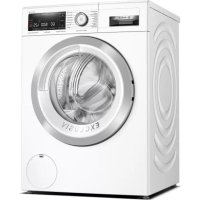
USER MANUAL Serie 8 WAV28M93 BOSCH
3.8 CmHa Ha KInoua Ha BpaTata 16
3.8.1 CbJIaHe Ha KIOUaIaNkata Ha BpaTata. 16
3.8.2 MoHTnpaHe Ha KIOUHAnKaTa Ha BpaTata 17
3.9 CMnHa Ha oCBeTneHHeTo Ha 6apa6aHa. 18
3.9.1 CbaJrHe Ha oCBetJeHMeTo Ha 6apa6aHa 18
3.9.2 MoHTnpaHe Ha OCBeTJIeHMeTo Ha 6apa6aHa 18
INHcTpymeHTn NOMOuN CpeDCTBa
| посочае Порожасту История | |
| Помошен Истру-
мент
[15000155] | Исттумент за разхлабва-
н на пленмасов части |
| Отberека Торх Т20
С OTВОР
[00340764] | 100 ММ, за винтоve с predecessor-
зенихфт |
| Динамометричес-
Клич
[15000441] | Динамометричес Клич 20-
100 Nm |
| Плосka OTberека
[00340854] | Врьх 3,5mm x 0,6 mm x
100 mm, Зашатна Истор -
1000 V AC |
| Плосka OTberека
[00340855] | Врьх 5,5mm x 1,0mm x
125 mm, Зашатна Истор -
1000 V AC |
| Кleineц с并在ов-
ни челюсти, по-
ытBI
[00341269] | Дылжина 200 MM |
| Кleineц розачки
[00342182] | Дылжина: 200 MM |
| посочане Порожбости Изобрахения | |
| Комбийниан Клич [00340811] | raechnia klinch 10°mm, M6 |
| Combination wrench [00340814] | raechnia klinch 13°mm, M8 |
| Комбийниан Клич [00340817] | raechnia klinch 17 mm, M10 |
| Комбийниан Клич [15000459] | raechnia klinch 16°mm, M10 |

PemOH
3.1CMraHa Ha rophna pa6oTeH nnot
CneuaJIHHHHTpymeHTn:
HakpainnK Torx TX20 cOTBOP,6,30MM (14") 152mm,3a BnHTOBe c [00341272]
N3nCKBaHe:
YpeBte n3KIOUeHOT 3aXpaHbHeTo.
YpeBTe N3KJIoueH OT BDOcHa6nITeHnTa MpeXa.
3.1.1 CbJIaHe Ha ropHna pa6oTeH nIOT
1.CBaneTe BnHTOBete(1).
2.И36yTaIe rOpHnpa6oTe nnoT KbM 3aHnKpAHa ypeDa(2).
3. PpemecTeTe ropon paoboteH nnot Harope (3), 3a da ro cbaJnte.

3.1.2 MoHTnpaHe Ha roPnHa pa6oTe Hnnot
MoHTnpaTaTe B o6paTeH peJ.

PemOH
3.2CMHaHaΦacHnaHn


BHIMATEJIHO
Octpn p6oBe Ha Kopnycal
HapaHbAHmO Tnp3BaHe
HocTe npedna3Hn pbKaBnU.


NPEyynPExKDEHNE
Ppnnb3BaHe Ha HAKNOHEn ypeN!
KoctHn ppaKtpn/HapaHbAHHN O Tnpema3BaHe
YkpeneTe ypeDnTe cpeu npnnB3BaHe.


BHIMATEJIHO
Pnck OT naaun yactn npadn pa3xna6eHN BHTOBe!
HapahBaHe npaDn npaaun yact
3akpenete KOMnoHEnTa, Taka He da He naHe.

BHUMAHNEI
Pnck OT naaun yactn npaepa3xna6eHN BnHTOBE!
PobpeHa npTu yactu Ha ypeHa nnB DOMa Ha KnneHTa, HAp. bHo
10.
3akpenete KOMNOHEHTa, Taka Ye Da He naHe.
N3nCKBaHe:
YpeBt E N3KIOUeH OT 3aXpaHbHeTo.
YpeBTe H3KNIOHcHOT BOOCHa6DITeHtA MpeKa.
TopnraT paOteH nnot e cBaaneH.→6
YekmejkeTo 3a nepunHnna npenapat e cbaneHo.→8
3.2.1 CbAaHe Ha aacadnnaHae
- 1.CBANETEBHTOBETE(1).
2.Ocbo6oTe KpenexHnTe eMeentn (2,3).

2.OCB6oBeTeUeCenHToCbeHNHeHHe Ha KOHTpONnIbOK
3. CbaneTe paacnnaHn naHn.
3.2.2 MoHTpaHHe Ha facaHnHaHEn
MoHTnpaTBeBobpaTeHpe.

PemOH
3.3 CmHa Ha YekMeJKeTo 3a nepuHn npenapaT
N3nCKBaHe:
YpeIbTe n3KJIoueHOT 3aXpaHbHaHeTo.
YpeBt E n3KIOUeH OT BOOChA6DITENHaT MpeXa.
3.3.1 CbIaIHe Ha YekMeJKeTo 3a nepnneH npenapat
1.ИЗterneteЧКмеджeto 3a nepinen npenapat.
2.1.HaTnCHeTe HADONY Bbpxy NOIIOKKkTA(1).
2.CbaneTe YekMeJKeTo 3a nepunen npenapat (2).

3.3.2 MoHTnpaHe Ha YekMeJKeTo 3a nepnne npenapat
MoHTnpaIteB06paTeHpeI.

PemOH
3.4 CmHa Ha dpbkkKaTa Ha YekMeDxKeTo 3a nepnIeH npenapaT
N3nCKBaHe:
YpeIbTe n3KJIoueHOT 3aXpaHbHaHeTo.
YpeBt E n3KIOUeH OT BOOChA6DITENHaT MpeXa.
YekmeJeKeTo 3a nepunHn npenapat e cBaeneHo.→8
3.4.1 CbAJIHe Ha dpBxKkata Ha YekMeJKeTo 3a nepHneH npenapat
1.OcbobodTe Kpenexhnte enemHTN.

2.CBaIeTe pBxKkTaHa YekMeJKeTo 3a nepuHn npenapat.
3.4.2 MoTHnpaHe Ha DpBkkKaTa Ha YekMeXdKeTo 3a nepnne npenapat
MOHTnpaTBeB ObaPteH peI.

PemOH
3.5 CMHa Ha BpTaTa


BHIMATEJIHO
OTBOpTe 0bIacTHa naHTnTe!
Ppema3BaHe/3axBaUaHHe Hn pbcTNTe
He nocaire Te KbM oBnaCTTa Ha naHTnte.
Hocete npedna3HN pKabu.
N3nCKBaHe:
YpeBte n3KNIOUeHOT 3aXpaHbHeTo.
YpeBte n3KIOueH OT BOOChA6nTeNaTa MPexa.
Bpatata e otbopeha.
3.5.1 NbBaxDaHe Ha BpaTata
1.

BHIMAHHEI
Pnck ot nadaaun yactn nopadn pa3xna6eHN BHTOBE!
NoBpeHa npTuHnHa ypeHa Nn B DoMa Ha KHeHTa, HAp.
TbHOTO.
3akpeneteKOMnoHeHTa,TakaYeHaHe naHe.

BHIMATEENHO
Pnck OT npdaun yactn nopadpa3xa6eHN BuHToBe!
HapaHbAhe npa ndaun yactn.
3akpenTe KOMnoHEHTa, Taka Ye da He naDHe.
CbaTe BHTOBete(1).

2.ИЗвадете Бата Tar Orope.
3.5.2 MoHTIpaHe Ha BpaTaTa
MoHTnpaTBeBobpaTeHpeI.

PemOH
3.6CMHaHa KOMNoHEnTHe Ha BpaTaTa

BHMMATEIHO
OTBOpTe 06nactTa Ha naHTnte!
Ppema3BaHe/3axBaUaHHe Hn pbcTNTe
He nocaire Te KbM oBnaCTTa Ha naHTnte.
Hocete npedna3HN pKabu.
N3nCKBaHe:
YpeBt en3KnIOueHOT 3aXpaHbHeTo.
YpeBte n3KIOueH OT BOOChA6nTeNaTa MPexa.
Bparatae cbaneha.→10
3.6.1 CbAJaHe Ha KOMnOHeHTNe Ha BpaTaTa
Pa3rno6eTe BpaTata OTBbH HABbTpco.

3.6.2 MoHTnpaHe Ha KOMNOHEHTUe Ha BpaTaTa
MOHTnpaTBeB o6paTeH peI.

PemOH
3.7 CmHa Ha yynbTHHeHMeTo Ha BpaTaTa


BHIMATEJIHO
Octpn p6bOBe h kopnycA HapahbaHnO t nop38aHe
Hocete npedna3n pkbauu.


BHIMATEJIHO
Pnck O T npaun qactn nopadn pa3xna6eHn BnHTOBe!
HapaHbAHe npaPi ndaun Yactn.
3akpenete KOMnoHEHTa, Taka Ye da He naHe.

BHIMAHINE!
PCKOTnadaunactnnapa3xna6eHNBHTOBE! NppeHaNpyrHactnHaypedaINBDOMAHAKNIENTO. 3akpeneteKOMPOHETA.TakayeNaHeNAHNE
V3nCKBaHe:
YpeDbTe N3KJIIOUeHOT 3aXpaHbHaHeTO.
YpeBt E N3KJIoueH OT BODOChA6DNTenHaT MaPexa.
YekmendkeTo 3a nepunHnnpenapaTe cBaaneHo.→8
BpataTa e cBaneha.→10
KanakbT Ha NOMnTa e CBaneH.→19
3.7.1 CbAJIHe Ha yIINbTHHeHMeTo Ha BpTaTa
1.


PDEUYPRXKDEHNE
PpnnIb3BaHe Ha HAKNoHEH ypeNi!
KoctHn ppaKtpn/HapaRaHHoT npema3BaHe
YkpeneTe ypeDnTe cpeu npnnB3BaHe.
NoBmHHeTe ypeDa oTnpa.
- P3xna6eTe BnHb0BeB E DOnnata CuaT Ha npedHnaHn (1).

3.CnycheTe ypeDa Haidony.

PemOH
- OTePahETe BnHtOBeTe B 6bnaCTa Ha nomrata (2).5.1. Pa3Xna6e BnHtOBeTe ot3ad Ha ypeDa (1).

NoBpXHCTTa Ha ypeDa MoKe Ce HeIaPcKa, Ako I3nONBaTe HENPAHN INCHPTyEMHeT.
13n013BaIe Camo IaCTMacOBH INCHPTyMEHTN 3a NODMHa H aO6TbAua npbCTeh.
Cbaene oobraa npbcteh ot ynbltheHHeTo C nactmacOB HhctpyMeHT.
10.Ocb6o6eTe ynnbTHHeHnTo Ha BpaTata ot npednnaheI.
11.Ocb6o6eTe KOHeKToPa Ha Ka6ena OT KInOuaNkata Ha BpaTata.

PemOH
- PaXnaBeTe BnHToBete B rOpHa TaCt Ha npEiHn naHEn (3).

- Caanete npednnaHn
Pnck OT nadaun yactn nopadn Hnpabunen MONTAX!
HapaHbBaHe nn nobpeXdaHe Ha ypeHa.
Haterhepe nptnckcaaipn pbcten Ha ynnbTHHeHTo Hbpaata 3,4Nm.
MoHTnpaTBeBobpaTeHpe.

PemOH
3.8CMHaHaKIOHaBpaTaTa
Kato npo3BODIeH NHE CME 3aBbJIeHN Da npoeOCTaBM HA noTpe6NIteNtE Kato
peepBa HAcT KIOUAnJa 3a Bpata, BIKIOENTENHO IHCTpyKJy3a 3ePOEMHT BcBOT-ETCTBe C PernAmHe (EC) 2019/2023. BxMxNCkAn DA ot E6IeKHM O6Ae, 4e
CneL CMHATA Ha KIOUAnKaTA Ha Bpata, e Heo6XoIMMo DA ce H3BbpUn eneKTPO
TEXHNECKA npOBepKa 3a BeOnaHOCOT kBAJINPHINAPAN EneKTPOTeXHK, Pnpd ype
Bt da 6bde Ncchat B EKCNIOATaUN. ToBa NIIue TpRbA DA b6e cNOTBpDHa KA
fikmaCaCb rBnaCHO cseuPhNHITE 3a CTpaHATA 3aKOH, paoNpeDn cTaNADTpN.

OTIACHOCT
Pnck OT TKOB ydap npaH nuactn noHanpeKeHne!
Onachoc3aXUBOTaOTOKOByapBCnyuHa HenpaBUNeH peMOHT
EneKtpnue TaeTn Tp8Ba da ce pmoHTnpaT OT KbaHnHnPAH neneKtpoTeKHn
CnepemOnTaT6BaJaCeN3BbPmI npOBepKa 3a 6E30NaCHOCTcbrnacoVDE0701nnBc0TBeTCTBne Cbc cneuHHTe 3a cTpaHata paope6M.

BHIMATEJIHO
Otpn p6oBe Ha Kpyncal HapaHbAHH o np3BaHe Hocete npedanshpKaBau

PENEUPPEKDEHNE
Ppnnb3BaHe Ha HAKIOHEn ypeDn!
KocTHn ppaKtpn/HapaHbHaHnO TnpMa3BaHe
Ykpeneyepeinte cpeu npnnb3Bahe.

BHIMATEHNO
Pck on 4nanaa npa7n pa3xna6bne BNHTOB! Hapnahanepnopa npanaaactn
3akpenete KOMnoHeHTa, Taka Ye da He naHe.

BHIMAHME!
Pnck O npdaun yactn nopadn pa3xna6bHn BHTOBe! Pobpea Ha npyur nactn Ha ypea IINB DOMa HKnueHT
3akpeneteKOMNOHeHt,TaKaYeHaHeHaHe.
N3UCKBaHe:
YpeBt en3KNIOHOT 3aXpaHbHaHeTO.
YpeBt EINKIOHcHOT BOOCHa6dntHaTa Mpeka.
YpeDnTe ca CBO6OHO DocTbNH.
Tognnt paoboteH nnot e cBaneH.→6
ΦacadHnT nHaHe n cBaJIeH.
BpataTa e cBaeneHa.→10
O6Tgauunr npbctHe cBaen.
IpeDnHrT nHaHe e CbAeH.
YnntbTheHMeTo Ha BpaTaTa e CbaNeHO.
3.8.1 CbānHe Ha KlnouankaTa Ha BpaTaTa
1.ИЗк nullуе Te unencena Ha KInouanKaTa Ha BpaTaTa.
2.Ocbo6oDeTe KIOHcAnKaTa Ha BpaTata.

3.CbaneTe KIOHuaKata Ha BpaTata.

PemOH
3.8.2 MoHTmpaHc KaIIOuayIkaTaHa BpataTa

MOHTnpaTBeBobpaTeHpe.
MOnHTnpaIteB06paTeHpeI.

PemOH
NoBpeHa npyrHuactn Ha ypeHa nn B Doma Ha KHeHTa, HAp.
DbHOTO.
3akpenete KOMnoHHTa, Taka He da He naHe.
CbaTe BInTOBeTe Otnpei KaTo 3aOnuHHeTe OToNHy Harope (2,3).
8.Cbane npednnahen.
3.11.2 MoHTupaHn npdeHnaHn
MoHTnpaTeB06paTeHpeI.
Poranéni padajíimi dily.
Zajistetejednotlivesoucasti predpadem.


Nebezpeci padajicich dilu kvuli uvolenynm sroubum!
Poskozeni jinych caski spotfebe nebo prkuk domacnosti zakaznika, napr. podlachy.
Sorg for at sikre apparater mod at glide.


Fare for nedfaldende dele pga. Iosnede skruer!
ersonskade pga. neddaldende dele.
Sorg for at sikre componenten mod at falde ned.


Fare for nedfaldende dele pga. Iosnede skruer!
Sorg for at sikre componenten mod at falde ned.
Preindstilling:
- Abn pumpens afdaekning.

- Fjern pumpens afdaekning.

Sorg for at sikre apparater mod at glide.
Sorg for at sikre componenten mod at falde ned.

Reparation

BEMARKI
Fare for nedfaldende dele pga. Iosnede skruer!
Sorg for at sikre componenten mod at falde ned.
Repair hints - Washing machine
1 Concerning this document. 108
1.1 Important information 108
1.1.1 Purpose 108
1.2 Explanation of symbols 108
1.2.1 Danger levels.. 108
1.2.2 Hazard symbols 108
1.2.3 Structure of the warnings.. 109
1.2.4 General symbols 109
Tools and aids 110
Repair 111
3.1 Replacing worktop 111
3.1.1 Removing worktop 111
3.1.2 Installing worktop 111
3.2 Replacing fascia panel 112
3.2.1 Removing fascia panel 112
3.2.2 Installing fascia panel 112
3.3 Replacing detergent drawer 113
3.3.1 Removing detergent drawer 113
3.3.2 Installing detergent drawer 113
3.4 Replacing detergent drawer handle 114
3.4.1 Removing detergent drawer handle 114
3.4.2 Installing detergent drawer handle 114
3.10 Replacing pump cover 124
3.10.1 Removing pump cover 124
3.10.2 Installing pump cover 124
3.11 Replacing front panel 125
3.11.1 Removing front panel 125
3.11.2 Installing front panel 127
Concerning this document
1.1.1 Purpose
These repair hints support consumer to repair appliances by himself according to the applicable eco-design regulation (as of 03/2021).
They contain information how to exchange defined spare parts including warnings and risks.
In case of questions, please contact our customer service. We will only be liable for damages if the repair hints have been followed properly.
1.2 Explanation of symbols
1.2.1 Danger levels
The warning levels consist of a symbol and a signal word. The signal word indicates the severity of the danger.
| Warning level Meaning |
| Danger | Non-observation of the warning message will result in death or serious injuries. |
| Warning | Non-observation of the warning message could result in death or serious injuries. |
| Caution | Non-observation of the warning message could result in minor injuries. |
| Notice | Non-observation of the warning message could result in damage to property. |
Table 1: Danger levels
1.2.2 Hazard symbols
Hazard symbols are symbolic representations which give an indication of the kind of danger.
The following hazard symbols are used in this document:
| Hazard symbol Meaning | |
| ! | General warning message |
| Danger from electrical voltage |
| Risk of explosion |
| Danger of cuts |
| Danger of crushing |
Concerning this document
| Hazard symbol Meaning | |
| Danger from hot surfaces |
| Danger from strong magnetic field |
| Danger from non-ionizing radiation |
Table 2: Hazard symbols
1.2.3 Structure of the warnings
Warnings in this document have a standardised appearance and a standardised structure.

Danger
Type and source of danger!
Possible consequences of ignoring the danger / warning.
Measures and prohibitions for preventing the danger.
The following example shows a warning that warns against electric shock due to live parts. The measure for avoiding the danger is mentioned.

Danger
Risk of electric shock due to live parts!
Death by electrocution
- Disconnect appliances from electrical supply at least 60 seconds before starting repairs.
1.2.4 General symbols
The following general symbols are used in this document:
| Gen. symbol Meaning | |
| i | Identification of a special tip (text and/or graphic) |
| j | Identification of a simple tip (only text) |
| Identification of a link to a video tutorial |
Table 3: General symbols
| Gen. symbol Meaning | |
| Identification of required tools |
| Identification of required preconditions |
| Identification of a condition (if ..., then ...) |
| Identification of a result |
| Start Identification of a key or button | |
| [00123456] Identification of a material number |
| Status Identification of displayed text / window(in the appliance's display) |

| Designation Details Images | |
| Auxiliary tool [15000155] | Tool for loosening out of plastic parts | |
| Screwdriver Torx T20 with bore hole [00340764] | 100 mm, for screws with safety pin | |
| Torque spanner [15000441] | Torque spanner 20 - 100 Nm | |
| Slot screwdriver [00340854] | Blade 3.5 mm x 0.6 mm x 100 mm, Protective Insulation 1000 V AC | |
| Slot screwdriver [00340855] | Blade 5.5 mm x 1.0 mm x 125 mm, Protective Insulation 1000 V AC | |
| Needle-nose pliers, angled pattern [00341269] | Length 200 mm | |
| Side-cutting pliers [00342182] | Length: 200 mm | |
| Designation Details Images | |
| Combination wrench [00340811] | Wrench size 10°mm, M6 | |
| Combination wrench [00340814] | Wrench size 13°mm, M8 | |
| Combination wrench [00340817] | Wrench size 17 mm, M10 | |
| Combination wrench [15000459] | Wrench size 16°mm, M10 | |

Repair
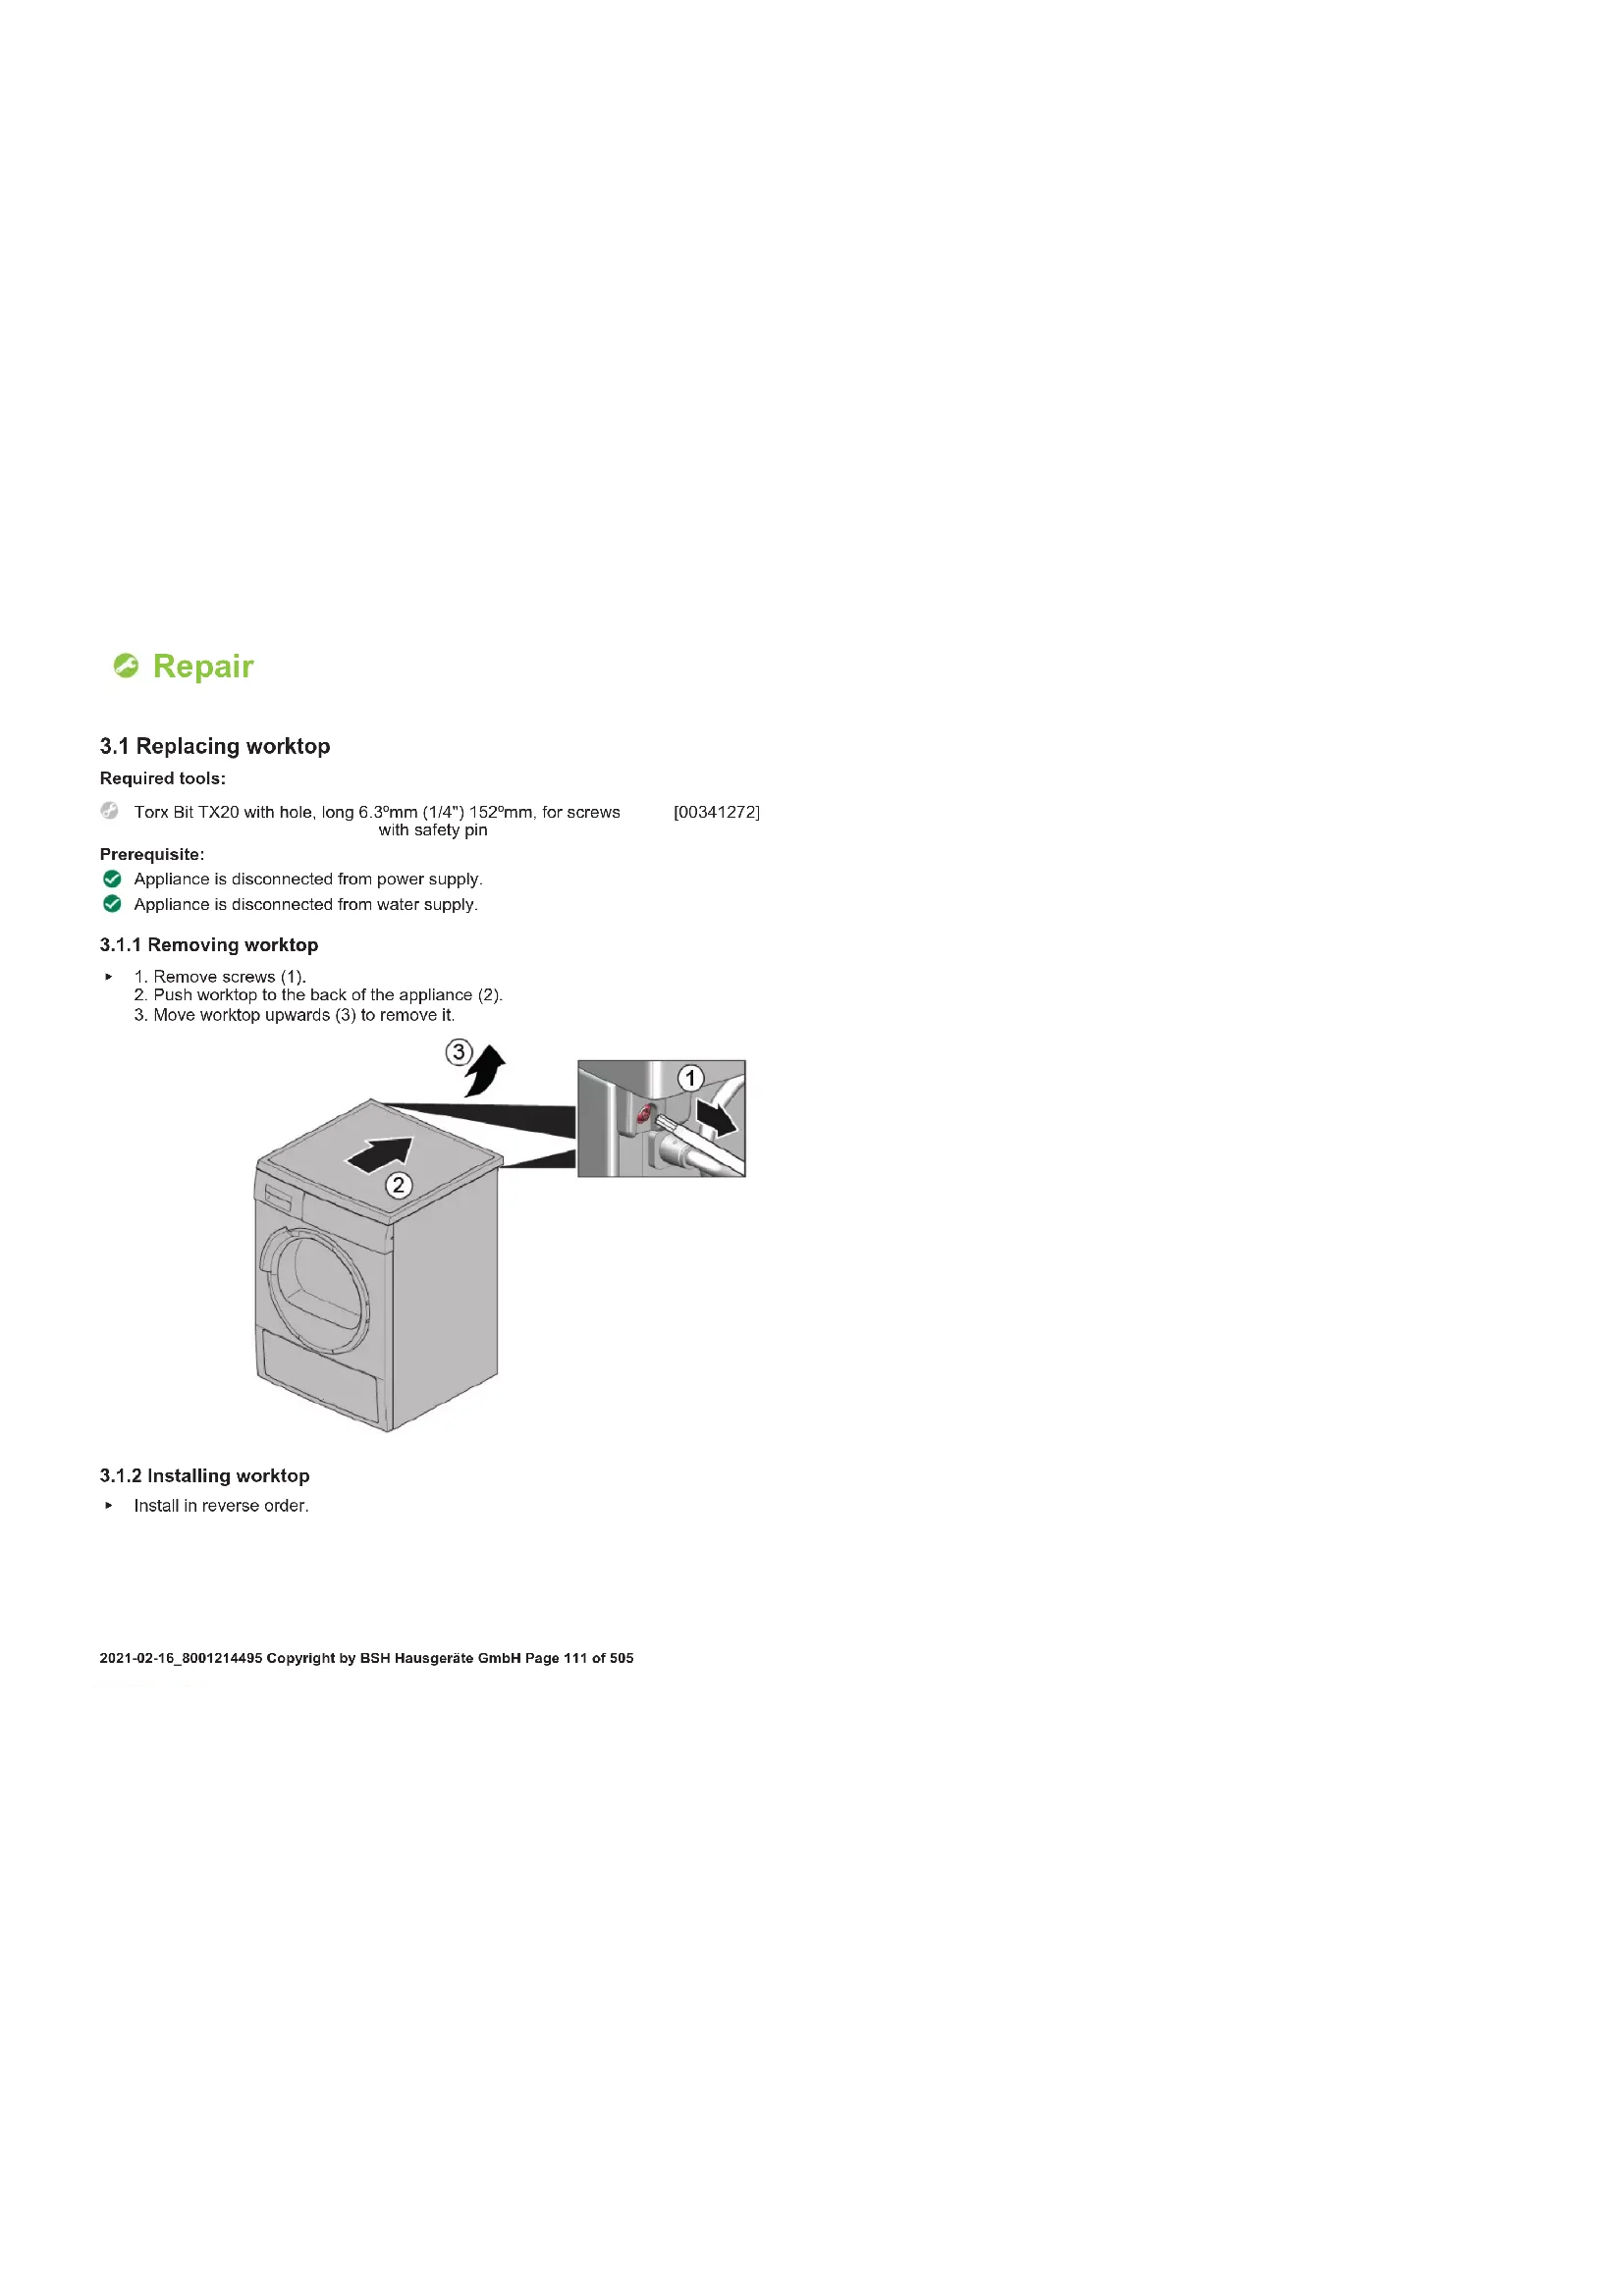
3.1 Replacing worktop
Required tools:
Torx Bit TX20 with hole, long 6.3mm (1/4") 152mm, for screws [00341272] with safety pin
Prerequisite:
Appliance is disconnected from power supply.
Appliance is disconnected from water supply.
3.1.1 Removing worktop
- Remove screws (1).
- Push worktop to the back of the appliance (2).
- Move worktop upwards (3) to remove it.

3.1.2 Installing worktop
Install in reverse order.

Repair
3.2 Replacing fascia panel


Sharp housing edges!
Cut injuries
Wear protective gloves.


Slipping of tilted appliances!
Bone fractures / crush injuries
Secure appliances against slipping.


Risk of falling parts due to released screws!
Injury because of falling parts
Secure component from falling down.


Risk of falling parts due to released screws!
Damage to other parts of the appliance or at customers home e.g. bot
tom.
Secure component from falling down.
Prerequisite:
Appliance is disconnected from power supply.
Appliance is disconnected from water supply.
Worktop has been removed. Page 111
Detergent drawer has been removed. Page 113
3.2.1 Removing fascia panel
-
- Remove screws (1).
-
Release catch elements (2, 3).

- Release plug contact of control unit.
- Remove fascia panel.
3.2.2 Installing fascia panel
Install in reverse order.

Repair
3.3 Replacing detergent drawer
Prerequisite:
Appliance is disconnected from power supply.
Appliance is disconnected from water supply.
3.3.1 Removing detergent drawer
- Pull out detergent drawer.
2.1. Press down on insert (1)

2. Remove detergent drawer (2).
3.3.2 Installing detergent drawer
Install in reverse order.

Repair
3.4 Replacing detergent drawer handle
Prerequisite:
Appliance is disconnected from power supply.
Appliance is disconnected from water supply.
Detergent drawer has been removed. Page 113
3.4.1 Removing detergent drawer handle
- Release catch elements.

- Remove detergent drawer handle.
3.4.2 Installing detergent drawer handle
Install in reverse order.

Repair
3.5 Replacing door

Prerequisite:
Appliance is disconnected from power supply.
Appliance is disconnected from water supply.
Door is opened.
3.5.1 Removing door
1.

Notice
Risk of falling parts due to released screws!
Damage to other parts of the appliance or at customers home e.g.
bottom
- Secure component from falling down.

Ca
Risk of falling parts due to released screws!
Injury because of falling parts.
- Secure component from falling down
Remove screws (1).

- Remove door upwards.
Install in reverse order.

Repair
3.6 Replacing door components

Caution
Open hinge area!
Finger crushing / entrapment
Do not reach into the hinge area.
Wear protective gloves.
Prerequisite:
Appliance is disconnected from power supply.
Appliance is disconnected from water supply.
Door has been removed. Page 115
3.6.1 Removing door components
Disassemble door from outside to inside.

3.6.2 Installing door components
Install in reverse order.

Repair
3.7 Replacing door seal

Caution
Sharp housing edges!
Cut injuries
Wear protective gloves.

Caution
Risk of falling parts due to released screws!
Injury because of falling parts.
Secure component from falling down.

Notice
Risk of falling parts due to released screws!
Damage to other parts of the appliance or at customers home e.g. bot
tom.
Secure component from falling down.
Prerequisite:
Appliance is disconnected from power supply.
Appliance is disconnected from water supply.
Detergent drawer has been removed. Page 113
Door has been removed. Page 115
Pump cover has been removed. Page 124
Slipping of tilted appliances!
Bone fractures / crush injuries
Secure appliances against slipping.
Lift up appliance at front.
- Release screws at bottom of front panel (1).

- Lower appliance down.

Repair
- Remove screws in pump area (2). 5. 1. Release screws at back of appliance (1).

- Remove worktop (2, 3).


Repair
6.1. Remove screws (1).
- Release cat elements of fascia panel (2, 3).
- Release screws of dispenser housing.

-
Remove fascia panel.
-
Remove drum light holder at top.


Notice
Risk of damaged surface! Surface of appliance can be scratched by using wrong tools. Only use plastic tools to replace the tension ring.
Remove tension ring from gasket with a plastic tool.
- Release door seal from front panel.
- Release cable connector from door lock.

Repair
- Release screws on top of front panel (3).

-
Remove front panel.
-
Release all hose connections.

- Remove door seal.
Risk of falling parts due to incorrect installation! Injury or damage to the appliance.
Tighten tension ring of boot gasket with 3,4 Nm.
Install in reverse order.

Repair
3.8 Replacing door lock
As a manufacturer, we are obliged to provide consumers with the spare part door lock including repair instructions in accordance with Regulation (EU) 2019/2023. However, we would like to point out that after replacing a door lock, an electrotechnical safety test by a qualified electrician is required before the device is put into operation. This person must be verifiably qualified according to the country-specific laws, regulations and standards.


Risk of electric shock due to live parts!
Danger to life through electric shock in case of improper repair
After the repair have a safety test according VDE 0701 or country-specific regulations performed.

Sharp housing edges!
Cut injuries
Wear protective gloves.


Slipping of tilted appliances!
Bone fractures / crush injuries
Secure appliances against slipping


Risk of falling parts due to released screws!
Injury because of falling parts.
- Secure component from falling down.


Risk of falling parts due to released screws!
Damage to other parts of the appliance or at customers home e.g. bottom.
- Secure component from falling down.
Prerequisite:
Appliance is disconnected from power supply.
Appliance is disconnected from water supply.
Appliances is freely accessible.
Worktop has been removed. Page 111
Fascia panel has been removed.
Door has been removed. Page 115
Tension ring has been removed.
Front panel has been removed.
Door seal has been removed.
- Disconnect door lock plug.
- Release door lock.

- Remove door lock.

Repair
Install in reverse order.

Repair
3.9 Replacing drum light


Sharp housing edges!
Cut injuries
Wear protective gloves.


Slipping of tilted appliances!
Bone fractures / crush injuries
Secure appliances against slipping.


Risk of falling parts due to released screws!
Injury because of falling parts
Secure component from falling down.


Risk of falling parts due to released screws!
Damage to other parts of the appliance or at customers home e.g. bot
m.
Secure component from falling down.
Prerequisite:
Appliance is disconnected from power supply.
Appliance is disconnected from water supply.
Appliances is freely accessible.
Worktop has been removed. Page 111
Detergent drawer has been removed. Page 113
Fascia panel has been removed.
3.9.1 Removing drum light

- Pull drum light holder out of appliance.
- Disconnect electrical connections.
- Remove drum light from drum light holder.
3.9.2 Installing drum light
Install in reverse order.

Repair
3.10 Replacing pump cover
Prerequisite:
Appliance is disconnected from power supply.
Appliance is disconnected from water supply.
3.10.1 Removing pump cover
- Open pump cover.

- Remove pump cover.

3.10.2 Installing pump cover
Install in reverse order.

Repair
3.11 Replacing front panel


Prerequisite:
Appliance is disconnected from power supply.
Appliance is disconnected from water supply.
Detergent drawer has been removed. Page 113
Door has been removed. Page 115
Door seal has been removed.
Pump cover has been removed. Page 124
3.11.1 Removing front panel
1.


Lift up appliance at front.
- Remove screws at bottom (1).

- Lower appliance down.

Repair
4.1. Remove screws (1).
- Push worktop to the back of the appliance (2).
- Move worktop upwards (3) to remove it.

5.1. Remove screws (1).
- Release catch elements (2, 3).

- Remove fascia panel.
7.


Caution
Risk of falling parts due to released screws! Injury because of falling parts.
Secure component from falling down.

Repair

Notice
Risk of falling parts due to released screws! Damage to other parts of the appliance or at customers home e.g. bottom.
Remove screws at front beginning from bottom to top (2, 3).

- Remove front panel.
3.11.2 Installing front panel
Install in reverse order.
Remonditeave - Pesumasin
1 Selle dokumendiga seoses 129
1.1 Tahtis teave 129
1.1.1 Eesmärk 129
1.2 Sumbolite selgitus 129
1.2.1 Ohutased 129
1.2.2 Ohusumbolid 129
1.2.3 Hoiatuste struktuur 130
1.2.4 Üldised sumbolid 130
Tabel 1: Ohutasedmed
1.2.2 Ohusumbolid
Ohusumbolid on sumboolsed kujutised, mis viytavad ohu laadile. Selles dokumendis kasutatakse alljargnevoid ohusumboleid.
m = 311
m = 311 ;

PERIGO
Risco deCHOque eltrico devidao a partes sob tensao!
- Remova o painel frontal.
3.11.2 Instalar o painei frontal