HFEK520J - Hand vacuum cleaner BLACK & DECKER - Free user manual and instructions
Find the device manual for free HFEK520J BLACK & DECKER in PDF.
Download the instructions for your Hand vacuum cleaner in PDF format for free! Find your manual HFEK520J - BLACK & DECKER and take your electronic device back in hand. On this page are published all the documents necessary for the use of your device. HFEK520J by BLACK & DECKER.
USER MANUAL HFEK520J BLACK & DECKER
Please read before returning this product for any reason.
If you have a question or experience a problem with your BLACK+DECKER purchase, go to: http://www.blackanddecker.com/instantanswers
If you can't find the answer or do not have access to the Internet, call 1-800-544-6986 from 8 a.m. to 5 p.m. EST Mon. - Fri. to speak with an agent. Please have the CATALOG NUMBER available when you call.
To register your new product, visit www.BlackandDecker.com/NewOwner
This instruction manual uses the following safety alert symbols and words to alert you to hazardous situations and your risk of personal injury or property damage.
MNGER: Indicates an imminently hazardous situation which, if not avoided, will result in death or serious injury.
WARNING: Indicates a potentially hazardous situation which, if not avoided, could result in death or serious injury.
CAUTION: Indicates a potentially hazardous situation which, if not avoided, may result in minor or moderate injury.
( without word) Indicates a safety related message.
NOTICE: Indicates a practice not related to personal injury which, if not avoided, may result in property damage.
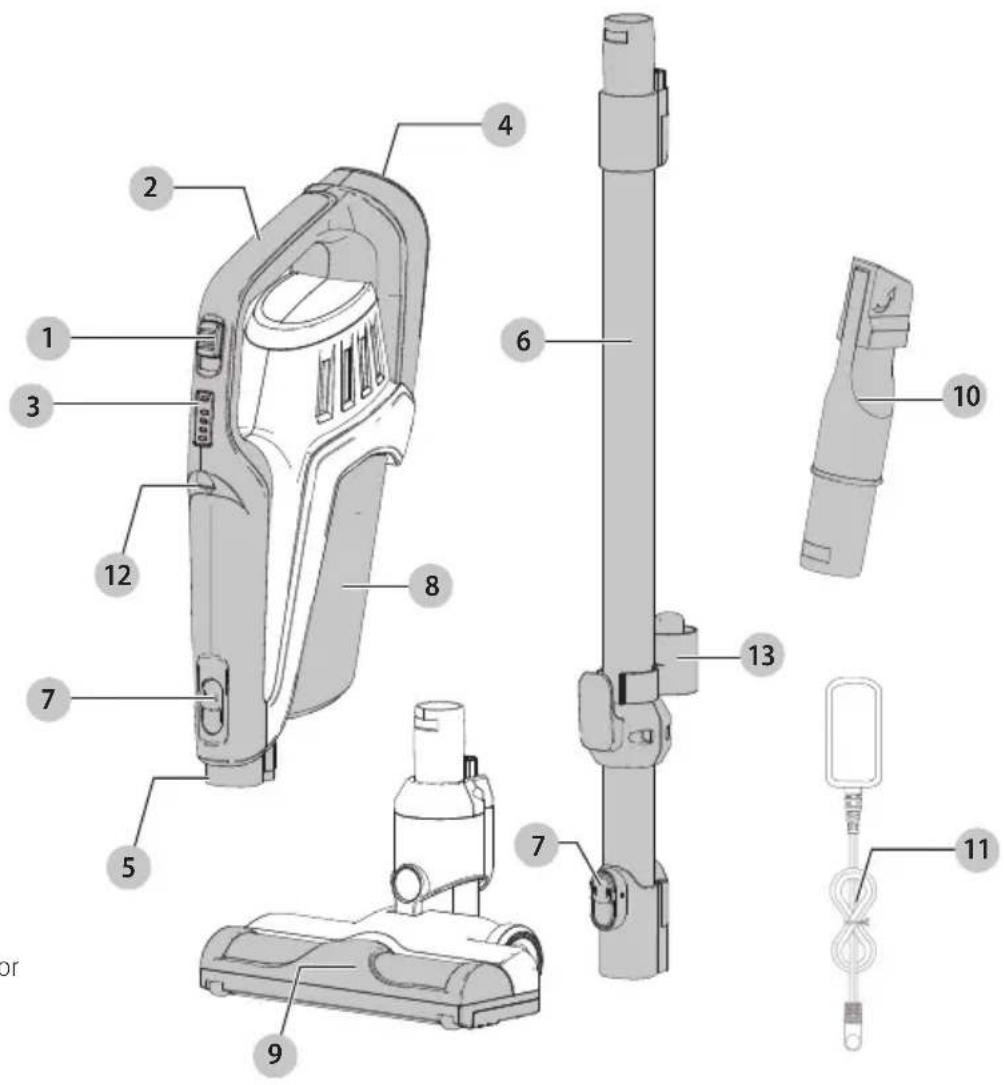
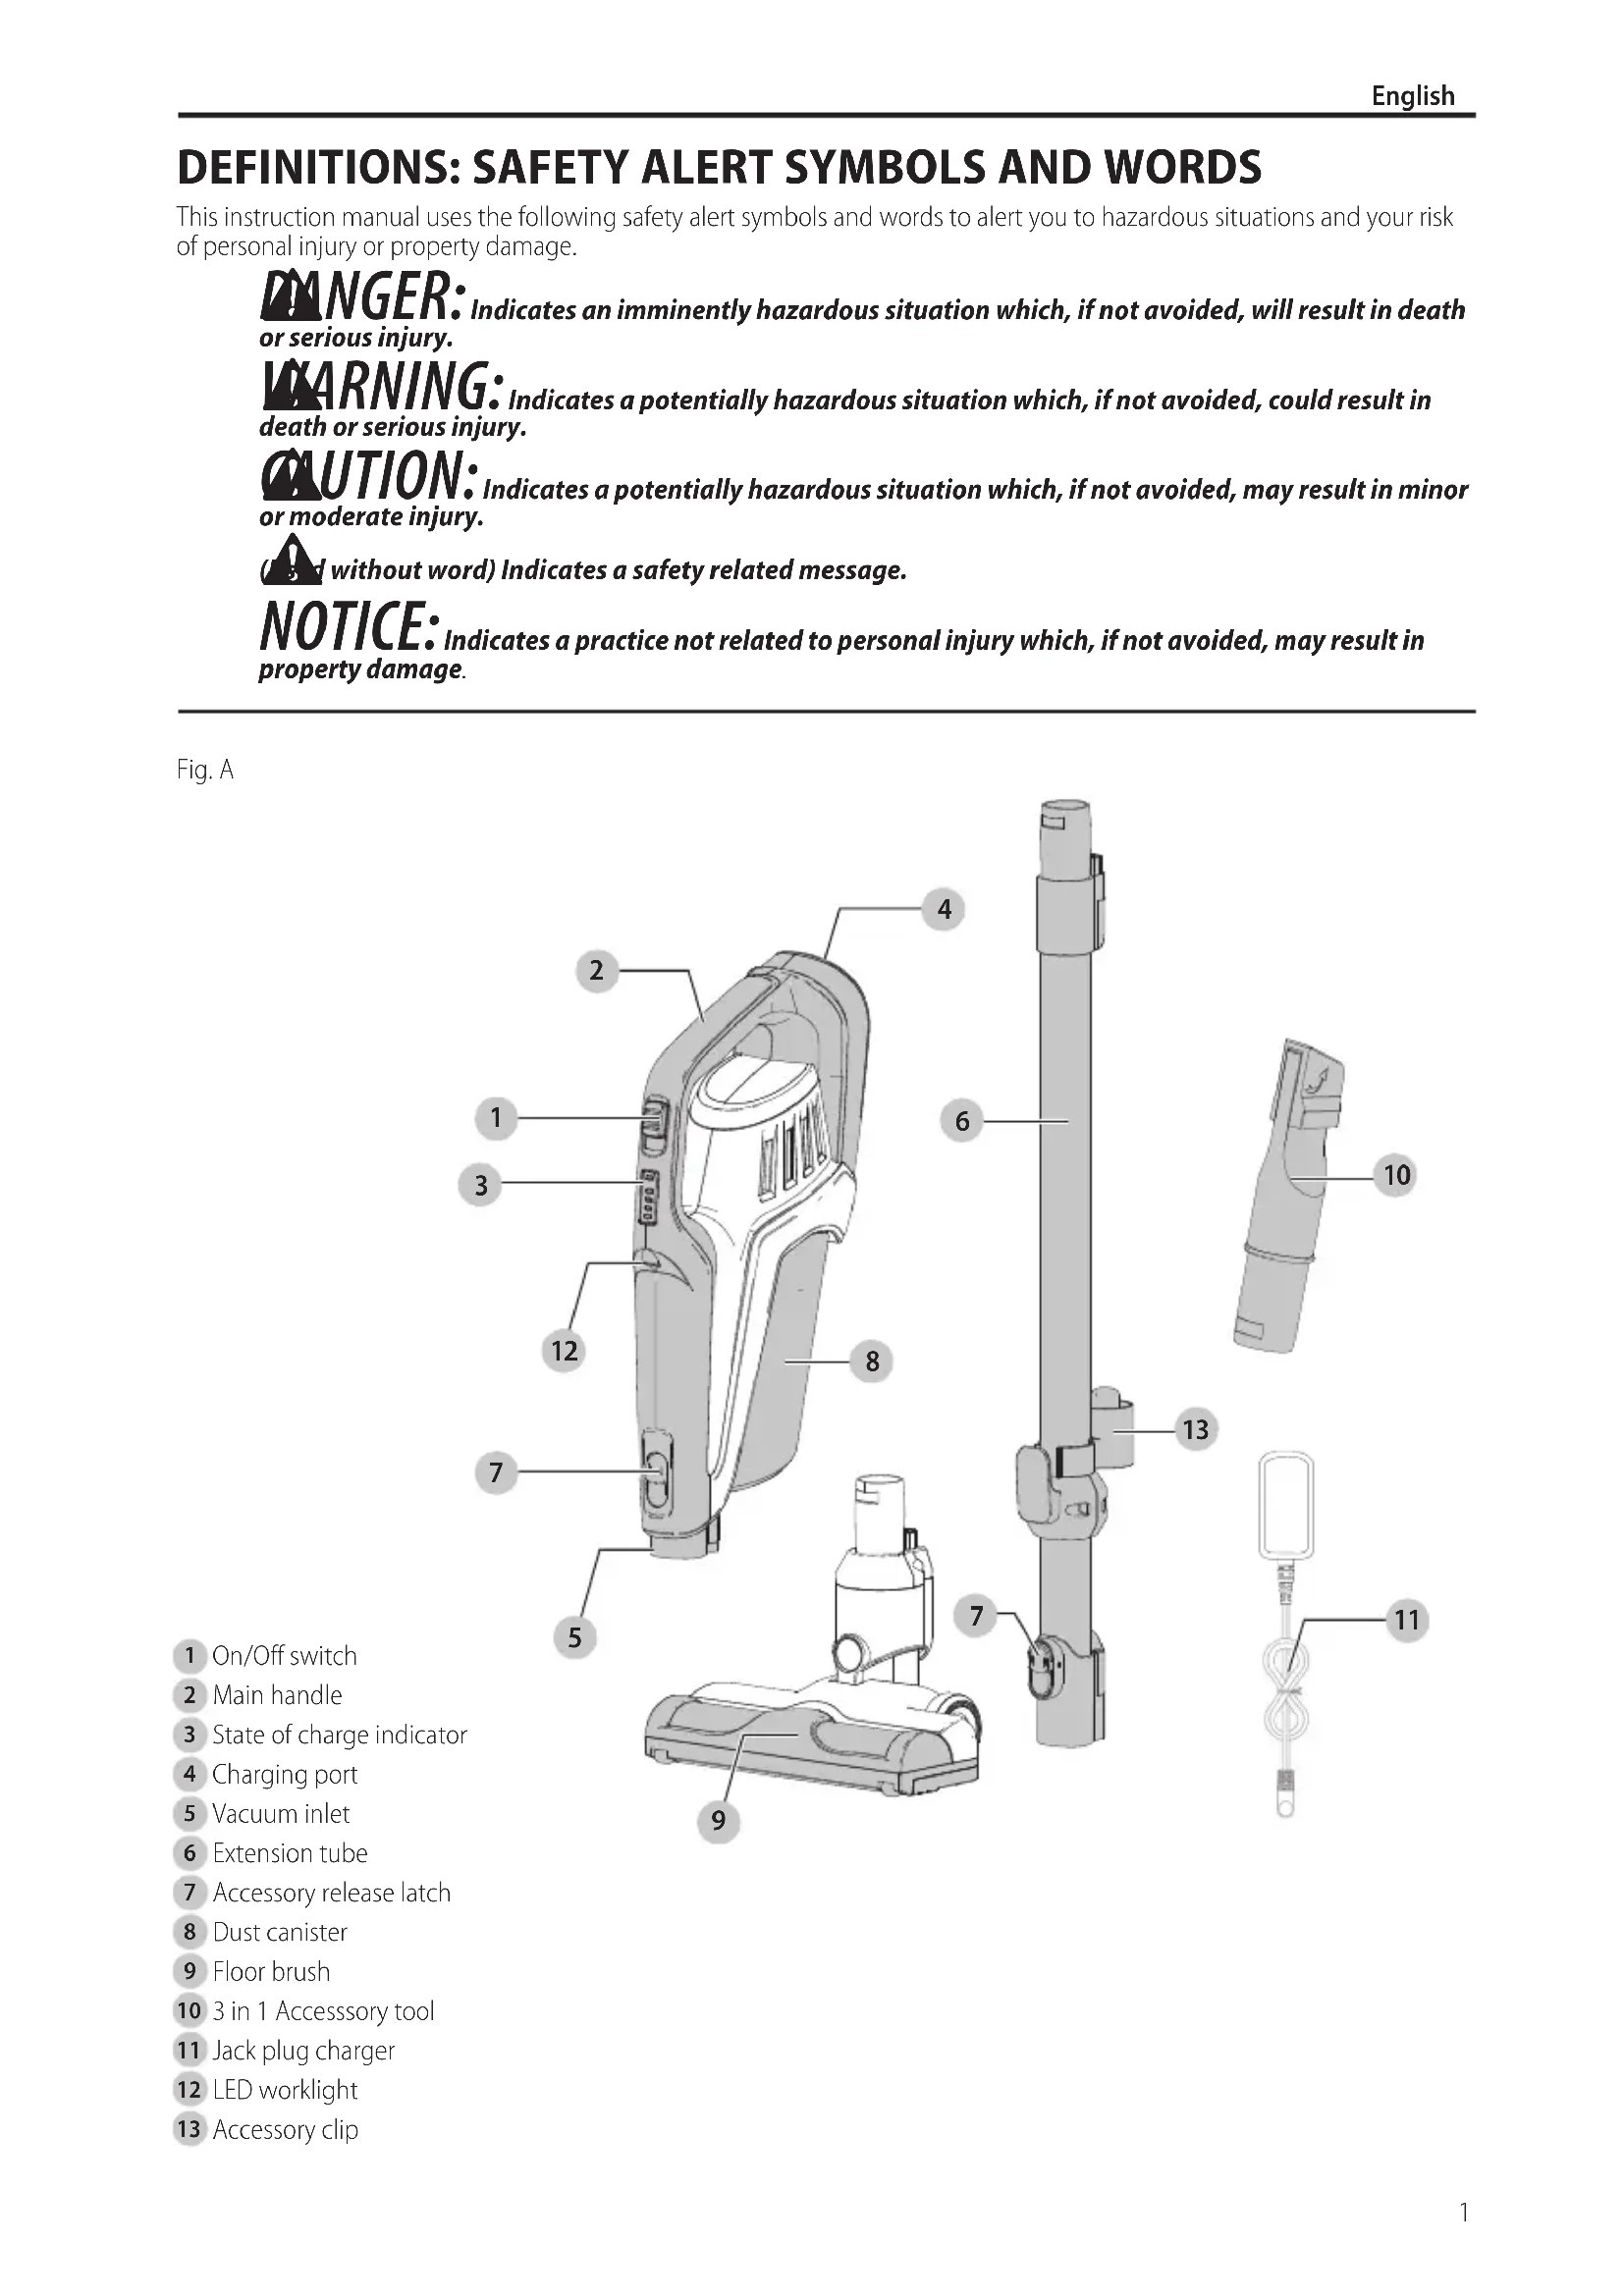
Fig. A
1 On/Off switch
2 Main handle
3 State of charge indicator
4 Charging port
5 Vacuum inlet
6 Extension tube
7 Accessory release latch
8 Dust canister
9 Floor brush
10 3 in 1 Accessory tool
11 Jack plug charger
12 LED worklight
13 Accessory clip
English
WARNING! Read all safety warnings and all instructions. Failure to follow the warnings and instructions may result in electric shock, fire and or serious injury.

WARNING: To reduce the risk of injury, read the instruction manual.
IMPORTANT SAFETY INSTRUCTIONS
When using an electrical appliances, basic precautions should always be followed, including the following:
READ ALL INSTRUCTIONS BEFORE USING THIS APPLIANCE.
WARNING: Read all safety warnings
and all instructions. Failure to follow the warnings and instructions listed below may result in electric shock, fire and/or serious injury.
WARNING: Some household dust contains chemicals known to the State of California to cause cancer, birth defects or other reproductive harm such as asbestos and lead in lead based paint.
WARNING: Do not attempt to modify or repair the appliance.
WARNING: Do not charge the battery at ambient temperatures below 39^ (4^) or above 104^ (40^) . Follow all charging instructions and do not charge the appliance outside of the temperature range specified in the instructions. Charging improperly or at temperatures outside of the specified range may damage the battery and increase risk of fire.
WARNING: To reduce the risk of fire, electrical shock or injury:
- Shock Hazard. To protect against risk of electrical shock, do not put charging base in water or other liquid.
- Do not allow to be used as a toy. Close attention is necessary when used by or near children.
- Use only as described in this manual. Use only manufacturer's recommended attachments.
-
Do not use with damaged cord or plug. If appliance is not working as it should, has been dropped, damaged, left outdoors, or dropped into water, return it to a service center.
-
Do not pull or carry by cord, use cord as a handle, close a door on cord, or pull cord around sharp edges or corners. Do not run appliance over cord. Keep cord away from heated surfaces.
- Do not unplug by pulling on cord. To unplug, grasp the plug, not the cord.
- Do not handle charger, including charger plug, and charger terminals with wet hands.
- Do not put any object into openings. Do not use with any opening blocked; keep free of dust, lint, hair, and anything that may reduce air flow.
- Keep hair, loose clothing, fingers, and all parts of body away from openings and moving parts.
- Use extra care when cleaning on stairs.
- Do not use to pick up flammable or combustible liquids, such as gasoline, or use in areas where they may be present.
- Do not pick up anything that is burning or smoking, such as cigarettes, matches, or hot ashes.
- Do not use without dust bag and/or filters in place.
- Do not charge the unit outdoors.
- Use only the charger supplied by the manufacturer to recharge.
- Do not incinerate the appliance even if it is severely damaged. The batteries can explode in a fire.
- This appliance is intended for household use only and not for commercial or industrial use.
- Do not allow the cord to hang over the edge of a table or counter or touch hot surfaces. The unit should be placed or mounted away from sinks and hot surfaces.
- Plug the charger directly into an electrical outlet.
- Use the charger only in a standard electrical outlet (120V/60Hz).
- Unplug the charger from outlet before any routine cleaning or maintenance.
- Do not look into the air vents when the unit is switched on, as sometimes there is a possibility of small debris being discharged from the air vents, especially after cleaning / replacement of the filters as debris inside the unit can be disturbed.
Leaks from battery cells can occur under extreme conditions. If the liquid, which is a 20 - 35% solution of potassium hydroxide, gets on the skin (1) wash quickly with soap and water or (2) neutralize with a mild acid such as lemon juice or vinegar. If the liquid gets into the eyes, flush them immediately with clean water for a minimum of 10 minutes. Seek medical attention.
ADDITIONAL SAFETY WARNINGS
a) Prevent unintentional starting. Ensure the switch is in the off-position before picking up or carrying the appliance. Carrying the appliance with your finger on the switch or energizing appliance that have the switch on invites accidents.
b) Recharge only with the charger specified by the manufacturer. A charger that is suitable for one type of battery pack may create a risk of fire when used with another battery pack.
c) Do not use a battery pack or appliance that is damaged or modified. Damaged or modified
batteries may exhibit unpredictable behavior resulting in fire, explosion or risk of injury.
d) Do not expose a battery pack or appliance to fire or excessive temperature. Exposure to fire or temperature above 266^ (130^) may cause explosion.
e) Have servicing performed by a qualified repair person using only identical replacement parts. This will ensure that the safety of the product is maintained.
f) Only for use with S010QU2300040 and S014CU2720050 chargers.
SAVE THESE INSTRUCTIONS
SYMBOLS
The label on your tool may include the following symbols. The symbols and their definitions are as follows:
V.......volts
A. amperes
Hz.....hertz
W.....watts
min.....minutes
or AC.....alternating current
=or DC......direct current
no.. no load speed
Class I Construction
(grounded)
..earthing terminal
A ...... safety alert symbol
Class II Construction
(double insulated)
.../min or rpm. revolutions or reciprocation
per minute
Wh....Watt Hours
ASSEMBLY
WARNING: Do not attempt to modify or repair the appliance.
Intended use
Your BLACK+DECKER lithium ion cordless 3 in 1 stick vacuum cleaner has been designed for light, dry vacuum cleaning purposes. This appliance is intended for household use only.
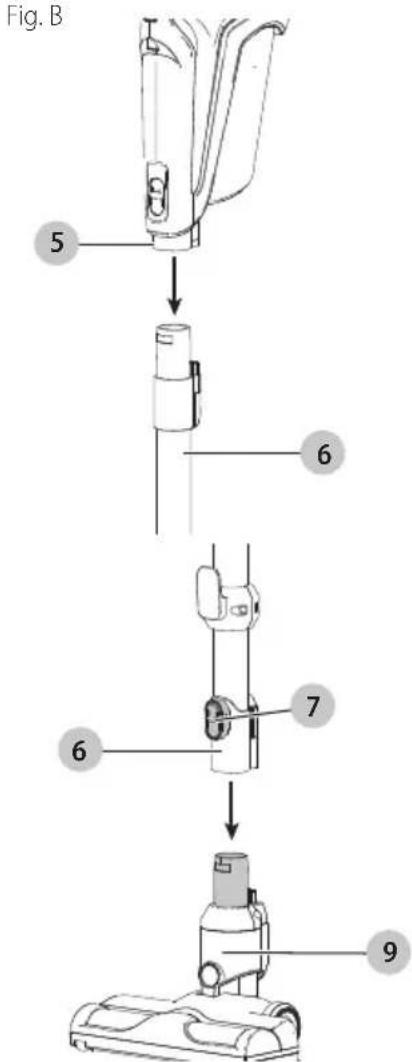
Assembly (Fig.B,C)
- Align the top of the extension tube 6 with the vacuum inlet 5 as shown in Fig. B.
- Push the extension tube 6 onto the vacuum inlet 5 so it locks into position.
- Align the bottom of the extension tube 6 with the floor brush 9 as shown in Fig. C.
-
Push the bottom of the extension tube 6 onto the floor brush 9 so it locks into position.
-
To remove an accessory, press the accessory release latch 7 located on the vacuum or extension tube and gently pull the connected accessory off.
WARNING: When not in use position the unit with the rear of the vacuum facing a wall so that any inadvertent fall of the unit would contact a wall and not people or pets.
Charging the battery (Fig. D)
WARNING: For use only with the supplied charger.
From new, the rechargeable cells of the product need a minimum charge time of 5 hours to ensure full power.
- Fig. D - Plug the jack plug 14 of the jack plug charger 11 into the charging port 4 of the vacuum. Plug the charger into any standard 120 Volt 60 Hz electrical outlet.
English
Fig. D
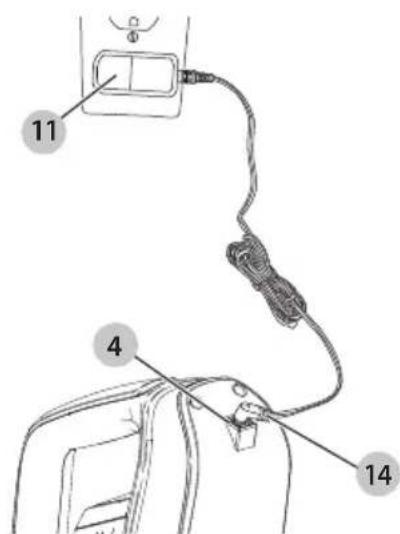
- While charging, the charger may get warm, this is perfectly normal and safe. It is safe to leave the appliance connected to the charger indefinitely. The charger automatically reduces power consumption when charging is complete.
WARNING: Do not charge the battery at ambient temperatures below 39^ (4^) or above 104^ (40^) . Follow all charging instructions and do not charge the appliance outside of the temperature range specified in the instructions.
USE
This vacuum cleaner can be used in one of four ways.
With the extension tube 6 and the floor brush 9. (Fig. E)
- With the floor brush 9 and the vacuum 15. (Fig. F)
- With the extension tube 6 and the 2 in 1 Accessory tool 10. (Fig. G)
With the 2 in 1 Accessory tool 10 and the vacuum 14. (Fig.H)
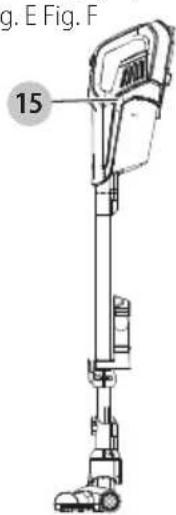
Fig. E Fig. F
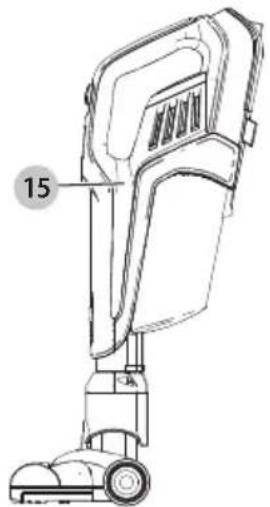

Fig. G
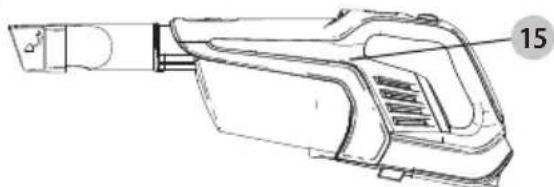
Fig. H
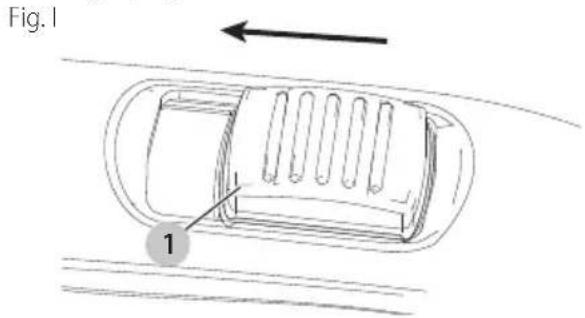
Switching ON and OFF (Fig. 1)
- To switch ON, slide the On/Off switch 1 forward to the "I" position.
- For increased power, slide the On/Off switch 1 forward to the "II" position.
nOTE: The floor brush will power on when it is attached to the vacuum or extension tube. The LED worklight will illuminate whenever the unit is switched ON.
NOTE: The state of charge indicator LEDs 3 will illuminate while the vacuum is ON.
To switch OFF, slide the On/Off switch 1 to the "O" position.
- Return the product to the charger immediately after use so that it will be ready and fully charged for the next use. Ensure that the product is fully engaged with the charger plug.
State of charge indicator
This appliance include a state of charge indicator 3 which consists of four green and one red LED lights that indicate the level of charge remaining in the battery. This feature is only activated when the vacuum is powered on.
The state of charge indicator is an indication of approximate levels of charge remaining in the battery pack according to the following indicators:
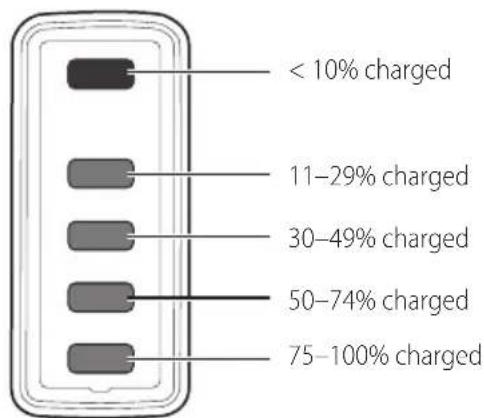
The LED battery indicator displays the remaining charge and warns you when the battery is low. The red LED will flash continuously when the unit is nearly out of charge. If the red LED flashes continuously when the switch is turned to the
ON position, plug the jack plug 14 of the jack plug charger 11 into the charging port 4 of the vacuum. Plug the charger into any standard 120 Volt 60Hz electrical outlet. NOTE: The state of charge indicator is only an indication of the charge left on the battery. It does not indicate tool functionality and is subject to variation based on product components, temperature and end-user application.
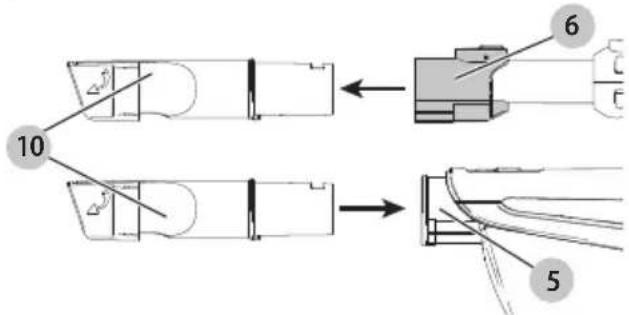
Using the 3 in 1 Accessory tool (Fig. J)
The 3-in-1 accessory tool 10 has two configurations. Brush mode. Small crevice mode.
The 3-in-1 accessory tool can be fitted either directly to the extension tube or to the vacuum inlet as shown in Fig. J.
- Align the top of the 3-in-1 accessory tool 10 with the vacuum inlet 5 or extension tube 6 and push into place so it locks into position as shown in Fig. J.
- The flat nozzle can be used to clean the wall corner, stairs, furniture crevices, and household appliance cooling fins.
The combination of a flat nozzle with a brush can be used to clean the furniture, curtains, lamps and lanterns. Fig. J
Cleaning and emptying the vacuum
WARNING: Projectile/Respiratory Hazard: Never use the vac without its filter.
NOTE: The filter is re-usable, do not confuse it with a disposable dust bag, and do not throw it away when the product is emptied. We recommend that you replace the filter every 6-9 months depending on frequency of use. There are two methods of cleaning the canister, a quick empty method and a thorough clean method.
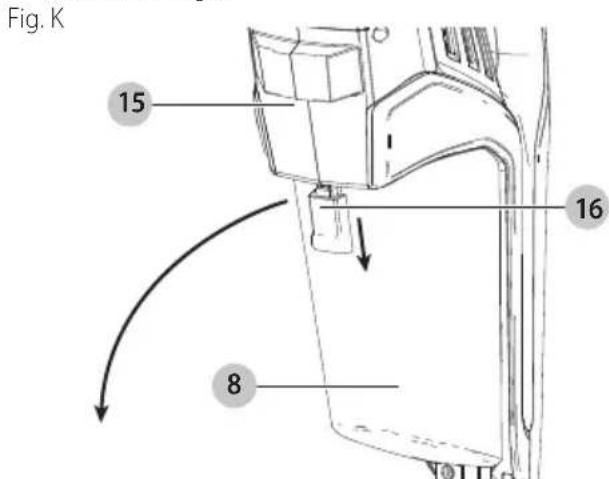
To empty the dust canister (Fig. K, L, M, O)
Pull back on the dust canister release button 16 to release and remove the dust canister 8 from the vacuum 15 as shown in Fig. K.
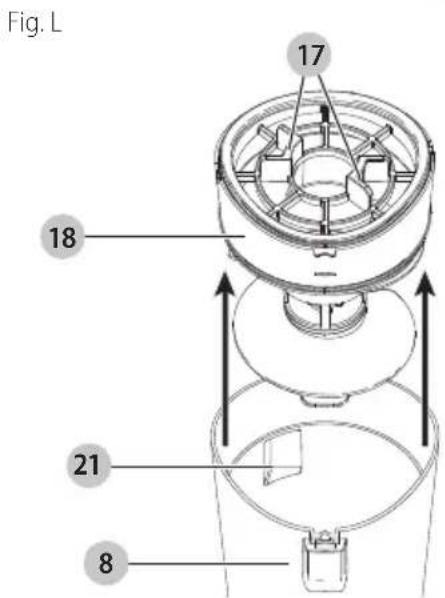
- Use your index finger and thumb to pinch the filter housing tabs 17 and lift the filter housing 18 from the dust canister as shown in Fig. L. NOTE: The filter housing fits snugly in the dust canister and may be difficult to remove at first.
- Place the dust canister over a trash can and empty the dust canister.
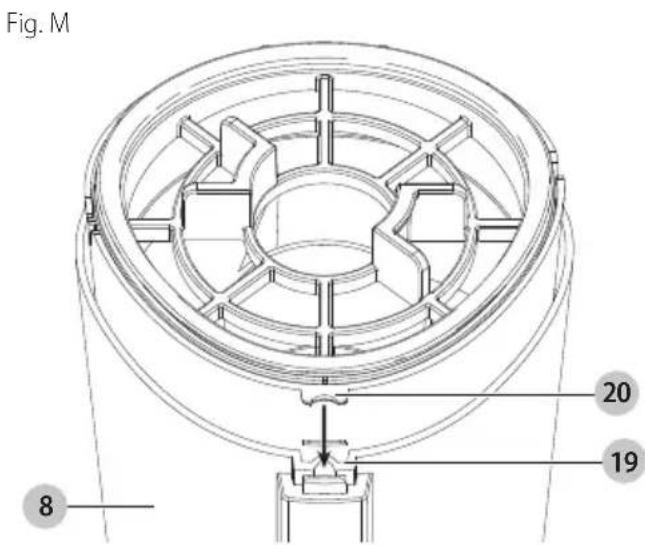
Install the filter housing into the dust canister 8 ensuring the dust canister slots 19 align with the filter housing tabs 20 as shown in Fig. M.
Install the dust canister onto the vacuum, until it clicks firmly into position. NOTE: Ensure the dust port 21 is placed towards the main handle 2 of the vacuum and the dust canister release button 16 is facing away from the vacuum 15 as shown in Fig O.
English
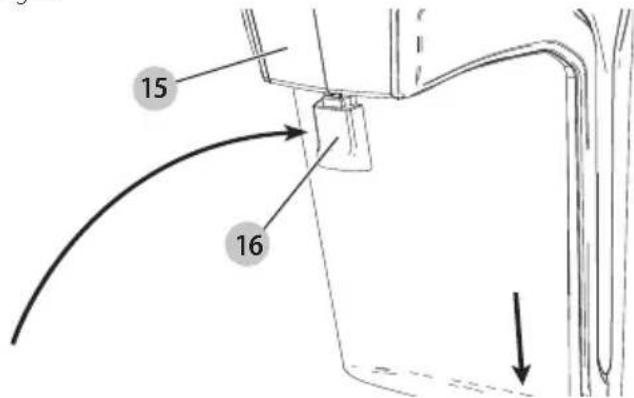
Fig. 0
Cleaning the filters (Fig. K, L, O, P - R)
- Pull back on the dust canister release button 16 to release and remove the dust canister 8 from the vacuum 15 as shown in Fig. K.
- Use your index finger and thumb to pinch the filter housing tabs 17 and lift the filter housing 18 from the dust canister as shown in Fig. L.
- Once the filter housing is removed from the dust canister, use your index finger and thumb to pinch the filter housing tabs 17 and rotate the filter 22 counterclockwise and remove it from filter housing as shown in Fig. P.
- Remove the foam filter 23 from the filter housing as shown in Fig. Q.
- Shake or lightly brush any loose dust off of the foam filter 23 and filter 22.
- Rinse out the dust canister 8 with warm soapy water.
- Wash the filters with warm soapy water.
- Ensure the filters are completely dry before refitting the filters into the filter housing 18.
- Refit the clean and dry foam filter 23 into the filter housing 18.
- Refit the clean and dry filter 22 into the filter housing 18 by aligning the filter locks 24, located on the sides of the filter, with the filter housing slots 25, located on the sides of the filter housing, and turn the filter clockwise until it locks firmly into position as shown in Fig. R.
Install the filter housing into the dust canister 8 ensuring the dust canister slots 19 align with the filter housing tabs 20 as shown in Fig. M.
Install the dust canister onto the vacuum, until it clicks firmly into position. NOTE: Ensure the dust port 21 is placed towards the main handle 2 of the vacuum and the dust canister release button 15 is facing away from the vacuum 16 as shown in Fig O.
iIMPORTAnT: Maximum dust collection will only be obtained with clean filters and an empty dust canister. If dust begins to fall back out of the product after it is switched off, this indicates that the dust canister is full and requires emptying.
- Wash the filters regularly using warm, soapy water and ensure that it is completely dry before using again. The cleaner the filter is, the better the product will perform.
It is very important that the filters are completely dry and correctly in position before use.
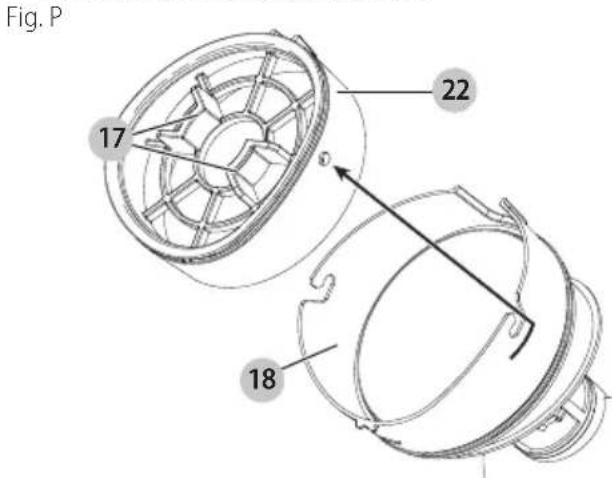
Fig. Q
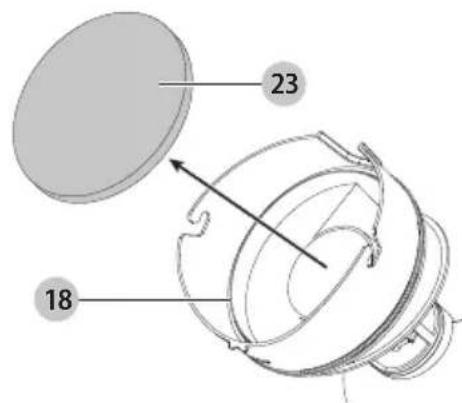
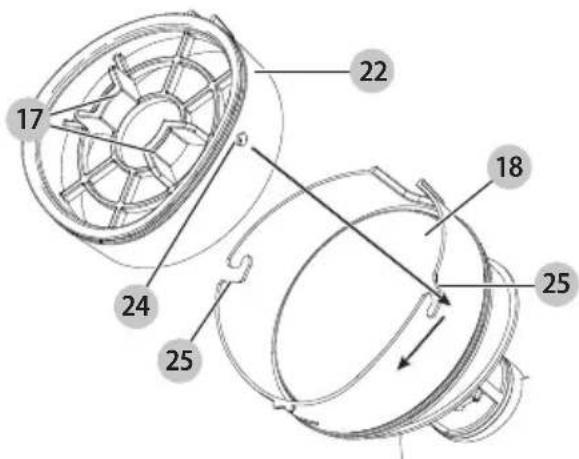
Fig. R
Removing and cleaning the rotary brushes (Fig. S, T, U, V, W)
CAUTION: To reduce the risk of injury from moving parts, disconnect the floor brush from the vacuum before cleaning or servicing.
- To remove the rotary brush 26 from the floor brush 9 use a coin or straight screwdriver to rotate the lock 27 on the lock plate 28 to the unlocked position 29 as shown in Fig. S.
- Remove the lock plate 28
- Lift the rotary brush up and slide the drive belt 31 off to the side as shown in Fig. T. The rotary brush 26 can now be removed.
NOTE: The end pieces 32 are also removable allowing you to clear the brushes of any hair or other debris that may have accumulated as shown in Fig. U.
- Once the rotary brush has been cleaned, reinstall the rotary brush into the floor brush 9.
- Slide the drive belt 31 onto the toothed gear 33 on the rotary brush as shown in Fig. V.
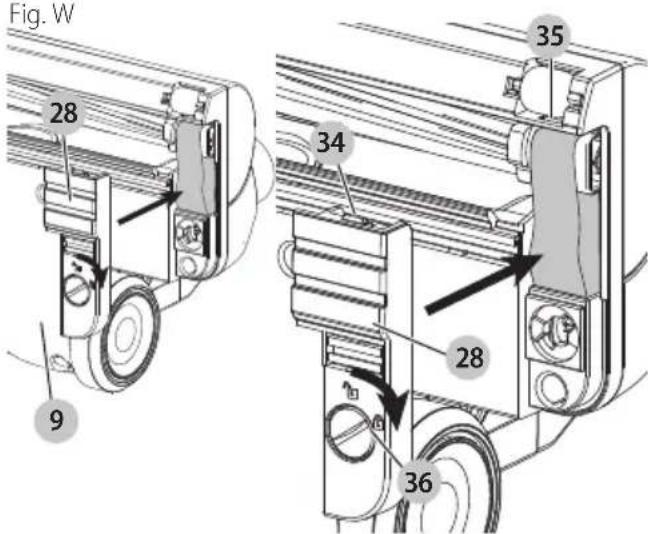
Install the lock plate 28 onto the floor brush. Insert the retaining bar 34 into slot 35 on the floor brush 9 shown in Fig. W.
Use a coin or straight screwdriver to rotate the lock 27 on the lock plate 28 to the locked position 36 as shown in Fig. W.
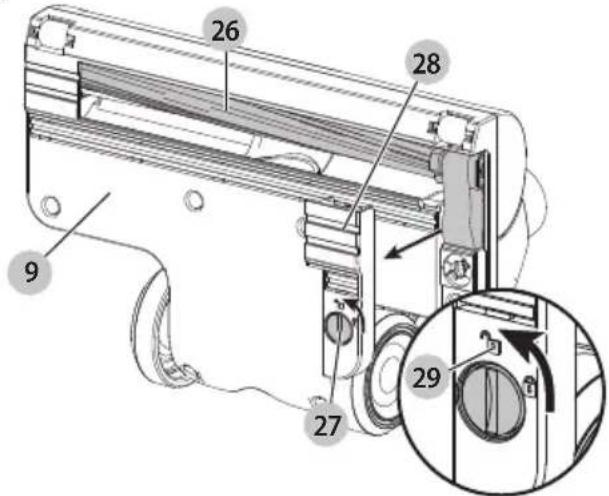
Fig. S
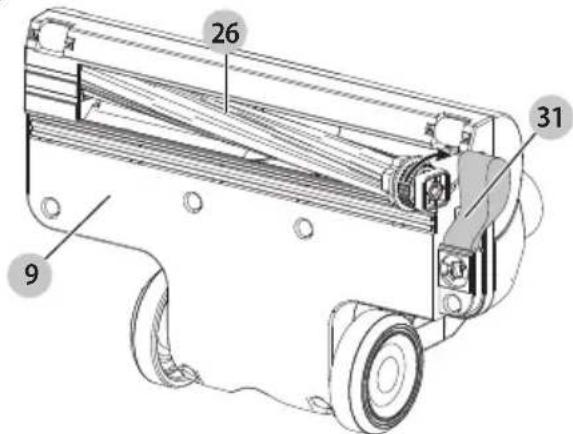
Fig. T
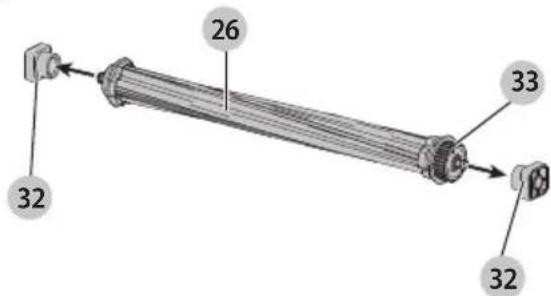
Fig. U
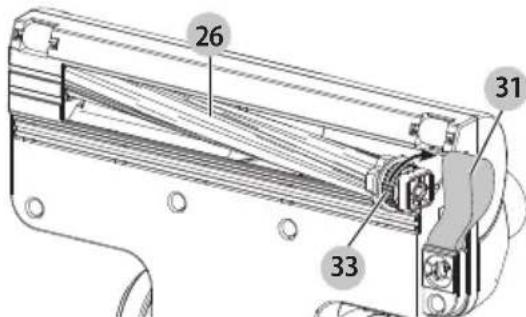
Fig. V
Storing the vacuum
This vacuum cleaner can be stored compactly and stand on it's own.
- Remove the vacuum 15 from the extension tube 6
- Place the catch 37 located on the back of vacuum cleaner into the storage hook 38,located on the extension tube 6, while the floor brush 9 is in the locked position as shown in Fig. X.
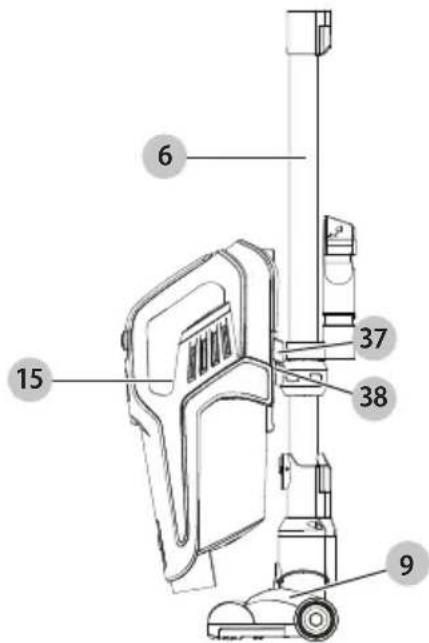
Fig. X
Replacing the filters
The filters should be replaced every 6 to 9 months and whenever worn or damaged. Replacement filters are available from your BLACK+DECKER dealer. Visit www.blackanddecker.com to locate dealers.
- Remove the old filters as described in Cleaning the Filters.
- Fit the new filters as described in Cleaning the Filters. (cat. no: SVFK10)
MAINTENANCE
Use only mild soap and damp cloth to clean the vac. Never let any liquid get inside the vac; never immerse any part of the vac into a liquid.
ENGLISH
WARNING: Make sure the vacuum is completely dry before using it.
IMPORTANT: To assure product SAFETY and RELIABILITY, repairs, maintenance and adjustment (other than those listed in this manual) should be performed by authorized service centers or other qualified service organizations, always using identical replacement parts.
TROUBLESHOOTING
If the product does not work, check the following:
- The charger was correctly plugged in for recharge. (It feels slightly warm to the touch.)
- The charger cord is not damaged and is correctly attached.
- The charger is plugged into a working electrical outlet.
- The switch is in the "OFF" position when charging.
If vacuum performance is poor, check the following:
- Clean the filters. (See "Cleaning and emptying the vacuum" section.)
- Empty the dust canister. (See "Cleaning and emptying the vacuum" section.)
- Clean the rotary brushes. (See "Removing and cleaning the rotary brushes" section.)
- The red LED flashes continuously, plug in the charger and perform a recharge cycle
For assistance with your product, visit our website www.blackanddecker.com for the location of the service center nearest you or call the BLACK+DECKER help line at 1-800-544-6986.
ACCESSORIES
Recommended accessories for use with your appliance are available from your local dealer or authorized service center. If you need assistance regarding accessories, please call:
1-800-544-6986.
WARNING: The use of any accessory not recommended for use with this appliance could be hazardous.
The RBRC Seal
The RBRC® (Rechargeable Battery)
Recycling Corporation) Seal on the nickel cadmium, nickel metal hydride or lithium ion batteries (or battery packs) indicates that the costs to recycle these batteries

(or battery packs) at the end of their useful life have already been paid by BLACK+DECKER. In some areas, it is illegal to place spent nickel cadmium, nickel metal hydride or lithium-ion batteries in the trash or municipal solid waste stream and the Call 2 Recycle program provides an environmentally conscious alternative.
Call 2 Recycle, Inc., in cooperation with BLACK+DECKER and other battery users, has established the program in the United States and Canada to facilitate the collection of spent nickel cadmium, nickel metal hydride or lithium-ion batteries. Help protect our environment and conserve natural resources by returning the spent nickel cadmium, nickel metal hydride or lithium-ion batteries to
an authorized BLACK+DECKER service center or to your local retailer for recycling. You may also contact your local recycling center for information on where to drop off the spent battery. RBRC® is a registered trademark of Call 2 Recycle, Inc.
SERVICE INFORMATION
ALL BLACK+DECKER Service Centers are staffed with trained personnel to provide customers with efficient and reliable power tool service. Whether you need technical advice, repair, or genuine factory replacement parts, contact the BLACK+DECKER location nearest you. To find your local service location, call: 1-800-544-6986 or visit
www.blackanddecker.com
TWO-YEAR LIMITED WARRANTY
Black & Decker (U.S.) Inc. warranties this product to be free from defects in material or workmanship for a period of two (2) years following the date of purchase, provided that the product is used in a home environment. This limited warranty does not cover failures due to abuse, accidental damage or when repairs have been made or attempted by anyone other than BLACK+DECKER and its Authorized Service Centers. A defective product meeting the warranty conditions set forth herein will be replaced or repaired at no charge in either of two ways: The first, which will result in exchanges only, is to return the product to the retailer from whom it was purchased (provided that the store is a participating retailer). Returns should be made within the time period of the retailer's policy for exchanges. Proof of purchase may be required. Please check with the retailer for its specific return policy regarding time limits for returns or exchanges. The second option is to take or send the product (prepaid) to a BLACK+DECKER owned or authorized Service Center for repair or replacement at BLACK+DECKER's option. Proof of purchase may be required. BLACK+DECKER owned and authorized service centers are listed online at www.blackanddecker.com. This warranty does not apply to accessories. This warranty gives you specific legal rights and you may have other rights which vary from state to state. Should you have any questions, contact the manager of your nearest BLACK+DECKER Service Center. This product is not intended for commercial use, and accordingly, such commercial use of this product will void this warranty. All other guarantees, express or implied, are hereby disclaimed.
LATIN AMERICA: This warranty does not apply to products sold in Latin America. For products sold in Latin America, check country specific warranty information contained in the packaging, call the local company or see the website for such information.
Imported by Black & Decker (U.S.) Inc.,
701 E. Joppa Rd.
Towson, MD 21286

BlackandDecker.com
1-800-544-6986
WARNING: Do not attempt to modify or repair the appliance.
ENSAMBLE
Ensemble (Fig. B, C)
Col. Americana, S. Juarez
Guadalajara, Jalisco
Tel. 01 33 38 25 69 78
Col. Fracc. Universidad
Chihuahua, Chihuahua
Tel. 01 614 413 64 04
Fernando González Armenta
Bolivia No. 605
Col. Felipe Carrillo Puerto
Cd. Madero, Tamaulipas
Tel. 01 833 221 34 50
Black & Decker (U.S.) Inc.
701 East Joppa Road, Towson, MD 21286
Part No.N604793
HFEK520J,HFEK620J
JULY 2018