
DN312X - Mixer DENON - Free user manual and instructions
Find the device manual for free DN312X DENON in PDF.
| Product type | 12-channel mixing console rack-mountable 19" |
| Brand | Denon |
| Model | DN312X |
| Category | Mixing console |
| Dimensions (W x H x D) | 48.3 x 4.4 x 20 cm (19" x 1U x ~20 cm) |
| Weight | Approximately 3.5 kg |
| Power supply | AC 100-240V (cable included) or DC 24 V |
| Number of channels | 12 (6 combo mic/line inputs + 6 stereo line RCA inputs) |
| Mic/line inputs | 6 combo XLR-6.35 mm inputs with MIC/PH/LINE selector |
| Stereo line inputs | 6 RCA inputs (channels 7/8 to 11/12) |
| Main line outputs | 2 balanced XLR outputs |
| Mono output | 1 TS 6.35 mm output |
| Recording outputs | 1 pair of stereo RCA outputs |
| Microphone monitoring output | 1 6.35 mm output (switchable with Mic On/Off) |
| Equalizer | 3-band (Low, Mid, High) on master mix |
| Mic 1 priority function | Priority level adjustment (attenuation of other channels) |
| Phantom power | +18 to +21 V available on each mic input (PH selector) |
| Indicators | VU meters with CLIP, per-channel SIG LEDs, power LED |
| Fuse | Spare fuse compartment (same rating) |
| Included accessories | Power cable, user manual, safety instructions |
Frequently Asked Questions - DN312X DENON
User questions about DN312X DENON
0 question about this device. Answer the ones you know or ask your own.
Ask a new question about this device
Download the instructions for your Mixer in PDF format for free! Find your manual DN312X - DENON and take your electronic device back in hand. On this page are published all the documents necessary for the use of your device. DN312X by DENON.
USER MANUAL DN312X DENON
User Guide (English)
Introduction
The DN-312X is an ultra-slim 1U rack-mounted 12-channel mixer with 6 mic/line combination inputs and 6 additional line inputs. It has balanced XLR outputs, a 1/4" (6.35 mm) mono output that can be used to connect the DN-312X to a remote mixer, a pair of RCA stereo outputs that can be used to connect to a remote recording device, and 1/4" (6.35 mm) mic monitoring port that can be used to monitor the mics' signals. The DN-312X provides individual volume control for all inputs in addition to volume control for the mono output port and a master volume control. It has a 3-level equalizer and a controlled priority for Mic/Line 1. It can be powered from standard AC or 24 V DC power source.
Please see this guide's Setup chapter to learn how to integrate DN-312X with your audio system.
Box Contents
DN-312X
Power Cable
User Guide
Safety & Warranty Manual
Support
For the latest information about this product (system requirements, compatibility information, etc.) and product registration, visit denonpro.com.
Features
Front Panel
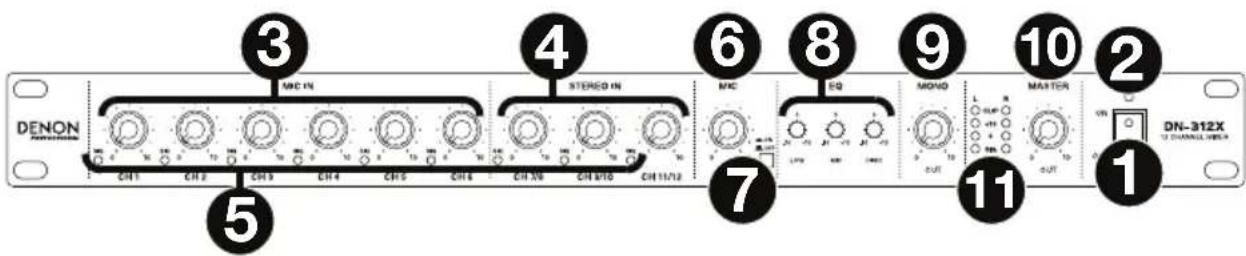
- Power Switch: Use this switch to power DN-312X on or off.
- Power Light: This light illuminates when DN-312X is powered on.
- Mic In Level: Turn these knobs to set the input level of the corresponding mic/line inputs (Channels 1–6).
- Stereo In Level: Turn these knobs to set the input level of the corresponding line inputs (Channels 7/8–11/12).
- Signal (Sig) Lights: Indicates that the channel's incoming audio signal is within an optimal range.
- Mic Level: Turn this knob to set the input level of the Mic Monitor output. Use the Mic On/Off button to enable to disable it.
- Mic On/Off: Press this to turn enable or disable the Mic Monitor output. When the button is depressed (in the down position), the signal from the mic/line inputs (Channels 1–6) will be sent to the Mic Monitor output, and the Line Outs will be disabled. When the button is raised (in the up position), the Mic Monitor output will be disabled, and all channels will be sent to the Line Outs.
- EQ: Turn these knobs to increase ("boost") or reduce ("cut") the amount of bass frequencies (Low), mid-range frequencies (Mid), and treble frequencies (High) of the main mix.
- Mono Level: Turn this knob to adjust the level of the Mono Out.
- Master Level: Turn this knob to adjust the level of the Line Outs, Mono Out, and Rec Out.
- Level Meters: These lights indicate the audio level of the Line Outs, Mono Out, and Rec Out. The Clip light can light up occasionally, but if it happens too often, reduce the volume of the mix and/or individual channels.
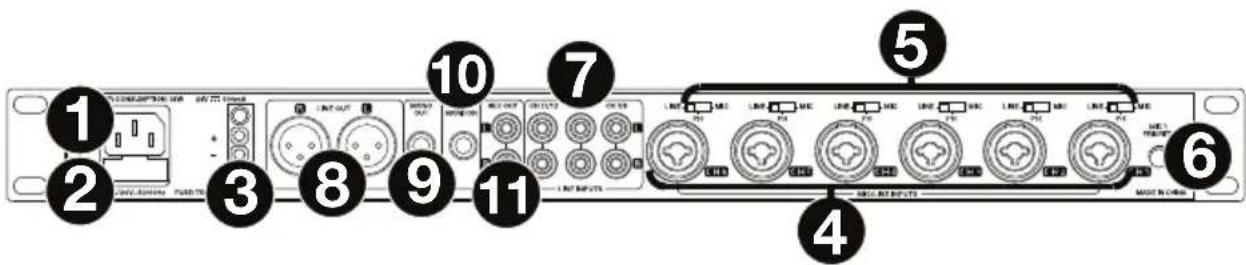
Rear Panel
-
AC Power Input: Use the included power cable to connect this input to a power outlet. Alternatively, use the DC power input, described below. (If both power inputs are connected to power outlets, DN-312X will draw its power from the AC power input.)
-
Fuse Cover: If the fuse is broken, use a screwdriver or other tool to lift this tab, and replace the fuse with a fuse with the same rating. Using a fuse with an incorrect rating can damage the unit and/or fuse.
-
DC Power Input: Use a separate DC power supply to connect this input to a power outlet. Alternatively, use the AC power input, described above. (If both power inputs are connected to power outlets, DN-312X will draw its power from the AC power input.)
-
Mic/Line Inputs (Channels 1–6): Connect microphones or line-level devices to these inputs with XLR or 1/4" (6.35 mm) cables.
-
Input Selector (Channels 1–6): Use these switches to set what type of audio source is connected to each mic/line input: a microphone without phantom power (Mic), a microphone with +18–21V of phantom power (Ph), or a line-level device (Line).
Note: Most dynamic microphones do not require phantom power, while most condenser microphones do. Consult your microphone's documentation to find out whether it needs phantom power.
-
Mic 1 Priority: Turn this knob to set how loud the volume level of all other inputs will be when the Channel 1 mic/line input receives an incoming signal. At its lowest setting, a signal received by the Channel 1 mic/line input will mute all other input signals entirely. At its highest setting, a signal received by the Channel 1 mic/line input will not affect the other input signals at all.
-
Line Inputs (Channels 7/8–11/12): Connect line-level devices to these inputs with standard stereo RCA cables.
-
Line Out: Use standard XLR cables to connect these outputs to your loudspeakers or amplifier system. Use the Master Level knob to control the level of these outputs.
-
Mono Out: Use a standard 1/4" (6.35 mm) TS cable to connect this output to a remote recording device, remote mixer, etc. The signal sent from this output is a summed mono signal of the line outs.
-
Mic Monitor: Use a standard 1/4" (6.35 mm) cable to connect this output to a powered monitor, remote mixer, etc. When the Mic On/Off button is depressed (in the down position), the signal from the mic/line inputs (Channels 1–6) will be sent to this output, and the Line Outs will be disabled. When the Mic On/Off button is raised (in the up position), this output will be disabled, and all channels will be sent to the Line Outs.
-
Rec Out: Use standard stereo RCA cables to connect these outputs to a remote recording device, remote mixer, etc. Use the Master Level knob to control the level of these outputs.
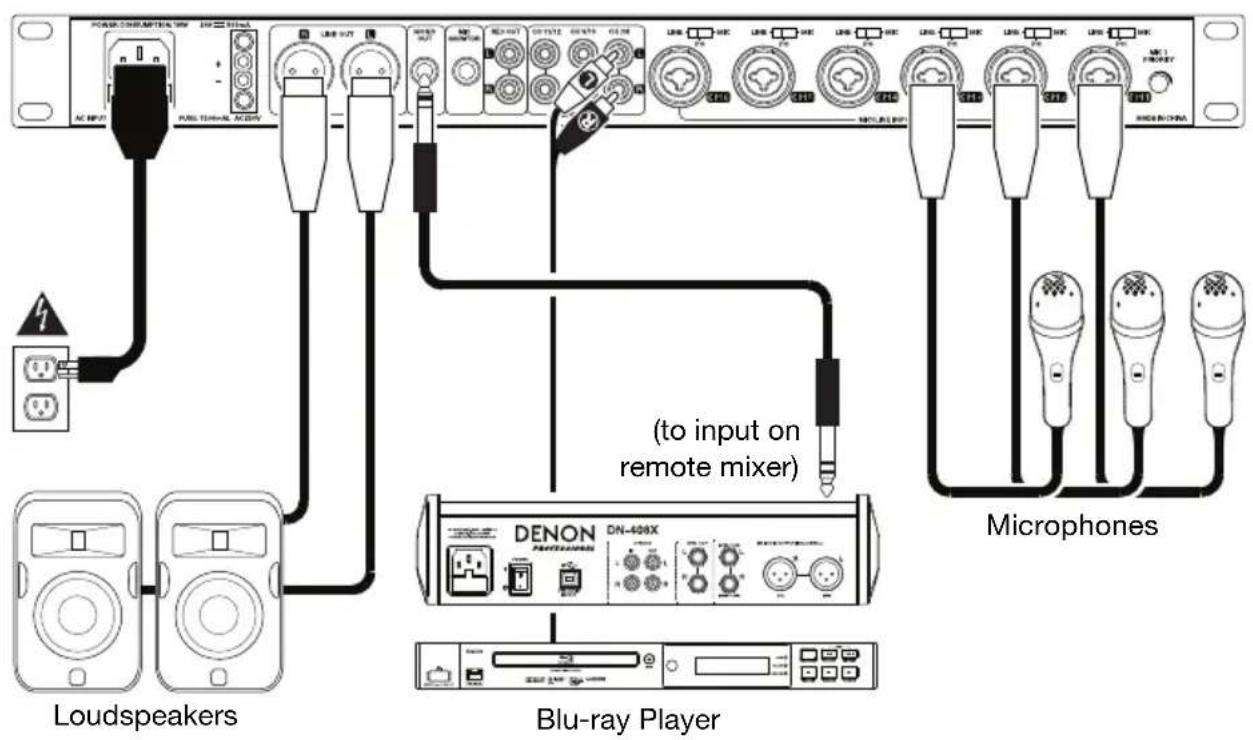
Setup
Items not listed under Introduction > Box Contents are sold separately.
To set up DN-312X with your sound system:
- If you are using any audio source with RCA outputs (Blu-ray ^® players, stereos, etc.), use standard RCA cables to connect them to the line inputs on the rear panel. Your audio sources must be line-level (no phono-level turntables).
- If you are using microphones or other audio sources that send a line-level signal, connect them to the mic/line inputs on the rear panel.
- Use standard XLR or 1/4" (6.35 mm) TRS cables to connect the line outputs on the rear panel to your loudspeakers, remote mixer, etc.
- If you want to send the main mix to a remote recording device, remote mixer, etc., use a standard 1/4" (6.35 mm) TS cable to connect the Mono Out on the rear panel to it. Alternatively, use standard stereo RCA cables to connect the Rec Outs on the rear panel to it.
- Use the included power cable to connect DN-312X to a power outlet.
- Power on all of your audio sources (Blu-ray players, stereos, microphones, etc.).
- Power on DN-312X.
Example
Technical Specifications
| Input Channels | Mic/Line Inputs (Channels 1-6) | |
| Microphone Input | XLR+1/4” (6.35 mm) combination, electronically balanced, discrete input configuration | |
| Frequency Response | 20 Hz - 22 kHz ( ± 2 dBu) | |
| THD+N | ≤ 0.03% @ 1 kHz | |
| Sensitivity | -40 dBu | |
| Maximum Input | -19 dBu | |
| Maximum Voltage Gain | 60 dB (Mic Input Line Out, Mic Out & Mono Out)50 dB (Mic Input Rec Out) | |
| Signal-to-Noise Ratio | ≥ 103 dB | |
| Phantom Power | +18-21 V, switch control | |
| Line Inputs (Channels 1-6) | ||
| Line Input | XLR+1/4” (6.35 mm) combination, electronically balanced | |
| Frequency Response | 20 Hz - 22 kHz ( ± 2 dBu) | |
| THD+N | ≤ 0.03% @ 1 kHz | |
| Sensitivity | 0 dBu | |
| Maximum Input | +21 dBu | |
| Maximum Voltage Gain | 20 dB (Mic Input Line Out, Mic Out & Mono Out)10 dB (Mic Input Rec Out) | |
| Signal-to-Noise Ratio | ≥ 103 dB | |
| Line Inputs (Channels 7/8-11/12) | ||
| Line Input | Stereo RCA pairs, electronically balanced | |
| Frequency Response | 20 Hz - 22 kHz ( ± 2 dBu) | |
| THD+N | ≤ 0.03% @ 1 kHz | |
| Sensitivity | +10 dBu | |
| Maximum Input | +21 dBu | |
| Maximum Voltage Gain | 10 dB (Line Input Line Out)0 dB (Line Input Rec Out)4 dB (Line Input Mono Out) | |
| Signal-to-Noise Ratio | ≥ 103 dB | |
| Impedance | Mic/Line Input | 1.4 kΩ |
| Line Input | ≥ 10 kΩ | |
| All Outputs | 120 Ω | |
| Equalizer | High | ±15 dB @ 12 kHz |
| Mid | ±12 dB @ 2.5 kHz | |
| Low | ±15 dB @ 80 Hz | |
| Crosstalk | Adjacent | Inputs 70 dB @ 1 kHz (Channels 1-6)≤ -68 dB @ 1 kHz (Channels 7/8-11/12) |
| Input → Output | ≤ -82 dB @ 1 kHz (channel level @ max., EQ @ unity, master level & others @ min., input selectors set to Line) | |
| Main Mix Line Output | 0 dBu (+2 dBu), balanced (channel level, master level & EQ @ unity, all others at min., input selectors set to Line) | |
| 0 dBu (+2 dBu), unbalanced (channel level, master level & EQ @ unity, all others at min., input selectors set to Line) | ||
| +21 dBu balanced/unbalanced, 1/4" (6.35 mm) jacks | ||
| < -83 dB @ 20 Hz - 22 kHz (channel level, master level & EQ @ unity, all others at min., input selectors set to Line) | ||
| Power | Connection: IECInput Voltage: 100V~, 110-120V~, 50/60Hz; 220-240V~, 50/60Hz or DC24V | |
| Dimensions(width x depth x height) | 19.0" x 7.7" x 1.7 "483 x 195 x 44 mm | |
| Weight | 6.4 lbs.2.9 kg | |
Specifications are subject to change without notice.
Trademarks & Licenses
Denon is a trademark of D&M Holdings Inc., registered in the U.S. and other countries.
Blu-ray™ and the logo are trademarks of the Blu-ray Disc Association.
All other product or company names are trademarks or registered trademarks of their respective owners.
denonpro.com


Brand : DENON
Model : DN312X
Category : Mixer