DCF145A1WDD - Freezer DANBY - Free user manual and instructions
Find the device manual for free DCF145A1WDD DANBY in PDF.

User questions about DCF145A1WDD DANBY
0 question about this device. Answer the ones you know or ask your own.
Ask a new question about this device
Download the instructions for your Freezer in PDF format for free! Find your manual DCF145A1WDD - DANBY and take your electronic device back in hand. On this page are published all the documents necessary for the use of your device. DCF145A1WDD by DANBY.
USER MANUAL DCF145A1WDD DANBY
natural_image
White hand symbol inside a black octagonal frame (no text or numbers)
natural_image
Gray circular icon with a white telephone handset and signal waves (no text or symbols)1-800-263-2629 (1-800-26-DANBY)
DO NOT RETURN THIS UNIT TO THE RETAILER WITHOUT FURTHER INSTRUCTIONS
Dear valued customer, we hope your Danby product purchase fulfills all your requirements. Your satisfaction is our priority! Please contact us at our toll free consumer service number for any inquiries you may have about your new unit.
NE PAS RETOURNER CET APPAREIL CHEZ LE DÉTAILLANT SANS CONSIGNES SUPPLÉMENTAIRES
Owner's Use and Care Guide....1-7
- Welcome
- Safety Instructions
- Installation
- Operation
• Care and Maintenance - Troubleshooting
- Warranty
CONGÉLATEUR HORIZONTAL
Read and follow all safety rules and operating instructions before first use of this product.

PRÉCAUTION :
natural_image
Line drawing of a rectangular refrigerator with lid and side buttons (no text or symbols)Thank you for choosing Danby
We know you're excited. We are too! However, the more familiar you are with your new appliance, the better experience you will have. We therefore strongly suggest that you read this Owner's Manual before plugging in your new appliance. It contains important operational information that will help you make full use of the technical features available in your Danby appliance. The manual also contains information designed to enhance operating reliability and safety, as well as tips to maintaining your new appliance so that it brings you happiness for years to come.
Please visit www.danby.com to access self-service tools, FAQs and more. Should you need additional assistance, please call 1-800-26-DANBY (1-800-263-2629).
Note: You will need the below information to obtain service under warranty. To receive service, you must provide the original receipt.
Model Number:
Serial Number:
Date of Purchase:
NEED HELP?
Before you call for service, here are a few things you can do to help us serve you better:
Read this Owner's Manual:
It contains instructions to help you use and maintain your appliance properly.
If you received a damaged appliance:
Immediately contact the retailer (or builder) that sold you the appliance.
Save time and money:
Check the Troubleshooting section at the end of the guide before calling. This section helps you solve common problems that may occur.
If you do need service, you can relax, knowing help is only a phone call away.

natural_image
Simple black-and-white icon of a telephone handset inside a circle (no text or symbols)1-800-26-Danby
(1-800-263-2629)

Important Safety Information READ AND FOLLOW ALL SAFETY INSTRUCTIONS
This appliance must be grounded. In the event of an electrical short circuit, grounding reduces the risk of electrical shock by providing an escape wire for the electrical current.
ELECTRICAL REQUIREMENTS
WARNING
ELECTRICAL RATING: The serial rating plate indicates the voltage and frequency the freezer is designed for.
Due to possible variations in line voltage (caused by overloading of circuits), it is advisable to install a separate fuse circuit from the meter panel. This will help to eliminate current fluctuation which might cause motor trouble.

IMPORTANT WARNING
An empty freezer is a very dangerous attraction to children. Remove either the gasket or lid from unused appliances, or take some other action that will guarantee it harmless.
DANGER: Risk of child entrapment. Before you throw away your old freezer:
- Take off doors.
- Leave the shelves in place so that children may not easily climb in.
DON'T WAIT! DO IT NOW!

WARNING! EXPLOSION HAZARD!
Risk of fire or explosion due to puncturing of refrigerant tubing. Do not use sharp objects to aid in defrost. Please handle with care. Keep flammable materials and vapors such as gasoline away from the freezer. Use non-1 ammable cleaner.
Disposal of this unit should be in accordance with federal and local regulations.
Please ensure that component parts shall be replaced with like components and that servicing shall be done by factory authorized service personnel, so as to minimize the risk of possible ignition due to incorrect parts or improper service.
GROUNDING INSTRUCTIONS
This appliance is equipped with a cord having a grounding wire with a grounding plug. The plug must be plugged into an outlet that is properly installed and grounded.
WARNING - Improper use of the grounding plug can result in a risk of electric shock. Consult a qualified electrician or service agent if the grounding instructions are not completely understood, or if doubt exists as to whether the appliance is properly grounded.
DO NOT USE AN EXTENSION CORD
Use an exclusive 115V wall outlet. Do not connect your freezer to extension cords or together with another appliance in the same wall outlet. Do not splice the cord.
SAVE THESE INSTRUCTIONS!

Important Safety Information READ AND FOLLOW ALL SAFETY INSTRUCTIONS
- This appliance is not intended for use by persons (including children) whose physical, sensory or mental capabilities may be different or reduced, or who lack experience or knowledge, unless such persons receive supervision or training to operate the appliance by a person responsible for their safety.
- Children should be supervised to ensure that they do not play with the appliance.
- Do not use extension cords or ungrounded (two prongs) adapters.
- If the supply cord is damaged, it must be replaced by the manufacturer, its service agent or similar qualified person in order to avoid hazard.
WARNING
- Keep ventilation openings, in the appliance enclosure or in the built-in structure, clear of obstruction.
- Do not use mechanical devices or other means to accelerate the defrosting process, other than those recommended by the manufacturer.
- Do not damage the refrigerant circuit.
- Do not use electrical appliances inside the food storage compartments of the appliance, unless they are of the type recommended by the manufacturer.
This unit is 153.5 cm (60.4 inches) wide by 83 cm (32.7 inches) high by 75.4 cm (29.7 inches) deep, please make sure that you leave a minimum of 12.7 cm (5 inches) of space between the unit and all surrounding walls. Please make sure that you leave 12.7 cm (5 inches) of space between all ventilation openings and any object near the unit. Do not cover any of the ventilation openings with any material as the unit needs adequate space to breathe.
SAVE THESE INSTRUCTIONS!
LOCATION
Remove exterior and interior packaging, wipe the outside thoroughly with a soft dry cloth and the inside with a wet, lukewarm cloth. Avoid placing the unit in a narrow recess or near any heat source, direct sunlight, or moisture. Let air circulate freely around the unit. Keep the rear of the freezer 5 inches away from the wall.
- Locate the freezer in such a manner that extension cords are not necessary.
- Due to lid and hinge arrangement, it is impossible to install your freezer directly against the wall. The spacing on the back is essential for maintaining proper air circulation around the freezer.
- Select a location with consistent year round temperatures. We do not recommend operating the freezer when surrounding air temperature is below 5°C (41°F), though it will not harm the freezer to stand in any temperature below 5°C (41°F), provided the temperature control is set to avoid running the unit. In order to keep operating cost down, do not place freezer near a stove, furnace, heat register or in direct sunlight. If the place selected for your freezer is damp or moist, as in basements, place freezer on wooden blocks (two or three 2x4's under entire length will ensure adequate support).
FEATURES
- FRONT MOUNTED THERMOSTAT: Easy access control knob controls the desired temperature inside the freezer. The proper food storage temperature is -18°C (0°F). The compressor turns on as soon as the temperature rises above the desired level.
- DEFROST DRAIN: For easy removal of melted ice during defrosting. It is recommended that you defrost your freezer once or twice a year.
- LED LIGHT
- RUST RESISTANT INTERIOR: Aluminum liner for long lasting durability (not pictured).
- LOCK: When the lid is closed, insert the key and rotate it 90° counterclockwise. To unlock, insert the key and rotate 90° clockwise. To prevent a child from being entrapped, keep key(s) out of reach of children and not in the vicinity of the freezer.
CAUTION:
The hinge of a chest freezer is under tension. You must exercise EXTREME CAUTION when attempting to remove, replace, and/or adjust.
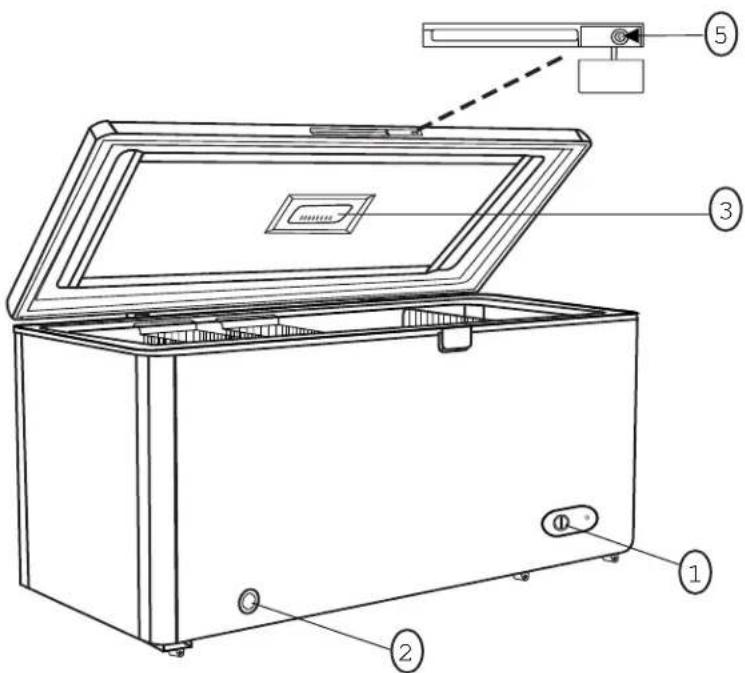
text_image
Technical diagram of a closed refrigerator with labeled parts including opening, internal compartments, and control panelThe freezer is ready to operate as received, when connected to the power supply. After connecting to the power supply, close the lid and allow the freezer to operate. The unit will run from 1 to 2 hours (possibly longer, depending on conditions) before operating temperature is reached. It will then start and stop (cycle) at fairly regular intervals. It is recommended that food not be placed in the freezer until you are satisfied that it is operating (cycling) regularly and no final adjustments are necessary.
Once your freezer is starting and stopping (cycling) regularly, it is ready to freeze and store foods. The proper food storage temperature is -18^ ( 0^ ). Do not operate freezer at temperatures below -19^ ( -3^ ), as this does not improve food preservation and only results in longer unit (cycle) running time. It is not advisable to freeze more than 25 kg (50 lbs.) of food in any 24 hour period. It will take 15 or more hours of unit running to freeze this amount of food.
When adding fresh, unfrozen food packages, store them against the walls. The sensing bulb of the thermostat is fastened to the liner wall on the “insulation side” of the freezer. In view of the value of the contents of your freezer, it is advisable to inspect contents and check freezer operation regularly.
Note:
This unit is not designed for outside installation, including installation anywhere that is not temperature controlled (garages, porches, carports, etc.). Before connecting the appliance to an electrical power supply, let it stand 6 hours. This will reduce the possibility of malfunctions in the cooling system due to transport handling.
TEMPERATURE CONTROL
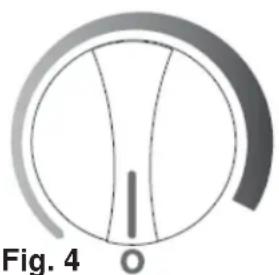
The temperature of the freezer compartment is controlled by adjusting/ setting the thermostat control knob, located on the front of the freezer cabinet. To start the freezer and achieve maximum cooling quickly:
- Turn the temperature control knob clockwise to the furthest (maximum) setting on the darker blue (wide) section of the graduated control dial.
- Allow the freezer to run at this setting for 3-4 hours.
- When maximum cooling is achieved, turn back the temperature control knob setting to the 2 o'clock position on the graduated blue control dial. See Fig.1.
- To turn off the freezer (no cooling), rotate the control knob to the "0" (off) position. See Fig.2.

natural_image
Abstract circular design with curved lines and a diagonal line, no text or symbols present.Fig. 1

natural_image
Abstract circular diagram with concentric arcs and a central vertical line (no text or symbols)Fig. 2
DEFROSTING
Moisture will be introduced to the liner during lid openings and the addition of unfrozen food packages. The moisture will accumulate in the form of frost, mostly on the upper part of the liner walls.
Accumulation of frost up to 6 mm (1/4") on the liner is not harmful. However, when it becomes heavier, it should be removed as it slows cooling, resulting in longer running (cycle) times. Under average conditions, defrosting will not be necessary more than once or twice a year. Besides frost, food particles and other foreign substances may accumulate and soil the liner.
For proper defrosting and cleaning, the following method is recommended:
- Unplug freezer.
- Quickly remove all frozen food and store in baskets, cartons or other suitable containers. Keep food well covered with blankets to avoid excessive temperature rise (ensuring food does not defrost).
- With the help of a wooden spatula or a plastic defrosting scoop, remove the frost and ice off the liner walls as soon as it becomes loose (approximately 15 minutes from start) - do not use any sharp instruments as this may result in damage to the liner wall and/or sealed system, voiding any and/or all warranties which may be in effect. Using a piece of cloth soaked in hot water, the process can be considerably accelerated. As soon as the ice has fallen to the bottom, remove it. Do not let it melt in the freezer as this will increase defrosting and cleaning time.
CLEANING
Now the liner is ready to be cleaned. Sprinkle baking soda on the bottom and walls. This will help in cleaning and with odor removal. In order to retain the finish of the freezer cabinet inside and outside, wash only with warm water and mild soap, then rinse and dry. Do not under any circumstances use a gritty soap or a kitchen scouring cleanser, as these tend to scratch the fi nish.
VACATION TIME
For short vacation periods, leave the control knob at its normal setting. During longer absences,
- remove all food,
- disconnect power cord from electrical outlet,
- defrost and clean the freezer thoroughly,
- leave lid open to avoid possible formations of condensation, mold or odors.
ELECTRICAL AND MECHANICAL FAILURE
In the event of mechanical or electrical failure of the freezer, contact a service agent immediately and give complete information of your freezer, the model number and serial number. These are shown on the serial plate located on the exterior (rear) cabinet wall.
POWER FAILURE
Most power failures are corrected within an hour or two and will not affect your freezer temperatures. However, you should minimize the number of lid openings while the power is off. During power failures of longer duration, take steps to protect your food.
IF YOU MOVE
Remove or securely fasten down all loose items inside the unit. To avoid damaging the leveling legs, turn them all the way into the base.
SOME IMPORTANT RULES FOR THE CORRECT USE OF THE FREEZER
- Never place hot foods in the freezer.
- Never place spoiled foods in the unit.
- Don't overload the unit.
- Don't open the lid unless necessary.
- Should the freezer be stored without use for long periods, it is suggested, after careful cleaning, to leave the lid open to allow the air to circulate inside the unit in order to avoid the possibility of condensation, mold or odors.

Troubleshooting
Occasionally, a minor problem may arise, and a service call may not be necessary - use this troubleshooting guide for a possible solution. If the unit continues to operate improperly, call an authorized service depot or Danby's Toll Free Number for assistance.
Tel: 1-800-26-Danby (1-800-263-2629)
| PROBLEM POSSIBLE CAUSE SOLUTION | ||
| Does not work • No power to unit | • Power cord is unplugged• Wrong voltage is being used | • Check connection of power cord to power source• Plug in unit• Use proper voltage |
| Freezer runs continuously • Temperature set too low (cold)• Lid is not closed• Hot food was inserted• Lid opened too long or too often• Close proximity to heat source or direct sunlight | • Set temperature control to warmer setting• Close lid securely• Be sure food is at room temperature before inserting• Minimize lid openings / duration• Do not place unit close to heat sources or direct sunlight | |
| Internal temperature not cold enough | • No power to unit• Power cord is unplugged• Temperature set too high (warm)• Lid is not closed• Hot food was inserted• Lid opened too long or too often• Air flow obstruction• Wrong voltage is being used.• Close proximity to heat source or direct sunlight | • Check connection of power cord to power source• Plug in unit• Check setting and adjust as needed• Close lid securely• Be sure that food is at room temperature• Minimize lid openings / duration• Allow room for air to circulate around unit• Use proper voltage• Do not place unit close to heat sources or direct sunlight |
LIMITED IN-HOME APPLIANCE WARRANTY
This quality product is warranted to be free from manufacturer's defects in material and workmanship, provided that the unit is used under the normal operating conditions intended by the manufacturer.
This warranty is available only to the person to whom the unit was originally sold by Danby Products Limited (Canada) or Danby Products Inc. (U.S.A.) (hereafter "Danby") or by an authorized distributor of Danby, and is non-transferable.
TERMS OF WARRANTY
Plastic parts, are warranted for thirty (30) days only from purchase date, with no extensions provided.
| First 18 months | During the first eighteen (18) months, any functional parts of this product found to be defective, will be repaired or replaced, at warrantor's option, at no charge to the ORIGINAL purchaser. |
| To obtain service | Danby reserves the right to limit the boundaries of “In Home Service” to the proximity of an Authorized Service Depot. Any appliance requiring service outside the limited boundaries of “In Home Service”, it will be the consumer's responsibility to transport the appliance (at their own expense) to the original retailer (point of purchase) or a service depot for repair. See “Boundaries of In Home Service” below. Contact your dealer from whom your unit was purchased, or contact your nearest authorized Danby service depot, where service must be performed by a qualified service technician. If service is performed on the unit by anyone other than an authorized service depot, or the unit is used for commercial application, all obligations of Danby under this warranty shall be void. |
| Boundaries of In Home Service | If the appliance is installed in a location that is 100 kilometres (62 miles) or more from the nearest service centre your unit must be delivered to the nearest authorized Danby Service Depot, as service must only be performed by a technician qualified and certified for warranty service by Danby. Transportation charges to and from the service location are not protected by this warranty and are the responsibility of the purchaser. |
Nothing within this warranty shall imply that Danby will be responsible or liable for any spoilage or damage to food or other contents of this appliance, whether due to any defect of the appliance, or its use, whether proper or improper.
EXCLUSIONS
Save as herein provided, by Danby, there are no other warranties, conditions, representations or guarantees, express or implied, made or intended by Danby or its authorized distributors and all other warranties, conditions, representations or guarantees, including any warranties, conditions, representations or guarantees under any Sale of Goods Act or like legislation or statute is hereby expressly excluded. Save as herein provided, Danby shall not be responsible for any damages to persons or property, including the unit itself, howsoever caused or any consequential damages arising from the malfunction of the unit and by the purchase of the unit, the purchaser does hereby agree to indemnify and hold harmless Danby from any claim for damages to persons or property caused by the unit.
GENERAL PROVISIONS
No warranty or insurance herein contained or set out shall apply when damage or repair is caused by any of the following:
1) Power failure.
2) Damage in transit or when moving the appliance.
3) Improper power supply such as low voltage, defective house wiring or inadequate fuses.
4) Accident, alteration, abuse or misuse of the appliance such as inadequate air circulation in the room or abnormal operating conditions (extremely high or low room temperature).
5) Use for commercial or industrial purposes (i.e., If the appliance is not installed in a domestic residence).
6) Fire, water damage, theft, war, riot, hostility, acts of God such as hurricanes, floods etc.
7) Service calls resulting in customer education.
8) Improper Installation (i.e., Building-in of a free standing appliance or using an appliance outdoors that is not approved for outdoor application).
Proof of purchase date will be required for warranty claims; so, please retain bills of sale. In the event warranty service is required, present this document to our AUTHORIZED SERVICE DEPOT.
Warranty Service
In-home
Danby Products Limited
PO Box 1778, Guelph, Ontario, Canada N1H 6Z9
Telephone: (519) 837-0920 FAX: (519) 837-0449
1-800-263-2629
07/14
Danby Products Inc.
PO Box 669, Findlay, Ohio, U.S.A. 45840
Telephone: (419) 425-8627 FAX: (419) 425-8629
CONSERVEZ CES INSTRUCTIONS!

Consignes de sécurité importantes PRENDRE CONNAISSANCE DE TOUTES LES INFORMATIONS RELATIVES À LA SÉCURITÉ AVANT D'UTILISER LE PRODUIT
CONSERVEZ CES INSTRUCTIONS!
EMPLACEMENT
text_image
Technical diagram of an open refrigerator with labeled parts including door, lid, and control panelMISE EN MARCHE DU CONGÉLATEUR
natural_image
Simple circular diagram with curved lines and a small mark, no text or symbols presentFig. 3
natural_image
Circular gauge or dial with internal lines and a central vertical line, labeled 'Fig. 4' at the bottom (no other text or symbols)DEGIVRAGE
Danby Products Limited
PO Box 1778, Guelph, Ontario, Canada N1H 6Z9
natural_image
Simple black-and-white icon of a telephone handset inside a circle (no text or symbols)1-800-26-Danby
(1-800-263-2629)

text_image
Technical diagram of an open refrigerator with labeled parts including door, lid, and buttonsMARCHA DEL CONGELADOR
natural_image
Abstract circular graphic with curved lines and a small horizontal bar (no text or symbols)Fig. 5

natural_image
Abstract circular design with curved lines and a central vertical bar (no text or symbols)Fig. 6
DESCONGELACION
All repair parts are available for purchase or special order when you visit your nearest service depot. To request service and/or the location of the service depot nearest you, call the TOLL FREE number.
When requesting service or ordering parts, always provide the following information:
- Product Type
- Model Number
- Part Number
- Part Description