
SRAFG186 - Rice cooker PANASONIC - Free user manual and instructions
Find the device manual for free SRAFG186 PANASONIC in PDF.
User questions about SRAFG186 PANASONIC
0 question about this device. Answer the ones you know or ask your own.
Ask a new question about this device
Download the instructions for your Rice cooker in PDF format for free! Find your manual SRAFG186 - PANASONIC and take your electronic device back in hand. On this page are published all the documents necessary for the use of your device. SRAFG186 by PANASONIC.
USER MANUAL SRAFG186 PANASONIC
Operating Instructions
Household Use only
Electronic Rice Cooker/Warmer

Veuillez Voir la version francaise de la page 27\~page 50
Espanol consulte la pagina 51 pagina 74.
(中文請參考第75頁~第98頁)
Thank you very much for purchasing this Panasonic product.
This product is intended for household use only.
Please read this Operating Instructions carefully for safe and proper use of this product. Be sure to read the "Important Safeguards" (page 2~3) and "Safety Precautions" (page 4~6) before use.
Reserve it for later use
Model No. 1.8 L SR-AFG186
Contents
IMPORTANT SAFEGUARDS 2
Safety Precautions 4~6
Instructions for Use 7
Parts Identification 8
- Main body/Accessories 8
Control panel 9
Adjusting the current time 9
Preparation 10
- Wash rice and add water 10
- Function selecting/Setting cooking time/ Tips to cook delicious rice 11
Menu functions 12
Pearl Rice, Jasmine Rice, Brown Rice, Casserole/Keep Warm 12
Congee, Porridge, Grain Congee, Soup 13
Steam 14
Cake 15
Reheat 16
Timer 17
Cleaning and Maintenance 18
Recipes 20
Troubleshooting 22~23
Error Messages 24
How to optimize the unit 25
Specifications 26
Notes 99
IMPORTANT SAFEGUARDS
When using electrical appliances, basic safety precautions should always be followed including the following:
- Read all instructions.
- Do not touch hot surfaces. Use handles or knobs.
- To protect against electrical shock do not immerse cord, plugs, or Rice Cooker except the pan in water or other liquid.
- Close supervision is necessary when any appliance is used by or near children.
- Remove plug from outlet when the appliance is not in use, before putting on or taking off parts, and before cleaning. Allow to cool before handling.
- Do not operate any appliance with a damaged cord or plug or after the appliance malfunctions or has been damaged in any manner. Return appliance to the nearest authorized service facility for examination, repair, or adjustment.
- The use of accessory attachments not recommended by the appliance manufacturer may cause injuries.
- Do not use outdoors.
- Do not let cord hang over edge of table or counter, or touch hot surfaces.
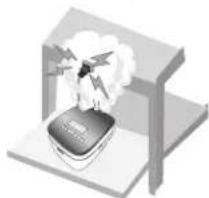
- Do not place on or near a hot gas or electric burner, or in a heated oven.
- Extreme caution must be used when moving an appliance containing hot oil or other hot liquids.
- To disconnect, turn the control to "off", then remove plug from wall outlet.
- Do not use appliance for other than intended use.
- This product is intended for household use only.
15. SAVE THESE INSTRUCTIONS.

CAUTION :
a) A short power-supply cord is to be provided to reduce the risk resulting from becoming entangled in or tripping over a longer cord.
b) The cord should be arranged so that it will not drape over the countertop or tabletop where it can be pulled on by children or tripped over unintentionally.
c) The use of extension cords is not recommended.
This appliance has a polarized plug (one blade is wider than the other). To reduce the risk of electric shock, this plug is intended to fit into a polarized outlet only one way. If the plug does not fit fully into the outlet, reverse the plug. If it still does not fit, contact a qualified electrician. Do not attempt to modify the plug in any way.
This appliance complies with Part 18 of the FCC Rules.
To prevent personal injury, injury to others and property damage, the following instructions must be followed.
Incorrect operation due to failure to follow instructions will cause harm or damage, the seriousness of which is classified below.

WARNING: Indicate a potential hazard which could result in death or serious injury.

CAUTION: Indicate a potential hazard which could result in injury or damage to property.
The instructions to be followed are represented by the following symbols.

This symbol indicates an action that is prohibited.

This symbol indicates an action that is must be followed.

WARNING

- Do not use the appliance if the power cord or power plug is damaged or the power plug is loosely connected to the power outlet.
(So as not to cause an electric shock, or a fire due to a short circuit.)
If the supply cord is damaged, it must be replaced by the manufacturer, its service agent or similarly qualified persons in order to avoid a hazard.
-
Do not damage the power cord or power plug.
-
Following actions are strictly prohibited.
Damaging, processing, making it contact with or near high-temperature section, forcibly bending, twisting, pulling, hanging on the corner, placing heavy objects on it, tying into bundles, sandwiching, pulling the power cord to move. (So as to avoid electric shock due to damaged power cord and plug or avoid fire due to short circuit.)
-
Do not insert any object into intake port, exhaust port or gap.
-
Especially metal objects such as pins or wires.
(So as not to cause an electric shock or malfunction.)
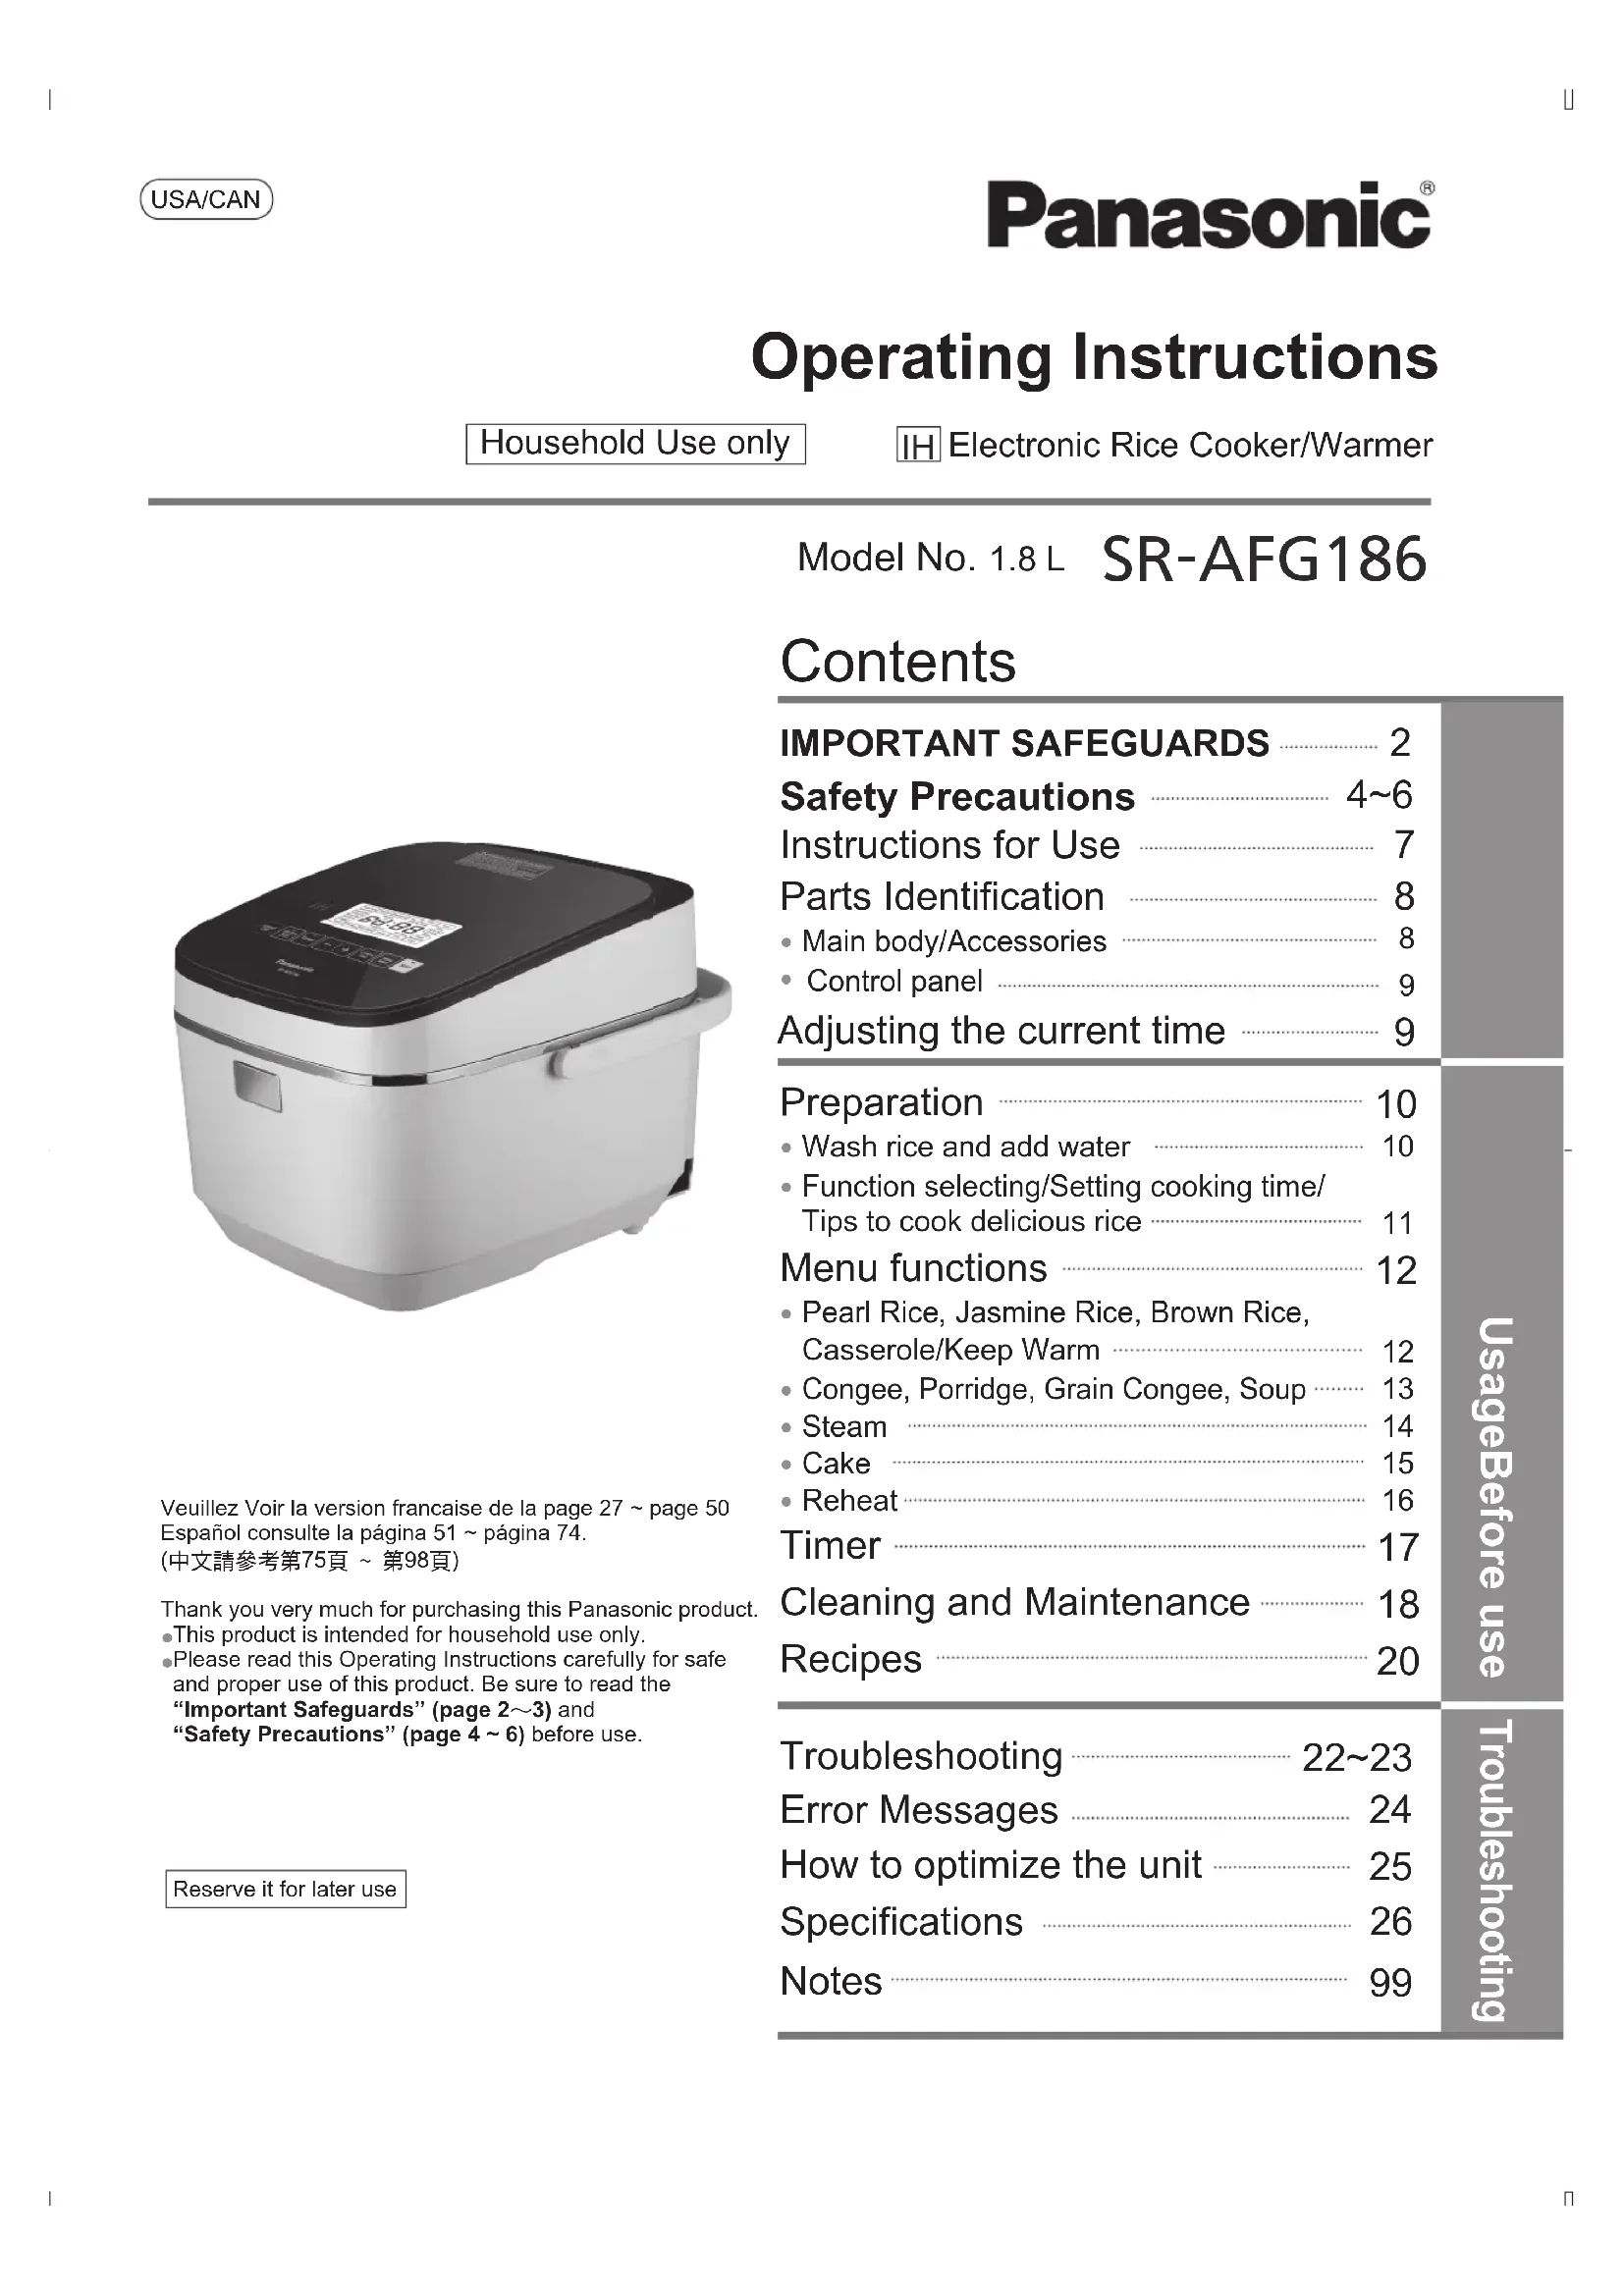
- Do not wash the main body, immerse the appliance in water or splash it with water.
(So as not to cause an electric shock, or a fire due to a short circuit.)
Consult your nearest Panasonic authorized service center if the appliance is subjected to water.

Exhaust port
Intake port
- Do not modify, disassemble, or repair this appliance.
(So as not to cause a fire, electric shock or injury.)
→For repair, please contact the Panasonic authorized service center.
- When in use or after cooking, do not expose your face or hands near the steam vent. Pay special attention to avoid exposure to children.
(So as not to cause a burn.)
- Do not put anything in the inner pan that would block the hole in the Inner Lid.
(So as to avoid burns or injuries caused by steam leak or cooked food blowing out.)
- Cooking method in which ingredients and seasonings are placed into a plastic bag to heat.

Steam vent
Hole on the inner lid


WARNING

- Do not connect or disconnect the power plug with wet hands.
(So as not to cause an electric shock or injury.)
- Do not open the lid during cooking.
(So as to avoid burns or injuries caused by steam leak or cooked food blowing out.)
- Do not use this appliance for any purpose other than its intended use as described in these Operating Instructions.
(So as not to cause a fire, burn, injury or electric shock.)

- This appliance is not intended for use by persons (including children) with reduced physi, sensory or mental capabilities, or lack of experience and knowledge, unless they have been given supervision or instruction concerning use of the appliance by a person responsible for their safety. Children should be supervised to ensure that they do not play with the appliance.
(So as not to cause burns, injury or electric shock.)
- Please use a dedicated power outlet with a minimum rating of 15 A, 120 V.
(Using the unit together with other equipment on the same outlet can cause overheating and fire.)
- Make sure that the power plug is fully inserted in the outlet.
(So as not to cause an electric shock or fire due to heat.)
- Remove dust on the power plug regularly.
(Dust accumulated on the power plug may cause insulation failure due to moisture, which could result in fire.)
Disconnect the power plug and wipe it with a dry cloth.
- Keep the appliance out of reach of small children.
(So as not to cause a burn, injury or electric shock.)
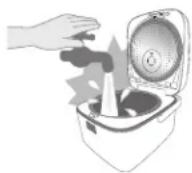
- If an exception or malfunction occurs, stop using the appliance immediately and unplug the power plug.
(So as not to cause smoke, fire, electric shock, burns or injury.)
Examples of malfunciton cases
The power plug and cord become abnormally hot.
- The power cord is damaged or intermittent power outages when being touched.
- The main body is deformed or abnormally hot.
The main body emits smoke or burning smell.
- The main body is broken, loose or makes abnormal noise.
The fan at the bottom does not rotate during cooking.
→ Immediately contact the Panasonic authorized service center for inspection or repair.
Safety Precautions

CAUTION

- Do not use a damaged or non-intended pan.
(So as not to cause burns or injury due to overheating or malfunction.)
-
Do not use the appliance in the following places.
-
Near heat or in the high humidity environments
(So as not to cause electric shock, electric leakage or fire.) - On uneven surface or a mat which is not heat-resistant.
(So as not to cause injury, burns or fire.) - In the places close to the wall or furniture, etc.
(So as not to bump into them when opening the lid, cause discoloration, deformation or damage to furniture.) -
On an aluminum plate or an electronic heating blanket.
(Aluminum material may generate heat and cause smoke or fire.) -
Do not move the main body while in use. Switch off and unplug before cleaning, transporting, or storing it.
(So as to avoid burns caused by the opening of the lid due to the touch of the hook key.)
- Do not touch the hot surface while the appliance is in use or after cooking.
The main body has a high temperature. In particular, the glass panel of the lid and the metal parts such as the inner lid and the pan.
(So as not to cause a burn.)
- Do not expose the power plug to steam.
(So as not to cause an electric shock, or a fire due to a short circuit.)
→When using a cabinet with sliding table, use the appliance where the power plug cannot be exposed to steam.
- Do not use appliance while empty.
(So as not to cause burn.)


- Be sure to hold the power plug when unplugging it.
Do not pull on the power cord.
(So as not to cause an electric shock, or a fire due to a short circuit.)
- Turn off the power and unplug from wall outlet before removing the pan or when the appliance is not in use.
(So as not to cause burns, injury, or an electric shock, leakage, fire due to insulation aging.)
- Wait for the main body to cool down sufficiently before cleaning.
(So as not to cause burns.)
- When used within a cupboard or other enclosed spaces, make sure that the steam can flow freely.
(So as not to cause discoloration or deformation of the cupboard.)
-
This appliance utilizes induction cooking technology which generates an electric field and may affect certain medical devices, including pacemakers.
-
Consult your physician before use.
- Maintain a minimum distance of approximately 20 inches (50 cm) to minimize or prevent interference.
(This appliance may have an impact on a pacemaker when it is operated.)
When a power outage occurs during use
Including unplugging the power plug, trip, etc.
- When a momentary power failure occurs, the appliance will return to the state before the power failure.
- If the power has failed for a long time, the following will occur after powered again.
During cooking: Continue cooking.
Cooking effect may be affected.
While keeping warm: Continue keeping warm.
Instructions for Use
About the main body
If the appliance is on the cabinet with sliding table, make sure that the table is capable to handle a load of 22lbs. (10 kg) Min. (So as not to drop the appliance.)
Do not cover the outer lid with cloth or other objects when the appliance is in use.
(So as not to cause the steam from being blocked, resulting in deformation, discoloration or malfunction of the outer lid.)


Periodically check the intake port and the exhaust port at the bottom of the rice cooker, and remove any dust. (Refer to "Cleaning and Maintenance" on P19)
Remove rice or any other matter stuck at the bottom sensor, at pan supporting rubber, below the rim or bottom of pan. (So as to avoid error display, or scorched rice, half cooked rice, etc.)
Pan supporting rubber (3 points)
Do not place the appliance near a device susceptible to electromagnetic interference. Radio, television, and hearing aids, etc.
(So as to avoid noise or reduce the volume.)
- Credit cards, IC Cards, and the like.
(So as not to damage the magnetic.)
Do not place magnets near the appliance. (So as to avoid abnormal operation.)
Do not use the appliance on an induction cooker. (So as not to damage the induction cooker or abnormal operation of the appliance.)
■Do not use the appliance outdoors.
(Unstable power supply may result in a appliance failure.)
Avoid using the appliance under direct sunlight.
(So as to avoid color change.)
Do not use the rice cooker on surfaces where the intake or exhaust ports can become blocked.
For example: on carpet, plastic bag, aluminum foil or fabric, etc.
(So as not to damage the appliance.)
About the Inner pan
Do not use the pan in a place other than the rice cooker.

- Do not use it in a gas stove or induction cooker or microwave.
Do not impact the pan with a hard object.

So as not to cause scratches or dents of the outer surface.

Pay attention to the following in order to avoid slash or scratch of the coating of the pan.
Before cooking

- Do not let objects like metal sieve contact with the coating of the pan.

After cooking

- Do not put vinegar into the rice in the pan. (While cooking Sushi and other food)
- Do not use a metal spoon.
While cooking porridge and other food)
- Do not touch or strike the pan.
(While filling a bowl with rice)
Notes
The following will not affect the product performance or personal health.
[Outer surface] superficial scratches, small dents or collision.
[Inner surface] flaking of the coating of the pan.
If the pan is deformed or you are worried about its condition, please purchase a new pan.
During cleaning and maintenance (P18)

- Do not use the pan as a washing container.
- Do not place a spoon or other utensils into the pan.
After cooking with seasoning, do not leave food inside the pan.
After cooking casserole or mixed rice, please clear the food in the pan as soon as possible and then clean the pan.
- Do not use bowl dryer or dish washer/dryer for cleaning.
- Do not put the pan in other utensil to dry after washing.
- Do not use abrasive powder or metal brush, nylon brush (with the grind), scouring pad to clean or scrub the pan.
To clean the pan, wash it with a soft sponge.


Parts identification
For the first use, clean the pan, rice scoop, congee (soup) scoop, steaming basket, inner lid, and steam cap (taste catcher). (P18-19)

Main body
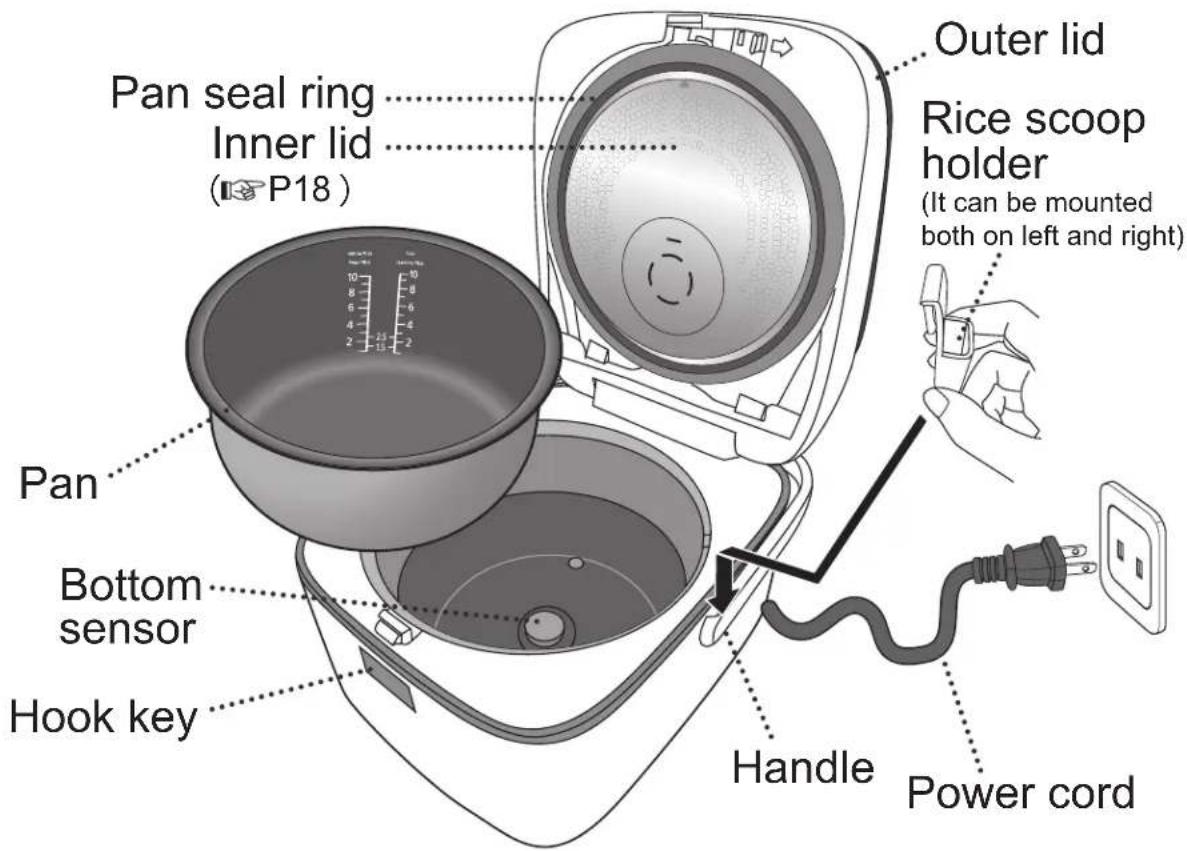
Accessories

Rice scoop (1)

Measuring cup(1) scoop (1)

Rice scoop holder (1)

(Approx. 180~mL )
Steaming basket (1)Congee
[Soup]
Parts identification
Control panel
IH
Pearl Rice
Regular
Delicious
Quick
Sticky
Hard
Reheat
Cooking Timer
Timer
Jasmine Rice


Brown Rice

h (approx.)
min later
Start
Congee
Porridge
Grain Congee
Steam
Soup
Cake
Start
- Press this key to start cooking or end the setting of the preset time.
Start
Cancel/Off key
- Cancel incorrect operation, or turn off keep warm.
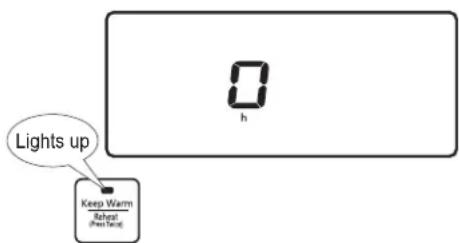
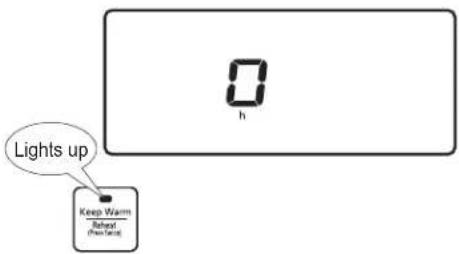
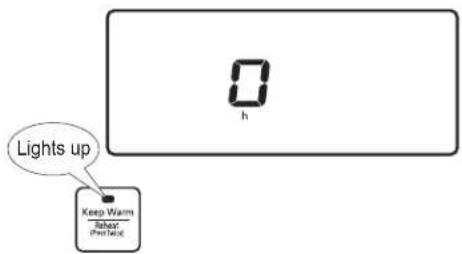
Keep Warm/Reheat key
- Press this key and then press the [Start] key to keep warm.
- Press this key twice and then press the [Start] key to start reheating.
Timer key
- Press this key to timer.
-/+key
- It is used to adjust the current time, set preset time and cooking time.
- Press and hold the key to quickly add or subtract time.
Menu Select key
It is used to select the desired function.
- Press and hold the key to quickly select functions.
Cooking Timer key
- Press this key to confirm the cooking time in the timer status.
Notes
The operation of the [Cancel/Off] key requires a longer time when the appliance is working, which is normal.
Adjusting the current time
Example: when adjusting 7:00 am to 8:30 am
① Plug in the power plug.

7:00
② Press and hold the + or - key for more than 3 seconds. (Release the key when you hear the "beep" sound from the buzzer)
The digits of "h, min" blink on the LCD display.

③ Press the ^+ or - key to adjust the time.
Every time the + or - key is pressed, time will increase or decrease in 1 minute increments. (After the time is adjusted, the number will flash a few times and stop automatically, and the time adjustment is completed.)
※You can not adjust the time while the appliance is working.
※Press and hold the + or - key to quickly add or subtract time.
※The system of 24-hour is adopted, and 24:00 is represented by 0:00.
If there is an error in time display, the preset cooking time and the cook end time will have error.
So please timely adjust the time.
8:30
This product contains a CR Coin Cell Lithium Battery which contains Perchlorate Material -special handling may apply.
See www.dtsc.ca.gov/hazardouswaste/perchlorate
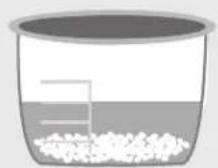
Preparation
Wash rice and add water
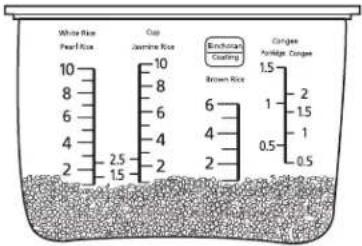
| 1 | Measure rice with the measuring cup provided •Maximum quantity of rice to be cooked at once, specifications" on P26. | ○Correct About 180mL (about 150g) | ×Incorrect | |
| 2 | Wash the rice till the water turns relatively clear ①Wash the rice quickly with plenty of water and stirring the rice lightly to wash it while changing water. ②Repeat several time of rice washing→pour off the water, till the water turns relatively clear. •In order to avoid scratching the non-stick coating on the pan surface, do not wash rice in the pan. •Wash the rice thoroughly. Otherwise, rice crust may appear and the residual rice bran may affect the taste of the rice. | ① | ② | |
| 3 | Place the washed rice into the pan Add water until the corresponding waterline(P11) and dry the outside of the pan. •Add water on a flat surface, and flatten the surface of the rice. (Confirm the scale on the left and right, and add water to the same height) •When select "Soup", the total volume of ingredients and water shall not exceed the maximum waterline for "Congee". •When cooking mixed rice or glutinous rice, please add water according to the following table 1. Table 1 | Example: when cooking 4 cups of pearl rice, add water to the "4" waterline of the "Pearl Rice". | ||
| Rice quantity (measuring cups) | Water quantity (measuring cup) | |||
| Mixed rice Glutinous rice | ||||
| 1 | "White Rice" waterline | 1 | ||
| 2 | 2 | |||
| 3 | 3 | |||
| 4 | 4 | |||
| 5 | 5 | |||
| 6 | 6 | |||
| ※The above water quantities can be increased or decreased according to personal preference. (When too much water is added, it may overflow when cooking.) | ||||
| 4 | Put the pan into the body and close the outer lid •When closing the outer lid, please confirm that there is a "click" sound, if the inner lid is not properly installed, the lid can not be closed. (P18 Inner lid) •Make sure that the steam cap (taste catcher) is installed in place. (P19 Steam cap (Taste Catcher)) | ① | ② | |
| 5 | Connect the power plug •Please plug the power plug, and make sure it is connected securely. | Power plug Power outlet | ||
Preparation
Function selecting/Setting cooking time/ Tips to cook delicious rice
Function selecting Table 2
| Categories of food to cook | Menu Select Waterline | *1Cooking time (Approx.) min | *2Keep warm (auto) | *3Time range to preset | |
| Pearl Rice | Regular | White Rice [Pearl Rice] | 37 minutes | ○ | 50 minutes or more |
| Delicious | 47 minutes | ○ | 60 minutes or more | ||
| Quick | 29 minutes | ○ | 40 minutes or more | ||
| Sticky | 52 minutes | ○ | 60 minutes or more | ||
| Hard | 32 minutes | ○ | 50 minutes or more | ||
| Jasmine Rice | Regular | White Rice [Jasmine Rice] | 32 minutes | ○ | 40 minutes or more |
| Delicious | 47 minutes | ○ | 60 minutes or more | ||
| Quick | 29 minutes | ○ | 40 minutes or more | ||
| Glutinous Rice | Delicious [Pearl Rice or Jasmine Rice] | Refer to on P10 Table 1 | *1 | × | *3 |
| Mixed Rice | Regular、Delicious、Sticky [Pearl Rice or Jasmine Rice] | White Rice [Pearl Rice or Jasmine Rice] | *1 | × | *3 |
| Brown Rice | Brown Rice Brown Rice | 1 hour and 50 minutes | × | 2 hours and 10 minutes or more | |
| Casserole | Casserole | White Rice [Pearl Rice or Jasmine Rice] | 42 minutes | × | × |
| Porridge | Congee | Congee | Table 3 | × | Cooking time + 1 minute or more |
| Grain Congee | |||||
| Porridge | Porridge Congee | ||||
| Steam | Steam | Water for a steam of more than 40 minutes: 4 measuring cups | Table 3 | × | × |
| Soup To the maximum waterbowl of "Congee" | Table 3 | × | × | ||
| Cake | Cake | - | Table 3 | × | × |
| *1 The time needed to cook the intermediate amount of rice (5 cups) at a voltage of 120 V, a room temperature of 20 °C and a water temperature of 20 °C for reference. ·The actual cooking time will vary according to the amount of rice, water, voltage, temperature, water temperature and rice quality. ·The cooking time for mixed rice, glutinous rice will vary according to the ingredients used. | |||||
| *2 All functions at the end of the cooking will be automatically converted to keep warm. But some functions with × mark are not recommended to keep warm, and please press the [Cancel/Off] key as soon as possible after the end of the cooking. | |||||
| *3 The functions of casserole, steam, soup, cake do not have timer. ·When cooking glutinous rice and mixed rice, do not use the function of timer to avoid food deterioration or performance influence. ·When the preset time is less than the cooking time, cook will start directly. ·In summer when temperature is high, the preset time should not be greater than 8 hours to avoid rice deterioration. | |||||
Setting cooking time
Table 3
| Categories of food to cook | Menu Select | Setting cooking time range | Setting increments | Initial value | Time display Time memory | |
| Porridge | Congee | 40 minutes ~ 2 hours | 10 minutes | 1 hour | Back to 40 minutes after 2 hours | ○ |
| Porridge | ||||||
| Grain Congee | 1~3 hours | 30 minutes | 2 hours | Back to 1 hour after 3 hours | ○ | |
| Steam | Steam | 1~60 minutes | 1 minute | 5 minutes | Back to 1 minute after 60 minutes | ○ |
| Soup | Soup | 40 minutes ~ 2 hours | 10 minutes | 1 hour | Back to 40 minutes after 2 hours | ○ |
| Cake | Cake | 40 ~ 60 minutes | 1 minute | 60 minutes | Back to 40 minutes after 60 minutes | ○ |
Tips to cook delicious rice
Measure water and rice correctly.
Gently and quickly wash rice. Do not place rice in a sieve. (So as to avoid rice fragmentation or rice sticking to the pan.)
Add water on a flat countertop. Do not use hot water or alkaline water of more than pH9. (So as to avoid rice from sticking the pan or becoming burned.)


※ For Pearl Rice, you can choose: Regular, Delicious, Quick, Sticky, Hard.
For Jasmine Rice, you can choose: Regular, Delicious, Quick.

■Kind reminder
- Do not choose the function of "Quick" or "Hard" to cook mixed rice and glutinous rice. (Water volume Table 1 on P10)
- "Quick" can be used for cooking rice. As the cooking time is shortened, the rice may be harder or there may be rice crust.
→Soak the rice in water in advance, and you can make the cooked rice become soft.
With "Delicious" function, you can make rice softer and more delicious. - Mixing of brown rice and white rice (Pearl Rice, Jasmine Rice) to cook may effect cooking result.
※When cooking with the "Regular" function of Pearl Rice
1
Press key to select "Regular" of the "Pearl Rice".
The selected function flashes.
Please use the "Regular" function under normal circumstances. In addition to the "Regular" function, you can also select the functions of "Delicious", "Quick", "Sticky" and "Hard". (The functions mentioned above are only applicable to "Pearl Rice" and "Jasmine Rice". And the functions of "Sticky" and "Hard" apply only to "Pearl Rice".)

2
Press Start key to start cooking.
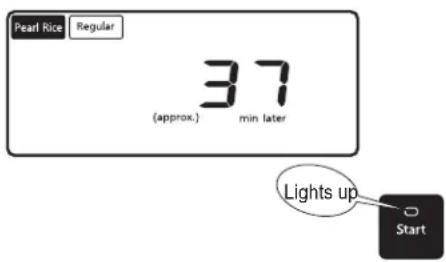
3
When cooking is over, loosen the rice.
After the buzzer rings, cooking finishes. The function will automatically turn to keep warm status. To prevent the rice from sticking together, please loosen the rice after cooking.
For mixed rice, glutinous rice, brown rice and casserole, press the [Cancel/Off] key as soon as possible so as not to affect the taste.
mM d
- Keep warm time displays from 0 to 23 of total 24 hours. After 24 hours, it displays the current time but continues to keep warm.
hour will be displayed when it is within 1 hour. - If the function of "keep warm" is longer than 96 hours, it will automatically stop, and the display shows "U14". If you want to clear the error code, please press the [Cancel/Off] key.
Cooked rice should be consumed within 12 hours of keeping warm to avoid discoloration or becoming stale. - When in keep warm function, there may be some droplets at the edge of the pan.
- The rice taste may be affected if the rice scoop is left in the pan when the rice is in keep warm function.
IH
2
Cooking Timer
min
Congee


2^·s ·s 1
3

Start
■Kind reminder
- Open the lid while cooking will increase the amount of dew condensation.
Incorrect water quantity or rice quantity may lead to overflow of rice water from the steam cap (taste catcher) or steam vent. - When the congee is kept in keep warm function for an excessively long time, it will get thicker.
- Soup may overflow if exceeding the "Congee" max water level.
( Specifications" on P26)
Take off and clean the steam cap (taste catcher) so as to avoid odor every time after use.
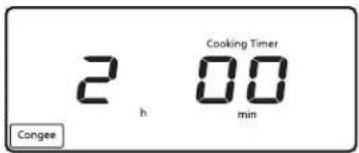
When cooking congee for 2 hours
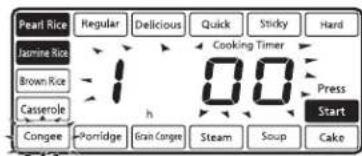
1
Press key to select "Congee".
The selected function flashes.
Flashes

2
Press - + key to set the cooking time.
Every time the [+] or [-] key is pressed, the cooking time will increase or decrease in 10 minutes interval.
- Press and hold the [+] or [-] key to quickly add or subtract time.
The cooking time for the last time can be memorized.
※For the cooking time which can be set, Table 3 on P11.
Flashes

3
Press Start key to start cooking.
- Remaining time is shown in 1 minute decrements.
Lights up

4
After the buzzer rings, cooking finishes, the function will automatically turn to keep warm status.
- Keep Warm function will affect taste, press [Cancel/Off] key if this is a concern.

IH


■Kind reminder
- If you wish to steam while cooking other recipe, please make sure you choose rice cooking function.
- For longer steaming time (over 40 minutes), add more water to avoid dry heating. (Table 2 on P11)
The time shown in the display is the remaining time after the water inside the pan is boiled. - Do not put anything in the inner pan that would block the hole in the Inner Lid.
※When steaming for 10 minutes
Preparation
① Add suitable amount of water into the pan.
②Put the steaming basket.
③Put the foods to be steamed
④ Close the outer lid.

1
Press key to select "Steam" function.
The selected function flashes.
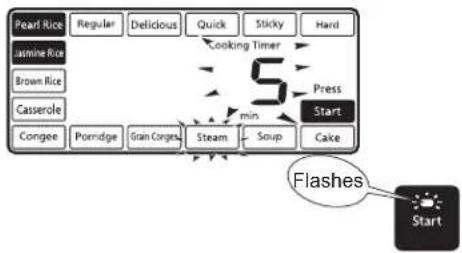
2
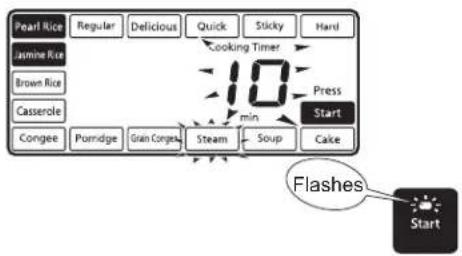
Press -|+ key to set the cooking time.
Every time the [+] or [-] key is pressed, the cooking time will increase or decrease in 1 minute interval.
- Press and hold the [+] or [-] key to quickly add or subtract time.
The cooking time for the last time can be memorized. For the cooking time which can be set, Table 3 on P11.
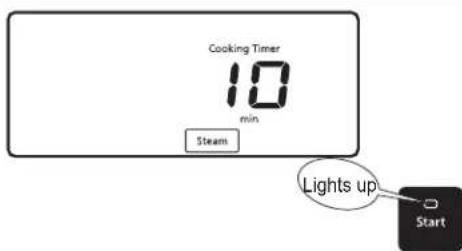
3
Press key to start cooking.
After water boils, remaining time is shown in 1 minute decrements.
4
After the buzzer rings, cooking finishes, the function will automatically turn to keep warm status.
- Keep Warm function will affect taste, press [Cancel/Off] key.
- The steaming basket is very hot at the time, please remove carefully.
■Kind reminder
Cake batter can not exceed the maximum amount in the following (the total weight of cake flour, milk, eggs, etc.) so as to avoid half-baked cake.
In addition to cake flour, you can use ordinary low-gluten flour to make cakes. recipes on P21.
While baking the maximum amount of cake batter, set the cooking time to 60 minutes in order to avoid half-baked cake.
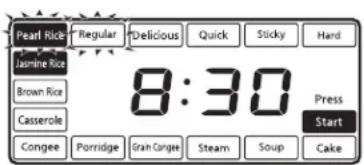
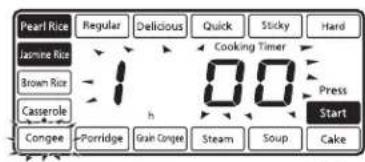
※When baking a cake with the function of "Cake" (50 minutes)
| Preparation | •Mix all the ingredients well in accordance with the requirements of cake flour. •Apply a layer of butter (or cooking oil) on the wall of the pan, then pour the stirred cake batter into the pan and close the outer lid. | ■The maximum amount of cake batter: 900 g |
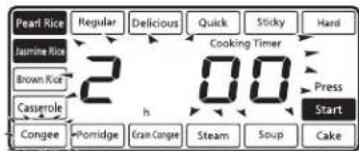
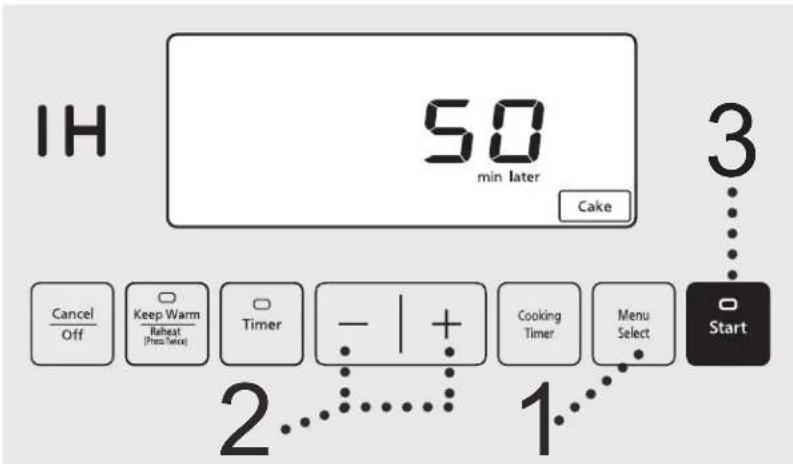
| 1 | Press key to select the "Cake". •The selected function flashes. | Pearl Rice Regular Delicious Quick Sticky Hard Jarrine Rice Cooking Timer Brown Rice 60 Press Casserole min Start Congee Porridge Gran Congee Steam Soup Cake Start |
| 2 | Press - + key to set the cooking time. •Every time the [+] or [-] key is pressed, the cooking time will increase or decrease in 1 minute interval. •Press and hold the [+] or [-] key to quickly add or subtract time. •The cooking time for the last time can be memorized. ※For the cooking time which can be set, Table 3 on P11. | Pearl Rice Regular Delicious Quick Sticky Hard Jarrine Rice Cooking Timer Brown Rice 50 Press Casserole min Start Congee Porridge Gran Congee Steam Soup Cake Start |
| 3 | Press key to start cooking. •Remaining time is shown in 1 minute decrements. | Cooking Timer 50 min later Cake Lights up Start |
| 4 | After the buzzer rings, cooking finishes, the function will automatically turn to keep warm status. •Keep Warm function will affect taste, press [Cancel/Off] key. •Take the pan out and cool for several minutes, then turn over the pan, and pour the cake out. Be careful not to burn your hands while taking the pan out. | Lights up Keep Warm Tulip min Wace |
IH
Reheat
15
(approx.)
min later


■Kind reminder
- When adding cooled rice, do not exceed the maximum amount of cooled rice (as shown in Table 4).
It is recommended to reheat cooled rice for only once so as not to affect the taste of rice. - Do not reheat mixed rice and glutinous rice, so as not to affect the taste.
※When reheatingcooled rice
Preparation
- Stir the cooled rice in the pan to make it even.
- When reheating, please refer to the following table of the amount of water to be added.
Table 4
| Cooled rice quantity (Waterline*) | Water volume (measuring cup) |
| 1 | --- |
| 2 | 1/2 |
| 3 | 1/2 |
| 4 | 1/2 |
| 5 | 1 |
The maximum amount of cooled rice quantity to reheat cannot exceed White Rice waterline - 5 Cups.
1
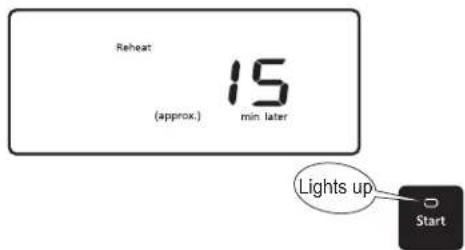
Press key twice successively and then press start key to start reheating.
After press [Keep warm/Reheat] key twice, the selected function flashes.
- No matter how much cooled rice to reheat, the heating time is about 15 minutes.
- Remaining time is shown in 1 minute decrements.
2
After the buzzer rings, cooking finishes, the function will automatically turn to keep warm status.
- Please loosen the rice as soon as possible, as it will be more delicious.
Timer
■Kind reminder
The function of timer does not apply to "Casserole", "Steam", "Soup", "Cake".
- When cooking glutinous rice and mixed rice, do not use the function of timer to avoid food deterioration or performance influence.
- In summer when temperature is high, the preset time should not be greater than 8 hours to avoid rice deterioration.
The time set in timer is the time when cooking ends.
The preset time and the cooking time for the last time can be memorized.
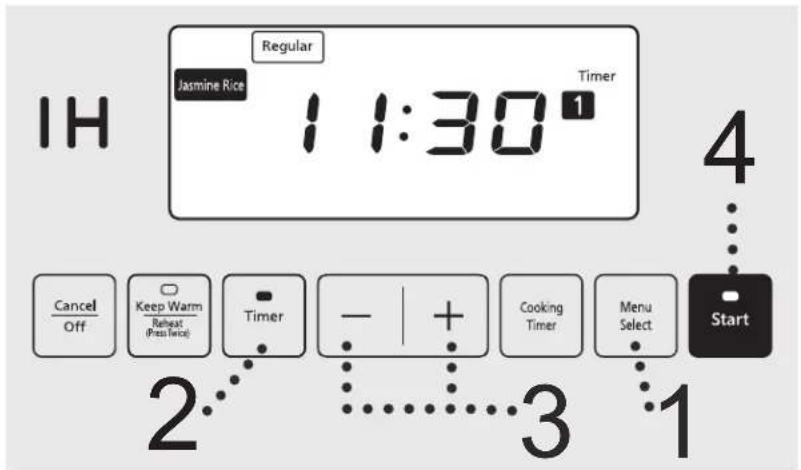
※When you want to use the "Timer1" function to complete the "Regular" of "Jasmine Rice" at 11:30
| First make sure the current time is correct. If it is not correct, please adjust it to the correct time. (P9) 1 Select a function according to the methods on P12~P13. •The selected function flashes. | Pearl Rice Regular Delicious Quick Limestone Rice 8:30 Press Brown Rice Casserole Congee Porridge Grain Coger Steam Soup Cake Start Flashes Start |
| Press key to select "Timer 1". When porridge timer is set, you need to set the cooking time according to Step 2 on P13, and then press the [Timer] key. If you press the [Timer] key first, you can press the [Cooking Timer] key to return to the cooking time setting mode. Each time you press the [Timer] key, Timer → Timer → Timer → will be displayed alternately. | Pearl Rice Regular Delicious Quick Limestone Rice 5:00 Press Brown Rice Casserole Congee Porridge Grain Coger Flashes Start |
| Press - + key to set the preset time. Every time the [+] or [-] key is pressed, the preset time will increase or decrease in 10 minutes increments. Press and hold the [+] or [-] key to quickly add or subtract time. When the preset time is less than the cooking time, cook will start directly. ※For the functions and time range which apply to timer, Table 2 on P11. | Pearl Rice Regular Delicious Quick Limestone Rice 1:30 Press Brown Rice Congee Porridge Grain Coger Flashes Start |
| Press key. To confirm congee cooking time under timer mode, please press [Cooking Timer] key. Under the timer status, press the [Timer] key to display the current time. | Regular 1:30 Lights up Lights off Start |
Cleaning and Maintenance
Attention
- Before cleaning, please unplug the power cord first. Do not clean the main body until it cools down.
- When cleaning the main body, do not immerse it into water, or clean it with lacquer thinner, gasoline, alcohol, cleaning powder or hard brush, etc.
- Do not use the dish washer or dish dryer.
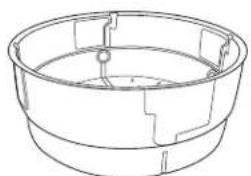
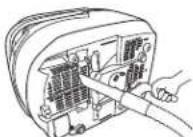
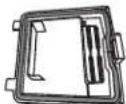
Inner lid
Wash with a mild dishwashing liquid.
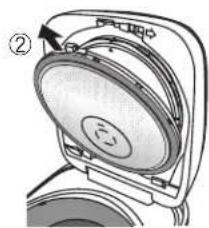
Disassembly
① Lever

Installation
① Move the lever to the right. (The inner lid will topple over toward the front direction.)
② Take out.
① Insert the inner lid into the slot. (Both sides)
② Press toward the lid until you hear a "click" sound.

Notes
- Please wash in time after using seasonings
(Casserole, mixed rice, etc.).
(Otherwise odor, deterioration or corrosion may be caused.)
Bottom sensor
Wipe with a damp cloth.
If the dirt is difficult to remove, wash with a mild dishwashing liquid, and then gently wipe a nylon brush.
Notes
If you do not clean the bottom sensor, the rice may get burnt or cooked badly.
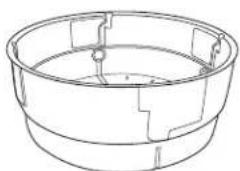
Upper frame/Pan supporting rubber (3 points)
Wipe with a damp cloth.
Notes
- Do not pour water in to wash.
The inner surface of the lid/Seal ring
Wipe with a damp cloth.
- Remove the steam cap (taste catcher), wipe the inner surface of the lid, installation location of the steam cap (taste catcher) and the seal ring.
- Do not pull the seal ring.
Pan
- Wash with a mild dishwashing liquid and soft sponge. Wipe off any water on the outside of the pan.
- Please do not use the pan as a container for cleaning.
Color change or stripes may appear on the fluoridized coating surface, which will not affect human health or normal functions of the main body
Steaming basket
Height adjustment
Place your thumb on the circle in the inner wall of the rotating portion, slightly raise up, then slightly turn counterclockwise, and let go your thumb. The steaming basket height will be deeper. To make the steaming basket lower, hold the bottom of the steaming basket with your palms, turn slightly clockwise, then hold upward, until you hear a "ba" sound.

Rotating portion

Fixed portion
Disassembling
When the steaming basket is in a lower state, make it upside down on the table, and firmly press its outside bottom until you hear a "ba" sound.
■Assembling
Align the bump on the outer periphery of the rotating portion to the slide groove of the inner wall of the fixed portion, then press firmly the inner bottom surface of the steaming basket until you hear a "ba" sound.


Accessories
Clean with diluted detergent and soft sponge.


Periodic inspection
Inspect about once a month, and wash immediately if there is dirt.
The bottom of the rice cooker
(Intake port/exhaust port)
Suck garbage and other foreign objects with a vacuum cleaner.

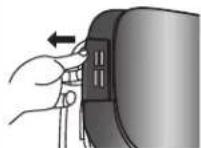
Steam Cap (Taste Catcher)
Remove and rinse.
Soup or oil tends to remain in the steam cap (taste catcher), so wash it with water after each use. (otherwise odor or deterioration may be caused.)

Disassembly
①Pull out from the lid. (Pull out horizontally in order to avoid the dripping of the steam condensation inside.)
② Press the tab to disassemble the steam cap (taste catcher).
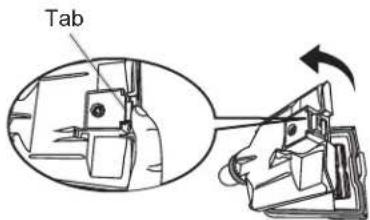
Installation (according to the order in reverse of the removal.)
①Insert A into B, and close the steam cap (taste catcher) until you hear a "click" sound.


②Insert into the lid. (a "click" sound is heard.)

Notes
- Do not remove the seal ring. (Otherwise steam leakage may be resulted.)
- If the seal ring is off, install it along the groove.
I ring.
Attention: Because of the different ingredients added into the rice, there may be scorched rice at the bottom.
- When cooking red bean congee, the red bean skin may block the steam cap (taste catcher),
further leading to the unexpected opening of the outer lid, so please be careful.
- While cooking white fungus soup which may become thick, use the "Congee" function, and the maximum cooking amount is the "Congee" maximum waterline so as not to overflow.
※1 cup (measuring cup): about 150 g.
Mixed rice
Ingredients:
Rice 1 cup
Fresh shiitake mushrooms 4, shredded
Shredded chicken 20g
Celery 15g
Water 1 cup
Seasonings:
Sesame oil 3 mL
Soy sauce 10 mL
Sugar 3 g
Salt 2 g
Dry starch 4g
Black pepper The right amount
Steps:
1) Wash the rice and pour it into the pan, and add 1 cup of water to soak for about 15 minutes.
2) After mixing all the seasonings, add shredded mushrooms, and shredded chicken, then spread evenly on rice of 1) and close the outer lid.
3) Press the [Menu Select] key and select "Casserole", then press the [Start] key.
4) After cooking is complete, press the [Cancel/Off] key. Open the outer lid, stir in celery, close the outer lid, and stew in residual heat for 5 minutes, then gently mix with the rice scoop.
Health porridge
Ingredients:
Rice 30g Black rice 20g
Glutinous 20g Red beans 30g
Millet 20g Green beans 30g
Seasonings:
Sugar The right amount
Steps:
1) Wash all the ingredients and put them into the pan.
2) Add water to the waterline "1" of "Congee", and close the outer lid.
3) Press the [Menu Select] key and select the "Grain Congee", set the cooking time to 2 hours, and then press the [Start] key.
4) When you hear the buzzer, the cooking is finished. (Appropriate amount of sugar can be added according to personal taste)
Note: You may add other ingredients according to your personal preferences (for example, barley, black beans, peanuts, corn, kidney beans, etc.).
For the ingredients difficult to cook porridge such as black beans, peanuts, and corn, please soak 4 hours first, and then set the cooking time to 3 hours.
Braised chicken wings
Ingredients:
Chicken wings 8
Onion 1/2, washed and sliced
Shiitake mushrooms 9
Ginger The right
Seasonings:
Shaoxing rice wine 20 mL Pepper oil 10 mL
Soy sauce 20 mL Pepper The right amount
Dark soy sauce 20~mL Sugar The right amount
amoutesame oil 10 mL
Steps:
1) Wash chicken wings, onion, shiitake mushrooms, slice onion, and cut chicken wings twice in the front and back to make them tasty.
2) After mixing all flavoring materials, put chicken wings in mix well and preserve for more than one hour.
3) Apply some oil in the bottom of the pan, and cover with a layer of ginger, and a layer of onions, then cover with a layer of shiitake mushrooms.
4) Put the chicken wings of 2) on the top, and pour the pickled spices evenly on the top, then close the outer lid.
5) Press the [Menu Select] key and select the "Steam"; set the cooking time to 20 minutes, and then press the [Start] key.
Pork short rib soup with tomato and potato
Ingredients:
Pork short ribs 400g
Potato
Tomato
Ginger
Scallion
Water 5 cups (about 900mL )
250
250
Several
Scallion
g
8
pieces
part
Seasonings:
Salt
7g
Steps:
1) Wash ribs and chop them into small pieces, cut long sections of scallions, slice ginger, cut tomato into pieces, peel potato and cut into small pieces.
2) Put ribs into the boiling water, and skim foam, drain and put them into the pan.
3) Use another pan, put a little oil, saute ginger and scallion, add tomato and potato, and fry slightly.
4) Add 5 cups of water and salt to 3), pour them into the pan after boiled, and then close the outer lid.
5) Press the [Menu Select] key and select the "Soup"; set the cooking time to 1 hour and 30 minutes, and then press the [Start] key.
Cake (made from cake premix)
Ingredients:
Cake premix 250g
Egg
1
Water or milk 100 mL
Butter or cooking oil A little
Steps:
1) Put cake premix, water or milk and eggs into the bowl and mix them well.
2) Apply some butter or cooking oil in the pan, then pour the cake batter of 1), and close the outer lid.
3) Press the [Menu Select] key and select the "Cake"; set the cooking time to 50 minutes, and then press the [Start] key.
4) When the buzzer sounds, it indicates that the cake has been baked.
5) Press the [Cancel/Off] key, remove the pan from the rice cooker and cool for 2 minutes, then invert the pan and put the cake onto a dish or plate. Wait it to cool and cut it to enjoy.
※ Please be careful not to pour the cake batter exceeding the specified weight, otherwise the cake will be half-baked.
Cake (made of low-gluten flour)
Ingredients:
Low-gluten flour 100g
3
Sugar 100g
Butter 30 g
Milk
25 mL
Steps:
1) Separate the egg yolk from the egg white and put them respectively in a bowl (without water and oil); add 20g of sugar in the egg yolk, and stir the sugar and egg yolk until they are smooth without particles.
2) Add 80g sugar into the egg white, and stir with a whisk until chopsticks can be upright in the egg white; add the egg yolk in the egg white, and stir well.
3) Gradually add the cake batter in sifted low-gluten flour, stir until it is smooth without particles.
4) Add the melted butter into the cake batter and stir until it is smooth without particles.
5) Add the milk into the cake batter and stir until it is smooth without particles.
6) Pour the cake batter into the pan, and close the outer lid.
7) Press the [Menu Select] key and select the "Cake"; set the cooking time to 50 minutes, and then press the [Start] key.
8) When the buzzer sounds, it indicates that the cake has been baked.
9) Press the [Cancel/Off] key, remove the pan from the rice cooker and cool for 2 minutes, then invert the pan and put the cake onto a dish or plate. Wait it to cool and cut it to enjoy.
*Please be careful not to pour the cake batter exceeding the specified weight, otherwise the cake will be half-baked.
Troubleshooting
Please check before requesting a repair.
| Symptom | Please check | Ref. page |
| Start cooking as soon as a timer is set | • Is the current time displayed correctly? (24-hour display) | 9 |
| • Is the preset time not within "Time range to preset"? | 11 | |
| Do not cook during preset time | • Is the current time displayed correctly? (24-hour display) | 9 |
| • Is the [Start] key pressed? | 17 | |
| Cooking time is long | • If cooking is made continuously, the cooking time will be longer. (May be extended up to 30 minutes) | — |
| • Due to the different amounts of rice and water, the remaining time display may be stopped for adjustment in the middle of cooking. | — | |
| • Is "U12" or "U15" displayed? | 24 | |
| Cooking time is short | • Due to the different amounts of rice and water, the remaining time display may be adjusted in the middle of cooking. | — |
| Make noise | • The "pu" sound is the sound given by fan to dissipate the heat during rotation. • The "grumble" sound is the sound given by IH (induction heating) during energizing. Sometimes you may hear these sounds during keep warm. | — |
| • The "xiu" sound is the sound of the steam ejection. | — | |
| Steam vapor leaks from a place other than the steam vent | • Is rice attached to the pan packing of the inner lid and along the pan, or is the pan deformed? | — |
| • Is the inner lid cleaned after each use, and correctly installed? | 18 | |
| Key operation can not be performed | • Are the indicator of the keys on? →Key operation can not be performed during cooking, timer or keep warm. Press the [Cancel/Off] key before operation. | — |
| • Are you wearing gloves or a plaster is on your finger when you are operating? | — | |
| When a power outage occurs during cooking | • End of cooking time may be delayed. • Depending on different outage duration, delicious rice may sometimes not be cooked. | — |
| Sparks occur from the power plug | • When plugging or pulling the power plug, small sparks may sometimes emerge. This is the inherent characteristics of IH (induction heating) mode, and is not a malfunction. | — |
| When the display disappears | • Is "8:30" displayed when the power plug is plugged in? (Display] lithium batteries are exhausted. Just plug in the power plug and you can cook and keep warm, but when you want to have a timer for cooking, you must check the current time every time. In this case, please replace them with new batteries. Batteries are fixed into the main body, and users cannot replace them by themselves. [Do not display] circuit board malfunction. →To replace batteries or for a faulty repair, please go to the Panasonic authorized service center. | — |
To be known
If you are careless to put water and rice into the main body without the pan, please consult the Panasonic authorized service center.
Troubleshooting
Please check before requesting a repair if it is not a failure.
Symptom Cause
Glutinous (soft)
Is the rice quantity and water volume correct?
- Is much broken rice mixed in?
- Is the rice immersed in water for a long time? (Preset time is too long, etc.) When using the timer function to cook, you need to put less water.
Is hot water used to wash rice?
Is rice loosened immediately after cooked?
- Is too much water added into new rice to cook?
Dry (hard)
Is the rice quantity and water volume correct?
Is "Quick" function used to cook?
Porridge is mushy
- Is rice soaked in water for a long time when timer cooking is set?
Is porridge kept warm?
Rice is scorched
Is rice washed adequately?
- Is there any foreign object at the bottom of the pan, on the bottom sensor and inside the main body?
Is timer cooking set?
Is much broken rice mixed in?
- Are spices added for cooking? (Casserole, mixed rice, etc.)
- Yellowish paste formed on the bottom of the pan is not a malfunction.
If it is not improved after the above has been confirmed, refer to "To improve scorched rice" (P25).
Condensation Odor Rice is yellow
Is rice loosened immediately after cooked?
- Has rice been keep warm for a time longer than 12 hours?
- Is cooled rice added into the inner pan and keep warm?
Is rice washed adequately?
Is the rice scoop placed during keep warm?
- Due to the different types of rice or water quality, cooked rice might be yellowish.
It may smell when you cook casserole, mixed rice with seasonings.
Carefully clean the pan, inner lid and steam cap (taste catcher).
Rice is dry
- Has rice been keep warm for a time longer than 12 hours?
Is reheating repeated many times?
Is the steam cap (taste catcher) mounted correctly? - Is rice attached to the pan seal ring of the inner lid and along the pan, or is the inner pan deformed?
Rice sticks onto the inner pan
- Due to the different varieties of rice, soft rice and glutinous rice might easily stick the pan.
A thin film is formed
Is bran remained?
Rice paper-like film is a result of the dry starch dissolution, and it is harmless; the rice which is not washed cleanly is likely to generate such a thin film.
Cooked rice has bumpy surface
-
Did you make the surface of rice smooth before cooking?
-
The powerful firepower of IH (induction heating) caused this. This is not an anomaly.
Under the following circumstances, rice tends to have uneven surface.
-
When rice has not been sufficiently washed.
-
When a lot of broken rice is mixed in.
- When rice has been broken due to excessive force used to wash it.
Error Messages
Please check before requesting a repair.
| Error display Plea | ck | Ref. page |
| u 10 | ·Has the pan being set? →Press the [Cancel/Off] key until the error display disappears. Put the dedicated pan in, and perform the operation again. | - |
| u 12 | ·Is any foreign object attached to the bottom of the pan or the bottom sensor? →Please remove foreign objects and dirt, and then press the [Cancel/Off] key. ·Is water too much? →Press the [Cancel/Off] key. (For continuous cooking, you can slightly reduce the amount of water) | 7 |
| u 14 | ·Keep warm duration over 96 hours? →Please press [Cancel/Off] key. | - |
| u 15 | ·Is the outer lid open? ·Is the steam cap (taste catcher) mounted? →If it is lost, please consult a Panasonic authorized service center. You can still cook without the steam cap (taste catcher), but ①Rice taste will deteriorate. (Rice will become dry during keep warm) ②Water may overflow when boiled. ③“U15” may be displayed again when cooking is finished. ④This may cause congee or porridge unable to be properly cooked. ·Is there any foreign object or oil dirt inside the steam cap (taste catcher)? →Wash it thoroughly before it is installed. | 12 |
| u 25 | ·Has any dust or other foreign object clogged the intake port and the exhaust port at the bottom of the rice cooker? →Remove dust according to the following steps. ①Press the [Cancel/Off] key, and then unplug the power plug. ②Remove the inner pan until the rice cooker cools down. ③Clear the dust in the intake port/exhaust port at the bottom of the rice cooker. (189) ·Is the rice cooker used on the carpet? →Do not use the rice cooker where the bottom of the rice cooker may be clogged. | - |
If the rice cooker is still not back to normal after the above is confirmed, go to the Panasonic authorized service center for repair.
| H | Try to unplug the power plug and plug it in again. If “H※※” still appears, then there is a fault. →Please consult the Panasonic authorized service center, and inform the error code (two digits after “H”). | - |
How to optimize the unit
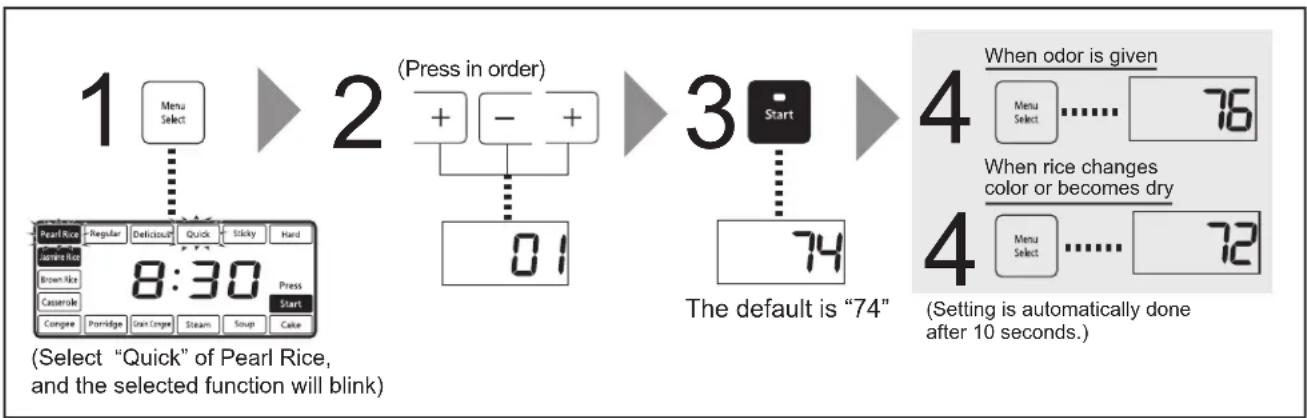
To change the temperature of keep warm (default temperature is 74)
- When the rice keeping warm has odor, please change to "76"; when it changes color or is drying, change to "72". (74 76 72)
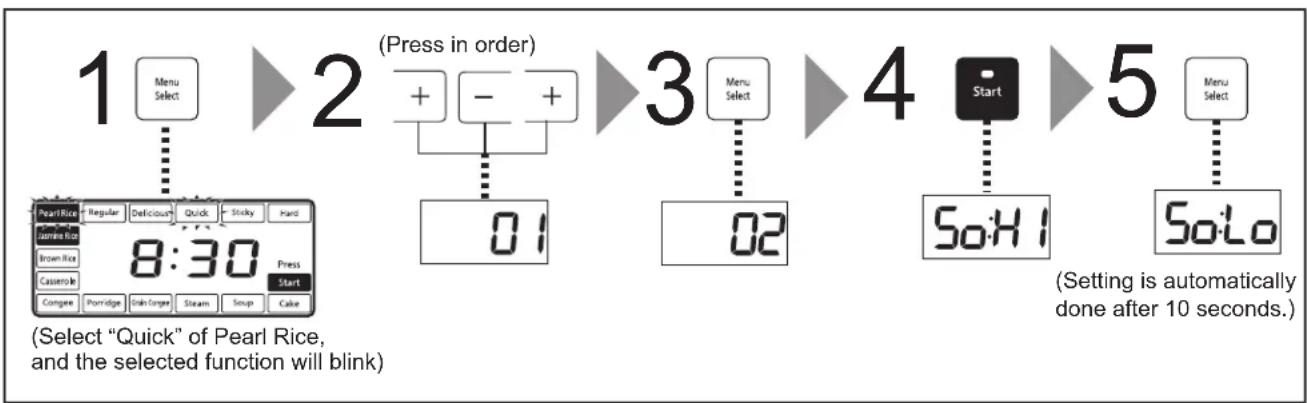
To improve scorched rice
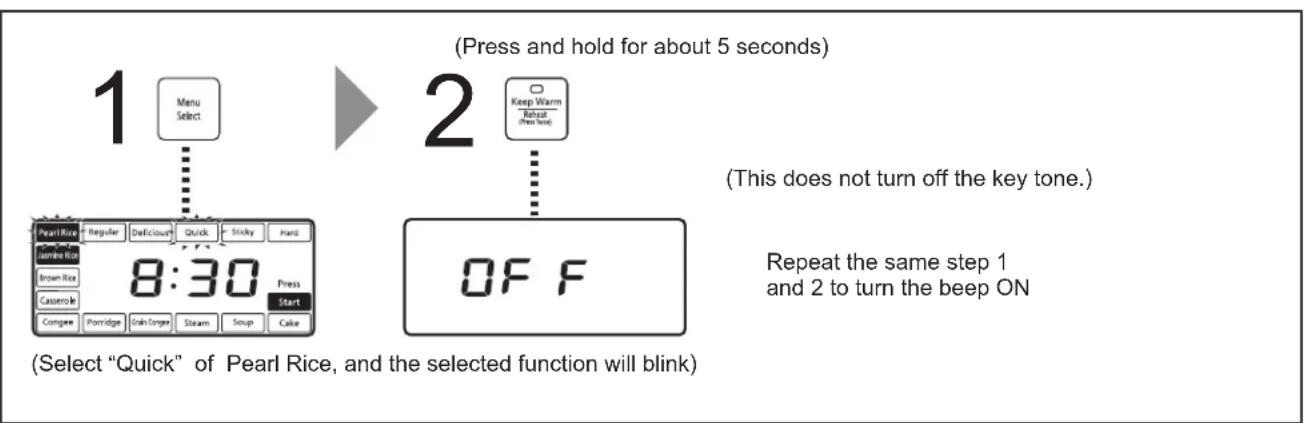
To eliminate the beep during cooking, reheat (end the beep)
Specifications
| Model No. | SR-AFG186 | |||
| Power supply/Rated frequency | 120 V 69 Hz | |||
| Rated power | 1370 W | |||
| Cooking quantity (Rice) L | Pearl Rice | Regular | 0.18 ~ 1.8 [1 ~ 10 cups] | |
| Delicious | ||||
| Quick | ||||
| Sticky | ||||
| Hard | ||||
| Jasmine Rice | Regular | 0.18 ~ 1.8 [1 ~ 10 cups] | ||
| Delicious | ||||
| Quick | ||||
| Brown Rice | 0.18 ~ 1.08 [1 ~ 6 cups] | |||
| Casserole | 0.36 ~ 1.08 [2 ~ 6 cups] | |||
| Congee cooking volume (rice quantity) L | Congee•Grain Congee | 0.09 ~ 0.36 [1/2 ~ 2 cups] | ||
| Porridge | 0.09 ~ 0.27 [1/2 ~ 11/2 cups] | |||
| Maximum cooking volume (ingredients + water) for soup L | 2.6*1 | |||
| Maximum weight (Approx.) of cake batter (g) | 900 | |||
| Power cord length (Approx.) m | 1.2 | |||
| Weight (Approx.) kg | 6.4 | |||
| Size (Approx.) cm | Width | 27.4 | ||
| Depth | 35.0 | |||
| Height | 24.5 (47.5*2) | |||
- (※1) Indicates the cooking capacity at the Maximum waterline of "Congee".
- (※2) It indicates the product height when opening the outer lid.
- The power consumption is about 1.0W in the standby mode. (When connecting power plug)
Riz 30g
Gluant 20g
Millet 20g
Championons shiitakes 9
Gingembre
Quantité adéquate
Assaisonnements:
Lamerican Association of Pediatricians and Surgeons
Destella

m = 311
1
m = 311
Star
This appliance has been tested and found to comply with Part 18 of the FCC Rules. These limits are designed to provide reasonable protection against harmful interference in a residential installation. Any changes or modifications not expressly approved by the party responsible for compliance could void the user's authority to operate this equipment.
Operation is subject to the following two conditions: (1) This appliance may not cause harmful interference, and (2) this appliance must accept any interference received, including interference that may cause undesired operation.
Declaration of Conformity
Trade Name: Panasonic
Model Numbers: SR-AFG186
Responsible Party: Panasonic Corporation of North America
Two Riverfront Plaza, Newark, NJ 07102-5490
Support Contact: http://shop/panasonic.com/support/
Panasonic Canada Inc.
5770 Ambler Drive, Mississauga, Ontario L4W 2T
Web site/Site Web: www.panasonic.com
Panasonic Appliances Rice Cooker (Hangzhou) Co.,Ltd.
Web site: http://panasonic.net/
© Panasonic Corporation 2016
RZ19AJ23
S1016-0
Printed in China
Imprimé en Chine
Limited Warranty (ONLY FOR U.S.A.)
Panasonic Products Limited Warranty
Limited Warranty Coverage (For USA Only)
If your product does not work properly because of a defect in materials or workmanship, Panasonic Consumer Electronics Company (referred to as "the warrantor") will, for the length of the period indicated on the chart below, which starts with the date of original purchase ("warranty period"), at its option either (a) repair your product with new or refurbished parts, (b) replace it with a new or a refurbished equivalent value product, or (c) refund your purchase price. The decision to repair, replace or refund will be made by the warrantor.
| Product or Part Name Labor | Parts | |
| .Ry 1 | ||
| Large Capacity Rice Cookers (SR-42 series) | 6 Months | 6 Months |
During the "Labor" warranty period there will be no charge for labor. During the "Parts" warranty period, there will be no charge for parts.
This warranty only applies to products purchased and serviced in the United States. This warranty is extended only to the original purchaser of a new product which was not sold "as is".
Mail-In Service - Online or Telephone Repair Request
Online Repair Request
To submit a new repair request, and for quick repair status visit our Web Site at: http://shop.panasonic.com/support
When shipping the unit, carefully pack and send it prepaid in the original (or supplied) carton. Include a letter detailing the complaint along with the bill of sales and provide a daytime phone number where you can be reached. A valid registered receipt is required under the Limited Warranty. When shipping Lithium Ion batteries please visit our web site at http://shop.panasonic.com/support as Panasonic is committed to providing the most up to date information.
IF REPAIR IS NEEDED DURING THE WARRANTY PERIOD, THE PURCHASER WILL BE REQUIRED TO FURNISH A SALES RECEIPT/PROOF OF PURCHASE INDICATING DATE OF PURCHASE, AMOUNT PAID AND PLACE OF PURCHASE. CUSTOMER WILL BE CHARGED FOR THE REPAIR OF ANY UNIT RECEIVED WITHOUT SUCH PROOF OF PURCHASE.
Limited Warranty Limits And Exclusions
This warranty ONLY COVERS failures due to defects in materials or workmanship, and DOES NOT COVER glass, plastic parts, temperature probes (if included) and normal wear and tear or cosmetic damage. The warranty ALSO DOES NOT COVER damages which occurred in shipment, or failures which are caused by products not supplied by the warrantor, or failures which result from accidents, misuse, abuse, neglect, bug infestation, mishandling, misapplication, alteration, faulty installation, set-up adjustments, maladjustment of consumer controls, improper maintenance, power line surge, lightning damage, modification, or commercial use (such as in a hotel, office, restaurant, or other business), rental use of the product, service by anyone other than a factory service center or other authorized servicer, or damage that is attributable to acts of God.
THERE ARE NO EXPRESS WARRANTY EXCEPT AS LISTED UNDER "LIMITED WARRANTY COVERAGE".
THE WARRANTY OR IS NOT LIABLE FOR INCIDENTAL OR CONSEQUENTIAL DAMAGES RESULTING FROM THE USE OF THIS PRODUCT, OR ARISING OUT OF ANY BREACH OF THIS WARRANTY. (As examples, this excludes damages for lost time, travel to and from the servicer, loss of or damage to media or images, data or other memory or recorded content. The items listed are not exclusive, but for illustration only.)
ALL EXPRESS AND IMPLIED WARRANTYES, INCLUDING THE WARRANTY OF MERCHANTABILITY, ARE LIMITED TO THE PERIOD OF THE LIMITED WARRANTY.
Some states do not allow the exclusion or limitation of incidental or consequential damages, or limitations on how long an implied warranty lasts, so the exclusions may not apply to you.
This warranty gives you specific legal rights and you may also have other rights which vary from state to state. If a problem with this product develops during or after the warranty period, you may contact your dealer or Service Center. If the problem is not handled to your satisfaction, then write to:
Consumer Affairs Department
.ry 1 secnailponkonic Corporation of North America
661 Independence Pkwy
Chesapeake, VA 23320
PARTS AND SERVICE, WHICH ARE NOT COVERED BY THIS LIMITED WARRANTY, ARE YOUR RESPONSIBILITY.
Shop
Accessories!
for all your Panasonic gear
Go to
http://shop.panasonic.com/support
Get everything you need to get the most out of your Panasonic products
Accessories & Parts for your Camera, Phone, A/V products, TV, Computers & Networking, Personal Care, Home Appliances, Headphones, Batteries, Backup Chargers & more...
Customer Services Directory
For Product Information, Operating Assistance, Parts, Owner's Manuals, Dealer and Service info go to http://shop.panasonic.com/support
For the hearing or speech impaired TTY: 1-877-833-8855
As of June 2015

Panasonic Canada Inc.
5770 Ambler Drive, Mississauga, Ontario L4W 2T3
PANASONIC PRODUCT - LIMITED WARRANTY
Panasonic Canada Inc. warrants this product to be free from defects in material and workmanship under normal use and for a period as stated below from the date of original purchase agrees to, at its option either (a) repair your product with new or refurbished parts, (b) replace it with a new or a refurbished equivalent value product, or (c) refund your purchase price. The decision to repair, replace or refund will be made by Panasonic Canada Inc.
| Category Service type Parts Labour | ||
| Induction Rice Cooker Carry-in 2 Year 2 Year |
In-home Service will be carried out only to locations accessible by roads and within 50km of an authorized Panasonic service facility.
This warranty is given only to the original purchaser, or the person for whom it was purchased as a gift, of a Panasonic brand product mentioned above sold by an authorized Panasonic dealer in Canada and purchased and used in Canada, which product was not sold "as is", and which product was delivered to you in new condition in the original packaging.
IN ORDER TO BE ELIGIBLE TO RECEIVE WARRANTY SERVICE HEREUNDER, A PURCHASE RECEIPT OR OTHER PROOF OF DATE OF ORIGINAL PURCHASE, SHOWING AMOUNT PAID AND PLACE OF PURCHASE IS REQUIRED
LIMITATIONS AND EXCLUSIONS
This warranty ONLY COVERS failures due to defects in materials or workmanship, and DOES NOT COVER normal wear and tear or cosmetic damage. The warranty ALSO DOES NOT COVER damages which occurred in shipment, or failures which are caused by products not supplied by Panasonic Canada Inc., or failures which result from accidents, misuse, abuse, neglect, mishandling, misapplication, alteration, faulty installation, set-up adjustments, misadjustment of consumer controls, improper maintenance, power line surge, lightning damage, modification, introduction of sand, humidity or liquids, commercial use such as hotel, office, restaurant, or other business or rental use of the product, or service by anyone other than a Authorized Servicer, or damage that is attributable to acts of God.
THIS EXPRESS, LIMITED WARRANTY IS IN LIEU OF ALL OTHER WARRANTYES, EXPRESS OR IMPLIED, INCLUDING ANY IMPLIED WARRANTYES OF MERCHANTABILITY AND FITNESS FOR A PARTICULAR PURPOSE. IN NO EVENT WILL PANASONIC CANADA INC. BE LIABLE FOR ANY SPECIAL, INDIRECT OR CONSEQUENTIAL DAMAGES RESULTING FROM THE USE OF THIS PRODUCT OR ASING OUT OF ANY BREACH OF ANY EXPRESS OR IMPLIED WARRANTY. (As examples, this warranty excludes damages for lost time, travel to and from the Authorized Servicer, loss of or damage to media or images, data or other memory or recorded content. This list of items is not exhaustive, but for illustration only.)
In certain instances, some jurisdictions do not allow the exclusion or limitation of incidental or consequential damages, or the exclusion of implied warranties, so the above limitations and exclusions may not be applicable. This warranty gives you specific legal rights and you may have other rights which vary depending on your province or territory.
WARRANTY SERVICE
PRODUCT OPERATION ASSISTANCE
For product information and operation assistance, please visit our Support page:
www.panasonic.ca/english/support
PRODUCT REPAIRS
Please locate your nearest Authorized Servicentre: help.panasonic.ca/english/support/servicentrelocator/default.asp
IF YOU SHIP THE PRODUCT TO A SERVICENTRE
Carefully pack and send prepaid, adequately insured and preferably in the original carton.
Include details of the defect claimed, and proof of date of original purchase.
Panasonic Canada Inc.
5770, Ambler Drive, Mississauga (Ontario) L4W 2T3