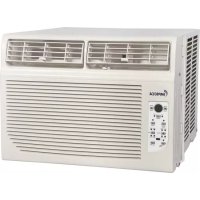
MNIWA06NR - Air Conditioning Impecca - Free user manual and instructions
Find the device manual for free MNIWA06NR Impecca in PDF.


| Product Type | Window Air Conditioner |
| Brand | Impecca |
| Model | MNIWA06NR |
| Power Supply | 115 V, 60 Hz (standard estimate) |
| Cooling Power | Not specified |
| Operating Modes | Cool, Dry, Fan |
| Fan Speed | High, Medium, Low |
| Remote Control Included | Yes (depending on model) |
| Timer | Yes (delayed off and on) |
| Display | LCD (temperature and timer) |
| Air Filter | Washable (regular cleaning recommended) |
| Installation | Double-hung window, width 58.4 to 91.4 cm, minimum vertical opening 36.8 cm |
| Restart Protection | Yes (3-minute delay) |
| Maintenance | Clean the filter and exterior with a soft dry cloth |
| Spare Parts | Contact Impecca technical service |
| Customer Service | Phone: +1 866.954.4440, website: www.impeccausa.com |
| Country of Manufacture | Not specified |
Frequently Asked Questions - MNIWA06NR Impecca
User questions about MNIWA06NR Impecca
0 question about this device. Answer the ones you know or ask your own.
Ask a new question about this device
Download the instructions for your Air Conditioning in PDF format for free! Find your manual MNIWA06NR - Impecca and take your electronic device back in hand. On this page are published all the documents necessary for the use of your device. MNIWA06NR by Impecca.
USER MANUAL MNIWA06NR Impecca
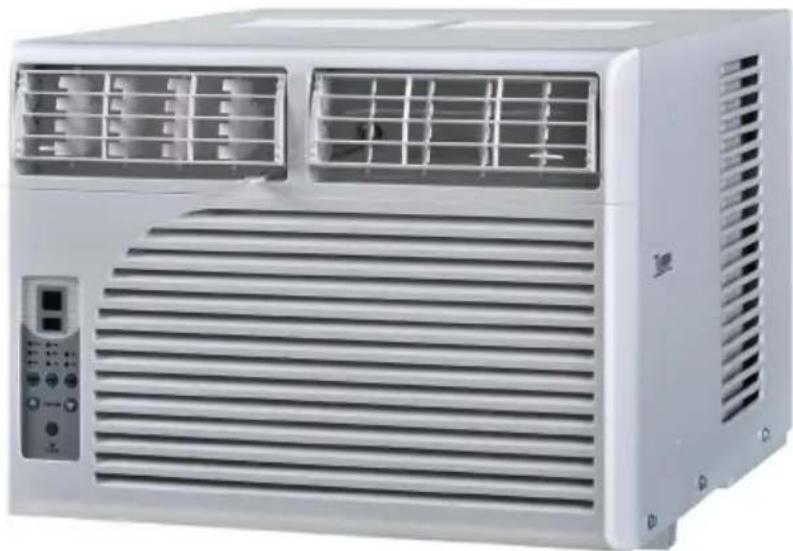
Window Air Conditioner—User Manual Aire acondicionado—Manual de usuario Climatiseur de fênetre—Mode d'emploi
Models N°: IWA-06NR, IWA-08NR, IWA-10NR
Read the following notices and information carefully to ensure proper operation of your air conditioner unit.
This manual is solely provided for informational purposes and in no way constitutes a legally binding document between the manufacturer, distributor, and end consumer.
Thank you for purchasing this quality Impecca window-mounted air conditioner unit. To ensure the longest life and highest energy efficiency of your unit, please have it installed by a qualified service technician and carefully follow these operating instructions. Keep these instructions in a safe place and consult them as needed.
Please note that constant enhancement and improvements to our air conditioning units may mean that your model will slightly differ in appearance from the model pictured in this manual, but the actual operation and installation of the unit remains unchanged.
SAFETY NOTICE:
This appliance should not be used by children or mentally/physically disabled persons without strict, direct supervision by a responsible adult. Never play with or around the appliance.
IMPORTANT INFORMATION
Read the following notices and information carefully to ensure proper operation of your air conditioner unit.
IMPORTANT INSTALLATION GUIDELINES
Ensure that a qualified and authorized technician performs the air conditioning unit installation.
- Do not install the units in areas with potential gas leaks and around inflammable substances. Areas without proper ventilation are hazardous and can cause fires.
- Ensure that your unit is connected to a circuit breaker with the amperage that corresponds to the electrical current required to operate your air conditioning unit. Improper electrical systems can lead to electrical shock, electrocution, or fire hazards.
- Ensure the unit is properly grounded. Improper grounding can lead to electrical shock, electrocution, or fire hazards.
SAFETY WARNINGS
- Do not stop unit operation by pulling the power cable out of the plug. Electrical shock, unit damage, and fire hazards may result in addition to other accidents.
- Connect your unit directly to a properly grounded wall-mount electrical socket. Never connect the unit with an extension cable or outlet splitter of any kind, which may result in electrical shock, overheating, fire hazards, or other accidents.
-
Do not press, stretch, kink, damage, heat, deform, or modify the power cable in any way. Doing so may result in electrical shock, electrocution, overheating, fire hazard, or other accidents. Should your units power cable be damaged in any way, contact technical support immediately for a replacement solution.
-
Do not operate the unit with wet or damp hands. Doing so may result in electric shock, electrocution, or other accidents.
- Ensure the power receptacle and unit plug are free of dust, rust, and other corrosion before connecting the unit. Failure to do so may lead to electrical shock, electrocution, fire hazards, or other accidents.
- Do not use the unit with underrated fuses, circuit breakers, or electrical wiring. An insufficient electrical system can result in unit failure, unit damage, unit performance issues, electrical shock, electrocution, fire hazards, or other accidents.
- Never place the unit near open-flames or burners as the operation of the unit can create a fire hazard or induce a lack of oxygen in confined spaces.
- Never place flammable objects near the air conditioning unit such as insecticides, paint, spray paint, or other aerosols. Never spray products on the unit as it may result in fire hazards or other accidents.
- Never insert sticks or other foreign objects into the unit. The rotating blades may break and cause bodily damage and result in fire hazards or other accidents.
- Do not wash the air conditioner unit with water or other liquids. Instead, use a dry dusting cloth. Should the unit surfaces be exceptionally dirty, use a cloth slightly dampened with warm, soapy water. May result in electrical shock, electrocution, fire hazards, or other accidents.
- Never use the following types of substances on the unit to avoid deformation, damage, and fire/electrical hazards: hot water (over 100° F/ 40° C), gasoline, paint thinners, benzene, kerosene, detergents, corrosives, or abrasives.
- Do not let the cooled air blow directly on your body, as it may result in personal discomfort or be harmful to your health such as inducing hypothermia in hot climates.
- Should your unit remain unused for a prolonged period of time, please turn the unit power off and then disconnect the power cable to ensure safety.
- Should an operating abnormality arise (such as a burning smell), stop the unit IMMEDIATELY, then disconnect the power cable and contact technical support.
ENERGY EFFICIENCY
- Avoid direct sunlight in the cooled space; lower shades, curtains, and blinds to ensure high unit performance.
- Reduce and remove heat sources from the room during cooling such as desktop computers, electronics, and cooking appliances.
IMPORTANT MAINTENANCE/DISPOSAL INFORMATION
- Contact technical support to ensure any necessary unit maintenance is performed by a qualified and authorized technician.
- Your unit should be disposed of in accordance to local laws and regulations. Please contact your municipality or local disposal authorities for further information on proper disposal.
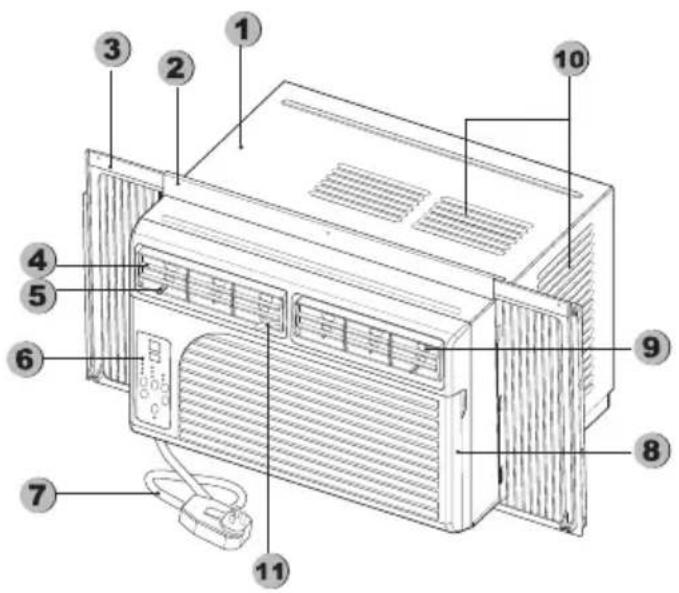
UNIT FEATURES
- Metal cabinet
- Upper guide
- Curtain (window filler)
- Up/down directional air blades
- Left/right directional air blades
- Control panel
- Power cord
- Front grille
- Left/right directional air blades
- Air intake
- Fresh Air/External air intake (optional, not on all units)
ELECTRONIC CONTROL PANEL
NOTE: The visual appearance of your control panel may differ significantly; rest assured that the functionality remains identical.
1. Digital display
Fan mode: indicates present room temperature Cool/Dry mode: indicates desired temperature Timer mode: indicates the remaining time
NOTE: if the temperature sensor fails, the display will continuously read 77° F or 25° C
2. Remote Control sensor
3. Operating mode
The current operating mode is indicated by the adjacent LEDs.
4. Timer button
Press this button while the unit is running to program a shutdown time set using the up and down arrow buttons. Press this button while the unit is in standby mode to program a startup time set using the up and down arrow buttons.
5. Speed button
Choose the fan speed rate between High, Medium, and Low.
6. Mode button
Select the unit operating mode between Cool, Dry, and Fan.
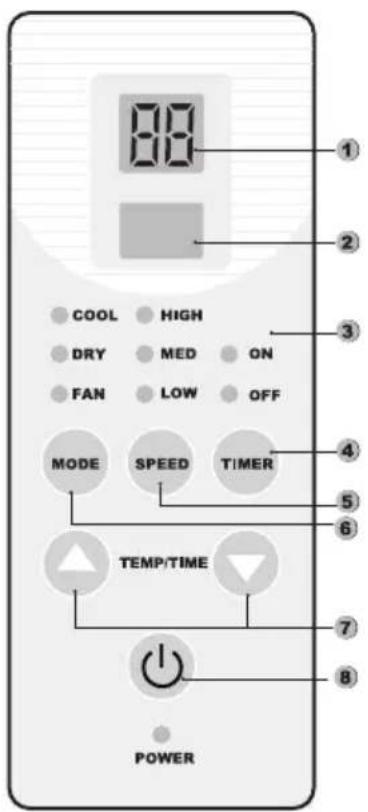
7. Temp/Time button
While the device is continuously operating, press this button to adjust the programmed room temperature using the up and down arrow buttons.
8. On/Off button
Turn the unit on or off. The power indicator LED illuminates when the device is powered on.
REMOTE CONTROL USE
NOTE: Only select models include a remote control.
REMOTE CONTROL FUNCTIONS
1. +/- Button
Increase or decrease the room temperature or set the timer duration after pressing the timer button.
2. Signal transmission window
Do not obstruct the IR transmitter to ensure your air conditioning unit responds to commands from the remote.
3. Cool button
Press this button to activate the cooling mode on your unit.
4. Dry button
Press this button to activate the dehumidification mode on your unit.
5. Fan button
Press this button to activate the fan on your unit to create air circulation without using the cooling compressor or dehumidifier.
6. On/off button
Turn the unit on or stop operation and turn the unit off.
7. Timer button
Press this button while the unit is running to program a shutdown time set using the up and down arrow buttons.
Press this button while the unit is in standby mode to program a startup time set using the up and down arrow buttons.
8. L-Fan button
Change the unit fan speed to a low, gentle output.
9. M-Fan button
Change the unit fan speed to a medium output.
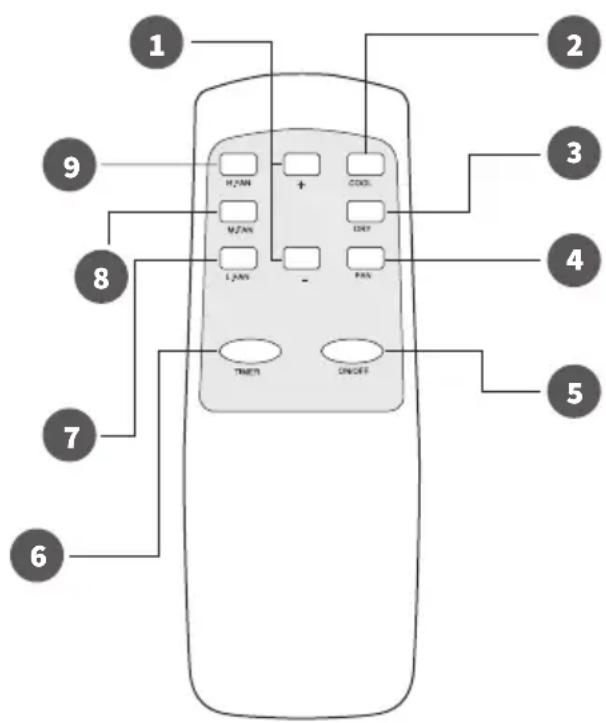
10. H-Fan button
Change the unit fan speed to a high, intense output.
POINTING THE REMOTE CONTROL
Point your remote control directly toward the control panel of your air conditioner unit. The device will emit a “beep” indicating that the command was received. If your unit does not respond to the remote control unit, ensure the batteries are correctly inserted (polarity, or the direction of the +/- symbols) or insert new batteries.
INSERTING BATTERIES
To insert batteries into the remote control, press firmly and slide the cover on the back side gently in the direction of the arrow. Insert the batteries while paying close attention to the polarity (the direction of the +/- symbols). Replace the back cover carefully.
NOTE: never mix battery types such as using an old and new battery or a lithium or rechargeable battery with an alkaline battery.
REMOTE CONTROL SAFETY INFORMATION
- Never place the remote control near a heat source such as an electric blanket, a space heater, or in direct sunlight.
- Avoid accidentally dropping the remote control
- Do not place objects that block or interfere with the infrared remote control signals.
- Do not splash water or other liquids on the remote control
- Do not place heavy objects on the remote control.
- Do not stand, sit, or bear unnecessary weight on the remote control.
- Replace batteries as needed, such as when the air conditioner unit does not respond to the remote control unit.
- Remove batteries when the remote control unit will be unused for prolonged periods of time.
- Dispose of batteries and the remote control in accordance with local laws and recycling instructions. Contact your municipality or waste management company for further information.
INSTALLATION INSTRUCTIONS
NOTE: This air conditioner unit must be installed by a qualified technician or service professional. Alternative or self-installation may void your warranty and result in unit damage and/or the risks and hazards described in the beginning of this manual. Contact technical support if you need contact information for an authorized technician.
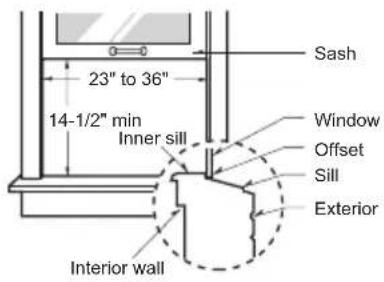
This air conditioner is designed for installation in a standard double-hung sash windows with a width of 23" to 36" (58.4 cm to 91.4 cm).
The lower sash must open sufficiently to allow a clear, vertical opening of 14.5" (36.8cm). Side louvers and the rear air conditioner have sufficient space for heat removal and proper air flow through the condenser unit. The rear of the unit MUST be outdoors, not inside a warehouse or garage space.
INSTALLATION HARDWARE
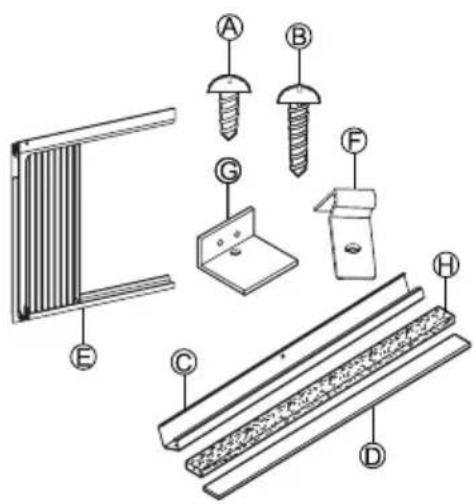
Before performing the installation, please verify that all installation pieces are present by comparing the parts inventory below with the diagram (see figure 2). You must have a Phillips screwdriver available to perform the installation.
| PART DESCRIPTION QTY | ||
| A Short screws 8 | ||
| B Wood screws 12 | ||
| C Upper guide 1 | ||
| D Insert strip 1 | ||
| E Curtain 2 | ||
| F | Curtain lock | 2 |
| G | Sash lock | 2 |
| H Foam seal | 1 | |
INSTALLATION POSITION
Determine what room or area you would like to cool; windows used for the installation must be strong enough to bear the air conditioner unit weight. Correct installation will ensure a long, useful unit life.
STEP 1: UPPER GUIDE
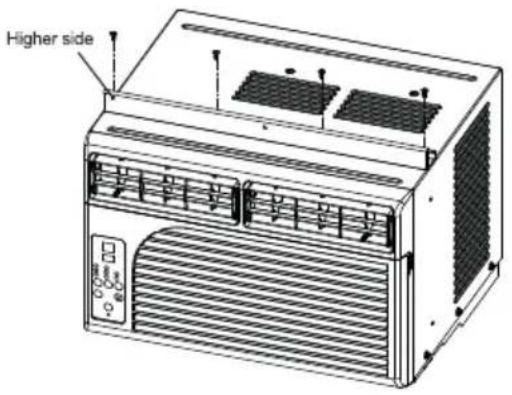
- Remove the air conditioner and upper guide (Part C) from the package and place them upright on a flat surface.
- Align the hole in the upper guide with the holes on the unit
- Fasten the upper guide to the unit with the short screws (Part A).
NOTE: The "higher side" of the upper guide will face the interior.
STEP 2: CURTAIN (WINDOW FILLER)
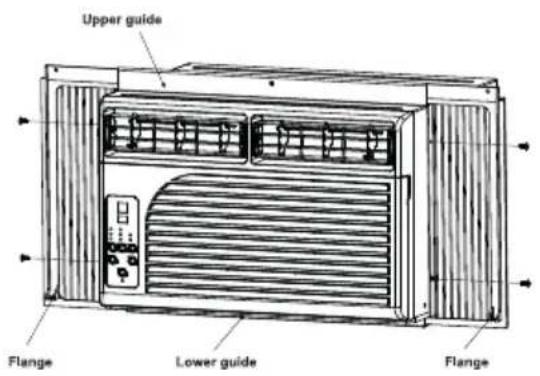
- Insert the side curtains (Part E) into the upper and lower guides of the air conditioner unit and fasten them to the unit with the short screws (Part A). The curtains are side-specific; ensure the left and right curtains are attached to the correct side.
NOTE: The upper guide and the curtains are offset to place the unit at the proper angle in the rear and ensure proper water condensation and drainage.
STEP 3: PLACING THE UNIT INTO THE WINDOW
- Carefully lift the air conditioner unit and place it into the open window so the base of the unit rests on the window sill. Carefully lower and close the window behind the upper guide. Ensure that all curtains and guides are inside the room and not blocked into the window sill or frame.
STEP 4: SECURELY FASTEN THE AIR CONDITIONER
- Extend the curtain panels to fill the window opening.
- Place the curtain lock (Part F) between the curtain extensions and the window sill. Insert the locking wood screws (Part B) through the sash lock and into the window sill.
- Secure the left and right flanges on the unit base with the locking wood screws (Part B)
- Drive locking wood screws (Part B) through the upper frame holes into the window sash.

- Attach the sash lock between the upper and lower window sashes and fasten with a locking wood screw (Part B) to ensure that the window can't accidentally be opened and prevent the unit from falling.
- Cut the foam sash seal (Part H) to fit the width of the window and insert in the space between the upper and lower window sash to prevent air and insects from coming through into the room.
- Plug in the unit to a grounded wall outlet.
- Check the unit control panel and remote control
- Start cooling operations and check for any abnormal sounds. If the unit produces a strange noise, turn the unit off and unplug it immediately. Consult the troubleshooting guide at the end of the manual and contact technical support if a solution is not provided or does not resolve the issue.
SPECIAL INSTALLATION FOR A STORM WINDOW
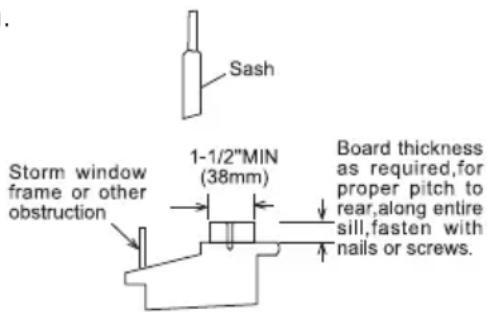
- Remove the storm window before unit installation.
- If the storm window frame can not be removed, ensure that the drain holes or slots are not obstructed by caulk, paint, dirt, or other substances/objects to ensure proper drainage of the air conditioner unit.
REMOVAL INSTRUCTIONS
To remove your air conditioning unit, follow these instructions:
- Turn the unit off and unplug the power cord.
- Remove the sash seal from the windows and unscrew the sash lock.
- Unscrew the curtain lock and remove the screws placed in the curtains.
- Close side curtain panels toward the unit
- While maintaining a firm grip on the air conditioning unit, raise the upper sash and carefully tilt the unit backwards to drain any condensation water at the base of the unit.
- Store the unit in a flat, dry, level place and include all installation parts and this manual with the unit.
IMPORTANT: Before performing any maintenance, ensure the air conditioner unit is turned off and disconnect the power cord from the outlet.
BEFORE FIRST SEASONAL USE
- Check to see if any objects such as leaves and branches are obstructing the air intake and outlets, both inside and outside.
- Check to see if the installation base is rusty or corroded.
- Ensure the electrical outlet is properly grounded.
- Check the air filter screen and clean as needed.
- Connect the power cord to a grounded electrical outlet.
- Insert batteries into your remote control.
DURING REGULAR OPERATION
- Remove the air filter screen by gently holding and pressing the lower ends of the front grille and pulling open. Lift the air filter and pull toward you.
- Clean the air filter screen with lukewarm water and air-dry. Do not expose the filter or screen to direct sunlight!
- Reinsert the filter screen
- Clean the unit with a soft, dry cloth or a vacuum cleaner. Use a cloth dampened with lukewarm, soapy water to remove excessive dirt.
AFTER THE LAST SEASONAL USE
- Dry out the interior of the unit by setting the temperature to 86° F and running in cooling mode for half a day.
- Turn the unit off and unplug the power cable.
- Clean the air filter screen and reinsert it.
- Clean the unit on both the indoor and outdoor sides.
- Remove the batteries from the remote control to avoid battery leakage.
NOTE: It's important to regularly clean the air filter unit as heating and cooling performance is significantly affected by a dirty filter. Dirty filters also substantially increase energy consumption (your electric bill) and the unit is noisier during operation.
Investigate the following possible causes:
THE AIR CONDITIONER DOES NOT FUNCTION AT ALL
- Is the power cable properly inserted into a functioning, grounded outlet?
- Is there a power failure such as a blown fuse or tripped circuit breaker?
- Is the timer set to «TIMER ON» mode? Disable the timer to immediately start operations.
- Is the ambient temperature lower than 61° F ( 16° C)? A safety device prevents the unit from cooling the room to even lower temperatures.
HEATING OR COOLING IS INSUFFICIENT
- Is the room temperature set properly?
- Is the air filter dirty?
- Are doors or windows open in the room?
- Is the room directly exposed to sunlight?
- Are there heat sources within the room?
- Are there a large number of people in the room?
REMEDIES
THE AIR CONDITIONER DOES NOT RESTART IMMEDIATELY AFTER TURNING IT OFF.
The unit can not be restarted for 3 minutes to allow the condenser to cool and avoid risk of fire. Wait a few minutes before restarting the unit.
FOG IS BLOWN OUT DURING COOLING
In warm, high humidity environments this may naturally occur. Continued cooling will remove excess humidity from the room and the fog will disappear.
THE UNIT EMITS A STRANGE SMELL
This may be caused by cigarette smoke or other residues from cooking and other living activities that remain in the air conditioning unit. Clean the filter.
THERE IS A «SQUEEZING» NOISE
The cycling of the refrigerant inside the unit can temporarily cause this noise.
THERE IS A «PATTING» NOISE
This is often caused by heat expansion in the plastic parts.
THE REMOTE CONTROL DOESN'T WORK
Ensure the remote control has a clear line-of-sight to the operating panel on the unit and ensure the sensors are not obstructed by curtains or other objects. Ensure the remote control has fresh, working batteries.
THERE IS MOISTURE/CONDENSATION AT THE AIR EXHAUST
High humidity environments may cause condensation at the air flow output. Wipe the condensation off with a sponge.
If any of the following phenomena occur despite the above troubleshooting techniques, please turn off the unit and disconnect the power cord immediately and contact technical support or a qualified technician:
- The fuse blows or circuit breaker trips frequently.
- The power cable is abnormally hot.
- The insulation of the power cable is ripped, shred or torn.
- The unit controls do not work.
- The unit produces abnormal noises.
CONTACT TECHNICAL SUPPORT
24/7 Online: www.impeccausa.com
Telephone: +1 866.954.4440
9am to 5pm EST
INTRODUCCIÓN:
PANEL DE CONTROL ELECTRÓNICO
INSTRUCCIONES PARA DESINSTALAR
PANNEAU DE CONTRÔLE ÉLECTRONIQUE
MATÉRIEL D'INSTALLATION
POSITION D'INSTALLATION
ÉTAPE 2: RIDEAU (ISOLER LA FENÊTRE)
INSTRUCTIONS D'ENLÈVEMENT
PANNEAU DE CONTRÔLE ÉLECTRONIQUE
MATÉRIEL D'INSTALLATION
POSITION D'INSTALLATION
ÉTAPE 2: RIDEAU (ISOLER LA FENÊTRE)
INSTRUCTIONS D'ENLÈVEMENT


- WINDOW AIR CONDITIONER—USER MANUAL AIRE ACONDICIONADO—MANUAL DE USUARIO CLIMATISEUR DE FÊNETRE—MODE D'EMPLOI
- SAFETY NOTICE
- IMPORTANT INFORMATION
- IMPORTANT INSTALLATION GUIDELINES
- SAFETY WARNINGS
- ENERGY EFFICIENCY
- IMPORTANT MAINTENANCE/DISPOSAL INFORMATION
- UNIT FEATURES
- ELECTRONIC CONTROL PANEL
- DIGITAL DISPLAY
- REMOTE CONTROL SENSOR
- OPERATING MODE
- TIMER BUTTON
- SPEED BUTTON
- MODE BUTTON
- TEMP/TIME BUTTON
- ON/OFF BUTTON
- REMOTE CONTROL USE
- REMOTE CONTROL FUNCTIONS
- BUTTON
- SIGNAL TRANSMISSION WINDOW
- COOL BUTTON
- DRY BUTTON
- FAN BUTTON
- L-FAN BUTTON
- M-FAN BUTTON
- H-FAN BUTTON
- POINTING THE REMOTE CONTROL
- INSERTING BATTERIES
- REMOTE CONTROL SAFETY INFORMATION
- INSTALLATION INSTRUCTIONS
- INSTALLATION HARDWARE
- INSTALLATION POSITION
- STEP 1: UPPER GUIDE
- STEP 2: CURTAIN (WINDOW FILLER)
- STEP 3: PLACING THE UNIT INTO THE WINDOW
- STEP 4: SECURELY FASTEN THE AIR CONDITIONER
- SPECIAL INSTALLATION FOR A STORM WINDOW
- REMOVAL INSTRUCTIONS
- BEFORE FIRST SEASONAL USE
- DURING REGULAR OPERATION
- AFTER THE LAST SEASONAL USE
- THE AIR CONDITIONER DOES NOT FUNCTION AT ALL
- HEATING OR COOLING IS INSUFFICIENT
- REMEDIES
- THE AIR CONDITIONER DOES NOT RESTART IMMEDIATELY AFTER TURNING IT OFF
- FOG IS BLOWN OUT DURING COOLING
- THE UNIT EMITS A STRANGE SMELL
- THERE IS A «SQUEEZING» NOISE
- THERE IS A «PATTING» NOISE
- THE REMOTE CONTROL DOESN'T WORK
- THERE IS MOISTURE/CONDENSATION AT THE AIR EXHAUST
- IF ANY OF THE FOLLOWING PHENOMENA OCCUR DESPITE THE ABOVE TROUBLESHOOTING TECHNIQUES, PLEASE TURN OFF THE UNIT AND DISCONNECT THE POWER CORD IMMEDIATELY AND CONTACT TECHNICAL SUPPORT OR A QUALIFIED TECHNICIAN
- CONTACT TECHNICAL SUPPORT
- INTRODUCCIÓN
- PANEL DE CONTROL ELECTRÓNICO
- INSTRUCCIONES PARA DESINSTALAR
- PANNEAU DE CONTRÔLE ÉLECTRONIQUE
- MATÉRIEL D'INSTALLATION
- POSITION D'INSTALLATION
- ÉTAPE 2: RIDEAU (ISOLER LA FENÊTRE)
- INSTRUCTIONS D'ENLÈVEMENT
Brand : Impecca
Model : MNIWA06NR
Category : Air Conditioning