NB150 ICE - Effect machine Eurolite - Free user manual and instructions
Find the device manual for free NB150 ICE Eurolite in PDF.
| Product type | Ground smoke machine |
| Brand | Eurolite |
| Model | NB150 ICE |
| Category | Effect machine |
| Power supply | 230 V / 50 Hz |
| Output power | 1500 W |
| Emission range | Approximately 5 m |
| Heating time | Approximately 10 min |
| Liquid tank capacity | 2 L |
| Dimensions (L x W x H) | 680 x 415 x 350 mm |
| Weight | 21 kg |
| Fuse | F 8 A, 250 V |
| Ice tank | Yes, to cool the smoke and create a heavy smoke effect |
| Control functions | Timer (adjustable intervals and duration), Manual, Continuous, DMX-512, Multifunction remote control with LCD screen |
| DMX protocol | 1 channel: smoke volume (0-255) |
| Connections | DMX IN/OUT (XLR 3-pin), Remote Control IN/OUT (XLR 5-pin), Mains |
| Cleaning | Regularly clean the output nozzle and heating element with a special cleaning fluid |
| Safety | Minimum distance of 50 cm from nozzle, do not point at people or flames, disconnect before filling and maintenance |
| Recommended fluid | High-quality water-based smoke fluid (e.g. EUROLITE smoke fluid "P" Profi) |
| Usage | Indoor use only, on a flat and water-resistant surface |
Frequently Asked Questions - NB150 ICE Eurolite
User questions about NB150 ICE Eurolite
0 question about this device. Answer the ones you know or ask your own.
Ask a new question about this device
Download the instructions for your Effect machine in PDF format for free! Find your manual NB150 ICE - Eurolite and take your electronic device back in hand. On this page are published all the documents necessary for the use of your device. NB150 ICE by Eurolite.
USER MANUAL NB150 ICE Eurolite
MULTI-LANGUAGE-INSTRUCTIONS
SAFETY INSTRUCTIONS 14
OPERATING DETERMINATIONS 15
DESCRIPTION OF THE DEVICE 16
Features 16
Overview 16
Installation 17
Connection with the mains 17
OPERATION 18
LCD-Display 18
Description of the functions 19
Timer mode 19
Manual mode 19
Continuous fogging 20
Controlling several devices via one remote-control 20
DMX-512 control 20
Addressing 21
DMX-protocol 21
CLEANING AND MAINTENANCE 21
Cleaning the heating element 21
Replacing the fuse 22
TECHNICAL SPECIFICATIONS 22
François
INTRODUCTION 23
INSTRUCTIONS DE SECURITE 23
EMPLOI SELON LES PRESCRIPIONS 24
DESCRIPTION DE L'APPAREIL 25
Features 25
Apercuedes parties 25
MISE EN SERVICE 26
Montage 26
Alimentation 26
MANIEMENT 27
Affichage LCD 27
Continuous fogging 28
This user manual is valid for the article numbers 51701983
You can find the latest update of this user manual in the Internet under:
Keep this device away from rain and moisture! Unplug mains lead before opening the housing!
For your own safety, please read this user manual carefully before you initially start-up.
Every person involved with the installation, operation and maintenance of this device has to
- be qualified
- follow the instructions of this manual
- consider this manual to be part of the total product
- keep this manual for the entire service life of the product
- pass this manual on to every further owner or user of the product
- download the ultimate version of the user manual from the Internet
INTRODUCTION
Thank you for having chosen a EUROLITE NB-150 ICE. If you follow the instructions given in this manual, we are sure that you will enjoy this device for a long period of time.
Unpack your NB-150 ICE.
Before you initially start-up, please make sure that there are no transport damages. Should there be any, do not take the device into operation and immediately consult your dealer.
SAFETY INSTRUCTIONS
CAUTION!
Be careful with your operations. With a dangerous voltage you can suffer a dangerous electric shock when touching the wires!
This device has left our premises in absolutely perfect condition. In order to maintain this condition and to ensure a safe operation, it is absolutely necessary for the user to follow the safety instructions and warning notes written in this user manual.

Important:
Damages caused by the disregard of this user manual are not subject to warranty. The dealer will not accept liability for any resulting defects or problems.
English
If the device has been exposed to drastic temperature fluctuation (e.g. after transportation), do not switch it on immediately. The arising condensation water might damage your device. Leave the device switched off until it has reached room temperature.
This device falls uner protection-class I. The power plug must only be plugged into a protection class I outlet.
Always plug in the power plug last. Make sure that the power-switch is set to OFF position before you connect the device to the mains.
Never let the power-cord come into contact with other cables! Handle the power-cord and all connections with the mains with particular caution!
Make sure that the available voltage is not higher than stated on the rear panel.
Make sure that the power-cord is never crimped or damaged by sharp edges. Check the device and the power-cord from time to time.
CAUTION! Before filling the machine disconnect from mains.
Never drink fluid or use it on the inside or outside of a human body. If fluid gets in contact with skin or eyes, rinse thoroughly with water. If it is necessary call a doctor immediately!
DANGER OF EXPLOSION! Never add flammable liquids of any kind to the fog liquid.
Keep device upright.
Never aim the output nozzle directly at people or at open flames.
DANGER OF BURNING! Keep minimum distance of 50 cm to nozzle!
Always disconnect from the mains, when the device is not in use or before cleaning it. Only handle the power-cord by the plug. Never pull out the plug by tugging the power-cord.
Unnused machines must be disconnected from the mains. If the power plug or the power switch is not accessible, the device must be disconnected via the mains.
Keep away children and amateurs!
Never leave this device running unattended.
OPERATING DETERMINATIONS
This device is a smoke-machine for creating a thick smoke made of a special smoke fluid. This product is only allowed to be operated with an alternating voltage of 230V , 50Hz and was designed for indoor use only.
Do not shake the device. Avoid brute force when installing or operating the device.
When choosing the installation-spot, please make sure that the device is not exposed to extreme heat, moisture or dust. There should not be any cables lying around. You endanger your own and the safety of others!
Before filling the device disconnect from mains. Never fill in any hot liquids.
Only use high-quality, water-based smoke fluid recommended by the manufacturer. Other smoke fluids may cause clogging.
Always make sure there is sufficient smoke fluid in the fluid tank. Operating this smoke-machine without smoke fluid will cause damage to the pump as well as over-heating of the heater.
English
Operate the device only after having familiarized with its functions. Do not permit operation by persons not qualified for operating the device. Most damages are the result of unprofessional operation!
Always store the device dry!
Always drain the tank and please use the original packaging if the device is to be transported.
Please consider that unauthorized modifications on the device are forbidden due to safety reasons!
Never remove the serial barcode from the device as this would make the guarantee void.
If this device will be operated in any way different to the one described in this manual, the product may suffer damages and the guarantee becomes void. Furthermore, any other operation may lead to dangers like short-circuit, burns, electric shock, etc.
DESCRIPTION OF THE DEVICE
Features
Universal Floor Fogger
Stand-alone smoke-machine with fluid-tank • The smoke is cooled down and "converts" it into floor smoke • No need for special fluid • With Volume/Timer remote control
Overview
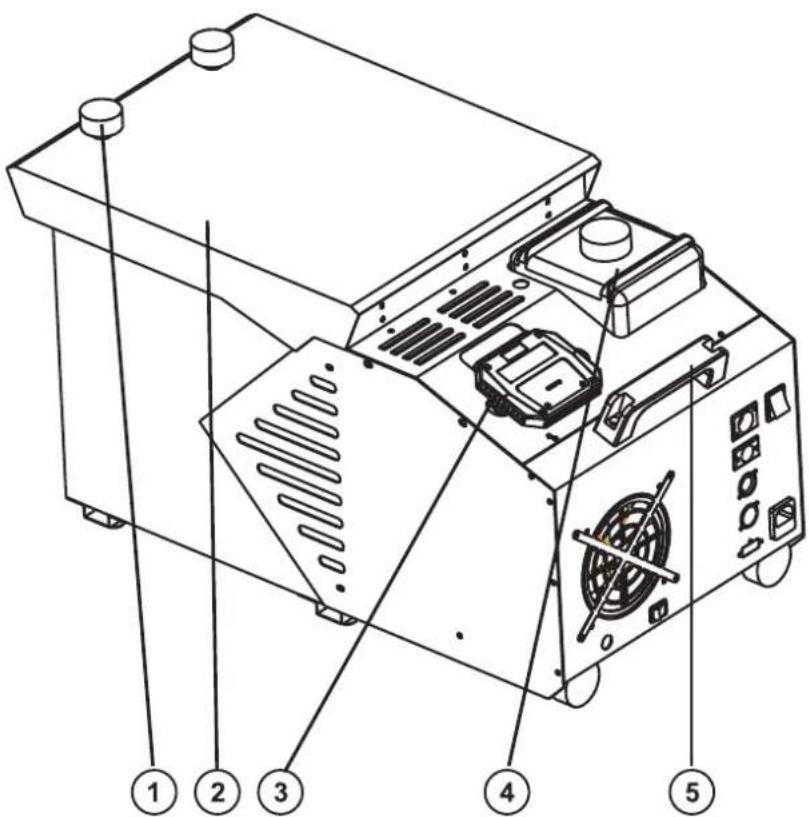
(1) Fixation screw
(2) Ice tank
(3) Remote holder
(4) Fluid tank
(5) Handle
English
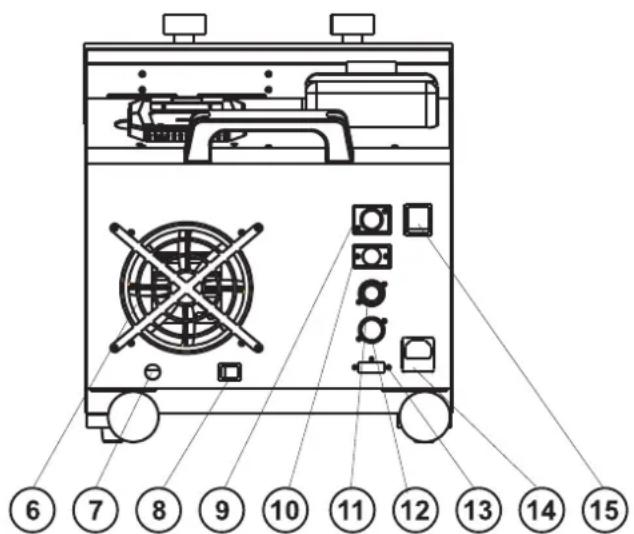
(6) Ventilation fan
(7) Drain tap
(8) Drain switch
(9) Remote control IN
(10) Remote control OUT
(11)DMX IN
(12) DMX OUT
(13) DIP-switches
(14) Power supply and fuse
(15) Power switch
STARTING OPERATION
Install the device on a plane surface.
The fluid tank of the device needs to be filled with smoke fluid before starting up operation and always disconnected from the mains as fluid could be spilled.
Only use quality smoke fluids available at your dealer. We recommend high-quality Eurolite smoke fluids (e.g. EUROLITE Smoke Fluid "P" Profi, 1 l). You must not use substances that are classified as "dangerous working material" or "inflammable fluids".
If fluid should get into the interior of the device, disconnect from mains immediately and consult a technician.
Fill the chamber with regular ice cubes.
Firmly attach the included tube to the drainage outtake. Connect the end of the tube to the drainage container.
When the chamber is filled, gently put the cover back and tighten with the fixation screw.
Firmly attach the remote control cable to the proper input on the rear of the machine.
Attention: Drain the water in regular intervals (ca. every 45 minutes).
Installation
Install the device in a well-ventilated area. The operation in an unsufficiently ventilated room can lead to a condensation of the smoke fluid. The resulting slippery surface can cause accidents. Keep a minimum distance of 20~cm around and above the device.
Furthermore do not orientate the escape nozzle directly in the direction of the audience's eyes. In order to create a good effect, there should be a distance between the device and the audience of at least 1.5m
Only install the smoke-machine on scratch resistant and water resistant surfaces.
This device is only constructed for a standing installation.
Connection with the mains
Connect the device to the mains with the power-plug.
The occupation of the connection-cables is as follows:
| Cable Pin International |
| Brown Live L |
| Blue Neutral N |
| Yellow/Green Earth |
The earth has to be connected!
If the device will be directly connected with the local power supply network, a disconnection switch with a minimum opening of 3mm at every pole has to be included in the permanent electrical installation.
The device must only be connected with an electric installation carried out in compliance with the IEC-standards. The electric installation must be equipped with a Residual Current Device (RCD) with a maximum fault current of 30mA .
OPERATION
Connect the remote control with the Remote Control-socket. Switch the device on via the power switch.
LCD-Display
NU5E40 DE HEAT
01 01 0164 oH
After a certain warm-up time, the device is ready to operate. When the machine is ready for fogging, the display shows "OK" below the display line HEAT. By pressing the Output-button on the remote control the smoke emission starts. It may happen that the display below the line HEAT flashes. In this case the device is heating up again and will be ready to operate in approx. 1-2 min. This process guarantees an appropriate vaporization temperature and the best smoke emission possible. The temperature is regulated by a high quality thermostat.
The remote control's interface allows the operator to customize fog machine functions by adjusting fogging duration, interval and volume. Its LCD displays current operating parameters, which are automatically stored in non-volatile memory, allowing the machine to be powered down without losing function settings. Instructions below:
Description of the functions
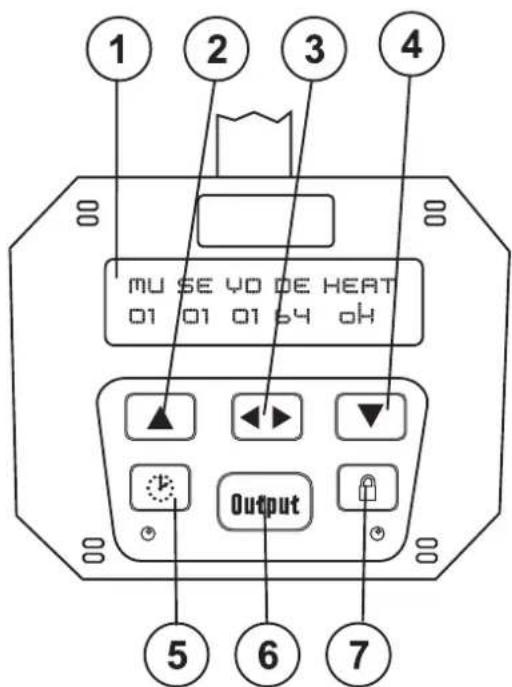
Description of the elements:
(1) LCD-display
(2) Up-button
(3) Function-button
(4) Down-button
(5) Timer-button
(6) Output-button
(7) Continuous-button
After the machine starts heating up, the display below HEAT flashes. When the machine is ready for fogging, the display shows "OK".
Via the Function key, you can move in the menu. Press the Function-key until the value of the desired function starts flashing. Via the Up/Down buttons, you can adjust the desired function values or change the selection. In this way, you can adjust the functions of the smoke-machine the best way to the requirements of the user. The individual functions are described in the following.
| LCD-display Function | ||
| Timer mode | MU 01-99 (minutes) | Adjust the interval between each fog emission |
| SE 01-99 (seconds) | Adjust the duration of each fog emission | |
| VO 01 minimum - 10 maximum | Adjust the output volume | |
| Manual mode | DE 01-99 (seconds) | Adjust the duration of each fog emission |
| Heating phase | HEAT flashing = heating phase Ok = ready | Display of heating phase |
Timer mode
By pressing the Timer-button, the device works with the adjusted settings (MU, SE and VO). The green LED below the Timer-button shows that the Timer-function is activated. If you wish to deactivate the Timer-function, press the Timer-button again.
Manual mode
By pressing the Manual-button, the fog emission is immediately triggered with the duration adjusted under "DE". The Manual-mode is automatically stopped after the duration you defined or by pressing the Manual-button again.
Continuous fogging
By pressing the Continuous-button, the device produces continued fog. The continued fog is only interrupted by necessary heating pauses. The green LED below the Continuous-button shows that the Continuous-function is activated. If you wish to deactivate the Continuous-function, press the Continuous-button again.
CAUTION: The escape nozzle will heat up during operation. Therefore do not touch the nozzle until it has cooled down completely.
Controlling several devices via one remote-control
You can control several NX-150 with one remote-control. If two or more device are connected, they will work similarly.
Only use a stereo shielded cable and 5-pin XLR-plugs and connectors in order to connect one device with another.
Connect the Remote Control with the Remote Control-input of the first device. Connect the Remote Control-output of the first device with the Remote Control-input of the next device. Always connect one output with the input of the next device until all devices are connected.
DMX-512 control
The wires must not come into contact with each other, otherwise the devices will not work at all, or will not work properly.
Please note, the starting address depends upon which controller is being used.
Only use a stereo shielded cable and 3-pin XLR-plugs and connectors in order to connect the controller with the device or one device with another.
Occupation of the XLR-connection:
DMX-output
XLR mounting-socket:
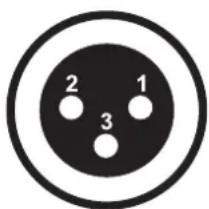
1: Ground
2: Signal (-)
3: Signal (+)
DMX-input
XLR mounting-plug:
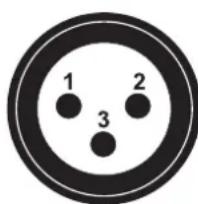
1: Ground
2: Signal (-)
3: Signal (+)
If you are using controllers with this occupation, you can connect the DMX-output of the controller directly with the DMX-input of the first device in the DMX-chain. If you wish to connect DMX-controllers with other XLR-outputs, you need to use adapter-cables.
Building a serial DMX-chain:
Connect the DMX-output of the first device in the DMX-chain with the DMX-input of the next device. Always connect one output with the input of the next device until all devices are connected.
Caution: At the last device, the DMX-cable has to be terminated with a terminator. Solder a 120 Ω resistor between Signal (-) and Signal (+) into a 3-pin XLR-plug and plug it in the DMX-output of the last device.
Addressing
Each device occupies 1 channel. To ensure that the control signals are properly directed to each device, the device requires addressing. This is to be done for every single device by changing the DIP switches as set out in this table.
The starting address is defined as the first channel from which the device will respond to the controller.
Please make sure that you don't have any overlapping channels in order to control each device correctly and independently from any other device on the DMX data link. If two, three or more devices are addressed similarly, they will work similarly.
Occupation of the DIP-switches:
| Setting the DMX-starting address: | DIP-switch no. | 1 | 2 | 3 | 4 | 5 | 6 | 7 | 8 | 9 | |
| Device number & channels | Starting address | 1 | 2 | 4 | 8 | 16 | 32 | 64 | 128 | 256 | |
| Device 1 - channel 1 | On | ▲ | |||||||||
| Off | ◇ | ◇ | ◇ | ◇ | ◇ | ◇ | ◇ | ◇ | |||
| Device 2 - channel 2 | On | ▲ | |||||||||
| Off | ◇ | ◇ | ◇ | ◇ | ◇ | ◇ | ◇ | ◇ | |||
| Device 3 - channel 3 | On | ▲ | ▲ | ||||||||
| Off | ◇ | ◇ | ◇ | ◇ | ◇ | ◇ | ◇ | ||||
| Device 4 - channel 4 | On | ▲ | |||||||||
| Off | ◇ | ◇ | ◇ | ◇ | ◇ | ◇ | ◇ | ◇ | |||
| Device 5 - channel 5 | On | ▲ | ▲ | ||||||||
| Off | ◇ | ◇ | ◇ | ◇ | ◇ | ◇ | ◇ | ||||
Controlling:
After having addressed all devices, you may now start operating these via your controller.
DMX-protocol
Channel 1 - Fog volume
| DMX-value: Volume (%) | |
| 0 - 255 | Gradual adjustment of the fog volume from 0 to 100 % |
CLEANING AND MAINTENANCE
Disconnect from mains before starting maintenance operation!
We recommend a frequent cleaning of the device. Please use a soft lint-free and moistened cloth. Never use alcohol or solvents!
Clean the escape nozzle frequently from smoke fluid residues. Clean out debris with vinegar and a pipe cleaner, making sure that the hole is free of clogs.
Cleaning the heating element
The heating element should regularly be cleaned every 30 operational hours in order to avoid clogging. Use smoke-machine cleaner available at your dealer.
Procedure:
Fill cleaner into empty tank. Run the machine several times in a well-ventilated room only. The number of repetitions depends on the pollution level of the vaporizing elements. After use clean all remaining cleaner and rinse the tank thoroughly with distilled water.
English
The EUROLITE smoke fluids we recommend are non-hazardous to the environment and can be disposed of via the sewage system.
There are no servicable parts inside the device except for the fuse. Maintenance and service operations are only to be carried out by authorized dealers.
Replacing the fuse
If the fine-wire fuse of the device fuses, only replace the fuse by a fuse of same type and rating.
Before replacing the fuse, unplug mains lead.
Procedure:
Step 1: Unscrew the fuseholder on the rearpanel with a fitting screwdriver from the housing (anticlockwise).
Step 2: Remove the old fuse from the fuseholder.
Step 3: Install the new fuse in the fuseholder.
Step 4: Replace the fuseholder in the housing and fix it.
Should you need any spare parts, please use genuine parts.
If the power supply cable of this device will be damaged, it has to be replaced by authorized dealers only in order to avoid hazards.
If defective, please dispose of the unusable device in accordance with the current legal regulations.
Should you have further questions, please contact your dealer.
TECHNICAL SPECIFICATIONS
| Power supply: 230 V/50 Hz |
| Power consumption: 1500 W |
| Smoke-output: approx. 5 m |
| Warm-up time: approx. 10 min. |
| Tank capacity: 2 l |
| Dimensions (LxWxH): 680 x 415 x 350 mm |
| Weight: 21 kg |
| Fuse: T 6.3 A, 250 V |
Please note: Every information is subject to change without prior notice. 28.03.2008 ©
euroliteGERMANY