
the Smart Waffle BWM620 - Cupcake maker BREVILLE - Free user manual and instructions
Find the device manual for free the Smart Waffle BWM620 BREVILLE in PDF.

| Product Type | Smart Waffle Maker |
| Brand | Breville |
| Model | the Smart Waffle BWM620 |
| Color | Stainless Steel |
| Dimensions (approx.) | 33 x 23 x 12 cm |
| Weight (approx.) | 3.0 kg |
| Power Supply | 110/120 V, 60 Hz, 1000 W |
| Number of Waffles per Batch | 1 (2 cavities) |
| Number of Browning Settings | 12 (from light to dark) |
| Cook Programs | Classic, Belgian, Buttermilk, Chocolate, Custom |
| Plate Type | Cast aluminum with PFOA-free non-stick coating |
| Display | LCD with countdown timer |
| Features | Auto preheat, A Bit More (extend cooking), timer restart |
| Safety | Auto shut-off, cool-touch handles, AssistMC plug |
| Care & Cleaning | Wipe plates with soft cloth after each use; do not immerse; do not use metal utensils |
| Spare Parts | Not provided by manufacturer; cooking plate not removable |
| Usage | Household use only |
| Warranty | See manufacturer's conditions |
| Included Accessories | Instruction booklet, online recipe book |
Frequently Asked Questions - the Smart Waffle BWM620 BREVILLE
User questions about the Smart Waffle BWM620 BREVILLE
0 question about this device. Answer the ones you know or ask your own.
Ask a new question about this device
Download the instructions for your Cupcake maker in PDF format for free! Find your manual the Smart Waffle BWM620 - BREVILLE and take your electronic device back in hand. On this page are published all the documents necessary for the use of your device. the Smart Waffle BWM620 by BREVILLE.
USER MANUAL the Smart Waffle BWM620 BREVILLE
Breville Consumer Service Center
USA
Mail: Breville USA
19400 S. Western Ave
Torrance CA
90501-1119
Phone: 1-866-273-8455
1-866-BREVILLE
Email: askus@brevilleusa.com
Canada
Mail: Breville Canada
Breville is a registered trademark of Breville Pty. Ltd. A.B.N. 98000 092 928.
Copyright Breville Pty. Ltd. 2013.
Due to continued product improvement, the products illustrated/photographed
in this booklet may vary slightly from the actual product.
BWM620XL/BWM640XL-B13
Breville®
the Smart Waffle™
on the purchase of your Breville product
Register online for product support and exclusive offers.*
USA Consumers: www.brevilleusa.com
Canadian Consumers: www.breville.ca
CONTENTS
4 Breville recommends safety first
6 Know your Breville product
8 Operating your Breville product
10 Care & cleaning
13 Recipes
At Breville we are very safety conscious. We design and manufacture consumer products with the safety of you, our valued customer, foremost in mind. In addition we ask that you exercise a degree of care when using any electrical appliance and adhere to the following precautions.
IMPORTANT SAFEGUARDS

READ ALL INSTRUCTIONS BEFORE USE AND SAvE FOR FUTURE REFERENCE
- Do not touch hot surfaces. Use handles or knobs. Always use oven mitts.
- To protect against electrical shock do not immerse cord, plugs, or this appliance in water or any other liquid.
- Close supervision is necessary when any appliance is used by or near children.
- Unplug from outlet when not in use and before cleaning. Allow to cool before adding or removing parts, and before cleaning the appliance.
- Do not operate any appliance with a damaged cord or plug or after the appliance malfunctions, or has been damaged in any other manner. Immediately cease use and call Breville Consumer Support for examination, repair or adjustment.
- The use of accessory attachments not recommended by Breville may cause injuries.
- Do not use outdoors.
- Do not let the cord hang over the edge of tables, counters, or touch hot surfaces.
- Do not place on or near a hot gas or electric burner, or in a heated oven.
- Do not touch hot surfaces. Appliance surfaces are hot during and after operation. To prevent burns or personal injury, always use protective hot pads or insulated oven mitts, or use handles or knobs where available.
-
Extreme caution must be used when moving an appliance containing hot oil or other liquids.
-
To disconnect, turn the control to the OFF position, then remove plug from wall outlet.
- Do not use appliance for other than intended use.
- The appliance is not intended to be operated by means of an external timer or separate remote-control system.
AddITIONAL SAFEGUARds
- Remove and safely discard any packaging material or promotional labels before using the waffle maker for the first time.
- To eliminate a choking hazard for young children, remove and safely discard the protective cover fitted to the power plug of this appliance.
- Ensure that the surface where the appliance operates is stable, level, clean and dry.
- When using this appliance, provide adequate air space above and on all sides for circulation. Keep a minimum distance of 4'' (10cm) of space from the surrounding sides and 8'' (20cm) above.
- The appliance is not intended for use by persons (including children) with reduced physical, sensory or mental capabilities, or lack of experience and knowledge, unless they have been given supervision or instruction concerning use of the appliance by a person responsible for their safety.
- Do not leave the appliance unattended when in use.
- Keep the appliance clean. Refer to care and cleaning section.
- If any of the contained instructions or warnings are not understood please contact Breville Consumer Support for assistance.
SHORT CORd INSTRUCTIONS
Your Breville appliance is fitted with a short power supply cord to reduce personal injury or property damage resulting from pulling, tripping or becoming entangled with a longer cord. If an extension cord is used, (1) the marked electrical rating of the cord set or extension cord should be at least as great as the electrical rating of the appliance, (2) the cord should be arranged so that it will not drape over the countertop or table-top where it can be pulled on by children or tripped over unintentionally and (3) the extension cord must include a 3-prong grounding plug.
BREVILLE ASSIST™ PLUG
Your Breville appliance comes with a unique Assist™ Plug, conveniently designed with a finger hole to ease removal from the wall outlet. For safety reasons it is recommended you plug your Breville appliance directly into its own electrical outlet on a dedicated circuit separate from other appliances. If the electric circuit is overloaded with other appliances, your appliance may not function properly. It is not recommended to use with a power strip.
CALIFORNIA PROPOSITION 65:
(Applicable to California residents only).
This product contains chemicals known to the State of California to cause cancer, birth defects or other reproductive harm.
FOR HOUSEHOLD USE ONLY SAVE THESE INSTRUCTIONS
KNOW
your Breville product
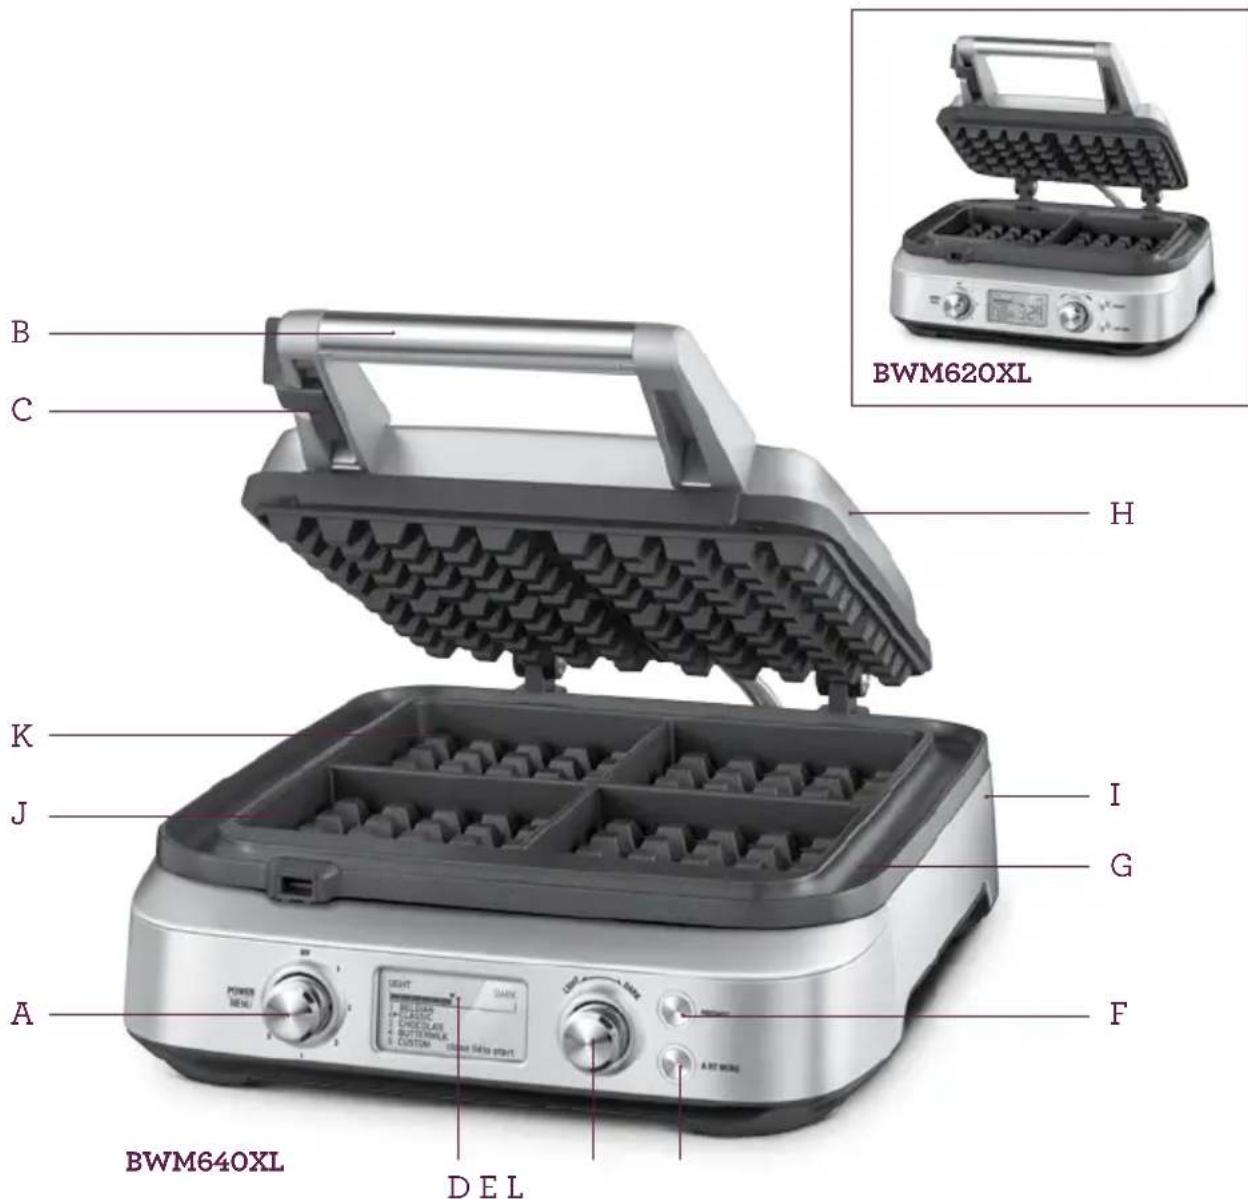
A. POWER/MENU dial
Select from four batter types and a CUSTOM setting.
B. Top plate lid
Integrated switch automatically starts the countdown timer when the lid is closed.
C. Storage locking clip
D. LCD with countdown timer
Color changing LCD turns orange to indicate cooking cycle has commenced.
E. Browning control dial
12 different settings allow you to customize your waffle color from light to dark.
F. Restart timer button
G. Integrated moat
No mess, no waste.
H. Stainless steel housing
I. Breville Assist™ plug (not shown)
J. PFOA-free non-stick
Prevents waffles from sticking.
K. Die-cast aluminum cooking plates
Thicker cooking plates for better heat retention and even browning.
L. A Bit MoreTM button
OPERATING
your Breville product
OPERATING YOUR BREVILLE PRODUCT
Before first use, remove and safely discard any packing material, promotional labels and tape from the waffle maker.
- Wipe the waffle maker cooking plates with a damp sponge or cloth. Dry thoroughly.
- Place the waffle maker on a flat, dry surface. Ensure there is a minimum distance of 4'' (10cm) of space on all sides of the waffle maker. Ensure there are no items on top of the waffle maker.
- Unwind the power cord completely and insert the power plug into a grounded 110/120V power outlet.
- Turn the POWER/MENU dial clockwise until the dial indicator reaches the desired waffle type or choose the CUSTOM setting. HEATING will be displayed on the LCD.
NOTE
When the waffle maker is turned on for the first time, it may emit vapors. It is safe and not detrimental to the performance of the appliance.
- There are 12 browning settings ranging from '1' (lightest) to '12' (darkest). The default browning setting is '6'. Use the LIGHT-DARK browning control dial to adjust the brownness of your waffle. Rotate clockwise to increase brownness, or rotate counterclockwise to reduce the brownness for a lighter colored waffle.
NOTE
When using the waffle maker for the first time, we recommend cooking on the preset default 6 bar "golden brown" color setting. You can also adjust the browning setting to your preference.
- Once the waffle maker has completed the preheating cycle, two audible alerts will sound and the LCD screen will turn orange. Lift the top plate lid completely into the open position. When the lid is in the open position, the LCD will turn blue and CLOSE LID TO START will appear. Pour in the batter evenly into the waffle plates. The batter should cover the peaks of the waffle plate (approximately half a cup for each waffle).
- Close the lid once the batter has been poured in. Once the lid is closed, the timer will automatically begin to count down. The LCD changes to orange to indicate that the cooking cycle has commenced. The waffle maker will automatically calculate the correct cooking time depending on a number of variables.
NOTE
Even if you have the same waffle batter type and shade setting, the cooking time may be different for each batch of waffles, due to other inputs which are considered when calculating the cooking time. This is the correct function of the waffle maker.
NOTE
The storage clip should be in it's open position when the waffle maker is cooking.
OPERATING YOUR BREVILLE PRODUCT
- Three audible alerts will sound at the end of the cooking cycle, the timer will disappear and "End" will be shown on the screen. Open the waffle maker lid and carefully remove your waffles. If you will no longer be cooking any more waffles, turn the Selector Dial to the OFF position.
NOTE
Do not use metal utensils when removing the waffles from the waffle maker as they may scratch the non-stick surface.
NOTE
If waffles are not removed immediately after the cooking cycle has completed, an audible alert will sound every 30 seconds.
- If you are cooking additional waffles, simply add more batter to the lower waffle plate and follow steps 7 & 8 above. If necessary to reset the time cycle, press the START button.
A BIT MORE
Allows you to conveniently and quickly add time to a cooking cycle. A BIT MORE™ can be used both during the cooking cycle or immediately after the cooking cycle has finished. In both instances, it will add a small amount of time proportional to the overall cooking time for that batch of waffles.
CARE & CLEANING
of your Breville product
CARE & CLEANING OF YOUR BREVILLE PRODUCT
Before cleaning, ensure the POWER | MENU dial is set to the OFF position and then remove the power plug from the power outlet.
Allow your waffle maker to cool a bit before cleaning. The waffle maker is easier to clean when slightly warm.
Always clean your waffle maker after each use to prevent a buildup of baked-on foods. Wipe cooking plates and overflow moat with a soft cloth to remove food residue.

CAUTION
DO NOT IMMERSE ANY PART OF THE BREVILLE WAFFLE MAKER IN WATER OR ANY OTHER LIQUID.
PFOA-FREE NON-STICK COATING
Cooking on a non-stick surface minimizes the need for oil, food does not stick and cleaning is easier. Any discoloration that may occur will only detract from the appearance of the waffle maker and will not affect the cooking performance. When cleaning the non-stick coating, do not use metal (or other abrasive) scourers. Wash with warm soapy water. Remove stubborn residue with a non-abrasive plastic scouring pad or nylon washing brush.
NOTE
The cooking plates, hinges and overflow moat are coated with a non-stick surface, do not use abrasives.
NOTE
Do not use spray-on nonstick coatings as this will affect the performance of the non-stick surface on the cooking plates.
STORAGE
To store your waffle maker:
- Ensure the POWER | MENU dial is set to the OFF position and then unplug power cord from the power outlet.
- Allow the waffle maker to fully cool.
- Set the top plate storage clip into the locked position.
- Wrap the power cord in the cord wrap area below the waffle maker.
- Store on a flat, dry level surface.
NOTE
The storage clip should not be used to clamp down the top plate when batter is in the cooking plates.
RECIPES
Visit brevilleusa.com/wafflebook to download our waffle recipe e-book and view the inspirations we have created.

CLASSIC WAFFLE BATTER
Makes 8 waffles
INGREDIENTS
4 eggs
2 cups milk
5 oz unsalted butter, melted and cooled
1 12 teaspoons vanilla extract
21% cups self-rising flour
3 tablespoons baker's sugar
METHOD
- Place eggs, milk, butter and vanilla in a large bowl and whisk until well combined.
- Combine flour and sugar into a second large mixing bowl and make a well in the center.
- Carefully whisk in egg-milk mixture to form a smooth batter.
- Select CLASSIC setting and set the browning control dial to setting 6.
- Preheat the waffle maker until the LCD color changes to orange and HEATING disappears.
- Pour 12 cup of batter into each waffle square and close lid to cook.
- At the end of the cooking cycle, open the lid and carefully remove your waffles. Repeat with remaining batter.
BELGIAN WAFFLE BATTER
Makes 8 waffles
INGREIDIENTS
3 eggs, separated
2 cups milk
5 oz unsalted butter, melted and cooled
1 12 teaspoons vanilla extract
214 cups self-rising flour
3 tablespoons baker's sugar
METHOD
- Place egg yolks, milk, butter and vanilla in a large bowl and whisk until well combined.
- Combine flour and sugar into a second large mixing bowl and make a well in the center.
- Carefully whisk in egg yolk-milk mixture to form a smooth batter.
- Beat egg whites with electric hand mixer until stiff peaks form. Gently fold egg whites into batter.
- Select BELGIAN setting and set the browning control dial to setting 6.
- Preheat the waffle maker until the LCD color changes to orange and HEATING disappears.
- Pour 12 cup of batter into each waffle square and close lid to cook.
- At the end of the cooking cycle, open the lid and carefully remove your waffles. Repeat with remaining batter.
BUTTERMILK WAFFLE BATTER
Makes 8 waffles
INGREDIENTS
3 eggs
15 oz buttermilk
3 oz vegetable oil (such as sunflower or canola)
2 cups self-rising flour
1 / 4 cup baker's sugar
1 teaspoon salt
METHOD
- Place eggs, buttermilk and vegetable oil into a large bowl and whisk until well combined.
- Combine flour, sugar and salt into a second large mixing bowl and make a well in the center.
- Carefully whisk in egg/buttermilk mixture to form a batter, with just a few lumps.
- If batter is too thick, stir in additional 1-2 tablespoons of buttermilk.
- Select BUTTERMILK setting and set the browning control dial to setting 6.
- Preheat the waffle maker until the LCD color changes to orange and HEATING disappears.
- Pour 12 cup of batter into each waffle square and close lid to cook.
- At the end of the cooking cycle, open the lid and carefully remove your waffles. Repeat with remaining batter.
CHOCOLATE WAFFLE BATTER
Makes 8 waffles
INGREDIENTS
5 oz. dark bittersweet chocolate, chopped
3 oz. unsalted butter, diced
2 eggs
112 cups milk
1 12 teaspoons vanilla extract
2 cups plain flour
3 / 4 cups baker's sugar
114 cup cocoa powder
1 teaspoon baking powder
1 teaspoon salt
METHOD
- Place the chocolate and butter in a microwave safe bowl and heat on 100% power for 30 seconds. Stir and continue until chocolate and butter have melted and mixture is smooth; set aside to cool slightly.
- Whisk eggs, milk and vanilla together in a large bowl and stir through cooled chocolate mixture until smooth.
- Sift flour, sugar, cocoa powder, baking powder and salt together in a large mixing bowl, and make a well in the center.
- Pour in egg mixture and whisk until mostly smooth with just a few lumps.
- Select CHOCOLATE setting and set the browning control dial to setting 6.
- Preheat the waffle maker until the LCD color changes to orange and HEATING disappears.
- Pour 12 cup of batter into each waffle square and close lid to cook.
- At the end of the cooking cycle, open the lid and carefully remove your waffles. Repeat with remaining batter.
FÉLICITATIONS
FICHE ASSISTMc DE BREVILLE
REvETEMENT ANTIAdHESIF SANS APFO
- Breville Consumer Service Center
- USA
- Canada
- Breville®
- Register online for product support and exclusive offers.*
- CONTENTS
- IMPORTANT SAFEGUARDS
- READ ALL INSTRUCTIONS BEFORE USE AND SAvE FOR FUTURE REFERENCE
- AddITIONAL SAFEGUARds
- SHORT CORd INSTRUCTIONS
- BREVILLE ASSIST™ PLUG
- CALIFORNIA PROPOSITION 65:
- FOR HOUSEHOLD USE ONLY SAVE THESE INSTRUCTIONS
- KNOW
- OPERATING
- OPERATING YOUR BREVILLE PRODUCT
- NOTE
- A BIT MORE
- CARE & CLEANING
- CARE & CLEANING OF YOUR BREVILLE PRODUCT
- CAUTION
- PFOA-FREE NON-STICK COATING
- STORAGE
- RECIPES
- CLASSIC WAFFLE BATTER
- INGREDIENTS
- METHOD
- BELGIAN WAFFLE BATTER
- INGREIDIENTS
- BUTTERMILK WAFFLE BATTER
- CHOCOLATE WAFFLE BATTER
- FÉLICITATIONS
- FICHE ASSISTMc DE BREVILLE
- REvETEMENT ANTIAdHESIF SANS APFO
Brand : BREVILLE
Model : the Smart Waffle BWM620
Category : Cupcake maker