
FSA 45 - String Trimmer STIHL - Free user manual and instructions
Find the device manual for free FSA 45 STIHL in PDF.


| Product type | Battery-powered grass trimmer / edger |
| Brand | STIHL |
| Model | FSA 45 |
| Dimensions (L) | 1100 to 1310 mm (adjustable) |
| Weight (with cutting tool and protective guard) | 2.3 kg |
| Battery type | Integrated lithium-ion, 18 V |
| Charger | STIHL LK 45, 100-240 V, 50-60 Hz, 0.65 A |
| Charging time | See www.stihl.com/charging-times |
| Intended use | Mowing dry grass, edging |
| Cutting tools | PolyCut 2-2 mowing head with cutting lines (1.6 mm) or blades |
| Sound pressure level (with lines) | 80 dB(A) |
| Sound pressure level (with blades) | 77 dB(A) |
| Vibrations (control handle) | 4.9 m/s² |
| Vibrations (loop handle) | 1.7 m/s² |
| Safety devices | Safety key, protective guard, trigger lock, unlocking button |
| Operating temperature range | 0 °C to +50 °C |
| Cleaning | Damp cloth for the trimmer, soft brush for guard and tool |
| Maintenance | Annual check by a STIHL specialist dealer |
| Spare parts and accessories | Original STIHL available from dealer |
| Repairability | Entrust to STIHL specialist dealer (do not repair yourself) |
| Disposal | Do not dispose of with household waste; battery must be disposed of separately |
Frequently Asked Questions - FSA 45 STIHL
User questions about FSA 45 STIHL
0 question about this device. Answer the ones you know or ask your own.
Ask a new question about this device
Download the instructions for your String Trimmer in PDF format for free! Find your manual FSA 45 - STIHL and take your electronic device back in hand. On this page are published all the documents necessary for the use of your device. FSA 45 by STIHL.
USER MANUAL FSA 45 STIHL
natural_image
Exterior view of a white and gray Li Auto brush tool (no text or symbols visible)natural_image
Technical line drawing of a mechanical assembly with no visible text or symbolsnatural_image
Illustration of a person performing a knee press or grip technique, showing two views (front and side) with no text or symbols.natural_image
Illustration showing a person using a tool to clean grass next to a circular device labeled '1', with no visible text or symbols.natural_image
Illustration of a person using a lawn power shaver next to a detailed circular saw blade diagram (no text or symbols)2 Guide to Using this Manual....20
3 Overview....20
4 Safety Precautions....22
5 Preparing Trimmer for Operation.... 27
6 Charging the Trimmer, LEDs.... 28
7 Assembling the Trimmer.... 28
8 Adjusting Trimmer for User.... 30
9 Inserting and Removing Activation Key.... 31
10 Switching the Trimmer On/Off....31
11 Testing the Trimmer....31
12 Operating the Trimmer....32
13 After Finishing Work....32
14 Transporting....32
15 Storing....33
16 Cleaning....33
17 Maintenance and Repairs.... 33
18 Troubleshooting.... 34
19 Specifications....34
20 Combinations of Cutting Attachments and Deflectors....35
21 Spare Parts and Accessories....35
22 Disposal.... 35
23 EC Declaration of Conformity.... 35
24 UKCA Declaration of Conformity...... 36
1 Introduction
Dear Customer,
Thank you for choosing STIHL. We develop and manufacture our quality products to meet our customers' requirements. The products are designed for reliability even under extreme conditions.
STIHL also stands for premium service quality. Our dealers guarantee competent advice and instruction as well as comprehensive service support.
STIHL expressly commit themselves to a sustainable and responsible handling of natural resources. This user manual is intended to help you use your STIHL product safely and in an environmentally friendly manner over a long service life.
We thank you for your confidence in us and hope you will enjoy working with your STIHL product.
Dr. Nikolas Stihl
IMPORTANT! READ BEFORE USING AND KEEP IN A SAFE PLACE FOR REFERENCE.
2 Guide to Using this Manual
2.1 Applicable Documentation
Local safety regulations apply.
▶ Read, understand and save the following documents in addition to this instruction manual:
- Safety information for STIHL batteries and products with built in batteries: www.stihl.com/safety-data-sheets
2.2 Symbols used with warnings in the text

WARNING
■ This symbol indicates dangers that can cause serious injuries or death.
▶ The measures indicated can avoid serious injuries or death.
NOTICE
■ This symbol indicates dangers that can cause damage to property.
▶ The measures indicated can avoid damage to property.
2.3 Symbols in Text

This symbol refers to a chapter in this instruction manual.
3 Overview
3.1 Trimmer and Charging Cable
The rechargeable battery is built into the trimmer.
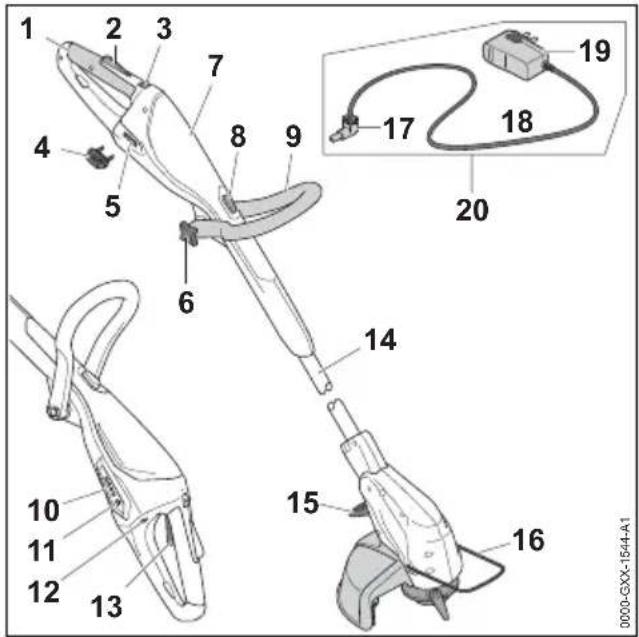
1 Control Handle
For operating, holding and controlling the trimmer.
2 Trigger Lockout
Locks trigger in position.
3 Release Slide
Operated together with the trigger lockout to unlock the trigger.
4 Activation Key
Activates the trimmer.
5 Key Socket
Accommodates the activation key.
6 Star Knob Nut
Secures loop handle to shaft.
7 Housing
Contains the built-in rechargeable battery.
8 Lockout Button
Locks the shaft at the required length.
9 Loop Handle
For holding and controlling the trimmer.
10 LEDs
Indicate trimmer's state of charge and malfunctions.
11 Button
Activates the LEDs on the trimmer.
12 Charging Socket
Accommodates the charger plug.
13 Trigger
The trigger switches the motor on and off.
14 Shaft
Connects all components.
15 Lever
Locks selected angle between shaft and motor housing.
16 Bump Guard
Protects objects from contact with the cutting attachment and maintains ground clearance when edging.
17 Charger Plug
Connects charging cable to charger socket.
18 Connecting Cable
Connects charger plug to appliance plug.
19 Appliance Plug
Connects charging cable to wall outlet.
20 Charging Cable
Serves to charge the trimmer.
# Rating label with serial number
3.2 Deflector and Cutting Attachments
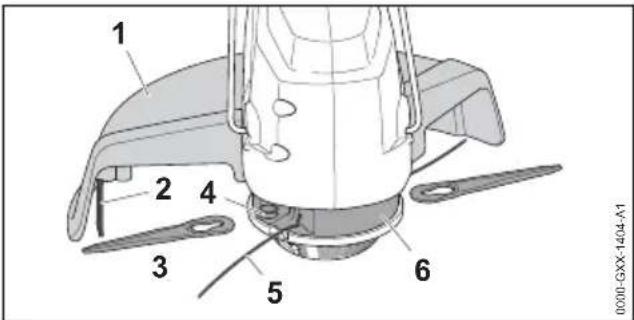
1 Deflector
Protects the user from flying debris and contact with the cutting attachment.
2 Line-limiting blade
The line-limiting blade trims the surplus mowing line to correct length while working.
3 Blade
The blades cut the grass.
4 Mounting
The mounting secures the blades in position.
5 Mowing line
The mowing lines cut grass.
6 Mowing head
The mowing head holds the mowing lines and cutting blades.
3.3 Symbols
Meanings of symbols that may be on the grass trimmer and charging cable:
This symbol indicates in what direction the release slide has to be pushed.
English 4 Safety Precautions
This symbols indicates that the length of the shaft is adjustable.

This symbols indicates that the control handle can be rotated 90°.
This symbol shows how far the mowing line has to be inserted.

This symbol shows in which direction the mowing line has to be inserted.

This symbol shows the direction of rotation of the cutting attachment.

LWA Guaranteed sound power level according to directive 2000/14/EC in dB(A) in order to make sound emissions of products comparable.
D-□C
LK 45 This symbol shows that an LK 45 charging cable must be used.
The data next to this symbol indicates the energy content of the battery according to the cell manufacturer's specification. The energy content available during operation is lower.

Operate the electric appliance in a dry place, indoors only.

Do not dispose of the product with your household waste.
4 Safety Precautions
4.1 Introduction
This product was designed for safe operation and features safety devices. Nevertheless, you should observe the following safety precautions in order to avoid possible dangers.
4.2 Warning Symbols
Meanings of warning symbols and labels on the brushcutter or charging cable:
Observe safety notices and take the necessary precautions.

Read, understand and keep the User Manual.

Wear safety glasses.
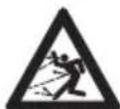
Observe the safety advice concerning flying objects and associated measures.

Always remove the activation key during breaks in work, transport, charging, storage, maintenance and repairs.

Protect the brushcutter from rain and moisture – do not immerse it in fluids.
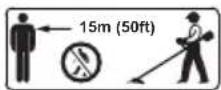
Maintain a safe distance.

Protect brushcutter from heat and fire.
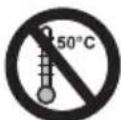
Observe brushcutter's specified temperature range.
4.3 Intended Use
The STIHL FSA 45 grass trimmer/edger is designed for mowing dry grass.
The trimmer must not be used in the rain.
A built-in battery supplies the trimmer with power.
The STIHL LK 45 charging cable recharges the STIHL FSA 45 trimmer.
WARNING
■ Charging cables not explicitly approved for the trimmer by STIHL may cause a fire or explosion. This can result in serious or fatal injuries and damage to property.
▶Always recharge a STIHL FSA 45 trimmer with a STIHL LK 45 charging cable.
■ Using the trimmer or the charging cable for purposes for which they were not designed may result in serious or fatal injuries and damage to property.
▶ Use the trimmer and charging cable as described in this instruction manual.
4.4 The Operator
WARNING
■ Users without adequate training or instruction cannot recognize or assess the risks involved in using the trimmer and charging cable. The user or other persons may sustain serious or fatal injuries.

▶ Read, understand and save the instruction manual.
▶ If you pass the trimmer and charging cable on to another user: Always give them the instruction manual.
▶ Make sure the user meets the following requirements:
- The user must be rested.
–The user must be in good physical condition and mental health to operate and work with the trimmer and the charging cable. If the user's physical, sensory or mental ability is restricted, he or she may work only under the supervision of or as instructed by a responsible person.
- The user is able to recognize and assess the risks involved in using the trimmer and charging cable.
–The user must be of legal age or is being trained in a trade under supervision in accordance with national rules and regulations.
– The user has received instruction from a STIHL servicing dealer or other experienced user before working with the trimmer and using the charging cable for the first time.
- The user must not be under the influence of alcohol, medication or drugs.
▶ If you have any queries: Contact a STIHL servicing dealer for assistance.
4.5 Clothing and equipment
WARNING
■ Objects can be thrown at high speed during operation. This may result in injury to the user.

▶ Wear close-fitting safety glasses. Suitable safety glasses are tested in accordance with EN 166 or national regulations and available commercially with the corresponding marking.
▶ Wear face protection.
- Wear long trousers made from resistant material.
■ Dust can be whipped up during operation. Whipped up dust can damage the respiratory passages and cause allergic reactions.
▶ If dust is generated: Wear a dust respirator mask.
■ Inappropriate clothing can snag on wood, brush or the brushcutter. Users not wearing suitable clothing are at risk of serious injury.
▶ Wear close-fitting clothing.
▶ Remove scarves and jewelry.
■ The user may come into contact with the rotating cutting attachment during operation. This may result in serious injury to the user.
▶ Wear robust footwear.
▶ Wear long trousers made from resistant material.
■ There is a risk of the user coming into contact with the cutting attachment or the line limiting blade during cleaning and maintenance work and when the cutting attachment is mounted or removed. This may result in injury to the user.
- Wear work gloves made from resistant material.
■ Wearing unsuitable footwear may cause the user to slip. This may result in injury to the user.
▶ Wear sturdy, closed-toed footwear with high-grip soles.
4.6 Work Area and Surroundings
4.6.1 Brushcutter
WARNING
■ Bystanders, children and animals are not aware of the dangers of the brushcutter or flying debris. This may result in serious injury to bystanders, children and animals and damage to property.
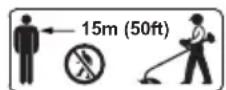
▶ Do not allow bystanders, children or animals within 15 meters of the work area.
English 4 Safety Precautions
- Maintain a clearance of 15 meters from objects.
▶ Do not leave the brushcutter unattended.
▶ Make sure that children cannot play with the brushcutter.
■ The brushcutter is not waterproof. If you work in the rain or in a damp environment, an electric shock may occur. This can result in injuries to the user and may damage the brushcutter.

- Do not work in the rain or in a damp environment.
■ Electrical components of the brushcutter can produce sparks. Sparks may cause fires and explosions in highly flammable or explosive environments. Persons may be seriously or fatally injured and property may be damaged.
- Do not work in a highly flammable or explosive environment.
4.6.2 Charging cable
WARNING
■ Onlookers, children and animals may be unaware of or unable to assess the dangers of a charging cable or electric current. Bystanders, children and animals may be seriously or fatally injured.
- Keep bystanders, children and animals away from the work area.
▶Do not leave the charging cable unattended.
▶Make sure that children cannot play with the charging cable.
■ The charging cable is not protected against all ambient conditions. If the charging cable is exposed to certain ambient conditions, it may catch fire or explode. This can result in serious injury to people and damage to property.
- Protect the charging cable from rain and moisture.
▶ Operate the charging cable in a dry place, indoors only.
▶ Do not operate the charging cable in an easily combustible or explosive environment.
▶ Use and store the charging cable at a temperature between 0^ C and 40^ C.
■ The connecting cable is a trip hazard. This can result in injuries and may damage the charging cable.
- Lay the connecting cable flat on the floor.
4.7 Safe Condition
4.7.1 Brushcutter
The brushcutter is in a safe condition if the following points are observed:
– The brushcutter is not damaged.
- The brushcutter is clean and dry.
- The controls function properly and have not been modified.
- A combination of cutting attachment and deflector recommended in this user manual is mounted.
- The cutting attachment and deflector are properly mounted.
- Genuine STIHL accessories for this brushcutter are fitted.
- The accessories are correctly attached.
WARNING
■ If not in safe condition, components may no longer operate correctly and safety devices may be disabled. This may result in serous or fatal injury to people.
▶ Work only with an undamaged brushcutter.
▶ Do not charge a damaged brushcutter.
▶ If the brushcutter is dirty or wet: Clean the brushcutter and allow it to dry.
▶ Never attempt to modify your brushcutter. Exception: Mounting one of the combinations of cutting attachment and deflector recommended in this user manual.
▶ If the controls do not function properly: Do not use your brushcutter.
▶ Fit genuine STIHL accessories for this brushcutter.
▶ Mount the cutting attachment and deflector as described in this user manual.
▶ Attach accessories as described in this User Manual or in the User Manual for the accessories.
▶ Never insert objects into the openings of the brushcutter.
▶ Never connect or short-circuit the keyslot contacts with metallic objects.
▶ Do not open the brushcutter.
▶ Replace worn or damaged labels.
▶ If you have any doubts, be sure to consult a STIHL dealer.
4 Safety Precautions English
4.7.2 Deflector
The deflector is in a safe condition if the following points are observed:
– The deflector is not damaged.
- The line limiter blade is correctly installed.
WARNING
■ If the product does not comply with safety requirements, components will no longer function properly or safety devices may be rendered inoperative. This can result in serious injuries.
▶ Work only with an undamaged deflector.
▶ Work with a correctly installed line limiter blade.
▶ If you have any queries: Contact your STIHL servicing dealer.
4.7.3 Mowing Head
The mowing head is in a safe condition if the following points are observed:
– The mowing head is not damaged.
– The mowing head is not jammed.
- The mowing lines are properly installed. If a Polycut mowing head with polymer blades is used:
- The polymer blades are free of damage and tears.
- The polymer blades are properly mounted.
– The wear limits are not exceeded.
WARNING
■ If they are in an unsafe condition, parts of the mowing head, mowing lines or polymer blades may come off and be ejected at high speed. They may cause serious injury to persons.
▶ Work only with an undamaged mowing head.
▶ If a PolyCut mowing head with polymer blades is used: Never work with damaged polymer blades.
▶ Never use metal objects in place of the nylon mowing lines or polymer blades.
▶ Observe and remain inside the wear limits.
▶ If you have any doubts, be sure to consult a STIHL dealer.
4.7.4 Charging Cable
The charging cable is in a safe condition if the following points are observed:
– Charging cable is undamaged.
- Charging cable is clean and dry.
WARNING
■ If the product does not comply with safety requirements, components will no longer func-
tion properly or safety devices may be rendered inoperative. This can result in serious or fatal injuries.
▶ Do not use a damaged charging cable.
▶ If the charging cable is dirty or wet: Clean the charging cable and allow it to dry.
▶ Do not modify the charging cable.
▶Never bridge the charging cable's contacts with metallic objects (short circuit).
▶ Do not open the charging cable.
4.8 Built-in Battery
WARNING
■ The built-in battery is not protected against all ambient conditions. If the built-in battery is exposed to certain ambient conditions, the trimmer may catch fire or explode. This can result in serious or fatal injuries and damage to property.

▶ Protect trimmer from heat and fire.
▶ Do not throw the trimmer into a fire.
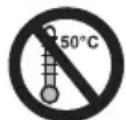
▶ Use and store your trimmer at temperatures between 0^ C and +50^ C.
- Keep trimmer away from metallic objects.
- Protect the trimmer from rain and damp – do not immerse it in fluids.
▶ Do not expose trimmer to high pressure.
▶ Do not expose trimmer to microwaves.
▶ Protect trimmer from chemicals and salts.
▶ Do not transport a damaged trimmer.
■ Fluid may escape from a damaged battery. The fluid can cause irritation if it contacts the skin or eyes.
- Avoid contact with the fluid.
▶ In case of contact with the skin: Wash affected areas with plenty of water and soap.
▶ In case of contact with the eyes: Rinse eyes with plenty of water for at least 15 minutes and seek medical advice.
■ A damaged or defective battery may smell unusual, emit smoke or burn. This can result in serious or fatal injuries and damage to property.
▶ If the trimmer smells unusual or emits smoke: Do not use the trimmer and keep it away from combustible substances.
▶ If the trimmer catches fire: Extinguish the trimmer with a fire extinguisher or water.
4.9 Working
WARNING
In certain situations, the user may no longer be able to concentrate on their work. This may result in the user stumbling, falling and suffering serious injury.
▶ Work carefully and and in a considered manner.
▶ If light and visibility are poor: Do not use your trimmer.
▶ Operate the trimmer alone.
- Keep the cutting attachment close to the ground.
▶ Watch out for obstacles.
▶ Work standing on the ground and keep your balance.
▶ If you feel tired, take a break.
■ The rotating cutting attachment can cut the user. This may result in serious injury to the user.
- Do not touch the rotating cutting attachment.
▶ If the cutting attachment is blocked by an object: Switch off the brushcutter and remove the activation key. Only then should you remove the object.
■ If the behavior of the trimmer changes during operation or feels unusual, it may no longer be in a safe condition. There is a risk of serious injury to people and damage to property.
- Stop work, remove the activation key and contact your STIHL servicing dealer.
■ Vibrations may occur during brushcutter operation.
▶ Wear gloves.
▶ Take breaks.
▶ If signs of a circulatory disturbance occur: Consult a doctor.
■ If the cutting attachment makes contact with a foreign object during operation, the object or parts of it may be thrown at high speed. Persons may be injured or property damaged.
- Remove foreign objects from the working area.
■ If the rotating cutting attachment makes contact with a hard object, sparks may occur and the cutting attachment may be damaged.
Sparks can cause fires in a flammable environment. Persons may be seriously or fatally injured and property may be damaged.
▶ Do not use in a flammable environment.
▶ Make sure the cutting attachment is in a safe condition.
■ Note that the cutting attachment continues to rotate for a short period after you release the trigger. This could cause serious injury to persons.
- Wait until the cutting attachment comes to a complete stop.
4.10 Charging
WARNING
■ Contact with live components may occur for the following reasons:
- Connecting cable is damaged.
- Plug is damaged.
– Wall outlet is not properly installed.
Contact with live components can result in an electric shock. This may result in serious or fatal injuries.
▶ Check that the connecting cable and plug are not damaged.
- Insert the plug in a properly installed wall outlet.
■ Overvoltage can occur in the charging cable if the line voltage or frequency are incorrect during charging. The charging cable may be damaged.
- Make sure the line voltage and frequency agree with the data on the charging cable's rating label.
■ A damaged or defective charging cable may produce an unusual smell or emit smoke during the charging process. This may result in personal injuries and damage to property.
▶ Disconnect the plug from the wall outlet.
■ The charging cable can overheat and cause a fire if heat dissipation is inadequate. This can result in serious or fatal injuries and damage to property.
▶ Do not cover the charging cable.
■ If several charging cables are connected to one wall outlet, electric cables may be overloaded during the charging process. The cables can overheat and cause a fire. This can result in serious or fatal injuries and damage to property.
- Connect the charging cable to a single wall outlet.
- Do not connect the charging cable to multiple sockets.
4.11 Transporting
WARNING
■ The trimmer may turn over or shift during transport. This may result in personal injuries and damage to property.

▶ Remove the activation key.
- Pack the trimmer in packaging or a transport box in such a way that it cannot move.
- Secure the packaging or transport box with lashing straps or a net so that the packaging or transport box cannot move.
4.12 Storing
4.12.1 Trimmer
WARNING
■ Children are not aware of and cannot assess the dangers of a trimmer and can be seriously injured.
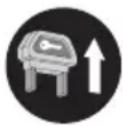
▶ Remove the activation key.
- Store the trimmer out of the reach of children.
■ Dampness can corrode the electrical contacts in the activation key socket and metal components. This can damage the trimmer.
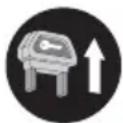
▶ Remove the activation key.
- Store the trimmer in a clean and dry condition.
■ The trimmer is not protected against all ambient conditions. The trimmer may be damaged if it is exposed to certain ambient conditions.
- Store the trimmer in a clean and dry condition.
- Store the trimmer in a confined space.
- Store the activation key separately from the trimmer.
4.12.2 Charging Cable
WARNING
■ Children are not aware of and cannot assess the dangers of a charging cable. Children may sustain serious or fatal injuries.
- Keep the charging cable out of the reach of children.
■ The charging cable is not protected against all ambient conditions. The charging cable may be damaged if it is exposed to certain ambient conditions.
▶ If the charging cable is hot: Allow the charging cable to cool down.
▶Store the charging cable in a clean and dry condition.
▶Store the charging cable in a confined space.
- Store the charging cable within temperature range of 0°C to +40°C.
4.13 Cleaning, Maintenance and Repair
WARNING
■ The brushcutter may start unintentionally if the activation key remains inserted during cleaning, maintenance or repair operations. There is a risk of serious injury to people and damage to property.
▶ Remove activation key.

■ Aggressive cleaning agents, cleaning with a water jet, or sharp objects can damage the brushcutter, deflector, cutting attachment and charging cable. If the brushcutter, deflector, cutting attachment or charging cable are not cleaned correctly, components may no longer function properly or safety devices may be rendered inoperative. They may cause serious injury to persons.
▶ Clean the brushcutter, deflector, cutting attachment and charging cable as described in this instruction manual.
■ If the brushcutter, deflector, cutting attachment or charging cable are not serviced or repaired correctly, components may no longer function properly or safety devices may be rendered inoperative. This may result in serous or fatal injury to people.
- Do not attempt to service or repair the brushcutter, deflector, cutting attachment or charging cable.
▶ If the brushcutter, deflector, cutting attachment or charging cable require servicing or repairs: Contact your STIHL servicing dealer for assistance.
5 Preparing Trimmer for Operation
5.1 Preparing the Brushcutter for Operation
The following steps must be performed before commencing work:
English 6 Charging the Trimmer, LEDs
- Ensure that the following components are in safe condition:
- Brushcutter, 4.7.1.
- Deflector, 14.7.2.
- Mowing head, 24.7.3.
- Charging cable, 4.7.4.
▶ Check the built-in battery, 11.3.
▶ Fully charge the brushcutter, ☐6.1.
▶ Clean the brushcutter, 16.1.
▶ Mount the deflector, 07.1.
- Fit the mowing lines or blades, 7.2.1 or 7.2.3.
▶ Mount the loop handle, 17.3.
▶ Adjust length of shaft, ☐8.2.
▶ Adjust the loop handle, 18.3.
▶ Check the controls, 1.1.
▶ If you cannot carry out this work: Do not use your brushcutter and contact your STIHL dealer for assistance.
6 Charging the Trimmer, LEDs
6.1 Charging the Trimmer
The charging time depends on several factors, e.g. temperature of the trimmer or ambient temperature. The actual charging time may differ from the specified charging time. For specified charging times see www.stihl.com/charging-times.
The charging process starts automatically when the plug is inserted in a wall outlet and the charging cable is connected to the trimmer. The charging process stops automatically when the trimmer is fully charged.
The trimmer and charging cable heat up during the charging process.
▶ Remove the activation key.
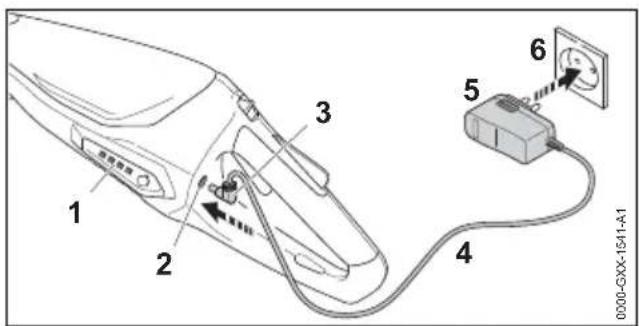
- Insert the plug (5) in a convenient wall outlet (6).
▶ Lay the connecting cable (4). - Insert the charger plug (3) in the charge socket (2).
The LEDs (1) glow green and show the state of charge.
▶ If the LEDs (1) stop glowing: Disconnect the charger plug (3) from the charge socket (2). The trimmer is fully charged.
▶ Disconnect the plug (5) from the wall outlet (6).
6.2 State of Charge
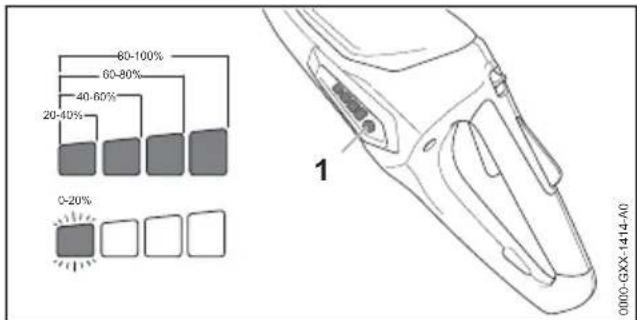
▶ Press the button (1).
The LEDs (5) glow green for about 5 seconds and indicate the state of charge.
▶ If the left LED flashes green: Recharge the trimmer.
6.3 LEDs
Indicate state of charge or malfunctions in the trimmer. The LEDs can glow or flash green or red.
The state of charge is indicated when the LEDs glow or flash green.
▶ If the LEDs glow or flash red: Troubleshooting, 18.
There is a malfunction in the trimmer.
7 Assembling the Trimmer
7.1 Mounting the Deflector
- Switch off the trimmer and remove the activation key.
7 Assembling the Trimmer English
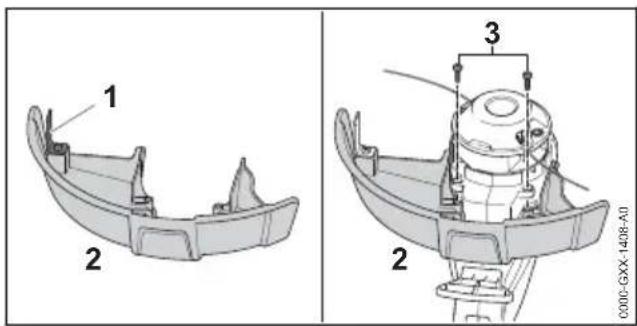
The line limiting blade (1) is already installed in the deflector (2) and must not be removed.
▶ Push the deflector (2) into the guides on the housing as far as stop.
The deflector (2) is tight against the housing.
- Insert and tighten down the screws (3) firmly.
The deflector (2) must not be removed again.
7.2 PolyCut 2-2 Mowing Head
7.2.1 Fitting Mowing Lines
▶ Switch off the trimmer and remove the activation key.
▶ Place mowing lines in a container filled with water for 12 to 24 hours before using.
This makes the nylon mowing lines supple.
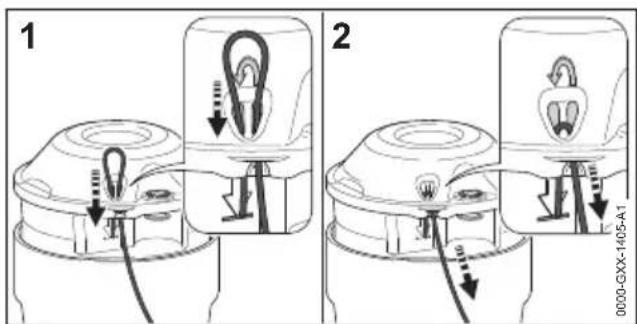
▶ Push mowing line up through the right opening from below.
Thread the mowing line through the left opening from above until the end of the line reaches the symbol.
▶ Hold the short end of the mowing line firmly.
▶ Pull the long end of the mowing line until it is tight against the mowing head.
natural_image
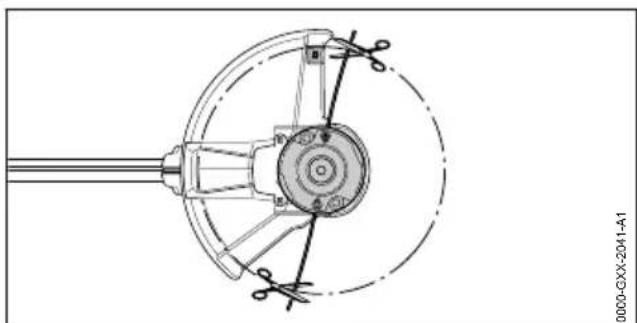
Technical line drawing of a mechanical assembly with no visible text or symbols▶ Cut the mowing lines so that they extend as far as the line limiting blade.
7.2.2 Removing Mowing Lines
▶ Switch off the trimmer and remove the activation key.
▶ Push the short end of the mowing line upwards out of the mowing head.
▶ Pull the short end of the mowing line upwards out of the mowing head.
▶ Pull the mowing line out of the mowing head.
7.2.3 Mounting the Blades
- Switch off the trimmer and remove the activation key.
▶ Place blades in a container filled with water for 12 to 24 hours before using. This makes the blades supple.
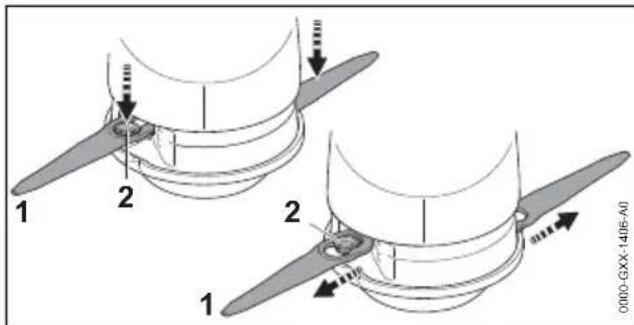
▶ Position the blade (1) on the mowing head so that the bushing (2) locates in the large bore in the blade (1).
▶ Pull the blade (1) outwards until the bushing (2) engages the small bore in the blade (1).
7.2.4 Removing the Blades
- Switch off the trimmer and remove the activation key.

▶ Push the blade (1) inwards until the bushing (2) is released from the small bore in the blade (1).
▶ Remove the blade (1) upwards.
7.3 Mounting the Loop Handle
- Switch off the trimmer and remove the activation key.
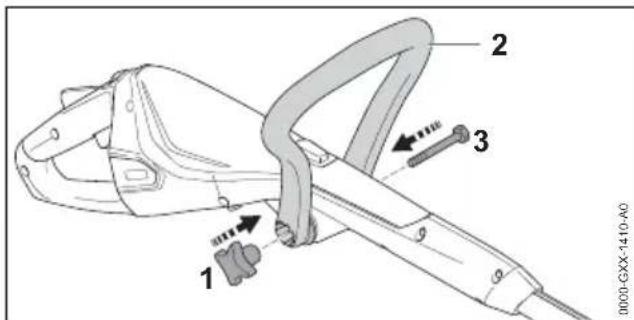
- Position the loop handle (2) so that the recess for the star knob nut (1) is on the right – viewed from the control handle.
English 8 Adjusting Trimmer for User
▶ Ease the ends of the loop handle (2) apart and push it onto the control handle until it engages in position.
▶ Insert the screw (3) through the hole.
▶ Fit the star knob nut (1) and tighten it down.
The loop handle (2) must not be removed again.
8 Adjusting Trimmer for User
8.1 Adjusting Shaft Angle
The shaft angle can be adjusted to suit the height and reach of the user.
- Switch off the trimmer and remove the activation key.
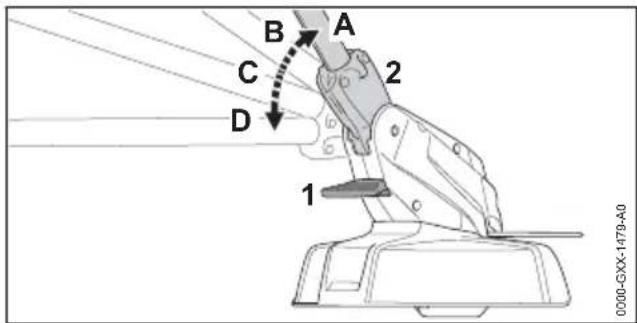
▶ Depress the lever (1) and hold it in that position.
▶ Move shaft (2) to the required position (A to D) until it engages.
▶ Release the lever (1).
8.2 Adjusting Length of Shaft
The length of the shaft can be adjusted to suit the height and reach of the user.
- Switch off the trimmer and remove the activation key.
▶ Hold the shaft firmly.
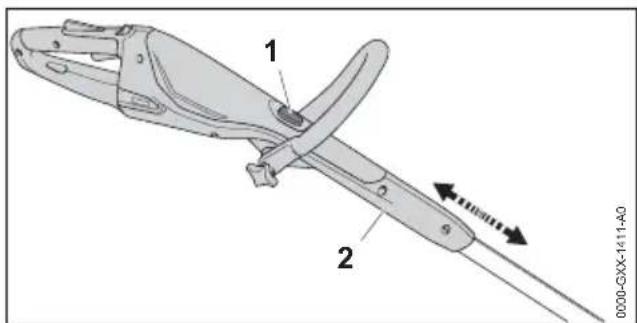
▶ Depress lock button (1) and hold it in that position.
▶ Pull or push the control handle (2) to the required position.
▶ Release the lock button (1).
▶ Move the control handle (2) back and forth until it engages.
8.3 Adjusting the Loop Handle
The loop handle can be set in different positions to suit the height and reach of the user.
- Switch off the trimmer and remove the activation key.
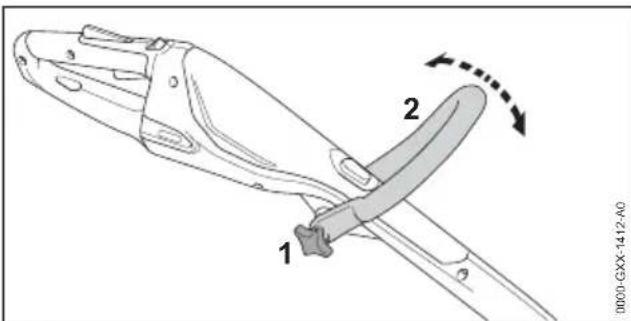
▶ Loosen the star knob nut (1).
▶ Tilt the loop handle (2) to the required position.
▶ Tighten down the star knob nut (1) firmly.
8.4 Converting Trimmer to Edger
- Switch off the trimmer and remove the activation key.
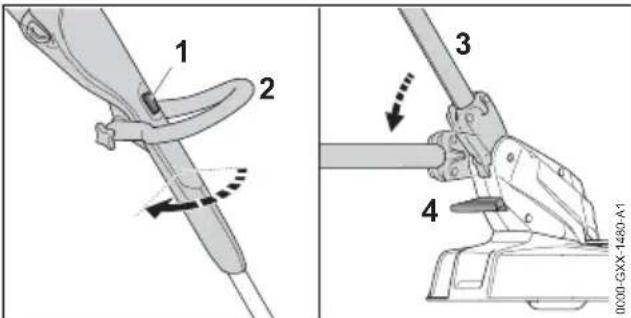
▶ Depress lock button (1) and hold it in that position.
▶ Rotate control handle (2) 90° until it engages.
▶ Release the lock button (1).
▶ Depress the lever (4) and hold it in that position.
▶ Swing the shaft (2) to the flattest position until it engages.
▶ Release the lever (4).
▶ Extend the bump guard (5) fully.
9 Inserting and Removing Activation Key
9.1 Inserting the Activation Key
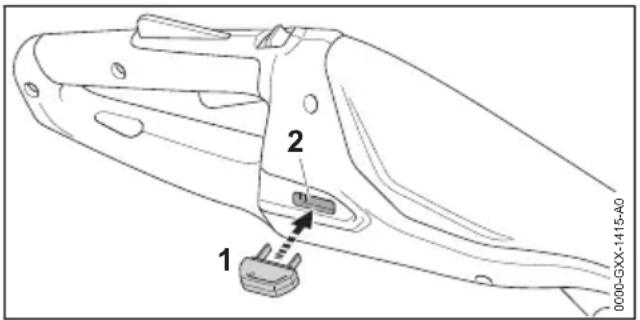
- Insert the activation key (1) in the socket (2).
9.2 Removing the Activation Key
- Stand the trimmer on a level surface.
▶ Remove the activation key. - Keep the activation key out of the reach of children.
10 Switching the Trimmer On/Off
10.1 Switching On
- Hold the trimmer with one hand on the control handle - wrap your thumb around the control handle.
- Hold the trimmer with the other hand on the loop handle - wrap your thumb around the loop handle.
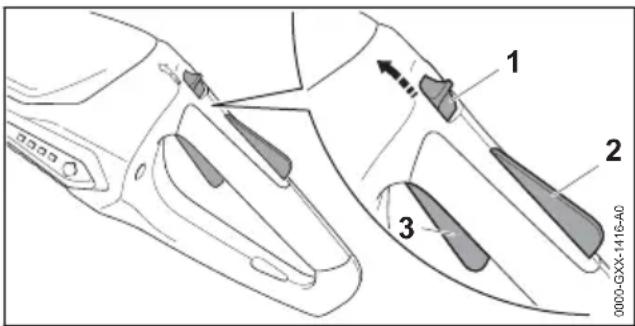
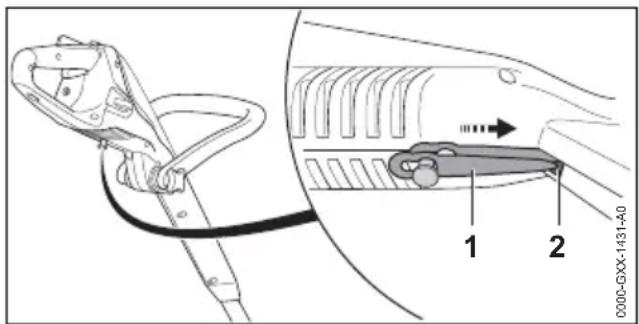
▶ Push the release slide (1) in the direction of the loop handle with your thumb and hold it there.
▶ Depress the trigger lockout (2) with your hand and hold it there.
You can let go of the release slide (1).
▶ Pull the trigger (3) with your index finger and hold it there.
The motor accelerates and the cutting attachment rotates.
10.2 Switching Off
▶ Release the trigger and lockout lever at the same time.
- Wait for the cutting attachment to come to a standstill.
▶ If the cutting attachment continues to rotate: Remove the activation key and contact your STIHL servicing dealer.
The trimmer has a malfunction.
11 Testing the Trimmer
11.1 Checking the Controls
Release slide, trigger lockout and trigger
▶ Remove the activation key.
▶ Attempt to pull the trigger lever without depressing the release slide and the trigger lockout.
▶ If the trigger can be pulled: Do not use your trimmer and contact your STIHL servicing dealer.
Release slide or trigger lockout is faulty.
▶ Push the release slide (1) in the direction of the loop handle with your thumb and hold it there.
▶ Depress the trigger lockout lever and hold it in that position.
▶ Pull the trigger.
▶ Let go of the trigger, trigger lockout and release slide.
▶ If the trigger, trigger lockout or release slide is stiff or does not spring back to the idle position: Do not use your trimmer and contact your STIHL servicing dealer.
The trigger, trigger lockout or release slide has a malfunction.
Switching On
▶ Insert the activation key.
▶ Push the release slide (1) in the direction of the loop handle with your thumb and hold it there.
▶ Depress the trigger lockout lever and hold it in that position.
▶ Pull the trigger and hold it there. The cutting attachment rotates.
▶ If 3 LEDs flash red: Remove the activation key and contact your STIHL servicing dealer. There is a malfunction in the trimmer.
▶ Release the trigger.
The cutting attachment stops rotating after a brief delay.
▶ If the cutting attachment continues to rotate: Remove the activation key and contact your STIHL servicing dealer.
The trimmer has a malfunction.
English 12 Operating the Trimmer
11.2 Inspecting the Cutting Attachment
- Switch off the brushcutter and remove the activation key.
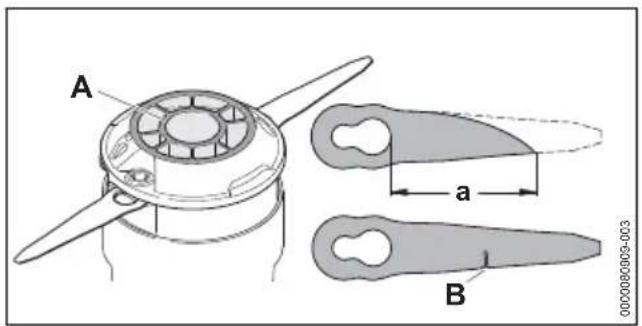
▶ If the wear mark (A) on the underside of the PolyCut 2-2 head is visible: Have the PolyCut 2-2 mowing head replaced by a STIHL servicing dealer.
▶ If the length of one of the blades, measured from the large bore to the tip, is less than 'a' = 45 mm: Replace both blades.
▶ If one blade is damaged (B): Replace both blades.
11.3 Checking the Built-In Battery
▶ Press the button.
The LEDs glow or flash.
▶ If the LEDs do not glow or flash: Do not use your trimmer and contact your STIHL servicing dealer.
There is a malfunction in the built-in battery.
12 Operating the Trimmer
12.1 Holding and Controlling the Trimmer
natural_image
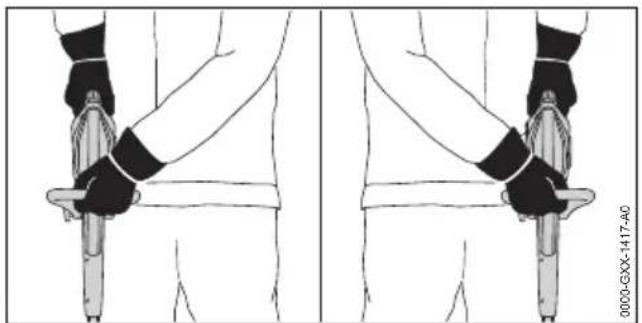
Illustration of a person holding a sword, viewed from front and side (no text or symbols)- Hold the trimmer with one hand on the control handle - wrap your thumb around the control handle.
- Hold the trimmer with the other hand on the loop handle - wrap your thumb around the loop handle.
12.2 Edging
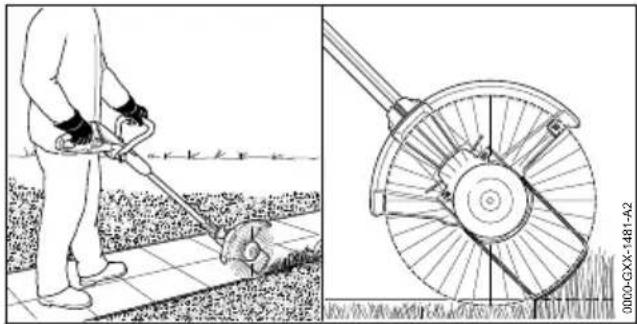
▶ Convert the trimmer to an edger.
▶ Extend the bump guard fully.
natural_image
Illustration of a person using a manual lawn power shaver next to a detailed close-up of the blade (no text or symbols)▶ Guide the trimmer along the edge of the lawn. The bump guard maintains the required ground clearance.
12.3 Mowing
The cutting height is determined by the distance of the cutting attachment from the ground.
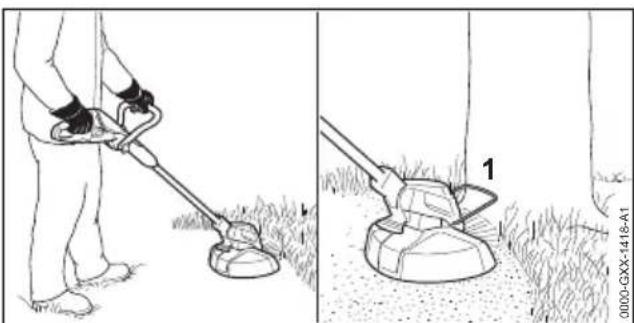
▶ Swing the brushcutter steadily back and forth in an arc.
▶ Move forward slowly in a controlled manner.
▶ If you work with a bump guard (1): Extend the bump guard (1) fully.
13 After Finishing Work
13.1 After Finishing Work
- Switch off the trimmer and remove the activation key.
▶ Clean the trimmer.
▶ Clean the deflector.
▶ Clean the cutting attachment.
14 Transporting
14.1 Transporting the brushcutter
- Switch off the brushcutter and remove the activation key.
- Adjust the shaft to its shortest length.
Carrying the brushcutter
- Carry the brushcutter in one hand properly balanced by the shaft, with the cutting attachment behind you.
Transporting the trimmer in the car
- Secure the brushcutter to prevent it tipping over or moving.
15 Storing English
▶ If the brushcutter has to be packed, observe the following points when packing the brush-cutter:
- Packaging or transport box must be non-conductive.
- Make sure the brushcutter cannot shift inside the packaging or transport box.
- Secure the packaging or transport box so that the packaging or transport box cannot move.
Owing to the built-in battery, the brushcutter is subject to the requirements for transporting dangerous goods. The brushcutter is classified as UN 3481 (lithium-ion batteries in equipment) and has been tested pursuant to UN Manual Tests and Criteria Part III, Subsection 38.3.
The transport regulations can be found in www.stihl.com/safety-data-sheets.
15 Storing
15.1 Storing the Trimmer
STIHL recommends that you store the trimmer with a charge between 40% and 60% (2 LEDs glow green).
- Switch off the trimmer and remove the activation key.
▶ Remove the mowing lines.
▶ Observe the following points when storing the trimmer: - The trimmer is out of the reach of children.
– The trimmer is clean and dry. - Trimmer is in an enclosed space.
- Trimmer is separated from the charging cable.
- Trimmer is in a temperature range between 0^ and +50^ .
15.2 Storing the Blades
Up to 6 blades can be kept directly on the trim-mer.
- Attach blade (1) to the underside of the trimmer.
▶ Push the tip of the blade (1) into the opening (2) in the trimmer.
0458-718-9621-B 33
▶ Fit the next blade on top of the first and so on.
15.3 Storing the Charging Cable
▶ Disconnect the plug from the wall outlet.
▶ Observe the following points when storing the charging cable:
- Charging cable is out of the reach of children.
- Charging cable is clean and dry.
- Charging cable is in an enclosed space.
- Charging cable is separated from the trim-mer.
- Charging cable is in a temperature range between 0^ and +40^ .
16 Cleaning
16.1 Cleaning the Brushcutter
- Switch off the brushcutter and remove the activation key.
- Clean the brushcutter with a damp cloth.
▶ Clean vents with a paintbrush.
16.2 Cleaning the Deflector and Cutting Attachment
- Switch off the trimmer and remove the activation key.
- Clean the deflector and cutting attachment with a damp cloth or a soft brush.
16.3 Cleaning the charging cable
▶ Disconnect the plug from the wall outlet.
- Disconnect the charger plug from the charge socket.
- Clean the charging cable with a damp cloth.
17 Maintenance and Repairs
17.1 Maintenance Intervals
The maintenance intervals are dependent on the environmental and operating conditions. STIHL recommends the following maintenance intervals:
Every 12 months
▶ Have the trimmer checked by a STIHL servicing dealer.
17.2 Servicing and Repairing the Trimmer
The trimmer cannot be serviced or repaired by the user.
▶ If your trimmer has a malfunction or is damaged or requires servicing: Contact your STIHL servicing dealer.
17.3 Servicing and repairing the charging cable
▶ If the charging cable is defective or damaged: Replace the charging cable.
The charging cable requires no servicing and cannot be repaired.
18 Troubleshooting
18.1 Troubleshooting Trimmer or Charging Cable
| Condition LEDs on trim-mer | Cause Remedy | |
| Trimmer does not start when switched on. | 1 LED flashes green. | Trimmer has low charge. |
| 3 LEDs glow red. | Trimmer is too hot. ▶ Remove the activation key. ▶ Allow trimmer to cool down. | |
| 3 LEDs flash red. | There is a electrical malfunction. ▶ Remove the activation key. ▶ Do not use your trimmer and contact your STIHL dealer for assistance. | |
| The trimmer is damp. ▶ Allow the trimmer to dry. | ||
| Trimmer cuts out during operation. | 3 LEDs glow red. | Trimmer is too hot. ▶ Remove the activation key. ▶ Allow trimmer to cool down. |
| There is a electrical malfunction. | Switch off the trimmer, wait 5 seconds and then switch on again. | |
| Trimmer runtime is too short. | The trimmer is not fully charged. | Fully charge the trimmer. |
| Normal trimmer life has been exceeded. | Replace the trimmer. | |
| Trimmer is not being charged. | 3 LEDs glow red. | Trimmer is too hot. ▶ Remove the activation key. ▶ Allow trimmer to cool down. |
| Malfunction in trimmer or charging cable. | Remove the activation key. ▶ Contact a STIHL servicing dealer for assistance. | |
19 Specifications
19.1 STIHL FSA 45 Trimmer
- Weight with cutting attachment and deflector: 2.3 kg
– Length: 1100 mm up to 1310 mm
– Battery technology: Lithium-ion - Voltage: 18 V
– Capacity in Ah: see rating label
– Energy content in Wh: see rating label - Permissible temperature range for operation and storage: 0^ up to +50^
If the trimmer is used at temperatures higher than +30°C the battery runtime may be shortened and the trimmer's performance reduced.
For battery life see www.stihl.com/battery-life.
19.2 STIHL LK 45 Charging Cable
– Voltage: 100-240 V, 50--60 Hz
– Power rating: 14.6 W
- Charge current: 0.65 A
- Permissible temperature range for operation and storage: 0^ up to 40^
For charging times see www.stihl.com/charging-times.
19.3 Noise and Vibration Data
K-value for sound pressure level is 2 dB(A). K-value for sound power level is 2 dB(A). K-value for vibration level is 2 m/s ^4 .
STIHL recommends that you wear hearing protection.
STIHL FSA 45 with PolyCut 2-2 mowing head equipped with 1.6 mm diameter "round, quiet" nylon line
– Sound pressure level L_pA measured according to EN 50636-2-91: 80 dB(A)
- Sound power level L_wA measured according to EN 50636-2-91: 94 dB(A)
STIHL FSA 45 with PolyCut 2-2 and cutting blades
- Sound pressure level L_pA measured according to EN 50636-2-91: 77 dB(A)
- Sound power level L_wA measured according to EN 50636-2-91: 87 dB(A)
- Vibration level a_hv measured according to EN 50636291
• Control handle: < 4.9 m/s ^2
- Loop handle: 1.7 ~m / s^2
The vibration values quoted above have been measured according to a standardized test procedure and may be used to compare electric power tools. Depending on the type of usage, the vibrations that actually occur may differ from the values quoted. The vibration values quoted may be used for an initial assessment of the user's exposure to vibrations. The actual exposure to vibrations has to be estimated. This process may also take into account times during which the electric power tool is switched off and times during which it is switched on but running off load.
Information on compliance with Vibration Directive 2002/44/EC is available at www.stihl.com/vib.
19.4 REACH
REACH is an EC regulation and stands for the Registration, Evaluation, Authorisation and Restriction of Chemical substances.
For information on compliance with the REACH regulation see www.stihl.com/reach.
20 Combinations of Cutting Attachments and Deflectors
20.1 STIHL FSA 45 Trimmer
The following mowing heads may be mounted together with the deflector for mowing heads:
- AutoCut 2-2 mowing head with 1.6 mm diameter "round, quiet" nylon line
– PolyCut 2-2 mowing head with cutting blades
Using the PolyCut 2-2 mowing head with nylon lines may shorten the battery runtime.
Mowing head cannot be installed by the user.
▶ Have the mowing head installed by a STIHL servicing dealer.
21 Spare Parts and Accessories
21.1 Spare parts and accessories
STIHL These symbols indicate original STIHL spare parts and original STIHL accessories.
STIHL recommends the use of original STIHL spare parts and accessories.
Despite ongoing market observation, STIHL is unable to judge the reliability, safety and suitability of other manufacturers' spare parts and accessories; accordingly, STIHL cannot warrant for the use of those parts.
Original STIHL spare parts and original STIHL accessories are available from STIHL dealers.
22 Disposal
22.1 Disposing of Brushcutter and Charging Cable
Contact the local authorities or your STIHL dealer for information on disposal.
Improper disposal can be harmful to health and pollute the environment.
The brushcutter contains a built-in rechargeable battery which must be disposed of separately.
▶ Have brushcutter disposed of by STIHL servicing dealer.
The STIHL servicing dealer will remove the built-in battery from the brushcutter for separate disposal.
▶ Take STIHL products including packaging to a suitable collection point for recycling in accordance with local regulations.
▶ Do not dispose with domestic waste.
23 EC Declaration of Con- formity
23.1 STIHL FSA 45 Brushcutter
declare under our sole responsibility that
- Designation: Cordless grass trimmer/lawn edge trimmer
– Manufacturer's brand: STIHL
– Model: STIHL FSA 45 - Serial number: 4512
conforms to the specifications of Directives 2011/65/EU, 2006/42/EC, 2014/30/EU and 2000/14/EC and has been developed and built in compliance with the versions of the following standards valid at the production date: EN 55014-1, EN 55014-2, EN 60335-1 and EN 50636-2-91.
Applied conformity assessment procedure in accordance with Directive 2000/14/EC, Annex VI.
Notified body: Intertek Deutschland GmbH (NB0905), Stangenstraße 1, 70771 Leinfelden-Echterdingen, Germany
– Measured sound power level: 94 dB(A)
– Guaranteed sound power level: 96 dB(A)
The technical documents are stored at ANDREAS STIHL AG & Co. KG Produktzulassung.
The year of manufacture, country of manufacture and serial number are specified on the rating plate of the brushcutter.
Dr. Jürgen Hoffmann, Director Product Certification & Regulatory Affairs
24 UKCA Declaration of Conformity
24.1 STIHL FSA 45 Brushcutter
UKCA
declare under our sole responsibility that
- Designation: Cordless grass trimmer/lawn edge trimmer
– Manufacturer's brand: STIHL - Model: STIHL FSA 45
– Serial number: 4512
conforms to the relevant provisions of UK regulations The Restriction of the Use of Certain Hazardous Substances in Electrical and Electronic Equipment Regulations 2012, Supply of Machinery (Safety) Regulations 2008, Electromagnetic Compatibility Regulations 2016 and Noise Emission in the Environment by Equipment for use Outdoors Regulations 2001 and has been manufactured in compliance with the following standards in the versions valid on the date of production: EN 55014-1, EN 55014-2, EN 60335-1 and EN 50636-2-91.
Applied conformity assessment procedure in accordance with UK regulations Noise Emission in the Environment by Equipment for use Outdoors Regulations 2001, Schedule 9.
Notified body: Intertek Testing & Certification Ltd (BN: 0359), Academy Place, 1-9 Brook Street, Brentwood Essex, CM14 5NQ, United Kingdom
– Measured sound power level: 94 dB(A)
– Guaranteed sound power level: 96 dB(A)
The technical documents are stored at ANDREAS STIHL AG & Co. KG.
The year of manufacture, country of manufacture and serial number are shown on the rating plate of the brushcutter.
Dr. Jürgen Hoffmann, Director Product Certification & Regulatory Affairs
Table des matières
natural_image
Technical line drawing of a mechanical assembly with no visible text or symbolsnatural_image
Illustration of a person performing a knee press or grip technique, showing two views (front and side) with no text or symbols.natural_image
Illustration of a person using a lawn power tool to cut a grassy area, alongside a detailed mechanical diagram showing the blade and wheel (no text or symbols)natural_image
Illustration showing a person using a manual lawn tool to clean grass, with a second view of a mounted device labeled '1' (no text or symbols on the device itself)natural_image
Technical line drawing of a mechanical assembly with no visible text or symbols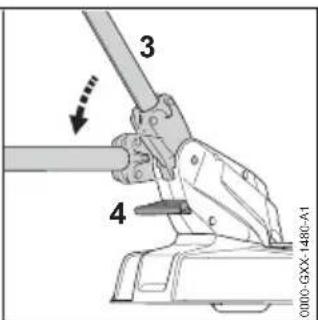
natural_image
Illustration of a person performing a knee press or grip technique, showing two views (front and side) with no text or symbols.natural_image
Illustration of a person using a lawn power shaver to cut grass, with a close-up view of the wheel blade (no text or symbols)natural_image
Illustration showing a person using a tool to clean grass next to a circular object labeled '1', with no text or symbols present.Noise Emission in the Environment by Equipment for use Outdoors Regulations 2001, Schedule 9.
Organismo notificato: Intertek Testing & Certification Ltd (BN: 0359), Academy Place, 1 – 9 Brook Street, Brentwood Essex, CM14 5NQ, United Kingdom
▶ Maaidraden of messen monteren, 7.2.1 of 7.2.3.
▶ Beugelhandgreep monteren, 17.3.
▶ Steellengte instellen, 08.2.
▶ Beugelhandgreep afstellen, 8.3.
▶ Bedieningselementen controleren, 1.1.
natural_image
Technical line drawing of a mechanical assembly with no visible text or symbolsnatural_image
Illustration of a person performing a martial arts or sword grip technique, showing two views (front and side) with no text or symbols.natural_image
Illustration of a person using a lawn power shaver to cut grass, with a close-up view of the blade (no text or symbols)natural_image
Abstract black-and-white striped pattern with no text or symbols0458-718-9621-B

- Introduction
- Guide to Using this Manual
- Applicable Documentation
- Symbols used with warnings in the text
- WARNING
- NOTICE
- Symbols in Text
- Overview
- Trimmer and Charging Cable
- Deflector and Cutting Attachments
- Symbols
- English 4 Safety Precautions
- Safety Precautions
- Introduction
- Warning Symbols
- Intended Use
- The Operator
- Clothing and equipment
- Work Area and Surroundings
- Brushcutter
- Charging cable
- Safe Condition
- Brushcutter
- Safety Precautions English
- Deflector
- Mowing Head
- Charging Cable
- Built-in Battery
- Working
- Charging
- Transporting
- Storing
- Trimmer
- Charging Cable
- Cleaning, Maintenance and Repair
- Preparing Trimmer for Operation
- Preparing the Brushcutter for Operation
- Charging the Trimmer, LEDs
- Charging the Trimmer
- State of Charge
- LEDs
- Assembling the Trimmer
- Mounting the Deflector
- Assembling the Trimmer English
- PolyCut 2-2 Mowing Head
- Fitting Mowing Lines
- Removing Mowing Lines
- Mounting the Blades
- Removing the Blades
- Mounting the Loop Handle
- Adjusting Trimmer for User
- Adjusting Shaft Angle
- Adjusting Length of Shaft
- Adjusting the Loop Handle
- Converting Trimmer to Edger
- Inserting and Removing Activation Key
- Inserting the Activation Key
- Removing the Activation Key
- Switching the Trimmer On/Off
- Switching On
- Switching Off
- Testing the Trimmer
- Checking the Controls
- Switching On
- Inspecting the Cutting Attachment
- Checking the Built-In Battery
- Operating the Trimmer
- Holding and Controlling the Trimmer
- Edging
- Mowing
- After Finishing Work
- After Finishing Work
- Transporting
- Transporting the brushcutter
- Carrying the brushcutter
- Transporting the trimmer in the car
- Storing English
- Storing
- Storing the Trimmer
- Storing the Blades
- Storing the Charging Cable
- Cleaning
- Cleaning the Brushcutter
- Cleaning the Deflector and Cutting Attachment
- Cleaning the charging cable
- Maintenance and Repairs
- Maintenance Intervals
- Every 12 months
- Servicing and Repairing the Trimmer
- Servicing and repairing the charging cable
- Troubleshooting
- Troubleshooting Trimmer or Charging Cable
- Specifications
- STIHL FSA 45 Trimmer
- STIHL LK 45 Charging Cable
- Noise and Vibration Data
- STIHL FSA 45 with PolyCut 2-2 and cutting blades
- REACH
- Combinations of Cutting Attachments and Deflectors
- STIHL FSA 45 Trimmer
- Spare Parts and Accessories
- Spare parts and accessories
- Disposal
- Disposing of Brushcutter and Charging Cable
- EC Declaration of Con- formity
- STIHL FSA 45 Brushcutter
- UKCA Declaration of Conformity
- STIHL FSA 45 Brushcutter
- UKCA
- Table des matières
Brand : STIHL
Model : FSA 45
Category : String Trimmer