
DR-GA500 - Headphones SONY - Free user manual and instructions
Find the device manual for free DR-GA500 SONY in PDF.

User questions about DR-GA500 SONY
0 question about this device. Answer the ones you know or ask your own.
Ask a new question about this device
Download the instructions for your Headphones in PDF format for free! Find your manual DR-GA500 - SONY and take your electronic device back in hand. On this page are published all the documents necessary for the use of your device. DR-GA500 by SONY.
USER MANUAL DR-GA500 SONY
Digital Surround Headset System
Operating Instructions ____ GB
Mode d'emploi FR
To reduce the risk of fire or electric shock, do not expose this apparatus to dripping or splashing, and do not place objects filled with liquids, such as vases, on the apparatus.
To avoid electrical shock, do not open the cabinet. Refer servicing to qualified personnel only.
Do not install the appliance in a confined space, such as a bookcase or built-in cabinet.
Notice for customers: the following information is only applicable to equipment sold in countries applying EU directives
The manufacturer of this product is Sony Corporation, 1-7-1 Konan Minato-ku Tokyo, 108-0075 Japan. The Authorized Representative for EMC and product safety is Sony Deutschland GmbH, Hedelfinger Strasse 61, 70327 Stuttgart, Germany. For any service or guarantee matters please refer to the addresses given in separate service or guarantee documents.
As the main plug of AC power adaptor is used to disconnect the AC power adaptor from the mains, connect it to an easily accessible AC outlet. Should you notice an abnormality in it, disconnect it from the AC outlet immediately.
The validity of the CE marking is restricted to only those countries where it is legally enforced, mainly in the countries EEA (European Economic Area).

natural_image
Symbol of a trash bin crossed with no text or numbers, representing environmental restriction (no text present)Disposal of Old Electrical & Electronic Equipment (Applicable in the European Union and other European countries with separate collection systems)
This symbol on the product or on its packaging indicates that this product shall not be treated as household waste. Instead it shall be handed over to the applicable collection point for the recycling of electrical and electronic equipment. By ensuring this product is disposed of correctly, you will help prevent potential negative consequences for the environment and human health, which could otherwise be caused by inappropriate waste handling of this product. The recycling of materials will help to conserve natural resources. For more detailed information about recycling of this product, please contact your local Civic Office, your household waste disposal service or the shop where you purchased the product.
- The digital surround processor for this system incorporates the Dolby Pro Logic II decoder. Manufactured under licence from Dolby Laboratories. “Dolby,” “Pro Logic,” and the double-D symbol are trademarks of Dolby Laboratories.
- “Virtualphones Technology” and “VPT” are registered trademarks of Sony Corporation.
- Microsoft and Windows are registered trademarks or trademarks of Microsoft Corporation in the United States and/or other countries.
- Macintosh and Mac OS are registered trademarks of Apple Inc. in the U.S. and other countries.
- IBM and PC/AT are trademarks and registered trademarks of International Business Machines Corporation.
- Pentium is a trademark or registered trademark of Intel Corporation.
- In this manual, Windows® XP Home Edition, Windows® XP Professional and Windows® XP Media Center Edition are referred to as Windows XP.
- In this manual, Windows Vista ^ is referred to as Windows Vista.
- In this manual, Windows® 7 Edition is referred to as Windows 7.
- In this manual, Macintosh ^ is referred to as Macintosh.
- All other names of systems and products are trademarks or registered trademarks of their respective owners. ^™ and ^® marks are omitted in this manual.
- PC screen terms depicted in this manual may differ from the actual terms.
Table Of Contents
Features......4
Checking the Components and Accessories....5
Location and Function of Parts......6
Digital Surround Processor Part Descriptions....6
Headset Part Descriptions......7
Connecting the Headset system.....8
Step 1-Ⓐ: Connecting a 7.1ch Sound Device....8
Step 1-⑧: Connecting a 5.1ch Sound Device....9
Step 1-©: Connecting a 2ch Sound Device....10
Step 1-⑭: Connecting to the Computer Using the USB cable....11
Step 2: Connecting the AC Adaptor ..... 12
Step 3: Preparing the Headset......12
Step 4: Checking the Settings of the Computer ....13
Listening to Sounds...... 16
Troubleshooting 20
Precautions 22
Specifications.... 23
Features
- 7.1ch VPT (Virtualphones Technology) ^*1 achieves precision three-dimensional surround sound with multi-channel speakers.
- Ideal for shooting games, typically requiring accurate reproduction of directional sound characteristics in “FPS*2 mode.”
- Built-in Dolby Pro Logic IIx decoder for 7.1ch extended surround from a 5.1ch/2ch/USB input source.
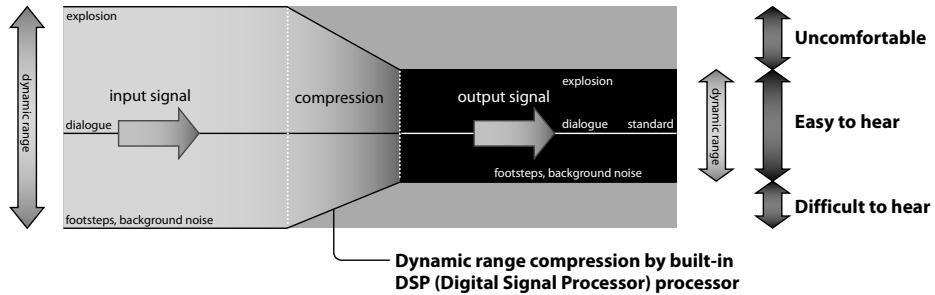
- COMPRESSION feature attenuates explosive sounds while enhancing lower level sounds (footsteps, etc.).
- 40mm driver unit for premium gaming sound quality.
- Open-air type, three-cushion design maintains a comfortable fit during long-term use.
- Lightweight structure provides wearing comfort ideal for PC gaming.
^*1 Superior “Virtualphones Technology (VPT)” creates that surround-sound realism typical of movie theatres, thanks to Sony audio analysis and digital signal processing technology.
^*2 FPS = First Person Shooting
The processor is optimised for the supplied headset. Although any headset can be used, use the supplied headset to obtain the best surround effects.
Checking the Components and Accessories
Before setting up the system, check that all of the components are included.
① Processor DP-GA500 (1)
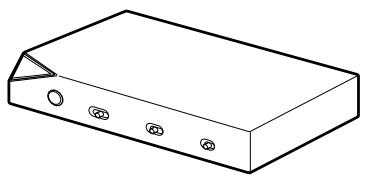
natural_image
Isometric line drawing of a rectangular electronic device with four circular ports and a triangular tip (no text or symbols)② Headset DR-GA210 (1)

natural_image
Line drawing of a multi-band耳机 with attached cable and connector (no text or symbols)③ AC adaptor (1)
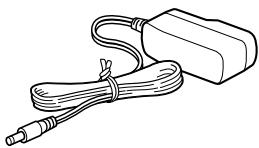
natural_image
Line drawing of a cable and plug device (no text or symbols)④ Dedicated USB cable (1)
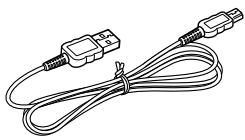
natural_image
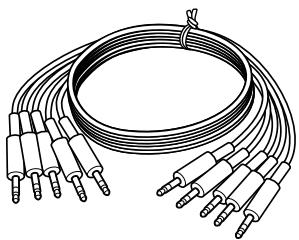
Line drawing of a USB cable with two connectors (no text or symbols)⑤ Multi-channel cable (7.1ch+MIC) (1)

natural_image
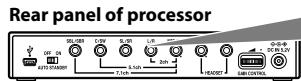
Coiled electrical cable with multiple terminal connectors (no text or symbols visible)Digital Surround Processor Part Descriptions
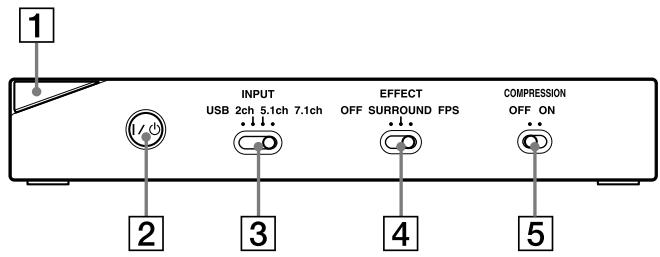
Front panel of processor
Rear panel of processor

1 Power indicator
(See page 16)
2 I / ⏻ (on / standby) switch
(See page 16)
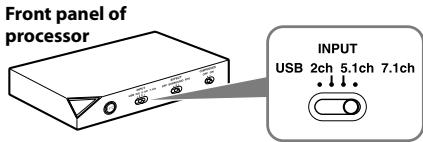
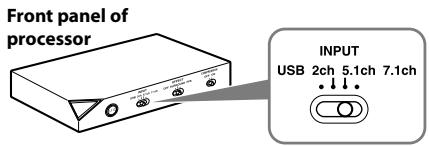
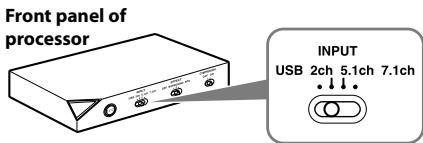
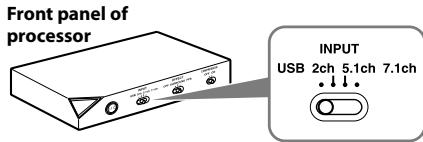
3 INPUT (USB/2ch/5.1ch/7.1ch) switch
4 EFFECT (OFF/SURROUND/FPS) switch
(See page 17)
5 COMPRESSION (OFF/ON) switch
(See page 18)
6 USB port
(See page 11)
7 AUTO STANDBY (OFF/ON) switch
(See page 19)
8 7.1ch/5.1ch/2ch (SBL/SBR, C/SW, SL/
SR, L/R, MIC OUT*) jacks
9 HEADSET (MIC IN*, PHONES) jacks
(See page 12)
10 GAIN CONTROL*
(See page 19)
11 ◇-G+ DC IN 5.2V jack
(See page 12)
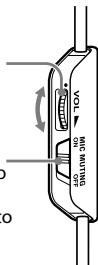
Headset Part Descriptions
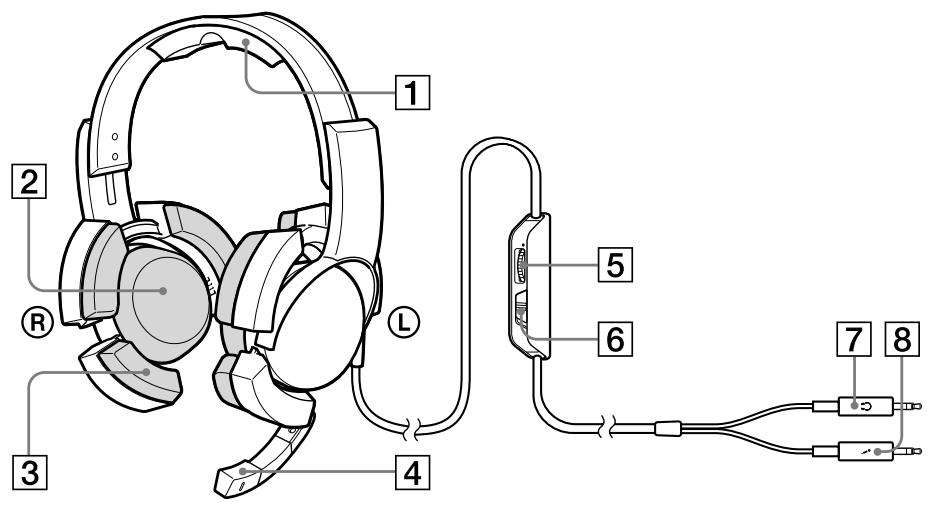
1 Head-band
2 Earpads
3 Support-pads
4 Microphone
5 VOL (volume) control*
(See page 16)
6 MIC MUTING switch
(See page 16)
7 Ⓞ (headphone) plug (Black)
8 (microphone) plug (Red)
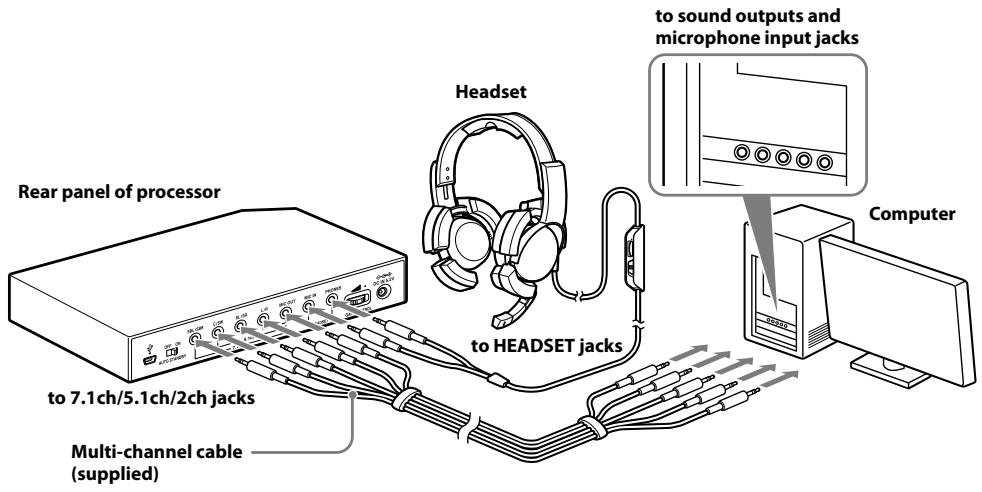
Connecting the Headset system
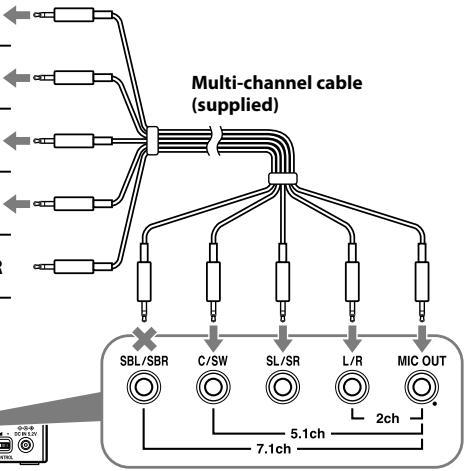
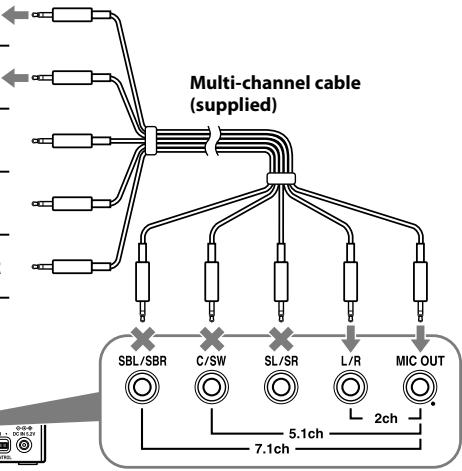
Step 1-Ⓐ: Connecting a 7.1ch Sound Device
1 Connect the processor to the sound device as illustrated below.
| Connecting jacks of the sound device* | Cable plug names | |
| MIC INConnect to MIC IN jack | - | MIC |
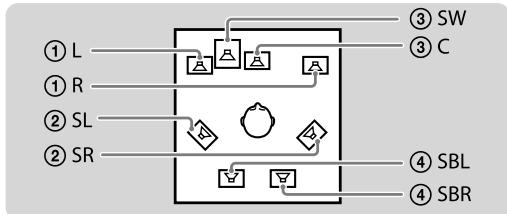
| L/R OUTConnect to L/R OUT jack | 1 | L / R |
| Surround L/R OUTConnect to SL/SR OUT jack | 2 | SL / SR |
| Center/Subwoofer OUTConnect to C/SW OUT jack | 3 | C / SW |
| Surround back L/R OUTConnect to SBL/SBR OUT jack | 4 | SBL / SBR |
* The jack name varies depending on the sound device.
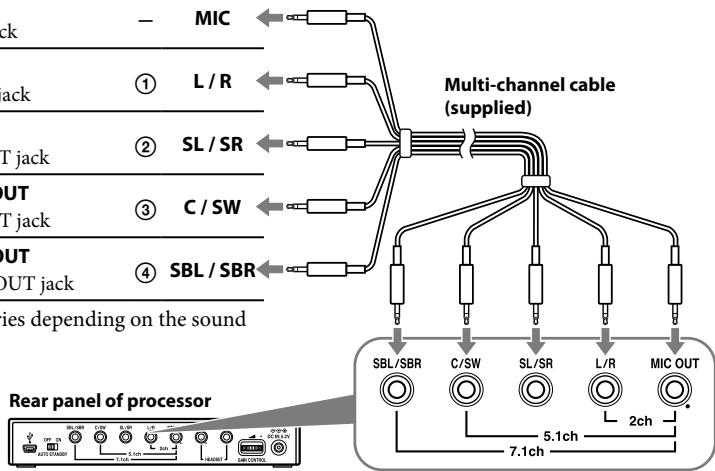
2 Slide the INPUT switch to "7.1ch."
3 Set the 7.1ch speaker mode in the computer.
For details on operation of your computer/sound device, refer to the operating instructions for it.
Do not connect the USB cable with multi-channel cable at the same time when you connect the processor to the computer. The computer sound setting may be switched to an unintended device.
Step 1-®: Connecting a 5.1ch Sound Device
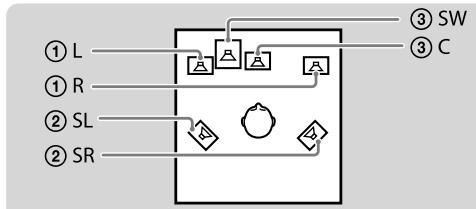
Connect the 5.1ch jacks of the processor by the supplied multi-channel cable. The EFFECT function provides 7.1ch extended surround output from a 5.1ch input source.
1 Connect the processor to the sound device as illustrated below.
flowchart
graph TD
    A["① L"] --> B["△"]
    C["① R"] --> D["△"]
    E["② SL"] --> F["◇"]
    G["② SR"] --> H["◇"]
    I["③ SW"] --> J["△"]
    K["③ C"] --> L["△"]
| Connecting jacks of the sound device* | Cable plug names | |
| MIC INConnect to MIC IN jack | — | MIC |
| L/R OUTConnect to L/R OUT jack | 1 | L / R |
| Surround L/R OUTConnect to SL/SR OUT jack | 2 | SL / SR |
| Center/Subwoofer OUTConnect to C/SW OUT jack | 3 | C / SW |
| Not connected | — | SBL / SBR |
* The jack name varies depending on the sound device.
2 Slide the INPUT switch to "5.1ch."
3 Set the 5.1ch speaker mode in the computer.
For details on operation of your computer/sound device, refer to the operating instructions for it.
Do not connect the USB cable with multi-channel cable at the same time when you connect the processor to the computer. The computer sound setting may be switched to an unintended device.
Step 1-©: Connecting a 2ch Sound Device
Connect the 2ch jacks of the processor by the supplied multi-channel cable. The EFFECT function provides 7.1ch extended surround output from a 2ch input source.
1 Connect the processor to the sound device as illustrated below.
| Connecting jacks of the sound device* | Cable plug names | |
| MIC INConnect to MIC IN jack | - | MIC |
| L/R OUTConnect to L/R OUT jack | 1 | L / R |
| Not connected | - | SL / SR |
| Not connected | - | C / SW |
| Not connected | - | SBL / SBR |
* The jack name varies depending on the sound device.
Rear panel of processor

2 Slide the INPUT switch to "2ch."
3 Set the 2ch speaker mode in the computer.
For details on operation of your computer/sound device, refer to the operating instructions for it.
Do not connect the USB cable with multi-channel cable at the same time when you connect the processor to the computer. The computer sound setting may be switched to an unintended device.
Step 1-⑭: Connecting to the Computer Using the USB cable
Connect the USB port on the computer to the USB port of the processor by the supplied USB cable.
Although the processor works as an external 2ch sound device, the EFFECT functions provide 7.1ch extended surround from 2ch input.
1 Connect the processor to the computer.
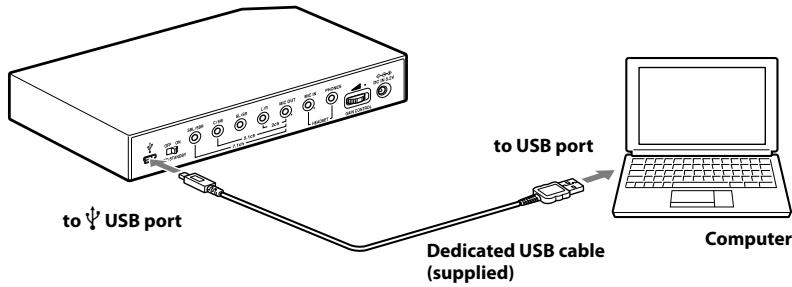
USB drivers are included in operating systems such as Windows XP, Windows Vista, Windows 7 and Mac OS X. USB drivers will be installed automatically when the processor is turned on at the first time after connecting and starting the computer.
When connecting to different USB ports, a computer may install USB drivers again.
Notes
- The headset is not guaranteed to operate with a USB hub or USB extension cable. Use the supplied USB cable only.
- When the headset is connected to the computer, the volume level of the computer may be set to maximum. Turn down the volume of the computer beforehand.
- The sound of digital broadcasting might not be output via USB of the computer when connecting by the USB cable. Connect it with the multi-channel cable if you cannot hear the sound of digital broadcasting (page 8 to 10).
2 Slide the INPUT switch to "USB."
3 Check the sound settings of the computer.
For details on operation of your computer device, refer to the operating instructions for it.
Do not connect the USB cable with multi-channel cable at the same time when you connect the processor to the computer. The computer sound setting may be switched to an unintended device.
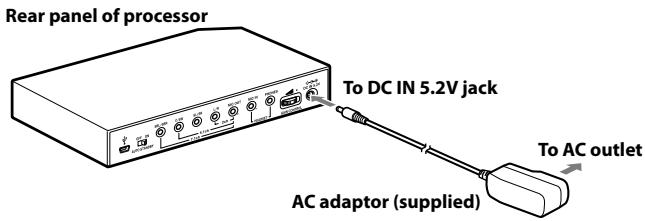
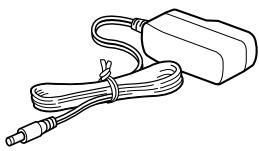
Step 2: Connecting the AC Adaptor
Connect the supplied AC adaptor to the processor, and then connect the AC adaptor to the AC outlet.
Step 3: Preparing the Headset
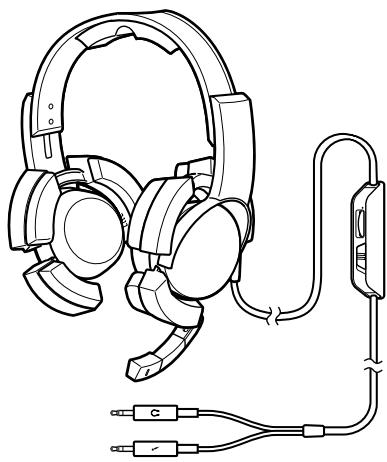
1 Connect the ⚪ (microphone) plug of the headset to the HEADSET (MIC IN) jack of the processor, and connect the Ⓞ (headphone) plug to the HEADSET (PHONES) jack.

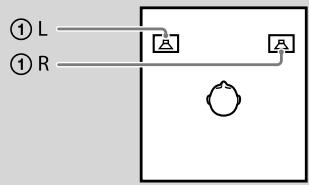
2 Adjust the band of the headset, and wear the earpad marked Ⓡ on your right ear, and the one marked Ⓛ on your left ear.
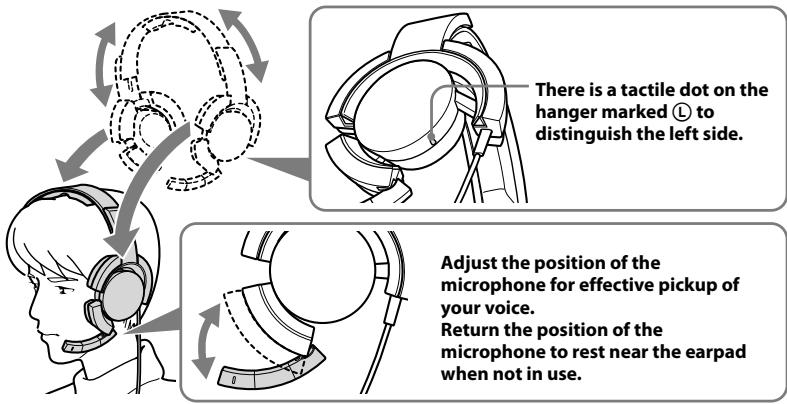
Note
If the position of the microphone is not correct, the sensitivity of the microphone will decrease, and sound from the headphone may enter the microphone.
Step 4: Checking the Settings of the Computer
To check the sound device settings of the computer
Before using the processor, check the setting of the sound device by following the instructions below according to your operating system. For details on the operation of your computer/sound device, refer to the operating instructions for it.
For Windows
Windows XP in Category View
Click the [start] menu, select [Control Panel], [Sounds, Speech and Audio Devices], [Sounds and Audio Devices], [Audio] tab, and then select the regular sound device (or [USB PnP Sound Device] if connection is by the supplied USB cable) for [Default device] in the Sound playback or Sound recording menu.
Windows Vista
Click the [Start] menu, select [Control Panel], [Hardware and Sound], [Sound], [Playback] or [Recording] tab, select the regular sound device (or [USB PnP Sound Device] if connection is by the supplied USB cable) for the playback device or recording device, and then click [Set default].
Windows 7
Click the [Start] menu, select [Control Panel], [Hardware and Sound], [Sound], [Playback] or [Recording] tab, select the regular sound device (or [USB PnP Sound Device] if connection is by the supplied USB cable) for the playback device or recording device, and then click [Set default].
For Macintosh
Mac OS X
Click the [Apple] menu, select [System Preferences], [Sound], [Output] or [Input] tab, and then select the regular sound device (or [USB PnP Sound Device] if connection is by the supplied USB cable) for [Select a device for sound output] or [Select a device for sound input].
(Continued)
To adjust the volume level of the sound
When connecting the computer to the processor with the USB cable, adjust the volume level using the VOL control on the headset.
When connecting with the multi-channel cable, you can adjust the volume level not only by the VOL control on the headset, but also by changing the computer volume level as below.
For Windows
Windows XP in Category View
Click the [start] menu and select [Control Panel], [Sounds, Speech and Audio Devices], [Sounds and Audio Devices], click [Volume] in Sound menu, and adjust the master volume level.
Windows Vista
Click the [Start] menu and select [Control Panel], [Hardware and Sound], [Adjust system volume], and adjust the master volume level.
Windows 7
Click the [Start] menu and select [Control Panel], [Hardware and Sound], [Adjust system volume], and adjust the master volume level.
For Macintosh
Mac OS X
Click the [Apple] menu, select [System Preferences], [Sound], [Output] tab, and adjust the speaker output level.
Notes
- You may have to perform settings depending on the software. For details, refer to the operating instructions of your software.
- The headset volume and the output level of the computer are not synchronized.
To set for music CD playback
This setting is necessary when playing back a music CD in the CD-ROM drive, if connection is by the supplied USB cable.
Follow the instructions below according to your operating system and click the check box of [Enable digital CD audio for this CD-ROM device]. For Windows Vista, Windows 7 and Macintosh, setting for music CD playback is not necessary.
For Windows XP in Category View
Click the [start] menu, and select [Control Panel], [Sounds, Speech and Audio Devices], [Sounds and Audio Devices], and [Hardware] tab. Select the CD-ROM drive for playing music, click [Properties], and then click the [Properties] tab. Click the check box of [Enable digital CD audio for this CD-ROM device].
To adjust the volume level of the microphone
Before using the processor, check and adjust the volume level of the microphone by the computer. Follow the instructions below according to your operating system, and check/adjust the volume level.
For details on the operation of your computer, refer to the operating instructions for it.
For Windows
Before adjusting the volume of the microphone, check the input level of the microphone by performing test recording with a sound recorder etc.
Windows XP in Category View
Click the [start] menu and select [Control Panel], [Sounds, Speech and Audio Devices], [Sounds and Audio Devices], and [Audio] tab. Check that [Default device] in the Sound recording menu is set to the regular sound device (or [USB PnP Sound Device] if connection is by the supplied USB cable), click [Volume] in the Sound recording menu, and adjust the microphone input level.
Windows Vista
Click the [Start] menu, select [Control Panel], [Hardware and Sound], [Sound], [Recording] tab, and select the regular sound device (or [USB PnP Sound Device] if connection is by the supplied USB cable) for the recording device and click [Set Default]. Select the regular sound device (or [USB PnP Sound Device] if connection is by the supplied USB cable) again, click [Properties], select the [Levels] tab, and adjust the microphone input level.
Windows 7
Click the [Start] menu, select [Control Panel], [Hardware and Sound], [Sound], [Recording] tab, and select the regular sound device (or [USB PnP Sound Device] if connection is by the supplied USB cable) for the recording device and click [Set Default]. Select the regular sound device (or [USB PnP Sound Device] if connection is by the supplied USB cable) again, click [Properties], select the [Levels] tab, and adjust the microphone input level.
For Macintosh
Mac OS X
Click the [Apple] menu, select [System Preferences], [Sound], [Input] tab, and adjust the microphone input level.
Notes
- The microphone does not support muting on the audio recording device of your computer. Slide the MIC MUTING switch of the Headset to “ON” muting the microphone.
- You may have to perform settings depending on the software. For details, refer to the operating instructions of your software.
Listening to Sounds
1 Turn on the connected computer.
2 Press the I / ⏻ (on / standby) switch to turn the processor on.
The power indicator of the processor lights white.
If you connect the USB port on the computer to the USB port of the processor by the supplied USB cable, USB drivers will be installed automatically when the processor is turned on at the first time after connecting and starting the computer.
3 Put on the headset.
(See page 12)
4 Start playback from the computer.
To adjust the volume
Adjust the volume level of the headset, and set the microphone muting mode.
VOL (volume)
Adjust the volume level of the headset.
MIC MUTING
ON: The microphone is set to the MIC MUTING ON mode. OFF: The microphone is set to the MIC MUTING OFF mode.
Notes
- When watching films, be careful not to increase the volume too high in quiet scenes. You may hurt your ears when a loud scene is played.
- The headset volume and the output level of the computer are not synchronised. Also note that the microphone muting mode is not synchronised.
- The music/sound might not be output from the headset if you connect to the processor by the USB cable and slide the INPUT switch to “USB” while using music software. In this case, restart the music software.
To select your preferred sound field (EFFECT function)
The EFFECT switch allows you to select your preferred sound field.
With 5.1ch, 2ch, or USB is connected when “FPS” or “SURROUND” is selected, the built-in Dolby Pro Logic IIx decoding will provide a similar sense of realism to 7.1ch. However, if the INPUT switch position does not match the connection, the EFFECT function will not work properly.
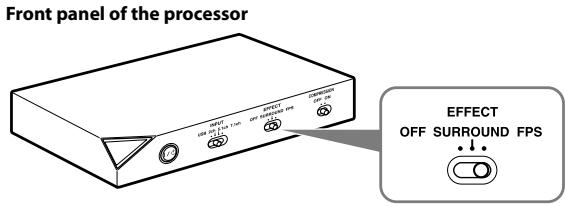
| Position of switch | Sound field mode and suitable sound source |
| FPS (First Person Shooting) | This setting provides clear localization of sounds respective of image.This is the recommended setting for FPS where locality of sounds need to be accurately perceived. The sound is listener-friendly, natural, clear and realistic. It is characterized by very sharply perceived localization of all channels. |
| SURROUND | This setting provides a seamless reproduction of all channels.The overall sound is perceived more as a whole than with the FPS mode, and provides the best sound field for playing multichannel surround games in general.Also recommended for movie watching. |
| OFF | 2ch sound is output.A multichannel source (7.1ch/5.1ch) is downmixed to 2ch sound. |
Note
The EFFECT function does not work for monaural sound sources.
About property of sound with the EFFECT function
- The EFFECT function may not be obtained from sound sources that do not incorporate video, such as music CDs.
- VPT (Virtualphones Technology) simulates the average human HRTF (head-related transfer function) ^* . The effect is perceived differently, depending on individual.
* HRTF = Head-Related Transfer Function. A mathematical measurement to show changes in sound between the source and your ears.
(Continued)
To make the sound to comfortable to hear (COMPRESSION function)
Slide the COMPRESSION switch to ON/OFF.
This function maintains the overall level of program material: explosive sounds are attenuated while lower level sounds (footsteps, etc.) are enhanced. It is very effective for limiting high dynamic range source material.
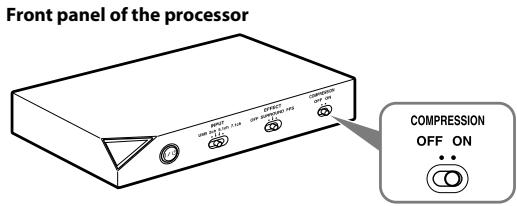
Note
Check carefully the volume control with the COMPRESSION function.
With the COMPRESSION function on, the sound may seem loud with when the audio signal from the computer is comparatively low. In this case, increase the computer's volume gradually, and set where overall the sound is consistent. Conversely, the sound may be felt to be too low. In this case, decrease the computer's volume gradually, and set for the most consistent overall sound.
Illustration of the compression process
flowchart
graph LR
    A["explosion"] --> B["input signal"]
    B --> C["compression"]
    C --> D["output signal"]
    D --> E["feedback noise"]
    E --> F["footsteps, background noise"]
    F --> G["Dynamic range compression by built-in DSP (Digital Signal Processor) processor"]
    style A fill:#f9f,stroke:#333
    style B fill:#ccf,stroke:#333
    style C fill:#cfc,stroke:#333
    style D fill:#fcc,stroke:#333
    style E fill:#cff,stroke:#333
    style F fill:#ffc,stroke:#333
    style G fill:#fcf,stroke:#333
    subgraph "Dynamic range"
        H["Uncomfortable"]
        I["Easy to hear"]
        J["Difficult to hear"]
    end
To adjust the volume level from the sound device (GAIN CONTROL)
The GAIN CONTROL adjusts the volume according to the rated output of the sound device (initial setting is “8”). Increase the GAIN CONTROL more than “8” if the output is low, even when the volume of the sound device is maximized. And if sound is distorted, decrease the volume level of the output on the sound device.
Rear panel of the processor
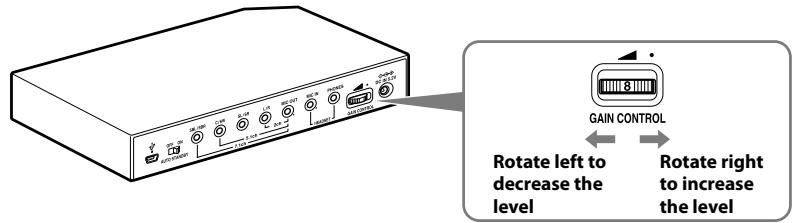
| Sound device rated output | GAIN CONTROL level |
| More than 2Vrms | Adjust the GAIN CONTROL level to “8,” and then adjust the audio output device to lower the sound. |
| 2Vrms | This processor is calibrated for 2Vrms standard output to the sound device when the GAIN CONTROL is set to “8.” |
| Less than 2Vrms | “8” - “10,” the GAIN CONTROL level adjust for the louder volume. |
To set the system to enter the standby mode automatically (AUTO STANDBY function)
The processor enters the standby mode automatically if the processor does not input sound for about 30 minutes.
You can turn the AUTO STANDBY function ON/OFF by the AUTO STANDBY switch.
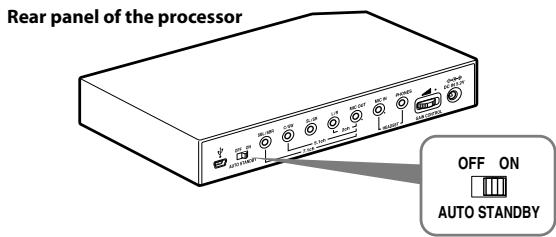
| Position of switch | Effect |
| ON | The AUTO STANDBY function will work. Turn on the system again by pressing the I / ⏻ (on / standby) switch. |
| OFF | The AUTO STANDBY function will not work. |
Troubleshooting
If you run into any problems using this system, use the following checklist. Should any problem persist, consult your nearest Sony dealer.
| Symptom | Cause and remedy |
| No sound | Check the connection between the processor and the computer.Turn on the computer connected to the processor, and start the playback.Turn on the processor.The INPUT setting does not match the actual connection method. (Example: the input signal is USB, the INPUT setting is 7.1ch, etc.)→ Set the INPUT switch to the appropriate input signal.Increase the headset volume.Connect the headphone plug properly.Increase the volume level of the computer and the music playback software.The system is connected while music software is in use.→ Restart the music software.The sound device of your computer is not set correctly (page 13).The volume control of your computer or the music playback software, etc., is set to mute.→ Unset mute.The GAIN CONTROL level is “0.”→ Increase the GAIN CONTROL.Your computer does not recognize the headset as a USB device if connection is by the supplied USB cable.→ Restart your computer.The CD-ROM drive of your computer does not support the digital play function if connection is by the supplied USB cable.→ Use a CD-ROM drive that supports the digital playback function.Digital broadcasts might not be heard with the USB connection.→ Connect the computer by the multi-channel cable (page 8 to 10).AUTO STANDBY activated because no sound was input for approx. 30 minutes.→ Turn on the processor again. |
| Distorted or intermittent sound (sometimes with noise) | Decrease the volume level on the connected computer. |
| Low sound | Increase the volume level on the connected computer and the music playback software.Increase the headset volume.Increase the GAIN CONTROL. |
| Loud background noise | ·If you connect the processor to a computer using the multi-channel cable, increase the volume level on the connected sound device.·Separate the processor from the computer.·The INPUT setting does not match the actual connection method. (Example: the input signal is 2ch, the INPUT setting is 7.1ch, etc.)→ Set the INPUT switch to the appropriate input signal. |
| The surround sound effect is not obtained | ·Set the EFFECT switch to “FPS” or “SURROUND” (page 17).·The surround effect does not work for monaural sound sources.·The INPUT setting does not match the actual connection method. (Example: the input signal is 2ch, the INPUT setting is 7.1ch, etc.)→ Set the INPUT switch to the appropriate input signal. |
| Sound is disrupted | ·The CPU of your computer is overloaded, if connection is by the supplied USB cable.→ Exit other unnecessary applications.·Other USB devices are connected to your computer and being used simultaneously while connected by the supplied USB cable.→ Quit operating other USB devices. |
| No sound from the microphone | ·Connect the microphone plug properly.·The MIC MUTING switch on the headset is set to “ON.”→ Slide the MIC MUTING switch to “OFF.”·The audio recording device of your computer is not set correctly (page 13). |
| Low sound from the microphone | ·Connect the microphone plug properly.·Move the microphone to the correct position.·The volume level of the microphone is set too low on the computer.→ Increase the volume level of the microphone on the computer. |
| Recorded sound from the microphone is noisy | ·There are electrical wires, fluorescent lights, or mobile phones near the headset (especially the microphone).→ Move away from any possible sources of electromagnetic interference.·Headphone sound leaked to the microphone.→ Move the microphone to the correct position. |
| Distorted sound from the microphone | ·The volume level of the microphone is set too high on the computer.→ Decrease the volume level of the microphone on the computer. |
| The MIC MUTING switch does not work | ·The computer's microphone input is already muted.→ Cancel microphone muting on the computer. |
| The computer output level settings of the center speaker and subwoofer may be reversed. | ·Depending on the computer, the computer output level settings of the center speaker and subwoofer may be reversed. Before changing the computer output level, refer to the operating instructions for details on operation of your computer. |
Precautions
On safety
- Do not drop, hit, or otherwise expose the processor or headset to strong shock of any kind. This could damage it.
- Do not disassemble or attempt to open any parts of the system.
- The earpads and head cushion may deteriorate due to long-term storage or use.
On placement
- Do not place the system in any of the following locations.
- Location exposed to direct sunlight, near a heater, or other extremely high temperature location
- Dusty location
- On an unsteady or inclined surface
- Location exposed to large amounts of vibration
- Bathroom or other high-humidity locations
On AC adaptor
- Be sure to use the supplied AC adaptor. Using AC adaptors with different plug polarity or other characteristics can cause product failure.
Unified polarity plug
- Be sure to always use the supplied AC adaptor. Even AC adaptors having the same voltage and plug polarity can damage this product due to the current capacity or other factors.
- If you are not going to use the system for a long time, unplug the AC adaptor.
On headphones
Act considerably
When the volume is too high, the sound leaks outside the headphones. Be careful not to increase the volume so high that it bothers people around you.
There is a tendency to increase the volume when using in noisy places. However, for reasons of safety, it is advised to keep the volume at a level whereby you can still hear sounds around you.
On cleaning
Use a soft cloth slightly moistened with mild detergent solution. Do not use solvents such as thinner, benzene or alcohol as these may damage the surface.
If the product breaks
- If the product breaks, or if a foreign object gets inside the unit, immediately turn off the power and consult your nearest Sony dealer.
- When taking the system to a Sony dealer, be sure to take both the headphones and processor.
Specifications
Digital surround processor (DP-GA500)
Decoder functions
Dolby Pro Logic IIx
Virtual surround function
OFF
SURROUND
FPS
Compression function
OFF
ON
Frequency response
20 - 20,000 Hz
Distortion rate
1% or less (1 kHz)
Input/Output jacks
USB jack
7.1ch/5.1ch/2ch (SBL/SBR, C/SW, SL/SR,
L/R, MIC OUT) jacks (stereo mini-jacks)
HEADSET (PHONES, MIC IN) jacks (stereo mini-jack)
Power requirements
DC 5.2 V (from the supplied AC adaptor)
Dimensions
Approx. 190 × 30 × 117 mm (w/h/d)
Mass Approx. 310 g
Operating environment Compliant computer
IBM PC/AT or compatible computers Apple Macintosh
CPU: Pentium II 266 MHz or better
USB port ^*1
Compliant OS:
Windows 7
Starter/Home Basic/Home Premium/ Professional/Ultimate
Windows Vista
Home Basic/Home Premium/Business/ Ultimate
Windows XP
Home Edition (SP2 or later)/Professional (SP2 or later)/Media Center Edition 2004
(SP2 or later)/ Media Center Edition 2005 (SP2 or later)
Mac OS X (10.3 or later)
Stereo Headset (DR-GA210)
Cord 1.5 m
Mass Approx. 240 g (without cord)
Headphones
Type Open air dynamic
Driver unit
40 mm, dome type (CCAW adopted)
Power handling capacity
1,000 mW (IEC ^*2 )
Impedance
40 Ω at 1 kHz
Sensitivity
100 dB/mW
Frequency response
14 - 22,000 Hz
Microphone
Design Boom microphone
Type Electret condenser
Open circuit voltage level
-38 dB (0 dB = 1 V/Pa)
Effective frequency rage
20 - 20,000 Hz
Supplied accessories
AC adaptor (5.2 V) (1)
Multi-channel cable (7.1ch+MIC) (1)
Dedicated USB cable (1)
Card warranty (1)
Operating Instructions (1)
*1 The processor supports USB 2.0 (USB 2.0 Full Speed).
^*2 IEC (International Electronic Committee) tested.
- For the operating environment mentioned above, the headset is not guaranteed to operate with all computers.
- The headset is not guaranteed to operate with home-built computers, operating systems that are personally up-graded, or multiple operating systems.
- The headset is not guaranteed to operate with functions such as system suspend, sleep and hibernation.
Design and specifications are subject to change without notice.
AVERTISSEMENT
natural_image
Symbol of a trash bin crossed with no text or numbers, representing environmental restriction (no text present)*2 FPS = First Person Shooting
natural_image
Isometric line drawing of a rectangular electronic device with four circular ports and a triangular tip (no text or symbols)② Casque DR-GA210 (1)

natural_image
Line drawing of a multi-band耳机 with attached cable and connector (no text or symbols)natural_image
Line drawing of a cable and plug device (no text or symbols)natural_image
Line drawing of a USB cable with connectors (no text or symbols)⑤ Câble multicanaux (7.1 canaux + MIC) (1)

natural_image
Coiled electrical cable with multiple terminal connectors (no text or symbols visible)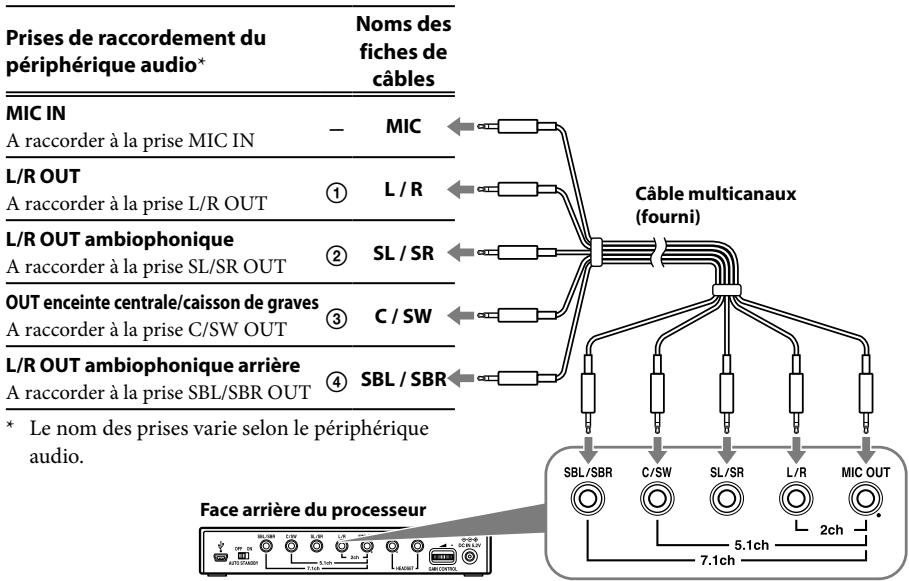
Remarques
Starter/Home Basic/Home Premium/Professional/Ultimate
Windows Vista
Home Basic/Home Premium/Business/Ultimate
Windows XP
natural_image
Symbol of a trash bin crossed with a diagonal line, no text or labels presentnatural_image
Simple line drawing of a rectangular electronic device with four circular ports and a triangular tip (no text or symbols)② Headset DR-GA210 (1)
natural_image
Line drawing of a multi-band耳机 with attached audio cable (no text or symbols)③ Netzteil (1)

natural_image
Line drawing of a cable and plug device (no text or symbols)natural_image
Line drawing of a USB cable with two connectors (no text or symbols)⑤ Mehrkanal-Kabel (7.1ch+MIC) (1)
natural_image
Line drawing of a coiled electrical cable with multiple terminal connectors (no text or symbols)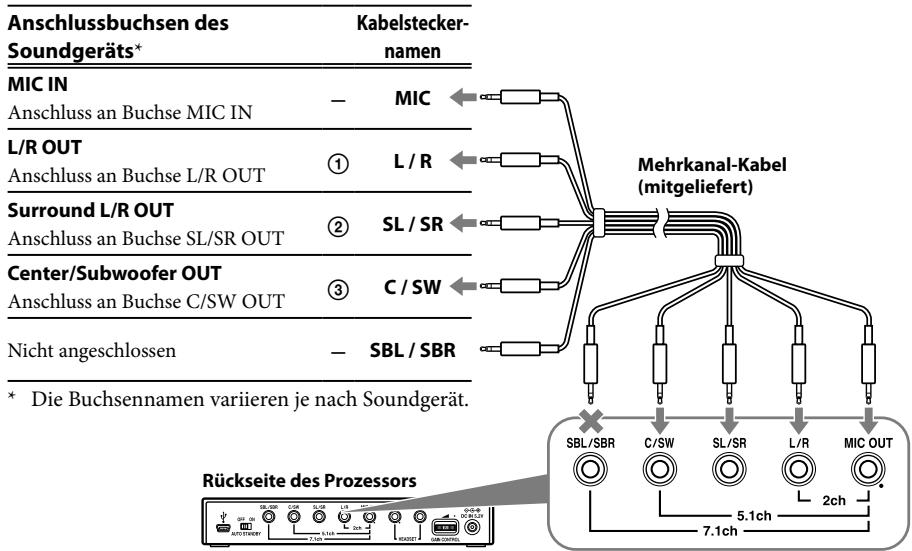
MIC MUTING
Starter/Home Basic/Home Premium/Professional/Ultimate
Windows Vista
Home Basic/Home Premium/Business/Ultimate
Windows XP
natural_image
Symbol of a trash bin crossed with a diagonal line, no text or labels present^*2 FPS = First Person Shooting
natural_image
Isometric line drawing of a rectangular electronic device with four circular ports and a triangular tip (no text or symbols)② Auriculares DR-GA210 (1)

natural_image
Line drawing of a multi-band headphones connected to a cable via a connector (no text or symbols present)③ Adaptador de ca (1)
natural_image
Line drawing of a handheld electronic device with coiled cable and connector (no text or symbols)natural_image
Line drawing of a USB cable with two connectors (no text or symbols)⑤ Cable multicanal (7.1ch+MIC) (1)
natural_image
Coiled electrical cable with multiple terminal connectors (no text or symbols visible)Starter/Home Basic/Home Premium/Professional/Ultimate
Windows Vista
Home Basic/Home Premium/Business/Ultimate
Windows XP
Home Edition (SP2 o posterior)/Professional (SP2 o posterior)/Media Center Edition 2004 (SP2 o posterior)/Media Center Edition 2005 (SP2 o posterior)
Mac OS X (10.3 o posterior)
- Digital Surround Headset System
- Notice for customers: the following information is only applicable to equipment sold in countries applying EU directives
- Table Of Contents
- Features......4
- Checking the Components and Accessories....5
- Location and Function of Parts......6
- Connecting the Headset system.....8
- Listening to Sounds...... 16
- Troubleshooting 20
- Precautions 22
- Specifications.... 23
- Features
- Checking the Components and Accessories
- Digital Surround Processor Part Descriptions
- Headset Part Descriptions
- Connecting the Headset system
- Step 1-Ⓐ: Connecting a 7.1ch Sound Device
- Connect the processor to the sound device as illustrated below.
- Slide the INPUT switch to "7.1ch."
- Set the 7.1ch speaker mode in the computer.
- Step 1-®: Connecting a 5.1ch Sound Device
- Slide the INPUT switch to "5.1ch."
- Set the 5.1ch speaker mode in the computer.
- Step 1-©: Connecting a 2ch Sound Device
- Slide the INPUT switch to "2ch."
- Set the 2ch speaker mode in the computer.
- Step 1-⑭: Connecting to the Computer Using the USB cable
- Connect the processor to the computer.
- Notes
- Slide the INPUT switch to "USB."
- Check the sound settings of the computer.
- Step 2: Connecting the AC Adaptor
- Step 3: Preparing the Headset
- Note
- Step 4: Checking the Settings of the Computer
- To check the sound device settings of the computer
- For Windows
- Windows XP in Category View
- Windows Vista
- Windows 7
- For Macintosh
- Mac OS X
- To adjust the volume level of the sound
- To set for music CD playback
- For Windows XP in Category View
- To adjust the volume level of the microphone
- Listening to Sounds
- To adjust the volume
- VOL (volume)
- MIC MUTING
- To select your preferred sound field (EFFECT function)
- About property of sound with the EFFECT function
- To make the sound to comfortable to hear (COMPRESSION function)
- To adjust the volume level from the sound device (GAIN CONTROL)
- To set the system to enter the standby mode automatically (AUTO STANDBY function)
- Troubleshooting
- Precautions
- On safety
- On placement
- On AC adaptor
- Unified polarity plug
- On headphones
- On cleaning
- If the product breaks
- Specifications
- Digital surround processor (DP-GA500)
- Stereo Headset (DR-GA210)
- Headphones
- Microphone
- Supplied accessories
- AVERTISSEMENT
- Remarques
- Windows XP
- Mac OS X (10.3 o posterior)
Brand : SONY
Model : DR-GA500
Category : Headphones