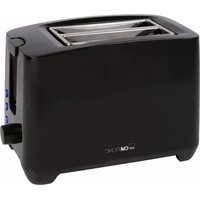
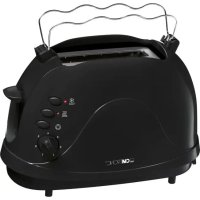
TA 3534 - Croque monsieur clip CLATRONIC - Free user manual and instructions
Find the device manual for free TA 3534 CLATRONIC in PDF.

| Product type | Toaster |
| Brand | Clatronic |
| Model | TA 3534 |
| Power supply | 220–240 V~, 50/60 Hz |
| Net weight | Approx. 1.6 kg |
| Number of slots | 2 |
| Browning level setting | 7 positions (from 1 = light to 7 = dark) |
| Additional functions | Defrost, reheat, emergency stop (Stop) |
| Removable grilling accessory | For rolls and pastries |
| Crumb tray | Removable, located under the appliance |
| Automatic shut-off | Yes, when the browning level is reached |
| Cable storage | Winds under the base |
| Housing material | Metal and plastic (unspecified, estimated) |
| Cleaning | Housing: damp cloth; crumb tray: empty and wipe |
| Burn protection | Caution: hot surfaces and metal parts |
| Do not immerse | Yes, risk of electric shock |
| Intended use | Private, household only |
| Repairability | Do not repair yourself; contact a qualified technician |
Frequently Asked Questions - TA 3534 CLATRONIC
User questions about TA 3534 CLATRONIC
0 question about this device. Answer the ones you know or ask your own.
Ask a new question about this device
Download the instructions for your Croque monsieur clip in PDF format for free! Find your manual TA 3534 - CLATRONIC and take your electronic device back in hand. On this page are published all the documents necessary for the use of your device. TA 3534 by CLATRONIC.
USER MANUAL TA 3534 CLATRONIC
Consummation: 1200-1400W
Thank you for choosing our product. We hope you will enjoy using the appliance.
Symbols in these Instructions for Use
Important information for your safety is specially marked. It is essential to comply with these instructions in order to avoid accidents and prevent damage to the machine:
WARNING:
This warns you of dangers to your health and indicates possible injury risks.
CAUTION:
This refers to possible hazards to the machine or other objects.
NOTE: This highlights tips and information.
General Notes
Read the operating instructions carefully before putting the appliance into operation and keep the instructions including the warranty, the receipt and, if possible, the box with the internal packing. If you give this device to other people, please also pass on the operating instructions.
- The appliance is designed exclusively for private use and for the envisaged purpose. This appliance is not fit for commercial use.
- Do not use it outdoors. Keep it away from sources of heat, direct sunlight, humidity (never dip it into any liquid) and sharp edges. Do not use the appliance with wet hands. If the appliance is humid or wet, unplug it immediately.
- When cleaning or putting it away, switch off the appliance and always pull out the plug from the socket (pull the plug itself, not the lead) if the appliance is not being used and remove the attached accessories.
- Do not operate the machine without supervision. If you leave the room you should always turn the device off. Remove the plug from the socket.
- The device and the mains lead have to be checked regularly for signs of damage. If damage is found the device must not be used.
- Use only original spare parts.
- In order to ensure your children's safety, please keep all packaging (plastic bags, boxes, polystyrene etc.) out of their reach.
WARNING!
Do not allow small children to play with the foil. There is a danger of suffocation!
Special safety information for this unit
- Always watch the unit while it is being used!
WARNING:
Very dry bread can start to burn when being toasted!
- The metal parts get hot. Danger of burns!
- Do not insert forks, knives or other objects in the toasting slot.
- Do not insert your fingers into the toasting slots (danger of burns).
- Do not set up the unit next to inflammable objects (e.g. curtains, wood, etc.)!
-
Do not operate the appliance with an external timer or separate remote control system.
-
Do not try to repair the appliance on your own. Always contact an authorized technician. To avoid the exposure to danger, always have a faulty cable be replaced only by the manufacturer, by our customer service or by a qualified person and with a cable of the same type.
- This appliance can be used by children aged from 8 years and above and persons with reduced physical, sensory or mental capabilities or lack of experience and knowledge if they have been given supervision or instruction concerning use of the appliance in a safe way and understand the hazards involved.
Children shall not play with the appliance. - Cleaning and user maintenance shall not be made by children unless they are older 8 years and supervised.
- Keep the appliance and its cord out of reach of children less than 8 years.
CAUTION:
Do not immerse the device into water for cleaning. Please follow the instructions as stipulated in the chapter "Cleaning".
Instructions
Before Initial Use

CAUTION:
In order to remove the protective layer on the heating coil you should operate the machine approximately three times when it is empty. Please select the maximum level of browning.

OTE:
Any smoke or smells produced during this procedure are normal. Please ensure sufficient ventilation.
Mains Lead
Unwind the required mains lead from the base.
Electrical Connection
Check whether the mains voltage that you want to use, corresponds with that of the appliance. You will find the information about it on the rating plate.
Operation
- Only connect the unit to a properly installed and earthed power socket.
- Adjust the degree of browning on the selector switch as required between the lightest level 1 to the darkest level 7. If you are not sure start with a lower setting.
- Insert the slices of bread in the toasting slot and lower the slide with the lever until it snaps into place.
- The appliance starts the toasting. When the set level of browning is reached, the appliance switches off automatically. The slide pops up automatically.
WARNING:
As the housing and the metal parts become hot during operation, please allow the device to cool down before putting it away.
Special Functions
To use the desired special function, press the relevant key, after pressing down the lever.

NOTE:
Heating or thawing:
The relevant LED indicates the function.
Thawing
to thaw and toast deep-frozen bread.
Warming to warm bread already toasted.
Stop to stop toasting in advance.
Detachable toasting attachment
If you would like to heat up rolls or toast them, place the toasting attachment onto the toasting slots.

WARNING:
- Do not overload the roasting attachment!
- Only one roll or piece of bread of comparable weight should be placed on top.
- Under no circumstances should you spread fat or better on the bread or roll. Fat may drip down and catch fire!
Mains Cable Take-up Device
The mains cable can be wound up on the base.
Cleaning

WARNING:
- Pull the mains plug out of the mains socket before you clean the unit and allow the unit to cool down.
- Do not immerse the appliance in water! Doing so may result in an electric shock or fire.

CAUTION:
Do not use abrasive or aggressive cleaners.
Housing
Only use a slightly damp cloth to clean the outside of the unit.
Crumb Tray
- The crumb tray is located at the bottom left of the device.
- Pull the crumb tray out by the handle, remove the small pieces of bread and push the tray back in place.
Technical Data
Model: TA 3534
Power supply: 220-240 V~, 50/60 Hz
Power consumption: 1200 - 1400 W
Protection class:
Net weight: approx. 1.6 kg
The right to make technical and design modifications in the course of continuous product development remains reserved.
This device has been tested according to all relevant current CE guidelines, such as electromagnetic compatibility and low voltage directives, and has been constructed in accordance with the latest safety regulations.
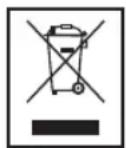
Disposal
Meaning of the "Dustbin" Symbol
Protect our environment: do not dispose of electrical equipment in the domestic waste.
Please return any electrical equipment that you will no longer use to the collection points provided for their disposal.
This helps avoid the potential effects of incorrect disposal on the environment and human health.
This will contribute to the recycling and other forms of reutilisation of electrical and electronic equipment.
Information concerning where the equipment can be disposed of can be obtained from your local authority.
Instrukcja obstugi
He 3aIIshaIte eIeKtpopnIpaI nd Yac Ioro npaCi 6e3 dOrgy!

3ACTEPEXEHH.
Kxip6 e dyke cyxim, BIn MoKe 3aropTnC8 TocTepi!
- Metanebi detani maotb Bncoky Temnepatyp! He6e3neka onikib!
3a6bOpHЯETbcra BCTaBJIaTn B TOcTeP HOxI, BnJeIKN Ta TOMy nOdi- 6Hi peyi.
3abopohreBcBCTaBnTn naIbci B TocTepe (he6e3neka onikiv).
He cTaBTe eIeKtpoPpIaI nObIu3y BiD peUeN, 10 MoJxTyb 3aRopTnCS (HaPnKJaI, rApDInH, DepeB'Ani peUi Ta iHwe)!
He npabnayte npncpoem 3a donomoro 3OBhiHbOTo TaMepa abo OKpeMoI cnCTeMM dNCTaHciHOro KepyBaHHra.
He pemontyute npina cami, ane 3BepHitbCra do ABTOPn3OBaHO foaxibra. Ira 3anobiraHHraP03i noKoJKeHn Ka6eIb XnBHeH HcIid 3amHHTn Ha eKBiBaJIeHTHn BnKlHouHO BnPo6HnKOM, a6o NaOIO cepBicHO cnyx6oHO a6o iHsoIO KBaIiΦikOBaHO Oco6oHO.
- Zei npnctpi MoKe BnKOpNCTOByBaTncb DITbMn, CTapHIMN 8 pokiv, i ocobam 3 obmexeHMMn o3nHMMn, ceHCOPHMn a6o po3ymOBHIMN 3dio6HOCTaMn, YI OCobAMn 6e3 DoCTaTHbOro DoCBiDy i 3HaHb, JaKIO BOHN BnKOpNCTOBYOTb npnctpii niD HargJdom a6o 6yIIN npoiHCTpykTOBahi zoDo BnKOpNCTaHHraPnCTpOu B 6e3- neHni cnoci6 i 3po3ymiIN noRo He6e3neKy.
-Дити He NOBHHI rpaTnca 3 npncToeM.
-Чишия Та Тхичhe obcnyroByBaHHЯ пистою He NOBHHI BIKOHyBaTncbДITbMn, HabiTbЯкso BOHn CTapwi 8 pOKi i nepe6yBAIOTBпд HaIGNYdOM.
- TpimaiTe npictri Ta noro Kaebb XnBneHna 03a 30HOo DocxHocti dite, MoIoDux 8 pokiv.

YBAGA.
He 3aHypoIte npnilad y Body, o6 nomntn Ioro. DToPmYTeC8 Bka3iBok, HabeDeHnx y po3diPi "OuHsEHHa".
Ihctpykci33actocyBaHHa
Ipeep nepwnm BkHoueHHm eJekTpponpnuLy

YBAGA.
I06BnAHTN3axCHNIaHapCNipani,TocTePcnIDabhi aO TpHi HarpitN 6e3 XnIbHX npOyKtIB.PnpCbomy cnId oBpaTHaHbNuy CTyniHbHarPiBaHH.

KA3IBKA.
PnU cBOMy MOKyTb NOBHTNcR IeRki DmM a6o 3anax -Ce a6coHOTHO HOpMaJIbHo. Picra zBoRo cIiD npOBiTn KIMHaTy.
Ka6eIb eJIekTpOmepeKi
Ka6eIbeEneKtpOxNIBHeHnCnI3MOTaTn36a3NCHOro eemeHTy.
Пдкнюенна do eNeKtpomepeki
IpepeBipTe, cB BiJIObIaE BnKOpNCTOByBaHa HAnpyra MepeXi Hanpy3i XINBHeHn npInaNy. Lr iHcOpMaJri po3MiueHa Ha Ioro nacnopTHn TaBnUci.
Ekcnnyatacia
- EneKtpponpnaad cnid niiKnHouaTn TiIbKn Do po3eToK, 0o 6bnadhaHizxNCHMM KOHTaKTamm i MaHOtB.
BctahOBiB cTynHb HarpiaHH nepeMkaem, ce MoKINBO BID nEeKoro nDcMaKyBaHH na cTynHi 1 do iTeHCMBHO HO a CtyneHI 7. Po3noHaIte 3aBKn 3 hAmMeHooCTyneHIO, kUo Bn He bNeBHeH, kN Bam notpi6H. - lMatoyok xni6a cnid noknactn B TOCTep i onyctnt peiitky BnH3 do ynpoy 3a donomoroHO BaxeJIO.
TocTeP po3NoUHe npOec NiDcMaXyBaHnHa. KOn 6yDe DocrHyTo Toi CtyniHb, LIO BV BCTaHOBuN, eNeKtpoPiJaB BiKnHOHTbcra ABOTMaTHuHO. PeSiITka ABOTMaTHuHO NiDHiMeTbcra BBepx.

3ACTEPEXEHHJ.
Ockibk Kopnyc i Metanebi deTani TocTepy nIac npaici HarpibaioTBcA DO BnCOKoi TemnepaTyPi, cIId dATN eNEKTPOnpnAnady OXONOHyTN, nepeD TmM YK NOCTaBtN IORO B Wkaany.
IodatkoBi yHkuii
I06obpatn fynkuiio, kkoBn XOTIN 6 ckopncTATNC, HATNC-HtB BiIOBIDHm KJIaBiN nicra toro JK nepeKIOHJIM Baxijb Bpo6oye noLOXeHH.

BKA3IBKA.
PiDorpiB a6o po3MopoxyBaHHa: BiNobiHa fynKuJ Bi3HaayeTbc8 ocBttneHnM KnaBiuy.

Po3Mo-poxyBAHHA

Pidorpib
Дяpo3mopokyBaHHi nDcmaKyBaHHxNl6y 3 rIb6OKOro 3amopokyBaHH.
Iπiirpiiyxni6y,uO Bke 6yno nicmaxeHo.

Cron
Длгпрпнненгпpoecу nICmaxybaHH. HatnchItb pernyTApCtynHi nIDcmaKByaHH.
3HIMHa HacaKa DnI npriroTyBaHHToCTiB
Ioo n iirpiynn 3acmaxntin x, BcTahOBiB hacaKy dnn npirotybnaHn TOCTIB y BiINOBIDHI rH3da.

3ACTEPEKEHHJ.
- 3a6bopohraeTbca KnaCTn Ha pewiTy 3aHaTTO BaxKi pei!
KnaIb6yIbIaackaTINbKnOOnHy6yIouKy a6oImatoQxN163BaIOU, 0u npBn3HO e pIBHO Bazi 6yIoQKn.
3a60pOHaTbCa Hama3yBaTu Ha xN16 a6o 6yoNoKy Macnlo a6o IHuJxKInu. KInp MoKe NtpaNTn Do KaMepu TocTepy Ha cnipanb i 3anaNTnc!
Pnctpi Dn3MoTyBaHHKa6eHIO
Kabel beneKtpoxnBneHn Bn MoKeTe HAMoTaN Ha HnXHIO qactHy TOCTepy.
OuHneHHa

3ACTEPEXEHHJ.
- Перацьким очишенин HeobxIDHO BNTIITN BUNKY eJIeKtpo-npnilady 3po3etkn i datn my OCTHTN.
He 3aHypioTe npnilad y Body! LcE moKe npn3BecTn do ypaJxehn eIeKtpnUHM cTpymom a6o nojexi.

yBATA.
3a6bopohreBcBnKOpNCTaTN DnOuHcEHH npnnaDy iDki a6o a6pa3nBHI MIOHc 3acobn.
Kopnyc
Uo6 ONUCTNTN KOPNc 33OBH,CKOpNCaTteCra 3JIeKb BOIoroHO TKAHHIO.
JIoTOKdIgKpnioK
IIOKДЯКPIMOKpo3aWOBAHm 3JIbA B HIXHnI YaCTNHi KoprnyCy npJnaNy.
BntTnHbItoKdKnKpUoK3apyKb,BNdaJIb3aNtKxla6naocTaBeItoKHaNoRoMicue.
TexhiHni napametpn
Modèle: TA 3534
PoaHHJXMBHeHH: 220-240 B\~,50/60 T
CnoxnbHnnoTyKHOCTi: 1200-1400BT
Tpyna enektpo6e3neuhocti:
Yka3bIbaet Ha BO3MOKHyHO ONaCHOCTb IJIa N3dEINr IN dpynx OKpyKaIOUcNx PpeDMeTOB.
IINPIMEYAHN: Daet COBtBn INHΦOpMaunio.
06uue 3ameuaHn
IpeiHaJOnM 3KcNlYaTaUm np6opA BnHMaTeIbHO npOuHTaTe npInarAeMyIO HCTpyKUIO NO 3KcNlYaTaUm IN COXpAHNTe ee B HAdExHOM MeCTe, BMeCTe C rapaHTnHBIM TaHOHOM, KACCOBbIM YekOM I, NO BO3MOxHocTn, KAPTOHNO Kopo6KOc C yNAKOBOyHbIM MaTePnaONOM. Ecn DaTe E Komy-NIo6o NonoNb-3OBaTbCra np6OpOM, O6raTeIbHO daJIte BnpndaCy daHNHyIO IHCTpyKUIO NO 3KcNlYaTaUm.
ПользунТecь пиборм толькх acthbIMобра3OMи noHa3haeHIO.пибор Heп徳нэнчehДя кOMMepueCKORO nCNoIb3OBAHIA.
He noIb3yItecb np6bOp moT KpbItbIM He6om. PpeOxpaHnIe np6op ot Xapbl, npMbx COIneHbIX lyuei, BnaXHOCTN (Hn B KOem cIyae He norgykaTe ero B BoDy) u yapOB 06 octpIe yrIbl. He npKacaiTeCb K np6bOp BnaXbIMn pykAm. Ecn np6bOp yBaXHMnCn nn HAOK, TyT Xe BbIHbTE BNIKY n3 po3ETKn.
- Pocne 3KcIpyatauM, MOHTaKe pInHaadJeKHOCTe, YnCTKe INI NIOLOMKe pN6Opa BcERda BbIHMaTe BnIKy n3 PO3ETKn (TJHNTe 3a BNJIky, a He 3a Ka6eJIb).
HeocTaeBnIe BkHoueHHbIe 3neKTpnpn6bp63 npncMoTpa.BbIXoJrN3 NOMEueHnB CBeJa BbIKHOaTe np6op.BbIHbTe WTeKepeN3 pO3eTKn.
- Pn6bop n Ka6eBcTeBOro NITaHnI Heo6xOIMOp peryI IraRHO o6CneIOBaTb Ha HAIuYHe CNeIOB NOBpeXKeHnI. Pn O6HapUkeHn IOBpeXKeHnI NoIb3OBaTbCpIb60pom 3aIpeuAETc.
- IcnoJb3yIte ToJIbKO opIMHaJIbHbIe 3aHactI.
- I3 coobpaekhen 6e3oanachocntn dny deTeH He octabIaIte IexKaTb yIpaKOBky (IInaCTIKOBbie MeuKN, KapTOH, NeHONlact T.D.) 6e3 npncMOtpa.
IPEyIPEXJEHNEI
He no3BOJnTe DeTmIrpaTb C nOIN3TNHeHOBOnnEHN. Onachocb ydybu!
CpeuaJIbHbIe Tpe6ObaHn8 6e3OpacHOCTn IJRA 3TOrO np6Opa
He octabTnTe np6op 6e3 na30pa!
I P E D U N P E X D E H N E:
CnIshkom cyxoi xne6 moKeT KpOme npOyeo hauatb ropeTb!
- Metanlneckne yactn harpebaotc. Onachoctb oXorob!
- Пожалуньста, He opудуи Te BHyTpN TocTepa BnIkaMn, HOxamn nII N T.I.
He cyuTe paIbUb I B waxTy TocTepa (OnacHocTb oXorOB).
He yctaHabnBaIte np6op B6n3n JeKOBocPnaMeHReMbIX npedMetOB (Haepmep: rapdInhbl, DepeBO n T.d.).
He ynpabnayte yctpoBcTBOM c NOMObBHeHHeTo TaMepa nIOTdJIbHOcCTeMbI dNCTaHcNOHHOro ynpabJeHna.
HnB Koem cnyae He pemOHnpuYte np6op camocToTeIbHO, a 6paaTecb B TaKOM cnyae 3a NOMOUsbK CpeUaJIncTy, IMeIO- 7eMy COOTBeTCTByUoN IOyck. I3 coo6paJxHn 6e3OnacHocTn, 3aMeHa CETeBOrO 5hUpa Ha paBHO3NaHbI IOpyCKaETcra TOnbKO Upe3 3aBOIN3ROTOBNTeIb, HAny cepBnCHyIO MaCTepCKyIO INIcoOTBEcTByUoIeR O KBaJInOuNpOBaHHOrO CneUaJInCTa.
- 3TO yCTPOIcTBO MOXeT hIOJIb3OBaTbCS dETbMn C 8 JIeT IIODbMn C OrpaHnueHHbIMN cH3UeCKIMN, Ocra3aTeJIbHbIMN uYMCTBeHNbIMN cNoCObHOCTaMn, a TaKKe IIOJbMn 6e3 ONbITA n 3HaHn, eCIn OHn HaxoJrTcN oD pINCMOTpOM nIN 6bIIIN pONHCTpyKTIpOBAHbl 06 NcPOnb3OBaHmN yCTPOIcTBa 6e3OpacHbIM O6pa3OM n IOHIMAIOT BO3MOxHbIE yrpo3bl.
- DeTЯM He pa3pewaetcI rIpaTb C yCTPOJCTBOM.
- Chstka n obcnyxnbHne He doJXHO BbINOJIHrTbcr DeTbMn, 3a NcKlIOueHnem Deten CTapwe 8 letn noD ha6IIOHeHnEM B3pOcIbIX.
- Pacnojarate neyb n ceteboi shhyp BHe doCraemocn deTei Mnaaie 8 let.

BHIMAHNE:
He norgykaite yctpoiCTBO B BODy dIy quCTKn. Co6JIouaTe Tpe6OBaHn, n3IOxEHHbIe B pa3dJe "YxOJ 3a np6Opom".
Hctpkno 3Kcnnyataun
Ipeep nepBbIM noJIb3ObaHnEM

BHIMAHINE:
Дя удамения зашино сmaкисHarpeBaTeNBHOrO энementsа erg Heo6xOДIMo Tpr nporpeTB.БьбepnteДЯТOTOМakcimamlbHyTO TemnepaTpy.

ПОНМЕЧАЙ:
IIOBHeHneJIeKOrO DbimaNIOCTOpOHero3aNaXpNI 3ToI npIeDype IeBHeHne HOpMaJIbHoE.ObecneYte IOctaToCHyHO BEHTINJUcIO NOMEuEHn.
Cetebou shyp
OTMOIte Ka6eBHa Heo6xOaMMyo DmHy co Da np60pa.
3JNeKtpueeckne coeHHeHHa
IpoBepbTe, YTO HApJKeHHe CeteBOrO 3NeKTPOnNTAHn, KOTOpoe npednoIaraeTcNcNoIb3OBaTb, COOTBeTCTByET HOMHaJny np6opa. HOMHaJIbHOe HApJKeHHe np6opa yka3aHo HaHnΦopMaIOHOHTo TablUnke.
3Kcnnyataun/npaokpa60TbI
BKnIOuHaIte npH6Op ToIbKO B PO3eTKy C 3aUNTHbIMN KOHTAKTAMN, yCTaHOBNeHHyO B COOTBETCTBN N C ppeINCAHNMI.
- Pn nmoi nepeknouateBb6epnte ctehen noJkapnbHn B dnaIa3OHe OT CBeTloro 1 do TemHoro 7. B clyae HeyBepenHOCTn, hauHaHTe c nepBOro noNoxkeHn.
BctabTe KycOeK (Kn) XnE6a B n3 (bl) TocTepa HaxaBa Ha pbUar,OnyCTnte cana3kn BnH3,do INx pfNKcaUIM.
TocTeP NaHnHaET NpJxkapuBaTb XIe6. KaK TOnbKO OH NpJxkapITcA Do yCTaHOBNeHHOro Ubeta, TocTeP aBTOMaTtueckN BbIKIOHTcA. Cana3Kn aBTOMaTHueckN BblEyT HabePx.
TIPEDYIPIEJEHDEHNE:
Tak KaK Kopnyc N MeTaJIuYeCKne Yactn TocTepa CnIbHo HArpeBaHOTcR Bo Bpemra paoTbI, daIte emy ocTbITb, pepei TEM KaK y6paTb.
CneuaJIbHbIe yHKn
Tc06bI BOCNoJIb3OBAtbc CneUaJIbHbIMn FyHKUJAMn HaxMITE, nocJe onyckaHnPBuHaB BHN3, COOTBetCTBYUOyU KHOIIky.
I PIMMEAHNA:
Pa3orpeBaHne nn pa3mopaxBaHne: CootBcTByoUaKoHTpOJIbHaJa lamNoUka cHHaIIN3npyet 06akTNbN3aUIn peXIma.

Pa3MopaxnBaHne
Ja pa3mopaxmbaHnI nocJeIooIeero noJkaPbAHArry6oko3amOpoxKeHHOrO xne6a.

Pa3orpeBa- Ipa pa3orpeBaHn paHee noD-Hne JkapenHoro Xne6a.

Cron
Ipy npexkdeBpeMeHHOro BbIKIOueHnra TocTepa.
CbeMbIe npHaNdxNEXKHOCTn dIy noDxkapBaHn
Ecnn Bbl xotnte pa3orpeb 6ynoqkn nnn nojdkapntb nx, yctahOBNTe npnHaNDexHOCHTn dnn nojdkapNBaHn B OTdeneHne DnTTOCTOB.
NPEyTNPEXDEHNE:
- He neperpykajte hacaiky dansbylouek!
KtanaTe Ha Hee MaKcHymOndHy 6yIouky nIIN Kycok Xne6a OndnakoBoi BEInuHbI.
HnBkoemcnyae He Hama3bIBAaTe Ha Xne6 nIN 6yIOuKIMaprAupINnnCnIBOCHoeMaCNo.OHO MOKeT NaATbNBOCnIaMeHNITcR!
MecTo HAMOTKIN CTeBORO shHypa
CetBoi shHyp hAmatbIbaETcHa npncnoc6neHHe Ha HxKHeu qactn npnbopa.
Yxoid 3a npnbopom
I P E D U N P E X D E H N E:
- Перацдои чстков Вынмайт e Влку n3 рoэтк n daite npn6opy octbITb.
He norpykaite npnbop B Body! Nocne 3Toro BO3nkaeT pNCK BO3- ropani nn ydapa 3JIeKtpnueckm TOKOM.
BHIMAHINE:
He nCnoB3yIe dIa NcCTKn CnIbHOMOIOue cpeCTBa nnnaactbl.
Kopnyc
IINYIcTKnIpi6opa ChapyknIOJIb3yITeCb BIAxHNOITpRnKoN.
JIoTOKdIgKpOWeK
- IOTOKДЯ KPOWEK BbI HauDTe CJIeBOI CTOPOHbI npi-6opa.
- BbITaHHTe BbIDBnKHyIOJNky dny XNe6bIx KpOWeK, BblTPaXHNTe N3 Hee OCTaTkn XNe6a N BCTaBbTe ee 6paTHo.
TexHnueckne daHHbIe
Modèle: TA 3534
3JIeKTPoNTaHHe: 220-240 B\~, 50/60 T
Iotppe6JIeMaMoUHocb: 1200-1400BaTT
Klacc 3aunTbI:
Bec HeTTO: npImepHo. 1,6 K
CoxpaHEno npaBo Ha texHnueckne I KOHCTpyKluOHbIe n3-MeHeHnB pamkax npoDoJkaIoUeIcra pa3pa6Otkn npoDykTa.
3To n3deneHne npoIIO BCE Heo6xOIMbIe I aKtYaIbHbIe npOBepKn, npEINcAHbIe dIpeKTHBOI CE, K npiM. Na 3JIeK-TPOMarHNTHyIO COBmecTnMOCTb I COOTBeTCTBHe Tpe6oBaHnM K Hn3KOBoNtHOI TEXHKe, OHO bIIO TAKKE cKOHCTpynpoBaHo I NOcTpoHcO yUeTOM NocPeDnX Tpe6oBaHnNo TexHnke 6e3oNaChOCTn.
(2)
:
y
.
aaii iLi
TA 3534
60/50 240-220
11,1400-1200
1
- 1.6山
y j 1
Lilipidol jiuwei
aee
gill g
aillll llll lllllllllllllllllll
Abis s j 1s cd 1s
a_1 + a_2 = 2
J 1
C
jell jlll Jaii ciil
jll jil jil jil jil jil jil jil
.5 13 20
aai g aiaiaai g aiaaaai g aiaiaiaaii i
jglall yll lll lll gll
jaiy aayni pi jil jil jil jil
Liaea yassill
aill lall aaiil jalo
lo 1
山
Jaaasill jala Jaa 2
J.
J 1
sucuuljus
L
0aJg 1
jglal jglal style 1000000000000000000000000000000000000000000
Jusall y jssy
它恰好 x = 1 或 3x + 4y + 1 = 0
i
sill jie 1jie 1jai jai jai jai jai jai jai
S ACD = S COD + S DCE - S CDE
1
sall 1n no jy jll
y
20 20
aiill 4b yie ciae j
J
a a
j 7 1
i
aill 5
y
i 1
i 1
L
J 1234567890
1234567890
1234567890
Lalal
jglplldiydi jolipia di jy