FR 3698 H - Deep fryer CLATRONIC - Free user manual and instructions
Find the device manual for free FR 3698 H CLATRONIC in PDF.
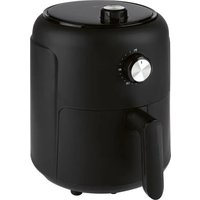
| Product type | Hot air fryer (oil-free) |
| Brand | Clatronic |
| Model | FR 3698 H |
| Power supply | 220-240 V ~ 50/60 Hz |
| Power | 900 W |
| Net weight | Approximately 2.6 kg |
| Basket capacity | Approximately 300 g (indicated max) |
| Temperature range | 80 °C to 200 °C (adjustable) |
| Timer | Up to 30 minutes with automatic shut-off |
| Operating indicator | Indicator light |
| Non-stick coating | Yes, interior of the tank |
| Safety | Safety switch preventing operation without basket |
| Automatic shut-off | Yes, at the end of the timer |
| Housing material | Heat-resistant plastic |
| Included accessories | Basket, grease tank |
| Cleaning | Hand wash; basket and tank washable in hot water |
| Maintenance | Clean after each use; do not immerse the appliance |
| Protection class | I |
| Cable length | Approximately 0.8 m |
| Color | Black (dominant) |
Frequently Asked Questions - FR 3698 H CLATRONIC
User questions about FR 3698 H CLATRONIC
0 question about this device. Answer the ones you know or ask your own.
Ask a new question about this device
Download the instructions for your Deep fryer in PDF format for free! Find your manual FR 3698 H - CLATRONIC and take your electronic device back in hand. On this page are published all the documents necessary for the use of your device. FR 3698 H by CLATRONIC.
USER MANUAL FR 3698 H CLATRONIC
natural_image
Black CMTRONIC air fryer with control panel and side arm (no visible text or symbols)Elimination......Page 22
ESPAÑOL
Indice
Overview of the Components ...... Page 3
Instruction Manual......Page 34
Technical Data......Page 38
LET OP: Anti-aanbaklaag
Thank you for choosing our product. We hope you will enjoy using the appliance.
Symbols in these Instruction Manual
Important information for your safety is specially marked. It is essential to comply with these instructions in order to avoid accidents and prevent damage to the appliance:

WARNING:
This warns you of dangers to your health and indicates possible injury risks.

CAUTION:
This refers to possible hazards to the appliance or other objects.

NOTE: This highlights tips and information.
General Notes
Read the operating instructions carefully before putting the appliance into operation and keep the instructions including the warranty, the receipt and, if possible, the box with the internal packing. If you give this appliance to other people, please also pass on the operating instructions.
- The appliance is designed exclusively for private use and for the envisaged purpose. This appliance is not fit for commercial use.
- Do not use it outdoors. Keep it away from sources of heat, direct sunlight, humidity (never dip it into any liquid) and sharp edges. Do not use the appliance with wet hands. If the appliance is humid or wet, unplug it immediately.
- When cleaning or putting it away, switch off the appliance and always pull out the plug from the socket (pull the plug itself, not the lead) if the appliance is not being used and remove the attached accessories.
- Do not operate the appliance without supervision. If you leave the room you should always turn the appliance off. Remove the plug from the socket.
- The appliance and the mains lead have to be checked regularly for signs of damage. If damage is found the appliance must not be used.
- Use only original spare parts.
- In order to ensure your children's safety, please keep all packaging (plastic bags, boxes, polystyrene etc.) out of their reach.

WARNING:
Do not allow small children to play with the foil.
There is a danger of suffocation!
Special Safety Precautions for this Appliance
You will find the following symbol with warning character on the appliance:

WARNING: Hot surface!
Danger of burns!
During operation and afterwards, the temperature of the accessible surfaces will be very high.
- Grasp the fat tank with inserted basket by the handle. If necessary, use oven gloves.
-
During operation, hot steam may escape from the air outlet opening. Keep a sufficient distance.
-
Do not cover the air inlet opening and air outlet opening, in order to ensure sufficient air circulation.
-
Keep sufficient distance (15 cm) to highly flammable objects such as furniture, curtains, etc.!
-
Due to rising heat and vapours do not place the appliance under wall cupboards.
- Do not operate the appliance with an external timer or separate remote control system.
- Do not tamper with the safety switch.
- This appliance can be used by children aged from 8 years and above and persons with reduced physical, sensory or mental capabilities or lack of experience and knowledge if they have been given supervision or instruction concerning use of the appliance in a safe way and understand the hazards involved.
• Children shall not play with the appliance. - Cleaning and user maintenance shall not be made by children unless they are older 8 years and supervised.
- Keep the appliance and its cord out of reach of children less than 8 years.
- Do not repair the appliance by yourself. Always contact an authorized technician. If the supply cord is damaged, it must be replaced by the manufacturer, its service agent or similarly qualified persons in order to avoid a hazard.
- This appliance is not intended to be immersed in water during cleaning. Please observe the instructions that we have included for you in the chapter “Cleaning”.
Unpacking the Appliance
- Remove the appliance from its packaging.
- Remove all packaging materials like foils, filling materials, cable holders, and carton packaging.
- Check the scope of deliveries for completeness.
- If there are missing parts or obvious damage, do not use the appliance. Return it to your retailer immediately.
Overview of the Components / Scope of Delivery
1 Air outlet openings
2 Air inlet openings
3 Operation indicator light
4 On/off switch/timer
5 Temperature controller
6 Basket
7 Cover for the release button
8 Release button
9 Handle of the basket
10 Fat tank
Notes for Use
Location
- Set the appliance onto a non-slip, level, and heat-resistant surface.
- Take care that the appliance and the mains cable never are placed onto hot surfaces or near heat sources (e.g. range, hob).
Electric Connection
Before inserting the power plug into the outlet, check that the mains voltage to be used matches that of the appliance. You can find the required information on the nameplate.
Switching the Appliance On / Off
- The appliance is switched off if the timer is set to the 0 position.
- Operation is only possible if the fat tank is used with the basket in the appliance.
- To use the appliance, set the desired time with the timer. And set the desired temperature with the temperature controller.
i NOTE:
Once the time is up, a bell will sound. The appliance will switch off automatically.
Before Initial Use
- There is a protective layer on the heating element. To remove this, operate the appliance for about 10 minutes without any contents.
i NOTE:
Any smoke or smells produced during this procedure are normal. Please ensure sufficient ventilation.
WARNING:
Allow the appliance to cool down before you clean it!
- Disconnect the mains plug from the wall socket.
- Before using the appliance, wipe out the basket, the fat tank and its interior.
Useful Hints for Use
- This appliance is used for the preparation of solid foods. Do not prepare any soups or liquid foodstuffs in it.
- A safety switch prevents the use of the appliance without a basket with the fat tank.
- To achieve an optimum result, fill the basket at most up to the MAX marking. Never overfill the basket, so that the food does not touch the heating element.
- Never put oil or other liquids in the fat tank. In order to achieve crispy results, you can baste the food with a little oil.
-
Do not prepare the appliance for high-fat foods (e.g. sausages).
-
All foods can be prepared in the appliance, which are also suitable for the oven.
- Note that the dough expands during baking of cakes, bread or similar. Nothing must come into contact with the heating element.
- Foods that are cooked over one another, must be shaken after half way through the cooking time. Thus the result is optimized and prevents uneven cooking.
- Pour water on homemade potato products after cutting at least 30 minutes to reduce the potato starch. Then dry the potato pieces with paper.
- The cooking time depends on several factors: Size, condition, quantity of food and set temperature. For standard values, see “Table of cooking times”.
- If you do not preheat the hot air fryer, add 5 minutes to the cooking time.
- Fry steaks / larger quantities of meat in a pan previously before leaving to cook in the hot air fryer. Time and temperature are dependent on the desired degree of doneness.
- With the appliance, you can also reheat food. Set the timer to 10 minutes and the temperature control to 150^ .
Using the Appliance
- Connect the appliance to a properly installed earthed socket.
- Turn on the appliance with the switch. The indicator light shines. You can select a cooking time.
- Turn the temperature controller to the desired temperature.
i NOTE:
Preheat the appliance for approx. 5 minutes.
-
Using the handle, pull the fat tank with the basket from the appliance.
-
Place the fat tank with basket on a heat-resistant surface.
-
Fill the basket with the desired food.
-
Slide the fat tank with the basket back into the appliance. It must engage.
-
If necessary, shake the food after half the cooking time. Pull it out of the fat tank with the basket on the handle.
WARNING:
• Hot steam can escape!
- Never shake the basket when it is in the fat tank, because this may contain hot oil.
-
Place the fat tank with basket on a heat-resistant surface.
-
Slide the cover of the release button towards the basket.
- Press the release button to remove the basket. Shake the contents of the basket.
- Put the basket back in the fat tank. This must engage.
- Slide the fat tank back into the appliance.
End of Operation
- A beep sounds when the set time has expired.

NOTE:
You may also abort the operation by setting the timer to the 0.
- Pull out the fat tank with the basket by the handle.
- Place the fat tank with basket on a heat-resistant surface.
- Slide the cover of the release button towards the basket.
- Press the release button to remove the basket. Put the food in a heatproof bowl.
- Put the basket back in the fat tank.
- Slide the fat tank back into the appliance.
Table of Cooking Times
| Foodstuffs | MIN / MAX approx. quantity (g) | Cooking time (minutes) | Temper- ature (°C) |
| Potato products | |||
| Thin frozen French fries | 200 - 300 | 18 - 20 | 200Thic |
| French fries | 20 - 25 | ||
| Potato gratin 300 | |||
froz
| Foodstuffs | MIN / MAX approx. quantity (g) | Cooking time (minutes) | Temper- ature (°C) |
| Meat | |||
| Steak | 100 - 300 | 10 - 15 180 | Pork cutlet |
| Hamburger | |||
| Sausages in batter | 13 - 15 200 | ||
| Poultry | |||
| Chicken lower leg | 100 - 300 | 25 - 30 | 180 |
| Chicken breast 15-20 | |||
| Baked | |||
| Cake,∅ max. 10 cm | 250 | 20 - 25 160 | |
| Muffins 15 - 18 200 | |||
| Quiche,∅ max. 10 cm | 300 20 - 22 180 | ||
| Light Refreshments | |||
| Frozen chicken nuggets | 100 - 300 | 6 - 10 | 200Froz |
| fingers | 100 - 250 | ||
| Spring rolls 8 - 10 | |||
| Stuffed vegetables | 10 160 | ||
| Frozen breaded cheese snacks | 8 - 10 180 | ||
Cleaning

WARNING:
• Always turn the appliance off before cleaning it and remove the mains plug. Wait until the appliance has cooled down.
- Do not immerse the appliance in water! Doing so may result in an electric shock or fire.

CAUTION: Non-stick coating
- Do not use any wire brush or other abrasive objects.
• Do not use any acidic or abrasive detergents.
• The basket and fat tank can be cleaned in a warm rinse.
- Clean the appliance inside and outside with a slightly moist, not wet cloth.
Storage
- Clean the appliance as described. Let the accessories dry completely.
• We recommend that you store the appliance in its original packaging when it is not to be used for a longer period.
• Always store the appliance at a well ventilated and dry place outside the reach of children.
Troubleshooting
If a problem occurs, it is often only a small thing. Before you contact our service, please note the following information:
| ProblemPossible Cause Remedy | ||
| The appliance is not working. | The appliance has no power supply. Check the | socket with another appliance. |
| Plug in the mains plug correctly. | ||
| Check the main circuit breaker. | ||
| You have not set the cooking time. Select a desi | red cooking time. | |
| The grease drainage container and the basket are not properly inserted. | Check the correct position. | |
| The food is not cooked to the end. | The basket is too full. Reduce the amount of food | d. Smaller quantities are cooked evenly. |
| The temperature is set too low. Set the tempera | ture higher with the temperature controller (see “Table of cooking times”). | |
| The cooking time is set too low. Use the timer to | increase the time (see “Table of cooking times”). | |
| The food is cooked unevenly. | When foods are placed on top of each other, there is inadequate airflow. | The food must be shaken after half the cooking time. |
| The food is not crisp. | Foods are used, which is only suitable for a conventional fryer. | Use oven-ready food or sprinkle it with a little oil. |
| Smoke comes out of the appliance. | You are preparing very fatty foods. Fat splashes | inside the appliance may cause the emission of fumes. Provide adequate ventilation. |
| In the fat tank there are still fat residues from previous use. | Clean the fat tank after each use as described in the chapter “Cleaning”. | |
Technical Data
Model: FR 3698 H
Power supply: 220-240 V\~, 50/60 Hz
Power consumption: 900 W
Protection class:....I
Net weight: .... approx. 2.6 kg
The right to make technical and design modifications in the course of continuous product development remains reserved.
This appliance has been tested according to all relevant current CE guidelines, such as electromagnetic compatibility and low voltage directives, and has been constructed in accordance with the latest regulations.
Disposal
Meaning of the "Wheelie Bin" Symbol
Take care of our environment; do not dispose of electrical appliances via the household waste.
Dispose of obsolete or defective electrical appliances via municipal collection points.
Please help to avoid potential environmental and health impacts through improper waste disposal.
You contribute to recycling and other forms of utilization of old electric and electronic appliances.
Your municipality provides you with information about collecting points.
Instrukcja obsługi
CTC Clatronic Sp. z o.o
Ul. Brzeska 1
45-960 Opole