CCTOS542S - Fridge CANDY - Free user manual and instructions
Find the device manual for free CCTOS542S CANDY in PDF.
| Product type | Refrigerator with freezer compartment |
| Brand | Candy |
| Model | CCTOS542S |
| Climate class | SN (10-32°C), N (16-32°C), ST (18-38°C), T (18-43°C) |
| Power supply | 220-240 V ~ 50 Hz / 230 V ~ 60 Hz |
| Refrigerant | R134a or R600a (isobutane) |
| Refrigerator defrost | Automatic |
| Freezer defrost | Manual |
| Door reversal | Yes (possible) |
| Interior lighting | Yes, replaceable bulb (max power indicated on the appliance) |
| Temperature indicator | Yes, for the coldest zone |
| Thermostat | Rotary knob (positions 0-6 approximately) |
| Vegetable drawer | Yes |
| Adjustable feet | Yes |
| Recommended maintenance | Interior cleaning with warm water and soft cloth |
| Safety | Do not use sharp tools to defrost; flammable gas R600a |
| Repairability | Repair by approved professional with original parts |
| Weight | Not specified (heavy appliance) |
Frequently Asked Questions - CCTOS542S CANDY
User questions about CCTOS542S CANDY
0 question about this device. Answer the ones you know or ask your own.
Ask a new question about this device
Download the instructions for your Fridge in PDF format for free! Find your manual CCTOS542S - CANDY and take your electronic device back in hand. On this page are published all the documents necessary for the use of your device. CCTOS542S by CANDY.
USER MANUAL CCTOS542S CANDY
natural_image
Simple black-and-white sketch of a four-leaf clover tree with a curved trunk and leaf (no text or symbols)natural_image
Line drawing of a room interior with a bed, sink, and mouse (no text or symbols)natural_image
Line drawing of a refrigerator cabinet with shelves and doors (no text or symbols)natural_image
Pure technical line drawing of two identical mechanical or architectural components with no text, numbers, or symbols.natural_image
Technical line drawing of a mechanical assembly with mounting holes and a downward arrow (no text or symbols)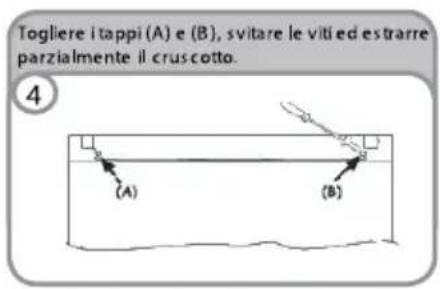
Your new appliance is designed exclusively for domestic use.
To ensure best use of your appliance, carefully read the operating instructions which contain a description of the appliance and advice on storing and preserving food.
Keep this handbook for future reference.
BEFORE USING THE APPLIANCE
1. Packing

The packing material is 100% recyclable and bears the recycling symbol. Comply with the local regulations for disposal. Keep the packing materials (plastic bags, polystyrene parts, etc.) out of the reach of children, as they are a potential source of danger.
2. Scrapping/Disposal
The appliance is manufactured using recyclable material.
This appliance is marked in compliance with European Directive 2002/96/EC on Waste Electrical and Electronic Equipment (WEEE). By ensuring the correct scrapping of this appliance, you can help prevent potentially negative consequences for the environment and the health of persons.
The symbol ☐ on the appliance, or on the accompanying documents, indicates that this appliance should not be treated as domestic waste but must be taken to a suitable collection centre for the recycling of electrical and electronic equipment. When scrapping the appliance, make it unusable by cutting off the power cable and removing the doors and shelves so that children cannot easily climb inside. Scrap the appliance in compliance with local regulations on waste disposal, taking it to a special collection centre; do not leave the appliance unattended even for a few days, since it is a potential source of danger for children. For further information on the treatment, recovery and recycling of this appliance, contact your
- After unpacking the appliance, make sure it is not damaged and that the door closes properly. Any damage must be reported to the dealer within 24 hours of delivery of the appliance.
- Wait at least two hours before switching the appliance on, in order to ensure that the refrigerant circuit is fully efficient.
- Make sure installation and the electrical connection are carried out by a qualified technician according to the manufacturer's instructions and in compliance with the local safety regulations.
- Clean the inside of the appliance before using it.
competent local office, the household waste collection service or the shop where you purchased the appliance.
Information:
This appliance does not contain CFC (the refrigerant circuit contains R134a) or HFC (the refrigerant circuit contains R600a) (refer to the rating plate inside the appliance).
Appliances with isobutane (R600a): Isobutane is a natural gas without environmental impact but is flammable. Therefore, make sure the refrigerant circuit pipes are not damaged.
Declaration of conformity
. This appliance is intended for storing food and is manufactured in conformity with European regulation (EC) No. 1935/2004.
CE
. This product has been designed, manufactured and marketed in compliance with:
- the safety objectives of Low Voltage Directive 2006/95/EC;
- the protection requirements of EMC Directive 2004/108/EC
. Electrical safety of the appliance is guaranteed only if it is connected to an efficient and approved earthing system

natural_image
Simple line drawing of a four-leaf clover tree on a hill (no text or symbols)IMPORTANT SAFETY INSTRUCTIONS
These warnings are provided in the interests of your safety. Ensure that you understand
all before installing or using this appliance. Your safety is of paramount importance.
If you are unsure about any of the meanings or these warnings contact the Customer Care Department.
Installation
- This appliance is heavy. Care should be taken when moving it.
- It is dangerous to alter the specifications or attempt to modify this product in any way.
- Ensure that the appliance does not stand on the electrical supply cable. If the supply cord is damaged, it must be replaced by the manufacturer, its service agent or similarly qualified persons in order to avoid a hazard.
- Any electrical work required to install this appliance should be carried out by a qualified electrician or competent person.
- Parts which heat up should not be exposed. Whenever possible, the back of the appliance should be close to a wall but leaving the required distance for ventilation as stated in the installation instructions.
- The appliance should be left for 2 hours after installation before it is turned on, in order to allow the refrigerant to settle.
WARNING: Keep ventilation opening, in the appliance enclosure or in the built-in structure, clear of obstruction.
Child Safety
- This appliance is not intended for use by young children or infirm persons unless they have been adequately supervised by a responsible person to ensure that they can use the appliance safely.
- Young children should be supervised to ensure that they do not play with the appliance.
During Use
- This appliance is designed for domestic use only, specifically for the storage of edible foodstuffs only.
- Frozen food should not be refrozen once it has thawed out.
- Do not place carbonated or fizzy drinks in the freezer.
- Ice lollies can cause 'frost/freezer burns' if consumed straight from the freezer.
- Do not remove items from the freezer if your hands are damp/wet, as this could cause skin abrasions or frost/freezer burns.
Maintenance and Cleaning
- Switch off, and unplug the appliance before carrying out any cleaning or maintenance work.
- Do not use sharp instruments to scrape off frost or ice. (See defrosting instructions).
WARNING: Do not use mechanical devices or other means to accelerate the defrosting process, other than those recommended by the manufacturer.
WARNING: Do not use electrical appliance inside the food storage compartments of the appliance, unless they are of the recommended
WARNING: Do not damage the refrigerant circuit.
Servicing
This product should be serviced by an authorised engineer, and only genuine spare parts should be used.
- Under no circumstances should you attempt to repair the machine yourself. Repairs carried out by inexperienced persons may cause injury or serious malfunctioning. Contact your local Service Force Centre.
At the End of the Appliance Life
- Before discarding an old PRODUCT, switch off and disconnect it from the power supply, Cut off and render any plug useless.
- Ensure that the door cannot jam (removing it is best), regardless of whether or not it can be pushed open from inside.
AN OLD PRODUCT CAN BE A DEADLY PLAYTHING FOR CHILDREN
CAUTION: At the end of the function life of the appliance it must be disposed in accordance with the W.E.E.E directive (See below). You appliance contains R600a refrigerant and inflammable gas in the insulating foam.

Please read this instruction book carefully before use and retain for future reference.
2. CORRECTLY POSITIONING
Well Ventilating
There is need of good ventilation around the refrigerator for easy dissipation of heat, high efficiency of refrigeration and low power consumption. For this purpose, sufficient clear space should be need around the refrigerator. Its back is at least 100mm away from the wall, its sides at least have a space of 100mm separately and the height from over its top is not less than 200mm. A clear space should be left to open its doors to 160°.
Power Supply
The refrigerator is only applied with power supply of single phase alternating current of (220-240)V\~/50Hz;230V\~/60Hz. If fluctuation of voltage in the district user is of so large that the voltage exceeds the above scope, for safety sake, be sure to apply a.c. automatic voltage regulator to the refrigerator. The refrigerator must employ a special power socket instead of common one with other electric appliances. Its plug must match the socket with ground wire.
Power Line Cord
The cord should be neither lengthened nor folded into coil during operation. Moreover, it is forbidden that cord is kept close onto the compressor at the back of the refrigerator, the surface temperature of which is quite high when operating. Touching with it would deactivate the insulation or cause leakage for electricity.
Protection from Moisture
Avoiding placing the refrigerator in a place where heavy moisture is present so as to minimize possibility of rusty for its metal parts. Still more, the refrigerator is forbidden to be directly sprayed by water, otherwise, poor insulation and current leakage would occur.
Protection from Heat
The refrigerator should be far away from any heat source or direct sunshine.
Fixing Stable
Floor on which refrigerator will be placed must be flat and solid.
It should not be laid on any soft material such as foam plastic, etc. If the refrigerator is not on the same level, adjust the screws suitably. the refrigerator should not be placed near anything which may echo.
Keep Away from Danger
It is inadvisable that the refrigerator is placed near any volatilizable or combustible such as gas, petrol, alcohol, lacquer and banana oil, etc. The above-mentioned objects can not be stored in the refrigerator.
Moving
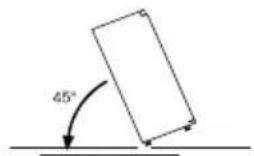
When fixed or moved, the refrigerator can not be set horizontally or declinet to more than 45^ or upside-down.
3. Cautions
- Water contained in food or getting into air inside the refrigerator by opening doors may form a layer of frost inside, It will weaken the refrigerator when the frost is thick, while it is more than 2mm thick, you should defrost.
- Defrosting in freezer chamber is operated manually. Before defrosting, take the food, the ice tray and the shelf out into the cold storing chamber temporarily then set the knob of the temperature regulator to position "0" (where the compressor will stop working) and leave the door open until ice and frost dissolve thoroughly deposited at the bottom of the freezer chamber, wipe off the water with soft cloth.. In the case of speeding up the defrosting, you may put a bowl of warm water (about 50 C) into the freezer chamber, and be sure to set the knob of the temperature regulator to original position after defrosting.
- It's inadvisable to heat the freezer chamber directly with hot water or hair dryer while defrosting to prevent deformation of the inner case.
- It's also inadvisable to scrape of ice and frost or separate food from the containers which have been congealed together with the food with sharp tool or wooden bars, so as not to damage the inner casing or the surface of the evaporator.
- If the supply cord of this appliance is damaged, it must only be replaced by a repair shop appointed by the manufacturer, because special purpose tools are required.
4. Care and maintenance
When there is a LED lamp, please note:
This LED lamp has a longlife time. Once it is broken, it is mandatory to call aftersales center to get a new one.
A replacement made by unqualified people without supervision from electrical engineer would result in electrical shock and injury.
5. Troubleshooting
1. WHEN THE REFRIGERATOR DOES NOT WORK
Check if there is a power failure.
Check if the power plug is plugged into the power outlet.
Check that the fuse has not blown.
2. WHEN THE REFRIGERATOR IS COOLING EXCESSIVELY
The temperature control dial may be set too high.
If you place foodstuffs containing a lot of moisture directly under the cool air outlets, they will freeze easily.
This does not indicate a malfunction.
3. WHEN THE REFRIGERATOR IS NOT COOLING SUFFICIENTLY
The food may be packed too tightly together which will block the flow of cool air.
You may have put something hot or a lot of foodstuffs into the refrigerator.
The door may not have been closed properly.
The door gaskets may be damaged.
The refrigerator may not be ventilated.
There may be insufficient clearance between the refrigerator and the surfaces
Immediately both sides and above.
The temperature control dial may not be set properly
4. WHEN THE DEFROSTING WATER OVERFLOWS INSIDE THE REFRIGERATOR AND ONTO THE FLOOR.
Check that the drain pipe and the drain hose are not clogged.
Check that the drain pan is housed properly.
5. WHEN CONDENSATION FORM ON THE OUTSIDE OF THE REFRIGERATOR
Condensation may form on the outside when the humidity is high such as during a wet season. This is the same result as the condensation formed when chilled water is poured into a glass. It does not, therefore, indicate a failure, wipe dry with a dry cloth.
6. WHEN YOU HEAR A SOUND LIKE WATER FLOWING
A sound like water flowing is the refrigerant flowing. It does not Indicate a malfunction.
7. WHEN THE CABINET'S SIDE PANEL HEATS UP
The side panel of the cabinet will heat up when the door is opened or closed frequently, when starting the unit and when the unit operates in summer with high ambient outside temperature, In such case, do not touch the panel, it results from the dissipation of the heat from inside the cabinet, and it does not mean that something is wrong with the refrigerator.
6. Technical specifications
*For the detailed technical specifications, please refer to the nameplate at the back of the refrigerator.
*Specifications are subject to change without prior notice.
FRIDGE
Wait at least two hours before switching the appliance on, in order to ensure that the refrigerant circuit is fully efficient.
CONTROL PANEL
natural_image
Line drawing of a computer room interior with monitor and keyboard (no text or symbols)The thermostat box to control the appliance is located inside the fridge compartment on the top right. To check whether the appliance is functioning, make sure that the thermostat knob is not set on "0".
DEFROSTING and FREEZING
The rating plate states the maximum quantity of foods that can be frozen, (see "gure 2). Freezing is guaranteed with any knob setting.
text_image
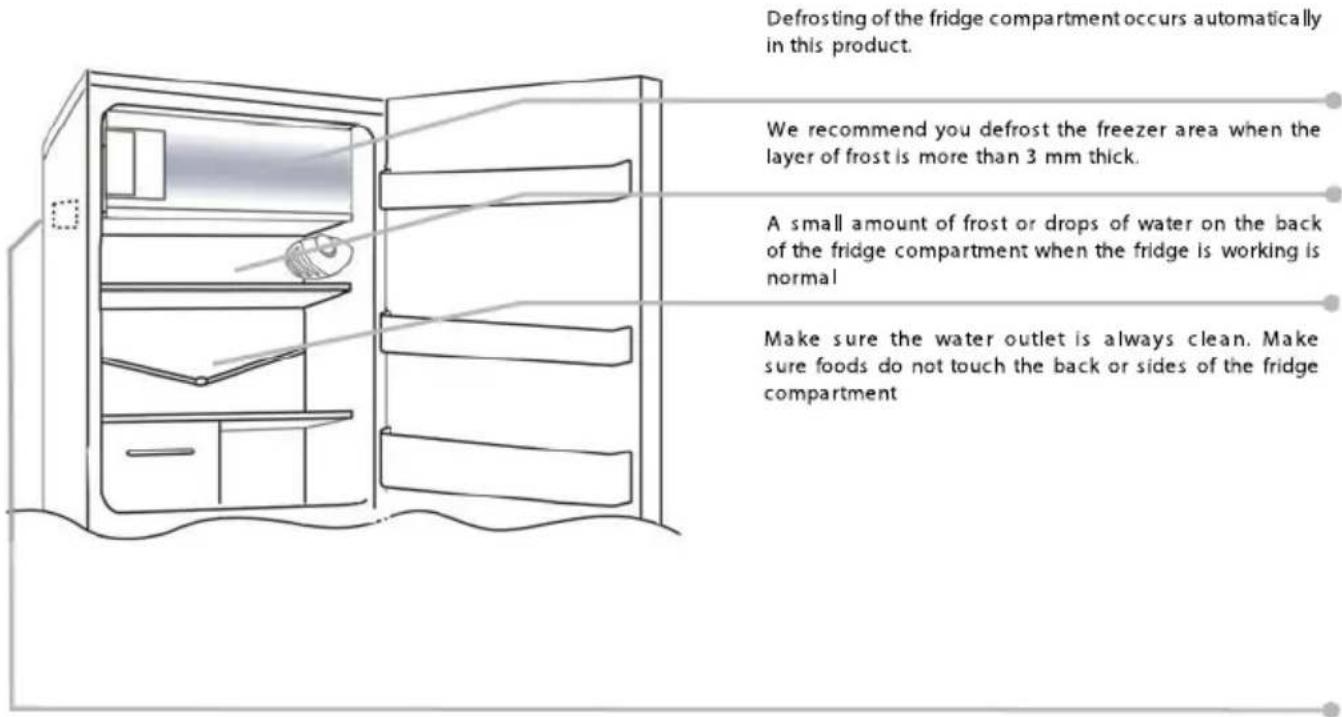
Defrosting of the fridge compartment occurs automatically in this product. We recommend you defrost the freezer area when the layer of frost is more than 3 mm thick. A small amount of frost or drops of water on the back of the fridge compartment when the fridge is working is normal Make sure the water outlet is always clean. Make sure foods do not touch the back or sides of the fridge compartmentNB. This is the rating plate. If you need to contact our Service Department in the event of faults, remember to give them the information on the plate.
Important: If the room temperature is very warm, the appliance may work continuously and a layer of frost will deposit on the back of the fridge compartment. In this case, turn the knob to lower settings (1-2).
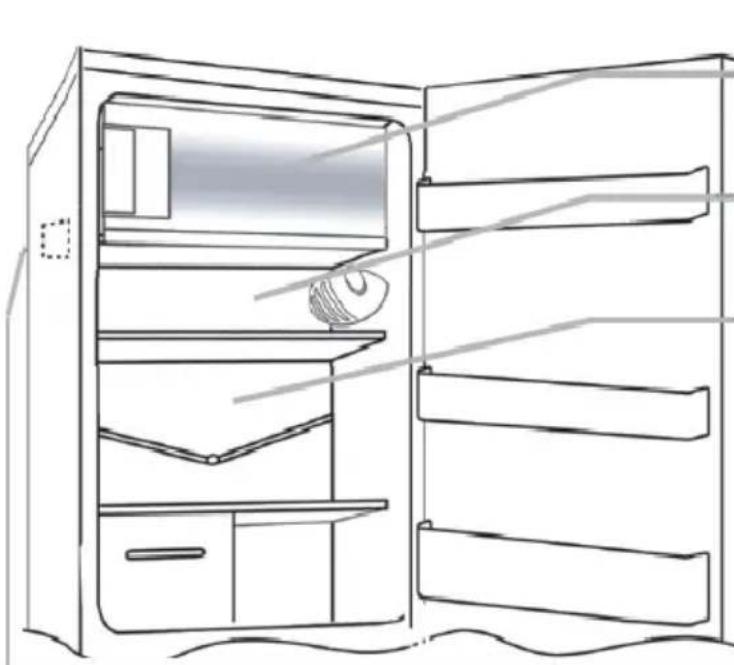
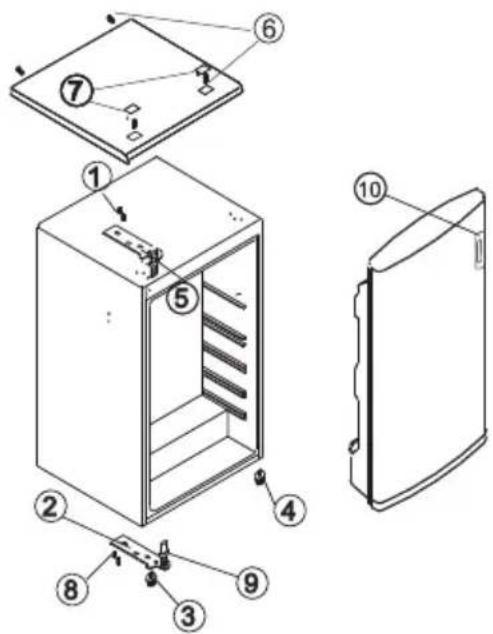
REVERSING THE OPENING OF THE DOORS
In order to reverse the opening of the doors, follow the indications in relation to the insert and hinge type your product is made up of.
A
Place or tilt the fridge at a 45° angle, since it is necessary to work on the bottom of the appliance
1
text_image
45°Remove the bottom hinge by removing the screws, the plug and washers, then remove the bottom door
2
natural_image
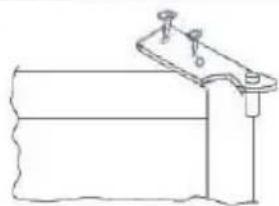
Pure technical line drawing of two identical mechanical or architectural components with no text, numbers, or symbols.Remove the middle screw and remove the top door
3
natural_image
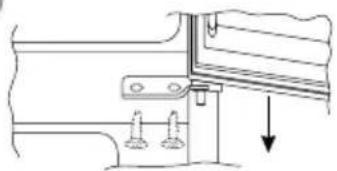
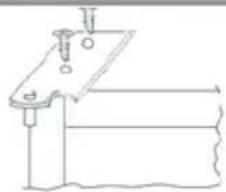
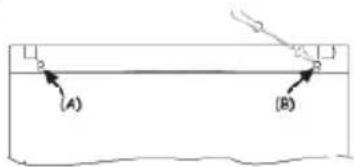
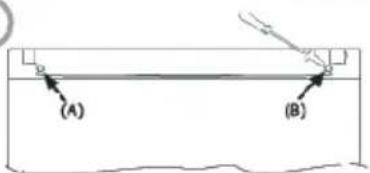
Technical line drawing of a mechanical assembly with mounting holes and a downward arrow (no text or symbols)Remove the caps (A) and (B), loosen the screws and partially remove the panel.
4

text_image
(A) (B)Unscrew the right hinge
5
natural_image
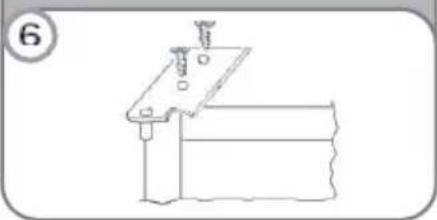
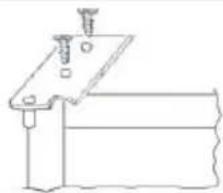
Simple line drawing of a mechanical clamp or bracket with a wavy base and mounting bracket (no text or symbols)Before reassemble the hinge to the left side, reverse the direction of the hinge.
6
natural_image
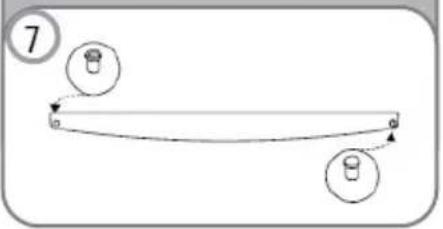
Pure technical line drawing of a mechanical assembly without any text, numbers, or symbolsRemove the plug on the left-hand side and insert it on the right hand-side of the door.
7
text_image
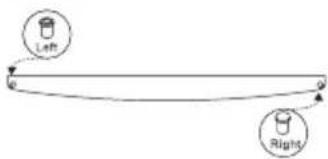
Left RightReassemble the hinges and doors working from bottom to top, 1 ☐ 2 ☐ 3
8
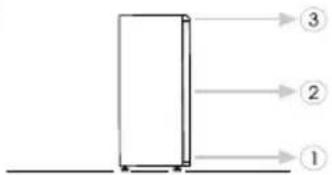
text_image
③ ② ①AVANT TOUTE UTILISATION
natural_image
Simple black-and-white sketch of a four-leaf clover tree on a hill (no text or symbols)INSTRUCTIONS DE SECURITE IMPORTANTES
natural_image
Line drawing of a room interior with a computer mouse and a monitor (no text or symbols)natural_image
Line drawing of a refrigerator cabinet with shelves and doors open (no text or symbols)natural_image
Simple line drawing of a door with a handle and screwdriver, no text or symbols present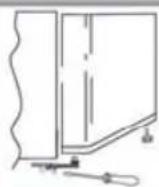
natural_image
Technical line drawing of a mechanical assembly with mounting holes and a downward arrow (no text or symbols)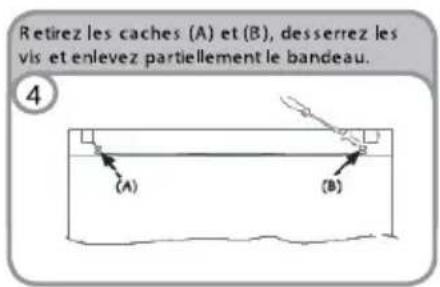
natural_image
Simple line drawing of a four-leaf clover tree with a curved trunk (no text or symbols)natural_image
Line drawing of a room interior with a door, window, and mouse (no text or symbols)natural_image
Line drawing of a refrigerator with shelves and door, no text or symbols presentnatural_image
Pure technical line drawing of two vertical panels with base and corner features, no text or symbols presentnatural_image
Simple line drawing of a rectangular container with a wavy top and two small square openings at the bottom (no text or symbols)natural_image
Simple line drawing of a mechanical or electrical component with no text, numbers, or symbolsnatural_image
Pure technical line drawing of a mechanical bracket or clamp assembly without any text, numbers, or symbolsnatural_image
Simple line drawing of a horizontal beam with two circular components at both ends (no text or symbols)natural_image
Simple line drawing of a rectangular frame with a horizontal base and small corner markers (no text or symbols)ANTES DE UTILIZAR EL ELECTRODOMÉSTICO
natural_image
Simple black-and-white sketch of a four-leaf clover tree on a hill (no text or symbols)natural_image
Line drawing of a refrigerator with a mouse inside, showing no text or symbolsnatural_image
Line drawing of an open refrigerator with shelves and doors (no text or symbols)natural_image
Technical line drawing of a mechanical assembly with mounting holes and a downward arrow (no text or symbols)
natural_image
Simple black-and-white sketch of a four-leaf clover tree on a hill (no text or symbols)INSTRUÇÕES DE SEGURANÇA IMPORTANTES
natural_image
Line drawing of a refrigerator with a mouse inside, no text or symbols presentnatural_image
Line drawing of a refrigerator with open doors and shelves, no text or symbols presentnatural_image
Simple line drawing of a door frame with a tool and base, no text or symbols present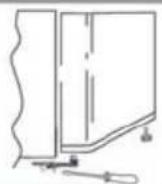
natural_image
Technical line drawing of a mechanical assembly with mounting holes and a downward arrow (no text or symbols)Retire as tampas (A) e (B), desaperte os parafusos e remova parcialmente o painel.
4
text_image
(A) (B)natural_image
Simple line drawing of a mechanical component or bracket with no text or symbolsnatural_image
Pure technical line drawing of a mechanical clamp or bracket assembly without any text, numbers, or symbolsflowchart
graph TD
    A["Left"] --> B["Right"]
    B --> A
natural_image
Simple black-and-white sketch of a tree with four rounded canopy and a curved trunk (no text or symbols)natural_image
Line drawing of a room interior with a door, window, and mouse (no text or symbols)natural_image
Simple line drawing of a cabinet or shelf with a handle and base, no text or symbols present
natural_image
Technical line drawing of a mechanical assembly with mounting holes and a downward arrow (no text or symbols)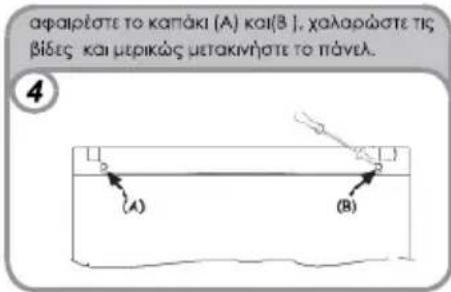
natural_image
Simple black-and-white sketch of a four-leaf clover tree on a hill (no text or symbols)ZALECENIA DOTYCZĄCE BEZPIECZEŃSTWA
natural_image
Line drawing of a room interior with a computer monitor and mouse, no text or symbols presentnatural_image
Technical line drawing of a mechanical assembly with two mounting holes and a downward arrow indicating motion (no text or symbols)natural_image
Simple line drawing of a mechanical component or bracket with no text or symbolsnatural_image
Simple line drawing of a mechanical assembly with no text or symbolstext_image
Left Rightflowchart
graph TD
    A[" "] --> B["③"]
    A --> C["②"]
    A --> D["①"]
natural_image
Simple black-and-white sketch of a four-leaf clover tree on a hill (no text or symbols)7. KDYŽ SE HŘEJÍ STĚNY CHLADNIČKY:
natural_image
Line drawing of a room interior with a door, window, and mouse (no text or symbols)natural_image
Two identical line drawings of a cabinet or shelf with handles and legs, no text or symbols present.natural_image
Technical diagram of a mechanical assembly with two screws and a downward arrow indicating force or direction (no text or symbols)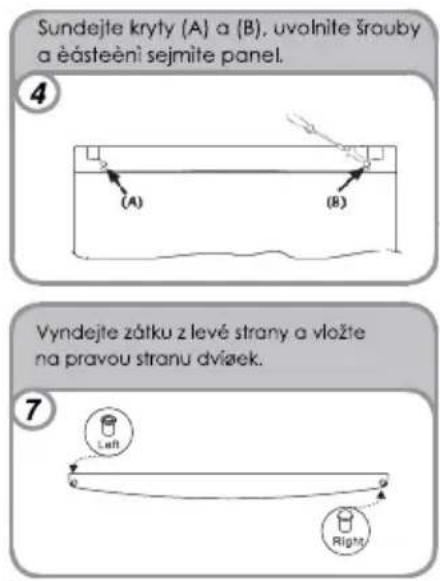
natural_image
Simple line drawing of a four-leaf clover tree on a hill (no text or symbols)BELANGRIJKE VEILIGHEIDSINSTRUCTIES
natural_image
Line drawing of a room interior with a computer mouse and a monitor (no text or symbols)natural_image
Line drawing of a refrigerator with open doors and shelves (no text or symbols)natural_image
Technical line drawing of a mechanical assembly with two mounting holes and a downward arrow indicating motion (no text or symbols)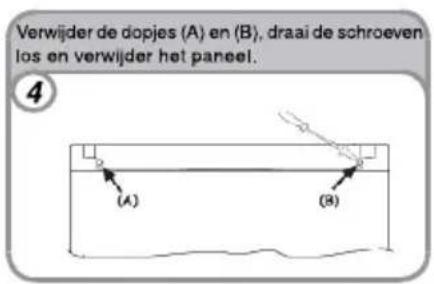
natural_image
Line drawing of a refrigerator with a mouse inside, showing no text or symbolsnatural_image
Line drawing of an open refrigerator with shelves and door (no text or symbols)natural_image
Two identical line drawings of a mechanical or architectural component with no text, numbers, or symbols.natural_image
Technical line drawing of a mechanical assembly with mounting holes and a downward arrow (no text or symbols)natural_image
Simple line drawing of a mechanical device with a lever and base (no text or symbols)text_image
Left Rightnatural_image
Pure technical line drawing of two mechanical components without any text, numbers, or symbolsnatural_image
Simple line drawing of a rectangular container with a wavy top and two small square openings at the bottom (no text or symbols)natural_image
Simple line drawing of a mechanical setup with a lever and base (no text or symbols)natural_image
Simple line drawing of a mechanical assembly with bolts and a base plate (no text or symbols)natural_image
Simple line drawing of a horizontal beam with two circular markers at endpoints (no text or symbols)natural_image
Line drawing of a room interior with a computer monitor and mouse, no text or symbols presentnatural_image
Technical line drawing of a mechanical assembly with two bolts and a downward arrow (no text or symbols)natural_image
Simple line drawing of a mechanical device with a lever and base (no text or symbols)natural_image
Pure technical line drawing of a mechanical assembly without any text, numbers, or symbolstext_image
Left RightSAFETY INSTRUCTIONS AND CAUTIONS
natural_image
Line drawing of a refrigerator with a mouse inside, showing no text or symbolsnatural_image
Line drawing of a refrigerator with open doors and shelves, no text or symbols presentnatural_image
Simple black-and-white sketch of a four-leaf clover tree on a hill, enclosed in a square frame (no text or symbols)FONTOS BIZTONSÁGI UTASÍTÁSOK
natural_image
Simple line drawing of a four-leaf clover tree with a curved trunk (no text or symbols)POMEMBNA VARNOSTNA NAVODILA
natural_image
Line drawing of a room interior with a computer mouse and monitor (no text or symbols)natural_image
Pure technical line drawing of two mechanical components with no text or symbolsnatural_image
Simple line drawing of a rectangular structure with a wavy top and two small squares at the bottom (no text or symbols)natural_image
Simple line drawing of a mechanical component or bracket with a pin and base, no text or symbols present.Pred premeščanjem tečaja na levo stran tečaj obrnite.
natural_image
Simple line drawing of a mechanical assembly with a base and mounting bracket (no text or symbols)Odstranite čep na levi strani in ga potisnite v luknjo na desni strani vrat.
flowchart
graph TD
    A["7"] --> B
    B --> C
    C --> D
    D --> E
    E --> F
    F --> G
    G --> H
    H --> I
    I --> J
    J --> K
    K --> L
    L --> M
    M --> N
    N --> O
    O --> P
    P --> Q
    Q --> R
    R --> S
    S --> T
    T --> U
    U --> V
    V --> W
    W --> X
    X --> Y
    Y --> Z
natural_image
Simple line drawing of a rectangular frame with a base and top, no text or symbols presentnatural_image
Simple black-and-white sketch of a four-leaf clover tree on a hill (no text or symbols)natural_image
Line drawing of a room interior with a computer monitor and mouse (no text or symbols)natural_image
Line drawing of a refrigerator cabinet with shelves and doors, no text or symbols presentV tomto zariadenie je odmrazovanie chladničky automatické.
natural_image
Pure technical line drawing of two mechanical components with no text or symbolsnatural_image
Simple line drawing of a rectangular container with a wavy top and two small square openings at the bottom (no text or symbols)natural_image
Simple line drawing of a mechanical component with a spring and lever (no text or symbols)Presuňte pravý záves vlavo.
6
natural_image
Pure technical line drawing of a mechanical assembly (no text or symbols)natural_image
Simple line drawing of a curved object with two circular markers, no text or symbols presentnatural_image
Simple line drawing of a rectangular frame with a small protrusion at the base (no text or symbols)PRIJE KORIŠTENJA UREĐAJA
natural_image
Simple line drawing of a four-leaf clover tree on a hill (no text or symbols)VAŽNE SIGURNOSNE NAPOMENE
Niže navedena upozorenja odnose se na vašu sigurnost. Budite sigurni da ste ih u potpunosti razumjeli prije instalacije ili korištenja uređaja. Vaša sigurnost je najvažnija.
Ako ste nesigurni u navedena značenja ili upozorenja molimo da se obratite ovlaštenom servisu.
INSTALACIJA UREĐAJA
natural_image
Line drawing of a room interior with a window, door, and a mouse (no text or symbols)Gumb termostata za kontrolu temperature uređaja nalazi se u unutarnjem prostoru hladnjaka s gornje desne strane. Da provjerite da li uređaj funkcionira, budite sigurni da gumb termostata nije postavljen na položaj "0".
ZALEĐIVANJE I ODLEĐIVANJE
Na pločici s tehničkim podacima navedena je maksimalna količina hrane koja se može zalediti (pogledajte sliku 2). Zaleđivanja je zajamčeno na bilo kojem položaju gumba termostata.
(slika 2)
natural_image
Line drawing of a refrigerator with shelves and door, showing front and side views (no text or symbols)Na ovom modelu, odleđivanje hladnjaka izvodi se automatski.
Preporučujemo da ledenicu odledite kada je sloj inja na unutarnjim stijenkama ledenice deblji od 3 mm.
natural_image
Pure technical line drawing of two identical mechanical components with no text or symbolsUklonite kapice A i B, odvijte vijke i privremeno uklonite masku.
3
text_image
(A) (B)natural_image
Simple line drawing of a mechanical device with a handle and base, no text or symbols presentnatural_image
Technical line drawing of a mechanical assembly with bolts and a base plate (no text or symbols)natural_image
Simple line drawing of a curved path with two circular markers and directional arrows (no text or symbols)natural_image
Simple line drawing of a rectangular frame with a base and corner markers (no text or symbols)Hladilnik
CANDY
CCTOS 542WH
Navodila za uporabo
PRED UPORABO APARATA
natural_image
Simple black-and-white sketch of a four-leaf clover with a leafy top (no text or symbols)POMEMBNA VARNOSTNA NAVODILA
text_image
Technical diagram of an open refrigerator with numbered parts for identificationnatural_image
Cartoon illustration of a smiling book character with arms and legs, accompanied by a thought bubble showing electrical circuit symbols (no text or labels)Zaščita pred vlago
natural_image
Cartoon illustration of a document character with arms and legs, holding an umbrella (no text or symbols)natural_image
Cartoon illustration of a smiling pot with a sprout and legs, no text or symbols presentStabilnost
Hladilnik postavite na trdna, ravna tla.
natural_image
Cartoon illustration of a smiling computer monitor with arms and legs (no text or symbols)natural_image
Cartoon illustration of a smiling document character holding a book (no text or symbols)Selitev
natural_image
Cartoon illustration of a smiling book character with limbs and arms, no text or symbols presentOpozorila
text_image
Technical diagram showing exploded view of a refrigerator with numbered components for assembly or maintenance.SLIKA 1
SLIKA 2
natural_image
Simple line drawing of a clover with four leaves, enclosed in a square frame (no text or symbols)text_image
Technical diagram of an open refrigerator with numbered parts for identificationnatural_image
Cartoon illustration of a smiling rectangular character waving, with arms and legs (no text or symbols)Napá anie
natural_image
Cartoon illustration of a book character with arms and legs, accompanied by a magnifying glass showing a battery and a resistor (no text or symbols)Ochrana voči vlhkosti
natural_image
Cartoon illustration of a document character with arms and legs, holding an umbrella and raindrops (no text or symbols)Ochrana pred teplom
natural_image
Cartoon illustration of a smiling pot with steam rising from its head (no text or symbols)Vyváženie
natural_image
Cartoon illustration of a smiling computer monitor with arms and legs (no text or symbols)natural_image
Cartoon illustration of a smiling rectangular character with arms and legs, holding a book and pouring liquid (no text or symbols)Premiestňovanie
natural_image
Cartoon character holding a rectangular object with a 45° angle标注 (no text or symbols on the figure itself)I( )POZORNENIA
text_image
Exploded view diagram of a refrigerator with numbered parts for identificationOBRÁZOK 1
text_image
Exploded view diagram of a refrigerator with numbered parts for identificationOBRÁZOK 2
OBRÁZOT 1 - PREDSTAVUSE POZÍCIU COMPONENTOV PRED VaMENOU.
OBRÁZOT 2 - PREDSTAVUSE POZÍCIU COMPONENTOV PO VaMENE DVIEROT.
natural_image
Symbol of a trash bin crossed with no text or numbers, representing waste sorting or disposal (no text present)
natural_image
Simple black-and-white sketch of a four-leaf clover tree on a curved base (no text or symbols)natural_image
Line drawing of a room interior with a computer mouse inside (no text or symbols)natural_image
Line drawing of an open refrigerator with shelves and doors (no text or symbols)natural_image
Technical line drawing of a mechanical assembly with mounting holes and a downward arrow indicating motion (no text or symbols)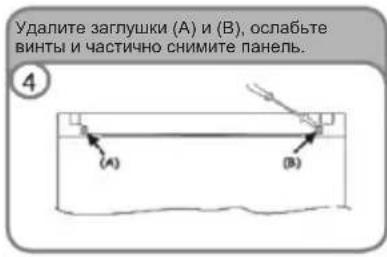
natural_image
Simple black-and-white sketch of a four-leaf clover tree on a hill (no text or symbols)ҚАУІПСІЗДІК ЖӨНІНДЕГІ МАНЫЗДЫ НЎСҚАУЛАР
natural_image
Line drawing of a computer room with an open door and mouse (no text or symbols)natural_image
Line drawing of an open refrigerator with doors, shelves, and a refrigerator lid (no text or symbols)natural_image
Technical line drawing of a mechanical assembly with no visible text or symbolsnatural_image
Simple line drawing of a mechanical clamp or bracket with no text or symbolsflowchart
graph TD
    A["Left"] --> B["Right"]
    B --> A
SAFETY WARNING UPDATING

Children and vulnerable people safety
English:
This appliance is not intended for use by persons (including children) with reduced physical, sensory or mental capabilities, or lack of experience and knowledge, unless they have been given supervision or instruction concerning use of the appliance by a person responsible for their safety.
Children should be supervised to ensure that they do not play with the appliance.
Italian:
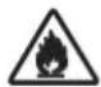
Caution: risk of fire!
If the model contains R600a-(see name plate under refrigerant) the coolant isobutene is naturals gas that, is very environmentally friendly but also combustible.
When transporting and installing the unit care must be taken to ensure that none of the refrigeration circuit components become damaged.
WARNING - Do not store explosive substances such as aerosol cans with a flammable propellant in this appliance
Test information for refrigerator freezer or upright freezer
In order to freeze more food stuff and reach best performance, the drawers (if have) in the freezer compartment can be removed for use.
The rated data in rating label and energy label of this appliance shall be validated by testing the samples which drawers have been removed.
ENGLISH:
RECCOMENDATIONS
The fridge makes some noises when working. This is entirely normal and you might hear HUMMING, GURGLING, RUSTLING AND WHISTLING, as well as slight CLICKING OR JUMPING noises.
FRENCH:
CONSEILS PRATIQUES
natural_image
Simple line drawing of a refrigerator with a piping bag and base, no text or symbols present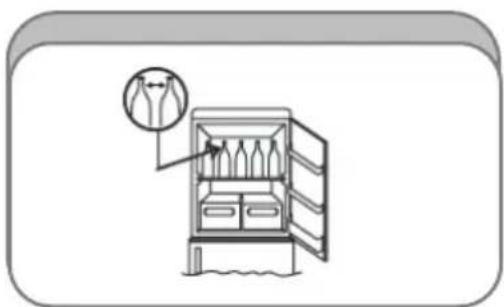
natural_image
Illustration of a refrigerator with an open door and a hanging bag, no text or symbols presentEN: Adjust the feet to level the appliance.
l'appareil.
natural_image
Diagram of a refrigerator with an arrow indicating airflow or movement, no text or symbols presentEN: Install the fridge leaving a gap between it and other furniture or appliances.
natural_image
Diagram of a refrigerator with a circular arrow indicating airflow or ventilation direction (no text or symbols)EN: Make sure accessories are installed properly.
Do not install the appliance outside.
The appliance works properly at the following temperature ranges:
Climatic class: SN +10 +32°C
Climatic class: N +16 +32°C
Climatic class: ST +18 +36°C
Climatic class: T +18 +43°C
Climatic class: N/ST +16 +38°C
(See appliance's rating plate)
FR:
PRECAUTIONS ET SUGGESTIONS GENERALES
Dear client, apart from the instruction booklet, we recommend you read carefully the instructions contained in this information sheet. This will provide you with some important safety guidelines, as well as instructions on how to install and operate the temperature control dial. Should the temperature control dial be missing, please ask your distributor for it.
1. THE COLDEST AREA OF THE FRIDGE
This symbol indicates the coldest area of your fridge. This area is usually defined by the fruit and vegetable compartment(s) at the bottom and the symbol shown here at the top.

2. TEMPERATURE INDICATOR
In order to help you set your fridge properly, we have included a temperature control dial which will monitor the temperature in the area defined as the coldest.
CAUTION: The indicator was designed to function exclusively in your fridge. It is not possible to use it in another fridge or for any other purposes.
text_image
CONTROLLED TEMPERATURE AREA DETAIL OK TEMPERATURE CONTROL DIALTEMPERATURE CONTROL
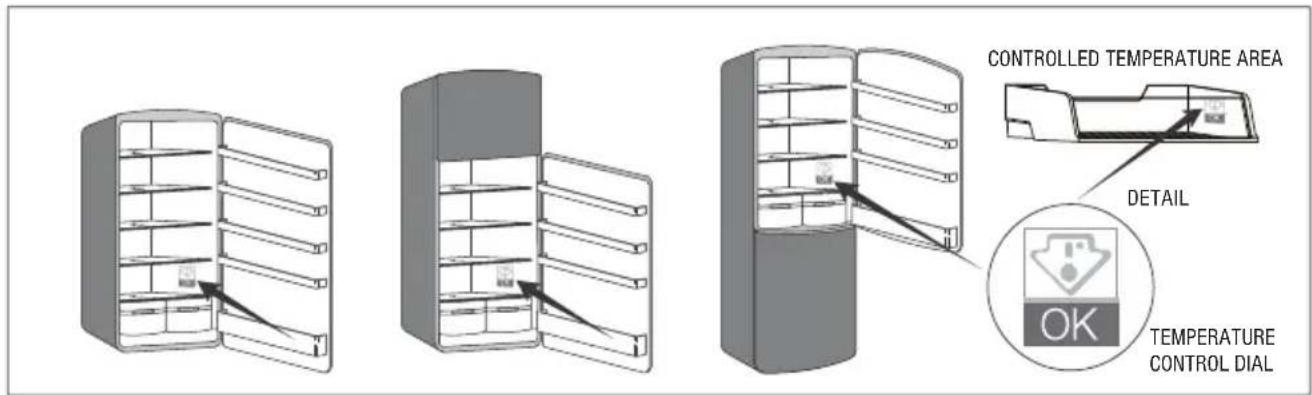
By using the temperature control dial you will be able to check on a regular basis that the temperature of the coldest area is correct. If this is not the case, it will be necessary to change the position of the thermostat.
The room temperature and the frequency with which the fridge door is opened have an impact on the internal temperature.
In order to maintain the correct temperature inside the fridge, check that the control dial is green (see Figure 1).
If the control dial turns white (see Figure 2), it means that the temperature is too high. In that case, set the thermostat and wait 12 hours before re-checking.
After charging the product or opening the door, it is normal for the control dial to turn white after a few seconds.


fi gure 1 fi gure 2
3. FOOD HYGIENE AND FRIDGE MANAGEMENT RULES
A good use of the fridge and the compliance with food hygiene rules contribute to improving food storage.
Clean the internal part of the fridge regularly with delicate products or with water and disinfectant in order to combat bacteria effectively.
Remove all food packaging before placing it in the fridge (for instance yoghurt carton packages).
Wrap the products systematically in order to avoid mutual contamination.
Do not place any kitchenware or other containers inside the fridge after having already used them prior to washing up (for instance, spoons or knives contaminated by food).
Wait for foodstuffs to have completely cooled down prior to storage (e.g. soups). Limit the number of door openings and in any case do not leave the doors open for a long time, in order to prevent the fridge temperature from rising.
Place the foodstuffs so that the air may flow freely throughout the entire fridge. Store the foodstuffs according to their nature inside the appropriate compartments and in particular, place the following items in the coldest area: meat, poultry, cold meats or sausages, ready-made dishes, mixed salads, egg or cream based pastry products, fresh pasta, dough, pizza, fresh products and cheeses made of whole or pasteurised milk, ready-made legumes sold without plastic bag and more generally all fresh products with use-by date and associated with storage temperatures lower or equal to +4°C.
text_image
COOL AREA COLD AREA COLDER AREAZ STUDIO - Cod. 41030825/A
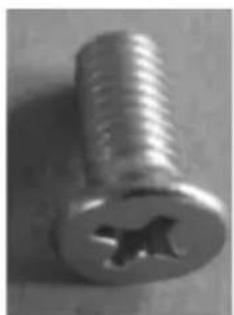
How to drive the screw of door handle (if there is handle for this model)
Step 1

natural_image
Pure electrical circuit lines without any symbolsStep 2
natural_image
Technical line drawing of a cylindrical mechanical component with mounting holes and a curved top edge (no text or symbols)
text_image
Step 3 Attention: Before driving the screw into the hole, please keep handle 4 or 6mm away from the hole, it will make you driving the screw assemblyStep 1: unscrew the round head screws on the side of the door to open
Step 2: drive the upper flat head screw into the positioning hole for 2 or 3 circles.
Step 3: drive the lower flat head screw into the positioning hole for 2 or 3 circles.
natural_image
Technical line drawing of a cylindrical device with two mounting holes, labeled 'Step 4' (no text or symbols on the diagram itself)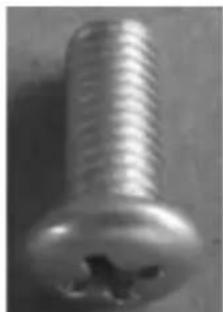
natural_image
Close-up of a metallic screw with threaded head and hole (no text or symbols visible)Round head screw
Step 4: alternatively drive the upper and lower screws into the holes for about 5 or 6 circles, until you can't drive it any more.
natural_image
Close-up of a metallic screw with a hole and threaded shaft (no text or symbols visible)Flat head screw
Rear spacer