USER MANUAL CMCH 202 ELG CANDY
Classe climatica
natural_image
Warning symbol of a flame inside a triangle (no text or numbers)
SAFETY INFORMATION....20
Storing Frozen Food 30
Freezing Fresh Food 31
ENERGY SAVING 31
TAKE CARE....31
Defrosng 31
Cleaning and Care 32
TROUBLE SHOOTING.... 32
Thank you for purchasing this product.
Before using your refrigerator, please carefully read this instrucon manual in order to maximize its performance. Store all documentaon for subsequent use or for other owners. This product is intended solely for household use or similar applicaons such as:
- the kitchen area for personnel in shops, oces and other working environments
- on farms, by clientele of hotels, motels and other environments of a residential type
- at bed and breakfasts (B & B)
- for catering services and similar applicaons not for retail sale.
This appliance must be used only for purposes of storage of food, any other use is considered dangerous and the manufacturer will not be responsible for any omissions. Also, it is recommended that you take note of the warranty conditions. Please, to obtain the best possible performance and trouble free operaon from your appliance it is very important to carefully read these instrucons. Failure to observe these instrucons may invalidate your right to free service during the guarantee period.
This guide contains many important safety informaon.
Please, we suggest you keep these instrucons in a safe place for easy reference and a good experience with the appliance.
The refrigerator contains a refrigerant gas (R600a: isobutane) and insulang gas (cyclopentane), with high compatibility with the environment, that are, however, inammable.
Cauon: risk of re
If the refrigerant circuit should be damaged:
- Avoid opening ames and sources of ignition.
Thoroughly venlate the room in which the appliance is situated
WARNING!
- Care must be taken while cleaning/carrying the appliance to avoid touching the condenser metal wires at the back of the appliance, as you might injure your ngers and hands or damage your product.
- This appliance is not designed for stacking with any other appliance. Do not aempt to sit or stand on top of your appliance as it is not designed for such use. You could injure yourself or damage the appliance.
- Make sure that mains cable is not caught under the appliance during and aer carrying/moving the appliance, to avoid the mains cable becoming cut or damaged.
- When poisoning your appliance take care not to damage your ooring, pipes, wall coverings etc. Do not move the appliance by pulling by the lid or handle. Do not allow children to play with the appliance or tamper with the controls. Our company declines to accept any liability should the instrucons not be followed.
- Do not install the appliance in humid, oily or dusty places, nor expose it to direct sunlight and to water.
- Do not install the appliance near heaters or inammable materials.
- If there is a power failure do not open the lid.
Frozen food should not be aected if the failure lasts for less than 20 hours. If the failure is longer, then the food should be checked and eaten immediately or cooked and then refrozen.
- If you nd that the lid of the chest freezer is dicult to open just aer you have closed it, don't worry. This is due to the pressure dierence which will equalize and allow the lid to be opened normally aer a few minutes.
- Do not connect the appliance to the electricity supply until all packing and transit protectors have been removed.
- Leave to stand for at least 4 hours before switching on to allow compressor oil to sele if transported horizontally.
- This freezer must only be used for its intended purpose (i.e. storing and freezing of edible foodstu).
- Do not store medicine or research materials in the Wine Coolers. When the material that requires a strict control of storage temperatures is to be stored, it is possible that it will deteriorate or an uncontrolled reason may occur that can cause risks.
- Before performing any operaon, unplug the power cord from the power socket.
- On delivery, check to make sure that the product is not damaged and that all the parts and accessories are in perfect condition.
- If in the refrigeraon system a leak is noted, do not touch the wall outlet and do not use open ames. Open the window and let air into the room. Then call a service center to ask for repair.
- Do not use extension cords or adapters.
- Do not excessively pull or fold the power cord or touch the plug with wet hands.
- Do not damage the plug and/or the power cord; this could cause electrical shocks or res.
- If the supply cord is damaged, it must be replaced by the manufacturer, its service agent or similarly qualified person in order to avoid a hazard.
- Do not place or store inammable and highly volale materials such as ether, petrol, LPG, propane gas, aerosol spray cans, adhesives, pure alcohol, etc. These materials may cause an explosion.
- Do not use or store inammable sprays, such as spray paint, near the Wine Coolers. It could cause an explosion or re.
- Do not place objects and/or containers lled with water on the top of the appliance.
- We do not recommend the use of extension leads and mul-way adapters.
- Do not dispose of the appliance on a re. Take care not to damage, the cooling circuit/pipes of the appliance in transportaon and in use. In case of damage do not expose the appliance to re, potenal ignition source and immediately
venlate the room where the appliance is situated.
- The refrigeration system posioned behind and inside the Wine Coolers contains refrigerant. Therefore, avoid damaging the tubes.
- Do not use electrical appliances inside the food storage compartments of the appliance, unless they are of the type recommended by the manufacturer.
- Do not damage the refrigerant circuit.
- Do not use mechanical devices or other means to accelerate the defrosng process, other than those recommended by the manufacturer.
- Do not use electrical appliances inside the food storage compartments, unless they are of the type recommended by the manufacturer.
- Do not touch internal cooling elements, especially with wet hands, to avoid cracks or injuries.
- Maintain the venlaon openings in the appliance enclosure or in the built-in structure, free of obstrucon.
- Do not use pointed or sharp-edged objects such as knives or forks to remove the frost.
- Never use hairdryers, electrical heaters or other such electrical appliances for defrosng.
- Do not scrape with a knife or sharp object to remove frost or ice that occurs. With these, the refrigerant circuit can be damaged, the spill from which can cause a re or damage your eyes.
- Do not use mechanical devices or other equipment to hasten the defrosng process.
- Absolutely avoid the use of open ame or electrical equipment, such as heaters, steam cleaners, candles, oil lamps and the like in order to speed up the defrosng phase.
- Never use water wash the compressor posion, wipe it with a dry cloth thoroughly aer cleaning to prevent rust.
- It is recommended to keep the plug clean, any excessive dust residues on the plug can be the cause re.
- The product is designed and built for domestic household use only.
- The guarantee will be void if the product is installed or used in commercial or non-residential domesc household premises.
- The product must be correctly installed, located and operated in accordance with the instrucons contained in the User Instrucons Booklet provided.
- The guarantee is applicable only to new products and is not transferable if the product is resold.
- Our company disclaims any liability for incidental or consequential damages.
- The guarantee does not in any way diminish your statutory or legal rights.
- Do not perform repairs on this Wine Coolers. All
intervenons must be performed solely by qualified personnel.
SAFETY CHILDREN!
- If you are discarding an old product with a lock or latch ed to the door, ensure that it is le in a safe condion to prevent the entrapment of children.
- This appliance can be used by children aged from 8 years and above and by persons with reduced physical, sensory or mental capabilities or with a lack of experience and knowledge; provided that they have been given adequate supervision or instrucon concerning how to use the appliance in a safe way and understand the hazards involved.
- Children should not play with the appliance. Cleaning and user maintenance should not be made by children without supervision.
CHEST FREEZER CANDY

Climate Class
The appliance is designed to operate at the limited range of ambient temperature, depending on climate zones. Do not use the appliance at the temperature out of the limit. Climate class of your appliance is indicated on the label with technical descripon inside the fridge compartment.
| Climate Class | Amb. T. (°C) | Amb. T. (°F) |
| SN | From 10 to 32 | From 50 to 90 |
| N | From 16 to 32 | From 61 to 90 |
| ST | From 16 to 38 | From 61 to 100 |
| T | From 16 to 43 | From 61 to 110 |
TRANSPORTATION INSTRUCTIONS
The appliance should be transported only in a vercal upright posion. The packing as supplied must be intact during transportaon. If during the course of transport the product has been transported horizontally, it must only be laid on its le hand side (when facing the door front) and it must not be operated for at least 4 hours to allow the system to sele aer the appliance is brought back to upright posion.
- Failure to comply with the above instrucons could result in damage occurring to the appliance. The manufacturer will not be held responsible if these instrucons are disregarded.
- The appliance must be protected against rain, moisture and other atmospheric influences.
3. INSTALLATION INSTRUCTIONS
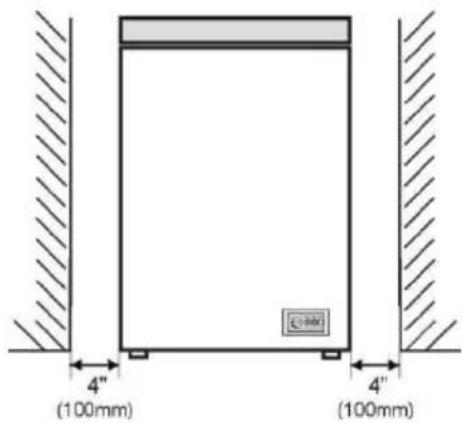
- If possible avoid placing the appliance near cookers, radiators or in direct sunlight as this will cause the compressor to run for long periods. If installed next to a source of heat or refrigerator, maintain the following minimum side clearances:
| From Cookers | 4" (100 mm) |
| From Radiators | 12" (300 mm) |
| From Fridges | 4" (100 mm) |
- Make sure that sucient room is provided around the appliance to ensure free air circulation. Ideally, A space of no less than 10cm must be le around the freezer, and ensure you allow gaps as shown in the below diagram.
-
The appliance should be located on a smooth surface.
-
It is forbidden to use the refrigerator outdoors.
-
Protecon from moisture. Do not locate the freezer in moist space to avoid the metal parts rusty. And do not spray water to the freezer, otherwise it will weaken the insulaon and causes current leakage.
-
Refer to "Cleaning and Care" secon to prepare your appliance for use.
-
If the freezer is installed in unheated areas, garages etc., in cold weather condensaon may form on the outer surfaces. This is quite normal and is not a fault. Remove the condensaon by wiping with a dry cloth.
STARTING TO USE
Before you staring to use the freezer, please check that:
- The interior is dry and air can circulate freely at the rear.
- Clean the interior as recommended under "TAKE CARE" secon.
- Insert the plug into the wall socket, all LED lights, digital display light returned to normal aer 2s.; enter to modify status without any operaon aer 5s, automatically locked
-
Set temperature range -24^ -16^ .
-
You will hear a noise as the compressor starts up. The liquid and gases sealed within the refrigeration system may also give rise to noise, whether the compressor is running or not which is quite normal.
- If you going to store already frozen food open the freezer lid and check that the freezer has reached correct temperature. Then you can put in your already frozen food (see "Storing Frozen Food").
- Do not load the appliance immediately aer is switched on. Wait until the correct storage temperature has been reached. We recommend that you check the temperature with an accurate thermometer (see "Freezer Operaon").
FREEZER OPERATION
Unlock Settings
Hold the “+” key and “-” key, both at the same me for more than 1s to unlock funcon, temperature seng, quick-frozen seng funcon.
Every press "Up" key, 1°C temperature increase; every press "Down", 1°C temperature decrease; when the stop buon operaon aer the 5s system automacally according to the set temperature, automac conrmaon and exit, stop ashing.
Temperature seng and quick-frozen set the boot parameters of 0,014 downme parameters.
Quick-Frozen Function
Press the “Super FRZ” 24h before the load. Key, the temperature is set to automacally -30^ , digital ash slow -30^ , the light is lit at the same me, stop ashing into frozen funcon aer 5s.
Running me is 26h, quick-frozen funcon automacally quit, stop quick-frozen funcon, its light is put out, restoring frozen before.
Unlock state, press the quick-frozen keys, stop quick-frozen funcon, its light is put out, back frozen before form.
Temperature Alarm Function
Electrical operation after 3h on the freezer, the temperature in the cabinet above -12°C, the alarm light is lit, and buzzer sounds.
Indicator Lights
- Frezer current state, the power indicator light lit. When state changes (i.e., digital flash), show all the bright display; a modified state (that is, the digital stop flashing), half light slow.
• Freezer power, the power indicator light go out.
Electrical operation after 3h on the freezer, the temperature in the cabinet above -12°C, the alarm light is lit, and buzzer sounds.
Suggestion: this product factory default temperature set point: -18°C. After each set, if without any key operation within 10s exit parameters setting, all the parameters set is valid.
Storing Frozen Food
Prepackaged commercially frozen food should be stored in accordance with the frozen food manufacturer's instructions for a +11X freezer compartment.
To ensure that the high quality achieved by the frozen food manufacturer and the food retailer is maintained the following should be remembered:
- Put packets in the freezer as quickly as possible after purchase.
- Do not exceed "Use By", "Best Before" dates on the packaging.
| DO | DON'T |
| Defrost food from the freezer thoroughly in a fridge or in a microwave oven following defrosting and cooking instructions. | Use pointed sharp-edged objects such as knives, forks to remove the ice. |
| Wrap all foods in aluminum foil or freezer quality plasc bags and make sure any air is excluded. | |
| Store commercially frozen food in accordance with the instrucons given on the packets that you buy. | |
| Always choose high quality fresh food and be sure it is thoroughly clean before you freeze it. | |
For more about storing, download the App and visit "Tips & Hints".
Freezing Fresh Food
Place fresh food to be frozen near the side walls to ensure fast freezing and away from already frozen food, if possible.
Freezing capacity of your appliance in a 24 hours period is 5 kg (10lb).
Never exceed this maximum capacity. Do not freeze too large a quantity at any one me. The quality of the food is best preserved when it is frozen right through to the center as quickly as possible.
Take special care not to mix already frozen food and fresh food.
ENERGY SAVING
For beer energy saving we suggest:
- Installing the appliance away from heat sources and not exposed to direct sunlight and in a well-venlated room.
- Avoid putting hot food into the refrigerator to avoid increasing the internal temperature and therefore causing connuous functionalizing of the compressor.
- Do not excessively stu foods so as to ensure proper air circulaon.
• Defrost the appliance in case there is ice to facilitate the transfer of cold.
- In case of absence of electrical energy, it is advisable to keep the refrigerator door closed.
- Open or keep the doors of the appliance open as lile as possible.
- Avoid adjusng the seng to temperatures too cold.
- Remove dust present on the rear of the appliance.
TAKE CARE
Defrosting
Defrost twice a year or when a frost layer of around 7 mm (1/4") has formed.
Alternatively you may switch o the freezer at the socket outlet and pull out the mains plug. Extract the water conduit and put in a water container.
6 hours before the defrosng, please set the thermostat knob at "MAX" posion to make sure the food is at the lowest temperature when you get it out. All food should be wrapped in several layers of newspaper and stored in a cool place (e.g. fridge or larder). Remove the freezer basket. Leave the lid open. Containers of warm water may be placed carefully in the freezer to speed up the defrosng.
When defrosng has nished ow out defrost water which collects at the boom of the freezer as the below diagram and dry the interior thoroughly. Switch on the Fast Freeze and leave it on for
about three hours.
flowchart
graph LR
    A["Step ①: Rotation arrow"] --> B["Step ②: Rotation arrow"]
    B --> C["Step ③: Rotation arrow"]
    C --> D["Step ④: Rotation arrow"]
-
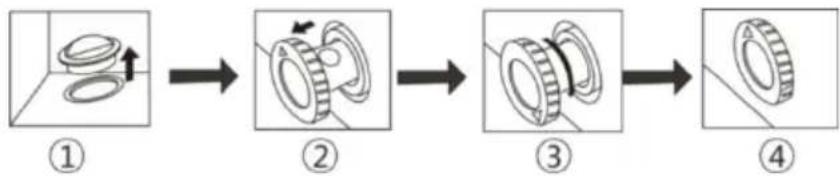
There is a water conduit at the boom of the freezer, when defrosng, extract the rubber cover, defrosted water will drip into the hole and ow out. (NOTES: Please keep the rubber cover well during the defrosng and put it back aer defrosng is done).
-
Extract the water conduit by 20-25mm unl the water hole can be seen.
-
Twist the water conduit unl the arrow points downward.
-
Aer defrosng is done, make sure there is no more water coming out before out the water conduit in place and make the arrow point upward.
Cleaning and Care
We recommend that you switch o the freezer at the socket outlet and pull out the mains plug before cleaning.
Never use any sharp abrasive instrument, soap, household cleaner, detergent and wax polish for cleaning.
Use lukewarm water to clean the cabinet of the freezer and wipe it dry.
Use a damp cloth wrung out in a soluon of one teaspoon of bicarbonate of soda to one pint of water to clean the interior and wipe it dry.
Excess deposit of ice should be removed on a regular basis using a plasc ice scraper available from your local store. Large accumulation of ice will impair the performance of the freezer.
If the freezer is not going to be used for a long period of me switch it o, remove all food, clean it and leave the lid ajar.
Check lid seals regularly to ensure they are clean and free from food parcles.
TROUBLE SHOOTING
- If the appliance does not operate when switched on, check.
- The product is designed and built for domesc household use only.
- The plug is inserted properly in the socket and that the power supply is on. (To check the power supply to the socket, plug in another appliance).
- The fuse has blown/circuit breaker has tripped/main distribuon switch has been turned off.
- The temperature control has been set correctly.
- If the provided plug has been replaced, make sure the new plug is properly connected. If the appliance is sill not operang aer the above checks, please contact Customer Service.
SCRAPPING OLD APPLIANCES


natural_image
Warning symbol of a flame inside a triangle (no text or numbers)
This appliance is marked according to the European direcve 2012/19/EU on Waste Electrical and Electronic Equipment (WEEE).
WEEE contains both pollung substances (which can cause negave consequences for the environment) and basic components (which can be re-used). It is important to have WEEE subjected to specific treatments, in order to remove and dispose properly all pollutants, and recover and recycle all materials.
Individuals can play an important role in ensuring that WEEE does not become an environmental issue; it is essenal to follow some basic rules:
WEEE should not be treated as household waste.
WEEE should be handed over to the relevant collecon points managed by the municipality or by registered companies. In many countries, for large WEEE, home collecon could be present.
In many countries, when you buy a new appliance, the old one may be returned to the retailer who has to collect it free of charge on a one-to-one basis, as long as the equipment is of equivalent type and has the same funcons as the supplied equipment.
By placing the C€ mark on this product, we are conming compliance to all relevant European safety, health and environmental requirements which are applicable in legislaon for this product.
TABLE DES MATIÈRES
INFORMATIONS SUR LA SÉCURITÉ .... 35
CONGELATEUR COFFRE CANDY 43
Classe climatique
natural_image
Warning symbol of a flame inside a triangle (no text or numbers)
AHORRO ENERGÉTICO....63
CUIDADOS....64
Descongelación 64
Clase climática
natural_image
Warning symbol of a flame inside a triangle (no text or numbers)
INSTALLATIONSANWEISUNG....76
INBETRIEBNAHME 76
Klimaklasse
natural_image
Warning symbol of a flame inside a triangle (no text or numbers)
Classe Climática
Κατηγορία κλίματος
Klimatski razred
Uređaj je osmišljen za rad u ograničenom rasponu okolišne temperature koja ovisi o klimatskim zonama. Ne upotrebljavajte uređaj na temperaturama koje nisu unutar raspona. Klimatski razred vašeg uređaja naznačen je na naljepnici s tehničkim opisom unutar odjeljka hladnjaka
| Klimatski razred | Okolišna temperatura (°C) | Okolišna temperatura (°F) |
| SN | Od 10 do 32 | Od 50 do 90 |
| N | Od 16 do 32 | Od 61 do 90 |
| ST | Od 16 do 38 | Od 61 do 100 |
| T | Od 16 do 43 | Od 61 do 110 |
UPUTE ZA PRENOŠENJE
natural_image
Warning symbol of a flame inside a triangle (no text or numbers)
Ovaj uređaj označen je sukladno Direkvi 2012/19/EZ o otpadnoj električnoj i elektroničkoj opremi (WEEE).
Klimatski razred
Ovaj uređaj je dizajniran za rad u prostoru čiji je temperaturni opseg ograničen u zavisnos od klimatskih zona. Nemojte ovaj uređaj koris na temperaturi koja je izvan dozvoljenih granica. Klimatski razred vašeg uređaja je naznačen na nalepnici sa tehničkim opisom, koja se nalazi u unutrašnjos zamrzivača.
| Klimatski razred | Sobna temp. (°C) | Sobna temp. (°F) |
| SN | Od 10 do 32 | Od 50 do 90 |
| N | Od 16 do 32 | Od 61 do 90 |
| ST | Od 16 do 38 | Od 61 do 100 |
| T | Od 16 do 43 | Od 61 do 110 |
UPUTSTVA ZA TRANSPORT
Ovaj uređaj treba transportova samo u uspravnom položaju. Ambalaža u koju je uređaj zapakovan se tokom transporta ne sme ošte. Ukoliko je uređaj tokom transportovan u horizontalnom položaju, može se naginja samo na njegovu levu stranu (gledano spreda) i ne sme se uključiva najmanje 4 sa da bi se sadržaj rashladnog sistema slegao nakon što je uređaj vraćen u uspravni položaj.
- Ukoliko se ne slede ova uputstva može doći do oštećivanja uređaja. Proizvođač uređaja se neće smatra odgovornim za nastalu štetu ukoliko se nisu sledila pomenuta uputstva.
- Ovaj uređaj se mora zaš od kiše, vlage i drugih atmosferskih ucaja.
UPUTSTVA ZA POSTAVLJANJE
- Uređaj mora bi postavljen na ravnoj površini.
- Zabranjeno je da se frižider drži na otvorenom.
- Zašte uređaj od vlage. Nemojte zamrzivač drža na vlažnom mestu kako ne bi došlo do pojave korozije na metalnim delovima. Nemojte zamrzivač prska vodom, jer to može oslabi njegovu izolaciju i doves do curenja rashladnog sredstva.
- Prilikom pripreme uređaja za upotrebu, vide odeljak „Čišćenje i održavanje“.
- Ukoliko je zamrzivač postavljen u prostoriji koja se ne greje, kao što je npr. garaža, može doći do pojave kondenzacije na njegovoj spoljašnjos. To je uobičajena pojava i nije reč o kvaru. Uklonite kondenzaciju pomoću suve krpe.
PUŠTANJE U RAD
Pre uključivanja vašeg zamrzivača, molimo proverite sledeće:
- Da li je unutrašnjost suva i da li vazduh slobodno može da cirkuliše s prednje strane.
- Da li je unutrašnjost očišćena kao što je opisano u odeljku „ODRŽAVANJE“.
- Postavite ukač u zidnu učnicu i uključite električno napajanje nakon čega će se upali CRVENA lampica. Vodite računa da ne prisnete slučajno prekidač i tako isključite uređaj. Zasijaće zelena lampica i kompresor će se pokrenu.
- Utaknite ukač u zidnu učnicu; sva LED svetla i svetlo digitalnog ekrana vraćaju se u normalno stanje nakon 2 sekunde; pristupite u status za izmenu; ako se ne izvrši nikakva radnja u narednih 5 sekundi, sistem će se automatski zaključa
- Postavite temperaturni raspon od -24°C do -16°C.
- Ukoliko želite da u skladište namirnice koje su već zamrznute, otvorite vrata zamrzivača i proverite da li je dosgao odgovarajuću temperaturu. Nakon toga možete da u njega ubacite
natural_image
Warning symbol of a flame inside a triangle (no text or numbers)
Klimatická třída
natural_image
Warning symbol of a flame inside a triangle (no text or numbers)
Klasa klimatyczna
natural_image
Warning symbol of a flame inside a triangle (no text or numbers)
Klimatski razred
natural_image
Warning symbol of a flame inside a triangle (no text or numbers)
Klimatická trieda
Clasa de climat
Климатичен клас
natural_image
Warning symbol of a flame inside a triangle (no text or numbers)
Klímaosztály
natural_image
Warning symbol of a flame inside a triangle (no text or numbers)
Климатический класс
natural_image
Warning symbol of a flame inside a triangle (no text or numbers)
natural_image
Exterior view of a modern office building (no signage)


natural_image
3D rendering of a mechanical component with a rectangular housing and mounting holes (no visible text or symbols)
EN - preparing: get the handle, screws, handle cover, hole covers.
step 1: get two screws into the handle up holes, x it into the door shell.
step 2: get two screws into the handle lower holes, x into the door shell.
step 3: get the handle cover, x it to the handle front, pressure the cover from one side to another side.
step 4: get the hole cover, pressure it into the hole of the handle.
noce:
- when x the handle, should keep the handle and the display cover in same line, as the following picture yellow line show.
natural_image
Technical diagram showing two views of a mechanical component with mounting holes and a circular feature, no text or symbols present.
EN - preparing: get the lock, screws, lock cover.
step 1: dig the foaming layer about 8-10mm depth.
step 2: put the lock core and the supporter into the hole.
step 3: x the lock supporter with two screws.
step 4: get the lock cover, the pressure it to the lock supporter, from one side to other side, as the following picture show.
noce:
-
when x the lock, should keep the lock cover and the handle right and le posion in same line, as the following picture yellow line show.
-
could through changing the screws xed posion to change the lock supporter posion.