
HMEC 2621 - Earphones SENNHEISER - Free user manual and instructions
Find the device manual for free HMEC 2621 SENNHEISER in PDF.
| Product type | Aviation headset with active noise compensation NoiseGard™ professional |
| Model | HMEC 26-2 (HMEC 2621) |
| Brand | Sennheiser |
| Headphone transducer | Dynamic, closed |
| Ear coupling | Supra-aural |
| Headphone frequency response | 20 to 14,000 Hz |
| Headphone impedance (HMEC 26-2) | 600 Ω mono / 1,200 Ω stereo |
| Nominal sound pressure level | 92 dB SPL at 1 kHz, 1 mW (depending on cable) |
| Active noise compensation | ≥ 18 dB (100 to 300 Hz) |
| Total attenuation (passive + active) | 15 to 30 dB |
| Microphone type | Permanent polarisation static, noise-cancelling |
| Microphone frequency response | 100 to 6,000 Hz |
| NoiseGard™ power supply | 2 AA batteries (1.5 V) or 2 rechargeable batteries (1.2 V) or via aircraft (12 to 35 V DC) |
| Battery operating time | Approx. 60 hours |
| Weight without cable | Approx. 210 g |
| Operating temperature range | -15 °C to 55 °C |
| Storage temperature range | -55 °C to 70 °C |
| Main functions | NoiseGard™ ON/OFF, volume control, mono/stereo switching, MUTING, TalkThrough (depending on variant), Auto-Shut-Off, hinged ear cup |
| Maintenance and cleaning | Only a soft, dry cloth. Replace ear cushions and headband padding annually |
| Safety | Keep at least 10 cm away from pacemakers. Maximum sound level >85 dB(A). Do not use for in-flight phone calls |
| Replacement parts | Ear cushions, wind protection, cables, padding, belt clip, cable clip |
| Warranty | 5 years |
Frequently Asked Questions - HMEC 2621 SENNHEISER
User questions about HMEC 2621 SENNHEISER
0 question about this device. Answer the ones you know or ask your own.
Ask a new question about this device
Download the instructions for your Earphones in PDF format for free! Find your manual HMEC 2621 - SENNHEISER and take your electronic device back in hand. On this page are published all the documents necessary for the use of your device. HMEC 2621 by SENNHEISER.
USER MANUAL HMEC 2621 SENNHEISER
NoiseGard™ professional
60 h Betriebszeit:
2 × 1,5 -V-Alkaline-Batterie
2 × 1,2-V-A k u
überBordnetz:
Important safety information
Please read this instruction manual carefully and completely before using the product.
Always include this instruction manual when passing the product on to third parties.
This instruction manual is also available on the Internet at www.sennheiser-aviation.com or www.sennheiser.com.
Preventing health problems and accidents
Always maintain a distance of at least 3.94'' (10 cm) between the ear cups and the cardiac pacemaker or implanted defibrillator since the product generates permanent magnetic fields.
- Keep product, accessory and packaging parts out of reach of children who could swallow smaller pieces.
- Switch the product off after use to conserve battery power. Remove the rechargeable batteries if the product will not be used for extended periods of time.
If during flight operation you, as the pilot, operate your connected device using the headset, this can limit your attention. During flight operation, do not use the headset for making phone calls or listening to music.
- With the NoiseGard™ noise compensation switched on, typical aircraft sounds (for example, those from engines, propellers, warning alarms, etc.) may sound different to you. Before operating any aircraft, make sure that, with NoiseGard™ switched on, you can hear and recognize these sounds. Set the volume to safe levels that do not interfere with your ability to hear informational sounds and warning alarms.
The product is capable of producing sound pressure exceeding 85 dB(A). In many countries 85 dB(A) is the maximum legally permissible level for continuous noise exposure during the working day. Do not listen at high volume levels for long periods of time to prevent hearing damage.
Preventing damage to the product and dysfunctions
Always keep the product dry and do not expose it to extreme temperatures (hairdryer, heater, extended exposure to sunlight, etc.) to avoid corrosion or deformation.
Only clean the product with a soft, dry cloth.
- Never repair or attempt to repair a defective product yourself. Contact your Sennheiser partner or the Sennheiser Service Department.
- Only replace parts of the product whose replacement is described in this instruction manual. All other parts of the product must be replaced by your Sennheiser partner.
- Only use attachments, accessories or spare parts specified by Sennheiser.
Intended use
Intended use of the product includes
- having read and understood this instruction manual, especially the chapter "Important safety information" on page 1,
- using the product within the operating conditions and limitations described in this instruction manual.
"Improper use" means using the product other than as described in this instruction manual, or under operating conditions which differ from those described herein.
The HMEC 26-2 headset
The HMEC 26-2 headset with NoiseGard™ professional active noise compensation features dynamic, closed headphones. The noise-compensating condenser microphone ensures excellent speech transmission even in noisy environments. Designed for use in aircraft cockpits.
Features
- NoiseGard™ active noise compensation reduces ambient noise by up to 18 dB – consequently the radio volume can be decreased
- Lightweight
- Extremely comfortable to wear due to the patented two-piece automatic headband and soft ear pads
- Peak level protection (cannot be switched off) safeguards you from volume peaks above 110 dB
- "Flip-away" headphone allows single-sided listening
- Flexible microphone boom, can be worn on either left or right-hand side
- Noise-compensating condenser microphone ensures excellent speech transmission
- Single-sided cable, easy to replace
- NoiseGard™ can be switched off with most headset variants so that the headset can be used as a conventional headset (see "The control units of the HMEC 26-2" on page 8 and 9)
-
Power supply for NoiseGard™ from aircraft DC power supply system (on suitably equipped aircraft) or batteries/rechargeable batteries
-
"Auto shut-off" extends battery life
- TalkThrough function (HMEC 26-2-T only)
ETSO approval C139, FAA approval C139
5 year warranty
Package contents
1 HMEC 26-2 headset
1 cable clip
1 wind and pop screen
1 pair of hygiene pads
1 audio cable with 3.5 mm jack plugs
1 belt clip
1 carry bag
1 instruction manual
1 EASA Form 1 for headset without cable
2 EASA Form 1 for headset with cable
* not supplied with all product variants (see page 21)
Operation
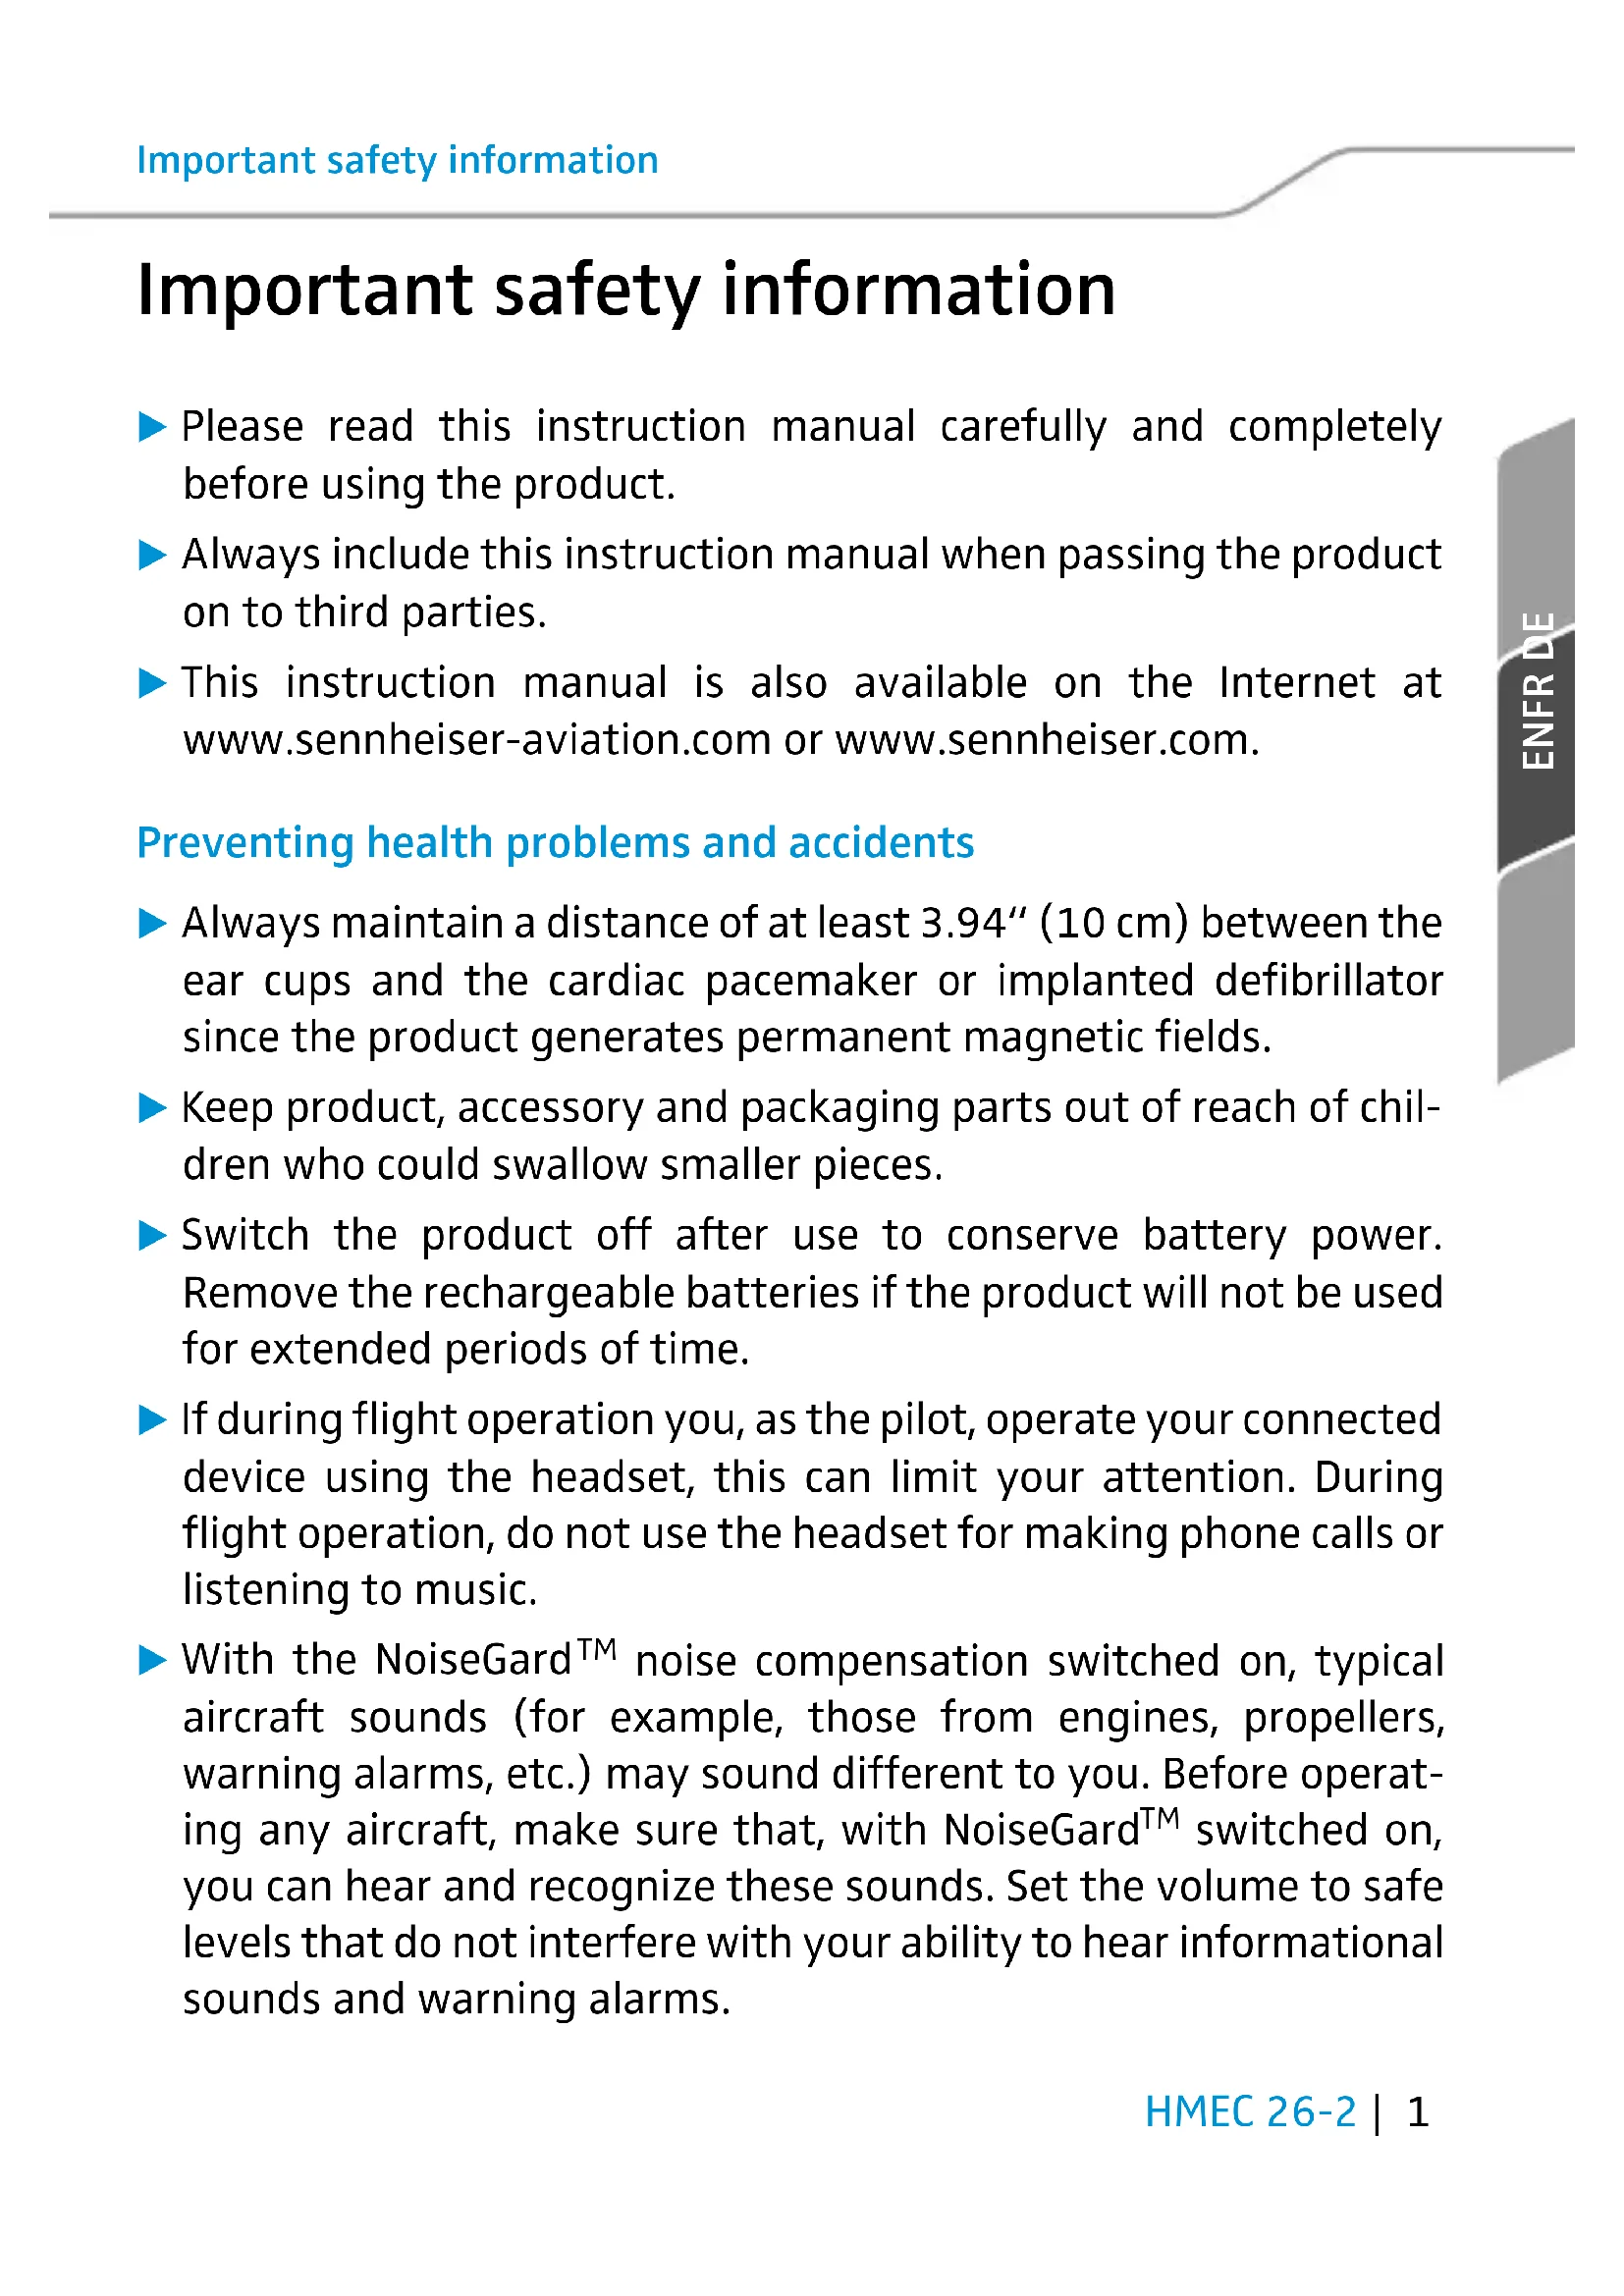
Putting on the headset
When putting on the headset, the patented two-piece headband adjusts automatically.
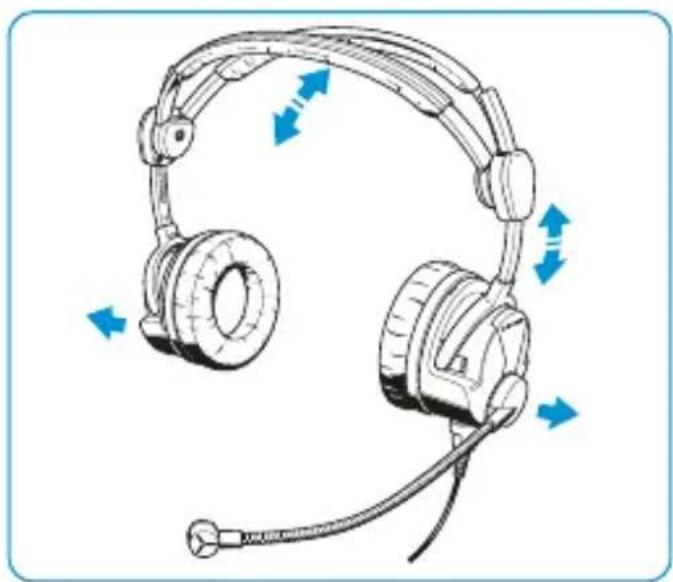
Flipping away one ear cup
The headset features a "flip-away" ear cup for single-sided listening.
Positioning the microphone

Bend the flexible microphone boom so that the microphone is placed at the corner of the mouth. Maintain a distance of 2 cm between microphone and mouth. Always use the supplied wind and pop screen.
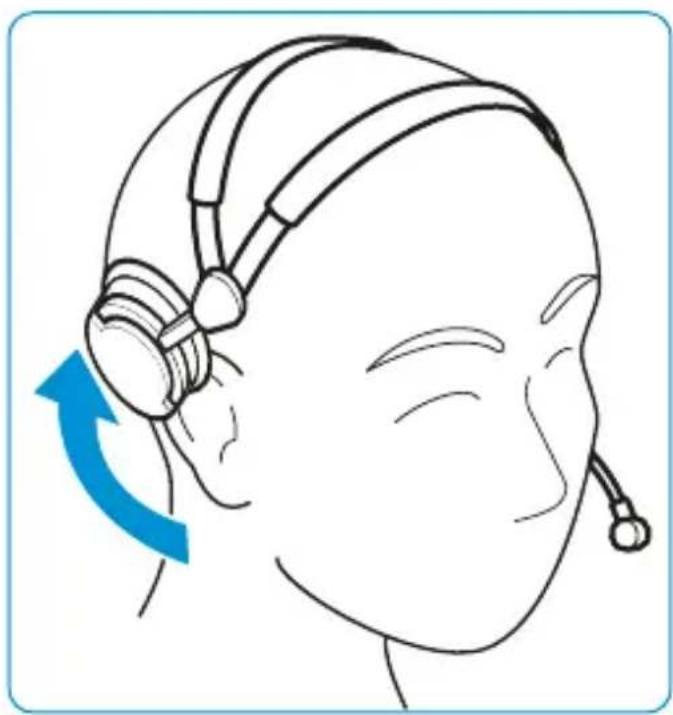
Turning the microphone boom
The microphone boom can be rotated. This allows the headset to be worn with the microphone boom positioned on either the left or right-hand side of the head.
Adjusting the volume directly on the audio system
Connect the headset to the corresponding sockets of your audio system. Adjust the volume directly on the audio system.
CAUTION
Hearing damage due to high volumes
The headset is capable of producing high sound pressure levels. Higher volumes or longer durations can damage your hearing!
Set the volume to a medium level. Make sure that you can hear critical environmental sounds and warning alarms.
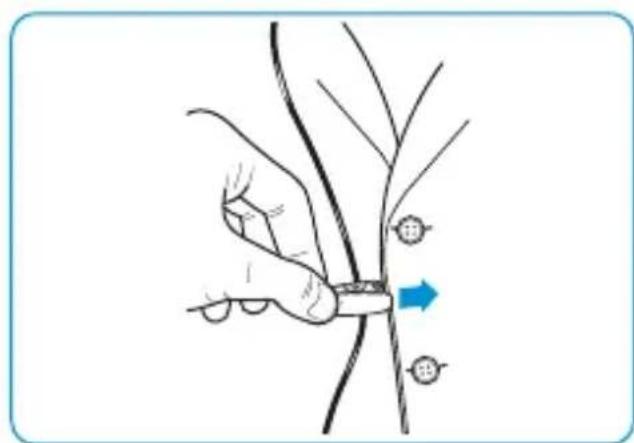
Adjusting the microphone sensitivity
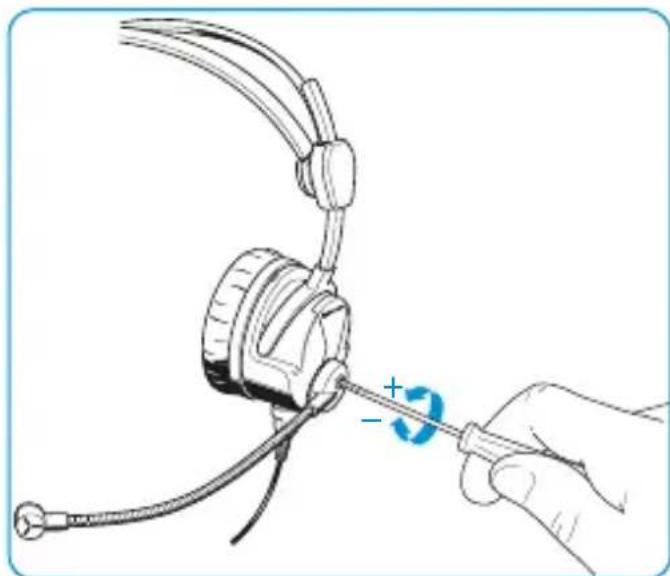
Turn a small screwdriver in the direction of the arrow to change the microphone sensitivity.
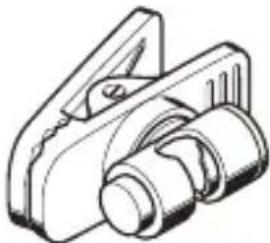
The control units of the HMEC 26-2
Control unit I
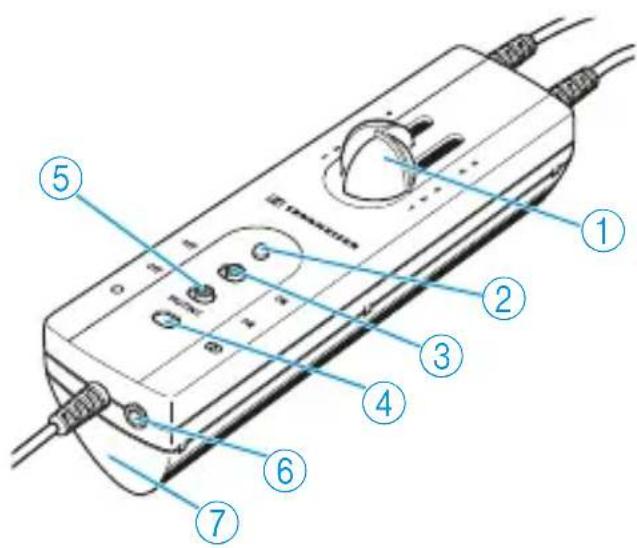
Volume controls
②LED
③ NoiseGard™ ON/OFF switch
④Mono/stereo switch /O O
(5) MUTING ON/OFF switch
(6) 3.5 ~mm jack socket
⑦ Battery compartment
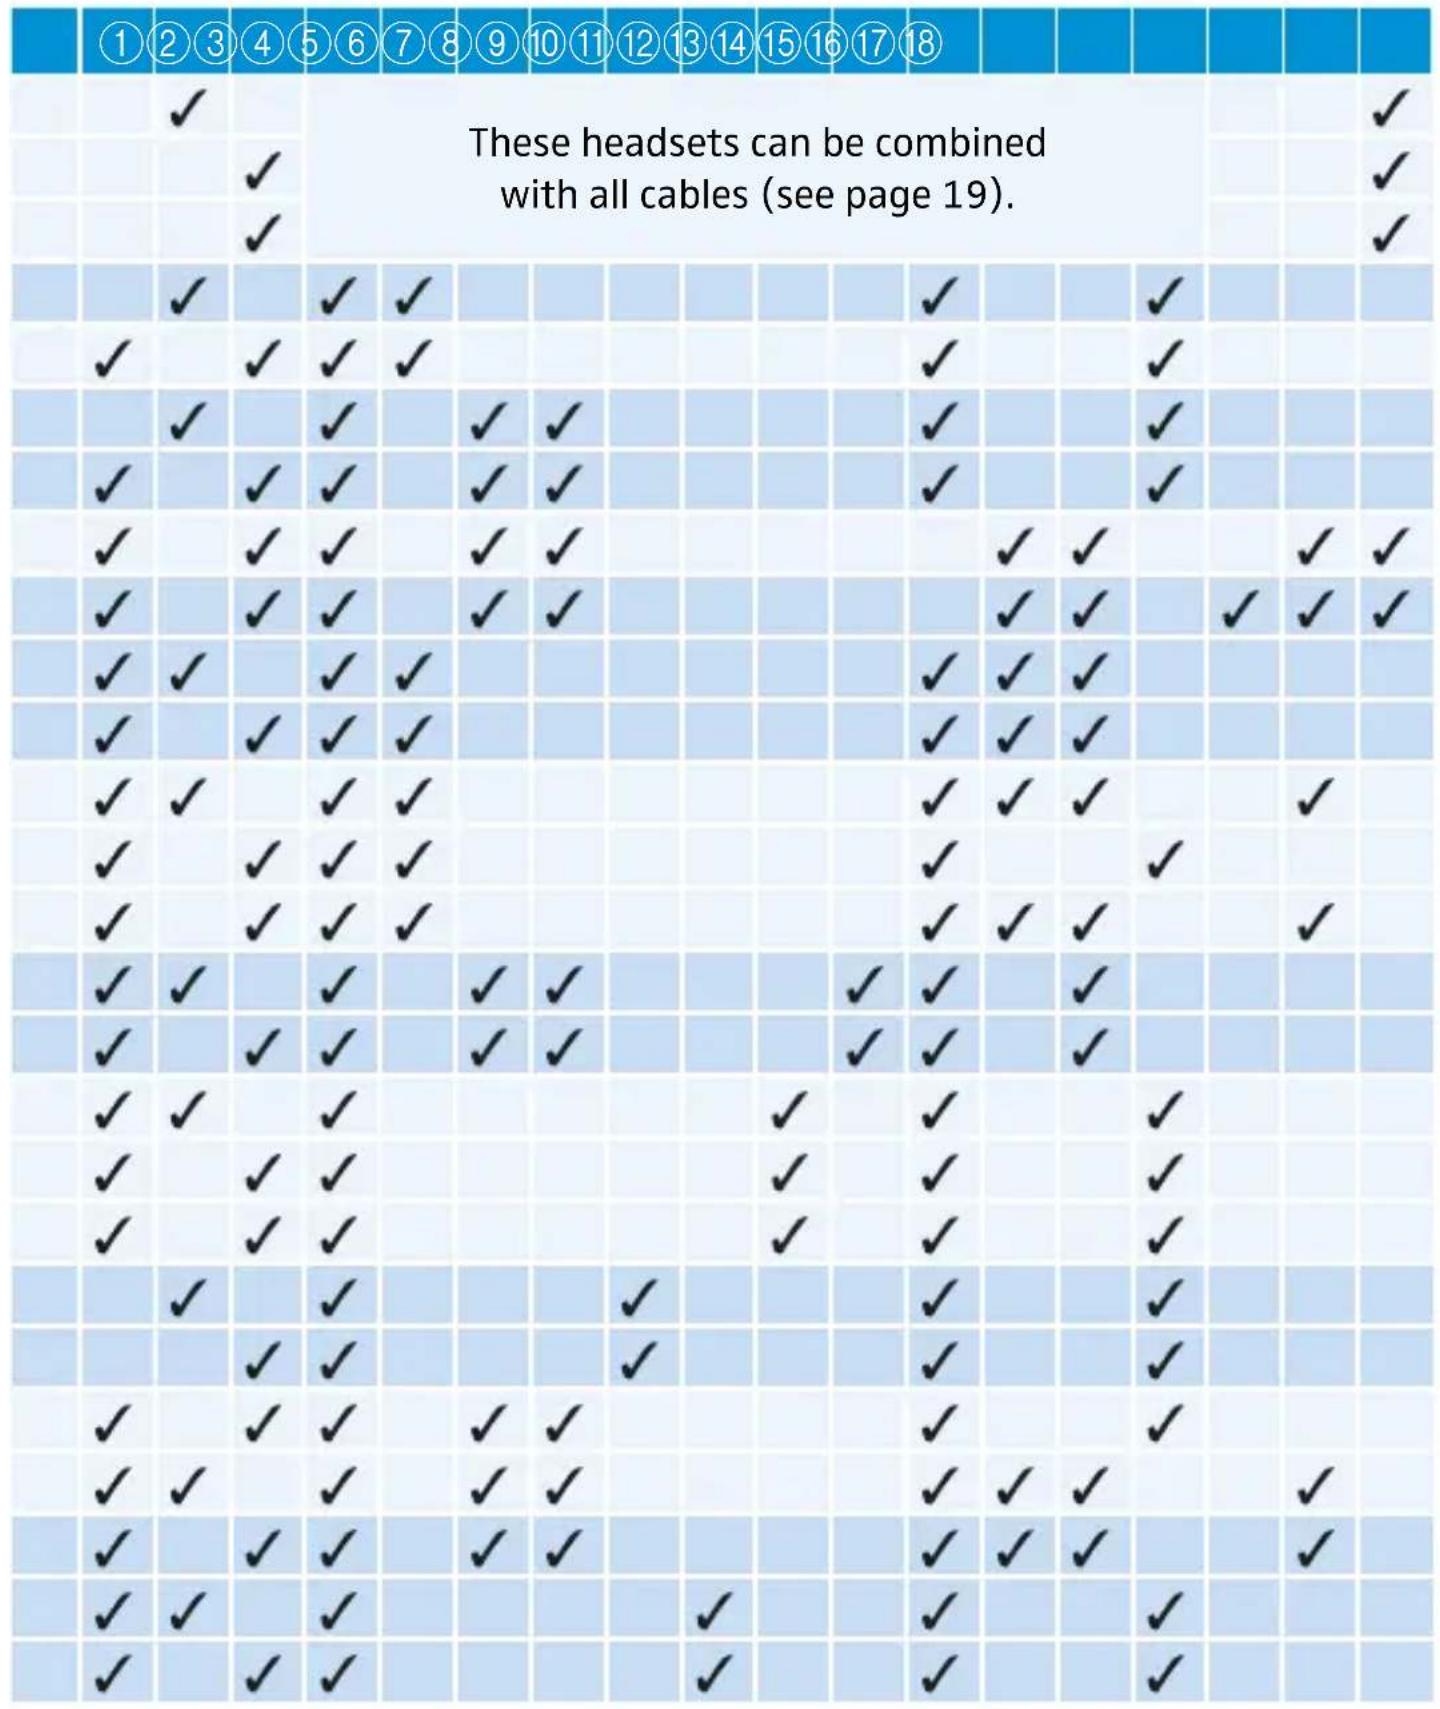
| Headset with control unit I | Operating element | ||||||
| 1 | 2 | 3 | 4 | 5 | 6 | 7 | |
| Cable -BV-K-2 | ✓ | ✓ | ✓ | ✓ | ✓ | ✓ | ✓ |
| Cable -B-K-2 | ✓ | ✓ | ✓ | ||||
| Cable -B-KP-2 | ✓ | ✓ | ✓ | ||||
| Cable -B-CP-2 | ✓ | ✓ | ✓ | ||||
| Cable -V-KX-2* | ✓ | ✓ | ✓ | ✓ | |||
| Cable -BV-CP-2* | ✓ | ✓ | ✓ | ✓ | |||
- with left/right swapping function of the stereo channels
Control unit II
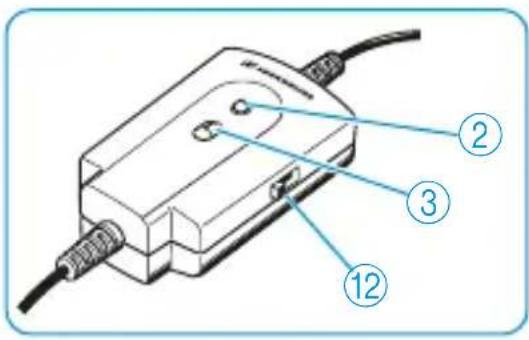

LED

NoiseGard™ ON/OFF switch**

3-position SPL switch*
| Headset with control unit II | Operating element | ||
| 2 3 12 | |||
| Cable -CP | ✓ | ✓ | |
| Cable -CP-2 | ✓ | ✓** | |
| Cable -KP | ✓ | ✓ | |
| Cable -KP-2 | ✓ | ✓** | |
| Cable -NP | ✓ | ✓ | |
| Cable -RP-2 | ✓ | ✓** | |
| Cable -DP-2 | ✓ | ✓** | |
| Cable -CP-3* | ✓ | ✓** | ✓ |
| Cable -KP-3* | ✓ | ✓** | ✓ |
| Cable -DP-3* | ✓ | ✓** | ✓ |
- available from October 2014
** no longer available from serial number 002 000 00
Using the headset
The HMEC 26-2 is available in different variants which vary in features and functions. It is therefore possible that your headset does not have all of the functions described in the following chapter.
Switching NoiseGard™ on/off
The NoiseGard™ ON/OFF switch ③ allows you to switch the NoiseGard™ active noise compensation on or off. With NoiseGard™ switched off, the headset can be used as a conventional headset.
Set the NoiseGard™ ON/OFF switch ③ to the desired position:
Position Function
ON NoiseGardTM is switched on.
The LED ② lights up, indicating the battery charge status (see page 12) or power supply via the aircraft DC power supply system.
OFF NoiseGard™ is switched off.
The LED ② is off.
Adjusting the volume
CAUTION
Hearing damage due to high volumes
This headset is capable of producing high sound pressure levels. Higher volumes or longer durations can damage your hearing.
Set the volume to a medium level. Make sure that you can hear critical environmental sounds and warning alarms.
On the control unit I:
- Use the two slide volume controls (1) to adjust the volume for the left and right channel separately.
On the control unit II:
- Use the 3-position SPL switch (12) to adjust a common volume for the left and right channel.
Switching between mono and stereo mode
The mono/stereo switch ④ allows you to switch between mono (○) and stereo (○○) mode, depending on the audio system. To move the mono/stereo switch ④, use a pointed tool.
Muting connected devices
If the MUTING OFF/ON switch ⑤ is set to the position ON, any audio and phone transmission is muted once ATC communications have been established. When the ATC conversation is over, the muted is automatically canceled.
Set the NoiseGard™ ON/OFF switch to the position ON.
-
Set the MUTING OFF/ON switch to the desired position to mute your connected devices or to cancel the muting:
-
OFF = mutating is canceled
- ON = mutating is activated
Changing the left and right stereo channel
The position "R" or "L" of the BOOM switch corresponds to the position of the microphone on the left or right side of the mouth. When the microphone boom is rotated to permit left or right side microphone orientation, the BOOM switch allows you to correctly assign the audio channels (L/R) to the appropriate headphone sides. This enables the correct orientation of the volume controls and any stereo audio signals.
**Powering NoiseGard™ via (rechargeable) batteries**
Insert two 1.5 ~V AA alkaline batteries (IEC LR 6) or two 1.2 ~V AA rechargeable batteries (IEC LR 6). Observe correct polarity when inserting the batteries.
The operating time with batteries/rechargeable batteries is approx. 60 hours. With NoiseGard™ switched on (see page 10), the LED ② provides information on the remaining battery/rechargeable battery capacity:
LED Meaning
lights up green The battery capacity is sufficient.
lights up red The batteries are flat. Replace the batteries.
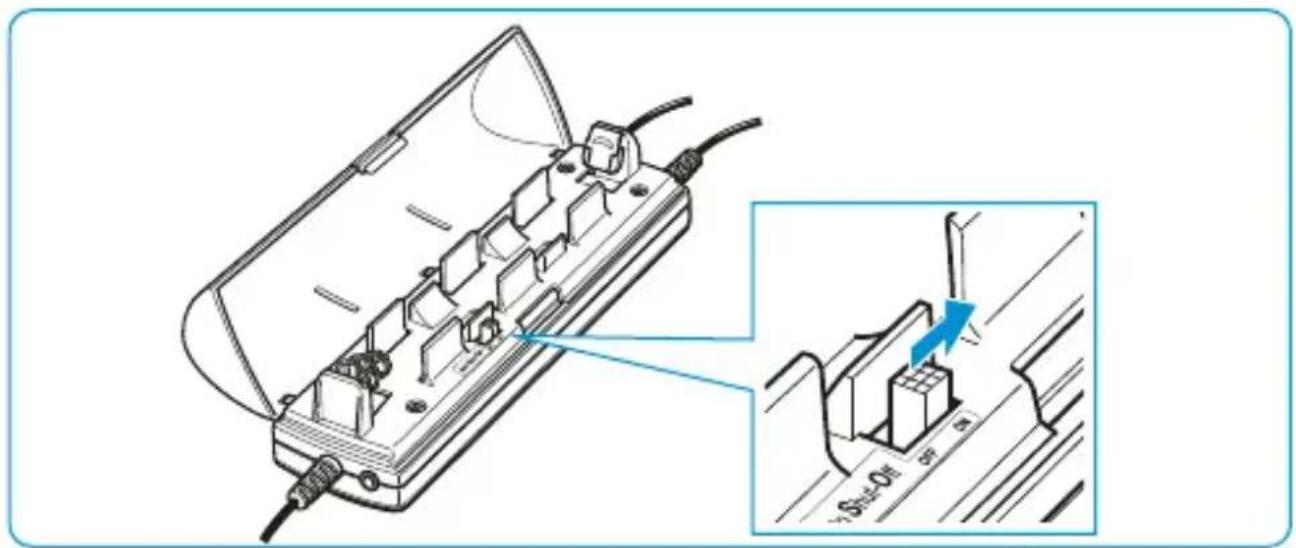
Activating the "auto shut-off" function
The battery-saving "auto shut-off" function automatically switches the NoiseGard™ electronics off when the headset is disconnected from the audio system or when the aircraft avionics are switched off. The headset is delivered ex-works with the function deactivated. You can activate "auto shut-off" as follows:
Set the switch to the position ASO.
Switching the TalkThrough function on/off (HMEC 26-2-T only)
The headset provides excellent attenuation of ambient noise. In order to allow you to communicate undisturbed with your surroundings while wearing the headset, the HMEC 26-2-T features a TalkThrough function. With TalkThrough switched on, a separate microphone (9) picks up acoustic signals in the immediate vicinity.
Unwanted background noise is filtered out, only allowing the voice of the other person to pass through the headset.
Press the button 11, to switch the TalkThrough function on. The LED 10 lights up.
Press the button again to switch TalkThrough off.
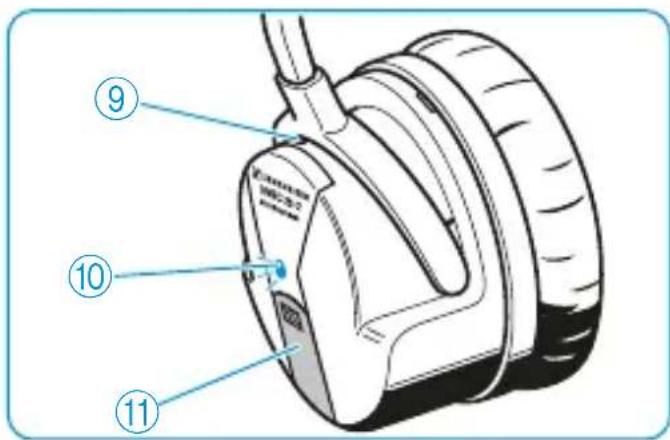

TalkThrough can only be used when the NoiseGard™ active noise compensation is switched on.
Connecting a mobile telephone or an audio device
CAUTION
Danger of accident due to reduced attention
Making telephone calls, listening to music or operating the mobile telephone or audio device limits your attention and may cause accidents.
During flight operation, do not use the headset for telephone calls or for listening to additional audio sources.

CAUTION
Hearing damage due to high volumes
The headset is capable of producing high sound pressure levels. Higher volumes or longer durations can damage your hearing!
Set the volume to a medium level. Make sure that you can hear critical environmental sounds and warning alarms.
- Connect the audio cable to the 3.5 ~mm jack socket ⑥ on the control unit I and to the corresponding jack socket on your mobile telephone or audio device.
You can adjust the volume via the headset's control unit (see page 11). However, the functions of the mobile telephone or audio device cannot be controlled via the headset's control unit.
Operate your mobile telephone or audio device as usual and observe the instructions of the manufacturer.
The latest list of compatible mobile telephones is available on our website at www.sennheiser.com.
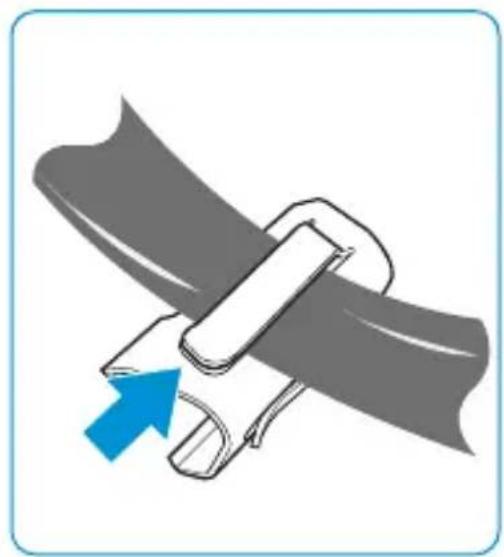
Attaching the belt clip
The belt clip allows you to attach the control unit to the seat belt so that the control unit doesn't hinder you.
Make sure not to squeeze any connection cable.
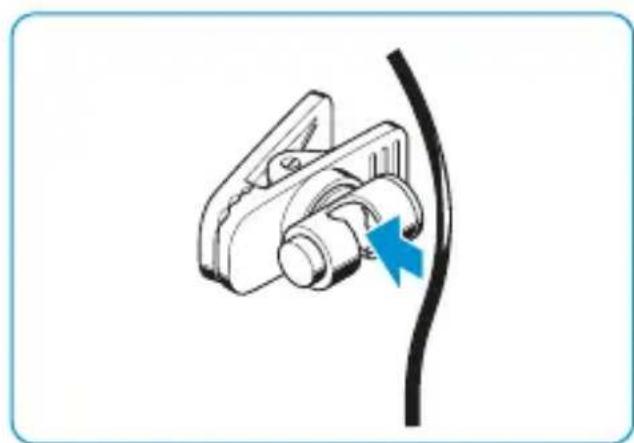
Attaching the cable clip
The cable clip allows you to attach the headphone cable to your clothing so that the cable doesn't hinder or distract you.
Loop the cable through the clip so that the headphone cable doesn't hinder you.
Care and maintenance
Cleaning and maintaining the headset
NOTICE
Liquids can damage the product
Liquids entering the product can short-circuit the electronics or damage the mechanics. Solvents or cleansing agents can damage the surface of the product.
- Keep all liquids far away from the product.
Before cleaning, pull out the plugs of the product from the connections in the aircraft.
Only use a soft, dry cloth to clean the product.
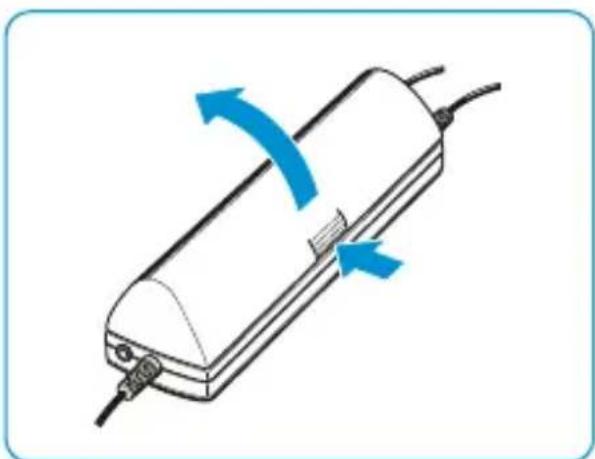
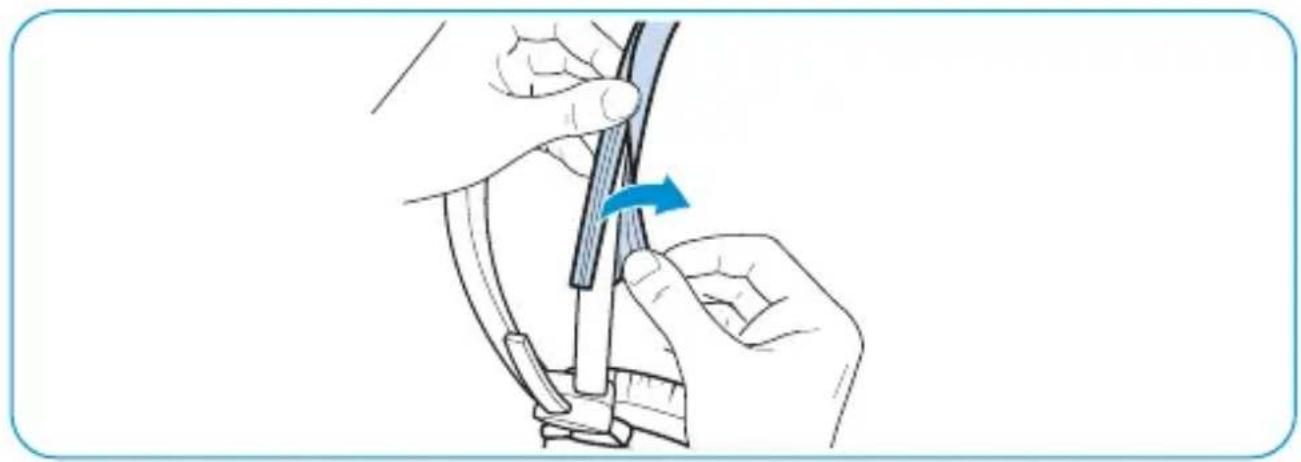
Replacing the ear pads
For reasons of hygiene, you should replace the ear pads annually.
Grasp the edge of the ear pad and pull sharply.
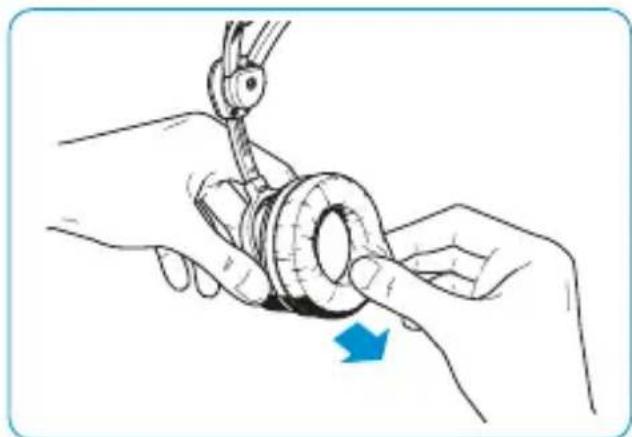
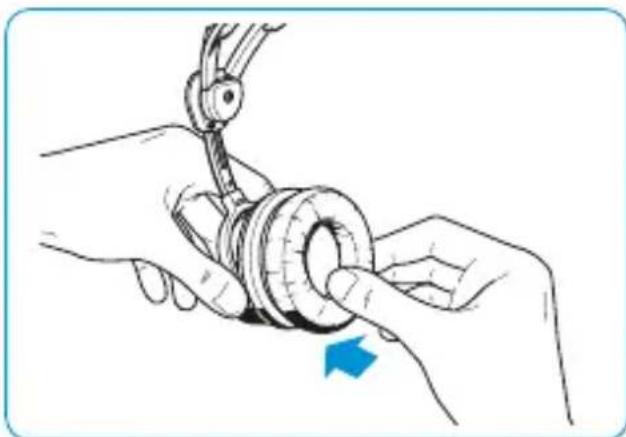
Attach the new ear pad to the ear cup by pressing firmly around the ear pad until you hear all 12 latches lock into place.
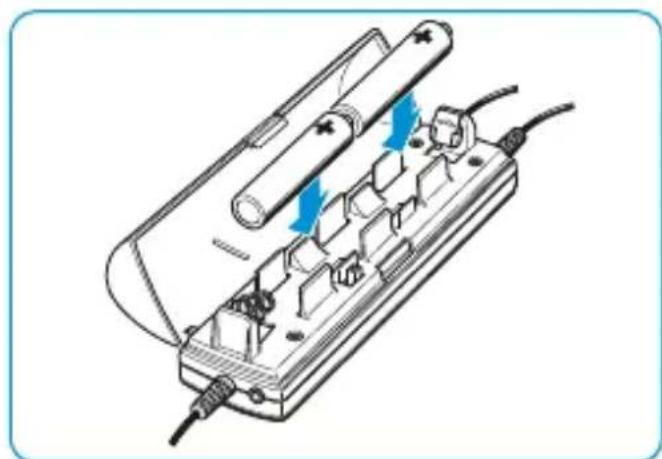
Replacing the headband paddings
For reasons of hygiene, you should replace the headband paddings annually.
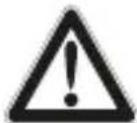
- Pull the Ziploc type fastening strips of the old headband paddings apart. If necessary, use a pointed tool.
Put the new headband paddings around the headbands.
Attach the new headband paddings by joining the fastenings strips.
Accessories and spare parts
By changing the cables, you can simply retrofit different control units (see page 8 and page 9) or connectors (see page 21) to your headset.
Accessories
Cable-CP. Cat.No.500852
Cable-CP-2. Cat.No.505684
Cable-KP .Cat.No.500842
Cable-KP-2. Cat.No.505686
Cable-NP...Cat.No.500855
Cable-RP-2 .Cat.No.505687
Cable -DP-2 .Cat. No. 505685
Cable -BV-K-2 .Cat. No. 505683
Cable-B-K-2 ...Cat. No. 505690
Cable-B-KP-2 .Cat.No.505682
Cable-B-CP-2 .Cat.No.505689
Cable-V-KX-2...Cat.No.505688
Cable -BV-CP-2 .Cat. No. 506279
Cable-CP-3. Cat.No.506379
Cable-KP-3. Cat.No.506377
Cable -DP-3 .Cat. No. 506378
Hygiene pads HZH 26, white, 200 pairs .Cat. No. 502595
Hygiene pads HZH 26, black, 200 pairs . . . . . .Cat. No. 504062
Spare parts
- Audio cable, length 0.6 ~m, 2 × 3.5 ~mm stereo jack plug
- Ear pads, leatherette, 1 pair
- Ear pads, leatherette, 100 pairs
- Wind and pop screen, 1 item
- Wind and pop screen, any number of items
- Carry bag
- Headband paddings, 1 pair
- Headband paddings, large, 1 pair
- Belt clip
- Cable clip HZC 08 (for round cables)
Product and cable variants
The following cables, connectors, control units and features are available for the HMEC 26-2 variants (see table on the following pages:
① Headphones with +6 dB characteristic SPL
② Microphone BKE 46 with 80 mV / Pa output voltage
③ Microphone BKE 46-1 with 60 mV / Pa output voltage
(4) Single-sided round cable, length approx. 1.65 ~m
⑤XLR-5 connector
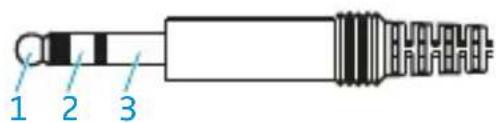
(6) 1 / 4'' (6.3 mm) jack plug (headphones)
⑦PJ-068 equivalent (microphone)
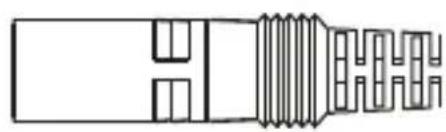
8-pin Neutricon connector
(9)6-pin Redel connector
10XLR-6 connector
⑪XLR-3 connector
⑫ Aircraft powered
⑬Battery powered
14Control unit I (see page 8)
15Control unit II (see page 9)
⑥ Audio cable (with 3.5 mm jack plugs)
⑰ Belt clip
18Carry bag
| Variant Cat. No. Part Number | ||
| HMEC 26-2 505671 026-35-2 | ||
| HMEC 26-2-1 505672 026-30-2 | ||
| HMEC 26-2-T 505680 026-C0-2 | ||
| HMEC 26-2-CP 505676 026-35-2-999-3211 | ||
| HMEC 26-2-1-CP-2* 505677 026-30-2-999-32C1 | ||
| HMEC 26-2-KP 505678 026-35-2-999-3111 | ||
| HMEC 26-2-1-KP-2* 505679 026-30-2-999-31C1 | ||
| HMEC 26-2-1-B-K-2* | 505674 | 026-30-2-999-11G1 |
| HMEC 26-2-1-BV-K-2* | 505675 | 026-30-2-999-11E1 |
| HMEC 26-2-BV-CP-2 | 505671 + 506279 | 026-30-2-999-22F1 |
| HMEC 26-2-1-BV-CP-2 | 505672 + 506279 | 026-30-2-999-22F1 |
| HMEC 26-2-B-CP-2 | 505671 + 505689 | 026-35-2-999-22G1 |
| HMEC 26-2-1-CP-3 506697 | 026-30-2-999-32H1 | |
| HMEC 26-2-1-B-CP-2* | 505672 + 505689 | 026-30-2-999-22G1 |
| HMEC 26-2-V-KX-2 | 505671 + 505688 | 026-35-2-999-41D1 |
| HMEC 26-2-1-V-KX-2* | 505672 + 505688 | 026-30-2-999-41D1 |
| HMEC 26-2-DP-2 | 505671 + 505685 | 026-35-2-999-3BC1 |
| HMEC 26-2-1-DP-2* | 505672 + 505685 | 026-30-2-999-3BC1 |
| HMEC 26-2-1-DP-3* | 505672 + 506378 | 026-30-2-999-3BH1 |
| HMEC 26-2-NP | 505671 + 500855 | 026-35-2-999-3811 |
| HMEC 26-2-1-NP* | 505672 + 500855 | 026-30-2-999-3811 |
| HMEC 26-2-1-KP-3 | 506698 026-30-2-999-31H1 | |
| HMEC 26-2-B-KP-2 | 505671 + 505682 | 026-35-2-999-2192 |
| HMEC 26-2-1-B-KP-2* | 505672 + 505682 | 026-30-2-999-2192 |
| HMEC 26-2-RP-2 | 505671 + 505687 | 026-35-2-999-36C1 |
| HMEC 26-2-1-RP-2* | 505672 + 505687 | 026-30-2-999-36C1 |
- Each -2-1 model is also available as a -2-T model (headphones with +6 dB characteristic SPL).
Specifications
Headphones
Transducer principle dynamic, closed
Ear coupling supra-aural
Frequency response 20 to 14,000 Hz
Impedance HMEC 26-2:
| 600 Ω mono/1,200 Ω stereo | |
| HMEC 26-2 with cable -2: | |
| 350 Ω mono/600 Ω stereo | |
| HMEC 26-2 with cable -3: | |
| 300 Ω mono | |
| Characteristic SPL | HMEC 26-2 with cable -CP, -KP, -NP: |
| 92 dB SPL at 1 kHz, 1 mW, mono | |
| 95 dB SPL at 1 kHz, 1 V | |
| HMEC 26-2 with cable -2: | |
| 95 dB SPL at 1 kHz, 1 mW, mono | |
| 100 dB SPL at 1 kHz, 1 V | |
| HMEC 26-2 with cable -3 (3-position SPL switch): | |
| 95 – 89 – 83 dB SPL at 1 kHz, 1 mW, mono | |
| 100 – 94 – 88 dB SPL at 1 kHz, 1 V | |
| Total attenuation (passive and active) | 15 to 30 dB |
| Max. SPL 120 dB SPL at 1 kHz | |
| Active noise compensation | ≥ 18 dB (100 to 300 Hz) |
| THD < 1% at 1 kHz, 95 dB SPL | |
| Contact pressure approx. 3.6 N | |
Microphone incl. preamplifier
| Type HMEC 26-2: B K E 4 6 HMEC 26-2-1/T: B K E 4 6 - 1 | ||
| Transducer principle pre-polarized condenser microphone, noise-compensating | ||
| Frequency response 100 to 6,000 Hz | ||
| Output voltage adjustable from 17 to 100 mV/Pa | ||
| BKE 46: factory preset | 8 0 m =800 mV-2 dB at 114 dB S | |
| BKE 46-1: factory preset | 60 mV/Pa ±1 dB =600 mV ±1 dB at 114 dB SPL | |
| Terminating impedance | 150 to 2,200 Ω | |
| Supply voltage | 8 to 16 V DC | |
| General data | ||
| Temperature range | operation: -15 °C to 55 °C storage: -55 °C to 70 °C | |
| Weight without cable | approx. 210 g | |
| Cable length | approx. 1.65 m | |
| Power supply for NoiseGardTM professional | via AA size battery (IEC LR 6) with approx. 60 hrs operating time: 2 x 1.5 V alkaline battery 2 x 1.2 V rechargeable battery via aircraft DC power supply system: 12 to 35 V DC, max. 35 mA | |
Connector assignment
Cable -V-KX-2
1/4" (6.3 mm) jack plug
PJ-068 equivalent
XLR-3 connector (solder side)
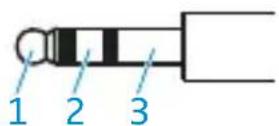
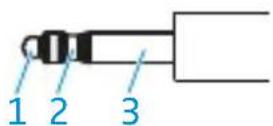
1 Audio Hi left
2 Audio Hi right
3 Audio Lo
1 not assigned
2 Microphone Hi
3 Microphone Lo
1 NoiseGardTM (DC+)
2 DC-
3 not assigned
Cable -CP, -CP-2, -CP-3, -B-CP-2, -BV-CP-2
Solder side
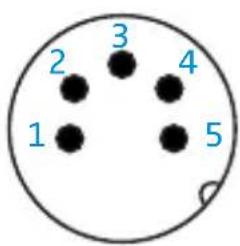
1 Audio Hi
2 Audio Lo / DC-
3 Microphone Hi
4 Microphone Lo
5 NoiseGardTM(DC+)
Cable -NP
Solder side
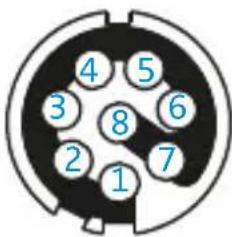
1 Audio Hi
2 Audio Lo
3 not assigned
4 Microphone Lo
5 Microphone Hi
6 not assigned
7 DC-
8 NoiseGard TM (DC+)
Cable -RP-2
Solder side
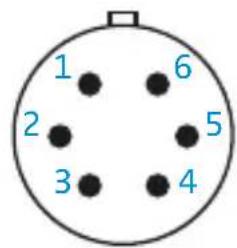
1 NoiseGard TM (DC+)
2 Audio Lo / DC-
3 Audio Hi left
4 Audio Hi right
5 Microphone Hi
6 Microphone Lo

Cable -DP-2, -DP-3
Solder side
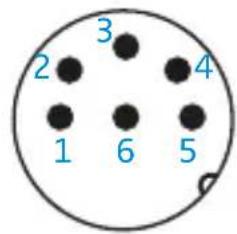
1 Audio +
2 Audio -
3 Microphone Hi
4 Microphone Lo
5 DC +
6 DC-
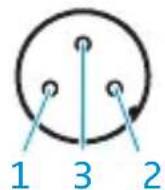
Cable -KP, -KP-2, -KP-3, -B-K-2, -B-KP-2, -BV-K-2
1/4" (6.3 mm) jack plug PJ-068 equivalent
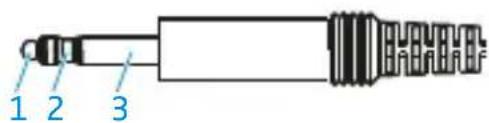
Cable -KP / -KP-2 / -KP-3 / -B-KP-2
1 Audio Hi 1 NoiseGardTM (DC+)
2 not assigned 2 Microphone Hi
3 Audio Lo/DC- 3 Microphone Lo
Cable -B-K-2
1 Audio Hi 1 not assigned
2 not assigned 2 Microphone Hi
3 Audio Lo 3 Microphone Lo
Cable -BV-K-2
1 Audio Hi left 1 not assigned
2 Audio Hi right 2 Microphone Hi
3 Audio Lo 3 Microphone Lo
Manufacturer Declarations
Warranty
Sennheiser GmbH & Co. KG gives a warranty of 5 years on this product. For the current warranty conditions, please visit our website at www.sennheiser-aviation.com or www.sennheiser.com or contact your Sennheiser partner.
CE Declaration of Conformity
RoHS Directive (2011/65/EU)
EMC Directive (2004/108/EC)
The declaration is available at www.sennheiser.com.
In compliance with
Europe EMC EN 55103-1/-2
China

Trademarks
Sennheiser and NoiseGard™ are registered trademarks of Sennheiser electronic GmbH & Co. KG. Other product and company names mentioned in this instruction manual may be the trademarks or registered trademarks of their respective owners.
- Directive RoHS (2011/65/UE)
- Directive CEM (2004/108/CE)
Am Labor 1, 30900 Wedemark, Germany
www.sennheiser-aviation.com | www.sennheiser.com
Printed in Germany, Publ. 06/14, 548043/A02

- Important safety information
- Preventing health problems and accidents
- Preventing damage to the product and dysfunctions
- Intended use
- The HMEC 26-2 headset
- Features
- Package contents
- Operation
- Putting on the headset
- Flipping away one ear cup
- Positioning the microphone
- Turning the microphone boom
- Adjusting the volume directly on the audio system
- CAUTION
- Adjusting the microphone sensitivity
- The control units of the HMEC 26-2
- Control unit I
- Control unit II
- Using the headset
- Switching NoiseGard™ on/off
- Position Function
- Adjusting the volume
- Switching between mono and stereo mode
- Muting connected devices
- Changing the left and right stereo channel
- **Powering NoiseGard™ via (rechargeable) batteries**
- LED Meaning
- Activating the "auto shut-off" function
- Switching the TalkThrough function on/off (HMEC 26-2-T only)
- Connecting a mobile telephone or an audio device
- Hearing damage due to high volumes
- Attaching the belt clip
- Attaching the cable clip
- Care and maintenance
- Cleaning and maintaining the headset
- NOTICE
- Replacing the ear pads
- Replacing the headband paddings
- Accessories and spare parts
- Accessories
- Spare parts
- Product and cable variants
- Specifications
- Headphones
- Microphone incl. preamplifier
- Connector assignment
- Cable -V-KX-2
- Cable -CP, -CP-2, -CP-3, -B-CP-2, -BV-CP-2
- Solder side
- Cable -NP
- Cable -RP-2
- Cable -DP-2, -DP-3
- Cable -KP, -KP-2, -KP-3, -B-K-2, -B-KP-2, -BV-K-2
- 1/4" (6.3 mm) jack plug PJ-068 equivalent
- Cable -KP / -KP-2 / -KP-3 / -B-KP-2
- Cable -B-K-2
- Cable -BV-K-2
- Manufacturer Declarations
- Warranty
- CE Declaration of Conformity
- In compliance with
- Trademarks
Brand : SENNHEISER
Model : HMEC 2621
Category : Earphones