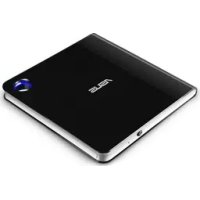
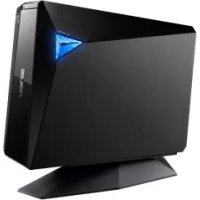
USER MANUAL SBW06D5HU ASUS
IN SEARCH OF INCREDIBLE
Quick Installation Guide
| English | Español | Kazakwa | Português | Tiếng Viêt |
| 繁體中文 | Eesti | 한국어 | Română | Українська |
| 简体中文 | Suomi | Lietuvių | Русский | لاوي |
| былгарски | Français | Latviešu | Slovenčina | عربي |
| Čeština | Magyar | Bahasa Malayu | Slovenščina | فارسی |
| Dansk | Bahasa Indonesia | Nederlands | Svenska | |
| Deutsch | Italiano | Norsk | ไทย | |
| Ελληνικά | 日本語 | Polski | Türkçe(Kurulum Kilavuzu) | |
Model / Model: SDRW-08D2S-U / SDRW-08D2S-U LITE / SDRW-08U5S-U / SDRW-08U7M-U /
SDRW-08U7C-U / SDRW-08U8M-U / SDRW-08U9M-U / SBC-06D2X-U /
SBW-06D2X-U / SBW-06D5H-U / BW-16D1H-U / BW-16D1H-U PRO /
BW-16D1X-U
Q25842
Revised Edition V5
January 2025
Copyright © 2025 ASUSTeK Computer Inc. All Rights Reserved.
Contents
English ....3 Română....17
Installing the external Optical Drive
The installation and bundled cables of your optical drive may differ between models, please refer to the following installation methods and select the one that most suits your model.
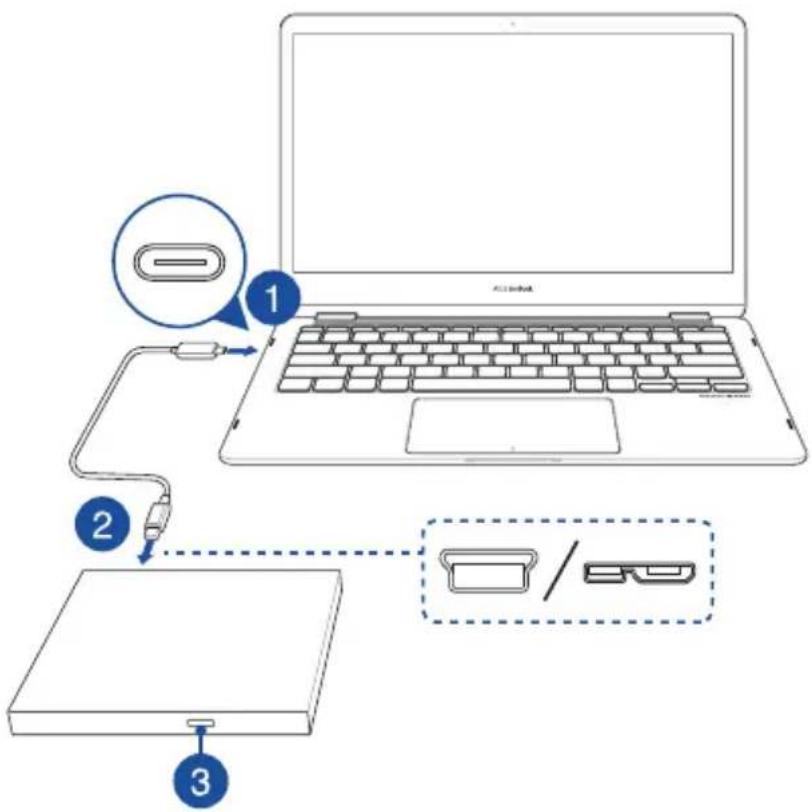
Using the bundled USB Type-C cable
Models: SDRW-08U7C-U / SDRW-08U8M-U / SDRW-08U9M-U / SBW-06D5H-U
- Connect the USB Type-C® connector on the bundled cable to a USB Type-C® port on your computer.
- Connect the bundled cable to your optical drive.
NOTE: This connector and port may vary between models.
- (For Windows only) Press the Eject button to open the optical drive tray.
Using the bundled Y-Cable
Models: SDRW-08D2S-U / SDRW-08D2S-U LITE / SDRW-08D6S-U / SDRW-08U5S-U / SDRW-08U7M-U / SDRW-08U9M-U / SBC-06D2X-U / SBW-06D2X-U / SBW-06D5H-U / SDR-08B1-U
- Connect the USB connector on the Y-cable to a USB port on your computer.
(optional) Connect the USB connector to another USB port for additional power if your computer's USB port does not provide enough power through the USB connector resulting in the optical drive not functioning properly.
NOTE:
- USB connector is only used for additional power, and cannot be used for data transfer.
- If you are using a Blu-ray optical disc drive, please ensure to connect both USB connectors (and) to USB ports on your computer.
- You may need to use a USB extension cable (purchased separately) to connect the additional USB connector if you do not have enough free USB ports on one side of the computer.
- Connect the Y-cable to your optical drive.
NOTE: This connector and port may vary between models.
- (For Windows only) Press the Eject button to open the optical drive tray.
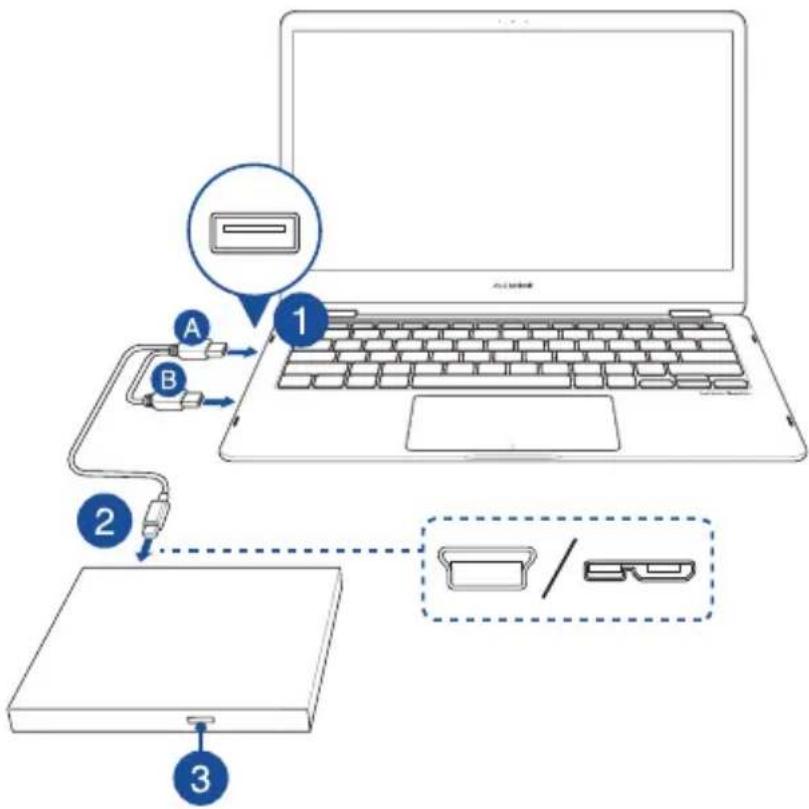
4

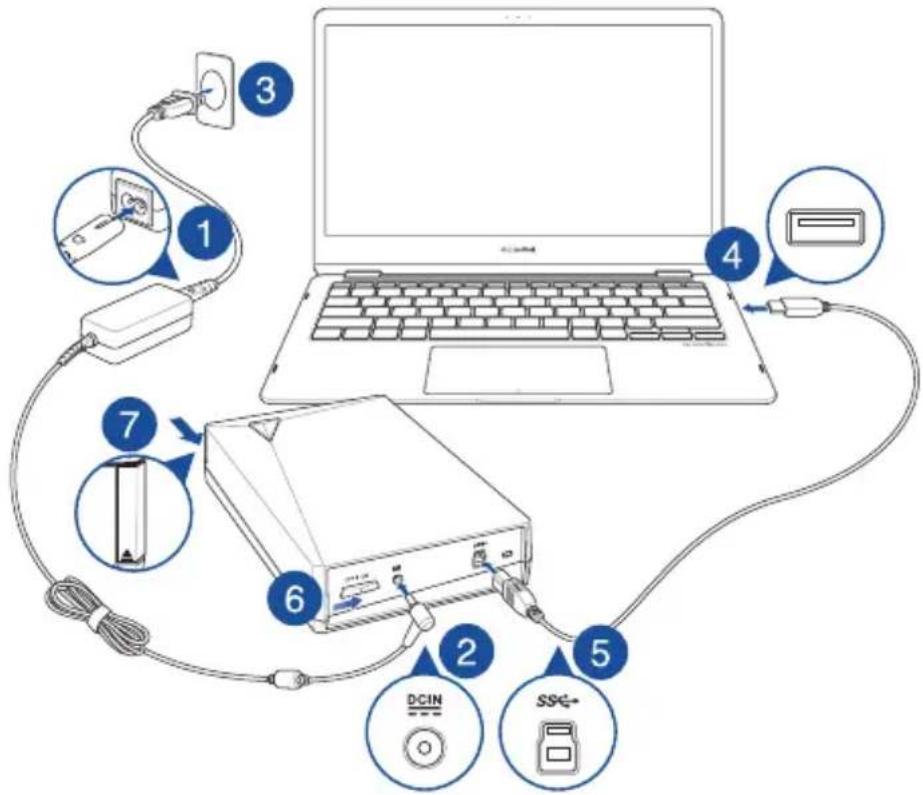
Using the bundled USB cable and power adapter
Models: BW-16D1H-U / BW-16D1H-U PRO / BW-16D1X-U
To connect the USB cable and power adapter please refer to the illustration below. After the cables and power have been connected, push the power switch to the ON position ③ power on your optical drive and press the Eject button ⑦ (For Windows only) to open the optical drive tray.
Setting up the optical drive stand (on selected models)
Models: BW-16D1H-U / BW-16D1H-U PRO
Models: SBC-06D2X-U / SBW-06D2X-U
![graph LR A["Initial Box"] --> B["Step 1"] B --> C["Step 2"] C --> D["Step 3"] D --> E["Step 4"]](/content/2026/03/507351/images/c5b2d16ea1cd723c3c70e6166d249cbd873a2f5539bcf81b451bb6f8c4239822.jpg)
Support
For more information on your external optical drive, please refer to https://www.asus.com/support.
https://www.asus.com/support
Installing the optical drive
The installation method and included cables for the optical drive may vary by model; therefore, please refer to the following installation methods and choose the one that best suits your model.
Using the included USB Type-C® cable
Models: SDRW-08U7C-U / SDRW-08U8M-U / SDRW-08U9M-U / SBW-06D5H-U
1. Connect the USB Type-C connector on the included cable to the USB Type-C port on your computer.
2. Connect the included cable to the optical drive.
Note: This connector and port may vary by model.
3. (In Windows) Press the Eject button to open the optical drive tray.
Using the included Y-cable
Models: SDRW-08D2S-U / SDRW-08D2S-U LITE / SDRW-08D6S-U / SDRW-08U5S-U / SDRW-08U7M-U / SDRW-08U9M-U / SBC-06D2X-U / SBW-06D2X-U / SBW-06D5H-U / SDR-08B1-U
1. Connect the USB connector on the Y-cable to a USB port on your computer.
(Optional) If the USB port on your computer does not provide sufficient power through the USB connector, causing the optical drive to malfunction, connect the additional USB connector to another USB port to provide extra power.
Note:
• The additional USB connector is only for providing extra power and cannot be used for data transfer.
• If you are using a USB optical drive, please ensure that both USB connectors are connected to the computer's USB ports.
• If there are not enough free USB ports on one side of the computer, you may need to use a USB extension cable (purchased separately) to connect the additional USB connector.
2. Connect the Y-cable to the optical drive.
Note: This connector and port may vary by model.
3. (In Windows) Press the Eject button to open the optical drive tray.
Using the included USB cable and power adapter
Models: BW-16D1H-U / BW-16D1H-U PRO / BW-16D1X-U
To connect the USB cable and power adapter, please refer to the illustration on page 5. After connecting the cables and power, push the power switch to the ON position to turn on the optical drive, and then press the Eject button (in Windows) to open the optical drive tray.
Setting up the optical drive stand (on specific models)
To install the optical drive stand, refer to page 5.
Support
For more information about the external optical drive, please visit: https://www.asus.com/support
Safety Guidelines
- Do not place damaged discs inside the device. A damaged disc may break while in use and damage the device.
- Use of any controls, adjustments, or procedures other than those specified in this manual may result in hazardous radiation exposure.
- Do not attempt to disassemble the drive.
- Do not move the device from a cold to a warm or hot environment. Drastic change in temperature is harmful to the device.
- Before moving or uninstalling the drive, remove any disc in it.
- Prevent liquids or any metal from getting into the device. If this situation occurs, contact your retailer for help.
- Do not use any evaporating solvents to clean the device. If you accidentally sprayed any solvent on the device, use a clean cloth to wipe it. You may also use a neutral cleaner to dilute the solvent to easily wipe it from the device.
- Do not turn off the computer while the device is in reading or writing mode.
- Do not place discs into the device immediately if they came from a cold environment, especially during cold seasons. Wait until the discs have reached room temperature.
- Use this product in environments with ambient temperatures between 0°C (32°F) and 40°C (104°F).
CD-ROM Drive Safety Warning
CLASS 1 LASER PRODUCT
CONSUMER LASER PRODUCT
EN 50689:2021
CLASS 1 LASER PRODUCT
Australia Statement Notice
From 1 January 2012 updated warranties apply to all ASUS products, consistent with the Australian Consumer Law. For the latest product warranty details please visit http://support.asus.com. Our goods come with guarantees that cannot be excluded under the Australian Consumer Law. You are entitled to a replacement or refund for a major failure and compensation for any other reasonably foreseeable loss or damage. You are also entitled to have the goods repaired or replaced if the goods fail to be of acceptable quality and the failure does not amount to a major failure. If you require assistance please call ASUS Customer Service 1300 2787 88 or visit us at http://support.asus.com.
Declaration of compliance for product environmental regulation
ASUS follows the green design concept to design and manufacture our products, and makes sure that each stage of the product life cycle of ASUS product is in line with global environmental regulations. In addition, ASUS disclose the relevant information based on regulation requirements.
Please refer to https://esg.asus.com/Compliance.htm for information disclosure based on regulation requirements ASUS is complied with:
EU REACH and Article 33
Complying with the REACH (Registration, Evaluation, Authorisation, and Restriction of Chemicals) regulatory framework, we published the chemical substances in our products at ASUS REACH website at https://esg.asus.com/Compliance.htm.
This product complies with the EU RoHS Directive. For more details, see https://esg.asus.com/Compliance.htm.
India RoHS
This product complies with the "India E-Waste (Management) Rules, 2016" and prohibits use of lead, mercury, hexavalent chromium, polybrominated biphenyls (PBBs) and polybrominated diphenyl ethers (PBDEs) in concentrations exceeding 0.1% by weight in homogenous materials and 0.01% by weight in homogenous materials for cadmium, except for the exemptions listed in Schedule II of the Rule.
Vietnam RoHS
ASUS products sold in Vietnam, on or after September 23, 2011, meet the requirements of the Vietnam Circular 30/2011/TT-BCT.
ASUS recycling and takeback programs come from our commitment to the highest standards for protecting our environment. We believe in providing solutions for you to be able to responsibly recycle our products, batteries, other components as well as the packaging materials. Please go to https://esg.asus.com/en/Takeback.htm for detailed recycling information in different regions.
| Product Name產品名稱 | Model Name型號 | Input rating輸入規格 |
| External Slim Optical Drive外接式薄型光碟機 | SDR-08B1-U A, SDRW-08D2S-U, SDRW-08U5S-U, SDRW-08U7M-U, SDRW-08U7C-U, SDRW-08U8M-U, SDRW-08U9M-U, SBC-06D2X-U, SBW-06D2X-U | 5V, 2.0A |
| External Slim Blu-ray Drive華碩外接式薄型藍光燒錄機 | SBW-06D5H-U 5V, 2.0A | |
| External H/H Optical Drive外接式半高型光碟機 | BW-16D1H-U, BW-16D1X-U 12V, 3.0A | |
China RoHS EFUP
Labelling - 10 Years
Compliance Statement of Innovation, Science and Economic Development Canada (ISED)
This device complies with Innovation, Science and Economic Development Canada licence exempt RSS standard(s). Operation is subject to the following two conditions: (1) this device may not cause interference, and (2) this device must accept any interference, including interference that may cause undesired operation of the device.
CAN ICES(B)/NMB(B)


KC: Korea Warning Statement
B급 기기 (가정용 방송통신기자재)
EAC Certification Logo
EAC
Per FCC Part 2 Section 2.1077
Responsible Party : Asus Computer International
Address : 48720 Kato Rd, Fremont, CA 94538
Phone/Fax No : (510)739-3777/(510)608-4555
hereby declares that the product
| Product Name Model Name | | Input rating |
| External Slim Optical Drive | SDRW-08D2S-U, SDRW-08U5S-U, SDRW-08U7M-U, SDRW-08U7C-U, SDRW-08U8M-U, SDRW-08U9M-U, SBC-06D2X-U, SBW-06D2X-U | 5V, 2.0A |
| External Slim Blu-ray Drive SBW-06D5H-U 5V, 2.0A | |
| External H/H Optical Drive BW-16D1H-U, BW-16D1X-U 12V, 3.0A | |
compliance statement:
These devices comply with part 15 of the FCC Rules. Operation is subject to the following two conditions: (1) These devices may not cause harmful interference, and (2) these devices must accept any interference received, including interference that may cause undesired operation.
Complies with 21 CFR 1040.10 and 1040.11 except for conformance with IEC 60825-1 Ed. 3., as described in Laser Notice No. 56, dated May 8, 2019.
ASUSTeK Computer Inc. hereby declares that this device is in compliance with the essential requirements and other relevant provisions of related UKCA Directives. Full text of UKCA declaration of conformity is available at: www.asus.com/support
English ASUSTeK Computer Inc. hereby declares that this device is in compliance with the essential requirements and other relevant provisions of related Directives. Full text of EU declaration of conformity is available at: www.asus.com/support
Address, City 1F., No. 15, Lide Rd., Beitou Dist., Taipei City 112
Authorized Representative in Europe ASUS COMPUTER GmbH
City Address Harkortstrasse 21-23, 40880 Ratingen
Country Germany
Authorized Representative in United Kingdom ASUSTEK (UK) LIMITED
City Address 1st Floor, Sackville House, 143-149 Fenchurch Street, London, EC3M
6BL, England
Country United Kingdom

30

ASUS
IN SEARCH OF INCREDIBLE
For a superior burning experience