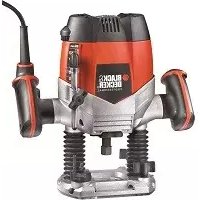
BPRR1200 - Router BLACK & DECKER - Free user manual and instructions
Find the device manual for free BPRR1200 BLACK & DECKER in PDF.


User questions about BPRR1200 BLACK & DECKER
0 question about this device. Answer the ones you know or ask your own.
Ask a new question about this device
Download the instructions for your Router in PDF format for free! Find your manual BPRR1200 - BLACK & DECKER and take your electronic device back in hand. On this page are published all the documents necessary for the use of your device. BPRR1200 by BLACK & DECKER.
USER MANUAL BPRR1200 BLACK & DECKER
natural_image
Technical line drawing of a mechanical device with multiple components and mounting brackets (no text or symbols)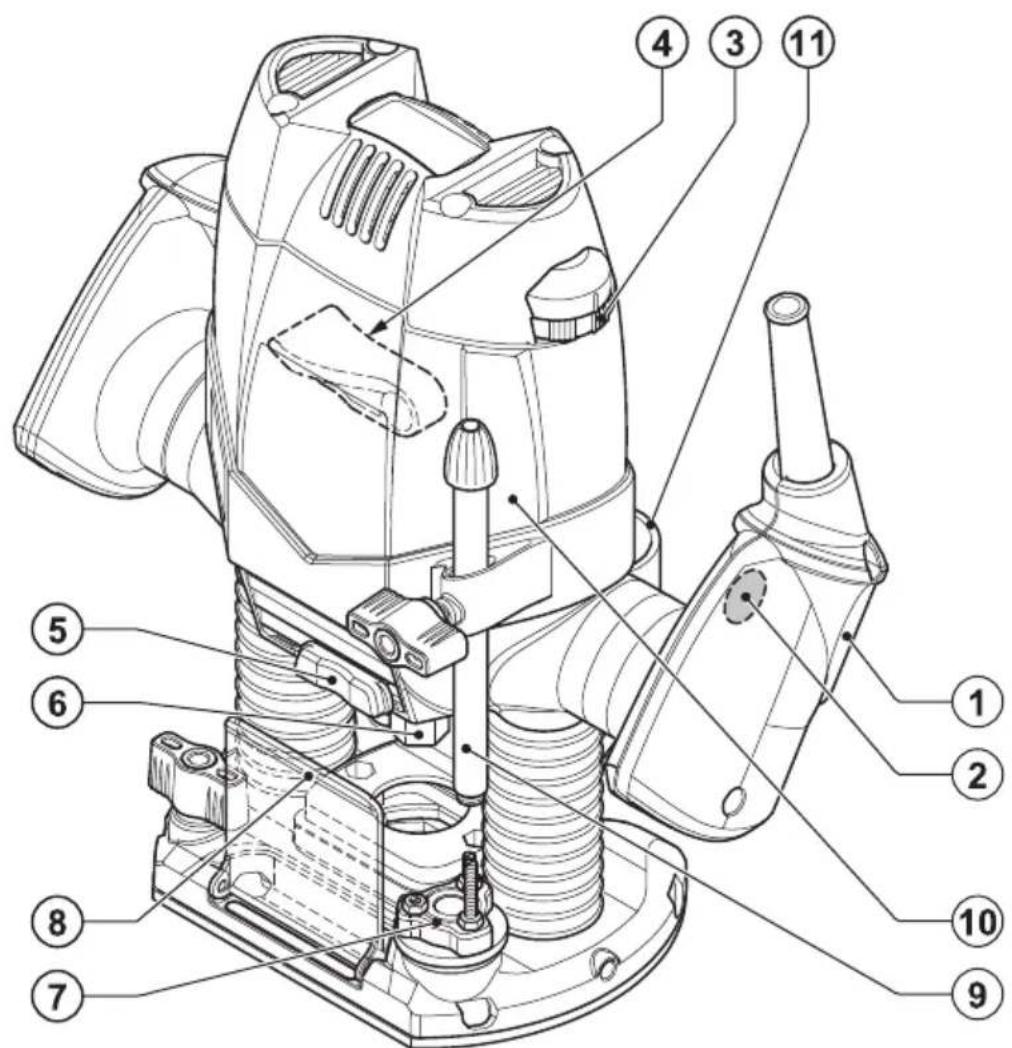
text_image
Technical diagram of a mechanical device with numbered parts for identification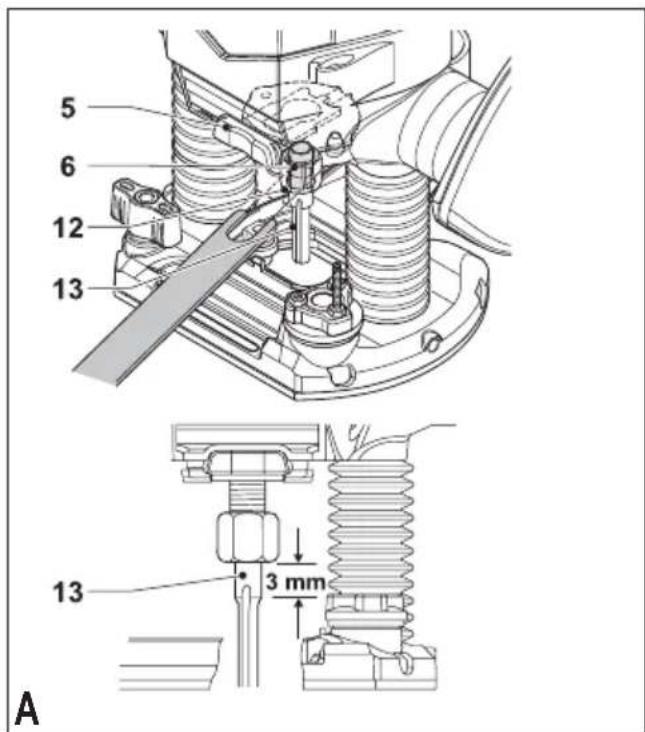
text_image
5 6 12 13 13 3 mm A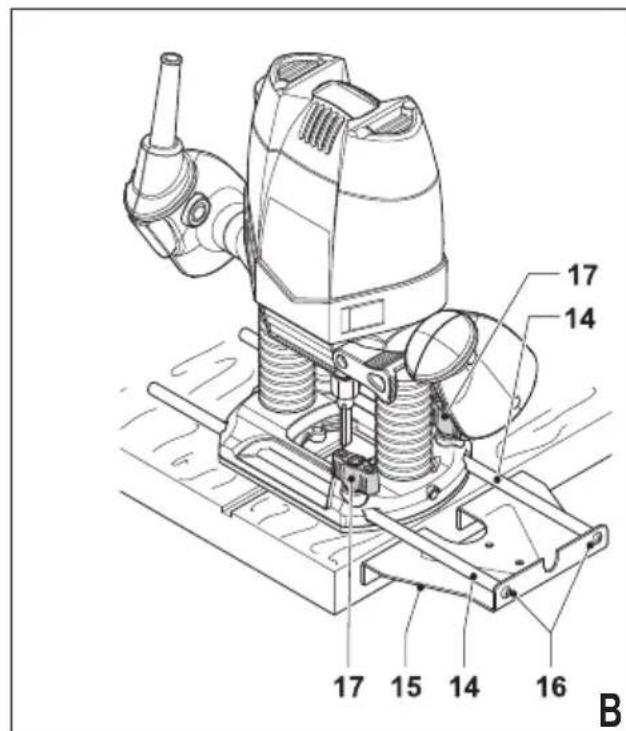
text_image
14 15 16 17 17 B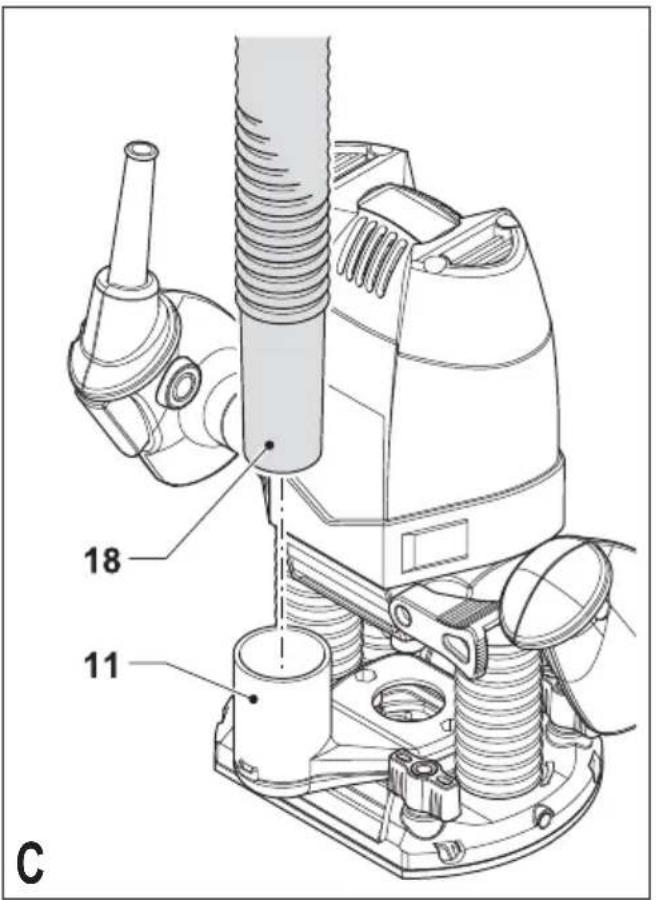
text_image
C 11 18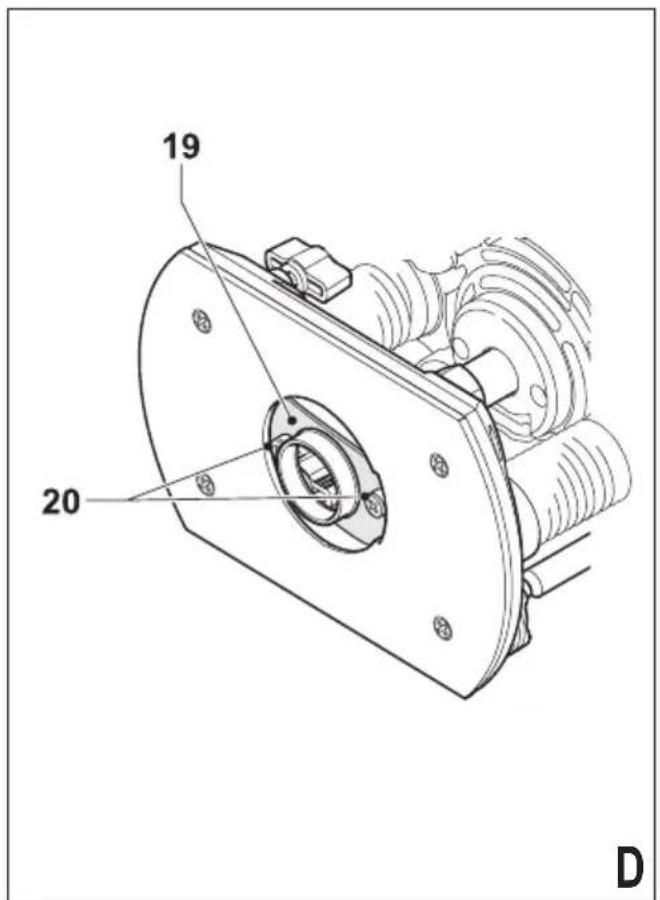
text_image
19 20 D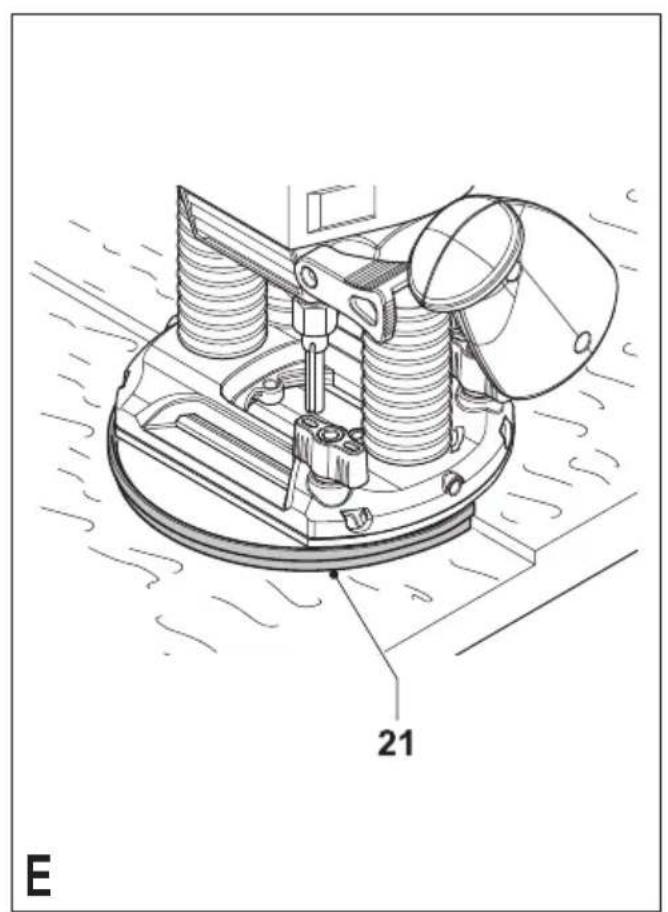
natural_image
Technical line drawing of a mechanical assembly with spring components and a labeled part 'E' (no text or symbols beyond label)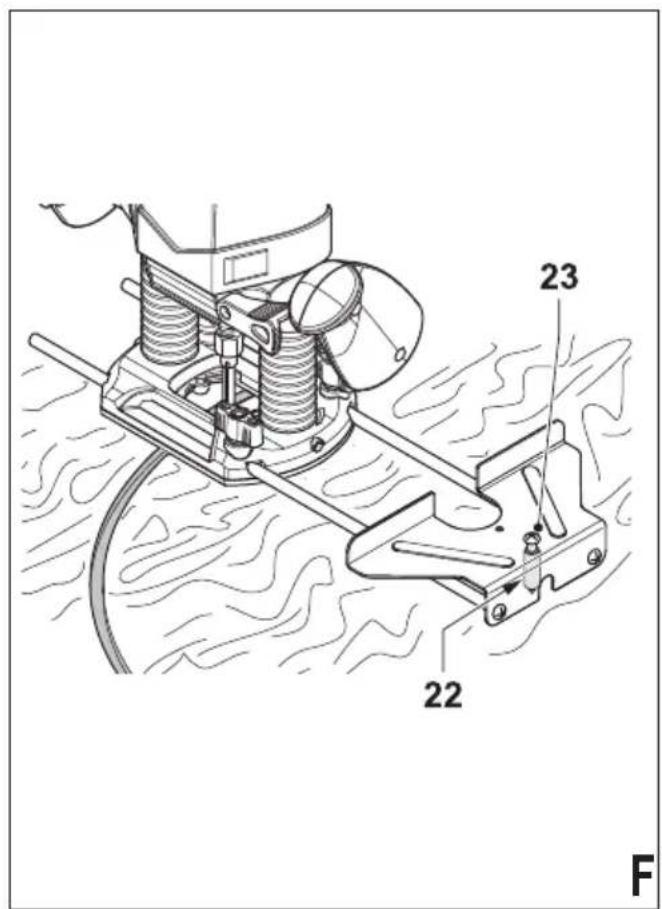
text_image
23 22 F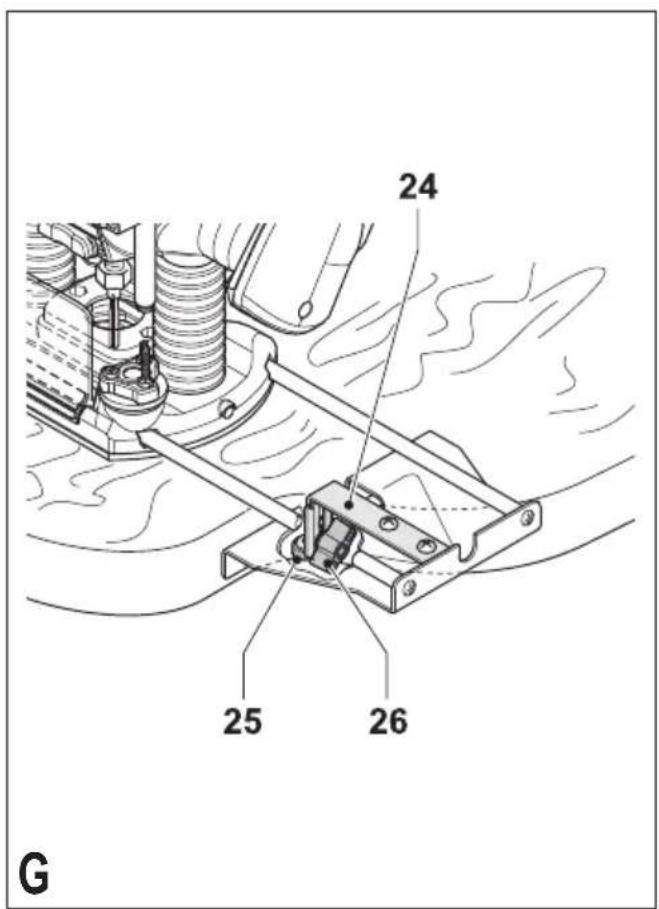
text_image
24 25 26 G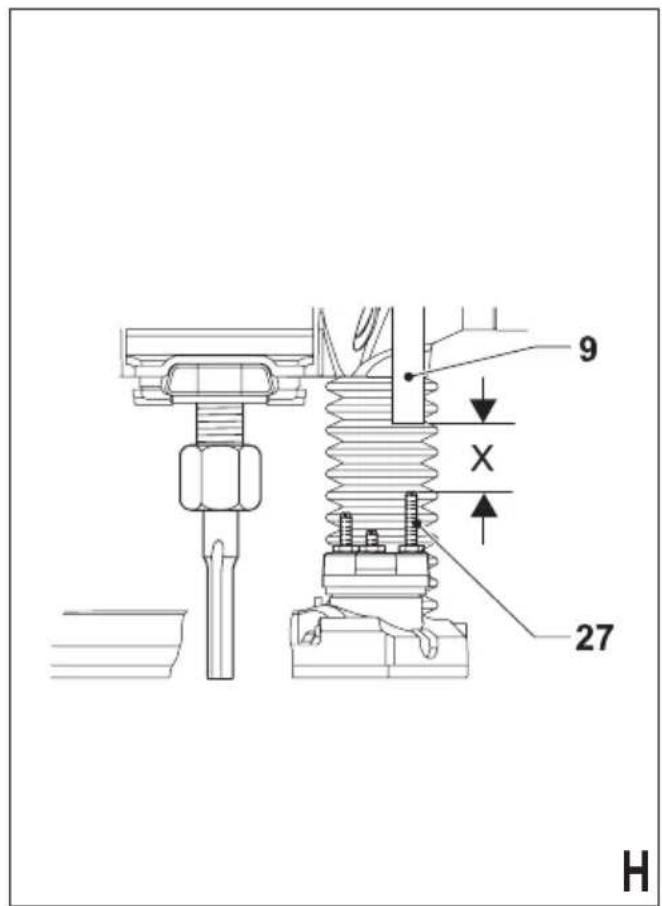
text_image
9 X 27 H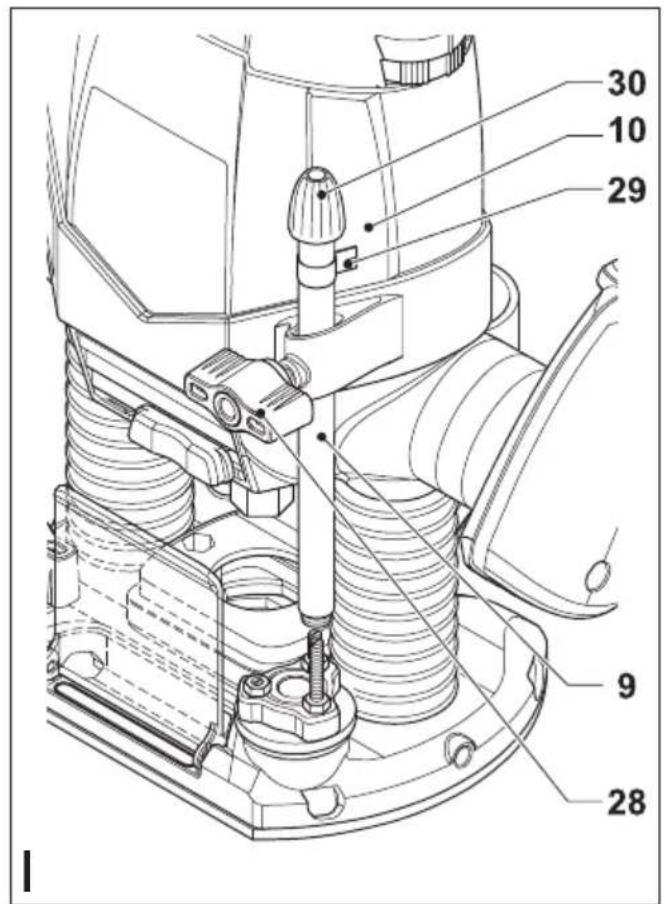
text_image
30 10 29 9 28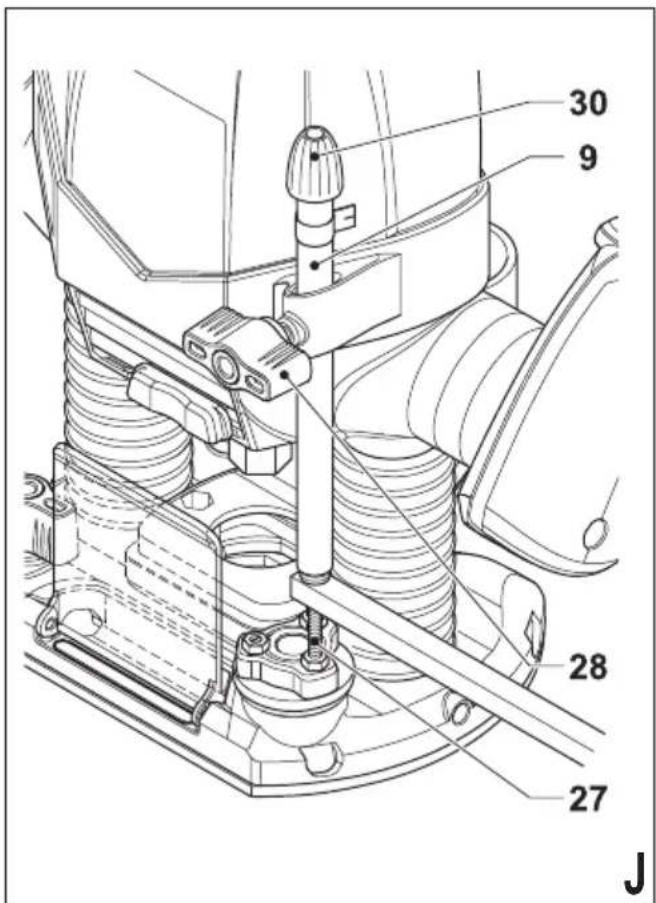
text_image
30 9 28 27 J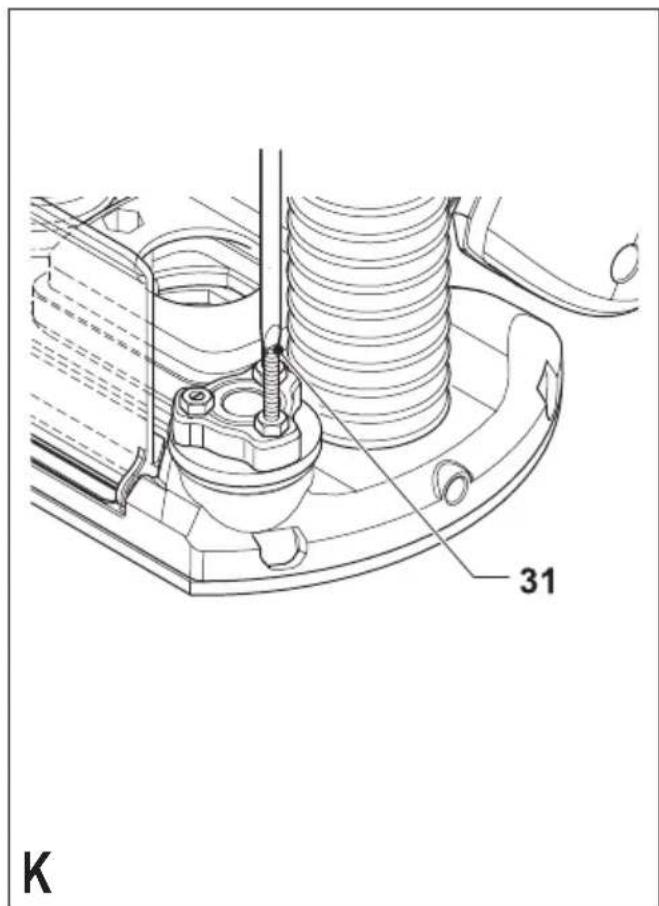
text_image
31 K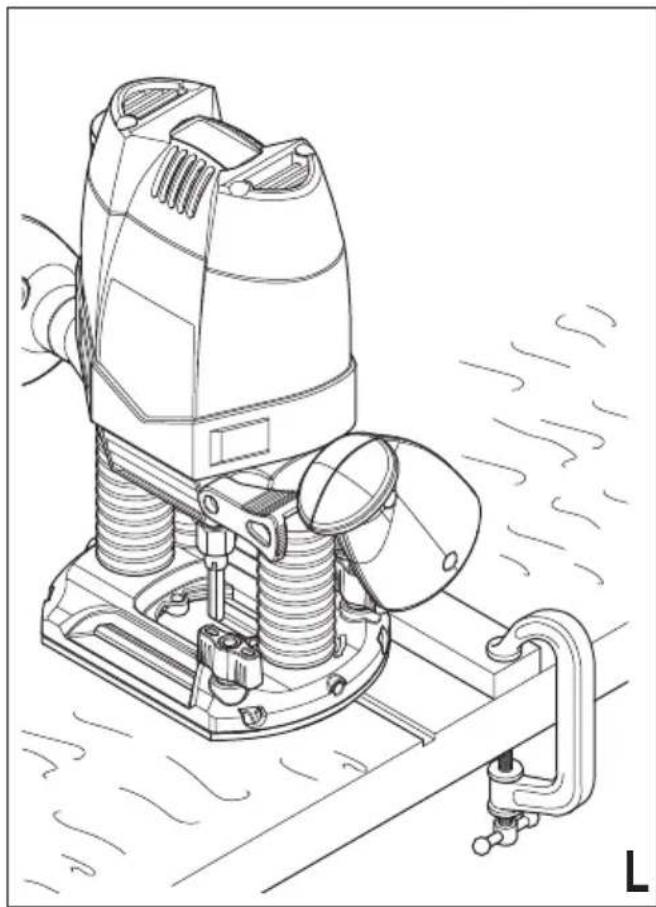
natural_image
Technical line drawing of a cleaning or cleaning machine with visible components and motion lines (no text or symbols)
natural_image
Diagram of a vehicle or motor with airflow arrows and a circular component, labeled 'M' in the corner (no text or symbols on the diagram itself)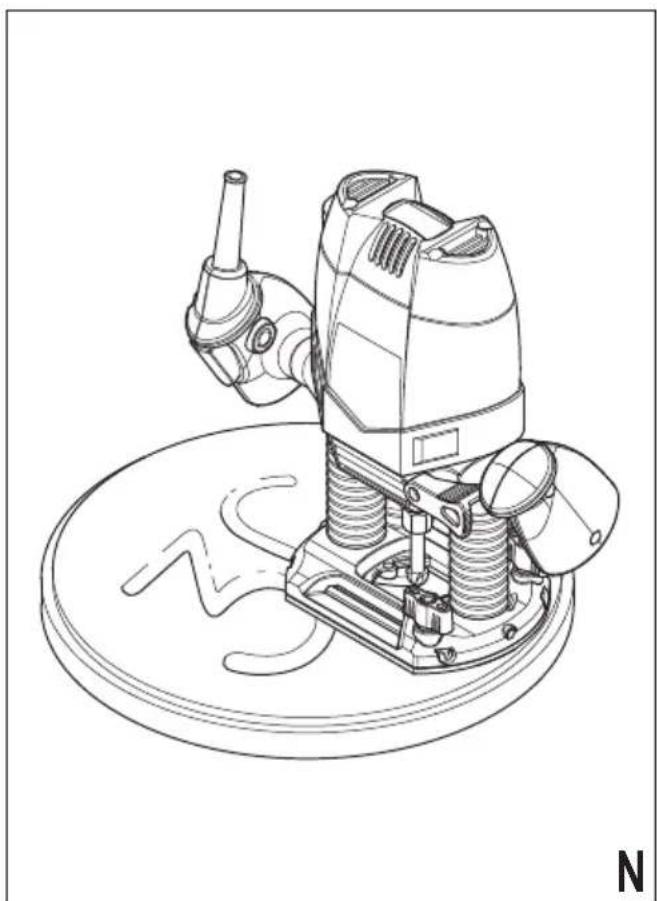
natural_image
Technical line drawing of a mechanical cleaning or cleaning device with no visible text or symbols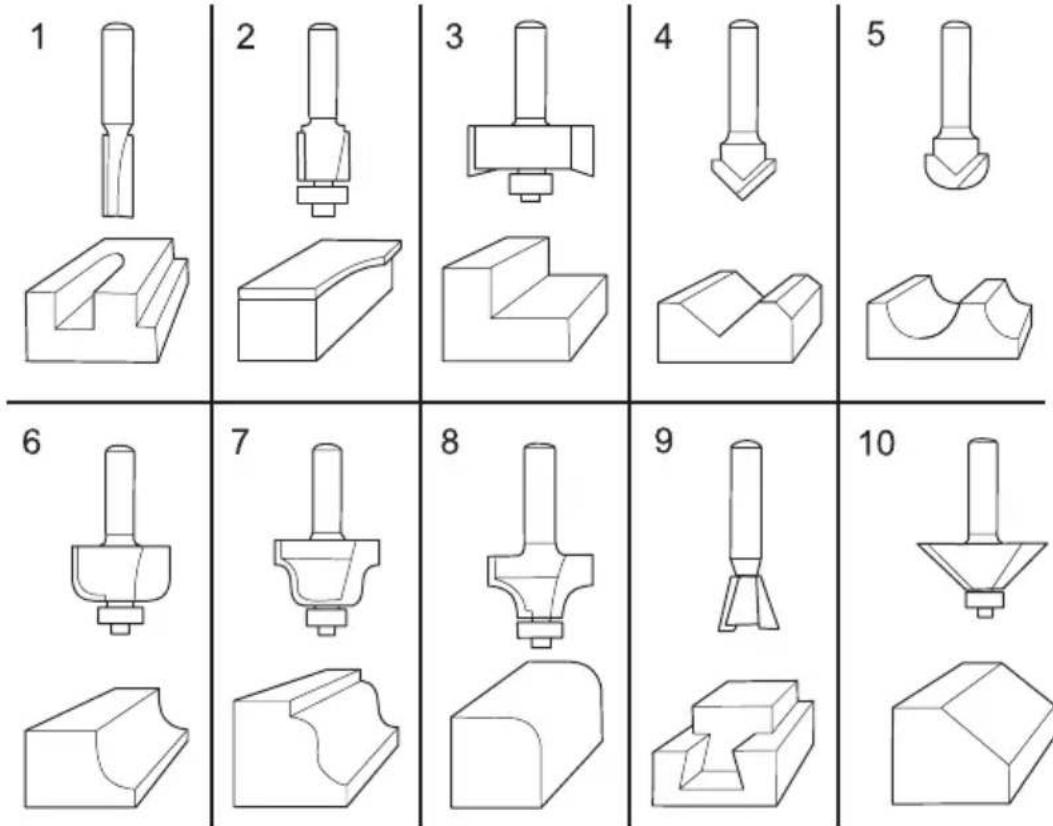
0
Intended use
Your Black & Decker router has been designed for routing wood and wood products. This tool is intended for consumer use only.
Safety instructions
General power tool safety warnings

Warning! Read all safety warnings and all instructions. Failure to follow the warnings and instructions listed below may result in electric shock, fire and/or serious injury.
Save all warnings and instructions for future reference.
The term "power tool" in all of the warnings listed below refers to your mains operated (corded) power tool or battery operated (cordless) power tool.
- Work area safety
a. Keep work area clean and well lit. Cluttered or dark areas invite accidents.
b. Do not operate power tools in explosive atmospheres, such as in the presence of flammable liquids, gases or dust. Power tools create sparks which may ignite the dust or fumes.
c. Keep children and bystanders away while operating a power tool. Distractions can cause you to lose control.
- Electrical safety
a. Power tool plugs must match the outlet. Never modify the plug in any way. Do not use any adapter plugs with earthed (grounded) power tools.
Unmodified plugs and matching outlets will reduce risk of electric shock.
b. Avoid body contact with earthed or grounded surfaces such as pipes, radiators, ranges and refrigerators. There is an increased risk of electric shock if your body is earthed or grounded.
c. Do not expose power tools to rain or wet conditions.
Water entering a power tool will increase the risk of electric shock.
d. Do not abuse the cord. Never use the cord for carrying, pulling or unplugging the power tool. Keep cord away from heat, oil, sharp edges or moving parts. Damaged or entangled cords increase the risk of electric shock.
e. When operating a power tool outdoors, use an extension cord suitable for outdoor use. Use of a cord suitable for outdoor use reduces the risk of electric shock.
f. If operating a power tool in a damp location is unavoidable, use a residual current device (RCD) protected supply. Use of an RCD reduces the risk of electric shock.
3. Personal safety
a. Stay alert, watch what you are doing and use common sense when operating a power tool. Do not use a power tool while you are tired or under the influence of drugs, alcohol or medication. A moment of inattention while operating power tools may result in serious personal injury.
b. Use personal protective equipment. Always wear eye protection. Protective equipment such as dust mask, non-skid safety shoes, hard hat, or hearing protection used for appropriate conditions will reduce personal injuries.
c. Prevent unintentional starting. Ensure the switch is in the off-position before connecting to power source and/or battery pack, picking up or carrying the tool. Carrying power tools with your finger on the switch or energising power tools that have the switch on invites accidents.
d. Remove any adjusting key or wrench before turning the power tool on. A wrench or a key left attached to a rotating part of the power tool may result in personal injury.
e. Do not overreach. Keep proper footing and balance at all times. This enables better control of the power tool in unexpected situations.
f. Dress properly. Do not wear loose clothing or jewellery. Keep your hair, clothing and gloves away from moving parts. Loose clothes, jewellery or long hair can be caught in moving parts.
g. If devices are provided for the connection of dust extraction and collection facilities, ensure these are connected and properly used. Use of dust collection can reduce dust-related hazards.
4. Power tool use and care
a. Do not force the power tool. Use the correct power tool for your application. The correct power tool will do the job better and safer at the rate for which it was designed.
b. Do not use the power tool if the switch does not turn it on and off. Any power tool that cannot be controlled with the switch is dangerous and must be repaired.
ENGLISH
c. Disconnect the plug from the power source and/or the battery pack from the power tool before making any adjustments, changing accessories, or storing power tools. Such preventive safety measures reduce the risk of starting the power tool accidentally.
d. Store idle power tools out of the reach of children and do not allow persons unfamiliar with the power tool or these instructions to operate the power tool. Power tools are dangerous in the hands of untrained users.
e. Maintain power tools. Check for misalignment or binding of moving parts, breakage of parts and any other condition that may affect the power tools operation. If damaged, have the power tool repaired before use. Many accidents are caused by poorly maintained power tools.
f. Keep cutting tools sharp and clean. Properly maintained cutting tools with sharp cutting edges are less likely to bind and are easier to control.
g. Use the power tool, accessories and tool bits etc., in accordance with these instructions, taking into account the working conditions and the work to be performed. Use of the power tool for operations different from those intended could result in a hazardous situation.
5. Service
a. Have your power tool serviced by a qualified repair person using only identical replacement parts. This will ensure that the safety of the power tool is maintained.
Additional power tool safety warnings

Warning! Additional safety warnings for routers
- Hold the power tool by the insulated gripping surfaces, because the cutter may contact its own cord. Cutting a "live" wire may make exposed metal parts of the power tool "live" and shock the operator.
- Use clamps or another practical way to secure and support the workpiece to a stable platform. Holding the work by hand or against your body leaves it unstable and may lead to loss of control.
Warning! Contact with, or inhalation of dusts arising from routing applications may endanger the health of the operator and possible bystanders. Wear a dust mask specifically designed for protection against dust and fumes and ensure that persons within or entering the work area are also protected.
• Thoroughly remove all dust after routing.
- Only use router bits with a shank diameter equal to the size of the collet installed in the tool.
- Only use router bits suitable for the no-load speed of the tool.
- Never use router bits with a diameter exceeding the maximum diameter specified in the technical data section.
- Do not use the tool in an inverted position.
- Do not attempt to use the tool in a stationary mode.
- If the supply cord is damaged, it must be replaced by the manufacturer or an authorised Black & Decker Service Centre in order to avoid hazard.
• Take special care when routing where the paint is possibly lead based or when routing some woods which may produce toxic dust:
- Do not let children or pregnant women enter the work area.
- Do not eat, drink or smoke in the work area.
- Dispose of dust particles and any other debris safely.
- The intended use is described in this instruction manual. The use of any accessory or attachment or performance of any operation with this tool other than those recommended in this instruction manual may present a risk of personal injury and/or damage to property.
Safety of others
- This appliance/tool is not intended for use by persons (including children) with reduced physical, sensory or mental capabilities, or lack of experience and knowledge, unless they have been given supervision or instruction concerning use of the appliance by a person responsible for their safety.
- Children should be supervised to ensure that they do not play with the appliance.
Residual risks.
Additional residual risks may arise when using the tool which may not be included in the enclosed safety warnings. These risks can arise from misuse, prolonged use etc.
Even with the application of the relevant safety regulations and the implementation of safety devices, certain residual risks can not be avoided. These include:
- Injuries caused by touching any rotating/moving parts.
- Injuries caused when changing any parts, blades or accessories.
- Injuries caused by prolonged use of a tool. When using any tool for prolonged periods ensure you take regular breaks.
- Impairment of hearing.
- Health hazards caused by breathing dust developed when using your tool (example:- working with wood, especially oak, beech and MDF.)
Labels on tool
The following pictograms are shown on the tool:

Warning! To reduce the risk of injury, the user must read the instruction manual.
Electrical safety

This tool is double insulated; therefore no earth wire is required. Always check that the power supply corresponds to the voltage on the rating plate.
- If the supply cord is damaged, it must be replaced by the manufacturer or an authorised Black & Decker Service Centre in order to avoid a hazard.
Features
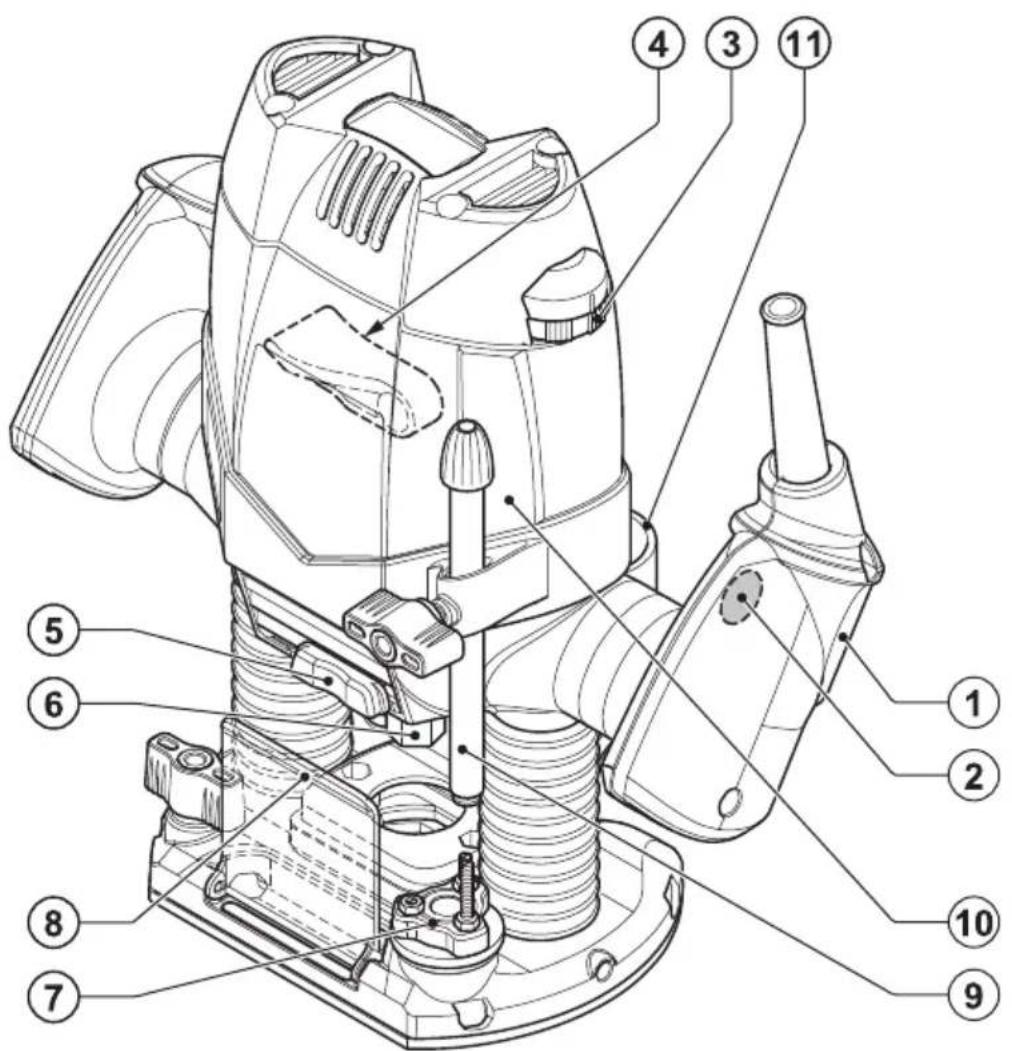
- On/off switch
-
Lock-off button
-
Variable speed control knob
- Plunge lock lever
- Spindle lock button
- Collet
- Revolver depth stop
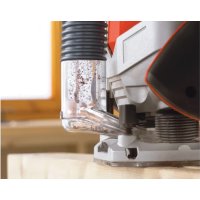
- Chip deflector
- Depth stop bar
- Depth of cut scale
- Dust extraction adaptor
Assembly
Warning! Before assembly, make sure that the tool is switched off and unplugged.
Fitting a router bit (fig. A)
- Remove the chip deflector (8).
- Keep the spindle lock button (5) depressed and rotate the spindle until the spindle lock fully engages.
- Loosen the collet nut (12) using the spanner provided.
- Insert the shank of the router bit (13) into the collet (6). Make sure that the shank protrudes at least 3 mm from the collet as shown.
- Keep the spindle lock button (5) depressed and tighten the collet nut (12) using the spanner provided.
Fitting the edge guide (fig. B)
The edge guide helps to guide the tool parallel to an edge.
- Fit the bars (14) to the edge guide (15) using the two screws (16) provided.
- Insert the bars (14) into the router base as shown.
- Set the edge guide to the required distance.
- Tighten the fixing screws (17).
ENGLISH
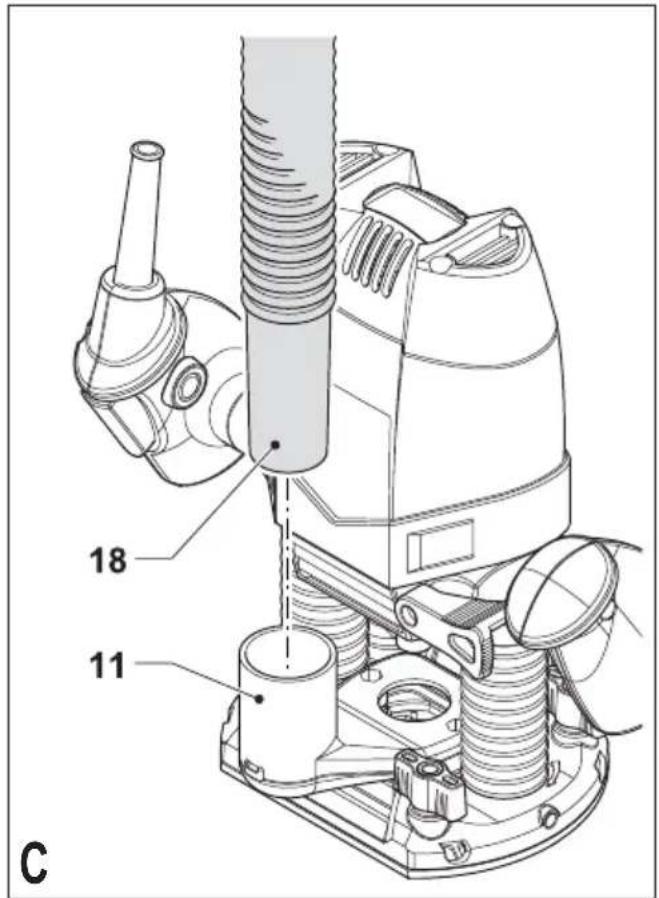
Fitting the dust extraction adaptor (fig. C)
The dust extraction adaptor allows you to connect a vacuum cleaner to the tool.
- Connect the hose (18) of the vacuum cleaner to the adaptor (11).
Fitting the template guide (fig. D)
- Fit the template guide (19) to the base of the router, with the flange to the bottom (workpiece) side.
- Insert the two long screws (20) from the bottom side through the template guide and the holes in the base.
- Place a nut onto each of the screws and securely tighten the nuts.
Fitting the distance piece (fig. E)
- Fit the distance piece (21) to the base of the router using the screws provided.
Fitting the centring pin (fig. F)
- Fit the edge guide to the router as shown in fig. B, but upside down.
- Fit the centring pin (22) to the workpiece side of the edge guide with the screw (23) provided.
Fitting the copy follower (fig. G)
- Fit the edge guide to the router as shown in fig. B.
- Fit the 'L' bar (24) to the upper side of the edge guide using the two screws and nuts provided.
- Adjust the rotating attachment (25) on the 'L' bar with the wing knob (26).
Use
Warning! Let the tool work at its own pace. Do not overload.
- Carefully guide the cable in order to avoid accidentally cutting it.
Adjusting the depth of cut (fig. H, I & J)
The depth of cut is the distance X between the depth stop bar (9) and the depth stop (27). The depth of cut can be set in two different ways as described below.
Adjusting the depth of cut using the scale (fig. I)
- Fit the router bit as described above.
- Loosen the locking screw (28).
- Pull the plunge lock lever (4) up.
- Plunge the router down until the router bit touches the workpiece.
- Push the plunge lock lever (4) down.
- Move the pointer (29) in the zero position on the scale (10).
- Add the desired depth of cut to the starting position.
- Move the depth stop bar (9) to the calculated position on the scale.
- Tighten the locking screw (28).
- Fine adjust using the adjusting knob (30).
- Pull the plunge lock lever (4) up and let the router return to its original position.
- After switching the router on, plunge it down and make the desired cut.
Adjusting the depth of cut using a piece of wood (fig. J)
- Fit the router bit and plunge the router down as described above.
- Pull the depth stop bar (9) up.
- Place a piece of wood with a thickness equal to the desired depth of cut between the depth stop (27) and the depth stop bar (9).
- Tighten the locking screw (28).
-
Fine adjust using the adjusting knob (30).
-
Remove the piece of wood.
- Pull the plunge lock lever (4) up and let the router return to its original position.
- After switching the router on, plunge it down and make the desired cut.
Adjusting the revolver depth stop (fig. K)
After turning the revolver depth stop to the desired setting, you can fine-adjust the depth stop to be used. If you want to make several cuts with a different depth of cut, adjust each of the depth stops.
- Turn the depth stop screw (31) up or down as required using a screwdriver.
Setting the speed
- Set the speed control knob (3) to the required speed. Use a high speed for small diameter router bits. Use a low speed for large diameter router bits.
Using a batten as a guide (fig. L)
When it is not possible to use the edge guide, for example when routing grooves in the back panel of a bookcase to support shelves, proceed as follows:
- Select a piece of wood with a straight edge to use as a batten.
- Place the batten onto the workpiece.
- Move the batten until it is in the correct position to guide the tool.
- Securely clamp the batten to the workpiece.
Using the template guide (fig. D)
The template guide can be used to make a cutout shape from a template, for instance a letter.
- Secure the template over the workpiece with double-sided tape or 'G' clamps.
- The router bit must extend below the flange of the template guide, to cut the workpiece in the shape of the template.
Using the distance piece (fig. E)
The distance piece can be used for trimming wooden or laminate vertical projections.
Using the centring pin (fig. F)
The centring pin can be used to cut out circular patterns.
- Drill a hole for the point of the centring pin in the centre of the circle to be cut.
- Place the router on the workpiece with the point of the centring pin in the drilled hole.
- Adjust the radius of the circle with the bars of the edge guide.
- The router can now be moved over the workpiece to cut out the circle.
Using the copy follower (fig. G)
The copy follower helps to maintain an equal cutting distance along the edge of irregularly shaped workpieces.
- Place the router on the workpiece at the desired distance from the edge to be copied.
- Adjust the bars of the edge guide until the wheel is in contact with the workpiece.
Switching on and off
Switching on
- Keep the lock-off button (2) depressed and press the on/off switch (1).
- Release the lock-off button.
Switching off
- Release the on/off switch.
Warning! Always operate the tool with both hands.
Hints for optimum use
- When working on outside edges, move the tool counterclockwise (fig. M). When working on inside edges, move the tool clockwise.
ENGLISH
- Use HSS router bits for softwood.
- Use TCT router bits for hardwood.
- You can use the tool without a guide (fig. N). This is useful for signwriting and creative work. Only make shallow cuts.
- Refer to the table below for common types of router bits.
Router bits (fig. O)
Description Application
Straight bit (1) Grooves and rebates
Trimming bit (2) Trimming laminates or hardwood; accurate profiling using a template
Rebating bit (3) Rebates on straight or curved workpieces
V-grooving bit (4) Grooves, engraving and edge bevelling
Core box bit (5) Fluting, engraving and decorative edge moulding
Cove bit (6) Decorative edge moulding
Ogee moulding bit (7) Decorative edge moulding
Rounding over bit (9) Rounding over edges
Dovetail bit (10) Dovetail joints
Chamfer bit (11) Chamfer edges
Maintenance
Your tool has been designed to operate over a long period of time with a minimum of maintenance. Continuous satisfactory operation depends upon proper tool care and regular cleaning.
Warning! Before performing any maintenance, switch off and unplug the tool.
- Regularly clean the ventilation slots in your tool using a soft brush or dry cloth.
- Regularly clean the motor housing using a damp cloth. Do not use any abrasive or solvent-based cleaner.
Accessories
The performance of your tool depends on the accessory used. Black & Decker accessories are engineered to high quality standards and designed to enhance the performance of your tool. By using these accessories you will get the very best from your too
Mains plug replacement (U.K. & Ireland only)
If a new mains plug needs to be fitted:
- Safely dispose of the old plug.
- Connect the brown lead to the live terminal in the new plug.
- Connect the blue lead to the neutral terminal.
- Connect the green/yellow lead to the earth terminal.
Warning! Follow the fitting instructions supplied with good quality plugs. Recommended fuse: 13 A.
Technical data
| BPRR1200 | ||
| Input voltage | V_AC | 220-240 |
| Power input | W | 1,200 |
| No-load speed | /min | 8,000 - 27,000 |
| Collet size | 5/16" (8 mm) / 1/4" (6.35 mm) / 6 mm | |
| Max. diameter of router bit | mm | 30 |
| Max. depth of cut | mm | 55 |
| Weight | kg | 3.6 |
Protecting the environment

Separate collection. This product must not be disposed of with normal household waste.
Should you find one day that your Black & Decker product needs replacement, or if it is of no further use to you, do not dispose of it with household waste. Make this product available for separate collection.

Separate collection of used products and packaging allows materials to be recycled and used again. Reuse of recycled materials helps prevent environmental pollution and reduces the demand for raw materials.
Local regulations may provide for separate collection of electrical products from the household, at municipal waste sites or by the retailer when you purchase a new product.
Black & Decker provides a facility for the collection and recycling of Black & Decker products once they have reached the end of their working life. To take advantage of this service please return your product to any authorised repair agent who will collect them on our behalf.
You can check the location of your nearest authorised repair agent by contacting your local Black & Decker office at the address indicated in this manual. Alternatively, a list of authorised Black & Decker repair agents and full details of our after-sales service and contacts are available on the Internet at: www.2helpU.com.
Guarantee
Black & Decker is confident of the quality of its products and offers an outstanding guarantee. This guarantee statement is in addition to and in no way prejudices your statutory rights. The guarantee is valid within the territories of the Member States of the European Union and the European Free Trade Area.
If a Black & Decker product becomes defective due to faulty materials, workmanship or lack of conformity, within 12 months from the date of purchase, Black & Decker guarantees to replace defective parts, repair products subjected to fair wear and tear or replace such products to make sure of the minimum inconvenience to the customer unless:
- The product has been used for trade, professional or hire purposes.
- The product has been subjected to misuse or neglect.
- The product has sustained damage through foreign objects, substances or accidents.
• Repairs have been attempted by persons other than authorised repair agents or Black & Decker service staff.
To claim on the guarantee, you will need to submit proof of purchase to the seller or an authorised repair agent. You can check the location of your nearest authorised repair agent by contacting your local Black & Decker office at the address indicated in this manual. Alternatively, a list of authorised Black & Decker repair agents and full details of our aftersales service and contacts are available on the Internet at:
www.2helpU.com
Please visit our website www.blackanddecker.co.uk to register your new Black & Decker product and to be kept up to date on new products and special offers. Further information on the Black & Decker brand and our range of products is available at www.blackanddecker.co.uk.
text_image
Technical diagram of a mechanical device with numbered parts for identification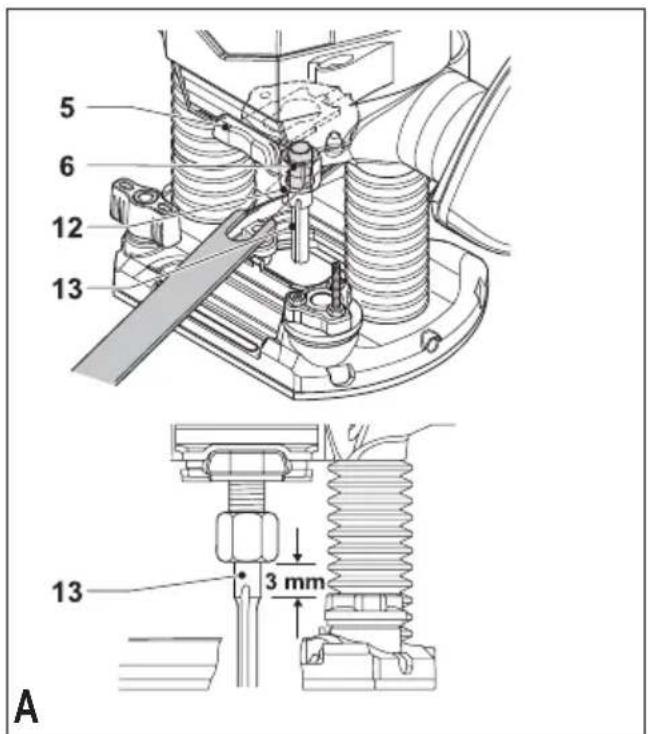
text_image
5 6 12 13 13 3 mm A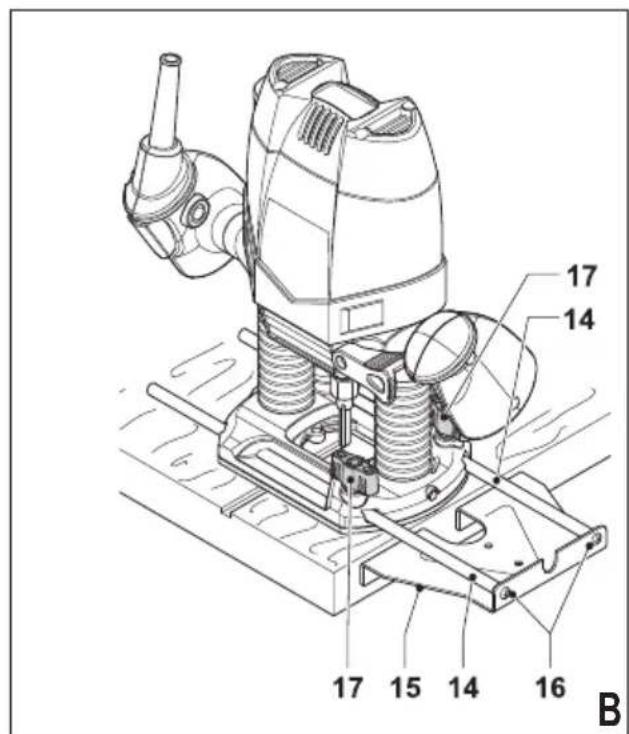
text_image
14 15 16 17 17 B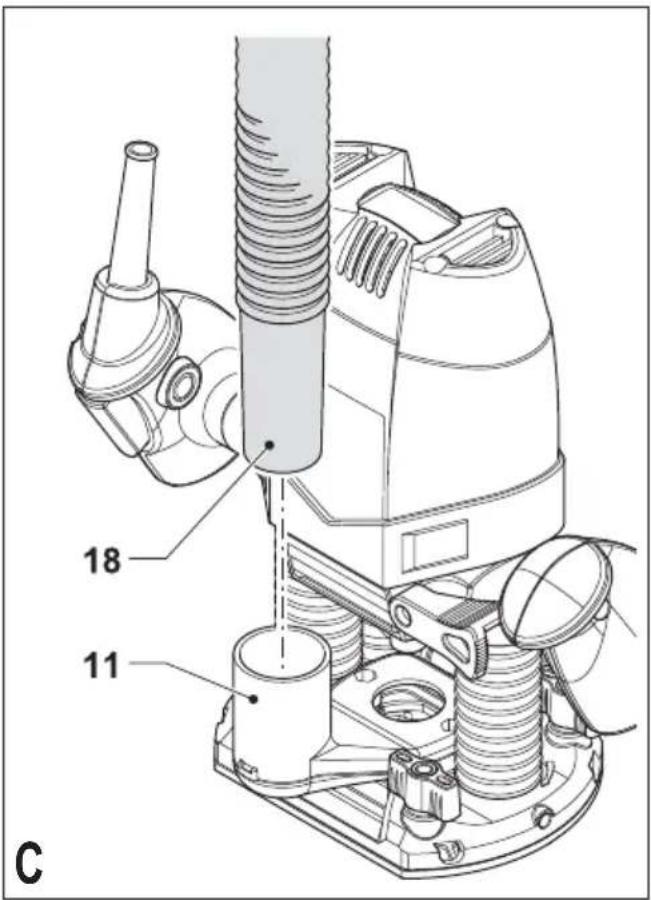
text_image
C 11 18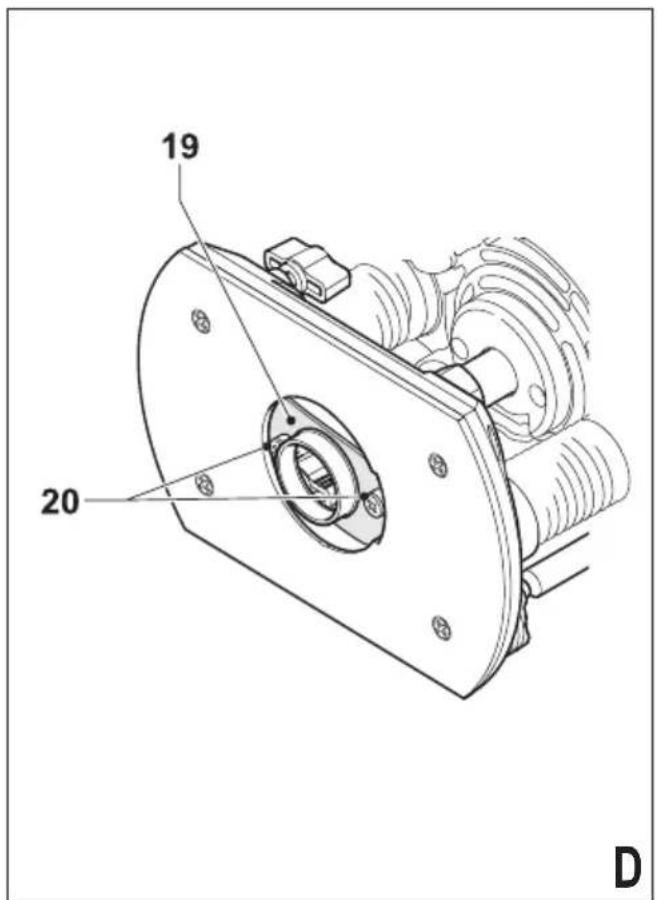
text_image
19 20 D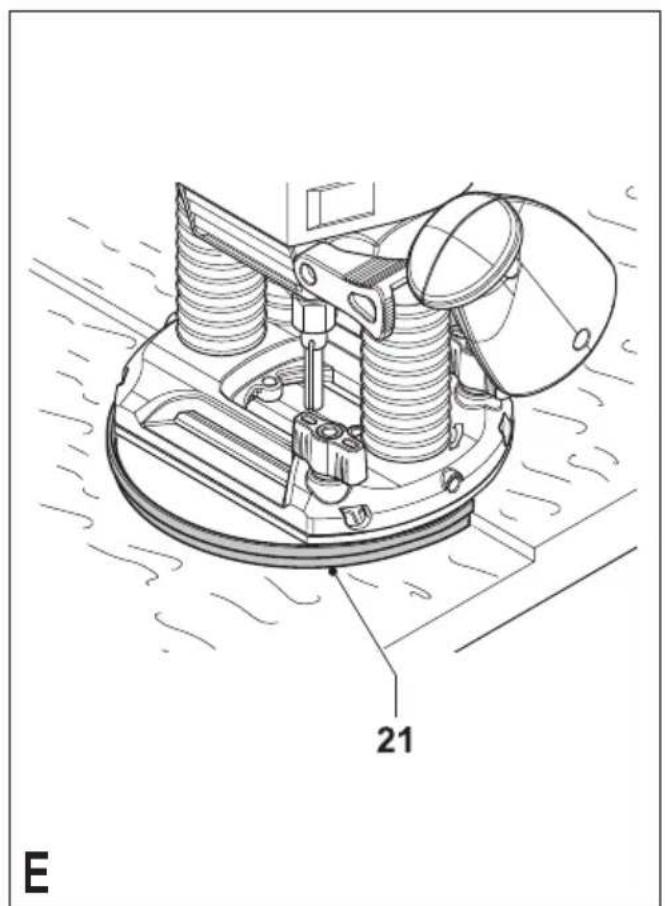
natural_image
Technical line drawing of a mechanical assembly with springs and a circular component, labeled '21' (no text or symbols beyond label)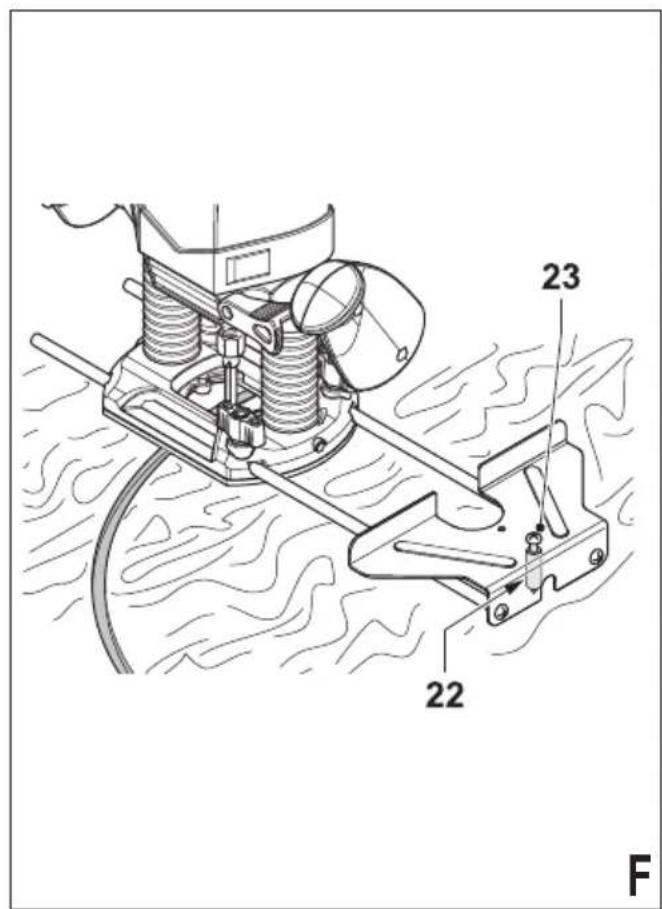
text_image
23 22 F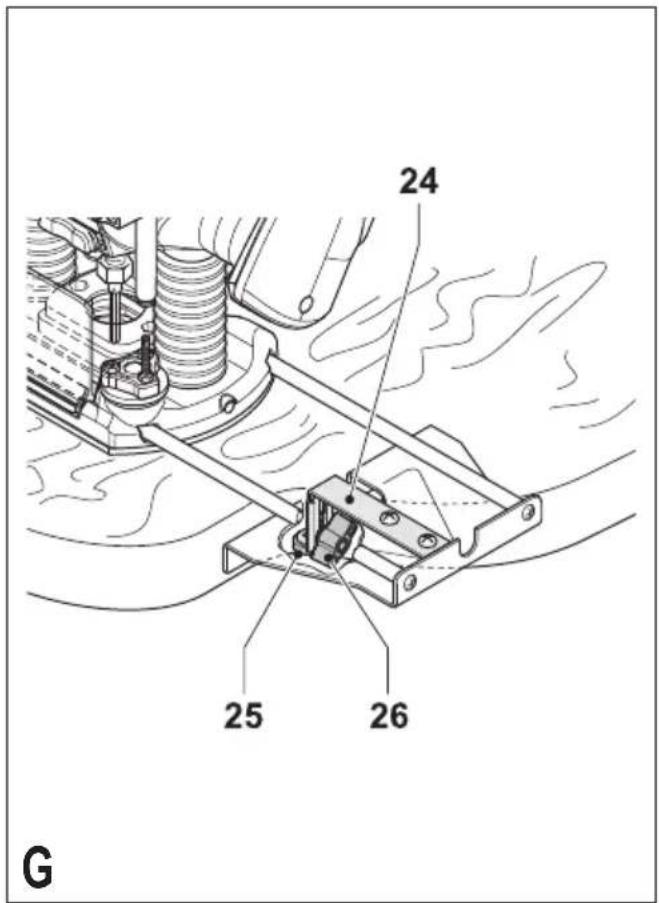
text_image
24 25 26 G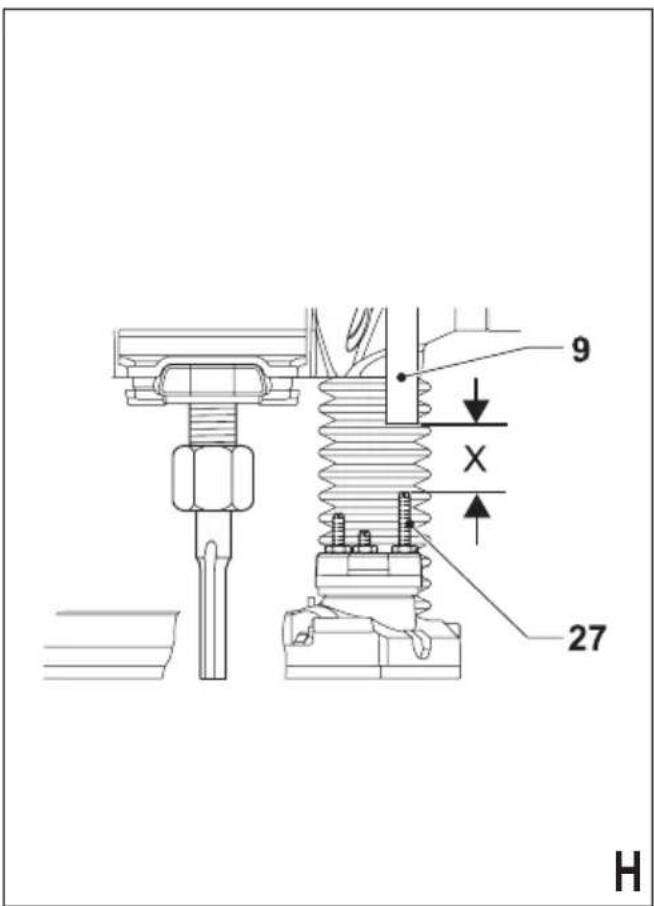
text_image
9 X 27 H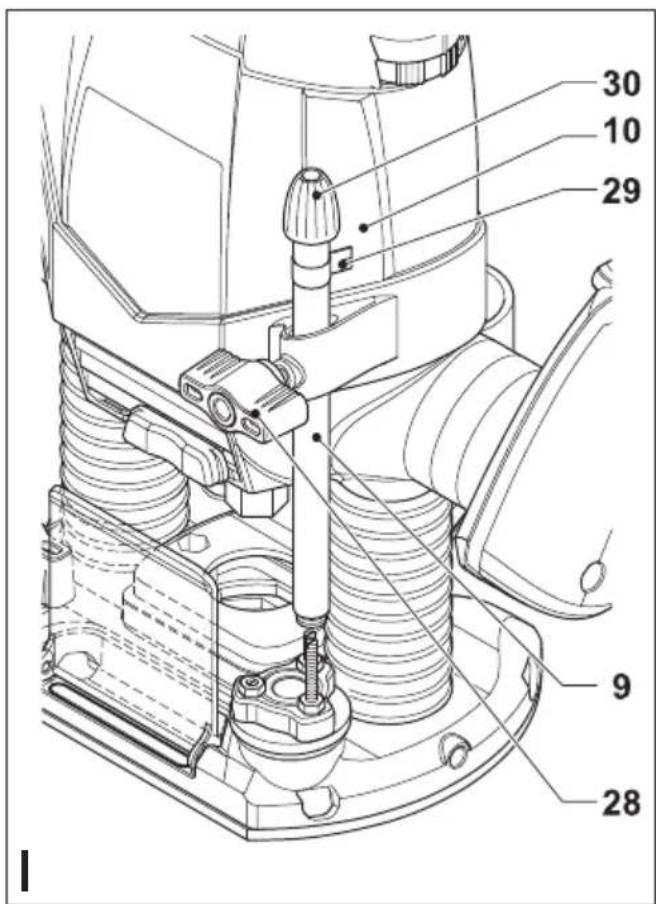
text_image
30 10 29 9 28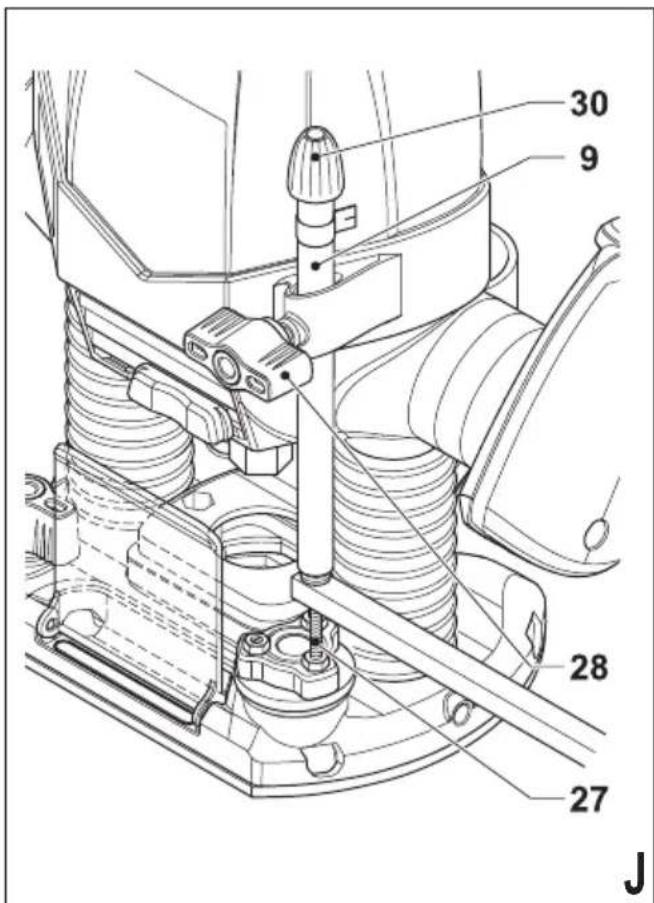
text_image
30 9 28 27 J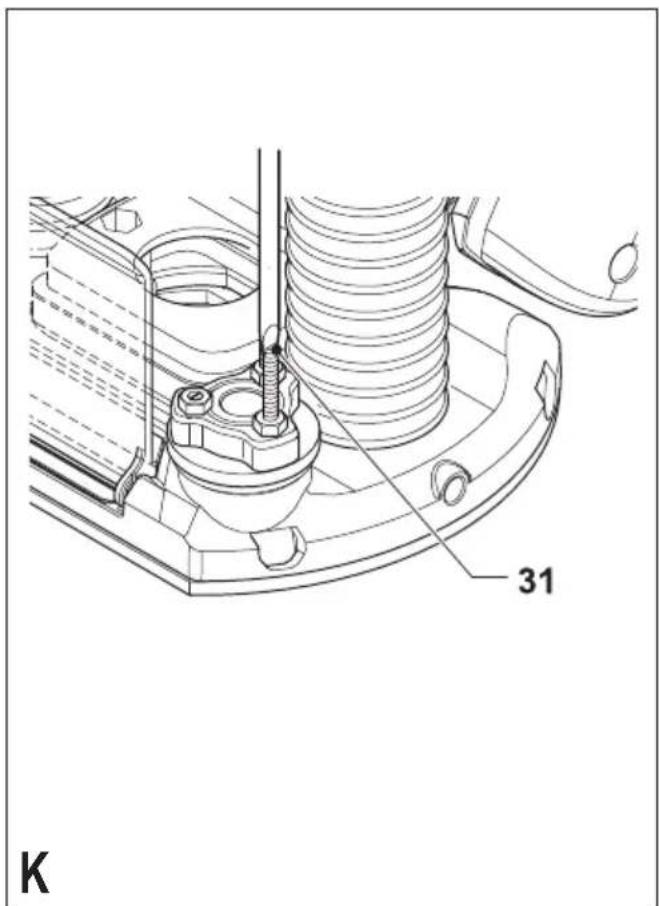
text_image
31 K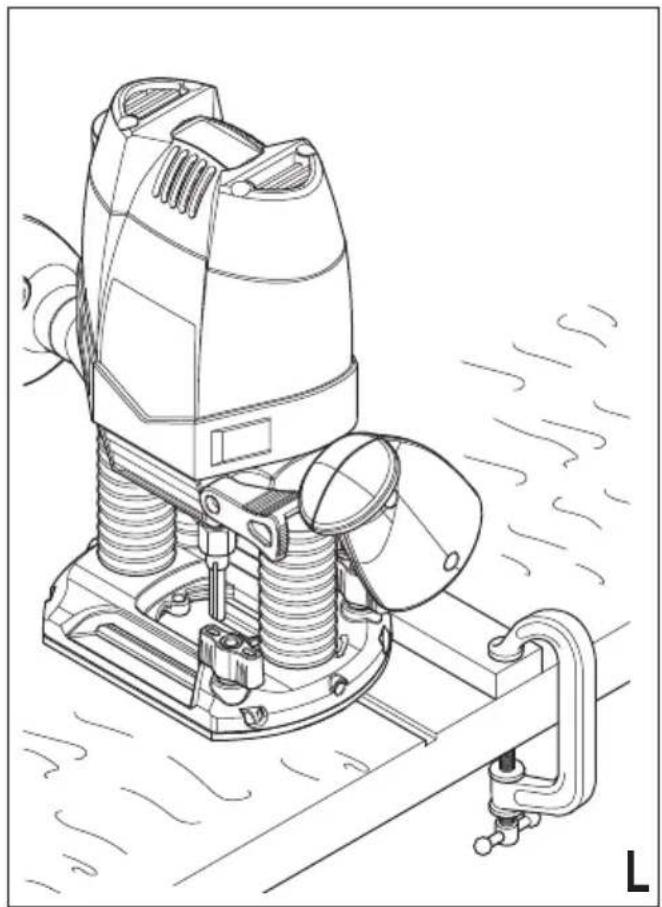
natural_image
Technical line drawing of a cleaning or cleaning machine with visible components and motion lines (no text or symbols)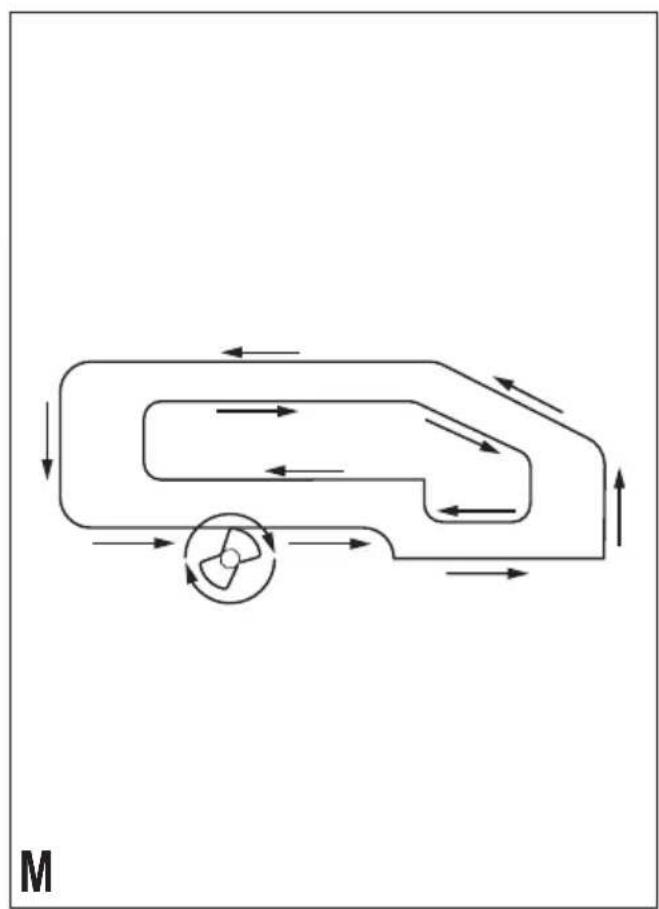
natural_image
Diagram of airflow around a vehicle with directional arrows indicating movement (no text or symbols)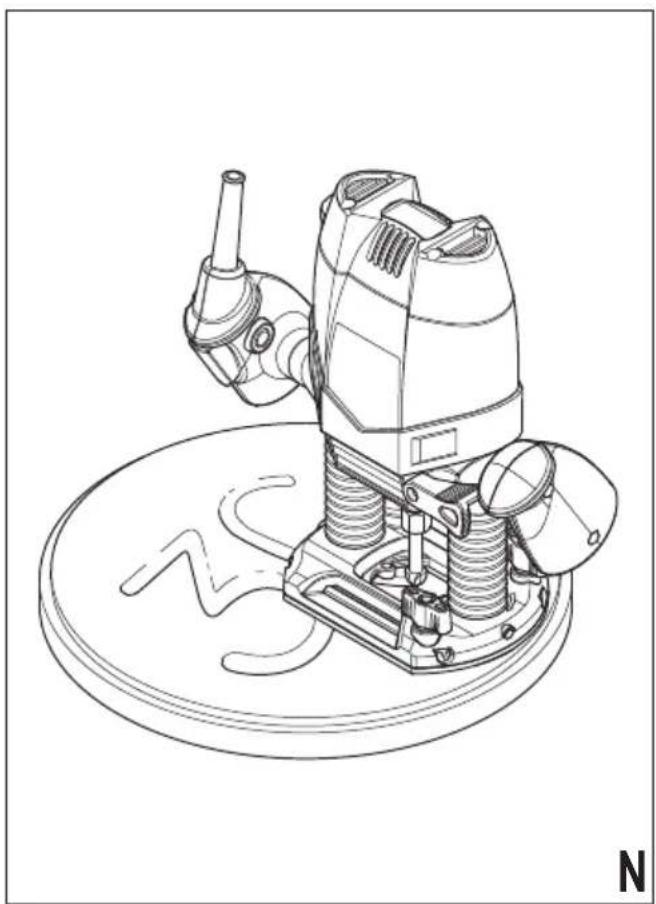
natural_image
Technical line drawing of a mechanical device with springs and a dial, no text or symbols present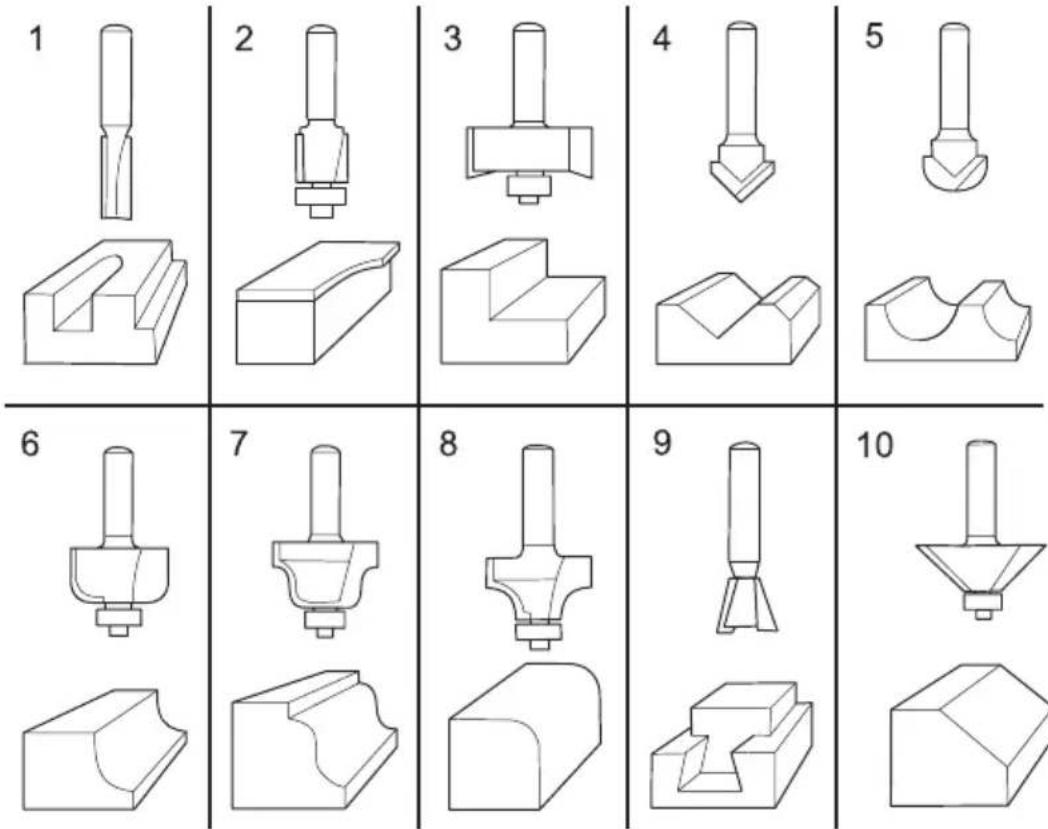
0
Utilisation prévue
natural_image
Technical line drawing of a cleaning or cleaning machine with visible components and motion lines (no text or symbols)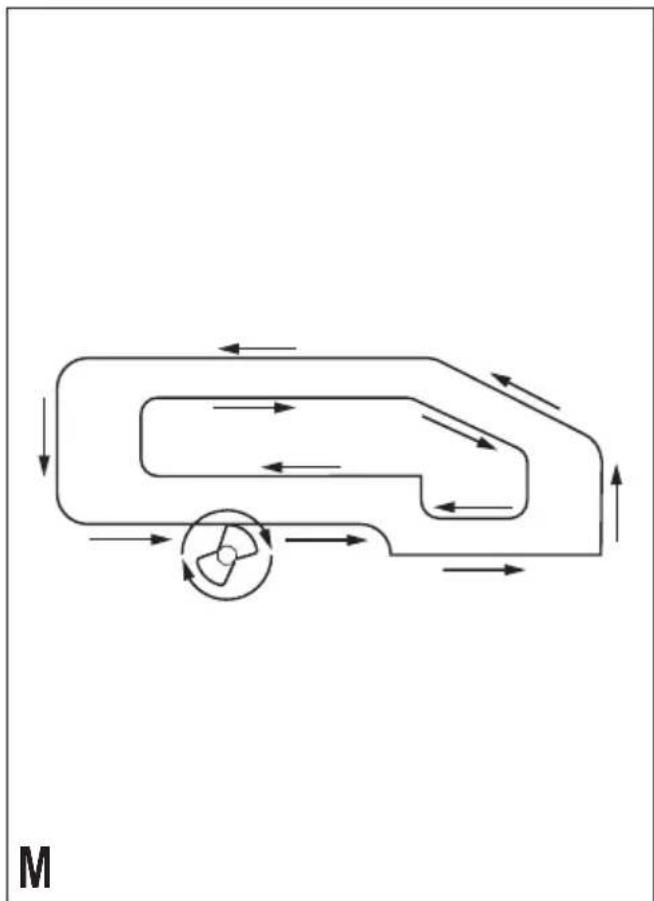
natural_image
Diagram of airflow around a vehicle with directional arrows indicating movement (no text or symbols)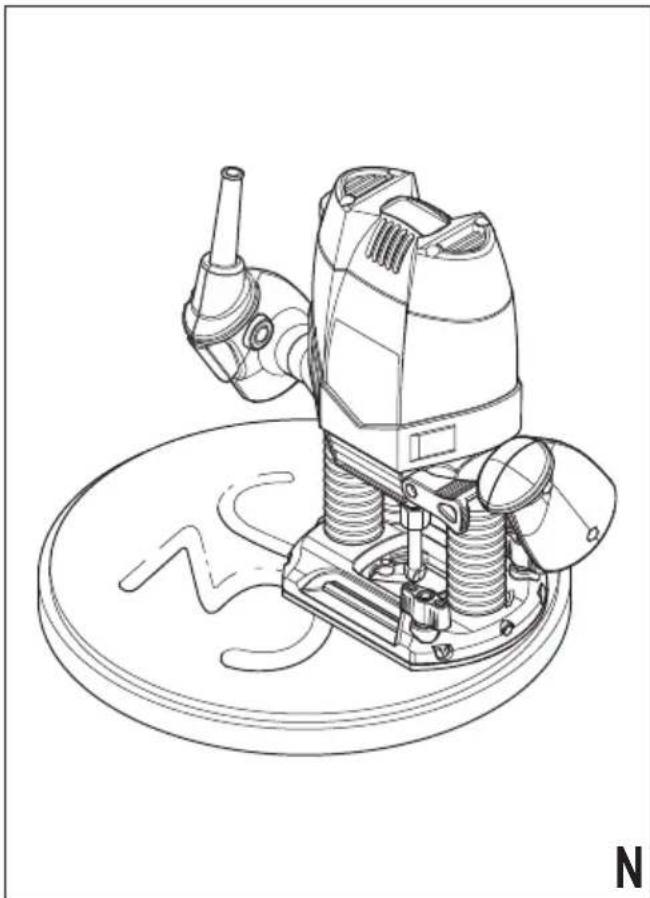
natural_image
Technical line drawing of a mechanical device with springs and a dial, no text or symbols present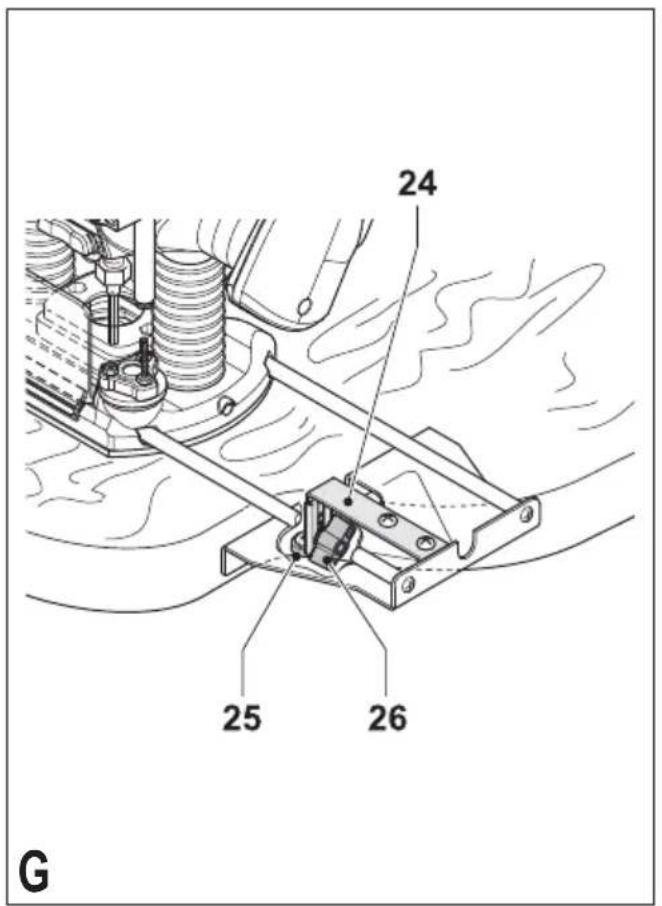
text_image
24 25 26 G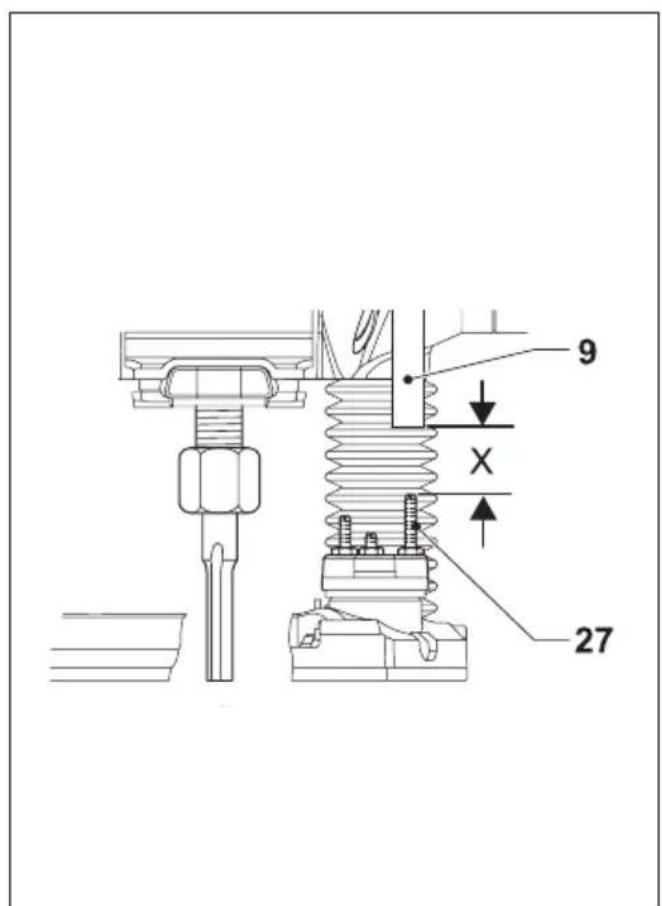
text_image
9 X 27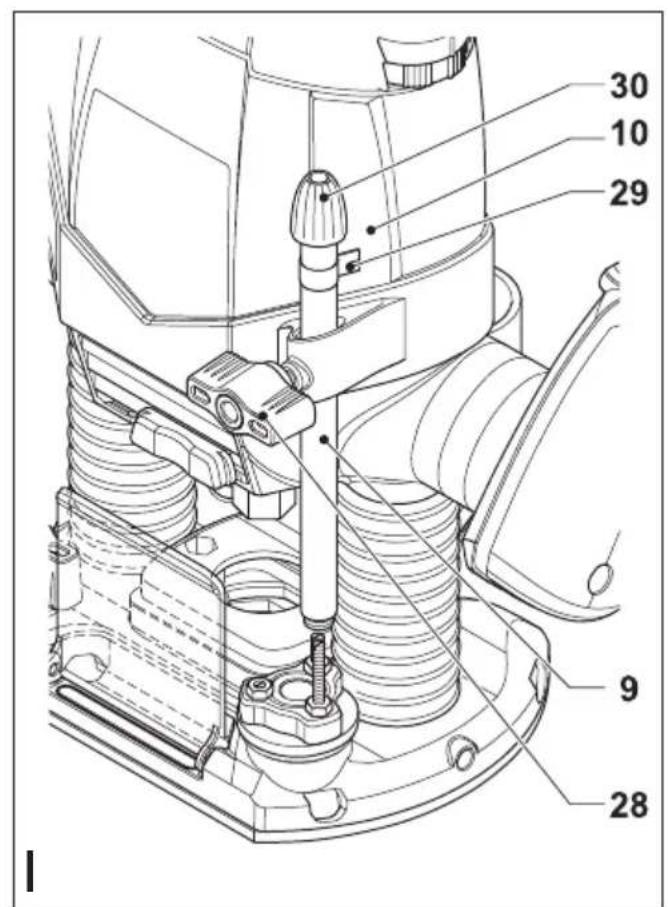
text_image
30 10 29 9 28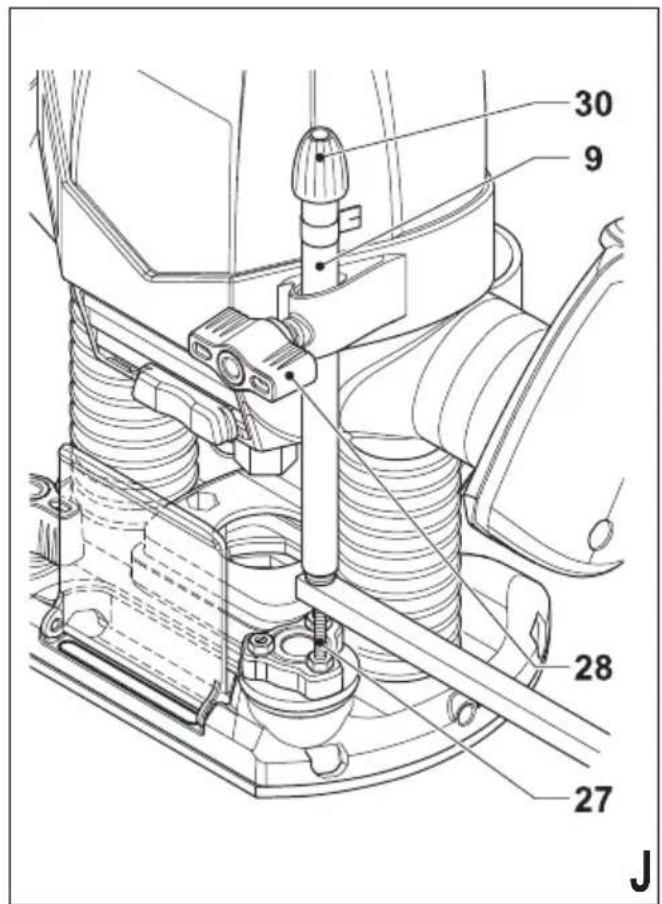
text_image
30 9 28 27 JArabic
text_image
18 11 C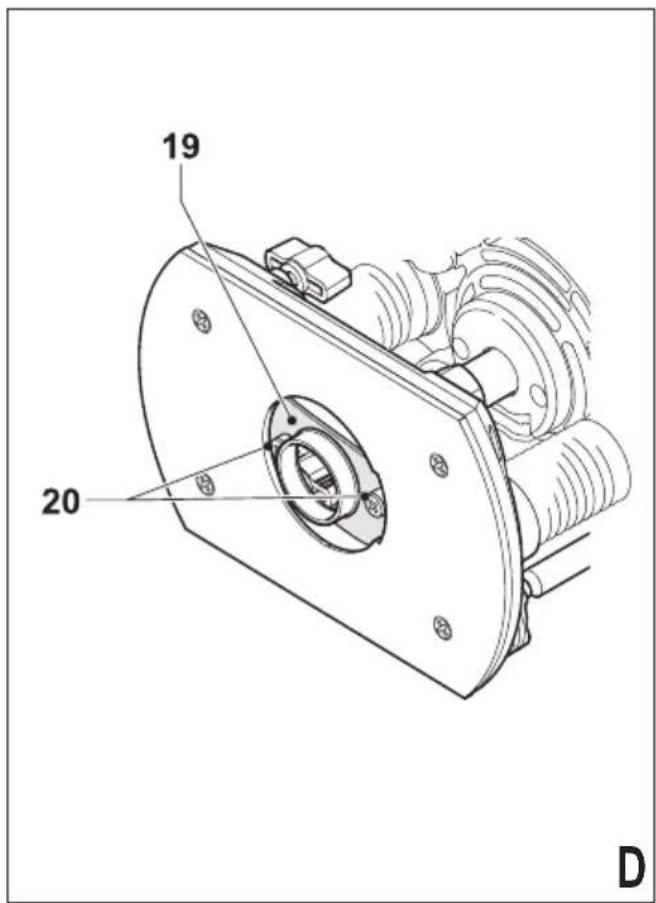
text_image
19 20 D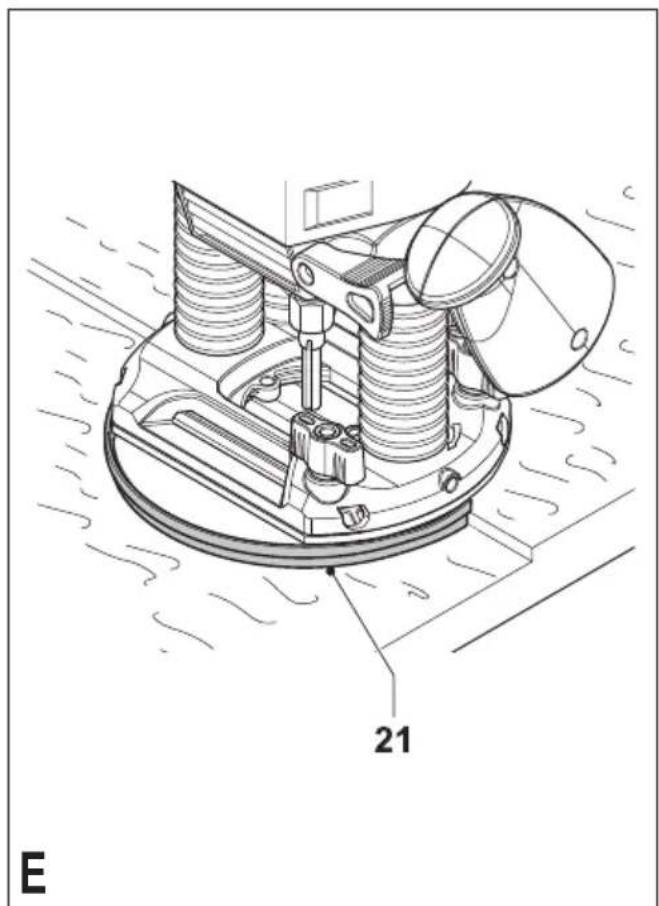
natural_image
Technical line drawing of a mechanical device with springs and a circular component, labeled '21' (no text or symbols beyond label)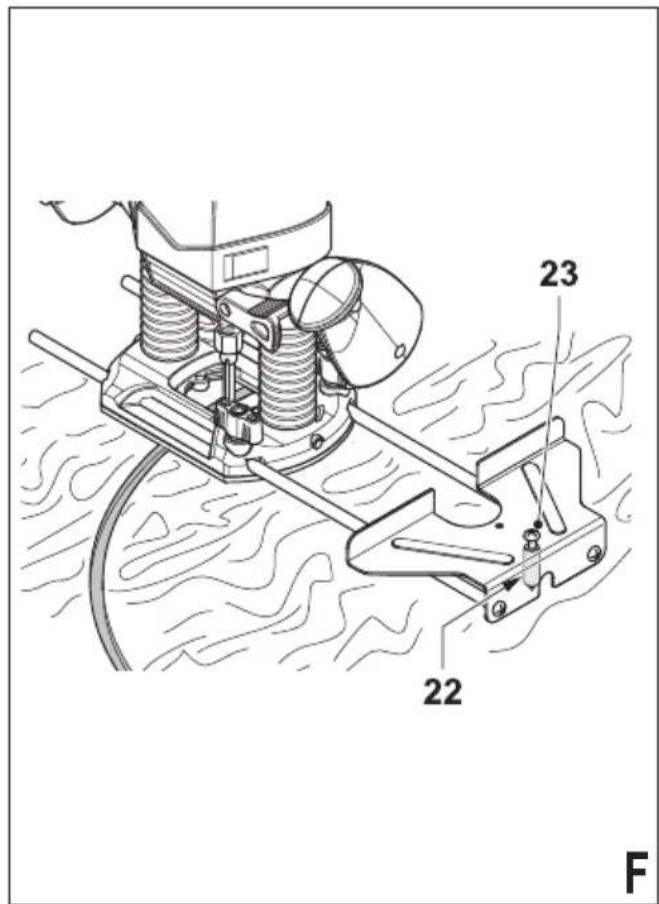
text_image
23 22 F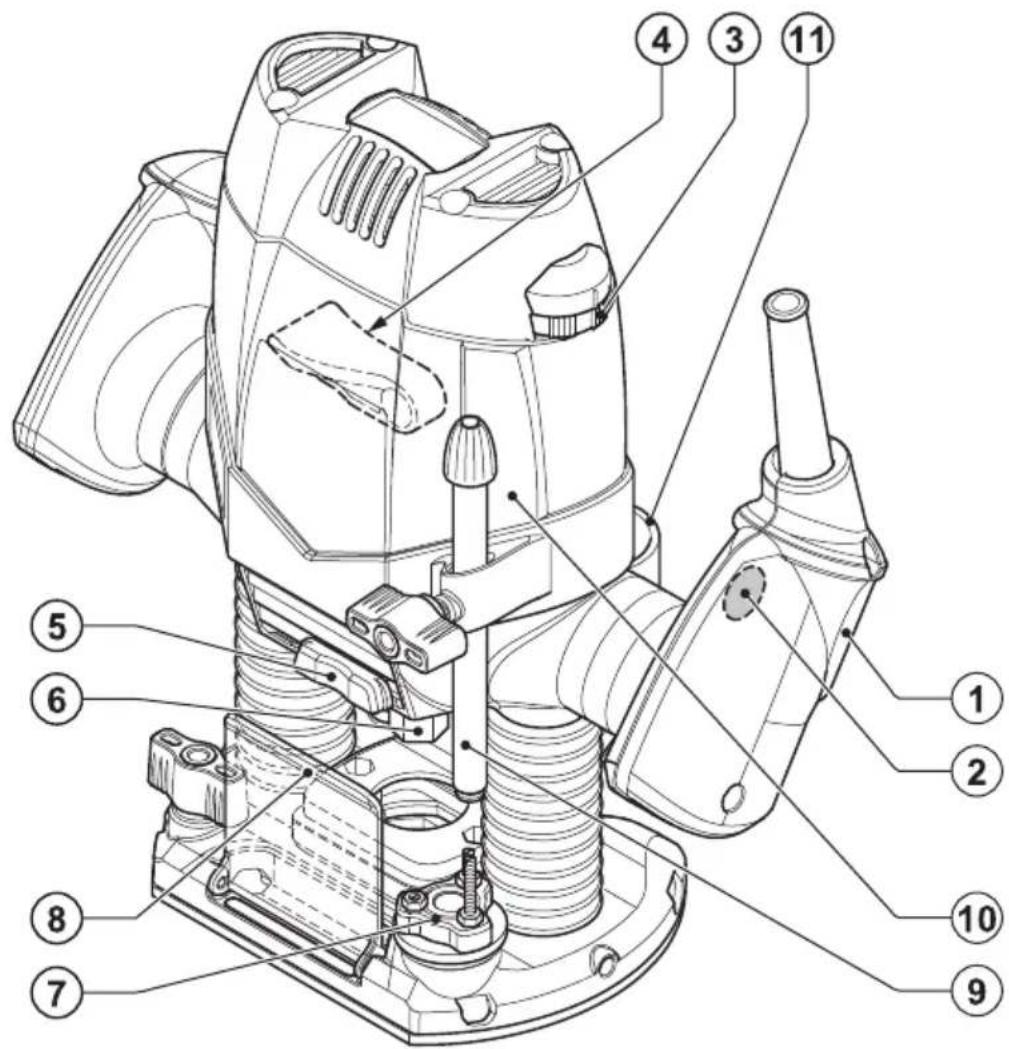
text_image
Technical diagram of a mechanical device with numbered parts for identification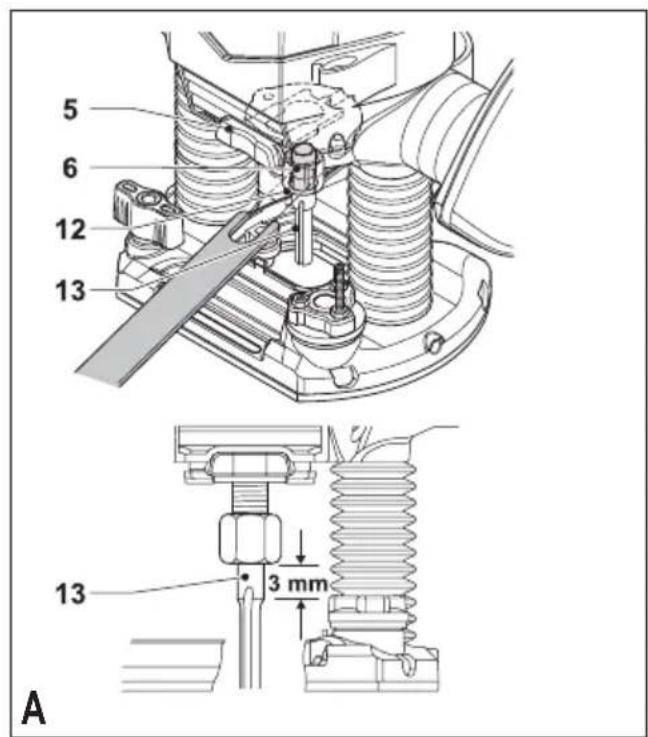
text_image
5 6 12 13 13 3 mm A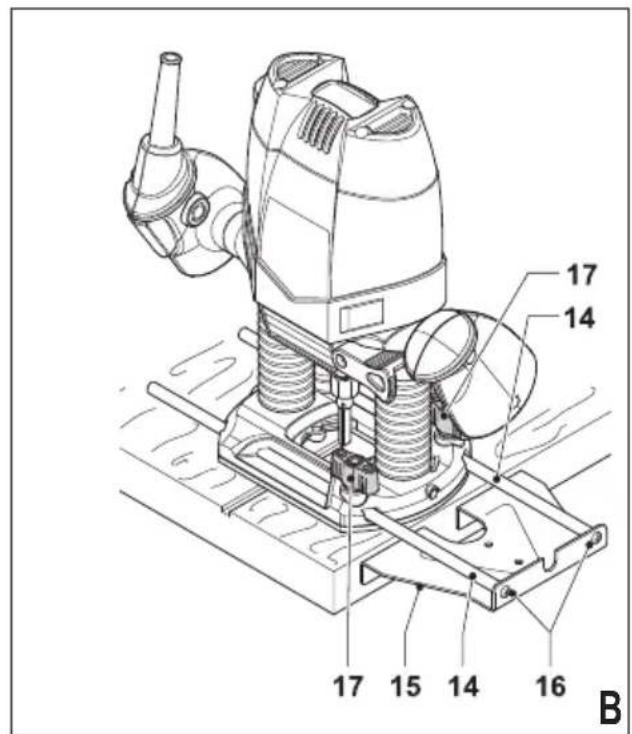
text_image
14 15 16 17 17 BNames & Addresses for Black & Decker Service Concessionaries
ALGERIA: Sarl Outillage Corporation, 08 Rue Med Boudiaf - Cheraga - Algiers, Algeria. Tel: (213-21) 375130, Fax: (213-21) 369667. ANGOLA: Angoferraria, Lda., Rua Robert Shields, No. 61, Luanda, Angola, Tel: 00244-222-395837 / 222-395034, Fax: 00244-222-394790. AZERBAIJAN: Royalton Holdings Ltd. 41 Khagani St. Apt. 47 AZ 1001, Baku. Tel: (994-12) 4935544, Fax: (994-12) 5980378. BAHRAIN: Kavalani & Sons W.L.L., P.O. Box 71, Sitra, Manama, Tel: (973) 17732888, Fax: (973) 17737379. Alfouz Services Co. WLL., P.O. Box 26562, Tubli, Manama. Tel: (973) 17783562, Fax: (973) 17783479. EGYPT: El Farab S.A.E., 15-Nabil El Wakkad Street, Dokki, Giza, Egypt, Tel: 00202-37603946 / 002-010-2582544, Fax: 00202-33352796. ETHIOPIA: Seif Tewfik Sherif, Arada Sub-City, Kebele 01/02, Global Insurance Building, 2nd Floor, Room 43, P.O. Box 2525, Addis Ababa, Ethiopia. Tel: (251-11) 1563968/ 1563969, Fax: (251-11) 1558009. IRAQ: Financial Links, Kazzaz Building Arasat Al-Hindia Block No: 629 Street: 31Building No: 1 Baghdad - Iraq. Tel: 00964 (0)780 195 2223/ 00964 (0)781 3763044. Al Sard Co. for General Trading Ltd. Jbara Bldg. 3Flr, Al Rasheed St. Bagdad. Tel: (964) 18184102. Sakhar Group, Arrassat al-hindya Al Masbah, Bagdad. (964) 7400144446. JORDAN: Palestine Bldg. Matl. (Bashiti Hardware), 93 King Abdullah 2nd Street, Opp. ELBA House, P.O. Box 3005, Amman 11953, Tel: (962-6) 5349098, Fax: (962-6) 5330731. KENYA: Dextron Tools Ltd., P.O. Box 20121-00200, Shariff House, Kimathi Street, Nairobi. Tel: (254-20) 6905000/ 2358021, Fax: (254-20) 6905111/ 6905112. KUWAIT: Al Omar Technical Co., P.O. Box 4062, 13041 Safat, Kuwait. Tel: (965) 24848595/ 24840039, Fax: (965) 24845652. Fawaz Al Zayani Establishment, P.O. Box 42426, Shop No. 18, Al Humaizi Commercial Complex, Khalifa Al Jassim, Shuwaikh, Kuwait. Tel: (965) 24828710, Fax: (965) 24828716. Fawaz Al Zayani Establishment, P.O. Box 42426, Shop No.18, Al Humaizi Commercial Complex, Khalifa Al Jassim, Shuwaikh, Kuwait. Tel: (965) 24828710, Fax: (965) 24828716. Fawaz Al Zayani Establishment, Fahaheel Industrial Area, Main St., Sanaya, Kuwait. Tel: (965) 23925830, Fax: (965) 24828716. LEBANON: Est. Shaya & Azar S.A.R.L., Boulevard Jdeideh - Mar Takla - Bouchrieh .P.O. Box 90545 Jdeideh.Beirut - Lebanon, Tel: 00961 1 872305 / 306 , Fax: 00961 1 872303. LIBYA: North Africa Trading ( El Ghoul Brothers), AlHilal Service Center Tawergha St. Misurata, Tel: 00218-091-3221408. (Benghazi) Sniydel st., Amr Ibn EL-Aas Rd. Tel: (+218) 92 5771120. (Tripoli) Al Barniq Service Center, Mokhazin elsukar st., ElFallah. Tel: (+218) 21 4808019. (Misrata) Al Hilal Service Center, Tawergha st. Tel: (+218) 51 2626743. MAURITIUS: Robert Le Marie Limited, Old Moka Road, Bell Village, P.O. Box 161, Port Louis, Tel: 00230-212 1865/ 212 2847, Fax: 00230-2080843. MOROCCO: Ets Louis Guillaud & Cie, 149, Quartier Industriel, Moulay Rachid, Casablanca, Postal Code 20450, Morocco, Tel: 00212-522729233, Fax: 00212-522729096. NIGERIA: Meridian Power Tools Ltd., Gr.Floor, #1 Alhaji Masha Rd, Next toTeslim Balogun Stadium, Near National Stadium Surulere, Lagos, Nigeria. Tel: 00234-1-7740431 / 7740410, Fax: 00234-1-7913798. OMAN: Al Jizzi Company LLC, P.O. Box 1704,PC 112 Ruwi, Oman. Tel: (968) 24832618/ 24835153, Fax: (968) 24831334/24836460. Al Hassan Technical & Construction Supplies Co. LLC, P.O. Box 1948, P.C. 112, Ruwi, Tel: (968) 24810575 / 24837054, Fax: (968) 24810287/ 24833080. Oman Hardware Co. LLC, P.O. Box 635, Ruwi Postal Code 112, Te: (968) 24815131, Fax: (968) 24816491. Khimji Ramdas, P.O. Box 19, Post Code 100, Ghala, Muscat, Oman. Tel: (968) 2459590/ 907 , Fax: (968) 24852752. Oman Marketing & Service Co. (Omasco), P.O. Box 2734, Behind Honda Showroom, Wattayah , Oman. Tel: (968) 24560232/ 24560255 , Fax: (968) 24560993. Oman Marketing & Service Co. (Omasco), Al Ohi , Sohar , Oman. Tel: (968) 26846379 , Fax: (968) 26846379 . Oman Marketing & Service Co. (Omasco), Sanaya , Salalah , Oman. Tel: (968) 23212290 , Fax: (968) 23210936.
PAKISTAN: ZIT Co - Nasir & Bros., 2nd Floor, Qadri Center, Chowk Dalgran Railway Road, Lahore, Pakistan, Tel: 0092 42 37670839 , Fax: 0092 42 37652989 . Ammar Service & Spares, 60-Bank Arcade, Serai Road , Karachi , Pakistan .Tel: (92-21) 32426905 , Fax: (92-21) 32427214 . QATAR : Teyseer Industrial Supplies & Services Co. WLL, 55 , Al Wakalat St .(Between St . 18 & 19 ) Salwa Industrial Area , P.O. Box 40523 Doha,Qatar , Te:(974) 44581536 , Fax:(974) 44682024 . Shaheen Electrical Works & Trading Co. WLL , Gate 34 , St .4 Industrial Area P.O. Box 9756 , Doha , Tel:(974) 44600230 /44600525 , Fax:(974) 44601338 . Al Muftah Service Centre , Al Wakrah Road , P.O. Box 875 , Doha,Qatar , Tel:(974) 4465088/ / 4465011/ /44446868 , Fax:(974) 44441415 / /44662599 . SAUDI ARABIA: (Al Bahr) Mohamed Ahmed Bin Affi Est., P.O. Box 530 , Yanbu , Al Bahr .Tel:(966-4) 3222626/ /3228867 , Fax:(966-4) 3222210 .(Al Khobar) Fawaz Ebrahim Al Zayani Trading Est., P.O. Box 76026 , Al Khobar # 31952 , Tel:(966-3) 8140914 , Fax:(966-3) 8140824 . MSS (Al-Mojil Supply & Services ) P.O. Box 450 , Jubail 31951 , Opp .Gulf Bridge Library & Riyadh House .Tel:(966-3) 361285/ /362448/ /3621729 , Fax:(966-3) /362358/ /3620783 .(Dammam) MSS (Al-Mojil Supply & Services), P.O. Box 450 , Jubail 31951 .Opp-Gulf Bridge Library & Riyadh House ,Tel:(966-3) /361285/ / /362448/ /36217ZN , Fax:(966-3) /362358/ / /3620783 .(Dammam) MSS (Al-Mojil Supply & Services), P.O. Box 450 , Jubail 31951 .Opp-Gulf Bridge Library & Riyadh House ,Tel:(966-3) /361285/ / /362448/ /36217ZN , Fax:(966-3) /36235W / /3620783 .Al Bawardi Tools & Hardware , P.O. Box X

BLACK & DECKER®
WARRANTY REGISTRATION CARD
YOUR NAME/ إسم