HappyCare HCASF1 - Iron TELEFUNKEN - Free user manual and instructions
Find the device manual for free HappyCare HCASF1 TELEFUNKEN in PDF.

| Product Type | Cordless Iron |
| Brand | TELEFUNKEN |
| Model | HappyCare HCASF1 |
| Power Supply | 220-240 V~, 50/60 Hz |
| Power | 2000-2400 W |
| Water Tank Capacity | 350 ml (max) |
| Continuous Steam Rate | 30 g/min |
| Steam Shot Rate | 160 g/min |
| Soleplate Type | Ceramic |
| Iron Rest | Silicone anti-slip pads |
| Rechargeable Base | Yes, swivel |
| Cordless System | Yes, 20-25 seconds autonomy |
| Charging time (cold) | 50 seconds |
| Charging time (during use) | 10-15 seconds |
| Vertical Steam Function | Yes |
| Spray Function | Yes |
| Auto Shut-off | Yes, after 2 minutes of inactivity |
| Anti-scale Cleaning | Yes, Auto Clean function |
| Overheat Protection | Yes |
Frequently Asked Questions - HappyCare HCASF1 TELEFUNKEN
User questions about HappyCare HCASF1 TELEFUNKEN
0 question about this device. Answer the ones you know or ask your own.
Ask a new question about this device
Download the instructions for your Iron in PDF format for free! Find your manual HappyCare HCASF1 - TELEFUNKEN and take your electronic device back in hand. On this page are published all the documents necessary for the use of your device. HappyCare HCASF1 by TELEFUNKEN.
USER MANUAL HappyCare HCASF1 TELEFUNKEN
Safety advices and warnings 3
Warning 3
Danger of electrocuon 5.
Danger of burns. 6
Conformity 7
Descripon 8
Set-up and Use 9
Before rst use 9
Using your cordless steam iron 9
✓Ironing ps 12
Cleaning and maintenance 12
Troubleshooting 14
Technical informaon 14
Environment and recycling 15
SAFETY ADVICES AND WARNINGS

WARNING!
- READ CAREFULLY THE INSTRUCTIONS BEFORE INSTALLING AND USING THIS APPLIANCE. IN THE CASE YOU RESELL THIS APPLIANCE, PLEASE MAKE SURE TO PROVIDE THIS INSTRUCTION MANUAL TO YOUR BUYER.
- THIS APPLIANCE IS INTENDED FOR DOMESTIC HOUSEHOLD USE ONLY AND SHOULD NOT BE USED FOR ANY OTHER PURPOSE OR IN ANY OTHER APPLICATION, SUCH AS FOR NON-DOMESTIC USE OR IN A COMMERCIAL ENVIRONMENT. ANY COMMERCIAL USE, INAPPROPRIATE USE OR FAILURE TO COMPLY WITH THE INSTRUCTIONS, THE MANUFACTURER ACCEPTS NO RESPONSIBILITY AND THE GUARANTEE WILL NOT APPLY.
- AFTER UNPACKING THE APPLIANCE, MAKE SURE IT IS NOT DAMAGED. IN CASE OF DOUBT, DO NOT USE THE APPLIANCE AND CONTACT YOUR SUPPLIER OR A QUALIFIED TECHNICIAN.
- REMOVE ALL PACKAGING AND DO NOT LEAVE THE PACKAGING MATERIAL SUCH AS PLASTIC BAGS, POLYSTYRENE AND ELASTIC BANDS IN EASY REACH OF CHILDREN AS THEY MAY CAUSE SERIOUS INJURIES.
-
THE USE OF ACCESSORY AND ATTACHMENTS NOT RECOMMENDED BY THE MANUFACTURER MAY CAUSE INJURIES.
-
THE APPLIANCE MUST NOT BE USED IF IT HAS BEEN DROPPED, IF THERE IS VISIBLE SIGNS OF DAMAGE, IF IT LEAKS OR IF IT FUNCTIONS ABNORMALLY IN ANY WAY.
- ALWAYS UNPLUG THE APPLIANCE IF NOT USING IT FOR A PERIOD OF TIME. THE APPLIANCE MUST NOT BE LEFT UNATTENDED WHILE IT IS CONNECTED TO THE MAIN SUPPLY.
- THE APPLIANCE MUST BE USED AND RESTED ON A STABLE SURFACE. WHEN PLACING THE APPLIANCE ON ITS STAND, ENSURE THAT THE SURFACE ON WHICH THE STAND IS PLACED IS STABLE.
- CHILDREN FROM 0 TILL 8 YEARS SHALL NOT USE THIS APPLIANCE. THIS APPLIANCE CAN BE USED BY CHILDREN AGED FROM 8 YEARS AND ABOVE AND PERSONS WITH REDUCED PHYSICAL, SENSORY OR MENTAL CAPABILITIES OR LACK OF EXPERIENCE AND KNOWLEDGE IF THEY HAVE BEEN GIVEN SUPERVISION OR INSTRUCTION CONCERNING USE OF THE APPLIANCE IN A SAFE WAY AND UNDERSTAND THE HAZARDS INVOLVED. CLEANING AND USER MAINTENANCE SHALL NOT BE MADE BY CHILDREN WITHOUT SUPERVISION. KEEP AWAY THIS APPLIANCE AND ITS ELECTRIC PLUG AWAY FROM CHILDREN UNDER 8 YEARS OLD WHEN IT'S ENERGIZED OR COOLING DOWN.
- CHILDREN SHALL NOT PLAY WITH THE APPLIANCE.

DANGER OF ELECTROCUTION!
- THIS APPLIANCE MUST BE EARTHED. IF YOU NEED TO USE AN EXTENSION LEAD, IT IS IMPORTANT THAT YOU USE A MODEL FITTED WITH AN EARTH PLUG.
- ENSURE TO CHECK THAT THE VOLTAGE MARKED ON THE RATING PLATE MATCHES TO YOUR LOCAL SUPPLY. IF NOT THE CASE, DO NOT USE THE APPLIANCE AND SEEK FOR EXPERT ADVICE.
- TAKE ALL NECESSARY MEASURE WITH CORDS AND EXTENSIONS TO AVOID ANY INJURIES WHILE IN USE.
- NEVER IMMERSE THIS APPLIANCE IN WATER.
- FOR YOUR OWN SAFETY, WE RECOMMEND YOU NEVER LEAVE THE APPLIANCE IN A PLACE THAT IS EXPOSED TO HUMIDITY OR INCLEMENT WEATHER CONDITION.
- NEVER USE APPLIANCE AS AN ADDITIONAL HEATING SOURCE.
- NEVER LEAVE APPLIANCE PLUGGED IN WHEN NOT IN USE. THE IRON MUST NOT BE LEFT UNATTENDED WHILE IT IS CONNECTED TO THE MAIN SUPPLY.
-
IF THE SUPPLY CORD IS DAMAGED, IT MUST BE REPLACED BY THE MANUFACTURER, ITS SERVICE AGENT OR SIMILARLY QUALIFIED TECHNICIANS IN ORDER TO AVOID A HAZARD. THE SUPPLY CORD SHOULD BE REGULARLY EXAMINED FOR SIGNS OF DAMAGE AND THE APPLIANCE IS NOT TO BE USED IF THE CORD IS DAMAGED.
-
THE APPLIANCE IS NOT INTENDED TO BE OPERATED BY MEANS OF AN EXTERNAL TIMER OR SEPARATE REMOTE-CONTROL SYSTEM.
- NEVER PLUG THE APPLIANCE AND TOUCH THE THERMOSTAT WITH WET HANDS.
- NEVER USE THE APPLIANCE WITH BARE OR WET FEET.
- NEVER UNPLUG THE APPLIANCE BY PULLING THE POWER CABLE OR THE APPLIANCE ITSELF.
- THE PLUG MUST BE REMOVED FROM THE SOCKET-OUTLET BEFORE THE WATER TANK IS FILLED WITH WATER. TO ADD WATER, TURN THE APPLIANCE OFF USING THE SWITCH. NEVER FILL THE APPLIANCE UNDER RUNNING WATER.
- ALWAYS UNPLUG THE APPLIANCE AND LET IT COOL DOWN COMPLETELY BEFORE ANY CLEANING OPERATION.
- NEVER MOVE THE APPLIANCE WHEN IN USE.

DANGER OF BURNS!
- THE APPLIANCE MUST BE USED AND RESTED ON A FLAT, STABLE, HEAT AND WATER RESISTANT SURFACE. WHEN PLACING THE IRON ON ITS STAND, ENSURE THAT THE SURFACE ON WHICH THE STAND IS PLACED IS STABLE.
- DO NOT PLACE IT ON A SOFT IRONING BOARD COVER OR ANY OTHER SOFT SURFACE. WHEN YOU PLACE THE STEAM
IRON ON THE IRON REST, MAKE SURE THE SURFACE ON WHICH YOU PLACE THE IRONING BOARD IS STABLE.
- WHEN IN USE, THE SURFACES OF YOUR STEAM IRON CAN REACH VERY HIGH TEMPERATURES, WHICH MAY CAUSE BURNS. DO NOT TOUCH THE HOT SURFACES OF THE APPLIANCE (ACCESSIBLE METAL PARTS AND PLASTIC PARTS ADJACENT TO THE METALLIC PARTS).
- NEVER LEAVE THE APPLIANCE UNATTENDED WHEN IN USE AND UNTIL IT HAS COOLED DOWN (AROUND 1 HOUR).
BEFORE ANY CLEANING OPERATION, WAIT UNTIL THE APPLIANCE IS COMPLETELY COLD AND HAS BEN UNPLUGGED FOR AT LEAST 1 HOUR. - DO NOT LIFT OR MOVE THE APPLIANCE WHEN IN USE TO AVOID BURNS.
- NEVER AIM THE APPLIANCE'S STEAM JET AT PERSONS OR ANIMALS. DO NOT USE THE APPLIANCE CLOSE TO CURTAINS, FURNITURE OR OTHER INFLAMMABLE OBJECTS.
CONFORMITY
THIS APPLIANCE HAS BEEN PRODUCED, CONTROLLED AND IN COMPLIANCE WITH THE FOLLOWING EUROPEAN DIRECTIVES LVD 2006/95/EC, EMC 2004/108/EC, ERP 1275/2008/EC, EMF 2013/35/EU, REACH 1907/2006/EC, WEEE 2012/19/EC, ROHS 2002/95/EC + 2011/65/EU.
DESCRIPTION
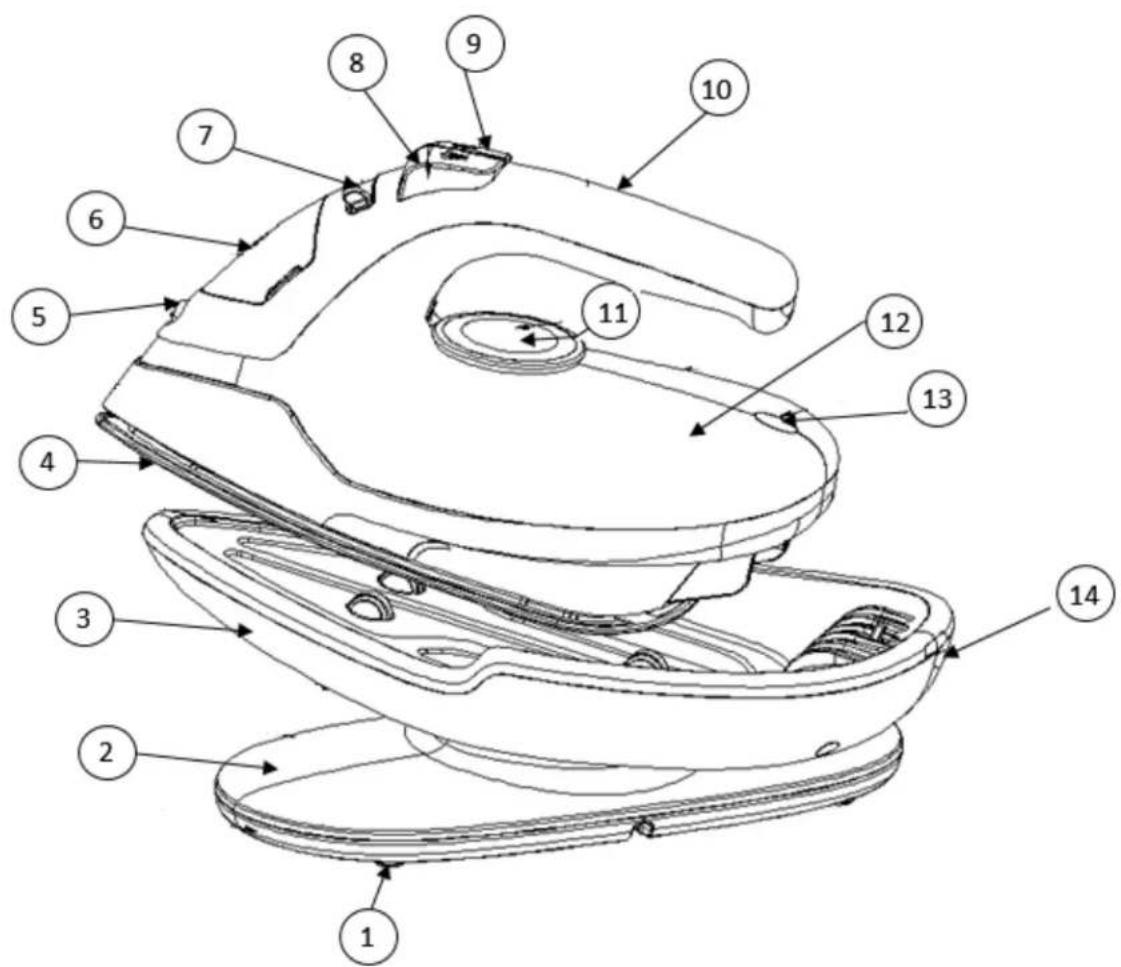
- 4 non slip silicone pad
- Base
- Rechargeable pivong base
- Ceramic soleplate
- Spray nozzle
- Water tank cap
-
Steam control joysck
-
Water spray control
- Steam boost buon
- Iron Handle
- Thermostat control dial
- Water tank (Max 350 ml)
- Heang light indicator
- Charging light indicator
SET-UP AND USE
Before rst use
- Remove any scker, protece foil or storage cover from the soleplate.
- Place the appliance on a at and stable surface.
- Put the iron on the iron rest.
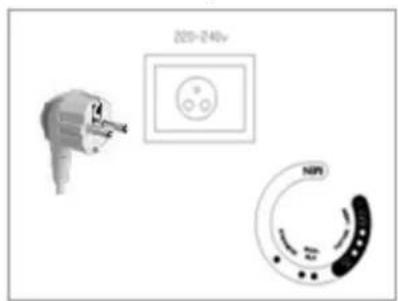
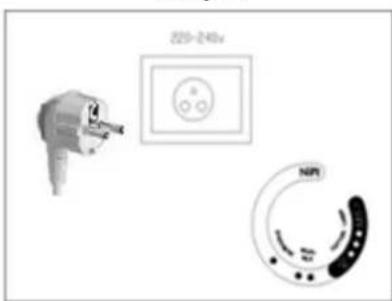
- Unwind the power cord fully, and insert the power plug into the power socket.
- Set the thermostat buoy on the « MAX » posion, let the iron heat up for few minutes then start to iron on a cloth for few minutes in order for all the residue present on or under the soleplate to go.
NOTE: It is normal that strange odor comes out from the unit for the rst use. This will cease aer a short while. Some parcles may come out of the soleplate when you use the iron for the rst me. This is normal; the parcles are harmless and stop coming out of the iron aer a short while.
Using your cordless steam iron
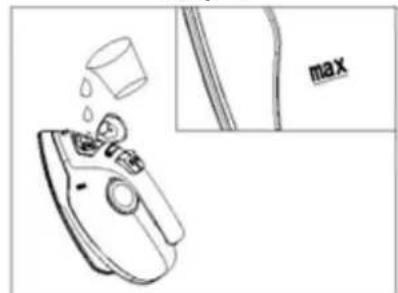
1. Filling the water tank
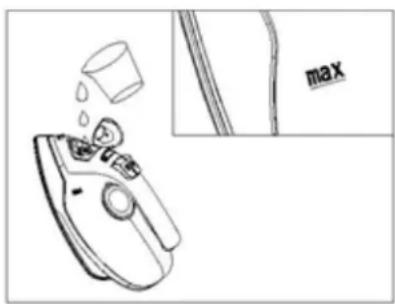
Open the water tank ller. Fill in the water tank with a jug without exceeding the "MAX" level of water indicator then close the water tank cap.
Always check that you have well closed back the water tank cap before starng to use your steam iron.
Always II in the water tank before using the steam iron.
You can alwaysrell your water tank when in use. Just follow the above step of water lling when the water level is low.
Note: Your steam iron has been designed to funcon using tap water. If your tap water is a very hard water type, we advise you to mix 50% tap water with 50% of distilled water available in most shops. In some waterfront areas, your water salt content can be high; in this case we recommend using only demineralized water. Always check that the water tank cap is properly closed aer lling it.
Never add perfume, vinegar, starch, descaling agents, chemically descaled water or other chemicals as they may cause water sping, brown staining, or damage to your steam iron.
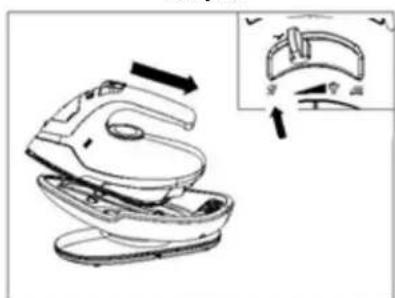
2. The rechargeable base system
Your cordless steam iron is equipped with a charging base allowing you free moves during your ironing experience by not being bothered with the power plug geng in your way. The 1 st me charging me is 50 seconds and during use the charging me will be between 10 to 15 seconds. The allowing me for ironing between each charging phase is from 20s up to 25s, please see below "Charging table" for the operon of the base.
Step 1
Plug your steam iron into a wall socket then select your desired temperature seng.
Step 2
Place the iron in the right posion horizontally to the charging base.
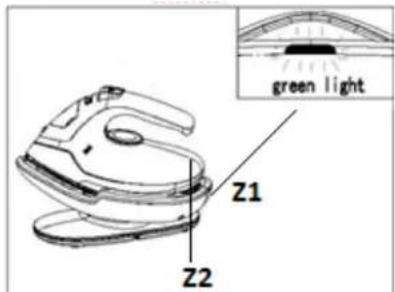
Step 3
The charging light indicator (Z1) will ash green to indicate that the iron is well posioned into the base and in the process of charging. The heang light indicator (Z2) will keep lighng to indicate the iron is rising to the selected temperature.
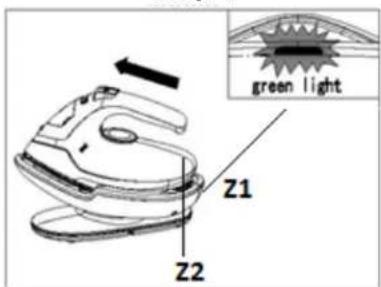
Step 4
The charging me is 50 seconds, when it is over the charging light indicator (Z1) will switch to x green light showing the iron is ready to use. And the heang light indicator (Z2) will shut o to indicate the iron has reached the selected temperature to iron.
Step 5
Aer 25 seconds of use, the charging base will produce 2 "beep" and ashing red to indicate the iron has to be placed back on its base for charging. And will switch to x green light when the charging me is over aer 50 seconds of charging.
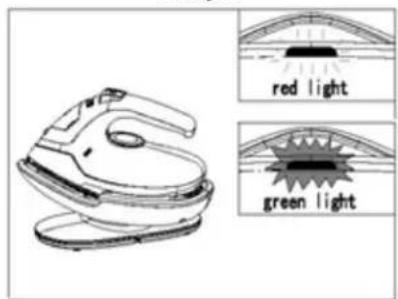
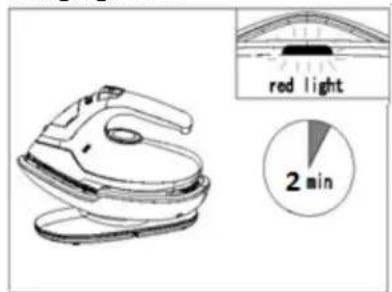
AUTO-SHUT OFF FUNCTION:
When not in use over 2 minutes, the charging base will produce 6 "Beeps" and charging light indicator will keep ashing red indicang the iron is not anymore on charge in the base.
To heat up the iron again, just remove it and put it back on the charging base.
WARNING: Do not touch hot soleplate at any me before cooling down! Never direct the steam at people! The supply cord may become hot during a long ironing session. Do not place the iron on a metal support when in use as it may damage the soleplate, always place the iron on the silicone support as it's equipped with thermal insulaon cushion designed to withstand high temperature.
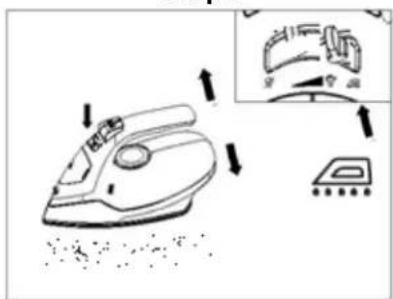
3. Dry/Steam ironing
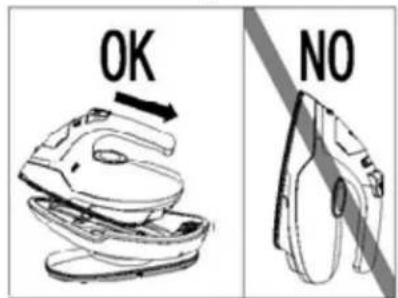
| Step 1 Fill in your water tank with a jug, ensure to respect the Max. level indicator. | Step 2 Plug your steam iron into a wall socket then select your desired temperature seng. | Step 3 OK NO NO |
| Step 4 Follow the instrucons given in the "Charging table" for charging the steam iron. | Step 5 Select your desired steam ow by using the steam control joysck. | Step 6 Press and release the steam boost buoyon for a powerful boost of steam to remove dicult creases. |
| VERTICAL STEAMING Set the thermostat to Max., hold the steam iron verally facing the garment, and keep pressing the steam boost buoyon. | SPRAY FUNCTION Press the spray buoyon to release to moisten the garment for an easier ironing on dicult creases. | DRY IRONING For dry ironing without steam, set the steam control to . |
4. Turning o your steam iron
Put the iron on the thermal insulang cushion base.
Set the steam control to , turn the thermostat control to the minimal then disconnect the plug from the wall outlet socket. Let the steam iron cool down for at least 30 minutes, then rewind the cable sector around the base before storing it back.
WARNING: Always let your steam generator cool down for at least one hour before pung it back in its storage!
Ironing ps
Always check rst whether a label with ironing instrucons is aached to the arcle. Follow these ironing instrucons in any case.
If the fabric consists of various kinds of bers, you must always select the lowest ironing temperature to iron the composition of those bers.
✓ Never iron over zip or rivet in the cloth. This will damage the soleplate. Iron around such object.
| Fabrics | Temperature | Steam seng | Steam boost | Spray |
| Synthec | MIN | No | No | |
| Silk | ● | No | No | |
| Wool | ●● | No | Yes | |
| Coon | ●●● | Yes | Yes | |
| Linen | MAX | Yes | Yes |
Cleaning and maintenance
Put the iron on the steam thermal insulang cushion base.
Set the steam control to , turn the thermostat control to the minimal then disconnect the plug from the wall outlet socket. Let the steam iron cool down for at least 30 minutes.
Empty the water tank of the remaining water.
Wipe akes and any other deposits on the soleplate with a damp cloth or a non-abrasive (liquid) cleaner. Clean the upper part of iron with a so damp cloth. Wipe the water drop on the steam staon iron and the thermal insulang cushion with dry cloth.
✓ Do not use chemical, steel, wooden or abrasive cleaners to scrape the soleplate.
Never use sharp objects to remove the deposits of the sole.
Never hold the iron or the base unit under the tap water.

WARNING: Always let your steam iron unplugged and cool down for at least one hour to pore any cleaning operacon except for An-Calc Auto Clean! To start the cleaning process, put your appliance close to a sink as water may come out of the tank when it is turned. Do not use any industrial or harsh descaling products when rinsing the boiler tank to avoid damaging the iron.
✓ Your cordless steam iron is equipped with the An-Calc Auto Clean funcon. To extend the life of your appliance and keep the steaming performance at its opmium level, it is recommended to perform monthly the An-calc Clean Funcon. Follow the below step:
Step 1
Fill in your water tank with a jug, ensure to respect the Max. level indicator.
Step 2
Plug your steam iron into a wall socket then set the temperature dial to MAX.

Step 3
Set the steam control to

Step 4
Follow the instrucons given in the "Charging table" for charging the steam iron. When the charging nishes, unplug steam iron and remove the iron.
Step 5
Hold your iron above the sink, set the steam control set to max. and gently shake the iron to ush out the scales unll all water has been used.
Step 6
Put back the iron to its base and set the steam control to 10. Let the steam iron cool down for at least 30 min. before pung it back in its storage.
TROUBLESHOOTING
| Issues | Main reasons | Acons |
| Dirty soleplate with brown stains. | Use of inappropriate heang selecon. Use of chemical starches. | Clean your soleplate with a gentle sponge. |
| Brown liquid come out of the soleplate. | Use of chemical descaling. | Never use chemical descaling. |
| Burnt ber accumulaon on the soleplate. | Clean your iron with the « An-Calc Auto Clean » funcon. | |
| No team jet or small steam jet. | Your water tank is empty. | Rell your water tank. |
| Your iron is scaled. | Clean your iron with the « An-Calc Auto Clean » funcon. | |
| Your iron is discharged. | Put it back on its charging base. | |
| The steam jet joysck is on minimum. | Set the steam jet joysck to the appropriate steam level. | |
| Your soleplate rejects small parcels. | Your soleplate is scaled. | Clean your iron with the « An-Calc Auto Clean » funcon. |
| Water runs from your soleplate. | Your iron is not hot enough to use the steam funcon. | Wait unl the heang light indicator shut o to use your iron. |
| You have stored your iron without emptying the water tank and set the steam joysck to minimum. | Always empty the water tank and set the steam joysck to minimum. | |
| Your iron is ont its base but the lighng is sll red. | Your iron is not well put back on its base. | Take it out then put it back into its base. |
| No water from the spray. | Your water tank is empty. | Rell your water tank. |
| Your iron cools down. | Your iron is discharged. | Put it back on its charging base. |
TECHNICAL INFORMATION
| Model | HCASF-1 |
| Rated voltage | 220V-240V ~50Hz/60Hz |
| Rated power input | 2000-2400W |
| Steam rate | 30 gr/min |
| Steam boost rate | 160 gr/min |
ENVIRONMENT AND RECYCLING
For EU product versions and/or in case that it is requested in your country:
- The materials of which the packaging of this appliance consists are included in a collecon, classicaon and recycling system. Should you wish to dispose of them, use the appropriate public recycling bins for each type of materials.
The product does not contain concentrates of substances that could be considered harmful to the environment
- The following informaon concerns the energy labeling and the ecological design:
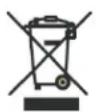
This symbol means that in case you wish to dispose of the product once its working life has ended, take it to an authorized waste agent for the selecve collecon of waste electrical and electronic equipment (WEEE)
This appliance complies with Directive 2012/19/EC on Low Voltage and Directive 2004/108/EC on Electromagnec Compatibility.


Imported by Vestel France, 17 rue de la Couture - 94563 Rungis CEDEX