
TKC203 - Blender TELEFUNKEN - Free user manual and instructions
Find the device manual for free TKC203 TELEFUNKEN in PDF.
| Brand | Telefunken |
| Model | TKC203 |
| Product Type | Blender |
| Power Supply | 220-240 V ~ 50/60 Hz |
| Motor Power | 500 W |
| Max Bowl Capacity | 1.5 L (cold preparations) / 1 L (hot preparations) |
| Bowl Material | Plastic |
| Blade Material | Stainless Steel |
| Speed Selector | 0 (stop), 1 (slow blending), 2 (fast blending), P (pulse/crushing) |
| Maximum Speed | Up to 21,000 rpm (position P) |
| Safety | Safety lock: bowl on motor unit and lid safety rod |
| Non-Slip Feet | Yes |
| Power Cord Length | Approximately 80 cm (approx.) |
| Included Accessories | Blender bowl, lid with measuring cap, stainless steel blade |
| Care and Cleaning | Hand wash accessories, do not put in dishwasher, wipe body with damp cloth |
| Weight (approx.) | 1.5 kg (approx.) |
| Dimensions (approx.) | 20 x 20 x 40 cm (approx.) |
| Max Continuous Use | 2 minutes, then rest 1 min between cycles, and 30 min before third use |
Frequently Asked Questions - TKC203 TELEFUNKEN
User questions about TKC203 TELEFUNKEN
0 question about this device. Answer the ones you know or ask your own.
Ask a new question about this device
Download the instructions for your Blender in PDF format for free! Find your manual TKC203 - TELEFUNKEN and take your electronic device back in hand. On this page are published all the documents necessary for the use of your device. TKC203 by TELEFUNKEN.
USER MANUAL TKC203 TELEFUNKEN
natural_image
Modern light blue blender with clear glass interior and control buttons (no visible text or symbols)TKC203
INSTRUCTIONS DE SÉCURITÉ
- LIRE IMPÉRATIVEMENT CE MODE D'EMPLOI ET LE CONSERVER AFIN DE POUVOIR LE CONSULTER ULTÉRIEUREMENT. IL COMPORTE DES INFORMATIONS IMPORTANTES. DANS LE CAS OÙ VOUS CÉDEZ CET APPAREIL À UN TIERS, N'OUBLIEZ PAS DE FOURNIR CETTE NOTICE AVEC L'APPAREIL.
- CET APPAREIL EST DESTINÉ Á ETRE UTILISÉ DANS DES APPLICATIONS DOMESTIQUES ET ANALOGUES TELLES QUE :
○ DES COINS CUISINES RÉSERVÉS AU PERSONNEL DANS DES MAGASINS, BUREAUX ET AUTRES ENVIRONNEMENTS PROFESSIONNELS ;
○ DES FERMES ;
○ L'UTILISATION PAR LES CLIENTS DES HÔTELS, MOTELS ET AUTRES ENVIRONNEMENTS Á CARACTÈRE RÉSIDENTIEL ;
○ DES ENVIRONNEMENTS DU TYPE CHAMBRES D'HÔTES.
- CET APPAREIL NE DOIT PAS ÊTRE UTILISÉ PAR LES ENFANTS. CONSERVER L'APPAREIL ET SON CÂBLE HORS DE PORTÉE DES ENFANTS.
- CET APPAREIL PEUT ÊTRE UTILISÉ PAR DES PERSONNES DONT LES CAPACITÉS PHYSIQUES, SENSORIELLES OU MENTALES SONT RÉDUITES OU DONT L'EXPÉRIENCE OU LES CONNAISSANCES NE SONT PAS SUFFISANTES, Á CONDITION QU'ILS BÉNÉFICIENT D'UNE SURVEILLANCE OU QU'ILS AIENT REÇU DES INSTRUCTIONS QUANT Á L'UTILISATION DE L'APPAREIL EN TOUTE SÉCURITÉ ET EN COMPRENNENT BIEN LES DANGERS POTENTIELS. LES ENFANTS NE DOIVENT PAS UTILISER L'APPAREIL COMME UN JOUET. LE
NETTOYAGE ET L'ENTRETIEN PAR L'USAGER NE DOIVENT PAS ÊTRE RÉALISÉS PAR DES ENFANTS.
- TOUJOURS DÉCONNECTER L'APPAREIL DE L'ALIMENTATION SI ON LE LAISSE SANS SURVEILLANCE ET AVANT MONTAGE, DÉMONTAGE OU NETTOYAGE.
- L'APPAREIL DOIT ÊTRE UTILISÉ UNIQUEMENT AVEC LE SOCLE FOURNI.
- AVERTISSEMENT : RISQUES DE BLESSÛRES EN CAS DE MAUVAISE UTILISATION DE L'APPAREIL !
- DES PRÉCAUTIONS DOIVENT ÊTRE PRISES LORS DE LA MANIPULATION DES COUTEAUX AFFÛTÉS, LORSQU'ON VIDE LE BOL ET LORS DU NETTOYAGE.
- METTRE L'APPAREIL Á L'ARRÊT ET LE DÉCONNECTER DE L'ALIMENTATION AVANT DE CHANGER LES ACCESSOIRES OU D'APPROCHER LES PARTIES QUI SONT MOBILES LORS DU FONCTIONNEMENT.
- MISE EN GARDE : ÉVITER TOUT DEBORDEMENT SUR LE CONNECTEUR.
- SOYEZ PRUDENT SI DU LIQUIDE CHAUD EST VERSÉ DANS LE ROBOT MULTIFONCTIONS OU BLENDER CAR IL PEUT ÊTRE ÉJECTÉ DE L'APPAREIL EN RAISON D'UN BRUSQUE DÉGAGEMENT DE VAPEUR D'EAU.
• L'APPAREIL NE DOIT PAS ÊTRE IMMERGÉ. - NE JAMAIS PLONGER L'APPAREIL, SON FIL ÉLECTRIQUE ET SA PRISE DE COURANT DANS L'EAU OU AUTRE LIQUIDE.
- IL EST CONSEILLÉ D'EXAMINER RÉGULIÈREMENT LE CÂBLE D'ALIMENTATION POUR DÉCELER TOUT SIGNE DE DÉTÉRIORATION ÉVENTUELLE.
- SI LE CÂBLE D'ALIMENTATION EST ENDOMMAGÉ, IL DOIT
ÊTRE REMPLACÉ PAR LE FABRICANT, SON SERVICE APRÈS-VENTE OU DES PERSONNES COMPÉTENTES DE QUALIFICATION SIMILAIRE AFIN D'ÉVITER TOUT DANGER.
- EN CE QUI CONCERNE LES DURÉES DE FONCTIONNEMENT ET LES RÉGLAGES DE VITESSE POUR LES ACCESSOIRES, RÉFÉREZ-VOUS AU PARAGRAPHE CI-APRÈS DE LA NOTICE DONNÉE DANS LA SECTION « MISE EN SERVICE ET UTILISATION ».
- EN CE QUI CONCERNE LES INFORMATIONS DÉTAILLÉES SUR LA MANIÈRE DE NETTOYER LES SURFACES EN CONTACT AVEC LES ALIMENTS, RÉFÉREZ-VOUS AU PARAGRAPHE CI-APRÈS DE LA NOTICE DONNÉE DANS LA SECTION « NETTOYAGE ET ENTRETIEN ».
- APRÈS AVOIR DEBALLÉ VOTRE APPAREIL, ASSUREZ-VOUS D'ABORD QU'IL N'A PAS ÉTÉ ABIMÉ. SI VOUS AVEZ UN DOUTE, N'UTILISEZ PAS VOTRE APPAREIL, ET CONSULTEZ UNE PERSONNE COMPÉTENTE.
- N'UTILISEZ JAMAIS D'ACCESSOIRES OU DE PIÈCES D'UN AUTRE FABRICANT. L'UTILISATION DE CE TYPE D'ACCESSOIRES OU DE PIÈCES ENTRAÎNE L'ANNULATION DE LA GARANTIE.
- L'APPAREIL NE DOIT PAS ÊTRE UTILISÉ S'IL A CHUTÉ, S'IL PRÉSENTE DES DOMMAGES APPARENTS, S'IL FUIT OU PRÉSENTE DES ANOMALIES DE FONCTIONNEMENT.
- ENLEVEZ BIEN TOUS LES ÉLÉMENTS DE L'EMBALLAGE, ET NE LAISSEZ PAS LES ÉLÉMENTS TELS QUE LES SACS PLASTIQUES, DU POLYSTYRÈNE OU DES ÉLASTIQUES À PORTÉE DES ENFANTS. CES ÉLÉMENTS POURRAIENT ÊTRE DANGEREUX POUR EUX.
• ASSUREZ-VOUS DE POSER L'APPAREIL SUR UNE SURFACE PLANE ET STABLE. NE LE METTEZ PAS SUR D'AUTRES APPAREILS.
- NE BRANCHEZ PAS LE PRODUIT ET N'APPUYEZ PAS SUR LES BOUTONS DU PANNEAU DE COMMANDE SI VOS MAINS SONT MOUILLÉES.
- PENDANT SON FONCTIONNEMENT, ÉVITEZ DE DÉPLACER L'APPAREIL.
INSTRUCTIONS DE SÉCURITÉ CONCERNANT LA MISE AU REBUT DE VOTRE APPAREIL
LA DIRECTIVE EUROPÉENNE SUR LES DÉCHETS DES ÉQUIPEMENTS ÉLECTRIQUES ET ÉLECTRONIQUES (DEEE), EXIGE QUE LES APPAREILS MÉNAGERS USAGES NE SOIENT PAS JETES DANS LE FLUX NORMAL DES DÉCHETS MUNICIPAUX. LES APPAREILS USAGÉS DOIVENT ÊTRE COLLECTÉS SÉPARÉMENT AFIN D'OPTIMISER LE TAUX DE RÉCUPÉRATION ET LE RECYCLAGE DES MATÉRIAUX QUI LES COMPOSENT, ET RÉDUIRE L'IMPACT SUR LA SANTÉ HUMAINE ET L'ENVIRONNEMENT.
LORSQU'IL NE FONCTIONNERA PLUS, NE JETEZ PAS L'APPAREIL AVEC LES ORDURES MÉNAGERES MAIS DÉPOSEZ-LE DANS UN CENTRE DE COLLECTE AGRÉE AFIN QU'IL PUISSE ÊTRE RECYCLÉ. VOUS CONTRIBUEREZ AINSI Á LA PROTECTION DE L'ENVIRONNEMENT.
NORMES DE SÉCURITÉ
CET APPAREIL EST CONFORME AUX DIRECTIVES ET NORMES EN VIGUEURS.
SOMMAIRE
DESCRIPTION.... 1
MISE EN SERVICE ET UTILISATION.... 2
MISE EN SERVICE ET UTILISATION
natural_image
Illustration of four common laboratory apparatus: a hand using a stand mixer, a box with a crossed-out baking pan, a beaker with a lid, and a blender with a stirrer (no text or symbols present)natural_image
Illustration of a blender, a cloth, and a trash bin with no visible text or symbolsnatural_image
Line drawing of a blender with an electrical plug inserted, showing the blade and handle (no text or symbols)natural_image
Illustration of four common laboratory equipment setups: a hand using a stand mixer, a crossed-out box, a cooking pot, and a blender with a lit lamp (no text or symbols present)natural_image
Illustration of a kitchen appliance, a hand cleaning cloth, and a food stall with no visible text or symbols.INFORMATION TECHNIQUE
natural_image
Exterior view of a light blue blender with clear glass casing and control buttons (no text or symbols visible)TKC203
SAFETY WARNINGS
- READ CAREFULLY THE INSTRUCTIONS BEFORE INSTALLING AND USING THIS APPLIANCE. IT CONTAINS IMPORTANT INFORMATIONS. IN THE CASE YOU RESELL THIS APPLIANCE, PLEASE MAKE SURE TO PROVIDE THIS INSTRUCTION MANUAL TO YOUR BUYER.
- THIS APPLIANCE IS INTENDED TO BE USED IN HOUSEHOLD AND SIMILAR APPLICATIONS SUCH AS:
○ STAFF KITCHEN AREAS IN SHOPS, OFFICES AND OTHER WORKING ENVIRONMENTS;
○ FARM HOUSES;
○ BY CLIENTS IN HOTELS, MOTELS AND OTHER RESIDENTIAL TYPE ENVIRONMENTS;
○ BED AND BREAKFAST TYPE ENVIRONMENTS.
- THIS APPLIANCE SHALL NOT BE USED BY CHILDREN. KEEP THE APPLIANCE AND ITS CORD OUT OF REACH OF CHILDREN.
- THIS APPLIANCE CAN BE USED BY PERSONS WITH REDUCED PHYSICAL, SENSORY OR MENTAL CAPABILITIES OR LACK OF EXPERIENCE AND KNOWLEDGE IF THEY HAVE BEEN GIVEN SUPERVISION OR INSTRUCTION CONCERNING USE OF THE APPLIANCE IN A SAFE WAY AND IF THEY UNDERSTAND THE HAZARDS INVOLVED. CHILDREN SHALL NOT PLAY WITH THE APPLIANCE. CLEANING AND MAINTENANCE SHALL NOT BE MADE BY CHILDREN.
- ALWAYS DISCONNECT THE APPLIANCE FROM THE SUPPLY IF IT IS LEFT UNATTENDED AND BEFORE ASSEMBLING, DISASSEMBLING OR CLEANING.
- WARNING: POTENTIAL INJURY FROM MISUSE.
- WARNING: AVOID SPILLAGE ON THE CONNECTOR.
- EXTRA CARE SHALL BE TAKEN WHEN HANDLING THE SHARP
CUTTING BLADES, EMPTYING THE BOWL AND DURING CLEANING.
- BE CAREFUL IF HOT LIQUID IS POURED INTO THE FOOD PROCESSOR OR BLENDER AS IT CAN BE EJECTED OUT OF THE APPLIANCE DUE TO A SUDDEN STEAMING.
- SWITCH OFF THE APPLIANCE AND DISCONNECT FROM SUPPLY BEFORE CHANGING ACCESSORIES OR APPROACHING PARTS THAT MOVE IN USE.
- THIS APPLIANCE CAN ONLY BE USED WITH ITS PROVIDED STAND.
- THE APPLIANCE MUST NOT BE IMMERSED.
- NEVER IMMERSE IN WATER OR ANY OTHER LIQUID THIS APPLIANCE, ITS ELECTRIC PLUG AND CORD.
- THE SUPPLY CORD SHOULD BE REGULARLY EXAMINED FOR SIGNS OF DAMAGE AND THE APPLIANCE IS NOT TO BE USED IF THE CORD IS DAMAGED.
- IF THE SUPPLY CORD IS DAMAGED, IT MUST BE REPLACED BY THE MANUFACTURER, ITS SERVICE AGENT OR SIMILARLY QUALIFIED PERSONS IN ORDER TO AVOID A HAZARD.
- REGARDING THE INFORMATION FOR OPERATING TIMES AND ACCESSORIES SETTING, THANKS TO REFER TO THE BELOW PARAGRAPH OF THE MANUAL.
- FOR THE DETAILS ON HOW TO CLEAN SURFACES IN CONTACT WITH FOOD, PLEASE SEE SECTION “CLEANING AND MAINTENANCE”.
- AFTER UNPACKING THE APPLIANCE, MAKE SURE IT IS NOT DAMAGED. IN CASE OF DOUBT, DO NOT USE THE APPLIANCE AND CONTACT A QUALIFIED TECHNICIAN.
-
THE USE OF ACCESSORY AND ATTACHMENTS NOT RECOMMENDED BY THE MANUFACTURER MAY CAUSE INJURIES.
-
THE APPLIANCE MUST NOT BE USED IF IT HAS BEEN DROPPED, IF IT HAS ANY VISIBLE DAMAGE, IF IT LEAKS OR IF IT FUNCTIONS ABNORMALLY IN ANY WAY.
- REMOVE ALL PACKAGING AND DO NOT LEAVE THE PACKAGING MATERIAL SUCH AS PLASTIC BAGS, POLYSTYRENE AND ELASTIC BANDS IN EASY REACH OF CHILDREN AS THEY MAY CAUSE SERIOUS INJURIES.
- MAKE SURE YOU HAVE PUT IT ON A FLAT, STABLE SURFACE.
• DO NOT PUT THIS APPLIANCE ON TOP OF OTHERS. - NEVER MOVE THE APPLIANCE WHEN IN USE.
- NEVER PLUG THE APPLIANCE WITH WET HANDS.
SAFETY INSTRUCTIONS ON RECYCLING
THE EUROPEAN DIRECTIVE ON WASTE ELECTRICAL AND ELECTRONIC EQUIPMENT (WEEE) REQUIRES THAT OLD HOUSEHOLD ELECTRICAL APPLIANCES MUST NOT BE DISPOSED OF IN THE NORMAL UNSORTED MUNICIPAL WASTE STREAM. OLD APPLIANCES MUST BE COLLECTED SEPARATELY IN ORDER TO OPTIMIZE THE RECOVERY AND RECYCLING OF THE MATERIALS THEY CONTAIN, AND REDUCE THE IMPACT ON HUMAN HEALTH AND THE ENVIRONMENT. THE CROSSED OUT "WHEELED BIN" SYMBOL ON THE PRODUCT REMINDS YOU OF YOUR OBLIGATION, THAT WHEN YOU DISPOSE OF THE APPLIANCE, IT MUST BE SEPARATELY COLLECTED.
CONSUMERS SHOULD CONTACT THEIR LOCAL AUTHORITY OR RETAILER FOR INFORMATION CONCERNING THE CORRECT DISPOSAL OF THEIR OLD APPLIANCE.
STANDARDS
THIS APPLIANCE IS CONFORMED TO CURRENT DIRECTIVES AND STANDARDS.
TABLE OF CONTENTS
DESCRIPTION.... 1
SET UP AND USE 2
Before first use.... 2
Assembling and disassembling the appliance.... 3
Description of the control panel 4
Using your appliance.... 4
TROUBLESHOOTING....6
CLEANING AND MAINTENANCE 6
TECHNICAL INFORMATION 7
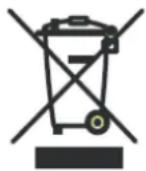
DESCRIPTION
- Measuring cup
- Locked safety pin
- Cover lid
- Locked safety hole
- Plastic bowl MAX 1.5L
- Bowl handle
- Stainless steel blades
- Bowl locked system
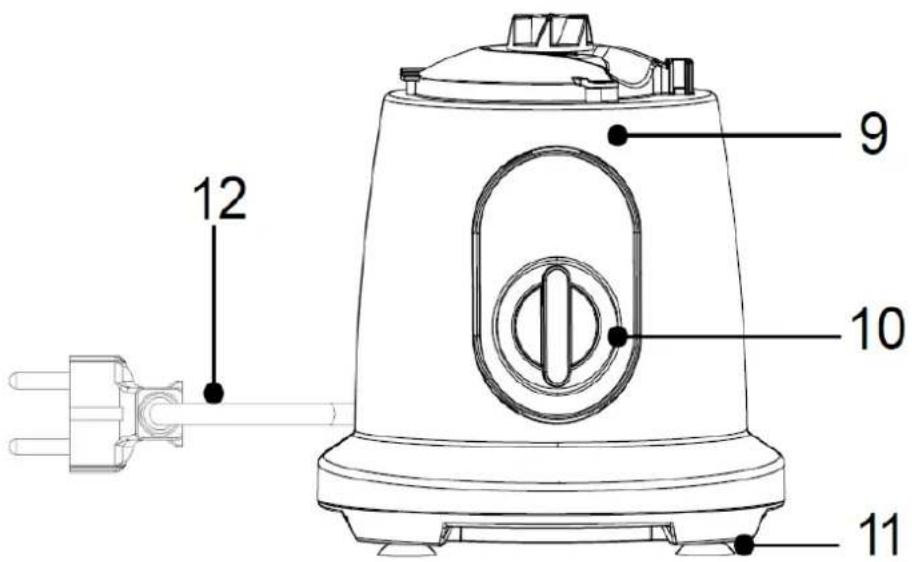
- Motor unit
- Speed variator
- Anti-slip feet
- Power cord
SET UP AND USE
Before first use
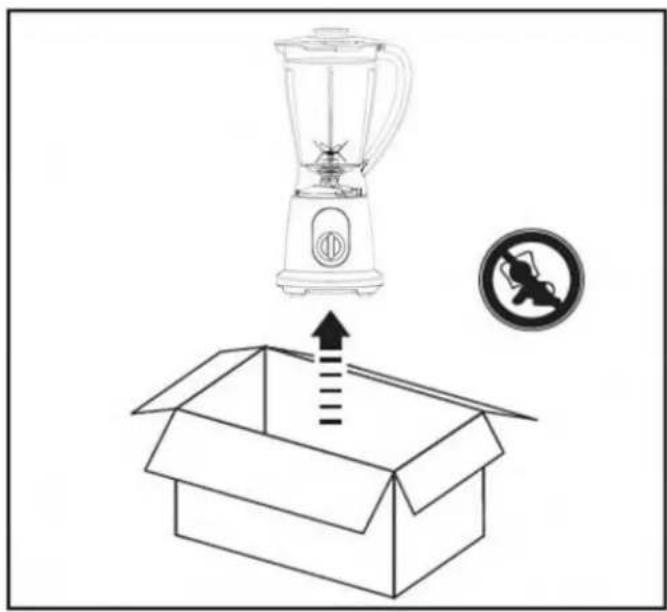
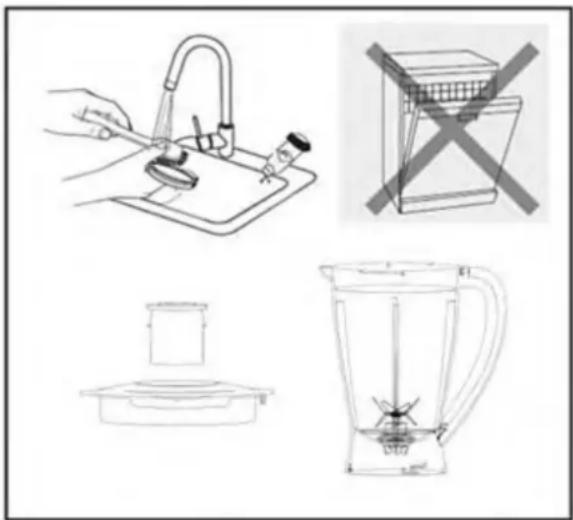
Remove all packaging and do not leave the packaging material such as plastic bags, polystyrene and elastic bands in easy reach of children as they may cause serious injuries.

natural_image
Illustration of kitchen utensils and a blender with no visible text or symbolsWash all accessories with a sponge damped with dishwashing liquid. Rinse thoroughly and dry them with a clean cloth.
Never put the accessories into a dishwasher.
Warning: Avoid spillage on the bowl electric connectors.
natural_image
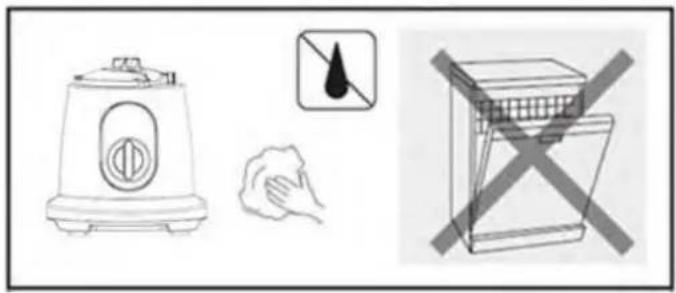
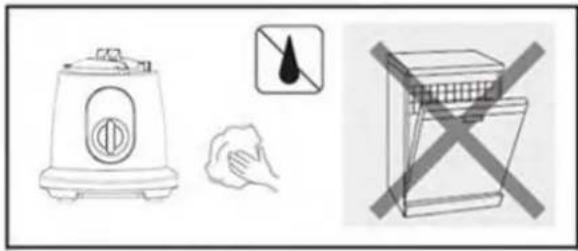
Illustration of a kitchen appliance with a hand cleaning, no text or symbols presentClean the outer body with a dry clean cloth.
Do not immerse the appliance into water.
Do not put the appliance into a dishwasher.
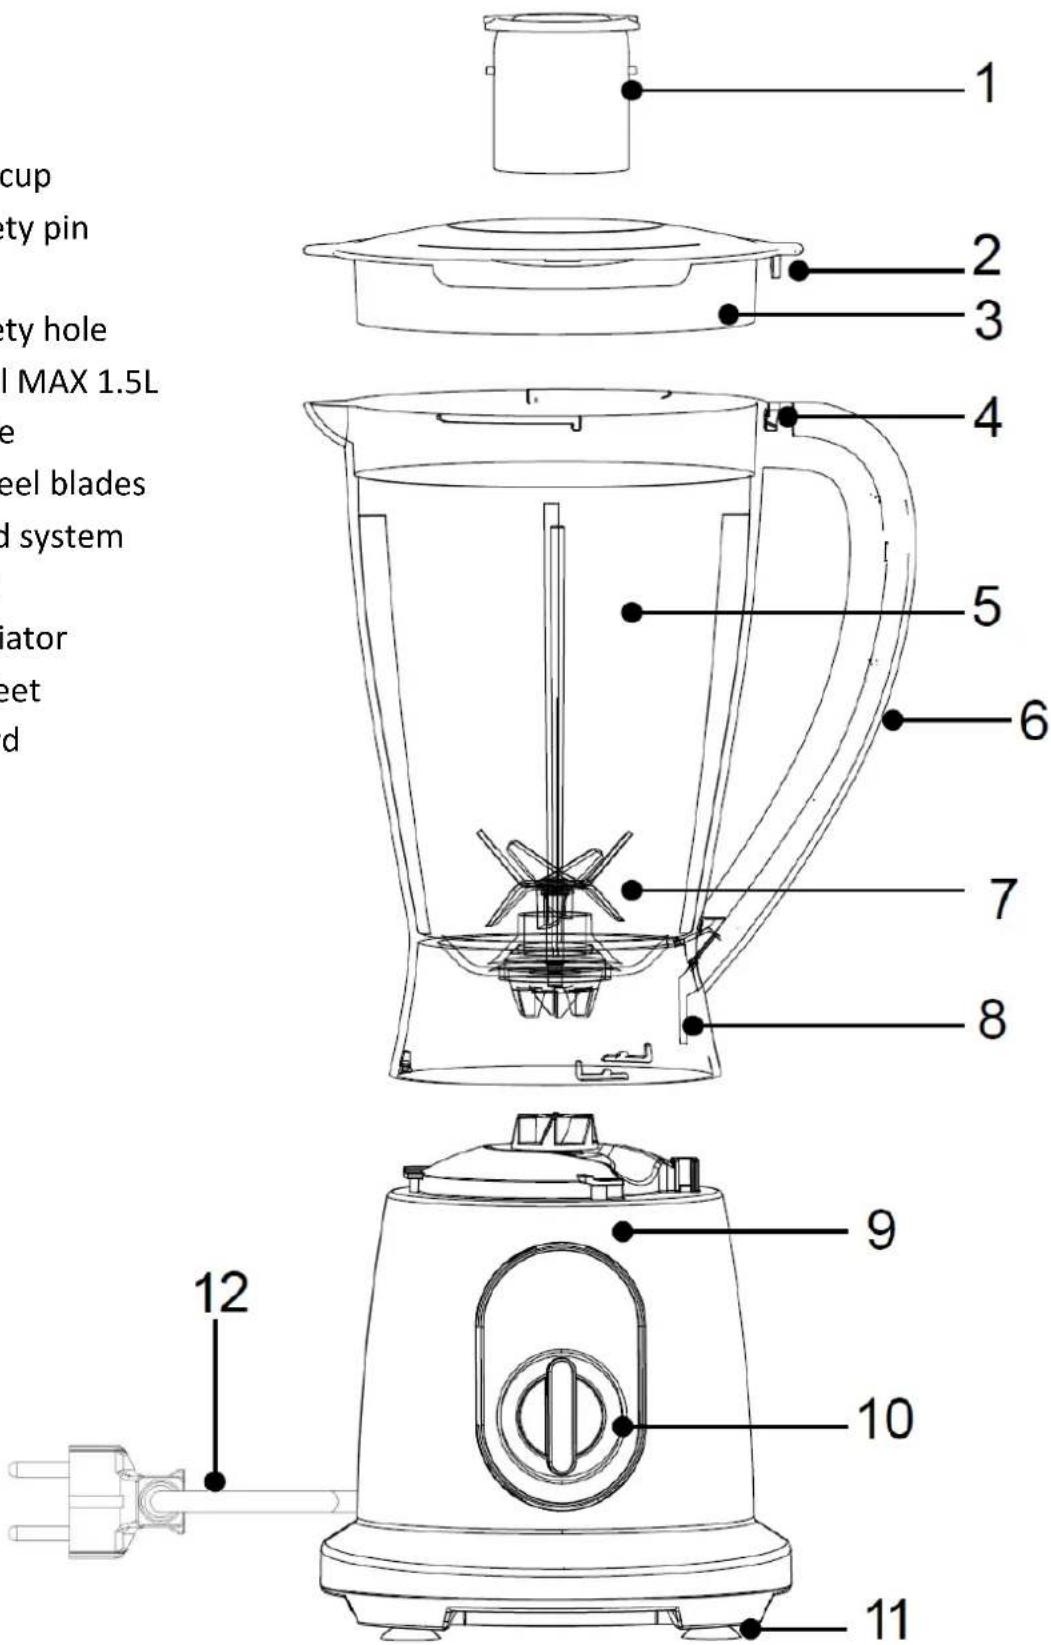
Assembling and disassembling the appliance
-
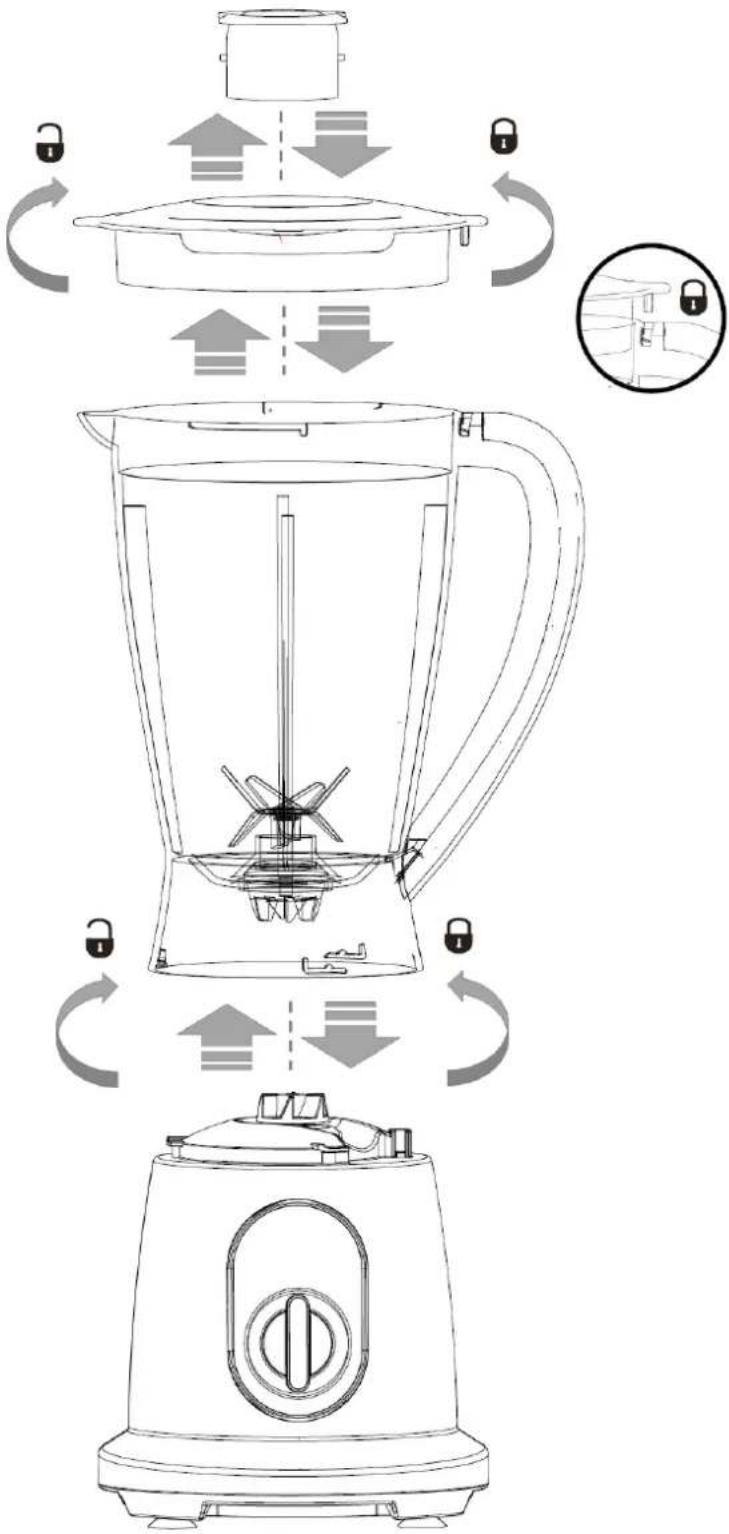
Lower the bowl on to the motor unit and turn anti-clockwise until it fit into its locking position.
-
To fit the lid, turn anti-clockwise the cover lid and slide the safety pin of the cover into the safety hole of the bowl until its locking position.
-
Insert the measuring cup into the hole of the cover lid.
To disassemble the appliance, proceed to reverse steps.
ATTENTION!
The blender will not work:
* If the bowl is not well assembled into the motor unit.
* If the safety pin of the cover is not well locked into the safety hole of the bowl.
Warning:
Never plug in the appliance before assembling the accessories. Always plug out when disassembling the appliance.
Description of the control panel
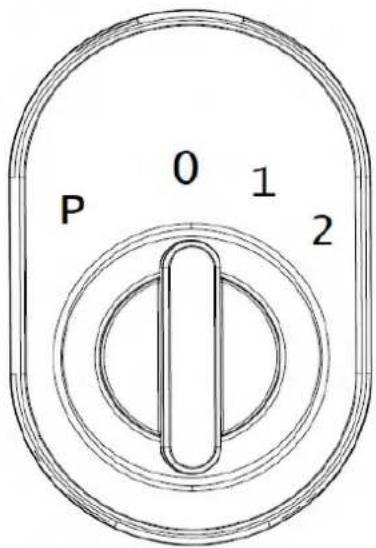
| 0 | « OFF » position: turn the variator to 0 to stop the machine. |
| 1 | « Blending at low speed » position: turn the variator to 1 to start mixing.Operating mode: blending up to 18000 tours/min ( ± 15%). |
| 2 | « Blending at high speed » position: turn the variator to 2 to start mixing.Operating mode: blending up to 21000 tours/min ( ± 15%). |
| P | « Pulse/ Ice crush » position: turn the variator to P and hold it to start mixing.Operating mode: blending up to 21000 tours/min ( ± 15%). |
Important: To avoid the motor overload, do not use the blender over 2 minutes for any of the blending position.
Let the appliance to cool down for at least 1 minute between the 1^st and the 2^nd use. Let the appliance to cool down for at least 30 minutes before using it the 3^rd time.
Using your appliance
The blender is intended for:
- blending fluids such as dairy products, sauces, fruit juices, soups, mixed drinks, milk shakes;
- mixing soft ingredients such as pancake batter;
- pureeing cooked ingredients such as mashed potatoes or carrots

natural_image
Line drawing of a blender with a power plug and plug outlet, no text or symbols present- Place your appliance on a flat and stable surface.
- Place all the ingredients inside the blender bowl. Do not pour over the 1.5L Max line for the cold preparation and 1L line for the hot preparation.
- Ensure that all accessories are well assembled before switching on the appliance.
- Plug the appliance to a power socket. Turn the variator to your desired mixing position until you get the desired texture.
At the end of your preparation, unplug the power cord from the wall outlet and turn the bowl clockwise to remove it from the motor unit.
If your food or blade is stuck in the bowl, unplug the appliance and remove the lid. Use a spatula, remove the food before turning the appliance on again.
To preserve the longevity of the product and the blades, it is imperative to prepare the food before putting it in the mixing bowl.
First put the liquid then the soft / solid ingredients in the mixing bowl until you obtain a homogeneous texture and the desired consistency.
| Ingredients | Food preparation |
| Frozen ingredients | Defrost all ingredients before putting them inside the jug. |
| All types of foods | Wash all ingredientsPeel off skins of all ingredients (hard skins, inedibles skins etc.)Remove seeds from fruits and vegetables (apricots, mangos, avocado etc.)Cut all ingredients (fruits, vegetables, meats) into 2 cm cubes |
| Cooked meats | Remove all bonesCut into 2 cm cubes |
| Cooked fishes | Remove all fish bones |
Warning:
- Always disconnect the appliance from the supply if it is left unattended and before assembling, disassembling or cleaning.
- Warning: avoid spillage on the electric connector.
- Never exceed the maximal level marked on the bowl to avoid any injuries:
○ 1.5L MAX. for cold dishes.
○ 1L MAX. for hot dishes.
- Never insert your hands or any objects into the hole of the cover.
- Do not open the cover lid and measuring cup during use.
- Do not let the appliance work for more than 30 seconds without any food or water.
• Always ensure all the accessories are well assembled. - Do not move the appliance when in use.
Recipes:
| Recipes | Programs | Ingredients | Preparation |
| Gaspacho | [cow7] | 1 onion peeled and chopped1/2 red pepper peeled and chopped1/2 green pepper deseeded and chopped1/2 cucumber chopped1 garlic peeled and chopped500 g chopped tomatoes1 tablespoon of vinegar1 slice of sandwich loafBasil leaves2 tablespoon of olive oilSalt and pepper | Place the vegetables, garlic and onion into the blender. Select the position 1.Add the chopped sandwich load and hold the knob on Pulse position. Season, add the oilive oil, basil leaves and vinegar. Select again the Pulse position.Let the preparation rest inside the fridge for 2 hours. |
| Crushed ice | P | 200g ice cubes | Put the ice cubes into the blender, close it. Hold the knob on the « Pulse/Ice crush » position. |
| Anti-stress milkshake | 2 | 4 peeled bananas125ml milk3 tablespoon of fresh cream1 scoop of vanilla ice cream | Add the ingredients into the blender, close the lid and turn the knob on position 2 « Blending at high speed ». |
| Mango lassi | 1 | 1 mango peeled, stoned and chopped20cl milk20cl yoghurt2 coffee spoons honey | Add the ingredients into the blender, close the lid and turn the knob on position 1 « Blending at low speed ». |
TROUBLESHOOTING
| Problems | Causes | Solutions |
| The appliance is not working after plugged in. | 1. Wrong assembling of accessories.2. The cover is not well assembled. | 1. Disassemble and assemble again all accessories.2. Switch off the appliance and replace correctly the cover. |
| Noise during operation. | 1. Squeaking/cracking noises.2. Vibration of motor/accessories. | This is normal: these noises indicate your machine is extracting the juice. |
| Abnormal noises or vibrations. | 1. Accessories are not well assembled.2. The appliance is not placed on a flat and stable surface. | 1. Switch off the appliance, disassemble and assemble again the accessories2. Switch off the appliance and place the appliance on a flat and stable surface. |
| Ingredients are sticked at the bottom of the bowl. | 1. The ingredients have high volume of stash and/or sugar.2. Too much ingredients and not enough water. | 1. Change your recipe for next time.2. Add liquids to your preparation. |
| Leaked over the cover lid. | 1. Too much water or ingredients.2. The cover is not well assembled. | 1. Remove water or ingredients.2. Switch off the appliance and replace correctly the cover. |
| Blades are not blending. | 1. Ingredients are too big.2. Too much water or ingredients. | 1. Repeat the cooking program. Ensure to cut your ingredients smaller (2-3cm).2. Take out the excess of water or ingredients. |
| Blender stop working | 1. Motor overload. | 1. Put the variator on 0, unplug the power cord and let the blender rest for 30 min. |
CLEANING AND MAINTENANCE
- At the end of the program, switch off your appliance by positioning the variator to 0.
- Unplug your appliance from the power socket.
Cleaning the accessories:
Wash the accessories with a sponge and dishwashing liquid and rinse them.
Do not put the appliance into a dishwasher.
Warning: avoid spillage on the electric connectors of the blender.
Cleaning the body motor unit:
natural_image
Illustration of kitchen appliances including a blender, towel, and a toaster with no visible text or symbolsClean the outer surface with a soft cloth (or sponge) on the surfaces of the appliance.
Do not use a hard brush or any others cleaners to avoid scratching or damaging the appliance. Never immerse the appliance.
Storing the unit:

TECHNICAL INFORMATION
| Model | TKC203 |
| Voltage | 220-240V ~ 50/60Hz |
| Power | 500W |
| Max. Capacity | 1.5L MAX. |
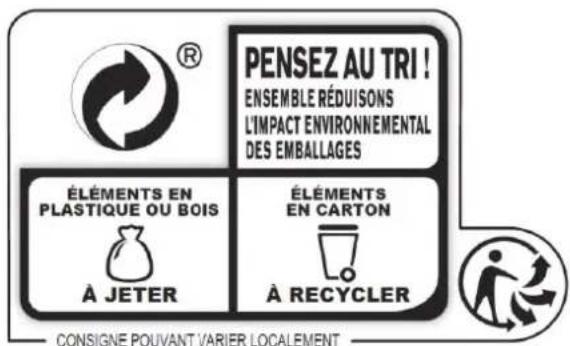
CONSIGNE POUVANT VARIER LOCALEMENT
WWW.CONSIGNESDETRI.FR
Vestel France, 17 rue de la Couture – 94563 Rungis CEDEX
This manual instruction is also available on the following website: http://pieces-detachees.sogedis.fr/


- INSTRUCTIONS DE SÉCURITÉ
- INSTRUCTIONS DE SÉCURITÉ CONCERNANT LA MISE AU REBUT DE VOTRE APPAREIL
- NORMES DE SÉCURITÉ
- SOMMAIRE
- MISE EN SERVICE ET UTILISATION
- INFORMATION TECHNIQUE
- SAFETY WARNINGS
- SAFETY INSTRUCTIONS ON RECYCLING
- STANDARDS
- TABLE OF CONTENTS
- DESCRIPTION
- SET UP AND USE
- Before first use
- Never put the accessories into a dishwasher.
- Assembling and disassembling the appliance
- ATTENTION!
- Warning:
- Description of the control panel
- Using your appliance
- CLEANING AND MAINTENANCE
- Cleaning the accessories:
- Cleaning the body motor unit:
- Storing the unit:
- TECHNICAL INFORMATION
- Vestel France, 17 rue de la Couture – 94563 Rungis CEDEX
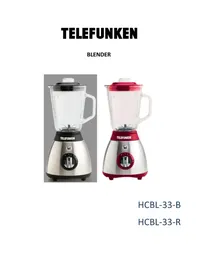
Brand : TELEFUNKEN
Model : TKC203
Category : Blender