RC80i - Speaker POLK - Free user manual and instructions
Find the device manual for free RC80i POLK in PDF.

User questions about RC80i POLK
0 question about this device. Answer the ones you know or ask your own.
Ask a new question about this device
Download the instructions for your Speaker in PDF format for free! Find your manual RC80i - POLK and take your electronic device back in hand. On this page are published all the documents necessary for the use of your device. RC80i by POLK.
USER MANUAL RC80i POLK
User Manual of Product 1:
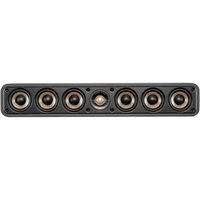
Polk Audio 90-RT 3-Way In-Ceiling-Speaker - The Vanishing Series | Perfect for Mains, Rear or Side-Surrounds | Paintable Wafer-Thin Sheer-Grille | Dual Band-Pass Bass Ports - Low Frequencies
User Manual of Product 2:
Polk Audio RC80i 2-way Premium In-Ceiling 8" Round Speakers, Set of 2 Perfect for Damp and Humid Indoor/Outdoor Placement - Bath, Kitchen, Covered Porches (White, Paintable-Grille)
LS Models
Modèles LS
Modelos LS
900-LS
700-LS
500-LS
RT Models
Modèles RT
Modelos RT
90-RT
70-RT
50-RT
polkaudio®
the speaker specialists
ENGLISH
IMPORTANT SAFETY INSTRUCTIONS READ BEFORE OPERATING EQUIPMENT
- Read these instructions.
- Keep these instructions.
- Heed all warnings.
- Follow all instructions.
- Do not use this apparatus near water.
- Clean only with dry cloth.
- Do not block any ventilation openings. Install in accordance with the manufacturer's instructions.
- Do not install near any heat sources such as radiators, heat registers, stoves, or other apparatus (including amplifiers) that produce heat.
-
Refer all servicing to qualified service personnel. Servicing is required when the apparatus has been damaged in any way, liquid has been spilled or objects have fallen into the apparatus, the apparatus has been exposed to rain or moisture, does not operate normally, or has been dropped.
-
WARNING: To reduce the risk of fire or electric shock, this apparatus should not be exposed to rain or moisture and objects filled with liquids, such as vases, should not be placed on this apparatus.

Product Disposal—Certain international, national and/or local laws and/or regulations may apply regarding the disposal of this product. For further detailed information, please contact the retailer where you purchased this product or the Polk Audio Importer/
Distributor in your country. A listing of Polk Audio Importer/Distributors can be found on the Polk Audio website www.polkaudio.com or by contacting Polk Audio at 5601 Metro Drive, Baltimore, Maryland 21215, USA—Phone: +1 410 358-3600.
WARNING: Listen Carefully
Polk Audio loudspeakers and subwoofer are capable of playing at extremely high volume levels, which could cause serious or permanent hearing damage. Polk Audio, Inc. accepts no liability for hearing loss, bodily injury or property damage resulting from the misuse of its products.
Keep these guidelines in mind and always use your own good judgment when controlling volume:
- You should limit prolonged exposure to volumes that exceed 85 decibels(dB).
For more about safe volume levels, go to the Occupational Health and Safety Administration (OSHA) guidelines at http://www.osha.gov/dts/osta/otm/noise/standards_more.html
TAKE INVENTORY
Inside each speaker container, you should find the following:
- One In-Ceiling Loudspeaker
- One Sheer-Grille
- Mounting Template
- Owner's Manual
- Registration Card
Important Note: If anything is missing or damaged, or if your speaker fails to operate, notify Polk Audio Customer Support Services immediately at 800-377-7655.
INSTALLATION RECOMMENDATION FOR OPTIMUM PERFORMANCE
Important Note: Vanishing Series Loudspeakers are not magnetically shielded and should not be placed closer than 1^ (30cm) from a CRT (tube) television or video monitor.
Important Note: You should have a thorough understanding of and adhere to all local building and fire codes. Also, you should be familiar with the area behind the wall or ceiling into which you plan to install your speakers. Always use wire that meets appropriate building and fire codes. Wiring is best performed by an experienced professional.
When installing your loudspeakers, be aware of the weight of your particular model and the sturdiness of the material into which you are installing the speakers. Be aware of any concealed studs, electrical wiring or plumbing in the wall or ceiling into which you are installing the speakers.
If you doubt that you possess the necessary skills or tools, consult your Polk Audio dealer or a professional installer.
WIRE RECOMMENDATIONS
(minimum recommended)
Runs
Lengths up to 25' 18 or 16
Lengths greater than 25' 16 or 14
but less than 50^
Lengths greater than 50^ 14 or 12
but less than 75^
Lengths greater than 75^12
Gauge
IMPORTANT INFORMATION BEFORE YOU INSTALL YOUR LOUDSPEAKERS Wall Or Ceiling Surface Preparation
If you're installing your Vanishing Series speaker into a heavily textured wall or ceiling (e.g. stucco or popcorn finish), you must prepare the wall surface immediately around the speaker cutout. Sanding and smoothing the wall or ceiling surface will ensure the speaker and grille both seat properly and flat to the surface.
LOUDSPEAKER INSTALLATION
You will need:
- Pencil for marking the location of installation.
Keyhole saw, utility knife or materialappropriate tool for cutting drywall or other wall material. - Screwdriver, preferably powered, with Phillips Head bit.
- Power drill with appropriate bit (optional, for starting wall cut).
Trace around the template.
Cut the hole with the appropriate tool.
CROSSOVER WARNING
Exercise extreme caution when installing this loudspeaker so you do not damage the crossover.
SECURITY EYEBOLT
Your Vanishing Series in-ceiling loudspeaker has an eyebolt on the back of the speaker that can be used for an extra measure of installation security. Follow standard building code installation procedures in your area.
IMPORTANT INFORMATION SHOULD YOU CHOOSE TO PAINT YOUR GRILLES
Because of its ultra-thin profile, the Vanishing Series Sheer-Grille requires a specific painting procedure to ensure smooth, even coverage.
Important Note: Do not remove the grille scrim before painting.
Paint Recommendation
We highly recommend you use a can of spray paint matched to the ceiling color you want the Sheer-Grilles to blend with.
Important Note: Never use a brush or roller to paint the grilles, as this will clog the perforated holes.
To paint the Sheer-Grille
- Elevate the Sheer-Grille off of a flat surface. This will ensure even coverage of the grille frame and make it easier to pick up.
Mounting Idea: A single spray can cap will raise the grille high enough. - Hold the spray paint about 12^ from the grille and at a 45^ angle.
- Apply one light, thin coat, moving evenly side to side over the grille, then work your way around the perimeter of the grille to ensure you cover the grille frame.
- After each application of paint, wait approximately 1 minute, rotate the grille 90^ , and apply the next thin coat.
Important Note: You must rotate the grille 90^ . Use your hands to define the next 90^ rotation and always rotate the grille in the same direction of travel.
- Three light, even applications should cover the grille and frame adequately. Remember to work your way around the grille frame to cover it evenly and completely.
ROOM ENVIRONMENT CONTROLS
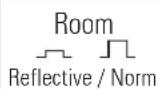
Room Switch
If your listening room is very reflective, with smooth sheetrock walls, hardwood floors and non-cushioned furniture, the sound will be overly "bright" and unnatural.
Engaging the Room Switch (Reflective) compensates for the effect of reflectivity in a "hard room" by attenuating only the portion of the tweeter response that can cause harshness resulting in listener fatigue. This flattens room response without hindering higher frequency response, for warmer, more realistic sound and more accurate imaging.
If your listening room is not highly reflective, that is it has curtains, carpeting, and cushioned furniture, leave the Room Switch in its Normal setting (Norm).
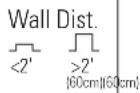
Wall Distance Switch (LS models only) In-ceiling loudspeakers excel when placed more than 2^ (60cm) from side walls. If position limitations demand that in-ceiling loudspeakers be installed closer than 2^ (60cm) from side walls, the proximity of the surface can result in a response "bump" between 50Hz and 200Hz . This can cause in-ceiling speakers to sound "boomy." The "Wall Distance" switch flattens response and eliminates "boominess" without sacrificing deep bass response, for more lifelike sound.
| DIMENSIONS | |||
| LS Models | 900-1s | 700-1s | 500-1s |
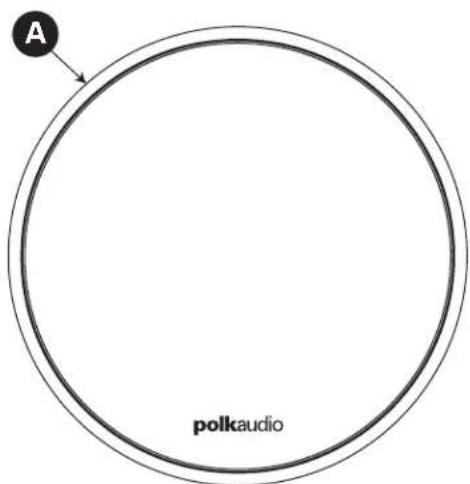
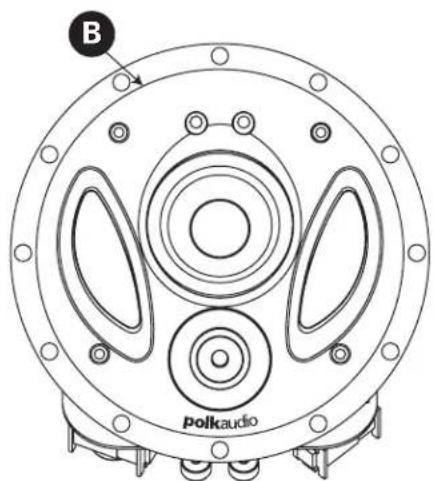
| A. Overall Diameter | 9 5/8" (244.48mm) | 8 1/8" (206.38mm) | 7 3/4" (195.58mm) |
| B. Cutout Diameter | 8 3/16" (207.95mm) | 6 1/2" (165.1mm) | 6" (152.4mm) |
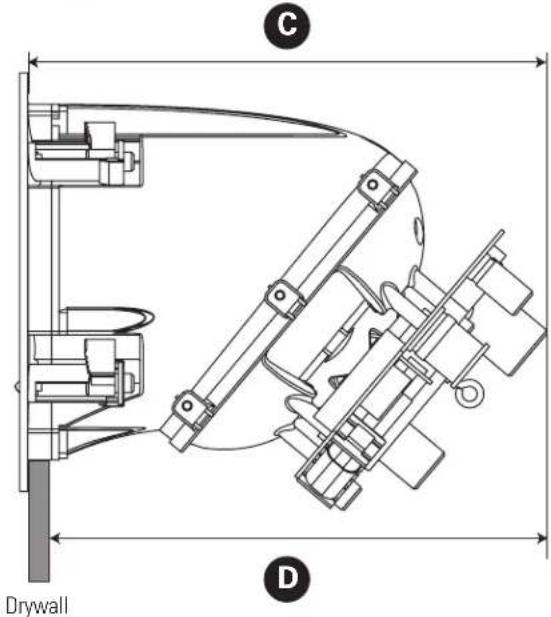
| C. Product Depth | 9 1/2" (241.3mm) | 8 1/2" (215.9mm) | 8 5/8" (219.08mm) |
| D. Mounting Depth (using 1/2" drywall) | 9" (228.6mm) | 8" (203.2mm) | 8 1/8" (206.38mm) |
| RT Models | 90-RT | 70-RT | 50-RT |
| A. Overall Diameter | 9 5/8" (244.48mm) | 8 1/8" (206.38mm) | 7 3/4" (195.58mm) |
| B. Cutout Diameter | 8 3/16" (207.95mm) | 6 1/2" (165.1mm) | 6" (152.4mm) |
| C. Product Depth | 9 1/2" (241.3mm) | 8 1/2" (215.9mm) | 8 5/8" (219.08mm) |
| D. Mounting Depth (using 1/2" drywall) | 9" (228.6mm) | 8" (203.2mm) | 8 1/8" (206.38mm) |
SPECIFIATIONS
For complete Vanishing Series specifications, visit www.polkaudio.com.
FRANÇAIS CONSIGNES DE SECURITE IMPORTANTES À LIRE ATTENTIVEMENT AVANT D'UTILISER LE PRODUIT
For more information visit our website at www.polkaudio.com
FAITES L'INVENTAIRE
(minimum recommendé)
Longueur
Peinture: recommendation
Limited Lifetime Warranty for Polk Audio Branded In-Wall and In-Ceiling Speakers
Important Note: This lifetime warranty applies only to in-wall and in-ceiling loudspeakers, and passive CSW subwoofoers sold after September 9, 2009.
Polk Audio, Inc., ("Polk") warrants to the original retail purchaser that Polk Audio branded in-wall and in-ceiling speakers, including passive CSW series subwoofer (collectively "product"), will be free from defects in materials and workmanship for the life of the product, under normal use and conditions. Should this product prove to be defective in material or workmanship, Polk will, at its option, (a) repair the product, or (b) replace the product. If the product model is no longer available and cannot be repaired effectively, or replaced with an identical model, Polk may, at its sole and absolute option, replace the unit with a current model of equal or greater value.
To obtain warranty service, you may refer to the instructions in your owner's manual or visit the Polk Audio website at www.polkaudio.com. You may also contact Polk Audio Customer Service at 1-800-377-7655 for instructions on where to send the product. You will be required to provide an original receipt or bill of sale, identifying you as the original purchaser and identifying the purchase made through an authorized Polk retailer. You will need to ship the product, prepaid and insured, together with the proof of purchase to Polk Audio, Inc. 1 Viper Way, Vista, CA 92081. Risk of loss or damage in transit shall be borne by the purchaser. Freight collect shipments will be refused.
This warranty is non-transferrable and does not apply to any product that has been modified or used in a manner contrary to its intended purpose, and does not cover damage to the product caused by installation or removal of the product. If modification(s) to a mounting surface are made to product(s) that have been substituted under warranty, Polk assumes no responsibility or liability for any modification made to the mounting surface or otherwise. This limited warranty is void if the product has an altered or missing serial number, or if the product was purchased from someone other than an authorized dealer. This limited warranty is void if the product has been damaged by accident or unreasonable use, neglect, improper service or other causes not arising out of defects in material or construction. Product(s) which are found to be damaged by abuse resulting in thermally damaged voice coils are not covered by this warranty but may be replaced at the sole and absolute discretion of Polk. This warranty terminates if you sell or otherwise transfer the product to another party. This limited warranty does not cover cosmetic damage, paint damage, damage to other components, parts or premises, or any consequential damages which may result for any reason. This limited warranty does not cover labor costs for the removal and/or reinstallation of the product.
THIS WARRANTY GIVES YOU SPECIFIC LEGAL RIGHTS AND YOU MAY HAVE OTHER RIGHTS THAT VARY FROM STATE TO STATE. ALL WARRANTYES, INCLUDING BUT NOT LIMITED TO EXPRESS WARRANTY, IMPLIED WARRANTY OF MERCHANTABILITY AND FITNESS FOR A PARTICULAR PURPOSE ARE EXPRESSLY EXCUSED AND DISCLAIMED TO THE MAXIMUM EXTENT ALLOWED BY LAW, AND POLK NEITHER ASSUMES NOR AUTHORIZES ANY PERSON TO ASSUME FOR IT ANY LIABILITY IN CONNECTION WITH THE SALE OF THE PRODUCT. POLK HAS ABSOLUTELY NO LIABILITY FOR ANY ACTS OF THIRD PARTIES. SOME STATES DO NOT ALLOW THE EXCLUSION OF CERTAIN IMPLIED WARRANTYES, OR CONDITIONS ON AN IMPLIED WARRANTY, SO THE ABOVE LIMITATION MAY NOT APPLY TO YOU. POLK DOES NOT ACCEPT LIABILITY FOR SPECIAL, INDIRECT, INCIDENTIAL, PUNITIVE OR CONSEQUENTIAL DAMAGES, LOST PROFITS, LOST SAVINGS OR DAMAGES RESULTING FROM IMPROPER USE, OR THE INABILITY TO USE THE PRODUCT. THE MAXIMUM LIABILITY FOR WHICH POLK MAY BE RESPONSIBLE SHALL NOT EXCEED THE PURCHASE PRICE OF THE PRODUCT. SOME STATES DO NOT ALLOW THE EXCLUSION OR LIMITATION OF INCIDENTAL OR CONSEQUENTIAL DAMAGES, SO THE ABOVE LIMITATION OR EXCLUSIONS MAY NOT APPLY TO YOU.
the speaker specialists
5601 Metro Drive
Baltimore, Maryland 21215
800-377-7655 (outside usA & CANADA: 410-358-3600)
www.polkaudio.com
polkaudio
the speaker specialists
5601 METRO DRIVE
BALTIMORE, MARYLAND 21215, USA
800-377-7655,FAX:416-764-5266
www.polkaudio.com
RCi SERIES
High
Performance
In-Wall
Speakers
polkaudio
the speaker specialists
PLACEMENT OPTIONS
Polk Audio RCi Series In-Wall Loudspeakers give you nearly endless placement options. But remember that placement choice for your in-wall speakers bears careful consideration, as installation requires that you cut a hole in your wall!
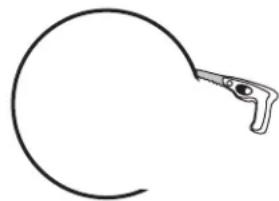
Fill a room with sound by installing in-wall speakers in nearly any wall or ceiling location [figure 1]. Polk RGi Series In-Wall Loudspeakers have a wide dispersion pattern and aimable tweeters that allow you to focus their sound.
ADJUSTING THE TWEETER
Aiming the tweter toward your listening position improves imaging and detail. When using RCI Series In-Wall Loudspeakers as front/main home theater speakers [figure 2], aim the tweter toward your listening position. For rear/surround speakers installed in walls or ceilings [figure 3], aim the tweter toward the nearest reflecting surface (an adjacent wall or ceiling) for a more diffuse sound field (if you so desire; for more direct sound, aim the twecters at your listening position).
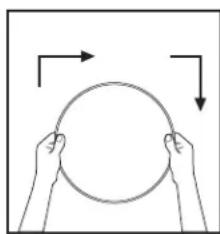
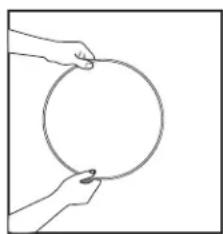
RC55i, RC65i, RC85i models: Holding the edges of the tweeter carefully between the thumbs and force fingers of both hands, rock the tweeter slightly to aim it [figure 4]. RC60i, RC80i models: Grasping the round tweeter with the tips of the fingers of one hand, pivot the tweeter toward the direction you desire [figure 5]. Do not "turn" the tweeter like a door knob.
Note: RGI Series In-Wall Loudspeakers are not magnetically shielded and should not be placed closer than 1' (30cm) from a television or video monitor. If you experience discoloration or distortion, immediately move the speakers away from your TV.
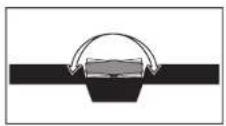
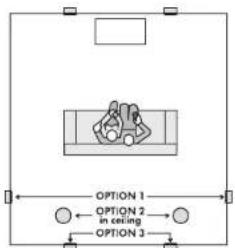
FIGURE 1
RC Series audio and A/V placement options, in wall or ceiling.
Recommended measurements for HT front stage placement.
Recommended measurements for HT front stage placement.
Examples of in-wall and in-ceiling placement. When used as rear/surfaces, aim Newton toward the nearest reflecting surface to achieve a similar effect. Also, use a large beam beamline.
RC5SI, RC6SI, RC8SI models: Holding the edges of the oblong with a single finger and the middle of the forefingers of both hands, rock the twenter slightly to aim it.
RC601, RC801 models: Grasping the round tweeter with the tips of the fingers of one hand, pivot the tweter in the middle of the finger.
- Paint of your choice (to make the job easier, we recommend spray painting the grille)
A paperclip or corkscrew (for removing the paintable grille, corkscrew can also be used to open the wine when you relax with your newly painted RCI speakers) - Masking tape
- Paint mask (to cover unpaintable parts, supplied!)
PREPARING TO PAINT:
- Separate the parts of the speaker. If the speaker is not yet installed, the grille can be removed simply by pushing the clamp screws forward to push the grille off the speaker from the inside. If the speaker is already in the wall, carefully hook the grille with a bent paper clip and pull it gently away from the frame [figure 6].
- When painting the frame of the speaker, use the supplied paint masks to carefully mask off the front of the speakers to protect the drivers and baffles while painting. You can do this while the speaker is already installed in the wall (if, for instance, you're repainting the room). If you do not have the paint masks, carefully mask the speaker components using paper and masking tape.
PAINTING THE FRAME:
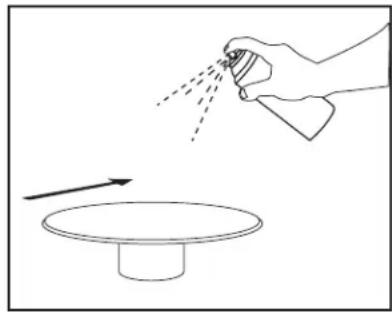
- Apply paint to exposed (unmasked parts). Use two or more thin coats. Spray painting is recommended [figure 7].
- When the paint is completely dry, remove the masking material.
PAINTING THE GRILLE:
- The grille of the RGi Series speaker features an event, protective powder coating. This powder coating is an ideal primer.
-
Grilles must be spray painted. Do not use a brush and paint. Thick, brushed paint may clog the grille holes.
3.RC55i,RC65i,RC85i models:Before spray painting the grille, carefully remove the grille's fabric scrim by peccing it away from the inside of the grille [figure 8].Place this on a clean, flat surface where it will not get wrinkled. -
After removing the grille by carefully hooking it with a bent paper clip and pulling it gently away from the frame, spray on two thin coats of finish color. If you're using a compressor and spray gun, use the finest, most diffuse setting. Be careful not to fill the holes in the grille with paint [figure 9].
- When the paint is completely dry, carefully install the grille by fitting it into its recess so that it is just resting on the frame. Starting with one corner, go around the speaker and push the grille into the grille notch a little bit at a time. Be gentle; the grille may be easily bent out of shape by rough handling. You will feel a positive "snap" when it is fully in place.
- RC55i, RC65i, RC85i models: When the grille is dry, carefully press the fabric seam back into place on the inside of the grille. The special fabric seam hides the speaker's drivers from view, and will not interfere with the sound.
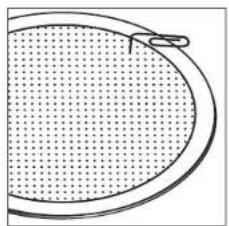
FIGURE 6
Use a paperclip to remove grille.
Mask the drivers and baffles, then spray paint in thin coats.
Peel away fabric grille arim before painting grille.
Paint the grille. Use thin coats of spray paint.
Do not block grille holes with paint.
Out of the box and into the wall, that's how easy it is to install Polk RCi Series In-Wall Loudspeakers.
If you intend to do the installation yourself we recommend that you possess some skill in the proper use of hand and power tools. You should have a thorough understanding of local building and fire codes and a familiarity with the area behind the wall or ceiling into which you plan to install your speakers. Install speaker wires before installing speakers. Wire meeting appropriate building and fire codes must be used. Use at least 18 gauge wire or heavier for the utmost in sound quality. Wiring is best performed by an experienced professional. If you are in doubt that you possess the necessary skills or tools, consult your Polk Audio dealer, or a professional installer.
YOU WILL NEED:
- Pencil for marking the location of installation
Keyhole saw, utility knife or materialappropriate incising implement forcutting drywall or other wall material
Level - Screwdriver, preferably powered with Phillips head bit
- Power drill with appropriate bit (optional, for starting wall cut)
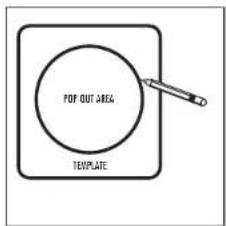
FIGURE 10a
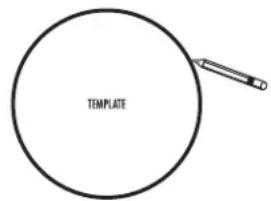
Round Template: Trace within the pop-out area. Plonilla roundola: Marque dentro del area que se va a deschar. Gaborit rond: Tracce à l'intérieur du gaborit. Runde Verloge: Umranden Si den inneren, gestationen Teil der Vorloge.

FIGURE 10b
- Make sure the material into which you plan to mount the speakers (plaster, drywall, paneling, stone, etc.) can support the weight of the speakers (see specification page for the weight of your model).
Make sure the locations you select do not conceal studs, electrical wiring or plumbing. Prior to installation, hold the speaker in your chosen location to make sure it safely clears obstacles such as stairs, corners, beams, lighting fixtures and door-window frames. Your cutout must be at least 1^ (25mm) from adjoining walls or ceiling, internal studs or plumbing. -
Using the template, trace the installation location with a pencil. You can do this by holding the template in your preferred location and tracing around it (rectangle) or within the template pop-out area (round). Use a level to make certain the template is straight and plumb. This is the exact cutout size [figures 10a & 10b].
-
Carefully cut the hole with the appropriate cutting tool for your wall or ceiling material. Start the hole by drilling a hole on the inside of the tracing (with the drill bit touching the line). Use this hole to insert the saw or knife and begin cutting [figure 11].
Once you have cut the hole, fish your previously positioned wiring out of the hole and connect the speaker. Follow the hookup directions included with your receiver. Strip 1/2inch (12 mm) of insulation from each of the two conductors of the wire to expose the bare metal and twist each of the conductors into a single unfrayed strand (so you have two unfrayed strands). Note that one of the terminals is red (+) and the other is black (-). Make certain that you connect the wire from the red terminal (+) of your amplifier or receiver to the red terminal (+) on your speaker and the wire from the black terminal (-) of your amplifier or receiver to the black terminal (-) on your speaker. Most wire has some indicator (such as color-coding, ribbing or writing) on one of the two conductors to help you maintain consistency [figure 12].
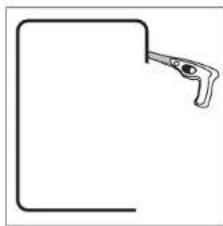
FIGURE 11
To install the speaker, first carefully remove the grille using a straightened paperclip or other pointed metal tool. Insert the point into one of the grille perforations near a corner and lift the grille free. Never use a knife or screwdriver to pry between the grille and the speaker frame. This will damage your speaker.
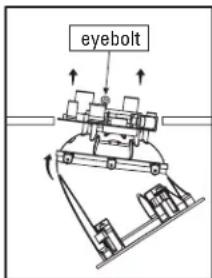
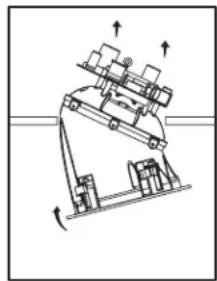
- Loosen the rotating wall clamps by unscrewing them. Make sure that the rotating wall clamps are flipped inwards so that your speaker fits into your cutout without nicking your wall. Then place the speaker carefully into the cutout [figure 13]. If you have a level, use it to help you correctly align the speaker. Tighten the wall clamp screws with a screwdriver. This will rotate the wall clamps and secure the speaker to the wall. Hint—on the RC55i, RC65i and RC85i models, tighten the center screws before tightening the corners for the most flush fit to your wall. Do not overtighten the wall clamp screws [figure 14].
- Carefully reinstall the grille by fitting it into its recess so that it is just resting on the frame. Starting with one corner, go around the speaker and push the grille into the grille notch a little bit at a time. Be gentle; the grille may be easily bent out of shape by rough handling. You will feel a positive "snap" when it is fully in place. (Where's the corkscrew?)
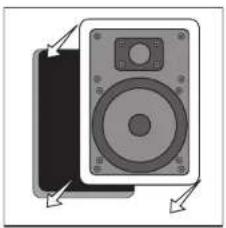
FIGURE 13
Place the speaker carefully into the cutout.
Cologue cuidadosamente el altavoz en el aquijero.
Placez delicatement le haut-parleur dans l'ouverture.
Platzieren die lausprecher vorsicht in der ausgeschreibeniten Öffnung.
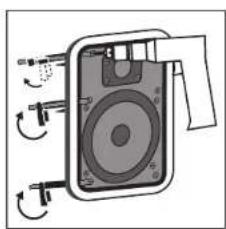
FIGURE 14
Tighten retaining wall clamps to engage wall. Use a 23 Phillips head screwdriver or a powered screwdriver.
Apriete las的前提下 de retencion de la pared para enganchar el alvarez to a pared. Use un destabilatorio Phillips No. 2 o un destabilatorio electrico.
When installing your RGi Series In-Wall Loudspeakers, be aware of the weight of your particular model (see specification page for the weight of your model) and the sturdiness of the material into which you are installing the speaker. Also be aware of any concealed studs, electrical wiring or plumbing in the wall or ceiling into which you are installing the speakers. If you are not sure of a safe way to install these speakers, consult a professional installer, your authorized Pink Audio dealer, or a building contractor.
If you plan to install your RCi Series speakers where water will directly contact them, it is advisable to use a silicone scallant or caulk between the frame of the speaker and the wall surface. This seal should prevent water from getting behind the loudspeaker and possibly damaging the wall surface. Do not position the speaker where water can pool on the surface of the woofer cone or tweeter dome, as this will great decrease the speaker's useful life (and everything will sound—glub glub!—like it's coming from under water!).
SPECIFICATIONS
RC551
RC651
RC85i
Frequency Response 67Hz-20kHz 32Hz-20kHz 30Hz-20kHz
Recommended Power 20-100wms 20-100wms 20-100wms
| Impedance | Compatible with 8 Ohm amplifiers | Compatible with 8 Ohm amplifiers | Compatible with 8 Ohm amplifiers |
| Efficiency (dB 1w/1m) @30 dB @30h | 60dB | ||
| Drive Unit Complement | |||
| Mid-Bass | 1.5mA*13.5cm mineral filled polypropylene cone, rubber suspension | 1.6mA*16.5mm mineral filled polypropylene cone, rubber suspension | 1.3mA*20cm mineral filled polypropylene cone, rubber suspension |
| Tweeter | 30°(1.3cm) soft cone in swivel mount | 90°(1.3cm) soft cone in swivel mount | 1°(2.5cm) soft cone in swivel mount |
| Cutout Dimension | 60°x 30°(15.7cm x 24.1cm) 13.72cm x 24.45cm | 75°x 104°(18.0cm x 27.3cm) 18.72cm x 27.31cm | 80°x 129°(22.1cm x 32.4cm) 22.0cm x 32.90cm |
| Depth with 92° drywall | 25% (15.50cm) | 25% (15.10cm) | 25% (7.30cm) |
| Shipping Weight Pair | 76LBS-3.4Kg | 6.16S-1.63Kg | 116LBS-5.32Kg |
RC601 RC801
Frequency Response 40Hz-20KHz 35Hz-20Hz
Rccommended Power 25100wrs 20140wns
Impedance Compatible with 8 Gbit amplities compatible with 8 Other amplifiers
Effciency (dB 1w/1m) 89db 90db
| Drive Unit Complement | ||
| Mid-Bass | 1-8% (10.5mm) mineral filled polycarbonate conc. rubber suspension | 1-6% (20mm) mineral filled polypropylene conc. rubber suspension |
| Tweeter | 3% (1.3mm) soft clay in ball and socket | 1% (75mm) soft clay in ball and socket |
| Cutout Dimensions | 7%*1 (0.25mm) diameter | 6%* (25.8 mm) diameter |
| Depth with 45° drywall | 2%* (6.03cm) | 3%* (8.26cm) |
| Shipping Weight Pair | 5% LBS - 2.5 Kg | 6% LBS - 4.51 Kg |
POLK AUDIO LIMITED WARRANTY
Polk Audio, Inc. warrants to the original purchaser only that this Polk Audio Loudspeaker Product (the "Product") will be free from defects in materials and workmanship for a period of five (5) years from the date of original retail purchase from a Polk Audio Authorized Dealer. However, this Warranty will automatically terminate prior to the expiration of the five (5) years if the original retail purchaser sells or otherwise transfers the Product to any other party. The original retail purchaser shall hereinafter be referred to as "you." To allow Polk Audio to offer the best possible warranty service, please fill out the Product Registration Card(s) and send it to the Factory, at the address provided on the Product Cards(s) within ten (10) days of the date of purchase.
Defective Products must be shipped, together with proof of purchase, prepaid insured to the Polk Audio Authorized Dealer from whom you purchased the Product, or to the Factory at 2550 Britannia Boulevard, Suite D, San Diego, California 92154. Products must be shipped in the original shipping container or its equivalent; in any case the risk of loss or damage in transit is to be borne by you. If upon examination at the Factory or Polk Audio Authorized Dealer it is determined that the unit was defective in materials or workmanship at any time during this Warranty period, Polk Audio or the Polk Audio Authorized Dealer will, at its option, repair or replace this Product at no additional charge, except as set forth below. All replaced parts and Products become the property of Polk Audio. Products replaced or repaired under this warranty will be returned to you within a reasonable time. freight prepaid.
This warranty does not include service or parts to repair damage caused by accident, disaster, misuse, abuse, negligence.
inadequate packing or shipping procedures, commercial use, voltage inputs in excess of the rated maximum of the unit, cosmetic appearance of cabinetry not directly attributable to defect in materials or workmanship, or service, repair, or modification of the Product which has not been authorized or approved by Polk Audio. This warranty shall terminate if the Serial number on the Product has been removed, tampered with or defaced.
This warranty is in lieu of all other expressed warranties. If this Product is defective in materials or workmanship as warranted above, your sole remedy shall be repair or replacement as provided above. In no event will Polk Audio, Inc. be liable to you for any incidental or consequential damages arising out of the use or inability to use the Product, even if Polk Audio, Inc. or a Polk Audio Authorized Dealer has been advised of the possibility of such damages, or for any claim by any other party. Some states do not allow the exclusion or limitation of consequential damages, so the above limitation and exclusion may not apply to you.
All implied warranties on this Product are limited to the duration of this expressed Warranty. Some states do not allow limitation on how long an implied Warranty lasts, so the above limitations may not apply to you. This Warranty gives you specific legal rights, and you also may have other rights which vary from state to state.
This Warranty applies only to Products purchased in the United States of America, its possessions, and U.S. and NATO armed forces exchanges and audio clubs. The Warranty terms and conditions applicable to Products purchased in other countries are available from the Polk Audio Authorized Distributors in such countries.
"Polk Aideo," "Polk," The Speaker Specialists, "Power Port" and "Dynamic Balance" are trademarks of Britannia Instrument Corporation used under license by Polk Audio Incorporated.
Dolby, Pro Logic, Dolby Digital and AC-3 are Trademarks of Dolby Laboratories Licensing Corp.