Edge - Speaker Martin Logan - Free user manual and instructions
Find the device manual for free Edge Martin Logan in PDF.


User questions about Edge Martin Logan
0 question about this device. Answer the ones you know or ask your own.
Ask a new question about this device
Download the instructions for your Speaker in PDF format for free! Find your manual Edge - Martin Logan and take your electronic device back in hand. On this page are published all the documents necessary for the use of your device. Edge by Martin Logan.
USER MANUAL Edge Martin Logan
Refer servicing to a qualified technician.
- To prevent fire or shock hazard, do not expose this module to moisture.
- Turn amplifier off should any abnormal conditions occur.
- Do not drive speaker beyond its rated power.


The lightning bolt flash with arrowhead symbol within an equilateral triangle
is intended to alert the user to the presence of uninsulated "dangerous voltage" within the product's enclosure that may be of sufficient magnitude to constitute a risk of electric shock.

The exclamation point within an equilateral triangle is intended to alert the user
to the presence of important operating and maintenance (servicing) instructions in the literature accompanying the appliance.

The fire within an equilateral triangle is intended to alert the user to the potential
of creating a fire hazard if they do not follow the instructions.

The dollar sign within an equilateral triangle is intended to alert the user that
they run the risk of causing damage that could be potentially expensive to repair if they don't follow the instructions.
Content Check List 3
Connection 4
Protect Your Investment 4
Break-In 4
Speaker Placement 4
Achieving Superior Imaging 4
Balancing Hard vs. Soft Surfaces Improves
High- and Mid-Frequency Performance 4
Choosing a Mounting Location 4
Balancing Bass Output. 5
Wall Rigidity Results in Better Sound 5
Suggested Placement of In-Ceiling Loudspeakers . 5
Painting the Speaker Grill 6
Edge/Axis Installation 6
Vanguish Installation 7
Frequently Asked Questions 9
Troubleshooting 10
Contacting Customer Service 10
General Information 11
Warranty Information 11
Serial Number. 11
Service 11
Specifications 12
Serial Number:
Record your serial number here for easy reference. You will need this information when filling out your warranty registration. The serial number is located near the binding posts and on the product carton.

13AUO2005
In accordance with the European Union WEEE (Waste Electrical and Electronic Equipment) directive effective August 13,
2005, we would like to notify you that this product may contain regulated materials which upon disposal, according to the WEEE directive, require special reuse and recycling processing. For this reason Martin Logan has arranged with our distributors in European Union member nations to collect and recycle this product at no cost to you.
To find your local distributor please contact the dealer from whom you purchased this product, email info@martinlogan.com or visit the distributor locator at www.martinlogan.com.
Please note, only this product itself falls under the WEEE directive. When disposing of packaging and other related shipping materials we encourage you to recycle these items through the normal channels.
CONTENT CHECK LIST
You will find the following items enclosed for your new MartinLogan loudspeaker. Should you require assistance please call our service department at (785) 749-0133.
Install Template Grill Cover Paint Shield
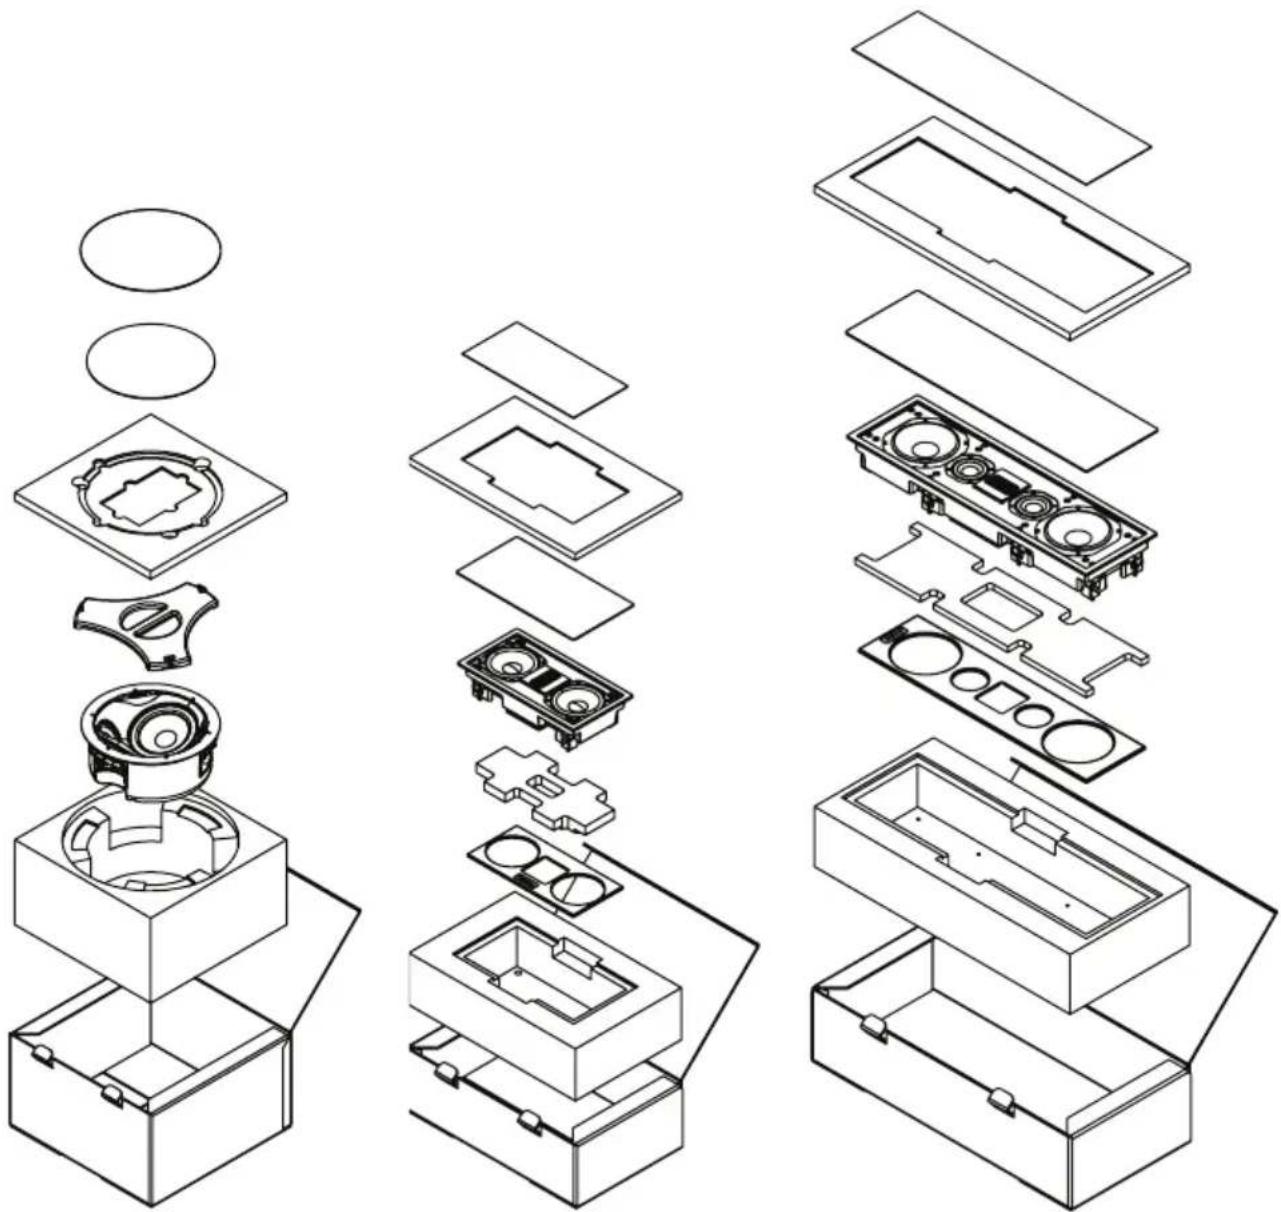
Vanquish Axis Edge
CONNECTION
WARNING! Turn your amplifier off before making or breaking any signal connections!

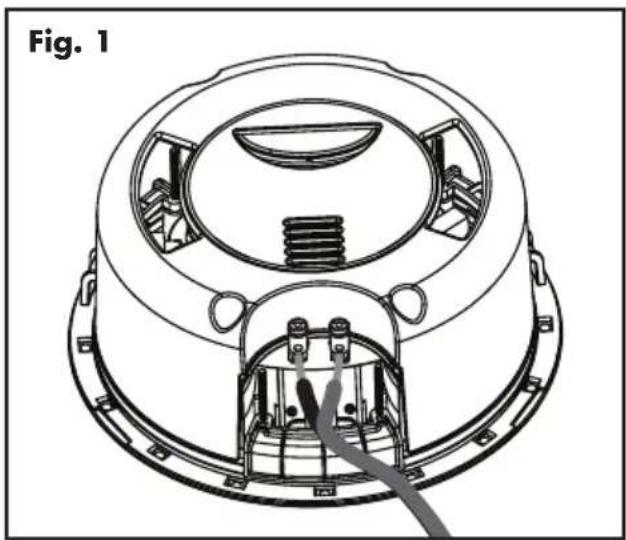
These speakers are designed with easy-to-use push-style binding posts that accept bare wire (fig. 1).
Assign the same color to the (+) and (-) terminals on both the speaker and the amplifier. Make certain that all connections are tight.
PROTECT YOUR INVESTMENT
- Use an amp that approximately matches the speaker's specified power handling.
-
To avoid damage, turn down the volume if the speaker is distorting, sounds harsh, or the bass begins to break up.
-
Tone controls and equalizers may increase the likelihood of distortion, especially at high volumes. Use these setting sparingly.
BREAK-IN
When you first begin to play your speakers, they will sound a bit bass shy. This is due to the high quality, long-life components used in the drivers.
Allow approximately 72 hours of break-in at 90 dB (moderate listening levels) before any critical listening.
SPEAKER PLACEMENT
Achieving Superior Imaging
These MartinLogan in-wall and in-ceiling speakers offer superb imaging and flexible placement in nearly any location. However, for best performance and imaging place speakers equidistant from one another and avoid physical obstructions between the speaker and primary listening position.
Rooms that are "over damped" with carpeting, drapes, and other sound absorbers can cause your system to sound dull and lifeless. On the other hand, rooms can have so many hard surfaces that the system sounds like a gymnasium. Experiment by adding or removing soft surfaces until you find a mix that sounds good to you.
Balancing Hard vs. Soft Surfaces Improves High- and Mid-Frequency Performance
Choosing a Mounting Location
Install the Edge and Axis speakers between wall studs.
Install the Vanquish between ceiling joists. Be careful to avoid electrical wires behind the wall and ceiling surfaces.
Balancing Bass Output
Corner placement of these speakers will reinforce their bass output. If you require balanced output across the entire audio spectrum avoid mounting these speakers in a corner.
Wall Rigidity Results in Better Sound
Increasing the rigidity of your walls may improve sonic performance. To do this consider adding cross bracing inside of the wall approximately 12^ (30cm) above and below the speaker.
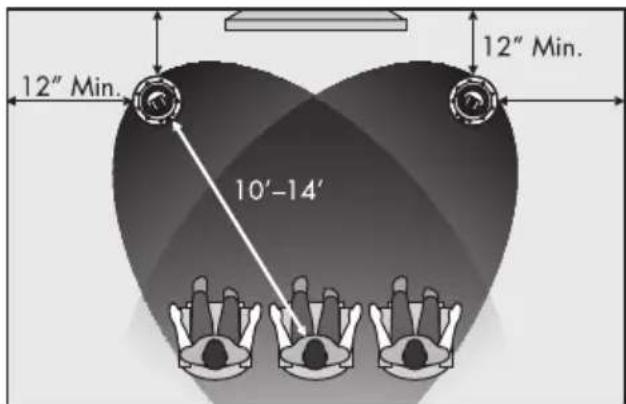
Figure 2. 2-channel installation.
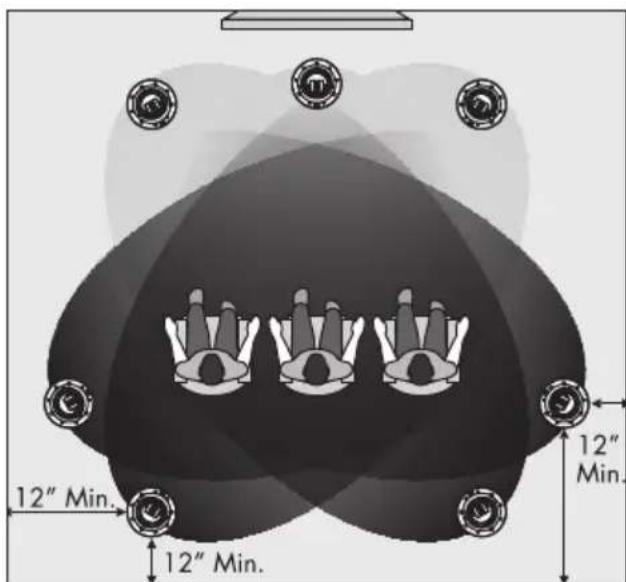
Figure 4. Adding surround channels to create a 5- or 7-channel installation.
Suggested Placement of In-Ceiling Loudspeakers Although figures 2-5 depict in-ceiling installations the same guidelines shown in figures 2 to 5 can be used when positioning in-wall front speakers and center channels.
When choosing placement follow these simple tips:
- Place a minimum of 12'' (30cm) from any wall corner.
- Place front and center channels equidistant between 10-14 feet (3-4.3m) from the listening position.
- Vanquish: Install in-ceiling only. Orient the tweeter towards the listening position.
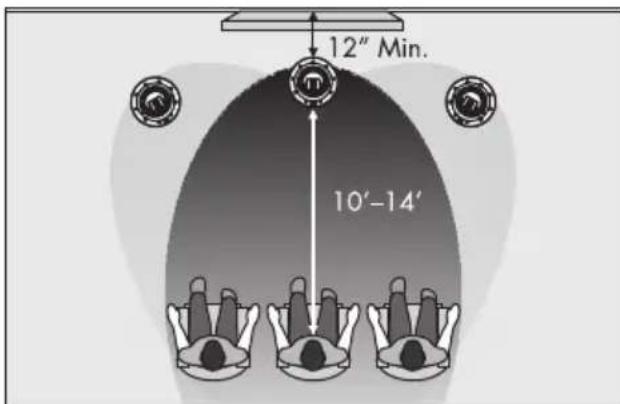
Figure 3. Adding a center channel.
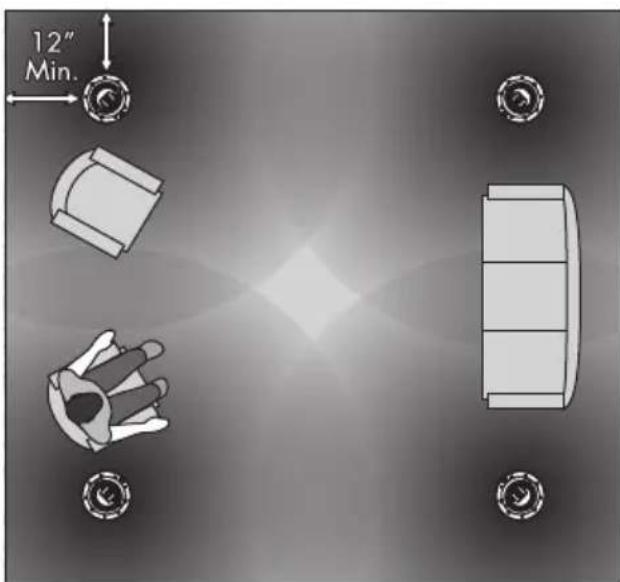
Figure 5. Distributed audio.
PAINTING THE SPEAKER GRILL
IMPORTANT! Before painting remove grill from speakers and remove the cloth scrim attached inside the grill.
- Remove the grill from the speaker. A protective cloth scrim is attached to the back of the grill with low-tack adhesive. Remove this scrim by gently pulling it away from the grill.
- Paint the grill, being careful not to plug the holes. Allow the paint to completely dry before
proceeding. IMPORTANT! For best results use a spray rather than a brush or roller.
- Gently press the scrim back into place before reinstalling the speaker grill.
INSTALLATION
NOTE: These instructions assume the mounting surface is of standard wood frame and standard sheet rock construction. If you wish to mount the speakers to another type of material you should contact a bonded contractor.
NOTE: See your local dealer for new construction pre-install brackets (sold separately).


WARNING! Before installing check local building codes to verify compliance with local regulations.
WARNING! Before installing check for obstructions behind drywall. To do this make a small hole, cutting at a 45^ angle (this will make the hole easier to patch if obstructions are found. Only cut out the mounting hole after you have verified there are no obstructions behind the dry wall.
WARNING! Use only speaker cable that is rated for in-wall use. The UL standard is CL2, CL3, and CM. The CSA standard is FT4. WARNING! Turn your amplifier off before making or breaking any signal connections.
EDGE/AXIS INSTALLATION
Recommended tools:
- Stud finder
Sharp pencil or pen - Pushpin
- Dry wall knife/saw
Wire strippers - Phillips screwdriver or electric drill and bit
- Tape measure
-
Low-tack tape
-
Using a stud finder, position the template so it is centered between wall studs or ceiling joists.
- Hold or pin the template in place and mark cutout with a pencil.
- Remove the template and cut out the opening with a drywall knife/saw.
- Place fiberglass insulation above and below the cutout hole. Place a half thick piece of fiberglass insulation behind the speaker.
5 Connect speaker cable. Be consistent when connecting speaker leads to the terminals on the speaker. Take great care to assign the
same color to the (+) terminal on both the speaker and the amplifier.
WARNING! Turn your amplifier off before making or breaking any signal connections!

6 Place speaker in hole. Orient the specially marked woofer so it is the closest to the listener's ear level at the primary listening position.
7 Use a 2-inch long #2 Phillips driver and an electric drill to lock all mounting locks in place. Use a low clutch setting on the drill.
8 Remove the protective cover from the tweeter
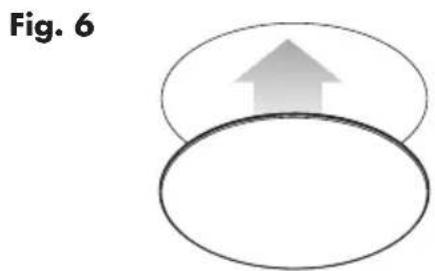
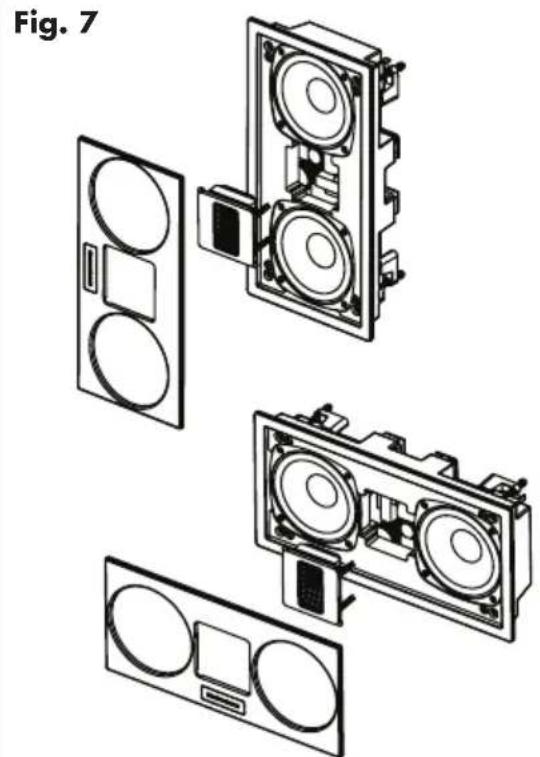
9 The Folded Motion XT tweeter should always be used in a vertical orientation. To do this, use your fingers to gently pull the tweeter assembly away from the speaker, rotate 90 degrees, and press it back into place (fig 7).
10 Gently press the glossy trim baffle into place. Remove the protective film from the trim.
11 Place the magnetic grill cover over the speaker.
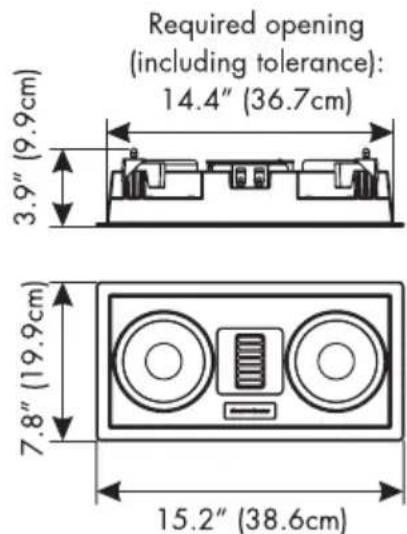
Fig. 8 Axis
VANQUISH INSTALLATION
Recommended tools:
- Stud finder
Sharp pencil or pen - Pushpin
- Dry wall knife/saw
Wire strippers - Phillips screwdriver or electric drill and bit
-
Tape measure
Low-tack tape -
Using a stud finder, position the template so it is centered between wall studs or ceiling joists.
- Hold or pin the template in place and mark cutout with a pencil.
- Remove the template and cut out the opening with a drywall knife/saw.
- Place fiberglass insulation 12'' (30cm) or thicker between the joists directly above the speaker.
5 Connect speaker cable. Be consistent when connecting speaker leads to the terminals on the speaker. Take great care to assign the same color to the (+) terminal on both the speaker and the amplifier.
WARNING! Turn your amplifier off before making or breaking any signal connections!

6 Place speaker in hole.
7 Orient the tweeter so it is pointing towards the primary listening position. Use a 2-inch long #2 Phillips driver and an electric drill. While holding the speaker in position by the installation handle, for each set of screws tighten both screws alternating between either screw until the mounting lock has moved firmly into place.
8 Loosen wing nuts and remove the installation handle.
9 Adjust the position switches. For a center channel application, set the 'Center Channel / Front or Surround' switch to 'Center Channel'. For a front- or surround-channel application, set the 'Center Channel / Front or Surround' switch to 'Front or Surround' and choose the appropriate position setting on the 2nd switch.
Please Note: When the 'Center Channel / Front or Surround' switch is set to 'Center Channel' the 2nd switch setting is irrelevant.
10 Remove the protective sticker that is covering the Folded Motion tweeter.
11 Place the magnetic grill cover over the speaker.
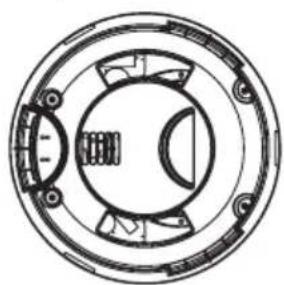
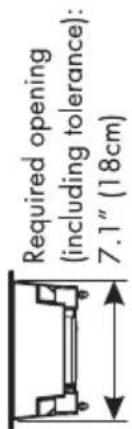
Fig. 7 Vanquish
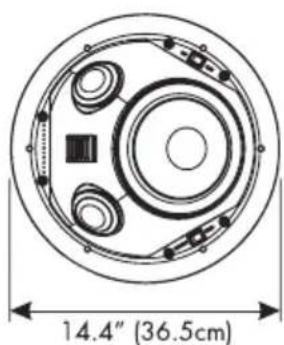
Required opening
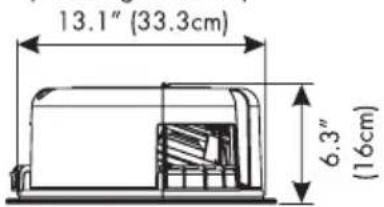
(including tolerance):
Frequently Asked Questions
How do I clean my speakers? Just use a dust free cloth or a soft brush to remove the dust from your speakers. Do not spray any kind of cleaning agent on or in close proximity to the drivers.
What size amplifier should I use? We recommend an amplifier rated within the suitable amplifier range of your speaker.
Could you suggest a list of suitable electronics and cables that would be ideal for MartinLogan speakers? The area of electronics and cable choice is probably the most common type of question that we receive. It is also the most subjective. We have repeatedly found that brands that work well in one setup will drive someone else nuts in another. We use many brands with great
success. Again, we have no favorites; we use electronics and cables quite interchangeably. We would suggest listening to a number of brands—and above all else—trust your ears. Dealers are always the best source for information when purchasing additional audio equipment or cables and will be well versed in the subject of special safety requirements for in-wall cable.
Will exposure to sunlight affect the life or performance of my speakers? We recommend that you not place any loudspeaker in direct sunlight. The ultraviolet (UV) rays from the sun can cause deterioration of grill cloth, speaker cones, etc. Small exposures to UV will not cause a problem. In general, the filtering of UV rays through glass will greatly reduce the negative effects.
TROUBLESHOOTING
No Output
- Check that all your system components are turned on, not muted, and that your balance control (if applicable) is set correctly.
- Check to make sure your power outlet at the wall is working.
- Check your power cords, speaker wires, and interconnecting cables.
- Check to make sure no headphones are plugged in.
- Swap speaker wires at your amplifier with those of a speaker that is functioning correct
ly. If the lack of output moves to a different speaker the problem could be with other equipment in your system (i.e. amp, pre-amp, processor, etc.)
- Try hooking up a different set of speakers. The lack of output could point to a problem with other equipment in your system (i.e. amp, pre-amp, processor, etc.)
Lack of Bass or Poor Imaging
- Check your speaker wires. Is the polarity correct — (+) to (+) and (-) to (-).
CONTACTING CUSTOMER SERVICE
MartinLogan customer service is available Monday-Friday between the hours of 8am-5pm (central time) by calling (785) 749-0133 or by emailing service@martinlogan.com.
GENERAL INFORMATION
WARRANTY INFORMATION
Your speakers are provided with an automatic Limited 90 Day Warranty coverage. You have the option, at no additional charge, to receive a Limited 5 Year Warranty coverage. To obtain the Limited 5 Year Warranty coverage you need to complete and return the Certificate of Registration to MartinLogan within 30 days of purchase. For your convenience MartinLogan also offers online warranty registration at www.martinlogan.com.
MartinLogan may not honor warranty service claims unless we have a completed Warranty Registration card on file! If you did not receive a Certificate of Registration with your new speakers you cannot be assured of having received new units. If this is the case, please contact your authorized MartinLogan dealer.
SERIAL NUMBER
Serial number is located on back of the speaker, The serial number may also be found on the product carton.
SERVICE
Should you use your MartinLogan product in a country other than the one in which it was originally purchased, we ask that you note the following:
1 The appointed MartinLogan distributor for any given country is responsible for warranty servicing only on units distributed by or through it in that country in accordance with its applicable warranty.
2 Should a MartinLogan product require servicing in a country other than the one in which it was originally purchased, the end user may seek to have repairs performed by the nearest MartinLogan distributor, subject to that distributor's local servicing policies, but all cost of repairs (parts, labor, transportation) must be borne by the owner of the MartinLogan product.
3 If, after owning your speaker for six months, you relocate to a country other than the one in which you purchased your speaker, your warranty may be transferable. Contact MartinLogan for details.
SPECIFICATIONS*
*Specifications are subject to change without notice.
Speaker Model.
Vanquish
System Frequency Response
37-25,000 Hz ± 3 dB
Aiming.
80^ × 30^
Sensitivity.
93 dB @ 2.83 volts/ meter
Impedance.
4 Ohms. Compatible with 4, 6, or 8 Ohm rated amps.
Crossover Frequency.
400,850,2000 Hz
High-Frequency Driver
1.25^ × 2.4^ (3.2cm× 6.1cm) Folded Motion XT Transducer with 4.5^ × 2.75^ (11.4cm× 7cm) diaphragm.
Mid-Frequency Driver.
Two 3.5'' (8.9cm) aluminum cone with stamped steel basket. Concave dust cap.
Low-Frequency Driver.
8^ (20.32cm) aluminum cone with cast aluminum basket. Concave dust cap.
Binding Post Inputs.
Push style
Components.
Custom air core coil inductors. polypropylene film capacitors in series and low DF electrolytic capacitors. Overall system thermal/current protection.
Suitable Amplifier Range.
20-300 watts
Maximum Power Handling.
150 watts
Weight.
16 lbs. (7.3kg)
Overall Size (diameter x depth | height x width x
epth)4" x 6.3" (36.5cm x 16cm)
Required opening (including tolerance) . . . . .
13.1" (33.3cm)
Projection from wall surface.
0.2^ (0.6cm)
Depth required behind wall surface .
6.1" (15.5cm)
Axis
45-25,000 Hz ± 3 dB
80^ × 30^
94 dB @ 2.83 volts/ meter
4 Ohms. Compatible with 4, 6, or 8 Ohm rated amps.
700,2000Hz
1.25^ × 2.4^ 3.2cm× 6.1cm) Folded Motion XT Transducer with 4.5^ × 2.75^ 11.4cm× 7cm) diaphragm.
Two 5.25'' (13.4cm) aluminum cone with cast aluminum basket. Concave dust cap.
Push style
Custom air core coil inductors. polypropylene film capacitors in series and low DF electrolytic capacitors. Overall system thermal/current protection.
20-250 watts
125 watts
13 lbs. (5.9kg)
15.2^ × 7.8^ × 3.9^ (38.6cm× 19.9cm× 9.9cm)
14.4^ × 7.1^ (36.7cm× 18cm)
0.2" (0.6cm)
3.7^ (9.4cm)
Edge
42-25,000 Hz ± 3 dB
80^ × 30^
95 dB @ 2.83 volts/ meter
4 Ohms. Compatible with 4, 6, or 8 Ohm rated amps.
400, 1800, 3000 Hz
1.25^ × 2.4^ (3.2cm× 6.1cm) Folded Motion XT Transducer with 4.5^ × 2.75^ (11.4cm× 7cm) diaphragm.
Two 3.5'' (8.9cm) aluminum cone with stamped steel basket. Concave dust cap.
Two 6.5'' (16.5cm) aluminum cone with cast aluminum basket. Concave dust cap.
Push style
Custom air core coil inductors. polypropylene film capacitors in series and low DF electrolytic capacitors. Overall system thermal/current protection.
20-300 watts
150 watts
19 lbs. (8.62 kg)
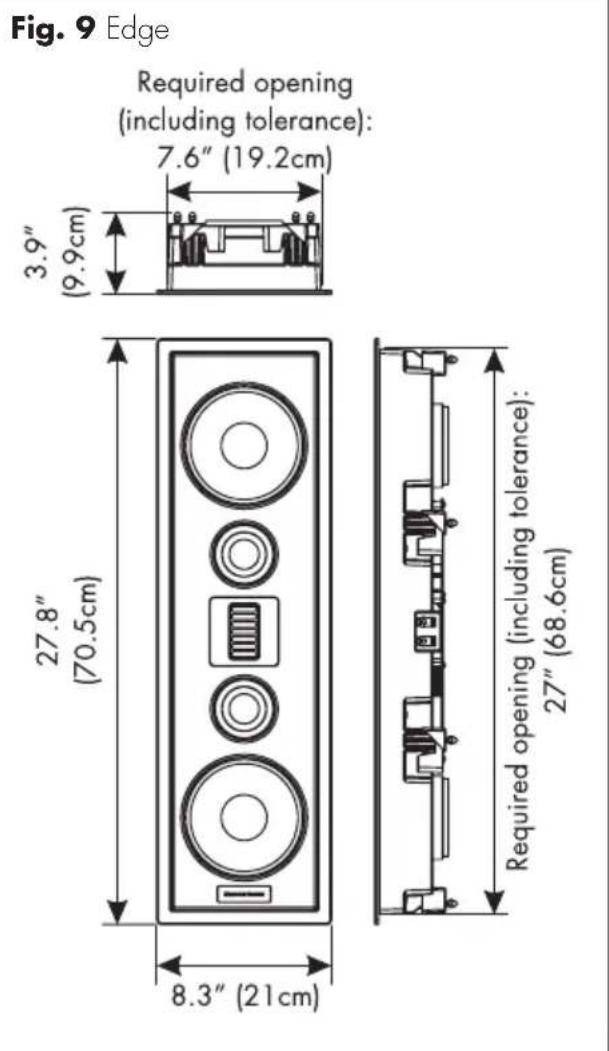
27.8^ × 8.3^ × 3.9^ (70.5cm× 21cm× 9.9cm)
27^ × 7.6^ (68.6cm× 19.2cm)
0.2^ 0.6cm
3.7^ [9.4cm]

MARTINLOGAN
Lawrence, Kansas, USA tel 785.749.0133 fax 785.749.5320 www.martinlogan.com