ML-60i - Loudspeaker Martin Logan - Free user manual and instructions
Find the device manual for free ML-60i Martin Logan in PDF.

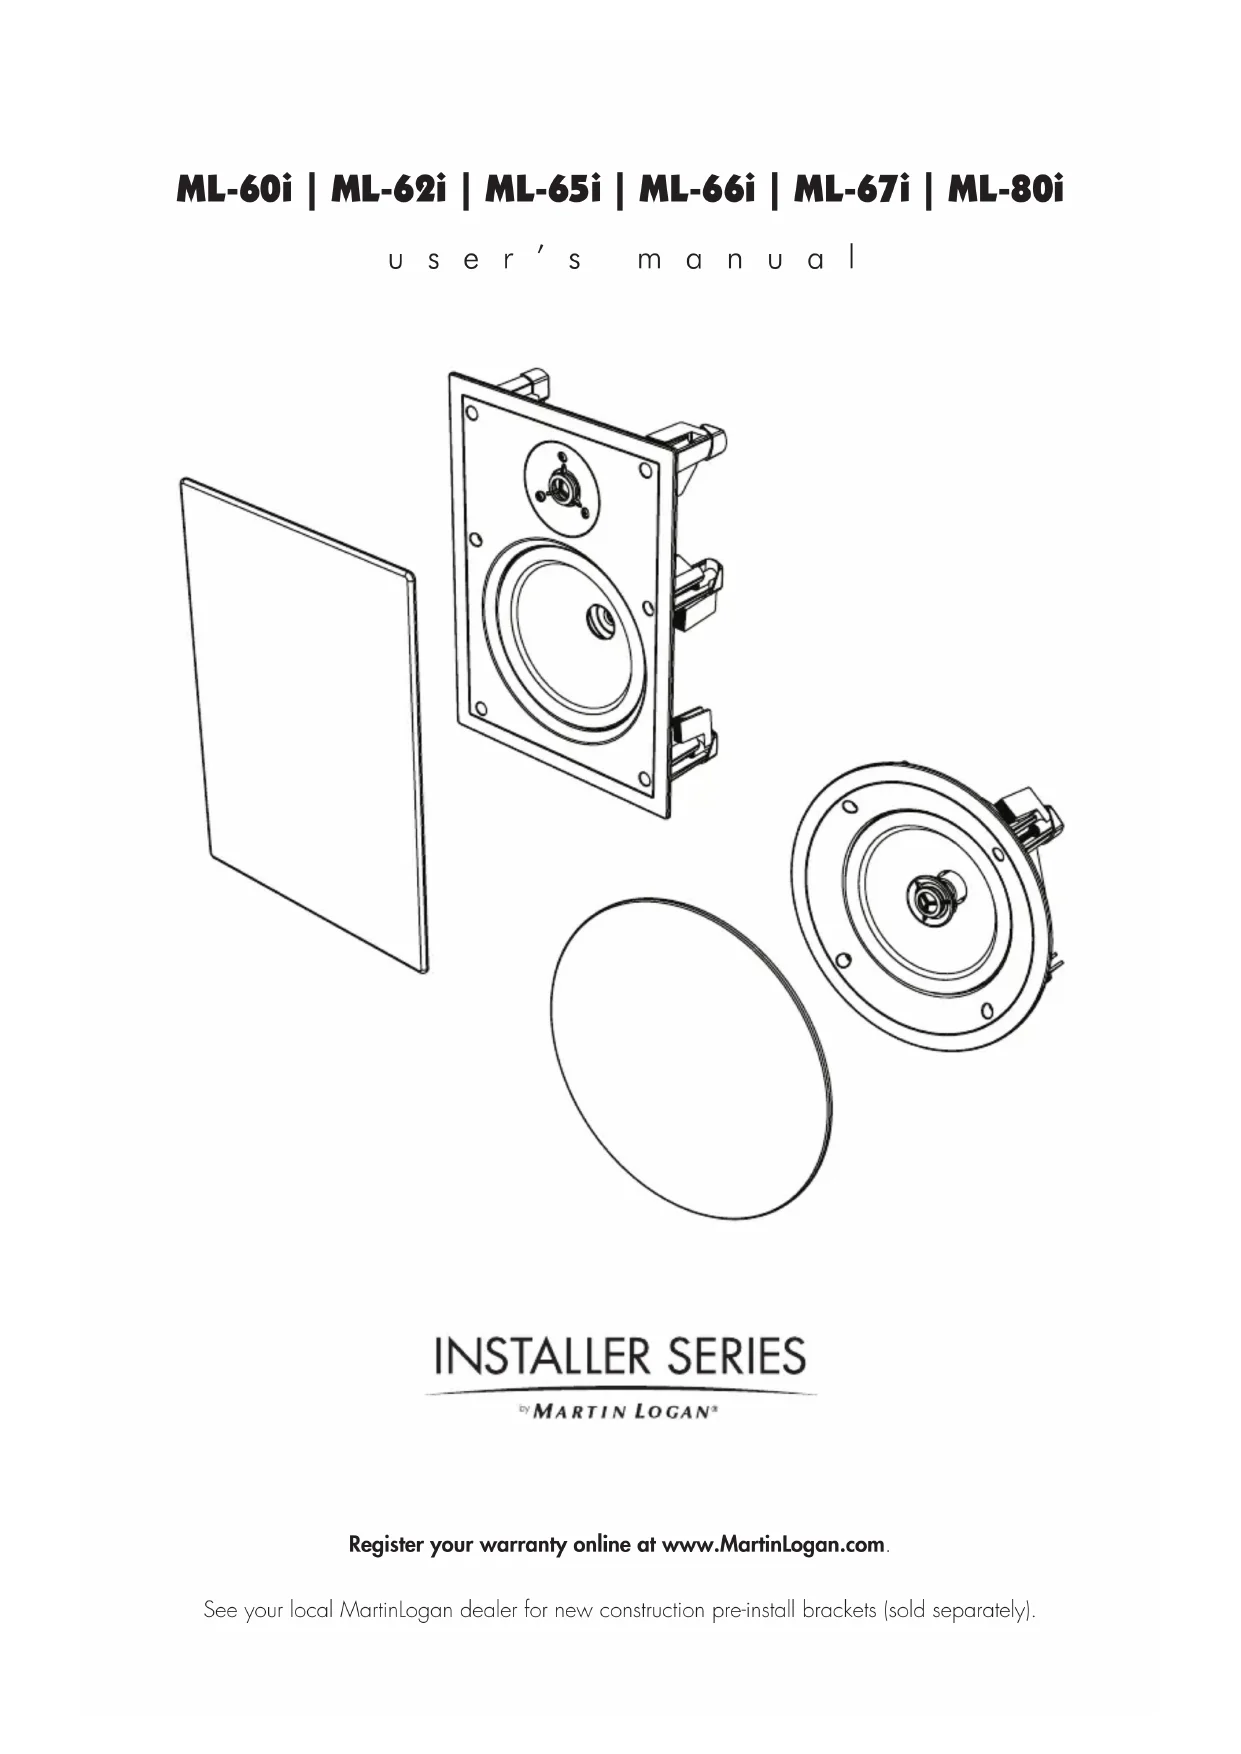

| Product Type | In-wall or in-ceiling speaker |
| Brand | Martin Logan |
| Model | ML-60i |
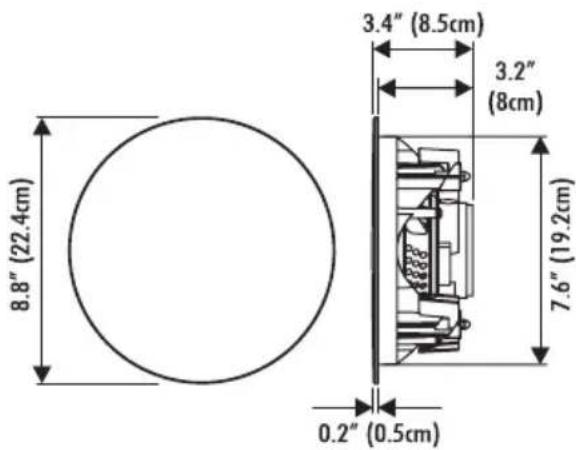
| Dimensions (H x W x D) | 8.8 x 3.4 inches (22.4 x 8.5 cm) |
| Required cutout | 7-7/8 inches (20 cm) in diameter |
| Required depth behind surface | 3.2 inches (8 cm) |
| Weight | 1.6 kg (3.5 lb) per speaker |
| Frequency response | 70 – 20,000 Hz ± 2 dB |
| Sensitivity | 89 dB |
| Impedance | 8 ohms (compatible) |
| Crossover frequency | 3,000 Hz |
| Tweeter | 0.75 inch (1.9 cm) titanium dome |
| Woofer | 6.5 inch (16.5 cm) mineral-filled polypropylene cone |
| Recommended amplifier power | 15 to 80 Watts |
| Rated maximum power | 50 Watts |
| Power supply | Passive, powered by amplifier |
| Installation type | Flush-mounted in wall or ceiling (between studs/joists) |
| Grille | Paintable, removable grille |
| Main functions | Stereo or multichannel speaker for home theater and distributed audio |
| Care and cleaning | Clean with a clean cloth or soft brush. Do not spray cleaning product on the speakers. |
| Safety | Follow instructions: do not expose to moisture, turn off amplifier if abnormality occurs, do not exceed rated power. |
| Spare parts and repairability | Replacement grille available from dealer. Repairs by a qualified technician. |
| Warranty | 90 days automatic, 5 years after online registration (www.martinlogan.com) |
| General information | Compliant with WEEE directive. Manufactured by Martin Logan, Lawrence, Kansas, USA. |
Frequently Asked Questions - ML-60i Martin Logan
User questions about ML-60i Martin Logan
0 question about this device. Answer the ones you know or ask your own.
Ask a new question about this device
Download the instructions for your Loudspeaker in PDF format for free! Find your manual ML-60i - Martin Logan and take your electronic device back in hand. On this page are published all the documents necessary for the use of your device. ML-60i by Martin Logan.
USER MANUAL ML-60i Martin Logan
ML-60i | ML-62i | ML-65i | ML-66i | ML-67i | ML-80i
user's manual
natural_image
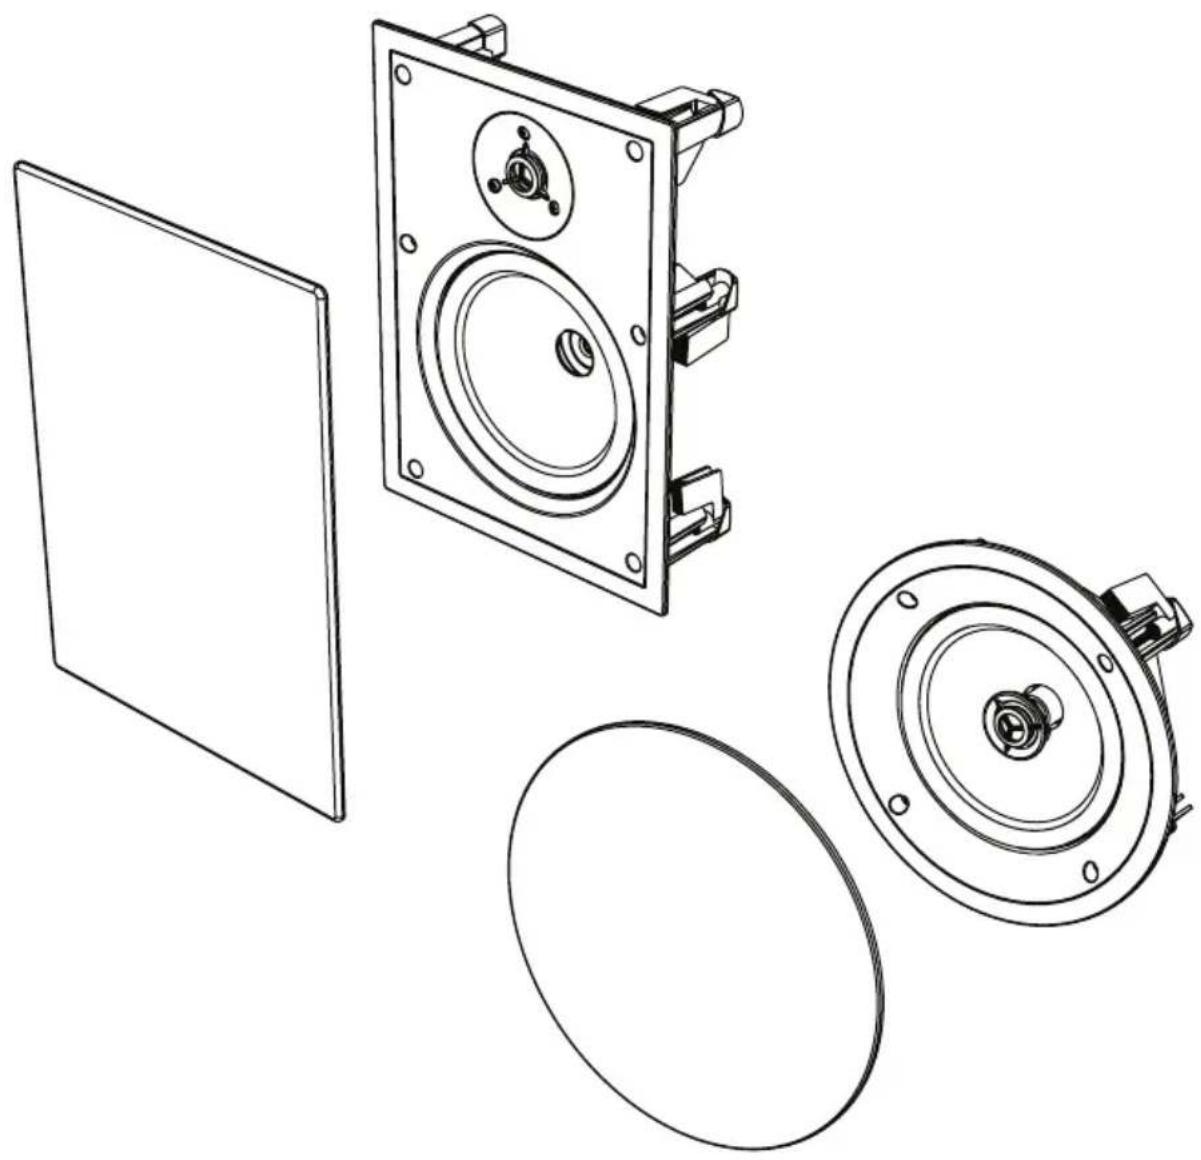
Technical line drawings of various speaker components including a panel, speaker chamber, and circular base (no text or labels)INSTALLER SERIES
by MARTIN LOGAN ^a
Register your warranty online at www.MartinLogan.com.
See your local MartinLogan dealer for new construction pre-install brackets (sold separately).
Content Check List....2
Safety Warnings and WEEE Recycling . . . . 2
Square Grilles, Pre-Installation Brackets, & Fire Rated Back Boxes .... 3
Protect Your Investment 6
Break-In 6
General Speaker Placement ....6
Placement Options (ML-60i, ML-65i, ML-66i, & ML-80i Speakers). . . . . . . . . 7
Placement Options (ML-62i Stereo Speaker) . . 7
Placement Options (Aimable ML-67i Speaker). . 8
Connecting the ML-62i....9
In-Ceiling Mounting (pictorial) ..... 10
In-Wall Mounting (pictorial) ..... 11
Installation 12
Painting the Speaker Grill 13
FAQ & Troubleshooting 14
Warranty and Service 15
Specifications 16
Content Check List
You will find the following items enclosed for your new MartinLogan loudspeaker. Should you require assistance please call our service department at (785) 749-0133.
____ Install Template ____ Grill Cover
Safety Warnings and WEEE Recycling

The lightning bolt flash with arrowhead symbol within an equilateral triangle is intended to alert the user to the presence of uninsulated "dangerous voltage" within the product's enclosure that may be of sufficient magnitude to constitute a risk of electric shock.

The exclamation point within an equilateral triangle is intended to alert the user to the presence of important operating and maintenance (servicing) instructions in the literature accompanying the appliance.

The fire within an equilateral triangle is intended to alert the user to the potential of creating a fire hazard if they do not follow the instructions.

The dollar sign within an equilateral triangle is intended to alert the user that they run the risk of causing damage that could be potentially expensive to repair if they don't follow the instructions.

WARNING!
• Refer servicing to a qualified technician.
- To prevent fire or shock hazard, do not expose this module to moisture.
- Turn amplifier off should any abnormal conditions occur.
- Do not drive speaker beyond its rated power.
In accordance with the European Union WEEE (Waste Electrical and Electronic Equipment) directive effective August 13, 2005, we would like to notify you that this product may contain regulated materials which upon disposal, according to the WEEE directive, require special reuse and recycling processing.
For this reason MartinLogan has arranged with our distributors in European Union member nations to collect and recycle this product at no cost to you. To find your local distributor please contact the dealer from whom you purchased this product, email info@martinlogan.com or visit the distributor locator at www.martinlogan.com.
Please note, only this product itself falls under the WEEE directive. When disposing of packaging and other related shipping materials we encourage you to recycle these items through the normal channels.
Square Grilles, Pre-Installation Brackets, & Fire Rated Backboxes
Square grilles, pre-installation brackets, and fire rated back boxes are available for certain MartinLogan Installer Series speakers. Contact your dealer for availability.
Fire rated backboxes meet the following requirements:
• 'One-Hour Fire-Rating' requirements
- 'For Use in Air Handling Spaces' requirements
Fire rated backboxes will contain fire, gas, smoke and heat within the enclosure for up to one hour. Fire rated backboxes also meet the following codes:
• ASTM E119-98 Vertical
• ASTM E119-98 Horizontal
• UBC 7-1
- UL 2043
• CAN/ULC S101-M89
Fire Rated Backbox Features:
• Corrosion-resistant metal.
- Insulated lining.
• 10dB of acoustic isolation between room boundaries.
- Integrated safety tab on the back of the cabinet accommodates installer-supplied safety cable;
- Standard top-surface 3/8-inch knockouts for conduit set-screw connector. Positioning of knockouts allows for vertical or horizontal installs.
- Pre-drilled mounting holes surround flange for easy installation.
- All boxes fit 12-inch, 16-inch, and 24-inch stud bays.
natural_image
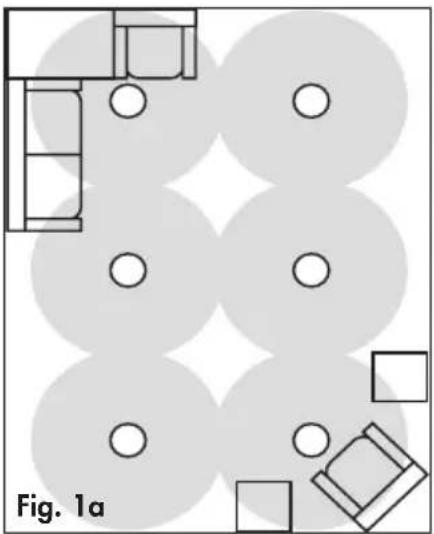
Floor plan layout with room layouts and geometric shapes (no text or labels)Multiple speakers, distributed audio.
natural_image
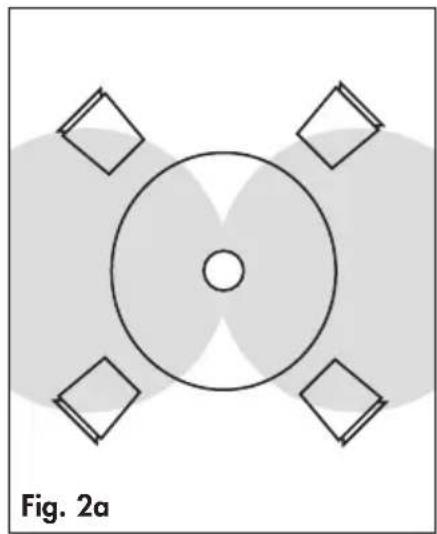
Symmetrical geometric diagram with a central circle and four surrounding diamond shapes, labeled Fig. 2a (no text or symbols within the diagram itself)ML-62i: 2-channel sound from a single speaker.
natural_image
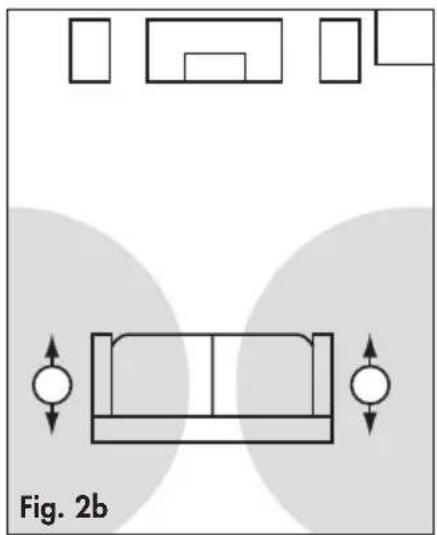
Diagram of a sofa layout with room layouts and directional arrows, labeled Fig. 2b (no text or symbols on the diagram itself)ML-62i: Wide dispersion surrounds in a 5.1-channel system using two speakers.
natural_image
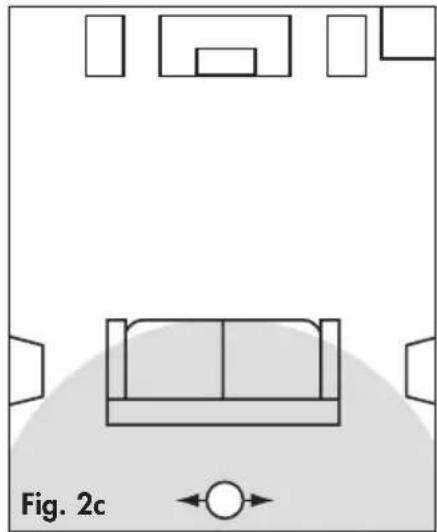
Top-down diagram of a living room layout with furniture and a central sofa, labeled Fig. 2c (no text or symbols on the diagram itself)ML-62i: Wide dispersion rear in a 6.1-channel system using one speaker.
natural_image
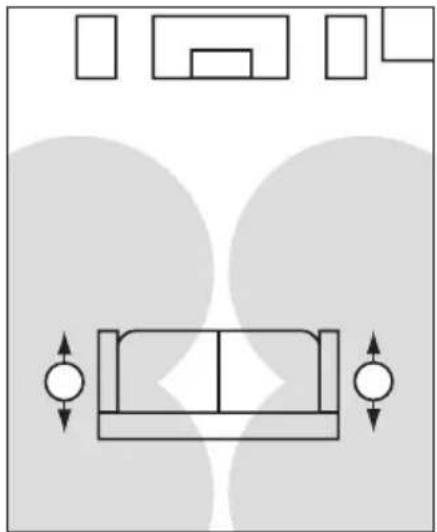
Simple line drawing of a sofa with two side handles and surrounding geometric shapes (no text or symbols)ML-62i: Surround and rear channels in a 7.1-channel system using two speakers.
natural_image
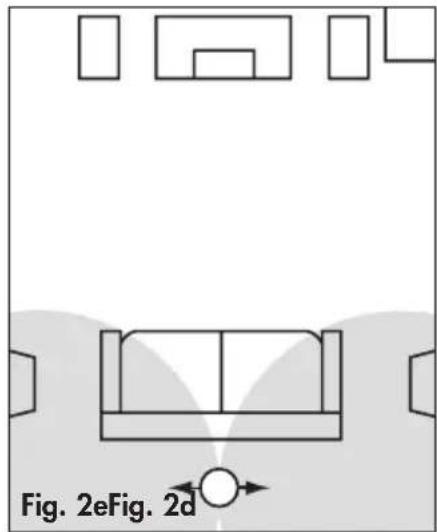
Diagram of a living room layout with furniture and a circular object, labeled Fig. 2eFig. 2d (no text or symbols on the diagram itself)ML-62i: Rear channels in a 7.1-channel system using one speaker.
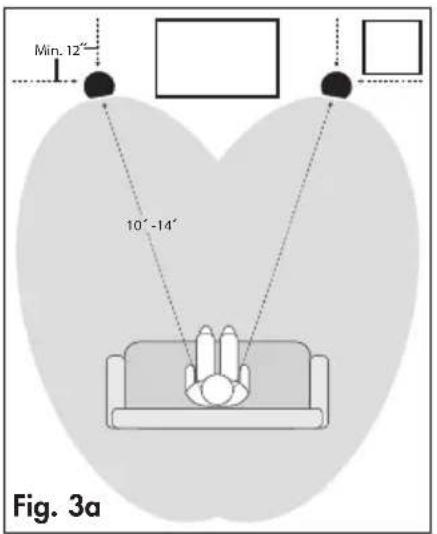
ML-67i: Front left and right speakers.
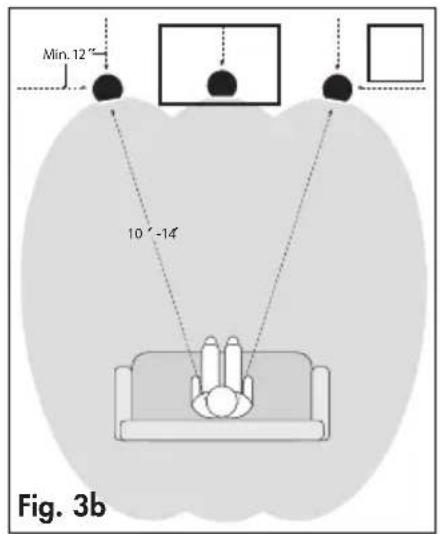
ML-67i: Front left, center, and right speakers.
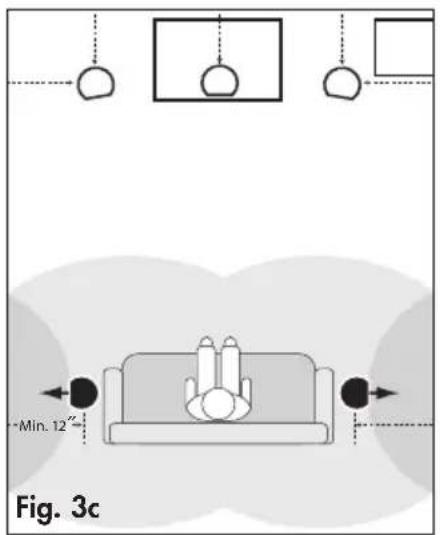
ML-67i: Non-direct surround channels in a 5.1-channel system.
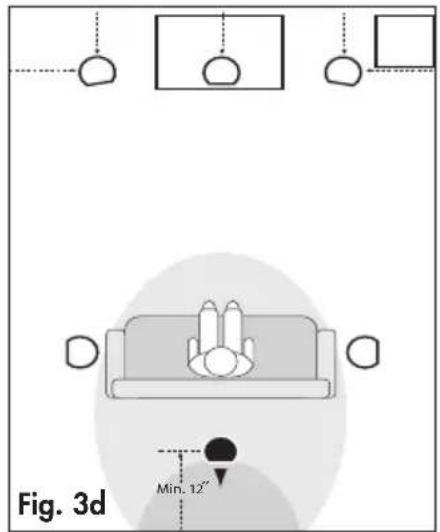
ML-67i: Non-direct rear channel in a 6.1-channel system.
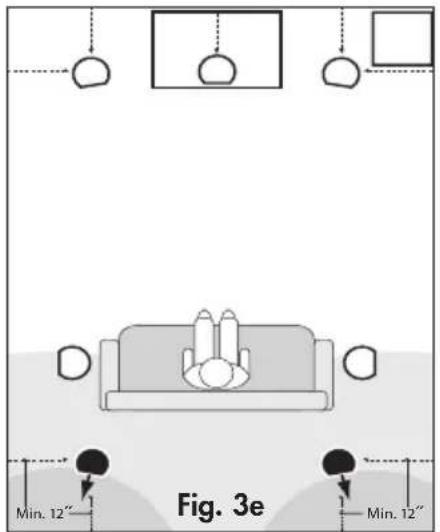
ML-67i: Non-direct rear channels in a 7.1-channel system.
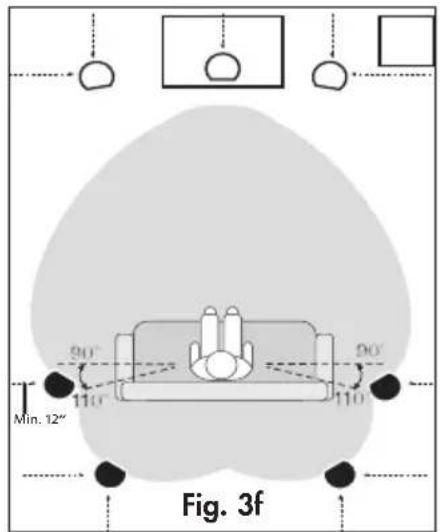
ML-67i: Direct radiating surround and rear channels in a 7.1-channel system.
Protect Your Investment
- Use an amp that approximately matches the speaker's specified power handling.
- To avoid damage, turn down the volume if the speaker sounds like it is distorting, sounds harsh, or the bass begins to break up.
- Tone controls and equalizers may increase the likelihood of distortion, especially at high volumes. Use these settings sparingly.
Break-In
When you first begin to play your speakers, they will sound a bit bass shy. This is due to the high quality, long-life components used in the drivers. Allow approximately 72 hours of break-in at 90dB (moderate listening levels) before any critical listening.
General Speaker Placement
Choosing a Mounting Location
Install the speakers between wall studs or ceiling joists being careful to avoid electrical wires behind the wall's surface. Please note, ML-67i should only be used in-ceiling.
Wall Rigidity Results in Better Sound
Increasing the rigidity of your walls may improve sonic performance. To do this consider adding cross bracing inside of the wall approximately 12-inch (30cm) above and below the speaker.
Achieving Superior Imaging
These MartinLogan in-wall and in-ceiling speakers offer superb imaging and flexible placement in nearly any location. However, for best performance and imaging place speakers equidistant from one another and avoid physical obstructions between the speaker and primary listening position.
Balancing Hard vs. Soft Surfaces Improves High- and Mid-Frequency Performance
Rooms that are "over damped" with carpeting, drapes, and other sound absorbers can cause your system to sound dull and lifeless. On the other hand, rooms can have so many hard surfaces that the system sounds like a gymnasium. Experiment by adding or removing soft surfaces until you find a mix that sounds good to you.
Balancing Bass Output
Corner placement of these speakers will reinforce their bass output. If you require balanced output across the entire audio spectrum avoid mounting these speakers in a corner.
When choosing placement follow these simple tips:
- Place a minimum of 12-inches (30cm) from any wall corner.
- Place fronts/centers equidistant between 10–14 feet (3–4.3m) from the listening position.
- ML-67i: Install in-ceiling only.
Placement Options (ML-60, ML-65i, ML-66i, ML-80i)
Stereo and Home Theater Applications (no illustration)
MartinLogan Installer Series in-wall and in-ceiling speakers are ideal for 2-channel stereo and multi-channel home theater installations. The guidelines from the previous section apply to both in-wall and in-ceiling speakers.
Multiple Speakers, Distributed Audio (Fig. 1a)
In larger areas (offices, etc.) multiple speakers may be used to eliminate the sound imbalances that occur with separate stereo speakers as people move around the room, or are seated closer to one speaker than the other. Position speakers to achieve the broadest sound coverage in the main listening area.
Placement Options (ML-62i Stereo Speaker)
ML-62i speaker offers two options for connection to an amplifier:
- 2-channels from a single speaker (2 amp channels connected to the speaker)
- 1-channel with wide dispersion (bridged for mono, 1 amp channel conencted).
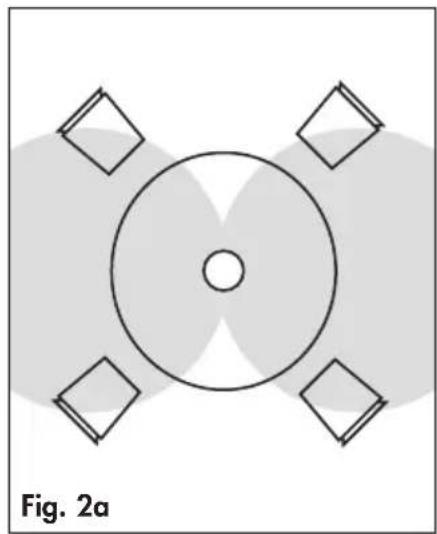
2-Channel Sound From a Single Speaker (Fig. 2a)
Ideal in smaller areas a single speaker is the preferred choice. The ML-62i is connected to the amp's left and right channels. Position the speaker to achieve the broadest sound coverage in the main listening area. Connect left and right channels to the speaker.
5.1-Channel Wide Dispersion Surround Placement Using Two Speakers (Fig. 2b)
Place an ML-62i on either side of the listening area. Orient so one tweeter points toward the front of the room and the other points toward the back. Bridge each speaker for mono and connect the amp's left and right surround channels to the appropriate speakers.
6.1-Channel Wide Dispersion Rear Placement Using One Speaker (Fig. 2c)
Center one ML-62i behind the listening area, tweeters pointed toward the left and right of the room. Bridge the speaker for mono and connect the amp's rear channel.
7.1-Channel Surround + Rear Placement Using Two Speakers (Fig. 2d)
Place one ML-62i on either side of the listening area. Orient so one tweeter of each
speaker points toward the front of the room and the other points toward the back. Connect the amp's left and right surround and rear channels to the appropriate speakers.
7.1-Channel Rear Placement Using One Speaker (Fig. 2e)
Center one ML-62i behind the listening area with tweeters positioned toward the left and right sides of the room. Connect the amp's left and right rear channels to the speaker.
Placement Options (Aimable ML-67i Speaker)
ML-67i speakers are optimized for use in rooms with ceiling heights ranging from 8–9 feet (2.4–2.74m). Point the tweeters toward the primary listening position. For overall clarity and balanced bass performance, these speakers should be mounted in the ceiling 12 inches (30 cm) or more from the wall, as shown in Figs. 3a to 3f.
Left/Center/Right Placement (Fig. 3a & 3b)
Follow the general guidelines for speaker placement provided at the beginning of the main section keeping in mind the distance from the front speakers to your primary listening area should be 10–14 feet (3–4.3m), as shown. Point the drivers toward the primary listening position.
Non-Direct Radiating Surround/Rear Placement
These speakers are also ideal for use as surrounds and rears. Aiming the speaker so sound bounces off the walls creates an enveloping, reverberant sound field. Keep in mind that speakers should be mounted 12 inches (30 cm) or more from the wall.
- 5.1-Channel Surround Placement (Fig. 3c): Position one speaker on either side of the listening area, with drivers pointed toward the side walls.
- 6.1-Channel Rear Placement (Fig. 3d): Begin with '5.1-Channel Surround Placement' (above). Center one speaker behind the listening area with drivers pointed toward the back wall.
- 7.1-Channel Rear Placement (Fig. 3e): Begin with '5.1-Channel Surround Placement' (above). Position another pair of ML-80i speakers behind the listening area, one slightly to the right, the other slightly to the left, with drivers pointed to the back of the room as shown.
Direct Radiating Surround/Rear Center Placement (Fig. 3f)
The ML-67i may be used as direct-radiating speakers, positioned with drivers pointed toward the listening area. Use Fig. 3f as a guide to positioning as you experiment to achieve optimal surround sound in your room.
Connecting the ML-62i
2-channels from a single speaker: Connect two sets of speaker cables from your amplifier to the left and right inputs on the ML-62i (Fig. 4a).
Single channel, wide dispersion: Connect one set of speaker cables to one set of binding posts on the ML-62i and use matching cable to bridge the second set of binding posts (Fig. 4b).
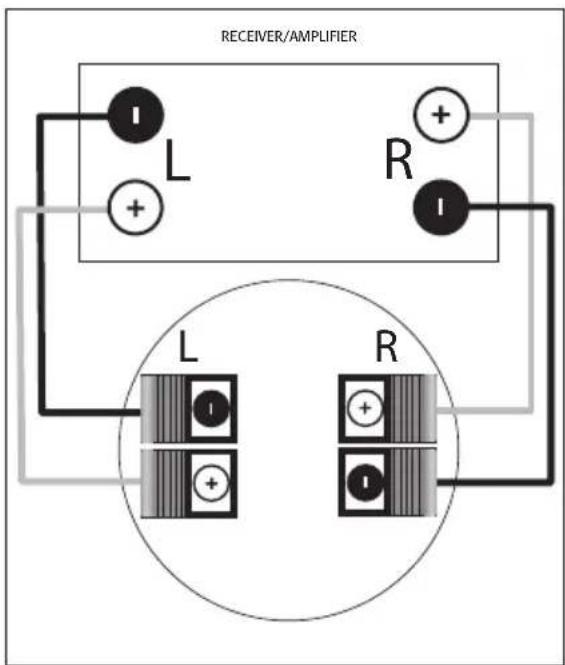
Fig. 4a: Wiring for 2-channel stereo sound from a single speaker.
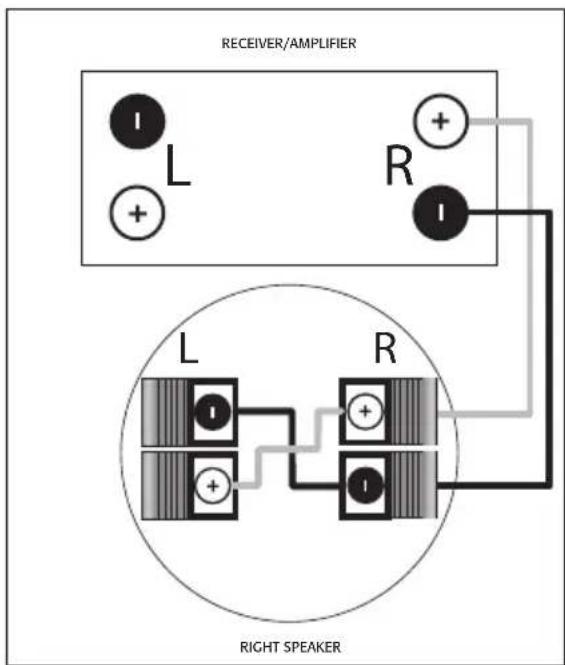
Fig. 4b: Bridging left and right inputs to wire for single channel with wide dispersion.
In-Ceiling Mounting (pictorial)
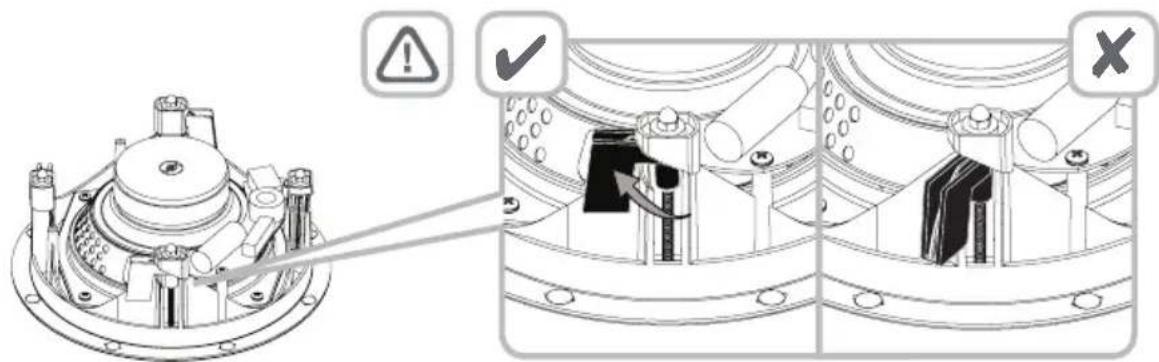
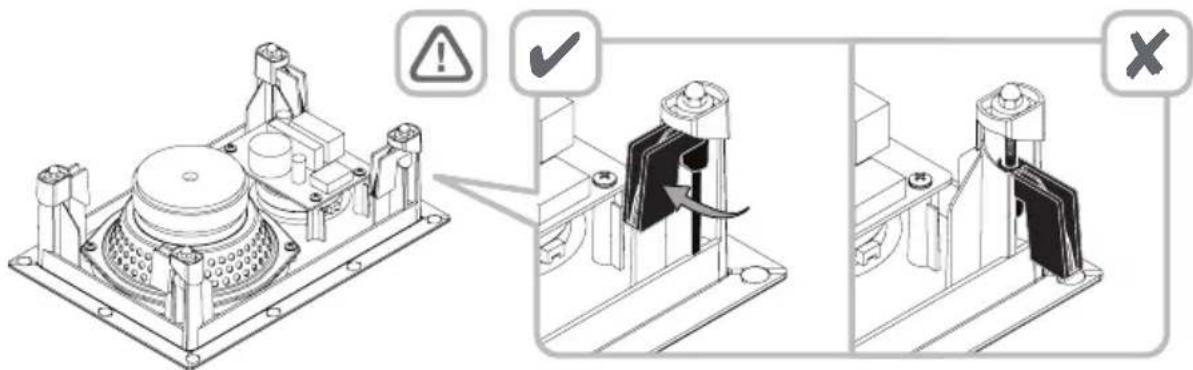
Note: Before pushing speaker into ceiling or wall clamps must be positioned as shown.
natural_image
Line drawing of a person holding a pencil and drawing a circle on paper (no text or symbols)Fig. 5a
natural_image
Line drawing of a hand holding a pen, with a circular object above (no text or symbols)Fig. 5b
natural_image
Illustration of hands assembling a circular mechanical component (no text or symbols visible)Fig. 5c
natural_image
Line drawing of a hand using a drill bit to adjust a circular component (no text or symbols)Fig. 5d
natural_image
Line drawing of two hands holding a circular object with a lid (no text or symbols)Fig. 5e
In-Wall Mounting (pictorial)
Note: Before pushing speaker into ceiling or wall clamps must be positioned as shown.
natural_image
Line drawing of hands holding a smartphone with a control panel (no text or symbols)Fig. 6a.1 Fig. 6a.2
natural_image
Line drawing of a hand holding a rectangular object with a pen, no text or symbols present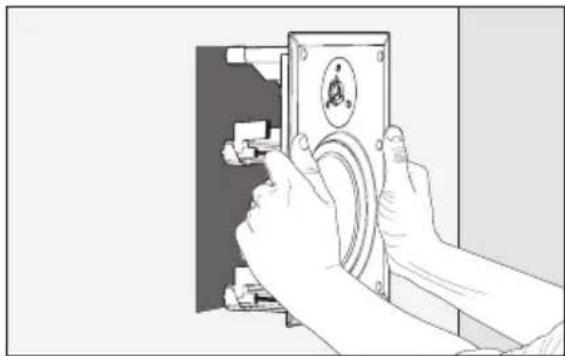
natural_image
Illustration of hands operating a mechanical device with a circular component (no text or symbols visible)Fig. 6c
natural_image
Line drawing of a hand holding a rectangular object, with another hand partially visible (no text or symbols)Fig. 6b
natural_image
Illustration of hands using a power tool to install a wall-mounted component (no text or symbols visible)Fig. 6d
natural_image
Line drawing of hands installing a speaker into a panel (no text or symbols)Fig. 6e
Installation
NOTE: These instructions assume the mounting surface is of standard wood frame and standard sheet rock construction. If you wish to mount the speakers to another type of material you should contact a bonded contractor.
NOTE: See your local dealer for new construction pre-install brackets (sold separately).
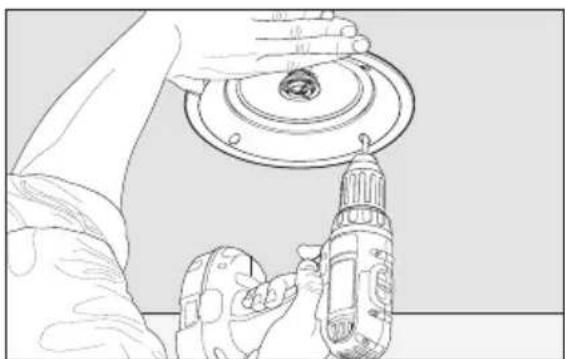
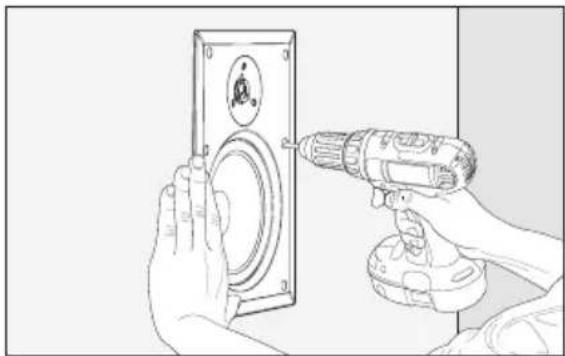
NOTE: While it is possible to use a manual screwdriver for installation, we strongly suggest using a power drill. To avoid damaging or breaking the clamps, set your drill to a LOW setting. A high power setting is NOT necessary and may cause clamps to crack or break from the added force. Such damage is not covered under warranty.

WARNING! Before installing check local building codes to verify compliance with local regulations. WARNING! Before installing check for obstructions behind drywall. To do this make a small hole, cutting at a 45° angle (this will make the hole easier to patch if obstructions are found). Only cut out the mounting hole after you have verified there are no obstructions behind the dry wall. WARNING! Use only speaker cable that is rated for in-wall use. The UL standard is CL2, CL3, and CM. The CSA standard is FT4. WARNING! Turn your amplifier off before making or breaking any signal connections.
Recommended tools:
- Stud finder
- Sharp pencil or pen
-
Dry wall knife/saw
-
Wire strippers
-
Power drill with
Phillips screwdriver -
Tape measure
-
Low-tack tape
-
If the template has a removable center, remove it at this time.
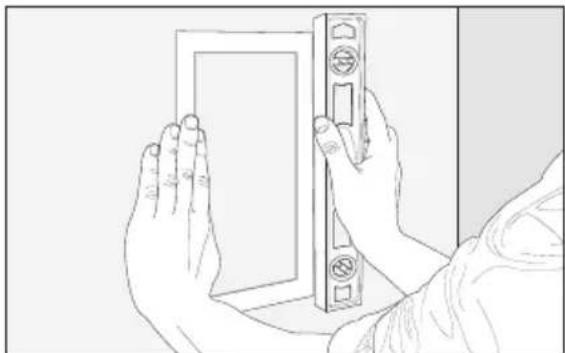
- Using a stud finder, position the template completely between wall studs or ceiling joists. ML-67i: Install in-ceiling only.
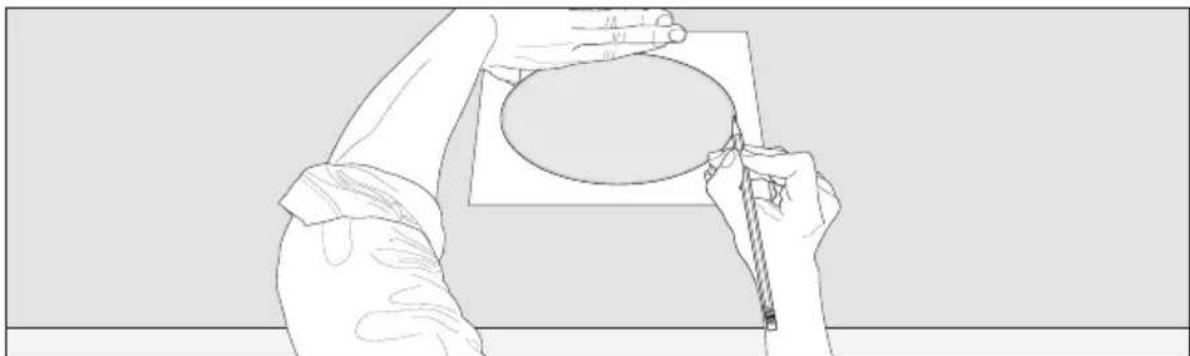
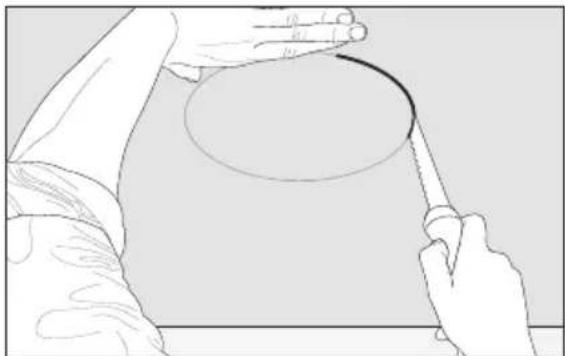
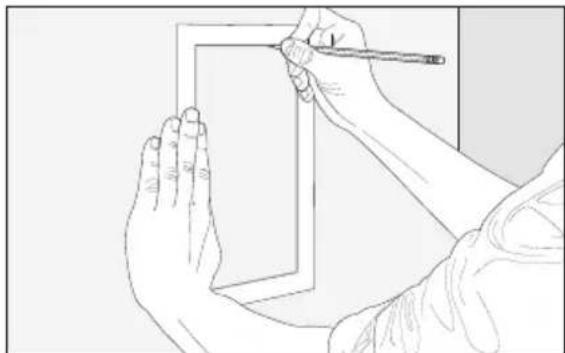
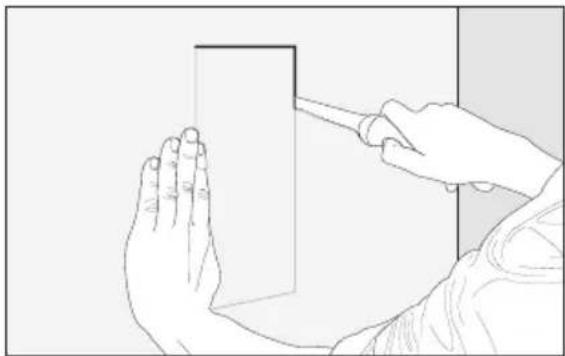
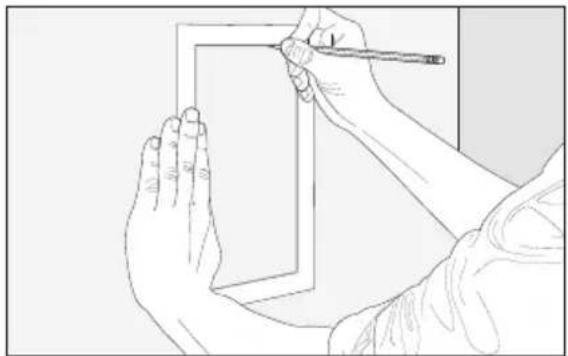
- Hold or tape the template in place and mark cutout with a pencil. For rectangular speakers, level the template before marking (Figs. 5a, 6a.1, & 6a.2).
-
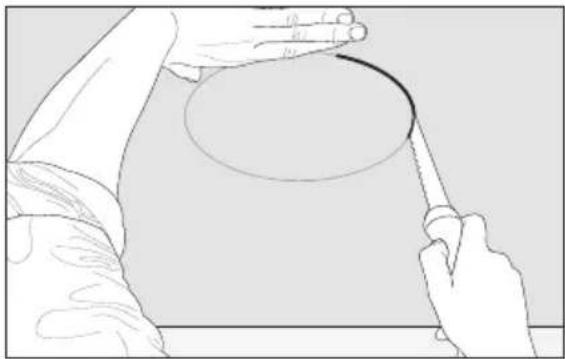
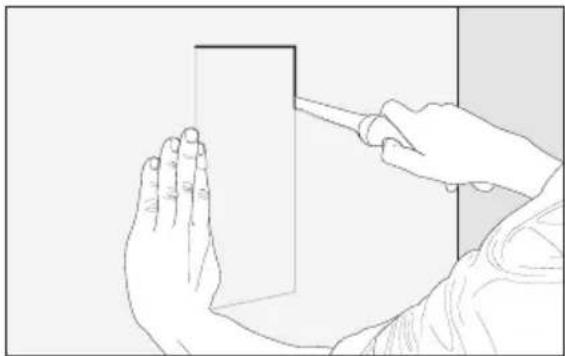
Remove the template and cut out the opening with a drywall knife (Figs. 5b & 6b).
-
In-wall: Place fiberglass insulation above and below the cut-out hole. Place a half thick piece of fiberglass insulation behind the speaker. In-ceiling: Place fiberglass insulation 12" (30cm) or thicker between the joists directly above the speaker.
-
Connect speaker cables. Be consistent when connecting the speaker leads to the terminals. Take great care to assign the same color to the (+) terminal on both the speaker and the amplifier. ML-62i: See the following section, "Connecting the ML-62i".
- Set your power drill to the low setting.
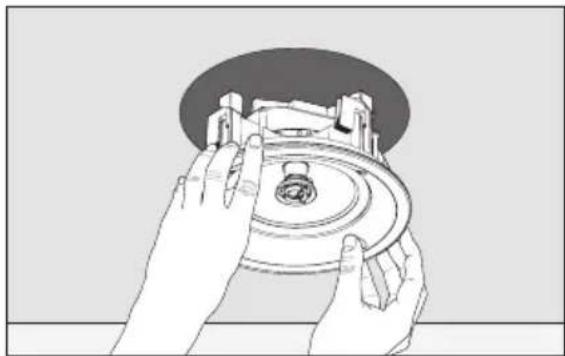
- Ensure the clamps on the lip of the speaker are positioned exactly as shown in the Warning Diagrams.
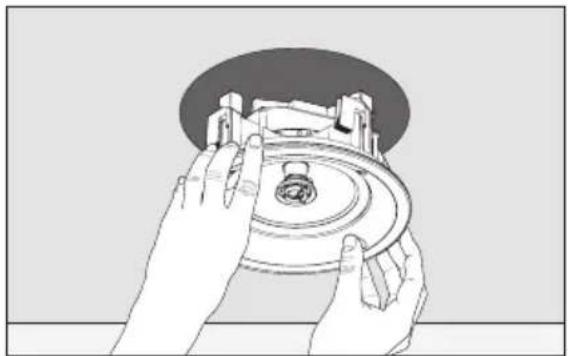
- Gently push the assembly into the ceiling or wall hole (Figs. 5c & 6c).
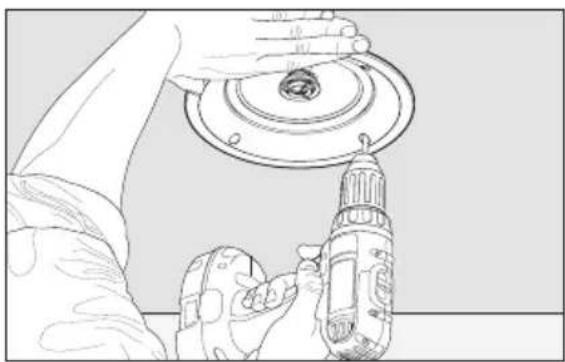
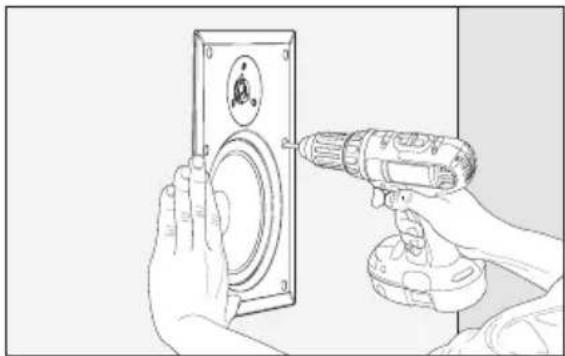
- Supporting the assembly with one hand, tighten each screw. Stop tightening when you sense resistance (Figs. 5d & 6d). ML-62i and ML-67i: Before tightening screws orient speaker so the drivers are positioned towards the desired position.
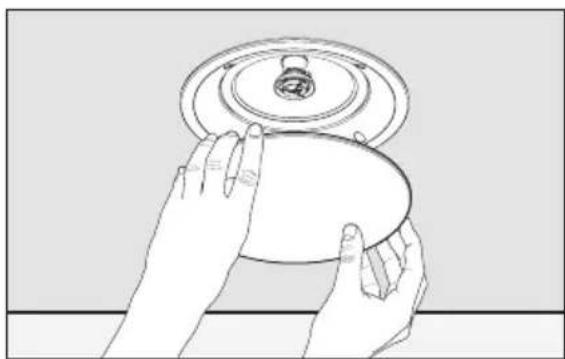
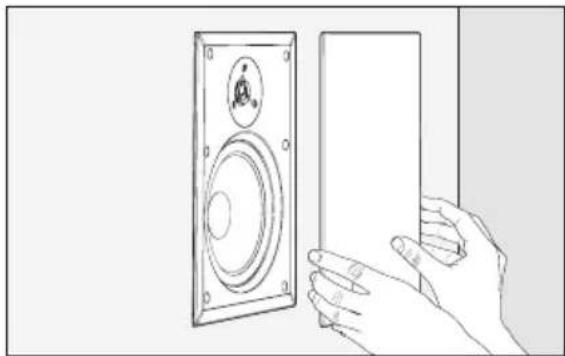
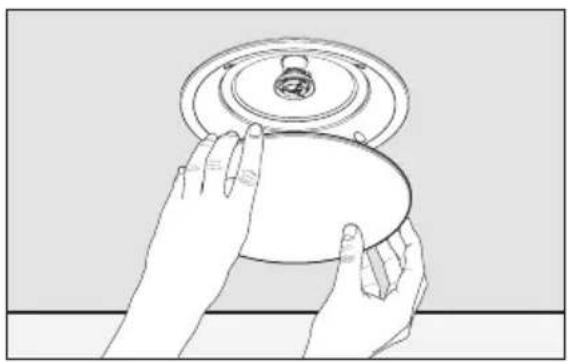
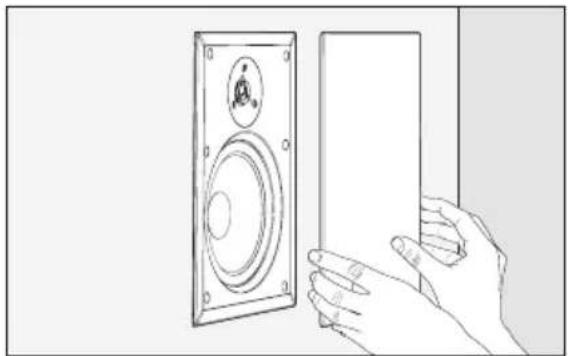
- Gently press the grill into place (Figs. 5e & 6e). Apply the MartinLogan logo badge if desired.
Painting the Speaker Grille
IMPORTANT! Before painting remove grille from speakers. Also remove the cloth scrim attached inside the grille. Do not paint the surface of the speaker behind the grille.
- Remove the grille from the speaker. A protective cloth scrim is attached to the back with low-tack adhesive. Remove this scrim by gently pulling it away from the grille.
- Paint the grille, being careful not to plug the holes. For best results use a spray rather than a brush. Allow the paint to completely dry before proceeding. Do not paint the surface behind the grille.
- Gently press the scrim back into place before re-installing the speaker grille.
Frequently Asked Questions
How do I clean my speakers? Use a dust free cloth or a soft brush to remove the dust from your speakers. Do not spray any kind of cleaning agent on or in close proximity to the drivers.
What size amplifier should I use? We recommend an amplifier rated within the suitable amplifier range of your speaker.
Could you suggest a list of suitable electronics and cables that would be ideal for MartinLogan speakers? The area of electronics and cable choice is probably the most common type of question that we receive. It is also the most subjective. We have repeatedly found that brands that work well in one setup will drive someone else nuts in another. We use many brands with great success. Again, we have no favorites; we use electronics and cables quite interchangeably. We would suggest listening to a number of brands—and above all else—trust your ears. Dealers are always the best source for information when purchasing additional audio equipment or cables and will be well versed in the subject of special safety requirements for in-wall cable.
Will exposure to sunlight affect the life or performance of my speakers? We recommend that you not place any loudspeaker in direct sunlight. The ultraviolet (UV) rays from the sun can cause deterioration of grill cloth, speaker cones, etc. Small exposures to UV will not cause a problem. In general, the filtering of UV rays through glass will greatly reduce the negative effects.
Troubleshooting
No Output
- Check that all your system components are turned on, not muted, and that your balance control (if applicable) is set correctly.
- Check to make sure your power outlet at the wall is working.
- Check your power cords, speaker wires, and interconnecting cables.
- Check to make sure no headphones are plugged in.
- Swap speaker wires at your amplifier with those of a speaker that is functioning correctly. If the lack of output moves to a different speaker the problem could be with other equipment in your system (i.e. amp, pre-amp, processor, etc.)
- Try hooking up a different set of speakers. The lack of output could point to a problem with other equipment in your system (i.e. amp, pre-amp, processor, etc.)
Lack of Bass or Poor Imaging
- Check your speaker wires. Is the polarity correct — (+) to (+) and (−) to (−)?
Warranty
MartinLogan offers online warranty registration at www.martinlogan.com.
Your speaker is provided with an automatic Limited 90 Day Warranty coverage.
You have the option, at no additional charge, to receive a Limited 5 Year Warranty coverage. To obtain the Limited 5 Year Warranty coverage register your speakers at www.martinlogan.com. Save a copy of your dealer receipt as it may be requested if service is required.
MartinLogan may not honor warranty service claims unless we have a completed Warranty Registration on file at www.MartinLogan.com!
Service
Should you be using your MartinLogan product in a country other than the one in which it was originally purchased, we ask that you note the following:
1 The appointed MartinLogan distributor for any given country is responsible for warranty servicing only on units distributed by or through it in that country in accordance with its applicable warranty.
2 Should a MartinLogan product require servicing in a country other than the one in which it was originally purchased, the end user may seek to have repairs performed by the nearest MartinLogan distributor, subject to that distributor's local servicing policies, but all cost of repairs (parts, labor, transportation) must be borne by the owner of the MartinLogan product.
3 If, after owning your speakers for six months, you relocate to a country other than the one in which you purchased your speakers, your warranty may be transferable. Contact MartinLogan for details.
Specifications\*
System Frequency Response ....
Aiming.
Sensitivity.
Impedance ....
Crossover Frequency.....
High-Frequency Driver ....
Low-Frequency Driver.
Binding Post Inputs ....
Suitable Amplifier Range ....
Maximum Power Handling ....
Weight.
Overall Size (dia. x depth | h x w x d) ....
Required ceiling opening (including tolerance).
Projection from wall surface .....
Depth required behind wall surface.....
ML-60i
70-20,000 Hz ±2 dB
N/A
89dB
Compatible with 8 ohms
3,000 Hz
0.75" (1.9cm) titanium dome
6.5" (16.5cm) mineral-filled polypropylene cone
Spring clip accommodates wire up to 12AWG
15-80 Watts
50 Watts
3.5 lbs. each (1.6 kg)
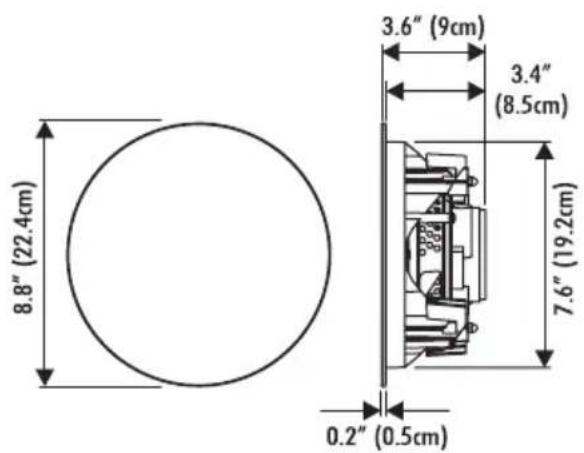
8.8" × 3.4" (22.4 × 8.5cm)
7-7/8" (20cm)
0.2" (0.5cm)
3.2" (8cm)
ML-62i
70-20,000 Hz ±2 dB
Rotate speaker assembly
89dB
Compatible with 4 ohms mono /8 ohms stereo
3,000 Hz
Two 0.75" (1.9cm) titanium domes
Dual voice-coil 6.5" (16.5cm) mineral-filled poly cone
Spring clip accommodates wire up to 12AWG
15-80 Watts mono / 15-40 Watts stereo
50 Watts
3.5 lbs. each (1.6 kg)
8.8" × 3.6" (22.4 × 9cm)
7-7/8" (20cm)
0.2" (0.5cm)
3.4" (8.5cm)
ML-65i
70-20,000 Hz ±2 dB
N/A
89dB
Compatible with 8 ohms
2,500 Hz
0.75" (1.9cm) titanium dome
6.5" (16.5cm) mineral-filled polypropylene cone
Spring clip accommodates wire up to 12AWG
15-90 Watts
60 Watts
3.5 lbs. each (1.6 kg)
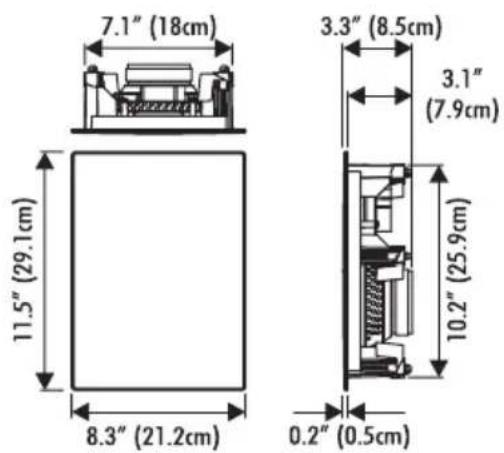
11.5"×8.3"×3.3(29.1×21.2×8.5cm)
7-1/4" × 10-1/4" (18.4cm × 26cm)
0.2" (0.5cm)
3.1" (7.9cm)
Specifications\*
System Frequency Response ....
Aiming.
Sensitivity.
Impedance ....
Crossover Frequency.....
High-Frequency Driver ....
Low-Frequency Driver.....
Binding Post Inputs ....
Suitable Amplifier Range ....
Maximum Power Handling ....
Weight.
Overall Size (dia. x depth | h x w x d) ....
Required ceiling opening (including tolerance) . .
Projection from wall surface ....
Depth required behind wall surface.....
ML-66i
75-20,000 Hz ±2 dB
N/A
89dB
Compatible with 8 ohms
2,500 Hz
0.75" (1.9cm) titanium dome
Two 5.5" (14cm) mineral-filled polypropylene cones
Spring clip accommodates wire up to 12AWG
15–100 Watts
70 Watts
5.9 lbs. each (2.7 kg)
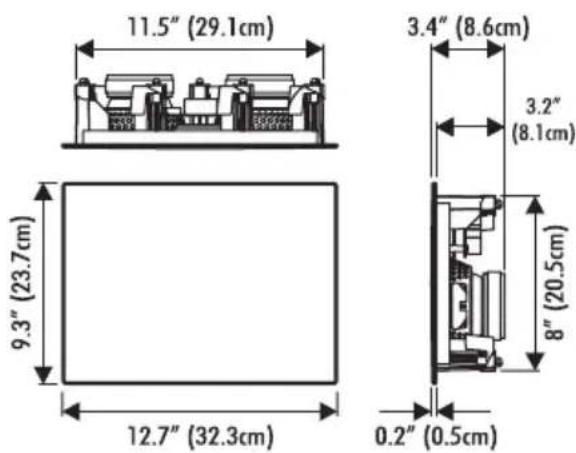
9.3" × 12.7" × 3.4" (23.7 × 32.3 × 8.6cm)
8-3/8" × 11-3/4" (21.3 × 29.8cm)
0.2" (0.5cm)
3.2" (8.1cm)
*Specifications are subject to change without notice.
ML-67i
$$ 7 0 - 2 0, 0 0 0 \mathrm{kHz} \pm 2 \mathrm{dB} $$
$$ \text { Rotate speaker assembly } $$
$$ 8 9 \mathrm{dB} $$
$$ \text { Compatible with } 8 \mathrm{ohms} $$
$$ 2, 5 0 0 \mathrm{Hz} $$
$$ 1 ^ {\prime \prime} (2. 5 \mathrm{cm}) \text { titanium dome } $$
$$ 6. 5 ^ {\prime \prime} (1 6. 5 \mathrm{cm}) \text { mineral - filled polypropylene cone } $$
$$ \text { Spring clip accommodates wire up to 12AWG } $$
$$ 1 5 - 8 0 \mathrm{Watts} $$
$$ 5 0 \mathrm{Watts} $$
$$ 5. 3 \text { lbs. each (2.4 kg) } $$
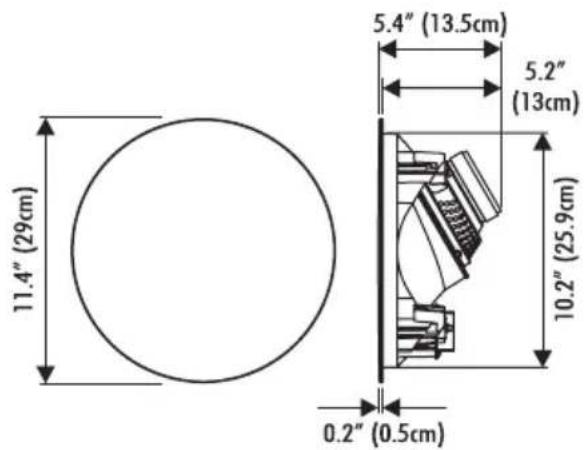
$$ 1 1. 4 ^ {\prime \prime} \times 5. 4 ^ {\prime \prime} (2 9 \times 1 3. 5 \mathrm{cm}) $$
$$ 1 0 - 1 / 2 ^ {\prime \prime} (2 6. 7 \mathrm{cm}) $$
$$ 0. 2 ^ {\prime \prime} (0. 5 \mathrm{cm}) $$
$$ 5. 2 (1 3 \mathrm{cm}) $$
ML-80i
$$ 6 0 - 2 0, 0 0 0 \mathrm{Hz} \pm 2 \mathrm{dB} $$
$$ \text { Compatible with 8 ohms } $$
$$ 2, 5 0 0 \mathrm{Hz} $$
$$ 1 ^ {\prime \prime} (2. 5 \mathrm{cm}) \text { titanium dome } $$
$$ 8 ^ {\prime \prime} (2 1 \mathrm{cm}) \text { mineral - filled polypropylene cone } $$
$$ \text { Spring clip accommodates wire up to 12AWG } $$
$$ 1 5 - 9 0 \mathrm{Watts} $$
$$ 6 0 \mathrm{Watts} $$
$$ 4. 4 \text { lbs. each (2 kg) } $$
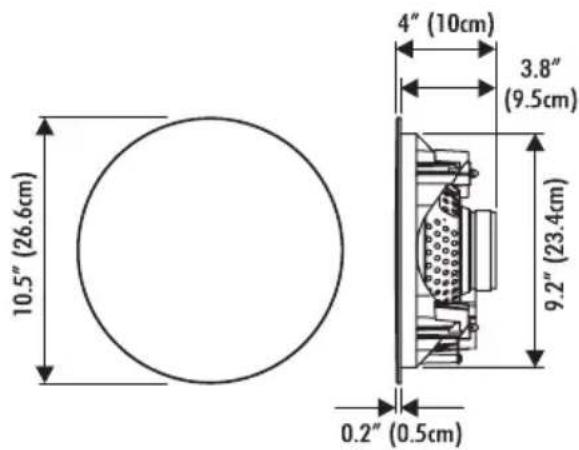
$$ 1 0. 5 ^ {\prime \prime} \times 4 ^ {\prime \prime} (2 6. 6 \times 1 0 c m) $$
$$ 9 - 1 / 2 ^ {\prime \prime} (2 4. 1 \mathrm{cm}) $$
$$ 0. 2 ^ {\prime \prime} (0. 5 \mathrm{cm}) $$
$$ 3. 8 ^ {\prime \prime} (9. 5 \mathrm{cm}) $$
INSTALLER SERIES
by MARTIN LOGAN*
Lawrence, Kansas, USA tel 785.749.0133 www.martinlogan.com
©2014 MartinLogan. All rights reserved.
Rev. #110413
ML-60i | ML-62i | ML-65i | ML-66i | ML-67i | ML-80i
natural_image
Technical line drawings of various speaker components including a panel, speaker chamber, and circular base (no text or labels)SÉRIE INSTALLER
par MARTIN LOGAN®
natural_image
Floor plan layout with room layouts and geometric shapes (no text or labels)Enceintes multiples, audio distribué.
natural_image
Symmetrical geometric diagram with a central circle and four surrounding diamond shapes, labeled Fig. 2a (no text or symbols within the diagram itself)natural_image
Diagram of a sofa layout with room layouts and directional arrows, labeled Fig. 2b (no text or symbols on the diagram itself)natural_image
Top-down diagram of a living room layout with furniture and a central sofa, labeled Fig. 2c (no text or symbols on the diagram itself)natural_image
Simple line drawing of a sofa with two side handles and surrounding geometric shapes (no text or symbols)natural_image
Diagram of a living room layout with furniture and a circular object, labeled Fig. 2eFig. 2d (no text or symbols on the diagram itself)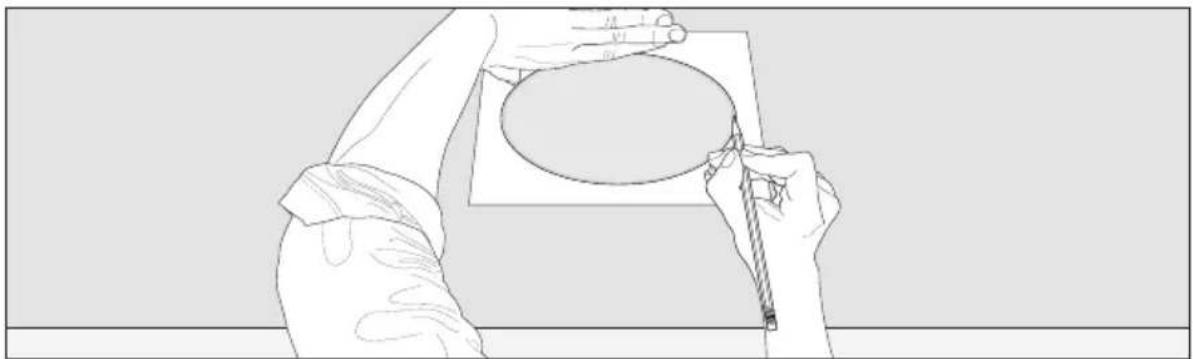
natural_image
Line drawing of a person holding a pencil and drawing a circle on paper (no text or symbols)Fig. 5a
natural_image
Line drawing of a hand holding a pen, with a circular object above (no text or symbols)Fig. 5b
natural_image
Illustration of hands assembling a circular mechanical component (no text or symbols visible)Fig. 5c
natural_image
Line drawing of a hand operating a mechanical component with a drill bit (no text or symbols)Fig. 5d
natural_image
Line drawing of two hands holding a circular object with a lid (no text or symbols)Fig. 5e
natural_image
Line drawing of hands holding a device with a wall-mounted control panel (no text or symbols)Fig. 6a.1 Fig. 6a.2
natural_image
Line drawing of a hand holding a rectangular object with a pen, no text or symbols present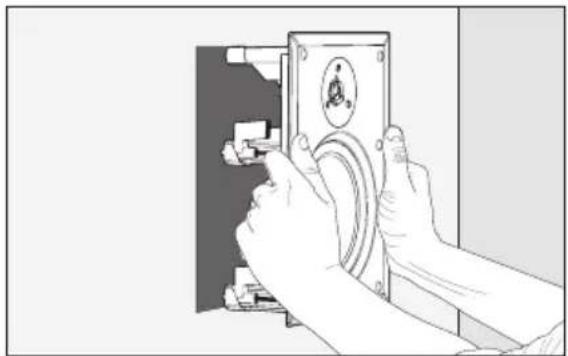
natural_image
Illustration of hands operating a mechanical device with a cable (no text or symbols visible)Fig. 6c
natural_image
Line drawing of a hand holding a rectangular object, with another hand partially visible (no text or symbols)Fig. 6b
natural_image
Illustration of hands using a power tool to install a wall-mounted component (no text or symbols visible)Fig. 6d
natural_image
Line drawing of hands holding a speaker and a blank panel (no text or symbols)Fig. 6e
Installation


- ML-60i | ML-62i | ML-65i | ML-66i | ML-67i | ML-80i
- INSTALLER SERIES
- Content Check List
- Safety Warnings and WEEE Recycling
- WARNING!
- Square Grilles, Pre-Installation Brackets, & Fire Rated Backboxes
- Fire rated backboxes meet the following requirements:
- Fire Rated Backbox Features:
- Protect Your Investment
- Break-In
- General Speaker Placement
- Choosing a Mounting Location
- Wall Rigidity Results in Better Sound
- Achieving Superior Imaging
- Balancing Hard vs. Soft Surfaces Improves High- and Mid-Frequency Performance
- Balancing Bass Output
- When choosing placement follow these simple tips:
- Placement Options (ML-60, ML-65i, ML-66i, ML-80i)
- Stereo and Home Theater Applications (no illustration)
- Multiple Speakers, Distributed Audio (Fig. 1a)
- Placement Options (ML-62i Stereo Speaker)
- 2-Channel Sound From a Single Speaker (Fig. 2a)
- 5.1-Channel Wide Dispersion Surround Placement Using Two Speakers (Fig. 2b)
- 6.1-Channel Wide Dispersion Rear Placement Using One Speaker (Fig. 2c)
- 7.1-Channel Surround + Rear Placement Using Two Speakers (Fig. 2d)
- 7.1-Channel Rear Placement Using One Speaker (Fig. 2e)
- Placement Options (Aimable ML-67i Speaker)
- Left/Center/Right Placement (Fig. 3a & 3b)
- Non-Direct Radiating Surround/Rear Placement
- Direct Radiating Surround/Rear Center Placement (Fig. 3f)
- Connecting the ML-62i
- In-Ceiling Mounting (pictorial)
- In-Wall Mounting (pictorial)
- Installation
- Recommended tools:
- Painting the Speaker Grille
- Frequently Asked Questions
- Troubleshooting
- No Output
- Lack of Bass or Poor Imaging
- Warranty
- MartinLogan offers online warranty registration at www.martinlogan.com.
- Service
- Specifications\*
- ML-60i
- ML-62i
- ML-65i
- ML-66i
- ML-67i
- ML-80i
- SÉRIE INSTALLER
Brand : Martin Logan
Model : ML-60i
Category : Loudspeaker