
SV 1200 Smart - Vacuum sealer CASO - Free user manual and instructions
Find the device manual for free SV 1200 Smart CASO in PDF.
| Product type | Sous vide cooker |
| Brand | Caso |
| Model | SV 1200 Smart |
| External dimensions (w/h/d) | 8 cm x 39 cm x 17 cm |
| Net weight | 1658 g |
| Power supply | 220-240 V ~ 50/60 Hz |
| Power consumption | 1200 W |
| Cooking capacity | 6 to 30 liters |
| Temperature range | 0 °C to 90 °C |
| Timer | Yes, adjustable |
| Connectivity | Built-in WiFi, CASO app |
| Main materials | Stainless steel (apron) and plastic (body) |
| Display | Digital (temperature and time) |
| Minimum container height | 17.5 cm |
| Maximum container temperature | 90 °C |
| Cleaning | Hand wash, not dishwasher safe |
| Recommended descaling | Every 25 uses (vinegar/water) |
| Warranty | 24 months |
| Included accessories | Tongs, stainless steel apron, lid, instruction manual |
| Safety | Automatic shut-off, overheating protection, electrical safety |
Frequently Asked Questions - SV 1200 Smart CASO
User questions about SV 1200 Smart CASO
0 question about this device. Answer the ones you know or ask your own.
Ask a new question about this device
Download the instructions for your Vacuum sealer in PDF format for free! Find your manual SV 1200 Smart - CASO and take your electronic device back in hand. On this page are published all the documents necessary for the use of your device. SV 1200 Smart by CASO.
USER MANUAL SV 1200 Smart CASO
natural_image
Exterior view of a black and silver cylindrical digital water heater (no visible text or symbols)
14 Instruction Manual....28
14.1 General....28
14.2 Information on this manual....28
14.3 Warning notices....28
14.4 Limitation of liability 29
14.5 Copyright protection....29
14.6 EU declaration of conformity 29
14.7 Safety 29
14.8 Intended use....29
14.9 General Safety information 30
14.10 Sources of danger 32
14.10.1 Danger of burns 32
14.10.2 Danger of fire 32
14.10.3 Dangers due to electrical power....33
15 Getting Started....34
15.1 Packaging safety information....34
15.2 What's included....34
15.3 Unpacking....34
15.4 Disposal of the packaging....34
16 Setup....34
16.1 Setup location requirements:....34
16.2 Electrical connection....35
17 Complete Overview....35
17.1 Assembling of the bracket 36
17.2 Overview and attachment....36
17.3 Assembling/Disassembling ....37
17.4 Control Panel....38
17.5 Rating plate 38
17.6 WiFi control 38
18 Operation....38
18.1 SousVide cooking....39
18.2 Wi-Fi Module....40
19 Storage....40
20 Cleaning and Maintenance....40
20.1 Safety information....40
20.2 Maintenance and cleaning: 41
20.3 Descaling....41
21 Troubleshooting....41
21.1 Safety notices....41
21.2 Troubleshooting....41
21.3 Troubleshooting table 42
22 Disposal of the Old Device....42
23 Guarantee....42
24 Technical Data....43
natural_image
Close-up of a mechanical component with concentric rings and central shaft (no visible text or symbols)natural_image
Close-up of a mechanical component with concentric rings and central hub (no visible text or symbols)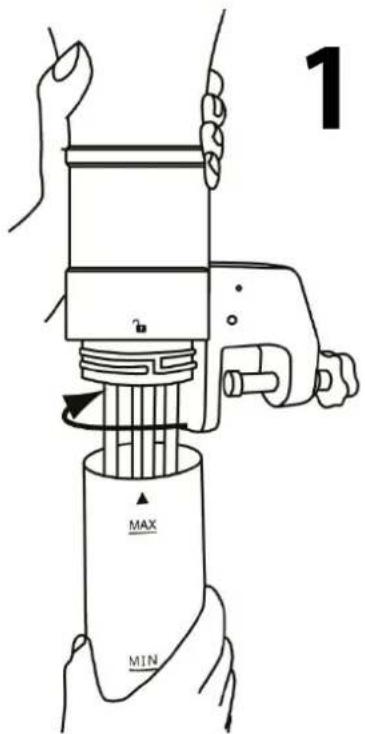
HINWEIS
natural_image
Close-up of a metallic mechanical component with internal cavities and a black triangular feature (no text or symbols visible)natural_image
Exterior view of a black and silver CO2O water heater with digital display (no text or symbols visible)
Item No. 1327
14 Instruction Manual
14.1 General
Please read the information contained herein so that you can become familiar with your device quickly and take advantage of the full scope of its functions.
Your SV 1200 Pro Smart will serve you for many years if you handle it and care for it properly. We wish you a lot of pleasure in using it!
14.2 Information on this manual
These Operating Instructions are a component of the SV 1200 Pro Smart (referred to hereafter as the device) and provide you with important information for the initial commissioning, safety, intended use and care of the device.
The Operating Instructions must be available at all times at the device. This Operating Manual must be read and applied by every person who is instructed to work with the device: • Commissioning • Operation • Troubleshooting and/or • Cleaning Keep the Operating Manual in a safe place and pass it on to the subsequent owner along with the device.
14.3 Warning notices
The following warning notices are used in the Operating Manual concerned here.
⚠GEFAHR
DANGER
A warning notice of this level of danger indicates a potentially dangerous situation.
If the dangerous situation is not avoided, this can lead to death or serious injuries.
▶ Observe the instructions in this warning notice in order to avoid the danger of death or serious personal injuries.
⚠️WARNUNG
WARNING
A warning notice of this level of danger indicates a possible dangerous situation. If the dangerous situation is not avoided, this can lead to serious injuries.
▶ Observe the instructions in this warning notice in order to avoid the personal injuries.
▲VORSICHT
ATTENTION
A warning notice of this level of danger indicates a possible dangerous situation. If the dangerous situation is not avoided, this can lead to slight or moderate injuries.
▶ Observe the instructions in this warning notice in order to avoid the personal injuries.
HINWEIS
PLEASE NOTE
A notice of this kind indicates additional information, which will simplify the handling of the machine.
14.4 Limitation of liability
All the technical information, data and notices with regard to the installation, operation and care are completely up-to-date at the time of printing and are compiled to the best of our knowledge and belief, taking our past experience and findings into consideration. No claims can be derived from the information provided, the illustrations or descriptions in this manual. The manufacturer does not assume any liability for damages arising as a result of the following:
• Non-observance of the manual
- Uses for non-intended purposes
- Improper repairs
- Technical alterations, modifications of the device
- Use of unauthorized spare parts
Modifications of the device are not recommended and are not covered by the guarantee. All translations are carried out to the best of our knowledge. We do not assume any liability for translation errors, not even if the translation was carried out by us or on our instructions. The original German text remains solely binding.
14.5 Copyright protection
This document is copyright protected. Braukmann GmbH reserves all the rights, including those for photomechanical reproduction, duplication and distribution using special processes (e.g. data processing, data carriers, data networks), even partially.
Subject to content and technical changes.
14.6 EU declaration of conformity
Hereby, Braukmann GmbH, declares that the radio equipment type [1327] is in compliance with Directive 2014/53/EU.
The full text of the EU declaration of conformity is available at the following internet address: http://www.caso-germany.de/nc/service/dokumente-download/
14.7 Safety
This chapter provides you with important safety notices when handling the device.
The device corresponds with the required safety regulations. Improper use can result in personal or property damages.
14.8 Intended use
This device is intended solely for indoor domestic use for sous vide cooking.
This device is intended for use in the household and for similar applications such as:
- in kitchens for employees in shops, offices, and other commercial areas; • in B&Bs,
• in agricultural estates; - by customers in hotels, motels and other residential establishments.
Uses for a different purpose or for a purpose which exceeds this description are considered incompatible with the intended or designated use.
⚠️WARNUNG
Warning
Danger due to unintended use! Dangers can emanate from the device if it is used for an unintended use and/or a different kind of use.
▶ Use the device exclusively for its intended use.
▶ Observe the procedural methods described in this Operating Manual.
Claims of all kinds due to damages resulting from unintended uses are excluded.
The User bears the sole risk.
14.9 General Safety information
HINWEIS
Please note
Please observe the following general safety notices with regard to the safe handling of the device.
▶ Examine the device for any visible external damages prior to using it. Never put a damaged device into operation.
▶ If the power cord is damaged, the appliance must be disposed of. The power cord cannot be replaced.
This device may be used by children aged 8 and above, if they are supervised or have been instructed at to the safe use of the device and have understood the resulting hazards.
▶ Cleaning and maintenance by the user must not be performed by children unless they are at least 8 years old and are supervised. Children are not allowed to play with the device.
The device and its connecting cable must be kept away from children who are less than 8 years old.
The device may be used by individuals with reduced physical, sensory or mental capabilities or a lack of experience and / or knowledge of their use if they are supervised or have been instructed at to the safe use of the device and have understood the resulting hazards.
▶ Only qualified electricians, who have been trained by the manufacturer, may carry out any repairs that may be needed. Improperly performed repairs can cause considerable dangers for the user.
HINWEIS Please note
▶ Only customer service departments authorized by the manufacturer may carry out repairs on the device during the guarantee period, as otherwise the guarantee entitlements will be null and void in the event of any subsequent damages.
▶ Do not leave the device unsupervised when it is in operation.
▶ Defective components must always be replaced with original replacement parts. Only such parts will guarantee that the safety requirements are fulfilled.
▶ When disconnect, please unplug by grasp the plug and not the cord, to avoid any injury.
▶ Unwind the cord completely during operation.
▶ Device should not be cleaned in dishwasher.
▶ The device may only be set vertically in a heat-resistant cooking vessel.
▶ The device is only suitable for heating up of drinking water. Otherwise the device could be damaged.
▶ Observe the markings for minimum and maximum of water level. Otherwise the device could be damaged.
▶ Do not remove the device from cooking vessel during operation.
▶ Do not move the cooking vessel during operation.
The device needs a distance of a least 1 cm to the bottom of cooking vessel so that the water circulation is not blocked.
▶ Pull the mains plug before removing the device from the cooking vessel with water.
Even after removal of the mains plug the device is still hot and should only be touchend at the control element and should not be placed on heat sensitive surfaces.
▶ Do not use distilled water.
HINWEIS
Please note
▶ Device is not intended to be operated by means of an external timer or separate remote-control system.
14.10 Sources of danger
14.10.1 Danger of burns
⚠️WARNUNG
Warning
Warning: Do not touch hot surfaces.
The device is very hot during and after operation! The heated water is also very hot. Risk of burn.
▶ Touch the heated device exclusively at the control element.
The device is hot during operation. Let the device cool down before cleaning or touching it. Do not touch the heated metal.
The heated device, the heated cooking vessel, the heated water and the steam can cause burns. Be careful with them. Use pot holders or oven gloves when you want to move the cooking vessel.
▶ Touch and remove the heated (vacuumed) food exclusively with a heat-resistant serving tong or something like that.
The heating element remains hot even after the mains plug has been disconnected and should therefore neither be touched nor placed on flammable surfaces.
14.10.2 Danger of fire
▲WARNUNG
Warning
There is a danger of fire due to the event the device is not used properly.
Observe the following safety notices to avoid dangers of fire:
▶ Do not set up the device near flammable material.
⚠️WARNUNG
Warning
▶ Keep this appliance away from sources of heat (gas, electric, burner, heated oven).
▶ Observe that the cord does not touch the hot device.
▶ Do not cover the device with foil or towels.
14.10.3 Dangers due to electrical power
⚠GEFAHR
Mortal danger due to electrical power!
Mortal danger exists when coming into contact with live wires or subassemblies! Observe the following safety notices to avoid dangers due to electrical power:
▶ If the power cord is damaged, the appliance must be disposed of. The power cord cannot be replaced.
▶ Do not operate this device if its power cable or plug is damaged, if it does not work properly or if it is damaged or has been dropped.
▶ Do not open the housing on the device under any circumstances. Do not insert any objects into the openings of the device. There is a danger of an electrical shock if live connections are touched and the electrical or mechanical structure is altered. In addition, functional faults on the device can also occur.
▶ Before plugging the appliance in or when you operate it, make sure your hands are dry.
▶ Remove the plug from the wall socket when the unit is not in use, and also before cleaning.
▶ Observe the min- and max-marking of the device when you fill the cooking vessel.
▶ When immersing the control element in water for a short time, allow the device to dry thoroughly (24 hours).
▶ Keep the cord of device away from water. Dive only the heating element of the device into water.
15 Getting Started
This chapter will guide you through safely unpacking and setting up your new unit.
15.1 Packaging safety information
▲GEFAHR DANGER
Packaging materials are not toys and should be disposed of properly.
▶ Do not allow children to play with packaging materials due to risk of suffocation.
15.2 What's included
The SV 1200 Pro Smart includes the following components:
• SV 1200 Pro Smart with WiFi equipment
- Instruction manual
HINWEIS PLEASE NOTE
▶ Examine the shipment to ensure the unit and manual are included and inspect the unit for any visible damage.
▶ Immediately notify the carrier and/or the supplier about an incomplete shipment or any damage as a result of inadequate packaging or mishandling.
15.3 Unpacking
Carefully remove the packaging material and unit from the carton.
15.4 Disposal of the packaging

Caso believes in the importance of recycling and has selected packaging materials that not only protect your unit from damage during transit, but can be recycled to minimize any ecological impact. Recycling the packaging materials preserves raw materials and reduces waste. Take any packaging materials that are no longer required to a recycling collection point for proper disposal.
HINWEIS PLEASE NOTE
▶ If possible, keep the original packaging for the duration of the guarantee period in the event a return is necessary.
16 Setup
16.1 Setup location requirements:
In order to ensure the safe and trouble-free operation of the device, the setup location must fulfill the following prerequisites:
- Attach the device only in the provided bracket at a heat resistant cooking vessel.
- The heat-resistant cooking vessel must be set up on a firm, flat, level and heat-resistant surface.
The carrying capacity of the support must be appropriate to withstand the weight of the cooking vessel, including device, water filling and the heaviest expected food loading.
- The device is not intended to be installed in a wall or a built-in cupboard.
- Do not set up the unit in a hot or damp environment or near flammable material.
- Do not move the cooking vessel with device when it is in operation.
- The device should not touch hot surfaces.
- The electrical outlet must be easily accessible so that the plug can be quickly disconnected in the case of an emergency.
- The setup of this unit in non-stationary locations (e.g., boats, airplanes, motor homes) must be carried out by a qualified electrician, provided they guarantee the prerequisites for the safe use of the unit.
16.2 Electrical connection
In order to ensure the safe and trouble-free operation of the device, the following instructions must be observed for the electrical connection:
- Before plugging in the unit, compare the voltage and frequency data on the vacuum sealer's rating plate (found on the bottom of the unit) with that of your electrical network. This data must be compatible. If in doubt consult a qualified electrician.
- The electrical outlet must be protected by a 16A safety cut-out switch.
- The use of a multi-plug outlet adapter is not recommended due to fire danger.
- Inspect the power cord for damage and ensure it doesn't run under the unit or over hot or sharp surfaces.
- The electrical safety of the unit is only guaranteed if it is connected to a properly installed protective conductor system. Use of the unit without a protective conductor is prohibited. If in doubt, consult a qualified electrician. The manufacturer cannot be made responsible for damages due to a missing or damaged protective conductor.
17 Complete Overview
This chapter provides you with an overview of your device and explains some of its key features.
17.1 Assembling of the bracket
Remove the bracket from the plastic bag. Place the bracket in the middle of the slot of the Sous Vide Stick (1 and 2). Slide the bracket upwards until it latches (3 and 4).

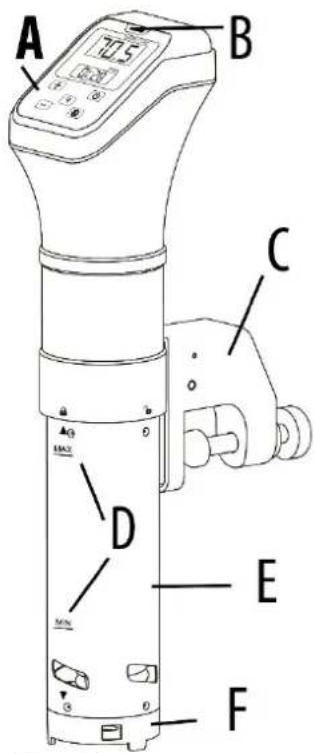
17.2 Overview and attachment
A control element
B operation indicator
C bracket
D max and min-marking
E stainless steel skirt
F cover
Attach the device by clamping it at the cooking vessel.
Fill water into the cooking vessel and observe min-/max-marking at device.
Plug in the power plug into outlet after this.
⚠️WARNUNG
Warning
▶ Refill probable evaporated water during use, so that always water is filled into cooking vessel up to min-marking. Otherwise the device could be damaged.
▶ Use a cooking vessel with capacity 6 – 30 L and minimum height of 17.5 cm.
▶ Please ensure that the cooking vessel can bear temperatures up to 90^ C.

⚠️WARNUNG Warning
Risk of crushing!
▶ When clamping the appliance to the cooking vessel, make sure that your hands are out of the way of the clamp to prevent crushing.
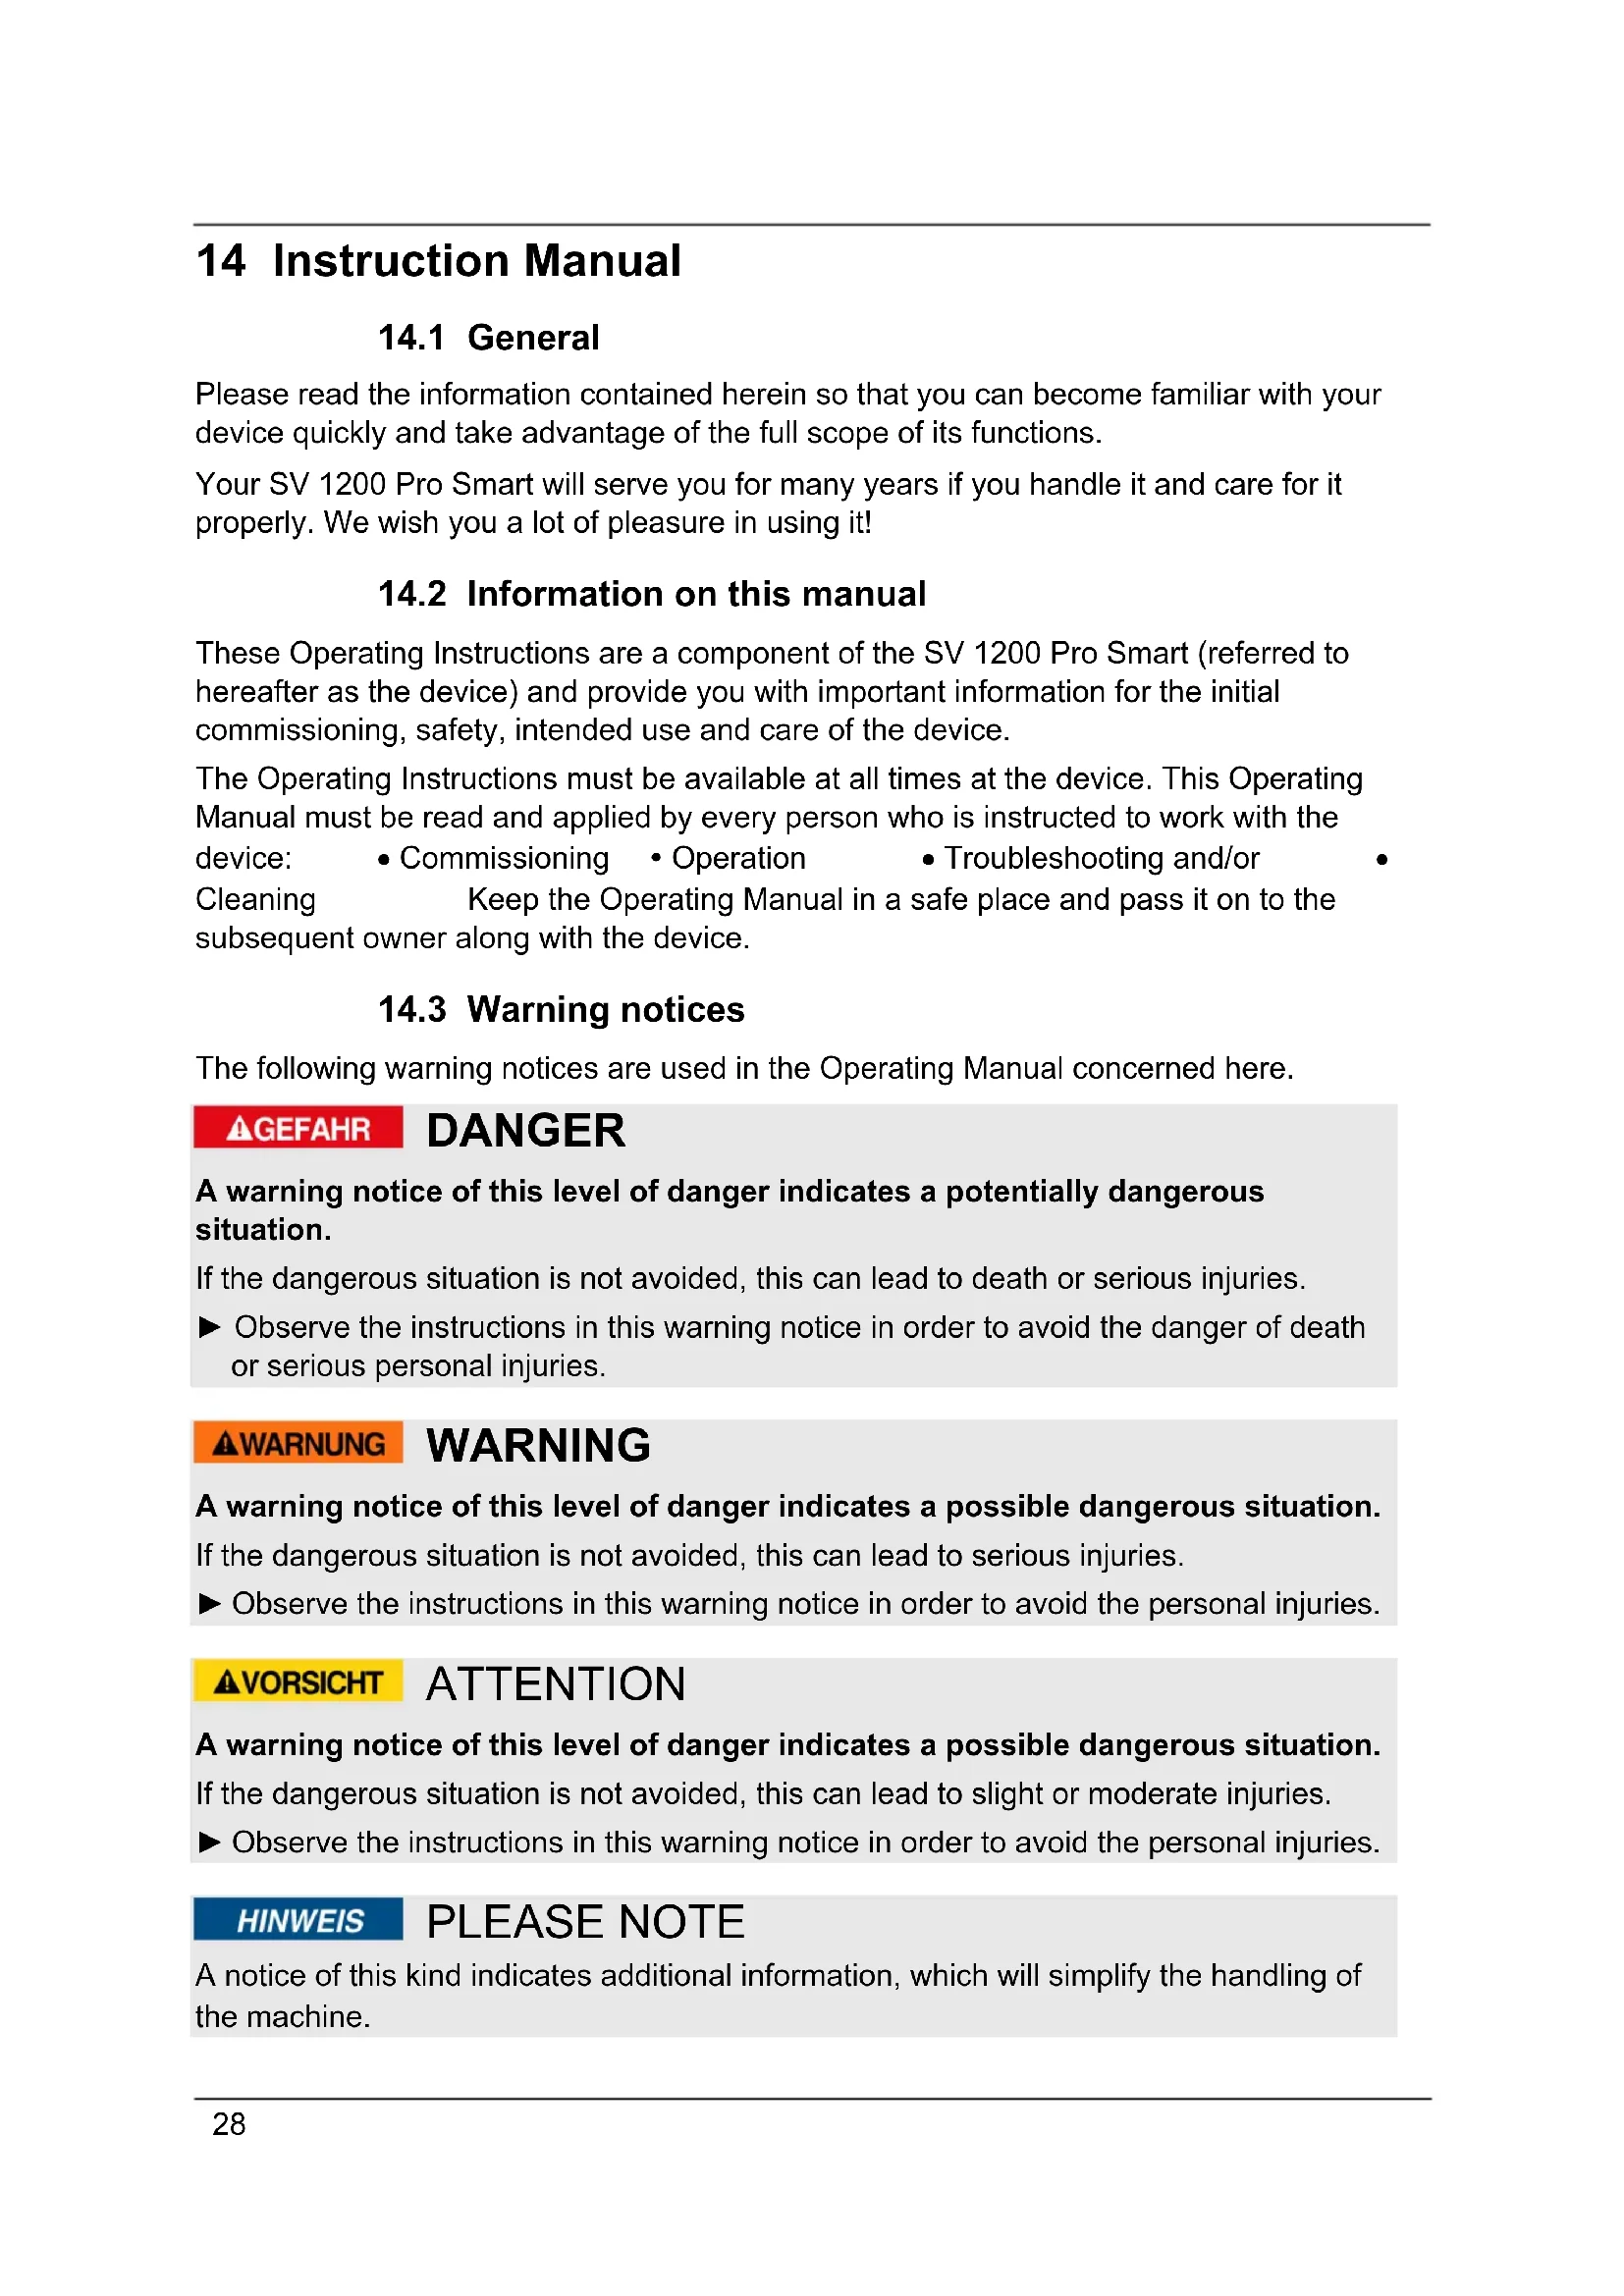
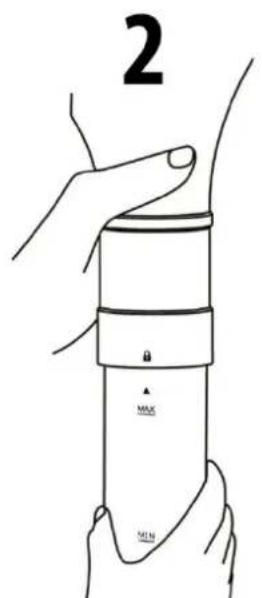
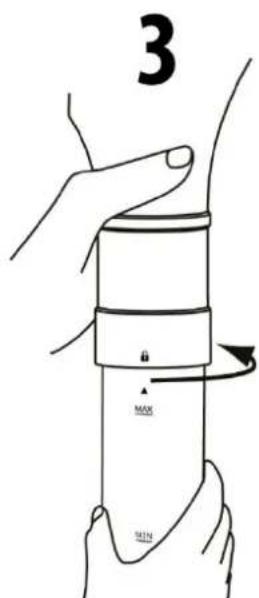
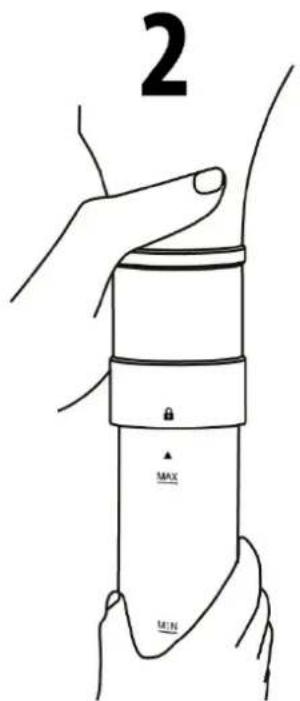
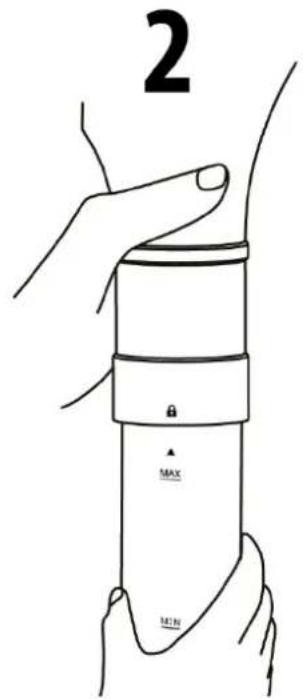
17.3 Assembling/Disassembling
Assembling of stainless steel skirt
Slide the stainless steel skirt over the heating rods so
that the arrow points to the opened lock symbol . Make sure that the propeller does not get caught. It must be positioned in the middle.

Rotate the stainless steel skirt clockwise until the arrow points to the

closed lock symbol: . For disassembling turn the stainless steel skirt counterclockwise. Make sure that the propeller does not get caught. It must be positioned in the middle.

natural_image
Close-up of a mechanical component with concentric rings and central hub (no visible text or symbols)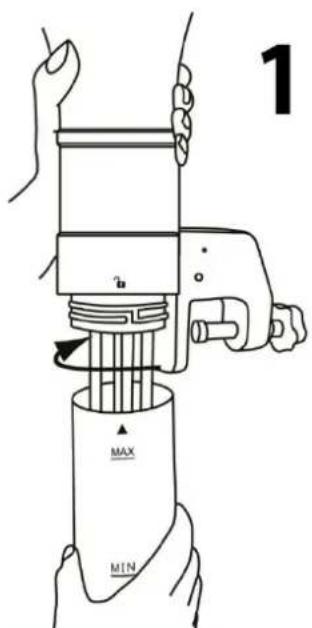

natural_image
Close-up of a metallic mechanical component with concentric rings and central hub (no visible text or symbols)HINWEIS Please note
▶ Make sure that the propeller does not touch the stainless steel skirt as it can easily be deformed.
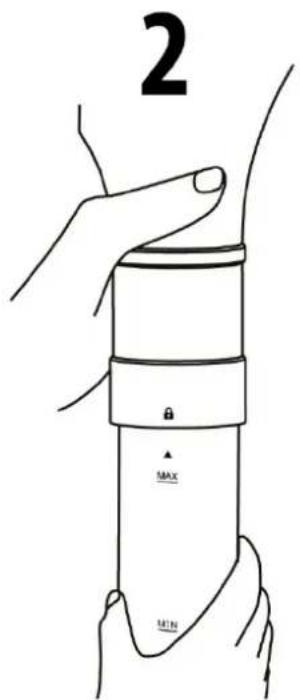
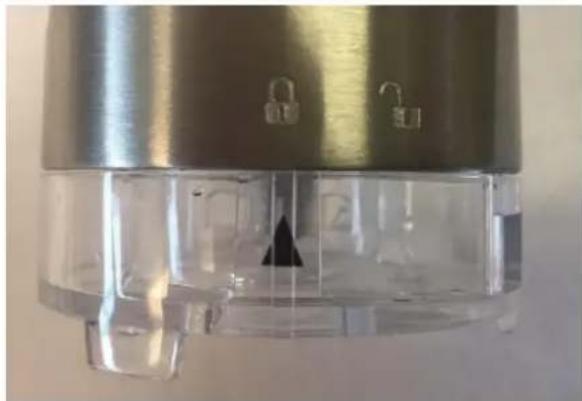
Place the cover in a way, that the arrow points
to the opened lock symbol

Tighten the cover in a clockwise direction until
the arrow points to the closed lock symbol .

natural_image
Close-up of a metallic mechanical component with internal cavities and a black arrow indicator (no text or symbols visible)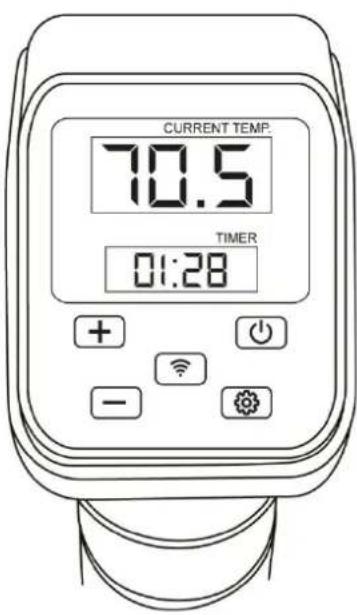
17.4 Control Panel
Current Temp
Timer – Shows the remaining cooking time


of temperature/time

tton to activate the Wi-Fi module

activation/deactivation of device and starting of process

Change setting of temperature to setting of time
17.5 Rating plate
The rating plate with the connection and performance data can be founded on the back side.
17.6 WiFi control
The device can optionally also be controlled / programmed via app via WiFi. Download the CASO-App to your smartphone or tablet. Details about the app, the scope of operation and installation instructions can be found on our website www.caso-germany.de
18 Operation
This chapter provides instructions on the proper operation of your vacuum sealer:
18.1 SousVide cooking
Cook gently in a vacuum bag. The food is cooked at low temperature in its own juice, making it particularly tender and tasty.
- Plug in the power plug. The button and the device is in standby mode. and operation indicator are illuminated
- Press button briefly until the device beeps.
- Set desired temperatur with and (0 - 90°C).
- Press button , to set the time. The timer is flashing. Set the desired hour,
with and confirm with - then set desired minute with

and . Confirm with and the device starts the heating process
- You can hear a signal and the operation indicator is flashing when the desired temperature is reached..
- The device will beep once desired temperature is reached. Place the vacuumed food into the cooking vessel. If needed weight the vacuumed bags.
-
The device counts down the time and will beep again, once time is over. Then "End" is shown in display.
-
When you want to change the settings please press change settings as described above.
for 3 seconds and
- You can deactivate the device by pressing ☐ for 3 seconds. The device will switch to standby mode. Display shows C for °C or F for °F and the ☐ button is illuminated. If you hold the ☐ bottom for 3 seconds, you can switch between °C and °F.
⚠️WARNUNG
Warning
▶ Risk of scalding! Carefully remove the food.
HINWEIS
Note: EE1
If the device should indicate "EE1" in the LED display after switching on even though the water filled in is above the minimum level, please add some salt to the water and stir well.
18.2 Wi-Fi Module
Press the W-Lan button

briefly to activate the integrated W-LAN module. The
device beeps once and the W-LAN button already connected to your W-LAN (pairing seconds and lights up constantly after a sub flash, no connection to the configured W-L or W-LAN name or access have been cha pairing process has not yet been carried of instructions.

starts to flash slowly. If the device is the button flashes for approx. 3-5 connection. If the button continues to be achieved.(reception level is too low W-LAN password is wrong). If the follow steps mentioned in pairing
19 Storage
Store the unit in its upright position, out of the reach of children.
HINWEIS PLEASE NOTE
▶ Turn off the device after use. So you can avoid unnecessary energy consumption and ensure your safety.
▶ Always unplug the appliance from its outlet immediately after using and before cleaning.
20 Cleaning and Maintenance
This chapter provides important information on properly cleaning and maintaining your SV 1200 Pro Smart.
20.1 Safety information
AGEFAHR Danger
Please observe the following safety notices, before cleaning the unit to avoid damage to the unit or personal injury:
▶ To ensure optimum performance, the unit must be cleaned regularly. Failure to clean the unit regularly can lead to potential malfunctions, as well as safety and health risks.
▶ Turn off and unplug the unit prior to cleaning.
▶ Clean the unit after every use as soon as it has cooled. Leaving the unit uncleaned for long periods can make it very difficult to remove leftover food and grime and may even damage the unit.
If moisture penetrates the unit's housing, it can damage the electronic components. Please ensure that no moisture enters the device (control element).
⚠GEFAHR
Danger
▶ Do not use any harsh or abrasive cleaning agents.
▶ Do not attempt to scrape off stubborn grime with hard or abrasive tools.
▶ Dry all parts thoroughly before using after cleaning.
▶ Do not clean the device in the dishwasher. Never immerse the control element of the device into liquid.
20.2 Maintenance and cleaning:
Let the device cool down before cleaning.
Take the device out off the cooking vessel and dry it thoroughly with a damn cloth.
Place it on a damp cloth after this, so that the heating element can dry inside.
Remove stainless steel skirt and cover as described at disassembling.
Clean both unter running water with a mild detergent and dry thoroughly after this.
Heating element (rods) and propeller can be cleaned carefully with a soft brush and mild detergent under running water.
Be careful that the propeller will not be deformed when you assemble device again.
20.3 Descaling
Descale the device regularly, at least after every 25th use.
Place the device into the cooking vessel and clamp it so that the device is cover with a mixture of 2/3 water and 1/3 vinegar just shortly under max marking.
Set temperature to 80 °C and heat up the mixture for at least 1 hour. In the meantime refill water. After this thoroughly clean all parts under running water that were in contact with the water and dry them.
21 Troubleshooting
The following table may help you narrow down and address minor malfunctions:
21.1 Safety notices
⚠GEFAHR
Danger
▶ Only qualified electricians, who have been trained by the manufacturer may carry out any repairs on electrical equipment.
▶ Improperly performed repairs may result in personal injury or damage to the device.
21.2 Troubleshooting
The device does not work:
- Check that the cable is properly plugged into the wall socket
- Check cable for damage.
- Verify that the wall socket works with another device.
21.3 Troubleshooting table
The digital display is lit, but the device does not start the cooking program and displays an error code instead:
| Error Code | Possible Causes Solution | |
| EE1 | 1. Cooking vessel is empty | Fill clean water up to above the “MIN” level. If the device should indicate “EE1” in the LED display after switching on even though the water filled in is above the minimum level, please add some salt to the water and stir well. |
| 2. Water too low Fill clean water | up to above the “MIN” level. | |
| 3. Device is not positioned correctly on the table | Place the device on a flat surface | |
| 4. Error in electronics Please contact customer service | ||
HINWEIS PLEASE NOTE
▶ In the event of technical troubles, faulty devices or missing parts, please contact Customer Service.
22 Disposal of the Old Device
To protect the environment, it's important to dispose of old electronic devices properly. Do not place your old unit in the non-recyclable waste under any circumstances.
HINWEIS PLEASE NOTE
▶ Please take your old unit to the nearest recycling center for safe disposal.
▶ Until it can be disposed of properly, store your old unit away from children.
23 Guarantee
We provide a 24 month guarantee for this product, commencing from the date of sale, for faults which are attributable to production or material faults.
Your legal guarantee entitlements in accordance with § 439 ff. BGB-E remain unaffected by this. The guarantee does not include damages, which were incurred as a result of improper handling or use, as well as malfunctions which only have a minor effect on the function or the value of the device. Consumables, transit damages, inasmuch as we are not responsible for these, as well as damages, which were incurred as a result of any repairs that were not performed by us, are also excluded from the guarantee entitlements.
This device is designed for use in domestic situations and has the appropriate performance levels.
Any use in commercial situations is only covered under the guarantee to the extent that it would be comparable with the stresses of being used in a domestic situation. It is not intended for any additional, commercial use.
In the event of justified complaints, we will repair the faulty device at our discretion or replace it with a trouble-free device. Any pending faults must be reported within 14 days of delivery. All further claims are excluded. To enforce a guarantee claim, please contact us prior to returning the device (always provide us with proof of purchase).
24 Technical Data
| Device Sous-Vide Cooker | |
| Name SV 1200 Pro Smart | |
| Item No.: 1327 | |
| Mains data 220-240 V~ 50/60 Hz | |
| Power consumption 1200W | |
| Capacity 6-30 L | |
| External measurements (W x H x D): 8 cm x 39 cm x 17 cm | |
| Net weight 1658 g |
natural_image
Exterior view of a COSO brand digital water heater (no text or symbols on body)
25 Mode d'emploi
25.1 Généralités
natural_image
Close-up of a metallic mechanical component with concentric rings and central hub (no visible text or symbols)natural_image
Close-up of a mechanical component with concentric rings and central hub (no visible text or symbols)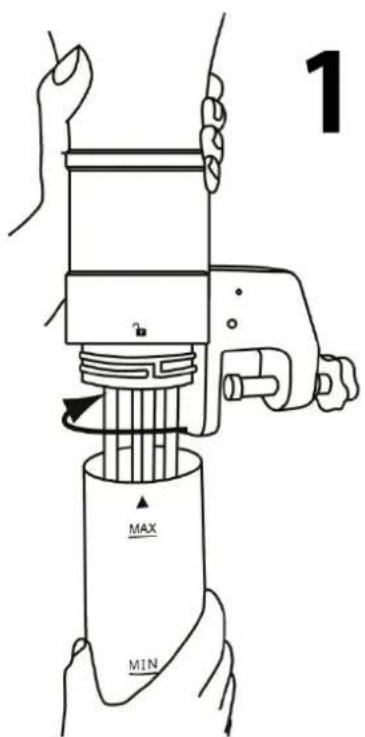


HINWEIS
Remarque
natural_image
Close-up of a metallic mechanical component with internal cavities and a black triangular feature (no text or symbols visible)
natural_image
Exterior view of a black and silver COSO water heater with digital display (no text or symbols on body)
Articolo-N. 1327
39 Istruzione d'uso
39.1 In generale
natural_image
Close-up of a mechanical component with concentric rings and central shaft (no visible text or symbols)natural_image
Close-up of a mechanical component with concentric rings and central hub (no visible text or symbols)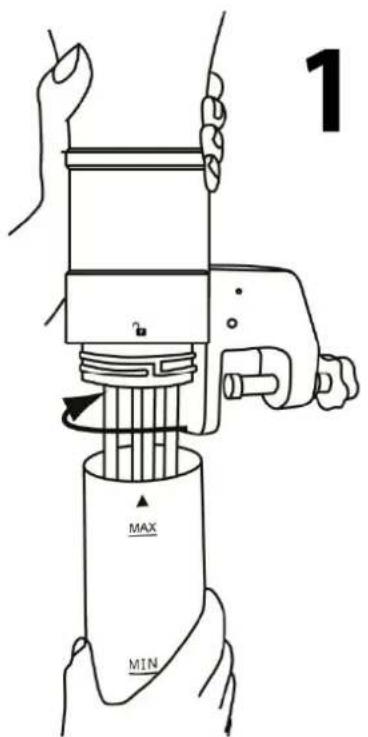

HINWEIS Indicazione
natural_image
Close-up of a metallic mechanical component with internal cavities and a black triangular feature (no text or symbols visible)natural_image
Exterior view of a black and silver cylindrical digital water heater (no visible text or symbols)


Artikelnummer 1327
▲WARNUNG WAARSCHUWING
⚠️WARNUNG WAARSCHUWING
⚠️WARNUNG WAARSCHUWING
▲WARNUNG WAARSCHUWING
natural_image
Close-up of a mechanical component with concentric circular features and central hub (no visible text or symbols)
natural_image
Close-up of a circular mechanical component with concentric rings and central hub (no visible text or symbols)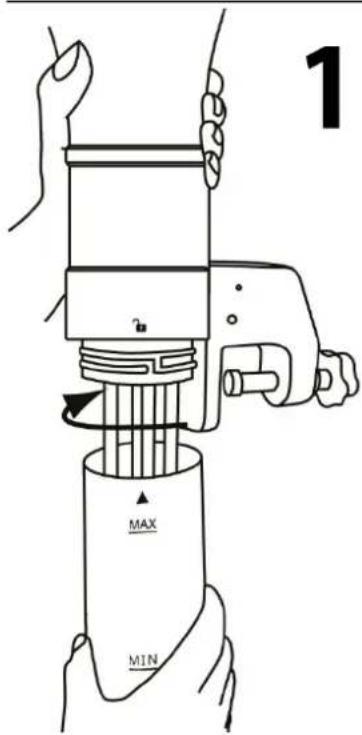

HINWEIS
Tip
natural_image
Close-up of a metallic mechanical component with internal cavities and a black triangular feature (no text or symbols visible)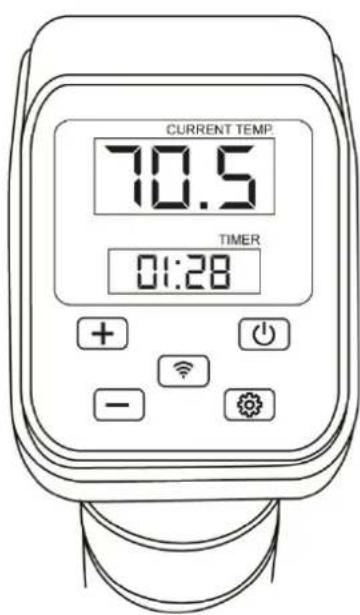
60.4 Bedieningselementen
⚠️WARNUNG WAARSCHUWING


- HINWEIS
- Instruction Manual
- General
- Information on this manual
- Warning notices
- ⚠GEFAHR
- DANGER
- ⚠️WARNUNG
- WARNING
- ▲VORSICHT
- ATTENTION
- PLEASE NOTE
- Limitation of liability
- Copyright protection
- EU declaration of conformity
- Safety
- Intended use
- General Safety information
- HINWEIS Please note
- Sources of danger
- Danger of burns
- Danger of fire
- ▲WARNUNG
- Dangers due to electrical power
- Mortal danger due to electrical power!
- Getting Started
- Packaging safety information
- ▲GEFAHR DANGER
- What's included
- Unpacking
- Disposal of the packaging
- Setup
- Setup location requirements:
- Electrical connection
- Complete Overview
- Assembling of the bracket
- Overview and attachment
- ⚠️WARNUNG Warning
- Risk of crushing!
- Assembling/Disassembling
- Assembling of stainless steel skirt
- Control Panel
- Rating plate
- WiFi control
- Operation
- SousVide cooking
- Note: EE1
- Wi-Fi Module
- Storage
- Cleaning and Maintenance
- Safety information
- AGEFAHR Danger
- Maintenance and cleaning:
- Descaling
- Troubleshooting
- Safety notices
- Troubleshooting
- Troubleshooting table
- Disposal of the Old Device
- Guarantee
- Technical Data
- Mode d'emploi
- Généralités
- Remarque
- Istruzione d'uso
- In generale
- HINWEIS Indicazione
- ▲WARNUNG WAARSCHUWING
- ⚠️WARNUNG WAARSCHUWING
- Tip
- Bedieningselementen
Brand : CASO
Model : SV 1200 Smart
Category : Vacuum sealer