
CZ720051 - Saucepan All-Clad - Free user manual and instructions
Find the device manual for free CZ720051 All-Clad in PDF.

User questions about CZ720051 All-Clad
0 question about this device. Answer the ones you know or ask your own.
Ask a new question about this device
Download the instructions for your Saucepan in PDF format for free! Find your manual CZ720051 - All-Clad and take your electronic device back in hand. On this page are published all the documents necessary for the use of your device. CZ720051 by All-Clad.
USER MANUAL CZ720051 All-Clad
Owner's Guide - Model No. NC00134439
IMPORTANT SAFEGUARDS. pg. 3
DESCRIPTION OF PARTS. 10
BEFORE FIRST USE. 13
PREPARING YOUR ELECTRIC PRESSURE COOKER FOR USE. pg. 13
TIPS TO ENSURE PERFECT COOKING RESULTS
SETTINGSDESCRIPION. pg.15
PRESSURE COOKING. 16
AVERAGE PRESSURE COOKING TIMES. pg. 19
SLOW COOKING. 20
STEAM 21
SAUTÉ 22
SEAR. pg. 23
REDUCE pg. 24
RICE. 25
REHEAT 27
HOW TO CLEAN YOUR PRESSURE COOKER . 28
WHAT TO DO IF YOUR PRESSURE COOKER IS NOT WORKING PROPERLY . 31
RECIPES. 34
MANUFACTURER'S LIMITED WARRANTY. pg. 40
IMPORTANT SAFEGUARDS
When using electrical appliances, basic safety precautions should always be followed including the following:
- Read all instructions.
- Do not touch hot surfaces. Use handles or knobs.
- To protect against electrical shock do not immerse cord, plugs, or any other parts in water except for the removable cooking bowl and accessories.
- Close supervision is necessary when any appliance is used by or near children.
- Unplug from outlet when not in use and before cleaning.
Allow to cool before putting on or taking off parts.
- Do not operate any appliance with a damaged cord or plug or after the appliance malfunctions or has been damaged in any manner. Return appliance to the nearest authorized service facility for examination, repair or adjustment.
- The use of accessory attachments not recommended by the appliance manufacturer may cause injuries.
- Do not use outdoors.
- Do not let the cord hang over the edge of table or counter, or touch hot surfaces.
- Do not place on or near a hot gas or electric burner, or in a heated oven.
- Do not move the product when in use or when the steam pressure valve is closed.
- Always attach plug to appliance first, then plug cord into the wall outlet. To disconnect, turn any control to «off», then remove plug from wall outlet.
- Do not use appliance for other than intended use.
SAVE THESE INSTRUCTIONS
EN
- To reduce the risk of electric shock, cook only in removable container.
CAUTION: DO NOT CARRY THE PRODUCT BY THE LID HANDLES.
Read and follow the instructions for use. Keep them for future use.
SAFETY INSTRUCTIONS
- This appliance complies with the safety regulations and conditions in effect at the time of manufacture.
- Check that the power supply voltage corresponds to that shown on the appliance (alternating current) and that there's a grounded plug.
- Given the diverse standards in effect, if the appliance is used in a country other than that in which it is purchased, have it checked by an approved service center.
- This appliance is intended for household use only.
- In case of commercial use, inappropriate use or failure to comply with the instructions, the manufacturer accepts no responsibility and the guarantee does not apply.
- This appliance is not intended for use by persons (including children) with reduced physical, sensory or mental capabilities, or lack of experience and knowledge, unless they have been given supervision or instruction concerning use of the appliance by a person responsible for their safety.
- Children should be supervised to ensure that they do not play with the appliance.
- Replace the sealing gasket every 2 years, or sooner if you see the gasket is worn or in need of replacement. Use only original parts available in authorized repair centers.
CONNECTING TO THE POWER SUPPLY
- Make sure the power cord is plugged in properly to both the appliance and the outlet.
- Only connect the appliance to grounded electrical outlet. If the sockets and plug on the appliance are not compatible, consult a professional qualified technician to replace the outlet with a more suitable one.
-
Do not use the appliance if:
-
It or its cord is damaged.
- The appliance has been dropped, shows visible damage, or does not work properly.
In these cases, the appliance must be sent to an approved Service Center. Do not take the appliance apart yourself.
- Do not use an extension cord. If you accept liability for doing so, only use a grounded extension cord which is in good condition and is suited to the wattage of the appliance.
- If the power cord is damaged, it must be replaced by the manufacturer, an authorized Service Center or a similarly qualified person in order to avoid any danger.
- Do not leave the cord hanging.
- Do not unplug the appliance by pulling on the cord.
- Always unplug the appliance immediately after use; when moving it; prior to any cleaning or maintenance.
USE OF THE APPLIANCE
- Use a flat and stable, heat resistant work surface, away from any water splashes.
- Always place your Electric Pressure Cooker on a dry surface.
- Always check the pressure release devices for clogging before use.
- Make sure that the Electric Pressure Cooker is properly closed before using it for pressure cooking.
- It is highly recommended not to move the Electric Pressure Cooker when it is under pressure. The pressure limit valve may move: this could cause burns by steam being released.
- Do not touch the hot surfaces. Be careful, metal parts and especially the lid are very hot. Always wear oven mitts.
- Never use the bowl handles to carry the product, use the carrying handles on the product body.
-
Your Electric Pressure Cooker cooks under pressure. Burns could result from boiling over if not used properly.
-
Do not open the pressure cooker until the unit has cooled and all internal pressure has been released. If the handles are difficult to push apart, this indicates that the cooker is still pressurized: do not force it open. Any pressure in the cooker can be hazardous.
- Do not try to open the lid until the float valve is down.
- Never use your Electric Pressure Cooker without liquid; when the removable cooking bowl is empty or not placed inside the product this could cause serious damage.
- Do not remove the removable cooking bowl while the appliance is working.
- Do not fill your Electric Pressure Cooker above maximum level. For food that expands considerably during cooking, such as rice, dehydrated vegetables or compotes, do not fill the Electric Pressure Cooker more than half full. Respect the levels indicated in the recipes.
- To avoid burns when cooking meat which has an outer layer of skin, which could swell due to the effects of pressure, do not pierce the skin after cooking if it appears swollen. Pierce food before cooking to avoid burns.
- When cooking food with a thick texture (chick peas, rhubarb, computes, etc.) the Electric Pressure Cooker should be shaken slightly before opening to ensure that the food does not spurt out.
- Do not use the Electric Pressure Cooker to fry under pressure using oil.
- The bottom of the removable cooking bowl and the heating plate should be in direct contact. Any objects inserted between them or food residue remaining on either surface will affect performance.
- Wipe clean the bottom of the removable cooking bowl and the heating plate after every use.
- Do not use other cooking bowl in the pressure cooker instead of the original removable cooking bowl. Only replace the removable cooking bowl with an original spare part designed to be used with this product.
- Use the removable cooking bowl in the pressure cooker ONLY. Do not use it to cook on stovetops, in the oven etc.
- During cooking and steam release, the appliance exhausts heat and steam. Keep your face and hands away from the steam flow. Do not touch the lid during cooking. Do not obstruct the steam outlet.
-
When opening the lid, always hold the lid by its handle. In some cases, boiling water may be trapped between the steam shield and the lid. This can cause severe scalding.
-
Use the product ONLY IF the removable bowl is correctly placed in the unit and the handle is correctly inserted above the carrying handles.
- If large amounts of steam are released from the rim of the lid, turn the power OFF and unplug the power cord at once. Carefully clean the lid, sealing gasket and sealing gasket support cover to ensure that food residue is not interfering with proper operation.
If the problem persists after cleaning, consult an authorized Service Center for repair. - If pressure is released continuously (during more than 1 minute) while pressure cooking, switch off the appliance and release pressure, and consult an authorized Service Center for repair.
- Do not immerse the pressure cooker housing in water, or pour water or food directly on to the heating plate without the removable cooking bowl in place. If you inadvertently do so, consult an authorized Service Center for repair.
- Do not touch the float valve and the limit pressure valve except when cleaning in accordance with instructions.
- Do not place foreign objects on top of or blocking the steam valve. Do not replace the safety valves.
- Do not use a cloth between the lid and the body to leave the lid open.
- If any part of the appliance is damaged, bring the appliance to a Service Center.
- Do not substitute the original sealing gasket with anything else than an original spare part designed to be used with this product.
- Any repairs should be made by an authorized service center using original spare parts.
- Do not use the appliance if any part is damaged.
- When using the browning and sauté function, always leave the lid open.
- Be aware that certain foods, such as applesauce, cranberries, pearl barley, oatmeal or other cereals, split peas, noodles, macaroni, rhubarb, or spaghetti can foam, froth, and sputter, and clog the pressure release device (steam vent). Use caution when cooking these foods and when opening the lid after cooking under pressure.

ELECTRICAL REQUIREMENTS
This appliance has a grounded power cord. Do not attempt to modify the power cord in any way.
- A short power-supply cord has been provided to reduce risk resulting from becoming entangled in or tripping over a longer cord.
- If an extension cord is used:
- The electrical specifications of the extension cord must be compatible with the ones of the appliance.
- The cord must be arranged so that it will not drape over the countertop or tabletop where it can be pulled on by children or tripped over unintentionally.
DISPOSING OF YOUR APPLIANCE


Your appliance contains many materials which can be recycled.

Take it to a local civic collection point.
CONGRATULATIONS ON YOUR PURCHASE
All-Clad Metalcrafters created the original collection of professional cookware made with a patented metal bonding process which eliminates uneven heating, an accomplishment that led to All-Clad becoming the product chosen for the kitchens of more four-star restaurants than any other. Still the only complete line of cookware made by an American company with materials produced in its own mill, All-Clad has revolutionized the art of cooking since its introduction.
With more than ten professional cookware collections featuring a variety of bonded metals and finishes, from high grade aluminum and stainless steel to copper, All-Clad combines professional design with high performance for all tastes and cooking styles.
The All-Clad cooking experience now extends to a focused selection of small electrical appliances, each designed without compromise to make a noticeable difference in both use and performance. Cooking connoisseurs now have a wonderful opportunity to complete their kitchen with electrics by All-Clad, the undisputed original.
All-Clad Metalcrafters has an ongoing policy of research and development and may modify its products without prior notice.

DESCRIPTION OF PARTS
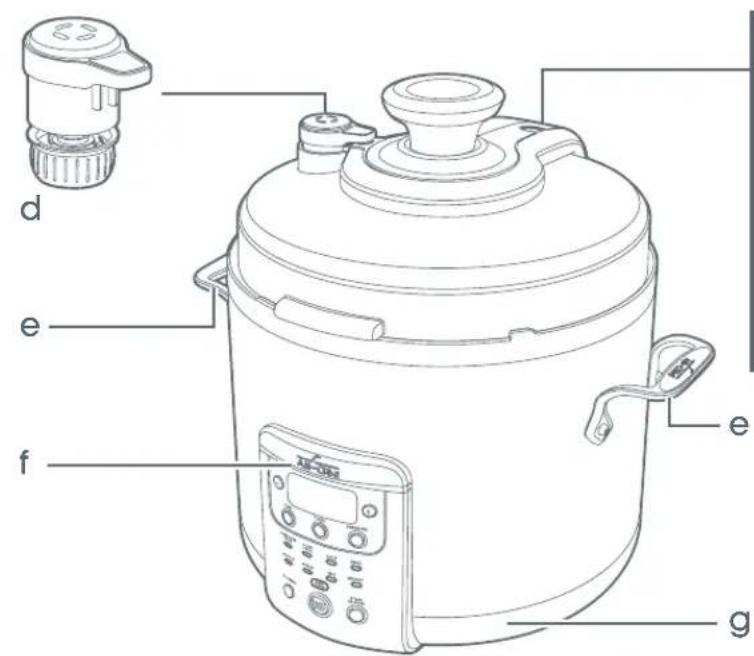
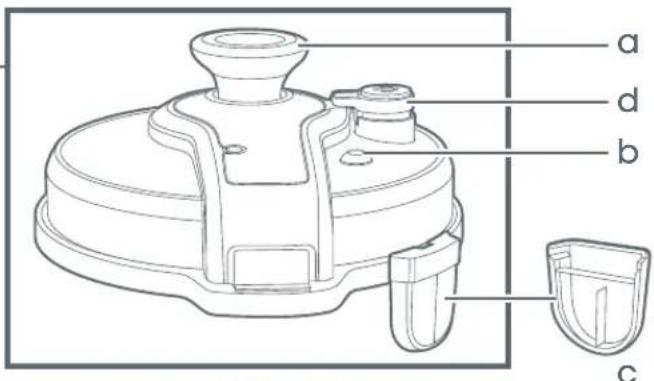

INTERIOR OF THE LID
a. Lid handle
b. Safety valve
c. Condensation collector
d. Pressure limit valve
e. Body handles
f. Control panel
g. Base
h. Scaling gasket
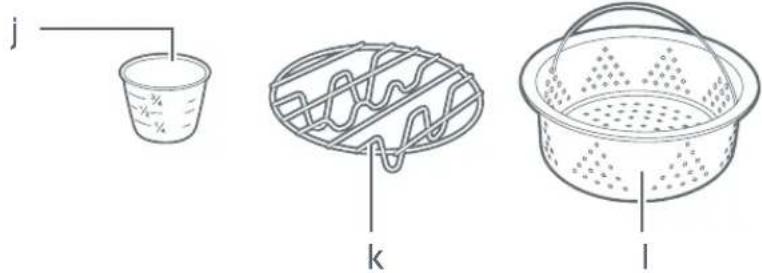
i. Cooking bowl
j. Measuring cup
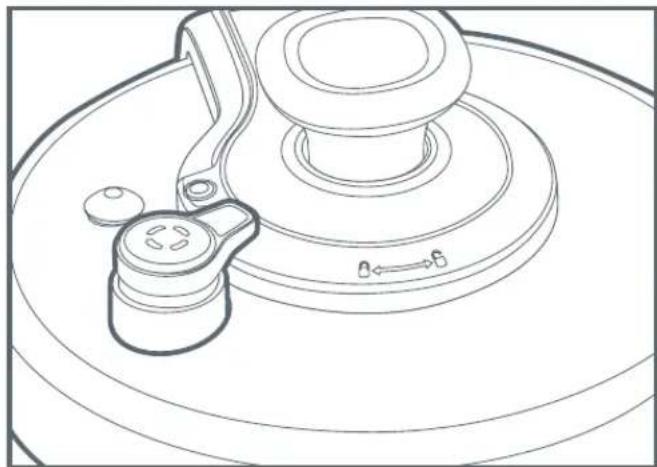
Pressure limit valve should be pointed toward the lid handle during cooking
k. Trivet
1. Steaming basket
m. Power cord
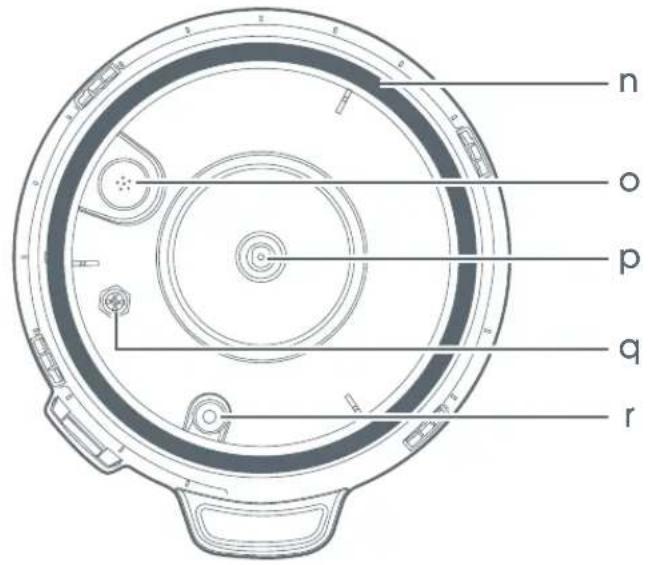
Interior of the lid
n. Sealing gasket
o. Valve strainer
p. Central nut
q. Safety valve
r. Float valve

CONTROL PANEL
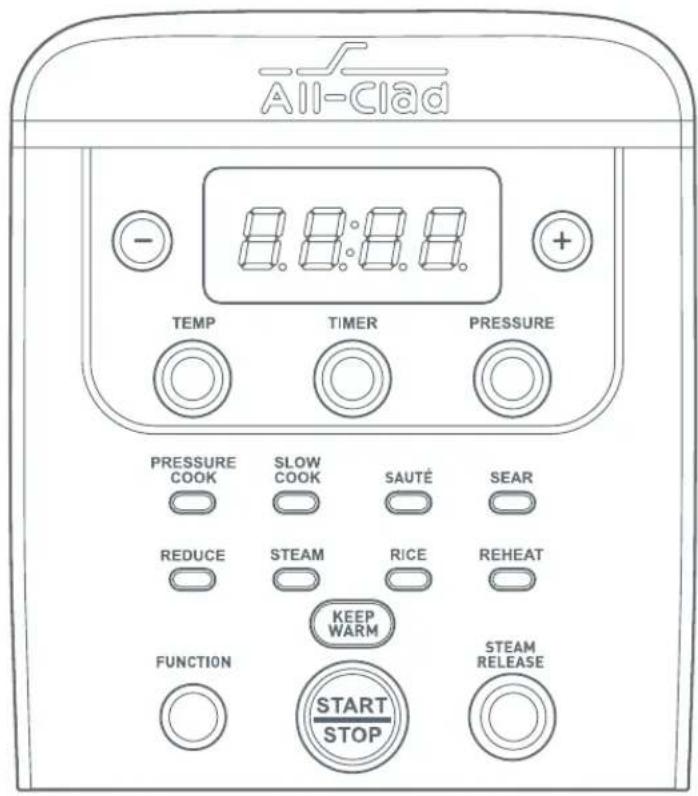
To decrease or increase the displayed value (temperature/time/pressure).

Access to cooking programs.

To start/stop the cooking.

To activate the steam release manually or automatically.


Activation of temperature, time of cooking, and pressure level.
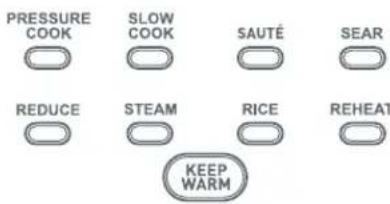
LEDs buttons correspond to a dedicated cooking program.
BEFORE FIRST USE
Always read the operating instructions carefully before using the appliance for the first time.
- Unpack the appliance.
- Remove all packaging materials from the inside of the appliance: plastic accessories as well as the removable power cord.
- Wipe the metal housing with a clean damp cloth.
- Rinse the cooking bowl, the condensation collector, the trivet, the steaming basket, and the sealing gasket using gentle dish washing liquid. Do not use harsh, abrasive, or chemical cleaners at any time.
- Be aware: only the accessories are dishwasher safe.
To open the lid, take hold of the handle, turn it to the left, lift and pull the lid to the right.
EN
PREPARING YOUR ELECTRIC PRESSURE COOKER FOR USE
- Put the condensation collector into place. Check that the sealing gasket is in the correct position under the lid.
- Place your appliance on a flat surface.
- Unroll the power cord; connect it to the appliance then to the wall outlet. It is now ready for operation.
- Ensure that the pressure limit valve is on and in the right position. Please note that the valve does not click into place and that it will remain somewhat loose. Check that the pressure limit valve is down before you start pressure cooking (please see picture on the DESCRIPTION OF PARTS section).
STANDBY MODE
- Once the appliance is connected to power supply, the system starts to self check, the buzzer makes a «BEEP» sound, the digital screen and all indicators light on. After 1 second, the screen displays 12 -12
- The product switches to Standby mode when not cooking after 1 minute without action.
TIPS TO ENSURE PERFECT COOKING RESULTS
The size of the food pieces needs to be uniform so that everything cooks at the same pace.
- Many foods (meat and poultry for example) benefit from browning first to develop flavor.
Salt the ingredients lightly before cooking to bring out the flavors, then season to taste just before serving.
- Rice, beans and a few other ingredients foam up in an electrical pressure cooker, and can clog valves. To prevent this, drizzle a tablespoon of olive oil or canola oil over the cooking liquid just before you close the appliance. Do not stir.
- Depending on the type of food, once cooking is completed, pressure is released either naturally, through quick-release (please refer to the corresponding chart).
- Add tender fresh herbs (mint, basil...) at the end of cooking rather than at the beginning to prevent their taste from fading.
Even after pressure is released, there is still steam under the lid and it is hot. We recommend to wait a bit before opening the lid. When you open the appliance, always tilt the lid away from your face and your arms to avoid burns.
- Ingredients are extremely hot when they come out of an electrical pressure cooker so let the food stand for about five minutes to cool down before serving.
SETTINGS DESCRIPTION
The Electrical Pressure Cooker offers 8 different cooking modes: Pressure Cook, Slow Cook, Steam, Sear, Saute, Reduce, Rice and Reheat. Each program has preset time, pressure, or temperature. However, you can adapt them according to the recipe, the amount of food being cooked, and your personal taste.
PROGRAMS SETTINGS
| Settings | ||||
| Programs Time | Pressure (Psi) (please refer to paragraph “Pressure cooking”) | Preheating Automatic Keep warm | ||
| Pressure 1 to 120 min | 1.5 to 12 (7 levels) | Yes Yes | ||
| Slow cook 2 to 12 hours - No Yes | ||||
| Reduce 1 to 120 min - No No | ||||
| Sauté 1 to 60 min - Yes No | ||||
| Sear 1 to 60 min - Yes No | ||||
| Steam 1 to 60 min - Yes Yes | ||||
| Rice 1 to 60 min - Yes Yes | ||||
| Reheat | 1 to 60 min - Yes | No | ||
NOTE: the pressure built up under the lid is measured as PSI, or pounds per square inch.
KEEP WARM
- KEEP WARM function is automatically activated at the end of the following programs: PRESSURE COOK, SLOW COOK, STEAM and RICE, and is displayed on the screen. The led for KEEP WARM lights when the function is on.
- In the KEEP WARM setting, condensation may build up in the upper ring. This is normal and in case of overflow it would be collected in the condensation collector.
Maximum duration for KEEP WARM is 6 hours. - At the end of the 6 hours, the appliance will automatically shut down.
Recommended KEEP WARM time is 1 hour to preserve the quality and flavor of the food. - KEEP WARM is automatic and cannot be used manually.
- You can stop the KEEP WARM by pressing the STOP button.
PRESSURE COOKING
- Check that the pressure limit valve is installed on the lid: if not, slide it on the metal stem on the lid and push down. After installation it will still remain loose.
- Open the lid of the appliance
- Place the ingredients in the removable cooking bowl.
- Close the lid, and turn it clockwise until it is sealed.
FUNCTION
- Press any button to activate the unit. The display will blink. Press the button once to select PRESSURE COOK. A default pressure level will be displayed on the screen. The LED for
PRESSURE COOK will flash and the button will blink to show that you can set the pressure level. You can adjust the pressure level (1-7) by pressing the buttons.
-
Once the pressure level is selected, it will be displayed on the screen.
-
Then, press the TIMER button for time setting. The TIMER button will blink and a default time value will be displayed.
- Adjust the time value by pressing the buttons.
- You can press the PRESSURE button, in case you need to change again the pressure level. The new pressure setting does not affect the time setting as they are independent from each other. Please note that the button is not active for this function.
- Once the settings are selected, press the START button to start preheating. The appliance will beep to indicate the start of the preheating phase. And the display shows
After preheating, it will beep again to indicate that cooking has begun: time will be displayed and will be counting down. - It is possible to change time and pressure settings during cooking: Press the button. Adjust the time value by pressing the button until the new time is displayed. The same can be done for the PRESSURE setting.
- Once the new settings are selected, press the START button to continue cooking (this will be signaled by an audible tone).
- The remaining time will be displayed and will be counting down. Once cooking is finished, the appliance will beep 3 times to indicate the end of cooking and be displayed on the screen.
NOTE: remains displayed during 1 minute, but at any time you can switch back to screen-by-pressing any button on the control panel.
STEAM RELEASE
- Once pressure has built up in the appliance, the float valve will rise. The safety lock in the lid will then be activated and the lid will not be able to be opened during cooking. Never attempt to open the lid during pressure cooking.
- It is normal for a small amount of steam to escape when pressure builds up and during cooking. This can happen from the float valve, the pressure limit valve or the sealing gasket (they all are safety devices).
- The pressure can be released in 3 different ways at the end of cooking; note that the Quick Release and Natural Release methods can be set prior to or once cooking has begun.
RELEASE AT END OF COOKING:
Quick release: Pressure is released quickly at the end of cooking. This prevents overcooking of ingredients.
STEAM RELEASE
To activate, press the button after selecting the cooking time and pressure settings before cooking, or anytime during cooking. Pressure will then be released automatically at the end of cooking. Be careful of the steam shots! always keep your face and arms away from the lid.
Natural release: The pressure cooker will cool down by itself and the pressure will be released naturally. During natural release, some foods might over cook due to remaining pressure in the pot. Use quick release if you want to stop the cooking process immediately.
STEAM RELEASE
Manual release: Press the button continuously for 3 seconds anytime after cooking. Steam will be released within 2 minutes.
- Do not touch the pressure limit valve.
- You can only unlock the lid once the pressure is released. It could last several minutes. Before unlocking the lid, check first that the float valve is down.
- You can then open the lid and remove the food.
- When you open the appliance, always tilt the lid away from your face and arms to avoid burns.
IMPORTANT: Be careful of the hot steam coming out from the bowl. Keep your face and hands away from the steam release.
AVERAGE PRESSURE COOKING TIMES
| Food Cooking Time Level | Pressure (Psi) | Release Method | ||
| Black beans 25 minutes 7 12 natural | ||||
| Chickpeas, dried 40 minutes 7 12 natural | ||||
| Lentils 8 minutes 7 12 natural | ||||
| Navy beans, dried 25 minutes 7 12 natural | ||||
| Pinto beans, driced 18-20 minutes 7 12 natural | ||||
| Barcy 15-18 minutes 4 7.5 natural | ||||
| Risotto 6 minutes 3 6 quick | ||||
| Wild rice | 25 minutes 4 7.5 | quick | ||
| Chicken breast | 7-10 minutes | 5 | 9 | natural |
| Chicken thighs | 8-12 minutes | 5 | 9 | natural |
| Chicken, whole | 10 minutes 5 9 quick | |||
| Turkey breast | 30 minutes 5 9 | natural | ||
| Bone-in pork shoulder | 40-50 minutes 7 12 natural | |||
| Boneless pork shoulder | 15 minutes 7 12 natural | |||
| Boneless lamb meat | 15 minutes 7 12 natural | |||
| Beef brisket | 50-60 minutes 7 12 | quick | ||
| Beef round | 18-20 minutes 7 12 | quick | ||
| Artichokcs, quartercd | 4 minutes | 4 | 7.5 | quick |
| Bcets | 20 minutes 4 7.5 | quick | ||
| Butternut squash, cut into 2-inch (5cm) cubes | 8 minutes | 4 | 7.5 | quick |
| Cauliflower florets | 2 minutes 4 7.5 | quick | ||
| Mustard greens, 1-inch (2,5 cm) strips | 6 minutes | 4 | 7.5 | quick |
| Pearl onions | 3 minutes 4 7.5 | quick | ||
| Potatoes, 1/4 inch (6mm) chunks | 4 minutes | 4 | 7.5 | quick |
| Red cabbage, cut into thin strips | 5 minutes | 4 | 7.5 | quick |
| Customized recipe | according to personal taste | 1 | 1.5 | according to personal taste |
| Poultry, soups | 10 minutes 5 9 | natural | ||
| Chili and stews | 20 minutes 6 10.5 | quick | ||
| Dessert (Custards, compotes...) | 15 minutes | 2 | 3 | natural |

SLOW COOKING
- Open the lid of the appliance
- Place the ingredients in the cooking bowl.
- Close the lid, and turn it clockwise until it is sealed.
- Press any button to activate the unit. The display will blink.
- Press the button twice to select SLOW COOK. The mode will be automatically displayed on the screen.
- The temperature button will blink to show that you can adjust the temperature. Choose the mode LO or HI by pressing the (+) buttons. The chosen mode will be displayed.
- Press the button to access the time setting. A default time value will be displayed (0400). Adjust the time value by pressing the (+) buttons. The selected time value will be displayed.
- You can press the button, if you need to change again the mode (HI or LO). In this case this will not affect the time setting as settings are independent from each other.
NOTE: The PRESSURE button is not active for this function.
- Once the settings are selected, press the START button. The START button will flash: cooking is starting and you will hear a beep, time will be displayed and counting down.
-
You can change the settings (time and temperature) during cooking. If you need to modify the time setting, press the button. Adjust the time value by pressing the buttons. The new time will be displayed. The process is the same for the temperature setting, if you need to modify it.
-
Once the new settings are selected, press the START button to continue cooking. You will hear a beep. The remaining time will be displayed and counting down.
- At the end of cooking, the product will automatically switch to KEEP WARM. You will hear 3 beeps.
[ \boxed{0000} ] will be displayed and time will be counting up.
STEAM
- Open the lid of the appliance
- Fill in the cooking bowl with water up to the MIN level indicator inside of the bowl.
Install the trivet in the cooking bowl. - Place the ingredients in the steaming basket and install the basket on the trivet.
- Close the lid, and turn it clockwise until it is sealed.
- Press any button to activate the unit. The display will blink.
- Press the button 6 times to select STEAM. The STEAM function will light up. A default time value will be displayed (0:0:15)
The button will blink to indicate that you can choose the time setting. - Adjust the time by pressing the
The new value will be displayed on the screen. - Once you have selected the time setting, press the START STOP button to start cooking. The appliance will beep and time will be counting down.
- You can change the time setting during cooking: press the button and adjust the time value by pressing the () buttons.

- Once the new time setting is selected, press the START button to continue cooking. The appliance will beep and the time will be counting down.
- At the end of cooking, the product will automatically switch to KEEP WARM. The appliance will beep 3 times and the time will be counting up.
TEMP PRESSURE NOTE both and buttons are not active for this function.
SAUTÉ
This function allows you to sauté food such as vegetables in a small amount of fat/oil before pressure cooking, or to cook food such as rice for pilaf or risotto recipes.
- Open the lid of the appliance and keep it open.
- Press any button to activate the unit. The display will blink.
- Press the FUNCTION button 3 times to select SAUTÉ. The SAUTÉ function lights up.
- A default temperature value will be displayed 260 . The button will blink to indicate that you can choose the temperature setting.
- Adjust the temperature by pressing the buttons.
- The new temperature value will be displayed.
- Press the ~~ ~~~~~~~~~~~~~~~~~~~~~~~~~~·~ ~~~~~~~~~~~~~~~~~~~~~~~~ ~ ~~~~~~~~~~~~~~~~~~~~~~~~· ~ ~~~~~~~~~~~~~~~~~~~~~ · ~ T_TEMP button to access the time setting. A default time value will be displayed (00:10). Adjust the time value by pressing the + buttons. The selected time value will be displayed.
-
You can press the button, if you need to modify it. In this case the new value will not affect time as settings are independent from each other.
-
Once the settings are selected, press the START button to start preheating. The appliance will beep. And the display shows
After the pre-heating period, cooking will start and the appliance will beep. - Place the ingredients in the cooking bowl. Take care of the projections if you put fresh food in hot oil.
The time will be displayed and counting down. - You can change the time setting during cooking: press the button and adjust the time value by pressing the (+) buttons. You can do the same for the temperature setting.
- Once the new settings are selected, press the START button to continue cooking. The appliance will beep and the time will be counting down.
- Once the count down ends, the cooking stops and the appliance will beep 3 times. You can remove the food.
NOTE: the button is not active for this function. There is no KEEP WARM on this function.
SEAR
This function is ideal to brown and caramelize the ingredients directly in the cooking bowl before pressure or slow cooking, adding a fine flavor to your dishes.
- Open the lid of the appliance and keep it open.
- Place the ingredients in the cooking bowl.
- Press any button to activate the unit. The display will blink.
- Press the button 4 times to select SEAR. The SEAR function will light up.
A default time value will be displayed ( ) the time by pressing the buttons.

- Once the new time settings are selected, press the START button to start preheating. The appliance will beep, and the display shows As soon as the temperature for cooking is reached, it will switch automatically to the cooking phase, the time will be counting down.
- You can change the time setting during cooking: press the button and adjust the time value by pressing the + - buttons.
- Once the new settings are selected, press the START button to continue cooking.
- At the end of the count down the appliance will beep 3 times to announce the end of cooking.
TEMP PRESSURE NOTE: and buttons are not active for this function. The KEEP WARM is not active for this function.
REDUCE
The REDUCE setting is ideal to thicken your sauces or broths.
- Open the lid of the appliance and keep it open.
- Press any button to activate the unit. The display will blink.
FUNCTION
-
Press the button 5 times to select REDUCE. The function will light up.
-
A default temperature value will be displayed ( ). Adjust the temperature by pressing the buttons.
-
Press the button to access the time setting: a default time value will be displayed (00:10). Adjust the time value by pressing the (+) buttons.
-
If the temperature needs to be modified, press the button and adjust the value by pressing the (+) buttons. This will not affect the time setting.
-
Once the settings are selected, press the START button: the appliance will beep to indicate the start of preheating. And the display shows
You can place the ingredients in the cooking bowl. It will then switch automatically to the cooking phase, the time will be counting down.
-
You can change the time or temperature settings during cooking: press the or button and adjust the time value by pressing the buttons.
-
Once the new settings are selected, press the 1st step to continue cooking.
- At the end of the count down the appliance will beep 3 times to announce the end of cooking.

NOTE: The button is not active for this function. The KEEP WARM is not active for this function.
RICE
- Open the lid of the appliance.
Measure out the rice and rinse it thoroughly under running water in a strainer for a long time (except for risotto rice which should not be rinsed). Then place the rice in the bowl with the corresponding quantity of water.
Make sure the rice is well distributed around the whole surface of the bowl in order to allow even cooking. - Add salt to your personal taste if required.
Water may be substituted for stock. If using stock, there is the risks of slightly browned rice on the bottom. - Close the lid.
- Press any button to activate the unit. The display will blink.
FUNCTION
- Press the button 7 times to select RICE. The function will light up.
A default time value will be displayed ( ) the time by pressing the buttons. - Press the START button: the appliance will beep to indicate the start of preheating. And the display shows
- When the temperature for cooking is reached, the appliance will beep. It will then switch automatically to the cooking phase and the time will be counting down.
- You can change the time setting during cooking: press the button and adjust the time value by pressing the + - buttons.
- Once the new settings are selected, press the START button to continue cooking.
Do not open the lid during cooking as steam will escape and this will affect the cooking time and the taste. - At the end of cooking, the product will automatically switch to KEEP WARM. The appliance will beep 3 times and the time will be counting up.
- Open the lid. Remove the cooking bowl. Stir the rice with the rice spoon to separate grains.
COOKING GUIDE FOR WHITE RICE
| Measuring cup of white rice (American) | White rice quantity | Recommended water level in bowl | Recommended cooking time | Servings estimate |
| 2 0.7 lbs 14 oz | 3 mn + 10 mn | keep warm 3 - 4 | ||
| 4 1.4 lbs 27 oz | 3 mn + 10 mn | keep warm 5 - 6 | ||
| 6 2 lbs 41 oz | 3 mn + 20 mn | keep warm 8 - 10 | ||
| 8 3 lbs 54 oz | 3 mn + 20 mn | keep warm 13 - 14 | ||
| 10 | 3.5 lbs 68 oz | 3 mn + 20 mn keep | warm 16 - 18 | |
| 12 | 4 lbs 81 oz | 3 mn + 20 mn keep | warm 19 - 21 |
COOKING TIPS:
After 3 minutes of cooking, the rice is cooked. Adding 10 to 20 minutes of keep warm will develop the rice's flavors (by removing humidity).
- According to rice types, these indications may vary.
REHEAT
- Open the lid
- Put the food to reheat in the cooking bowl and close the lid.
- Press any button to activate the unit. The display will blink.
FUNCTION
- Press the button 8 times to select REHEAT. The function will light up.
- A default time value will be displayed ( ) the time by pressing the buttons.
EN
- Press the START button: the appliance will beep to indicate the start of preheating. And the display shows
The pressure cooker will then switch to the reheat phase and the time will be counting down. -
You can change the time setting during reheat: press the button and adjust the time value by pressing the (+) buttons.
-
Once the new time settings are selected, press the START button to continue cooking.
- At the end of the count down the appliance will beep 3 times to indicate the end of cooking.
TEMP PRESSURE NOTE: and buttons are not active.
There is no KEEP WARM on this function.
HOW TO CLEAN YOUR PRESSURE COOKER
DISMANTLING AND CLEANING THE SECURITY PARTS
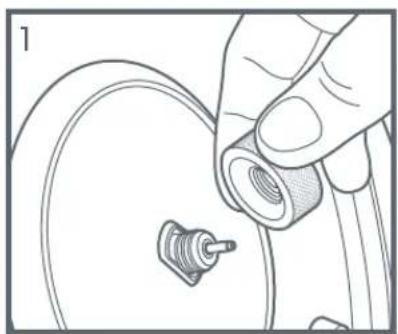
Unscrewing the central bolt (under the lid) to remove the lid from the body.

Removing the sealing gasket. Cleaning the float valve.
Removing the pressure limit valve.
Removing the valve strainer. Checking the safety valve.
Once your food is cooked, unplug the appliance to clean it:
Clean the housing with a damp and soft cloth. Do not use abrasive sponge as it may scratch the glossy surface.
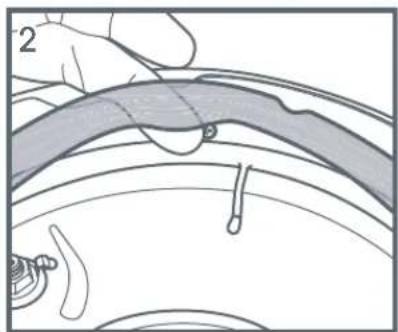
To clean the lid : unscrew the central nut (under the lid) in anti-clockwise direction. Remove the nut and keep it in a safe place (picture 1 on previous page). Then remove the lid and clean it under water. Dry it off thoroughly before putting it back into place. Finally screw back the nut, taking care that it is in the correct position (the black sealing ring must be pressed against the lid surface).
- Rinse the sealing gasket (picture 2). Dry it off thoroughly before putting it back into place. Make sure that the gasket is correctly positioned on the metal ring.
- To clean the float valve (picture 3): remove the seal at the bottom of the pipe, and remove the pipe from the top of the lid. Clean it under running water. Take care that the duct is properly cleaned. Dry thoroughly the seal and the pipe before putting the valve back in its original position.
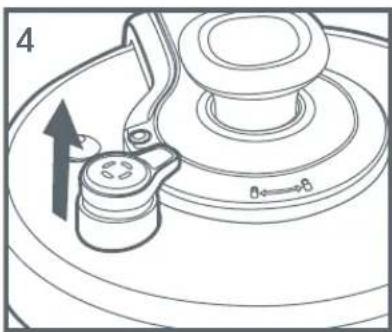
- To clean the pressure limit valve (picture 4): remove the valve weight gently from the top of the lid and rinse it under running water, paying special attention to the inside. Dry it off thoroughly. Take care also that the duct of the valve on the lid is properly cleaned before putting the valve weight back in its original position.
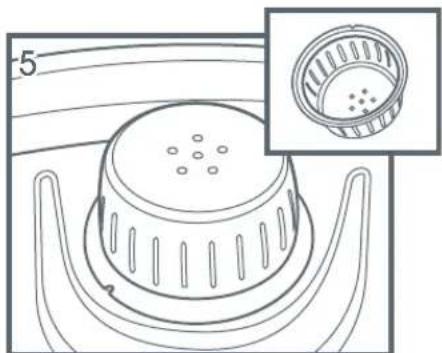
- To clean the strainer of the valve (picture 5) (under the lid): pull the strainer slightly to unclip it. Then clean it under running water. Dry it off thoroughly. Then put it back in its original positon (you should hear a "click" sound and the valve strainer must be close up against the inside of the lid).
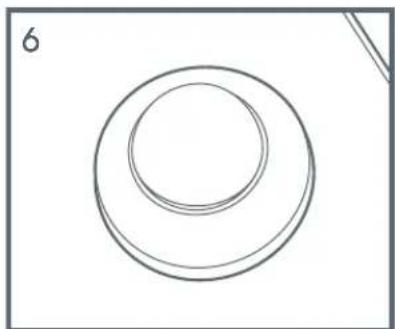
- Ensure that the safety valve (picture 6) is working properly, by pushing it slightly with the finger, checking that there is no dirt or remaining food. But never attempt to unscrew it.
- Clean the removable cooking bowl and the accessories. Only the accessories are dishwasher safe. Do not use a scourer to clean the bowl as this can damage the non stick coating on the bowl.
- Remove the condensation collector and clean it thoroughly under running water. Put it back in its original position.
IMPORTANT:
- Do not immerse the appliance in water. Always use the provided cooking bowl. Do not pour water or food directly into the appliance without the cooking bowl.
- If you inadvertently immerse your appliance in water or spill water directly on the heating element (when the bowl is not in place), take it to your service center for repair.
- Clean your appliance after each use.
- Change the sealing gasket every 2 years.
WHAT TO DO IF YOUR PRESSURE COOKER IS NOT WORKING PROPERLY
| Problems Possible causes Solutions | ||
| Unable to open the lid. | Unable to open because of pressure in the inner pot. | Wait for the pressure in the pot to be completely released automatically. Press and hold the steam release button. Note: when you press and hold the steam release button more than 3 seconds, the valve remains open during 30 seconds. |
| Pressure in the pot is fully released but the float valve is stuck because it is too dirty, and therefore unable to move down. | Be sure the pressure is totally released by complete cool down 2 hours minimum (do not attempt to put the product into water to cool it down). Then use a stick to poke the float valve, to make it fall down. Be careful, keep your face away from the lid and the handle. Before using it again, please clean and wipe the float valve. | |

| Problems Possible causes Solutions | ||
| Unable to close the lid. | Sealing gasket is not properly installed. | Install the sealing gasket properly on the metal ring. |
| The float valve is stuck because it is dirty, and it blocks the mechanism of the lid. | Please use a stick to poke the float valve, to make it fall down.Dismantle the float valve to clean it (see more details in the section “How to clean”) Never attempt to use the appliance when the float valve is dirty. | |
| Intense release of pressure from pressure limit valve. | Faulty pressure control resulted in release of pressure. | Send to repair and maintenance department. |
| Pressure limit valve did not fall into place. | Gently press the pressure limit valve to make it fall into place. Refer to page 11 for the correct position of the valve. | |
| Food is not cooked or badly cooked | Rice: water ratio is incorrect. | Use the required rice/water ratio. Be sure the releasing valve is not dirty and create leakage during cooking. |
| No electricity from the power grid. | Check the home electric circuit. | |
| E0 is displayed on screen | Lid temperature sensor is faulty. | Send to repair and maintenance department. |
| E1 is displayed on screen | Bottom temperature sensor is faulty. | Send to repair and maintenance department. |
| E2 is displayed on screen. | Lid is not locked. | Check if the selected program requires the lid totally closed. If yes, completely lock the lid. If not, send to repair and maintenance department. |
| E5 is displayed on screen. | Abnormal low pressure. | Check that the gasket is properly installed and cleaned. Check that the pressure limit valve falls down into place and is cleaned. Check that the lid fixing nut is well tightened. |
| Steam leaking from lid. | The sealing gasket was not properly installed. | Remove the gasket, clean it and reinstall the sealing gasket properly, in the correct position. |

RECIPES
Cream of Leek & Potato Soup
Preparation time: 15 minutes
Cook Time: 20 minutes
Yield: 8 cups
2 tablespoons butter
14 cup olive oil
3 large leeks (white and pale green parts only), halved lengthwise, thinly sliced (about 5 cups)
3 medium potatoes, peeled and diced (about 4 cups)
2 medium carrots, peeled and chopped (about 1 cup)
3 cups chicken broth
12 cup white wine
1 cup cream
Salt and pepper, to taste
Fresh chopped parsley
Place butter and olive oil into the cooking pot. Keep the lid open and select SEAR program; when butter has melted, add leeks, potatoes, and carrots. Cook and stir 10 minutes or until vegetables are softened. Add broth and wine. Close the lid. Select PRESSURE COOK program Level 7 and Time 10 minutes.
Once the timer beeps 3 times to indicate the end of cooking, manually release pressure by pressing on the steam release button for about 5 seconds. The steam release process will take about 4 to 5 minutes. Slowly open the lid and place about 3 cups of your soup in a blender. Blend until mixture is smooth and creamy. Place the blended soup in large serving bowl and repeat in batches with remaining soup. Add cream and stir to combine. Salt and pepper to taste. Serve hot topped with parsley.
Mussels in White Wine
Preparation time: 20 minutes
Cook Time: 8 minutes
Yield: 4 lbs. mussels (1/2 lb. per person)
1 tablespoon butter
3 cloves garlic, finely chopped (about 112 teaspoons)
2 shallots, finely chopped (about 14 cup)
12 cup dry white wine
1 medium tomato, chopped (about 12 cup)
4 lbs. black mussels, washed, and sorted
2 lemons, quartered, divided
2 tablespoons chopped fresh parsley
1 sprig fresh thyme
1 bay leaf
Additional parsley
French bread, toasted and buttered
Place butter, garlic and shallots into the cooking pot. Keep the lid open and select SAUTÉ program. Cook and stir 4 minutes or until softened. Add the white wine and tomatoe; stir well.
EN
Add mussels, 4 lemon quarters, parsley, thyme, and bay leaf; stir to combine. Close the lid. Select PRESSURE COOK program Level 7 and Time 4 minutes.
Once the timer beeps 3 times to indicate the end of cooking, manually release pressure by pressing on the steam release button for about 5 seconds. The steam release process will take about 4 to 5 minutes. Slowly open the lid and carefully remove mussels. Place on a large platter and squeeze the juice from the remaining lemon quarters over the mussels. Sprinkle with additional parsley and serve with French bread.
NOTE: Fresh or frozen mussels can be used for this recipe.
Beef Bolognese Sauce
Preparation time: 10 minutes
Cook Time: 45 minutes
Yield: 9 cups
1 lb. ground beef
1 lb. ground pork
3 pieces bacon, chopped.
1 medium carrot, peeled and diced (about 34 cup)
1 medium celery stalk, diced (about 12 cup)
1 medium onion, chopped (about 1 cup)
2 garlic cloves, crushed (about 1 teaspoon)
12 cup red wine
1 (28 oz.) can crushed tomatoes
1 (6 oz.) can tomato paste
2 teaspoons dried oregano
2 teaspoons dried basil
2 bay leaves
1 teaspoon Kosher salt
12 teaspoon freshly cracked peppe
12 cup grated parmesan cheese
Place beef, pork, bacon, carrot, celery, onion and garlic into the cooking pot. Keep the lid open and select SEAR program. Cook and stir 25 minutes or until meat is browned. Add wine, tomatoes, tomato paste, oregano, basil, bay leaves, salt, and pepper; stir well. Close the lid. Select PRESSURE COOK program Level 6 and Time 20 minutes.
Once the timer beeps 3 times to indicate the end of cooking, manually release pressure by pressing on the steam release button for about 5 seconds. The steam release process will take about 4 to 5 minutes. Slowly open the lid and remove the bay leaves. Sprinkle with parmesan cheese just before serving.
Preparation time: 10 minutes
Cook Time: 15 minutes
Yield: 6 cups
1 tablespoon olive oil
2 tablespoons butter
1 medium onion, chopped (about 1 cup)
8 oz. pancetta, diced
112 cups Arborio rice
3 cups chicken stock
2 tablespoons lemon juice
1 cup frozen peas
12 cup grated parmesan cheese
12 teaspoon Kosher salt
14 teaspoon freshly cracked pepper
Add oil and butter into cooking pot. Keep the lid open and select SEAR program. Add the onion and pancetta; cook and stir 10 minutes or until pancetta is browned. Add the rice and stir to coat. Add chicken stock, lemon juice, and peas; stir well. Close the lid. Select RICE program and Timer 5 minutes.
Once the timer beeps 3 times to indicate the end of cooking, manually release pressure by pressing on the steam release button for about 5 seconds. The steam release process will take about 4 to 5 minutes. Stir in cheese, salt, and pepper. Serve hot.

Rosemary and Red Wine Braised Lamb Shanks
Preparation time: 15 minutes
Cook Time: 50 minutes
Yield: 4 servings
4 lamb shanks, about 1 12 lbs. each, French trimmed
14 cup all-purpose flour
2 tablespoons olive oil, divided
1 medium onion, chopped (about 1 cup)
3 medium carrots, sliced (about 2 cups)
2 garlic cloves, minced (1 teaspoon)
34 cup dry red wine
14 cup beef or vegetable stock
2 medium tomatoes, chopped (about 112 cups)
1 tablespoon fresh rosemary
1 tablespoon lemon zest
Salt and pepper, to taste
Dry shanks; coat in flour, shake off excess. Keep the lid open and select SEAR program. Add 1 tablespoon of oil in the cooking pot and brown the shanks two at a time (about 12-15 minutes) and set aside; repeat with the remaining two shanks. Remove shanks; set aside.
Keep the lid open and select SEAR program. Add remaining 1 tablespoon oil, onions, carrots, and garlic. Cook and stir for about 10 minutes or until softened. Add wine, stock, tomatoes, rosemary, and lemon zest. Return all lamb shanks to the cooking pot.
Close the lid. Select PRESSURE COOK program Level 7 and Timer 25 minutes.
Once the timer beeps 3 times to indicate the end of cooking, manually release pressure by pressing on the steam release button for about 5 seconds. The steam release process will take about 4 to 5 minutes. Meat should be very tender and almost falling off the bone. Season with salt and pepper to taste. Serve lamb with vegetables and pan sauce.
Whiskey Bread Pudding with White Chocolate Sauce
Preparation time: 10 minutes
Cook Time: 20 minutes
Yield: 6 to 8 servings
3 eggs, lightly beaten
1/3 cup sugar
2 tablespoons whisky or bourbon
1 teaspoon vanilla extract
1 teaspoon ground cinnamon
12 teaspoon ground nutmeg
2 cups warm milk (105 to 115 F)
6 cups favorite bread, toasted and cubed (about 12 ounces)
12 cup raisins
1 cup white chocolate morsels
12 cup heavy whipping cream
Spray a 6-cup souffle dish with cooking spray; set aside.
In a large bowl add eggs, sugar, whiskey, vanilla, cinnamon, and nutmeg; beat until well combined. Add milk and mix well. Add bread and raisins and toss until well mixed. Pour into the prepared souffle dish; cover tightly with foil.
Add 1 12 cups water to cooking pot and place trivet and steam basket inside. Carefully place the covered souffle dish in the steam basket; close the lid. Select PRESSURE COOK program Level 3 and Time 20 minutes.
Meanwhile, combine chocolate and cream in a microwave-safe bowl. Heat on HIGH for 2 minutes, stirring every 20 seconds until mixture is smooth. Set aside and keep warm.
Once the timer beeps 3 times to indicate the end of cooking, let pressure release naturally on its own (about 10 minutes). Remove the souffle dish from the cooking pot and serve pudding warm or at room temperature with the white chocolate sauce.

MANUFACTURER'S LIMITED WARRANTY
: www.all-clad.com / www.all-clad.ca
With a strong commitment to the environment, All-Clad electrical products are repairable during and after the warranty period.
Before returning any defective products to the point of purchase, please call All-Clad consumer service directly at the phone number below for repair options.
Your help to sustain the environment is appreciated!
The Warranty
This electrical product or product with batteries is guaranteed by All-Clad for a period of 2 years against any manufacturing defect in materials or workmanship, starting from the initial date of purchase.
The manufacturer's warranty by All-Clad is an extra benefit which does not affect consumer's Statutory Rights.
The All-Clad warranty covers all costs related to restoring the proven defective product so that it conforms to its original specifications, through the repair or replacement of any defective part and the necessary labor. At All-Clad's choice, a replacement product may be provided instead of repairing a defective product. All-Clad's sole obligation and your exclusive resolution under this warranty are limited to such repair or replacement.
Conditions & Exclusions
The All-Clad warranty only applies within the United States and Canada, and is valid only on presentation of a proof of purchase.
For warranty service please contact All-Clad Consumer Service using the appropriate toll free number or website listed below. A consumer service representative will personally assist you with the evaluation, repair or replacement of your product at the closest All-Clad service center.
All-Clad shall not be obliged to repair or replace any product which is not accompanied by a valid proof of purchase.
This warranty will not cover any damage which occurs as a result of misuse, negligence, failure to follow All-Clad instructions, use on current or voltage other than as stamped on the product, or a modification or unauthorized repair of the product. It also does not cover normal tear and wear, maintenance or replacement of consumable parts, and the following:
- using the wrong type of water or consumable
- scaling (any de-scaling must be carried out according to the instructions for use);
- ingress of water, dust or insects into the product;
-mechanical damages,overloading
- damages or bad results due to wrong voltage or frequency
- accidents including fire, flood, lightning, etc
- professional or commercial use
- damage to any glass or porcelain ware in the product
This warranty does not apply to any product that has been tampered with, or to damages incurred through improper use and care, faulty packaging by the owner or mishandling by any carrier.
The All-Clad manufacturer's warranty applies only for products purchased and used in USA & Canada. Where a product is purchased in one country and then used in another one:
a) The All-Clad guarantee does not apply in case of non conformity of the purchased product with the local standards, such as voltage, frequency, power plugs, or other local technical specifications
b) The repair process for products purchased outside the country of use may require a longer time if the product is not locally sold by All-Clad
c) In cases where the product is not repairable in the new country, the All-Clad guarantee is limited to a replacement by a similar product or an alternative product at similar cost, where possible.
EN
Consumer Statutory Rights
This All-Clad manufacturer's warranty does not affect the statutory rights a consumer may have or those rights that cannot be excluded or limited, nor rights against the retailer from which the consumer purchased the product. This warranty gives a consumer specific legal rights, and the consumer may also have other legal rights which vary from State to State or Country to Country or Province to Province. The consumer may assert any such rights at his sole discretion.
Additional information
Accessories, Consumables and end-user replaceable parts can be purchased, if locally available, as described in All-Clad internet site.
| U.S.A. | GROUPE SEB USA 2121 Eden Road Millville, NJ 08332 | CANADA | GROUPE SEB CANADA 345 Passmore Avenue Toronto, ON M1V 3N8 |
| 800-255-2523 | 1-800-418-3325 |

: www.all-clad.com / www.all-clad.ca
SOMMAIRE
MESURES DE SECURITE IMPORTANTES. pg. 43
DESCRIPTION DES PIECES. 50
AVANT LA PREMIÈRE UTILISATION. 53
PREPARATION DE VOTRE AUTOCUISEUR ELECTRIQUE POUR L'UTILISATION . 53
ASTUCES POUR ASSURER DES RÉSULTATS DE CUISSON PARFAITE pg. 54
DESCRIPTION DES RÉGLAGES. pg. 55
CUISSON SOUS PRESSION. 56
TEMPS MOYENS DE CUISINE SOUS PRESSION. pg. 59
CUISSON LENTE (« SLOW COOKING ») pg. 60
STEAM (VapeUR) . pg. 61
SAUTÉ (« SAUTER »). pg. 62
: www.all-clad.com / www.all-clad.ca
: www.all-clad.com / www.all-clad.ca
: www.all-clad.com / www.all-clad.ca

www.all-clad.com