VR230620 - Cooker GAGGENAU - Free user manual and instructions
Find the device manual for free VR230620 GAGGENAU in PDF.
User questions about VR230620 GAGGENAU
0 question about this device. Answer the ones you know or ask your own.
Ask a new question about this device
Download the instructions for your Cooker in PDF format for free! Find your manual VR230620 - GAGGENAU and take your electronic device back in hand. On this page are published all the documents necessary for the use of your device. VR230620 by GAGGENAU.
USER MANUAL VR230620 GAGGENAU
Use and care manual 2
⚠ Safety Definitions 2
IMPORTANT SAFETY INSTRUCTIONS 3
Fire Safety 3
Cooking Safety 4
Burn Prevention 5
Child Safety 5
Cleaning Safety 6
Proper Installation and Maintenance 6
Proposition 65 Warning 7
Causes of damage 8
Environmental protection 8
Energy saving tips 8
Getting to know your appliance 9
Electric grill 9
Display on the illuminated ring 9
Accessories 9
Special accessories 9
Before using the appliance for the first time 10
Cleaning the appliance 10
Preparing the grill 10
Heating the grill 10
Operating the appliance 11
Turning on 11
Turning off 11
Residual heat display 11
Overheating protection 11
Safety shut-off 11
Table of settings and tips 12
Tips for cooking and roasting 13
Cleaning and maintenance 14
Cleaning the appliance 14
Faults – What to Do? 15
Customer Service 16
Additional information on products, accessories, replacement parts and services can be found at www.gaggenau.com and in the online shop www.gaggenau.com/zz/store
Safety Definitions
WARNING
This indicates that death or serious injuries may occur as a result of non-observance of this warning.
CAUTION
This indicates that minor or moderate injuries may occur as a result of non-observance of this warning.
NOTICE
This indicates that damage to the appliance or property may occur as a result of non-compliance with this advisory.
Note: This alerts you to important information and/or tips.

IMPORTANT SAFETY INSTRUCTIONS
READ AND SAVE THESE INSTRUCTIONS

WARNING
When properly cared for, your new appliance has been designed to be safe and reliable. Read all instructions carefully before use. These precautions will reduce the risk of burns, electric shock, fire, and injury to persons. When using kitchen appliances, basic safety precautions must be followed, including those in the following pages.
Fire Safety
Do not allow aluminum foil, plastic, paper or cloth to come in contact with a hot surface element, burner or grate. Do not allow pans to boil dry.
If the cooktop is near a window, forced air vent or fan, be certain that flammable materials such as window coverings do not blow over or near the burners or elements. They could catch on fire.
Always have a working smoke detector near the kitchen.
Never leave the cooktop unattended when in use. Boilovers cause smoking and greasy spillovers may ignite.

WARNING
TO REDUCE THE RISK OF A GREASE FIRE:
- Never leave surface units unattended at high settings. Boilovers cause smoking and greasy spillovers that may ignite. Heat oils slowly on low or medium settings.
- Always turn hood ON when cooking at high heat or when flambéing food (i.e. Crepes Suzette, Cherries Jubilee, Peppercorn Beef Flambé).
- Clean ventilating fans frequently. Grease should not be allowed to accumulate on fan or filter.
- Use proper pan size. Always use cookware appropriate for the size of the surface element.
In the event that personal clothing or hair catches fire, drop and roll immediately to extinguish flames.
Have an appropriate fire extinguisher available, nearby, highly visible and easily accessible near the appliance.
Smother flames from food fires other than grease fires with baking soda. Never use water on cooking fires.

IMPORTANT SAFETY INSTRUCTIONS
READ AND SAVE THESE INSTRUCTIONS

WARNING
TO REDUCE THE RISK OF INJURY TO PERSONS IN THE EVENT OF A GREASE FIRE, OBSERVE THE FOLLOWING:
- SMOTHER FLAMES with a close-fitting lid, cookie sheet, or metal tray, then turn off the burner. BE CAREFUL TO PREVENT BURNS. If the flames do not go out immediately, EVACUATE AND CALL THE FIRE DEPARTMENT.
- NEVER PICK UP A FLAMING PAN
- You may be burned.
- DO NOT USE WATER, including wet dishcloths or towels – a violent steam explosion will result.
-
Use an extinguisher ONLY if:
-
You know you have a Class ABC extinguisher, and you already know how to operate it.
- The fire is small and contained in the area where it started.
- The fire department is being called.
- You can fight the fire with your back to an exit.
Whenever possible, do not operate the ventilation system during a cooktop fire. However, do not reach through fire to turn it off.
Cooking Safety

WARNING
Use this appliance only for its intended use as described in this manual. NEVER use this appliance as a space heater to heat or warm the room. Doing so may result in carbon monoxide poisoning and overheating the appliance. Never use the appliance for storage.

WARNING
NEVER cover any slots, holes or passages in the oven bottom or cover an entire rack with materials such as aluminum foil. Doing so blocks air flow through the oven and may cause carbon monoxide poisoning. Aluminum foil linings may also trap heat, causing a fire hazard.

WARNING
Risk of burns!
Only close the appliance cover once the appliance has cooled down.
Never turn on the appliance with the appliance cover closed. Don't set down food on appliance cover or use it for keeping food warm.

IMPORTANT SAFETY INSTRUCTIONS
READ AND SAVE THESE INSTRUCTIONS
Burn Prevention
DO NOT TOUCH SURFACE UNITS OR AREAS NEAR UNITS - Surface units may be hot even though they are dark in color. Areas near surface units may become hot enough to cause burns. During and after use, do not touch, or let clothing, potholders, or other flammable materials contact surface units or areas near units until they have had sufficient time to cool. Among these areas are the cooktop and areas facing the cooktop.
Do not heat or warm unopened food containers. Build-up of pressure may cause the container to burst and cause injury.
Always use dry potholders. Moist or damp potholders on hot surfaces may result in burns from steam. Do not let potholder touch hot heating elements. Do not use a towel or other bulky cloth.
Always turn hood ON when cooking at high heat or when flambéing food (i.e. Crêpes Suzette, Cherries Jubilee, Peppercorn Beef Flambé).
Use high heat settings on the cooktop only when necessary. To avoid bubbling and splattering, heat oil slowly, on no more than a low-medium setting. Hot oil is capable of causing extreme burns and injury.
Never move a pan of hot oil, especially a deep fat fryer. Wait until it is cool.
Secure all loose garments, etc., before beginning. Tie long hair so that it does not hang loose, and do not wear loose-fitting clothing or hanging garments, such as ties, scarves, jewelry, or dangling sleeves.

WARNING
Risk of burns!
If the appliance cover (VD) is fitted: do not close the appliance cover until the appliance has cooled down completely. Do not operate the appliance with the cover closed. Do not use the appliance cover for placing objects or for keeping things warm.
Child Safety
When children become old enough to use the appliance, it is the responsibility of the parents or legal guardians to ensure that they are instructed in safe practices by qualified persons.
Do not allow anyone to climb, stand, lean, sit, or hang on any part of an appliance, especially a door, warming drawer, or storage drawer. This can damage the appliance, and the unit may tip over, potentially causing severe injury.
Do not allow children to use this appliance unless closely supervised by an adult. Children and pets should not be left alone or unattended in the area where the appliance is in use. They should never be allowed to play in its vicinity, whether or not the appliance is in use.

IMPORTANT SAFETY INSTRUCTIONS
READ AND SAVE THESE INSTRUCTIONS

CAUTION
Items of interest to children should not be stored in an appliance, in cabinets above an appliance or on the backsplash. Children climbing on an appliance to reach items could be seriously injured.
Cleaning Safety
Do not clean the appliance while it is still hot. Some cleaners produce noxious fumes when applied to a hot surface. Wet clothes and sponges can cause burns from steam.
Do not use steam cleaners to clean the appliance.
Do not soak removable heating elements - Heating elements should never be immersed in water.
Proper Installation and Maintenance
Have the installer show you the location of the circuit breaker or fuse. Mark it for easy reference.
This appliance must be properly installed and grounded by a qualified technician. Connect only to properly grounded outlet. Refer to Installation Instructions for details.
This appliance is intended for normal family household use only. It is not approved for outdoor use. See the Statement of Limited Product Warranty. If you have any questions, contact the manufacturer.
Do not store or use corrosive chemicals, vapors, flammables or nonfood products in or near this appliance. It is specifically designed for use when heating or cooking food. The use of corrosive chemicals in heating or cleaning will damage the appliance and could result in injury.
Make sure reflector pans or drip bowls are in place - Absence of these bowls or pans during cooking may subject wiring or components underneath to damage.

WARNING
Failure to operate knobs properly may result in personal injury and damage to the appliance.
Do not operate this appliance if it is not working properly, or if it has been damaged. Contact an authorized service provider.
Do not cook on a broken cooktop. Cleaning solutions and spillovers may create a risk of electric shock.
Do not repair or replace any part of the appliance unless specifically recommended in this manual. Refer all servicing to an authorized service provider.
To avoid electrical shock hazard, before servicing the appliance, switch power off at the service panel and lock the panel to prevent the power from being switched on accidentally.

IMPORTANT SAFETY INSTRUCTIONS
READ AND SAVE THESE INSTRUCTIONS

CAUTION
Malfunction
Always set control knobs to the zero position when the appliance is not in operation.
Proposition 65 Warning:
This product may contain a chemical known to the State of California, which can cause cancer or reproductive harm. Therefore, the packaging of your product may bear the following label as required by California:
STATE OF CALIFORNIA PROPOSITION 65 WARNING:

WARNING
Cancer and Reproductive Harm - www.P65Warnings.ca.gov
Causes of damage
NOTICE
Damage to device through inappropriate accessories
Only use the designated original accessories. Don't use grill trays or aluminum foil. This damages the grill shelf.
Environmental protection
In this section, you can find information about saving energy and disposing of the appliance.
Energy saving tips
- Stop the heating appliance when it reaches the required temperature.
- If you are preparing small amounts of food, use the option to switch on the front or the rear grill element only.
- Switch to a lower grill setting in good time.
- Select the appropriate ongoing grill setting. You will waste energy if you select an ongoing grill setting that is too high.
- Use the residual heat of the grill. For longer cooking times, switch the appliance off 5–10 minutes before the end of the cooking time.
Getting to know your appliance
Electric grill
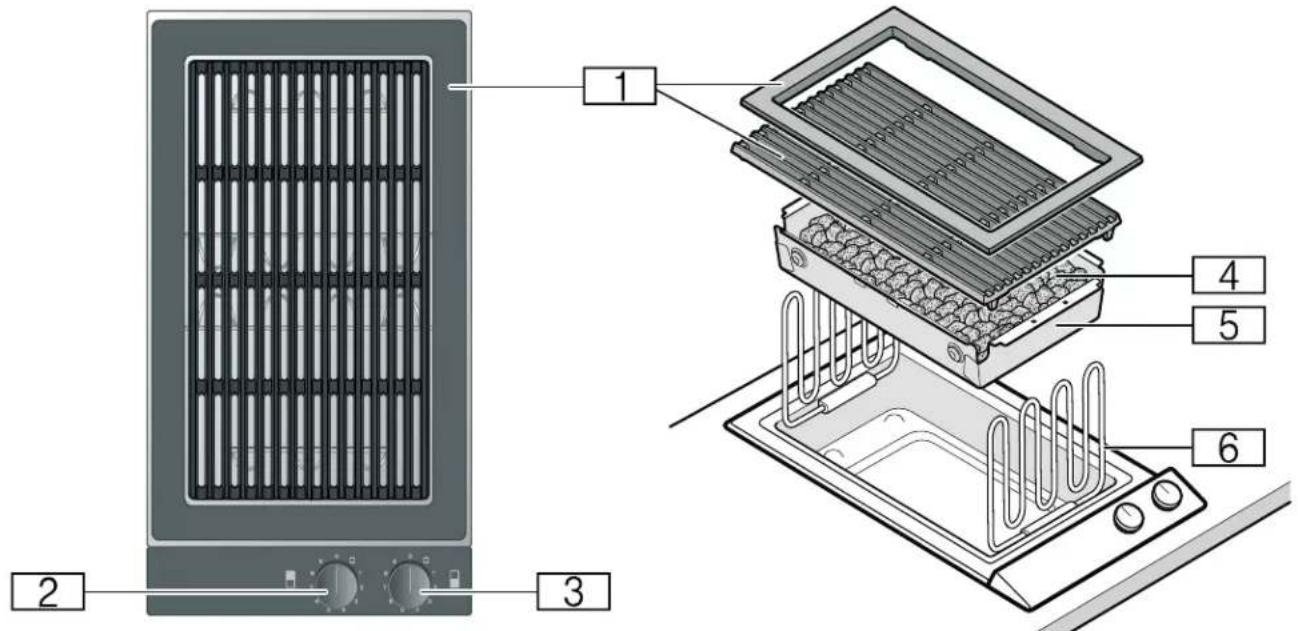
text_image
Diagram of a microwave oven with labeled components including air grating, heater, and cooling unit(Wire rack and frame
0 Control knob for the rear grill element:
Grill settings 1-9
□ Connecting the grill elements
8 Control knob for the front grill element
Grill settings 1-9
□ Connecting the grill elements
@ Lava stones
H Lava stone container
P Grill element
Display on the illuminated ring
The control knob is encircled by an illuminated ring that indicates a number of statuses and functions.
| Display Meaning | |
| ○ Off Appliance OFF | |
| ● Lit orange Appliance ON | |
| ● Lit white but gradually changing to orange | Appliance ON heat-up indicator |
| ● Slowly flashing orange | Appliance OFF residual heat indicator |
| ● Flashing orange and white alternately | Safety shut-off, power failure |
Accessories
As standard, your device comes with the following accessories:
Lava stones
Cleaning brush
Special accessories
You can order the following accessories from your specialist dealer:
LV 030 000 Lava stones (replacement)
Use the accessories only as indicated. The manufacturer assumes no liability for incorrect usage of the accessories.
Before using the appliance for the first time
In this section, you can find out what you must do before using your appliance to prepare food for the first time. Read the safety information before you start.
Cleaning the appliance
Before using the appliance and accessory parts for the first time, clean them thoroughly with lukewarm soapy water.
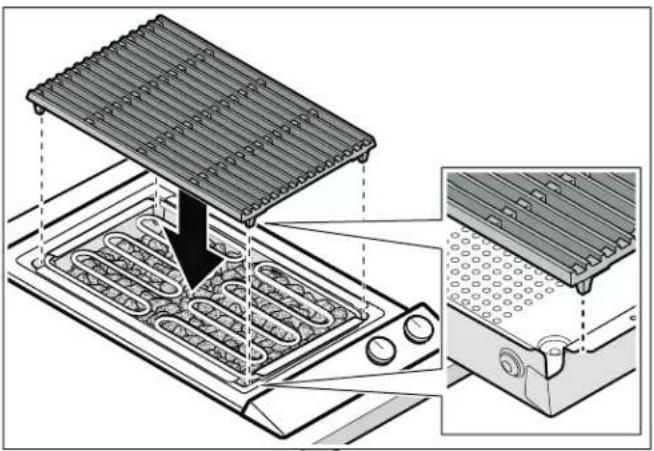
Preparing the grill
- Correctly insert the lava stone tray. The recesses in the lava stone tray correspond to the recesses in the base of the appliance.

text_image
Technical diagram showing a mechanical assembly with labeled parts and checkmark indicators for inspection or validation.- Remove the lava stones from the film and place them in the lava stone tray.
- Fold both grill elements downwards. The grill elements must lie flat.
- Put the wire rack in place. Position the wire rack so that the feet of the wire rack fit into the recesses in the lava stone tray. Ensure that the wire rack is lying flat.
text_image
Diagram illustrating a food preparation setup with labeled components and a magnified view of the interior.- Put the frame in place. Ensure that the frame is lying flat and that the distance between the frame and the wire rack is the same all round.

natural_image
Line drawing of a rectangular appliance with a grid-patterned panel and control buttons (no text or symbols)
WARNING
Risk of burns!
The appliance parts become hot during operation. Only operate the grill when the frame and wire rack inserted correctly.
Heating the grill
Heat the grill for a few minutes at grill setting 9. This will get rid of the new-appliance smell and any contamination.
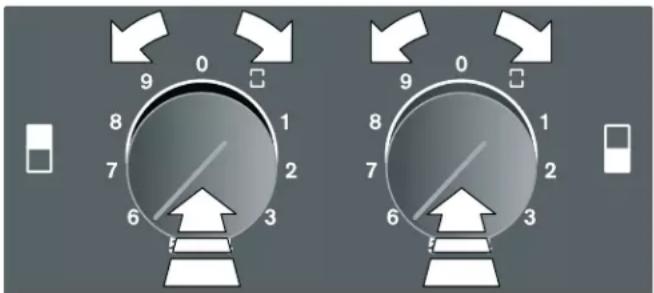
Operating the appliance
Turning on
The frame is cooler than the wire rack during operation. Only use the surface of the wire rack for grilling.
The two grill elements can be controlled separately. This means that you can grill foods that require different temperatures at the same time. If required, you can connect the two grill elements together and set the same grill setting at the same time for both of them.
Push in the other control knob and turn it to the required grill setting. The illuminated ring lights up white. If you do not want to cook over the entire grill zone, switch on the front or rear grill element only.
text_image
9 0 8 1 7 2 6 3 5 9 0 8 1 7 2 6 3The illuminated ring dims from white to orange while the appliance is heating up. An audible signal sounds when the set temperature has been reached. The preheating phase at grill setting 9 takes approximately 10 minutes.
Connecting the grill elements
Push in any control knob and turn it to the □ symbol. Push in the other control knob and turn it to the required grill setting. Both grill elements are now at this grill setting.
Turning off
Turn the control knobs to position 0. The indicator light goes out.

WARNING
Risk of burns!
The appliance will remain hot for a long time even after you switch it off. Do not touch the appliance while the residual heat indicator is flashing.

WARNING
Risk of burns!
Only close the appliance cover once the appliance has cooled down. Never turn on the appliance with the appliance cover closed. Don't set down food on appliance cover or use it for keeping food warm.
Residual heat display
After switching off the appliance, the illuminated ring on the control knob slowly flashes orange until the appliance has cooled enough for it to be safe to touch. Do not touch the appliance while the residual heat indicator is flashing.
Overheating protection
In the event of overheating, the appliance automatically turns off the grill heating elements in order to protect the countertop and cabinets. After the appliance has sufficiently cooled down, turn it back on.
Safety shut-off
For your protection, the appliance is equipped with a safety shut-off. Any kind of heating will be switched off after 4 hours if the appliance controls are not used during this time. The heating element will also remain off after a power failure. The illuminated ring on the control knob flashes orange and white alternately.
Turn the control knob to 0. You will now be able to start the appliance again as usual.
Table of settings and tips
| Food Grill setting Grilling time Comments | ||
| Meat and poultry | ||
| Beef steak, medium, 34''-114'' (2–3 cm) | 8 3–4 mins each side The steak is medium when meat juice can be seen on the surface. | |
| Veal cutlet, 34'' (2 cm) 7 6 mins each side | ||
| Kebab skewers, 312 oz (100 g) each | 6–7 15–20 mins Turn several times. | |
| Lamb cutlet, rare, 34'' (2 cm) 7 6 mins each side | ||
| Pork neck steak, 34'' (2 cm) | 7 6–8 mins each side | |
| Grilled sausage, 112-312 oz (50–100 g) | 6–7 10–20 mins Turn several times. | |
| Hamburger, 12'' (1 cm) | 6–7 12–15 mins | |
| Turkey steaks, 34'' (2 cm) | 6–7 12–15 mins | |
| Chicken wings, 312 oz (100 g) each | 6–7 15–20 mins Turn several times. | |
| Fish and seafood | ||
| King prawns | 7 5–12 mins Use shell-on prawns, raw or cooked. | |
| Lobster, precooked | 8 7–15 mins | |
| Salmon steak, 114'' (3 cm) | 6 10–15 mins | |
| Tuna steak, 114'' (3 cm) | 6–7 7–10 mins | |
| Fish fillet, 34'' (2 cm) | 6 6–8 mins e.g. herring or halibut | |
| Trout, whole, 7 oz (200 g) | 7 12–15 mins Coat the trout with oil to prevent the skin stick-ing to the wire rack. | |
| Side dishes | ||
| Vegetables | 5 10–15 mins e.g. sliced zucchini and aubergine, quartered peppers | |
| Mushroom caps | 6 4–6 mins | |
| Fruit(e.g. peach or pear halves) | 5 5–10 mins each side | |
| Keeping warm | 1 –2 Ensure that the wire rack is not too hot to keep food warm. | |
Tips for cooking and roasting
- The values given in the table of settings are only a guide; you may need more or less heat depending on the type and state of the food.
- Heat the appliance to the required temperature. The illuminated ring lights up white. The illuminated ring dims from white to orange while the appliance is heating up. An audible signal sounds when the set temperature has been reached.
- Always preheat the grill. The intense heat radiation enables a crust to form quickly and prevents meat juice from escaping.
- Before grilling, you can coat or marinate the food in heat-resistant oil (e.g. peanut oil). This improves the flavor. Take care not to use too much oil/marinade, otherwise this could cause flames to form or generate lots of smoke.
- Do not salt the meat before grilling. Otherwise soluble nutrients and meat juice may escape.
- Place the food to be grilled directly on the wire rack. Do not use aluminum foil or grill trays.
- Only turn the items on the grill over when they lift off the wire rack easily. If meat sticks to the grill, the fibres are destroyed and meat juice escapes.
- Do not pierce the meat while grilling it, otherwise meat juice may escape.
- Cured meat such as ham and smoked pork chops are not suitable for grilling. This can produce a compound that is harmful to health.
- Score chops on the bones and in fatty layers several times so that they do not curl up.
- Remove fatty layers after grilling rather than before, otherwise the meat loses juice and flavor.
- Poultry will turn out particularly crispy and brown if you baste it towards the end of the grilling time with butter, salted water or orange juice.
- Fruit can be seasoned to taste after grilling with honey, maple syrup or lemon juice.
- You can parboil vegetables that take a long time to cook (e.g. corn on the cob) before placing them on the grill.
- Grill fillets of fish on the skin side first. Coat the skin with oil to prevent it sticking to the wire rack.
- Serve grilled food hot. If you keep it warm it will go tough.
Cleaning and maintenance

WARNING
Risk of burns!
The appliance grows hot during operation. Let appliance cool down prior to cleaning.

WARNING
Risk of electrical shock!
Moisture entering the appliance can cause an electrical shock. Don't use a high-pressure cleaner or steam cleaner.
NOTICE
Surface damage
Do not use these cleaning agents
• Caustic or corrosive cleaners
- Oven cleaners
- Cleaners that are caustic, contain chlorine or are aggressive
- Cleaners containing large proportions of alcohol
- Hard, scratchy dish-washing sponges, brushes or scourers
If such an agent comes into contact with the appliance, wipe it off immediately with water.
Thoroughly wash out new sponge cloths before using them.
Cleaning the appliance
Clean the appliance after each use once it has cooled down. This will prevent residues from being burnt on. Residues that have been burnt-on several times can be difficult to remove.
Do not scrape burnt-on residues. Instead, leave them to soak in water and washing-up liquid.
Remove the wire rack and fold the heating elements upwards. Remove the lava stone tray and the lava stones.
| Appliance part/ surface | Recommended cleaning |
| Wire rack and frame | Remove heavy soling with the cleaning brush. Soak the wire rack in the sink. Clean using the cleaning brush and washing-up liquid and dry thoroughly. For heavy soiling, use our grill cleaning gel (article number 00311761). You can also clean the wire rack and the frame in the dishwasher. This may cause the wire rack and the frame to become lighter in colour. This does not affect its usability. |
| Stainless steel tray | Apply washing-up liquid with a soft, damp cloth; dry with a soft cloth. Leave stubborn dirt to soak. For heavy soiling, use our stainless steel cleaner (article no. 00311499) or grill cleaning gel (article no. 00311761). |
| Lava stone tray | Remove the lava stones. Clean the lava stone tray in a sink of water and washing-up liquid using a scrubbing brush; dry with a soft cloth. Leave stubborn dirt to soak or remove it using our grill cleaning gel (article no. 00311761). |
| Lava stones | Replace the lava stones when they have turned black. This means that the lava stones are saturated with fat, which may generate a lot of smoke or ignite during operation. You can obtain compatible lava stones from your specialist dealer (article no. LV 030 000). |
| Control panel | Soapy water – the cloth must not be too wet. Dry with a soft cloth. If acidic substances (e.g. vinegar, ketchup, mustard, marinades) are spilled on the control panel, remove them immediately. |
| Control knobs | The soapy cloth must not be too wet. Dry with a soft cloth. |

CAUTION
Damage to the appliance
Do not detach the control knobs to clean them.
Faults – What to Do?

WARNING
Risk of electric shock!
Incorrect repairs are dangerous. Repairs may only be carried out by an authorized servicer. If the appliance is not functioning properly, unplug the power cord or switch off the fuse in the fuse box. Contact Customer Support.
Faults often have simple explanations. Please read the notes in the table before calling customer service.
Disruption Possible cause Solution
| The appliance does not work The plug is not plugged in Connect the appliance to the mains | ||
| Faulty fuse Check in the fuse box to make sure that the fuse for the appliance is in working order | ||
| Power failure Check whether other kitchen appliances are working | ||
| The appliance does not heat up and the illuminated ring is lit white | Demo mode is activated Deactivate demo mode: | |
| 1. Turn all the control knobs to 0. Unplug the appliance from the mains for 30 seconds (switch off the household fuse or the circuit breaker in the fuse box).2. Reconnect the appliance. Turn any of the control knobs one position anti-clockwise within 3 minutes. All the illuminated rings light up white.3. Turn the control knob three positions clockwise.4. Turn the control knob back to 0. Two audible signals confirm that demo mode has been deactivated. | ||
| The appliance does not heat up and the illuminated ring is lit white | Overheating protection The appliance itself switches off the grill heating element in order to protect the appliance and the fitted unit. Once the appliance is cool enough, it will switch the grill heating element on again. It can take up to 45 minutes to cool down. | |
| The appliance switches itself off while in use; the illuminated ring flashes orange and white alternately | Safety switch off: The controls on the appliance have not been used for a long time | Turn the control knob to 0, then switch it back on (if you wish to continue using the appliance) |
| The appliance remains off after a power failure | Turn the control knob to 0, then switch it back on (if you wish to continue using the appliance) | |
Customer Service
If your appliance needs repairs, our Customer Service is there for you. We work hard to help solve problems quickly and without unnecessary service calls, getting your appliance back up and running correctly in the least amount of time possible.
When you call, please indicate the product number (E-Nr.) and serial number (FD-Nr.) so that we can support you in a qualified manner. You will find the data plate with these numbers on the bottom of the appliance. To avoid having to search when you need it, you can enter your appliance data and the Customer Service telephone number here.
E-Nr. FD-Nr.
Customer Service
Please read the use and care instructions provided with your appliance. Failure to do so may result in an error in using the appliance resulting in unnecessary service calls, which may not be covered by the warranty.
WARNING
Risk of electric shock!
Incorrect repairs are dangerous. Repairs may only be carried out by an authorized servicer. If the appliance is not functioning properly, unplug the power cord or switch off the fuse in the fuse box. Contact Customer Support.
Please find the contact data of all countries in the enclosed customer service list.
To book a service visit and product advice
USA 877 442 4436
toll-free
CANADA 877 442 4436
toll-free
Table des Matières
www.P65Warnings.ca.gov
Sources des dommages
AVIS
text_image
Diagram of a microwave oven with labeled components including air grating, heater, and cooling unit(Grille et cadre
text_image
Technical diagram showing a mechanical assembly with labeled parts and checkmark indicators for inspection or validation.text_image
Technical diagram showing a device with a grid-patterned top panel and internal components, including an inset close-up of the component.natural_image
Illustration of a rectangular appliance with a grid-patterned panel and control buttons (no text or symbols)AVERTISSEMENT
Risque de brûlure !
text_image
Diagram of a microwave oven with labeled components including air grating, heater, and cooling unittext_image
Technical diagram showing a mechanical assembly with labeled parts and checkmark indicators for inspection or validation.text_image
Technical diagram showing a device with a grid-patterned roof and internal tray, annotated with an arrow indicating process direction.natural_image
Illustration of a portable air conditioner unit with heat exchanger and control knobs (no text or symbols)ADVERTENCIA
1901 Main Street, Suite 600
Irvine, CA 92614
USA
www.gaggenau.com
1-877-442-4436
© 2022 BSH Home Appliances Corporation