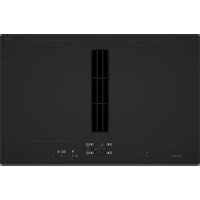
VP414611 - Cooker GAGGENAU - Free user manual and instructions
Find the device manual for free VP414611 GAGGENAU in PDF.
User questions about VP414611 GAGGENAU
0 question about this device. Answer the ones you know or ask your own.
Ask a new question about this device
Download the instructions for your Cooker in PDF format for free! Find your manual VP414611 - GAGGENAU and take your electronic device back in hand. On this page are published all the documents necessary for the use of your device. VP414611 by GAGGENAU.
USER MANUAL VP414611 GAGGENAU
Use and care manual 2
IMPORTANT SAFETY INSTRUCTIONS 3
Fire Safety 3
Cooking Safety 4
Burn Prevention 4
Child Safety 5
Cleaning Safety 6
Cookware Safety 6
Proper Installation and Maintenance 6
Proposition 65 Warning 7
Causes of damage 8
Environmental protection 8
Energy saving tips 8
Getting to know your appliance 9
Teppan Yaki 9
Control knob 9
Display on the illuminated ring 9
Accessories 9
Before using the appliance for the first time 10
Cleaning the appliance 10
Heating up the Teppan Yaki 10
Operating the appliance 10
Turning on 10
Turning off 11
Residual heat display 11
Keeping warm setting 11
Safety shut-off 11
Table of settings and tips 12
Tips for cooking and roasting 13
Using the with Teppan Yaki with cookware 14
Cleaning and maintenance 14
Cleaning the appliance 15
Faults - What to Do? 16
Demo Mode 17
Customer Service 17
Additional information on products, accessories, replacement parts and services can be found at www.gaggenau.com and in the online shop www.gaggenau.com/zz/store
Safety Definitions
WARNING
This indicates that death or serious injuries may occur as a result of non-observation of this warning.
CAUTION
This indicates that minor or moderate injuries may occur as a result of non-observation of this warning.
NOTICE
This indicates that damage to the appliance or property may occur as a result of non-compliance with this advisory.
Note: This alerts you to important information and/or tips.

IMPORTANT SAFETY INSTRUCTIONS
READ AND SAVE THESE INSTRUCTIONS
WARNING
When properly cared for, your new appliance has been designed to be safe and reliable. Read all instructions carefully before use. These precautions will reduce the risk of burns, electric shock, fire, and injury to persons. When using kitchen appliances, basic safety precautions must be followed, including those in the following pages.
Fire Safety
Do not allow aluminum foil, plastic, paper or cloth to come in contact with a hot surface element, burner or grate. Do not allow pans to boil dry.
If the cooktop is near a window, forced air vent or fan, be certain that flammable materials such as window coverings do not blow over or near the burners or elements. They could catch on fire.
Always have a working smoke detector near the kitchen.
Never leave the cooktop unattended when in use. Boilovers cause smoking and greasy spillovers may ignite.
WARNING
TO REDUCE THE RISK OF A GREASE FIRE:
- Never leave surface units unattended at high settings. Boilovers cause smoking and greasy spillovers that may ignite. Heat oils slowly on low or medium settings.
- Always turn hood ON when cooking at high heat or when flambéing food (i.e. Crepes Suzette, Cherries Jubilee, Peppercorn Beef Flambé).
- Clean ventilating fans frequently. Grease should not be allowed to accumulate on fan or filter.
4.Use proper pan size. Always use cookware appropriate for the size of the surface element.
In the event that personal clothing or hair catches fire, drop and roll immediately to extinguish flames.
Have an appropriate fire extinguisher available, nearby, highly visible and easily accessible near the appliance.
Smother flames from food fires other than grease fires with baking soda. Never use water on cooking fires.

IMPORTANT SAFETY INSTRUCTIONS
READ AND SAVE THESE INSTRUCTIONS
WARNING
TO REDUCE THE RISK OF INJURY TO PERSONS IN THE EVENT OF A GREASE FIRE, OBSERVE THE FOLLOWING:
1.SMOTHER FLAMES with a close-fitting lid, cookie sheet, or metal tray, then turn off the burner. BE CAREFUL TO PREVENT BURNS. If the flames do not go out immediately, EVACUATE AND CALL THE FIRE DEPARTMENT.
2. NEVER PICK UP A FLAMING PAN - You may be burned.
3.DO NOT USE WATER, including wet dishcloths or towels - a violent steam explosion will result.
4.Use an extinguisher ONLY if:
- You know you have a Class ABC extinguisher, and you already know how to operate it.
- The fire is small and contained in the area where it started.
- The fire department is being called.
- You can fight the fire with your back to an exit.
Whenever possible, do not operate the ventilation system during a cooktop fire. However, do not reach through fire to turn it off.
Cooking Safety
WARNING
Use this appliance only for its intended use as described in this manual. NEVER use this appliance as a space heater to heat or warm the room. Doing so may result in carbon monoxide poisoning and overheating the appliance. Never use the appliance for storage.
WARNING
NEVER cover any slots, holes or passages in the oven bottom or cover an entire rack with materials such as aluminum foil. Doing so blocks air flow through the oven and may cause carbon monoxide poisoning. Aluminum foil linings may also trap heat, causing a fire hazard.
WARNING
Risk of burns!
Putting water or ice cubes on the hot frying surface causes water to splash and steam.
Burn Prevention
DO NOT TOUCH SURFACE UNITS OR AREAS NEAR UNITS - Surface units may be hot even though they are dark in color. Areas near surface units may become hot enough to cause burns. During and after use, do not touch, or let clothing,

IMPORTANT SAFETY INSTRUCTIONS
READ AND SAVE THESE INSTRUCTIONS
potholders, or other flammable materials contact surface units or areas near units until they have had sufficient time to cool. Among these areas are the cooktop and areas facing the cooktop.
Do not heat or warm unopened food containers. Build-up of pressure may cause the container to burst and cause injury.
Always use dry potholders. Moist or damp potholders on hot surfaces may result in burns from steam. Do not let potholder touch hot heating elements. Do not use a towel or other bulky cloth.
Always turn hood ON when cooking at high heat or when flambéing food (i.e. Crêpes Suzette, Cherries Jubilee, Peppercorn Beef Flambre).
Use high heat settings on the cooktop only when necessary. To avoid bubbling and splattering, heat oil slowly, on no more than a low-medium setting. Hot oil is capable of causing extreme burns and injury.
Never move a pan of hot oil, especially a deep fat fryer. Wait until it is cool.
Secure all loose garments, etc., before beginning. Tie long hair so that it does not hang loose, and do not wear loose-fitting clothing or hanging garments, such as ties, scarves, jewelry, or dangling sleeves.

WARNING
Risk of burns!
If the appliance cover (VD) is fitted: do not close the appliance cover until the appliance has cooled down completely. Do not operate the appliance with the cover closed. Do not use the appliance cover for placing objects or for keeping things warm.
Child Safety
When children become old enough to use the appliance, it is the responsibility of the parents or legal guardians to ensure that they are instructed in safe practices by qualified persons.
Do not allow anyone to climb, stand, lean, sit, or hang on any part of an appliance, especially a door, warming drawer, or storage drawer. This can damage the appliance, and the unit may tip over, potentially causing severe injury.
Do not allow children to use this appliance unless closely supervised by an adult. Children and pets should not be left alone or unattended in the area where the appliance is in use. They should never be allowed to play in its vicinity, whether or not the appliance is in use.

IMPORTANT SAFETY INSTRUCTIONS
READ AND SAVE THESE INSTRUCTIONS
CAUTION
Items of interest to children should not be stored in an appliance, in cabinets above an appliance or on the backsplash. Children climbing on an appliance to reach items could be seriously injured.
Cleaning Safety
Do not clean the appliance while it is still hot. Some cleaners produce noxious fumes when applied to a hot surface. Wet clothes and sponges can cause burns from steam.
Do not use steam cleaners to clean the appliance.
Do not soak removable heating elements - Heating elements should never be immersed in water.
Cookware Safety
Hold the handle of the pan when stirring or turning food. This helps prevent spills and movement of the pan.
Use Proper Pan Size.
The use of undersized cookware will expose a portion of the heating element or burner to direct contact and may result in ignition of clothing. Select cookware having flat bottoms large enough to cover the surface heating unit. This appliance is equipped with one or more surface units of different sizes. Proper relationship of cookware to heating element or burner will also improve efficiency.
Cookware not approved for use with ceramic cooktops may break with sudden temperature changes. Use only pans that are appropriate for ceramic cooktops (only certain types of glass, heatproof glass, ceramic, earthenware, or other glazed utensils are suitable).
Always position handles of utensils inward so they do not extend over adjacent work areas, burners, or the edge of the cooktop. This reduces the risk of fires, spills and burns.
Proper Installation and Maintenance
Have the installer show you the location of the circuit breaker or fuse. Mark it for easy reference.
This appliance must be properly installed and grounded by a qualified technician. Connect only to properly grounded outlet. Refer to Installation Instructions for details.
This appliance is intended for normal family household use only. It is not approved for outdoor use. See the Statement of Limited Product Warranty. If you have any questions, contact the manufacturer.
Do not store or use corrosive chemicals, vapors, flammables or nonfood products in or near this appliance. It is specifically designed for use when heating or cooking food. The use of corrosive chemicals in heating or cleaning will damage the appliance and could result in injury.

IMPORTANT SAFETY INSTRUCTIONS
READ AND SAVE THESE INSTRUCTIONS
Make sure reflector pans or drip bowls are in place - Absence of these bowls or pans during cooking may subject wiring or components underneath to damage.

WARNING
Failure to operate knobs properly may result in personal injury and damage to the appliance.
Do not operate this appliance if it is not working properly, or if it has been damaged. Contact an authorized servicer.
Do not cook on a broken cooktop. Cleaning solutions and spillovers may create a risk of electric shock.
Do not repair or replace any part of the appliance unless specifically recommended in this manual. Refer all servicing to a factory authorized service center.
To avoid electrical shock hazard, before servicing the appliance, switch power off at the service panel and lock the panel to prevent the power from being switched on accidentally.
Proposition 65 Warning:
This product may contain a chemical known to the State of California, which can cause cancer or reproductive harm. Therefore, the packaging of your product may bear the following label as required by California:
STATE OF CALIFORNIA PROPOSITION 65 WARNING:

WARNING
Cancer and Reproductive Harm - www.P65Warnings.ca.gov
Causes of damage
The frying surface is robust and smooth but, like a good pan, it will exhibit signs of use over time. These do not affect how it works.
The frying surface is robust and smooth but, like a good pan, it will exhibit signs of use over time. These do not affect how it works.
NOTICE
Scratches or gouges on the frying surface
Never use a knife to cut food on the frying surface. Use the spatula supplied to turn the food. Do not hit the spatula against the frying surface.
NOTICE
Plastics, films and foils
Aluminum foil and plastic cookware will melt on the hot frying surface. Never place containers made of aluminum foil on the frying surface. Never place objects made of plastic or cookware with plastic handles on the frying surface.

CAUTION
Malfunction
Always set control knobs to the zero position when the appliance is not in operation.
Environmental protection
In this section, you can find information about saving energy and disposing of the appliance.
Energy saving tips
- Stop the heating appliance when it reaches the required temperature.
- Use the edge of the frying surface to keep food that is already cooked warm, whilst continuing to cook food in the middle.
- Switch back to a lower temperature in good time.
- Select an appropriate temperature. Using a temperature that is too high wastes energy.
- Use the residual heat of the Teppan Yaki. For longer cooking times, switch the appliance off 5-10 minutes before the end of the cooking time.
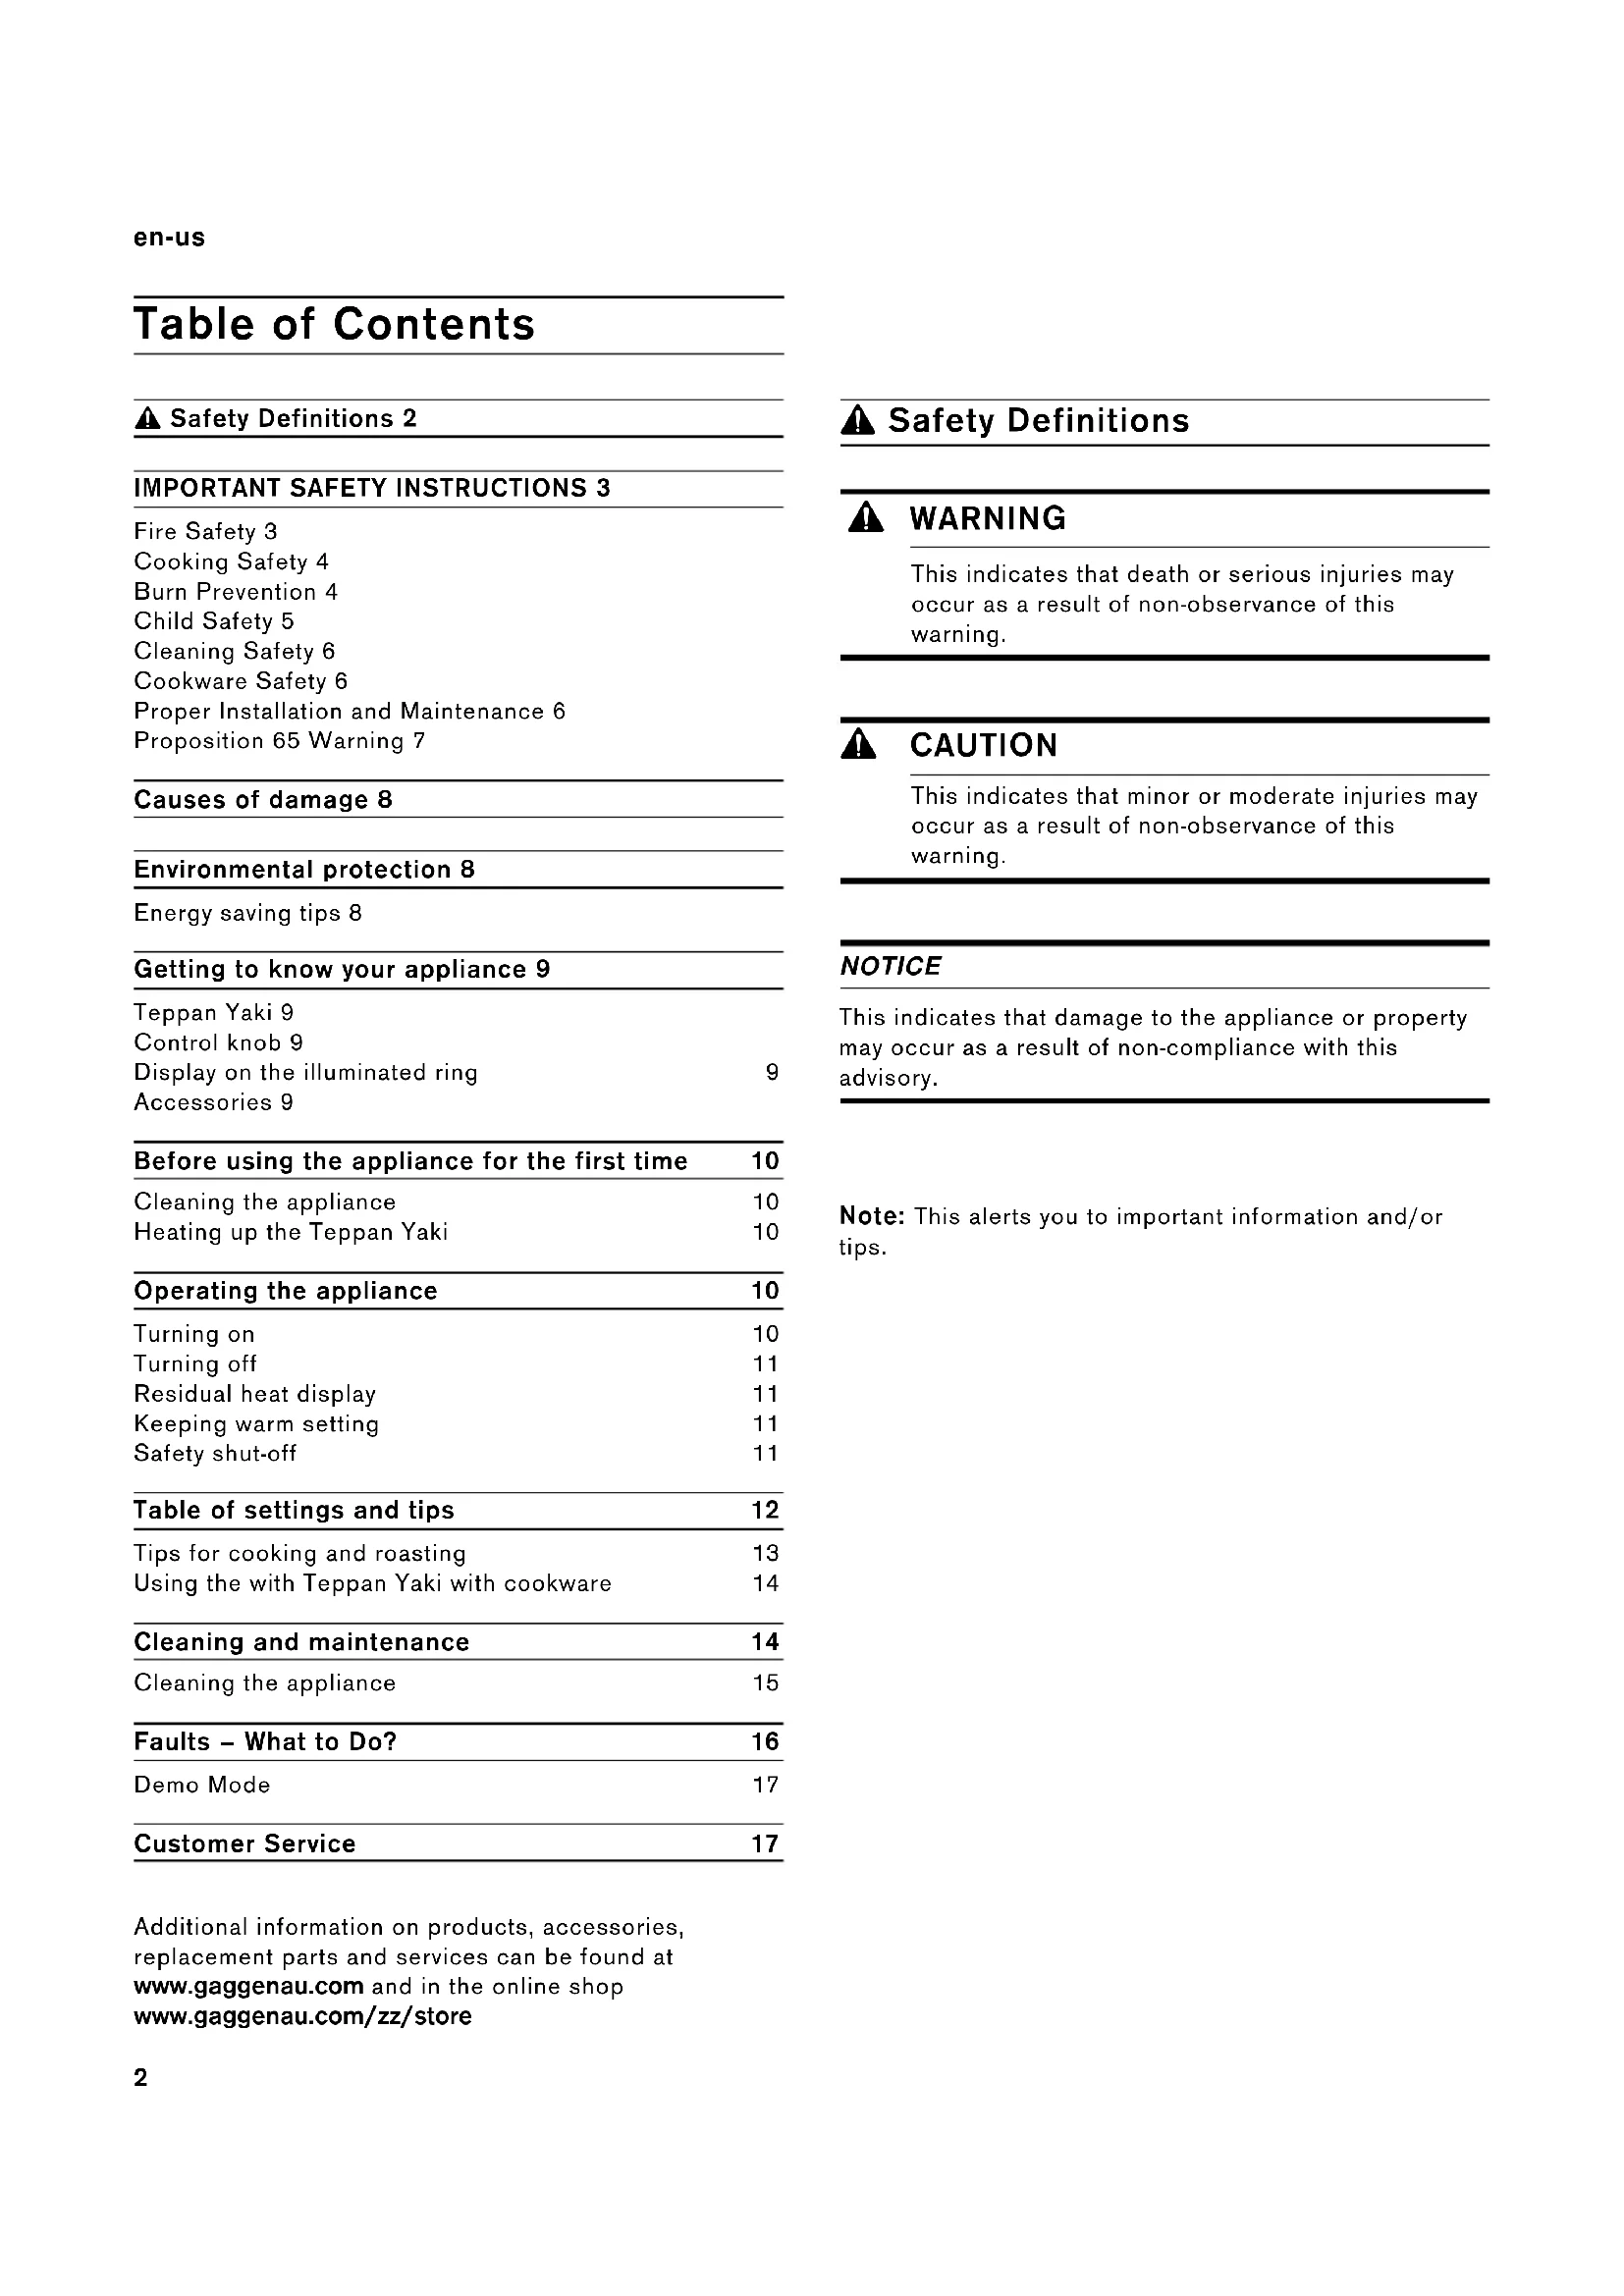
Getting to know your appliance
Teppan Yaki
Frying surface
2 Selecting the cooking zone
3 Temperature setting
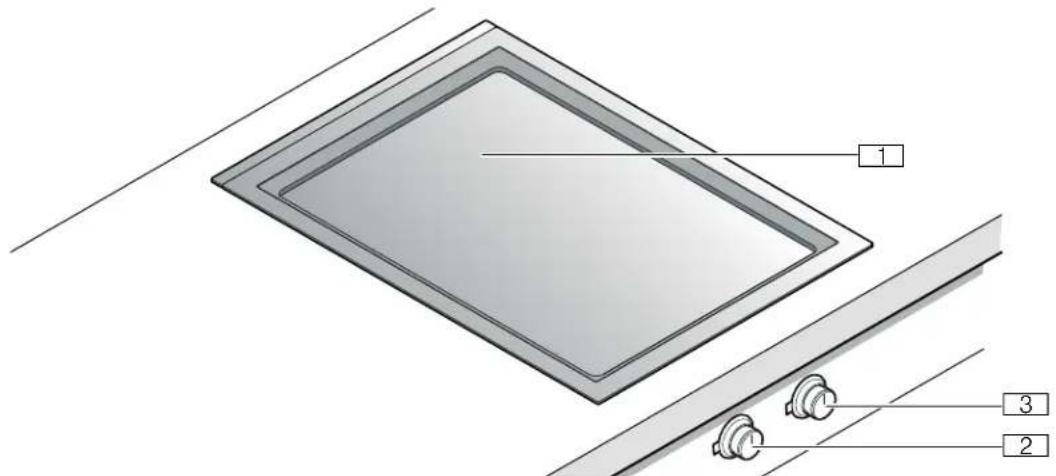
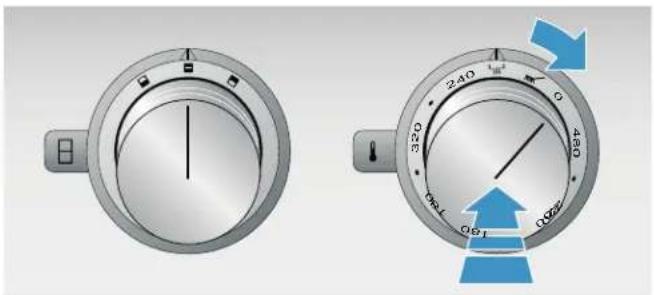
Control knob

Use the right-hand control knob to select the temperature between 240-480 ^ F , the keeping warm setting or the cleaning setting.
Use the left-hand control knob to select the cooking zones:
Both cooking zones operating
Only the front cooking zone is operating
Only the rear cooking zone is operating
Display on the illuminated ring
Each control knob is encircled by an illuminated ring with various display functions.
| Display screen Meaning | ||
| ○ Off Appliance OFF | ||
| ● Lit orange Appliance ON | ||
| ● Flashing orange | Appliance OFF | |
| Residual heat indicator | ||
| ● Flashing orange and white alternately | Safety shut-off, power failure | |
| ● Flashing yellow and magenta alternately | Appliance fault | |
| Call Customer Service | ||
| ● Lights up green for a few seconds, then turns yellow | Appliance initialized, only after initial connection or power failure | |
Accessories
As standard, your device comes with the following accessories:
Spatulas (2) Spatulas to turn the food
Before using the appliance for the first time
In this section, you can find out what you must do before using your appliance to prepare food for the first time. Read the safety information before you start.
Cleaning the appliance
Before using the appliance for the first time, clean it thoroughly with lukewarm soapy water.
Heating up the Teppan Yaki
To eliminate the new appliance smell, heat up the Teppan Yaki without anything on it for a few minutes at 420^ F.
Operating the appliance
Turning on
- Push in the temperature control knob and turn it clockwise or anti-clockwise to the required temperature between 240 - 480° F.
The illuminated ring behind the temperature control knob flashes while the appliance is heating up. The illuminated ring lights up continuously when the set temperature has been reached.
2.If you do not want to cook on the entire heating zone, you can use the left-hand control knob to select only the front or only the rear area. Push in the left-hand control knob and select the required heating zone or select
3. After it heats up, use the spatula or a heat-resistant brush (e.g. silicone brush) to spread a little oil or fat evenly over the frying surface.
4. Place the food directly onto the frying surface without a pot or pan.
5.Use the spatula supplied to turn the food.
Turning off
Turn the control knob to position 0.

WARNING
Risk of burns!
When the appliance cover is closed, this leads to a build-up of heat. Only operate or switch on the appliance when the appliance cover is open. Do not use the appliance cover for keeping warm or setting down. Only close the appliance cover once the appliance has cooled down.

CAUTION
Damage to the appliance
Remove spilled liquids before opening the appliance cover.
Residual heat display
After switching off the appliance, the illuminated ring on the temperature control knob slowly flashes until the appliance has cooled enough for it to be safe to touch.
Keeping warm setting
The keeping warm setting enables you to keep food warm once you have cooked it.
Turn the temperature control knob to the keeping warm setting. You can use the left-hand control knob to select the entire area or only the front or rear area.
Safety shut-off
For your protection, the appliance is equipped with a safety shut-off. Any kind of heating is switched off after four hours if the appliance controls are not used during this time. The heating element also remains off after a power failure. The illuminated ring behind the temperature control knob is flashing white and orange alternately.
Turn the temperature control knob to 0. You will now be able to start the appliance again as usual.
Table of settings and tips
| Food Temperature | °C F | Cooking time Comments | |
| Meat and poultry | |||
| Beef steak, medium | Sear at | Fry for 2:30 mins | For example, entrecôte, fillet steak, rump |
| 1-1.2 in (2.5-3 cm) | 460-480 | each side | steak. The steak is medium when meat |
| Continue | Continue cooking for | juice can be seen on the surface. | |
| cooking at 380 | 6-11 mins | ||
| Pork neck steak 0.75 in (2 cm) 440-460 15-18 mins | |||
| Veal escalope 0.6 in (1.5 cm) 400-420 16-20 mins | |||
| Strips of beef or pork 1.7-1.9 lb | 460-480 8-10 mins | Distribute the pieces of meat evenly; they should not be touching. | |
| (800-900 g) | |||
| Strips of poultry | 400-420 10-12 mins | ||
| 1.7-1.9 lb (800-900 g) | |||
| Minced meat 1.3 lb (600 g) 460-480 9-10 mins | |||
| Saddle of lamb, medium | Sear at 420 | Fry for 2 mins each | |
| 0.6-1 in (1.5-2.5 cm) | side | ||
| Continue | Continue cooking for | ||
| cooking at 340 | 4-6 mins | ||
| Turkey steak 0.6 in (1.5 cm) 420-440 12-16 mins | |||
| Poultry liver 0.4 in (1 cm) | 420-440 3-5 mins | ||
| Fish and seafood | |||
| Fish fillet 0.4 in (1 cm) | 420-440 5-7 mins | For example, perch, cod, bassa, haddock, plaice, monkfish, sole, pike-perch. | |
| 0.75 in (2 cm) | 400-420 7-10 mins | ||
| 1 in (2.5 cm) | 380-400 15-17 mins | ||
| Salmon steak 1 in (2.5 cm) | 380-400 15-17 mins | ||
| 1.2 in (3 cm) | 340-360 18-20 mins | ||
| Tuna steak | 380-400 15-20 mins | ||
| 1-1.2 in (2.5-3 cm) | |||
| Prawns (1 oz/30 g each) | 400-420 6-7 mins | ||
| Scallops (1 oz/30 g each) | 400-420 8-12 mins | ||
| Vegetables | |||
| Aubergines, sliced | 400-420 6-8 mins | Salt the aubergines and leave to stand for approx. 30 minutes before frying. Then dry. | |
| 1.3 lb (600 g) | |||
| Mushrooms, sliced | 460-480 12-14 mins | ||
| 1.3 lb (600 g) | |||
| Carrots, julienne | 380-400 12-16 mins | ||
| 1.3 lb (600 g) | |||
| Potatoes, boiled, sliced | 420-460 7-10 mins | ||
| 1.3 lb (600 g) | |||
| Peppers, cut into strips | 420-440 8-12 mins | ||
| 1.3 lb (600 g) | |||
| Zucchini, sliced | 400-420 8-10 mins | ||
| 1.3 lb (600 g) | |||
| Food Temperature | °C | Cooking time Comments |
| Onions or leeks, cut into rings 1.3 lb (600 g) | 360-400 5-7 mins | |
| Egg-based dishes and desserts | ||
| Fried eggs, scrambled eggs (4-6 eggs) | 380-400 3-5 mins | |
| Crêpes (2-6 pcs) 380-400 1-2 mins each side | ||
| Sliced fruit 0.6-0.8 lb (300-400 g) | 380-400 5-7 mins For example, pineapple, apple, mango.Use clarified butter for frying. Sweetenwith sugar or honey to taste. | |
| Banana in coconut (4 halves) 380-400 6-9 mins | ||
| Side dishes and miscellaneous | ||
| Rice, boiled 1.1 lb (500 g) 400-420 5-7 mins | ||
| Pine nuts 0.6 lb (300 g) 340 5-7 mins Turn frequently | ||
| Rice noodles, coiled 0.8 lb (400 g) | 420-460 4-5 mins | |
| Tofu 0.6 lb (300 g) 400-440 3-5 mins Turn frequently | ||
| White bread cubes/croutons 0.2 lb (100 g) | 380 10-12 mins Turn frequently to begin with | |
Tips for cooking and roasting
- Only put on the food once the heating indicator has gone out. This also applies to raising the temperature between two preparations.
- Press the meat, poultry and fish pieces flat onto the frying surface with the spatula. Only turn them once they can easily be removed from the surface, in order to not destroy the fibers. Otherwise fluid can come out, which causes the food to dry out.
- Meat, poultry and fish pieces shouldn't touch each other during frying so that they don't absorb any liquid.
- Don't pierce or cut meat prior to or during cooking, in order to prevent meat juice from escaping.
- Don't salt meat, poultry and fish prior to frying, in order to prevent the extraction of water and soluble nutrients.
- Fish fillet can be rolled in flour (floured) prior to frying. This prevents it from sticking as much.
- Only turn fish fillet once if possible. First fry it on the skin side.
-
Only use oils and fats that can be heated up hot and are suitable for frying, e.g. refined plant oils or concentrated butter (clarified butter).
-
The frying surface is hotter in the centre than in the edge area. Particularly if you are cooking food with different cooking times and the temperature requirements at the same time, you can arrange the food optimally on the plate. Pay attention to this also when selecting the amount of food. Rule of thumb: The thinner the food, the higher the temperature and the shorter the cooking time.
- When working with just one heating zone: Select the highest setting in each case for the temperature range specified in the cooking table, or set it approx. 40^ F higher than you are used to from preparing with both heating zones. Use approximately half of the amount specified.
Using the with Teppan Yaki with cookware
You can also use the Teppan Yaki to cook with cookware. Cooking methods that require little heat input can be used to do this. You can heat food quickly on the hob first, if required, before continuing cooking on the Teppan Yaki.
Approx. 300^ F is best for melting, defrosting, and keeping food warm. 320 - 400^ F is best for soaking rice and cereals, and for heating small quantities of food.
Use heat-resistant cookware with a lid. Take care not to scratch the stainless steel frame accidentally when placing the cookware on the heating surface. Please note that if the cookware is smaller than the surface being heated, this is not an energy-efficient cooking method.
If you do not require the entire frying surface, you can use the left-hand control knob to select only the front or rear area. You can find the ideal temperature for your application by moving the cookware.
Cleaning and maintenance

WARNING
Risk of electrical shock!
Moisture entering the appliance can cause an electrical shock. Don't use a high-pressure cleaner or steam cleaner.

WARNING
Risk of burns!
- The appliance grows hot during operation. Let appliance cool down prior to cleaning.
- The accessible parts get hot during operation. Never touch hot parts. Keep children away.
- Pouring water or ice cubes onto the hot frying surface produces splashes and steam. Do not bend over the appliance. Keep a safe distance.
NOTICE
Surface damage
Do not use these cleaning agents
- Caustic or corrosive cleaners
Oven cleaners - Cleaners that are caustic, contain chlorine or are aggressive
- Cleaners containing large proportions of alcohol
- Hard, scratchy dish-washing sponges, brushes or scourers
If such an agent comes into contact with the appliance, wipe it off immediately with water.
Thoroughly wash out new sponge cloths before using them.
Cleaning the appliance
Cleaning the appliance once cooled
- Pour a little water (max. 1 cup / 250 ml) mixed with washing-up liquid on the frying surface so that it is thinly covered.
- Turn the temperature control knob to the cleaning level position.
3.Leave the dirt to soak for 5-10 minutes. - Clean the frying surface using a scrubbing brush.
5.Mop up the liquid with a soft sponge and remove. Rub the frying surface dry with a soft cloth.
Clean the appliance after each use once it has cooled down. Burnt-on residues can be difficult to remove.
Remove the worst of the residue with the spatula.
Carefully remove cleaner residues before next using the appliance.
Cleaning between uses
Ice cubes are better suited to cleaning the appliance when hot than water as they cause less splashing and steam.
- Switch off appliance.
2.Use the spatula to push 4 or 5 ice cubes over the hot frying surface.
3.Use the spatula to remove dirt that has begun to soften. - Switch the appliance on again. Wait until the appliance has reached the set temperature again before placing food on the frying surface.
| Appliance part/surface | Recommended cleaning |
| Frying surface Use a brush and washing-up liquid to remove greasy residues. Remove stubborn dirt with our "Wie-ner Kalk" cleaning powder (article no. 00311774). Make a paste out of cleaning powder mixed with water and use this to clean the surface. Always wipe the surface in the brush direction.Follow the instructions on the cleaner's packaging. | |
| Frying surface, burnt-on dirt | With the appliance cold, apply our cleaning gel (article no. 00311859) to stubborn dirt and leave it to work for at least two hours, or overnight for heavy soiling. Then rinse off thor-oughly and dry. Follow the instruc-tions on the cleaner's packaging. |
| Stainless steel frame | Soapy water - dry with a soft cloth.Use a minimal amount of water when cleaning to prevent water from pene-trating the appliance.Soak burnt-on remnants with a small amount of soapy water; do not scour.Remove heavy soiling or yellow dis-coloration caused by heat using our stainless steel cleaner (article no. 00311499). |
| Control knob Soapy water - the cloth must not be too wet. Dry with a soft cloth. | |
Faults - What to Do?
Faults often have simple explanations. Please read the notes in the table before calling customer service.

WARNING
Risk of electric shock!
Incorrect repairs are dangerous. Repairs may only be carried out by an authorized servicer. If the appliance is not functioning properly, unplug the power cord or switch off the fuse in the fuse box. Contact Customer Support.
Disruption Possible cause Solution
| The appliance does not work The plug is not plugged in Connect the appliance to the mains | ||
| Faulty fuse Check in the fuse box to make sure that the fuse for the appliance is in working order | ||
| Power failure Check whether other kitchen appliances are working | ||
| The appliance is not working and the illuminated ring behind the control knob is flashing orange and white alternately | Power failure Check whether other kitchen appliances are working | |
| The appliance does not heat up when it is switched on. | Demo mode is activated | Deactivate demo mode.→ "Demo Mode" on page 17 |
| All the illuminated rings behind the control knobs light up white for 10 seconds after it is switched on. The illuminated ring around the active control knob then lights up orange. | ||
| The appliance does not heat up when it is switched on. | Electronics fault | Contact after-sales service |
| The illuminated ring behind the control knob is flashing yellow and magenta alternately. | ||
| The appliance switches off while operat-ing. | Safety switch off: The controls on the appliance have not been used for a long time. | Turn the temperature control knob to 0, then switch it back on, if required. |
| The illuminated ring behind the control knob flashes orange and white alternately. | ||
| The appliance switches off while operat-ing. | Power failure in the house-hold: Following a power failure, the appliance remains switched off for safety reasons. | Turn the temperature control knob to 0, then switch it back on, if required. |
| The illuminated ring behind the control knob flashes orange and white alternately. | ||
Demo Mode
The demo mode is activated if all of the illuminated rings around the control knobs light up white for 10 seconds after switching on the appliance. The appliance does not heat up. The illuminated ring around the temperature control knob lights up orange.
You can deactivate the demo mode as follows:
- Turn the temperature control knob back to 0. Disconnect the appliance from the power supply. Wait for at least 30 seconds.
- Reconnect the appliance. The illuminated rings around the control knobs light up green for a few seconds and then turn yellow. Wait until the illuminated rings switch off.
- Then deactivate the demo mode within three minutes as follows: Turn the temperature control knob anti-clockwise to position 240.
- Turn the control knob clockwise to position
- Turn the control knob anti-clockwise to position 0. Wait until the illuminated ring turns yellow.
- Turn the control knob clockwise to position . The illuminated ring lights up green. Wait for five seconds. The illuminated ring now turns yellow.
Demo mode has now been deactivated. To save the setting, always exit the menu as follows:
- Turn the control knob to 0. Then turn the control knob anti-clockwise to position 240. Turn the control knob clockwise to position . Turn the control knob counterclockwise to position 0. Wait until the illuminated ring goes out.
Customer Service
If your appliance needs repairs, our Customer Service is there for you. We work hard to help solve problems quickly and without unnecessary service calls, getting your appliance back up and running correctly in the least amount of time possible.
When you call, please indicate the product number (E-Nr.) and serial number (FD-Nr.) so that we can support you in a qualified manner. You will find the data plate with these numbers on the bottom of the appliance. To avoid having to search when you need it, you can enter your appliance data and the Customer Service telephone number here.
E-Nr. FD-Nr.
Customer Service
Please read the use and care instructions provided with your appliance. Failure to do so may result in an error in using the appliance resulting in unnecessary service calls, which may not be covered by the warranty.
WARNING
Risk of electric shock!
Incorrect repairs are dangerous. Repairs may only be carried out by an authorized servicer. If the appliance is not functioning properly, unplug the power cord or switch off the fuse in the fuse box. Contact Customer Support.
Please find the contact data of all countries in the enclosed customer service list.
To book a service visit and product advice USA 8774424436
toll-free
CANADA 877 442 4436
toll-free
Table des Matieres
1901 Main Street, Suite 600
Irvine, CA 92614
USA
www.gaggenau.com
1-877-442-4436
© 2022 BSH Home Appliances Corporation