
WU3400 - Fridge LIEBHERR - Free user manual and instructions
Find the device manual for free WU3400 LIEBHERR in PDF.

| Product Type | Wine Refrigerator (Refrigerated Wine Cabinet) |
| Brand | Liebherr |
| Model | WU3400 |
| Bottle Capacity | 34 bottles (Bordeaux format 0.75 L) |
| Temperature Zones | Two independent zones (upper and lower compartment) |
| Temperature Range | 41 °F to 68 °F (5 °C to 20 °C) |
| Display | Capacitive touch digital display |
| Open Door Alarm | Yes, after 180 seconds |
| Temperature Alarm | Yes, if the set range is exceeded |
| Ventilation | Interior fan for homogeneity and humidity |
| Interior Lighting | LED, adjustable intensity, lights up when door is opened |
| Safety Lock | Yes, with key |
| Activated Carbon Filter | Yes, annual replacement recommended |
| Shelves | Sliding wooden shelves, max load 25 kg per shelf |
| Power Supply | 110-120 V, 15-20 A, dedicated circuit recommended |
| Climate Class | SN-ST (50 °F to 100 °F / 10 °C to 38 °C) |
| Refrigerant | R600a (flammable) |
| Warranty | 2 years parts and labor, 5 years sealed system, 6-12 years parts (depending on conditions) |
| Care and Cleaning | Exterior cleaning with soft cloth, interior with warm water and mild detergent; dust filter to be cleaned annually |
| Additional Features | Sabbath mode, child safety, display brightness adjustment, demonstration mode |
Frequently Asked Questions - WU3400 LIEBHERR
User questions about WU3400 LIEBHERR
0 question about this device. Answer the ones you know or ask your own.
Ask a new question about this device
Download the instructions for your Fridge in PDF format for free! Find your manual WU3400 - LIEBHERR and take your electronic device back in hand. On this page are published all the documents necessary for the use of your device. WU3400 by LIEBHERR.
USER MANUAL WU3400 LIEBHERR
Please Read and Follow these Instructions. 2
Disposal of Old Appliance 3
Disposal of this Appliance 3
R600a Refrigerant 3
Important Safety Information. 4
Electrical Safety 4
Safety Regulations. 5
Disposal of Carton. 5
Setting Up 5
The Right Environment for Your Wines. 6
Description of the Appliance 6
Operating and Control Elements. 7
Switching the Appliance On and Off 7
Setting the Temperature 7
Door Open Alarm. 8
Temperature Alarm 8
Ventilation Button. 8
Setup Mode. 8
Interior Light 11
Air Exchange with Activated Charcoal Filter. 11
Additional Features 12
Storage Diagram. 12
Safety Lock. 12
Cleaning. 13
Troubleshooting 14
Customer Service 14
Appliance Information. 15
Turning Off the Appliance. 15
Liebherr Warranty Plan. 16
Please Read and Follow these Instructions
These instructions contain Danger, Warning and Caution notes.
This information is important for safe and efficient installation and operation.
Always read and comply with all Danger, Warning and Caution notes!
DANGER!
Danger indicates a hazard which will cause serious injury or death if precautions are not followed.
WARNING!
Warning indicates a potentially hazardous situation which, if not avoided, could result in death or serious injury.
CAUTION
Caution indicates a potentially hazardous situation which, if not avoided, may result in minor or moderate injury.
IMPORTANT
This indicates information that is especially relevant to a problem-free installation and operation.
IMPORTANT
All types and models are subject to continuous improvement. The manufacturer reserves the right to make modifications to the shape, equipment and technology.
Disposal of Old Appliance
DANGER!
Risk of child entrapment.
Child entrapment and suffocation are not problems of the past.
Junked or abandoned refrigerators are still dangerous - even if they will sit for "just a few days."
If you are getting rid of your old refrigerator, please follow these instructions to help prevent accidents.
Before you discard old appliances:
- Remove the doors.
- Leave the shelves in place so that children may not easily climb inside.
- Cut off the power cable from the discarded appliance. Discard separately from the appliance.
- Be sure to follow your local requirements for disposal of appliances.
Contact the trash collection agency in your area for additional information.
Disposal of this Appliance
This appliance contains flammable gases within the refrigeration circuit and insulation foam.
Contact the municipality or disposal company in your area for information on approved recycling or disposal.
R600a Refrigerant
WARNING!
The refrigerant R600a contained within the appliance is environmentally friendly, but flammable. Leaking refrigerant can ignite.
To prevent possible ignition, follow the warnings below:
- Keep ventilation openings, in the appliance enclosure or in the built-in structure, clear of obstruction.
- Do not use mechanical devices or other means to accelerate the defrosting process, other than those recommended by the manufacturer.
- Do not damage the refrigerant circuit.
- Any repairs and work on the appliance should only be performed by the customer service department.
- Do not use electrical appliances inside the wine cooler compartment, unless they are of the type recommended by the manufacturer.
Important Safety Information
- To prevent injury to you or damage to the unit, the appliance should be unpacked and set up by two people.
- If the appliance is damaged on delivery, contact the supplier immediately before connecting it to the power source.
- To guarantee safe operation, ensure that the appliance is set up and connected as described in this manual.
- Disconnect the appliance from the power source if a fault occurs. Pull out the plug, turn off or disable the power source.
- When disconnecting the appliance, always pull it out by the plug; never pull on the cable.
- Any repairs and work on the appliance should only be performed by the customer service department. Unauthorized work may be dangerous to the user. The power source cable should only be changed or replaced by the customer service department.
- Do not store explosives or sprays using combustible propellants such as butane, propane, pentane, etc. in the appliance. Electrical components might cause leaking gas to ignite. You can identify such sprays by the printed contents or a flame symbol.
- To prevent possible injury due to an electrical shock, be sure to disconnect the power cord or turn off the circuit breaker before cleaning the appliance.
- To avoid injury or damage to the appliance, do not use steam cleaning equipment to clean the appliance.
- Do not operate the appliance in the presence of explosive fumes.
- In the event of a power outage, open the door as infrequently as possible.
- To protect the appliance from possible damage, allow it to stand 1/2 to 1 hour in place before turning on the electricity. This allows the refrigerant and system lubrication to reach equilibrium.
Electrical Safety
Connect this appliance to a 15 amp or 20 amp, 110-120 VAC, circuit which is grounded and protected by a circuit breaker or fuse.
We recommend using a dedicated circuit for this appliance to prevent circuit overload and the chance of interruption to the appliance.
This appliance is equipped with a three-prong (grounding) polarized plug for your protection against possible shock hazards.
Where a two-prong wall receptacle is encountered, contact a qualified electrician and have it replaced with a properly grounded three-prong receptacle in accordance with all local codes and ordinances.
WARNING!
Electrocution hazard.
Electrical grounding required.
- Do not remove the round grounding prong from the plug.
- Do not use extension cords or ungrounded (two-prong) adapters.
- Do not use a power cord that is frayed or damaged.

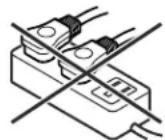
- Do not use a power strip.
Failure to follow these instructions may result in fire, electrical shock or death.
Safety Regulations
The appliance is designed to cool and store wine and beverages. It is designed as a household appliance.
IMPORTANT
The appliance is not intended for outdoor use.
The appliance is manufactured to operate within specific ambient temperature limits according to its climate rating.
The climate rating indicates the ambient temperature at which the appliance may be operated in order to deliver optimal refrigeration performance.
Climate Rating Ambient Temperature
SN-ST 50^ to 100^ (10^ to 38^)
IMPORTANT
Do not operate the appliance outside the specified ambient temperature range.
- The refrigerant circuit has been tested for leaks.
- The appliance complies with current safety regulations
CAN/CSA C22.2 No.60335-1-11
UL 60335-1 Fifth Edition
CAN/CSA C22.2 No. 60335-2-24-06
UL 60335-2-24 First Edition
We recommend cleaning the appliance before turning it on for the first time. See Cleaning.
Turn on the appliance several hours before filling it.
WARNING!
Do not allow children to play with the appliance. Children must not climb, sit or stand on the shelves or door.
Failure to follow these instructions may result in death or serious injury.
Disposal of Carton
The packaging is designed to protect the appliance and individual components during transport and is made of recyclable materials.
WARNING!
Keep packaging materials away from children. Polythene sheets and bags can cause suffocation!
If possible, please recycle packaging material at a recycling facility.
Setting Up
CAUTION!
To avoid risk of personal injury or property damage, have two people unpack and move this appliance into place.
IMPORTANT
Protect the finished floor surface before you uncrate the unit.
Avoid placing the appliance in direct sunlight or near the stove, range top, radiators and similar heat sources.
As soon as you uncrate the unit:
- Examine the unit and packaging for shipping damage. Contact the carrier immediately if you suspect there is any damage.
Note the type (model number), service number, appliance / serial number, date of purchase and where purchased in the space provided in the back of this manual.
The Right Environment for Your Wines
A grapevine is an extremely sensitive plant. From the time it is planted until its maturing period and the time the grapes are harvested and the wine is made, it is dependent on three factors: light, air humidity and ambient temperature.
This sensitivity continues even after the wine is bottled.
To allow the flavor of the wine to fully develop or to preserve the excellent aroma, the wine has to be stored at optimal conditions. Your wine cooler offers the best conditions for this.
Wines only develop their full flavor and aroma when they are at the right temperature for drinking.
In your wine cooler, wines can be brought slowly and evenly to the ideal drinking temperature.
Red wines and white wines can be stored at the same time at the optimal drinking temperature in two separately adjustable temperature zones.
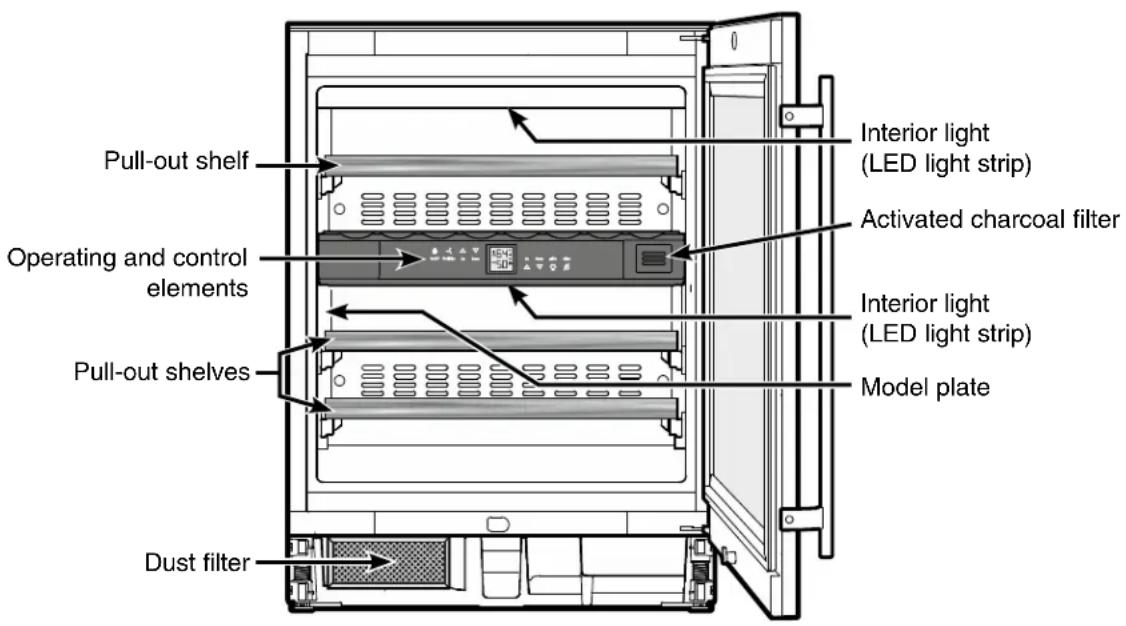
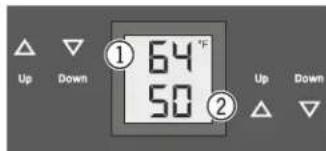
Description of the Appliance
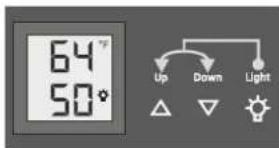
Operating and Control Elements
The electronic control panel features "touch capacitive technology". Any function can be activated by touching the corresponding icon.
The exact contact point is between the symbol and its label
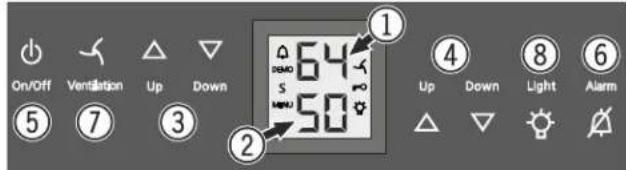
① Upper compartment temperature display
② Lower compartment temperature display
③ Upper compartment temperature setting buttons
Lower compartment temperature setting buttons
⑤ On/Off button (switching the appliance on and off)
⑥ Audible alarm Off button
⑦ Fan switch
⑧ Interior light On/Off button
Symbols in the display
Alarm (symbol flashes if the temperature inside the appliance is too high or too low)
DEMO Demo mode is activated
S Sabbath mode is activated
MENUsetup mode is activated (activating the child lock, adjusting the display brightness and activating the Sabbath mode)
The interior fan runs continuously.
Child lock is activated
The interior light is switched on continuously
Switching the Appliance On and Off
Switching the appliance on
Press the On/Off button until the temperature display lights up.

On/Off
Switching the appliance off
Keep the On/Off button pressed for approx. 3 seconds until the temperature display goes out.
Setting the Temperature
The temperature of each compartment can be set separately.
Reducing the temperature
Press the Down button.
Increasing the temperature
Press the Up button.
- When you press one of the buttons for the first time, the display will start to flash.
- Pressing this button again enables you to change the temperature setting.
The electronic control system will switch over automatically about 5 seconds after the last time you pressed the button, and the actual temperature will be displayed.
The temperature can be set between 41^ and 68^ (5^ and 20^)
The following drinking temperatures are recommended for the various types of wine.
Red wines 57^ to 68^ (14^ to 20^)
Rose wines 50^ to 54^ (10^ to 12^)
White wines 46^ to 54^ (8^ to 12^)
Sparkling wines 44^ to 48^ (7^ to 9^)
Champagne 41^ to 44^ (5°C to 7°C)
If you are storing wine for long periods of time, it should be stored at a temperature of between 50^ and 54^ (10^ and 12^)
Door Open Alarm
If the door is left open for more than 180 seconds, the audible alarm signal will sound.
If the door must be opened for a lengthy period Alarm in order to place items into the appliance, cancel the audible alarm signal by pressing the Alarm button.
The alarm switches back to standby when the door is shut.
Temperature Alarm
If the temperatures in the interior are out of the permitted range, the audible alarm signal will sound and the temperature display will flash.
- Cancel the audible alarm signal by pressing the Alarm button.
After a lengthy power failure, the temperature in the interior may have risen to a too high level. After the power supply is restored, the drop in temperature can be watched on the display.
The temperature display will stop flashing as soon as the temperature in the interior has reached the set value.
Temperature alarm after a fault in the appliance
If a fault occurs in the appliance, the temperature in the interior may rise too high or drop too low. The audible alarm signal will sound and the temperature display will flash.
- Cancel the audible alarm signal by pressing the Alarm button.
If the temperature displayed is too high (warm), first check whether the door is closed correctly.
If the temperature display continues to show a value that is too high or too low after one hour, contact the customer service department.
If F1, F8, S1, S2, S7 or S8 appears in the display, a fault has occurred in the appliance.
In this case, contact the customer service department.
Ventilation Button
The interior fan ensures a constant and even interior temperature and a suitable climate for wine storage.
The humidity in the appliance can be increased even further by pressing the Ventilation button. This has a particularly positive effect for long-term storage.
The increased level of humidity prevents the corks from drying out.
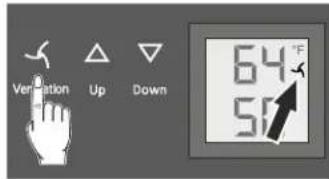
To switch on
Press the Ventilation button - the symbol lights up.
Setup Mode
In the setup mode, you can activate the following functions:
5 = Sabbath mode
This feature considers the religious requirements on the Sabbath or holidays. When the Sabbath mode is active, some functions of the electronic controls are switched off.
The lighting remains off.
- The cooling fan remains in its actual state: If it is on, it remains on, if it is off, it remains off.
There is no door alarm.
There is no temperature alarm.
h = Display brightness
Used to adjust the display brightness
= Temperature display mode
You can choose the unit of temperature for the display in degrees Fahrenheit or degrees Celsius.
C = Child lock
The child lock is designed to protect the appliance from being switched off and the temperature setting from being changed accidentally.
Sabbath mode
Activating the Sabbath mode
Press for 5 seconds. Display = 5
Press Display = 51
Press Display 51
Press Display =
The Sabbath mode is now activated.
Deactivating the Sabbath mode
Press for 5 seconds. Display = 5 5
Press Display= 50
PressDisplay= 5
Press setup mode.
The appliance will change back to normal operation.
h = Display brightness
Adjusting the display brightness
Press for 5 seconds. Display =
Down Press Display=
Press Display
Use buttons Up and Down to select the desired setting.
h0 = display lighting off
h1 = minimum brightness
h5 = maximum brightness
Press 3 h
Press Exit setup mode.
The appliance will change back to normal operation.
The adjusted brightness will be activated after one minute.
Note
If a button is pressed, the display lights up for one minute at maximum brightness.
= Temperature display mode
Note
The factory setting is degrees Fahrenheit.
Press for 5 seconds. Display =
Press Down
Press Down
Press
Press Display
Press setup mode.
The appliance will change back to normal operation.
The temperature reading is now displayed in degrees Celsius.
Note
To change the temperature display back to degrees Fahrenheit, follow the steps above.
C = Child lock
Activating the child lock
Press for 5 seconds. Display =
Press display=
Press Display
Press
Press Exit setup mode.
The appliance will change back to normal operation.
Deactivating the child lock
Press for 5 seconds. Display = 5
Press display=
Press Display
PressDisplay=
Press setup mode.
The appliance will change back to normal operation.
Interior Light
The interior of the appliance is lit by an LED light strip at the top of each compartment.
The interior light will always switch on when the appliance door is opened.
The interior light will go out approx. 5 seconds after the door is closed.
Press the Light button if you want the interior light to be on even when the door is closed.
Note
This function applies to the lighting of both compartments.
Furthermore, the brightness of the lighting can be adjusted.
Press the Light button.
- Press and hold the Light button and at the same time press the temperature setting buttons to increase or decrease the brightness.
Note: The brightness will change in all compartments.
The light intensity of the LED light corresponds to laser class 1/1M.
IMPORTANT
The light cover may only be removed by customer service staff.

Risk of eye damage.
If the cover is removed, do not look directly at the light through optical lenses from a close distance.
Air Exchange with Activated Charcoal Filter
The way in which wines continue to age depends on the ambient conditions.
The quality of the air is therefore decisive for preserving the wine. We recommend that you replace the filter illustrated here once a year. Filters can be obtained from your dealer.

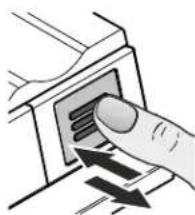
Changing the filter
- Push in the filter and release it again.

Pull out the filter.
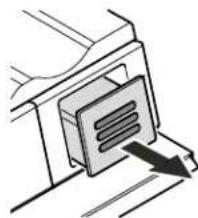
- Remove the back part of the filter.
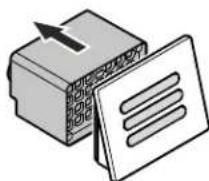
- Fit the new filter to the cover.
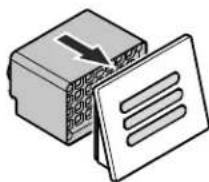
- Insert the filter, push it in as far as it will go and then release it again. The filter is automatically locked into place. You will hear a click.
Additional Features
Pull-out shelves
The pull-out shelves allow bottles of wine to be viewed and removed more easily.
The control element panel shelf cannot be removed.

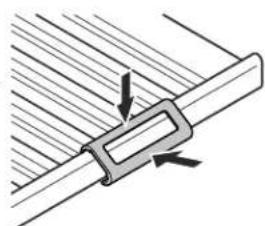
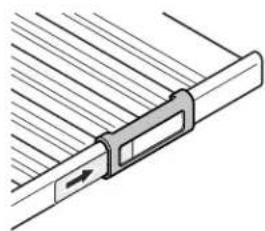
Labels
The appliance is supplied with one label for each wooden shelf.
Use these to label the type of wine stored on each shelf.
Additional labels can be obtained from your dealer.
Click the label holder into place and slide the label in from the side.
Storage Diagram
for 0.75 I Bordeaux bottles
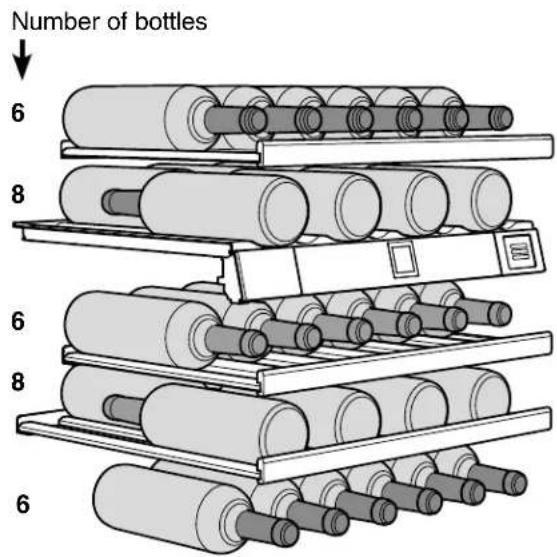
Total 34 bottles
IMPORTANT
The maximum load per wooden shelf is 55 lbs (25 kg).
Safety Lock
The lock in the appliance door is equipped with a safety mechanism.
Locking the appliance
- Insert the key and push as shown by arrow 1.
Turn the key 90^ clockwise 2.
UnlockING the appliance
- Insert the key and push.
Turn the key 90^ counterclockwise.
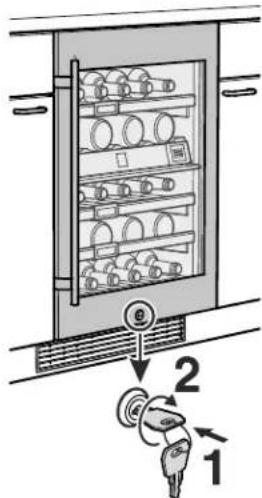
Note
Hold the key at all times. The lock cylinder is spring loaded and will eject the key if you release it.
WARNING!
Risk of child entrapment and suffocation due to a locked appliance door.
Keep the key in a safe place out of reach of children and not in the vicinity of the appliance.
Cleaning
WARNING!
- To prevent possible injury due to an electrical shock, be sure to disconnect the power cord or turn off the circuit breaker before cleaning the appliance.
- To avoid injury or damage, do not use steam cleaning equipment to clean the appliance.
IMPORTANT
Mold can form on the bottles and labels depending on the type of adhesive used on the labels. This can be prevented by carefully cleaning any adhesive residues off the bottles.
Cleaning the appliance outside
- Clean the door surface with a clean and soft cloth. If necessary, use a moist cloth (water + detergent).
Use a glass cleaner to clean the glass surface.
IMPORTANT
Do not use abrasive or scouring pads or sponges.
Do not use concentrated cleaning agents.
Never use abrasive or acid-based cleaners or chemical solvents.
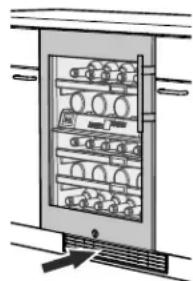
The dust filter in the appliance base must be cleaned at least once a year.
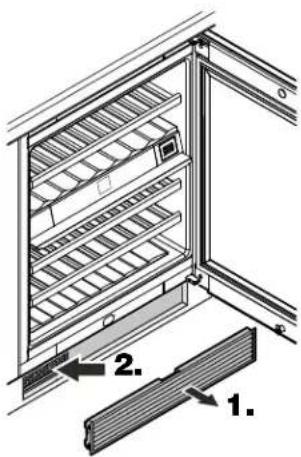
- Remove the ventilation grille from the toe kick panel.
- Clean the dust filter using a vacuum cleaner.
- Reattach the ventilation grille.
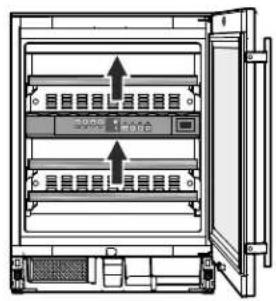
Cleaning the appliance interior
The wooden shelves can be removed for easier cleaning of the inside of the appliance.
Removing the wooden shelf
Pull the wooden shelf upwards on the right and left at the back (release) and then remove it towards you.

Clean the inside of the appliance with lukewarm water and a little detergent.
Thoroughly dry all parts with a cloth.
- Do not damage or remove the model plate on the inside of the appliance. It is very important for servicing your appliance.
Inserting the wooden shelf
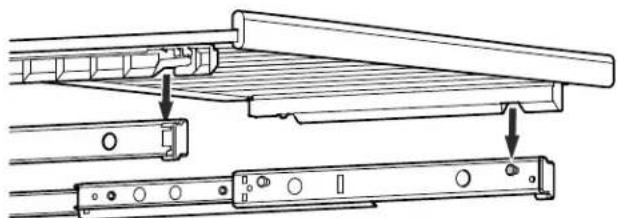
Extend the pull-out rails as far as they will go. Place the front recesses of the wooden shelf on the securing pins.
Slide the wooden shelf together with the pull-out rails into the appliance as far as they will go.
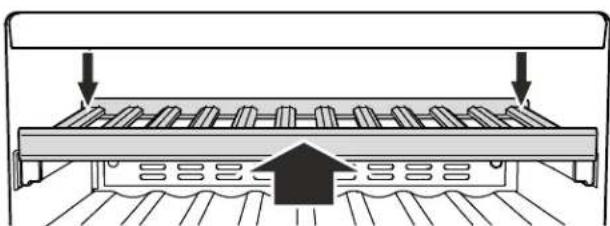
Push the wooden shelf right to the back so that it clicks into place at the front.
Push the wooden shelf downwards on the right and left at the back and click into place.
Troubleshooting
Your appliance is designed and manufactured for a long life and reliable operation.
If a problem occurs during operation, check whether it is due to an operating error.
Please note that even during the warranty period, you may be responsible for certain repair costs.
| Problem Possible cause and remedy | |
| Appliance does not work, display is off. | - Is the appliance turned on?- Is the power cord properly inserted in the outlet?- Is the circuit breaker or fuse in working order? |
| Motor seems to run too long. | - Is the ambient temperature too hot? See Safety Regulations.- Has the appliance been opened too often or left open too long? |
| The temperature is not cold enough. | - Is the temperature setting correct? See Setting the Temperature.- Has an excessive amount of wine been placed in the appliance?- Does a separately installed thermometer show the correct reading?- Is the ventilation system working properly?- Is the dust filter in the appliance base dirty? See section entitled Cleaning.- Is the appliance set up too close to a heat source? |
| The fans inside the appliance are running even though the fan function has been deactivated and the compressor (refrigeration unit) is idle. | - This is a normal operating state depending on the set interior temperature and ambient temperature at the place of installation. |
| F1, F8, S1, S2, S7 or S8 appears in the display. | - A fault has occurred in the appliance. Contact the Liebherr Service Center. |
| When inserting the mains plug, the refrigeration unit does not switch on, but a value is shown in the temperature display. | - Demo mode is activated. Contact the Liebherr Service Center. |
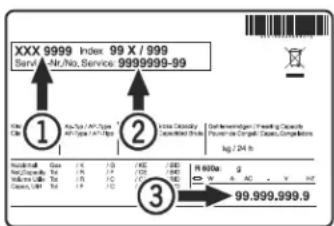
Customer Service
If none of the above possible causes apply, and you can not rectify the fault yourself, contact the Liebherr Service Center. Indicate the type (1) of appliance, service number (2) and the appliance / serial number (3) as shown on the model plate.
The position of the model plate is shown in the section entitled Description of the Appliance.
Appliance Information
Record this information when the appliance is installed.
Type Designation:
Service Number:
Appliance / Serial Number:
Date of Purchase:
Where Purchased:
Turning Off the Appliance
If your appliance is to be turned off for any length of time, switch it off and disconnect the plug or switch off or unscrew the fuse.
Clean the appliance and leave the door open in order to prevent unpleasant odors.
LIEBHERR WARRANTY PLAN
FULL TWO YEAR WARRANTY
For two years from the date of original purchase, your Liebherr warranty covers all parts and labor to repair or replace any part of the product which proves to be defective in materials or workmanship.
FULL FIVE YEAR WARRANTY
For five years from the date of original purchase, your Liebherr warranty covers all parts and labor to repair or replace any components that prove to be defective in materials or workmanship in the sealed system. The "Sealed System" means only the compressor, condenser, evaporator, drier and all connecting tubing.
LIMITED 6TH THROUGH 12TH YEAR WARRANTY
From the 6th through 12th year from the date of original purchase, your Liebherr warranty covers all parts that prove to be defective in materials or workmanship in the Sealed System (parts only).
TERMS APPLICABLE TO EACH WARRANTY
All service provided by Liebherr under the warranty must be performed by authorized Liebherr service representatives, unless otherwise specified by Liebherr. Service will be provided in the home during normal business hours. This warranty applies only to products installed for normal residential use. Details regarding a non-residential warranty are available on request.
The warranty applies only to products installed in Canada and any one of the fifty states of the United States or the District of Columbia. This warranty does not cover any parts or labor to correct any defect caused by negligence, accident or improper use, maintenance, installation, service or repair, including but not limited to improper removal and reinstallation of the condensing unit.
THE WARRANTY DESCRIBED ABOVE ARE MADE EXPRESSLY IN LIEU OF ANY OTHER WARRANTYES, EXPRESSED OR IMPLIED, INCLUDING ANY IMPLIED WARRANTY OF MERCHANTABILITY OR FITNESS FOR A PARTICULAR PURPOSE, AND OF ANY OTHER OBLIGATION OR LIABILITY ON THE PART OF LIEBHERR. IN NO EVENT SHALL LIEBHERR BE LIABLE FOR SPECIAL, INCIDENTAL OR CONSEQUENTIAL DAMAGES ARISING FROM THE BREACH OF THESE WARRANTYES OR ANY OTHER WARRANTYES, WHETHER EXPRESS, IMPLIED OR STATUTORY.
Some states do not allow the exclusion or limitation of incidental or consequential damages so the above limitation or exclusion may not apply to you. This warranty gives you specific legal rights and you may also have other rights which vary from state to state.
To receive parts and/or service and the name of the Liebherr authorized service representative nearest you, contact your Liebherr dealer or distributor or contact the Liebherr designated national service provider:
in the US: Service-appliances.us@liebherr.com, or call 1-866-LIEBHER or 1-866-543-2437 in Canada: www.euro-parts.ca, or call 1-888-LIEBHER, 1-888-543-2437.
LIEBHERR
Manuel
d'utilisation
et d'entretien
de l'armoire à vin
réfrigérante
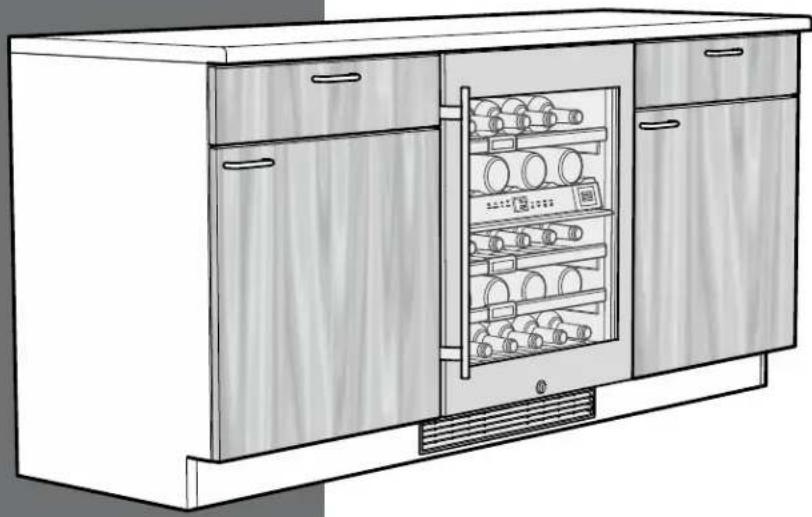
Table des matieres Page
Désactiver le mode Shabbath
For Service in the U.S.
Lieb Herr Service Center
Toll Free: 1-866-LIEBHER or 1-866-543-2437
Email: Service-appiances.us@liebherr.com
PlusOne Solutions, Inc.
3501 Quadrangle Blvd, Suite 120
Orlando, FL 32817
For Service in Canada
Lieb Herr Service Center
Toll Free: 1-888-LIEBHER or 1-888-543-2437
www.euro-parts.ca
EURO-PARTS CANADA
39822 Belgrave Road
Belgrave, Ontario, N0G 1E0
Phone: (519) 357-3320
Fax: (519) 357-1326