
RW404761 - Fridge GAGGENAU - Free user manual and instructions
Find the device manual for free RW404761 GAGGENAU in PDF.
User questions about RW404761 GAGGENAU
0 question about this device. Answer the ones you know or ask your own.
Ask a new question about this device
Download the instructions for your Fridge in PDF format for free! Find your manual RW404761 - GAGGENAU and take your electronic device back in hand. On this page are published all the documents necessary for the use of your device. RW404761 by GAGGENAU.
USER MANUAL RW404761 GAGGENAU
Further information and explanations are available online:

text_image
QR code image containing encoded data, no visible human-readable textTable of contents
1 Safety...... 4
1.1 Safety definitions .... 4
1.2 General information...... 4
1.3 Intended use.... 4
1.4 Restrictive Use 5
1.5 Safe transport.... 5
1.6 Safe installation 5
1.7 Safe use 6
1.8 Damaged appliance.... 7
1.9 State of California Proposition 65 Warnings.... 9
2 Preventing material damage .... 10
3 Environmental protection and energy-saving.... 10
3.1 Disposal of packaging ..... 10
3.2 Saving energy...... 10
4 Installation and connection..... 10
4.1 Included in delivery 10
4.2 Criteria for the installation location.... 11
4.3 Installing the appliance ..... 11
4.4 Preparing the appliance for first use.... 11
4.5 Connecting the appliance to the electricity supply...... 11
5 Familiarizing yourself with your appliance.... 12
5.1 Appliance 12
5.2 Control panel.... 13
6 Features.... 14
6.1 Extendable bottle shelf...... 14
6.2 Odor filter 14
7 Basic Operation ...... 14
7.1 Switching on the appliance..... 14
7.2 Operating tips.... 14
7.3 Switching off the appliance ..... 14
7.4 Setting the temperature...... 14
7.5 Keylock.... 14
7.6 Display brightness..... 15
8 Additional functions ...... 15
8.1 Interior lighting.... 15
8.2 Presentation mode 15
8.3 Ventilation.... 15
8.4 Display brightness...... 16
9 Alarm.... 16
9.1 Door alarm 16
9.2 Temperature alarm.... 16
10 Wine storage compartment .... 16
10.1 Arranging the maximum number of standard bottles... 16
10.2 Tips for storing wine...... 17
10.3 Drinking temperatures...... 17
11 Defrosting.... 18
11.1 Defrosting in the wine storage compartment.... 18
12 Cleaning and maintenance..... 18
12.1 Care instructions for stainless steel surfaces.... 18
12.2 Preparing the appliance for cleaning.... 18
12.3 Cleaning the appliance ..... 18
12.4 Cleaning the condensation channel and drainage hole ... 19
12.5 Cleaning the ventilation grille.... 19
12.6 Removing the fittings...... 19
12.7 Replacing the odor filter...... 20
13 Troubleshooting...... 21
14 Storage and disposal...... 23
14.1 Taking the appliance out of operation 23
14.2 Disposal of your old appli- ance.... 23
15 Customer Service.... 23
15.1 Model number (E-Nr.) and production number (FD)...... 23
16 Technical specifications...... 24

1 Safety
Observe the following safety instructions.
1.1 Safety definitions
Here you can find explanations of the safety signal words used in this manual.
⚠ WARNING – Risk of injury!
This indicates that death or serious injuries may occur as a result of non-observance of this warning.
CAUTION – Risk of injury!
This indicates that minor or moderate injuries may occur as a result of non-observance of this warning.
NOTICE:
This indicates that damage to the appliance or property may occur as a result of non-compliance with this advisory.
Note: This alerts you to important information and/or tips.
1.2 General information
■ Read this manual carefully.
- Keep the manual and the product information in a safe place for future reference or for the next owner.
■ Do not connect the appliance if it has been damaged in transit.
1.3 Intended use
This appliance is only intended to be fitted under a counter.
Only use this appliance:
■ for storing wine.
■ for normal household use and in enclosed spaces in a residential environment.
■ Up to an altitude of 1500 m above sea level.
1.4 Restrictive Use
This appliance is not intended for use by persons (including children) with reduced physical, sensory or mental capabilities, or lack of experience and knowledge, unless they have been given supervision or instruction concerning use of the appliance by a person responsible for their safety.
Do not let children play with the appliance.
Cleaning and user maintenance must not be performed by children unless they are being supervised.
1.5 Safe transport
⚠ WARNING – Risk of injury!
The heavy weight of the appliance may result in injury when lifted.
▶ Do not lift the appliance on your own.
1.6 Safe installation
⚠ WARNING – Risk of electric shock!
Incorrect installation is dangerous.
- Connect and operate the appliance only in accordance with the specifications on the rating plate.
- Connect the appliance to a power supply with alternating current only via a correctly installed socket outlet with grounding.
- The protective conductor system of the domestic electrical installation must be properly installed.
▶ Never equip the appliance with an external switching device, e.g. a timer or remote control. - When the appliance is installed, the mains plug of the power cord must be freely accessible. If free access is not possible, an isolating switch must be integrated into the permanent electrical installation according to the installation regulations.
- When installing the appliance, check that the power cord is not trapped or damaged.
If the insulation of the power cord is damaged, that can be dangerous.
▶ Never let the power cord come into contact with heat sources.
⚠ WARNING – Risk of explosion!
If the appliance's ventilation openings are closed off, a leak in the refrigeration circuit may result in a flammable mixture of gas and air.
- Keep ventilation openings in the appliance casing or in the integrated casing clear of obstruction.
⚠ WARNING – Risk of fire!
It is dangerous to use an extended power cord and non-approved adapters.
▶ Do not use extension cords or multiple socket strips.
▶ Only use adapters and power cords approved by the manufacturer.
▶ If the power cord is too short and a longer one is not available, please contact an electrician to have the domestic installation adapted.
Portable multiple socket strips or portable power supply units may overheat and cause a fire.
- Do not place portable multiple socket strips or power supply units on the back of the appliance.
1.7 Safe use
⚠ WARNING – Risk of electric shock!
Moisture intrusion may cause an electric shock.
▶ Use the appliance in enclosed spaces only.
▶ Never expose the appliance to intense heat or humidity.
- Do not use any steam cleaners or high-pressure cleaners to clean the appliance.
⚠ WARNING – Risk of suffocation!
Children may pull packaging material over their heads, or wrap themselves up in it and suffocate.
- Keep packaging material away from children.
▶ Do not allow children to play with packaging material.
Children may breathe in or swallow small parts, causing them to suffocate. - Keep small parts away from children.
▶ Do not allow children to play with small parts.
⚠ WARNING – Risk of explosion!
If the cooling circuit is damaged, flammable refrigerant may escape and explode.
- To accelerate the defrosting process, do not use any other mechanical devices or means other than those recommended by the manufacturer.
Products which contain flammable propellants and explosive substances may explode, e.g. spray cans.
- Do not store products which contain flammable propellants (e.g. spray cans) or explosive substances in the appliance.
WARNING – Risk of fire!
Electrical devices placed inside the appliance may cause a fire, e.g. heaters or electric ice makers.
▶ Do not operate electrical devices within the appliance.
⚠ WARNING – Risk of injury!
Injury to the eyes caused by escaping flammable refrigerant and hazardous gases.
- Do not damage the tubes of the refrigerant circuit or the insulation.
1.8 Damaged appliance
⚠ WARNING – Risk of electric shock!
If the appliance or the power cord is damaged, this is dangerous.
▶ Never operate a damaged appliance.
▶ Never pull on the power cord to unplug the appliance. Always unplug the appliance at the power outlet.
▶ If the appliance or the power cord is damaged, immediately unplug the power cord or switch off the breaker in the circuit breaker box.
▶ Call Customer Service. → Page 23
Improper repairs are dangerous.
▶ Repairs to the appliance should only be performed by authorized service providers.
en-us Safety
▶ Only original spare parts may be used to repair the appliance.
If the power cord of this appliance becomes damaged, it must be replaced by the manufacturer, the manufacturer's Customer Service, or an authorized service provider in order to prevent injury.
⚠ WARNING – Risk of fire!

If the tubes are damaged, flammable refrigerant and harmful gases may escape and ignite.
- Keep open flames and ignition sources away from the appliance.
▶ Ventilate the room.
▶ Switch off the appliance. → Page 14
▶ Unplug the appliance from the power source or switch off the circuit breaker in the fuse box.
▶ Call Customer Service. → Page 23
1.9 State of California Proposition 65 Warnings
This product may contain a chemical known to the State of California, which can cause cancer or reproductive harm. Therefore, the packaging of your product may bear the following label as required by California:
STATE OF CALIFORNIA PROPOSITION 65 WARNING: / AVERTISSEMENT ISSUE DE LA PROPOSITION 65 DE L'ÉTAT DE LA CALIFORNIE:

text_image
Warning symbol with exclamation mark inside a triangleWARNING / AVERTISSEMENT
Cancer and Reproductive Harm / Cancer et dommages à la reproduction - www.P65Warnings.ca.gov.
2 Preventing material damage
NOTICE:
Using the base, runners or appliance doors as a seat or climbing surface may damage the appliance.
- Do not stand or lean on the base, runners or doors.
Contamination with oil or fat may cause plastic parts and door seals to become porous.
- Keep plastic parts and door seals free of oil and grease.
If you clean fittings and accessories in the dishwasher, this may cause them to become deformed or discolor.
▶ Never clean fittings and accessories in the dishwasher.
3 Environmental protection and energy-saving
3.1 Disposal of packaging
The packaging materials are environmentally compatible and can be recycled.
- Sort the individual components by type and dispose of them separately.
3.2 Saving energy
If you follow these instructions, your appliance will use less power.
Selecting the installation location
-
Keep the appliance out of direct sunlight.
■ Install the appliance as far away as possible from heating elements, stoves and other heat sources: -
Maintain a 1^1/4 (30 mm) clearance to electric or gas stoves.
- Maintain an 11^13 / _16 (300 mm) clearance to oil or solid-fuel stoves.
■ Never cover or block the exterior ventilation grilles.
Saving energy during use
Note: The arrangement of the fittings does not affect the energy consumption of the appliance.
■ Open the appliance only briefly and then close it carefully.
■ Never cover or block the interior ventilation openings or the exterior ventilation grilles.
4 Installation and connection
4.1 Included in delivery
After unpacking all the parts, check for any damage in transit and for completeness of delivery. If you have any concerns, contact your dealer or our Customer Service → Page 23.
The delivery consists of the following:
■ Built-under appliance
■ Equipment and accessories
■ Installation instructions
■ User manual
■ Explanation of the limited product warranty
■ Warranty enclosure ^2
■ Energy label
■ Information on energy consumption and noises
4.2 Criteria for the installation location
WARNING
Risk of explosion!
If the appliance is in a space that is too small, a leak in the refrigeration circuit may result in a flammable mixture of gas and air.
▶ Only install the appliance in a space with a volume of at least 35 ft^3 ( 1 m^3 ) per 0.3 oz (8 g) refrigerant. The amount of refrigerant is indicated on the rating label.
$$ \rightarrow \text { "Appliance" }, \text { Fig. } 1 / 4, $$
The weight of the appliance from factory may be up to 135 lbs (60 kg) depending on the model.
The subfloor must be sufficiently stable to bear the weight of the appliance.
4.3 Installing the appliance
- Install the appliance in accordance with the enclosed installation instructions.
4.4 Preparing the appliance for first use
- Remove the information material.
- Remove the protective film and transit bolts, e.g. remove the adhesive strips and cardboard.
- Clean the appliance for the first time. → Page 18
4.5 Connecting the appliance to the electricity supply
-
Insert the power plug of the appliance's power cord in a socket outlet with grounding nearby.
The connection data of the appliance can be found on the rating plate. → "Appliance", Fig. 1/4, Page 12 -
Check the power plug is inserted properly.
√ The appliance is now ready to use.
5 Familiarizing yourself with your appliance
5.1 Appliance
Here you can find an overview of the parts of your appliance.

text_image
1 2 3 4 51
Your appliance may differ from the diagrams with regard to cosmetic features and dimensions.
| 1 | Interior lighting |
| 2 | Control panel → Page 13 |
| 3 | Extendable bottle shelf → Page 14 |
| 4 | Rating label → Page 24 |
| 5 | Screw foot |
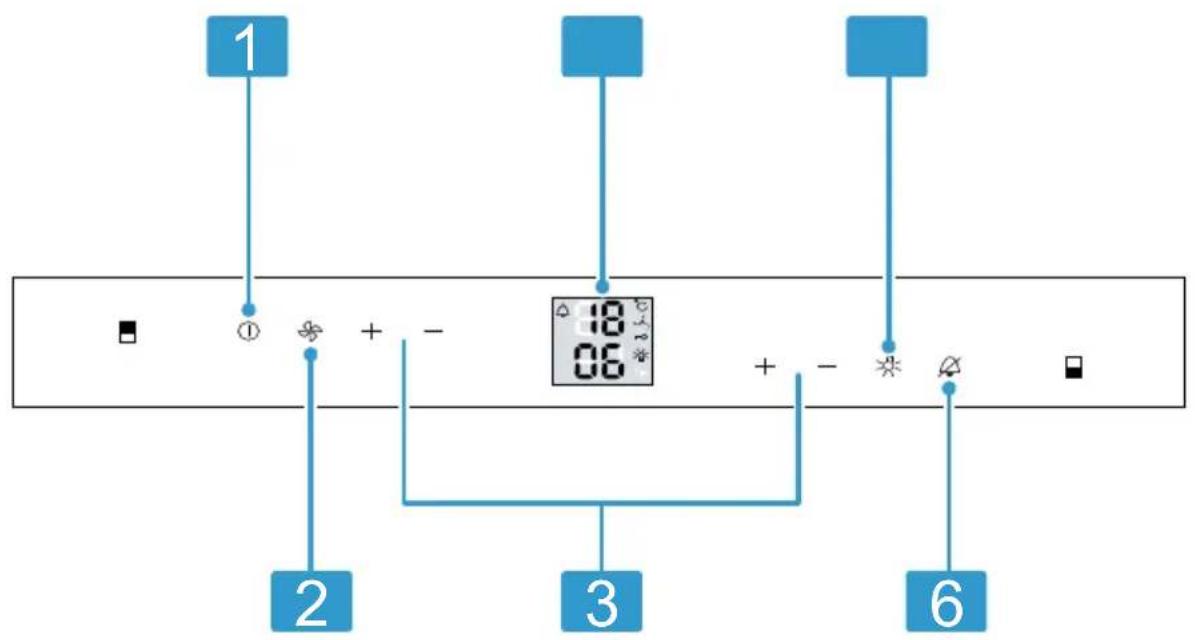
5.2 Control panel
You can use the control panel to configure all functions of your appliance and to obtain information about the operating status.
flowchart
graph TD
    A["1"] --> B["2"]
    B --> C["3"]
    C --> D["6"]
    style A fill:#4A90E2,stroke:#333
    style B fill:#FFD700,stroke:#333
    style C fill:#FFA500,stroke:#333
    style D fill:#FFA500,stroke:#333
    subgraph Display
        E["18:06"]
        F["06"]
        G["+"]
        H["-"]
        I["+"]
        J["-"]
        K["×"]
    end
2
1 The main switch turns the appliance on or off.
2 * switches the fan on or off.
3 —/+sets the temperature of the selected compartment.
4 Displays the set temperature of the wine storage compartment °C.
5 switches the interior lighting on or off.
6 switches the warning signal off.
6 Features
The features of your appliance depend on the model.
6.1 Extendable bottle shelf
In order to achieve an improved overview and to remove bottles more quickly, pull out the extendable bottle shelf.

natural_image
Illustration of a conveyor belt system with rollers and a blue tray, showing a black arrow indicating direction (no text or symbols)6.2 Odor filter
The odor filter filters odors in the refrigerator compartment and can be replaced if required.
→ "Replacing the odor filter", Page 20
Change the odor filter every year. This keeps the filter quality permanently high.
7 Basic Operation
7.1 Switching on the appliance
- Press ①
√ The appliance begins to cool.
- Set the desired temperature.
→ Page 14
7.2 Operating tips
■ Once you have switched on the appliance, the set temperature is only reached after several hours.
■ When you close the door, a vacuum may be created. The door is then difficult to open again. Wait a moment until the vacuum is offset.
■ The temperature in the appliance varies due to the following conditions:
- How often the appliance is opened
- Load capacity
- Ambient temperature
- Direct sunlight
7.3 Switching off the appli- ance
▶ Press①
7.4 Setting the temperature
Setting the temperature of the wine storage compartment
- Press—+ repeatedly until the temperature display shows the desired temperature.
7.5 Keylock
The button lock prevents the appliance from being operated accidentally or incorrectly while running.
Switching on the keylock
- Press and hold for 5 seconds.
"MENU" appears in the display and "c" flashes. - Press
√ The submenu display shows "c1". - Press
√ The submenu display shows "c" and \~appears.
4. Press
√ The settings menu is exited: shows the active keylock.
Switching off the keylock
- Press and hold for 5 seconds.
"MENU" appears in the display and "c" flashes.
- Press
√ The submenu display shows "c0".
- Press
√ The submenu display shows "c".
- Press
√ The settings menu is exited.
7.6 Display brightness
You can set the brightness of the display in stages.
Note: The set display brightness does not take effect when starting up the appliance until the interior temperatures set are reached.
h0 Minimum brightness
h5 Maximum brightness
Setting the display brightness
- Press and hold for 5 seconds.
"MENU" appears in the display and "c" flashes.
-
Press □ until "h" lights up.
-
Press
-
Press □+ □until the setting display submenu shows the desired setting.
-
Press
√ The submenu display shows "h".
- Press
√ The settings menu is exited.
8 Additional functions
Find out which additional functions can be used for your appliance.
8.1 Interior lighting
The interior lighting switches on automatically when you open the appliance.
Tip: If the interior lighting is switched on when the door is closed, you can switch on the presentation mode too.
8.2 Presentation mode
In presentation mode, the interior lighting is permanently switched on.
Switching on presentation mode
▶ Press
√ ✿ appears in the display. The interior lighting remains switched on, even if the appliance door is closed.
Switching off the presentation mode
▶ Press
Setting the brightness of the presentation lighting
- Press
√ 🙏 appears on the display.
-
Press and hold 🌿
-
Press and hold □+ □until the desired brightness is reached.
-
Release
8.3 Ventilation
The fan button should be switched on for the long-term storage of wine. This means that a climate that matches that of a wine cellar is
reached in the appliance interior. The increased humidity prevents the corks from drying out.
Switching on the ventilation
▶ Press
√ 🎨 appears on the display.
8.4 Display brightness
You can set the brightness of the display in stages.
Note: The set display brightness does not take effect when starting up the appliance until the interior temperatures set are reached.
h0 Minimum brightness
h5 Maximum brightness
Setting the display brightness
- Press and hold for 5 seconds.
"MENU" appears in the display and "c" flashes.
2. Press □ until "h" lights up.
3. Press
4. Press □+ □ until the setting display submenu shows the desired setting.
5. Press
√ The submenu display shows "h".
6. Press
√ The settings menu is exited.
9 Alarm
9.1 Door alarm
If the appliance door is open for a while, the door alarm switches on.
Switching off the door alarm
- Close the appliance door or press ⚠.
√ The warning tone is switched off.
9.2 Temperature alarm
If the wine storage compartment is too warm or too cold for an extended period, the temperature alarm switches on.
Switching off the temperature alarm
▶ Press
√ The warning tone is switched off.
10 Wine storage compartment
In the wine storage compartment, you store wine at a constant temperature.
You can set the temperature in the wine storage compartment from 5 °C to 20 °C.
10.1 Arranging the maximum number of standard bottles
- To place the maximum number of bottles in the appliance, place wine bottles into the appliance laying down facing forwards and backwards alternately.
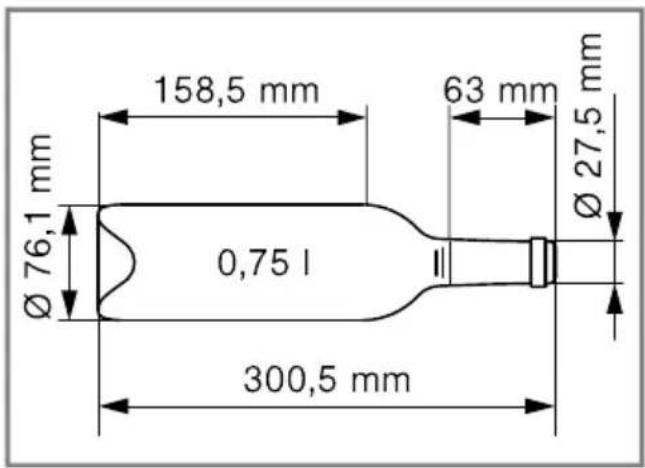
text_image
158,5 mm 63 mm Ø 27,5 mm Ø 76,1 mm 0,75 l 300,5 mmStandard bottle
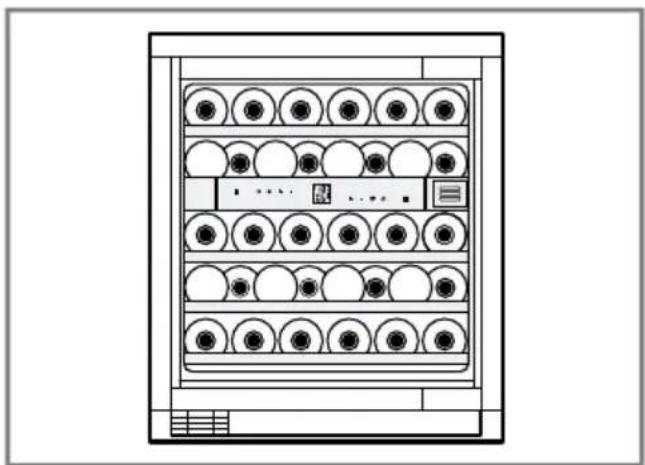
natural_image
Technical line drawing of a multi-level rack cabinet with circular compartments and control panel (no text or symbols)Storage example with 34 standard bottles
10.2 Tips for storing wine
Note the following tips for storing wine.
■ Do not store the wine bottles in crates or boxes in the appliance. The open bottle trays allow continuous air circulation. As a result, excess humidity is quickly removed.
■ Before you enjoy your wine, you should slowly warm it to room temperature. Take rosé out of the appliance 2 to 5 hours before consuming, and take red wine out of the appliance 4 to 5 hours before consuming. Serve white wine immediately after taking it out of the appliance. Sparkling wine and
champagne should be chilled in the refrigerator for a short while before drinking.
■ Always store wine a little cooler than its ideal serving temperature, as the wine warms up as soon as it is poured into the glass.
10.3 Drinking temperatures
The correct serving temperature is crucial for the taste of the wine.
| Type of wine Drinking temperature | |
| Full-bodied red Bor-deaux | 18 °C |
| Côtes du Rhône red, Barolo | 17 °C |
| Full-bodied red Burgundy, red Bordeaux | 16 °C |
| Port 15 °C | |
| Young red Burgundy | 14 °C |
| Young red wines | 12 °C |
| Young Beaujolais, all white wines with little residual sugar | 11 °C |
| Old white wines, full-bodied Chardonnay | 10 °C |
| Sherry 9 °C | |
| Young white wines, from late vintage on-ward | 8 °C |
| Loire, Entre-deux-Mers white wines | 7 °C |
11 Defrosting
11.1 Defrosting in the wine storage compartment
When the appliance is operating, condensation droplets or frost form on the rear panel of the wine storage compartment due to functional reasons. The back panel in the wine storage compartment defrosts automatically.
The condensation drains into the drainage hole via the condensation channel.
To ensure that the condensation can drain and odors do not form, observe the following information:
→ "Cleaning the condensation channel and drainage hole", Page 19.
12 Cleaning and maintenance
To keep your appliance working efficiently for a long time, it is important to clean and maintain it carefully. Customer Service must clean inaccessible points. Cleaning by Customer Service can give rise to costs.
12.1 Care instructions for stainless steel surfaces
When taking care of and cleaning stainless steel surfaces, use only cleaning cloths and cleaning agents suitable for stainless steel.
Tips
■ To prevent visible scratches, wipe the stainless steel surface in the direction of the grain.
■ Suitable cleaning agents and cleaning cloths are available from our customer service, your dealer or on our website.
12.2 Preparing the appliance for cleaning
- Switch off the appliance.
→ Page 14
- Disconnect the appliance from the power supply.
Unplug the appliance from the power source or switch off the circuit breaker in the fuse box.
-
Take out all bottles and store them in a cool place.
-
Remove all fittings and accessories from the appliance.
→ Page 19
12.3 Cleaning the appliance
WARNING
Risk of electric shock!
Moisture intrusion may cause an electric shock.
- Do not use any steam cleaners or high-pressure cleaners to clean the appliance.
NOTICE:
Unsuitable cleaning agents may damage the surfaces of the appliance.
- Do not use hard scouring pads or cleaning sponges.
- Do not use strong or abrasive cleaning agents.
- Do not use cleaning agents with a high alcohol content.
If liquid gets into the drainage hole, the evaporation pan may overflow.
- The rinsing water must not get into the drainage hole.
If you clean fittings and accessories in the dishwasher, this may cause them to become deformed or discolor.
▶ Never clean fittings and accessories in the dishwasher.
- Prepare the appliance for cleaning. → Page 18
- Clean the appliance, the fittings, the accessories and the door seals with a dish cloth, lukewarm water and a little pH-neutral dishwashing liquid.
- Dry thoroughly with a soft, dry cloth.
- Insert the fittings.
- Connect the appliance to the electricity supply. → Page 11
- Switch on the appliance. → Page 14
12.4 Cleaning the condensation channel and drainage hole
Regularly clean the condensation channel and drainage hole to ensure that the condensation can drain.
- Carefully clean the condensation channel and the drainage hole, e.g. using a cotton bud.

12.5 Cleaning the ventilation grille
- Remove the exterior ventilation grille for cleaning.
- Remove the exterior ventilation grille forwards.
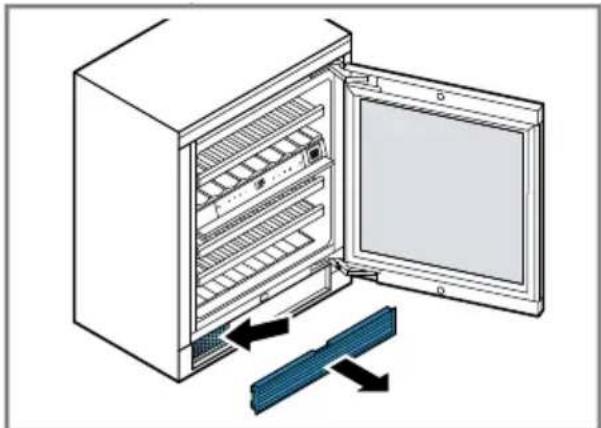
natural_image
Diagram of an open refrigerator with a blue rack and black arrows indicating cooling or ventilation (no text or symbols)- Clean the exterior ventilation grille with lukewarm soapy water and a dish cloth.
- Clean the dust filter with a vacuum cleaner.
- Let the exterior ventilation grille dry completely and insert it.
12.6 Removing the fittings
If you want to clean the fittings thoroughly, remove these from your appliance.
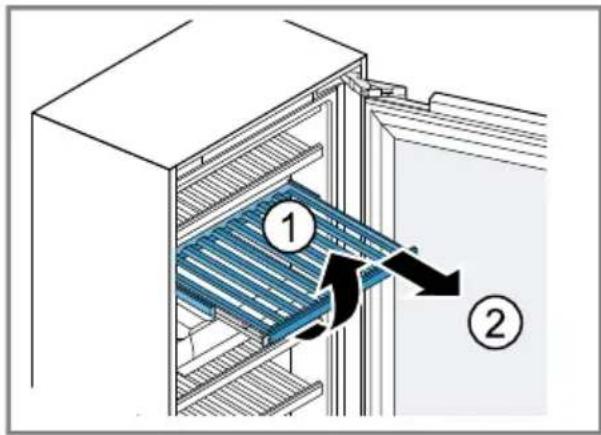
Extendable bottle shelf Removing the extendable bottle shelf
- Pull the extendable bottle shelf all the way out.
en-us Cleaning and maintenance
- Lift the extendable bottle shelf at the front ① and remove it .②
text_image
Diagram of a refrigerator interior showing labeled components and airflow directionInserting the extendable bottle shelf
- Pull out the pull-out rails fully and put the bottle shelf with the front recesses on the retaining bolt.

natural_image
Diagram showing two blue mechanical components with mounting holes and a separate bracket (no text or symbols)-
Slide the bottle shelf with the pull-out rails all the way into the appliance.
-
Push the bottle shelf fully to the rear until it clicks into place at the front. Push the rear bottle shelf downwards and click it into place.
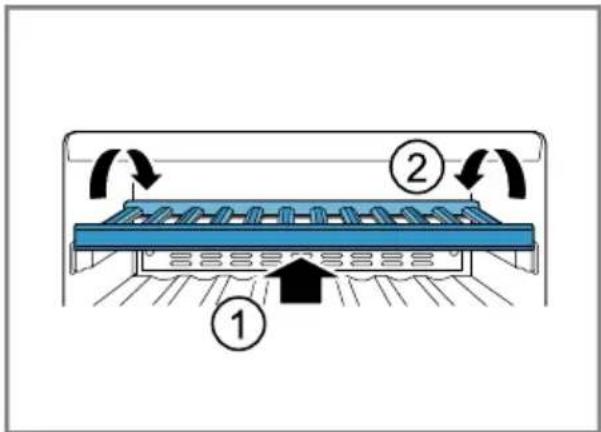
text_image
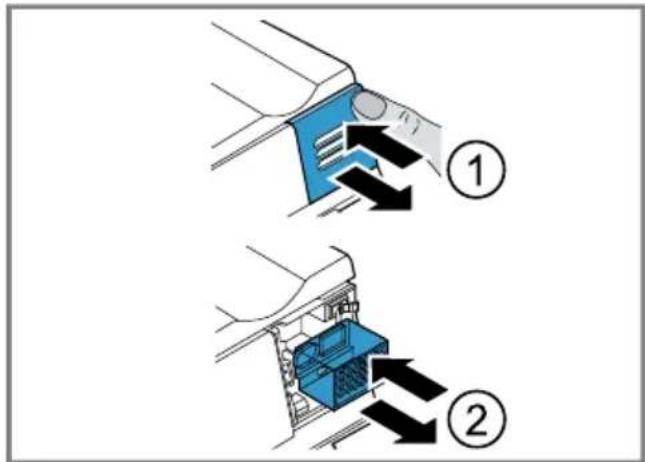
Diagram of a refrigerator with labeled parts and airflow indicators12.7 Replacing the odor filter
-
Push the odor filter cover, release it and remove it.
-
Take the used odor filter out of the odor filter holder and replace it with the new odor filter.
-
Insert the cover, push it in as far as it will go and release it.
√ A clicking sound is heard. The cover is automatically locked.
text_image
Diagram illustrating two steps of a cleaning or cleaning process with numbered instructions and directional arrows indicating movement.Note: A new odor filter can be purchased from our customer service or our website.
13 Troubleshooting
You can eliminate minor issues on your appliance yourself. Please read the information on eliminating issues before contacting Customer Service. This may avoid unnecessary repair costs.

WARNING
Risk of electric shock!
Improper repairs are dangerous.
- Repairs to the appliance should only be performed by authorized service providers.
▶ Only original spare parts may be used to repair the appliance.
If the power cord of this appliance becomes damaged, it must be replaced by the manufacturer, the manufacturer's Customer Service, or an authorized service provider in order to prevent injury.
Issue Cause and troubleshooting
| Notification showing FOr F appears on the display. | The electronics have detected a fault.► Call customer service.→ "Customer Service", Page 23 |
| The appliance is not cooling, the displays and lighting are lit. | Showroom mode is switched on.► Call customer service.The customer service number can be found in the enclosed customer service directory. |
| The LED lighting does not work. | Various causes are possible.► Call customer service.→ "Customer Service", Page 23 |
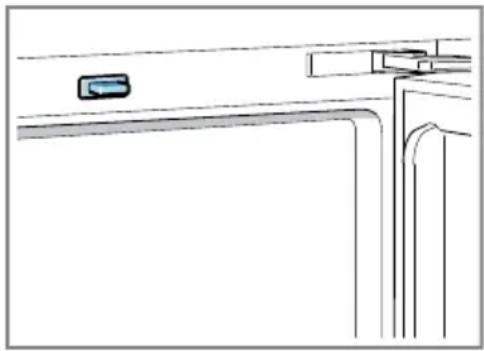
natural_image
Pure architectural line drawing of a window with no text, numbers, or symbolsLight switch is jammed.
▶ Check whether the light switch can be moved.
| Issue Cause and troubleshooting | |
| The temperature differs greatly from the setting. | Various causes are possible.1. Switch off the appliance. → Page 142. Switch the appliance back on after approximately 5 minutes. → Page 14- If the temperature is too warm, check the temperature again after a couple of hours.- If the temperature is too cold, check the temperature again on the following day. |
| The base of the wine storage compartment is wet. | The condensation channel or drainage hole is blocked.► Clean the defrost water outlet and the drainage hole. → Page 19 |
| The appliance hums, bubbles, buzzes, gar-gles or clicks. | Not an issue. A motor is running, e.g. refrigerating unit, fan. Refrigerant is flowing through the pipes. The motor, switches or solenoid valves are switching on or off.No action required. |
| The appliance makes noises. | Fittings wobble or stick.► Check the removable fittings and, if required, replace these. |
14 Storage and disposal
14.1 Taking the appliance out of operation
- Switch off the appliance.
→ Page 14 - Disconnect the appliance from the power supply.
Unplug the appliance from the power source or switch off the circuit breaker in the fuse box. - Clean the appliance. → Page 18
- To ensure the ventilation inside the appliance, leave the appliance open.
14.2 Disposal of your old appliance
Environmentally compatible disposal allows valuable raw materials to be recycled.
WARNING
Risk of harm to health!
Children can lock themselves in the appliance, thereby putting their lives at risk.
- Remove the appliance doors.
- To prevent children from climbing in, leave shelves and containers in the appliance.
- Keep children away from the discarded appliance.
WARNING
Risk of fire!
If the tubes are damaged, flammable refrigerant and harmful gases may escape and ignite.
- Do not damage the tubes of the refrigerant circuit or the insulation.
-
Unplug the appliance from the power supply.
-
Cut through the power cord.
- Remove the appliance doors.
- Dispose of the appliance in an environmentally responsible manner. Information about current disposal methods can be obtained from your specialist dealer or local authority.
15 Customer Service
With any warranty repair, we will make sure your appliance is repaired by an authorized service provider using genuine replacement parts. We use only genuine replacement parts for all repairs.
Detailed information on the warranty period and terms of warranty can be found in the Statement of Limited Product Warranty, from your retailer, or on our website.
If you contact Customer Service, you will need the model number (E-Nr.) and the production number (FD) of your appliance.
USA: 1-877-442-4436
www.gaggenau.com
www.gaggenau.com/us/appliances/eshop
CA: 1-877-442-4436
www.gaggenau.com
www.gaggenau.ca
15.1 Model number (E-Nr.) and production number (FD)
You can find the model number (E-Nr.) and the production number (FD) on the appliance's rating plate.
→ "Appliance", Fig. 1/4, Page 12
Making a note of your appliance's details and the Customer Service telephone number will enable you to find them again quickly.
16 Technical specifications
Refrigerant, cubic capacity and further technical specifications can be found on the rating plate.
→ "Appliance", Fig. 1/4, Page 12
text_image
QR code image containing encoded data, no visible human-readable textTable des matières
1 Sécurité...... 27
text_image
Warning symbol image with exclamation mark inside triangleWARNING / AVERTISSEMENT
Cancer and Reproductive Harm / Cancer et dommages à la reproduction - www.P65Warnings.ca.gov.
natural_image
Illustration of a conveyor belt system with rollers and a blue tray, showing a black arrow indicating direction (no text or symbols)6.2 Filtre anti-odeurs
natural_image
Technical line drawing of a multi-level rack cabinet with circular components and control panel (no text or symbols)natural_image
Diagram of an open refrigerator with a blue rack and black arrows indicating cooling or ventilation (no text or symbols)text_image
Diagram of a refrigerator interior showing labeled components and airflow directionnatural_image
Diagram showing two blue mechanical components with mounting holes and a separate rail-mounted bracket (no text or symbols)text_image
Diagram of a washing machine with labeled parts and directional arrows indicating motion or flow.12.7 Remplacer le filtre anti-odeurs
text_image
Diagram showing two steps of a mechanical device operation, labeled ① and ②, with arrows indicating direction of movement.natural_image
Line drawing of a kitchen appliance with a blue control panel and curved door (no text or symbols)www.gaggenau.com/us/appliances/eshop
text_image
QR code image containing encoded data, no visible human-readable textTabla de contenidos
1 Seguridad 51
natural_image
Warning symbol: black exclamation mark inside a triangle (no text or numbers)WARNING / AVERTISSEMENT
Cancer and Reproductive Harm / Cancer et dommages à la reproduction - www.P65Warnings.ca.gov.
natural_image
Illustration of a conveyor belt system with rollers and a blue tray, showing a black arrow indicating direction (no text or symbols)6.2 filtro antiolores
natural_image
Front view diagram of a server rack with multiple circular units and indicator lights (no text or labels)natural_image
Diagram of an open refrigerator with a blue rack and directional arrows indicating storage or ventilation (no text or symbols)text_image
Diagram of a refrigerator interior showing labeled parts and airflow directionnatural_image
Diagram showing two blue mechanical components with mounting holes and a separate rail-mounted bracket (no text or symbols)text_image
Diagram of a refrigerator with labeled parts and directional arrows indicating flow or movement12.7 Sustituir el filtro desodorizante
text_image
Diagram illustrating two steps of a mechanical or electrical component assembly, labeled ① and ②, with arrows indicating direction.natural_image
Line drawing of a door handle with a small object on the left side (no text or symbols)www.gaggenau.com/us/appliances/eshop
CA:
1-877-442-4436
www.gaggenau.com
www.gaggenau.ca
1901 Main Street, Suite 600
Irvine, CA 92614
USA
www.gaggenau.com
1-877-442-4436
© 2024 BSH Home Appliances Corporation
