
KCM1208 - Coffee machine KITCHENAID - Free user manual and instructions
Find the device manual for free KCM1208 KITCHENAID in PDF.
| Product Type | Drip Coffee Maker |
| Brand | KitchenAid |
| Model | KCM1208 |
| Capacity | 12 cups (approx. 1.8 L) |
| Power | 1100 W |
| Voltage/Frequency | 120 V / 60 Hz |
| Recommended Coffee Type | Medium grind |
| Compatible Filters | Permanent gold filter (included) or cone paper filter (not included) |
| Main Functions | Programmable clock, auto shut-off, keep warm (2 h), pause and pour, brew strength (Regular/Bold), auto-clean function |
| Delayed Brew Programming | Auto Set up to 24 hours in advance |
| Water Reservoir | Removable, water level markings |
| Carafe | Glass with handle and lid |
| Warming Plate | Yes, automatic keep warm |
| Display | LED with clock, Auto, Clean, Bold, brew icons, A.M./P.M. indicators |
| Safety | Grounded 3-prong plug, anti-drip valve, auto shut-off, carafe lid required |
| Maintenance | Brew basket and gold filter dishwasher safe (top rack); carafe and reservoir hand wash; descale with vinegar |
| Descale Indicator | Clean icon flashes after 100 brew cycles |
| Replacement Parts | Carafe, brew basket, gold filter, water reservoir |
| Warranty | 1 year, hassle-free replacement (USA/Canada) |
| Customer Service | Customer Experience Center: 1 800 541-6390 (United States), 1 800 807-6777 (Canada) |
Frequently Asked Questions - KCM1208 KITCHENAID
User questions about KCM1208 KITCHENAID
0 question about this device. Answer the ones you know or ask your own.
Ask a new question about this device
Download the instructions for your Coffee machine in PDF format for free! Find your manual KCM1208 - KITCHENAID and take your electronic device back in hand. On this page are published all the documents necessary for the use of your device. KCM1208 by KITCHENAID.
USER MANUAL KCM1208 KITCHENAID
natural_image
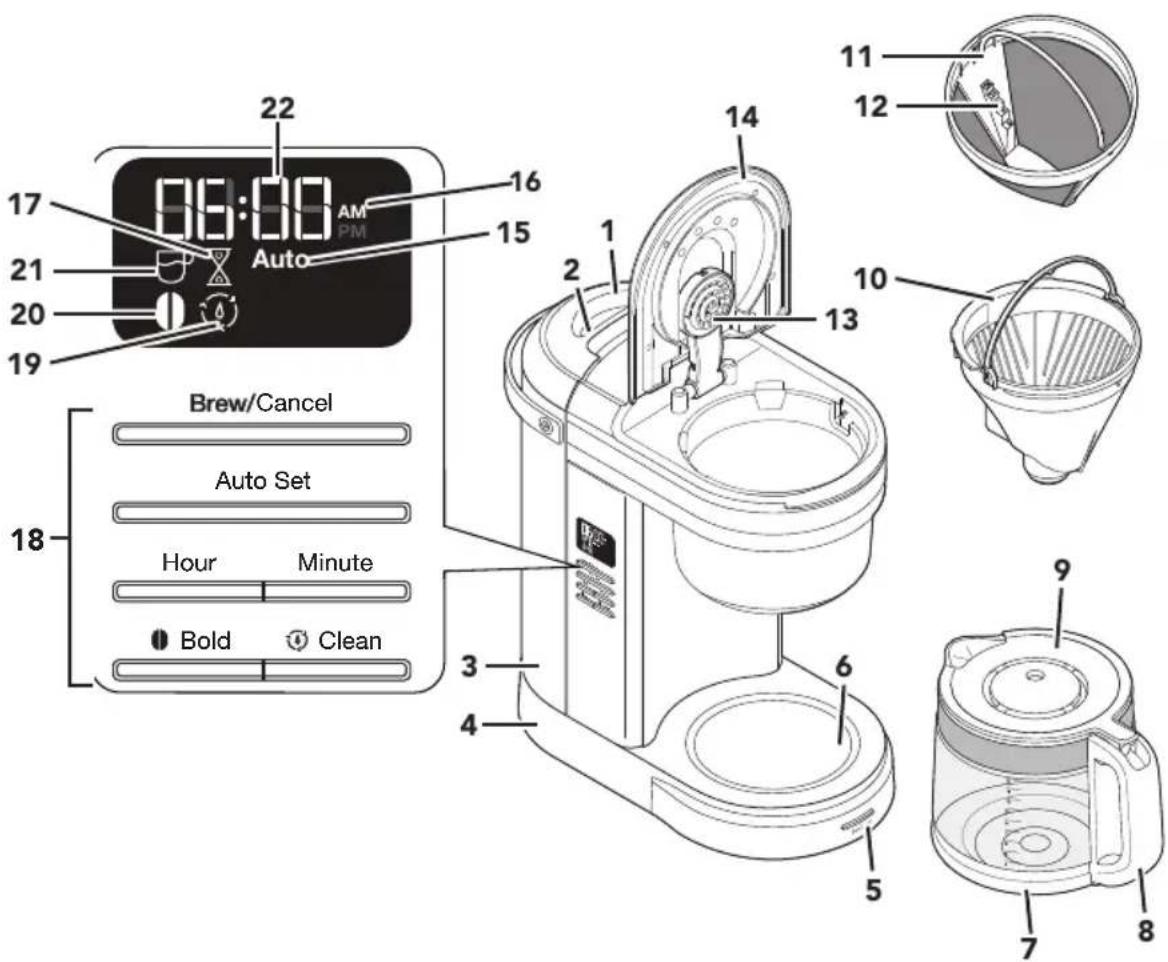
Exterior view of a kitchen stand mixer with digital display and control buttons (no text or symbols on main body)PARTS AND FEATURES

1 Water Tank Lid
2 Water Tank Handle
3 Water Tank
4 Cord Storage in Base (not shown)
5 Brew/Cancel Button
6 Warming Plate
7 Glass Carafe
8 Carafe Handle
9 Carafe Lid
10 Brew Basket
11 Gold Tone Filter
12 Dosage Ladder
13 Showerhead
14 Brew Basket Lid
15 Auto Icon
16 A.M./P.M. Indicator
17 Remaining Keep Warm Time Icon
18 Control Panel
19 Clean Icon
20 Bold Icon
21 Brew Icon
22 Clock
NOTE: Default measurement for 1 cup = approximately 5 oz (147 ml).
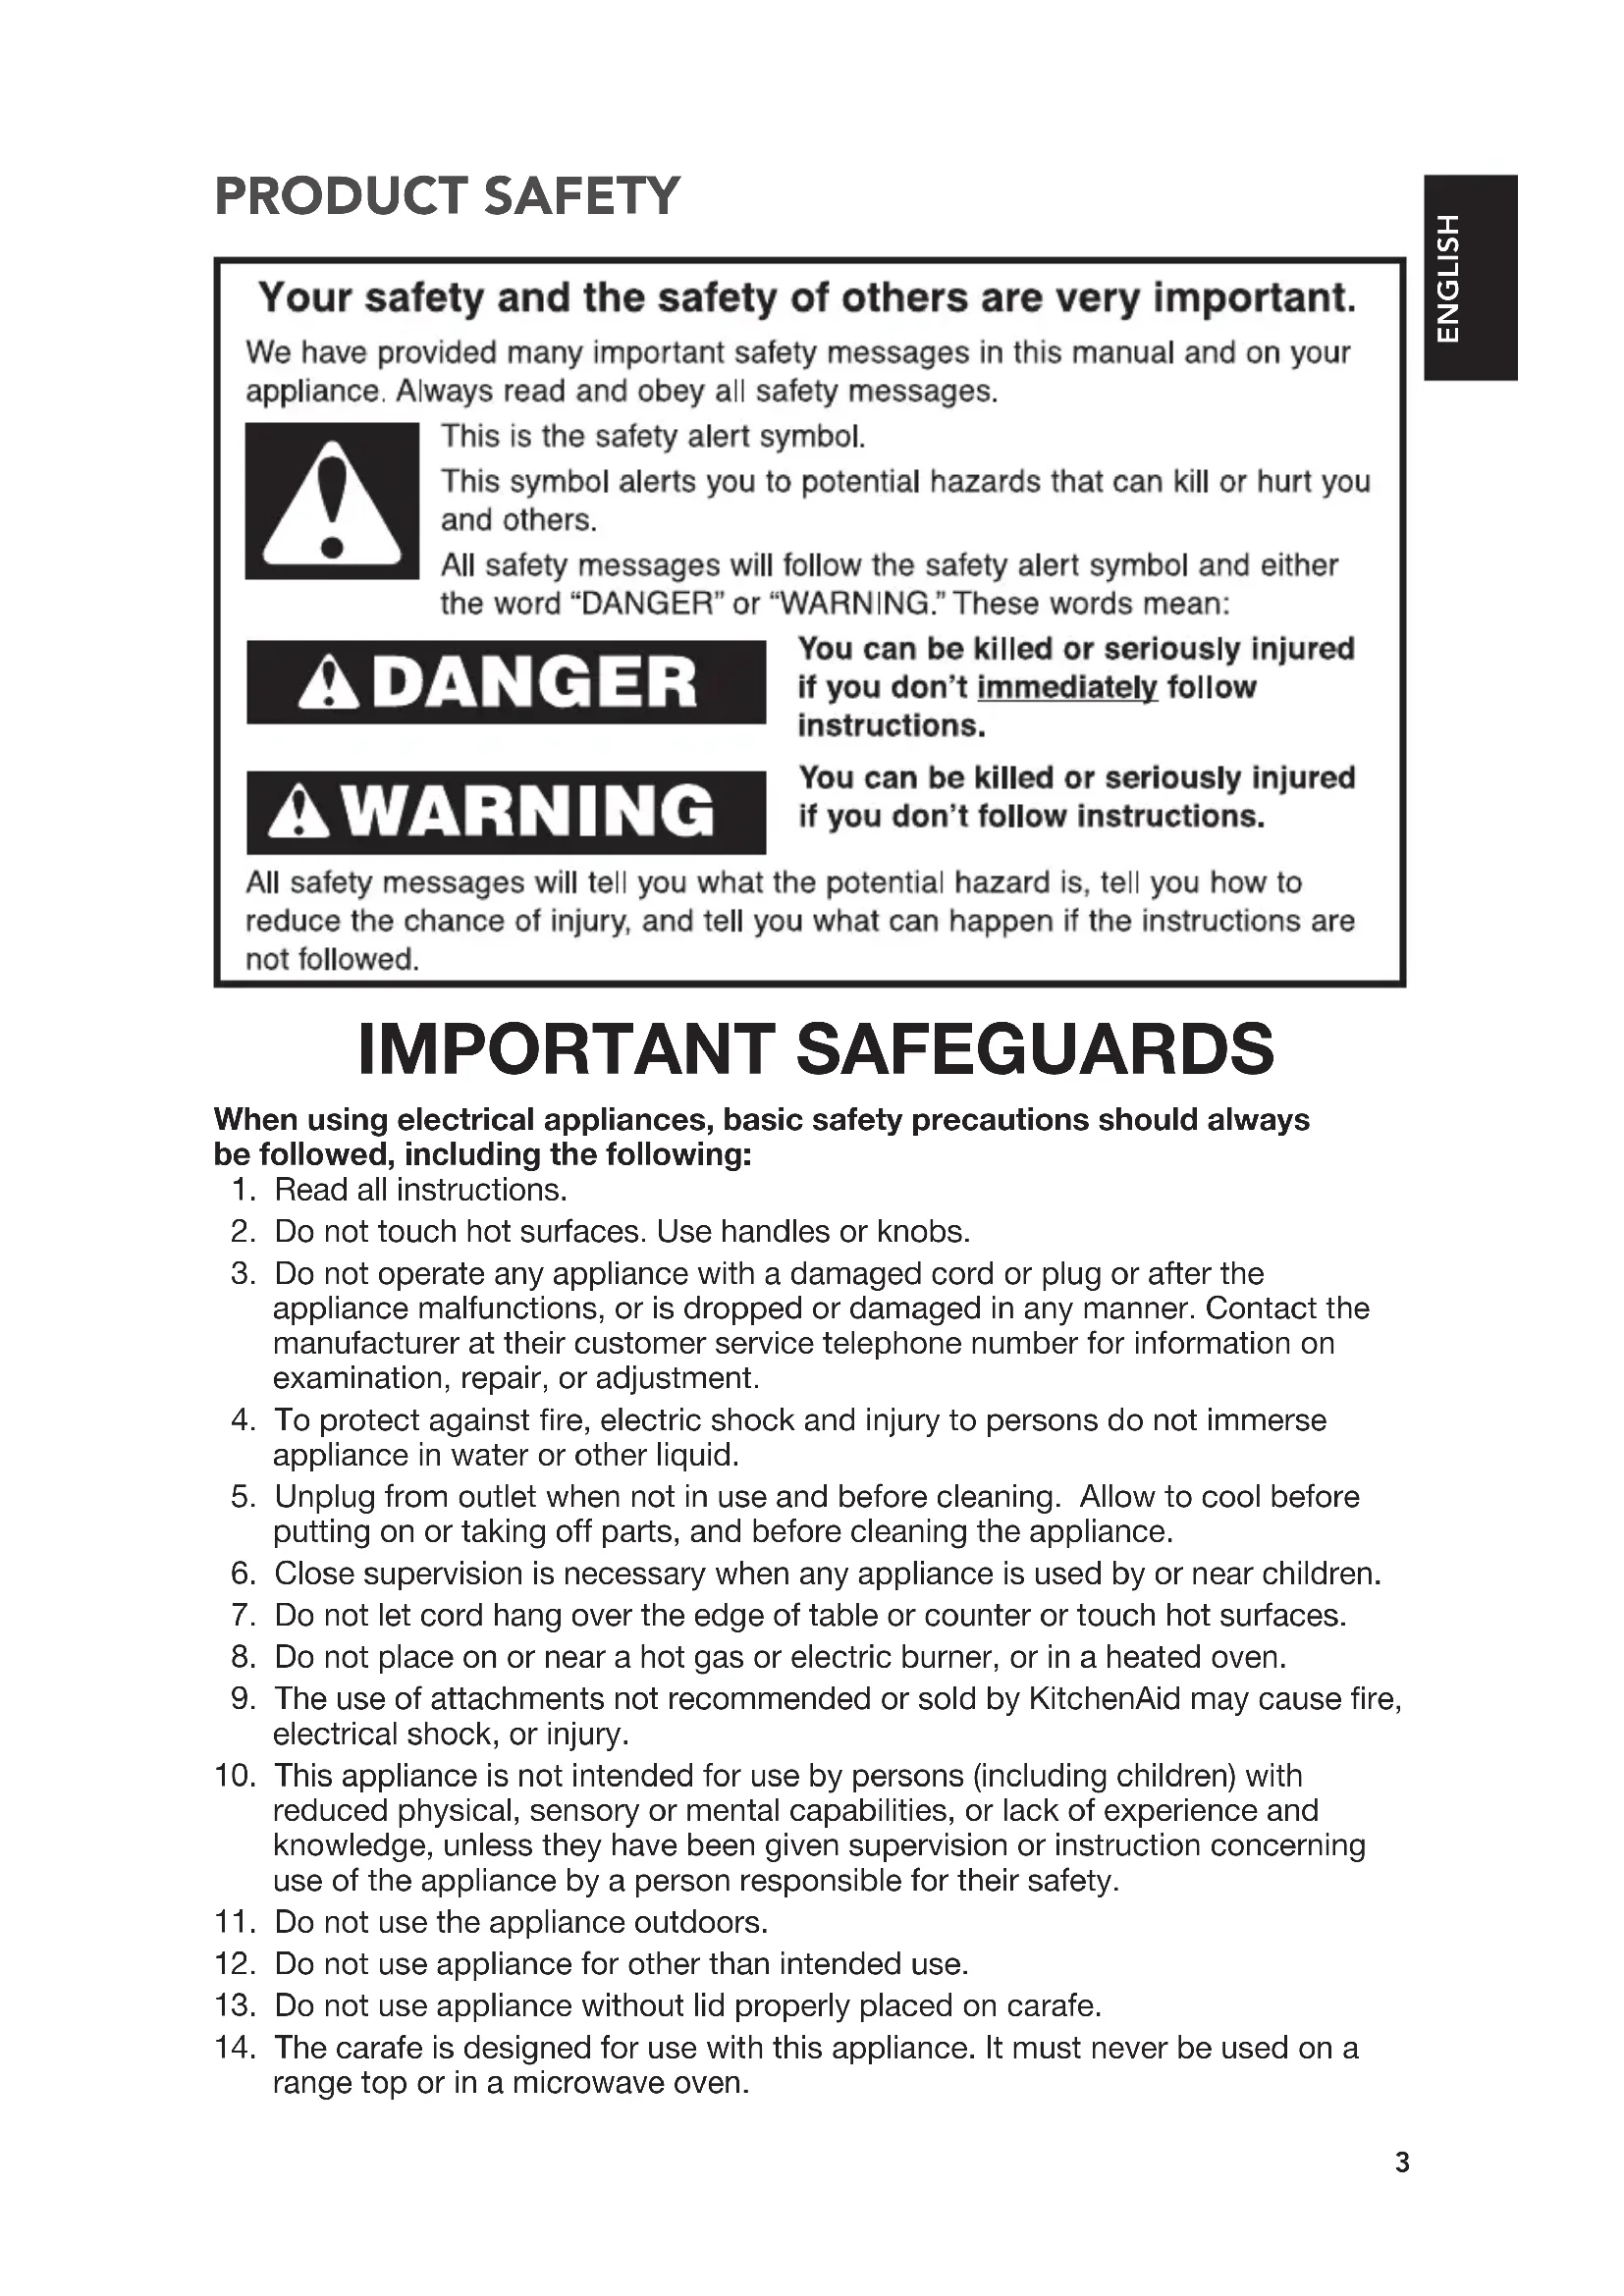
Your safety and the safety of others are very important.
We have provided many important safety messages in this manual and on your appliance. Always read and obey all safety messages.

This is the safety alert symbol.
This symbol alerts you to potential hazards that can kill or hurt you and others.
All safety messages will follow the safety alert symbol and either the word "DANGER" or "WARNING." These words mean:

You can be killed or seriously injured if you don't immediately follow instructions.

You can be killed or seriously injured if you don't follow instructions.
All safety messages will tell you what the potential hazard is, tell you how to reduce the chance of injury, and tell you what can happen if the instructions are not followed.
IMPORTANT SAFEGUARDS
When using electrical appliances, basic safety precautions should always be followed, including the following:
- Read all instructions.
- Do not touch hot surfaces. Use handles or knobs.
- Do not operate any appliance with a damaged cord or plug or after the appliance malfunctions, or is dropped or damaged in any manner. Contact the manufacturer at their customer service telephone number for information on examination, repair, or adjustment.
- To protect against fire, electric shock and injury to persons do not immerse appliance in water or other liquid.
- Unplug from outlet when not in use and before cleaning. Allow to cool before putting on or taking off parts, and before cleaning the appliance.
- Close supervision is necessary when any appliance is used by or near children.
- Do not let cord hang over the edge of table or counter or touch hot surfaces.
- Do not place on or near a hot gas or electric burner, or in a heated oven.
- The use of attachments not recommended or sold by KitchenAid may cause fire, electrical shock, or injury.
- This appliance is not intended for use by persons (including children) with reduced physical, sensory or mental capabilities, or lack of experience and knowledge, unless they have been given supervision or instruction concerning use of the appliance by a person responsible for their safety.
- Do not use the appliance outdoors.
- Do not use appliance for other than intended use.
- Do not use appliance without lid properly placed on carafe.
- The carafe is designed for use with this appliance. It must never be used on a range top or in a microwave oven.
PRODUCT SAFETY
- Do not set a hot carafe on a wet or cold surface.
- To disconnect, turn any control to "off," then remove plug from wall outlet.
- Scalding may occur if the lid is removed during the brewing cycles.
- Do not use a cracked carafe or a carafe having a loose or weakened handle.
- Do not clean carafe with abrasive cleaners, steel wool pads, or other abrasive material.
- Do not fill the water tank above the marked maximum fill line.
SAVE THESE INSTRUCTIONS
This product is designed for household use only.
ELECTRICAL REQUIREMENTS
WARNING

Electrical Shock Hazard
Plug into a grounded 3 prong outlet.
Do not remove ground prong.
Do not use an adapter.
Do not use an extension cord.
Failure to follow these instructions can result in death, fire, or electrical shock.
Voltage: 120 VAC
Frequency: 60 Hz
Wattage: 1100 W
NOTE: If the plug does not fit in the outlet, contact a qualified electrician. Do not modify the plug in any way. Do not use an adapter.
Do not use an extension cord. If the power supply cord is too short, have a qualified electrician or service technician to install an outlet near the appliance.
The cord should be arranged so that it will not drape over the countertop or tabletop where it can be pulled on by children or tripped over unintentionally.
WARNING

Electrical Shock Hazard
Plug into a grounded 3 prong outlet.
Do not remove ground prong.
Do not use an adapter.
Do not use an extension cord.
Failure to follow these instructions can result in death, fire, or electrical shock.
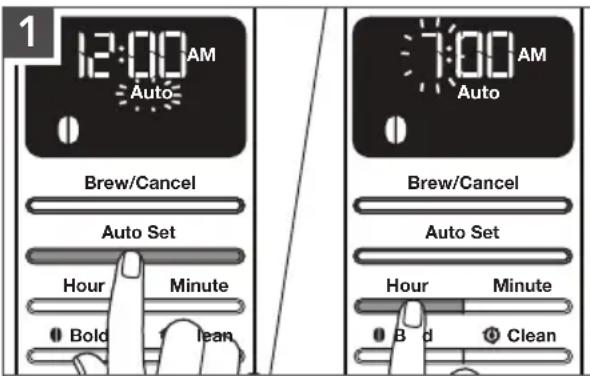
NOTE: When the Coffee Maker is first plugged in or when power is restored after an interruption, the display will initially show 12:00 AM.
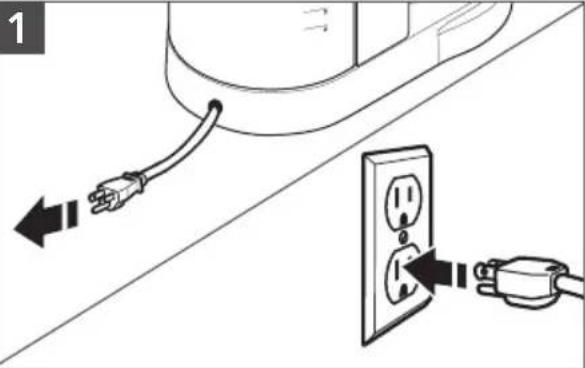
Cord is stored in base. If needed, gently pull cord outwards. Plug into a grounded 3 prong outlet.
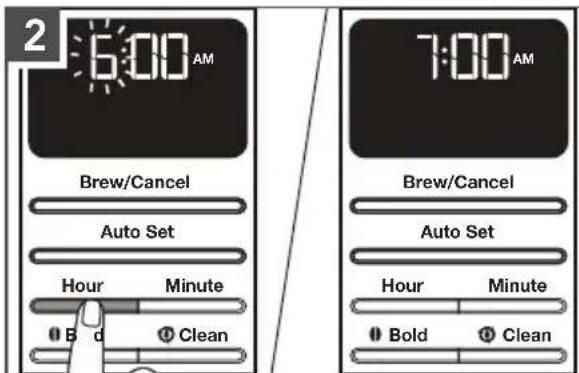
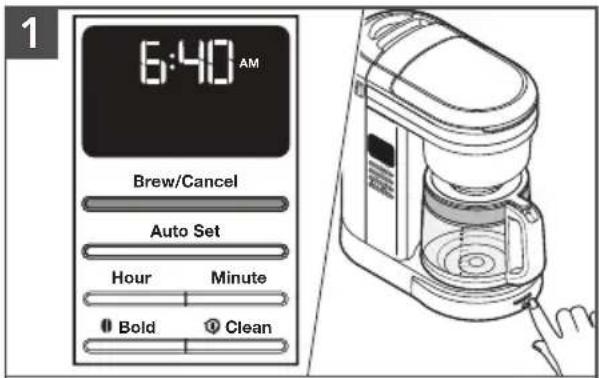
To set the hour: Press Hour.
The hour digits will change with each press; or press and hold to scroll rapidly.
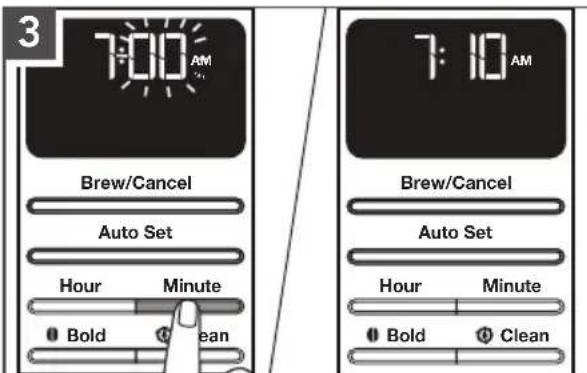
To set the minutes: Press Minute.
The minutes digits will change with each press; or press and hold to scroll rapidly.
To save the current displayed time and exit clock setup: Press any other button or do not press any button for 10 seconds.
PRODUCT USAGE
SETTING THE BREW STRENGTH
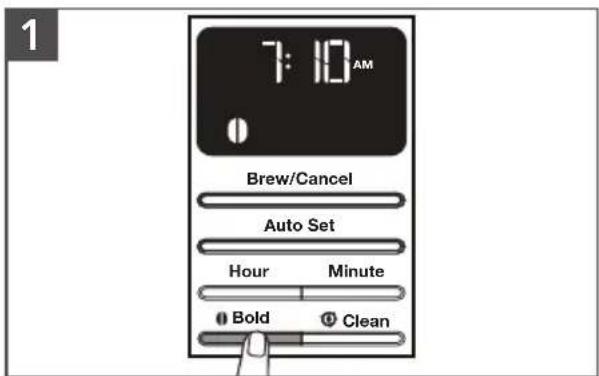
To switch between Regular and Bold brew strengths: Press the Bold button.
NOTE: Regular is the default setting.
TIP: While brewing small batches (2-4 cups), using the "Bold Setting" is recommended.
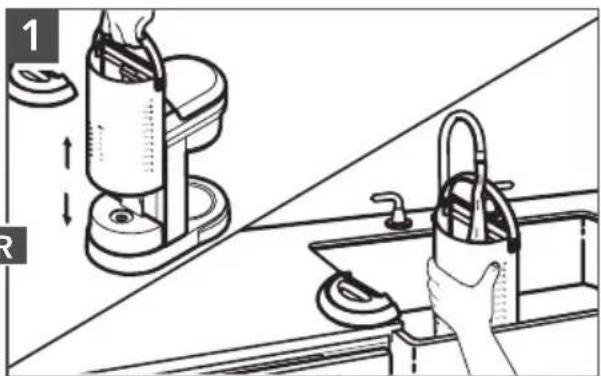
FILLING WATER FOR BREWING
TIP: Brew 2 Carafe of fresh, cool water and discard before brewing the first Carafe of coffee.
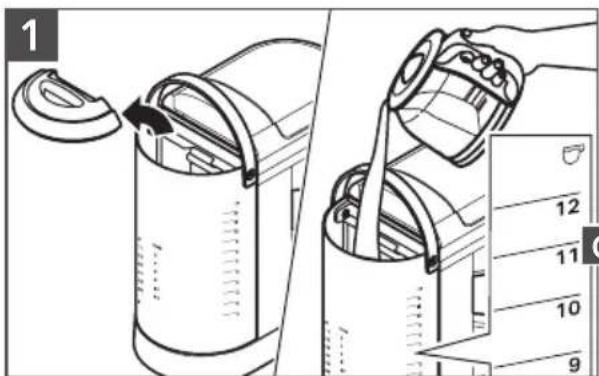
Pour fresh water in the Water Tank. Use the level markings. Then, close the lid properly.
natural_image
Illustration of a kitchen sink with hand cleaning the sink (no text or symbols)Lift the Water Tank up gently. Pour fresh water in the Water Tank. Place the Water Tank back in position properly.
NOTE: Fill the Water Tank with only the amount of water needed to brew your desired number of cups. If you put in 12 cups of water, the Coffee Maker will brew all 12 cups.
natural_image
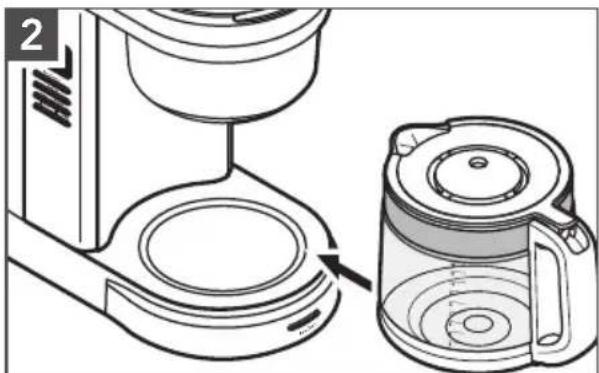
Line drawing of a coffee maker and its water dispenser (no text or symbols)Place the Carafe in the Coffee Maker. Make sure the Carafe lid is in place and bottom of the Carafe is fully seated.
PRODUCT USAGE
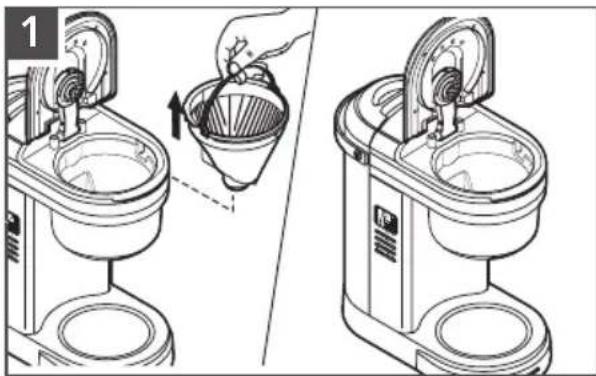
ASSEMBLY OF BREW BASKET
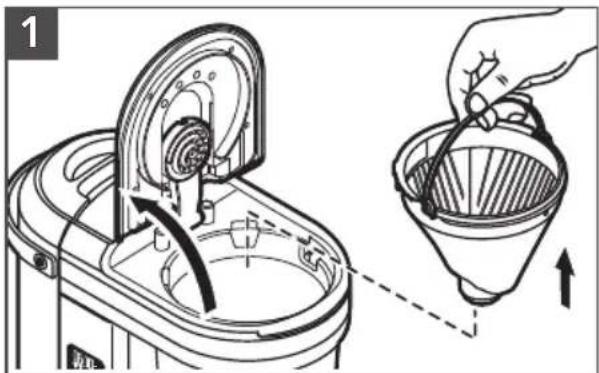
Raise the Brew Basket lid and remove the Brew Basket.
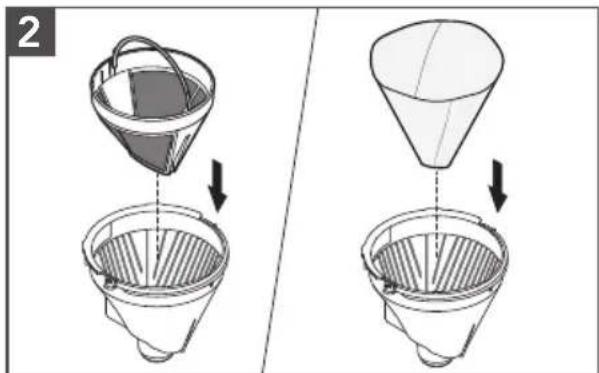
Insert the Gold Tone permanent filter or cone paper filter into the Brew Basket.
TIP: The coffee filter can also be inserted and coffee grounds added with or without removing the Brew Basket from the Coffee Maker.
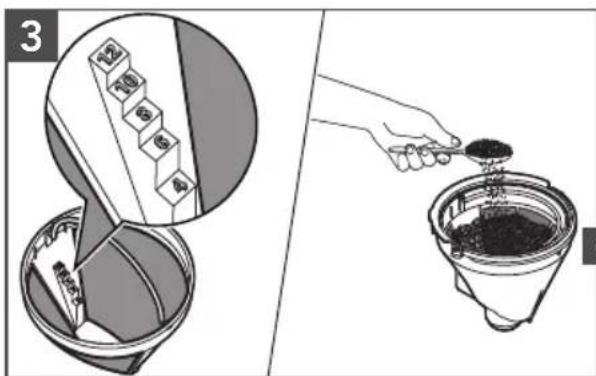
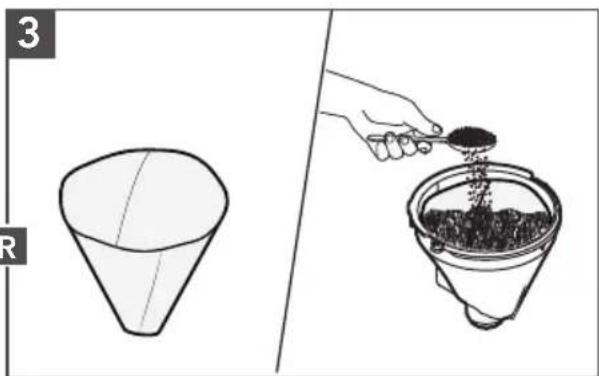
Gold tone permanent filter: Add coffee grounds. Use the "Dosage Ladder".
For example: If you need 12 cups of Brew Coffee, then add coffee grounds till 12 cups scale level.
Cone paper coffee filter: Add desired coffee grounds. Use the "coffee dosage chart" on the back of the Water Tank as a guide for how much coffee grounds to use. Pre-wetting the paper is not required.
IMPORTANT: Do not use both types of filters at the same time.
Using both filters might cause water and coffee to overflow the Brew Basket.
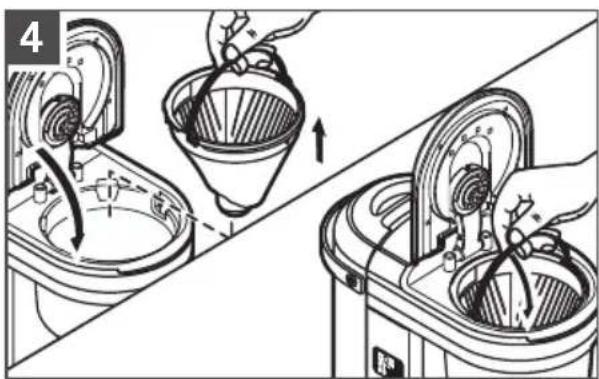
Place the basket into the Coffee Maker aligning with the slot. Be sure the brew basket lid is fully closed before brewing.
NOTE: Use a medium grind appropriate for automatic Drip Coffee Makers. Too fine grind will produce bitterness and may clog the coffee filter.
NOTE: Do not operate the Coffee Maker without the brew basket in place.
NOTE: When the Coffee Maker is first plugged in or when power is restored after an interruption, the display will initially show 12:00 A.M.
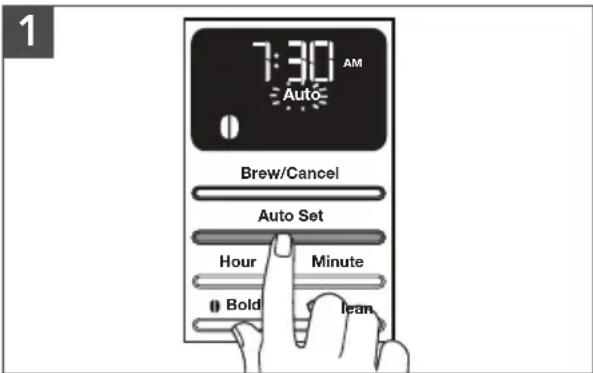
IMPORTANT: Set the correct time as per the instructions in "Setting the clock" before using the Auto Set feature.
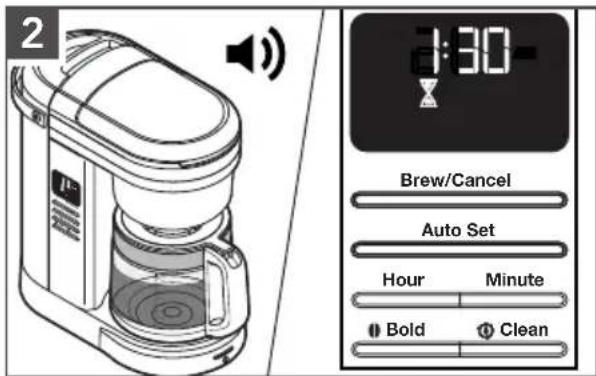
Press the Auto Set button one time. The Auto indicator light will flash and the time display will change to the currently set Auto Set time (12:00 A.M. is the default time).
To set the time the Coffee Maker should begin brewing: Press the Hour button. The hour digits will change with each press; or press and hold to scroll rapidly.

Next, press the Minute button. The hour setting will stay solid and the minute setting will begin to blink.
To save the Auto set time and exit set-up: Press any other button or do not press any button for 10 seconds. The Auto indicator will remain lit and the time display will go back to the current time.
TIP: To cancel the Auto Set time after programming is complete: Press Auto Set button again; or press the Brew/Cancel button.
NOTE: Default standard brewing cycle time for a full Carafe (12 cups) is approximately 10-minutes.
USING THE PREVIOUSLY PROGRAMMED AUTO SET TIME
These steps can be followed to save the Auto Set time after following the steps in the "Programming the Auto Set feature" section.
Press the Auto Set button. The Auto indicator will flash and the time display will show the previously set Auto time.
To save the current displayed time and exit Auto Set: Wait for 10 seconds, or press any button. The Auto indicator will remain lit and the time display will go back to the current time.
BREWING COFFEE
TIP: Brew 2 pots of fresh, cool water and discard before brewing the first pot of coffee.
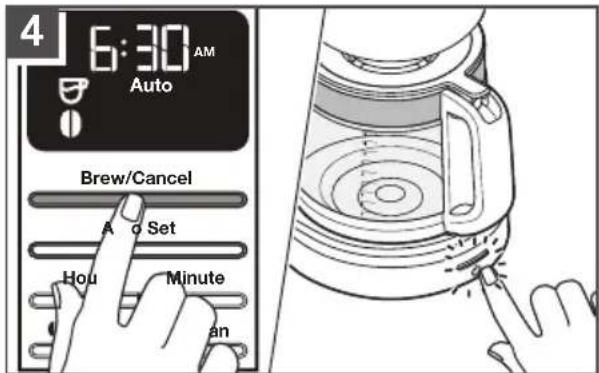
Press any of the Brew/Cancel buttons provided on side or on front to begin brewing coffee.
The Coffee Maker will beep 3 times when the Brew cycle is complete. Then, 2-hour Warm mode will start.
NOTE: Default Standard Brewing cycle time for a full pot (12 cups) is approximately 10-minutes.
IMPORTANT: Allow the Coffee Maker to cool for 5 minutes before starting next brew cycle.
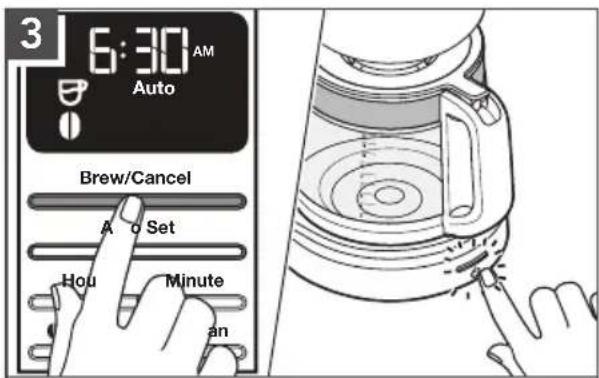
After Warm mode end, the Coffee Maker will automatically turn off. To Cancel Brew cycle or Warm mode, press the Brew/Cancel button once.
TIP: Opening the Brew Basket while coffee is brewing will interrupt the brew process and impair the flavor.
PAUSE AND POUR FEATURE
The "Pause and pour" feature enables you to remove the Carafe and pour a cup of coffee before brewing is finished. When the Carafe is removed, a special valve stops the flow of coffee from the Brew Basket. However, brewing does not stop.
Make sure to place the Carafe back in the place within 25 seconds to avoid the overflow of the water and coffee grounds from the Brew Basket.
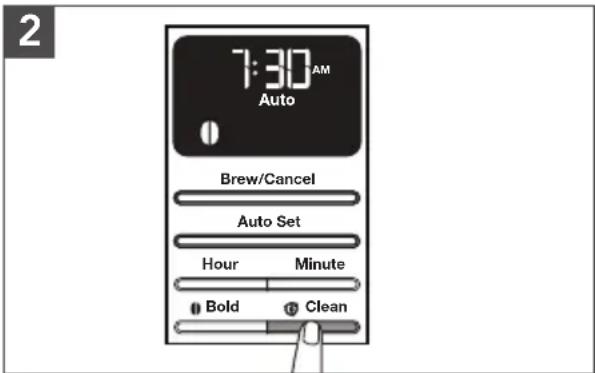
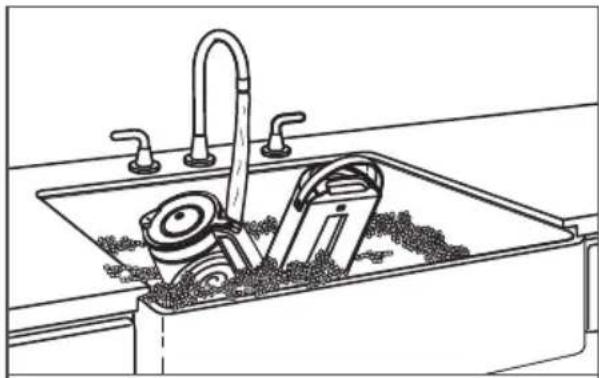
CARE AND CLEANING
NOTE: Unplug and allow the Coffee Maker to cool down before cleaning.
natural_image
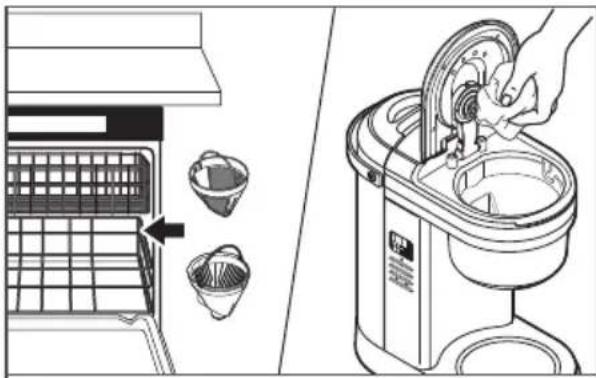
Illustration of a kitchen appliance with a hand operating the lid and a side view showing its interior components (no text or symbols present)Dishwasher-safe parts, top rack only: Brew Basket and Gold Tone Permanent filter.
Wipe the Showerhead with a damp cloth to remove any coffee splashes.
natural_image
Line drawing of a kitchen sink with buckets and a faucet, no text or symbols presentWash by hand in warm and soapy water. Dry thoroughly: Carafe and Water Tank.
REMOVING MINERAL DEPOSITS WITH VINEGAR
Mineral deposits (scale) from water will build up in the Coffee Maker over the time and impair brewing efficiency and coffee quality. The “Clean icon” will flash in display after completing 100 brew cycles. Then, it is time to descale the Coffee Maker.
natural_image
Line drawing of a kitchen mixer with a hand pouring liquid into a bowl (no text or symbols)Empty the Brew Basket.
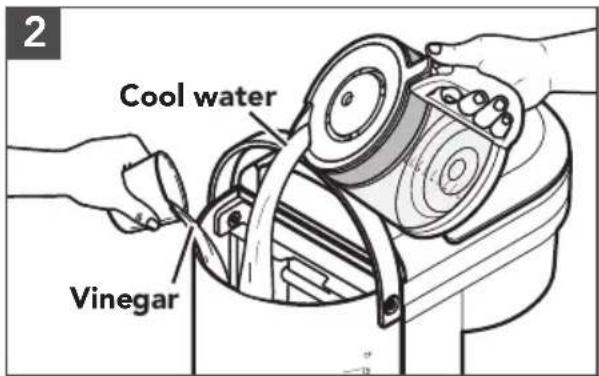
Fill the Water Tank with 6 cup vinegar and 6 cup cool water.
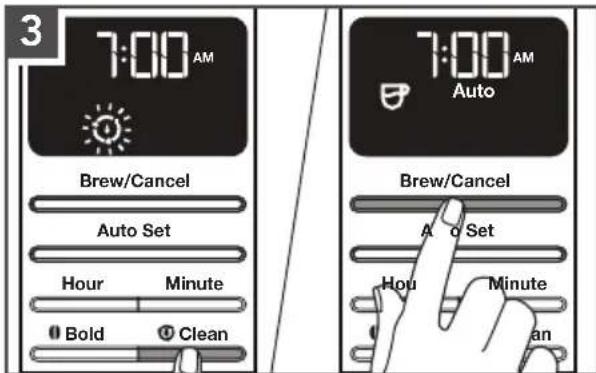
Press the Clean button. Then, press the Brew/Cancel button to begin the Clean cycle. After the Clean cycle ends (approximately 30 minutes), 3 beeps will sound, and the "Clean icon" will turn off.
Run 2-3 fresh, cool water-only cycles after the Clean cycle is complete.

WARNING
Electrical Shock Hazard
Plug into a grounded 3 prong outlet.
Do not remove ground prong.
Do not use an adapter.
Do not use an extension cord.
Failure to follow these instructions can result in death, fire, or electrical shock.
| Problem Solution | |
| If the display is not illuminated: | Plug into a grounded outlet. If you have a circuit breaker box, make sure the circuit is closed. |
| If only a portion of the water added to the Coffee Maker actually brews: | The Coffee Maker requires immediate descaling. Please refer to the “Care and cleaning” section. |
| If you hear 3 rapid tones: | There is no water in the Water Tank. See the “Filling water for brewing” section. |
| If “Er1” flashes on the display and you hear 1 tone: | A button may be jammed. Unplug and press each button several times. Plug the Coffee Maker. If “Er1” appears again on the display, repeat this procedure. |
| If coffee overflows the Brew Basket: | The Brew Basket is not correctly in place. See the “Assembly Of Brew Basket” section. |
| Too much coffee ground was placed into the Brew Basket. | |
| Used both Gold tone filter and paper filter together. | |
| If water exits from the back of the Coffee Maker: | Too much water was poured into the Water Tank. |
| If the problem is not due to one of the above items: | See the “Arranging for Service” chapter in the “Warranty and Service” section. Do not return the Espresso Machine to the retailer as they do not provide service. |
WARRANTY AND SERVICE
KITCHENAID COFFEE MAKER WARRANTY FOR THE 50 UNITED STATES, THE DISTRICT OF COLUMBIA, PUERTO RICO, AND CANADA
This warranty extends to the purchaser and any succeeding owner for Coffee Makers operated in the 50 United States, the District of Columbia, Puerto Rico, and Canada.
| Length of Warranty: One Year Full Warranty from date of purchase. | |
KitchenAid Will Pay for Your Choice of: | Hassle-Free Replacement of your Coffee Maker. See the next page for details on how to arrange for service, or call the Customer eXperience Center toll-free at 1-800-541-6390.ORThe replacement parts and repair labor costs to correct defects in materials and workmanship. Service must be provided by an Authorized KitchenAid Service Center. |
| KitchenAid Will Not Pay for: | A. Repairs when your Coffee Maker is used in other than normal single family home use.B. Damage resulting from accident, alteration, misuse or abuse.C. Any shipping or handling costs to deliver your Coffee Maker to an Authorized Service Center.D. Replacement parts or repair labor costs for Coffee Maker attachments operated outside the 50 United States, District of Columbia, Puerto Rico, and Canada. |
| DISCLAIMER OF IMPLIED WARRANTIES; LIMITATION OF REMEDIES | |
| IMPLIED WARRANTIES, INCLUDING TO THE EXTENT APPLICABLE WARRANTIES OF MERCHANTABILITY OR FITNESS FOR A PARTICULAR PURPOSE, ARE EXCLUDED TO THE EXTENT LEGALLY PERMISSIBLE. ANY IMPLIED WARRANTIES THAT MAY BE IMPOSED BY LAW ARE LIMITED TO ONE YEAR, OR THE SHORTEST PERIOD ALLOWED BY LAW. SOME STATES AND PROVINCES DO NOT ALLOW LIMITATIONS OR EXCLUSIONS ON HOW LONG AN IMPLIED WARRANTY OF MERCHANTABILITY OR FITNESS LASTS, SO THE ABOVE LIMITATIONS OR EXCLUSIONS MAY NOT APPLY TO YOU.IF THIS PRODUCT FAILS TO WORK AS WARRANTED, CUSTOMER'S SOLE AND EXCLUSIVE REMEDY SHALL BE REPAIR OR REPLACEMENT ACCORDING TO THE TERMS OF THIS LIMITED WARRANTY. KITCHENAID AND KITCHENAID CANADA DO NOT ASSUME ANY RESPONSIBILITY FOR INCIDENTAL OR CONSEQUENTIAL DAMAGES. This warranty gives you specific legal rights and you may also have other rights which vary from state to state or province to province. | |
WARRANTY AND SERVICE
HASSLE-FREE REPLACEMENT WARRANTY—50 UNITED STATES, DISTRICT OF COLUMBIA, AND PUERTO RICO
We're so confident the quality of our products meets the exacting standards of KitchenAid that, if your Coffee Maker should fail within the first year of ownership, KitchenAid will arrange to deliver an identical or comparable replacement to your door free of charge and arrange to have your original Coffee Maker returned to us. Your replacement unit will also be covered by our one year limited warranty.
If your Coffee Maker should fail within the first year of ownership, simply call our toll-free Customer eXperience Center at
1-800-541-6390 Monday through Friday. Please have your original sales receipt available when you call. Proof of purchase will be required to initiate the claim. Give the consultant your complete shipping address (no P.O. Box numbers, please).
When you receive your replacement Coffee Maker, use the carton, packing materials, and prepaid shipping label to pack up your original Coffee Maker and send it back to KitchenAid.
HASSLE-FREE REPLACEMENT WARRANTY—CANADA
We're so confident the quality of our products meets the exacting standards of the KitchenAid brand that, if your Coffee Maker should fail within the first year of ownership, we will replace your Coffee Maker with an identical or comparable replacement. Your replacement unit will also be covered by our one year limited warranty.
If your Coffee Maker should fail within the first year of ownership, simply call our toll-free Customer eXperience Center at
1-800-807-6777 Monday through Friday. Please have your original sales receipt available when you call. Proof of purchase will be required to initiate the claim. Give the consultant your complete shipping address.
When you receive your replacement Coffee Maker, use the carton, packing materials, and prepaid shipping label to pack up your original Coffee Maker and send it back to KitchenAid.
ARRANGING FOR SERVICE AFTER THE WARRANTY EXPIRES, OR ORDERING ACCESSORIES AND REPLACEMENT PARTS
In the United States and Puerto Rico:
For service information, or to order accessories or replacement parts, call toll-free at 1-800-541-6390 or write to:
Customer eXperience Center, KitchenAid Small Appliances, P.O. Box 218, St. Joseph, MI 49085-0218
Outside the United States and Puerto Rico:
Consult your local KitchenAid dealer or the store where you purchased the Coffee Maker for information on how to obtain service.
For service information in Canada:
Call toll-free 1-800-807-6777.
For service information in Mexico:
Call toll-free 01-800-0022-767.
PIÈCES ET CARACTÉRISTIQUES
natural_image
Illustration of a kitchen sink with hand holding a water dispenser, showing mechanical components and a directional arrow (no text or symbols)natural_image
Line drawing of a coffee maker and its watermelon being processed (no text or symbols)natural_image
Diagram of a hand pouring liquid into a funnel using a mechanical device (no text or symbols present)natural_image
Two-step diagram showing a funnel pouring liquid into a filter, with arrows indicating direction (no text or symbols)natural_image
Illustration of a washing machine with hand positioning and lifting a bucket (no text or symbols)natural_image
Illustration of a kitchen appliance with a hand operating the lid and a side view showing its interior components (no text or symbols present)natural_image
Line drawing of a kitchen sink with faucet and bucket (no text or symbols)natural_image
Diagram showing a hand pouring liquid into a coffee maker using a filter (no text or symbols present)Customer eXperience Center, KitchenAid Small Appliances, P.O. Box 218, St. Joseph, MI 49085-0218
natural_image
Illustration of a kitchen sink with handwashing and cleaning tools (no text or symbols)natural_image
Line drawing of a coffee maker and its water dispenser (no text or symbols)natural_image
Diagram showing a hand pouring liquid into a funnel-shaped container with internal components (no text or symbols)natural_image
Two-step diagram showing a funnel pouring liquid into a filter, with arrows indicating process direction (no text or symbols)natural_image
Illustration showing a funnel and a hand pouring dark granular material into a filter (no text or symbols)natural_image
Illustration of a kitchen appliance with hands operating a funnel and rotating the sink (no text or symbols)natural_image
Illustration of a kitchen appliance with a hand operating the lid and a side view showing its interior components (no text or symbols present)natural_image
Line drawing of a kitchen sink with buckets and a faucet (no text or symbols)natural_image
Line drawing of a kitchen mixer with a hand pouring liquid into a bowl (no text or symbols)Customer eXperience Center, KitchenAid Small Appliances, P.O. Box 218, St. Joseph, MI 49085-0218
natural_image
White silhouette of a telephone handset on black background (no text or symbols)PRODUCT QUESTIONS OR RETURNS
QUESTIONS SUR LE PRODUIT OU LES RETOURS
MEXICO: KitchenAid.com.mx
LATIN AMERICA: KitchenAid-Latam.com
KitchenAid®
®/TM ©2020 KitchenAid. All rights reserved. Used under license in Canada.

- PARTS AND FEATURES
- Your safety and the safety of others are very important.
- IMPORTANT SAFEGUARDS
- When using electrical appliances, basic safety precautions should always be followed, including the following:
- PRODUCT SAFETY
- SAVE THESE INSTRUCTIONS
- WARNING
- PRODUCT USAGE
- FILLING WATER FOR BREWING
- USING THE PREVIOUSLY PROGRAMMED AUTO SET TIME
- BREWING COFFEE
- PAUSE AND POUR FEATURE
- CARE AND CLEANING
- REMOVING MINERAL DEPOSITS WITH VINEGAR
- Electrical Shock Hazard
- WARRANTY AND SERVICE
- HASSLE-FREE REPLACEMENT WARRANTY—CANADA
- ARRANGING FOR SERVICE AFTER THE WARRANTY EXPIRES, OR ORDERING ACCESSORIES AND REPLACEMENT PARTS
- In the United States and Puerto Rico:
- Outside the United States and Puerto Rico:
- For service information in Canada:
- For service information in Mexico:
- PIÈCES ET CARACTÉRISTIQUES
- KitchenAid®
Brand : KITCHENAID
Model : KCM1208
Category : Coffee machine