
SMO 658CNE - Cooker WHIRLPOOL - Free user manual and instructions
Find the device manual for free SMO 658CNE WHIRLPOOL in PDF.
| Brand | Whirlpool |
| Model | SMO 658CNE |
| Product type | Built-in cooker with oven |
| Power supply | 230 V / 50 Hz, 16 A (domestic network >3 kW) |
| Main cooking functions | 6th Sense, Forced Air + Steam, Forced Air, Circulated Air, Cook 4, Turbo Grill, Frozen, Large pieces, Dough rising, Defrost, Keep warm, Eco Forced Air, Convection, Fast preheating |
| Steam functions | Forced Air + Steam, 3 steam levels (Low, Medium, High) |
| Automatic cleaning | Pyrolysis (full and eco), Drain, Descaling |
| Water tank capacity | 1.5 liters |
| Included accessories | Metal grid, Drip tray, Baking tray |
| Bulb types | Halogen 20-40 W / 230 V, type VG9, T300 °C |
| Number of grid levels | 5 levels |
| Child lock | Yes (long press on back button) |
| Demo mode | Yes (available in settings) |
| Eco mode | Yes (reduces brightness and turns off lamp after 1 min) |
| Delayed start function | Yes (program end time) |
| Timer function | Yes (without cooking) |
| Favorites | Up to 10 recordable favorite functions |
| Removable door | Yes (for cleaning) |
| Repairability | Bulb and door replaceable by user |
| After-sales service | Contact Whirlpool service with rating plate codes |
| Country of origin | Not specified in the manual |
Frequently Asked Questions - SMO 658CNE WHIRLPOOL
User questions about SMO 658CNE WHIRLPOOL
0 question about this device. Answer the ones you know or ask your own.
Ask a new question about this device
Download the instructions for your Cooker in PDF format for free! Find your manual SMO 658CNE - WHIRLPOOL and take your electronic device back in hand. On this page are published all the documents necessary for the use of your device. SMO 658CNE by WHIRLPOOL.
USER MANUAL SMO 658CNE WHIRLPOOL
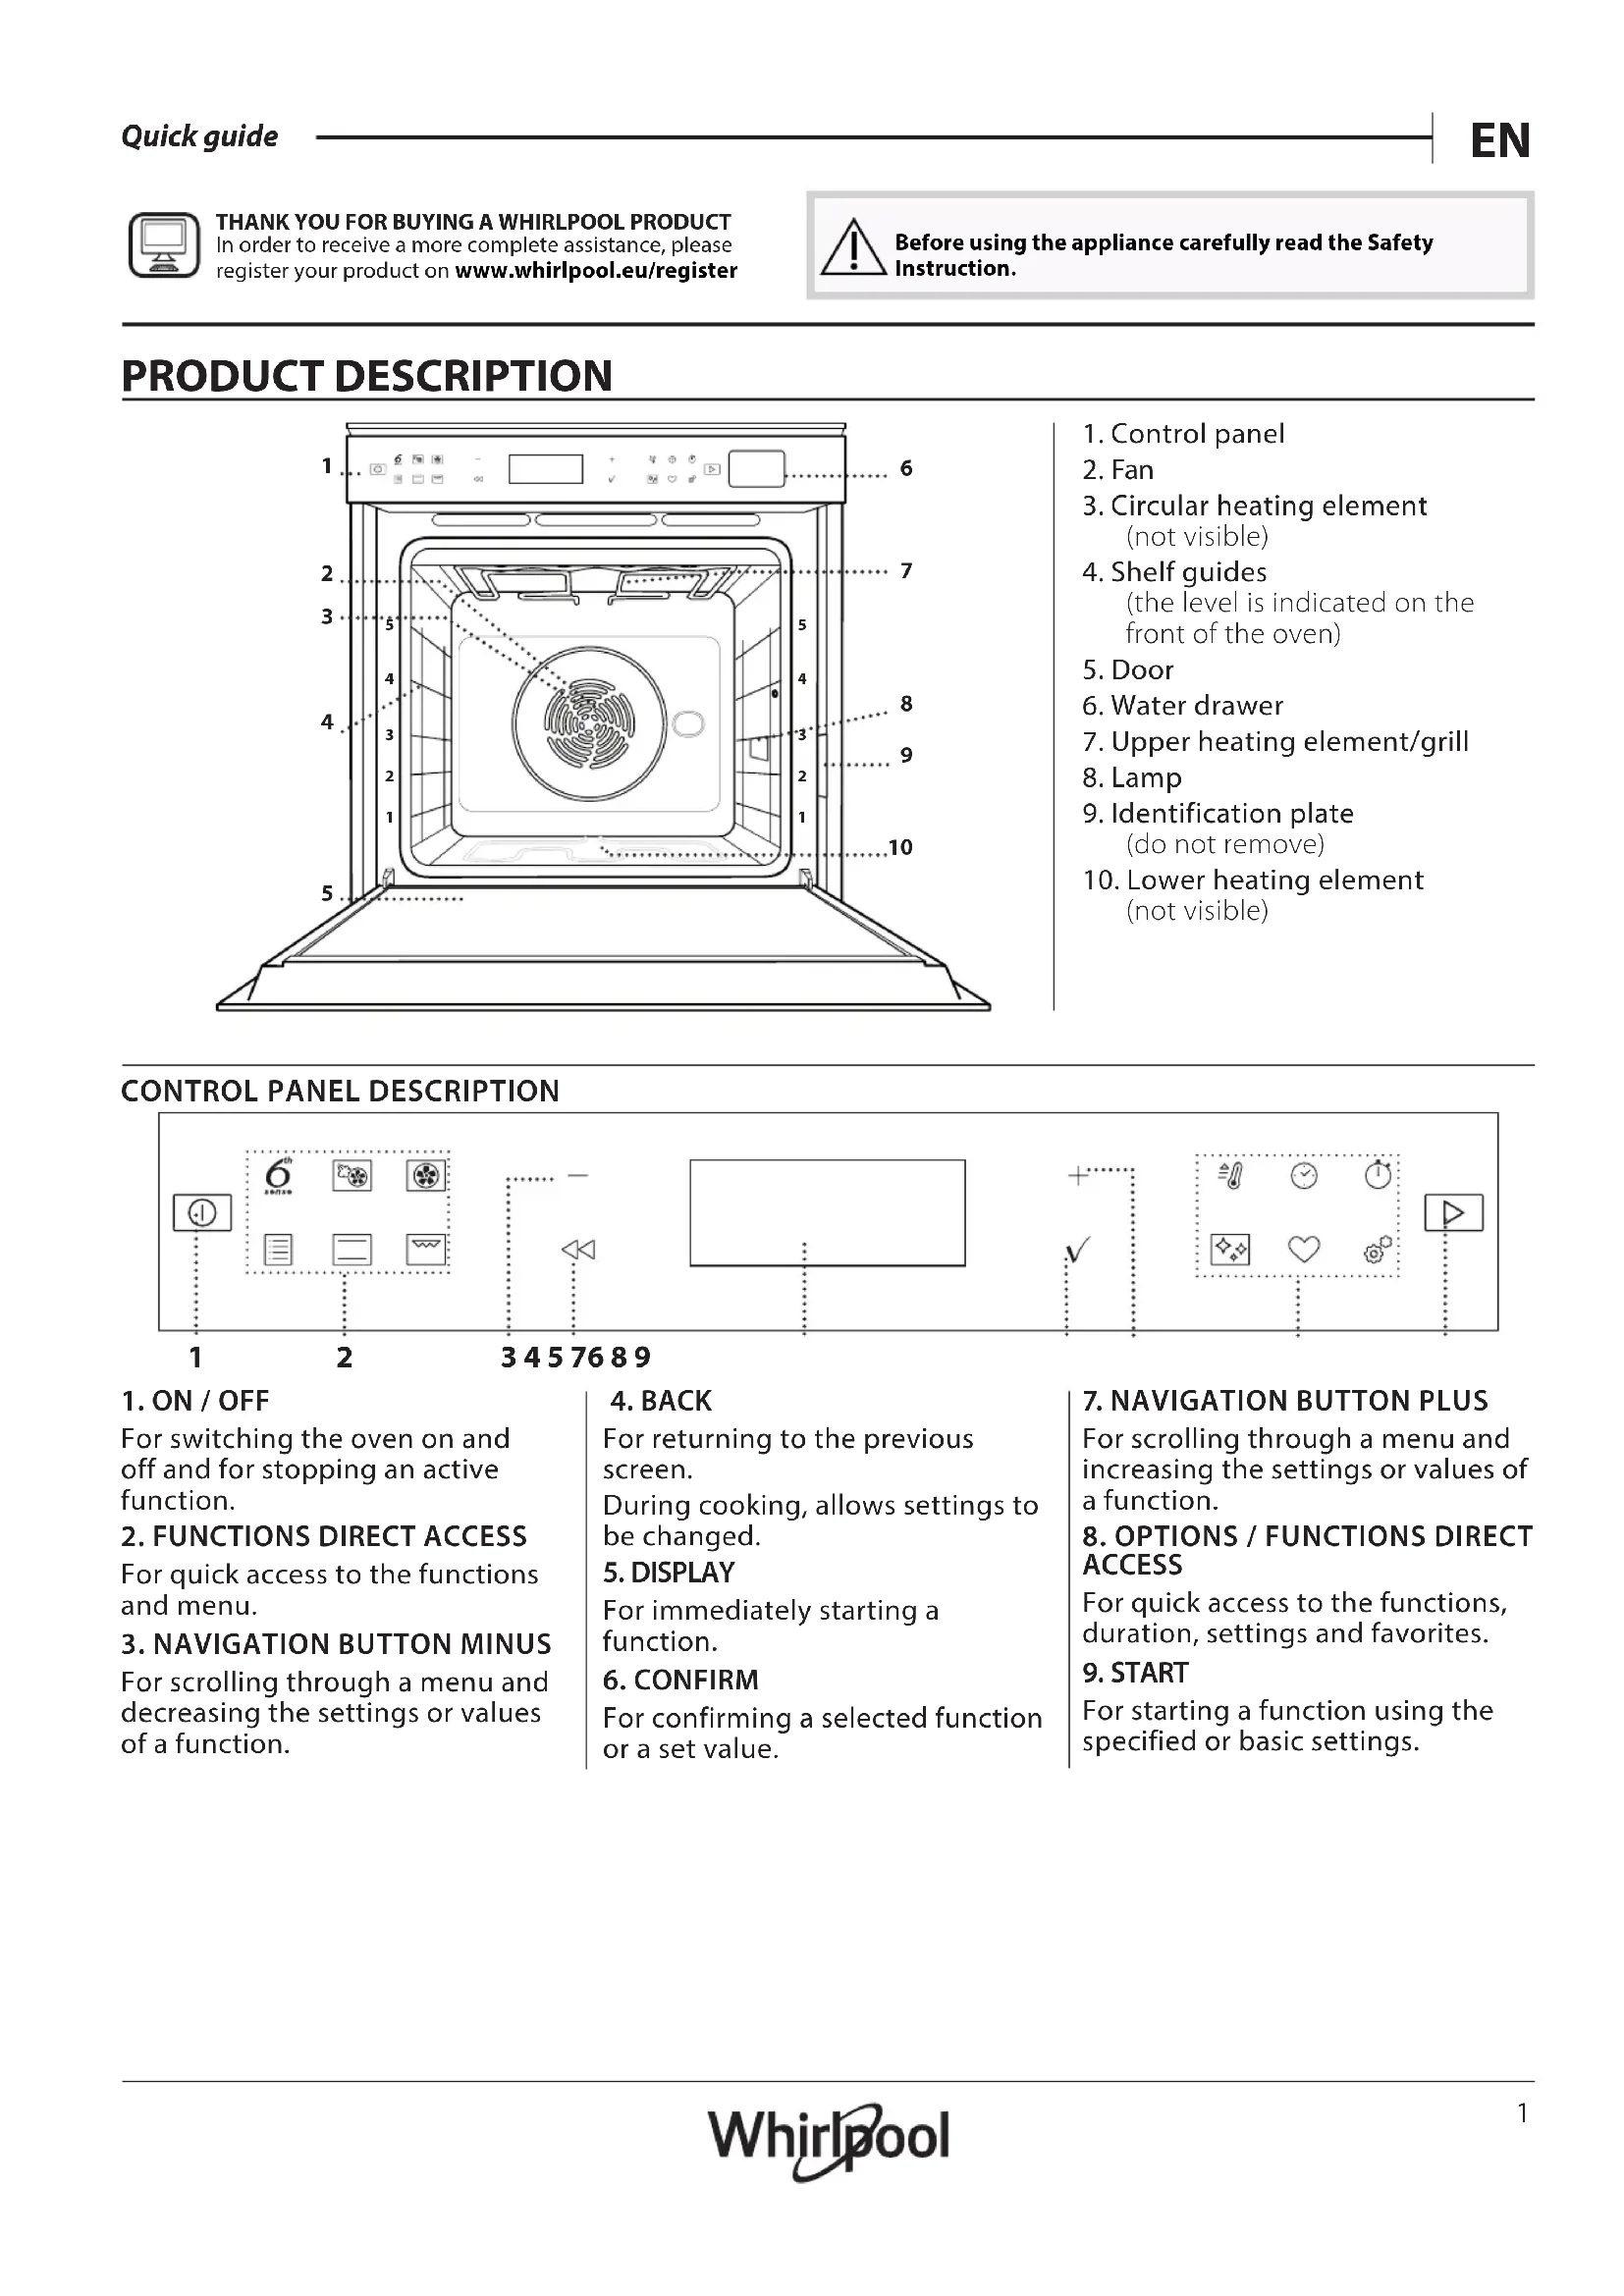
- Control panel
2.Fan - Circular heating element (not visible)
- Shelf guides (the level is indicated on the front of the oven)
- Door
- Water drawer
- Upper heating element/grill
- Lamp
- Identification plate (do not remove)
- Lower heating element (not visible)
CONTROL PANEL DESCRIPTION

1.ON/OFF
For switching the oven on and off and for stopping an active function.
2. FUNCTIONS DIRECT ACCESS
For quick access to the functions and menu.
3. NAVIGATION BUTTON MINUS
For scrolling through a menu and decreasing the settings or values of a function.
4. BACK
For returning to the previous screen.
During cooking, allows settings to be changed.
5. DISPLAY
For immediately starting a function.
6. CONFIRM
For confirming a selected function or a set value.
7. NAVIGATION BUTTON PLUS
For scrolling through a menu and increasing the settings or values of a function.
8 OPTIONS / FUNCTIONS DIRECT ACCESS
For quick access to the functions, duration, settings and favorites.
9. START
For starting a function using the specified or basic settings.
ACCESSIONS
Use to cook food or as a support for pans, cake tins and other ovenproof items of cookware.
Use as an oven tray for cooking meat, fish, vegetables, focaccia, etc. or position underneath the wire shelf to collect cooking juices.

Use for cooking all bread and pastry products, but also for roasts, fish en papillotte, etc.

To facilitate inserting or removing accessories.
- Available only on certain models
The number and the type of accessories may vary depending on which model is purchased.
Other accessories can be purchased separately from the After-sales Service.
INSERTING THE WIRE SHELF AND OTHER ACCESSORIES
Insert the wire shelf horizontally by sliding it across the shelf guides, making sure that the side with the raised edge is facing upwards.
Other accessories, such as the drip tray and the baking tray, are inserted horizontally in the same way as the wire shelf.
REMOVING AND REFITTING THE SHELF GUIDES
- To remove the shelf guides, lift the guides up and then gently pull the lower part out of its seating: The shelf guides can now be removed.
- To refit the shelf guides, first fit them back into their upper seating. Keeping them held up, slide them into the cooking compartment, then lower them into position in the lower seating.
FITTING THE SLIDING RUNNERS (IF PRESENT)
Remove the shelf guides from the oven and remove the protective plastic from the sliding runners.
Fasten the upper clip of the runner to the shelf guide and slide it along as far as it will go. Lower the other clip into position. To secure the guide, press the lower portion of the clip firmly against the shelf guide. Make sure that the runners can move freely. Repeat these steps on the other shelf guide on the same level.


Please note: The sliding runners can be fitted on any level.
FUNCTIONS

6^th SENSE
sense hese allow a fully automatic cooking for all types of food (Lasagna, Meat, Fish, Vegetables, Cakes & Pastries, Salty cakes, Bread, Pizza).
To get the best from this function, follow the indications on the relative cooking table.

FORCED AIR + STEAM
Combining the properties of steam with those of the forced air, this function allows you to cook dishes pleasantly crispy and browned outside, but at the same time tender and succulent inside. To achieve the best cooking results, we recommend to select a HIGH steam level for fish cooking, MEDIUM for meat and LOW for bread and desserts.

FORCED AIR
For cooking different foods that require the same cooking temperature on several shelves (maximum three) at the same time. This function can be used to cook different foods without odours being transferred from one food to another.

TRADITIONAL FUNCTIONS
CONVECT BAKE
For cooking meat, baking cakes with fillings on one shelf only.
COOK 4 FUNCTIONS
For cooking different foods that require the same cooking temperature on four levels at the same time. This function can be used to cook cookies, tarts, round pizzas (also frozen) and to prepare a complete meal. Follow the cooking table to obtain the best results.
TURBO GRILL
For roasting large joints of meat (legs, roast beef, chicken). We recommend using a drip tray to collect the cooking juices: Position the pan on any of the levels below the wire shelf and add 500ml of drinking water.
FROZEN BAKE
The function automatically selects the ideal cooking temperature and mode for 5 different types of ready frozen food. The oven does not have to be preheated.
SPECIAL FUNCTIONS
》MAXI COOKING
For cooking large joints of meat (above 2.5kg ). It is advisable to turn the meat over during cooking, to obtain even browning on both sides. It is best to baste the meat every now and again to prevent it from drying out.
RISING
For optimal proving of sweet or savoury dough. To maintain the quality of proving, do not activate the function if the oven is still hot following a cooking cycle.
DEFROST
To speed up defrosting of food. Place food on the middle shelf. Leave food in its packaging to prevent it from drying out on the outside.
> KEEP WARM
For keeping just-cooked food hot and crisp.
ECO FORCED AIR
For cooking stuffed roasting joints and fillets of meat on a single shelf. Food is prevented from drying out excessively by gentle, intermittent air circulation. When this ECO function is in use, the light will remain switched off during cooking. To use the ECO cycle and therefore optimise power consumption, the oven door should not be opened until the food is completely cooked.

CONVENTIONAL
For cooking any kind of dish on one shelf only.

GRILL
For grilling steaks, kebabs and sausages, cooking vegetables au gratin or toasting bread. When grilling meat, we recommend using a drip tray to collect the cooking juices: Position the tray on any of the levels below the wire shelf and add 500ml of drinking water.

FAST PREHEAT
For preheating the oven quickly.

TIMERS
For editing function time values.

MINUTEMINDER
For keeping time without activating a function.

CLEANING
AUTOMATIC OVEN CLEANING - PYRO
For eliminating cooking spatters using a cycle at very high temperature. Two selfcleaning cycles are available: A complete cycle (Pyro) and a shorter cycle (Pyro Eco). We recommend using the quicker cycle at regular intervals and the complete cycle only when the oven is heavily soiled.
- DRAIN
For draining the boiler automatically to prevent residual water remaining in there when the appliance will not be used for a certain period of time.
- DESCALE
For removing limescale deposits from the boiler. We recommend using this function at regular intervals. If yuo do not, a message will appear on the display reminding you to clean the oven.

SETTINGS
For adjusting the oven settings.
When "ECO" mode is active the brightness of the display will be reduced to save energy and lamp switches off after 1 minute. It will be reactivated automatically whenever any of the buttons are pressed.
When "DEMO" is "On" all commands are active and menus available but the oven doesn't heat up. To deactivate this mode, access "DEMO" from " SETTINGS" menu and select "Off".
By selecting "FACTORY RESET", the product switches off and then it returns to first switch on. All settings will be deleted.
FIRST TIME USE
1. SELECT THE LANGUAGE
You will need to set the language and the time when you switch on the appliance for the first time: "English" will show on the display.

Press or to scroll through the list of available languages and select the one you require. Press to confirm your selection.
Please note: The language can subsequently be changed by selecting "LANGUAGE" in "SETTINGS" menu, available by pressing
2. SET THE POWER CONSUMPTION
The oven is programmed to consume a level of electrical power that is compatible with a domestic network that has a rating of more than 3kW (16): If your household uses a lower power, you will need to decrease this value (13).

Press or to select 16 "High" or 13 "Low" and press to confirm.
DAILYUSE
1. SELECT A FUNCTION
Press to switch on the oven: the display will show the last running main function or the main menu. The functions can be selected by pressing the icon for one of the main functions or by scrolling through a menu: To select an item from a menu (the display will show the first available item), press + or to select the desired one, then press to confirm.

FAVORITES
For retrieving the list of 10 favorite functions.
3. SET THE TIME
After selecting the power, you will need to set the current time: The two digits for the hour will flash on the display.

Press to set the current hour and press : The two digits for the minutes will flash on the display. Press + or to set the minutes and press to confirm.
Please note: You may need to set the time again following lengthy power outages. Select "CLOCK" in " SETTINGS" menu, available by pressing
4. HEAT THE OVEN
A new oven may release odours that have been left behind during manufacturing: this is completely normal.
Before starting to cook food, we therefore recommend heating the oven with it empty in order to remove any possible odours. Remove any protective cardboard or transparent film from the oven and remove any accessories from inside it. Heat the oven to 200^ for around one hour, ideally using a function with air circulation (e.g. "Forced Air" or "Convection Bake").
Please note: It is advisable to air the room after using the appliance for the first time.
2. SET THE FUNCTION
After having selected the function you require, you can change its settings. The display will show the settings that can be changed in sequence. Pressing allows you to change the previous setting again.
change it, then press to confirm and continue with the settings that follow (if possible).
In the same way, it is possible to set the grill level: There are three defined power levels for grilling: 3 (high), 2 (mid), 1 (low).
In "Forced Air + Steam" function, you can select the amount of steam from the following values: 1 (Low), 2 (Mid), 3 (High).
Please note: Once the function has been activated, the temperature/grill level can be changed using +or -
DURATION

When the icon flashes on the display, press or + to set the cooking time you require and then press to confirm. You do not have to set the cooking time if you want to manage cooking manually (untimed): Press or to confirm and start the function. By selecting this mode, you cannot program a delayed start.
Please note: You can adjust the cooking time that has been set during cooking by pressing : press to amend it and then press to confirm.
END TIME (START DELAY)
In many functions, once you have set a cooking time you can delay starting the function by programming its end time. The display shows the end time while the icon flashes.

Press to set the time you want cooking to end, then press to confirm and activate the function. Place the food in the oven and close the door: The function will start automatically after the period of time that has been calculated in order for cooking to finish at the time you have set.
Please note: Programming a delayed cooking start time will disable the oven preheating phase: The oven will reach the temperature your require gradually, meaning that cooking times will be slightly longer than those listed in the cooking table. During the waiting time, you can press+ or te amend the programmed end time or press to change other settings. By pressing , in order to visualize information, it is possible to switch between end time and duration.
.6th SENSE
These functions automatically select the best cooking mode, temperature and duration to cook, roast or bake all the dishes available.
When required, simply indicate the characteristic of food to obtain an optimal result.
WEIGHT / HEIGHT / PIZZA (ROUND-TRAY-LAYERS)

To set the function correctly, follow the indications on the display, when prompted, and press + or to set the required value then press to confirm.
DONENESS/BROWNING
In some 6th Sense functions it is possible to adjust the doneness level.

When prompted, press to select the desired level between rare (-1) and well done (+1). Press or to confirm and start the function.
In the same way, where allowed, in some 6th Sense functions, it's possible to adjust the browning level between low (-1) and high (1).
. COOKING WITH STEAM
By selecting the "Forced Air + Steam" or one of the several 6^th Sense dedicated recipes it is possible cook any kind of food thanks to the use of the steam. Steam spreads more quickly and more evenly through food compared to just the hot air typical of Conventional Functions: this reduce cooking times, locking in food's precious nutrients and ensuring you obtain excellent, truly delicious results with all your recipes.
Through the complete duration of the steam cooking the door must be kept closed.
For proceed with steam cooking, it will be necessary fill the tank located inside the oven using the drawer on the control panel.
When requested on the display with "ADD WATER" or "FILL DRAWER" indications, open the drawer by pressing it lightly.
Pour in slowly some drinking water until the display shows "TANK FULL". Maximum tank capacity is approximately 1.5 litre.
Close the drawer by pushing it carefully towards the panel until completely closed. The drawer must always remain closed, except for water filling.

It will be necessary to add water only when the tank won't be filled enough to complete the cooking. Avoid to fill the tank when the oven is switched off or up to it will requested from the display.
3. START THE FUNCTION
At any time, if the default values are those desired or once you have applied the settings you require, press to activate the function.
During the delay phase, by pressing the oven will ask if you want to skip this phase, starting immediately the function.
Please note: Once a function has been selected, the display will recommend the most suitable level for each function. At any time you can stop the function that has been activated by pressing 0 .
If the oven is hot and the function requires a specific maximum temperature, a message will shown on the display. Press to return to previous screen and select a different function or wait for a complete cooling.
4. PREHEATING
Some functions have an oven preheating phase: Once the function has started, the display indicates that the preheating phase has been activated.

Once this phase has finished, an audible signal will sound and the display will indicate that the oven has reached the set temperature, requiring to "ADD FOOD".
At this point, open the door, place the food in the oven, close the door and start cooking by pressing or
Please note: Placing the food in the oven before preheating has finished may have an adverse effect on the final cooking result. Opening the door during the preheating phase will stop pause it.
The cooking time does not include a preheating phase. You can always change the temperature you want the oven to reach using + or -
5. PAUSE COOKING / TURN OR CHECK FOOD
By opening the door, the cooking will be temporarily paused through deactivating heating elements.
To resume the cooking, close the door.
Some 6th Sense functions will require the food to be turned during cooking.

An audible signal will sound and the display shows the action to be done. Open the door, do the action prompted by the display and close the door, then press to continue cooking.
In the same way, at 10% of time before the end of cooking, the oven prompts you to check the food.

An audible signal will sound and the display shows the action to be done. Check the food, close the door and press or continue cooking.
Please note: Press to skip these actions. Otherwise, if no action is done after a certain time the oven will continue the cooking.
6.END OF COOKING
An audible signal will sound and the display will indicate that cooking is complete.

Press to continue cooking in manual mode (untimed) or press + to extend the cooking time by setting a new duration. In both cases, the cooking parameters will be retained.
BROWNING
Some functions of the oven enable you to brown the surface of the food by activating the grill once cooking is complete.

When the display shows the relevant message, if required press to start a five-minute browning cycle. You can stop the function at any time by pressing ① to switch the oven off.
.FAVORITES
Once cooking is complete the display will prompt you to save the function in a number between 1 and 10 on your list of favorites.

If you would like to save a function as a favorite and store the current settings for future use, press otherwise, to ignore the request press.
Once has been pressed, press the Q to select the number position, then press to confirm.
Please note: If the memory is full or the number chosen has already been taken, the oven will ask you to confirm overwriting the previous function.
To call up the functions you have saved at a later time, press 心 : The display will show your list of favorite functions.

Press or to select the function, confirm by pressing , and then press to activate.
.CLEANING
AUTOMATIC CLEANING - PYRO
Do not touch the oven during the Pyro cycle. Keep children and animals away from the oven during and after (until the room has finished airing) running the Pyro cycle.
Remove all accessories - including shelf guides - from the oven before activating the function. If the oven is installed below a hob, make sure that all the burners or electric hotplates are switched off while running the selfcleaning cycle. For optimum cleaning results, remove excessive residuals inside the cavity and clean the inner door glass before using the pyrolytic function. We recommend only running the Pyro function if the appliance contains heavy soiling or gives off bad odours during cooking.
Press to show "Pyro" on the display.

Press to select the desired cycle, then press to confirm. Once a cycle has been selected, if desired, press + or to set end time (start delay), then press to confirm. Clean the door and remove all accessories as prompted, then close the door and press when done: the oven will begin the self-cleaning cycle, while the door locks automatically: a warning message appears on the display, along with a countdown indicating the status of the cycle in progress. Once the cycle has been completed, the door remains locked until the temperature inside the oven has returned to a safe level.
Please note: Pyrolytic cycle can also be activated when the tank is filled with water.
- DRAIN
The drain function allows the water to be drained in order to prevent stagnation in the tank. For optimal use of the appliance, it is advisable to always carry out draining every time the oven has been used with a steam cycle.

Once selected the "Drain" function, press and follow the actions indicated: Open the door and place a large jug under the drain nozzle located at the bottom right of the panel. Once started the draining, keep the jug in position until the operation is completed. The
average duration for full load drainage is about three minutes.
If needed, it is possible to pause the draining process by pressing BACK or STOP button (for example in case the jug would be already full of water in the middle of the draining process).
The jug must be at least 2 liters large.
Please note: to ensure that the water is cold, it is not possible to perform this activity before 4 hours have elapsed from the last cycle (or the last time the product was powered). During this waiting time, the display will show the following feedback "WATER IS HOT - PLEASE WAIT".
- DESCALE
This special function, activated at regular intervals, allows you to keep the tank and the steam circuit in the best condition.
The message < PLEASE DESCALE > will be shown on display, to remind you to execute this operation regularly.
Descale requirement is triggered by the number of steam cooking cycles performed or steam boiler working hours since the last descale cycle (see the table below).
| “PLEASE DESCALE”MESSAGE APPEARS AFTER | WHAT TO DO |
| 15 cycles of steam cooking | Descale is recommended |
| 22 hours of steam cooking duration | |
| 20 cycles of steam cooking | It is not possible to run a Steam cycle until a Descale cycle will be carried out |
| 30 hours of steam cooking duration |
The descending procedure can also be performed whenever the user desires a deeper cleaning of the tank and the internal steam circuit.
The average duration of the full function is around 180 minutes. Once the function is started, follow all the steps indicated on the display.
Please note: The function can be paused but, if it is canceled at any time, the entire descending cycle must be repeated from the beginning.
PHASE 1: DRAINING (up to 3 min.)
When the display will show <PLACE A CONTAINER UNDER NOZZLE> , please proceed with the draining task as described in the dedicated Drain paragraph.
Please note: to ensure that the water is cold, it is not possible to perform this activity before 4 hours have elapsed from the last cycle (or the last time the product was powered). During this waiting time, the display will show the following feedback "WATER IS HOT - PLEASE WAIT".
The jug must be at least 2 liters large.
PHASE 2: DESCALING (~120 min.)
When display will show <ADD 1.7 L OF SOLUTION> , please pour the descending solution in the drawer. We recommend to prepare the descending solution adding 3 sachets (corresponding to 75 g ) of the specific Oven WPRO* descaler in 1,7 liters of drinking water at ambient temperature.

Once the descending solution is poured inside the drawer, press to start the main descending process. The descending phases do not need you to stay in front of the appliance. After each phase is completed, an acoustical feedback will be played and the display will show instructions to proceed with the next phase.
PHASE 3: DRAINING (up to 3 min.)
When the display will show <PLACE A CONTAINER UNDER NOZZLE> , please proceed with the draining task as described in the dedicated Drain paragraph.
PHASE 4: RINSING (~20 min.)
To clean the tank and the steam circuit, rinse cycle has to be done.
When the display shows
PHASE 5: DRAINING (up to 3 min.)
PHASE 6: RINSING (~20 min.)
PHASE 7: DRAINING (up to 3 min.)
PHASE 8: RINSING (~20 min.)
PHASE 9: DRAINING (up to 3 min.)
After the last draining operation press OK to complete the descale.
When Descale procedure is completed, it will be possible to use all the steam functions.
*WPRO descaler is the suggested professional product for the maintenance of the best performance of your steam function in the oven. Please follow the instructions for use on the packaging. For orders and information contact the after sales service or www.whirlpool.eu
Whirlpool will not be held responsible for any damage caused by the use of other cleaning products available on the market.
. MINUTEMINDER
When the oven is switched off, the display can be used as a timer. To activate this function, make sure that the oven is switched off and press + or :The icon will flash on the display.
Press + or to set the length of time you require and then press to activate the timer.

An audible signal will sound and the display will indicate once the minuteminder has finished counting down the selected time.
Please note: The minuteminder does not activate any of the cooking cycles. Press + or to change the time set on the timer.
Once the minuteminder has been activated, you can also select and activate a function.
Press to switch on the oven and then select the function you require.
Once the function has started, the timer will continue to count down independently without interfering with the function itself.
Please note: During this phase, it isn't possible to see the minuteminder (only the icon will be displayed), that will continue counting down in background. To retrieve the minuteminder screen press 0 to stop the function that is currently active.
. KEYLOCK
To lock the keypad, press and hold for at least five seconds. Do this again to unlock the keypad.

Please note: This function can also be activated during cooking. For safety reasons, the oven can be switched off at any time by pressing ①
| FOOD CATEGORIES SUGGESTED QUANTITY | TURNS(of cook time) | LEVEL AND ACCESSORIES | |||
| LASAGNA - 0.5 | -3 kg- | 2 | |||
| MEAT | Beef roasted | Roast (doneness 0) | 0.6 - 2 kg- | 3 | |
| Hamburgers (doneness 0) 1.5 - 3 cm 3/5 | 5 4 | ||||
| Pork-roasted | Roast | 0.6 - 2.5 kg- | 3 | ||
| Sausages & wurstel 1.5 - 4 cm 2/3 | 5 4 | ||||
| Chicken-roasted | Whole | 0.6 - 3 kg- | 2 | ||
| Fillet & breast 1 - 5 cm 2/3 | 5 4 | ||||
| Kebabs one grid 1/2 | 5 4 | ||||
| FISH | Filletts 0.5 - 3 (cm) | 3 2 | |||
| Filletts-frozen | 0.5 - 3 (cm) | - | 3 2 | ||
| VEGETABLES | Vegetables-roasted | Potatoes | 0.5 - 1.5 kg | - | 3 |
| Vegetables-stuffed | 0.1 - 0.5 kg cad | - | 3 | ||
| Vegetables-roasted | 0.5 - 1.5 kg | - | 3 | ||
| Vegetables-gratin | Potatoes | one tray | - | 3 | |
| Tomatoes | one tray | - | 3 | ||
| Peppers | one tray | - | 3 | ||
| Broccoli | one tray | - | 3 | ||
| Cauliflower | one tray | - | 3 | ||
| Others | one tray | - | 3 | ||
| CAKES & PASTRIES | Rising cakes in tin | Sponge Cake | 0.5 - 1.2 kg | - | 3 |
| Pastries & filled pies | Cookies | 0.2 - 0.6 kg- | 3 | ||
| Choux pastry | one tray | - | 3 | ||
| Tart | 0.4 - 1.6kg | - | 3 | ||
| Strudel | 0.4 - 1.6kg | - | 3 | ||
| Fruit filled pie | 0.5 - 2 kg | - | 3 | ||
| QUICHE | - | 0.8 - 1.2 kg | - | 2 | |
| BREAD | Rolls | 60 - 150 g each | - | 3 | |
| Sandwich Loaf in tin | 400 - 600 g each | - | 2 | ||
| Big bread | 0.5 - 2.0 kg | - | 2 | ||
| Baguettes | 200 - 300 g each | - | 3 | ||
| PIZZA | Thin | round - tray | - | 2 | |
| Thick | round - tray | - | 2 | ||
| Frozen | 1 - 4 layers - | 2 | |||
| ACCESSIONS | Wire shelf | Oven tray or cake tin on wire shelf | Drip tray / Baking tray or oven tray on wire shelf | Drip tray / Baking tray | Drip tray with 500 ml of water |
| RECIPE STEAM LEVEL PREHEAT TEMPERATURE (°C) | DURATION (MIN.) | SHELF AND ACCESSORIES | |||
| Shortbread / Cookies | LOW | Yes | 140 - 150 | 35 - 55 | 3 |
| Small cake / Muffin | LOW | Yes | 160 - 170 | 30 - 40 | 3 |
| Leavened cakes | LOW | Yes | 170 - 180 | 40 - 60 | 2 |
| Sponge cakes | LOW | Yes | 160 - 170 | 30 - 40 | 2 |
| Focaccia | LOW | Yes | 200 - 220 | 20 - 40 | 3 |
| Bread loaf | LOW | Yes | 170 - 180 | 70 - 100 | 3 |
| Small bread | LOW | Yes | 200 - 220 | 30 - 50 | 3 |
| Baguette | LOW | Yes | 200 - 220 | 30 - 50 | 3 |
| Roast potatoes | MID | Yes | 200 - 220 | 50 - 70 | 3 |
| Veal / Beef / Pork 1 kg | MID | Yes | 180 - 200 | 60 - 100 | 3 |
| Veal / Beef / Pork (pieces) | MID | Yes | 160 - 180 | 60 - 80 | 3 |
| Roast Beef rare 1 kg | MID | Yes | 200 - 220 | 40 - 50 | 3 |
| Roast Beef rare 2 kg | MID | Yes | 200 | 55 - 65 | 3 |
| Leg of lamb | MID | Yes | 180 - 200 | 65 - 75 | 3 |
| Stew pork knuckles | MID | Yes | 160 - 180 | 85 - 100 | 3 |
| Chicken / guinea fowl / duck 1 - 1.5 kg | MID | Yes | 200 - 220 | 50 - 70 | 3 |
| Chicken / guinea fowl / duck (pieces) | MID | Yes | 200 - 220 | 55 - 65 | 3 |
| Stuffed vegetables (tomatoes, courgettes, aubergines) | MID | Yes | 180 - 200 | 25 - 40 | 3 |
| Fish fillet | HIGH | Yes | 180 - 200 | 15 - 30 | 3 |
ACCESSIONS
Wire shelf
Oven tray or cake tin on wire shelf

Drip tray / Baking tray or oven tray on wire shelf

Drip tray / Baking tray

Drip tray with 500 ml of water
COOKING TABLE
| RECIPE FUNCTION PREHEAT TEMPERATURE (°C) DURATION (MIN.) | SHELF AND ACCESSORIES | |||||
| Leavened cakes / Sponge cakes | Yes 170 30 - 50 | 2 | ||||
| Yes 160 30 - 50 | 2 | |||||
| Yes 160 30 - 50 | 4 | 1 | ||||
| Filled cakes(cheesecake, strudel, apple pie) | Yes 160 - 200 30 - 85 | 3 | ||||
| Yes 160 - 200 35 - 90 | 4 | 1 | ||||
| Cookies / Shortbread | Yes 150 20 - 40 | 3 | ||||
| Yes 140 30 - 50 | 4 | |||||
| Yes 140 30 - 50 | 4 | 1 | ||||
| Yes 135 40 - 60 | 5 | 3 1 | ||||
| Small cakes / Muffin | Yes 170 20 - 40 | 3 | ||||
| Yes 150 30 - 50 | 4 | |||||
| Yes 150 30 - 50 | 4 | 1 | ||||
| Yes 150 40 - 60 | 5 | 3 1 | ||||
| Choux buns | Yes 180 - 200 30 - 40 | 3 | ||||
| Yes | 180 - 190 | 35 - 45 | 4 | 1 | ||
| Yes | 180 - 190 | 35 - 45* | 5 | 3 1 | ||
| Meringues | Yes | 90 110 - 150 | 3 | |||
| Yes | 90 | 130 - 150 | 4 | 1 | ||
| Yes | 90 | 140 - 160* | 5 | 3 1 | ||
| Pizza / Bread / Focaccia | Yes 190 - 250 | 15 - 50 | 2 | |||
| Yes 190 - 230 20 - 50 | 4 | 1 | ||||
| Pizza (Thin, thick, focaccia) | Yes 220 - 240 | 25 - 50* | 5 | 3 1 | ||
| Frozen pizza | Yes 250 10 - 15 | 3 | ||||
| Yes 250 | 10 - 20 | 4 | 1 | |||
| Yes 220 - 240 | 15 - 30 | 5 | 3 1 | |||
| Savoury pies(vegetable pie,quiche) | Yes | 180 - 190 | 45 - 55 | 3 | ||
| Yes | 180 - 190 | 45 - 60 | 4 | 1 | ||
| Yes | 180 - 190 | 45 - 70* | 5 | 3 1 | ||
| Vols-au-vent / Puff pastry crackers | Yes 190 - 200 20 - 30 | 3 | ||||
| Yes | 180 - 190 | 20 - 40 | 4 | 1 | ||
| Yes | 180 - 190 | 20 - 40* | 5 | 3 1 | ||
HOW TO READ THE COOKING TABLE
| RECIPE | FUNCTION | PREHEAT | TEMPERATURE (°C) | DURATION (Min.) | SHELF AND ACCESSORIES |
| Lasagne / Flans / Baked pasta / Cannelloni | Yes 190 - 200 | 45 - 65 | 3 | ||
| Lamb / Veal / Beef / Pork 1 kg Yes 190 - 200 | Yes | 40 - 60 | 3 | ||
| Roast pork with crackling 2 kg — 170 | Yes | 40 - 60 | 2 | ||
| Chicken / Rabbit / Duck 1 kg Yes 200 - 230 | Yes | 50 - 60 | 3 | ||
| Turkey / Goose 3 kg | Yes | 190 - 200 | 80 - 130 | 2 | |
| Baked fish / en papillote (fillets, whole) | Yes 180 - 200 | 40 - 60 | 3 | ||
| Stuffed vegetables (tomatoes, courgettes, aubergines) | Yes 180 - 200 | 50 - 60 | 2 | ||
| Toast | — | 3 (High) | 3 - 6 | 5 | |
| Fish fillets / Steaks | — | 2 (Mid) | 20 - 30** | 4 3 | |
| Sausages / Kebabs / Spare ribs / Hamburgers | — | 2 - 3 (Mid - High) | 15 - 30** | 5 4 | |
| Roast chicken 1-1.3 kg | — | 2 (Mid) | 55 - 70*** | 2 1 | |
| Leg of lamb / Shanks | — | 2 (Mid) | 60 - 90*** | 3 | |
| Roast potatoes | — | 2 (Mid) 35 - 55*** | 3 | ||
| Vegetable gratin | — | 3 (High) | 10 - 25 | 3 | |
| Cookies | Cookies | Yes | 135 | 50 - 70 | 5 4 3 1 |
| Tarts | Tarts | Yes | 170 | 50 - 70 | 5 3 2 1 |
| Round pizzas | Pizza | Yes | 210 | 40 - 60 | 5 3 2 1 |
| Complete meal: Fruit tart (level 5) / lasagna (level 3) / meat (level 1) | Yes | 190 | 40 - 120* | 5 3 1 | |
| Complete meal: Fruit tart (level 5) / roasted vegetables (level 4) / lasagna (level 2) / cuts of meat (level 1) | Yes | 190 | 40 - 120* | 5 4 2 1 | |
| Lasagna & Meat | Yes | 200 | 50 - 100* | 4 1 | |
| Meat & Potatoes | Yes | 200 | 45 - 100* | 4 1 | |
| Fish & Vegetables | Yes | 180 | 30 - 50* | 4 1 | |
| Stuffed roasting joints | — | 200 | 80 - 120* | 3 | |
| Cuts of meat (rabbit, chicken, lamb) | — | 200 | 50 - 100* | 3 |
- Estimated length of time: dishes can be removed from the oven at different times depending on personal preference.
Turn food halfway through cooking.
* Turn food two thirds of the way through cooking (if necessary).
The table lists the best function, accessories and level to use to cook different types of food.
Cooking times start from the moment food is placed in the oven, excluding preheating (where required).
Cooking temperatures and times are approximate and depend on the amount of food and the type of accessory used.
Use the lowest recommended settings to begin with and, if the food is not cooked enough, then switch to higher settings.
Use the accessories supplied and preferably darkcoloured metal cake tins and baking trays. You can also use Pyrex or stoneware pans and accessories, but bear in mind that cooking times will be slightly longer.
| ACCESSIONS | Wire shelf | Oven tray or cake tin on wire shelf | Drip tray / Baking tray or oven tray on wire shelf | Drip tray / Baking tray | Drip tray with 500 ml of water |
CLEANING AND MAINTENANCE
Make sure that the oven has cooled down before carrying out any maintenance or cleaning. Do not use steam cleaners.
Do not use wire wool, abrasive scourers or abrasive/corrosive cleaning agents, as these could damage the surfaces of the appliance.
Wear protective gloves. The oven must be disconnected from the mains before carrying out any kind of maintenance work.
EXTERIOR SURFACES
- Clean the surfaces with a damp microfibre cloth. If they are very dirty, add a few drops of pH-neutral detergent. Finish off with a dry cloth.
- Do not use corrosive or abrasive detergents. If any of these products inadvertently comes into contact with the surfaces of the appliance, clean immediately with a damp microfibre cloth.
INTERIOR SURFACES
After every use, leave the oven to cool and then clean it, preferably while it is still warm, to remove any deposits or stains caused by food residues To dry any condensation that has formed as a result of cooking foods with a high water content, let the oven to cool completely and then wipe it with a cloth or sponge.
- If there is stubborn dirt on the interior surfaces, we recommend running the automatic cleaning function for optimal cleaning results.
- Clean the glass in the door with a suitable liquid detergent.
- The oven door can be removed to facilitate cleaning.
ACCESSIONS
Soak the accessories in a washing-up liquid solution after use, handling them with oven gloves if they are still hot. Food residues can be removed using a washing-up brush or a sponge.
BOILER
To ensure that the oven always works at optimum performance and to help prevent the build-up of limescale deposits over time, we recommend using the "Drain" and "Descale" functions regularly.
After a long period of non-use of the "Forced Air + Steam" function, it is highly suggested to activate a cooking cycle with the empty oven by filling completely the tank.
REPLACING THE LAMP
- Disconnect the oven from the power supply.
- Remove the shelf guides.
- Remove the lamp cover.
- Replace the lamp.
- Reposition the lamp cover, pushing it on firmly until it snaps into place.
- Refit the shelf guides.
- Reconnect the oven to the power supply.
Please note: Only use 20-40 W/230 ~ V type G9, T300°C halogen bulbs. The bulb used in the product is specifically designed for domestic appliances and is not suitable for general room lighting within the home (EC Regulation 244/2009). Light bulbs are available from our After-sales Service.
- If using halogen bulbs, do not handle them with your bare hands as your fingerprints could cause damage. Do not use the oven until the light cover has been refitted.

REMOVING AND REFITTING THE DOOR
- To remove the door, open it fully and lower the catches until they are in the unlock position.

- Close the door as much as you can. Take a firm hold of the door with both hands – do not hold it by the handle.
Simply remove the door by continuing to close it while pulling it upwards at the same time until it is released from its seating. Put the door to one side, resting it on a soft surface.

-
Refit the door by moving it towards the oven, aligning the hooks of the hinges with their seating and securing the upper part onto its seating.
-
Lower the door and then open it fully. Lower the catches into their original position: Make sure that you lower them down completely.

Apply gentle pressure to check that the catches are in the correct position.

- Try closing the door and check to make sure that it lines up with the control panel. If it does not, repeat the steps above: The door could become damaged if it does not work properly.
TROUBLESHOOTING
| PROBLEM POSSIBLE CAUSE SOLUTION | ||
| The oven is not working. | Power cut.Disconnection from the mains. | Check for the presence of mains electrical power and whether the oven is connected to the electricity supply. Turn off the oven and restart it to see if the fault persists. |
| The display shows the letter “F” followed by a number or letter. | Oven failure. | Contact you nearest Client After-sales Service Centre and state the number following the letter “F”. |
| The oven does not heat up.The function does not start. | “DEMO” mode is running. Access | DEMO" from “ SETTINGS” and select “Off”. |
| The light switches off. “ECO” mode is “On”. | Access “ECO” from “ SETTINGS” and | select “Off”. |
| The door will not open. Cleaning cycle in progress. | Wait for the function to finish and for the oven to cool down. | |

Policies, standard documentation and additional product information can be found by:
- Visiting our website docs.whirlpool.eu
- Using QR Code
- Alternatively, contact our After-sales Service (See phone number in the warranty booklet). When contacting our After-sales Service, please state the codes provided on your product's identification plate.

PRODUKTBESCHREIBUNG

8. ACCÉS DIRECT AUX OPTIONS / FONCTIONS
3. NAVIGATIETOETS MIN
TRADITIONELE FUNCTIONS
HETE LUCHT
FASE 1: AFVOEREN (tot 3 min.)
FASE 3: AFVOEREN (tot 3 min.)
FASE 4: SPOELEN (~20 min.)
FASE 5:AFVOEREN (tot 3 min.)
FASE 6: SPOELEN (~20 MIN.)
FASE 7: AFVOEREN (tot 3 min.)
FASE 8:SPOELEN ( 20 MIN.)
FASE 9: AFVOEREN (tot 3 min.)
3. CÓMOCONFIGURARLA HORA
1.BKJIIOUeyHE/BbIKJIOUeyHNE
BkIIOueHne n BbIKIOueHne neu, npeKpaueHne BbINoHHeHna aKTNBHOyHKcUN.
KoHueCTBO TIN npHaIeXHOCTe MoKeT BapbIPOBaTbCBy 3aBNCIMOCTN OT pPiO6peTeHHo MOdeJI.
YCTAHOBKA PEWETKNI IpyTNX IPNHADJIEXKHOCTEIN
BctabBe peeweTky ropn3oHTaIbHO B depkataJI npotNBHpaonlaar ee TaK, TTo6bl npinnoHrtble Kpa 6bln 6bpeHb BBepx.
Дугп epнадлжно, takne kaK noДоH npOTnBHeB, BCTaBnIOTc rOpN3OHTaJIbHo TEM JKe cnOCo6OM,чTo n peWetka.
CHATNE UYCTAHOBKA DEPXATELEI IPOTUBHEI
-ДЯСНТЯДерЖATEENПOTNBHeI pINIOHUMITE INN OCTOPOXHO N3BNEKUTe HIXHIOU YAcTb IN3 rHe3da: Pocne 3TOrO DEpXaTeJI NPOTNBHeM MoXHO BbIHyTb.
Дя установки држателейnpOTиBHeCHaЧаньТаБТe INxВВерхHee ГЗд.3aДВИНБTeДржателпрOTиBHeB KAmepy DuxOBKN B npINODHrOM NIOJOKeHn, a 3aTeM ONYCTNTE INx TaK, qTO6bl OHn 3aHJIIM MeCTo B HIXKHeM ГЗд.
YCTAHOBKA TELECKONNUECKNX HANPABJIOUIX (PNHANUIN)
BbHbTe depKaTeI npOTnBHe n3 dYxOBKn n CHmnte
IIaCTNKOByIO 3aunTy C BbldBnKbIX HApnpabJIOuX.
3aKpeNITE BepxHNI 3axm HappaBnIOseH a
dePkaTeI npOTnBHe n CdbnHbTe ee Brny6b Do
ynopa. Onyctne BTOPOI 3axm B npedycmotpeHoe
noLoxeHne. UTo6bl 3akpenTb depKaTeJIb,
CNbHO HaXMMte Ha HxHHIOU qACTb 3axmAb
HaNPaBHeHn OT depKaTeI NaIKn. Y6eINTEcb, yTO
NoDBnKHa JaCTb HAppaBnIOuSeM MoKeT CBO6oHDn
nepeMeaTbc. NobTOPnTe 3Tu Je DeiCTBnI DnA
BTOPOI depKaTeJI npOTnBHe Ha TOM Ke ypOBHe.


06paTne BHMaHne: BbIDBnXhBie HappabNIOuIe Moryr KpeNTbcra Ha IIObOM yPoBHe.
PEXKIMbl

6^th SENSE
OHN DeNAOT BO3MOKHBIM NOHOCTBIO
abTomatnueckoe npuroTOBneHne 6IIOJ IIO6bIX TUNOB (la3aHb, mco, pbio, OBOU, INporu n Dpyra Bblneka, HecnlaKnne nporu, xne6, nua).
IЯ MaKcMaJIbHO 3ΦΦeKTHBHO IcNoJIb3OBaHnI ATOI yHKUIN CJIeYJTE yKa3aHnIM, pNBeDEHHbIM B COOTBetCTByIOUe Ta6JIuE nprirotOBHeHnI.

KOHBEKUNA+NAP
Blaoroda copetahnupnpuroToBJeHna npay
I KOHBekun 3TOT peKIM NO3BOJnE rTOBNTb 6NIOda C xpyCTauei npymHOI KOPoYKO, HO HexHbIe I COUHbIe BHTpI. IJI NOnyehnI NyUwero pe3ynbTaTa peKOMeHNyETc Bbl6npaTb yPoBeH bnapA «BbICOK. IIN pInrOToBHeHn py6bI, «CpeH. IIN Mca n «Hn3K. IIN XLe6a n DecepTob.

KOHBEKUN
ДлгОДНБРЕМEHNOТПИROTOВЛЕNHЯ pa3JIчньх YKTOB C OДИHAKOBOI TempepaTpoi ПИROTOВЛЕNHЯ СКOLьКИX yPOBHIX (makcIMyM TpN) 6e3 cmeINBAHIN OB. 3TOT pEXIM rapaHTnpyET OTCYCTBNE pepeHOCA OB C ODHORO nPoDAkTA HaДPyRO.

TPAUNUHOHHbIE ΦYHKcN
-ПОДРУМАНBAHNE
Pekm dna 3aneKaHnMa CaN BbineKaHn nporOB cHaunHKo TOnbKO Ha ODHOM yPOBHe.
COOK4ΦYHKUH
PexnIM nI npriTOBneHn 6JIIO, Tpe6yIOxOdHaKOBoTtemNepaTpbl, cpa3y HaYeTbipex ypOBHX.3Ty fynKcuiMOxHO NcnoJb3OBaTb IINr ppiROTOBHeHn neeHbI, INPOXhbIX-KOp3HOK, KpyTbIX NtU (B TOM uNCNE 3amopoxeHHbIX) IN KOMnJIeKCHbIX 6JIIO, IINr NOnyehn HAnNyUHnx pe3yNbTaTOB npiJeprKNaTeCb peKOMeHdaIy Ta6NIuCbl npriTOBHeHn 6JIOD.
-ΓPUNJB C KOHBEK
PeknI Jxapkn KpynhbIX KcKOB Mca (poct6nΦ, 6apaHbN HOKKN, cblnra). PekomeHnyetcnaIOJIb3OBA Tb NOIOH dJr C6opa CTeKaHOZero COKa OT JapeHn: Pa3MeCTnte NOdoH Ha IIO6OM ypOBHe IOI peWETKO, HAIINB B Hero 500 Mt NITbeBOB BObl.
- 3AMOPOX.BbINEU.
3TOT pexim aBtOMaTnueckn Bb6npaet Han60Jee NOxOJaYIO TempeaTy n CnOCo6 npiroTOBHeHn IaI PA3NHybIX TINOB rOTOBbIX 3AmOpOKeHHbIX npOyKToB. PporpeB dYXOBKn He Tpe6yeTcR.
CNEUAAHbIEPEXIMbl
》BOJIbIaIPOUIA
Pekim dny npirotoBneHna 60JIbux KycKOB mca (6OJee 2,5 Kr). PekomeHyTeCn NepeBopaunBaTb Mco BO Bpem npiroTOBneHna. UTo6bl OHO paBHomePNO pOxapuNocb C o6eNX CTOpOH. Bpem OT BpemHn noIbaiTe Mco COKOM BO n36exaHne nepecywnBaHna.
>PODbEM TECTA
Pekm, oecneuBAoUOn ONTMaJIbHbIe ycNoBnIy NOdbema Tecta. IINI NOLyEHH
KaueCTBeHHoro Tecta He nCNoIb3yIte peKIM, ecn neyb He OCTbIa nocne npNroTOBJeHna.
PA3MOPO3KA
Pekm dny yckopeHHoro pa3MopaxnBaHn npOyKTOB.Pa3MeCTnTe npOyKTbHa cpeHem yPOBHe.PekomeHdyETcOCTABnTb npOyKTbI B ynaKOBKe, YTO6bl PpeoTbPaTb BbcixHne IOBepxHOCTHO CIOJ.
》PODAEPK.TEMI.
Pexm, no3B0Jouu coxpaHrToRpAumTOIbKO yTO npuroTOBneHHbIe 6JIOda.
KOHBEKLUN3KO
PexnM DnA 3aneKaHnF apwnpoBaHoro Mca nMaChbIX Φnne Ha OndHom ypOBHe. DeNkathna npepbIBnCTaunPKyIaunB03dyxa npedOTbpaauet nepecuWbAHne npOdyKTOB. B npouecce npiroTOBneHn6IuD B pexnme 三 K O ^ 四 OCBeueHne kamepbI dYxOBKn OCTaETcB bIKIOeHHbIM. PnpncNoB3OBaHn npexnma 三 K O ^ 四 , npedycMaTPBAUoero ONTmN3aUH eHepronoTpe6NeHn, DBepua dYxOBKn DOJXHa OCTaBaTbc3akpytOn Do Tex nop, NOKa 6JIIOHO He 6ydet NOJHOCTbIO rOTBO.

BE3 KOHBEKUIN
PexmI npiroTOBneHn IIO6bIX 6IOJ TOJIbKO Ha ODHOM yPOBHe.

PnJIb
PeknIM nI npuroTOBneHn Ha rpuJe CTeIKOB, 1aWbIka, KOJIbAcOK, OBOUHbIX 3aNEKaHOK IN Xle6hIx TOCTOB. Pn npuroTOBneHn Ha rpuJe MraCa peKOMeHdyETcNcNOJb3OBaTb NIOdOH dIy c6opa coka OT kapeHn: YctAHOBIne npOTnBEHb Ha IIO6oYpOBeHb NOd peWeTKo, HAIINB B Hero 500 MNIITBeBOB BObl.

BbICTPbI INPOΓPEB
BbIcTpbl npeBaPnteHbHn HarpeB dYxOBKn.

TAVIMEpbI

TAUMEP

OcIeXnBaHne BpeMeHn 6e3 aKTHBaCn npexima.
#
-ПИРОЛТИЕСКА OЧИCTKA ДУХOBКИ
Pekm dny oucTkn DyXOBKn OT 3aRpa3HeHn,
6pa3yUoIuXcB Npocece npiroTOBneHnna
npOyKTOB, NOd DeiCTBnEM OyeHb BbICOKo
TemnepaTypbl. PpeDycmOTpeHO Dba pa3NnuHbIX
zNKla camoouchTkn: NOhbl ZNK (NipOJNTka)
UYKOpOeHHbl zNKl (NipOJNTka 3KO).
UcnoJIb3yIte yKOpOeHHbl zNKI uepe3
peYrJaRhble INHTepBaJIbI, a NOhbl ZNKI - TOJbKO
KOrDa DxyOBKa CINbHO 3aRpa3HeHa.
CINBBObl
A B T O M A T N U C E C K N C L I B B O D B I N 3 nap o r e H e p a T o p a, B bI N O J H R E M B I B T O M C L Y U A E, E C N I B I H E P I N A H I P y E T E P O N J B 3 O B A T B C R D I X O B K O B T E U E H N E D I N T E N B H O R O B P E M E H N.
- YDAJI. HAKINb
OuNTka naporehepatopa ot Hakinn. IcnoIb3yIte 3Ty fynkunpo peryarpho.B npotnbHom cnyae Ha dncnnee 6ydt nOBJrTbcra COo6eHnna, HanomHaouune O Heo6xOIMOCtOn ouNCTKn DxyOBKn.

HACTPOKNI
U3meheneHaCTpoek neu.
Pn aKTHBOM pexkme 念 KO»rpkocb Ducnner CHXaetc BueJx 3KOHOMN 3JeKtpo3Heprn N Iamnoyka BblIOuayetca uepe3 1 MHyty. OHa aBTOMaTnueckn BKIOUaETcCHOBa npn HaKaTN JHO60K HONKn.
IEPBOE IcIIOJIb3OBAHnE
1.BbIEPUTEa3bIK
Pn nepBOM BkIIOueHnn np6op npednoKt Bb6paTb 3bIK:Ha dncnlee oTo6paxaetcA «English».

PpOCMOTpuTe CnncOK DOCTyNHbIX Ra3bIKOB C NOMOuBIO +nnn H-BbIepeTuTe Tpe6yeMbI R3bIK. HaxmTE √dIra NOITBePxJeHnRA Bb6opa.
06paTne BHIMaHHe: B daJIbHeIWeM r3bIK MOxHO n3MeHHTb nyTeM Bbl6opa «r3blK» B MeHIO «HACTPOUKN», OTKpbIB erO HaxKaTNEM
2. YCTAHOBITE UPOBEHb IOTPE6JRAEMOIMOLUHOCTN
B 3aBoDcKnx HactpoiKaX dyxOBKn yCTaHOBnEHypOBeHb NOTpe6JemO MOHOCTH, COBMeCTmMbIn C DOMaSHHMN 3JIeKTPOCETAMC HOMHaJIbHOJ MOUHOCTbIO 60JIee 3 kBt (16):Ecnn 3JIeKTPOCeTB B BaIeM DOME paccuHTaHa Ha MeHbSyIO MOUHOCTb, YMeHbWInTe DaHHoe 3HaueHne (13).

HaKMTe Hn,Tc6bblBb6paTb 16《BbICOKn》nn13 Hn3Kn》,a3aTe HaKMTe nnoDTBePKeHn.
EKEHEBHOE NcIOJIb3OBAHNE
1.BbIBOPPEKIMMA
BkIouHte neyb HaxaTneM 14 DCnPee OTo6paXaETcNPOCJeHb N BbI6paHHbI OCHOBHO pEXHM INN OCHOBHOe MEHIO.
Pexkmbi Moryt Bb6upaTbCn HaxaTneM Ha 3Haoyok ODHoro n3 OCHOBbIX peKIMOB NIN BB6Opom n3 MeHIO: IyBb6opa HyxhoN IO3NcNn N3 MeHIO (Ha DCnIee oTo6paXaetc nepBaJIOCTynHnO3NcNn) HaxmTe + nn,3aTEM HaxmTe nIOPTBepKdEHH.
EcnBkIoueH pexm «JEMO», Bce KOMaHbI aKTINBbI mEHIO IOCTyNbI, Ondako Neyb He HarpeBaetc.ДЯdeakTINBaUHn 3TOrO peKIma HauInTe onuio «JEMO» uepe3 MeHIO «HACTPOIKN» n BbIbepnte «BbIKJ.
Pn Bb6ope «C5POC HACTPOEK» npn6op BkIIOUaETc, a 3aTeM Bo3BpaauaeTc B COCTOHNe npn nepBOM BKIOUeHIn. BCE NaCTpOKn C6paCbIbaIOTc.

U35PAHHOE
DocTyN K cnNcKy n3 10 n36paHbIX peXIMOB.
3. YCTAHOBITE BPEM
Iocne Bb6opa MoUHcTn Heo6xOuMo yCTaHOBNTb TeKyuee Bpem:Ha dncnnee HaHyT MmraT bDe uΦpbYuaca.

HaxMITE HIN DnIyCTaHOBKn Yaca, a 3aTeM HaxMITE V:Ha nCnIeep HaHyT MmraTb DBe CnOpbl MNHyT. HaxMITE HIN DnIyCTaHOBKn MmHyT, a 3aTeM HaxMITE V nIOITBePckDeHn.
O6paTne BHHMaHHe: B cnyae dInTeBHoRO OTKnHoueHn 3JIeKtpnueeCTBa MoKeT Ntpe6oBaTbCRA NOBtOpHaY yCTaHOBka BpemHn. Bbl6epnte «yACbl» B MeHIO «HACTPOIKN», OTKpbIB erO HaxKaTNEM
4.ПОГРЕТЕ ПЧБ
HOBa ney MoKcet YBJIbTcR NCTOCHNKOM 3anaxOB, CB3aHHbIX C npOeCCOM pOnn3BOJcTBa: 3To HOpMaJIbHOe ABHeHne. Ipeed hauAnom nprirotobHeHn6Iou peKoMeHdyETc npOrpeTb NcyTIO neY dny ydaJeHn BO3MOxHbIX OCTaTOUHbIX 3aAnXOB.CHMnTe c DxyOBKn 3aunTHbIKapTOH nPpO3paHyIO NeHky, BbIHbTe BCE npInadNexKHOCTN. IpOrpeTe dYxOBKy npu TemnepaType 200^ B TeueHne npImepHo Ondoro Yaca, Lyuwe BCero - B pexmE C BeHTnlaucnei (HaNPmEp, "KohBeKzra" nn "PiOpymaHnBaHne").
06paTte BnHMaHne: NocIe nepBOrO nCnOJb3ObaHna Neu peKOMeHnyETc npOBeTpNTb NOMEueHne.
2. HACTPOIKA PEXKIMA
Iocne TOrO KaK peXm 6yIeT BbIbpaH, Bbl MoKeTe n3MeHnT b erO HAcTpoiKn. Ha dnCnIeN 6yDyT IocNeIOBaTeJIbHO BblBOJNbCra HAcTpaINBaEMbIe npaMeTpbl. HaxaTne 3BOLJeT BepHyTbcr K npdeIbduJeHacTpoiKe.
TEMNEPATyA /YPOBEHb TPNJIy /YPOBEHb IAPA

Korda 3HaueHne Ha dncnlee Mmraet, n3MeHnte
ero HaxkTneM n, a 3aTeM Haxmnte dny V NOITBepKdHn. NocIe 3TOrO nepexoJte K cNeDyIOuIM NaCTPOKAM (ecnn 3TO BO3MOxHO).
TakIM JKe 6Opa3OM MOxHO yCTaHOBHTb yPOBeHb rPnIa;
IINr nprirotOBHeHn 6NIOd Ha rPnIe npeDycmOTpeHO
TpN oHKCuPOBaHHbIX yPOBnMoUHocTH: 3 (BbICOKn),
2 (cpeHn), 1 (Hn3Kn). B pexKmE «KoHBeKuH + nap»
MOxHO BB6PaTB KOJIueCTBO napa n3 cneDuOUIX
npednaeraembix BapNaHTOB: 1 (Hn3Kn), 2 (cpeHn), 3 (BbICOKn).
06paTte BHMaHHe: Nocne aKTHBaunpeXIMaMOxHO n3MeHb TemepaTy/poBeHb rPnla C NOMOuBIO+NN
ДЛNTЕльHOCTb

Korda 3HaQOK Hducnlee Muraet, 3adaTe Tpe6yemoe Bpem npiroTOBHeHn HaKaTneM nn, a 3aTeM Haxmte nnoTBePckJeHn. Ecnb bI co6npaeteCb roTOBtB pyuHOM pexnme (6e3 Taimepa), MOxHO He yCTaHaBnBaTb Bpem npiroTOBHeHn: Haxmte V nn noTBePckJeHn, a 3aTe mAKTNbpyuTe peXm. Ppi BbIope 3tOrO pexMa npoRpaMnpoBaHne OTIOKeHHoro CTapTa HeBO3MOxHO.
06paTte BHMaHHe: IInTeIbHOCTb nprirotOBJIeHn MOxHO n3MeHtB nOcNe 3aNyCKa peXIMHaHXaTIeM : HaXMITE +NIN JAR KOppeKTInpOBKn, a 3aTeM HaXMITE nIOITBePckJeHn.
BPEMOKOHUAHNA(OTJIOXKEHHBCTAPT)
MHOHINPEKIMOB NOCHE 3aHaNBApeMeHINPIROTOBNEHMOXHOYCTaHOBNTb 3aepkky CTApTa,3aAB BpEMOKOHuaHNA.Ha dncnnee oTo6paKaetcBpeMAOKOHauHNI MUFAET3Haoyok

Haxmte nIIN IaI3aHaHn Tpe6yemoro BpemeHn OKOHuaHn npiroTOBneHn, a 3aTeM Haxmte nIe NOITBePjKeHn n AKTNaCn pexIma. NomeCTnte npOdyKT B neY n 3aKpoIneT DBepy: Ppoecc npiroTOBneHn CTapTyET ABTomATnueCKN B HxKnbl MOneHT, paCCHTaHHbI TaK, yTo6bl 6JIIOo OKa3aNoCb rOTOB K yCTaHOBHeHHOMY BAMN BpemeHn.
06paTte BHHMaHHe:YCTaHOBka OTIOXeHHORO CTapTa
OTMeHReT CTAIOI NpeDBaPHTbHOrO HArpeBa Neu:
NockoJIbky DxOBKa BbIXODHT Ha 3aDaHHyTo TEMpePaTyPy
NOCTeNEHNO, BpEMn PnIroTOBLeHnOkAKeTcH HemHO
DInnHHee, Yem yKa3aHO B Ta6bNIe PnIroTOBLeHn.Bo BpEmn
OXnJaHn3aNyCKa Bbl MoKTe N3MeHHTb
3aIporpamMIpOBAHHoe BpEMn OKOHuaHnHaKaTneM +nn
- IN3MeHHTb DpyrHe NaCTPOIN HaxaTneM AByTEM
HaxaTnna (1) OTObpaXeHn INΦOpMaUu) MOxHo
NepeKIIIOu4bCmExy BpEmeHm OKOHuaHnN
INITeNbHOCTbIO pIroTOBJIeHn.
.6 ^th SENSE
3TN peKIMbI ABTomaTneCKN BbIbnpaIOT ONTMaJIbHbI cnOco6 nprirotoblen, Temnepatypu n dInTeJbHOCTb
npnroTOBneHnaKapKn N BbIneueKNCex 6nO.
Ipocto 3aadaTe xapaKtepcntknpOdykTa nNoIyUHe npBocxOndhpe3yNbTat.
BEC / BbICOTA / NIIUCA (YPOBHN KPYIbIX PNOTUBHEI)

Длправьнов Habсторкп ржма сдуnte уka3aHnM, BBIOHMbIM Ha dincnpne. Haxmte nIIN dIra- 3адан Tpe6yeMoro 3haueHnA, a 3aTeM Haxmte nIЯ NOdTBePXDehnA.
CTENHeB FOTOBH. / NOIpyMHNBAHNE
Дян HeKOTOpbIX ΦyHKcIи BpeKmE «6th Sense» MoXHO OTperyJInPoBaTb CTeNeHb FOToBHOCTn.

Pn OTo6paKeHn NOcka3Kn HaxMnte KHOKN —
Bb6opa KeJaemO CTeneHn FOTOBHOCTN —OT O6kapKn
chApKn (-1)do xopoWe npoxapKn (+1).HaxMnte nn
DnnoTBepeJHnA, a 3aTe m AKTNBpyNe peXm.
AnoruHbIM o6pa30m, eCNI 3TO peaIN3OBaHO, B
HeKOTOpbIX pexImax 6th Sense moxHo perynpOBA Tb
ypoBeHb NopymraHbAHn OT Hn3KOr (-1) Do BBICOKOr (1).
.ПРИГOTOBJIЕНЕHAПAPY
Bb6paB "KoHBeKun+ nap" nIN OIN H3 HeckOJIbKnx peIeNTOB 6th Sense, MoKHO nprirotOBt bIO6bI npOdyKtb Ha npay. Iap pacnpeJeTcra no npOdyKTam 60Jee 6bICTpo IN paBHOMepHO NO cPabHeHIO C npOCTO rOpAUM BO3dYxOM, XapaKTePbIM dIpeKIMOB KOHBeKUn:
3TO COKpaIaET Bpem npiroTOBHeHn, COxpaHReT B npOyKTx ueHHbIe NITaTeNbHbIe BeueCTBa I rapaHTnpyET BlicOKoKaueCTBeHHbIpe3yIbTaT npiroTOBHeHn IIO6bIX BaIINX peCenTOB.
B TeueHne Bcero peKIma npuROTOBHeHnHa npay DBepua DOJXHa OCTaBaTbCra 3aKpbIToH.
ДлпpoДолженя пpriroTOBненя Ha napy notpe6yETca 3anONHnTb pe3epByap, HaxOJaIcNc BHyTpN dYxOBKn, uepe3 loTOK Ha naHeJI ynpaBLeHnJ.
Iocne BbIOBaHa nucnne 3anpoca "IOBABHTb BOy" nn "HANOJIHITb IOTOK" oTKpoTe loTOK, cIeKa Haxab Ha Hero.
MeIeHNO 3aIbAaTe NITbEByO BDO NOBHeHn Ha
Incnnee Hndnnc "PONHAR EMKOCTb".MakcmaHBna
BmecTmocTb pe3epByapa coCTabJreT npIM.1,5 n.
3akpoTe IOTOK, octopoxHO CdBHyB erO B HanpaBneHn
naHei Do ynpa.Kpome MOMeTOB 3aJIbBKn BObl JOTOK
BCerDa DOnKeH OCTaBaTbCRA 3aKpbTbIM.

Boda dOJIxHa IO6aBIArTbCra ToIbKO B TOM Cnyae,ecnn
KOLNueCTBA BObI Bpe3epByape HeIOCTaTOUHO DJIa 3aBepWeHn PnIroTOBNeHn.
I36eraTe 3aIIbKn BObl B pe3epByap npn BblKIOueHHo IyXOBKe nn Do nOABNeHnaInpoca Ha dncnnee.
3.3ANYCK PEXKIMA
Ecnn 3NaueHnno yMOnuHaHnIO COOTBeTCTBYOT Tpe6oBaHnIe nnecn BCE Tpe6yeMbIe HaCTpOKn yKe 3aDaHbI, HaxmTe aKTUBaUnPpeKMa.
Pn Haxattn B a3e OTJIOXeHHORO CTapTa CNTema cnpocnt, He Jenaete Nn Bbl nponyctntb 3Ty fay n AKTNBnPOBaTb pexm HEmdneHNO.
06paTne BHIMaHHe: Pocne BbIbOpa pexIma Ha DCnIe e OTo6paKaIOTCa peKOMeHNaCLIN NO BbIbOpy yPOBn IJI KAKDOro peXIMa. IIra OCTaHOBKn peXIMa B NIO6oN MOMeHT IOCTaTOUHO HxKaTb 0
Ecni DuyxOBka HarpeJaacb, Ho pexkM Tpe6yeT CneuaJIbHOI MaKcMaJIbHOI TemnepaTypbI, Ha DCNpIe NOBIIaETC coOTBeTCTByIOUee COO6uHHe. HaxMMTe <dIra BO3BpaUeHn B InpdeIduUeE OKHO N BbIbepnte npyroI peKIM INI DoXdITecb, KOrDa neYb OKOHaTeNbHO OCTbIHET.
4. INPEB.HAHPE
HekotopbIe pexnmbI npedymatpnbAOT ctaNIO npedBapntelbHorO nporpeBa dxyobKn: Iocne 3anycka pexnma Ha dinCnnee nOBJIaETcR COo6ueHHe O TOM, YTO neyb HaxoDHTcB φa3e npedBapntelbHorO HarpeBa.

Pocne 3aBepueHnAa3bl npeDbapntelbHoro HarpEba pa3daeTcra 3ByKOBoCnHaJI N Ha DnCnIee NOBnEeTcra coo6uHHe o TOM, YTO ney DoCTurna 3aDaHHoI TemnepaTypbI. Pocne 3TORO BbIBoDnTcra 3anpoc "IO5AB. IPOJyKT".
OTkpOte DBepy, NomeCTnTe npOyKtB nYeB n HaxMNTe √nn 3aNyCk pOuceca npuROTOBHeHn.
06paTte BnMaHHe: NomeuHne npOyKTOB BV neybdo 3aBepseHnnpEaBapTeNbHO HArpeBa MoKet yXyDUnTb pe3yIbTaT nprirotobHeH.NcIn OTkpbl DBepy B pa3e npEaBapTeNbHO HArpeBa, neyb npNoCTaHOBHT pa6oty.
BpeM npiroTOBHeH He yuHTbIbAeT a3y npEbnapntelbHoro HarpBa. Bbl MoKeTe B IIO60 MmOeHT N3MeHnTb TemnepaTy, 10 KOtOpOn DOJXHa nporpeBaTbcr neyb, HaxKaTNEm + nn -
5. PAV3A B PIPNFOBOTHEHIN / IPEBOPAUNBAHNE INI NPOBEPKA IPOJYKTOB
PnO TkpbBaHnn DBepuI npoceC npriroTOBneHnnpIOCTaHaBnBaETCn HaPeBaTeJbHbIe 3JIeMeHTblBbIKUoyaOTcR.
YTo6bI BO3O6HOBnTb npoecc npuROTOBHeHn8, 3aKpOnTe DBepy.
B HekoToPbIx pexKImax 6th Sense Heo6xOJIMO nepeBopauNbTaB npOdyKT Bo Bpemr rOtOBKn.

Pn3TOM pa3daeTc 3ByKOBOI CnHJI N Ha DnCnnee
OT6paKaTcJeCTBHe, KOtOpoe DOnJXHO 6bITb BbINOJIHeHO. OTKpoIte DBepCu, BBIOJIHnTe DeIeCTBHe, YkazAHHOe Ha dncPiee, CHOBA 3aKpOIte DBepCu n HaxMnTe
DnI npoOJIxKeHn npOcecca npriROToBJIeHn.
AhaonuHbIM 6pa30m, 3a 10% BpeMeHHdo KOHua npiroTOBHeHn yXOBKa npednoKHT Bam npoBepntb 6nIO.

Pn3OM pa3daetc 3ByKOBO CnHaJI Na Ha DnCnIe OTO6paKaTaTc DeNCTBHe, KOToPoE DoJXHO 6bITb BbINOJIHeHo. PpOBepbTe npOyKbI, 3aKpoIe TBepy N HaxMITE KHOKNY ,uTqbl npOIOJKNtB pOceCC npriOTOBHeHn.
06paTne BHIMAHHe: UTo6bI npOpyCTnB 3Ty a3y, HaxMITE
B npotnbHom cnuyae uepe3 onpeeneHoe Bpemr,ecnHe npdpnpnHb HkaKx DeiCTBn, neyb npoJONKNT npiroTOBJIeHne.
6.3ABEPUHEHNEIPIIROTOBJEHHN
O 3aBepseHn npriROTOBHeHn yBeOMIT 3ByKOBoi CnHn n COOTBETCTByIOUee COO6eHne Ha dncJIee.

Haxmnte KhoNky,to6bl npoJOnKntb npiroTOBneHne BpyHom pexKme (6e3 3aHaHnA nnTeNbHOCTn npiroTOBneHn) nnn Haxmnte KhoNky,to6bl npoJInb BpeM npiroTOBneHn, yctaHONB HOByIO npoJOnKnteNbHOCTb. B o6Ox cnyaX npametpbI npiroTOBneHn COxpaHraIOTc.
ПОДРУМЯНВАНЕ
HeKOTOpbIe peXkMbI npEpyCMaTpmbIoT Bo3MOxHOCTb DOnOJIHHTeJbHOro NOpDpyMaHnBaHnN pOdykTa.3To DeJaETc3a Cuet BKNIOUeHn rpnna nocne 3aBepWeHn OCHOBHOrO zIKKa npriROTOBJeHn.

Korda Ha dinCnnee noBUTcA COOTBeTCTByIOUe eCOO6uHHe, HaxMITE ATO6bl 3aNyCTnTB NATMNHyTHbI LUKN NOdpymAHBaHn (ecn Heo6xOJMo).Pexm MOXHO OCTaHOBTB BJIIO6oe Bpem, Haxab KHOJky BBIKHOUeHn DyXOBKn.
U3BPAHHOE
IIO OKOHuaHn npriroTOBHeHna HdncJIee NOBbIeTcnpednoJKeHne COxpaHHTb pexIM B CnNcKe n36paHHbIXpeKIMOB NOD HOMEpOM OT 1 do 10.

YTo6bI COxpaHnTbpeXIM B CnNcKe n36paHHbIXpeXIMOB IIN COxpaHnTb TeKyuIe HaCTPOKn DnI NCNoB3OBAHnB DaJIbHeiWeM, HaxmTe 2 npOTNBOM cnyae c6pocbTe 3aIPOC HaxkTaHem .
Iocne HaKaTnHaXmTe nnBb6opa Homepa, a 3aTeMaHxMTe nnoTBepeKdEHH.
06paTne BnMaHHe:EcIi nAmrB 3aONHeHa nn BbIbpaHHbI Homep yke 3aHrT, CNTeMa NOnPocNt Bac NoDTBepdntb ydaJIeHne IpebldyuIero pexkma dIy coXpaHEny TeKyuIero.
ДЯ ВьзOBa COxpaHeHHOro peKIma ɪЗ пamTи HaKMITE
:Ha nucnnee noaBnaetc cncoK u36paHHbIX pexIMOB.

Bb6epnte peKIM HaKaTneM Hn, NOaTBepnTe C NOMOuIIO a 3aTeM HaxMMTe dNbaKTNbBaunpeKIMa.
.YNCTKA
- ABTOMATUHECKA OUHCTKA - NINOJIN3
He npukacaiTecb K duyOBke BO BpeMa cnKna npoln3a.
DepeKnte DeTei XNBOTbIX BdaIOn OT dyXOBKn BO Bpemn nocne zukna npOun3a (noka nomeueHne He 6ydt npoBeTpeno).
Ipeed 3aynckom 3ToI yHKun BBHbTe n3 dyXOBKn BCE npHaJnHexHoCTn (BkIIOyA HnPaBnaIOuNe peWeTkn). Ecnn dYxOBKa yCTaHOBneHa NpBapOCHn NaHeNbIo, BblKnIOUHTe BCE rOpelKn IIN 3NeKtPOKOHOFOPKn Ha BpeM caMOoOcNtKn. Dn8 60nee KaueCTBeHHoN OoNCTKn ydaJIte OCTaTK NIIu IN BHYTpN KAMepbI OoNCTnTE BHYTpEHHee cTeKN DBepuIpeed 3aynckom NpOONITueCKoOnctKn. PekomeHdyETcNcNoB3OBaTB pexm NipOIn3a, TOlbKO eCNI np6Op CNbHO 3aRpa3HeH IIN BbJeJIeT HePnpraTHbIe 3aNaXn B pnocece pnproTOBHeHn NIIu. HaxMtTe KNOpKy dIra OTO6paKeHn CmBOla «Piopnl3» Ha dnCnlee.

HaXMMTe 4n,YTo6bl BbIbpaTb HxHbIuKN, 3aTeM HaXMMTe nIy NOITBepKdEHN. KaT OJIbKO uKNBbIbpaH, pN Heo6xoIMOCtN HaXMMTe 4n,YTo6bl HAcTPOINTB BPem OKOHuaHN (OTIOKeHHbI CTapT), 3aTeM HaXMMTe nIy NOITBepKdEHN.
OuNCTnTe DBepy, BbHbTe BCE npHaJdJIeXHOCTN B COOTBcTBN C yKa3aHnA Mn Ha dncnlee, a 3aTEM 3aKpOte DBepy n HaxmTE D: DBePua ABTomTuYeCKn 6boknyetcra, a dyxOBka 3aynckaeT uKN camoouchTKn: Ha dncnlee NOBnE TcR ppeDynpexJaIOoee COo6ueHne, a TaKke n HauhnaeTcO bpaTHbI OTCHT BpeMeHN, POKa3bBAUOn XOD BbINOpHeHn UKnLa. O 3aBepWeHN UNKla DBePca OCTaETcRA6bOKnPobAHHO JTO Tex NOP, NOKa TEMpePaTypa BHyTpH He DOCTnHET 6e30NaCHOrO yPOBHn.
PpmeHHe:PiPoJIITnueeckaOuNCTKa TaKKe MoKeT 6bIb3anyuHa,ecn pe3epByap HAnONHeBQoI.
CJMB
PexIM CInBa PpeHa3Hauen DnA CInBa BOBb BO n36eKaHne ee 3actaBaanBpe3epByape. DnA ONTmAmbHorO mCNoB3OBaHH npu6opapekomeHdyetc BblONHHTb CINB
KaJdbpa3 npn nCNOJIb3OBAHmB dyXOBOM uKafouKna nprirotobneHnHa napy.

Iocne Bb60paФyHKcun «CnVB» HaxMNTe nBbINOJHNTe yKa3aHHbIe DeiCTBnI: OTKpoTe DBepuN IOCTaBBte 6oIb7uO EMKOCTb NOc CInB, paCNOJoxKeHHbI B npaBOM HxKhem Yrny naHEn. Iocne 3aNycca CnBa He BbIHMaTe EMKOCTb, NOKa Oepaun He 6ydet 3aBepseHa.
CpeHnI npOIOJNKeTJIbHOCTb CnIBa npi NOnHO 3aRpy3Ke COCTABnEe OKoNO Tpex MNHyT.
Pn Heo6xOaUMocTn npnoctaHOBnte npoecc cInBa, Haxab KhoNky HA3ADn nn «CTO» (HaNPmep, B cnuyae, ecnn EMKoCTb yke 3aOpJHeHa BOOn, a npoecc cInBa eue He 3aBepehen).
KyBshIN DOJXeH 6bITb O6bEMOM He MeHee 2 NITPOB.
PpmeHHe:OcUeCTBnTb3To DeICTBnE MoXHO nocne IIOHOrO OCTbIBaHn BObl He paHee Yem Upe3 4 yaca nocne nocJeHrO uKnla npriOTOBLeHnna (mN nocJeHn yctAHOBKn 61oJa).B TeHHe BpemeH OxHaHn Ha DncPiue 6ydet oTo6paKaTbCnIeDyUoHce coo6uHHe:«BODA TOPRA— IODOXNTE
- YDAJIEHNE HAKINI
Pn peynapHOM nCnoB3ObaHN 3OT CneuaJIbHbI peKIM no3BOJraET COxpaHHTb naporeHepaTOP u napoBoi KOHTyp B INdeaIbHOM COCTOHN.
Coo6eHne <3AUYCTNE YDAJIEHNE HAKINN> NOBNTcHa Daicnlee B KaueCTBe HaONMHaHnO Heo6xOaMoctnpeyIapHO BoINOpHeHn 3ToI onepaun.
IoBHeHne COO6eHnO Heo6xOJIMOCtN IpOBeHnO uHCTKn OT HaKInn OObcNoBJeHO KOJIueCTBOM BbINOnHeHHbIX UKNIOB PpiroTOBHeHn Ha npy nUu Yacamn pa6OtI napOBOro KOTNa C MmOeHTa NocJeHero UNKla OUnCTKn OT HaKInn (CM. Ta6NIcy HnKe).
06bem KyBwHnHa dONJKeH 6bITb He MeHee 2 NHTPOB.
》3TAN2:YDAJIEHHEHAKIN(\~120MNH)
KordaHa dncnnee noBntc coo6eHne

Iocne TOrO, KaK pactBOp IJRA ydaJIeHnHaKaIIIN 3aIIT B KIOBEy, HaxMMTe D , YTO6bl HaaybTo OCHOBHO npoceC ydaJIeHn HaKIIIN. Bam He o6raTeIbHO KOHTPOIpOBaTb npoecc ydaJIeHn HaKIIIN, cTOn y npu6opa. N0 3aBePseHn KaKdORo 3TaTaN ydaJIeHn HaKIIIN 3ByUHT CnHaJ, N Ha dinCpIee OTO6paXAIOTc INCTpyKcN IN JIA nepexOJa K CleNyUoiemy 3Tany.
TAbIuCA PnIroTOBJeHnBaJIoD
| PEÇEПТ PЕЖМ ПОГРЕВ TEMПЕРATУР(A°C) | ДЛЛТЕЛБНСТБ(MIN.) | УРОBEHB IN ПИHAДЛЕХNOCTN | ||
| Пиори ИЗ ДЮЖЕВОТ ТECTА /БИСКВИТНБ(TOPT) | Дa 17030-50 | 2 | ||
| Дa 16030-50 | 2 | |||
| Дa 16030-50 | 4 1 | |||
| Пиори с НACHИКо(ЧИЗKEК,Шtrudь,Ябочьй пирог) | Дa 160-20030-85 | 3 | ||
| Дa 160-20035-90 | 4 1 | |||
| Пechень/песочьпесеньe | Дa 15020-40 | 3 | ||
| Дa 14030-50 | 4 | |||
| Дa 14030-50 | 4 1 | |||
| Дa 13540-60 | 5 3 1 | |||
| Сладные пiroжны /maфши | Дa 17020-40 | 3 | ||
| Дa 15030-50 | 4 | |||
| Дa 15030-50 | 4 1 | |||
| Дa 15040-60 | 5 3 1 | |||
| Пиорожны ИЗ заварноу ТECTа | Дa | 180-20030-40 | 3 | |
| Дa | 180-190 | 35-45 | 4 1 | |
| Дa | 180-190 | 35-45* | 5 3 1 | |
| Мереги | Дa | 90 | 110-150 | 3 |
| Дa | 90 130-150 | 4 1 | ||
| Дa | 90 | 140-160* | 5 3 1 | |
| Xлес / пица /фokачa | Дa | 190-250 | 15-50 | 2 |
| Дa | 190-230 20-50 | 4 1 | ||
| Пица (Тонкая, Толстая, Фокачa) | Дa | 220-240 | 25-50* | 5 3 1 |
| Замороженna Пица | Дa 250 10-15 | 3 | ||
| Дa 250 | 10-20 | 4 1 | ||
| Дa | 220-240 | 15-30 | 5 3 1 | |
| Несладь Величka(Pиорс овошон Начнков, КИSH) | Дa | 180-190 | 45-55 | 3 |
| Дa | 180-190 45-60 | 4 1 | ||
| Дa | 180-190 | 45-70* | 5 3 1 | |
| Воловны / пиори ИЗ слоевого ТECTа | Дa | 190-200 20-30 | 3 | |
| Дa | 180-190 20-40 | 4 1 | ||
| Дa | 180-190 | 20-40* | 5 3 1 | |
PEKIMbl

DE3 KOHBKUIM

KOHBEKLIN

ПОДРУМΗΝΑΗΜΕ

Pb

TPNbCKO1

BOLbSAI NOPUN

Cook 4

KOHBEKUNA KOK
3HaHeHnTeMnepaTpybI NdInTeBHOCTN PpIroTOBnEHHA BnIAKOTcOpNEHTPOBOOHyBMN 3aBNCAT OT KOINyEcTa nCnONb3yEmBX
PnHnAeXHoCTe. HauHaiTe c cambix Hn3Knx pekomeHIOBaHHbx Hactpoek, n, ecn61noO okaxetc HreTOBbIM, nepeoxoNTe K 60lee Bbcokim HactpOkaM. VcNoIb3yIte BxOaIue N E KOMNkEeT PnHaJNeXHOCTN, OTdaBaIte npedouTeHne fOpMa IINBaIeKn IN potOBHM 3 TeMHORo MeTtAla. Bbl TAKKe MokeTe NcIOJIb3OBAbTB Nocdy IV XapOnpOHOrO CTKJIa INIIN KepaMKN. PIn 3OM yUHTbIABaITe, YTO BPEM PPnOTOBIEHnB HeHEMHO rYBeJIINHBAETC.
| ПИЗHAДLEЖHOCTN | ... | ... | ... | ... | ... |
| Ршетka | ПразИВЕнь илloфорma На ршетке | ПразДОн / BCTавно празИВЕнь илlo празИВЕнь на ршетке | ПразДОн / BCTавно празИВЕнь | ПразДОн c 500 ml Вodyы |
YnCTKA N yXoD
Ipeed hauanom IIO6bIX
dienCTBnNo uNCTKe N yXoOy
daTe dYXOBKe OCTbITb.
He nCnoJIb3yUte
napoouHCTnTEnn.
He nCnoB3yIte a6pa3nBhble ry6Kn, cTaNbHbIe MoaJIKN, arpeccNBHbIe n a6pa3nBhble MOUOJIne cpeCTBa, TAK KAOK OHN MOryt NOBpeNTb NOBepXHOCTn np6opa.
HaedeHbTe 3aunTHbIe nepaATkn. OTKIOUHTe DyXOBky OT 3neKTPocETn nepeB BbINOJIHeHm IIO6bIX DeIcTBn NO 06cnyKuBaHIO.
BHEUIHNE NOBEPXHOCTN
- PpOtpaIte NOBepxHOCTn np6opa BlaxHoi
caΦeTKoN 3MKNPOBOJOKHa.
Pn CINbHOM 3aRpa3HeHm IO6abTe HeCKoJIbKO Kaenb
MOUeero CpECDtBa C HeITpaJIbHbIM pH. B 3aBepweHne
npOTpIte NOBepxHOCTn HAcyXo CyXO TKaHbIO.
He nCnoIb3yIte arpeccuBhbIe nn a6pa3uHBbIe YnCTraIue cpeCTBa. Ppi cnuyaHOM nonaHaNn TaKx cpeCTB Ha NOBepXHOCTb PpIbopa HeMeDneHNO pOtpnte erO BnaXHO canfoTKoN 3 MKNPOBOJOKHa.
BHYTPEHHNE NOBEPXHOCTN
- Pocne KaJIOrO HcONb3OBAHnJaTe DyXOBKe OCTbITb, Nocne Yero OunchTne ee, JenaTeNbHO Noka OHa ee Tennla,OT OTNOKeHn nIaTeH,Obpa3yUoUxxCn npn npuroTOBHeHn Niu.ДЯ ydaJIeHn KOHeHcata, BO3NkaUoTe B pe3yIbTaTe npuroTOBHeHn npodKyTob C 60JIbUm CoedePkaHnEM BoDi,doXdntEc bONHOrO OxJaXeHn DyXOBKn,a 3aTeM npotpnte ee CTeHN CaΦeTKoN IIN rY6KoN.
- EcnHa BHyTpEHnX NOBepxHOCTaEcTb BbeBWeec3aRpa3HeHne, nIg ONTmAbhBix peyIbTaTOB
pekomeHnyetc3aNyCTNb yHKnHO aBTOMaTnueckoOuNCTKn.
- CONTROL PANEL DESCRIPTION
- 1.ON/OFF
- FUNCTIONS DIRECT ACCESS
- NAVIGATION BUTTON MINUS
- BACK
- DISPLAY
- CONFIRM
- NAVIGATION BUTTON PLUS
- OPTIONS / FUNCTIONS DIRECT ACCESS
- START
- ACCESSIONS
- INSERTING THE WIRE SHELF AND OTHER ACCESSORIES
- REMOVING AND REFITTING THE SHELF GUIDES
- FITTING THE SLIDING RUNNERS (IF PRESENT)
- FUNCTIONS
- 6th SENSE
- FORCED AIR + STEAM
- FORCED AIR
- TRADITIONAL FUNCTIONS
- CONVECT BAKE
- COOK 4 FUNCTIONS
- TURBO GRILL
- FROZEN BAKE
- SPECIAL FUNCTIONS
- 》MAXI COOKING
- RISING
- DEFROST
- > KEEP WARM
- ECO FORCED AIR
- CONVENTIONAL
- GRILL
- FAST PREHEAT
- TIMERS
- MINUTEMINDER
- CLEANING
- AUTOMATIC OVEN CLEANING - PYRO
- - DRAIN
- - DESCALE
- SETTINGS
- FIRST TIME USE
- SELECT THE LANGUAGE
- SET THE POWER CONSUMPTION
- DAILYUSE
- SELECT A FUNCTION
- FAVORITES
- SET THE TIME
- HEAT THE OVEN
- SET THE FUNCTION
- DURATION
- END TIME (START DELAY)
- .6th SENSE
- WEIGHT / HEIGHT / PIZZA (ROUND-TRAY-LAYERS)
- DONENESS/BROWNING
- COOKING WITH STEAM
- START THE FUNCTION
- PREHEATING
- PAUSE COOKING / TURN OR CHECK FOOD
- 6.END OF COOKING
- BROWNING
- .FAVORITES
- .CLEANING
- AUTOMATIC CLEANING - PYRO
- PHASE 1: DRAINING (up to 3 min.)
- MINUTEMINDER
- KEYLOCK
- CLEANING AND MAINTENANCE
- EXTERIOR SURFACES
- INTERIOR SURFACES
- BOILER
- REPLACING THE LAMP
- REMOVING AND REFITTING THE DOOR
- PRODUKTBESCHREIBUNG
- ACCÉS DIRECT AUX OPTIONS / FONCTIONS
- NAVIGATIETOETS MIN
- TRADITIONELE FUNCTIONS
- HETE LUCHT
- FASE 1: AFVOEREN (tot 3 min.)
- FASE 3: AFVOEREN (tot 3 min.)
- FASE 4: SPOELEN (~20 min.)
- CÓMOCONFIGURARLA HORA
- 1.BKJIIOUeyHE/BbIKJIOUeyHNE
- YCTAHOBKA PEWETKNI IpyTNX IPNHADJIEXKHOCTEIN
- CHATNE UYCTAHOBKA DEPXATELEI IPOTUBHEI
- YCTAHOBKA TELECKONNUECKNX HANPABJIOUIX (PNHANUIN)
- PEXKIMbl
- KOHBEKUNA+NAP
- KOHBEKUN
- TPAUNUHOHHbIE ΦYHKcN
- -ПОДРУМАНBAHNE
- COOK4ΦYHKUH
- -ΓPUNJB C KOHBEK
- - 3AMOPOX.BbINEU.
- CNEUAAHbIEPEXIMbl
- 》BOJIbIaIPOUIA
- >PODbEM TECTA
- PA3MOPO3KA
- 》PODAEPK.TEMI.
- KOHBEKLUN3KO
- BE3 KOHBEKUIN
- PnJIb
- BbICTPbI INPOΓPEB
- TAVIMEpbI
- TAUMEP
- #
- -ПИРОЛТИЕСКА OЧИCTKA ДУХOBКИ
- CINBBObl
- - YDAJI. HAKINb
- HACTPOKNI
- IEPBOE IcIIOJIb3OBAHnE
- 1.BbIEPUTEa3bIK
- YCTAHOBITE UPOBEHb IOTPE6JRAEMOIMOLUHOCTN
- EKEHEBHOE NcIOJIb3OBAHNE
- 1.BbIBOPPEKIMMA
- U35PAHHOE
- YCTAHOBITE BPEM
- 4.ПОГРЕТЕ ПЧБ
- HACTPOIKA PEXKIMA
- TEMNEPATyA /YPOBEHb TPNJIy /YPOBEHb IAPA
- ДЛNTЕльHOCTb
- BPEMOKOHUAHNA(OTJIOXKEHHBCTAPT)
- .6 th SENSE
- BEC / BbICOTA / NIIUCA (YPOBHN KPYIbIX PNOTUBHEI)
- CTENHeB FOTOBH. / NOIpyMHNBAHNE
- .ПРИГOTOBJIЕНЕHAПAPY
- 3.3ANYCK PEXKIMA
- INPEB.HAHPE
- PAV3A B PIPNFOBOTHEHIN / IPEBOPAUNBAHNE INI NPOBEPKA IPOJYKTOB
- 6.3ABEPUHEHNEIPIIROTOBJEHHN
- ПОДРУМЯНВАНЕ
- U3BPAHHOE
- .YNCTKA
- - ABTOMATUHECKA OUHCTKA - NINOJIN3
- CJMB
- - YDAJIEHNE HAKINI
- 》3TAN2:YDAJIEHHEHAKIN(\~120MNH)
- YnCTKA N yXoD
- BHEUIHNE NOBEPXHOCTN
- BHYTPEHHNE NOBEPXHOCTN
Brand : WHIRLPOOL
Model : SMO 658CNE
Category : Cooker