WW22N6850QX - Washing machine SAMSUNG - Free user manual and instructions
Find the device manual for free WW22N6850QX SAMSUNG in PDF.


User questions about WW22N6850QX SAMSUNG
0 question about this device. Answer the ones you know or ask your own.
Ask a new question about this device
Download the instructions for your Washing machine in PDF format for free! Find your manual WW22N6850QX - SAMSUNG and take your electronic device back in hand. On this page are published all the documents necessary for the use of your device. WW22N6850QX by SAMSUNG.
USER MANUAL WW22N6850QX SAMSUNG
What you need to know about the safety instructions 4
Important safety symbols 4
Important safety precautions 5
Critical installation warnings 6
Installation cautions 7
Critical usage warnings 8
Usage cautions 10
Critical cleaning warnings 13
Regulatory Notice 14
Installation 16
What's included 16
Installation requirements 18
Step-by-step installation 22

Before you start 28
Initial settings 28
Laundry guidelines 28
Detergent drawer guidelines 30
Operations 33
Feature panel 33
Simple steps to start 35
Cycle overview 36
Special features 39
Maintenance 45
SELF CLEAN+ 45
Smart Care 46
Emergency drain 47
Cleaning 48
Recovery from freezing 51
Care against an extended time of disuse 51
Cleaning the exterior 52
Cleaning the interior 52
English2
Troubleshooting 53
Checkpoints 53 Information codes 57
Specifications 59
Fabric care chart 59 Protecting the environment 60 Declaration of conformity 60 Specification sheet 61 Cycle chart 62
English 3
Safety information
Congratulations on your new Samsung washer. This manual contains important information on the installation, use and care of your appliance. Please take some time to read this manual to take full advantage of your washer's many benefits and features.
What you need to know about the safety instructions
Please read this manual thoroughly to ensure that you know how to safely and efficiently operate the extensive features and functions of your new appliance. Please store the manual in a safe location close to the appliance for future reference. Use this appliance only for its intended purpose as described in this instruction manual.
Warnings and Important Safety Instructions in this manual do not cover all possible conditions and situations that may occur. It is your responsibility to use common sense, caution, and care when installing, maintaining and operating your washer.
Because the following operating instructions cover various models, the characteristics of your washer may differ slightly from those described in this manual and not all warning signs may be applicable. If you have any questions or concerns, contact your nearest service center or find help and information online at www.samsung.com.
Important safety symbols
What the icons and signs in this user manual mean:

WARNING
Hazards or unsafe practices that may result in severe personal injury, death and/or property damage.

CAUTION
Hazards or unsafe practices that may result in personal injury and/or property damage.

NOTE
Indicates that a risk of personal injury or material damage exists.
These warning signs are here to prevent injury to yourself and others.
Please follow them explicitly.
After reading this manual, store it in a safe place for future reference.
Read all instructions before using the appliance.
As with any equipment that uses electricity and moving parts, potential hazards exist.
To safely operate this appliance, familiarize yourself with its operation and exercise care when using it.
SAVE THESE INSTRUCTIONS
English4
Important safety precautions
WARNING
To reduce the risk of fire, electric shock, or injury to persons when using your appliance, follow basic precautions, including the following:
- Read all instructions before using the appliance.
- Do not wash or dry articles that have been previously cleaned in, washed in, soaked in, or spotted with gasoline, dry-cleaning solvents, other flammable or explosive substances as they give off vapors that could ignite or explode.
- Do not allow children to play on or in the appliance. Close supervision of children is necessary when the appliance is used near children.
- Before the appliance is removed from service or discarded, remove the door to the washing or drying compartment.
- Do not reach into the appliance if the drum is moving.
- Do not install or store this appliance where it will be exposed to the weather.
- Do not tamper with controls.
- Do not repair or replace any part of the appliance or attempt any servicing unless specifically recommended in the user-maintenance instructions or in published user repair instructions that you understand and have the skills to carry out.
- Do not add gasoline, dry-cleaning solvents, or other flammable or explosive substances to the wash water. These substances give off vapors that could ignite or explode.
- Under certain conditions, hydrogen gas may be produced in a hot water system that has not been used for 2 weeks or more. HYDROGEN GAS IS EXPLOSIVE. If the hot water system has not been used for such a period, before using a washer or combination washer-dryer, turn on all hot water faucets and let the water flow from each for several minutes. This will release any accumulated hydrogen gas. As the gas is flammable, do not smoke or use an open flame during this time.
SAVE THESE INSTRUCTIONSSAVE THESE I
English 5
Safety information
Critical installation warnings
⚠ State of California Proposition 65 Warnings (US only)
This product contains chemicals known to the State of California to cause cancer and birth defects or other reproductive harm.
The installation of this appliance must be performed by a qualified technician or service company.
- Failure to do so may result in electric shock, fire, an explosion, problems with the product, or injury.
The appliance is heavy, therefore take care when lifting it.
Plug the power cord into a wall socket that meets local electrical specifications. Use the socket for this appliance only, and do not use an extension cord.
- Sharing a wall socket with other appliances, using a power strip, or extending the power cord may result in electric shock or fire.
- Ensure that the voltage, frequency, and current supplied to the washer matches those listed in the product specifications. Failure to do so may result in electric shock or fire. Plug the power plug into the wall socket firmly.
Remove all foreign substances such as dust or water from the power plug terminals and contact points using a dry cloth on a regular basis.
• Unplug the power plug and clean it with a dry cloth.
- Failure to do so may result in electric shock or fire.
Plug the power plug into the wall socket so that the cord is running towards the floor.
- If you plug the power plug into the socket in the opposite direction, the electric wires within the cable may be damaged and this may result in electric shock or fire.
Keep all packaging materials out of the reach of children as these may be dangerous.
• If a child places a plastic bag over his or her head, he or she can suffocate.
If the appliance, power plug, or power cord is damaged, contact your nearest Samsung service center for service.
This appliance must be properly grounded.
Do not ground the appliance to a gas pipe, plastic water pipe, or telephone line.
• This may result in electric shock, fire, an explosion, or problems with the product.
SAVE THESE INSTRUCTIONS
English6
- Never plug the power cord into a socket that is not grounded correctly. Make sure that the socket is in accord with local and national regulations.
Do not install this appliance near a heater or any flammable material.
Do not install this appliance in a humid, oily or dusty location, or in a location exposed to direct sunlight or water (rain drops).
Do not install this appliance in a location exposed to low temperatures.
• Frost may cause the tubes to burst.
Do not install this appliance in a location where gas may leak.
• This may result in electric shock or fire.
Do not use an electric transformer to power the washer.
• This may result in electric shock or fire.
Do not use a damaged power plug, damaged power cord, or loose wall socket.
• This may result in electric shock or fire.
Do not pull or bend the power cord excessively.
Do not twist or tie the power cord.
Do not hook the power cord over a metal object, place a heavy object on the power cord, insert the power cord between objects, or push the power cord into the space behind the appliance.
• This may result in electric shock or fire.
Do not pull the power cord when unplugging the power plug.
• Unplug the power plug by pulling the plug.
• Failure to do so may result in electric shock or fire.
This appliance should be positioned so that the power plug, the water supply taps, and the drain pipes are accessible.
Installation cautions

CAUTION
This appliance should be positioned in such a way that the power plug is easily accessible.
- Failure to do so may result in electric shock or fire due to electric leakage.
SAVE THESE INSTRUCTIONSSAVE THESE I
English 7


Safety information
Install your appliance on a solid, level floor that can support its weight.
- Failure to do so may result in abnormal vibrations, movement, noise, or problems with the product.
Critical usage warnings

WARNING
If the appliance is flooded, turn off the water and power supplies immediately and contact your nearest Samsung service center.
• Do not touch the power plug with wet hands.
- Failure to do so may result in electric shock.
If the appliance generates a strange noise, a burning smell, or smoke, unplug the power plug immediately and contact your nearest Samsung service center.
- Failure to do so may result in electric shock or fire.
In the event of a gas leak (such as propane gas, LP gas, etc.), ventilate the room immediately without touching the power plug. Do not touch the appliance or power cord.
- Do not use a ventilating fan. Do not turn on a light.
• A spark may result in an explosion or fire.
Do not let children play in or on the washer. In addition, when disposing of the appliance, remove the washer door lever.
• Children can suffocate to death if trapped inside the product.
Make sure to remove the packaging (sponge, styrofoam) attached to the bottom of the washer before using it.
Do not wash items contaminated with gasoline, kerosene, benzene, paint thinner, alcohol or other inflammable or explosive substances in the washer.
• This may result in electric shock, fire, or an explosion.
Do not open the washer door by force while it is operating (high-temperature washing/drying/spinning).
- Water flowing out of the washer may result in burns or cause the floor to be slippery. This may result in injury.
- Opening the door by force may result in damage to the product or injury.
Do not insert your hand under the washer while an operation is in progress.
• This may result in injury.
SAVE THESE INSTRUCTIONS
English8
Do not touch the power plug with wet hands.
• This may result in electric shock.
Do not turn the appliance off by unplugging the power plug while an operation is in progress.
- Plugging the power plug into the wall socket again may cause a spark and result in electric shock or fire.
Do not let children or the infirm use this washer without proper supervision. Do not let children climb in or onto the appliance.
• This may result in electric shock, burns, or injury.
Do not insert your hand or a metal object under the washer while it is operating.
• This may result in injury.
Do not unplug the appliance by pulling the power cord. Always grip the plug firmly and pull it straight out of the outlet.
• Damage to the power cord may cause a short-circuit, fire, and/or electric shock.
Do not attempt to repair, disassemble, or modify the appliance yourself.
- Do not use a fuse (such as copper, steel wire, etc.) other than a standard fuse.
- If the appliance needs to be repaired or reinstalled, contact your nearest Samsung service center.
- Failure to do so may result in electric shock, fire, problems with the product, or injury.
If the water supply hose comes loose from the faucet and floods the appliance, unplug the power plug.
- Failure to do so may result in electric shock or fire.
Unplug the power plug when the appliance is not being used for long periods of time or during a thunder or lightning storm.
- Failure to do so may result in electric shock or fire.
If any foreign substance enters the appliance, unplug the power plug and contact your nearest Samsung service center.
• This may result in electric shock or fire.
SAVE THESE INSTRUCTIONSSAVE THESE I
English 9


Safety information
Do not let children (or pets) play in or on your washer. The washer door does not open easily from the inside and children may be seriously injured if trapped inside.
Usage cautions

CAUTION
If the washer is contaminated by a foreign substance such as detergent, dirt, food waste, etc., unplug the power plug and clean the washer using a damp, soft cloth.
- Failure to do so may result in discoloration, deformation, damage, or rust.
The front glass may be broken by a strong impact. Take care when using the washer.
• If the glass is broken, it may result in injury.
After a water supply failure or when reconnecting the water supply hose, open the faucet slowly.
Open the faucet slowly after a long period of non-use.
- The air pressure in the water supply hose or the water pipe may damage a product part or result in a water leak.
If a draining error occurs during an operation, check if there is a draining problem.
- If the washer is used when it is flooded because of a draining problem, it may result in electric shock or fire.
Insert the laundry into the washer completely so that the laundry does not get caught in the door.
- If laundry gets caught in the door, it may result in damage to the laundry or the washer, or result in a water leak.
Turn the water supply off when the washer is not being used.
- Ensure that the water supply hose connectors are properly tightened.
Ensure that the rubber seal and front door glass are not contaminated by a foreign substance (e.g. waste, thread, hair, etc.).
- If a foreign substance is caught in the door or the door is not completely closed, it may cause a water leak.
SAVE THESE INSTRUCTIONS
English10
Open the faucet and check if the water supply hose connectors are firmly tightened and that there are no water leaks before using the product.
- If the connectors on the water supply hoses connector are loose, it may result in a water leak.
The product you have purchased is designed for domestic use only.
Using the product for business purposes qualifies as product misuse. If the product is used for business purposes, the product will not be covered by the standard warranty provided by Samsung and no responsibility can be attributed to Samsung for malfunctions or damages resulting from such misuse.
Do not stand on the appliance or place objects (such as laundry, lighted candles, lighted cigarettes, dishes, chemicals, metal objects, etc.) on the appliance.
• This may result in electric shock, fire, problems with the product, or injury.
Do not spray volatile material such as insecticide onto the surface of the appliance.
- As well as being harmful to humans, this may result in electric shock, fire, or problems with the product.
Do not place objects that generate electromagnetic fields near the washer.
• This may result in injury due to a malfunction.
Water drained during a high-temperature wash or drying cycle is hot. Do not touch the water.
• This may result in burns or injury.
Do not wash, spin, or dry water-proof seats, mats, or clothing (*) unless your appliance has a special cycle for washing these items.
(*): Woollen bedding, rain covers, fishing vests, ski pants, sleeping bags, diaper covers, sweat suits, and bicycle, motor cycle and car covers, etc.
- Do not wash thick or hard mats even if the washer mark is on the care label. This may result in injury or damage to the washer, walls, floor, or clothing due to abnormal vibrations.
- Do not wash throw rugs or doormats with rubber backing. The rubber backing may come off and stick to inside the drum, and this may result in a malfunction such as a drainage error.
Do not operate the washer when the detergent drawer is removed.
• This may result in electric shock or injury due to a water leak.
SAVE THESE INSTRUCTIONSSAVE THESE I
English 11


Safety information
Do not touch the insides of the drum during or just after drying as it is hot.
• This may result in burns.
Do not insert your hand into the detergent drawer.
• This may result in injury as your hand may be caught by the detergent input device.
- Do not use the liquid detergent container (on applicable models only) for powdered detergent. Remove the container and put powdered detergent directly into the Main wash compartment.
Do not place any objects (such as shoes, food waste, animals) other than laundry into the washer.
- This may result in damage to the washer, or injury and death in the case of pets due to abnormal vibrations.
Do not press the buttons using sharp objects such as pins, knives, fingernails, etc.
• This may result in electric shock or injury.
Do not wash laundry contaminated by oils, creams, or lotions usually found in skincare shops or massage clinics.
• This may cause the rubber seal to become deformed and result in a water leak.
Do not leave metal objects such as safety pins or hair pins in the drum for long periods of time. Do not leave bleach in the drum for long periods of time.
• Doing either may cause the drum to rust.
- If rust starts appearing on the surface of the drum, apply a (neutral) cleansing agent to the surface and use a sponge to clean it. Never use a metal brush.
Do not use dry cleaning detergent directly and do not wash, rinse, or spin laundry contaminated by dry cleaning detergent.
- This may result in spontaneous combustion or ignition due to the heat from the oxidation of the oil.
Do not use water from water cooling/heating devices.
• This may result in problems with the washer.
Do not use natural hand-washing soap in the washer.
- If it hardens and accumulates inside the washer, it may result in problems with the product, discoloration, rust, or bad odours.
SAVE THESE INSTRUCTIONS
English12
Place socks and brassieres in a washing net and wash them with the other laundry.
Do not wash large laundry items such as bedding in the washing net.
- Failure to do so may result in injury due to abnormal vibrations.
Do not use hardened detergent.
• If it accumulates inside the washer, it may result in a water leak.
Make sure that the pockets of all the clothing items to be washed are empty.
- Hard, sharp objects such as coins, safety pins, nails, screws, or stones can cause extensive damage to the appliance.
Do not wash clothing with large buckles, buttons, or other heavy metal objects in the washer.
Sort the laundry by color on the basis of its colorfastness and select the recommended cycle, water temperature, and additional functions.
- Failure to do this may result in discoloration or fabric damage.
Take care that children's fingers are not caught in the door when you close it.
• Failure to do so may result in injury.
Critical cleaning warnings

WARNING
Do not clean the appliance by spraying water directly onto it.
Do not use a strong acidic cleaning agent.
Do not use benzene, thinner, or alcohol to clean the appliance.
• This may result in discoloration, deformation, damage, electric shock, or fire.
Before cleaning the washer or performing maintenance, unplug the appliance from the wall socket.
- Failure to do so may result in electric shock or fire.
SAVE THESE INSTRUCTIONSSAVE THESE I
English 13

Safety information
Regulatory Notice
1. FCC Notice

FCC CAUTION:
Any changes or modifications not expressly approved by the party responsible for compliance could void the user's authority to operate the equipment.
This device complies with Part 15 of FCC Rules. Operation is Subject to following two conditions:
- This device may not cause harmful interference, and
- This device must accept any interference received including interference that cause undesired operation.
For product available in the USA/Canada market, only channel 1\~11 can be operated. Selection of other channels is not possible.
FCC STATEMENT:
This equipment has been tested and found to comply within the limits for a Class B digital device, pursuant to part 15 of the FCC Rules. These limits are designed to provide reasonable protection against harmful interference in a residential installation.
This equipment generates, uses, and can radiate radio frequency energy and, if not installed and used in accordance with the instructions, may cause harmful interference to radio communications. However, there is no guarantee that interference will not occur in a particular installation. If this equipment does cause harmful interference to radio or television reception, which can be determined by turning the equipment off and on, the user is encouraged to try to correct the interference by one or more of the following measures:
• Reorient or relocate the receiving antenna
- Increase the separation between the equipment and receiver
- Connect the equipment into an outlet on a different circuit from that to which the receiver is connected
- Consult the dealer or an experienced radio/TV technician for help.
FCC RADIATION EXPOSURE STATEMENT:
This equipment complies with FCC radiation exposure limits set forth for an uncontrolled environment. This equipment should be installed and operated with a minimum distance of 20cm between the radiator and your body. This device and its antenna(s) must not be co-located or operation in conjunction with any other antenna or transmitter.
SAVE THESE INSTRUCTIONS
English14
2. IC Notice
The term "IC" before the radio certification number only signifies that Industry Canada technical
specifications were met. Operation is subject to the following two conditions: (1) this device may not cause interference, and (2) this device must accept any interference, including interference that may cause undesired operation of the device.
This Class B digital apparatus complies with Canadian ICES-003.
For product available in the USA/Canada market, only channel 1\~11 can be operated. Selection of other channels is not possible.
IC RADIATION EXPOSURE STATEMENT:
This equipment complies with IC RSS-102 radiation exposure limits set forth for an uncontrolled environment. This equipment should be installed and operated with minimum distance 20cm between the radiator & your body. This device and its antenna(s) must not be co-located or operation in conjunction with any other antenna or transmitter.
Open Source License Notice
This device uses open source software. Open Source Licenses are available on the product menu.
Tap "Settings > Network > Software Update > Legal Information" on the device for more details.
SAVE THESE INSTRUCTIONSSAVE THESE I
English 15


Installation
Follow these instructions carefully to ensure proper installation of the washer and to prevent accidents when doing laundry.
What's included
Make sure all the parts are included in the product package. If you have a problem with the washer or the parts, contact a local Samsung customer center or your retailer.
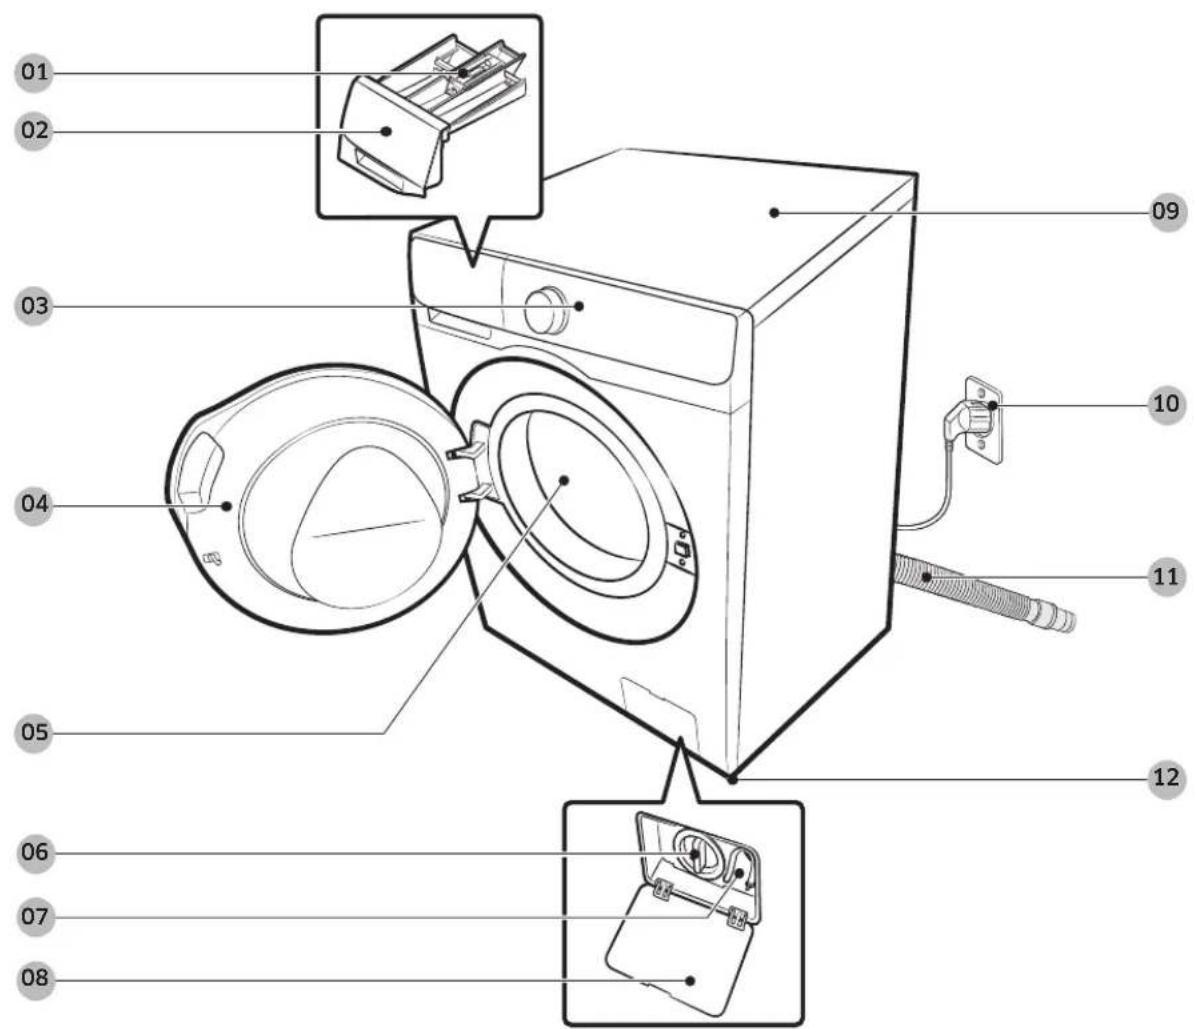
text_image
Labeled diagram of a washing machine with numbered parts for identification01 Release lever
02 Detergent drawer
03 Control panel
04 Door
05 Drum
06 Pump filter
07 Emergency drain tube
08 Filter cover
09 Worktop
10 Power plug
11 Drain hose
12 Levelling feet
* The design of the drawer and/or the lever differs with the model.
English16
Parts supplied
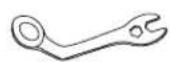


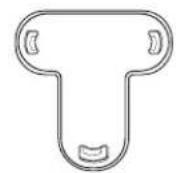
Spanner Bolt caps Hose guide Cap Fixer
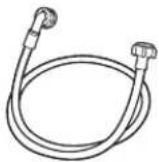
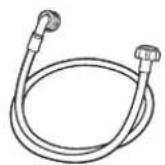
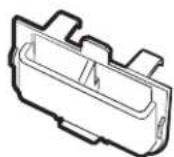
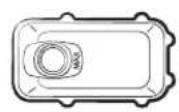
Cold water hose Hot water hose Liquid detergent guide (applicable models only)
Liquid detergent guide
Tools needed for installation


Philips screwdriver Level Adjustable Plier Measuring tape
NOTE
- Bolt caps: The provided number (3 to 6) of bolt caps depends on the model.
• The appearance of the machine and provided accessories may differ with the model. - To purchase an accessory or lost part, contact a local Samsung service center, Samsung Customer Care, or your retailer.
• Hot water hose: Applicable models only.
• Liquid detergent guide: Applicable models only.
CAUTION
- Do not reuse old water hoses, which may leak or burst, causing flooding and/or property damage.
• Make sure rubber washers are inserted in each coupling of the water hose.
Installation
Installation requirements
Electrical supply and grounding
• AC 120 V / 60 Hz fuse or circuit breaker is required.
• Use an individual branch circuit. Connect only the washer to the circuit.
To ensure proper grounding, the washer comes with a power cord featuring a three-prong grounding plug for use in a properly installed and grounded outlet.
Check with a qualified electrician or service person if you are not sure about the grounding.
Do not modify the provided plug. If it does not fit the outlet, call a qualified electrician to install a proper outlet.

WARNING
- Do NOT use an extension cord.
• Use only the power cord that comes with the washer. - Do NOT connect the ground wire to plastic plumbing, gas lines, or hot water pipes.
- Improperly connected grounding conductors may cause electric shock.
- To prevent unnecessary risk of fire, electrical shock, or personal injury, all wiring and grounding must be done in accordance with local codes, or in the absence of local codes, in accordance with the National Electrical Code, ANSI/ NFPA No. 70-Latest Revision (for the U.S.) or the Canadian Electrical Code CSA C22.1 – Latest Revisions and local codes and ordinances. It is your responsibility to provide adequate electrical service for your washer.
Water supply
Proper water pressure for this washer is between 20-116 psi (137-800 kPa). Water pressure less than 20 psi (137 kPa) may cause the water valve not to close completely. Or, it may take longer to fill the drum, causing the washer to turn off. Faucets must be within 4 feet (122 cm) from the rear of the washer so that the provided inlet hoses reach the washer.
To reduce the risk of leaks:
• Make sure faucets are easily accessible.
• Turn off the taps when the washer is not in use.
- Check for any leaks at the water inlet hose fittings on a regular basis.

CAUTION
Before using the washer for the first time, check all connections at the water valve and taps for any leaks.
Drain
Samsung recommends a standpipe 18 in (46 cm) high. The drain hose must be connected through the hose clip to the standpipe, and the standpipe must fully cover the drain hose.
English18
Flooring
For best performance, the washer must be installed on a solid floor. Wood floors may need to be reinforced to minimize vibration and/or unbalanced loads. Carpeting and soft tile surfaces do not provide good resistance to vibrations and may cause the washer to move slightly during the spin cycle.

CAUTION
Do NOT install the washer on a platform or a poorly supported structure.
Water temperature
Do not install the washer in areas where water may freeze as the washer always retains some water in its water valves, pumps, and/or hoses. Frozen water left in the connection parts may cause damage to belts, the pump, and other components of the washer.
Alcove or closet installation
Minimum clearance for stable operation:
| Sides 1 in. (25 mm) | |
| Top 17 in. (432 mm) | |
| Rear 5.9 in. (150 mm) | |
| Front 2 in. (51 mm) |
If both the washer and a dryer are installed in the same location, the front of the alcove or closet must have at least a 72 in ^2 (465 cm ^2 ) unobstructed air opening. Your washer alone does not require a specific air opening.
Undercounter installation
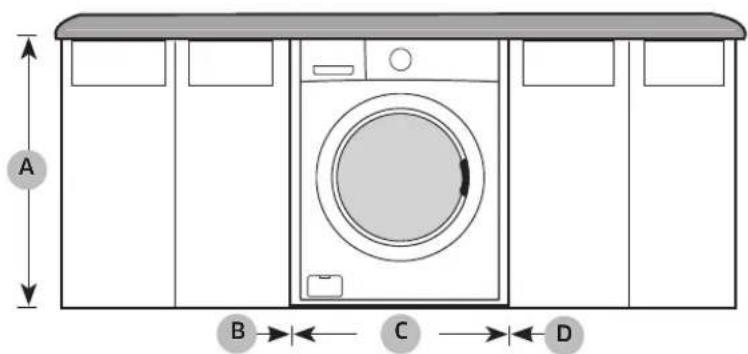
text_image
A B → ← C → ← D| A 33.9 in. (860 mm) C 23.6 in. (600 mm) | |
| B 1 in. (25 mm) D 1 in. (25 mm) |
English 19


Installation
Side by side installation
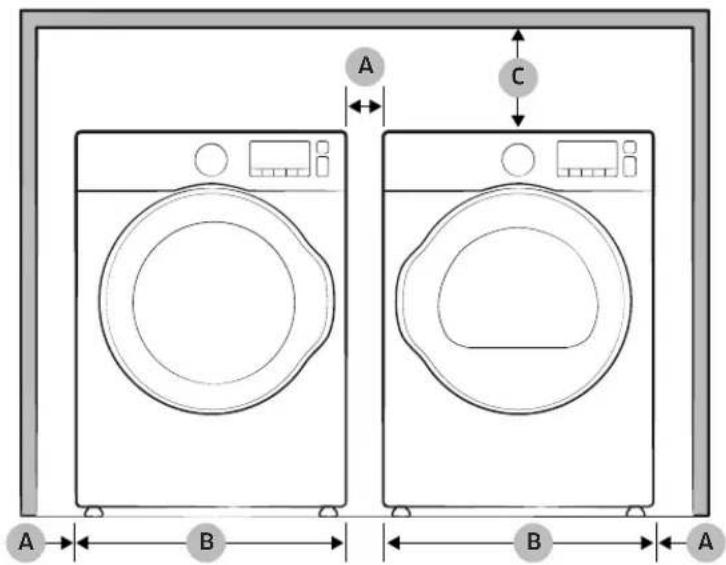
text_image
A C A B B A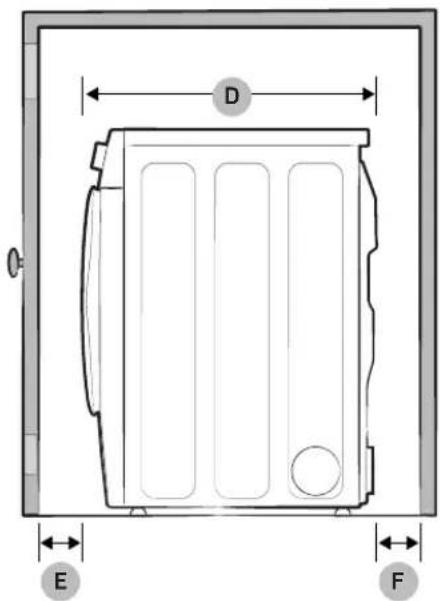
text_image
D E F| A* 1 in. (25 mm) D 27.1 in. (688 mm) | |
| B 23.6 in. (600 mm) E 3 in. (76 mm) | |
| C 17 in. (432 mm) F 3 in. (76 mm) |
*This clearance is not applicable to standalone washers.
English20
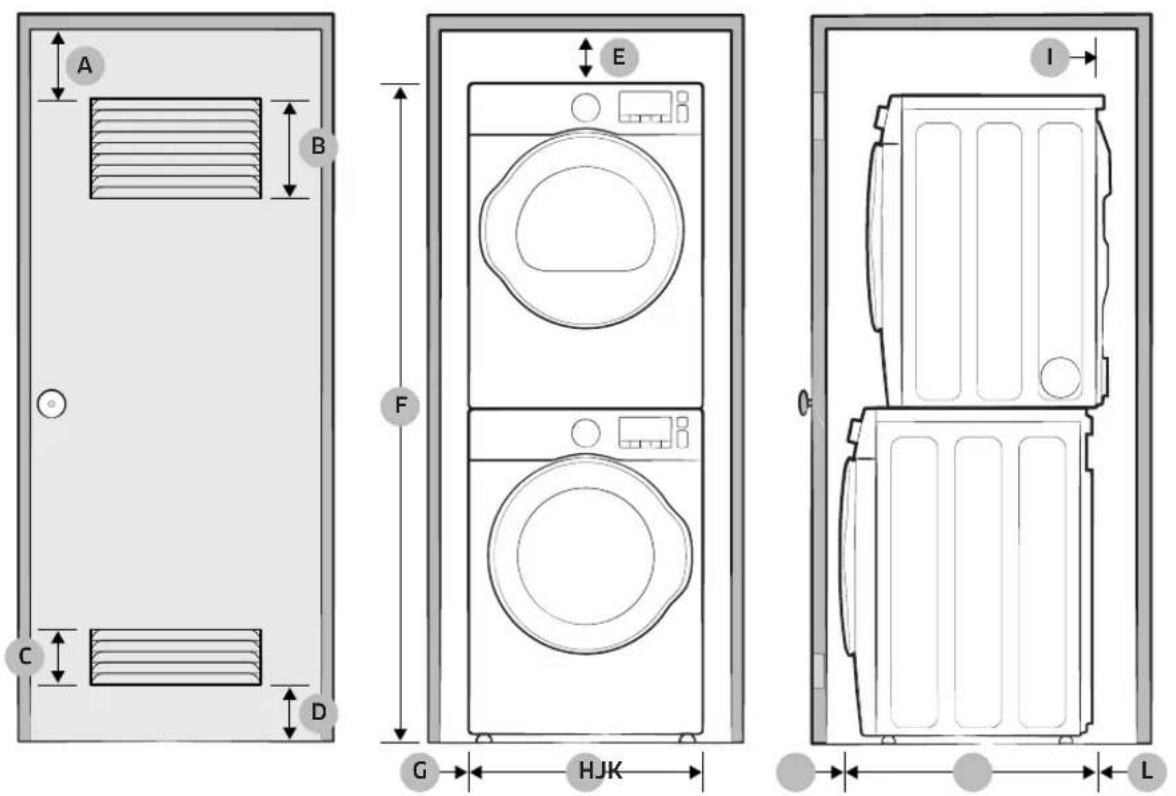
Stacked installation (Model: SK-DH)
text_image
A B C D E F G HJK I L| A 3 in. (76 mm) G 1 in. (25 mm) | ||
| B 48 in ^2 . (310 mm ^2 ) H 23.6 in. (600 mm) | ||
| C 24 in ^2 . (155 mm ^2 ) I 5.5 in. (140 mm) | ||
| D 3 in. (76 mm) J 3 in.(76mm) | ||
| E 6 in. (152 mm) K 27.1 in. (688 mm) | ||
| F | 67 in. (1702 mm) | L |

WARNING
Samsung's washers and dryers can be stacked to maximize usable space.
- The dryer legs need to be removed to stack the washer and dryer. You can purchase an optional stacking kit from your Samsung retailer.
English 21
Installation
Step-by-step installation
STEP 1 Select a location
Location requirements:
• A solid, level surface without carpeting or flooring that may obstruct ventilation
• No direct sunlight
- Adequate room for ventilation and wiring
- Ambient temperature always higher than the freezing point (32 °F/0 °C)
• Away from heat sources
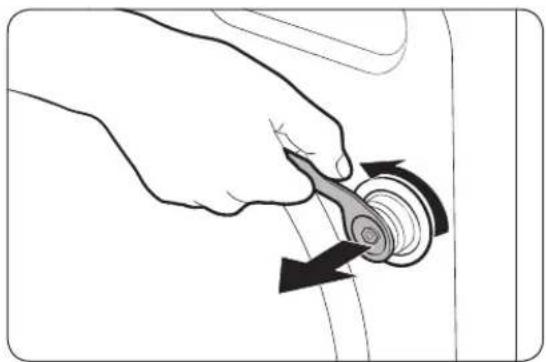
STEP 2 Remove the shipping bolts
natural_image
Illustration of a hand holding a tool with a circular component and directional arrows indicating rotation (no text or symbols)Unpack the product package and remove all shipping bolts.
- Loosen all shipping bolts on the rear of the machine using the spanner.

NOTE
An adjustable wrench or 10 mm open-end wrench is required for removing the shipping bolts.
natural_image
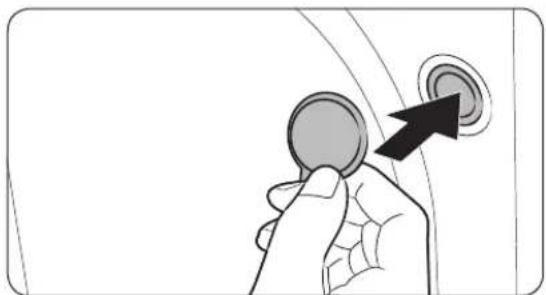
Hand holding a circular button with an arrow pointing to the button (no text or symbols present)- Fill the holes with the supplied plastic bolt caps.
Keep the shipping bolts for future use.

WARNING
Packaging materials can be dangerous to children. Dispose all packaging material (plastic bags, polystyrene, etc.) out of children's reach.
English22
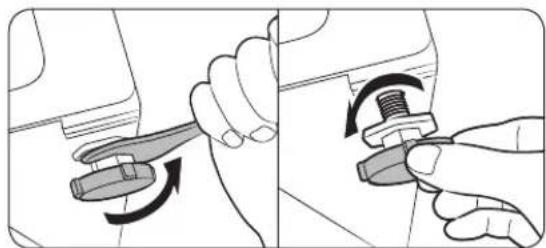
STEP 3 Adjust the levelling feet
natural_image
Illustration showing two-step mechanical assembly: one with a tool and arrow indicating rotation, the other with a threaded bolt and curved arrow indicating rotation (no text or symbols)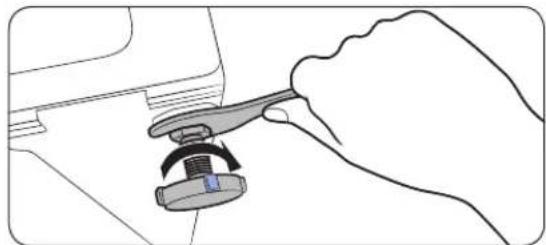
natural_image
Line drawing of a hand using a tool to adjust a mechanical component (no text or symbols)-
Gently slide the washer into position. Excessive force may damage the levelling feet.
-
Level the washer by manually adjusting the levelling feet.
-
When levelling is complete, tighten the nuts using the spanner.
NOTE
An adjustable wrench or 17 mm open-end wrench is required to loosen or tighten the leveling feet.
STEP 4 Connect the water hose
text_image
Technical diagram showing mechanical assembly with labeled parts A and B, including hoses and a central component.CAUTION
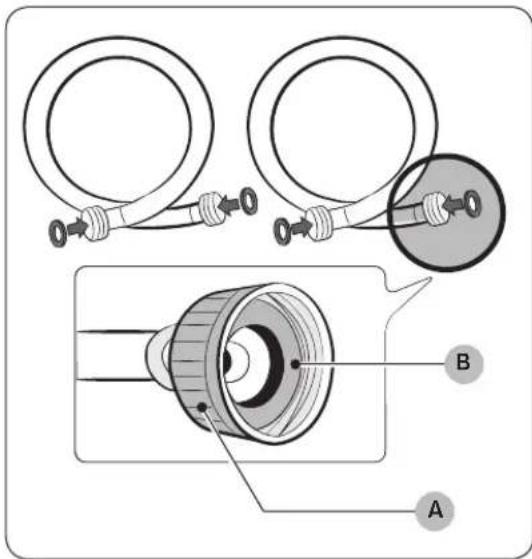
• Make sure you use a new water hose, and there are rubber gaskets (B) inside the couplings (A) at either end of the water hose. A water hose without the gasket may leak.
- If there is a water leak, stop using the washer and contact a local Samsung service center. A water leak may cause electric shock.
- Do not stretch the water hose by force. If the hose is too short, replace the hose with a longer, high-pressure hose.
- To prevent leaks, make sure both water hoses are not bent or kinked. A water leak may cause electric shock.
Installation
natural_image
Diagram showing two mechanical components with rotating arms, no text or symbols present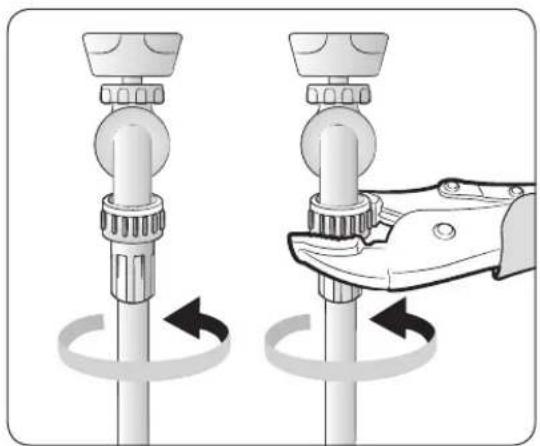
natural_image
Illustration of two mechanical components with rotating arms, one being adjusted by a hand using a tool (no text or symbols)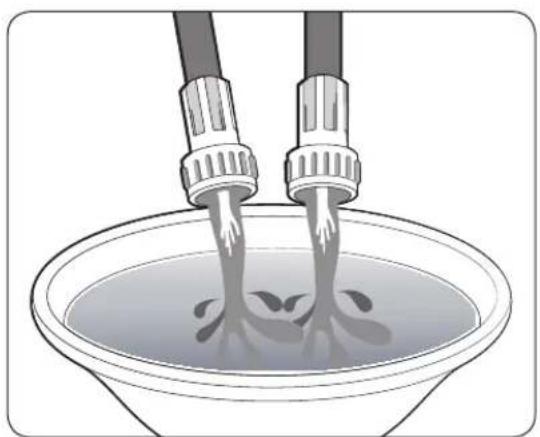
natural_image
Illustration of two hands pouring liquid into a bowl (no text or symbols)To connect the water hoses to the faucets:
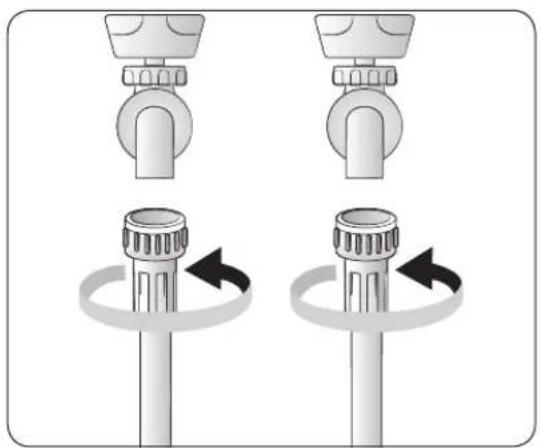
- Connect one end of each water hose to the Hot or Cold tap.
- Turn the fittings by hand until they are tight, and then tighten them by just an additional two-thirds of a turn with a plier. Do not overtighten the fittings. You can damage them.
-
When done, pull the water hoses up and down to check if they are properly connected.
-
Put the other ends of the hoses into a bucket and open the taps for 10-15 seconds to remove impurities. When done, close the taps.
English24
natural_image
Diagram of a car interior showing hoses and connectors with a black arrow pointing to a component (no text or symbols present)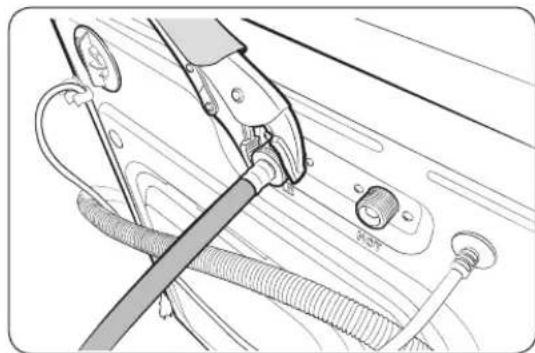
natural_image
Technical line drawing of a mechanical assembly with hoses and connectors (no text or symbols)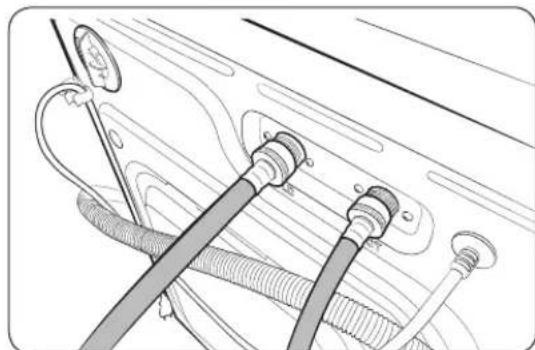
natural_image
Diagram of hoses and connectors in a vehicle, no text or symbols present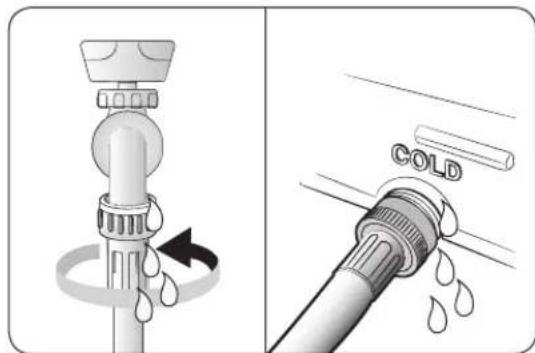
text_image
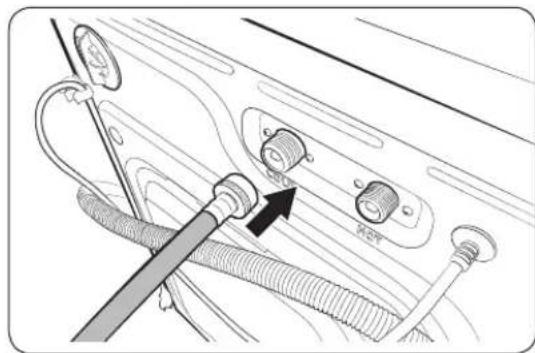
COLD- Connect the other ends of the water hoses to the corresponding inlets on the rear of the machine as specified. Make sure the hot water hose is connected to the hot inlet, and the cold water hose to the cold inlet.
- Repeat step 2 above on the other fittings. Make sure both water hoses are connected properly. See the '4C' information code for troubleshooting.
- Open both faucets, and check if there is a leak.
NOTE
If you do not want to use the hot water hose, insert the inlet cap into the hot water inlet. In this case, you must select Tap Cold for the water temperature. All other water indicators turn off.
CAUTION
To prevent water hoses from being bent or kinked, make sure there is at least a 6 inch (150 mm) space between the washer and the rear wall.


Installation
STEP 5 Position the drain hose
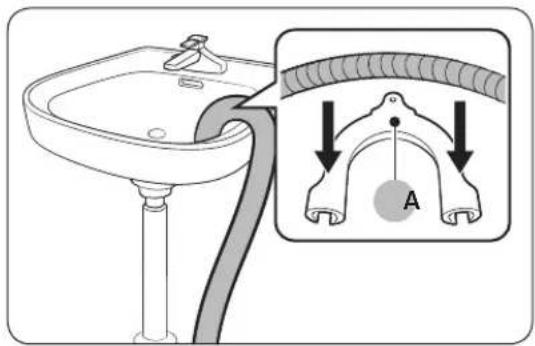
The drain hose can be positioned in three ways:
text_image
Diagram showing a toilet sink connected to a curved tube with labeled component A, accompanied by a magnified view of the tube's internal structure.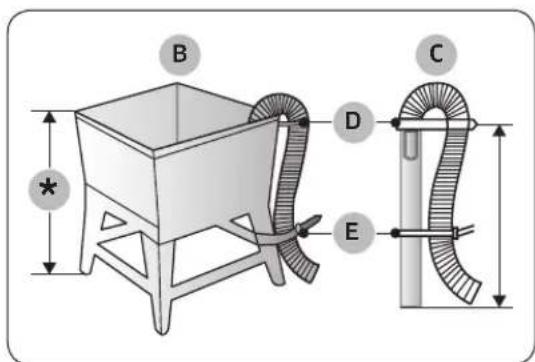
text_image
B * C D E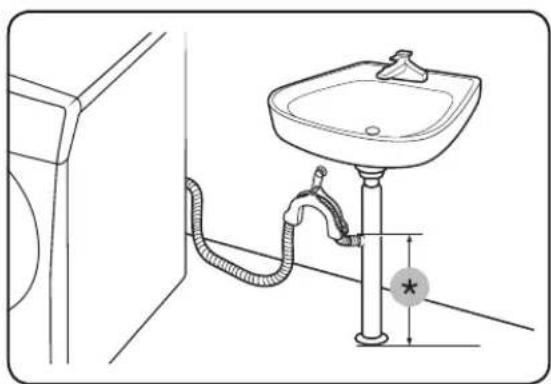
natural_image
Line drawing of a bathroom sink with tubing and a wall-mounted drain (no text or symbols)Over the edge of a wash basin
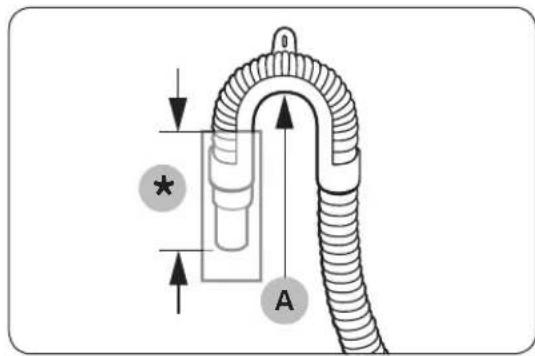
The drain hose must be placed at a height of between 24 in. (60 cm) and 35 in. (90 cm) from the floor. To keep the spout of the drain hose bent, use the supplied plastic hose guide (A). Secure the guide to the wall using a hook to ensure stable drainage.
In a standpipe or laundry tub
The laundry tub (B) or standpipe (C) must be no shorter than 18 in. (46 cm) and no higher or longer than 96 inches (245 cm). Make sure the drain hose and the standpipe are not airtight.

NOTE
D: Hose retainer / E: Tie straps
In a sink drain pipe branch
The drain pipe branch mush be above the sink siphone so that the end of the hose is at least 24 in. (60 cm) above the ground. (*) : 24 in. (60 cm)
English26
text_image
Diagram of a U-shaped tube with labeled components and directional arrows, marked with symbols A and *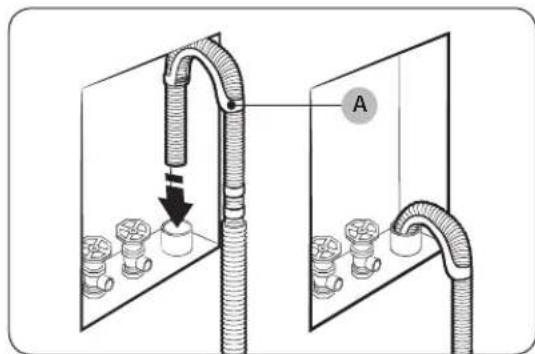
text_image
Diagram showing a pipe installation with labeled component A, indicating fluid flow or movement in a container or tank system.STEP 6 Power on
Plug the power cord into an AC 120 V / 60 Hz approved electrical outlet protected by a fuse or circuit breaker. Then, press Power to turn on the washer.
CAUTION
- Connect the hose guide (A) within 6 in. (15 cm)* of the end of the drain hose. If the drain hose is extended beyond the end of the hose guide, mold or microorganisms could spread inside the washer.
- The drain hose can be installed up to 96 in. (245 cm) high, but the draining capability can be reduced at the maximum height. Water remaining in the drain system may cause an odour.
- If the drain hose is installed less than 18 in. (46 cm) high, water can be drained during the process due to a siphon phenomenon. If this happens, a '4C' information code appears on the display.
Wall standpipe drain system
The drain hose must be placed into a wall standpipe drain system. To keep the end of the drain hose bent, use the supplied hose guide (A). Secure the guide to the wall using a hook to ensure stable drainage.
Before you start
Initial settings
Run Calibration (recommended)
Calibration ensures accurate weight detection by the washer. Make sure the drum is empty before running Calibration.
- Press Power to turn on the washer.
-
Press and hold Temp. and Delay End simultaneously for 3 seconds.
-
Press Start/Pause to start Calibration.
-
The door is locked during the operation.
-
The drum keeps rotating clockwise and anticlockwise for several minutes.
-
When complete, the washer turns off automatically.
Laundry guidelines
STEP 1 Sort
Sort the laundry according to these criteria:
- Care Label: Sort the laundry into cottons, mixed fibres, synthetics, silks, wools, and rayon.
• Color: Separate whites from colors. - Size: Mixing different sized items together in the drum improves the washing performance.
- Sensitivity: Wash delicate items separately for pure, new woollen items, curtains, and silk items. Check the labels on the items.

NOTE
Make sure to check the care label on all clothing, and sort clothing accordingly before starting the wash.
STEP 2 Empty pockets
Empty all the pockets of your laundry items
- Metal objects such as coins, pins, and buckles on clothing may damage other laundry items as well as the drum.
Turn clothing with buttons and embroideries inside out
- If pants or jacket zippers are open while washing, the drum may be damaged. Zippers should be closed and fixed with a string.
- Clothing with long strings may become entangled with other clothes. Make sure to tie the strings before starting the wash.
STEP 3 Use a laundry net
- Brassieres (water washable) must be placed in a laundry net. Metal parts of the brassieres may break through and tear other laundry items.
- Small, light clothing such as socks, gloves, stockings, and handkerchiefs may become caught around the door. Place them inside a fine laundry net.
- Do not wash the laundry net by itself without other laundry. This may cause abnormal vibrations that could move the washer and result in injury.
English28
STEP 4 Prewash (if necessary)
Select the Prewash option for the selected cycle if the laundry is heavily soiled. Do not use the Prewash option if you will be adding detergent manually to the drum.
STEP 5 Determine the load capacity
Do not overload the washer. Overloading may cause the washer to wash improperly.
NOTE
When washing bedding or bedding covers, the wash time may be lengthened or the spin efficiency may be reduced. For bedding or bedding covers, the recommended maximum spin level is “Low or Medium Spin”, and the load capacity is 3.0 kg or less.
CAUTION
If the laundry is unbalanced and the "Ub" information code is displayed, redistribute the load. Unbalanced laundry may reduce the spinning performance.
STEP 6 Add the correct detergent type
The type of detergent depends on the type of fabric (cotton, synthetic, delicate items, wool), color, wash temperature, and degree of soiling. Always use “low suds” HE laundry detergent which is designed for automatic washers.
NOTE
- Follow the detergent manufacturer's recommendations based on the weight of the laundry, the degree of soiling, and the hardness of the water in your local area. If you are not sure about the water hardness, contact a local water authority.
- Do not use detergent that tends to be hardened or solidified. This detergent may remain after the rinse cycle, blocking the drain outlet.
CAUTION
When washing wool using the WOOL, use only a neutral liquid detergent. If used with WOOL, powder detergent may remain on the laundry and discolor the laundry.
Use HE detergent only

natural_image
Abstract logo design featuring stylized lowercase 'h' and letter 'e' within a black circular swirl (no text or symbols)Your washer is designed to use high efficiency (HE) detergents.
- For the best cleaning results, use a high efficiency detergent such as Tide HE, Wisk HE, Cheer HE or Gain HE*. High efficiency detergents contain suds suppressors that reduce or eliminate suds. When fewer suds are produced, the load tumbles more efficiently and cleaning is maximized. (* Brand names are trademarks of their respective manufacturers.)
WARNING
Regular detergent is not recommended.
Use HE detergents only.
English 29
Before you start
Detergent drawer guidelines
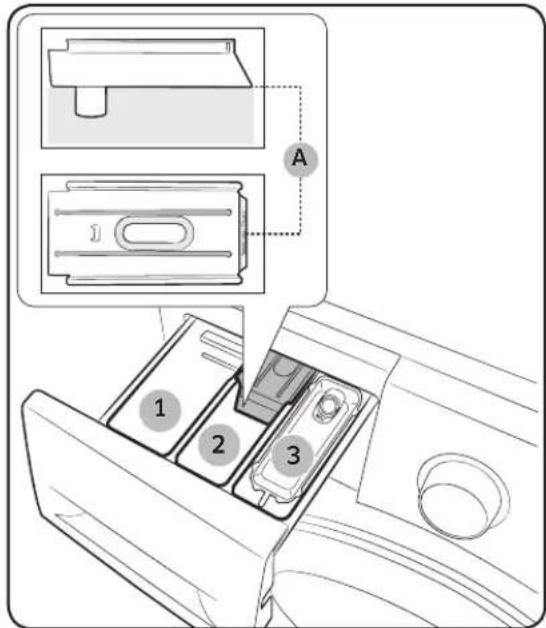
The washer provides a four-compartment dispenser: the front-left compartment for the main wash, the rear-left for pre-wash, the front-right for fabric softeners, and the rear-right for the liquid chlorine bleach.
text_image
A 1 2 3-
Main-wash compartment: Apply main-wash detergent, water softener, soaking detergent, color-safe, non-chlorine bleach, and/or stain removers.
-
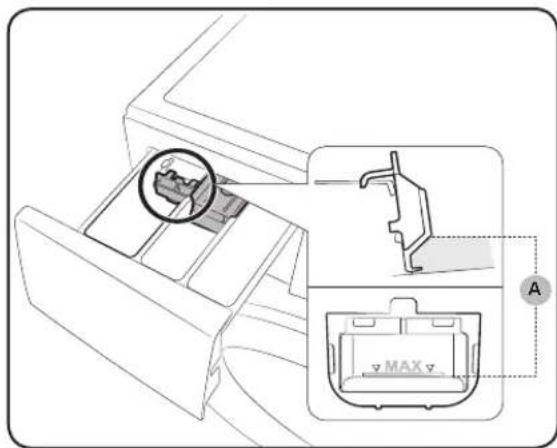
Softener compartment: Apply fabric softener. Do not exceed the max line (A).
-
Bleach compartment: Apply liquid chlorine bleach.

CAUTION
- Do not open the detergent drawer while the washer is operating.
• Do not use the following types of detergent:
- Tablet or capsule types
- Ball or net types
- To prevent the compartment clogging, concentrated or highly-enriched agents (fabric softener or detergent) must be diluted with water before being applied.
- Before moving the washing machine, make sure to empty the detergent drawer that might contain detergent and/or fabric softener. The content in the drawer may spill out on the floor.
English30
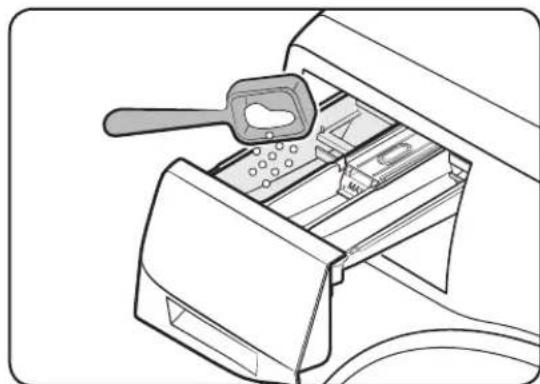
To add washing agents to the detergent drawer
natural_image
Line drawing of a printer drawer with a clip inserted, showing internal components and wiring (no text or symbols)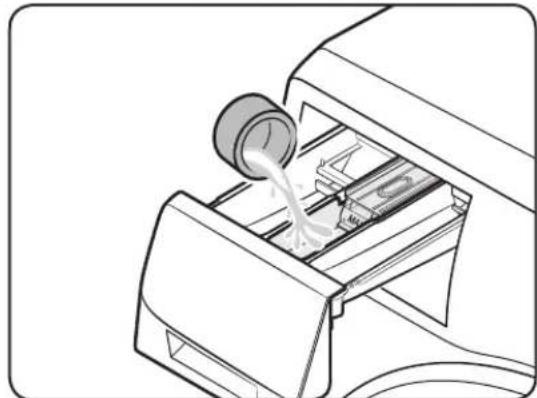
natural_image
Line drawing of a printer emitting liquid into a slot (no text or symbols)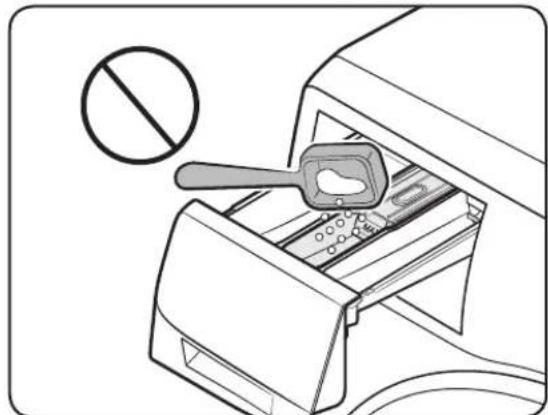
natural_image
Illustration of a toaster with a hand holding a tray, no text or symbols present- Slide open the detergent drawer.
-
Apply laundry detergent to the main-wash compartment as instructed or recommended by the manufacturer. To use liquid detergent, see page <32>.
-
Apply fabric softener to the softener compartment. Do not exceed the max line (A).
-
Close the detergent drawer.
CAUTION
- Do not apply powder detergent to the liquid detergent container.
- Concentrated fabric softener must be diluted with water before applied.
- Do not apply main-wash detergent to the softener compartment.
Before you start
To add washing agents to the detergent drawer
text_image
Technical diagram showing a device with a zoomed-in view and labeled MAX component, likely illustrating a mechanical or electrical assembly.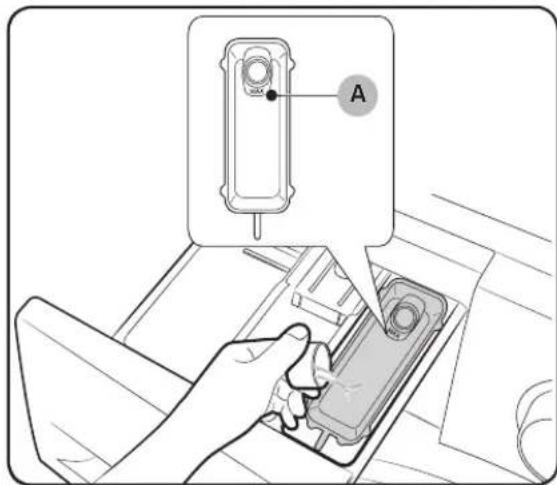
text_image
Diagram showing a hand inserting a device into a car's air vent, with an inset labeled 'A' pointing to the component.To use liquid detergent
First insert the provided liquid container in the main-wash compartment. Then, apply liquid detergent to the container below the marked max line (A).

CAUTION
Do not exceed the max line that is marked inside the container. Remove the liquid container if using power detergent.
To use bleach compartment
First insert the provided drawer bleach in the bleach compartment.
Apply only liquid chlorine bleach to the drawer bleach. Do not exceed the max line (A).

CAUTION
Do not apply undiluted liquid chlorine bleach directly onto the load or into the drum. It is a powerful chemical and can cause fabric damage,
To use oxi-type boosters or color-safe bleach
Oxygen boosters or color-safe bleach can increase washing performance. Make sure to add the oxygen booster or color-safe bleach after putting the laundry into the drum.

NOTE
To use both powder detergent and powder oxygen booster or powder color-safe bleach, it is more effective to put them together into the drum before loading the laundry.
English32
Operations

WARNING
To reduce the risk of fire, electric shock, or injury to persons, read the IMPORTANT SAFETY INSTRUCTIONS before operating this appliance.
Feature panel
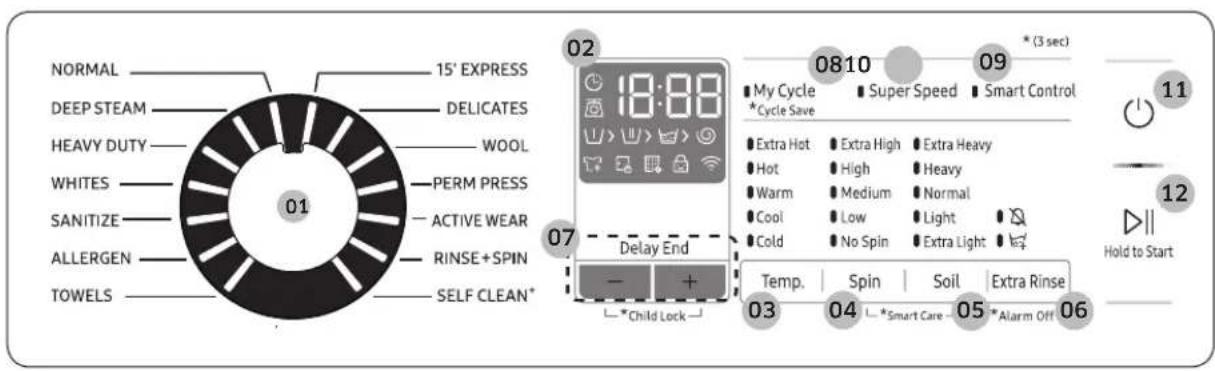
text_image
NORMAL 15° EXPRESS DEEP STEAM DELICATES HEAVY DUTY WOOL WHITES PERM PRESS SANITIZE ACTIVE WEAR ALLERGEN RINSE+SPIN TOWELS SELF CLEAN* 01 02 0810 09 *(3 sec) My Cycle *Cycle Save Super Speed Smart Control Extra Hot Extra High Extra Heavy Hot High Heavy Warm Medium Normal Cool Low Light Cold No Spin Extra Light Temp. Spin Soil Extra Rinse 03 04 *Smart Care - 05 *Alarm Off 06 Hold to Start 11 12| 01 Cycle Selector Turn the dial to select a cycle. | |
| 02 Display | The display shows current cycle information and estimated time remaining, or an information code when a problem occurs. |
| 03 Temp. | Press to change the water temperature for the current cycle.Extra Hot: Heavily soiled, colorfast items. Only available with NORMAL, HEAVY DUTY, and SANITIZE.)Hot: Whites and heavily soiled, colorfast items.Warm: Colorfast items.Cool: Brightly colored, very lightly soiled items. The washer supplies additional hot water or uses the heater to warm up the water if it is below 60 °F (16 °C)Cold: Uses only cold water without using the heater. No warm water is supplied. |
Operations
| 04 Spin | Press to change the spinning speed for the current cycle.Extra High: Extends the spinning process to effectively remove moisture from the load.NOTEExtra High uses a stronger spinning process to remove moisture, so it is not suitable for wrinkle-free or no-iron fabrics, or overloads.High: Underwear, t-shirts, jeans and sturdy cottons.Medium: Jeans, wrinkle-free or wash-and-wear items and synthetics.Low: Delicate items that requires a lower spinning speed.No Spin: The drum does not spin after the final drain process.Rinse Hold (No lamp turns on): The final rinse process is suspended so that the laundry remains in the water. To unload the laundry, run a drain or spin process.NOTESpin Only: This cycle runs a spin cycle only. Press and hold Spin for 3 seconds. With the cycle time on the display, press Spin repeatedly until a desired spinning speed is selected. Then, press Start/Pause (Hold to Start) to start the cycle.This cycle is available only when no specific cycle is selected |
| 05 Soil | Press the button to select the soil level/washing time.Extra Heavy: For extremely soiled loads.Heavy: For heavily soiled loads.Normal: For moderately soiled loads. This setting is best for most loads.Light: For lightly soiled loads.Extra Light: For barely soiled loads. |
| 06 Extra Rinse | Press this button to add an additional rinse at the end of the cycle to remove laundry additives more thoroughly. |
| 07 Delay End | Delay End lets you set the end time of the current cycle. Based on your settings, the start time of the cycle will be determined by the machine's internal logic. For example, this setting is useful for programming your machine to finish a wash at the time you normally return home from work.Press to choose a preset unit of hours. |
| 08 My cycle | Choose your favorite cycle including temperature, spin, soil level, options, etc. (see page 42) |
English34
| 09 Super Speed | Press this button if you need to shorten the washing time, applicable for Normal, Deep steam, Heavy Duty or Allergen course. The shortened time may differ depending on the Cycles/Load/Option. |
| 10 Smart Control | Press to activate/deactivate the Smart Control function. When the Smart Control function is activated, you can control your washing machine using your mobile device. For more information, see the SmartThings section on page <41>. |
| 11 Power Press to turn on/off the washer. | |
| 12 Start/Pause (Hold to Start) | Press to start or stop operation. |
Simple steps to start
text_image
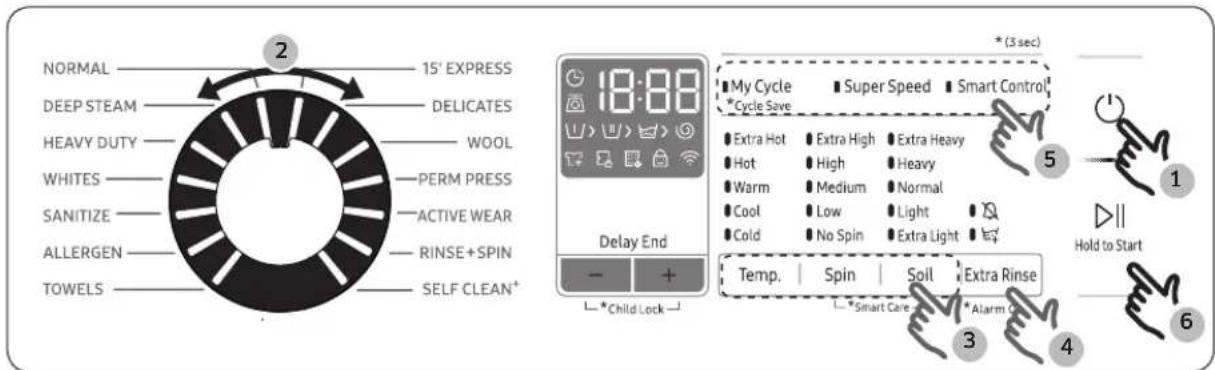
NORMAL 15' EXPRESS DEEP STEAM DELICATES HEAVY DUTY WOOL WHITES PERM PRESS SANITIZE ACTIVE WEAR ALLERGEN RINSE+SPIN TOWELS SELF CLEAN+ Delay End - + - *Child Lock *(3 sec) My Cycle *Cycle Save Super Speed Smart Control Extra Hot Extra High Extra Heavy Hot High Heavy Warm Medium Normal Cool Low Light Cold No Spin Extra Light Temp. Spin Soil Extra Rinse *Smart Care *Alarm C Hold to Start- Press Power to turn on the washer.
- Turn the Cycle Selector to select a cycle.
- Change the cycle settings (Temp., Spin, and Soil) as necessary.
- To add an option, press Options. Use the button again to choose a preferred item.
- The machine provides three easy to access buttons for My Cycle, Super Speed and Smart Control for for easy access. To use an option item, press the corresponding button.
- Press Start/Pause (Hold to Start).
To change the cycle during operation
- Press Start/Pause (Hold to Start) to stop operation.
- Select a different cycle.
- Press Start/Pause (Hold to Start) again to start the new cycle.
English 35


Operations
Cycle overview
Standard cycles
| Cycle Description | |
| NORMAL | For most fabrics including cottons, linens, and normally soiled items. |
| DEEP STEAM | For heavily soiled, colorfast items. This cycle uses steam and a high water temperature to effectively remove stains. |
| HEAVY DUTY | For sturdy, colorfast fabrics and heavily soiled items. |
| WHITES • For white items with or without bleach. | |
| SANITIZE | For heavily soiled, colorfast items. This cycle heats the water to 150 °F to eliminate bacteria.NOTEIf you press Start/Pause (Hold to Start) during the heating portion of Sanitize cycle, your washer door will remain locked for your safety. |
| ALLERGEN | This cycle removes dust mites, pet dander, and other allergy causing substances from fabric. |
| TOWELS • For bath towels, washcloths, and mats. | |
| 15' EXPRESS | For lightly soiled items in less than 4.4 pounds (2.0 kg) that you want to wash quickly.Use less than 0.044 pounds (20 g) of detergent. Using more than 0.044 pounds (20 g) of detergent may leave detergent residue.For liquid detergent, use a max of 20 ml of liquid detergent. |
| DELICATES | For sheer fabrics, bras, lingerie (silk), and other handwash-only fabrics.For best performance, use liquid detergent. |
| WOOL | For machine-washable wool. Loads should be under 8 pounds (3.63kg). For best results, we recommend a load of 4.4 pounds (2.0kg) or less.The Wool cycle washes laundry by moving the wash drum horizontally to maintain the characteristics of the wool fibers and to prevent damage to the cloth. It then stops for a period of time to allow the laundry to soak in the water after which it re-starts.We recommend you use a neutral detergent to prevent damage to the cloth and to improve the washing results. |
English36
| Cycle Description | |
| PERM PRESS | For wash-and-wear, synthetic fabrics, and lightly to normally soiled items. |
| ACTIVE WEAR | Use this cycle to wash exercise wear such as sports jerseys, training pants, shirts/tops and other performance clothing. This cycle provides effective soil removal with gentle action for special fabric care. |
| RINSE+SPIN | Use for loads that need rinsing only or to add rinse-aided fabric softener to a load. |
| SELF CLEAN+ | Cleans the drum by removing dirt and bacteria from the drum.Perform once every 40 washes with no detergent or bleach added.Make sure the drum is empty.Do not add any drum cleaning agents. |
Options
| Option Description | ||
| Alarm off | You can turn on or off the sound from the washing machine. When this function is set to Off, the alarm, the melody of cycle completion, and the power-off beep will not sound. However, the other sounds stay active. | |
| Extra Rinse | Add an additional rinse at the end of the cycle to remove laundry additives more thoroughly. | |
Operations
Delay End
You can set the washer to finish your wash automatically at a later time by choosing a delay of between 1 to 24 hours (in 1 hour increments). The hour displayed indicates the time the wash will finish.
- Select a cycle. Then, change the cycle settings if necessary.
- Press Delay End (or the +/- button) repeatedly until a desired end time is set.
- Press and hold Start/Pause (Hold to Start). The Delay End indicator blinks and the washing machine tumbles the drum to sense the weight of the load if load sensing is preset for the selected cycle. When complete, it displays your set time with the timer running.
- To cancel the Delay End, restart the washing machine by pressing Power.
Real-life case
You want to finish a two-hour cycle 3 hours from now. To do this, you add the Delay End option to the current cycle with a 3-hour setting, and then press Start/Pause (Hold to Start) at 2:00 p.m. The washer starts operating at 3:00 p.m. and ends at 5:00 p.m. Provided below is the time line for this example.

text_image
2:00 pm Set the Delay End to 3 hours 3:00 pm Start 5:00 pm EndLoad sensor
The load sensor icon lights up when you select a cycle that supports load sensing. Some cycles may not support loading sensing. Once you start the cycle, the icon blinks or stays solid during the load sensing process, and turns off when the process is complete.
English38
Special features
Child Lock
To prevent accidents by children, Child Lock locks all buttons except for Power.
To activate Child Lock
- On the manual dispenser models, press and hold - and + (of the Delay End option) simultaneously for 3 seconds. Then, press and hold Start/Pause (Hold to Start) to activate. The door locks and the Child Lock indicator turns on.
To deactivate Child Lock temporarily
On the manual dispenser models, press and hold - and + (of the Delay End option) simultaneously for 3 seconds.

NOTE
- If you open the door 1 minute or more after deactivating Child Lock, an alarm sounds for up to 2 minutes.
- If you close the door within 2 minutes, the door locks and Child Lock is reactivated. If you do not close the door or the door is not properly closed, the alarm keeps sounding for 2 minutes.
- To add laundry after activating Child Lock, first deactivate Child Lock or restart the washing machine.
To cancel the Child Lock
- On the manual dispenser models, press and hold - and + (of the Delay End option) simultaneously for 3 seconds to deactivate, and then press and hold the buttons again for 3 seconds to cancel Child Lock. The door unlocks and the Child Lock indicator turns off.
Sound On/Off
You can turn on or off the sound from the washing machine. When this function is set to Off, the alarm, the melody of cycle completion, and the power-off beep will not sound. However, the other sounds stay active.
• To mute the sound, press and hold Options for 3 seconds.
• To unmute the sound, press and hold again for 3 seconds.
- Your setting will be kept even after restarting the machine.
Operations
My Cycle
Create your own washing cycle with preferred settings and use the with the push of the push of a single button.
To create your own cycle
- Turn the Cycle Selector to select a cycle.
- Change the cycle settings (Temp., Spin, and Soil Level) as necessary.
- To add an option, press the corresponding buttons.
- Press and hold My Cycle for 3 seconds to save your settings. Applicable indicators blink for 3 seconds.
Once you save the cycle, you can use it by pressing My Cycle.
Using Steam Wash
If you select Deep Steam course, the steam acts at the most effective times for the detected amount of laundry, maximizing the effect of the steam, increasing the wash temperature, enhancing the Soak effect, and improving wash performance.
- Load the washer.
- Press the Power button.
- Turn the Cycle Selector and select a Deep Steam Course.
- Add detergent to the dispenser tray and add fabric softener up to the marked line.
- Press the Start/Pause (Hold to Start) button. The washer automatically selects the optimal wash conditions by sensing the weight of the laundry.
ATC (Auto Temperature Control)
ATC enables the washer to control water temperatures in each washing cycle using the washer's internal thermistor. It is designed to maintain certain washing temperatures for best results.
NOTE
- If you select cycle, this cycle is the regulation cycle. Since new washer must reduce the amount of energy usage as a first priority, customers will notice more cold water entering the washers, but this is normal and not a problem.
- In these cycles, the Hot temperature is similar to bath-water temperatures, and the Warm temperature to comfortable swimming pool temperatures.
• To wash clothes at a specific temperature, you must choose a different cycle first.
English40

SmartThings
Wi-Fi connection
On your smartphone, go to the Settings and turn on the wireless connection and select an AP (Access Point).

NOTE
- This device is designed for household use only (Class B), and can be used in all residential areas.
- This device may cause wireless interference, and neither the manufacturer or the installer of this device can provide a safety measure of any kind.
- Recommended encryption methods are WPA/TKIP and WPA2/AES. Newly developed Wi-Fi protocols or unapproved Wi-Fi protocols are not supported.
- The reception sensitivity of a wireless network may be affected by surrounding wireless environments.
- If your Internet provider has registered the MAC address of your PC or the modem module for permanent use, your Samsung washing machine fails to connect to the Internet. If this is the case, contact your Internet provider.
- The Internet firewall may interrupt your Internet connection. If this happens, contact your Internet provider.
- If Internet failure continues after following the measurement of your Internet provider, contact a local Samsung retailer or service centre.
- For installing wired and wireless routers, refer to the user manual of the router you use.
• Samsung washing machine supports the Wi-Fi 2.4 GHz protocols. - Samsung washing machine supports the IEEE802.11 b/g/n (2.4 GHz), Soft-AP protocols. (IEEE802.11n is recommended)
- An unapproved wired/wireless router may fail to connect to Samsung washing machine.
Download
On an app market (Google Play Store, Apple App Store, Samsung Galaxy Apps), find the SmartThings app with a search term of "SmartThings". Download and install the app on your device.

NOTE
- The SmartThings app is available on third-party devices with Android OS 6.0 (Marshmallow) or higher, Samsung devices with Android OS 5.0 (Lollipop) or higher, and iOS devices with iOS 10.0 or higher. (For iPhones, it must be iPhone 6 or higher). The app is optimised for Samsung smartphones (Galaxy S and Note series).
• Some functions of the app may operate differently on third-party devices.
- The app is subject to change without notice for improved performance.
English 41


Operations
Log in
You must first log into SmartThings with your Samsung account. To create a new Samsung account, follow the instructions on the app. You don't need a separate app to create your account.

NOTE
smartphone user automatically logs in.
If you have a Samsung account, use the account to log in. A registered Samsung
To register your device to SmartThings
- Make sure your smartphone is connected to a wireless network. If not, go to the Settings and turn on the wireless connection and select an AP (Access Point).
- Select to run SmartThings on your smartphone.
- When a message of "A new device is found.", select Add.
- If no message appears, select + and select your washing machine in a list of devices available. If your washing machine is not listed, select Device Type > Specific Device Model, and then add your washing machine manually.
- Register your washing machine to the SmartThings app as follows.
a. Log into SmartThings with your Samsung account.
b. Turn a Wi-Fi connection on.
c. Add your washing machine to SmartThings. Make sure your washing machine is connected to SmartThings.
d. When registration is complete, your washing machine appears on your smartphone.
Washing Machine app
Integrated control: You can monitor and control your washing machine both at home and on the go.
- Select the Washing Machine icon on SmartThings. The Washing Machine page appears.
- Check the operation status or notifications related to your washing machine, and change options or settings if necessary.
English42
SmartThings
| Category Checkpoint Description | ||
| Monitoring | Washing status | You can check the current cycle and its options, and the remaining cycle time. |
| Smart Control | The Smart Control status is shown for the washing machine. | |
| Self Check | Use this to check if the washing machine operates normally. | |
| Energy monitoring | Use this to monitor the energy consumption status. | |
| Control | Start/Pause (Hold to Start)/Cancel | Select a cycle and necessary options, and then select Start/Pause/Cancel to start an operation, to stop temporarily, or to cancel the current operation. |
| My Favorite | Add frequently used cycles and options to My Favorite for later use. | |
| Notification | Cycle completed Notifies you the current cycle is complete. | |
| alarm (applicable models only) | Notifies you of the addition of a new load. | |
| Remaining laundry (applicable models only) | Notifies you of any laundry left after a cycle is complete. | |
| Q-Rator | Laundry Recipe* | You can select the fabric type, color, and the soil level to get recommended options and wash cycles that you can start right away. |
| Laundry Planner* | You can set the desired time for a wash cycle to finish.After you set the desired time, you will get a recommended cycle that will end within the time you set, and you can start or reserve the recommended cycle. | |
| HomeCare Wizard * | Provides a regular report with an analysis of the machine operation state in a user-set frequency (every week/month).You can use this regular report to check your usage pattern, maintenance requirements, and energy consumption ** for the set period of time. | |
| * Requires 'SmartThings', available on Android and iOS.Registration required.** Indicative results only. | ||
English 43
Operations
Open Source Announcement
The software included in this product contains open source software. You may obtain the complete corresponding source code for a period of three years after the last shipment of this product by sending an email to mailto:oss.request@samsung.com.
It is also possible to obtain the complete corresponding source code in a physical medium such as a CD-ROM; a minimal charge will be required.
The following URL http://opensource.samsung.com/opensource/SMART_AT_051/seq/0 leads to the download page of the source code made available and open source license information as related to this product. This offer is valid to anyone in receipt of this information.
text_image
QR code image containing encoded data, no visible human-readable text
NOTE
Hereby, Samsung Electronics, declares that the radio equipment type appliance is in compliance with Directive 2014/53/EU. The full text of the EU declaration of conformity is available at the following internet address: The official Declaration of conformity may be found at http://www.samsung.com, go to Support > Search Product Support and enter the model name.
Wi-Fi max transmitter power : 20 dBm at 2.412 GHz - 2.472 GHz
English44
Maintenance
Keep the washer clean to prevent its performance from deteriorating and to preserve its life cycle.
SELF CLEAN+
Perform this cycle regularly to clean the drum and to remove bacteria from it.
- Make sure the drum is empty.
- Press Power to turn on the washer.
- Press SELF CLEAN+ .
- Press Start/Pause (Hold to Start).
NOTE
The water temperature for SELF CLEAN ^+ is set to EXTRA HOT, which cannot be changed.
CAUTION
Do not use any cleaning agents. Do not add detergent or bleach. Chemical residue in the drum degrades the cleaning performance.
SELF CLEAN+reminder
- The SELF CLEAN+ reminder appears on the main screen once every 40 washes. It is advisable to perform the SELF CLEAN+regularly.
- If you do not run the cycle within 1 hour when the SELF CLEAN+ reminder appears, the reminder turns off automatically.
- When you first see this reminder, you can ignore the reminder for 6 consecutive washes. From the 7^th wash, the reminder no longer appears. However, it appears again on the second 40^th wash.
Maintenance
Smart Care
To enable this function, you must first download the Samsung Smart Washer app at the Play Store or the Apple Store, and install it on a mobile device featuring a camera operation.
The Smart Care function has been optimized for Galaxy & iPhone series (applicable models only).
- When the washing machine detects an issue to check, an information code appears on the display. To enter Smart Care mode, press and hold Soil and Spin simultaneously for 3 seconds.
- The washing machine starts the self-diagnosis procedure and display an information code if a problem is detected.
- Run the Samsung Smart Washer app on your mobile device, and tap Smart Care.
- Put the mobile device close to the washing machine's display so that the mobile device and the washing machine face each other. Then, the information code will be recognized automatically by the app.
- When the information code is recognized correctly, the app provides detailed information about the problem with applicable counteractions.
NOTE
- The function name, Smart Care, may differ depending on the language.
- If there is strong reflected light on the washing machine display, the app may fail to recognize the information code.
- If the app fails to recognize the Smart Care code consecutively, enter the information code manually onto the app screen.
English46
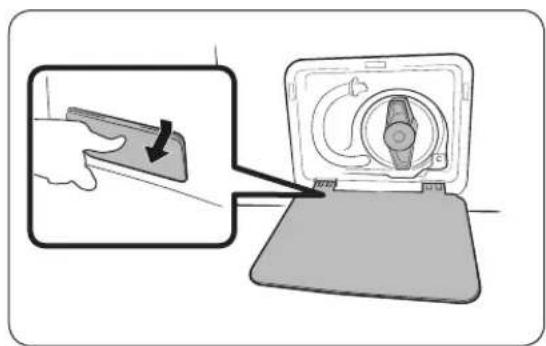
Emergency drain
In case of a power failure, drain the water inside the drum before taking out the laundry.
text_image
Diagram showing a hand holding a device next to a device with a rotary knob, annotated with an arrow indicating action.-
Power off the washer, and then unplug it from the electrical outlet.
-
Gently press the top area of the filte cover to open.
natural_image
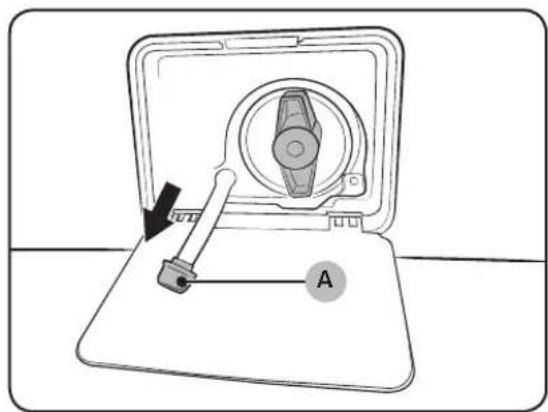
Diagram of a device with a lever and labeled component A, no text or symbols present- Put an empty, spacious container around the cover, and stretch the emergency drain tube to the container while holding the tube cap (A).
natural_image
Line drawing of a hand using a pipette to clean a bowl with a mounted device (no text or symbols)-
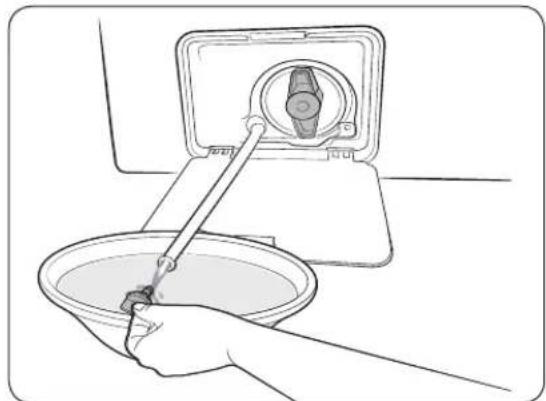
Open the tube cap and let water in the Emergency drain tube (B) flow into the container.
-
When done, close the tube cap, and reassemble the tube. Then, close the filter cover.
NOTE
Use a spacious container because the water in the drum may be more than expected.


Maintenance
Cleaning
Surface of the washer
Use a soft cloth with a nonabrasive household detergent. Do not spray water onto the washer.
Mesh filter
Clean the mesh filter of the water hose once or twice a year.

natural_image
Diagram of a car door panel with a hose and valve, showing mechanical components (no text or symbols)-
Turn off the washer, and then unplug the power cord.
-
Close the faucet.
-
Loosen and disconnect the water hose from the back of the washer. Cover the hose with a cloth to prevent water from gushing out.
-
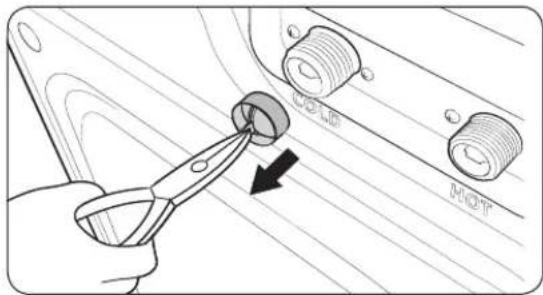
Use pliers to pull out the mesh filter from the inlet valve.
-
Submerge the mesh filter deeply in water so that the threaded connector is also submerged.
-
Dry the mesh filter completely in a shaded area.
-
Reinsert the mesh filter into the inlet valve, and reconnect the water hose to the inlet valve.
-
Open the faucet.
text_image
COOL MOTNOTE
If the mesh filter is clogged, the "4C" information code appears on the the washer's display screen.
English48
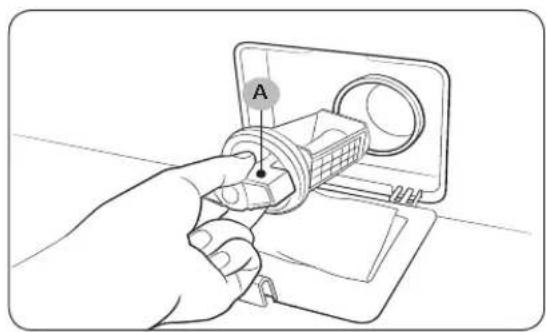
Pump filter
It is advisable to clean the pump filter 5 or 6 times a year to prevent it from clogging. A clogged pump filter may reduce the bubble effect.
natural_image
Hand inserting a component into a device housing (no text or symbols visible)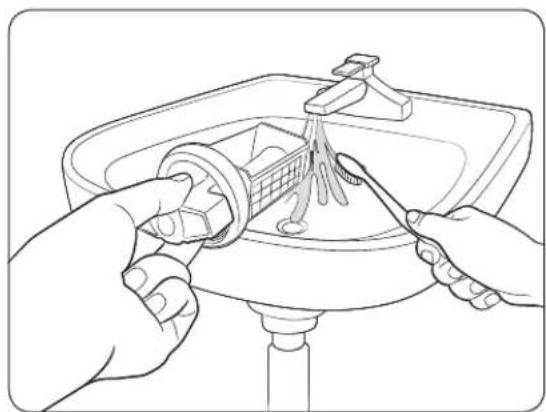
natural_image
Illustration of hands using a tool to clean or adjust a cleaning machine (no text or symbols visible)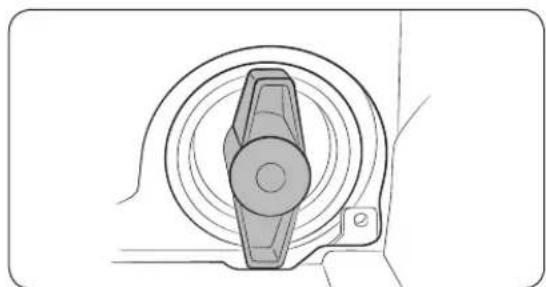
natural_image
Technical line drawing of a mechanical component with concentric circular features and a central shaft (no text or symbols)- Turn off the washer, and then unplug the power cord.
- Drain the remaining water inside the drum. See the "Emergency drain" section on page 49.
- Gently press the top area of the filte cover to open.
- Turn the pump filter knob (A) to the left, and drain off the remaining water.
- Clean the pump filter using a soft brush. Make sure the drain pump propeller inside the filter is unclogged.
- Reinsert the pump filter, and then turn the filter knob to the right.
- Close the filter cover.
NOTE
- Some pump filters feature a safety knob that is designed to prevent accidents by children. To open the safety knob of the pump filter, push in and turn it counterclockwise. The spring mechanism of the safety knob helps open the filter.
• To close the safety knob of the pump filter, turn it clockwise. The spring makes a rattling sound, which is normal.
NOTE
If the pump filter is clogged, the "5C" information code appears on the washer's display screen.


Maintenance

CAUTION
- Make sure the filter knob is closed properly after cleaning the filter. Otherwise, this may cause a leak.
- Make sure the filter is inserted properly after cleaning it. Otherwise, this may cause an operational failure or a leak.
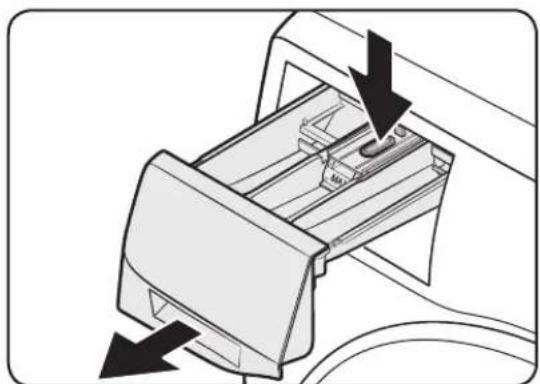
Detergent drawer
natural_image
Diagram of a printer or printer device with arrows indicating process flow (no text or symbols present)- While holding down the release lever (A) inside the drawer, slide open the drawer, and then remove the drawer from the washer.
- Remove the Liquid detergent container from the drawer.
natural_image
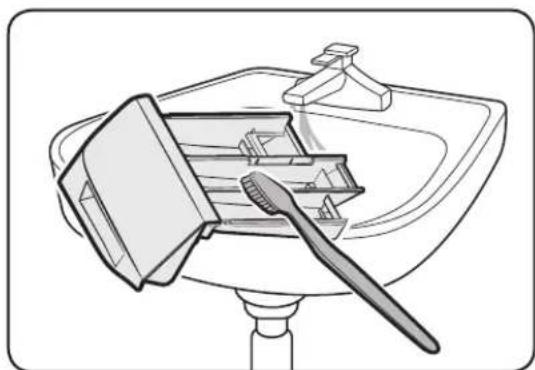
Line drawing of a bathroom sink with a toothbrush resting on it (no text or symbols)- Clean the drawer components in flowing water using a soft brush.

NOTE
Other parts of the drawer can also be removed. They can fall out if you hold the drawer upside down.
natural_image
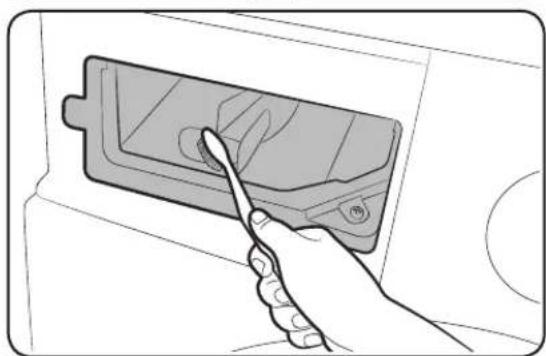
Illustration of a hand using a tool to adjust or install a component inside a container (no text or symbols visible)- Clean the drawer recess using a soft brush.
- Reinsert the liquid detergent container into the Detergent Drawer.
- Slide the drawer into the drawer recess, and then push it inward until it is fully closed.

NOTE
To remove remaining detergent, perform a RINSE+SPIN cycle with the drum empty.
English50
Door diaphragm
natural_image
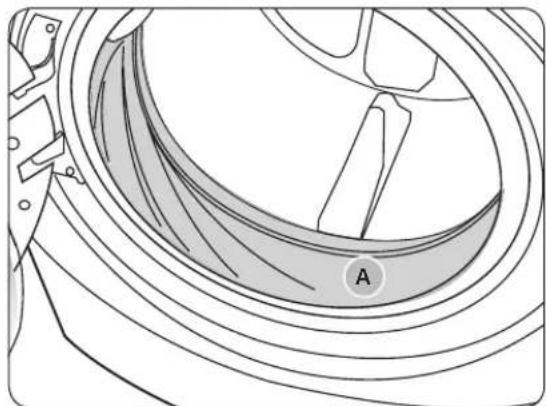
Technical line drawing of a mechanical component with labeled section A (no text or symbols beyond label)- Open the door and empty the drum.
- Turn over the diaphragm (A).
- Combine 3/4 cups of liquid chlorine bleach and 1 gallon of warm tap water.
- Wearing rubber gloves, use a soft, clean cloth dipped in the water and chlorine solution to clean the diaphragm.
- Let stand 5 minutes, and then wipe up and dry well.
- Put the diaphragm back to position.

CAUTION
Use bleach carefully and be sure to follow the bleach manufacturer's use and care instructions.
Recovery from freezing
The washer may freeze when the temperature in its location drops below 0 °C.
- Turn off the washer, and then unplug the power cord.
- Pour warm water over the faucet to loosen the water hose.
- Disconnect the water hose, and soak it in warm water.
- Pour warm water into the drum and leave it for about 10 minutes.
- Reconnect the water hose to the faucet.

NOTE
If the washer still doesn't operate normally, repeat the steps above until it operates normally.
Care against an extended time of disuse
Avoid leaving the washer unused for an extended time. If you intend to leave the washer unused for a long period of time, follow the directions below:
- Press the Power button, and then turn the Cycle Selector to RINSE+SPIN.
- Empty the drum, close the door, and then press Start/Pause (Hold to Start).
- When the cycle is complete, close the faucets and disconnect the water hoses.
- Turn off the washer, and then unplug the power cord.
- Open the door to let air circulate through the drum.
English 51


Maintenance
Cleaning the exterior
- Turn off the water faucets after finishing the day's washing.
This will shut off the water supply to your washer and prevent the unlikely possibility of damage from escaping water. Leave the door open to allow the inside of your washer to dry out. - Use a soft cloth to wipe up all detergent, bleach, or other spills as they occur.
Clean the following as recommended below: - Control Panel – Clean with a soft, damp cloth. Do not use abrasive powders or cleaning pads. Do not spray.
- cleaners directly on the panel.
- Cabinet - Clean with soap and water.
Cleaning the interior
Clean the interior of your washer periodically to remove any dirt, soil, odor, mold, mildew, or bacterial residue that may remain in your washer as a result of washing clothes.

CAUTION
Failure to follow these instructions may result in unpleasant conditions, including odors and/or permanent stains on your washer or laundry.

NOTE
Hard water deposits may be removed, if needed. Use a cleaner labeled "Washer safe".
English52

Troubleshooting
Checkpoints
If you encounter a problem with the washer, first check the table below and try the suggestions.
| Problem Action | |
| Does not start. | Make sure the washer is plugged in.Make sure the door is properly closed.Make sure the faucets are open.Make sure to press or tap Start/Pause (Hold to Start) to start the washer.Make sure Child Lock is not activated.Before the washer starts to fill, it will make a series of clicking noises to check the door lock and does a quick drain.Check the fuse or reset the circuit breaker. |
| Water supply is insufficient, or no water is supplied. | Fully open the faucet.Make sure the door is properly closed.Make sure the water supply hose is not frozen.Make sure the water supply hose is not kinked or clogged.Make sure there is sufficient water pressure. |
| After a cycle, detergent remains in the detergent drawer. | Make sure the washer is running with sufficient water pressure.If you are using powdered detergent, do not use more than recommended.If you are using liquid detergent, do not over fill the liquid detergent compartment.Remove the liquid detergent and softener containers, and then clean the detergent drawer. |
| Excessive vibrations or makes noise. | Make sure the washer is installed on a level, solid floor that is not slippery. If the floor is not level, use the levelling feet to adjust the height of the washer.Make sure the shipping bolts are removed.Make sure the washer is not contacting any other object.Make sure the laundry load is balanced.The motor can cause noise during normal operation.Overalls or metal-decorated clothes can cause noise while being washed. This is normal.Metal objects such as coins can cause noise. After washing, remove these objects from the drum or filter case. |
English 53
Troubleshooting
| Problem Action | |
| Does not drain and/or spin. | Make sure the drain hose is neither kinked nor obstructed all the way to the drain system. If you there is a drain restriction, call for service.Make sure the debris filter is not clogged.Close the door and press or tap Start/Pause (Hold to Start). For your safety, the washer will not tumble or spin unless the door is closed.Make sure the drain hose is not frozen or clogged.Make sure the drain hose is connected to a drain system that is not clogged.If the washer is not supplied with sufficient power, the washer temporarily will not drain or spin. As soon as the washer regains sufficient power, it will operate normally. |
| The door does not open. | Press or tap Start/Pause (Hold to Start) to stop the washer.It may take a few moments for the door lock mechanism to disengage.The door will not open until 3 minutes after the washer has stopped or the power has been turned off.Make sure all the water in the drum is drained.The door may not open if water remains in the drum. Drain the drum and open the door manually.Make sure the door lock light is off. The door lock light turns off after the washer has drained. |
| Excessive suds. | Make sure you use the recommended types of detergent.Use high efficiency (HE) detergent to prevent oversuding.Reduce the detergent amount for soft water, small loads, or lightly soiled loads.Non-HE detergent is not recommended. |
| Cannot add additional detergent. | Make sure the remaining amount of detergent and fabric softener is not over the limit. |
English54
| Problem Action | |
| The washer stops. | Plug the power cord into a live electrical outlet.Check the fuse or reset the circuit breaker.Close the door and press the Start/Pause (Hold to Start) button to start the washer. For your safety, the washer will not tumble or spin unless the door is closed.Before the washer starts to fill, it will make a series of clicking noises to check the door lock and does a quick drain.There may be a pause or soak period in the cycle. Wait and the washer may start.Make sure the mesh filter of the water supply hose at the faucets is not clogged. Periodically clean the mesh filter.If the washer is not supplied with sufficient power, the washer temporarily will not drain or spin. As soon as the washer regains sufficient power, it will operate normally. |
| The washer fills with the wrong water temperature. | Fully open both taps.Make sure the temperature selection is correct.Make sure the hoses are connected to the correct taps. Flush the water lines.Make sure your water heater is set to supply hot water with a minimum temperature of 120 °F (49 °C) at the tap. Also, check the water heater capacity and recovery rate.Disconnect the hoses and clean the mesh filter. The mesh filter may be clogged.While the washer fills, the water temperature may change as the automatic temperature control feature checks the incoming water temperature. This is normal.While the washer fills, you may notice just hot and/or just cold water going through the dispenser when cold or warm temperatures are selected. This is a normal function of the automatic temperature control feature as the washer determines the water temperature. |
| The load is wet at the end of a cycle. | Use the High or Extra High spin speed.Use high efficiency (HE) detergent to reduce oversuding.The load is too small. Small loads (one or two items) may become unbalanced and not spin completely.Make sure the drain hose is not kinked or clogged. |
English 55
Troubleshooting
| Problem Action | |
| Leaks water. | Make sure the door is properly closed.Make sure all hose connections are tight.Make sure the end of the drain hose is correctly inserted and secured to the drain system.Avoid overloading.Use high efficiency (HE) detergent to prevent oversudsing. |
| Has odours. | Excessive suds collect in recesses and can cause foul odours.Run cleansing cycles to sanitize periodically.Clean the door seal (diaphragm).Dry the washer interior after a cycle has finished. |
| No bubbles are seen (Bubbleshot models only). | Overloading may screen bubbles.Severely contaminated laundry may not generate bubbles. |
If a problem persists, contact a local Samsung service center.
English56
Information codes
If the washer fails to operate, you may see an information code on the screen. Check the table below and try the suggestions.
| Code Action | |
| 1C | Check the water level sensor.Power off and then power the washer on after 2-3 minutes, and then try again.Depending on the model, the drain system drains water automatically. The POWER and Start/Pause (Hold to Start) buttons may be disabled during this process. |
| DC | The door is open.Close the door, and then press Start/Pause (Hold to Start) to resume operation. |
| DC1 | Check the door switch.Power off and then power the washer on after 2-3 minutes, and then try again. |
| LC | Check for water leaks.Power the washer off, and then check the drain system for any leaks. Once the leak issue is resolved, power the washer on after 2-3 minutes.Depending on the model, the drain system drains water automatically. The POWER and Start/Pause (Hold to Start) buttons may be disabled during this process. |
| 4C | Check the water supply line.Check the connection to the water line (including water taps).Power off and then power the washer on after 2-3 minutes, and then try again.Depending on the model, the drain system drains water automatically. The POWER and Start/Pause (Hold to Start) buttons may be disabled during this process. |
| 4C2 | Laundry needs protection because the water being supplied is too hot.Make sure the cold and hot water taps are properly connected.Power off and then power the washer on after 2-3 minutes, and then try again. |
English 57
Troubleshooting
| Code Action | |
| 5C | Check the drain system.·Make sure the drain filter is not clogged.·If the drain filter is clogged, clean the filter filter, and then restart the washer. |
| HC | Check the washing heater.·Power off the washer, and then contact a Samsung customer service center. |
| UB | Check the spinning process.·The load may not be balanced inside the drum. Check the drum and make sure the load is balanced.·Press START/PAUSE to resume operation, or power off and then power the washer on after 2-3 minutes, and then try again. |
| 8C, 8C1, 8C2 | Check the MEMS sensor.·Power off and then power the washer on after 2-3 minutes, and then try again. |
| OC | Water may overflow.·Close the water tap, and then call for service. |
| 3C | Check the motor.·Power off and then power the washer on after 2-3 minutes, and then try again. |
| AC6 | Check the PBA communication status.·Power off and then power the washer on after 2-3 minutes, and then try again. |
| 9C1/9C2 | The electronic control needs to be checked.·Check if power is supplied properly.·If the information code remains, contact a Samsung service center. |
| SF | System failed.·Power off the washer, and then contact a Samsung service center. |
If any information code keeps appearing on the screen, contact a local Samsung service center.
English58
Specifications
Fabric care chart
The following symbols provide garment care direction. The clothing care labels include symbols for drying, bleaching, drying and ironing, or dry cleaning when necessary. The use of symbols ensures consistency among garment manufacturers of domestic and imported items. Follow care label directions to optimize garment life and reduce laundering problems.
Wash cycle
 | Normal |
| [2446] | Permanent press/Wrinkle resistant/Wrinkle control |
 | Gentle/Delicates |
 | Hand wash |
Water temperature
| ... | Hot |
| .. | Warm |
| . | Cold |
NOTE
This represents appropriate wash water temperatures for various items. The temperature range for Hot below 135 °F (57 °C), Warm below 90 °F (32 °C) and Cold below 70 °F (20 °C). (Wash water temperature must be a minimum of 16 °C for detergent activation and effective cleaning.)
Bleach
| [0724] | Any bleach (when needed) |
| [TWT4] | Only non-chlorine (color-safe)bleach (when needed) |
| [73XX] | Tumble dry |
Normal
| [6075] | Permanent press/Wrinkle resistant/Wrinkle control |
 | Gentle/Delicates |
Special instructions
| [ZK6K] | Line dry/Hang to dry |
 | Drip dry |
| [8BB2] | Dry flat |
Heat setting
| High | |
| Medium | |
| Low | |
| Any heat | |
| No heat / Air |
Specifications
Iron dry or steam temperatures
 | High |
 | Medium |
| [024K] | Low |
Warning symbols for laundering
| Do not wash | |
| Do not wring | |
| Do not bleach | |
| Do not tumble dry |
 | No steam (added to iron) |
 | Do not iron |
Dry-clean
| Dry-clean | |
| Do not dry-clean | |
| Line dry / Hang to dry | |
| Drip dry | |
| Dry flat |
Protecting the environment
- This appliance is manufactured from recyclable materials. If you decide to dispose of it, please observe local waste disposal regulations. Cut off the power cord so that the appliance cannot be connected to a power source. Remove the lid so that animals and small children cannot get trapped inside the appliance.
- Do not exceed the detergent quantities recommended in the detergent manufacturers' instructions.
- Use stain removal products and bleaches before the wash cycle only when necessary.
- Save water and electricity by only washing full loads (the exact amount depends upon the program used).
Declaration of conformity
This appliance complies with UL2157.
English60
Specification sheet

natural_image
Line drawing of a front-loading washing machine with control panel and door (no text or symbols)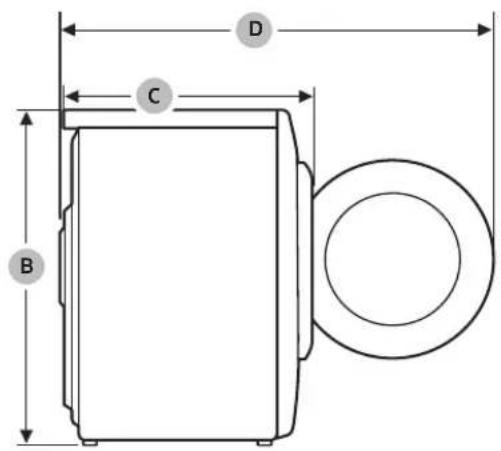
text_image
D C B| Type Front loading washer | |||
| Model WW22N6850Q* | |||
| Dimensions (inches (mm)) | A. Width 23.6 (600) | ||
| B. Height-overall 33.5 (850) | |||
| C. Depth 27.1 (688) | |||
| D. Depth with door open 43.9 (1115) | |||
| Water pressure (psi (kPa)) 20 - 116 (137 - 800) | |||
| NET weight (lb (kg)) 170 (77) | |||
| Spin revolution 1400 rpm | |||
| Heater rating 900 W | |||
| Power consumption | Washing 120 V | 200 W | |
| Washing and heating | 120 V 1150 W | ||
| Spin 120 V 550 W | |||
| Drain | 120 V | 80 W | |
English 61
Specifications
Cycle chart
Use this chart to set the best cycle and options for you laundry.

NOTE
| Setting Temp. Spin Soil Level | |||
| ●: factory setting EH: Extra Hot EH: Extra High EH: | Extra Heavy | ||
| ●: can be selected H: Hot H: High H: Heavy | |||
| W: Warm M: Medium N: Normal | |||
| C: Cool L: Low L: Light | |||
| CD: Cold NS: No Spin EL: Extra Light | |||
WW22N6850Q*
| Cycle | Temp. Spin | Soil | |||||||||||||
| EH | H | W | C | CD | EH | H | M | L | NS | EH | H | N | L | EL | |
| NORMAL | |||||||||||||||
| DEEP STEAM | |||||||||||||||
| HEAVY DUTY | |||||||||||||||
| WHITES | |||||||||||||||
| SANITIZE | |||||||||||||||
| ALLERGEN | |||||||||||||||
| TOWELS | |||||||||||||||
| 15' EXPRESS | |||||||||||||||
| DELICATES | |||||||||||||||
| WOOL | |||||||||||||||
| PERM PRESS | |||||||||||||||
| ACTIVE WEAR | |||||||||||||||
| RINSE + SPIN | |||||||||||||||
| SELF CLEAN+ | |||||||||||||||
English62
| Cycle | Options | ||||
| Extra Rinse Super Speed Delay End My cycle Alarm off | |||||
| NORMAL | ● ● ● | ● ● | |||
| DEEP STEAM | ● ● ● | ● ● | |||
| HEAVY DUTY | ● ● ● | ● ● | |||
| WHITES | ● ● ● | ● | |||
| SANITIZE | ● ● ● | ● | |||
| ALLERGEN | ● ● ● | ● ● | |||
| TOWELS | ● ● ● | ● | |||
| 15' EXPRESS | ● ● ● | ● | |||
| DELICATES | ● ● ● | ● | |||
| WOOL | ● ● ● | ||||
| PERM PRESS | ● ● ● | ● | |||
| ACTIVE WEAR | ● ● ● | ● | |||
| RINSE + SPIN | ● ● ● | ● | |||
| SELF CLEAN+ | ● | ● | |||
English 63
Warranty (U.S.A)
SAMSUNG WASHER
LIMITED WARRANTY TO ORIGINAL PURCHASER
This SAMSUNG brand product, as supplied and distributed by SAMSUNG ELECTRONICS AMERICA, INC. (SAMSUNG) and delivered new, in the original carton to the original consumer purchaser, is warranted by SAMSUNG against manufacturing defects in materials and workmanship for a limited warranty period of:
One (1) year part and labor, Three (3) years stainless tub part (Part Only), Ten (10) years washing Digital Inverter Motor part (Part Only)
This limited warranty begins on the original date of purchase, and is valid only on products purchased and used in the United States. To receive warranty service, the purchaser must contact SAMSUNG for problem determination and service procedures. Warranty service can only be performed by a SAMSUNG authorized service center. The original dated bill of sale must be presented upon request as proof of purchase to SAMSUNG or SAMSUNG's authorized service center. SAMSUNG will provide in-home service during the warranty period at no charge, subject to availability within the contiguous United States. In-home service is not available in all areas.
To receive in-home service, product must be unobstructed and accessible to the service agent. If service is not available, SAMSUNG may elect to provide transportation of the product to and from an authorized service center.
English64
SAMSUNG will repair, replace, or refund this product at our option and at no charge as stipulated herein, with new or reconditioned parts or products if found to be defective during the limited warranty period specified above. All replaced parts and products become the property of SAMSUNG and must be returned to SAMSUNG. Replacement parts and products assume the remaining original warranty, or ninety (90) days, whichever is longer. This limited warranty covers manufacturing defects in materials and workmanship encountered in normal, noncommercial use of this product and shall not apply to the following: damage that occurs in shipment; delivery and installation; applications and uses for which this product was not intended; altered product or serial numbers; cosmetic damage or exterior finish; accidents, abuse, neglect, fire, water, lightning, or other acts of nature or God; use of products, equipment, systems, utilities, services, parts, supplies, accessories, applications, installations, repairs, external wiring or connectors not supplied or authorized by SAMSUNG that damage this product or result in service problems; incorrect electrical line voltage, fluctuations and surges; customer adjustments and failure to follow operating instructions, maintenance and environmental instructions that are covered and prescribed in the instruction book; product removal and reinstallation; problems caused by pest infestations. This limited warranty does not cover problems resulting from incorrect electric current, voltage or supply, light bulbs, house fuses, house wiring, cost of a service call for instructions, or fixing installation errors. SAMSUNG does not warrant uninterrupted or error-free operation of the product.
EXCEPT AS SET FORTH HEREIN, THERE ARE NO WARRANTIES ON THIS PRODUCT EITHER EXPRESS OR IMPLIED, AND SAMSUNG DISCLAIMS ALL WARRANTIES INCLUDING, BUT NOT LIMITED TO, ANY IMPLIED WARRANTIES OF MERCHANTABILITY, INFRINGEMENT OR FITNESS FOR A PARTICULAR PURPOSE.
Warranty (U.S.A)
NO WARRANTY OR GUARANTEE GIVEN BY ANY PERSON, FIRM, OR CORPORATION WITH RESPECT TO THIS PRODUCT SHALL BE BINDING ON SAMSUNG. SAMSUNG SHALL NOT BE LIABLE FOR LOSS OF REVENUE OR PROFITS, FAILURE TO REALIZE SAVINGS OR OTHER BENEFITS, OR ANY OTHER SPECIAL, INCIDENTAL OR CONSEQUENTIAL DAMAGES CAUSED BY THE USE, MISUSE, OR INABILITY TO USE THIS PRODUCT, REGARDLESS OF THE LEGAL THEORY ON WHICH THE CLAIM IS BASED, AND EVEN IF SAMSUNG HAS BEEN ADVISED OF THE POSSIBILITY OF SUCH DAMAGES.
NOR SHALL RECOVERY OF ANY KIND AGAINST SAMSUNG BE GREATER IN AMOUNT THAN THE PURCHASE PRICE OF THE PRODUCT SOLD BY SAMSUNG AND CAUSING THE ALLEGED DAMAGE. WITHOUT LIMITING THE FOREGOING, PURCHASER ASSUMES ALL RISK AND LIABILITY FOR LOSS, DAMAGE, OR INJURY TO PURCHASER AND PURCHASER'S PROPERTY AND TO OTHERS AND THEIR PROPERTY ARISING OUT OF THE USE, MISUSE, OR INABILITY TO USE THIS PRODUCT. THIS LIMITED WARRANTY SHALL NOT EXTEND TO ANYONE OTHER THAN THE ORIGINAL PURCHASER OF THIS PRODUCT, IS NONTRANSFERABLE AND STATES YOUR EXCLUSIVE REMEDY.
Some states do not allow limitations on how long an implied warranty lasts, or the exclusion or limitation of incidental or consequential damages, so the above limitations or exclusions may not apply to you. This warranty gives you specific rights, and you may also have other rights, which vary from state to state.
To obtain warranty service, please contact SAMSUNG at:
Samsung Electronics America, Inc.
85 Challenger Road
Ridgefield Park, NJ 07660
Visits by a Service Engineer to explain functions, maintenance or installation is not covered by warranty.
Please contact the Samsung call center for help with any of these issues.
English66
Warranty (CANADA)
SAMSUNG WASHER
LIMITED WARRANTY TO ORIGINAL PURCHASER
This SAMSUNG brand product, as supplied and distributed by SAMSUNG ELECTRONICS CANADA, INC. (SAMSUNG) and delivered new, in the original carton to the original consumer purchaser, is warranted by SAMSUNG against manufacturing defects in materials and workmanship for a limited warranty period of:
One (1) year part and labor, Ten (10) years washing Digital Inverter Motor (Part only)
This limited warranty begins on the original date of purchase, and is valid only on products purchased and used in the Canada. To receive warranty service, the purchaser must contact SAMSUNG for problem determination and service procedures. Warranty service can only be performed by a SAMSUNG authorized service center. The original dated bill of sale must be presented upon request as proof of purchase to SAMSUNG or SAMSUNG's authorized service center. SAMSUNG will provide in-home service during the warranty period at no charge, subject to availability within the Canada. In-home service is not available in all areas.
To receive in-home service, product must be unobstructed and accessible to the service agent. If service is not available, SAMSUNG may elect to provide transportation of the product to and from an authorized service center.
Warranty (CANADA)
SAMSUNG will repair, replace, or refund this product at our option and at no charge as stipulated herein, with new or reconditioned parts or products if found to be defective during the limited warranty period specified above. All replaced parts and products become the property of SAMSUNG and must be returned to SAMSUNG. Replacement parts and products assume the remaining original warranty, or ninety (90) days, whichever is longer. This limited warranty covers manufacturing defects in materials and workmanship encountered in normal, noncommercial use of this product and shall not apply to the following: damage that occurs in shipment; delivery and installation; applications and uses for which this product was not intended; altered product or serial numbers; cosmetic damage or exterior finish; accidents, abuse, neglect, fire, water, lightning, or other acts of nature or God; use of products, equipment, systems, utilities, services, parts, supplies, accessories, applications, installations, repairs, external wiring or connectors not supplied or authorized by SAMSUNG that damage this product or result in service problems; incorrect electrical line voltage, fluctuations and surges; customer adjustments and failure to follow operating instructions, maintenance and environmental instructions that are covered and prescribed in the instruction book; product removal and reinstallation; problems caused by pest infestations. This limited warranty does not cover problems resulting from incorrect electric current, voltage or supply, light bulbs, house fuses, house wiring, cost of a service call for instructions, or fixing installation errors. SAMSUNG does not warranty uninterrupted or error-free operation of the product.
EXCEPT AS SET FORTH HEREIN, THERE ARE NO WARRANTIES ON THIS PRODUCT EITHER EXPRESS OR IMPLIED, AND SAMSUNG DISCLAIMS ALL WARRANTIES INCLUDING, BUT NOT LIMITED TO, ANY IMPLIED WARRANTIES OF MERCHANTABILITY, INFRINGEMENT OR FITNESS FOR A PARTICULAR PURPOSE.
English68
NO WARRANTY OR GUARANTEE GIVEN BY ANY PERSON, FIRM, OR CORPORATION WITH RESPECT TO THIS PRODUCT SHALL BE BINDING ON SAMSUNG. SAMSUNG SHALL NOT BE LIABLE FOR LOSS OF REVENUE OR PROFITS, FAILURE TO REALIZE SAVINGS OR OTHER BENEFITS, OR ANY OTHER SPECIAL, INCIDENTAL OR CONSEQUENTIAL DAMAGES CAUSED BY THE USE, MISUSE, OR INABILITY TO USE THIS PRODUCT, REGARDLESS OF THE LEGAL THEORY ON WHICH THE CLAIM IS BASED, AND EVEN IF SAMSUNG HAS BEEN ADVISED OF THE POSSIBILITY OF SUCH DAMAGES.
NOR SHALL RECOVERY OF ANY KIND AGAINST SAMSUNG BE GREATER IN AMOUNT THAN THE PURCHASE PRICE OF THE PRODUCT SOLD BY SAMSUNG AND CAUSING THE ALLEGED DAMAGE. WITHOUT LIMITING THE FOREGOING, PURCHASER ASSUMES ALL RISK AND LIABILITY FOR LOSS, DAMAGE, OR INJURY TO PURCHASER AND PURCHASER'S PROPERTY AND TO OTHERS AND THEIR PROPERTY ARISING OUT OF THE USE, MISUSE, OR INABILITY TO USE THIS PRODUCT. THIS LIMITED WARRANTY SHALL NOT EXTEND TO ANYONE OTHER THAN THE ORIGINAL PURCHASER OF THIS PRODUCT, IS NONTRANSFERABLE AND STATES YOUR EXCLUSIVE REMEDY.
Some provinces do not allow limitations on how long an implied warranty lasts, or the exclusion or limitation of incidental or consequential damages, so the above limitations or exclusions may not apply to you.
This warranty gives you specific rights, and you may also have other rights, which vary from province to province.
To obtain warranty service, please contact SAMSUNG at:
Samsung Electronics Canada Inc.
2050 Derry Road West,
Mississauga, Ontario L5N 0B9 Canada.
www.samsung.com/ca/support (English)
www.samsung.com/ca_fr/support (French)
Visits by a Service Engineer to explain functions, maintenance or installation is not covered by warranty.
Please contact the Samsung call center for help with any of these issues.


Memo


Memo


SAMSUNG
text_image
QR code image containing encoded data, no visible human-readable textScan the QR code* or visit www.samsung.com/spsn to view our helpful How-to Videos and Live Shows
*Requires reader to be installed on your smartphone
Scan this with your smartphone
QUESTIONS OR COMMENTS?
| COUNTRY CALL OR VISIT US ONLINE AT | |
| U.S.A 1-800-SAMSUNG (726-7864) www.samsung.com/us/support | |
| CANADA 1-800-SAMSUNG (726-7864) | www.samsung.com/ca/support (English)www.samsung.com/ca_fr/support (French) |


DC68-03645B-00
Lave-linge
text_image
Diagram of a washing machine with numbered parts for identification and assembly reference.natural_image
Illustration showing a hand using a wrench to adjust a mechanical component, with no text or symbols present.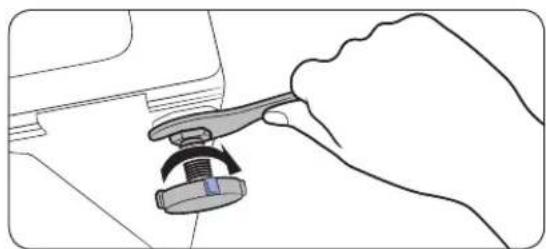
natural_image
Line drawing of a hand using a tool to adjust a mechanical component (no text or symbols)text_image
Technical diagram showing pipe installation with labeled components A and B, including coiled hoses and a central component.ATTENTION
natural_image
Diagram showing two mechanical components with rotating arms, no text or symbols present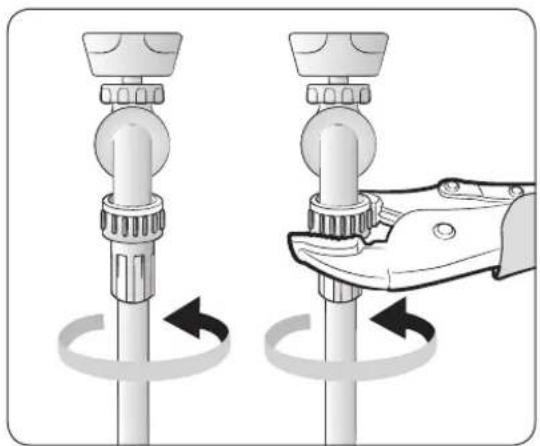
natural_image
Illustration of a hand using a tool to adjust or install a cylindrical component, showing rotational motion (no text or symbols)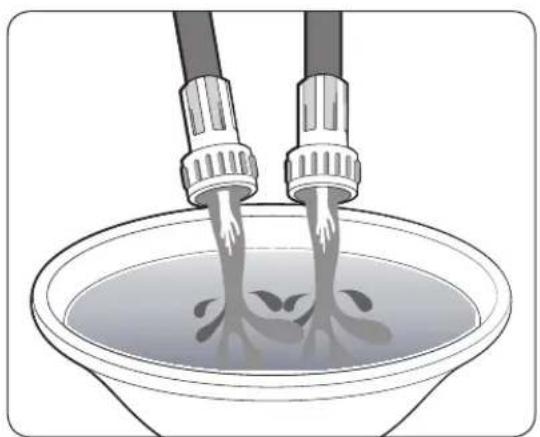
natural_image
Illustration of two containers pouring liquid into a bowl (no text or symbols)natural_image
Diagram of a car interior showing hoses and control knobs with an arrow pointing to a component (no text or symbols present)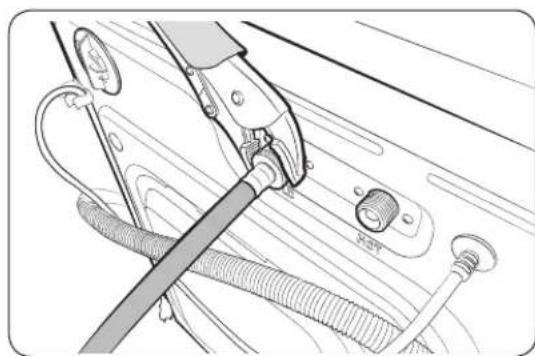
natural_image
Technical line drawing of a mechanical assembly with hoses and connectors (no text or symbols)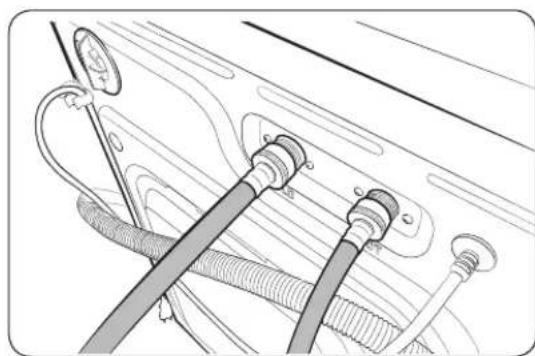
natural_image
Illustration of hoses and connectors in a vehicle (no text or symbols)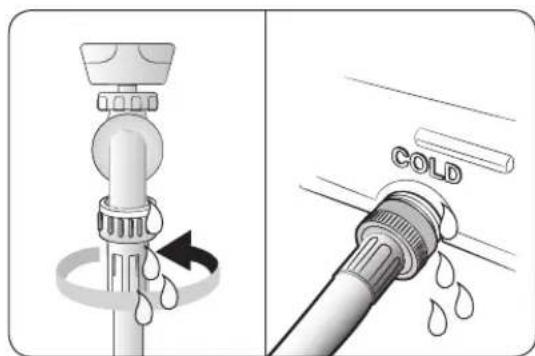
text_image
COLDnatural_image
Line drawing of a square sink with a hose and handle, no text or symbols present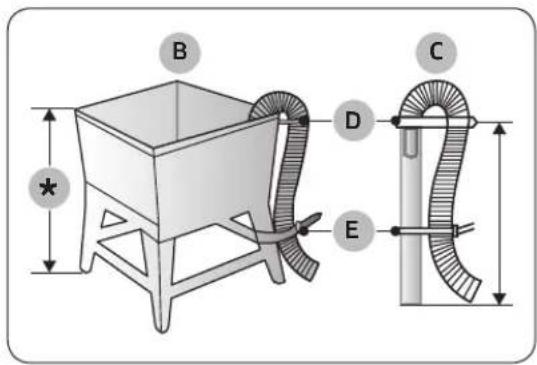
text_image
B * C D E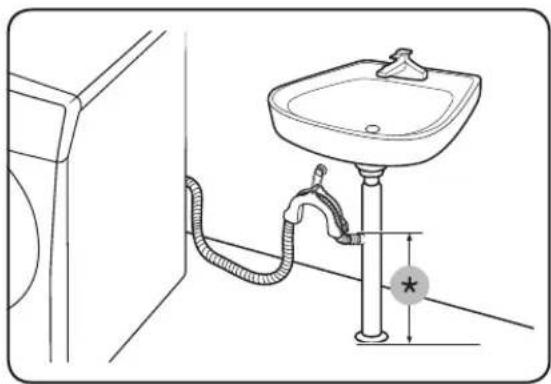
natural_image
Line drawing of a bathroom sink with tubing and a vertical pipe, no text or symbols presenttext_image
Diagram of a hose with labeled components and directional arrows, marked with symbols A and *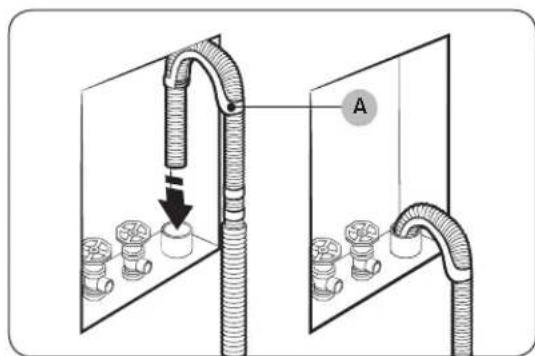
text_image
Diagram showing a pipe installation with valves and a labeled component 'A' in a container-like setupATTENTION
natural_image
Abstract logo design featuring stylized 'he' letters in white on black and black curved background (no text or symbols)text_image
Diagram of a car interior showing labeled compartments and a device with component Anatural_image
Line drawing of a mechanical device with a handle and internal components (no text or symbols)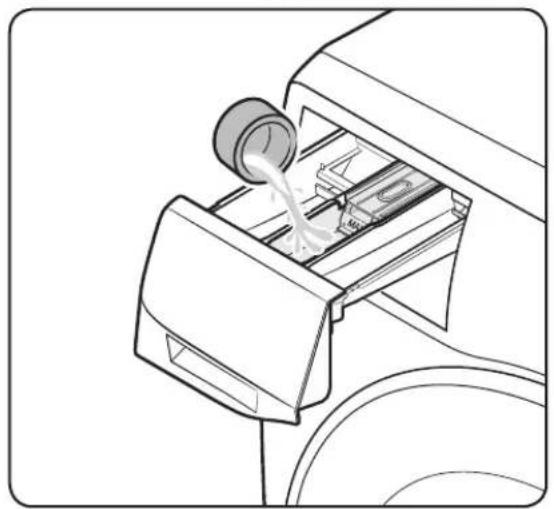
natural_image
Line drawing of a mechanical device with a cylindrical component inserted into a housing (no text or symbols)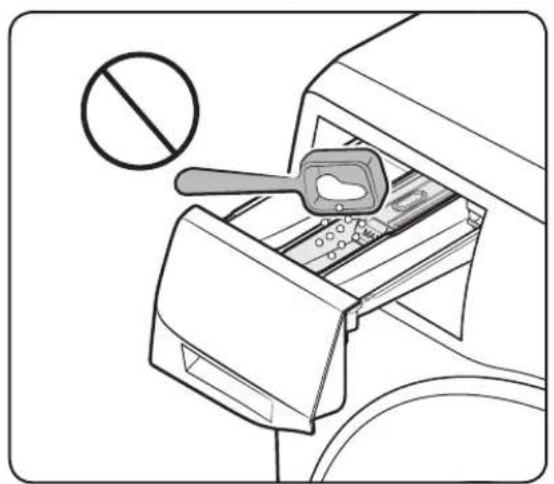
natural_image
Line drawing of a hand tool inserting into a device into a drawer, with no text or symbols present.text_image
Technical diagram showing a device's internal structure with labeled components and a magnified view of the device's internal structure.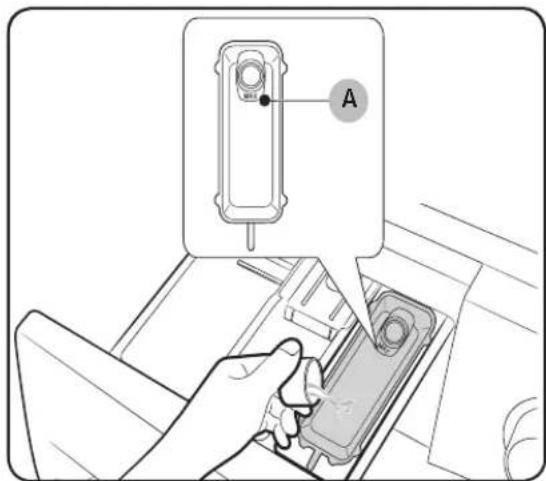
text_image
Diagram showing a hand inserting a device into a mobile phone, with an inset labeled 'A' pointing to the device.My Cycle (Mon cycle)
text_image
QR code image containing encoded data, no visible human-readable text
NOTE
text_image
Diagram showing a hand holding a device next to a device with a rotary knob, illustrating the process of moving or rotating.text_image
Diagram of a device with labeled component A and directional arrow indicating movement or forcenatural_image
Line drawing of a hand using a pipette to clean a bowl with a mounted device (no text or symbols)natural_image
Diagram of a car door handle assembly with a pipe fitting and valve (no text or symbols)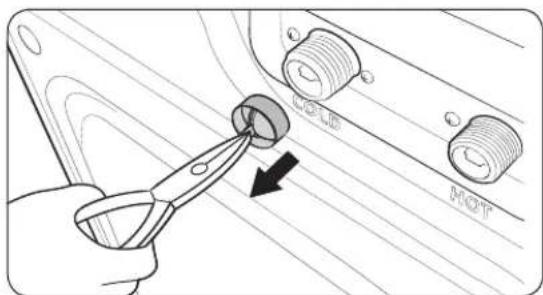
text_image
COLD HOTnatural_image
Hand inserting a component into a device (no text or symbols visible)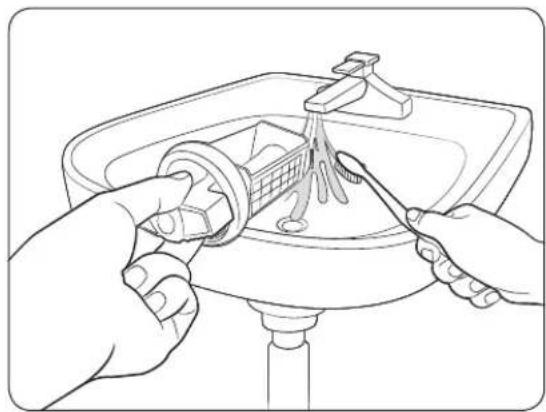
natural_image
Illustration of hands using a tool to clean or repair a small object inside a sink (no text or symbols visible)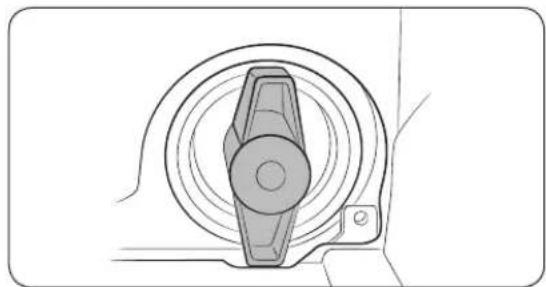
natural_image
Technical line drawing of a mechanical component with concentric circular features (no text or symbols)natural_image
Diagram of a printer or printer device with arrows indicating process flow (no text or symbols present)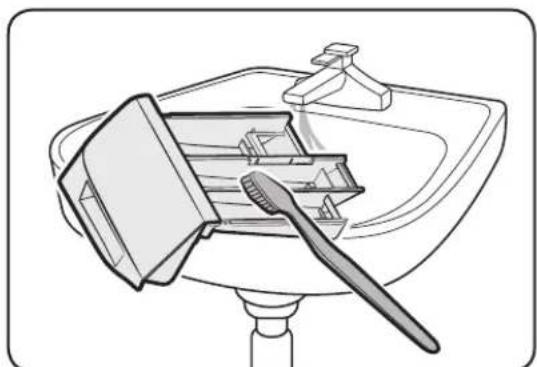
natural_image
Illustration of a toothbrush cleaning a bathtub with a toothbrush resting on it (no text or symbols)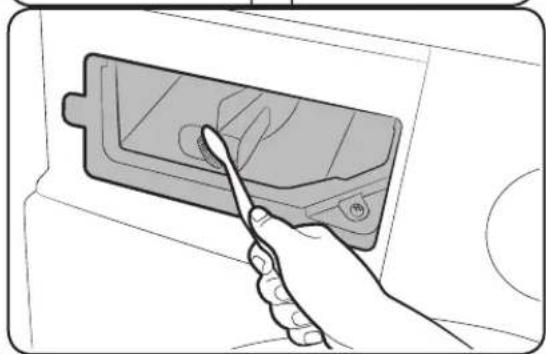
natural_image
Illustration of a hand using a tool to adjust or install a component into a device (no text or symbols visible)natural_image
Technical line drawing of a mechanical component with labeled section A (no text or symbols beyond label)natural_image
Line drawing of a front-loading washing machine with control panel and door (no text or symbols)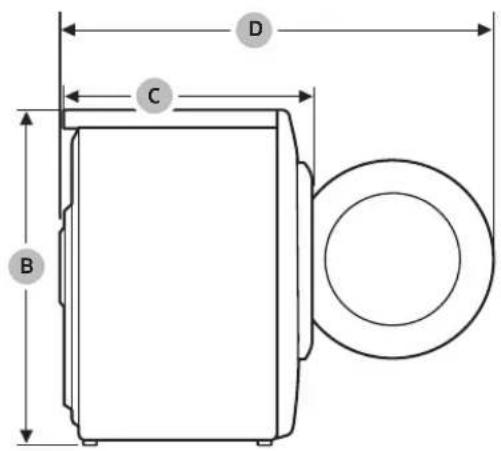
text_image
D C B| Programme | Temp. Spin (Essorage) Soil (Salissure) | ||||||||||||||
| EH | H | W | C | TC | EH | H | M | L | NS | EH | H | N | L | EL | |
| NORMAL | ● | ● | ● | ● | ● | ● | ● | ● | ● | ● | ● | ● | ● | ● | ● |
| DELICATES (DÉLICAT) | ● | ● | ● | ● | ● | ● | ● | ● | |||||||
| HEAVY DUTY (GRAND RENDEMENT) | ● | ● | ● | ● | ● | ● | ● | ● | ● | ● | ● | ● | ● | ● | ● |
| WHITES (VÊTEMENTS BLANCS) | ● | ● | ● | ● | ● | ● | ● | ● | ● | ● | ● | ● | ● | ● | |
| SANITIZE (STÉRILISATION) | ● | ● | ● | ● | ● | ● | ● | ● | ● | ● | ● | ||||
| ALLERGEN (ANTIACARIENS) | ● | ● | ● | ● | ● | ● | ● | ● | ● | ● | ● | ||||
| TOWELS (SERVIETTES) | ● | ● | ● | ● | ● | ● | ● | ● | ● | ● | ● | ● | |||
| 15' EXPRESS (15 MINUTES EXPRESSE) | ● | ● | ● | ● | ● | ● | ● | ● | ● | ● | ● | ● | ● | ● | |
| DELICATES (DÉLICAT) | ● | ● | ● | ● | ● | ● | ● | ● | |||||||
| WOOL (LAINE) | ● | ● | ● | ● | ● | ● | |||||||||
| PERM PRESS (INFROISSABLES) | ● | ● | ● | ● | ● | ● | ● | ● | ● | ● | ● | ● | |||
| PERM PRESS (INFROISSABLES) | ● | ● | ● | ● | ● | ● | ● | ● | ● | ● | ● | ● | |||
| ACTIVE WEAR (VÊTEMENTS DE SPORT) | ● | ● | ● | ● | ● | ● | ● | ● | ● | ||||||
| RINSE+SPIN (RINÇAGE+ESSORAGE) | ● | ● | ● | ● | |||||||||||
| SELF CLEAN (AUTONETTOYAGE)+ | ● | ● | |||||||||||||
| Programme | Options | ||||
| Extra Rinse (Rinçage Supplémentaire) | Super Speed (Haute vitesse) | Delay End (Arrêt différé) | My Cycle (Mon cycle) | Alarme Éteinte | |
| NORMAL | ● ● ● | ● ● | |||
| DEEP STEAM (VAPEUR PROF.) | ● ● ● | ● ● | |||
| HEAVY DUTY (GRAND RENDEMENT) | ● ● ● | ● ● | |||
| WHITES (VÊTEMENTS BLANCS) | ● ● ● | ● | |||
| SANITIZE (STÉRILISATION) | ● ● ● | ● | |||
| ALLERGEN (ANTIACARIENS) | ● ● ● | ● ● | |||
| TOWELS (SERVIETTES) | ● ● ● | ● | |||
| DELICATES (DÉLICAT) | ● ● ● | ● | |||
| WOOL (LAINE) | ● ● ● | ||||
| PERM PRESS (INFROISSABLES) | ● ● ● | ● | |||
| ACTIVE WEAR (VÊTEMENTS DE SPORT) | ● ● ● | ● | |||
| RINSE+SPIN (RINÇAGE+ESSORAGE) | ● ● ● | ● | |||
| SELF CLEAN (AUTONETTOYAGE)+ | ● | ● | |||
Ridgefield Park, NJ 07660
Samsung Electronics Canada Inc.
2050 Derry Road West,
Mississauga, Ontario L5N 0B9 Canada.
www.samsung.com/ca/support (English)
www.samsung.com/ca_fr/support (French)
text_image
QR code image containing encoded data, no visible human-readable textScan the QR code* or visit www.samsung.com/spsn to view our helpful How-to Videos and Live Shows
*Requires reader to be installed on your smartphone
Scan this with your smartphone
DES QUESTIONS OU DES COMMENTAIRES ?
| PAYS APPELEZ LE OU RENDEZ-VOUS SUR LE SITE | ||
| U.S.A 1-8 | 00-SAMSUNG (726-7864) www.samsung.com/us/support | |
| CANADA 1 | 800-SAMSUNG (726-7864) | www.samsung.com/ca/support (English)www.samsung.com/ca_fr/support(French) |


DC68-03645B-00
Lavadora
Manual del usuario
WW22N6850Q\*
text_image
SAMSUNGContenido
text_image
Labeled diagram of a washing machine with numbered parts for identificationnatural_image
Hand holding a tool interacting with a circular component, showing rotational motion arrows (no text or symbols)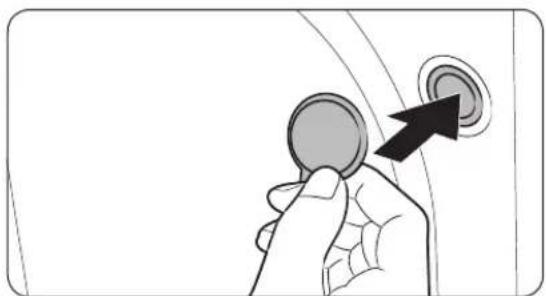
natural_image
Hand holding a circular button with an arrow pointing to the right button (no text or symbols present)natural_image
Illustration showing a hand using a wrench to adjust a mechanical component, with no text or symbols present.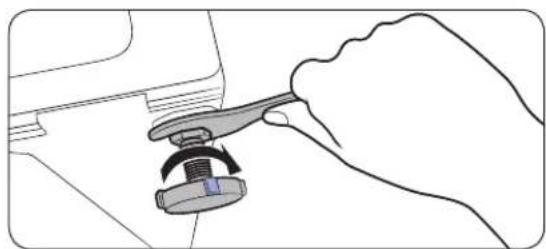
natural_image
Line drawing of a hand using a tool to adjust a mechanical component (no text or symbols)text_image
Technical diagram showing mechanical assembly with labeled parts A and B, including hoses and a central component.PRECAUCIÓN
natural_image
Diagram showing two mechanical components with rotating arms, no text or symbols present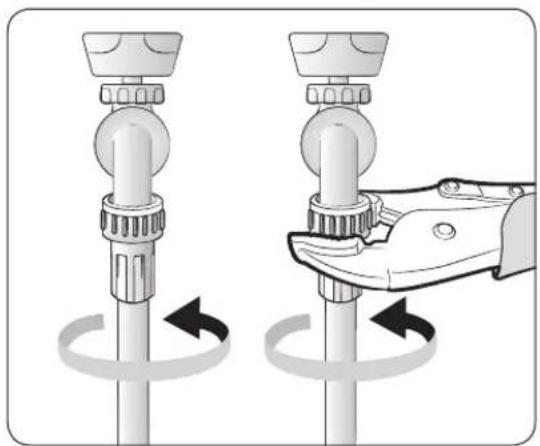
natural_image
Illustration of a hand using a tool to adjust or install a cylindrical component, showing rotational motion (no text or symbols)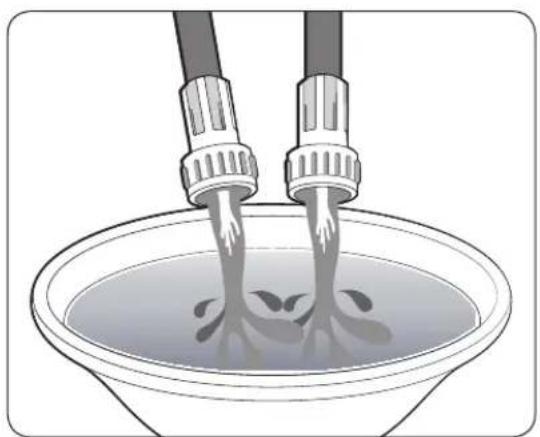
natural_image
Illustration of two containers pouring liquid into a bowl (no text or symbols)natural_image
Diagram of a car interior showing hoses and control knobs with an arrow pointing to a component (no text or symbols present)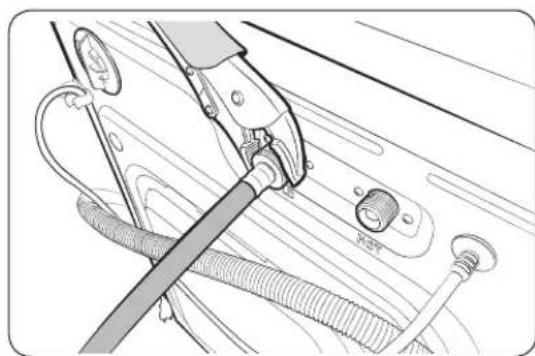
natural_image
Technical line drawing of a mechanical assembly with hoses and connectors (no text or symbols)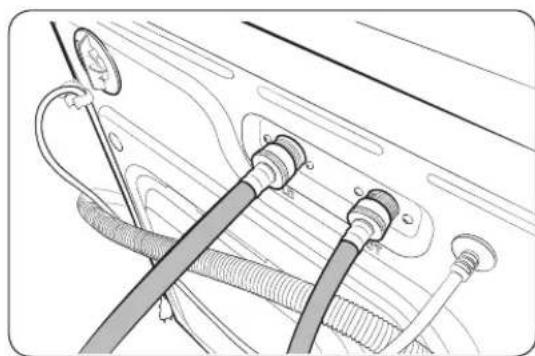
natural_image
Illustration of hoses and connectors in a vehicle (no text or symbols)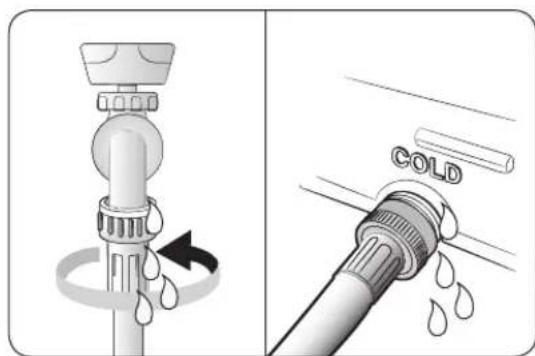
text_image
Diagram illustrating the process of a water tap with water droplets, showing fluid flow and cold condition labels.text_image
Diagram showing a toilet sink with a tube inserted into a basin, labeled with point A and directional arrows indicating flow or movement.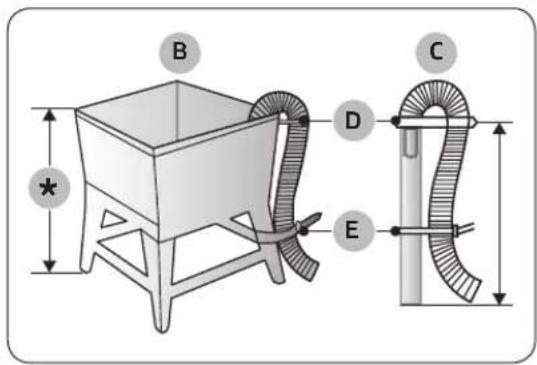
text_image
B * C D E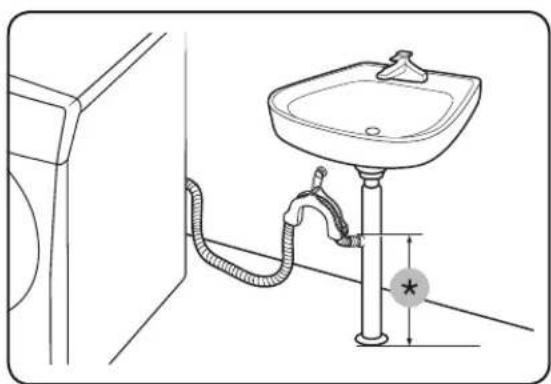
natural_image
Line drawing of a bathroom sink with tubing and a wall-mounted drain (no text or symbols)text_image
Diagram of a hose assembly with labeled components and directional arrows, marked with symbols A and *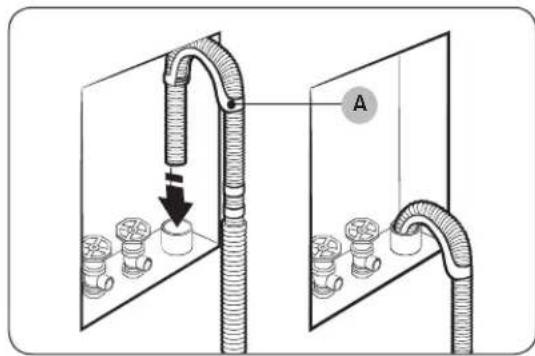
text_image
Diagram showing a pipe installation with labeled component A, indicating fluid flow or movement in a container.PASO 6 Encendido
natural_image
Abstract logo design featuring stylized lowercase 'h' and letter 'e' with curved lines, no text or symbols present.natural_image
Line drawing of a mechanical device with a handle and internal components (no text or symbols)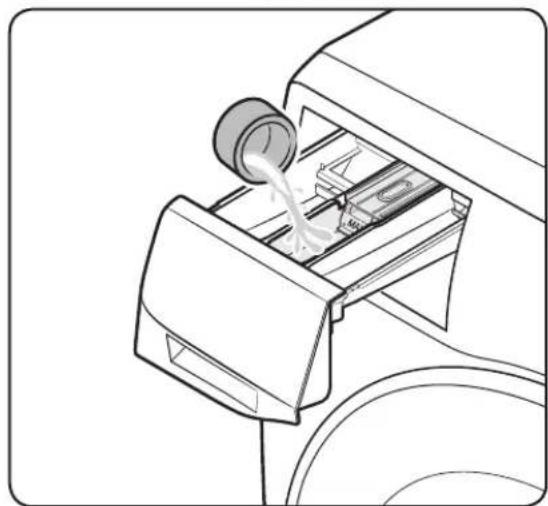
natural_image
Line drawing of a mechanical device with a cylindrical component inserted into a housing (no text or symbols)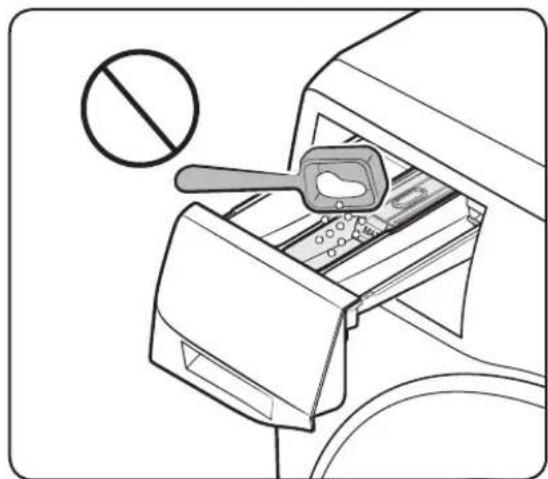
natural_image
Line drawing of a device with a hand holding a tool, showing no text or symbols on the device itself.text_image
Technical diagram showing a device interior with labeled components and a magnified view of the MAX component.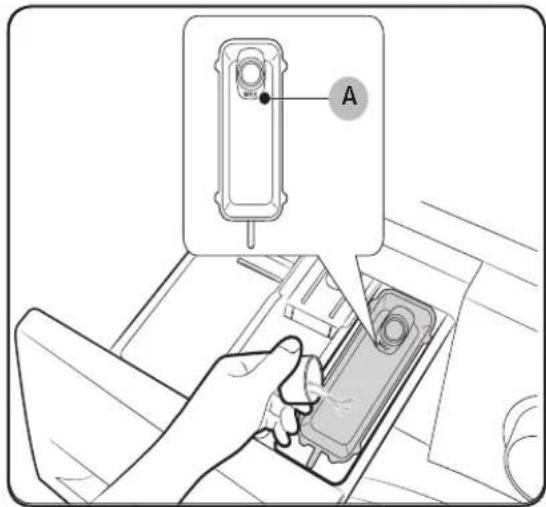
text_image
Diagram showing a hand inserting a device into a car's seat, with an inset labeled 'A' pointing to the component.text_image
QR code image containing encoded data, no visible human-readable text
NOTA
text_image
Diagram showing a hand holding a device next to a washing machine with a rotary dial, illustrating the process.text_image
Diagram of a device with labeled parts A and an arrow indicating direction, likely illustrating a mechanical or electrical component.natural_image
Line drawing of a hand pouring liquid into a bowl using a tool, with no text or symbols present.natural_image
Diagram of a car door handle assembly with a pipe fitting and valve (no text or symbols)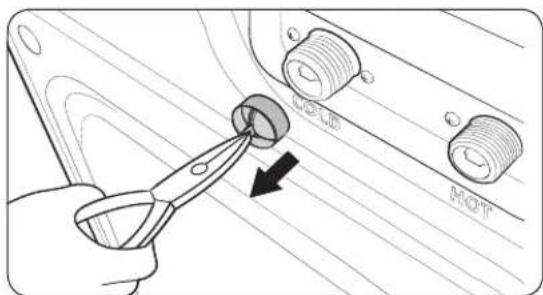
text_image
COLD HOTnatural_image
Hand inserting a component into a device (no text or symbols visible)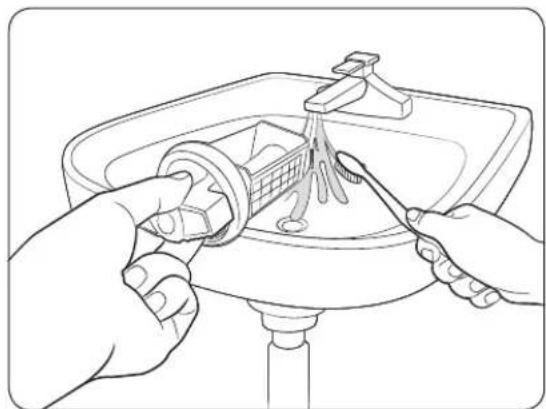
natural_image
Line drawing of hands using a tool to clean or adjust a kitchen sink (no text or symbols)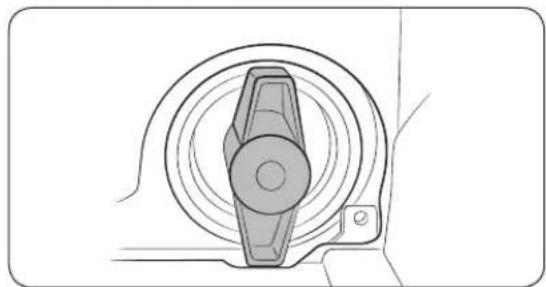
natural_image
Technical line drawing of a mechanical component with concentric circular features (no text or symbols)natural_image
Diagram of a printer or printer device with arrows indicating process flow (no text or symbols present)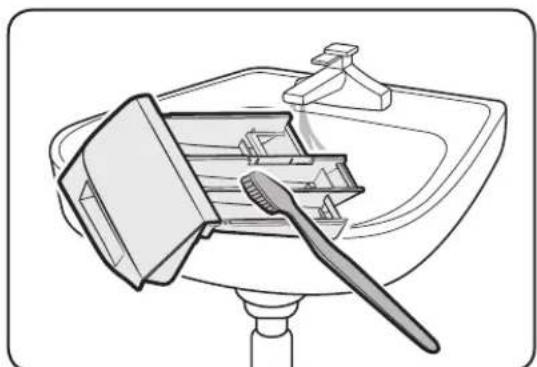
natural_image
Illustration of a toothbrush cleaning a bathtub with a toothbrush resting on it (no text or symbols)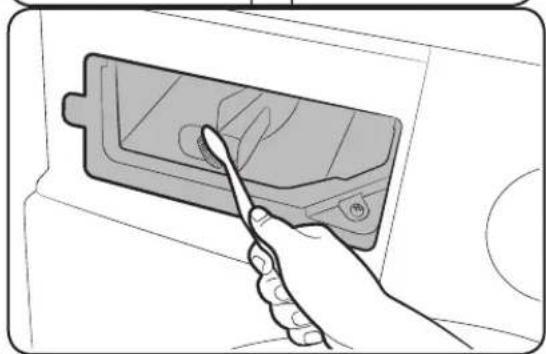
natural_image
Illustration of a hand using a tool to clean or install a device into a container (no text or symbols visible)natural_image
Technical line drawing of a mechanical component with labeled section A (no text or symbols beyond label)natural_image
Line drawing of a front-loading washing machine with control panel and door (no text or symbols)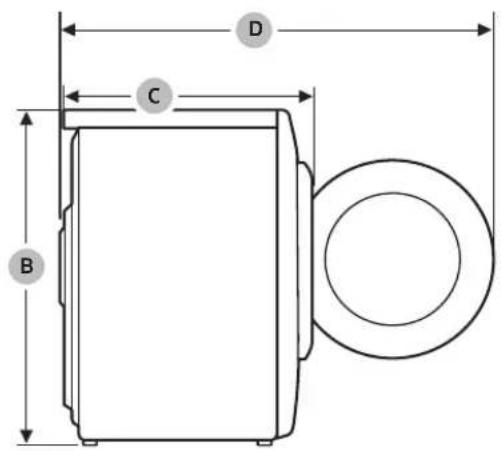
text_image
D C B| Ciclo | Temp. (Temperatura) Sp | In (Centrifugar) Soil (Nivel de Suciedad) | |||||||||||||
| EH | H | W | C | TC | EH | H | M | L | NS | EH | H | N | L | EL | |
| NORMAL | ● | ● | ● | ● | ● | ● | ● | ● | ● | ● | ● | ● | ● | ● | |
| DELICATES (DELCADOS) | ● | ● | ● | ● | ● | ● | ● | ● | ● | ● | |||||
| HEAVY DUTY (CARGA PESADA) | ● | ● | ● | ● | ● | ● | ● | ● | ● | ● | ● | ● | ● | ● | ● |
| WHITES (ROPA BLANCA) | ● | ● | ● | ● | ● | ● | ● | ● | ● | ● | ● | ● | ● | ● | |
| SANITIZE (ESTERILIZAR) | ● | ● | ● | ● | ● | ● | ● | ● | ● | ● | ● | ||||
| ALLERGEN (ALERGENICO) | ● | ● | ● | ● | ● | ● | ● | ● | ● | ● | ● | ||||
| TOWELS (TOALLAS) | ● | ● | ● | ● | ● | ● | ● | ● | ● | ● | ● | ● | |||
| 15' EXPRESS (RÁPIDO 15') | ● | ● | ● | ● | ● | ● | ● | ● | ● | ● | ● | ● | ● | ● | |
| DELICATES (DELCADOS) | ● | ● | ● | ● | ● | ● | ● | ● | ● | ● | |||||
| WOOL (LANA) | ● | ● | ● | ● | ● | ● | |||||||||
| PERM PRESS (PLANCHADO PERMANENTE) | ● | ● | ● | ● | ● | ● | ● | ● | ● | ● | ● | ● | |||
| PERM PRESS (PLANCHADO PERMANENTE) | ● | ● | ● | ● | ● | ● | ● | ● | ● | ● | ● | ● | |||
| ACTIVE WEAR (ROPA DEPORTIVA) | ● | ● | ● | ● | ● | ● | ● | ● | ● | ● | |||||
| RINSE + SPIN (ENJUAGAR + CENTRIFUGAR) | ● | ● | ● | ● | |||||||||||
| SELF CLEAN+ (AUTOLIMPIEZA+) | ● | ● | |||||||||||||
| Ciclo | Opciones | ||||
| Extra Rinse (Extra Enjuague) | Super Speed | Delay End (Término Retardado) | My Cycle (Mi Ciclo) | Alarma apagada | |
| NORMAL | ● ● ● | ● ● | |||
| DEEP STEAM (VAPORIZACIÓN PROFUNDA) | ● ● ● | ● ● | |||
| HEAVY DUTY (CARGA PESADA) | ● ● ● | ● ● | |||
| WHITES (ROPA BLANCA) | ● ● ● | ● | |||
| SANITIZE (ESTERILIZAR) | ● ● ● | ● | |||
| ALLERGEN (ALERGENICO) | ● ● ● | ● ● | |||
| TOWELS (TOALLAS) | ● ● ● | ● | |||
| DELICATES (DELICADOS) | ● ● ● | ● | |||
| WOOL (LANA) | ● ● ● | ||||
| PERM PRESS (PLANCHADO PERMANENTE) | ● ● ● | ● | |||
| ACTIVE WEAR (ROPA DEPORTIVA) | ● ● ● | ● | |||
| RINSE + SPIN (ENJUAGAR + CENTRIFUGAR) | ● ● ● | ● | |||
| SELF CLEAN+ (AUTOLIMPIEZA+) | ● | ● | |||
Ridgefield Park, NJ 07660
Samsung Electronics Canada Inc.
2050 Derry Road West,
Mississauga, Ontario L5N 0B9 Canada.
www.samsung.com/ca/support (English)
www.samsung.com/ca_fr/support (French)
text_image
QR code image containing encoded data, no visible human-readable textScan the QR code* or visit www.samsung.com/spsn to view our helpful How-to Videos and Live Shows
*Requires reader to be installed on your smartphone
Scan this with your smartphone