
REH 2060 - Frying Pan Orbegozo - Free user manual and instructions
Find the device manual for free REH 2060 Orbegozo in PDF.
| Product type | Radiant electric heater |
| Brand | Orbegozo |
| Model | REH 2060 |
| Rated thermal power | 2000 W (2.0 kW) |
| Minimum thermal power | 0 W (off) |
| Power supply | 230 V ~ 50 Hz |
| Control type | Electronic with adjustable thermostat (5–40 °C) |
| Weekly timer | Yes |
| 24 h timer | Yes |
| Remote control | Yes (CR2032 battery included) |
| Child lock | Yes (child clock function) |
| Display | Touch LED screen |
| Heating modes | Low and high |
| Wall mounting | Yes (bracket provided, min distance floor 15 cm, ceiling 50 cm) |
| Floor feet | Yes (4 screws ST12x4mm provided) |
| Overheat protection | Yes (do not cover) |
| Protection rating | Do not use near a bathtub, shower or swimming pool |
| Cleaning | Unplug, clean grilles with soft cloth, no abrasives |
| Heat output type | Electric storage (electronic control) |
| Auxiliary consumption | 0 W in standby |
| Repairability | Contact authorized technical service |
| Standards | Low Voltage Directive 2006/95/EC and EMC 2004/108/EC |
Frequently Asked Questions - REH 2060 Orbegozo
User questions about REH 2060 Orbegozo
0 question about this device. Answer the ones you know or ask your own.
Ask a new question about this device
Download the instructions for your Frying Pan in PDF format for free! Find your manual REH 2060 - Orbegozo and take your electronic device back in hand. On this page are published all the documents necessary for the use of your device. REH 2060 by Orbegozo.
USER MANUAL REH 2060 Orbegozo
Read this manual carefully before running this appliance and save it for reference in order to obtain the best results and ensure safe use.
Read the operating instructions carefully before putting the appliance into operation and keep the instructions including the warranty, the receipt and, if possible, the box with the internal packing. If you give this device to other people, please also pass on the operating instructions.
General
- This appliance can be used by children aged from 8 years and above and persons with reduced physical, sensory or mental capabilities or lack of experience and knowledge if they have been given supervision or instruction concerning use of the appliance in a safe way and understand the hazards involved. Children must never play with the appliance. Cleaning and user maintenance must never be carried out by children without supervision.
- Children should be supervised to ensure that they do not play with the appliance.
- WARNING: In order to ensure your children's safety, please keep all packaging (plastic bags, boxes, polystyrene etc.) out of their reach.
4.If the supply cord is damaged it must be repaired by the Authorized Service Agent to avoid a hazard. -
Never pull on the cord when unplugging.
-
Do not use the unit with a damaged cord or plug, or if it is not working properly.
- Do not handle the appliance with wet hands.
- Never immerse the appliance in water or any other liquid.
9.Make sure the appliance has been unplugged before cleaning. - This appliance must be installed following the national regulations for electrical installations.
- This appliance is for household use only.
- In case that you need a copy of the instruction manual, you can ask for it writing an email to sonifer@sonifer.es.
- WARNING: In case of misuse, there is a risk of possible injury.
Special Safety Instructions
WARNING: In order to avoid overheating, do not cover the heater.
- Children of less than 3 years should be kept away unless continuously supervised.
- Children aged from 3 years and less than 8 years shall only switch on/off the appliance provided that it has
been placed or installed in its intended normal operating position and they have been given supervision or instruction concerning use of the appliance in a safe way and understand the hazards involved. Children aged from 3 years and less than 8 years shall not plug in, regulate and clean the appliance or perform user maintenance.
-
CAUTION: Some parts of this product can become very hot and cause burns. Particular attention has to be given where children and vulnerable people are present.
-
The device should not be placed immediately below a socket base.
-
Do not place a heater in use near curtains, furniture, wood paneling or combustible material which can deteriorate with heat.
-
Do not use this heater in the immediate vicinity of a bath, shower or pool.
-
Check if the voltage indicated on the bottom of the appliance corresponds to the local mains voltage before you connect the appliance.
-
The appliance must be connected to an earthed mains outlet. If you wish to use an extension cord, a 3-wire type is suitable.
-
Do not use the appliance in flammable atmospheres (e.g. in the vicinity of combustible gases or sprays cans)! Explosion and fire hazard!
-
Important! Do not insert any object into the appliance openings! Risk of injury (electric shock) and damage to the appliance!
-
Attention! The front grille becomes very hot when the appliance is in use. Place the appliance so that is cannot be touched by accident! Risk of burns! The appliance will cool down gradually after being switched off.
-
Keep the mains cord at a safe distance from the air inlet and outlet grills. Do not wind the cord around the appliance and do not bend it.
-
Always unplugged the heater after use.
-
The socket-outlet must be accessible at all times to enable the mains plug to be disconnected as quickly as possible.
-
Do not attempt to move the heater while in use.
-
Do not use the heater on extremely deep-pile carpets!
-
Do not use the heater in an upright position.
-
There is tip over switch on the base. When the heater tips over, the electricity will be turned off automatically.
INSTALLATION (WHILE USE ON THE FLOOR AS PORTABLE APPLIANCE)
Please attach the feet on the heater's housing, and fixing them with supplied ST12x4mm (8pcs) screws.
WALL MOUNTING (WHILE USE THE HEATER AS FIXED APPLIANCE)
Please note that the product must be installed at least 15cm from the floor and 50~cm from the ceiling.
-For wall mounting study scheme
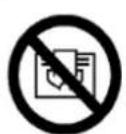
- Uninstall the bracket from the body. See the image1
- Drill the holes at each sides on the wall, then insert the plastic expanded plugs within Fix the bracket in the wall with screw. See the image 3
- Fit the heater into suitable position ensuing that the holes align with bracket. See image 3
- Tight the screw on the top of bracket to catch steady. See image 4

OPERATION
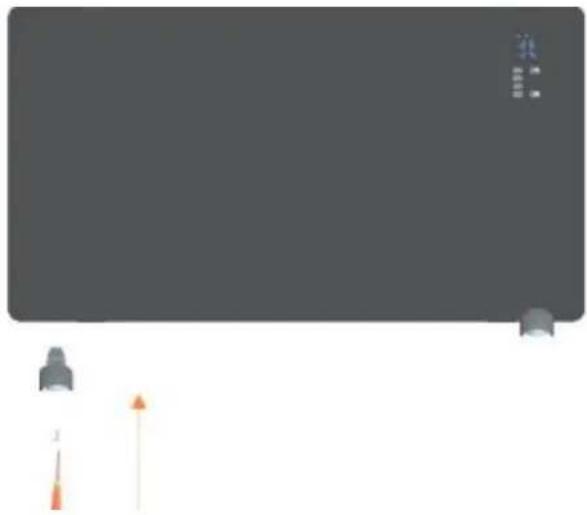
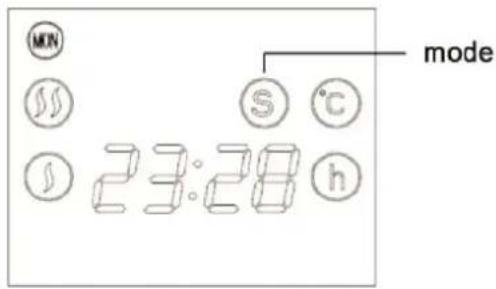
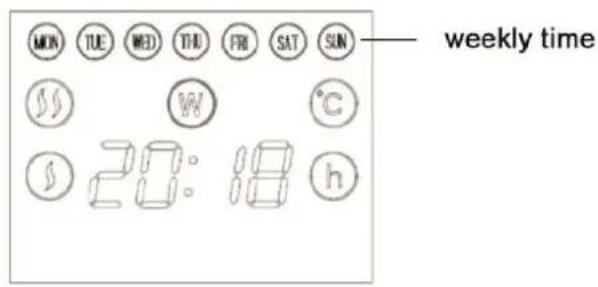
Before you working the heater, your should turn on the switch in side. The display shows as image 1, it's standby mode, no heating, shows in the screen.
Long press (MOE) button to set hours, long press (MN) button to set minutes, long press (SET) to set day, see image 1.
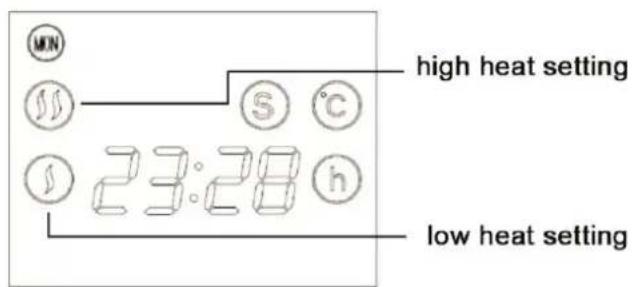
Press to change the mode from standby mode to work mode, the display shows as below image 2, shows in the screen.
Press button to regulate high heat setting and low heat setting, it's low heat setting when shows in the screen, it's high setting when shows in the screen.
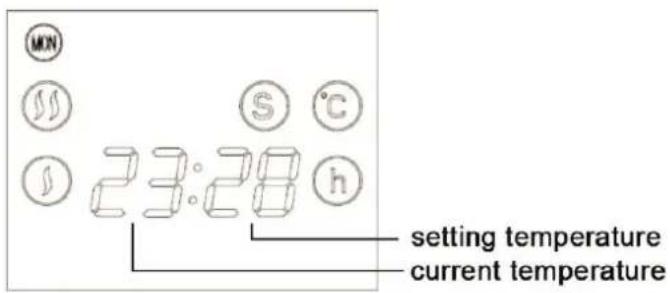
Press or button to select the desired temperature from a range of 5^ - 40^ . The temperature shows in 2 sets numbers, the left number shows current temperature, the right number shows setting temperature
WEEKLY TIMER MODE
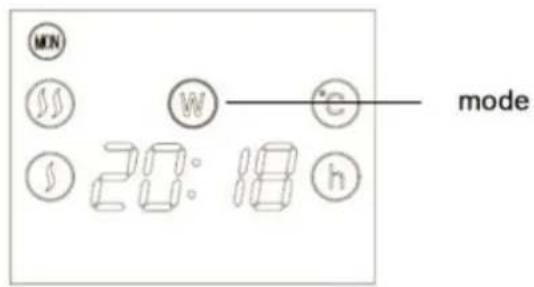
Press to change the mode from standby mode to work mode, the display shows as below image 5, shows in the screen.
Press button to choose weekly time, For example, Monday to Friday, 2. Monday to Saturday, 3, Wednesday, Friday......, see image 6.
After choose the weekly timer, press button to set the heat settings.
Press button to set the the start time, press button to set the stop time. For example, Press button to 9:00, it means from 0:00 to 9:00, the heater keep working, then press
button to set the stop time, if set 12:00, it will stop on 12:00, and then press and again until 24 hours all was setting, it will show current time when the setting is finish
CHILD CLOCK
Long press bottom, will be display on the screen, so you can not make any operation, and same way to touch to delete the child clock function.
REMOTE CONTROL
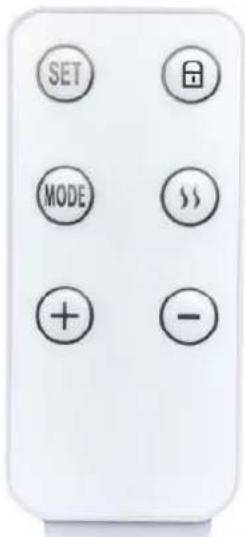
SET: P, W, S three modes to choose and set current week.
MODE Reserve week. Set 24H timer in S mode.

Set child lock.

Adjust the power.
: Set open appointment time and increase temperature.
- : Set close appointment time and decrease temperature.
Battery: 1XCR2032 lithium battery (included)
The appliance emits a beep upon each operation setting.
CLEANING AND MAINTENANCE
- Before cleaning always remove the plug from the electrical socket outlet.
Clean the air inlet and outlet grilles frequently. - Never use abrasive powders or solvents.
This product is only suitable for well insulated spaces or occasional use
REH 1060
| Item Symbol | Value | Unit | Item | Unit | |||
| Heat output | Type of heat input, for electric storage local space heaters only (select one) | ||||||
| Nominal heat output | Pnom | 1.0 | KW | manual heat charge control, with integrated thermostat | N/A | ||
| Minimum heat output (indicative) | Pmin | 0 | KW | manual heat charge control with room and/or outdoor temperature feedback | N/A | ||
| Maximum continuous heat output | Pmax,c | 1.0 | KW | electronic heat charge control with room and/or outdoor temperature feedback | yes | ||
| Auxiliary electricity consumption | fan assisted heat output | N/A | |||||
| At nominal heat output | elmax | 0 | KW | Type of heat output/room temperature control (select one) | |||
| At minimum heat output | elmin0 | KW | single stage heat output and no room temperature control | N/A | |||
| In standby mode | elsb0 | W | Two or more manual stages, no room temperature control | N/A | |||
| with mechanic thermostat room temperature control | N/A | ||||||
| with electronic room temperature control | N/A | ||||||
| electronic room temperature control plus day timer | N/A | ||||||
| electronic room temperature control plus week timer | yes | ||||||
| Other control options (multiple selections possible) | |||||||
| room temperature control, with presence detection | N/A | ||||||
| room temperature control, with open window detection | N/A | ||||||
| with distance control option | N/A | ||||||
| with adaptive start control | yes | ||||||
| with working time limitation | N/A | ||||||
| with black bulb sensor | N/A | ||||||
| Contact details info | SONIFER SA. Avenida de Santiago 86, 30007, Murcia. Spain. | ||||||
REH 1560
| Item Symbol | Value | Unit | Item | Unit | |||
| Heat output | Type of heat input, for electric storage local space heaters only(select one) | ||||||
| Nominalheatoutput | Pnom | 1.5 | KW | manual heat charge control, with integrated thermostat | N/A | ||
| Minimulheatoutput(indicative) | Pmin | 0 | KW | manual heat charge control with room and/or outdoor temperature feedback | N/A | ||
| Maximumcontinuousheatoutput | Pmax,c | 1.5 | KW | electronic heat charge control with room and/or outdoor temperature feedback | yes | ||
| Auxiliary electricity consumption | fan assisted heat output | N/A | |||||
| At nominalheatoutput | elmax | 0 | KW | Type of heat output/room temperature control (select one) | |||
| Atminimumheatoutput | elmin 0 | KW | single stage heat output and no room temperature control | N/A | |||
| In standbymode | elsb 0 | W | Two or more manual stages, no room temperature control | N/A | |||
| with mechanic thermostat room temperature control | N/A | ||||||
| with electronic room temperature control | N/A | ||||||
| electronic room temperature control plus day timer | N/A | ||||||
| electronic room temperature control plus week timer | yes | ||||||
| Other control options (multiple selections possible) | |||||||
| room temperature control, with presence detection | N/A | ||||||
| room temperature control, with open window detection | N/A | ||||||
| with distance control option | N/A | ||||||
| with adaptive start control | yes | ||||||
| with working time limitation | N/A | ||||||
| with black bulb sensor | N/A | ||||||
| Contact details | SONIFER SA. Avenida de Santiago 86, 30007, Murcia. Spain. | ||||||
| info | |||||||
REH 2060
| Item Symbol | Value | Unit | Item | Unit | ||
| Heat output | Type of heat input, for electric storage local space heaters only(select one) | |||||
| Nominalheatoutput | Pnom | 2.0 | KW | manual heat charge control, with integrated thermostat | N/A | |
| Minimunemhatoutput(indicativel) | Pmin | 0 | KW | manual heat charge control with room and/or outdoor temperature feedback | N/A | |
| Maximucontinuous heatoutput | Pmax,c | 2.0 | KW | electronic heat charge control with room and/or outdoor temperature feedback | yes | |
| Auxiliary electricity consumption | fan assisted heat output | N/A | ||||
| Atnominalheatoutput | eImax | 0 | KW | Type of heat output/ room temperature control (select one) | ||
| Atminimumheatoutput | eImin 0 | KW | single stage heat output and no room temperature control | N/A | ||
| Instandbymode | eISB 0 | W | Two or more manual stages, no room temperature control N/A | |||
| with mechanic thermostat room temperature control | N/A] | |||||
| with electronic room temperature control | N/A | |||||
| electronic room temperature control plus day timer | N/A | |||||
| electronic room temperature control plus week timer | yes | |||||
| Other control options (multiple selections possible) | ||||||
| room temperature control, with presence detection | N/A | |||||
| room temperature control, with open window detection | N/A | |||||
| with distance control option | N/A | |||||
| with adaptive start control | yes | |||||
| with working time limitation | N/A | |||||
| with black bulb sensor | N/A | |||||
| Contact details info | SONIFER SA. Avenida de Santiago 86, 30007, Murcia. Spain. | |||||
Disposal of old electrical appliances.
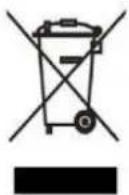
The European directive 2002/96/EC on Waste Electrical and Electronic Equipment (WEEE), requires that old household electrical appliances must not be disposed of in the normal unsorted municipal waste stream. Old appliances must be collected separately in order to optimize the recovery and recycling of the materials they contain, and reduce the impact on human health and the environment. The crossed out "wheeled bin" symbol on the product reminds you of your obligation, that when you dispose of the appliance, it must be separately collected. Consumers should contact their local authority or retailer for information concerning the correct disposal of their old appliance.
DECLARATION OF CONFORMITY: This device complies with the requirements of the Low Voltage Directive 2006/95/EC and the requirements of the EMC directive 2004/108/EC.
FRANÇAISE
CONSEILS DE SECURITE

- General
- Special Safety Instructions
- INSTALLATION (WHILE USE ON THE FLOOR AS PORTABLE APPLIANCE)
- WALL MOUNTING (WHILE USE THE HEATER AS FIXED APPLIANCE)
- OPERATION
- WEEKLY TIMER MODE
- CHILD CLOCK
- REMOTE CONTROL
- CLEANING AND MAINTENANCE
- This product is only suitable for well insulated spaces or occasional use
- Disposal of old electrical appliances.
- FRANÇAISE
- CONSEILS DE SECURITE
Brand : Orbegozo
Model : REH 2060
Category : Frying Pan