CM938RVS - Oven ETNA - Free user manual and instructions
Find the device manual for free CM938RVS ETNA in PDF.
| Brand | ETNA |
| Model | CM938RVS |
| Product type | Combination microwave oven |
| Capacity | 25 L (estimated) |
| Microwave power | 1000 W (max) |
| Grill power | 1200 W (estimated) |
| Hot air power | 1500 W (estimated) |
| Maximum temperature | 220 °C |
| Cooking functions | Microwave, Grill, Hot air, Microwave + Grill, Microwave + Hot air, Grill + Fan |
| Control type | Rotary knobs and touch keys |
| Display | LED digital |
| Defrost programs | 5 automatic (F01 to F05) |
| Child safety | Yes |
| Turntable | Glass, diameter 31.5 cm (estimated) |
| Interior lighting | Halogen bulb |
| Dimensions (W x H x D) | 595 x 455 x 550 mm (estimated) |
| Net weight | 25 kg (estimated) |
| Power supply | 230 V ~ 50 Hz |
| Included accessories | Grid, glass drip tray, turntable, turntable ring |
| Cleaning | Smooth surfaces, do not use abrasive cleaners |
| Repairability | User-replaceable bulb |
Frequently Asked Questions - CM938RVS ETNA
User questions about CM938RVS ETNA
0 question about this device. Answer the ones you know or ask your own.
Ask a new question about this device
Download the instructions for your Oven in PDF format for free! Find your manual CM938RVS - ETNA and take your electronic device back in hand. On this page are published all the documents necessary for the use of your device. CM938RVS by ETNA.
USER MANUAL CM938RVS ETNA
| Introduction | 4 | |
| Description | 5 | |
| Control panel 6 | ||
| Oven function table 8 | ||
| The microwave 10 | ||
| Initial use 11 | ||
| Child lock 12 | ||
| Use | Operation | 13 |
| Using the microwave 13 | ||
| Using the oven 14 | ||
| Using the Microwave + Grill 14 | ||
| Using the Microwave + Hot Air 15 | ||
| Using an Auto defrost setting 15 | ||
| Stopping an oven function 16 | ||
| Cancelling an oven function 16 | ||
| Cleaning | Cleaning the appliance 17 | |
| Cleaning the top inside of the oven 17 | ||
| Replacing the oven light 18 | ||
| Troubleshooting | 19 | |
| 19 | ||
| Your oven and the environment | ||
| Disposal of the appliance and packaging | 21 | |
Introduction
Congratulations on choosing this Etna oven. This product is designed with simple operation and optimum comfort in mind. The oven has a wide range of settings enabling you to select the correct cooking method every time.
This manual shows how you can best use this oven. In addition to information about operating the oven, you will also find background information that may be useful when using the appliance.

Read the separate safety instructions before using the appliance!
Read this manual before using the appliance and keep it in a safe place for future use.
Installation instructions are supplied separately.
Description
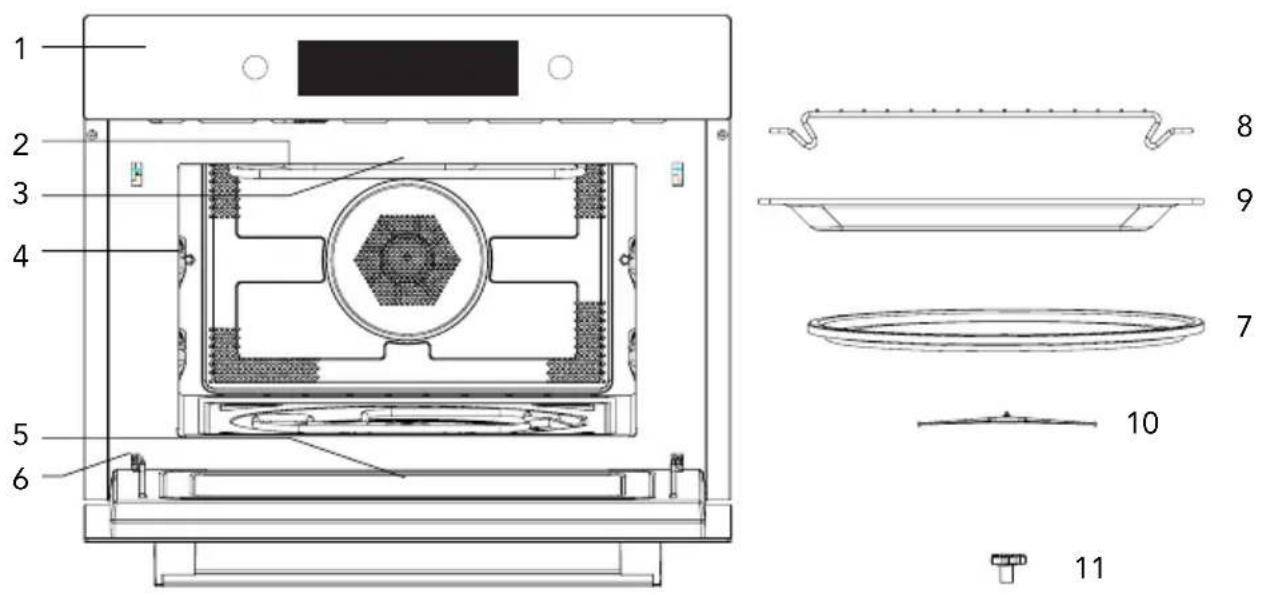
- Controlpanel
- Grillelement
- Lighting
- Racklevel
- Overendoor
- Doorhinge
- Glass turntable
- Grillrack
- Glass baking tray
- Glass turntable ring
- Glass turntable drive mechanism
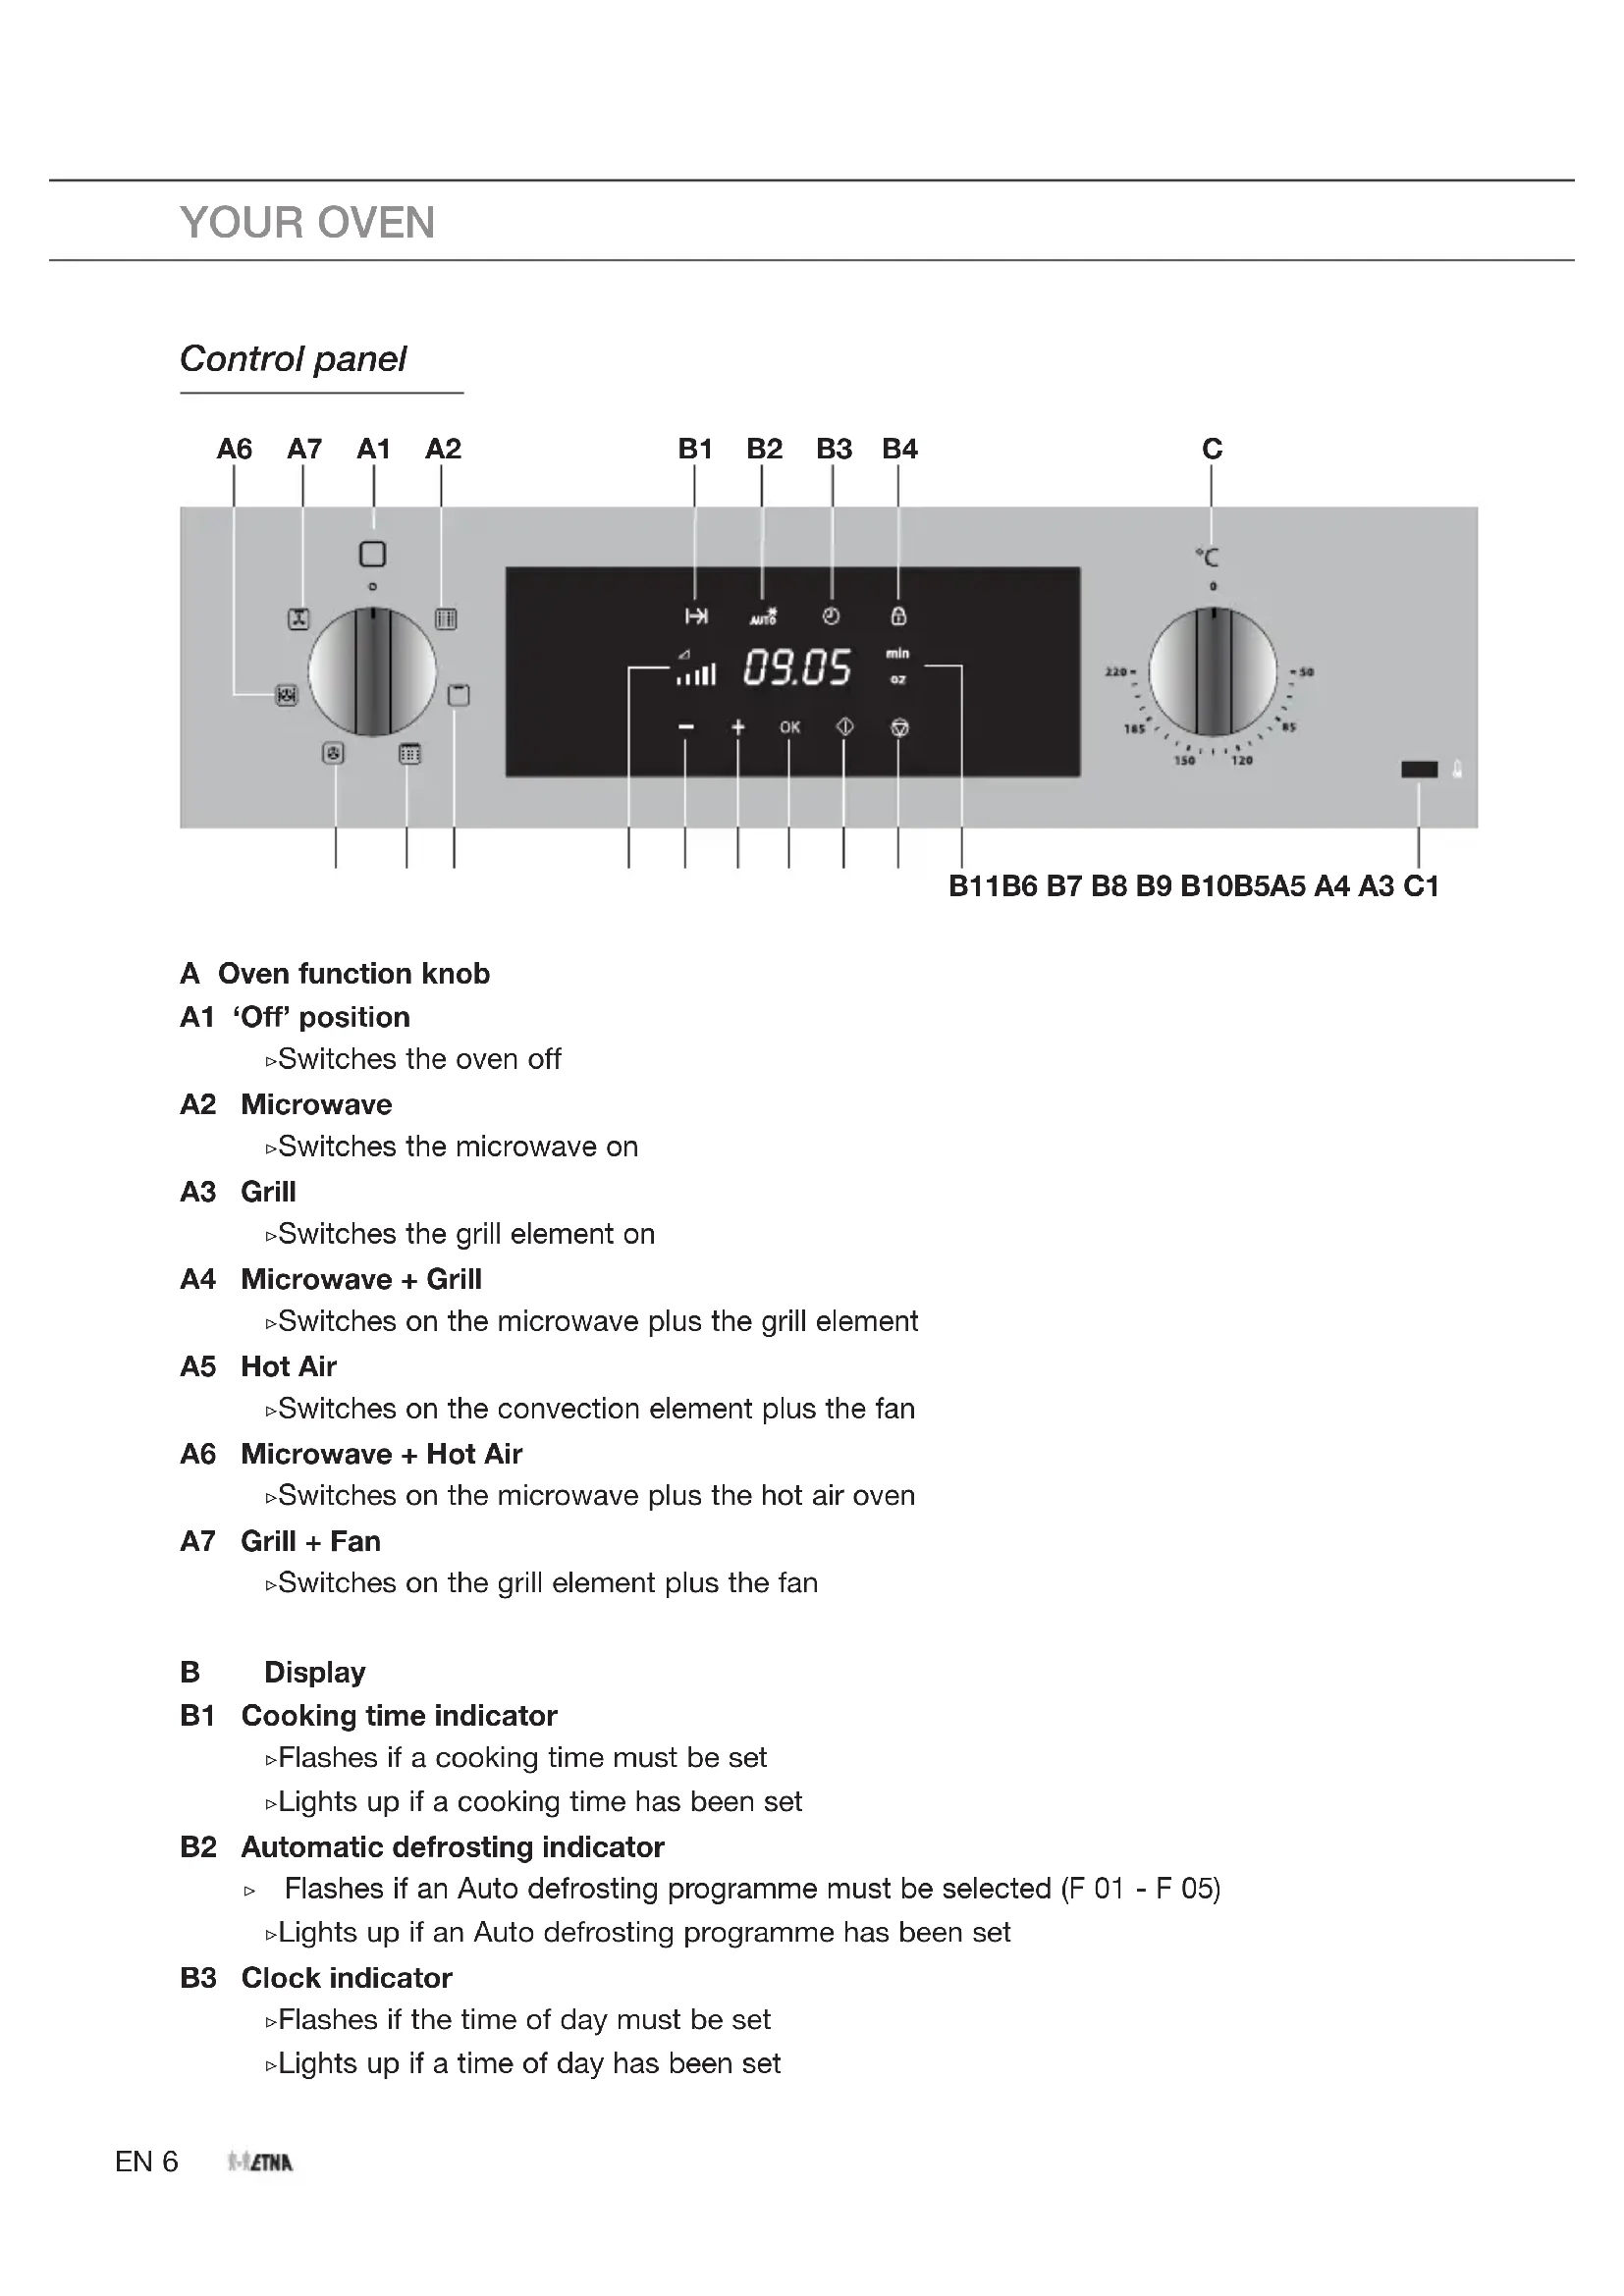
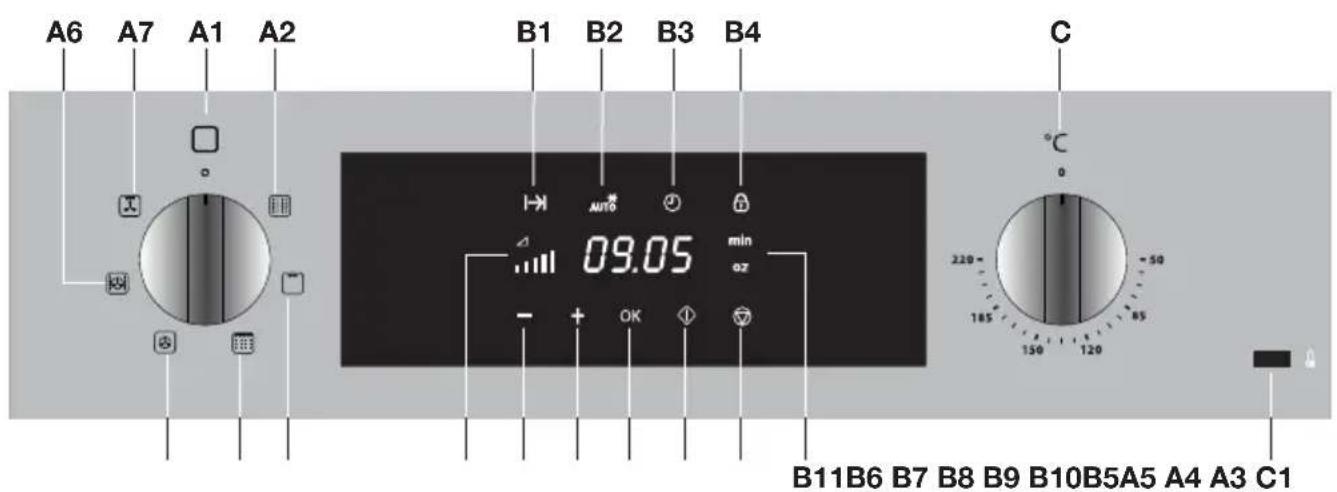
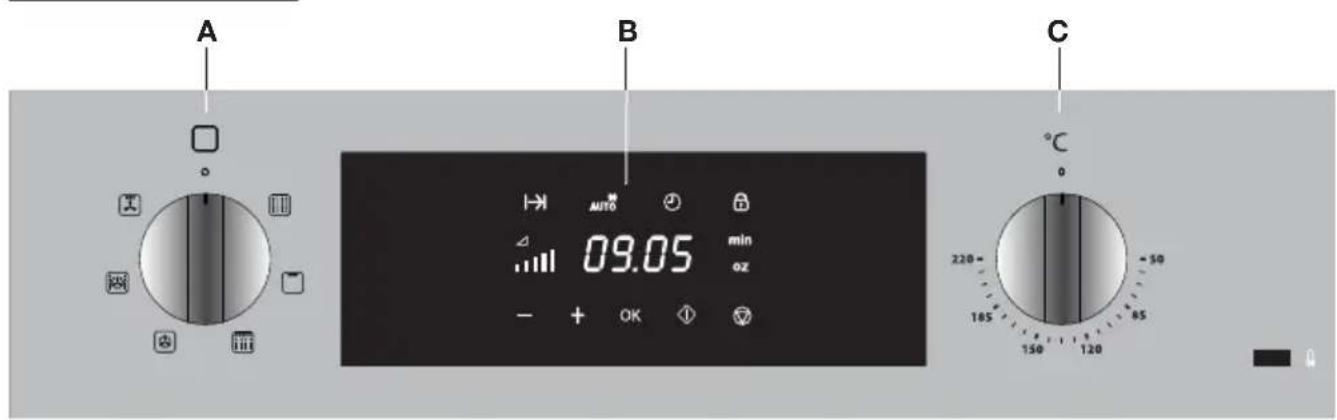
Control panel
A Oven function knob
A1 'Off' position
Switches the oven off
A2 Microwave
Switches the microwave on
A3 Grill
Switches the grill element on
A4 Microwave + Grill
Switches on the microwave plus the grill element
A5 Hot Air
Switches on the convection element plus the fan
A6 Microwave + Hot Air
Switches on the microwave plus the hot air oven
A7 Grill + Fan
Switches on the grill element plus the fan
B Display
B1 Cooking time indicator
Flashes if a cooking time must be set
Lights up if a cooking time has been set
B2 Automatic defrosting indicator
Flashes if an Auto defrosting programme must be selected (F 01 - F 05)
Lights up if an Auto defrosting programme has been set
B3 Clock indicator
Flashes if the time of day must be set
Lights up if a time of day has been set
B4 Child lock indicator
Lights up if the child lock is active
B5 Microwave power indicator
Indicates microwave power with 4 lines (1 line = low / 4 lines = high)
B6 -' touch key
Reduce time
Reduce power
Select the Auto defrost setting (from the Microwave function)
B7 +' touch key
Increase time
Increase power
Select the Auto defrost setting (from the Microwave function)
B8 'OK' touch key
Confirm a setting
B9 Start touch key
Start a function
B10 Stop touch key
Stop a function
B11 Minute/weight indicator
Flashes if a time or weight must be set
Lights up if a time or weight has been set
C Temperature knob
Set a temperature (between 50 and 220^ ) by turning the knob
C1 Temperature light
Lights up when the oven heats with the convection element.
Oven functions table
Consult the table below to choose the correct function. Also read the preparation instructions on the food packaging.

Use only oven dishes that are suitable for a temperature of 220^ .
| Function | Description | |
| Microwave Consult the chapter titled 'The microwave!' ·This function uses microwaves. Dishes are defrosted, heated or cooked quickly and efficiently. ·Place the dish on the turntable. ·Recommended power: 800 W | ||
| Grill ·The dish is heated by the grill element. ·This function can be used to grill 'au gratin', toast bread and grill sausages. ·Place the grill rack with the baking tray on level 2. ·Check cooking progress regularly. At high temperatures, meat can burn quickly. | 2 | |
| Microwave + Grill ·Consult the chapter titled 'The microwave!' ·The dish is cooked with a combination of microwaves and grilling. This shortens the cooking time, but the dishes do get a nice brown crispy top. ·This setting is suitable for cooking small portions or thin pieces of fish, meat or poultry. ·Place the dish on the turntable or on the glass baking tray. ·Recommended temperature: 200°C ·Recommended power: 600 W | ||
| Hot Air ·The dish is heated by hot air from the back of the oven. ·This function provides uniform heating and is ideal for baking. ·Place the baking tray on level 1. ·Recommended temperature: 180°C. ·Preheating is recommended. | 1 | |
| Microwave + Hot Air ·Consult the chapter titled 'The microwave'! ·The dish is cooked with a combination of microwaves and hot air. This shortens the cooking time, but the dishes do get a nice brown crispy top. ·This function is used to cook meat, poultry and vegetables. But also for casseroles, cakes and bread. ·Place the dish on the turntable or on the glass baking tray. ·Recommended temperature: 160°C ·Recommended power: 600 W | ||
| Grill + Fan ·The dish is heated by the grill element and the heat is spread by the fan. ·This function is used to grill fish, meat and vegetables. ·Place the grill rack with the baking tray on level 2. ·Recommended temperature: 170°C. ·Check cooking progress regularly. At high temperatures, meat can burn quickly. ·Preheat for 5 minutes. |
The microwave
Microwaves are high-frequency electromagnetic waves. The energy makes it possible to cook or warm up dishes without affecting the form or colour.

Note! never use the (combi) microwave function without a dish in the oven! The oven can become damaged if the microwave cannot apply its power.
Important!
The food is cooked from the inside out by means of heat distribution. The cooking continues even when you take the dish from the oven. Standing times in recipes and in this book should therefore be adhered to, in order to ensure:
Even heating into the middle of the dish.
- Equal temperatures in all parts of the dish.
Guidelines for microwave cookware
Cookware you use for the microwave function should not block the microwaves.
Metals such as stainless steel, aluminium and copper reflect microwaves. For that reason, do not use metal cookware. Cookware which is designated as microwave-safe can be used safely. For more information about suitable cookware, consult the following guidelines and always use the turntable or the glass baking tray on level 1
if you use the microwave function.
| Cookware Microwave-safe Remarks | ||
| Aluminium foil | ✓X | Can be used in small quantities to prevent certain parts of the food from overcooking. Arcing can occur if the foil is too close to the oven wall or if too much foil is used. |
| Porcelain and earthenware | ✓ | Porcelain, earthenware, glazed earthenware and ivory porcelain are usually suitable, unless they have a metal edge. |
| Disposable tableware made from polyester or cardboard | ✓ | Frozen meals are sometimes packaged in disposable tableware. |
| Fast food packaging: - Polystyrene cups | ✓ | Can be used to warm up food. Polystyrene can melt if it overheats. |
| - Paper bags or newspaper | X | Can catch fire. |
| - Recycled paper or packaging with metal edges | X | Can cause arcing. |
| Cookware Microwave-safe Remarks | ||
| Glassware - Oven dishes - Fine glassware - Glass jars | ✓ | Can be used, unless it has a metal edge. Can be used to warm up food or liquids. Thin glass can break or shatter with sudden heating. The lid must be removed. Only suitable for warming. |
| Metal | X | Can cause arcing or fire. |
| Paper - Plates, cups - Paper towels - Recycled paper | ✓ | For short cooking times and warming. For absorbing excess moisture. |
| X | Can cause arcing. | |
| Plastic | ✓ | Especially heat-resistant plastic. Other types of plastic can warp or discolour at high temperatures. Do not use melamine plastic. Can be used to hold moisture. May not touch the food. Be careful when you remove the film: hot steam can escape. Only if boil-proof or ovenproof. Must not be airtight. If necessary, prick it with a fork. |
:Recommended
X : Careful
X:Unsafe
First use
Use the turntable for cooking dishes with the microwave or combi microwave functions. Never place cold (frozen) dishes directly on the glass turntable. The difference in temperature could cause it to shatter!
- Open the door, remove all the packaging and check the oven for damage. Don't install the oven if it is damaged, but contact your supplier.
- Remove the protective film from the casing.
- Clean the oven interior and accessories with a damp cloth. Do not use any abrasive cleaner or strong-smelling cleaning products.
- Place the turntable in the centre of the oven cavity with the opening for the drive mechanism facing downwards. Do not use the oven without the turntable with ring and drive mechanism.
- Connect the oven to the mains.

When the appliance is connected to the mains, you must set the time clock (see 'Setting time'/steps 1 and 2 can be skipped).
Setting the time
- Press the ^+ touch key until the clock indicator lights up.
- Press 'OK'.
- The hour indicator will flash.
Set the hour using the - and + touch keys.
- Confirm the settings by pressing 'OK'.
The minute indicator will flash.
- Set the minutes using the - and + touch keys.
- Confirm the settings by pressing 'OK'.

If you don't want to see the time in the display, then press the - and +' touch keys at the same time for 5 seconds. The time disappears (the dot between the hour and minute indicators remains flashing). Press the - and + touch keys at the same time for 5 seconds to make the time visible again.
Child lock
With the childproof lock you can lock the control panel to prevent unintended use of the oven.
- You can activate the child lock by pressing the 'stop' touch key for a few seconds.
The display indicates the child lock indicator (SAFE). This indicates that all functions are locked.
- To deactivate the child lock, press the stop touch key again for a few seconds.
The child lock indicator disappears from the display, indicating that all functions are unlocked.
Controls
Using the microwave
- Turn the oven function knob to the microwave setting. The cooking time indicator flashes.
- Press the 'OK' touch key.
- Set the cooking time using the - and + touch keys.
- Press the 'OK' touch key. The microwave power indicator flashes.
- Set the power using the - and + touch keys:
| Power Use | ||
| 200 W • Manual defrosting, softening butter or ice cream. • Keeping food warm. | ||
| 400 W • Cooking dairy products or jam at low temperatures. • Cooking rice. • Quick defrosting. | ||
| 600 W • Melting chocolate. • Cooking fish and shellfish. • Warming or reheating on two levels. • Cooking dry beans at a low temperature. • Warming/reheating or cooking special dishes with eggs. | ||
| 800 W • Cooking fresh or frozen leafy vegetables. | ||
| 1000 W • Quickly warming up or reheating drinks, water and dishes containing a lot of fluids. • For cooking fresh or frozen vegetables. | ||
- Press the 'OK' touch key.
To change a setting, press the 'OK' touch key again if needed.
- Press the Start touch key.
The microwave switches on.
Using the oven
- Turn the oven function knob to select an oven function (consult the Oven functions table). The cooking time indicator flashes.
- Select a temperature with the temperature knob (not needed with the Grill and Grill + Fan functions).
- Set the cooking time using the - and + touch keys.
- Press the 'OK' touch key.
To change a setting, press the 'OK' touch key again if needed.
- Press the Start touch key.
The oven switches on.

Note: for some dishes, the oven must be preheated first! Consult the information about the dish.
Using the Microwave + Grill
- Turn the oven function knob to the Microwave + Grill setting.
The cooking time indicator flashes.
- Set the cooking time using the - and + touch keys.
- Press the 'OK' touch key.
The microwave power indicator flashes.
- Set the power using the - and + touch keys:
| Power Use | ||
| 200 W • Roasting | ||
| 400 W • Grilling meat and poultry | ||
| 600 W • Baking a cake • Cooking ‘au gratin’ dishes | ||
- Press the 'OK' touch key.
To change a setting, press the 'OK' touch key again if needed.
- Press the Start touch key.
The oven switches on.
Using the Microwave + Hot Air
- Turn the oven function knob to the Microwave + Hot Air setting.
The cooking time indicator flashes.
- Select a temperature with the temperature knob.
- Set the cooking time using the - and + touch keys.
- Press the 'OK' touch key.
The microwave power indicator flashes.
- Set the power using the - and + touch keys:
| Power Use | ||
| 200 W • Baking a cake | ||
| 400 W • Roasting fish and poultry | ||
| 600 W • Cooking a quick meal | ||
- Press the 'OK' touch key.
To change a setting, press the 'OK' touch key again if needed.
- Press the Start touch key.
The oven switches on.
Using an Auto defrosting setting
- Turn the oven function knob to the microwave setting.
The cooking time indicator flashes.
- Press the - or + touch keys to select the auto defrosting setting.
The Automatic defrosting indicator flashes.
- Press the 'OK' touch key.
The 'F 01' indicator flashes.
- Set a defrosting setting using the - and + touch keys (consult the table):
| Programme Dish | Weight (g) Time | (min) Standing time | (min) | |
| F 01 | Meat 100-2000 2 | -43 20-30 | ||
| F 02 | Poultry 100-2500 | 2-58 20-30 | ||
| F 03 | Fish 100-2000 2 | 13 20-30 | ||
| F 04 | Fruit 100-500 2-1 | 3 10-20 | ||
| F 05 | Bread | 100-800 2-19 10-20 |
- Press the 'OK' touch key.
The weight indicator flashes in the display.
- Use the - and +^ touch keys to set the weight of the frozen dish:
- Press the 'OK' touch key.
- Press the Start touch key.
The oven switches on. Turn the food over as soon as the oven gives a sound signal and displays a flashing 'turn' message.
Stopping an oven function
You can stop or cancel a running programme by opening the door or pressing the Stop touch key.
In both cases:
- The microwave function will immediately stop.
- The grill or hot air function will stop.

Note! the grill element may still be very hot.
- The cooking time stops (the display indicates the remaining cooking time).
At this time you can:
- turn the dish around or stir it.
- change the settings (power, time or temperature).
You can resume a running programme by closing the door and pressing the Start touch key.
Cancelling an oven function
- You can stop or cancel a running programme by setting the oven function knob to the 'Off' setting or by pressing the Stop touch key twice.
- At the end of cooking (End in the display), set the oven function knob and the temperature knob to the 'Off' setting.
Cleaning the appliance
Clean your appliance regularly to prevent a build-up of grease and food particles, especially on interior and exterior surfaces, the door and door gasket.
- Switch on the child lock (to prevent the appliance starting to operate unexpectedly).
- Clean the exterior surfaces with a soft cloth and soapy warm water.
- Wipe afterwards with a clean, damp cloth and dry the surfaces.
- Remove splashes and stains on the interior surfaces with a soapy cloth.
- Wipe afterwards with a clean, damp cloth and dry the surfaces.

Take care that no water enters the vents.
Never use abrasive cleaning agents or chemical solvents.
Ensure that the door gasket is always clean. This will prevent a build-up of dirt so that the door can close properly.
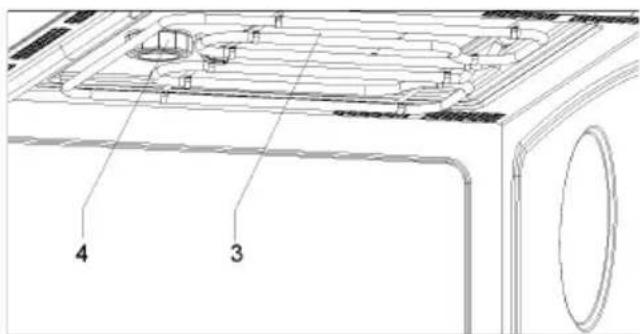
Cleaning the top inside of the oven

Note! wait until the grill element has cooled before cleaning.
-
Keep the mica plate (3) that is located in the top wall very clean. Dirt on the plate can cause damage or arcing.
-
Do not use aggressive cleaning agents or sharp objects for cleaning.

Note! do not remove the mica plate.
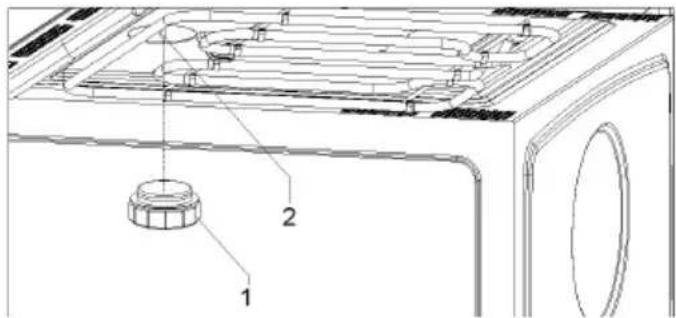
Replacing the oven light bulb

The light bulb is a consumer item and therefore does not fall under the guarantee. Before replacing the light bulb, disconnect the appliance from electricity by unplugging it or switching off the fuse in the circuit breaker box!

The light bulb in this household appliance is designed exclusively for lighting this appliance. The light bulb is not suitable for lighting a household area.
The light bulb is located in the top wall of the oven and can be changed easily.
- Unscrew the glass cover (1).
- Remove the halogen bulb (2).
Note! The bulb can be very hot.
- Insert a new halogen bulb of the same type.
Note! Do not directly touch the surface of the bulb. This may reduce the life of the bulb. Follow the instructions of the manufacturer of the light bulb.
- Screw the glass cover back on tightly.
General
Try the solutions below if you have problems with your oven. You could save yourself the time and effort of an unnecessary phone call to customer services.
The food stays raw.
- Check that the timer has been set correctly and that the 'Start' touch key has been pressed.
- Check that the door is properly closed.
- Check that the electricity is working properly (fuse in the circuit breaker box/ plug in the socket).
The food is overcooked or undercooked.
- Check whether the correct oven function and temperature have been selected.
- Check that the correct cooking time has been set.
- Check that the correct power has been set.
The touch keys don't respond; the display is locked.
- Disconnect the appliance from the power supply for a few minutes (unscrew the fuse or switch off the mains), then reconnect the appliance and switch it on.
- Set the time again.
Condensation appears inside the oven.
- This is normal. Wipe the oven clean after use.
The fan continues to operate after the oven has been switched off.
This is normal. The fan will keep working for a while after the oven has been switched off.
Air flow is detected around the door and outer casing.
This is normal.
Light is reflected around the door and the exterior of the appliance.
This is normal.
Steam escapes from around the door or vents.
This is normal.
A clicking sound occurs while the oven is operating, especially in defrosting mode.
This is normal.
The main fuse in your home trips often.
- Consult a service technician.
The display shows an error code.
- There is a fault in the electronic module. Disconnect the appliance from the power supply for a few minutes. Then reconnect it and set the current time.
- Consult a service technician if the error persists.
Storing and repairing the oven.
- Repairs should only be performed by a qualified service technician. If maintenance is required, take the plug out of the socket and contact the Etna customer service.
Have the following information at hand when you call:
- The model number and serial number (stated on the inside of the oven door)
Warranty details
A clear description of the problem

Choose a clean, dry place if you have to store the oven temporarily, as dust and moisture can damage the appliance.
Disposal of the appliance and packaging
This product is made from sustainable materials. However, the appliance must be disposed of responsibly at the end of its useful life. The government can provide you with information about this.
The appliance packaging can be recycled. The following materials have been used:
cardboard
polyethylene wrap (PE)
CFC-free polystyrene (hard PS foam)
Dispose of these materials responsibly in accordance with legal provisions.
The product has a pictogram of a crossed-out waste container. This indicates that household appliances must be disposed of separately. This means that the appliance may not be processed via the regular waste flow at the end of its useful life. You should take it to a special municipal waste depot or a sales outlet that offers to do this for you.
Collecting household equipment separately prevents harm to the environment and public health. The materials used in manufacturing this appliance can be recycled, which provides considerable savings in energy and raw materials.

Declaration of conformity
We hereby declare that our products comply with the relevant European directives, standards and regulations as well as all requirements referred to in the standards.

576840