
ERG16610 - Fridge ELECTROLUX - Free user manual and instructions
Find the device manual for free ERG16610 ELECTROLUX in PDF.
User questions about ERG16610 ELECTROLUX
0 question about this device. Answer the ones you know or ask your own.
Ask a new question about this device
Download the instructions for your Fridge in PDF format for free! Find your manual ERG16610 - ELECTROLUX and take your electronic device back in hand. On this page are published all the documents necessary for the use of your device. ERG16610 by ELECTROLUX.
USER MANUAL ERG16610 ELECTROLUX
natural_image
Line drawing of a hand holding a shelf with three panels, no text or symbols presentDeurplateaus
natural_image
Line drawing of a door frame with two horizontal panels and directional arrows indicating movement (no text or symbols)
Nuttige tips

Energiebesparing
natural_image
Line drawing of a hand holding a tool above a kitchen sink, with footprints and a magnified inset showing the tool's rotation (no text or symbols)text_image
Technical diagram showing a mechanical component with numbered parts and an inset view highlighting a specific section.Hulp bij storingen
text_image
Diagram illustrating a mechanical assembly with numbered steps and directional arrows indicating motion or movement.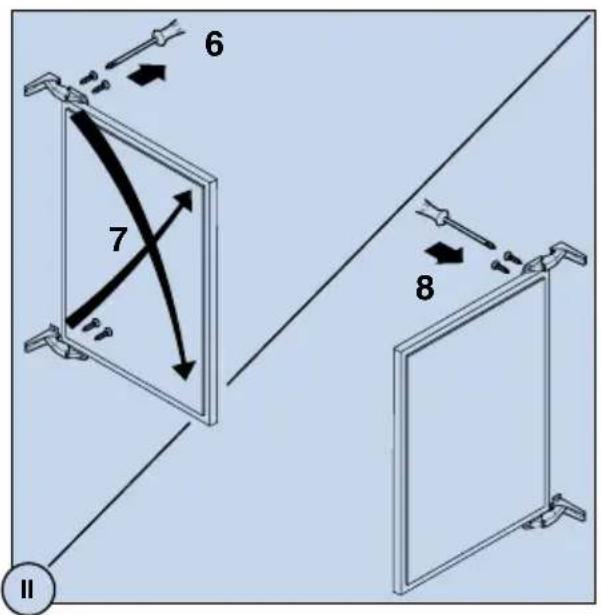
text_image
6 7 8 II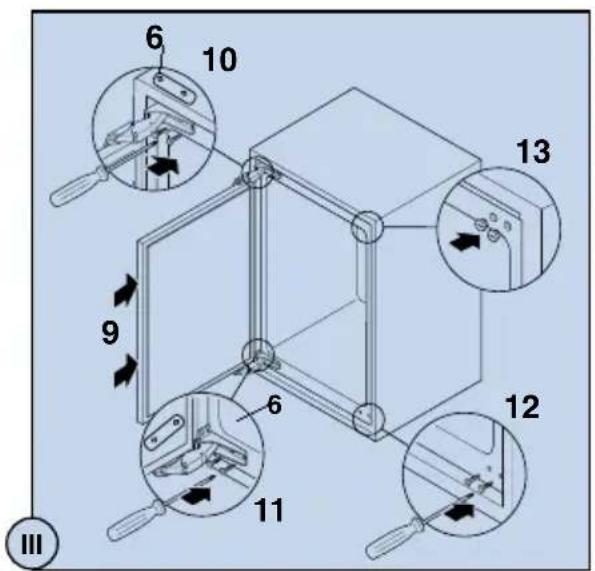
text_image
6 10 9 13 6 11 12 IIItext_image
a J I M b c 4 5 D M E v
text_image
F I 3 L 1 N 5 4 N 2 VI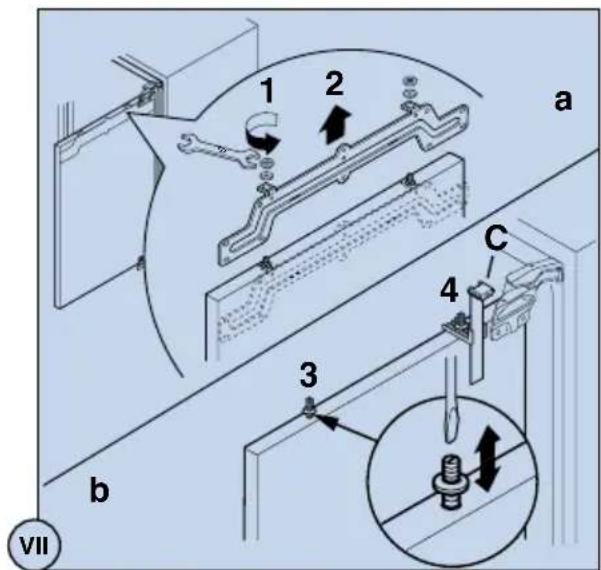
text_image
1 2 a C 4 3 b VII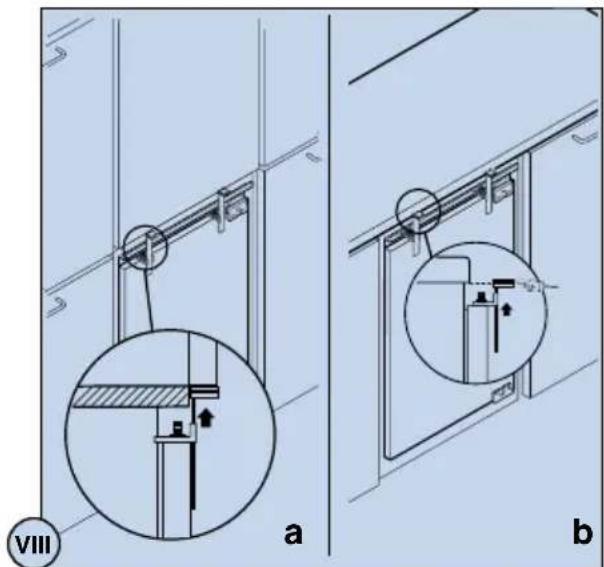
text_image
VIII a b
text_image
2 x 3 1 IX a = = x O b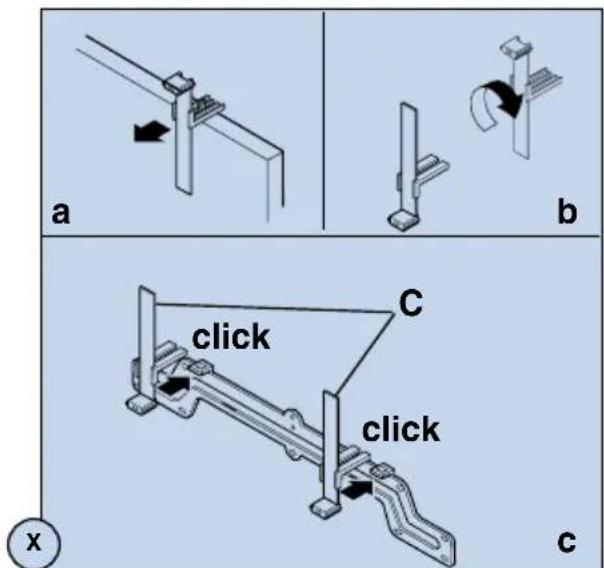
text_image
a b click C click c x c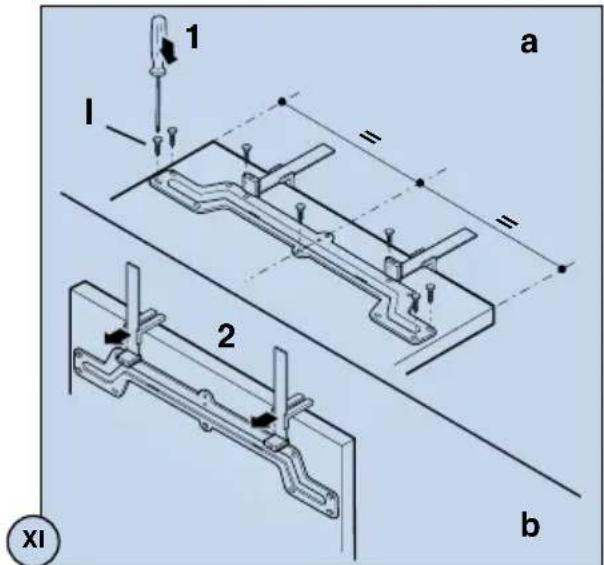
text_image
1 a l = = 2 b XI
text_image
1 2 45° 3 XII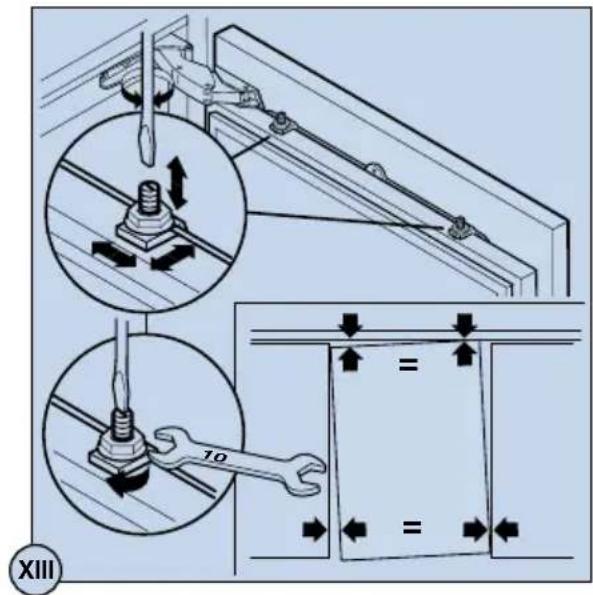
text_image
Technical diagram illustrating screw fastening and mounting mechanism with labeled components and directional arrows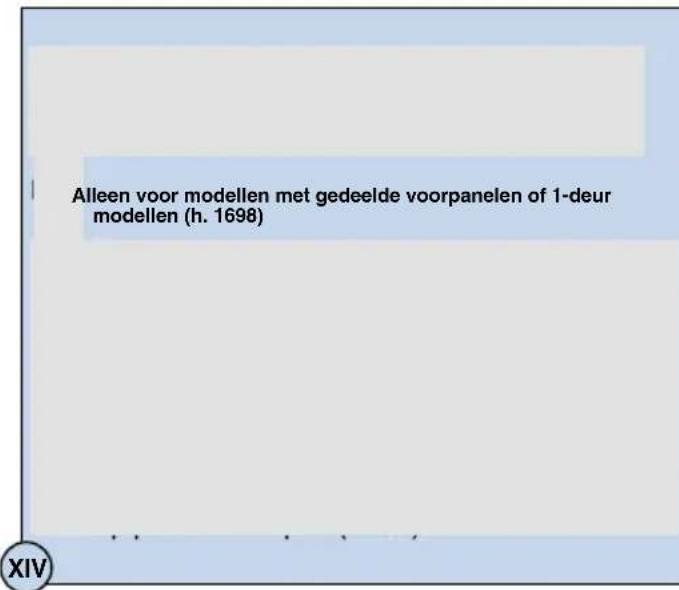
text_image
a 8 mm J 2 K 1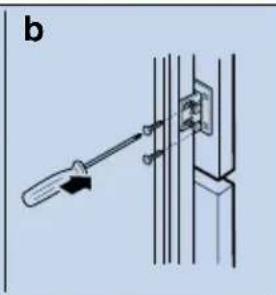
natural_image
Diagram of a screwdriver inserted into a vertical panel, showing mechanical assembly (no text or symbols)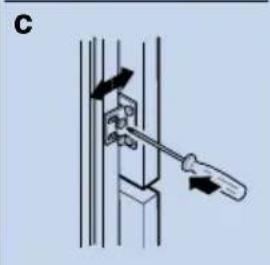
natural_image
Diagram of a mechanical assembly with a screwdriver inserted into a bracket (no text or symbols)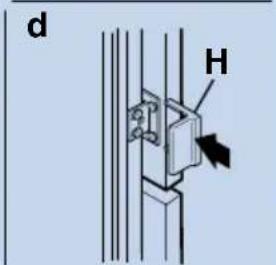
text_image
d H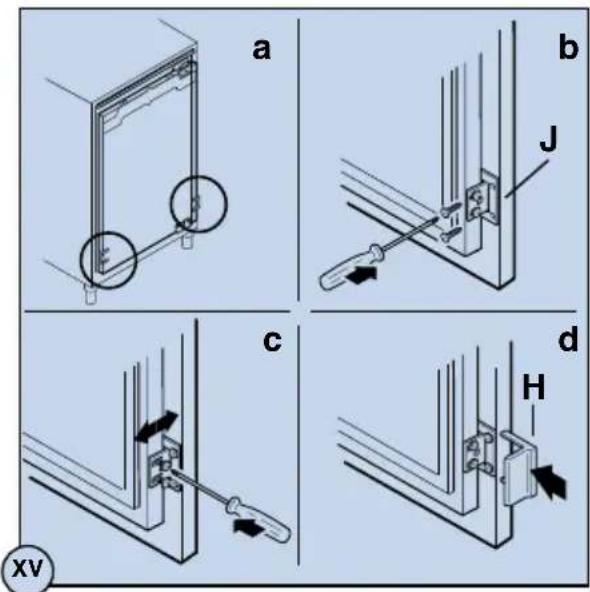
text_image
a b J c d H XV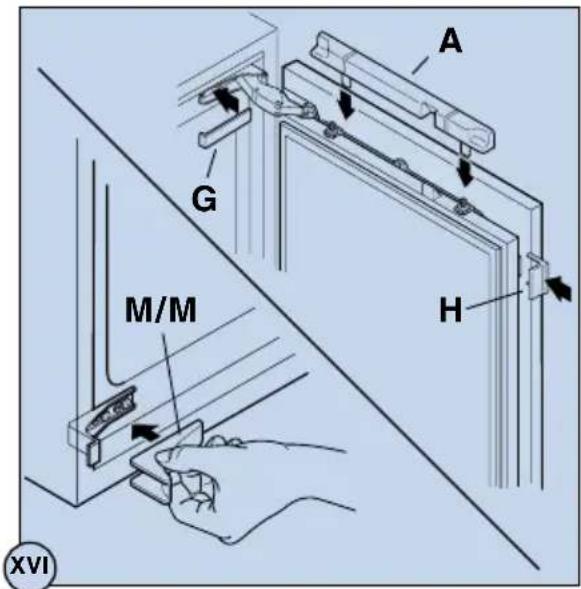
text_image
A G M/M H XVInatural_image
Line drawing of a hand holding a shelf with a pair of gloves, no text or symbols presentBalconnets de contre-porte
natural_image
Technical line drawing of a door frame with two horizontal panels and directional arrows indicating movement (no text or symbols)
Conseils

Économie d'énergie
natural_image
Line drawing of a kitchen sink with hand holding a tool, showing a magnified view of the handle (no text or symbols)text_image
Technical diagram showing a mechanical component with labeled parts and an inset view of the component's rotation.text_image
Diagram illustrating a mechanical assembly with numbered components and directional arrows indicating motion or assembly steps.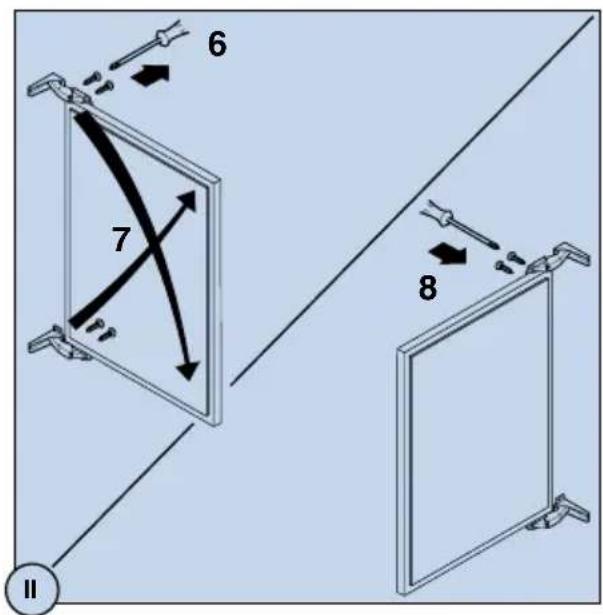
text_image
6 7 8 II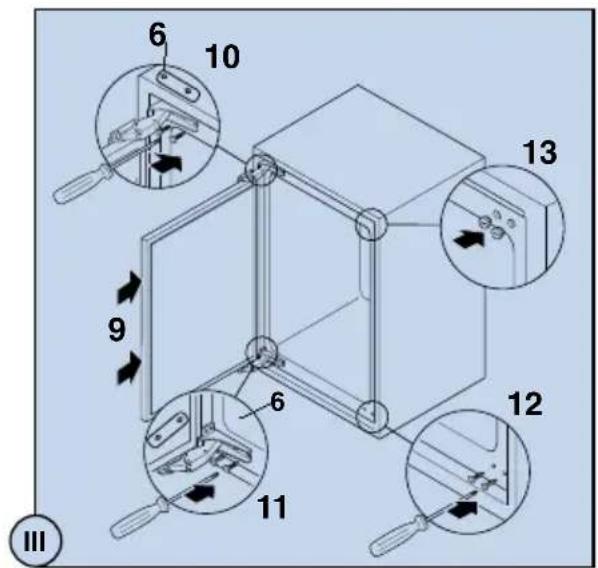
text_image
6 10 9 13 6 11 12 IIItext_image
a J I M b c 4 5 D M E v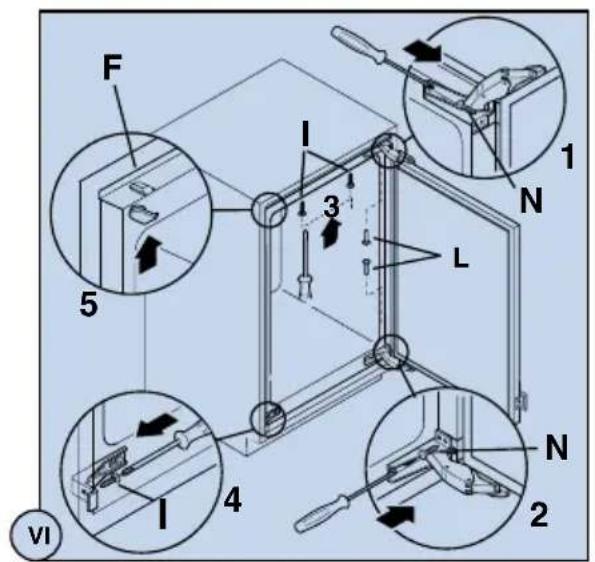
text_image
F I 3 5 L 1 N 4 N 2 VI
text_image
1 2 a C 4 3 b VII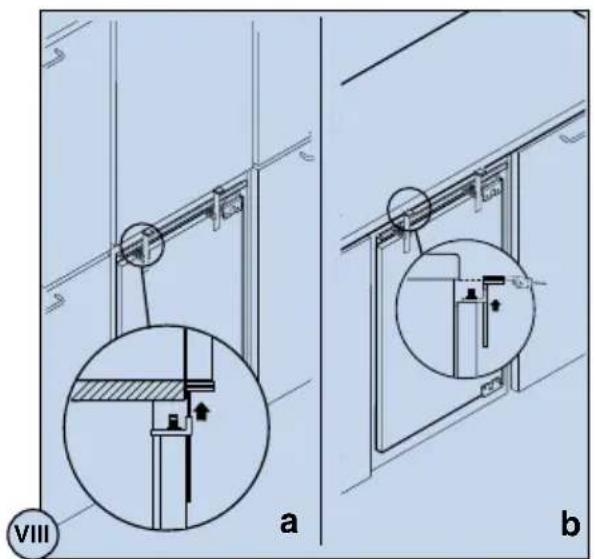
text_image
VIII a b
text_image
2 x 3 1 IX a = = x O b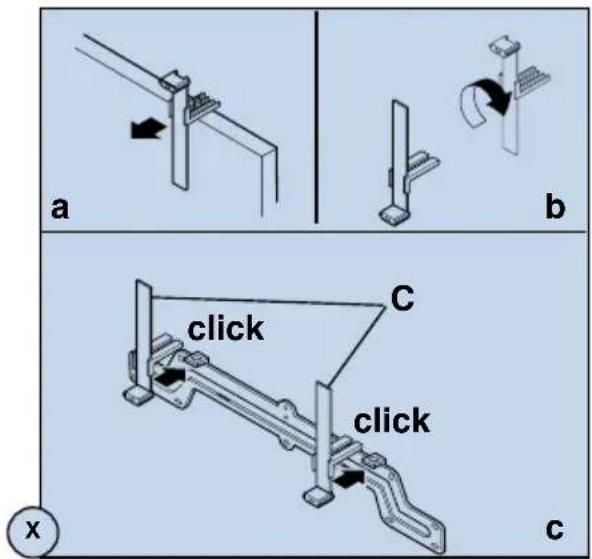
text_image
a b click c click x c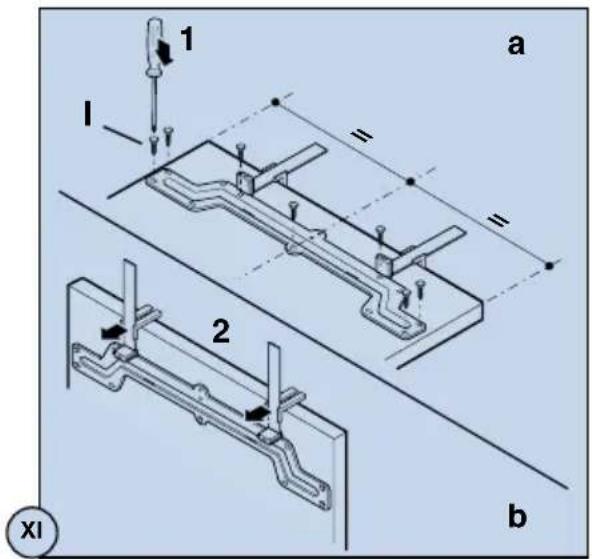
text_image
1 a l = = 2 b XI
text_image
1 2 45° 3 XII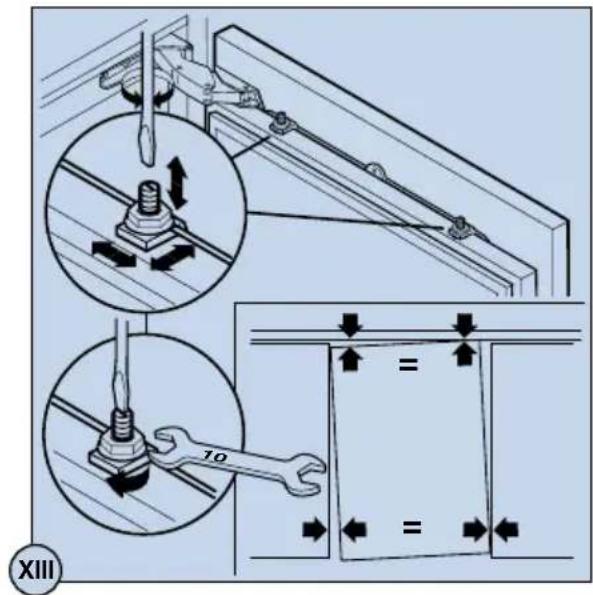
text_image
Technical diagram illustrating screw fastening and mounting mechanism with labeled components and directional arrows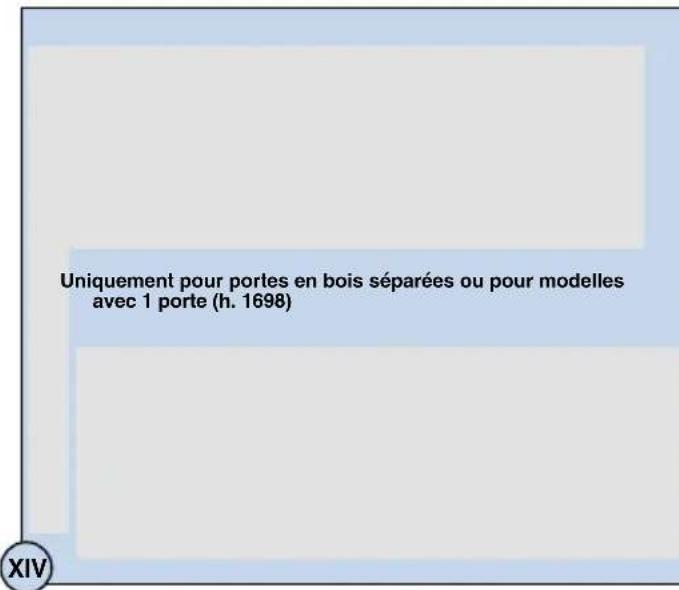
text_image
a 8 mm J 2 K 1
natural_image
Diagram of a screwdriver inserted into a vertical panel, showing mechanical assembly (no text or symbols)
natural_image
Diagram of a mechanical assembly with a tool inserted into a bracket (no text or symbols visible)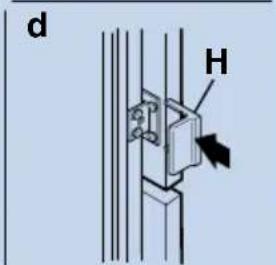
text_image
d H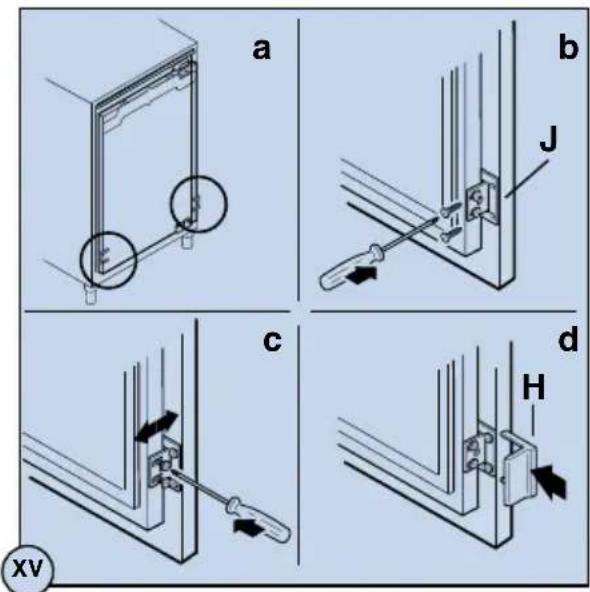
text_image
a b J c d H XV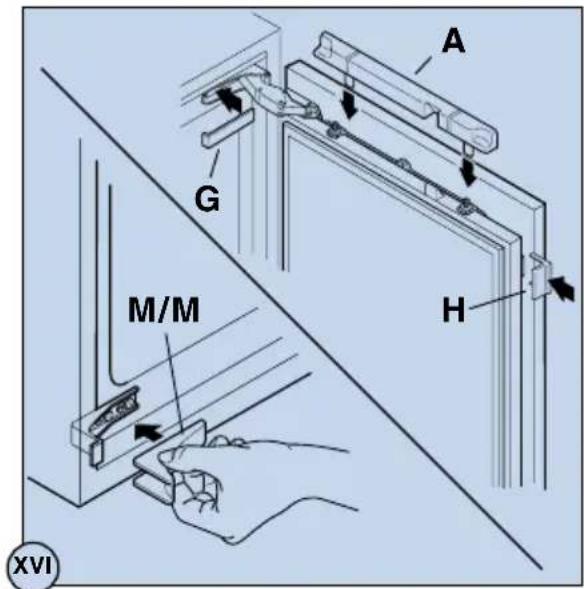
text_image
A G M/M H XVInatural_image
Line drawing of a hand holding a shelf with three small bowls, no text or symbols presentTürabstellfächer
natural_image
Technical line drawing of a door frame with two horizontal panels and directional arrows indicating movement (no text or symbols)
Tipps

Energie-Einsparung
natural_image
Line drawing of a kitchen sink with hand holding a tool, showing a magnified view of the handle (no text or symbols)text_image
Diagram showing a mechanical assembly with labeled parts and directional arrows, including numbered callouts.Was tun, wenn...
text_image
Diagram illustrating a mechanical assembly with numbered steps and directional arrows indicating motion or movement.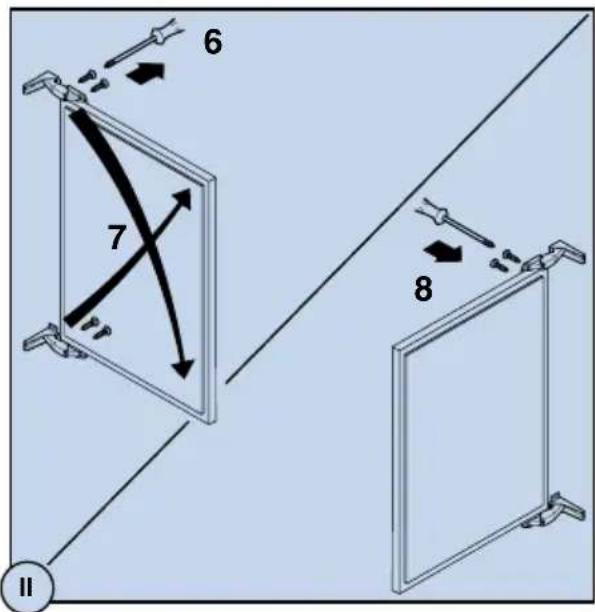
text_image
6 7 8 II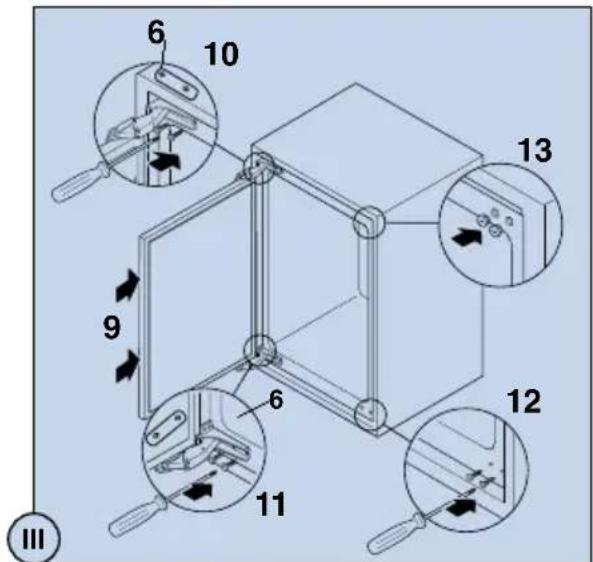
text_image
6 10 9 13 6 11 12 IIItext_image
a J I M b c 4 5 D M E v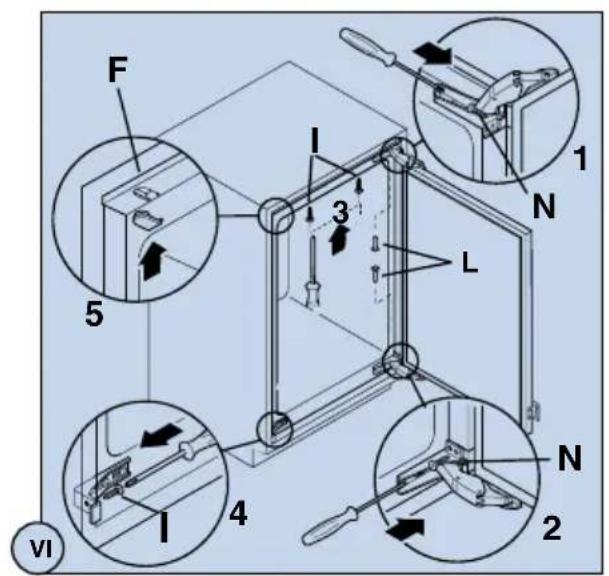
text_image
F I 3 L 1 N 5 4 N 2 VI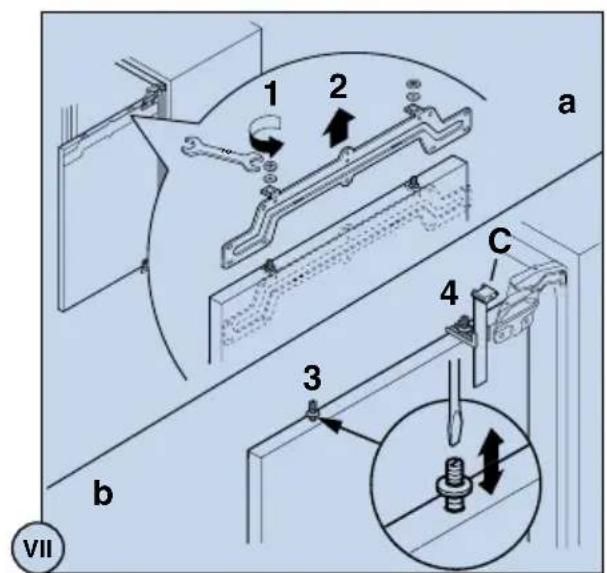
text_image
1 2 a C 4 3 b VII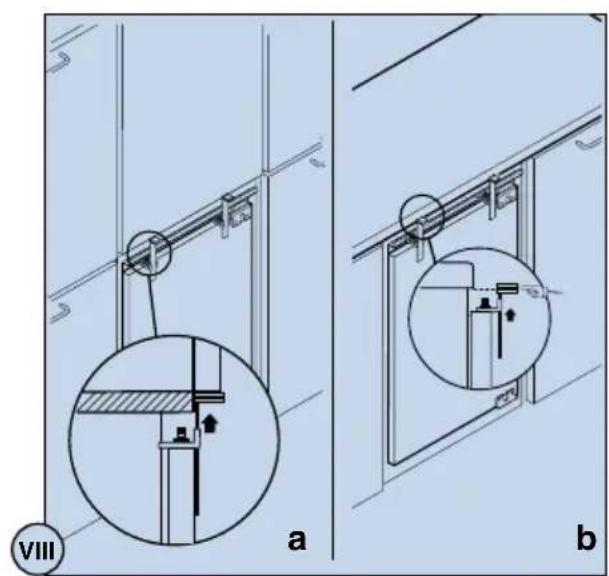
natural_image
Technical diagram showing two views (a and b) of a mechanical assembly with labeled components, no readable text or symbols present.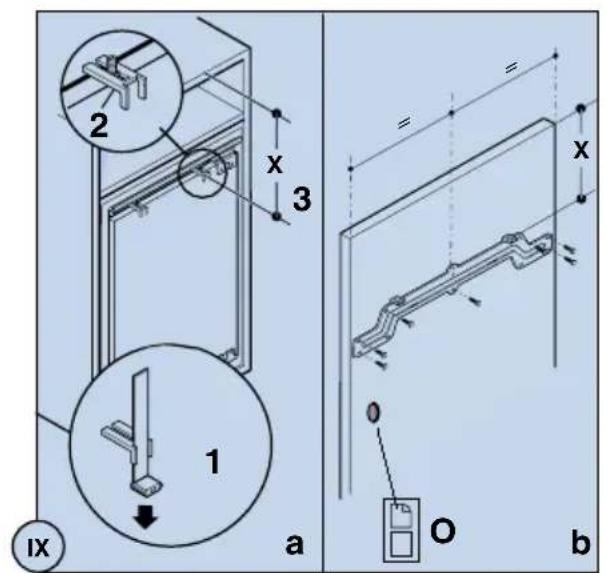
text_image
2 x 3 1 IX a = = x 0 O b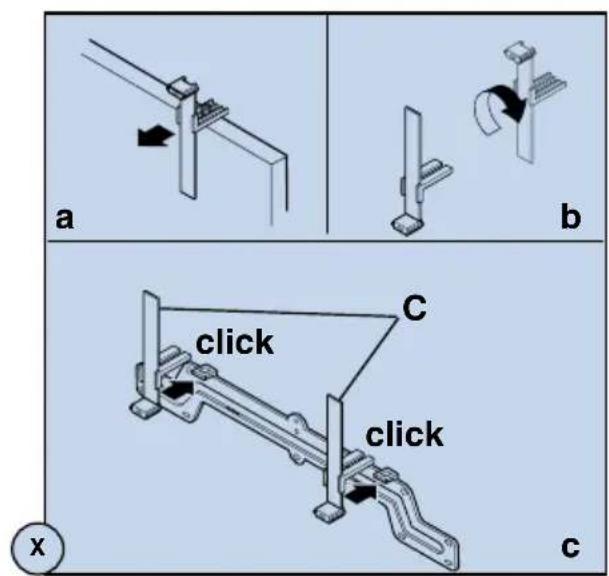
text_image
a b click c click x c
text_image
1 a l = = 2 b XI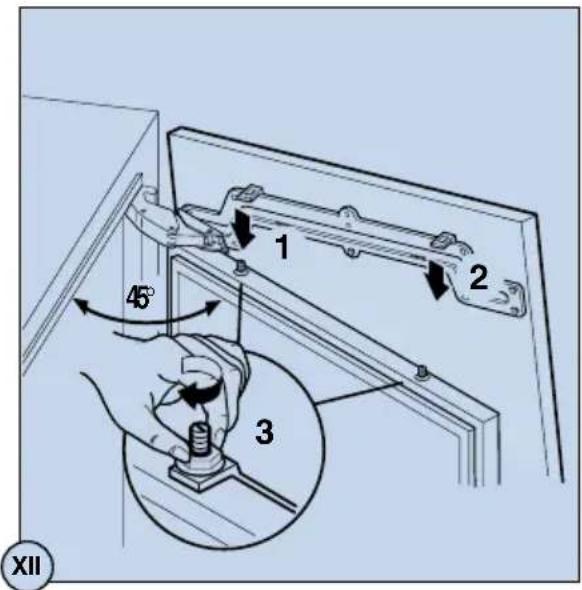
text_image
1 2 45° 3 XII
text_image
Technical diagram illustrating screw fastening and mounting mechanism with labeled components and directional arrows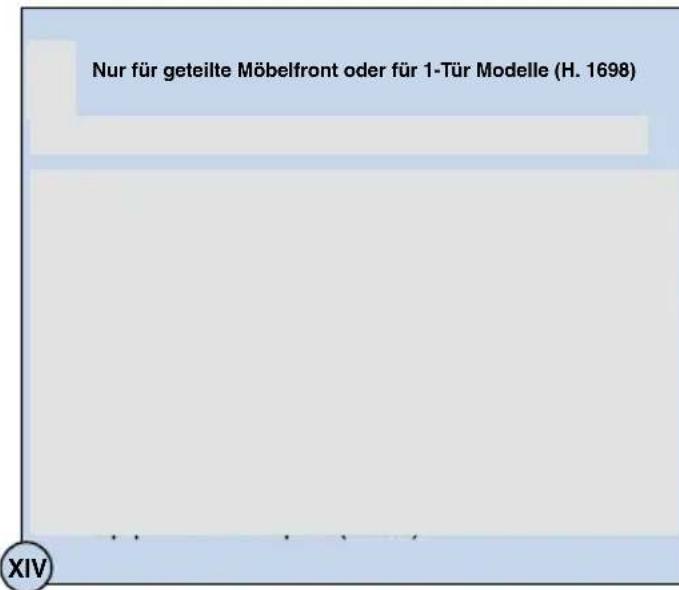
text_image
a 8 mm J 2 K 1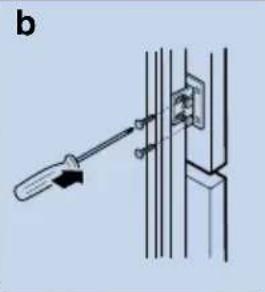
natural_image
Diagram of a mechanical lever assembly with a lever and pivot (no text or symbols)
natural_image
Diagram of a screwdriver inserted into a mechanical bracket (no text or symbols)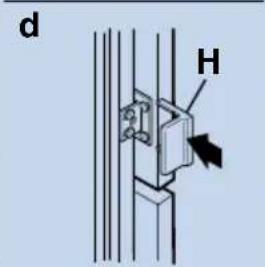
text_image
d H
text_image
a b J c d H XV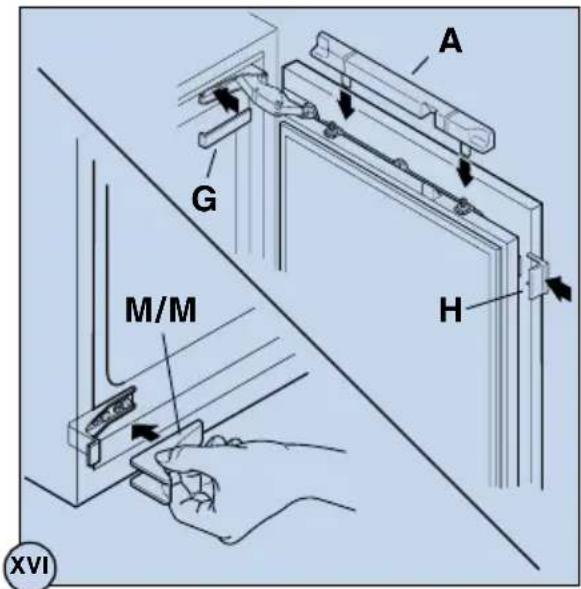
text_image
A G M/M H XVIWelcome to the world of Electrolux
Thank you for choosing a first class product from Electrolux, which hopefully will provide you with lots of pleasure in the future. The Electrolux ambition is to offer a wide variety of quality products that make your life more comfortable. You find some examples on the cover in this manual. Please take a few minutes to study this manual so that you can take advantage of the benefits of your new machine. We promise that it will provide a superior User Experience delivering Ease-of-Mind. Good luck!
Before installing and using the appliance read this user's instruction book carefully. It contains safety precautions, hints, information and ideas. If the refrigerator is used in compliance with the instructions written, it will operate properly and provide you with greatest satisfaction.
The symbols below help you to find things more easily:

Safety precautions
Warnings and information at this symbol serve safety for you and your appliance.

Hints, useful information

Environmental information

Symbol for ideas
At this symbol ideas can be found according to food and its storing.

The symbol on the product or on its packaging indicates that this product may not be treated as household waste. Instead it shall be handed over to the applicable collection point for the recycling of electrical and electronic equipment. By ensuring this product is disposed of correctly, you will help prevent potential negative consequences for the environment and human health, which could otherwise be caused by inappropriate waste handling of this product. For more detailed information about recycling of this product, please contact your local city office, your household waste disposal service or the shop where you purchased the product.
Contents
Safety Instructions....67
Diposal....68
Use and Control / Before Use....69
Temperature Setting Buttons 69
Starting up and temperature regulation ....70
SUPERCOOL....71
lternal parts / 72
Door shelves....72
Hints 73
Maintenance / Defrosting....73
Regular cleaning 74
How to change the bulb 75
Something not Working 76
Customer Service and Spare Parts 77
Installation / Positioning 77
Electrical connection 78
Building-in....78

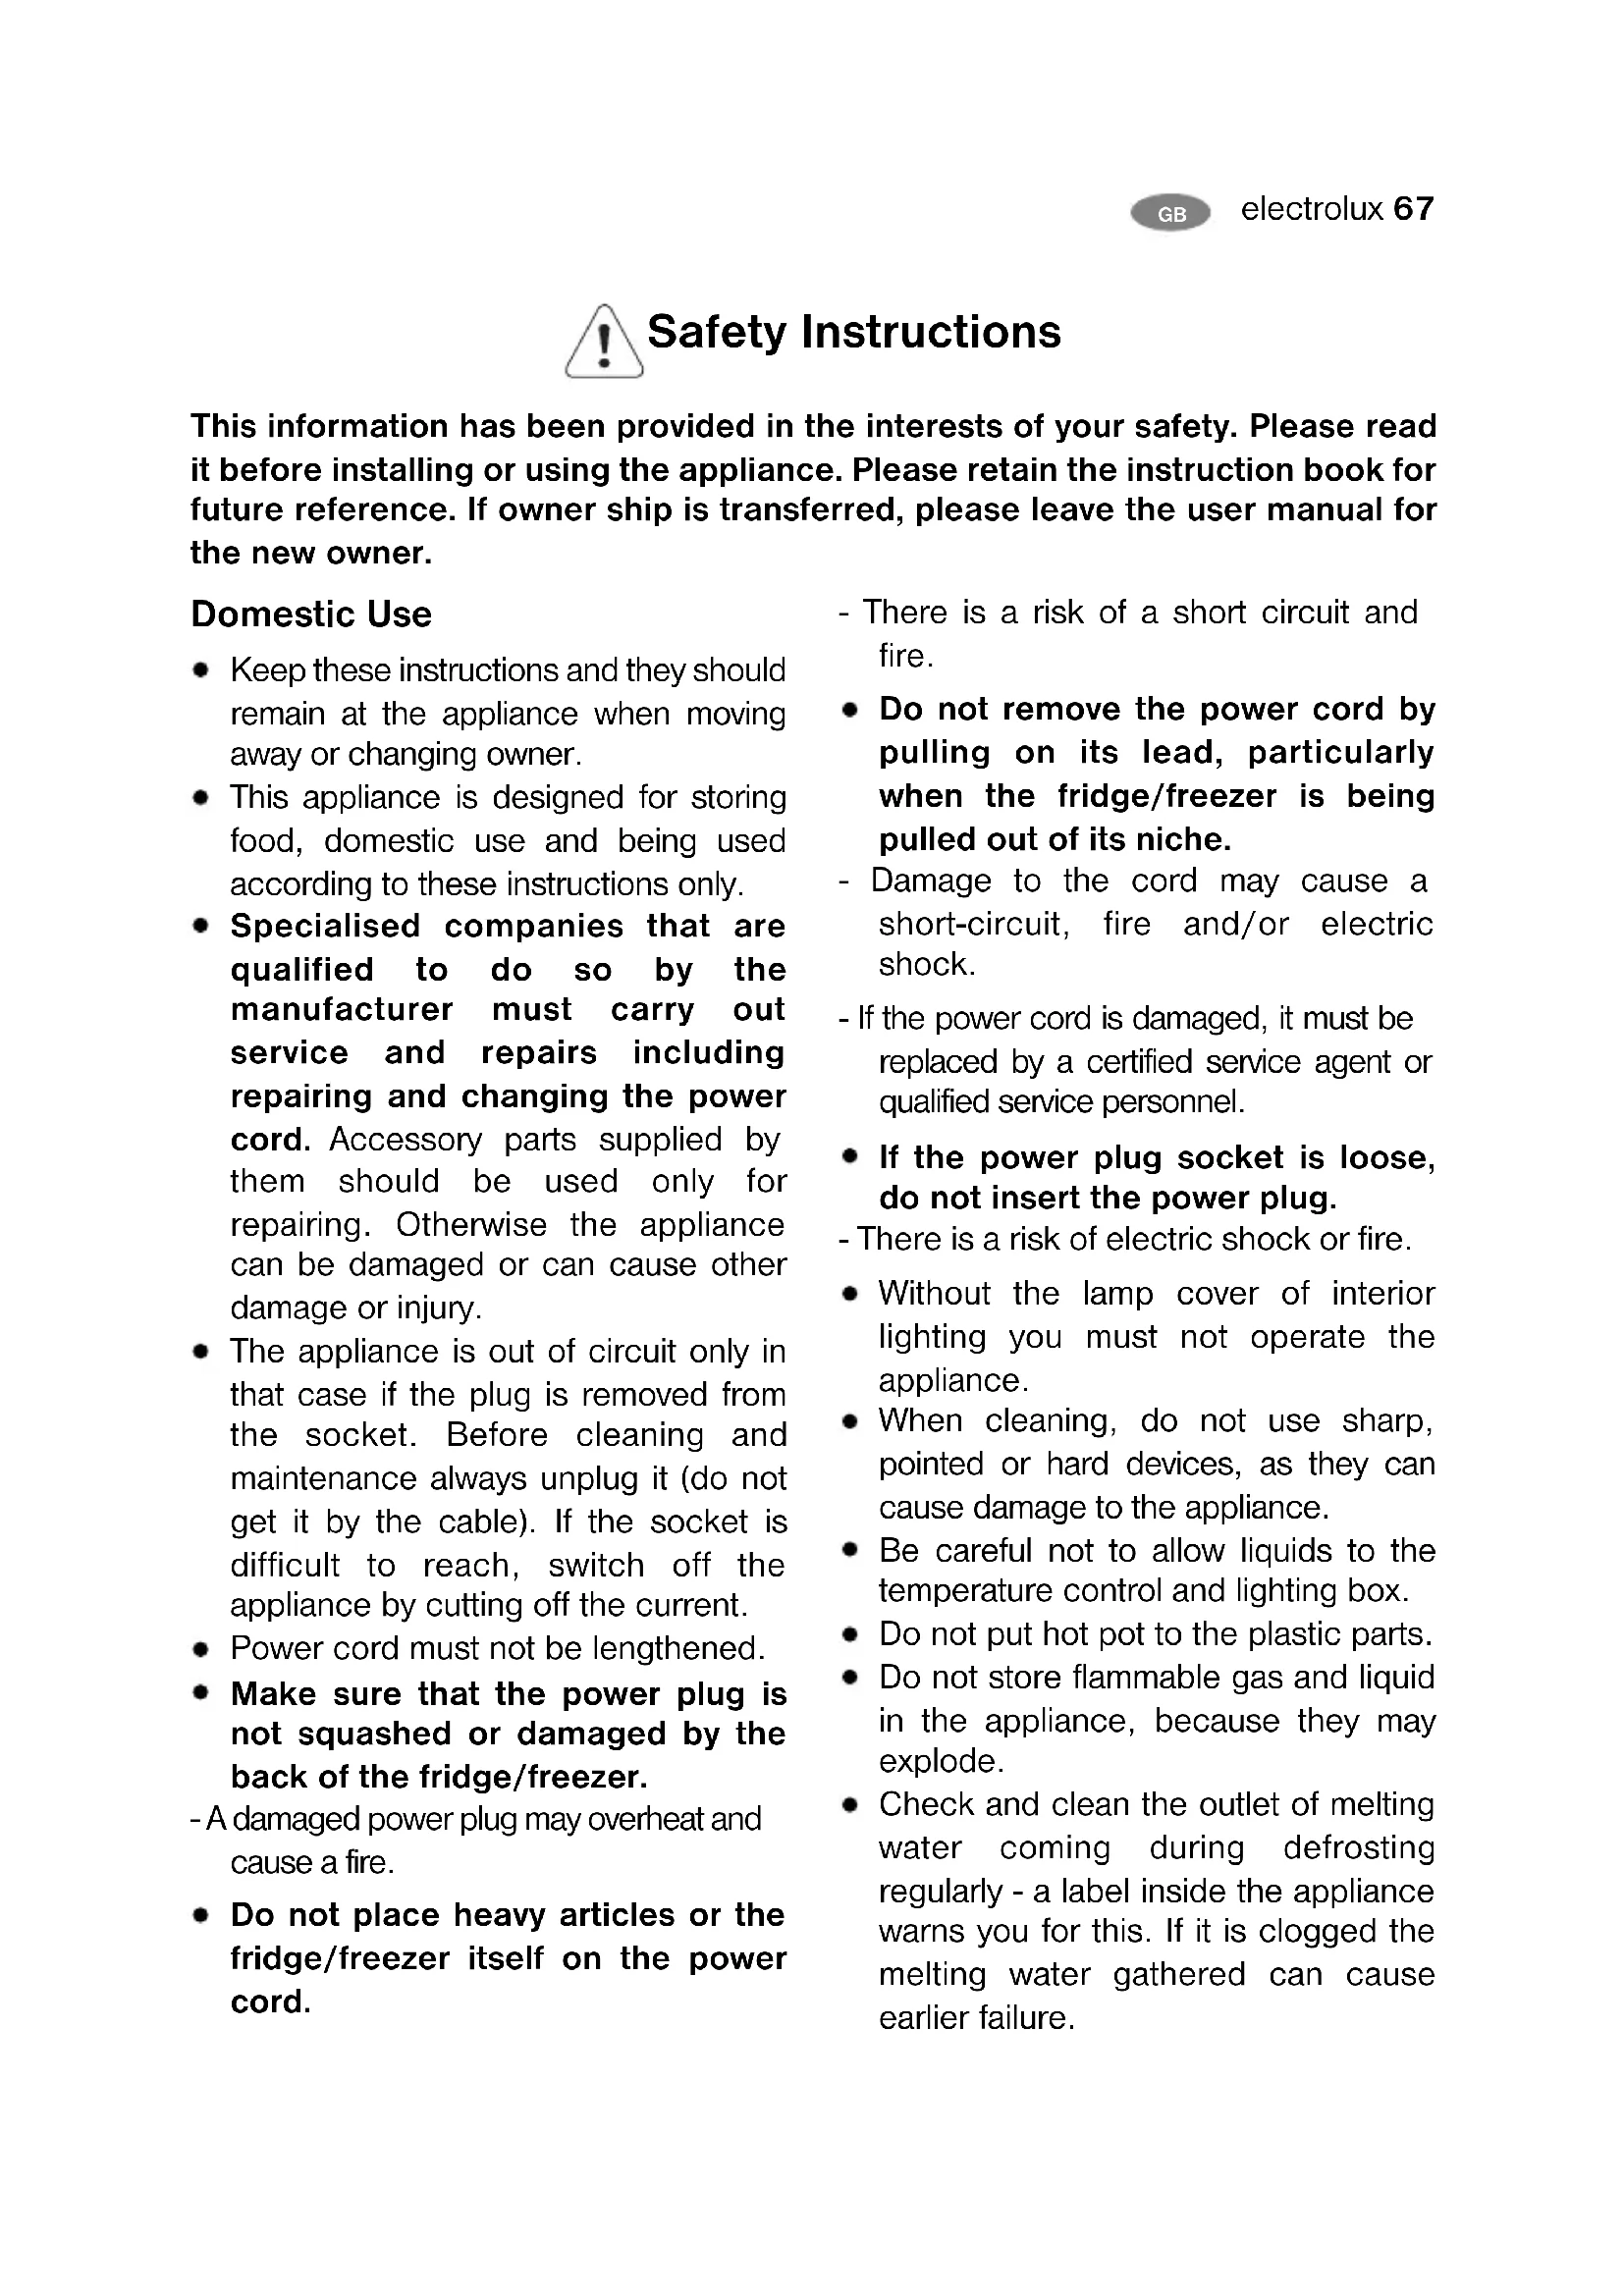
Safety Instructions
This information has been provided in the interests of your safety. Please read it before installing or using the appliance. Please retain the instruction book for future reference. If owner ship is transferred, please leave the user manual for the new owner.
Domestic Use
- Keep these instructions and they should remain at the appliance when moving away or changing owner.
- This appliance is designed for storing food, domestic use and being used according to these instructions only.
- Specialised companies that are qualified to do so by the manufacturer must carry out service and repairs including repairing and changing the power cord. Accessory parts supplied by them should be used only for repairing. Otherwise the appliance can be damaged or can cause other damage or injury.
- The appliance is out of circuit only in that case if the plug is removed from the socket. Before cleaning and maintenance always unplug it (do not get it by the cable). If the socket is difficult to reach, switch off the appliance by cutting off the current.
• Power cord must not be lengthened.
- Make sure that the power plug is not squashed or damaged by the back of the fridge/freezer.
- A damaged power plug may overheat and cause a fire.
- Do not place heavy articles or the fridge/freezer itself on the power cord.
- There is a risk of a short circuit and fire.
- Do not remove the power cord by pulling on its lead, particularly when the fridge/freezer is being pulled out of its niche.
- Damage to the cord may cause a short-circuit, fire and/or electric shock.
- If the power cord is damaged, it must be replaced by a certified service agent or qualified service personnel.
- If the power plug socket is loose, do not insert the power plug.
- There is a risk of electric shock or fire.
- Without the lamp cover of interior lighting you must not operate the appliance.
- When cleaning, do not use sharp, pointed or hard devices, as they can cause damage to the appliance.
- Be careful not to allow liquids to the temperature control and lighting box.
- Do not put hot pot to the plastic parts.
- Do not store flammable gas and liquid in the appliance, because they may explode.
- Check and clean the outlet of melting water coming during defrosting regularly - a label inside the appliance warns you for this. If it is clogged the melting water gathered can cause earlier failure.
Precautions for child safety
- Do not allow children to play with the packaging of the appliance. Plastic foil can cause suffocation.
- Adults must handle the appliance. Do not allow children to play with it or its controlling parts.
- If you are discarding the appliance pull the plug out of the socket, cut the connection cable (as close to the appliance as you can) and remove the door to prevent playing children to suffer electric shock or to close themselves into it.
- This appliance is not intended for use by persons (including children) with reduced physical sensory or mental capabilities, or lack of experience and knowledge, unless they have been given supervision or instruction concerning use of the appliance by a person responsible for their safety.

Environment Protection
- This appliance does not contain gasses which could damage the ozone layer, in either its refrigerant circuit or insulation materials. The appliance shall not be discarded together with the urban refuse and rubbish. Avoid damaging the cooling unit. Information on your local disposal sites may be obtained from your municipal authorities.
- Remove the plug and ensure that any locks or catches are removed, to prevent young children being trapped inside.

Disposal
Appliance Packaging Information
The materials marked with the symbol

are recyclable.
PE< for polyethylene, e.g. sheet wrapping material
PS< for polystyrene, e.g. padding material (always CFC-free)
POM< polyoxymethylene, e.g. plastic clips.
All materials are environmentally sound!
Safety precautions for isobutane
Warning
- The refrigerant of the appliance is isobutane (R600a) that is inflammable and explosive to a greater extent.
- Keep ventilation openings, in the appliance enclosure or in the built-in structure, clear of obstruction.
- Do not use mechanical devices or other means to accelerate the defrosting process, other than those recommended by the manufacturer.
- Do not damage the refrigerant circuit.
- Do not use electrical appliances inside the food storage compartments of the appliance, unless they are of the type recommended by the manufacturer.

Use and Control
Before Use
i Wait 4 hours before connecting the appliance to allow the oil to flow back in the compressor.
- Before using the appliance for the first time, wash the interior and all internal accessories with lukewarm water and some neutral soap so as to remove the typical smell of a brand-new product, then dry thoroughly.

Do not use detergents or abrasive powders, as these will damage the finish.
- Remove safety elements used for transportation.
Control panel
A Pilot light (green)
B ON/OFF switch
C Temperature setting buttons (for warmer temperatures)
D Temperature display
E Temperature setting buttons (for colder temperatures)
F SUPERCOOL indicator light (yellow)
- SUPERCOOL for intensive fridge cooling
G Push button for SUPERCOOL
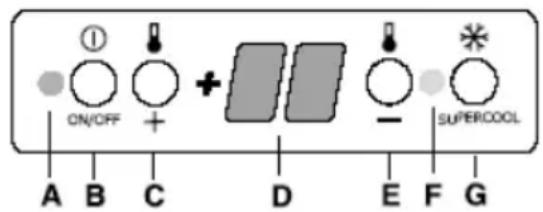
text_image
ON/OFF + SUPERCOOL A B C D E F GTemperature Setting Buttons
The temperature is adjusted using the "+" (WARMER) and "-" (COLDER) buttons.
These buttons are connected to the temperature display.
- The temperature display is switched over from the display of the ACTUAL temperature (temperature display is illuminated) to the display of the DESIRED temperature (temperature display flashes) by pressing one of the two buttons, "+" or "-"
- With each further press of one of the two buttons, the DESIRED temperature is adjusted by 1°C.
- If neither button is pressed, the temperature display automatically switches back after a short period (approx. 5 sec.) to the display of the ACTUAL temperature.
DESIRED temperature means:
The temperature that is required in the refrigerator, this can be adjusted to the temperatures shown in the display. The DESIRED temperature is indicated by flashing numbers.
ACTUAL temperature means:
The temperature display indicates the temperature that is currently present in the refrigerator. The ACTUAL temperature is indicated by continuously illuminated numbers.
Temperature Display
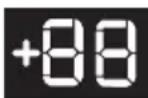
The temperature display can indicate several pieces of information.
- During normal operation, the temperature currently present in the refrigerator (ACTUAL temperature) is displayed.
- When the temperature is being adjusted, the temperature currently set flashes (DESIRED temperature).
Prior to Initial Start-Up
Please clean the appliance interior and all accessories prior to initial startup (see section: "Cleaning and Care").
Starting up and temperature regulation
- Insert the plug into the plug socket. When the refrigerator compartment door is opened, the internal lighting is switched on.
- Press ON/OFF button. The green mains pilot indicator illuminates.
- Press either the "+" (WARMER) or "-" (COLDER) button. The temperature display switches over and the DESIRED temperature currently set flashes on the temperature display.
- Set the required temperature by pressing the "+" (WARMER) or "-" (COLDER) buttons (see section "Temperature setting buttons"). The temperature display will immediately show the changed setting. With each further press of one of the two buttons, the DESIRED temperature is adjusted by 1°C. Adjustable temperature range: +2°C to +8°C.
Note: From a food safety point of view, +5°C for the refrigerator compartment should be considered cold enough as a storage temperature.
- Once the required temperature has been set, after a short period (approx. 5 sec.) the temperature display will change and again indicate the current ACTUAL temperature inside the fridge. The display will change from flashing to continuous illumination. The compressor will start and then run automatically.
Information! When the setting is changed, the compressor does not start immediately if automatic defrosting is currently taking place.
i As the storage temperature within the fridge is reached quickly you can store food immediately after switching on.
SUPERCOOL
SUPERCOOL Button
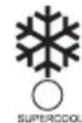
The SUPERCOOL function is suited for quick cooling of large quantities of goods in the erator, e.g. drinks and salads for a
- The SUPERCOOL function is switched on by pressing the SUPERCOOL button. The yellow light illuminates.
- The SUPERCOOL function now ensures intensive cooling. A DESIRED temperature of +2°C is automatically selected. The SUPERCOOL function is ended automatically after a period of 6 hours. The originally selected DESIRED temperature is again valid and the compartment will return to. The temperature display shows the ACTUAL refrigerator temperature.
- The SUPERCOOL function can be ended manually at any time by pressing the SUPERCOOL button again. The yellow light goes out.

If the SUPERCOOL function is switched on the temperature g may not be changed.
Switching off the Appliance
To switch off, press the ON/OFF button for approx. 3 seconds. This will result in a countdown from "3" to "1" taking place in the temperature display. On reaching "1" the fridge will switch off. The temperature display will go off.
Note: The appliance cannot be switched on or off if unplugged, or if there is no power being supplied to it. Following connection to the mains power supply, the appliance returns to the same operating state as before the interruption of main power.
If the appliance is not going to be used for an extended period:
- Switch off the appliance by holding down the ON/OFF button until the display goes off (see above).
- Remove the mains plug or switch off or disconnect from the electricity supply.
- Clean thoroughly (see section: "Cleaning and Care").
- Finally, leave the door open so as to avoid a build up of odours.
Holiday Setting
In the holiday mode the temperature for the refrigerator is approximately +15°C.
In the holiday mode it is therefore possible to leave the door of the empty refrigerator closed during periods of extended absence.
Advantage: Unintentional closing of the door, or accidental closing of the door by persons who have access to your home during your absence, is no longer possible. Without the stand-by mode leaving the door closed would lead to the accumulation of odours and mould.
After emptying and cleaning the appliance, proceed as follows:
- To activate the holiday setting, press the "+" (WARMER) or "-" (COLDER) button. The temperature display will change and indicate in flashing numbers the DESIRED temperature that is currently set.
- Hold down the "+" (WARMER) button until the temperature display indicates H (for holiday). The temperature shown in the temperature display will
change in steps of 1^ C until it reaches +8^ C. After +8^ C the value +15^ C will appear in the display with the letter H. The fridge is now operating in energysaving holiday mode.
- After a few seconds the temperature display will again change to the ACTUAL emperature. The display will change from flashing to continuous illumination.
To switch the fridge back to normal operation, press the "-" (COLDER) button.
i Important! Do not store any goods in the refrigerator when the standby mode is operational. The temperature is regulated at about +15°C when the stand-by mode is operational. This is too warm for food products.
Internal Parts
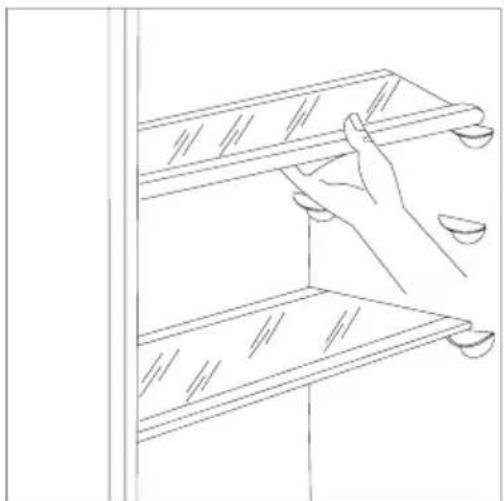
Storage shelves
- The shelves can be removed for cleaning.
- To permit storage of food packages of various sizes, the shelves can be placed at different heights.
- To remove the internal shelf pull forward until it can be tipped up or down and removed.
- Please do the same in reverse to insert the shelf at a different height.
- For better use of space, the front halfshelves can lie over the rear ones.
natural_image
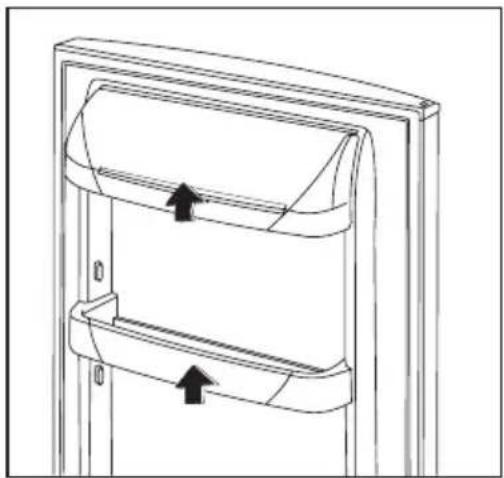
Line drawing of a hand holding a shelf with three panels, no text or symbols presentDoor shelves
- To permit storage of food packages of various sizes, the central door shelf can be adjusted in height.
- Gradually pull the shelf in the direction of the arrows until it comes free, then reposition as required.
- For more thorough cleaning, the top and bottom door shelves can be removed by pulling them in the direction of the arrows, then refitting them in position.
natural_image
Technical line drawing of a door frame with two curved panels and directional arrows indicating movement (no text or symbols)
Hints

Saving Energy
- Pay careful attention to where the cabinet is placed. See the section Installation. When installed correctly the cabinet will consume less energy.
- Try to avoid keeping the doors open for long periods or opening the doors too frequently as warm air will enter the cabinet and cause the compressor to switch on unnecessarily often.
- If the ambient temperature is high, the thermostat knob is on the coldest setting (higher numbers) and the appliance is fully loaded, the compressor may run continuously, causing frost or ice to form on the evaporator. If this happens, turn the knob to a warmer setting (lower numbers) to allow automatic defrosting and so a saving in electricity consumption.
- Do not place warm foods inside the appliance. Allow warm foods to cool first.
- Keep the heat emitting condenser, the metall grille on the rear wall of your appliance, always clean.
Hints for refrigeration
- Do not store warm food or evaporating liquids in the refrigerator and do cover or wrap up the food, particularly if it has a strong smell.
To help you use your refrigerator correctly, here are some useful hints:
- Raw meat (beef, pork, lamb & poultry): wrap in polythene bags and place on top of the salad compartment, this being the coldest spot in the refrigerator.
Meat can only be stored safely in this way for one or two days at the most.
- Cooked food, cold cuts, jelly, etc.: these should be well covered and can be stored on any of the glass shelves.
- Fruit & vegetables: these should be thoroughly cleaned and placed in the bottom drawer/s.
- Butter & cheese: these should be placed in special airtight containers or wrapped in aluminium foil or polythene bags to keep out as much air as possible.
- Milk bottles: these should have a top and should be stored in the bottle rack on the door.
Bananas, potatoes, onions and garlic, if not packed, must not be kept in the refrigerator.
Maintenance

Unplug the appliance before carrying out any maintenance operation.

Warning
This appliance contains hydrocarbons in its cooling unit maintenance and recharging must therefore only be carried out by authorised technicians.
Defrosting
Bleeding part of the moisture of cooling chamber in form of frost and ice goes with the operation of the refrigerator.
Thick frost and ice has an insulating effect, so it reduces cooling efficiency as the temperature increases and it needs more energy.
At this type of appliance defrosting cooling compartment is automatic without any external intervention.
The thermostatic control interrupts the operation of compressor at regular intervals for more or less time - during this cooling is interrupted - temperature of the cooling compartment increases and defrosting occurs. After defrosting the thermostatic control restarts operation of the system.
Melting water flows through defrost water outlet into the evaporative tray maintained on the top of compressor and evaporates due to warmth of it.

Check and clean the outlet of melting water coming during defrosting regularly. If it is clogged the melting water gathered can cause earlier failure as it can go to the insulating of the appliance.
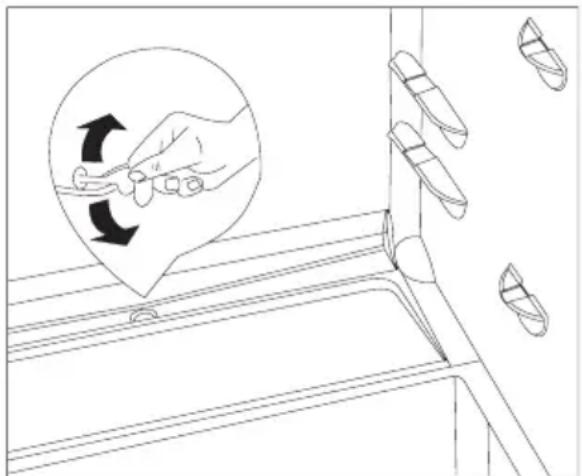
natural_image
Line drawing of a hand holding a tool near a kitchen sink, with no text or symbols present.Clean the melting water outlet with the supplied pipe scraper that can be seen in the figure. The pipe scraper has to be stored in the outlet.
Occasionally check the defrost water outlet not to be clogged up.
The most typical case of clogging up in the defrost water outlet when you put food wrapped in some paper into the appliance and this paper contacts back plate of cooling compartment and freezes to it. If you remove the food right at this moment the paper will tear and it can cause clogging up in the outlet by getting into it. So you are asked to be careful - because of the above - when placing foods wrapped in paper into the appliance.

In case of increased demand e.g. during heatwaves, the refrigerator temporarily happens to operate constantly - during this the automatic defrosting is ineffective.
Remaining small ice and frost stains on back plate of the cooling compartment after defrosting period is not abnormal.
Regular cleaning
It is recommended to wash the inside of the refrigerator in 3-4 weeks time.
Household cleaner or soap must not be used.
After you made it no-current wash the appliance using lukewarm water and wipe it.
Clean the magnet door rubber profile with clean water.
After cleaning plug the appliance to the mains socket.
Dust and dirt collected on the back of the refrigerator, condenser is recommended to be removed and clean the evaporative tray on top of the compressor once or twice a year.
When the refrigerator is not in use
In case the appliance will not be used for a long time follow these steps:
Break the circuit of the appliance.
Remove foods from the refrigerator.
Defrost and clean it as written before.
Leave the door open to avoid a build up of air inside.
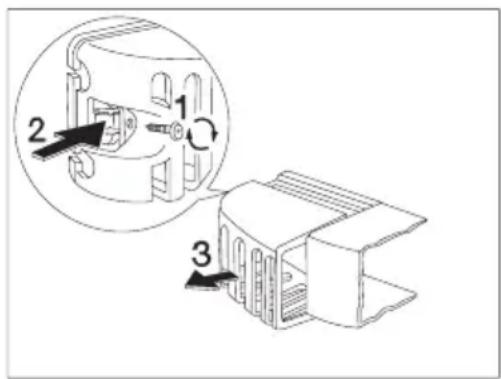
How to change the bulb
- Break the circuit of the appliance.
- Unscrew the lamp cover securing screw.
- Unhook the moving part by pressing it as shown in the figure.
- Replace the bulb with one of the same power (the maximum power is shown on the light bulb cover)
- Fix the lamp cover in place.
- Screw the lamp cover securing screw.
- Reconnect the appliance.
- Open the door and check if the light comes on.
text_image
Technical diagram showing a mechanical component with labeled parts and an inset view of the internal structure.Something not Working
Problems may be due to causes which can easily be solved before calling the Technical Service. Please follow these instructions:
| SYMPTOM | SOLUTION |
| Door does not close | Weight surpasses the storage limit of the door shelf so spread weight more evenly or take some products out.The appliance is not properly installed. Please look in the Building-in. section. |
| It is too warm inside the refrigerator | Set a lower temperature.Distribute the food products to allow cold air to circulate around them.Make sure that the door is completely closed and that the insulating strip is complete and clean.The temperature where the cabinet is placed is above normal room temperature. |
| It is too cold inside the refrigerator. | Set a warmer temperature. |
| The compressor works continuously. | Set a warmer temperature.The temperature where the cabinet is placed is above normal room temperature.Check that the ventilation is sufficient and that the ventilation openings are unobstructed.The cause could be the introduction of large quantities of food and/or frequent opening/closing of the door. |
| Noises | Sometimes this is normal. Temperature control may cause clicking sounds when the system is connected ordisconnected.The injected cooling gas may produce a gurgling soundwhile passing through the tubes.The motor may cause a humming noise and/or slightbumping.The insulation material used has a tendency to slightly increase noise levels, how ever it allows for much better insulation and a lower energy consumption. |
Malfunctions
If the electronics in the appliance have detected a fault that prevents the ACTUAL temperature being measured, the temperature display shows a square. The appliance will continue to function using a backup programme until your local Customer Service engineer has repaired the appliance.
Customer service and spare parts
If you cannot find the remedy for a malfunction in these operating instructions, please contact your dealer or our customer service department and consult the Guarantee card.
Selective ordering of replacement parts can save unnecessary travel and costs.
For this reason always provide the following appliance information:
Model Name
• Model Number (PNC)
- Serial Number (S-No.)
This information can be found on the rating plate inside the cabenit on the left hand wall. We recommend that you enter this information here, so that it is handy if needed.
Technical specifications
The technical data is indicated in the rating plate on the left side inside the appliance.
Installation
Take utmost care when handling your appliance so as not to cause any damages to the cooling unit with consequent possible fluid leakages.
- During normal operation, the condenser and compressor at the back of the appliance heat up considerably. Always ensure that there is adequate ventilation as a failure to do this will result in component failure and possible food loss. See installation instructions.
- Important: if the supply cord is damaged, it must be replaced by a special cord or assembly available from the manufacturer or its service agent.
Positioning
- Unpack the cabinet and check that it is in good condition and free of any transport damage.
- The appliance must not be located close to radiators or gas cookers.
- Avoid prolonged exposure of the appliance to direct sunlight.
- For safety reasons, minimum ventilation must be as shown in Fig.
Attention: keep ventilation openings clear of obstruction.
- It is necessary that the niche is provided with a conduct of ventilation having the following dimensions:
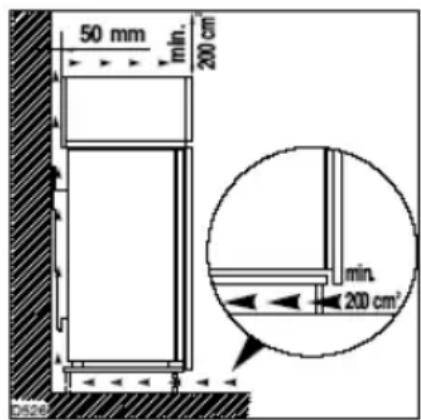
text_image
50 mm min. 200 cm³ min. 200 cm² bsizeDepth 50 mm
Width 540 mm
The climate classification can be found on the rating plate, which is located inside the cabinet on the left hand wall.
The following table shows which ambient temperature is correct for each climate classification:
| Climate classification | for an ambient temperature of |
| SN + | 10... + 32 °C |
| N + | 16... + 32 °C |
| ST + | 16... + 38 °C |
| T + | 16... + 43 °C |
Electrical connection
Before plugging in, ensure that the voltage and frequency shown on the serial number plate correspond to your domestic power supply.
Voltage can vary by ±6% of the rated voltage.
For operation with different voltages, a suitably sized auto-transformer must be used.

Important
The appliance must be earthed.
The power supply cable plug is provided with a contact for this purpose.
If the domestic power supply socket is not earthed. connect the appliance to a separate earth in compliance with current regulations, consulting a specialist technician.
The Manufacturer declines all responsibility if the above safety precautions are not observed.

This appliance complies with the following E.E.C. Directives:
- 87/308 EEC of 2/6/87 relative to radio interference suppression.
- 73/23 EEC of 19.2.73 (Low Voltage Directive) and subsequent modifications.
- 89/336 EEC of 3.5.89
(Electromagnetic Compatibility Directive) and subsequent modifications.

Attention!
It must be possible to disconnect the appliance from the mains power supply; the plug must therefore be easily accessible after installation.
Building-in
Dimensioned drawing
See "Installation Instructions"
Please check whether, after installing your appliance and especially after reversing the door, the door seal seals right round. A badly fitting door seal may lead to heavy frosting and thereby to a higher power consumption.
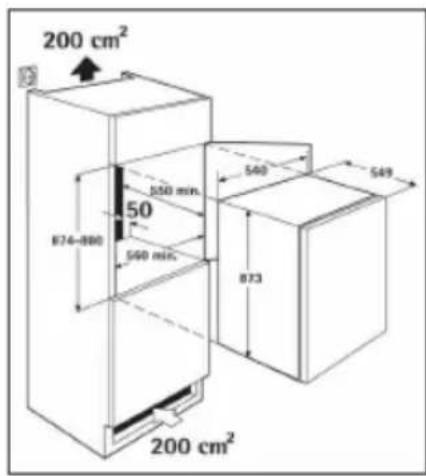
text_image
200 cm² 50 B74-B80 550 min. 560 min. 540 549 B73 200 cm²
Warning!
If the ambient temperature is cold (i.e. in Winter), the gasket may not fit perfectly to the cabinet. In that case, wait for the natural fitting of the gasket or accelerate this process by heating up the part involved with a normal hairdrier.
text_image
Diagram illustrating a mechanical assembly with numbered steps and directional arrows indicating motion or movement.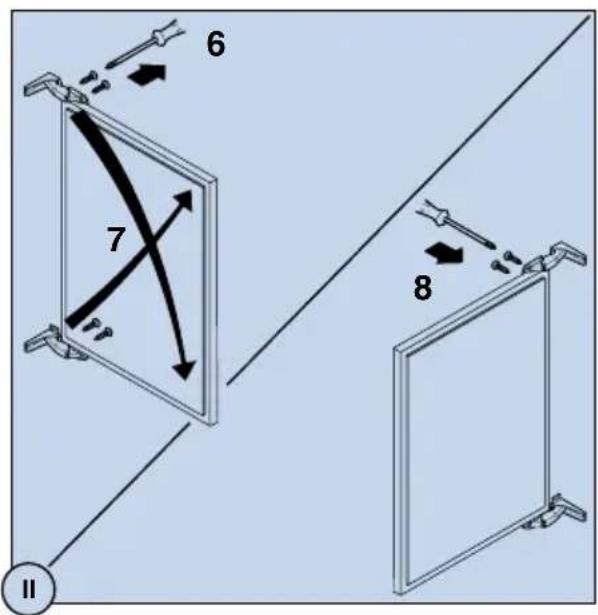
text_image
6 7 8 II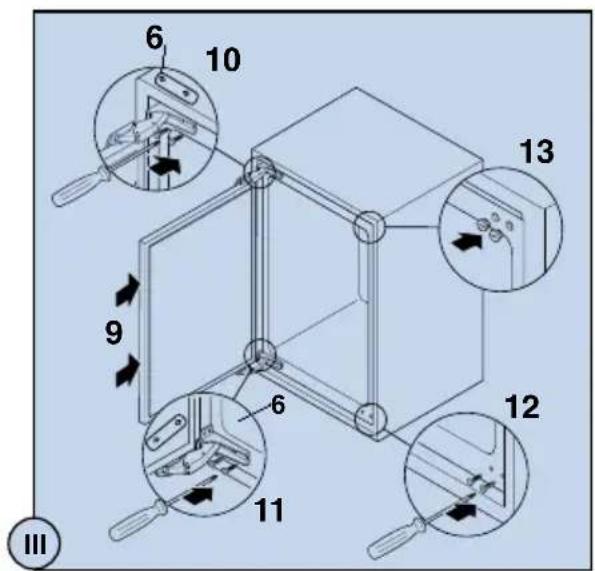
text_image
6 10 9 13 6 11 12 IIItext_image
a J I B 4 5 M c b III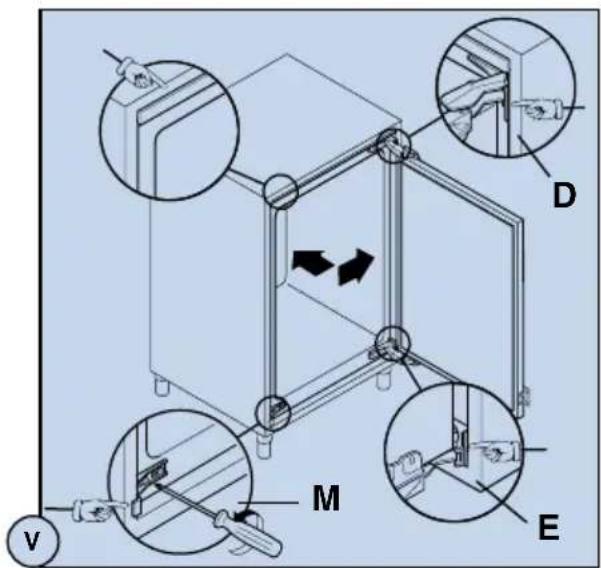
text_image
Technical diagram of a mechanical assembly with labeled components (D, E, M, V) and directional arrows indicating movement or force.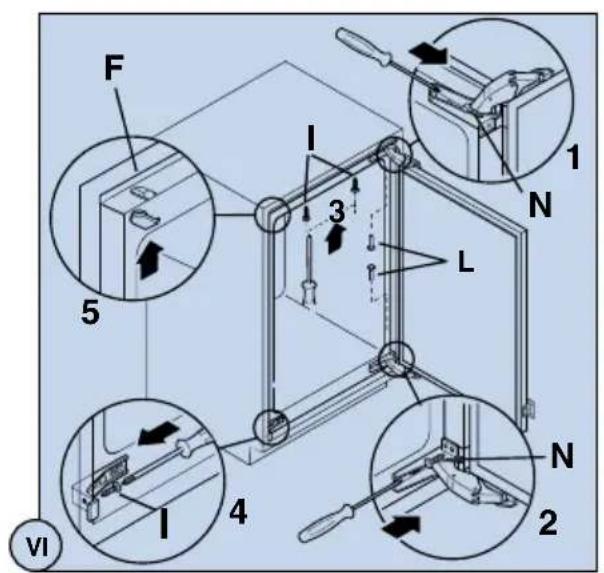
text_image
F I 3 L 1 N 5 4 N 2 VI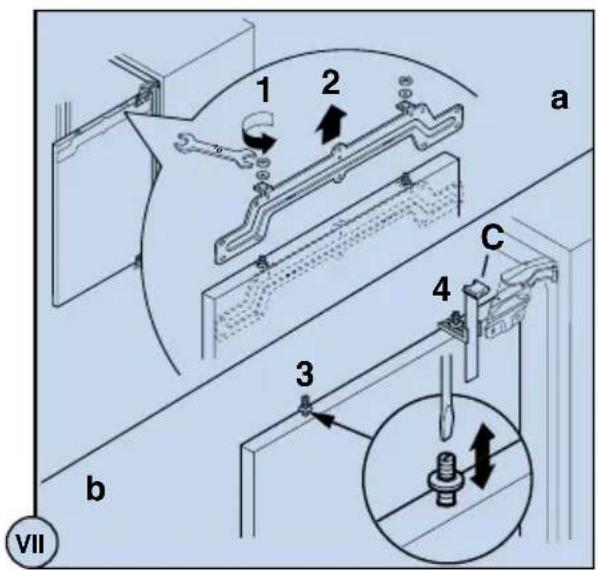
text_image
1 2 a C 4 3 b VII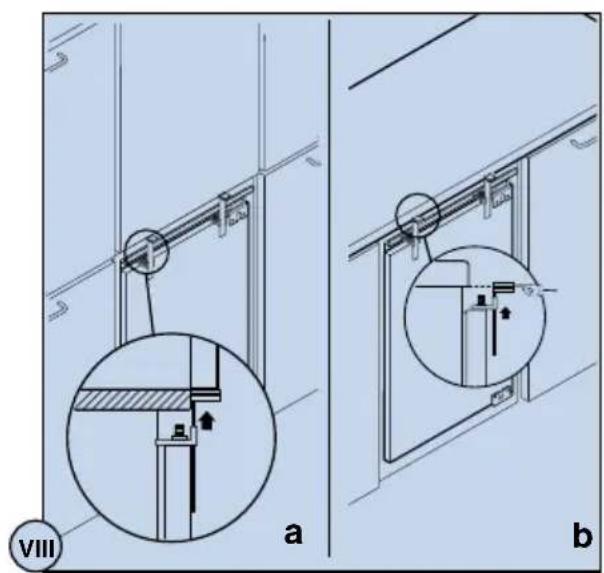
text_image
VIII a b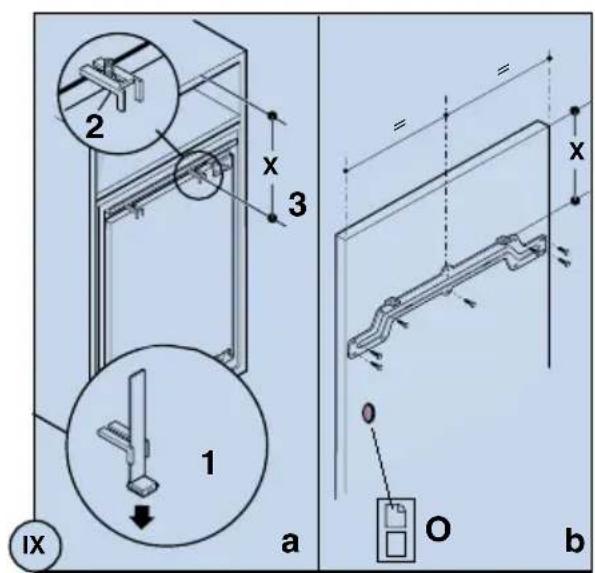
text_image
2 x 3 1 IX a O b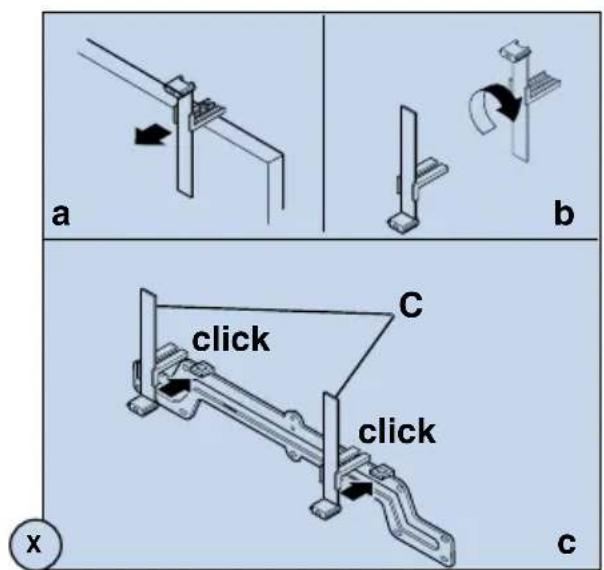
text_image
a b click c click x c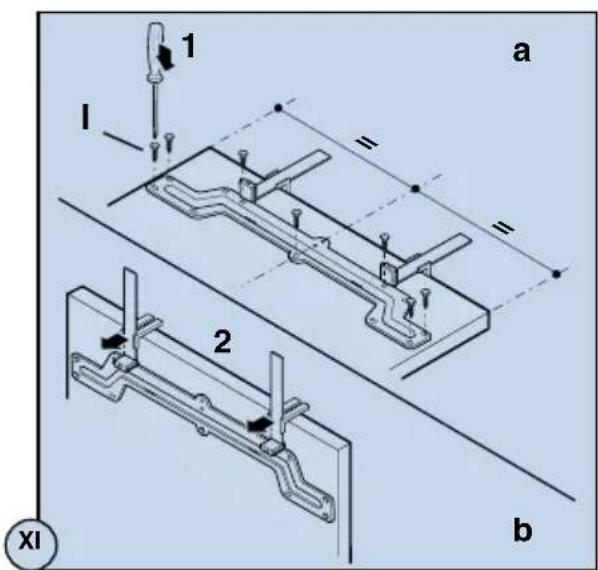
text_image
1 I = = 2 b XI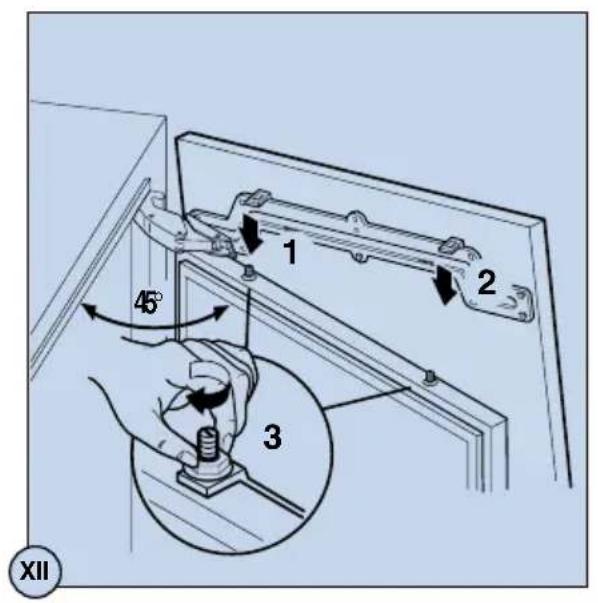
text_image
1 2 45° 3 XII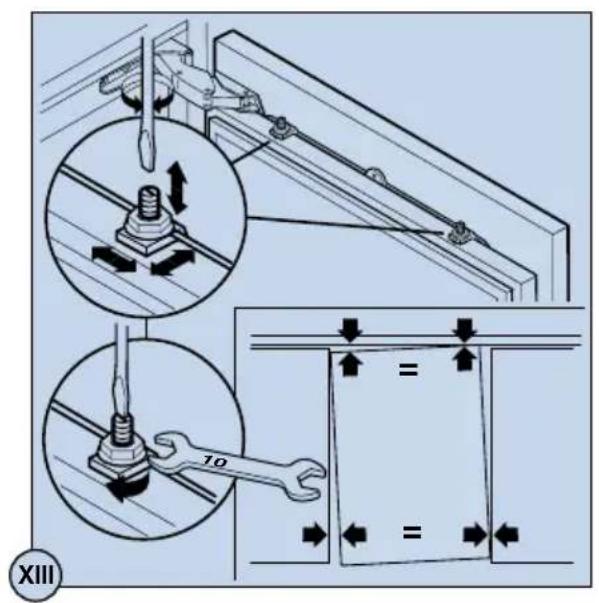
text_image
XIII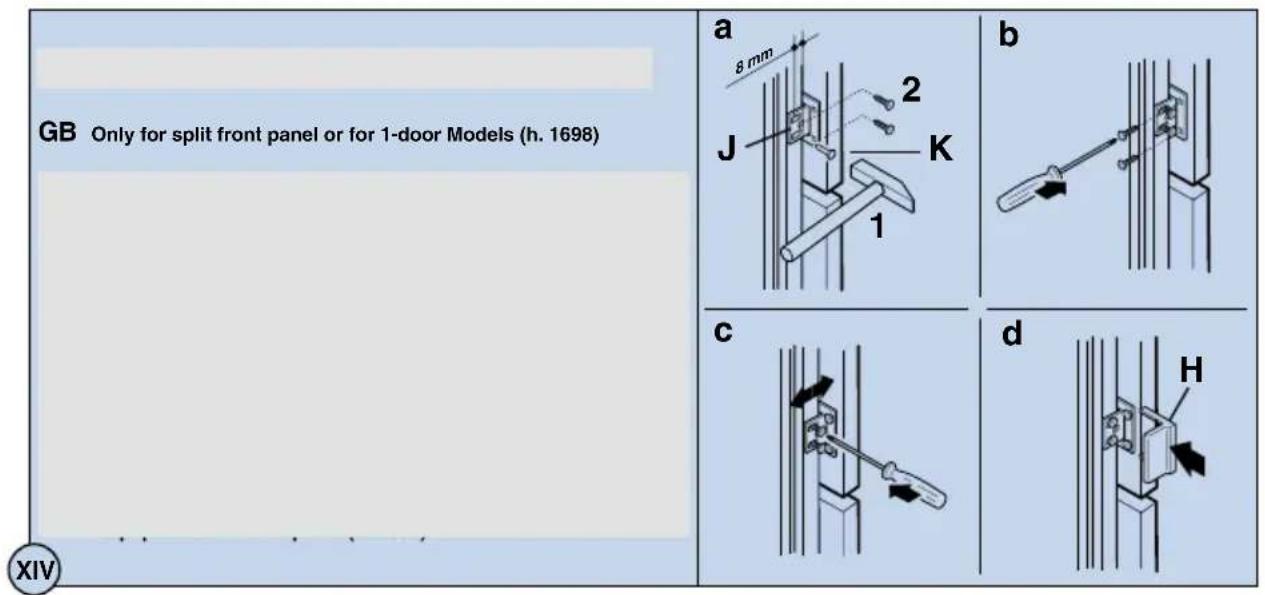
text_image
GB Only for split front panel or for 1-door Models (h. 1698) a 8 mm J 2 K 1 b c d H XIV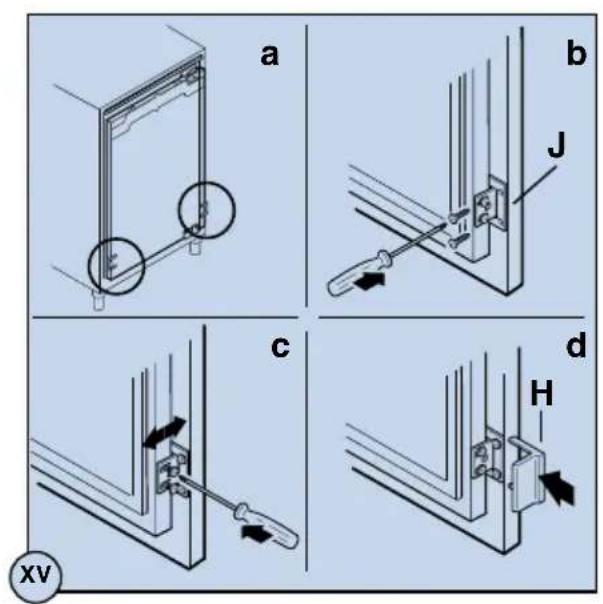
text_image
a b J c d H XV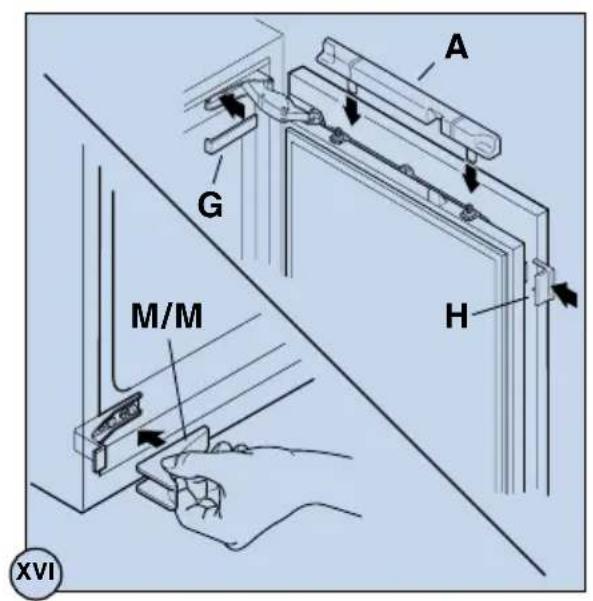
text_image
A G M/M H XVIwww.electrolux.com
www.electrolux.nl
