RP 3608DA - Vacuum Cleaner METABO - Free user manual and instructions
Find the device manual for free RP 3608DA METABO in PDF.

| Product Type | Cordless Vacuum Cleaner |
| Brand | Metabo |
| Model | RP 3608DA |
| Rated Voltage | 36 V DC |
| Motor Type | DC Motor |
| Maximum Airflow | 124 cfm (3.5 m³/min) |
| Maximum Suction Pressure | 2.9 psi (201 hPa) |
| Tank Capacity (dry) | 8 L (2.1 gallons) |
| Tank Capacity (wet) | 6 L (1.6 gallons) |
| Battery | Lithium-ion 36 V, model BSL36B18 |
| Weight (with batteries) | 10.9 kg (24.0 lbs) |
| Dimensions (L × W × H) | 331 × 369 × 382 mm |
| Charging Time | Approximately 52 minutes |
| Charger | UC18YSL3 (120 V, 60 Hz) |
| Suction Type | Dry and wet |
| Special Features | Battery charge indicator, USB port for charging devices, pulse air filter cleaning |
| Safety | Overflow float mechanism, automatic shut-off in case of overload or overheating |
| Maintenance | Regular filter cleaning, check screws and terminals |
| Spare Parts | Cloth filter, paper filter, nylon filter, dust bag |
| Included Accessories | Hose (1.5 m), telescopic tube, floor brush, crevice nozzle, tool box, polyethylene bags |
Frequently Asked Questions - RP 3608DA METABO
User questions about RP 3608DA METABO
0 question about this device. Answer the ones you know or ask your own.
Ask a new question about this device
Download the instructions for your Vacuum Cleaner in PDF format for free! Find your manual RP 3608DA - METABO and take your electronic device back in hand. On this page are published all the documents necessary for the use of your device. RP 3608DA by METABO.
USER MANUAL RP 3608DA METABO
SAFETY INSTRUCTIONS AND INSTRUCTION MANUAL
WARNING
IMPROPER OR UNSAFE use of this cleaner can result in death or serious bodily injury! This manual contains important information about product safety. Please read and understand this manual BEFORE operating the cleaner. Please keep this manual available for other users and owners before they use the cleaner. This manual should be stored in safe place.
INSTRUCTIONS DE SECURITE ET MODE D'EMPLOI
AVERTISSEMENT
IMPORTANT SAFETY INFORMATION
Read and understand all of the safety precautions, warnings and operating instructions in the Instruction Manual before operating or maintaining this power tool.
Most accidents that result from power tool operation and maintenance are caused by the failure to observe basic safety rules or precautions. An accident can often be avoided by recognizing a potentially hazardous situation before it occurs, and by observing appropriate safety procedures.
Basic safety precautions are outlined in the "SAFETY" section of this Instruction Manual and in the sections which contain the operation and maintenance instructions.
Hazards that must be avoided to prevent bodily injury or machine damage are identified by WARNINGS on the power tool and in this Instruction Manual.
NEVER use this power tool in a manner that has not been specifically recommended by metabo HPT.
MEANINGS OF SIGNAL WORDS
WARNING indicates a potentially hazardous situations which, if ignored, could result in death or serious injury.
CAUTION indicates a potentially hazardous situations which, if not avoided, may result in minor or moderate injury, or may cause machine damage.
NOTE emphasizes essential information.
IMPORTANT SAFETY INSTRUCTIONS
When using an electrical appliance, basic precautions should always be followed, including the following:
READ ALL INSTRUCTIONS BEFORE USING (THIS APPLIANCE)
WARNING
To reduce the risk of fire, electric shock, or injury:
- Do not use outdoors.
- Do not allow to be used as a toy. Close attention is necessary when used by or near children.
- Use only as described in this manual. Use only manufacturer's recommended attachments.
- Do not handle appliance with wet hands.
-
Use extra care when cleaning on stairs.
-
Do not operate cleaner in explosive2. atmospheres, such as in the
fl ammable or combustible liquids, gasses or 13. For Household Use Only dust.
- Do not use to pick up flammable or combustible liquids, such as gasoline, or use in areas where they may be present.
-
Do not pick up anything that is burning or smoking, such as cigarettes, matches, or hot ashes.
-
Never use when the temperature is below 23^ (-5^) or above 104^ (40^) .
- Do not put any object into openings. Do not use with any opening blocked; keep free of dust, line, hair, and anything that may reduce air flow.
- Keep hair, loose clothing, fingers, and all parts of body away from openings and moving parts.
Do not use without dust bag and/or filters in
- For Household Use Only
GENERAL SAFETY RULES
SAVE THESE INSTRUCTIONS
1) Work area safety
a) Keep work area clean and well lit.
Cluttered or dark areas invite accidents.
b) Do not operate cleaner in explosive atmospheres, such as in the presence of flammable liquids, gases or dust.
Motor of cleaner may create sparks which may ignite the dust of fumes.
c) Keep children and bystanders away while operating a cleaner.
Distractions can cause you to lose control.
2) Electrical safety
a) Avoid body contact with earthed or grounded surfaces such as pipes, radiators, ranges and refrigerators.
There is an increased risk of electric shock if your body is earthed or grounded.
b) Do not expose cleaner to wet conditions.
Water entering a cleaner will increase the risk of electric shock.
3) Personal safety
a) Stay alert, watch what you are doing and use common sense when operating a cleaner.
Do not use a cleaner while you are tired or under the influence of drugs, alcohol or medication.
A moment of inattention while operating cleaner may result in serious personal injury.
b) Use safety equipment. Always wear eye protection.
Safety equipment such as dust mask, nonskid safety shoes, hard hat, or hearing protection used for appropriate conditions will reduce personal injuries.
c) Dress properly. Do not wear loose clothing or jewellery. Keep your hair, loose clothing, fingers and all parts of body away from openings and moving parts.
Loose clothes, jewellery or long hair can be caught in moving parts.
4) Cleaner use and care
a) Disconnect the battery pack from the cleaner before making any adjustments, changing accessories, or storing cleaner.
Such preventive safety measures reduce the risk of starting the cleaner accidentally.
b) Store idle cleaner out of the reach of children and do not allow persons unfamiliar with the cleaner or these instructions to operate the cleaner.
Cleaner are dangerous in the hands of untrained users.
c) Maintain cleaner. Check for misalignment or binding of moving parts, breakage of parts and any other condition that may affect the cleaner operation.
If damaged, have the cleaner repaired before use.
Many accidents are caused by poorly maintained cleaner.
d) Use the cleaner, accessories, in accordance with these instructions and in the manner intended for the particular type of cleaner, taking into account the working conditions and the work to be performed.
Use of the cleaner for operations diff erent from intended could result in a hazardous situation.
e) Prevent the appliance from sucking in the following: Fire or injury may result.
Foaming liquids such as oil, hot water, chemicals or detergent.
O Generated spark during metal grinding or cutting.
High temperature things, such as lighted cigarette.
Inflammable substances (gasoline, thinner, benzene, kerosene, paint, etc.), explosive substances (nitroglycerine, etc.), combustible substances (aluminum, zinc, magnesium, titanium, red phosphorus, yellow phosphorus, celluloid, etc.)
Sharp things, such as nail and razor.
Solidification materials, such as cement powder and toner, and conductive fine dusts, such as metal powder and carbon powder.
5) Battery powered cleaner use and care
a) Ensure the switch is in the off position before inserting battery pack.
Inserting the battery pack into cleaner that have the switch on invites accidents.
b) Recharge only with the charger specified by the manufacturer.
A charger that is suitable for one type of battery pack may create a risk of fire when used with another battery pack.
c) Use cleaner only with specifically designated battery packs.
Use of any other battery packs may create a risk of injury and fire.
d) When battery pack is not in use, keep it away from other metal objects like paper clips, coins, keys, nails, screws, or other small metal objects that can make a connection from one terminal to another.
Shorting the battery terminals together may cause burns or a fire.
e) Under abusive conditions, liquid may be ejected from the battery, avoid contact. If contact accidentally occurs, fl ush with water. If liquid contacts eyes, additionally seek medical help.
Liquid ejected from the battery may cause irritation or burns.
f) Do not use a battery pack or cleaner that is damaged or modifi ed. Damaged or modifi ed batteries may exhibit unpredictable behavior resulting in fire, explosion or risk of injury.
g) Do not expose a battery pack or cleaner to fire or excessive temperature. Exposure to fire or temperature above 130^ may cause explosion. The temperature of 130^ can be replaced by the temperature of 265^ .
h) Follow all charging instructions and do not charge the battery pack or cleaner outside of the temperature range specified in the instructions. Charging improperly or at temperatures outside of the specified range may damage the battery and increase the risk of fire.
i) Do not modify or attempt to repair the cleaner or the battery pack (as applicable) except as indicated in the instructions for use and care.
j) Wipe clean any dust, dirt, water or other liquid which may collect on the battery connector.
6) Service
a) Have your cleaner serviced by a qualified repair person using only identical replacement parts.
This will ensure that the safety of the cleaner is maintained.
b) If appliance is not working as it should, has been dropped, damaged, left outdoors, or dropped into water, return it to a service center.
SPECIFIC SAFETY RULES AND SYMBOLS
- Do not put your hands or face near the cleaner opening during use.
Doing so might lead to injuries.
-
Do not block the cleaner opening or intake. Blocking the cleaner opening will cause an increase in the motor rotation speed abnormally and might damage the vanes on the inner section of the unit or cause injuries. The motor might also overheat and cause a fire.
-
Do not use in locations where inflammable materials such as lacquer, paint, benzene, thinner or gasoline are present. Also do not let items such as lighted cigarette butts be suctioned inside at such locations.
Explosion or fires might result.
-
If you notice the unit is operating poorly or making abnormal noises, immediately stop using and shut off the power switch. Request an inspection and repair from the dealer where you purchased the unit or a metabo HPT Authorized Service Center. Continuing to use while operating abnormally might cause injuries.
-
If the unit is mistakenly dropped or strikes another object, make a thorough check of the unit for cracks, breakage or deformation, etc.
Injuries might occur if the unit has cracks, breakage or deformation.
- Do not use near objects generating high heat such as stoves.
Fires might occur if used near such locations.
- Make a thorough inspection if using the cleaner to clean viscous powder or dust particles.
Powder or dust particles might be suctioned in and adhere internally, causing the vanes to break or injuries to occur.
- Do not leave on locations such as benches or fl oors while still rotating.
Injuries might occur.
- ALWAYS wear ear protectors when using the cleaner for extended periods.
Prolonged exposure to high intensity noise can cause hearing loss.
- When working at elevated locations, clear the area of all other people and be aware of conditions below you.
- NEVER touch moving parts.
NEVER place your hands, fingers or other body parts near the cleaner's moving parts.
- NEVER use a cleaner for applications other than those specified.
NEVER use a cleaner for applications other than those specified in the Instruction Manual. - Handle cleaner correctly.
Operate the cleaner according to the instructions provided herein. Do not drop or throw the cleaner. NEVER allow the cleaner to be operated by children, individuals unfamiliar with its operation or unauthorized personnel.
- Keep all screws, bolts and covers tightly in place.
Keep all screws, bolts, and plates tightly mounted. Check their condition periodically.
- Do not use cleaner if the plastic housing or handle is cracked.
Cracks in the cleaner's housing or handle can lead to electric shock. Such cleaner should not be used until repaired.
- NEVER use a cleaner which is defective or operating abnormally.
If the cleaner appears to be operating unusually, making strange noises, or otherwise appears defective, stop using it immediately and arrange for repairs by a metabo HPT authorized service center.
- Carefully handle cleaner.
Should a cleaner be dropped or struck against hard materials inadvertently, it may be deformed, cracked, or damaged.
- Do not wipe plastic parts with solvent.
Solvents such as gasoline, thinner benzine, carbon tetrachloride, and alcohol may damage and crack plastic parts. Do not wipe them with such solvents.
Wipe plastic parts with a soft cloth lightly dampened with soapy water and dry thoroughly. - ALWAYS wear eye protection that meets the
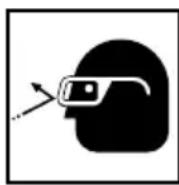
requirement of the latest revision of ANSI Standard Z87.1.
- Do not use the product if the tool or the battery terminals (battery mount) are deformed. Installing the battery could cause a short circuit that could result in smoke emission or ignition.
- Keep the tool's terminals (battery mount) free of swarf and dust.
Prior to use, make sure that swarf and dust have not collected in the area of the terminals.
During use, try to avoid swarf or dust on the tool from falling on the battery.
When suspending operation or after use, do not leave the tool in an area where it may be exposed to falling swarf or dust. Doing so could cause a short circuit that could result in smoke emission or ignition. - Definitions for symbols used on this cleaner V . volts
direct current
IMPORTANT SAFETY INSTRUCTIONS FOR BATTERY CHARGER
WARNING
Death or serious bodily injury could result from improper or unsafe use of battery chargers. To avoid these risks, follow these basic safety instructions:
READ ALL INSTRUCTIONS
- This manual contains important safety and operating instructions for battery charger Model UC18YSL3.
-
Before using battery charger, read all instructions and cautionary markings on (1) battery charger, (2) battery, and (3) product using battery.
-
Plug of battery charger must match the outlet.
Never modify the plug in any way. Unmodified plugs and matching outlets will reduce risk of electric shock.
4. Do not abuse the cord. Never use the cord for carrying, pulling or unplugging the battery charger.
Keep cord away from heat, oil, sharp edges or moving parts.
Damaged or entangled cords increase the risk of electric shock.
5. To reduce risk of injury, charge metabo HPT rechargeable battery type, BSL36B18. Other type of batteries may burst causing personal injury and damage.
6. Do not expose battery charger to rain or snow.
7. Use of an attachment not recommended or sold by the battery charger manufacturer may result in a risk of fire, electric shock, or injury to persons.
8. To reduce risk of damage to electric plug and cord, pull by plug when disconnecting battery 7. charger.
9. Make sure cord is located so that be stepped on, tripped over, or otherwise subjected to damage or stress.
10. Do not operate battery charger with damaged cord or plug-replace them immediately.
11. Do not operate battery charger if it has received a sharp blow, been dropped, or otherwise damaged in any way; take it to a qualified serviceman.
12. Do not disassemble battery charger; take it to a quali ed serviceman when service or repair is required. Incorrect reassembly may result in a risk of electric shock or fire.
13. To reduce risk of electric shock, unplug charger from receptacle before attempting any maintenance or cleaning. Removing the battery will not reduce this risk.
IMPORTANT SAFETY INSTRUCTIONS FOR USE OF THE BATTERY AND BATTERY CHARGER
You must charge the battery before you can use the cleaner. Before using the model UC18YSL3 battery charger, be sure to read all instructions cautionary statements on it, the battery and in this manual.
REMEMBER: USE ONLY metabo HPT BATTERY TYPES, BSL36B18. OTHER TYPES OF BATTERIES MAY BURST AND CAUSE INJURY!
Follow these instructions to avoid the risk of injury:
WARNING
Improper use of the battery or battery charger can lead to serious injury. To avoid these injuries:
- NEVER disassemble the battery.
- NEVER incinerate the battery, even if it is damaged or is completely worn out. The battery can explode in a fire.
- NEVER short-circuit the battery.
- NEVER insert any objects into the battery charger's air vents. Electric shock or damage to the battery charger may result.
- NEVER charge outdoors. Keep the battery away from direct sunlight and use only where there is low humidity and good ventilation.
- NEVER charge when the temperature is below and 32^ (0^) or above 104^ (40^) .
- NEVER insert foreign objects into the hole for the battery or the battery charger.
i8. wNEVERtstore the battery or battery charger in places where the temperature may reach or exceed 104^ (40^) - ALWAYS operate charger on standard household electrical power (120 volts). Using the charger on any other voltage may overheat and damage the charger.
- ALWAYS wait at least 15 minutes between charges to avoid overheating the charger.
- ALWAYS disconnect the power cord from its receptacle when the charger is not in use.
CAUTION ON LITHIUM-ION BATTERY
To extend the lifetime, the lithium-ion battery equips with the protection function to stop the output. In the cases of 1 and 2 described below, when using this product, even if you are pulling the switch, the motor may stop. This is not the trouble but the result of protection function.
- When the battery power remaining runs out, the motor stops.
In such case, charge it up immediately. - If the cleaner is overloaded, the motor may stop. In this case, release the switch of cleaner and eliminate causes of overloading. After that, you can use it again.
- If the battery is overheated under overload work, the battery power may stop. In this case, stop using the battery and let the battery cool. After that, you can use it again.
Furthermore, please heed the following warning and caution.
WARNING
In order to prevent any battery leakage, heat generation, smoke emission, explosion and ignition beforehand, please be sure to heed the following precautions.
- Do not incinerate this appliance severely damaged. The batteries can explode in a fire.
- Do not pierce battery with a sharp object such as a nail, strike with a hammer, step on, throw or subject the battery to severe physical shock.
- Do not use an apparently damaged or deformed battery.
- Do not use the battery in reverse polarity.
- Do not connect directly to an electrical outlets or car cigarette lighter sockets.
- Do not use the battery for a purpose other than those specified.
- If the battery charging fails to complete even when a specified recharging time has elapsed, immediately stop further recharging.
- Do not put or subject the battery to high temperatures or high pressure such as into a microwave oven, dryer, or high pressure container.
- Keep away from fire immediately when leakage or foul odor are detected.
- Do not use in a location where strong static electricity generates.
- If there is battery leakage, foul odor, heat generated, discolored or deformed, or in any way appears abnormal during use, recharging or storage, immediately remove it from the equipment or battery charger, and stop use.
- Caution-The battery used in this device may present a risk of fire or chemical burn if mistreated. Do no disassemble, heat above 104^ (40^) , or incinerate. Replace battery with metabo HPT battery type BSL36B18 only. Use of another battery may present a risk of fire or explosion.
- Dispose of used battery promptly. Keep away from children. Do not disassemble and do not dispose of in fire.
CAUTION
- If liquid leaking from the battery gets into your eyes, do not rub your eyes and wash them well with fresh clean water such as tap water and contact a doctor immediately.
If left untreated, the liquid may cause eyeproblems. - If liquid leaks onto your skin or clothes, wash even well with clean water such as tap water immediately.
There is a possibility that this can cause skin irritation. - If you find rust, foul odor, overheating, discolor, deformation, and/or other irregularities when using the battery for the first time, do not use and return it to your supplier or vendor.
WARNING
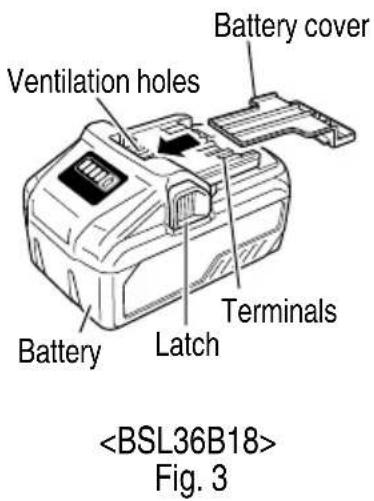
If a conductive foreign matter enters in the terminal of lithium ion battery, the battery may be shorted, causing fire. When storing the lithium ion battery, obey surely the rules of following contents.
Do not place conductive debris, nail and wires such as iron wire and copper wire in the storage case.
Either install the battery in the power tool or store by securely pressing into the battery cover until the ventilation holes are concealed to prevent short-circuits (See Fig. 3).
REGARDING LITHIUM-ION BATTERY TRANSPORTATION
When transporting a lithium-ion battery, please observe the following precautions.
WARNING
Notify the transporting company that a package contains a lithium-ion battery, inform the company of its power output and follow the instructions of the transportation company when arranging transport.
- Lithium-ion batteries that exceed a power output of 100 Wh are considered to be the freight classification of Dangerous Goods and will require special application procedures.
For transportation abroad, you must comply with international law and the rules and regulations of the destination country.
- If the BSL36B18 is installed in the power tool, the power output will exceed 100 Wh and the unit will be classified as Dangerous Goods for freight classification.
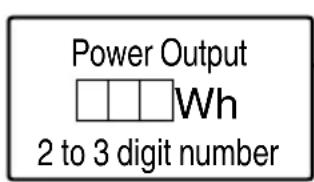
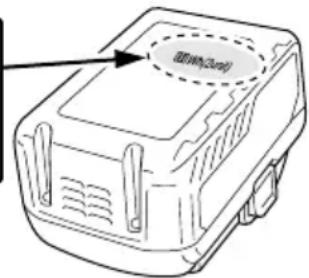
Fig. 1
DISPOSAL OF THE EXHAUSTED BATTERY
WARNING
Do not dispose of the exhausted battery. The battery must explode if it is incinerated. The product that you have purchased contains a rechargeable battery. The battery is recyclable. At the end of its useful life, under various state and local laws, it may be illegal to dispose of this battery into the municipal waste stream. Check with your local solid waste offi cials for details in your area for recycling options or proper disposal.
SAVE THESE INSTRUCTIONS AND MAKE THEM AVAILABLE TO OTHER USERS AND OWNERS OF THIS CLEANER!
FUNCTIONAL DESCRIPTION
NOTE
The information contained in this Instruction Manual is designed to assist you in the safe operation and maintenance of the power tool.
NEVER operate, or attempt any maintenance on the tool unless you have first read and understood all safety instructions contained in this manual.
Some illustrations in this Instruction Manual may show details or attachments that differ from those on your own power tool.
NAME OF PARTS
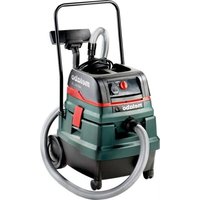
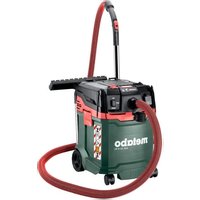
- Cordless Cleaner
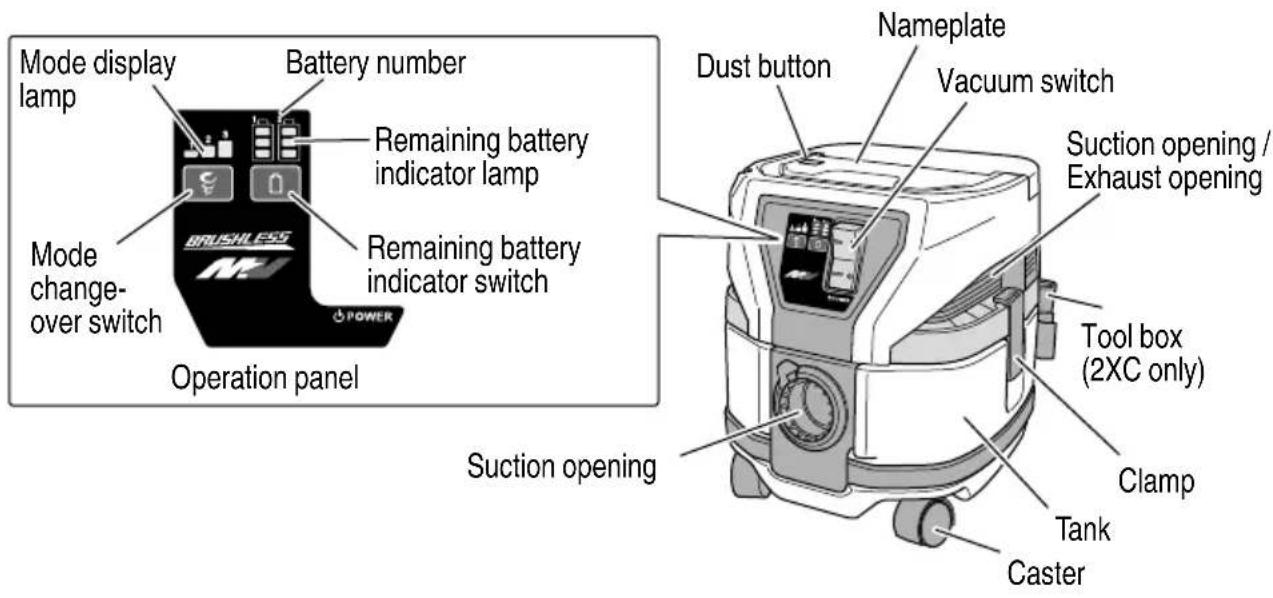
Fig. 2
- Battery 3. Battery Charger

SPECIFICATIONS
- Cordless Cleaner
| Model RP3608DA | ||
| Rated voltage 36 V | ||
| Motor DC motor | ||
| Application Wet and Dry type | ||
| Max. Airflow 124 cfm (3.5 m) | 3/min) | |
| Max. Vacuum 2.9 psi (201 hPa) | ||
| Details-Dry 2.1 gal (8 L) | ||
| Details-Wet 1.6 gal (6 L) | ||
| Battery* | Model BSL36B18 | |
| Type | Li-ion battery | |
| Voltage | DC 36 V / 18 V | |
| Dimensions (W × D × H) | 13-1/32" × 14-17/32" × 15-1/32" (331 mm × 369 mm × 382 mm) | |
| Weight | 24.0 lbs. (10.9 kg) (BSL36B18 x 2pcs.) | |
-
Existing batteries (BSL3660/3626X/3626/3625/3620, BSL18.... and BSL14.... series) cannot be used with this tool.
-
Battery Charger
| Model | UC18YSL3 |
| Input power source | Single phase: AC 120 V 60 Hz |
| Charging time (At a temperature of 68°F (20°C)) | BSL36B18 : Approx. 52 min |
| Charging voltage | DC 14.4 – 18 V |
| Charging current | DC 8.0 A |
| Weight | 1.3 lbs. (0.6 kg) |
NOTE: The charging time may vary according to temperature and power source voltage.
ASSEMBLY AND OPERATION
APPLICATIONS
General cleaning in workplaces and others.
Collection of fine dusts generated during grinding, cutting or drilling of concrete or wood using power tools.
O Suction of liquid such as water spilt on the floor.
UNPACKING
Carefully unpack the power tool.
Take out the accessories in the tank before work.
CHARGING METHOD
NOTE
Before plugging into the receptacle, make sure the following points.
The power source voltage is stated on the nameplate.
The cord is not damaged.
WARNING
Do not charge at voltage higher than indicated on the nameplate.
If charged at voltage higher than indicated on the nameplate, the charger will burn out.
- Connect the charger's power cord to a receptacle. When the power cord is connected, the charge indicator lamp will blink in red. (At 1-second intervals)

WARNING
Do not use the electrical cord if damaged. Have it repaired immediately.
- Insert the battery to the battery charger.
Firmly Insert the battery into the battery charger as shown in Fig. 5.
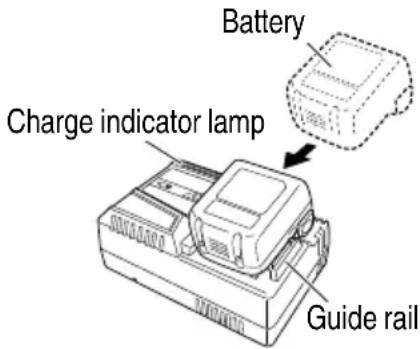
Fig. 5
- Charging
When inserting a battery in the charger, the charge indicator lamp will blink in blue. When the battery becomes fully recharged, the charge indicator lamp will light up in green.(See Table 2)
(1) Charge indicator lamp indication
The indications of the charge indicator lamp will be as shown in Table 2, according to the condition of the battery charger or the battery.
Table 2
| Indications of the charge indicator lamp | ||||
| Charge indicator lamp (RED / BLUE / GREEN / PURPLE) | Before charging | Blinks (RED) | Lights for 0.5 seconds. Does not light for 0.5 seconds. (off for 0.5 seconds) | Plugged into power source |
| While charging | Blinks (BLUE) | Lights for 0.5 seconds. Does not light for 1 second. (off for 1 second) | Battery capacity at less than 50% | |
| Blinks (BLUE) | Lights for 1 second. Does not light for 0.5 seconds. (off for 0.5 seconds) | Battery capacity at less than 80% | ||
| Lights (BLUE) | Lights continuously | Battery capacity at more than 80% | ||
| Charging complete | Lights (GREEN) | Lights continuously (Continuous buzzer sound: about 6 seconds) | ||
| Overheat standby | Blinks (RED) | Lights for 0.3 seconds. Does not light for 0.3 seconds. (off for 0.3 seconds) | Battery overheated. Unable to charge. (Charging will commence when battery cools) | |
| Charging impossible | Flickers (PURPLE) | Lights for 0.1 seconds. Does not light for 0.1 seconds. (off for 0.1 seconds) (Intermittent buzzer sound: about 2 seconds) | Malfunction in the battery or the charger | |
(2) Regarding the temperature of the rechargeable battery.
The temperatures for rechargeable batteries are as shown in the Table 3, and batteries that have become hot should be cooled for a while before being recharged.
Table 3
| Rechargeable batteries | Temperatures at which the battery can be recharged |
| BSL36B18 | 32°F – 122°F (0°C – 50°C) |
(3) Regarding recharging time (At 68^ (20^)
Table 4 Charging time
| Charger Battery | UC18YSL3 |
| BSL36B18 Approx. 52 min. | |
NOTE
The recharging time may vary according to the ambient temperature.
- Disconnect battery charger from the receptacle.
CAUTION
Do not pull the plug out of the receptacle by pulling on the cord.
Make sure to grasp the plug when removing from receptacle to avoid damaging cord.
- Remove the battery from the battery charger.
Supporting the battery charger with hand, pull out the battery from the battery charger.
NOTE
Be sure to pull out the battery from the battery charger after use, and then keep it.
Regarding electric discharge in case of new batteries, etc.
As the internal chemical substance of new batteries and batteries that have not been used for an extended period is not at the electric discharge might be low when using them the first and second time. This is a temporary phenomenon, and normal time required for recharging will be restored by recharging the batteries 2-3 times.
How to make the batteries perform longer
(1) Recharge the batteries before they become completely exhausted.
When you feel that the power of the tool becomes weaker, stop using the tool and recharge its battery. If you continue to use the tool and exhaust the electric current, the battery may be damaged and its life will become shorter.
(2) Avoid recharging at high temperatures.
A rechargeable battery will be hot immediately after use. If such a battery is recharged immediately after use, its internal chemical substance will deteriorate, and the battery life will be shortened. Leave the battery and recharge it after it has cooled for a while.
CAUTION
- When the battery charger has been continuously used, the battery charger will be heated, thus constituting the cause of the failures. Once the charging has been completed, give 15 minutes rest until the next charging.
- If the battery is charged while it is heated because it has been left for a long time in a location subject to direct sun because the battery has just been used, the charge indicator lamp of the charger lights for 0.3 seconds, does not light for 0.3 seconds (off for 0.3 seconds). In such a case, first let the battery cool, then start charging.
- When the charge indicator lamp flickers (at 0.2-second intervals), check for and take out any foreign objects in the charger's battery installation hole. If there are no foreign objects, it is probable that the battery or charger is malfunctioning. Take it to your authorized Service Center.
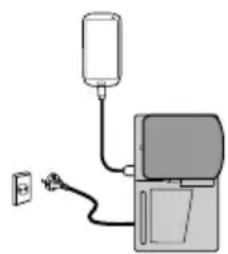
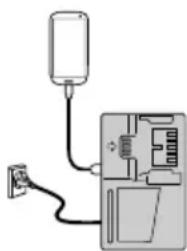
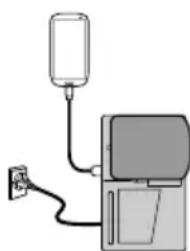
HOW TO RECHARGE USB DEVICE
When an unexpected problem occurs, the data in a USB device connected to this product may be corrupted or lost.
actiAtaey,make sure to back up any data contained in the USB device prior to use with this product.
Please be aware that our company accepts absolutely no responsibility for any data stored in a USB device that is corrupted or lost, nor for any damage that may occur to a connected device.
WARNING
- Prior to use, check the connecting USB cable for any defect or damage. Using a defective or damaged USB cable can cause smoke emission or ignition.
- When the product is not being used, cover the USB port with the rubber cover. Buildup of dust etc. in the USB port can cause smoke emission or ignition.
NOTE
The time required for charging will be longer when a USB device and battery are being simultaneously charged.
There may be an occasional pause during USB recharging.
When a USB device is not being charged, turn the USB power switch OFF and remove the USB device from the charger.
Failure to do so may not only reduce the battery life of a USB device, but may also result in unexpected accidents.
(1) Select a charging method
Depending on the charge method selected, either the battery is inserted into the charger or the power cord is plugged into an outlet.
Charging a USB device by battery (Fig. 6-a)
- Charging a USB device from a electrical outlet (Fig. 6-b)
- Charging a USB device and battery from a electrical outlet (Fig. 6-c)
a
b
C
Fig. 6
(2) Turn the USB power switch ON (Fig. 7) When you turn the USB power switch ON, the USB power indicator lamp will light up.
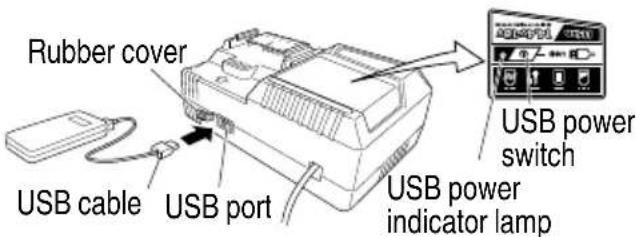
Fig. 7
(3) Connect the USB cable. (Fig. 7)
Pull back the rubber cover and firmly plug in a commercially available USB cable (appropriate to the device being charged) into the USB port.
- When the power cord is not plugged into an outlet and the battery runs out of power, power output will stop and the USB power indicator lamp will shut off.
- When the USB power indicator lamp goes out, change the battery or plug the power cord into an electrical outlet.
(4) When charging is completed
The USB power indicator lamp will not go out when a USB device has been completely charged.
To verify charge status, check the USB device.
Turn the USB power switch OFF and unplug the power cord from the electrical outlet. (Fig. 7)
- Remove the battery from the charger and place the rubber cover over the USB port.
BEFORE USE
Check the work area to make sure that it is clear of debris and clutter.
Clear the area of unnecessary personnel. Ensure that lighting and ventilation is adequate.
PRIOR TO OPERATION
WARNING
Before use, check the following. 1 to 2 should be checked before insert the battery.
- Confirm that the vacuum switch (Fig. 8)
If, without knowing that the vacuum switch is ON, the battery is inserted, the appliance will start suddenly, causing unexpected accidents.
The vacuum switch will be turned on by pushing "ON" and it will be turned off by returning it to "OFF". Be sure to check that the vacuum switch is OFF.
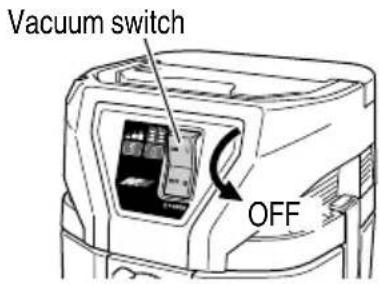
Fig. 8
- Order of use for batteries
When two batteries are installed, the battery with the least remaining power is used first until it is empty. Once empty, use is automatically switched over to the other battery.
Use is still possible with a single installed battery.
NOTE
When there is no more remaining power in a battery, immediately recharge the battery for convenient use later.
- Check the filter
Referring to "2. Attaching the Filter" the filter should be correctly attached.
CAUTION
Water absorption amount will severely decline if the standardly equipped cloth filter is repeatedly used to absorb liquid.
Use the separately sold nylon filter when repeatedly absorbing large amounts of water.
- Inserting the battery (Fig. 9)
As you pull on the clamp lever, open the battery guard. Next, match the battery with the unit's groove and firmly press the battery in until you hear a click.
CAUTION
Do not touch the terminals. Doing so may result in cutting your hand on the terminals or other unexpected injury.
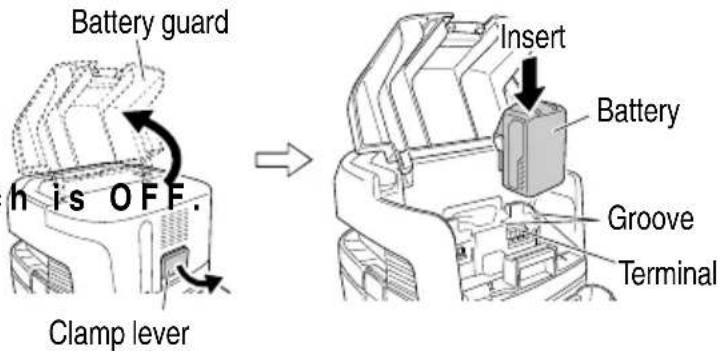
Fig. 9
5. Removing the battery (Fig. 10)
When removing the battery from the unit, press the latches on both sides and slide the battery upwards to pull it out.
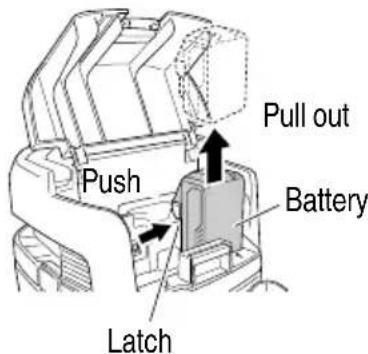
Fig. 10
6. Switch operation (Fig. 11)
During operation, suction power will change each time you press the mode change-over switch.
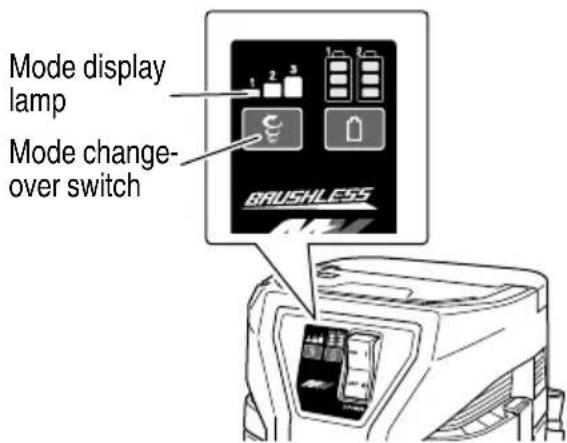
Fig. 11
Pressing the mode change-over switch switches power as shown in Table 5.
Table 5
| Display lamp sequence | 1 2 3 | 1 2 3 | 1 2 3 |
| Air volume cfm (m3/min) | 57 (1.6) 85 (2.4) 124 (3.5) | ||
| Vacuum degree psi (hPa) | 0.6 (42) 1.2 (80) 2.9 (201) | ||
NOTE
When you switch ON the unit after switching it OFF, the mode change-over switch will revert to its state prior to being switched OFF. The unit will revert to mode [2] when set at [3].
HOW TO USE
CAUTION
Do not use the head top as a footstool or do not sit on it. Otherwise the appliance begins to move suddenly, causing an injury.
NOTE
Handle the hose with care. Do not bend the hose by force, or do not trample it, or do not pull it to move the cleaner. Moreover, do not put away the hose as it is bent. Otherwise troubles such as its deformation may be caused.
1. Connecting the hose (Fig. 12)
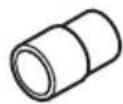
Press the attached hose into the suction opening of the tank until it clicks and connect it. When removing the hose, pull out the hose while pushing the button of the suction opening.
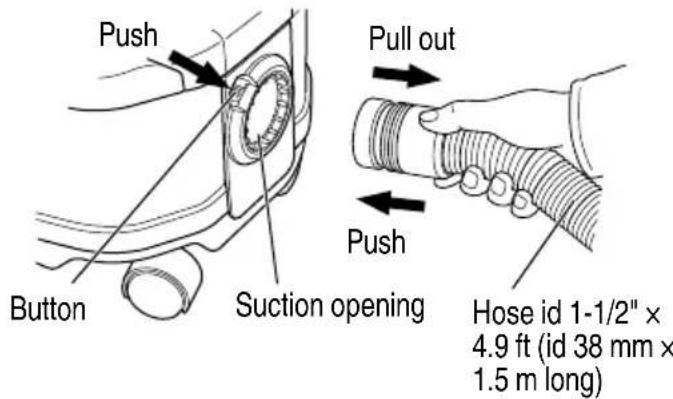
Fig. 12
2. Attaching the fi Iter
WARNING
O Be sure to turn off the vacuum switch disconnect the battery.
Be sure to attach the filter. (cloth filter or filter for dusts) Otherwise the motor will be damaged.
When you collect fine dusts, such as siding powder and stone powder, use the optional paper filter.
Since it is a filter for dry and wet suction, do not remove it when you suck up liquids, such as water.
NOTE
If the filter is wet, leave it to dry out of direct sunlight. Using the filter when wet will conspicuously reduce the suction power.
(1) Remove the two clamps, use the handles to draw up the head and remove it from the tank. (Fig. 13)
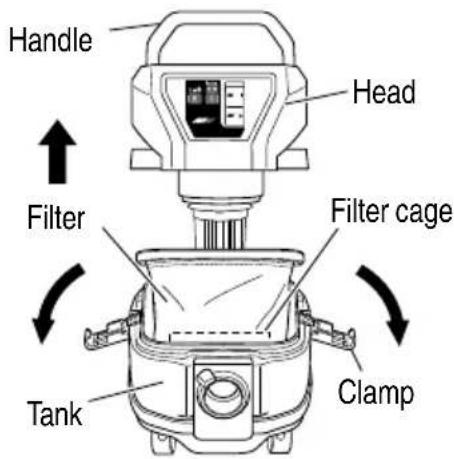
Fig. 13

(2) Insert the cloth filter so that the seam is on the other side of the hose inlet. (Fig. 14)
Fig. 14
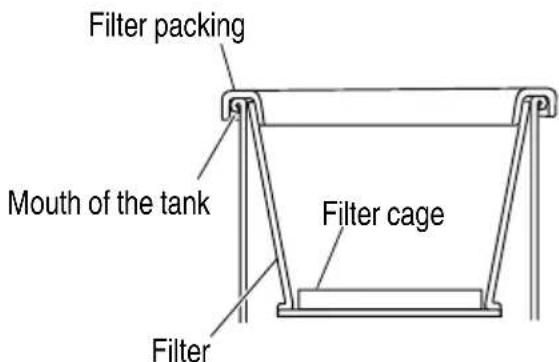
(3) Check that the filter packing is put on the mouth of the tank. (Fig. 15)
Fig. 15
(4) Check that the filter cage is on the bottom of the filter. (Fig. 15)
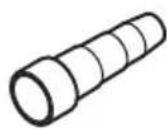
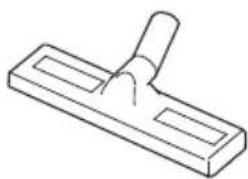
3. Attach the zoom pipe, master nozzles, etc. When it is used as a cleaner (Fig. 16)
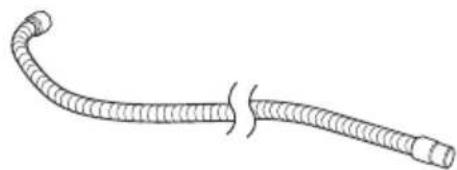
(1) Connect in order of Hose id 1 - 1 / 2^ × 4.9 ft (id 38mm× 1.5m long), zoom pipe and Master nozzle. Connection is done by pressing in the direction of the arrow. The suction mouth for crevices can also be attached depending on the application.
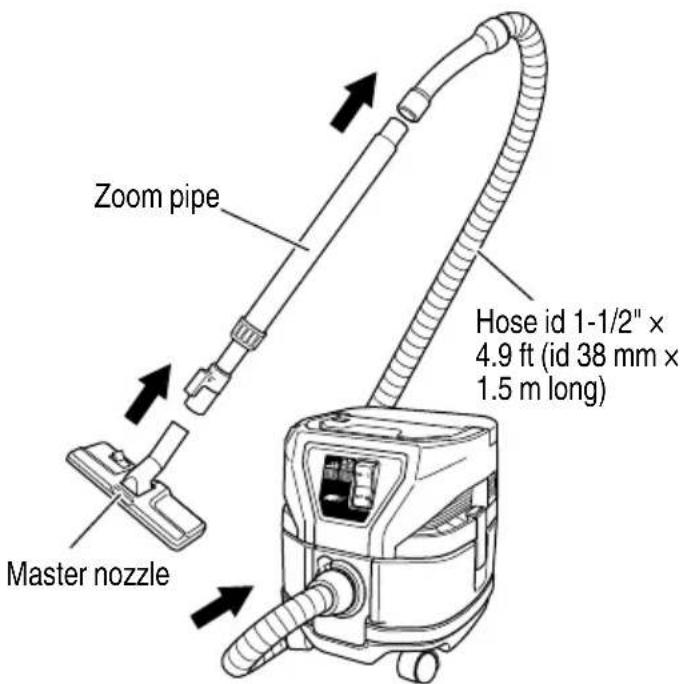
Fig. 16
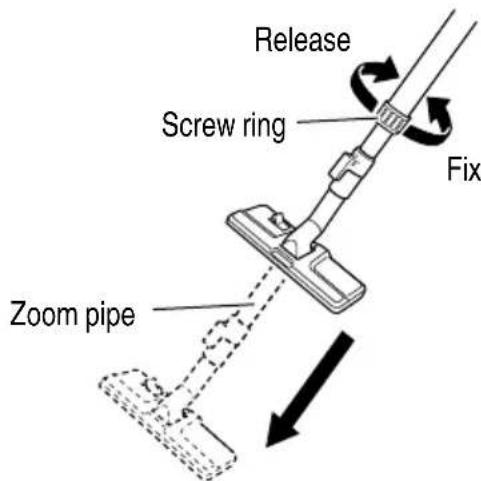
(2) Next, loosen the screw ring on the zoom pipe and adjust to the length appropriate to the task. After the adjustment, make sure the screw ring is secure by securely tightening it. (Fig. 17)
Fig. 17
4. Connect power tools (Fig. 18)
Connect in order of Hose id 1 - 1 / 2^ × 4.9 ft (id 38mm× 1.5m long) and Adapter or Joint (D) (Optional Accessory). Connection is done by pressing in the direction of the arrow.
NOTE
Depending on the operating environment, the main unit's temperature protective function may activate and switch off the unit. Should the unit switch off, refer to TROUBLESHOOTING GUIDE (Page 23).

Fig. 18
5.Filter cleaning CAUTION
If the tank is filled with dusts, the suction power declines. Dump dusts as early as possible when they reach the half of the tank height. When the suction power declines during use, remove dusts in the following procedure:
NOTE
Since the filter cleaning device operates when the suction power declines to some extent, it also operates in the following cases:
- When the suction mouth at the tip of the hose is closed.
When the hose is clogged with foreign matter. To clean the filter using a strong air flow:
(1) Pull out the zoom pipe on the tip of the hose.
(2) Block off the tip of the hose with your hand and turn the power switch ON. Next, press the dust button on the top of the head for approximately one second and release the button. Repeat three times and the suction power should recover. (Fig. 19)
If the suction power is not recovered, the tank is almost filled with dusts. Dump dusts in the tank.
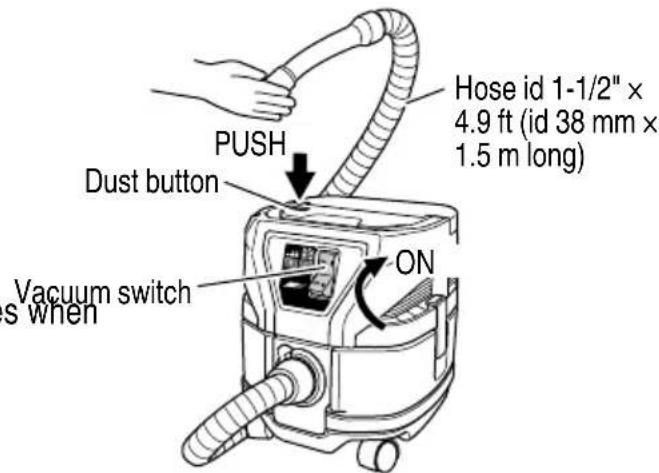
Fig. 19
6. Dump dusts

WARNING
Be sure to turn off the vacuum switch and disconnect the battery.

CAUTION
Do not impact the tank, the filter, or the head. Otherwise they will be deformed or damaged.
Although it is based on the amount of suction of dusts and liquids, dump dusts and liquids in the tank at least once a day and keep the appliance, the filter, etc. clean. Otherwise suction power fall, motor failure, bad smell or rusting may be caused.
Do not hold the clamps when you dump dusts in the tank. Otherwise the clamps may be damaged.
NOTE
Do not tilt the tank with accessories (Pipe, Master nozzle, etc.) inserted in the base or in the tank. Otherwise any part may be damaged.
WARNING
If the appliance is pushed on its side while the tank contains liquid, the liquid will get inside the motor or switch region, causing an electric shock or motor failure.
(1) Remove the clamps (2 pieces) and raise the handle of the head. (Fig. 20)
(2) Lightly striking the inner side of the filter several times, remove dusts attached to the filter.
(3) Tilt the tank and dump dusts. (Fig. 21)
(4) Attach the filter, the filter cage, the head, and the clamp in the initial positions.
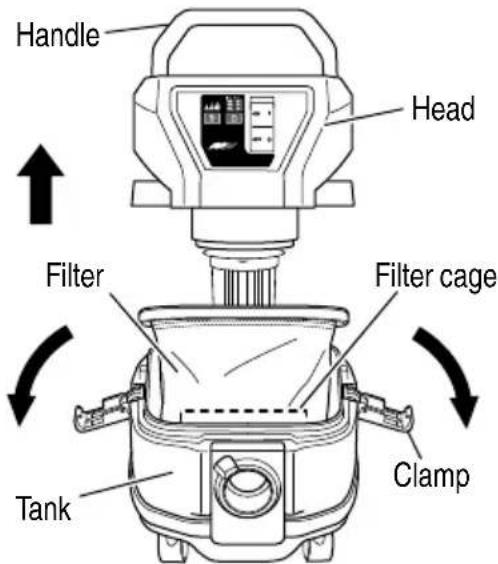

Fig. 20
Fig. 21
7. Transportation and storage
(1) How to use the handle (Fig. 22)
When carrying or moving the appliance, hold the handle of the head part. When you do not use the handle, put it in the head part.
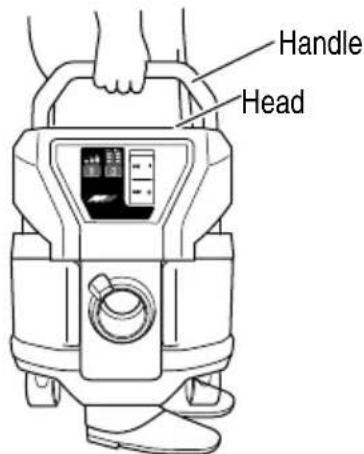
Fig. 22
(2) Fixation and release of the caster (Fig. 23) By lowering the lever of the caster with the brake, the rotation of the wheel is fixed. When releasing the fixed wheel, raise the lever. When moving with the appliance on a vehicle, fix the caster to retain the appliance. However, when you move the appliance, check that the caster is released, or the caster will be damaged.
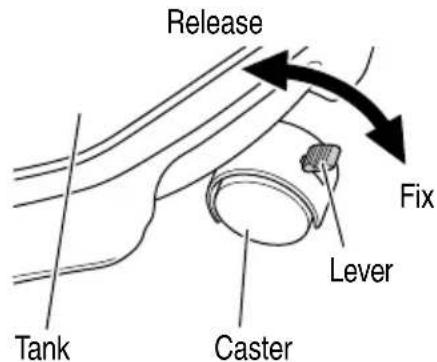
Fig. 23
(3) Tool box assembly (Fig. 24)
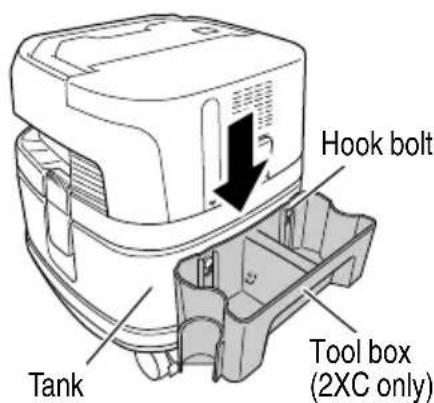
Fig. 24
(4) Storing the appliance during breaks (Fig. 25)
Anytime you stop work or take a break from cleaning, you can quickly store the unit by hooking the zoom pipe to the pipe holder (the hole at the top of the unit) so that it stands.
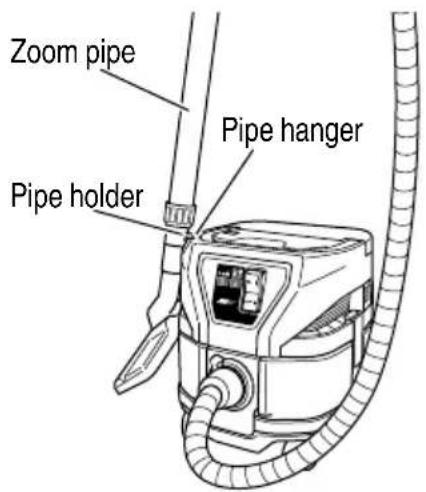
Fig. 25
(5) When the appliance is stored (Fig. 26)
After removing the suction opening and hose, hook the zoom pipe to the pipe holder so that it stands.
Store the master nozzle, crevice nozzle and battery in the tool box.
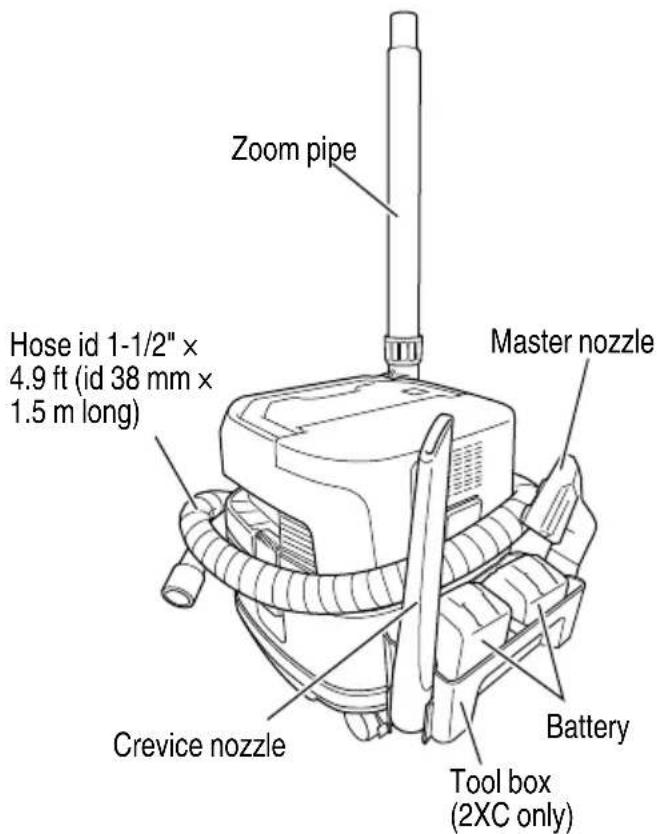
Fig. 26
NOTE
When the attachments are stored in the appliance, do not apply any excess force to the attachments.
8. How to attach the paper fi Iter (Optional)
WARNING
Be sure to turn off the appliance and remove the battery.
- When using a paper fi lter, use it in combination with the standard cloth fi lter.
If the paper fi tter gets torn, dust may get inside the motor, causing abnormal noise or fire due to overheating.
CAUTION
When using a paper fi liter, avoid sucking in liquids such as water or wet dust, as this may lead to tearing of the fi liter.
(1) Open the paper filter horizontally so that the suction hole in the paper fi lter is over the top of the tank. (Fig. 27)
(2) Before attaching the filter to the appliance, bend the two folds in the cardboard approx. 90^ in the direction of the arrow. (Fig. 28)
(3) Match the suction hole in the paper filter with the suction opening of the appliance. Insert the fi lter in the direction of the arrow as shown in the illustration, so that the cardboard of the paper filter goes past the stopper on the suction opening. (Fig. 29)
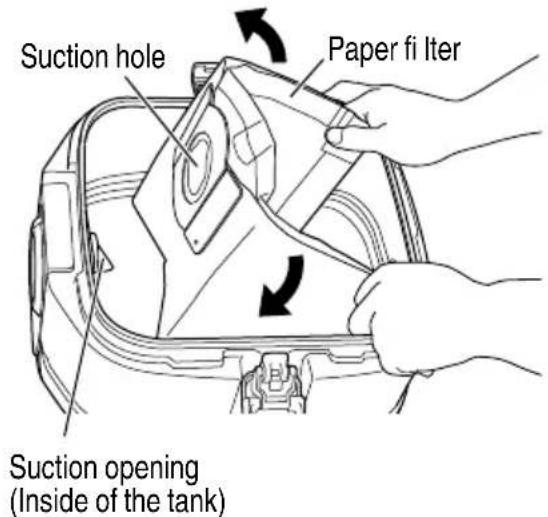
Fig. 27
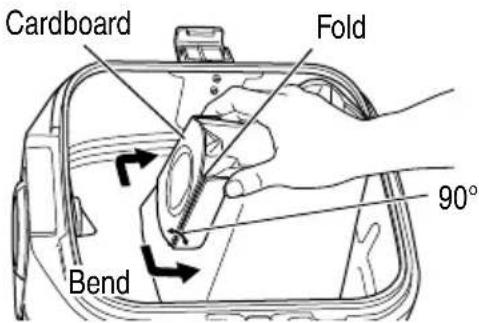
Fig. 28

Fig. 29
FLOAT MECHANISM
This appliance is equipped with a float mechanism to prevent water from entering in the motor when it sucks in more than a specific quantity of water. When the float operates not to suck in water, turn off the switch promptly and throw away water in the tank.
WARNING
With the fl oat working, do not continue operation. Otherwise the temperature of the motor may rise abnormally causing troubles such as deformation of parts or motor burnout.
- Avoid sucking in foaming liquid such as detergent or foams. Before the float works, foams may spurt from the air outlet. If you continue to use the appliance as it is, it will lead to electric shock or failure.
ABOUT REMAINING BATTERY INDICATOR
1. Battery
You can check the battery's remaining capacity by pressing the remaining battery indicator switch to light the indicator lamp. (Fig. 30, Table 6)
The indicator will shut off approximately 3 seconds after the remaining battery indicator switch is pressed.
It is best to use the remaining battery indicator as a guide since there are slight differences such as ambient temperature and the condition of the battery. Also, the remaining battery indicator may vary from those equipped to a tool or charger.
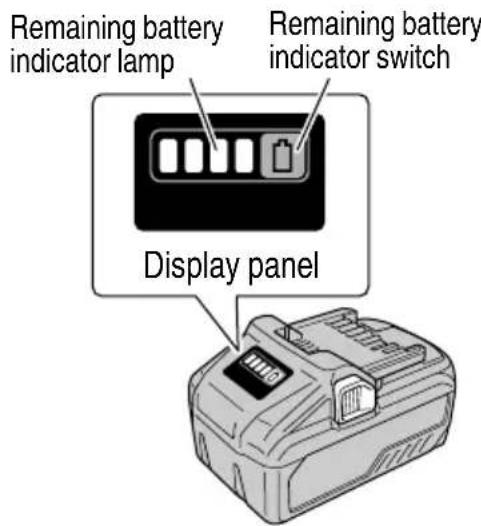
Fig. 30
Table 6
| State of lamp B | Battery Remaining Power |
| Lights; The battery remaining power is over 75%. | |
| Lights; The battery remaining power is 50% - 75%. | |
| Lights; The battery remaining power is 25% - 50%. | |
| Lights; The battery remaining power is less than 25%. | |
| Blinks; The battery remaining power is nearly empty. Recharge the battery soonest possible | |
| Blinks; Output suspended due to high temperature. Remove the battery from the tool and allow it to fully cool down. | |
| Blinks; Output suspended due to failure or malfunction. The problem may be the battery so please contact your dealer. |
The Table 7 shows the state of remaining battery indicator lamp and the battery remaining power.
NOTE
Do not give a strong shock to the display panel or break it. It may lead to a trouble.
2. Cleaner
Install batteries and press the battery switch of the remaining battery indicator lamp to check the displays for each battery. (Fig. 31)
The lamps will only light while the battery switch of the remaining battery indicator lamp is pressed.
The numbers 1 and 2 of the remaining battery indicator lamp represent the numbered slots in which the batteries are installed. (Fig. 31, 32)
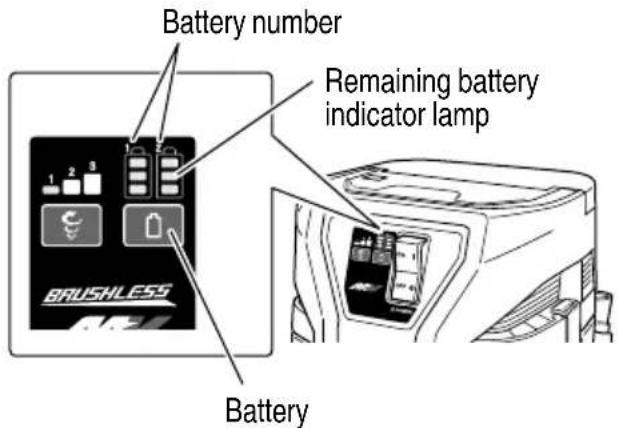
Fig. 31
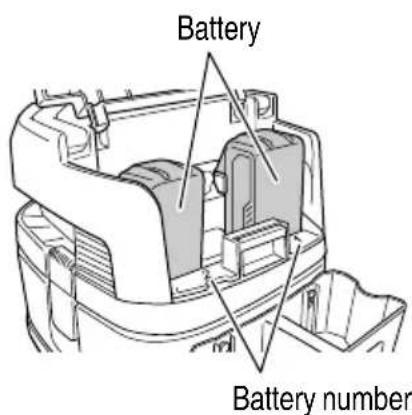
Fig. 32
Table 7
| State of lamp | Battery Remaining Power |
| Lights; The battery remaining power is over 75%. | |
| Lights; The battery remaining power is 50% – 75%. | |
| Lights; The battery remaining power is 25% – 50%. | |
| The battery remaining power is less than 25%. Recharge the battery soonest possible |
Check the cleaner's remaining battery indicator after switching off the main unit.
MAINTENANCE AND INSPECTION
WARNING
For inspection and maintenance, be sure to turn off the vacuum switch and disconnect the battery.
- Do not work with wet hands. May cause electric shock or injuries.
1. Maintenance of fi Iter
NOTE
Since a fi Iter is a consumable, we recommend you to prepare spares.
The cloth filter should simply be tapped even if it is considerably clogged. Strong brushing will shorten its life.
O Do not hurl a fi lter. May break its resin part. A clogged fi lter will decrease the suction po remarkably. Tap the inner side of the fi lter to 7. drop off dusts regularly.
2. Inspecting the mounting screws
Regularly inspect all mounting screws and ensure that they are properly tightened. Should any of the screws be loose, retighten them immediately. Failure to do so could serious hazard.
3. Maintenance of the motor
The motor unit winding is the very "heart" of the power tool. Exercise due care to ensure the winding does not become damaged and/or wet with oil or water.
4. Inspection of terminals (tool and battery)
Check to make sure that swarf and dust have not collected on the terminals.
On occasion check prior, during and after operation.
CAUTION
Remove any swarf or dust which may have collected on the terminals.
Failure to do so may result in malfunction.
5. Check for Dust
Dust may be removed with a soft cloth or a cloth dampened with soapy water. Do not use bleach, chlorine, gasoline or thinner, for they may damage the plastics.
6. Storage
Storing in a place below 104^ (40^) and out of the reach of children.
NOTE
Storing lithium-ion batteries.
Make sure the lithium-ion batteries have been fully charged before storing them.
Prolonged storage (3 months or more) of batteries with a low charge may result in performance deterioration, significantly reducing battery usage time or rendering the batteries incapable of holding a charge.
However, significantly reduced battery usage time may be recovered by repeatedly charging and using the batteries two to five times.
If the battery usage time is extremely short despite repeated charging and use, consider the batteries dead and purchase new batteries.
Service and repairs
All quality power tools will eventually require servicing or replacement of parts because of wear from normal use. To assure that only authorized replacement parts will be used, all service and repairs must be performed by a metabo HPT AUTHORIZED SERVICE CENTER, ONLY.
Important notice on the batteries for the metabo HPT cordless power tools
Please always use one of our designated genuine batteries. We cannot guarantee the safety and performance of our cordless power tool when used with batteries other than these designated by us, or when the battery is disassembled and modified (such as disassembly and replacement of cells or other internal parts).
TROUBLESHOOTING GUIDE
WARNING
- To avoid injury from an accidental start, turn the switch OFF and remove the plug from the power source or remove the battery from the main body before making any adjustments.
-
All electrical or mechanical repairs should be done only by qualified service technicians. Contact metabo HPT Authorized Service Center.
-
Cleaner
| Symptom Possible | cause Remedy | |
| Tool doesn't run No remaining | battery power Charge the battery. | |
| Battery isn't fully installed. Push in the ba-terry until a click is heard. | ||
| Concrete dust is accumulated on the terminals of the battery installation compartment as well as on the battery sliding grooves. | Clean off the accumulated concrete dust with a dry cloth. | |
| Suction power is weak. Fails to suck in dust. | The tank is full of dust or water. Disp-ose | of the dust or water. After that, remove any dust attached to the fi I ter. |
| Filter is clogged. | Conduct air blow dusting or remove the dust attached to the fi I ter. | |
| The fi I ter is not installed. (Not set in place) | Check to see if the filter is properly set. | |
| Plastic bag is incorrectly installed. | Properly install the plastic bag. | |
| Dust leaks from the vent. | Filter is not installed. Filter is improperly installed. | Properly install the filter. |
| Filter is damaged. | Replace the damaged filter. | |
| Tool suddenly stopped | Tool was overburdened | Get rid of the problem causing the overburden. |
| The battery and/or the unit is overheated. | Let the battery and/or the unit cool down. | |
| Attachments such as the connection adapter or joint -can't be attached -fall off | The shape or the dimensions of an attachment part does not match. | Check the model in use and make sure to use the designated accessories and attachments listed in this document or in our catalogue. |
| Battery cannot be installed | Attempting to install a battery other than that specifi ed for the tool. | Please install a multi volt type battery. |
- Charger
| Symptom Possible | cause Remedy | |
| The charge indicator lamp rapidly flickers purple, and battery charging doesn't begin. | The battery is not inserted all the way. | Insert the battery firmly. |
| There is foreign matter in the battery terminal or where the battery is attached. | Remove the foreign matter. | |
| The charge indicator lamp blinks red, and battery charging doesn't begin. | The battery is not inserted all the way. | Insert the battery firmly. |
| The battery is overheated. If left alone, the battery will automatically begin charging if its temperature decreases, but this may reduce battery life. It is recommended that the battery be cooled in a well-ventilated location away from direct sunlight before charging it. | ||
| Battery usage time is short even though the battery is fully charged. | The battery's life is depleted. Replace the battery with a new one. | |
| The battery takes a long time to charge. | The temperature of the battery, the charger, or the surrounding environment is extremely low. | Charge the battery indoors or in another warmer environment. |
| The charger's vents are blocked, causing its internal components to overheat. | Avoid blocking the vents. | |
| The cooling fan is not running. Contact a metro HPT Authorized Service Center for repairs. | ||
| The USB power lamp has switched off and the USB device has stopped charging. | The battery's capacity has become low. | Replace the battery with one that has capacity remaining. |
| Plug the charger's power plug into an electric socket. | ||
| USB power lamp does not switch off even though the USB device has finished charging. | The USB power lamp lights up green to indicate that USB charging is possible. | This is not a malfunction. |
| It is unclear what the charging status of a USB device is, or whether its charging is complete. | The USB power lamp does not switch off even when charging is complete. | Examine the USB device that is charging to confirm its charging status. |
| Symptom Possible cause Remedy | ||
| Charging of a USB device pauses midway. | The charger was plugged into an electrical socket while the USB device was being charged using the battery as the power source. | This is not a malfunction. The charger pauses USB charging for about 5 seconds when it is diff erentiating between power sources. |
| A battery was inserted into the charger while the USB device was being charged using a power socket as the power source. | ||
| Charging of the USB device pauses midway when the battery and the USB device are being charged at the same time. | The battery has become fully charged. This is not a malfunction. The charger pauses USB charging for about 5 seconds while it checks whether the battery has successfully completed charging. | |
| Charging of the USB device doesn’t start when the battery and the USB device are being charged at the same time. | The remaining battery capacity is extremely low. | This is not a malfunction. When the battery capacity reaches a certain level, USB charging automatically begins. |
ACCESSIONS
WARNING
ALWAYS use Only authorized metabo HPT replacement parts and accessories. Never use replacement parts or accessories which are not intended for use with this tool. Contact metabo HPT if you are not sure whether it is safe to use a particular replacement part or accessory with your tool.
The use of any other attachment or accessory can be dangerous and could cause injury or mechanical damage.
NOTE
Accessories are subject to change without any obligation on the part of the metabo HPT.
STANDARD ACCESSORIES
| RP3608DA (2WC) | 1 2 3 4 5 6 7 8 9 10 11 12 13 14 15 16 17 18 19 20 21 22 23 24 25 26 27 28 29 30 31 32 33 34 35 36 37 38 39 40 41 42 43 44 45 46 47 48 49 50 51 52 53 54 55 56 57 58 59 60 61 62 63 64 65 66 67 68 69 70 71 72 73 74 75 76 77 78 79 80 81 82 83 84 85 86 87 88 89 90 91 92 93 94 95 96 97 98 99 100 101 102 103 104 105 106 107 108 109 110 111 112 113 114 115 116 117 118 119 120 121 122 123 124 125 126 127 128 129 130 131 132 133 134 135 136 137 138 139 140 141 142 143 144 145 146 147 148 149 150 151 152 153 154 155 156 157 158 159 160 161 162 163 164 165 166 167 168 169 170 171 172 173 174 175 176 177 178 179 180 181 182 183 184 185 186 187 188 189 190 191 192 193 194 195 196 197 198 199 200 201 202 203 204 205 206 207 208 209 210 211 212 213 214 215 216 217 218 219 220 221 222 223 224 225 226 227 228 229 230 231 232 233 234 235 236 237 238 239 240 241 242 243 244 245 246 247 248 249 250 251 252 253 254 255 256 257 258 259 260 261 262 263 264 265 266 267 268 269 270 271 272 273 274 275 276 277 278 279 280 281 282 283 284 285 286 287 288 289 290 291 292 293 294 295 296 297 298 299 300 301 302 303 304 305 306 307 308 309 310 311 312 313 314 315 316 317 318 319 320 321 322 323 324 325 326 327 328 329 330 331 332 333 334 335 336 337 338 339 340 341 342 343 344 345 346 347 348 349 350 351 352 353 354 355 356 357 358 359 360 361 362 363 364 365 366 367 368 369 370 371 372 373 374 375 376 377 378 379 380 381 382 383 384 385 386 387 388 389 390 391 392 393 394 395 396 397 398 399 400 401 402 403 404 405 406 407 408 409 410 411 412 413 414 415 416 417 418 419 420 421 422 423 424 425 426 427 428 429 430 431 432 433 434 435 436 437 438 439 440 441 442 443 444 445 446 447 448 449 450 451 452 453 454 455 456 457 458 459 460 461 462 463 464 465 466 467 468 469 470 471 472 473 474 475 476 477 478 479 480 481 482 483 484 485 486 487 488 489 490 491 492 493 494 495 496 497 498 499 500 501 502 503 504 505 506 507 508 509 510 511 512 513 514 515 516 517 518 519 520 521 522 523 524 525 526 527 528 529 530 531 532 533 534 535 536 537 538 539 540 541 542 543 544 545 546 547 548 549 550 551 552 553 554 555 556 557 558 559 560 561 562 563 564 565 566 567 568 569 570 571 572 573 574 575 576 577 578 579 580 581 582 583 584 585 586 587 588 589 590 591 592 593 594 595 596 597 598 599 600 601 602 603 604 605 606 607 608 609 610 611 612 613 614 615 616 617 618 619 620 621 622 623 624 625 626 627 628 629 630 631 632 633 634 635 636 637 638 639 640 641 642 643 644 645 646 647 648 649 650 651 652 653 654 655 656 657 658 659 660 661 662 663 664 665 666 667 668 669 670 671 672 673 674 675 676 677 678 679 680 681 682 683 684 685 686 687 688 689 690 691 692 693 694 695 696 697 698 699 700 701 702 703 704 705 706 707 708 709 710 711 712 713 714 715 716 717 718 719 720 721 722 723 724 725 726 727 728 729 730 731 732 733 734 735 736 737 738 739 740 741 742 743 744 745 746 747 748 749 750 751 752 753 754 755 756 757 758 759 760 761 762 763 764 765 766 767 768 769 770 771 772 773 774 775 776 777 778 779 780 781 782 783 784 785 786 787 788 789 790 791 792 793 794 795 796 797 798 799 800 801 802 803 804 805 806 807 808 809 810 811 812 813 814 815 816 817 818 819 820 821 822 823 824 825 826 827 828 829 830 831 832 833 834 835 836 837 838 839 840 841 842 843 844 845 846 847 848 849 850 851 852 853 854 855 856 857 858 859 860 861 862 863 864 865 866 867 868 869 870 871 872 873 874 875 876 877 878 879 880 881 882 883 884 885 886 887 888 889 890 891 892 893 894 895 896 897 898 899 900 901 902 903 904 905 906 907 908 909 910 911 912 913 914 915 916 917 918 919 920 921 922 923 924 925 926 927 928 929 930 931 932 933 934 935 936 937 938 939 940 941 942 943 944 945 946 947 948 949 950 951 952 953 954 955 956 957 958 959 |
| RP3608DA (2WC) | 1 Battery (BSL36B18) 2 Battery Charger (UC18YSL3) 3 Battery cover (Code No. 329897) 4 Hose id 1-1/2" × 4.9 ft (id 38 mm × 1.5 m long) (Code No. 373580) 5 Creme nozzle (Code No. 337523) 6 Master nozzle (Code No. 337522) 7 Polyethylene bag (10 pcs.) (Code No. 328099) 8 Tool box (Code No. 373588) 9 Hose id 1-1/2" × 4.9 ft (id 38 mm × 1.5 m long) (Code No. 373580) 10 ZOOM pipe (Code No. 373582) 11 Creme nozzle (Code No. 337523) 12 Master nozzle (Code No. 337522) 13 Polyethylene bag (10 pcs.) (Code No. 328099) 14 Hose id 1-1/2" × 4.9 ft (id 38 mm × 1.5 m long) (Code No. 373580) 15 Creme nozzle (Code No. 337523) 16 Master nozzle (Code No. 337522) 17 Polyethylene bag (10 pcs.) (Code No. 328099) 18 Hose id 1-1/2" × 4.9 ft (id 38 mm × 1.5 m long) (Code No. 373580) 19 Creme nozzle (Code No. 337523) 20 Master nozzle (Code No. 337522) 21 Polyethylene bag (10 pcs.) (Code No. 328099) 22 Hose id 1-1/2" × 4.9 ft (id 38 mm × 1.5 m long) (Code No. 373580) 23 Creme nozzle (Code No. 337523) 24 Master nozzle (Code No. 337522) 25 Polyethylene bag (10 pcs.) (Code No. 328099) 26 Hose id 1-1/2" × 4.9 ft (id 38 mm × 1.5 m long) (Code No. 373580) 27 Creme nozzle (Code No. 337523) 28 Master nozzle (Code No. 337522) 29 Polyethylene bag (10 pcs.) (Code No. 328099) 30 Hose id 1-1/2" × 4.9 ft (id 38 mm × 1.5 m long) (Code No. 373580) 31 Creme nozzle (Code No. 337523) 32 Master nozzle (Code No. 337522) 33 Polyethylene bag (10 pcs.) (Code No. 328099) 34 Hose id 1-1/2" × 4.9 ft (id 38 mm × 1.5 m long) (Code No. 373580) 35 Creme nozzle (Code No. 337523) 36 Master nozzle (Code No. 337522) 37 Polyethylene bag (10 pcs.) (Code No. 328099) 38 Hose id 1-1/2" × 4.9 ft (id 38 mm × 1.5 m long) (Code No. 373580) 39 Creme nozzle (Code No. 337523) 40 Master nozzle (Code No. 337522) 41 Polyethylene bag (10 pcs.) (Code No. 328099) 42 Hose id 1-1/2" × 4.9 ft (id 38 mm × 1.5 m long) (Code No. 373580) 43 Creme nozzle (Code No. 337523) 44 Master nozzle (Code No. 337522) 45 Polyethylene bag (10 pcs.) (Code No. 328099) 46 Hose id 1-1/2" × 4.9 ft (id 38 mm × 1.5 m long) (Code No. 373580) 47 Creme nozzle (Code No. 337523) 48 Master nozzle (Code No. 337522) 49 Polyethylene bag (10 pcs.) (Code No. 328099) 50 Hose id 1-1/2" × 4.9 ft (id 38 mm × 1.5 m long) (Code No. 373580) 51 Creme nozzle (Code No. 337523) 52 Master nozzle (Code No. 337522) 53 Polyethylene bag (10 pcs.) (Code No. 328099) 54 Hose id 1-1/2" × 4.9 ft (id 38 mm × 1.5 m long) (Code No. 373580) 55 Creme nozzle (Code No. 337523) 56 Master nozzle (Code No. 337522) 57 Polyethylene bag (10 pcs.) (Code No. 328099) 58 Hose id 1-1/2" × 4.9 ft (id 38 mm × 1.5 m long) (Code No. 373580) 59 Creme nozzle (Code No. 337523) 60 Master nozzle (Code No. 337522) 61 Polyethylene bag (10 pcs.) (Code No. 328099) 62 Hose id 1-1/2" × 4.9 ft (id 38 mm × 1.5 m long) (Code No. 373580) 63 Creme nozzle (Code No. 337523) 64 Master nozzle (Code No. 337522) 65 Polyethylene bag (10 pcs.) (Code No. 328099) 66 Hose id 1-1/2" × 4.9 ft (id 38 mm × 1.5 m long) (Code No. 373580) 67 Creme nozzle (Code No. 337523) 68 Master nozzle (Code No. 337522) 69 Polyethylene bag (10 pcs.) (Code No. 328099) 70 Hose id 1-1/2" × 4.9 ft (id 38 mm × 1.5 m long) (Code No. 373580) 71 Creme nozzle (Code No. 337523) 72 Master nozzle (Code No. 337522) 73 Polyethylene bag (10 pcs.) (Code No. 328099) 74 Hose id 1-1/2" × 4.9 ft (id 38 mm × 1.5 m long) (Code No. 373580) 75 Creme nozzle (Code No. 337523) 76 Master nozzle (Code No. 337522) 77 Polyethylene bag (10 pcs.) (Code No. 328099) 78 Hose id 1-1/2" × 4.9 ft (id 38 mm × 1.5 m long) (Code No. 373580) 79 Creme nozzle (Code No. 337523) 80 Master nozzle (Code No. 337522) 81 Polyethylene bag (10 pcs.) (Code No. 328099) 82 Hose id 1-1/2" × 4.9 ft (id 38 mm × 1.5 m long) (Code No. 373580) 83 Creme nozzle (Code No. 337523) 84 Master nozzle (Code No. 337522) 85 Polyethylene bag (10 pcs.) (Code No. 328099) 86 Hose id 1-1/2" × 4.9 ft (id 38 mm × 1.5 m long) (Code No. 373580) 87 Creme nozzle (Code No. 337523) 88 Master nozzle (Code No. 337522) 89 Polyethylene bag (10 pcs.) (Code No. 328099) 90 Hose id 1-1/2" × 4.9 ft (id 38 mm × 1.5 m long) (Code No. 373580) 91 Creme nozzle (Code No. 337523) 92 Master nozzle (Code No. 337522) 93 Polyethylene bag (10 pcs.) (Code No. 328099) 94 Hose id 1-1/2" × 4.9 ft (id 38 mm × 1.5 m long) (Code No. 373580) 95 Creme nozzle (Code No. 337523) 96 Master nozzle (Code No. 337522) 97 Polyethylene bag (10 pcs.) (Code No. 328099) 98 Hose id 1-1/2" × 4.9 ft (id 38 mm × 1.5 m long) (Code No. 373580) 99 Creme nozzle (Code No. 337523) 100 Master nozzle (Code No. 337522) 101 Polyethylene bag (10 pcs.) (Code No. 328099) 102 Hose id 1-1/2" × 4.9 ft (id 38 mm × 1.5 m long) (Code No. 373580) 103 Creme nozzle (Code No. 337523) 104 Master nozzle (Code No. 337522) 105 Polyethylene bag (10 pcs.) (Code No. 328099) 106 Hose id 1-1/2" × 4.9 ft (id 38 mm × 1.5 m long) (Code No. 373580) 107 Creme nozzle (Code No. 337523) 108 Master nozzle (Code No. 337522) 109 Polyethylene bag (10 pcs.) (Code No. 328099) 110 Hose id 1-1/2" × 4.9 ft (id 38 mm × 1.5 m long) (Code No. 373580) 111 Creme nozzle (Code No. 337523) 112 Master nozzle (Code No. 337522) 113 Polyethylene bag (10 pcs.) (Code No. 328099) 114 Hose id 1-1/2" × 4.9 ft (id 38 mm × 1.5 m long) (Code No. 373580) 115 Creme nozzle (Code No. 337523) 116 Master nozzle (Code No. 337522) 117 Polyethylene bag (10 pcs.) (Code No. 328099) 118 Hose id 1-1/2" × 4.9 ft (id 38 mm × 1.5 m long) (Code No. 373580) 119 Creme nozzle (Code No. 337523) 120 Master nozzle (Code No. 337522) 121 Polyethylene bag (10 pcs.) (Code No. 328099) 122 Hose id 1-1/2" × 4.9 ft (id 38 mm × 1.5 m long) (Code No. 373580) 123 Creme nozzle (Code No. 337523) 124 Master nozzle (Code No. 337522) 125 Polyethylene bag (10 pcs.) (Code No. 328099) 126 Hose id 1-1/2" × 4.9 ft (id 38 mm × 1.5 m long) (Code No. 373580) 127 Creme nozzle (Code No. 337523) 128 Master nozzle (Code No. 337522) 129 Polyethylene bag (10 pcs.) (Code No. 328099) 130 Hose id 1-1/2" × 4.9 ft (id 38 mm × 1.5 m long) (Code No. 373580) 131 Creme nozzle (Code No. 337523) 132 Master nozzle (Code No. 337522) 133 Polyethylene bag (10 pcs.) (Code No. 328099) 134 Hose id 1-1/2" × 4.9 ft (id 38 mm × 1.5 m long) (Code No. 373580) 135 Creme nozzle (Code No. 337523) 136 Master nozzle (Code No. 337522) 137 Polyethylene bag (10 pcs.) (Code No. 328099) 138 Hose id 1-1/2" × 4.9 ft (id 38 mm × 1.5 m long) (Code No. 373580) 139 Creme nozzle (Code No. 337523) 140 Master nozzle (Code No. 337522) 141 Polyethylene bag (10 pcs.) (Code No. 328099) 142 Hose id 1-1/2" × 4.9 ft (id 38 mm × 1.5 m long) (Code No. 373580) 143 Creme nozzle (Code No. 337523) 144 Master nozzle (Code No. 337522) 145 Polyethylene bag (10 pcs.) (Code No. 328099) 146 Hose id 1-1/2" × 4.9 ft (id 38 mm × 1.5 m long) (Code No. 373580) 147 Creme nozzle (Code No. 337523) 148 Master nozzle (Code No. 337522) 149 Polyethylene bag (10 pcs.) (Code No. 328099) 150 Hose id 1-1/2" × 4.9 ft (id 38 mm × 1.5 m long) (Code No. 373580) 151 Creme nozzle (Code No. 337523) 152 Master nozzle (Code No. 337522) 153 Polyethylene bag (10 pcs.) (Code No. 328099) 154 Hose id 1-1/2" × 4.9 ft (id 38 mm × 1.5 m long) (Code No. 373580) 155 Creme nozzle (Code No. 337523) 156 Master nozzle (Code No. 337522) 157 Polyethylene bag (10 pcs.) (Code No. 328099) 158 Hose id 1-1/2" × 4.9 ft (id 38 mm × 1.5 m long) (Code No. 373580) 159 Creme nozzle (Code No. 337523) 160 Master nozzle (Code No. 337522) 161 Polyethylene bag (10 pcs.) (Code No. 328099) 162 Hose id 1-1/2" × 4.9 ft (id 38 mm × 1.5 m long) (Code No. 373580) 163 Creme nozzle (Code No. 337523) 164 Master nozzle (Code No. 337522) 165 Polyethylene bag (10 pcs.) (Code No. 328099) 166 Hose id 1-1/2" × 4.9 ft (id 38 mm × 1.5 m long) (Code No. 373580) 167 Creme nozzle (Code No. 337523) 168 Master nozzle (Code No. 337522) 169 Polyethylene bag (10 pcs.) (Code No. 328099) 170 Hose id 1-1/2" × 4.9 ft (id 38 mm × 1.5 m long) (Code No. 373580) 171 Creme nozzle (Code No. 337523) 172 Master nozzle (Code No. 337522) 173 Polyethylene bag (10 pcs.) (Code No. 328099) 174 Hose id 1-1/2" × 4.9 ft (id 38 mm × 1.5 m long) (Code No. 373580) 175 Creme nozzle (Code No. 337523) 176 Master nozzle (Code No. 337522) 177 Polyethylene bag (10 pcs.) (Code No. 328099) 178 Hose id 1-1/2" × 4.9 ft (id 38 mm × 1.5 m long) (Code No. 373580) 179 Creme nozzle (Code No. 337523) 180 Master nozzle (Code No. 337522) 181 Polyethylene bag (10 pcs.) (Code No. 328099) 182 Hose id 1-1/2" × 4.9 ft (id 38 mm × 1.5 m long) (Code No. 373580) 183 Creme nozzle (Code No. 337523) 184 Master nozzle (Code No. 337522) 185 Polyethylene bag (10 pcs.) (Code No. 328099) 186 Hose id 1-1/2" × 4.9 ft (id 38 mm × 1.5 m long) (Code No. 373580) 187 Creme nozzle (Code No. 337523) 188 Master nozzle (Code No. 337522) 189 Polyethylene bag (10 pcs.) (Code No. 328099) 190 Hose id 1-1/2" × 4.9 ft (id 38 mm × 1.5 m long) (Code No. 373580) 191 Creme nozzle (Code No. 337523) 192 Master nozzle (Code No. 337522) 193 Polyethylene bag (10 pcs.) (Code No. 328099) 194 Hose id 1-1/2" × 4.9 ft (id 38 mm × 1.5 m long) (Code No. 373580) 195 Creme nozzle (Code No. 337523) 196 Master nozzle (Code No. 337522) 197 Polyethylene bag (10 pcs.) (Code No. 328099) 198 Hose id 1-1/2" × 4.9 ft (id 38 mm × 1.5 m long) (Code No. 373580) 199 Creme nozzle (Code No. 337523) 200 Master nozzle (Code No. 337522) 201 Polyethylene bag (10 pcs.) (Code No. 328099) 202 Hose id 1-1/2" × 4.9 ft (id 38 mm × 1.5 m long) (Code No. 373580) 203 Creme nozzle (Code No. 337523) 204 Master nozzle (Code No. 337522) 205 Polyethylene bag (10 pcs.) (Code No. 328099) 206 Hose id 1-1/2" × 4.9 ft (id 38 mm × 1.5 m long) (Code No. 373580) 207 Creme nozzle (Code No. 337523) 208 Master nozzle (Code No. 337522) 209 Polyethylene bag (10 pcs.) (Code No. 328099) 210 Hose id 1-1/2" × 4.9 ft (id 38 mm × 1.5 m long) (Code No. 373580) 211 Creme nozzle (Code No. 337523) 212 Master nozzle (Code No. 337522) 213 Polyethylene bag (10 pcs.) (Code No. 328099) 214 Hose id 1-1/2" × 4.9 ft (id 38 mm × 1.5 m long) (Code No. 373580) 215 Creme nozzle (Code No. 337523) 216 Master nozzle (Code No. 337522) 217 Polyethylene bag (10 pcs.) (Code No. 328099) 218 Hose id 1-1/2" × 4.9 ft (id 38 mm × 1.5 m long) (Code No. 373580) 219 Creme nozzle (Code No. 337523) 220 Master nozzle (Code No. 337522) 221 Polyethylene bag (10 pcs.) (Code No. 328099) 222 Hose id 1-1/2" × 4.9 ft (id 38 mm × 1.5 m long) (Code No. 373580) 223 Creme nozzle (Code No. 337523) 224 Master nozzle (Code No. 337522) 225 Polyethylene bag (10 pcs.) (Code No. 328099) 226 Hose id 1-1/2" × 4.9 ft (id 38 mm × 1.5 m long) (Code No. 373580) 227 Creme nozzle (Code No. 337523) 228 Master nozzle (Code No. 337522) 229 Polyethylene bag (10 pcs.) (Code No. 328099) 230 Hose id 1-1/2" × 4.9 ft (id 38 mm × 1.5 m long) (Code No. 373580) 231 Creme nozzle (Code No. 337523) 232 Master nozzle (Code No. 337522) 233 Polyethylene bag (10 pcs.) (Code No. 328099) 234 Hose id 1-1/2" × 4.9 ft (id 38 mm × 1.5 m long) (Code No. 373580) 235 Creme nozzle (Code No. 337523) 236 Master nozzle (Code No. 337522) 237 Polyethylene bag (10 pcs.) (Code No. 328099) 238 Hose id 1-1/2" × 4.9 ft (id 38 mm × 1.5 m long) (Code No. 373580) 239 Creme nozzle (Code No. 337523) 240 Master nozzle (Code No. 337522) 241 Polyethylene bag (10 pcs.) (Code No. 328099) 242 Hose id 1-1/2" × 4.9 ft (id 38 mm × 1.5 m long) (Code No. 373580) 243 Creme nozzle (Code No. 337523) 244 Master nozzle (Code No. 337522) 245 Polyethylene bag (10 pcs.) (Code No. 328099) 246 Hose id 1-1/2" × 4.9 ft (id 38 mm × 1.5 m long) (Code No. 373580) 247 Creme nozzle (Code No. 337523) 248 Master nozzle (Code No. 337522) 249 Polyethylene bag (10 pcs.) (Code No. 328099) 250 Hose id 1-1/2" × 4.9 ft (id 38 mm × 1.5 m long) (Code No. 373580) 251 Creme nozzle (Code No. 337523) 252 Master nozzle (Code No. 337522) 253 Polyethylene bag (10 pcs.) (Code No. 328099) 254 Hose id 1-1/2" × 4.9 ft (id 38 mm × 1.5 m long) (Code No. 373580) 255 Creme nozzle (Code No. 337523) 256 Master nozzle (Code No. 337522) 257 Polyethylene bag (10 pcs.) (Code No. 328099) 258 Hose id 1-1/2" × 4.9 ft (id 38 mm × 1.5 m long) (Code No. 373580) 259 Creme nozzle (Code No. 337523) 260 Master nozzle (Code No. 337522) 261 Polyethylene bag (10 pcs.) (Code No. 328099) 262 Hose id 1-1/2" × 4.9 ft (id 38 mm × 1.5 m long) (Code No. 373580) 263 Creme nozzle (Code No. 337523) 264 Master nozzle (Code No. 337522) 265 Polyethylene bag (10 pcs.) (Code No. 328099) 266 Hose id 1-1/2" × 4.9 ft (id 38 mm × 1.5 m long) (Code No. 373580) 267 Creme nozzle (Code No. 337523) 268 Master nozzle (Code No. 337522) 269 Polyethylene bag (10 pcs.) (Code No. 328099) 270 Hose id 1-1/2" × 4.9 ft (id 38 mm × 1.5 m long) (Code No. 373580) 271 Creme nozzle (Code No. 337523) 272 Master nozzle (Code No. 337522) 273 Polyethylene bag (10 pcs.) (Code No. 328099) 274 Hose id 1-1/2" × 4.9 ft (id 38 mm × 1.5 m long) (Code No. 373580) 275 Creme nozzle (Code No. 337523) 276 Master nozzle (Code No. 337522) 277 Polyethylene bag (10 pcs.) (Code No. 328099) 278 Hose id 1-1/2" × 4.9 ft (id 38 mm × 1.5 m long) (Code No. 373580) 279 Creme nozzle (Code No. 337523) 280 Master nozzle (Code No. 337522) 281 Polyethylene bag (10 pcs.) (Code No. 328099) 282 Hose id 1-1/2" × 4.9 ft (id 38 mm × 1.5 m long) (Code No. 373580) 283 Creme nozzle (Code No. 337523) 284 Master nozzle (Code No. 337522) 285 Polyethylene bag (10 pcs.) (Code No. 328099) 286 Hose id 1-1/2" × 4.9 ft (id 38 mm × 1.5 m long) (Code No. 373580) 287 Creme nozzle (Code No. 337523) 288 Master nozzle (Code No. 337522) 289 Polyethylene bag (10 pcs.) (Code No. 328099) 290 Hose id 1-1/2" × 4.9 ft (id 38 mm × 1.5 m long) (Code No. 373580) 291 Creme nozzle (Code No. 337523) 292 Master nozzle (Code No. 337522) 293 Polyethylene bag (10 pcs.) (Code No. 328099) 294 Hose id 1-1/2" × 4.9 ft (id 38 mm × 1.5 m long) (Code No. 373580) 295 Creme nozzle (Code No. 337523) 296 Master nozzle (Code No. 337522) 297 Polyethylene bag (10 pcs.) (Code No. 328099) 298 Hose id 1-1/2" × 4.9 ft (id 38 mm × 1.5 m long) (Code No. 373580) 299 Creme nozzle (Code No. 337523) 300 Master nozzle (Code No. 337522) 301 Polyethylene bag (10 pcs.) (Code No. 328099) 302 Hose id 1-1/2" × 4.9 ft (id 38 mm × 1.5 m long) (Code No. 373580) 303 Creme nozzle (Code No. 337523) 304 Master nozzle (Code No. 337522) 305 Polyethylene bag (10 pcs.) (Code No. 328099) 306 Hose id 1-1/2" × 4.9 ft (id 38 mm × 1.5 m long) (Code No. 373580) 307 Creme nozzle (Code No. 337523) 308 Master nozzle (Code No. 337522) 309 Polyethylene bag (10 pcs.) (Code No. 328099) 310 Hose id 1-1/2" × 4.9 ft (id 38 mm × 1.5 m long) (Code No. 373580) 311 Creme nozzle (Code No. 337523) 312 Polyethylene bag (10 pcs.) (Code No. 328099) 313 Hose id 1-1/2" × 4.9 ft (id 38 mm × 1.5 m long) (Code No. 373580) 314 Creme nozzle (Code No. 337523) 315 Polyethylene bag (10 pcs.) (Code No. 328099) 316 Hose id 1-1/2" × 4.9 ft (id 38 mm × 1.5 m long) (Code No. 373580) 317 Creme nozzle (Code No. 337523) 318 Polyethylene bag (10 pcs.) (Code No. 328099) 319 Hose id 1-1/2" × 4.9 ft (id 38 mm × 1.5 m long) (Code No. 373580) 320 Creme nozzle (Code No. 337523) 321 Hose id 1-1/2" × 4.9 ft (id 38 mm × 1.5 m long) (Code No. 373580) 322 Creme nozzle (Code No. 337523) 323 Polyethylene bag (10 pcs.) (Code No. 328099) 324 Hose id 1-1/2" × 4.9 ft (id 38 mm × 1.5 m long) (Code No. 373580) 325 Creme nozzle (Code No. 337523) 326 Hose id 1-1/2" × 4.9 ft (id 38 mm × 1.5 m long) (Code No. 373580) 327 Creme nozzle (Code No. 337523) 328 Hose id 1-1/2" × 4.9 ft (id 38 mm × 1.5 m long) (Code No. 373580) 329 Creme nozzle (Code No. 337523) 330 Hose id 1-1/2" × 4.9 ft (id 38 mm × 1.5 m long) (Code No. 373580) 331 Creme nozzle (Code No. 337523) 332 Hose id 1-1/2" × 4.9 ft (id 38 mm × 1.5 m long) (Code No. 373580) 333 Creme nozzle (Code No. 337523) 334 Hose id 1-1/2" × 4.9 ft (id 38 mm × 1.5 m long) (Code No. 373580) 335 Creme nozzle (Code No. 337523) 336 Hose id 1-1/2" × 4.9 ft (id 38 mm × 1.5 m long) (Code No. 373580) 337 Creme nozzle (Code No. 337523) 338 Hose id 1-1/2" × 4.9 ft (id 38 mm × 1.5 m long) (Code No. 373580) 340 Creme nozzle (Code No. 337523) 341 Hose id 1-1/2" × 4.9 ft (id 38 mm × 1.5 m long) (Code No. 373580) 342 Hose id 1-1/2" × 4.9 ft (id 38 mm × 1.5 m long) (Code No. 373580) 344 Hose id 1-1/2" × 4.9 ft (id 38 mm × 1.5 m long) (Code No. 373580) 345 Hose id 1-1/2" × 4.9 ft (id 38 mm × 1.5 m long) (Code No. 373580) 346 Hose id 1-1/2" × 4.9 ft (id 38 mm × 1.5 m long) (Code No. 373580) 347 Hose id 1-1/2" × 4.9 ft (id 38 mm × 1.5 m long) (Code No. 373580) 348 Hose id 1-1/2" × 4.9 ft (id 38 mm × 1.5 m long) (Code No. 373580) 349 Hose id 1-1/2" × 4.9 ft (id 38 mm × 1.5 m long) (Code No. 373580) 350 Hose id 1-1/2" × 4.9 ft (id 38 mm × 1.5 m long) (Code No. 373580) 351 Hose id 1-1/2" × 4.9 ft (id 38 mm × 1.5 m long) (Code No. 373580) 352 Hose id 1-1/2" × 4.9 ft (id 38 mm × 1.5 m long) (Code No. 373580) 353 Hose id 1-1/2" × 4.9 ft (id 38 mm × 1.5 m long) (Code No. 373580) 354 Hose id 1-1/2" × 4.9 ft (id 38 mm × 1.5 m long) (Code No. 373580) 355 Hose id 1-1/2" × 4.9 ft (id 38 mm × 1.5 m long) (Code No. 373580) 356 Hose id 1-1/2" × 4.9 ft (id 38 mm × 1.5 m long) (Code No. 373580) 357 Hose id 1-1/2" × 4.9 ft (id 38 mm × 1.5 m long) (Code No. 373580) 358 Hose id 1-1/2" × 4.9 ft (id 38 mm × 1.5 m long) (Code No. 373580) 359 Hose id 1-1/2" × 4.9 ft (id 38 mm × 1.5 m long) (Code No. 373580) Hose id: Holes: Holes: Holes: Holes: Holes: Holes: Holes: Holes: Holes: Holes: Holes: Holes: Holes: Holes: Holes: Holes: Holes: Holes: Holes: Holes: Holes: Holes: Holes: Holes: Holes: Holes: Holes: Holes: Holes: Holes: Holes: Holes: Holes: Holes: Holes: Holes: Holes: Holes: Holes: Holes: Holes: Holes: Holes: Holes: Holes: Holes: Holes: Holes: Holes: Holes: Holes: Holes: Holes: Holes: Holes: Holes: Holes: Holes: Holes: Holes: Holes: Holes: Holes: Holes: Holes: Holes: Holes: H holes: Holes: Holes: Holes: Holes: Holes: Holes: Holes: Holes: Holes: Holes: Holes: Holes: Holes: Holes: Holes: Holes: Holes: Holes: Holes: Holes: Holes: Holes: Holes: Holes: Holes: Holes: Holes: Holes: Holes: Holes: Holes: Holes: Holes:Holes: Holes: Holes: Holes: Holes: Holes: Holes: Holes: Holes: Holes: Holes: Holes: Holes: Holes: Holes: Holes: Holes: Holes: Holes: Holes: Holes: Holes: Holes: Holes: Holes: Holes: Holes: Holes: Holes: Holes: Holes: Holes: Holes: Hole: Holes: Holes: Holes: Holes: Holes: Holes: Holes: Holes: Holes: Holes: Holes: Holes: Holes: Holes: Holes: Holes: Holes: Holes: Holes: Holes: Holes: Holes: Holes: Holes: Holes: Holes: Holes: Holes: Holes: Holes: Holes: Holes: Holes:Holes:Holes:Holes:Holes:Holes:Holes:Holes:Holes:Holes:Holes:Holes:Holes:Holes:Holes:Holes:Holes:Holes:Holes:Holes:Holes:Holes:Holes:Holes:Holes:Holes:Holes:Holes:Holes:Holes:Holes:Holes:Holes:Holes:H holes:Holes:Holes:Holes:Holes:Holes:Holes:Holes:Holes:Holes:Holes:Holes:Holes:Holes:Holes:Holes:Holes:Holes:Holes:Holes:Holes:Holes:Holes:Holes:Holes:Holes:Holes:Holes:Holes:Holes:Holes:Holes:Holes:Holes: Holes: Holes: Holes: Holes: Holes: Holes: Holes: Holes: Holes: Holes: Holes: Holes: Holes: Holes: Holes: Holes: H |
OPTIONAL ACCESSORIES (sold separately)
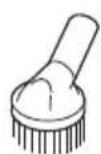
- Adapter 2. Joint (D) 3. Wet nozzle
- Brush 5. Hose id 1 - 3 / 32'' × 16.4 ft
(id 28× 5 m long)
- Paper filter
- Nylon filter
- Application tool
For details contact metabo HPT Authorized Service Center.
NOTE
Specifications are subject to change without any obligation on the part of the metabo HPT.
INFORMATIONS IMPORTANTES DE SECURITE
Please contact KOKI HOLDINGS AMERICA LTD. at 1-800-59-TOOLS (toll free), or metabo HPT AUTHORIZATION POWER TOOL SERVICE CENTER regarding COLLECTION.

Pour le RAMASSAGE, contacter KOKI HOLDINGS AMERICA LTD. au 1-800-59-TOOLS (appel Gratisuit), ou UN SERVICE APRES-VENTE D'OUTILS ÉLECTRIQUE AGRÉÉ PAR metabo HPT.

Con respectfully a la RECOLECCION de baterias,pongase en contacto con KOKI HOLDINGS AMERICA LTD. numero 1-800-59-TOOLS (llamada Gratis), o con metabo HPT AUTHORIZED POWER TOOL SERVICE CENTER.
Issued by
Koki Holdings Co., Ltd.
Shinagawa Intercity Tower A, 15-1, Konan 2-chome, Minato-ku, Tokyo 108-6020, Japan
Distributed by
Koki Holdings America Ltd.
1111 Broadway Ave, Braselton, Georgia, 30517
Koki Holdings America Ltd. Canadian Branch
3405 American Drive, Units 9-10, Mississauga, ON, L4V 1T6