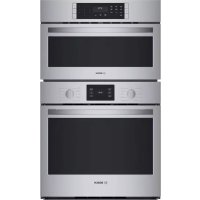
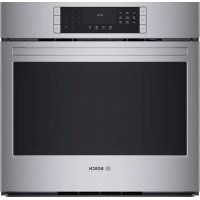
HBE5451UC - Built-in oven BOSCH - Free user manual and instructions
Find the device manual for free HBE5451UC BOSCH in PDF.

| Product type | Built-in oven |
| Brand | Bosch |
| Model | HBE5451UC |
| Installation | Built-in |
| Cooking modes | Bake, Broil Plus, Warm, Frozen Foods, Defrost, Conv Bake, Conv Broil Plus, Conv Multi-Rack, Conv Broil, Pie |
| Temperature range | 100 °F to 500 °F |
| Timer | Short-term timer and automatic programming (duration up to 10 h, delayed end up to 23 h 59 min) |
| Oven light | 12 V, 20 W, G4 base, 300 °C resistance |
| Included accessories | Baking/roasting grid, enameled baking sheet, safety rods, ceiling cover |
| Cleaning | Hot water and dish soap; do not use aggressive, abrasive or steam cleaners |
| Safety | Important safety instructions (fire, burn, children), automatic shut-off in case of error |
| Limited warranty | 365 days for material and workmanship defects; 30 days for appearance |
| After-sales service (United States) | Phone: 800-944-2904; parts and accessories available online |
| Rating plate | On the right side inside the door |
| Number of rack levels | 5 positions |
| Type of interior coating | Self-cleaning catalytic enamel on side and rear walls |
| Oven door | Removable and detachable (removable inner and intermediate glass panels) |
| Fast preheat function | Yes, with Conv Bake mode |
| Energy saving | Tips: multi-level cooking, use of residual heat, dark pans |
| Country of origin | Manufactured by BSH Home Appliances Corporation (United States) |
Frequently Asked Questions - HBE5451UC BOSCH
User questions about HBE5451UC BOSCH
0 question about this device. Answer the ones you know or ask your own.
Ask a new question about this device
Download the instructions for your Built-in oven in PDF format for free! Find your manual HBE5451UC - BOSCH and take your electronic device back in hand. On this page are published all the documents necessary for the use of your device. HBE5451UC by BOSCH.
USER MANUAL HBE5451UC BOSCH
IMPORTANT SAFETY INSTRUCTIONS 4
Proper Installation and Maintenance 4
Fire Safety 4
Burn Prevention 5
Child Safety 5
Cleaning Safety 5
Cookware Safety 5
State of California Proposition 65Warnings 5
Causes of damage 6
Protecting the environment 6
Tips for saving energy 6
Your new appliance 7
Oven 7
Function selector 7
Temperature selector 8
Timer 8
Accessories 9
Before using the oven for the first time 10
Setting the time 10
Baking out the oven 10
Cleaning the accessories 10
Operation 10
Switching on the oven 10
Kitchen timer 10
Setting the automatic timer 11
Basic Settings 11
Cleaning and maintenance 12
Cleaning agents 12
Catalytic cooking compartment panels 13
Removing and installing the door panels 13
Removing and fitting the appliance door 14
Removing and inserting the hook-in racks 14
Troubleshooting 15
Replacing the oven light bulb 16
Bosch® Support 17
Before Calling Service 17
Data Plate 17
Service 17
Parts and Accessories 17
Tips for using your appliance 18
Baking 18
Roasting and broiling 19
Tested for you in our cooking studio 20
STATEMENT OF LIMITED PRODUCT WARRANTY ... 21
What this Warranty Covers & Who it Applies to 21
How Long the Warranty Lasts 21
Repair/Replace as Your Exclusive Remedy 21
Out of Warranty Product 21
Warranty Exclusions 21
Additional information on products, accessories, replacement parts and services can be found at
www.bosch-home.com and in the online shop
www.bosch-home.com/us/store
This Bosch Appliance is made by
BSH Home Appliances Corporation
1901 Main Street, Suite 600
Irvine, CA 92614
Questions?
1-800-944-2904
www.bosch-home.com/us
We look forward to hearing from you!
Safety Definitions
WARNING
This indicates that death or serious injuries may occur as a result of non-observance of this warning.
CAUTION
This indicates that minor or moderate injuries may occur as a result of non-observation of this warning.
NOTICE: This indicates that damage to the appliance or property may occur as a result of non-compliance with this advisory.
Note: This alerts you to important information and/or tips.
IMPORTANT SAFETY INSTRUCTIONS READ AND SAVE THESE INSTRUCTIONS
WARNING
When properly cared for, your new appliance has been designed to be safe and reliable. Read all instructions carefully before use. These precautions will reduce the risk of burns, electric shock, fire, and injury to persons. When using kitchen appliances, basic safety precautions must be followed, including those in the following pages.
Proper Installation and Maintenance
Have the installer show you the location of the circuit breaker or fuse. Mark it for easy reference.
This appliance must be properly installed and grounded by a qualified technician. Connect only to properly grounded outlet. Refer to Installation Instructions for details.
This appliance is intended for normal family household use only. It is not approved for outdoor use. See the Warranty. If you have any questions, contact the manufacturer.
Do not store or use corrosive chemicals, vapors, flammables or nonfood products in or near this appliance. It is specifically designed for use when heating or cooking food. The use of corrosive chemicals in heating or cleaning will damage the appliance and could result in injury.
Do not operate this appliance if it is not working properly, or if it has been damaged. Contact an authorized servicer.
Do not obstruct oven vents.
Do not repair or replace any part of the appliance unless specifically recommended in this manual. Refer all servicing to a factory authorized service center.
In the event of an error the display flashes and beeps continuously. Disconnect appliance from the power supply and call a qualified technician.
WARNING
When removing the door make sure oven is cool and power to the oven has been turned off before removing the door. Failure to do so could result in burns.
The oven door is heavy and fragile. Use both hands to remove the oven door. The door front is glass. Handle carefully to avoid breaking.
Grasp only the sides of the oven door. Do not grasp the handle as it may swing in your hand and cause injury or damage.
Failure to grasp the oven door firmly and properly could result in personal injury or product damage.
Lay the door on a flat smooth surface so that the door cannot fall over. Failure to do so may result in personal injury or damage to the appliance.
WARNING
To avoid injury from hinge bracket snapping closed, be sure that both levers are securely in place before removing door. Also, do not force door open or closed - the hinge could be damaged and injury could result.
WARNING
Make sure the appliance and lights are cool and power to the appliance has been turned off before replacing the light bulb(s). Failure to do so could result in electrical shock or burns. The lenses (if equipped) must be in place when using the appliance. The lenses (if equipped) serve to protect the light bulb from breaking. The lenses (if equipped) are made of glass. Handle carefully to avoid breaking. Broken glass can cause an injury.
WARNING
Light socket is live when door is open if main power supply is not turned off.
Fire Safety
WARNING
NEVER cover any slots, holes or passages in the oven bottom or cover an entire rack with materials such as aluminum foil. Doing so blocks air flow through the oven. Aluminum foil linings may also trap heat, causing a fire hazard.
If materials inside an oven or warming drawer should ignite, keep door closed. Turn off the appliance and disconnect the circuit at the circuit breaker box.
WARNING
Use this appliance only for its intended use as described in this manual. NEVER use this appliance as a space heater to heat or warm the room. Doing so may result in overheating the appliance. Never use the appliance for storage.
Always have a working smoke detector near the kitchen. In the event that personal clothing or hair catches fire, drop and roll immediately to extinguish flames.
Have an appropriate fire extinguisher available, nearby, highly visible and easily accessible near the appliance. Smother flames from food fires other than grease fires with baking soda. Never use water on cooking fires.
IMPORTANT SAFETY INSTRUCTIONS READ AND SAVE THESE INSTRUCTIONS
WARNING
TO REDUCE THE RISK OF INJURY TO PERSONS IN THE EVENT OF A GREASE FIRE, OBSERVE THE FOLLOWING:
a. SMOTHER FLAMES with a close-fitting lid, cookie sheet, or metal tray, then turn off the burner. BE CAREFUL TO PREVENT BURNS. If the flames do not go out immediately, EVACUATE AND CALL THE FIRE DEPARTMENT.
b. NEVER PICK UP A FLAMING PAN - You may be burned.
c. DO NOT USE WATER, including wet dishcloths or towels - a violent steam explosion will result.
d. Use an extinguisher ONLY if:
- You know you have a Class ABC extinguisher, and you already know how to operate it.
- The fire is small and contained in the area where it started.
- The fire department is being called.
- You can fight the fire with your back to an exit.
Burn Prevention
DO NOT TOUCH HEATING ELEMENTS OR INTERIOR SURFACES OF OVEN - Heating elements may be hot even though they are dark in color. Interior surfaces of an oven become hot enough to cause burns. During and after use, do not touch, or let clothing, potholders, or other flammable materials contact heating elements or interior surfaces of oven until they have had sufficient time to cool. Other surfaces of the appliance may become hot enough to cause burns. Among these surfaces are oven vent openings, surfaces near these openings and oven doors.
Exercise caution when opening the appliance. Standing to the side, open the door (or drawer) slowly and slightly to let hot air and/or steam escape. Keep your face clear of the opening and make sure there are no children or pets near the unit. After the release of hot air and/or steam, proceed with your cooking. Keep doors shut unless necessary for cooking or cleaning purposes. Do not leave open doors unattended.
Do not heat or warm unopened food containers. Build-up of pressure may cause the container to burst and cause injury.
Use caution when cooking foods with high alcohol content (e.g. rum, brandy, bourbon) in the oven. Alcohol evaporates at high temperatures. There is a risk of burning as the alcohol vapors may catch fire in the oven. Use only small quantities of alcohol in foods, and open the oven door carefully.
Always place oven racks in desired location while oven is cool. Always use oven mitts, when the oven is warm. If a rack must be moved while oven is hot, do not let potholder contact the heating elements.
CAUTION
To avoid possible injury or damage to the appliance, ensure rack is installed exactly per installation instructions and not backwards or upside down.
Always use dry potholders. Moist or damp potholders on hot surfaces may result in burns from steam. Do not let potholder touch hot heating elements. Do not use a towel or other bulky cloth.
Secure all loose garments, etc. before beginning. Tie long hair so that it does not hang loose, and do not wear loose fitting clothing or hanging garments, such as ties, scarves, jewelry, or dangling sleeves.
Child Safety
When children become old enough to use the appliance, it is the legal responsibility of the parents or legal guardians to ensure that they are instructed in safe practices by qualified persons.
Do not allow anyone to climb, stand, lean, sit, or hang on any part of an appliance, especially a door, warming drawer, or storage drawer. This can damage the appliance, and the unit may tip over, potentially causing severe injury.
Do not allow children to use this appliance unless closely supervised by an adult. Children and pets should not be left alone or unattended in the area where the appliance is in use. They should never be allowed to play in its vicinity, whether or not the appliance is in use.
CAUTION
Items of interest to children should not be stored in an appliance, in cabinets above an appliance or on the backsplash. Children climbing on an appliance to reach items could be seriously injured.
Cleaning Safety
Keep oven free from grease build up.
Cookware Safety
NOTICE: Do not place food directly on oven bottom. Follow the manufacturer's directions when using cooking or roasting bags.
Do not place cookware on open oven door.
State of California Proposition 65 Warnings
WARNING
This product contains chemicals known to the State of California to cause cancer, birth defects or other reproductive harm.
Causes of damage
NOTICES:
- Accessories, foil, baking paper or cookware on the bottom of the oven interior: do not place any accessories on the bottom of the oven interior. Do not line the bottom of the oven interior with any type of foil or baking paper. Do not place cookware on the bottom of the oven interior when a temperature above 122^ ( 50^ ) is set. This produces a build-up of heat. Baking and roasting times are no longer correct and the enamel is damaged.
- Do not use the oven with the Roof Liner fitted in the bottom of the cavity.
Water in the hot oven interior: Never pour water into the hot oven interior. Steam is produced. Damage to the enamel can arise due to the temperature change. - Do not leave moist groceries in a closed oven for an extended period of time. It can lead to corrosion inside the oven.
-
Fruit juice can leave stains in the oven. Always remove fruit juice immediately and wipe up first with a damp and then a dry cloth. Cool oven first to avoid steam burns from wet dish cloth.
-
Cooling with the appliance door open: only allow the oven cavity to cool when it is closed. Even if the appliance door is only open a little, front panels of adjacent units could be damaged over time.
- Highly soiled door seal: the appliance door will no longer close properly during operation if the door seal is highly soiled. Adjoining furniture fronts may be damaged. Always keep the door seal clean.
- Appliance door as a seat or storage surface: do not stand, sit or hang on the appliance door. Do not place any cookware or accessories on the appliance door.
- Inserting accessories: depending on the appliance type, accessories can scratch the door pane when closing the appliance door. Always slide accessories fully into the oven interior.
- Do not hold or carry the appliance by the door handle. The door handle cannot carry the weight of the device and could break off.
Protecting the environment
Unpack the appliance and dispose of the packaging in line with environmental requirements.
Tips for saving energy
- Open the appliance door as little as possible while cooking, baking or roasting.
- Use dark, black-painted or enameled baking forms. These absorb the heat particularly well.
- It is best to bake several cakes in succession. The oven is still warm. This shortens the baking time for the second cake. You can also slide in two loaf tins next to each other.
- In the hot air mode, you can bake simultaneously on several levels.
- For longer cooking times, you can switch off the oven 10 minutes before the end of the cooking time and you can use the residual heat to finish cooking.
Your new appliance
Get to know your appliance. You will find information on the control panel, the oven, types of heating and accessories.
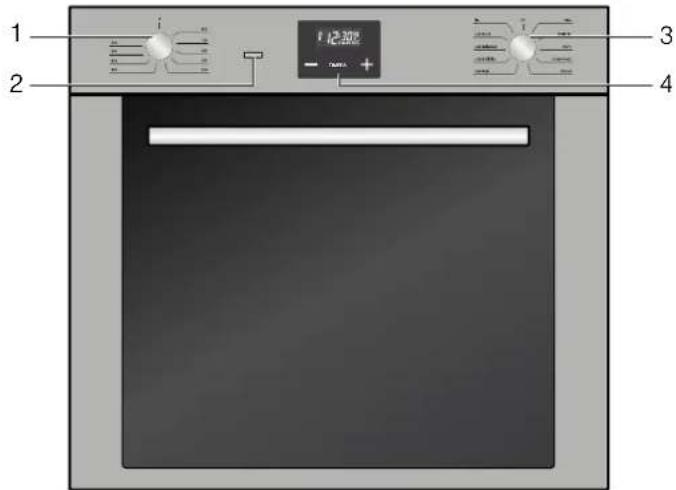
Oven
1 Temperature selector
2 Function lamp
3 Function selector
4 Display and function buttons
NOTICE: Do not place food directly on oven bottom.
Do not obstruct oven vents.
Function selector
Use the function selector to set the type of heating.

Position Use
Off The oven is turned off.
Bake For cakes, casseroles and lean roast pieces. The heat comes evenly from the upper and lower heating elements.
Position Use
| Broil Plus The heat coming from the broil ele-ment gives perfect broiling results above all for thin and medium thick-ness meat and in combination with the rotisserie (where present) gives the food an even browning at the end of cooking. Perfect for sausages, ribs and bacon. This function enables large quantities of food, particularly meat, to be broiled evenly. |
| Warm The heat coming just from the bottom allows you to complete the cooking of foods that require a higher bottom temperature, without affecting theirbrowning. Perfect for cakes, pies, tarts and pizzas. |
| Frozen Foods The combination of fan-assisted cooking and traditional cooking allows different foods to be cooked on several levels extremely quickly and efficiently. Perfect for large vol-umes that call for intense cooking, useful not only for frozen, but also for fresh food. |
| Defrost Rapid defrosting is helped by switch-ing on the fan provided and the top heating element that ensure uniform distribution of low temperature air inside the oven. |
| Conv Bake The operation of the fan, combined with traditional cooking, ensures uni-form cooking even with complex recipes. Perfect for every type of food, even when simultaneously cooked on several levels. |
| Conv Broil Plus The air produced by the fan softens the strong heatwave generated by the broil element, broiling perfectly even very thick foods. Perfect for large cuts of meat. |
| Conv Multi-Rack The combination of the fan and the circular element (incorporated in the rear of the oven) allows you to cook different foods on several levels, as long as they need the same temperatures and same type of cooking. Hot air circulation ensures instant and uniform distribution of heat. For multi-ple level cooking we recommend using 2nd and 4th shelves. |
Position Use
Conv Broil Through the combined action of the fan and the heat of the central element only, this function is perfect for rapid cooking and cooking au gratin of small quantities of food (particularly meats), by bringing together the dietary advantages of broiling and the even cooking of the fan.
Pie The combination of the fan with lower heating and a little of top heating element allows cooking to be completed more rapidly. Perfect for any type of food, but in particular for pie and cakes.
Note: When you set the heating function, the oven light in the cooking compartment switches on.
Temperature selector
Set the temperature using the temperature selector.
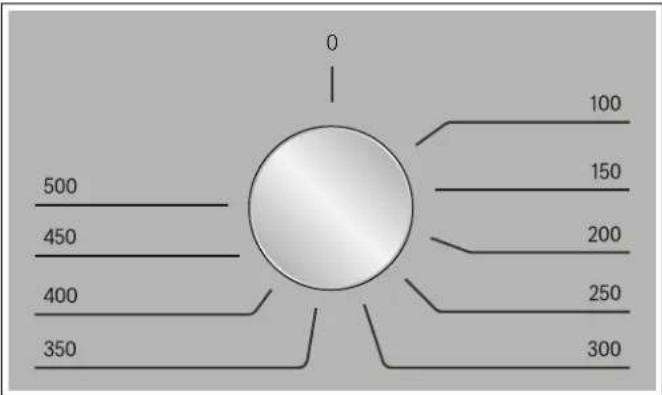
Position Meaning
| 0 Off The oven does not heat. | ||
| 100-500 | Temperature range | The temperature in the cook-ing compartment in °F. |
When the oven is heating, the display lamp blinks. When the set temperature has been reached, it lights up continuously and a signal sounds.
Timer
You can control your oven with the timer. This way you can select the time at which the oven should switch on or at which the timer should end the baking or cooking process. The timer can also be used as a short-term timer.
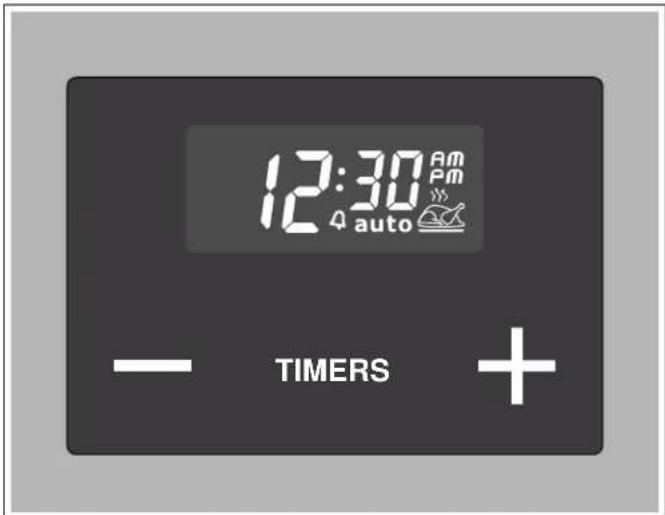
Function buttons
| Symbol | Meaning | Use |
| TIMERS | Timer functions Set duration or cooking time | |
| - | Minus Reduce duration or cooking time | |
| + | Plus Increase duration or cooking time |
Display symbols
| Symbol Meaning | |
| 00:00 | Time / Cooking time / End time / Kitchen timer |
| Oven is ready for operation. | |
| auto | A cooking time duration / Cooking time duration with end time is programmed |
| The kitchen timer is active | |
| Am/PM | Time display: 12 h format To change to 24 h format, see the section "Adjusting the time" |
Accessories
The accessories can be inserted into the cooking compartment at 5 different levels. Always insert them as far as they will go so that the accessories do not touch the door panel. Ensure that you always insert the accessories into the cooking compartment correctly.
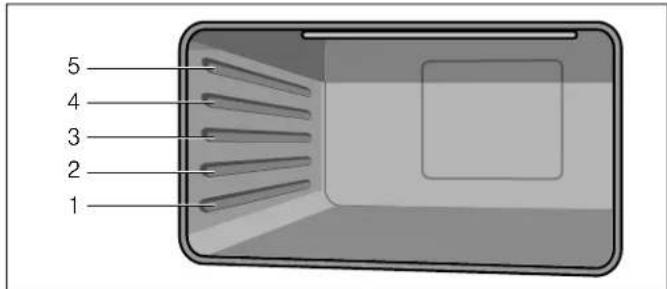
You can pull out the accessories two thirds of the way without them tipping. This allows meals to be removed easily.
The accessories may become deformed when they become hot. As soon as they have cooled down, the deformation disappears with no effect on the function. You can buy accessories from customer service, from specialist retailers or online.
The pull-out rails allow you to pull accessories out completely.
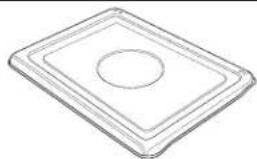
Accessories Explanation
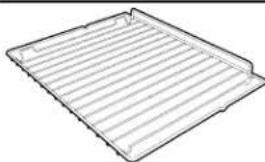
Baking and roasting shelf
For ovenware, cake tins, roasts, broiled items, frozen meals.
Enamel baking tray
For moist cakes, pastries, frozen meals and large roasts. Can also be used as a drip tray to collect run-off fat.

Locking pins
For locking the hinges.
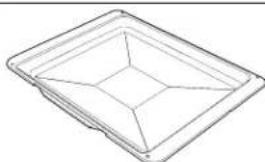
Roof liner
The roof liner can be inserted permanently above the oven broil element to avoid soiling of the cavity roof. It is removable and coated with porcelain enamel to facilitate cleaning.
Note: The porcelain coverage on the roof liner is not even, some areas will have a less shiny surface. This is normal, the metal is still covered and protected.
Inserting the roof liner
Insert the roof liner by carefully sliding it in above the broil element. To remove it pull it carfully out of the oven cavity.

Before using the oven for the first time
In this section, you can find out what you must do before using your oven to prepare food for the first time. Read the Safety information section beforehand.
Remove the appliance packaging and dispose of it appropriately.
Setting the time
After connecting the oven or after a power failure, 0:00 and auto will blink on the display.
- Hold the TIMERS button down until the colon blinks on the display.
- Set the current time with the + and - buttons. Hold the + or - button down to change the value faster.
The time set is taken over after 5 seconds.
Setting the time during operation
- Hold the + and - button down until the colon blinks on the display.
- Set the current time with the + and - buttons. Hold the + or - button down to change the value faster.
The time set is taken over after 5 seconds.
Baking out the oven
Pre-cleaning the oven
- Remove the accessories, the hook-in racks and the roof liner from the cooking compartment.
- Completely remove any leftover packaging, e.g. small pieces of polystyrene, from the cooking compartment.
- Some parts are covered with a protective film. Remove this scratch protection film.
- Clean the outside of the appliance with a soft, damp cloth.
- Clean the cooking compartment with hot soapy water.
Heating up the oven
To remove the new smell, heat up the oven when it is empty and closed.
- Turn the function selector to the Bake operating mode.
- Turn the temperature selector to the maximum temperature.
- Switch the oven off after 40 minutes.
Re-cleaning the oven
- Clean the cooking compartment with hot soapy water.
- Refit the hook-in racks.
Cleaning the accessories
Before using the accessories, clean them thoroughly using a cloth and warm soapy water.
Operation
Switching on the oven
- Use the function selector to set the type of heating.
- Use the temperature selector to set the temperature.
The oven begins to heat up.
Switching off the oven
Turn the function selector and temperature selector to the off position.
Changing settings
The heating function and temperature or broil setting can be changed at any time using their respective selectors.
Heating up
In order to heat up the cooking compartment as quickly as possible, use the "Conv Bake" heating type. When the set temperature has been reached (indicator light lights up continuously and signal sounds), set the desired heating type.
Kitchen timer
The short-term timer has no influence on the functioning of the oven. The duration of the short-term timer can be set from 1 minute to 23 hours and 59 minutes.
- Hold the TIMERS button down until the blinks and 0:00 is displayed.
- Set the desired duration with the + and - buttons. The set time is taken over after 5 seconds.
After the time has elapsed, a signal sounds and the symbol blinks.
Note: While the short-term timer is running, the time is displayed and the 品 symbol lights up continuously.
Changing the set time:
To change the remaining time, hold the TIMERS button down until the symbol blinks on the display. Then change the remaining time with the + and - buttons.
Canceling the short-term timer
To delete the setting, hold the TIMERS button down until the symbol blinks on the display. Then press the + and - buttons simultaneously.
Switching the signal tone off
Hold the TIMERS button down until the clock disappears. After seven minutes, the signal switches off automatically.
Setting the automatic timer
With the TIMER function, you can set an operating time duration or program a start and end time.
Automatic switch-off
- Press the TIMERS button down until the symbol blinks.
- Press the TIMERS button again. On the display, auto and blink.
- Use the ^+ and - buttons to set the operating time duration. The operating time duration can be set from 1 minute to 10 hours.
- Set the desired heating type and temperature. The oven starts. The auto signals light up on the display, the current time is displayed.
The operating time duration has elapsed
A signal sounds, auto blinks on the display.
- Switch off the temperature selector and function selector.
- Hold the TIMERS button down until the symbol appears. The oven switches back to manual mode.
Canceling the operating time duration
To delete the setting, hold the TIMERS button down until the symbol blinks on the display. Then press the + and - buttons simultaneously.
Automatic switch-on and switch-off
Baking or roasting starts for the set duration at a later time which you chose.
- Press the TIMERS button down until the symbol blinks.
- Press the TIMERS button again. On the display, auto and blink.
- Use the ^+ and - buttons to set the operating time duration. The operating time duration can be set from 1 minute to 10 hours.
-
Press the TIMERS button again. auto and the symbol blink on the display. The end time for the programmed operating time duration is displayed.
-
Adjust the end time with the + and - buttons. The end time can be set up to 23 hours and 59 minutes.
The oven calculates the start time. After 5 seconds, the time set is taken over.
The and auto signals go out, the current time is displayed. - Set the desired heating type and temperature. The oven will begin to heat at the calculated start time. On the display, the auto symbols light up.
The operating time duration has elapsed
A signal sounds, auto blinks on the display.
- Switch off the temperature selector and function selector.
- Hold the TIMERS button down until the symbol appears. The oven switches back to manual mode.
Canceling the operating time duration
To delete the setting, hold the TIMERS button down until the symbol blinks on the display. Then press the + and - buttons simultaneously.
Basic Settings
You can always make the following basic settings:
| Basic setting Options |
| Acoustic signal · quiet · middle · loud* |
| Time format · 24 h* · 12 h am/pm |
- Factory setting
Adjust the signal volume
The oven must be switched off.
- Hold the + and - button down until the colon blinks on the display.
- Press the TIMERS button again. Signal appears on the display.
- Press the - button repeatedly until the required volume is reached.
Changing the time format
The oven must be switched off. Press and hold the + button for 3 seconds. Rm / Pm appears on the display. To change to the 24 h time format, hold the + button down again for 3 seconds.
Cleaning and maintenance
With good care and cleaning, your oven will remain clean and fully-functioning for a long time to come. Here we will explain how to maintain and clean your oven correctly.
Notes
- Slight differences in the colors on the front of the oven are caused by the use of different materials, such as glass, plastic and metal.
- Shadows on the door panel that look like streaks, are caused by reflections made by the oven light.
- Enamel is baked on at very high temperatures. This can cause some slight color variation. This is normal and does not affect operation. The edges of thin trays cannot be completely enameled. As a result, these edges can be rough. This will not impair the anticorrosion protection.
WARNING
RISK OF ELECTRICAL SHOCK
Moisture entering the appliance can cause an electrical shock. Don't use a high-pressure cleaner or steam cleaner.
WARNING
RISK OF BURNS
The appliance becomes very hot. Never touch the hot inside surfaces of the oven interior or heating elements. Always allow the appliance to cool down. Keep children away.
Cleaning agents
Observe the following information to ensure that the different surfaces are not damaged by using the wrong type of cleaning agent.
Do not use:
- any harsh or abrasive cleaning agents,
- cleaning agents with a high concentration of alcohol,
- hard scouring pads or sponges,
- high-pressure cleaners or steam cleaners.
Wash new sponge cloths thoroughly before use.
Area Cleaning agents
| Appliance exterior | Hot soapy water: Clean with a dish cloth and dry with a soft cloth. Do not use glass cleaner or a glass scraper. |
| Stainless steel Hot soapy water:Clean with a dish cloth and dry with a soft cloth. Remove flecks of lime scale, grease, starch and albumin (e.g. egg white) immediately. Corrosion can form under such flecks.Special stainless steel cleaning products suitable for hot surfaces are available from our customer service or from specialist retailers. Apply a very thin layer of the cleaning product with a soft cloth. | |
| Aluminum and plastic | Glass cleaner: Clean with a soft cloth. |
| Enamel surfaces (smooth surfaces) | To facilitate cleaning, you can switch on the interior lighting and detach the appliance door if necessary. Apply commercially available dish-washing liquid or a vinegar solution with a soft, damp cloth or chamosi; dry with a soft cloth. Soften baked-on food residues with a damp cloth and detergent. Leave the cooking compartment open to dry after cleaning. |
| Self-cleaning surfaces (rough surfaces) | Please see the notes in section: Self-cleaning surfaces |
| Door panels Glass cleaner:Clean with a soft cloth. Do not use a glass scraper. | |
| Glass cover for the oven light | Hot soapy water: Clean with a dish cloth. |
| SealDo not remove. | Hot soapy water: Clean with a dish cloth. Do not scour. |
| Rails Hot soapy water:Soak and clean with a dish cloth or brush. | |
| Accessories Hot soapy water:Soak and clean with a dish cloth or brush. | |
| Roof liner Hot soapy water:Soak and clean with a dish cloth or brush.Remove from oven for cleaning. | |
Catalytic cooking compartment panels
The catalytic cooking compartment panels are coated with self-cleaning enamel.
The surfaces clean themselves while the oven is in operation. Larger splashes will only be removed after the oven has been used several times.
Self-cleaning surfaces
The rear and side walls are covered with catalytic paneling. So not use oven cleaner on the catalytic panels. Slight discoloration of the enamel does not affect self-cleaning.
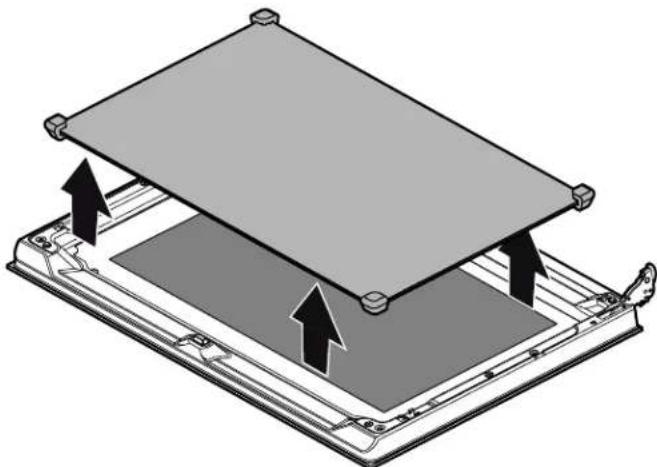
Removing and installing the door panels
To facilitate cleaning, you can remove the glass panels from the oven door.
Removing the door panels
- Open the oven door fully.
- Lock both hinges on the left and right using a locking pin.
Note: The locking pins must be fully inserted into the holes in the hinges.
- Lift the bottom of the inner panel slightly until the fastening pins come out of the holder (1).
- Carefully lift the top of the inner panel until the fastening pins come out of the holder (2).
CAUTION
When lifting the inner panel, the middle panel may stick to the inner panel. Make sure that the middle panel does not fall.
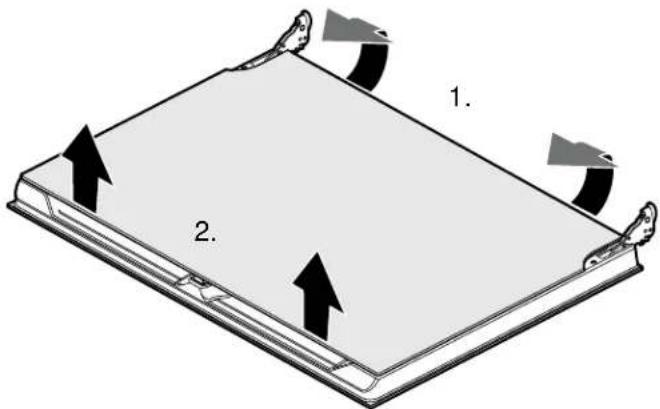
- Remove the inner panel.
- Remove the middle panel.

Note: The middle panel is kept in place with rubber bushings rather than retaining pins.
Clean the panels with glass cleaner and a soft cloth.
WARNING
RISK OF INJURY
Scratched glass in the appliance door can burst. Do not use any glass scrapers or strong or abrasive cleaning agents.
Fitting the door panels
- Reinsert the middle panel.
Note: Make sure that the panel is seated correctly. All rubber bushings must lay flat against the outer panel.
- Reinsert the inner panel.
Note: All four fastening pins must engage in the holders provided for them.
- Remove the locking pins and close the oven door.
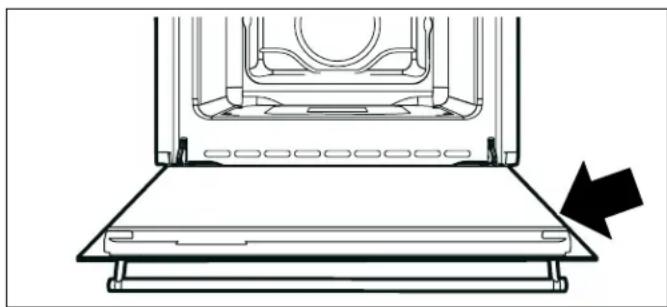
Removing and fitting the appliance door
In case of especially heavy soiling, the oven door can be removed for better cleaning. Normally, however, this is not necessary.
CAUTION
WHEN REMOVING THE OVEN DOOR:
-
Make sure oven is cool and power to the oven has been turned off before removing the door. Failure to do so could result in electrical shock or burns.
-
The oven door is heavy and parts of it are fragile. Use both hands to remove the oven door. The door front includes glass components. Handle carefully to avoid breakage.
-
Grasp only the sides of the oven door. Do not grasp the handle as it may swing in your hand and cause damage or injury.
-
Failure to grasp the oven door firmly and properly could result in personal injury or product damage.
-
To avoid injury from hinge bracket snapping closed, be sure that both locking levers are securely in place before removing the door. Also, do not force the oven door open or closed - the hinge could be damaged and injury could result.
-
Do not lay the removed door on sharp or pointed objects as this could break the glass. Lay the door on a flat, smooth surface, positioned so that the door cannot fall over.
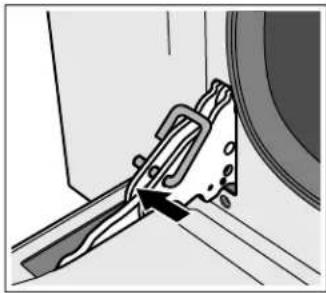
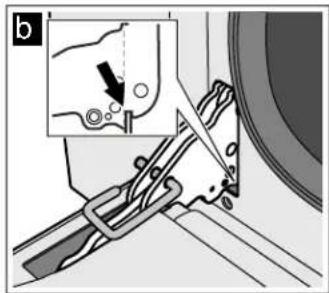
Removing the appliance door
- Open the oven door fully.
- Lock both hinges on the left and right using a locking pin (a).
Note: The locking pins must be fully inserted into the holes in the hinges.
- Grip the oven door on either side with both hands and close the oven door by approx. 30^ (b).
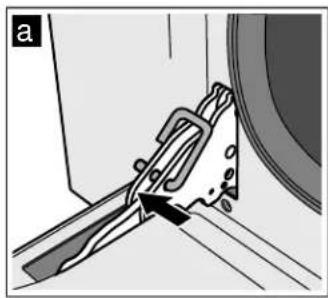
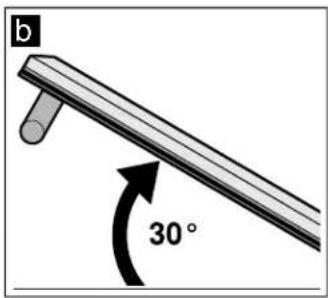
- Raise the oven door slightly and pull it out.
Note: Do not fully close the oven door. The hinges could become bent and the enamel could be damaged.
Fitting the appliance door
- Grip the oven door on either side with both hands.
- Slide the hinges into the slots in the oven (a).
Note: The notch below the hinges must engage into the frame of the oven (b).
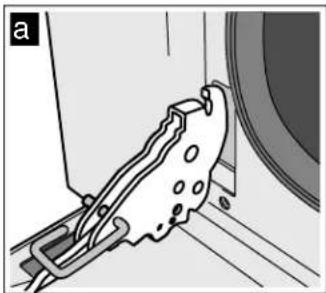
- Lower the door downwards.
- Remove the locking pins.
WARNING
RISK OF INJURY
Do not touch the hinge if the oven door falls out unintentionally or a hinge snaps closed. Call customer service.
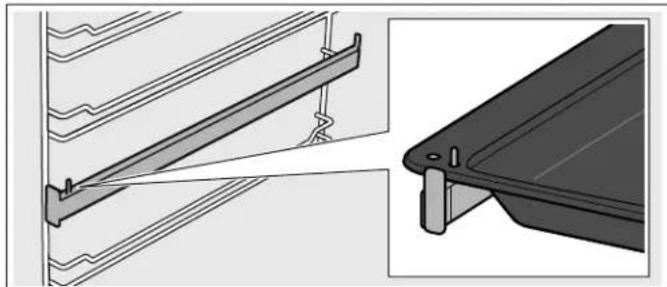
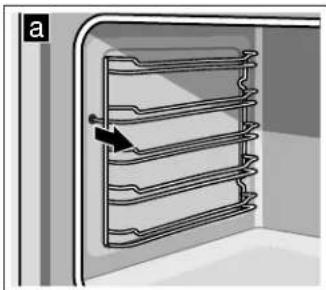
Removing and inserting the hook-in racks
You can remove the hook-in racks for easier cleaning.
Removing the hook-in racks
The hook-in racks are each fixed to the side panels of the cooking compartment at three points.
- Grip the front of the hook-in rack and pull it to the middle of the cooking compartment.
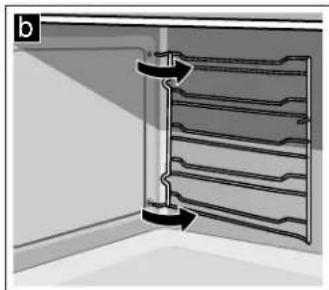
The front hook of the hook-in rack will release from the hole. - Fold out the hook-in rack further and pull it from the rear holes of the side panel.
- Hold the catalytic cooking compartment panel in place.
- Remove the hook-in rack from the cooking compartment.
Inserting the hook-in rack
- Hold the catalytic cooking compartment panel in place.
- Insert the hooks of the hook-in rack into the rear holes in the side panel.
- Press the front hook of the hook-in rack into the hole.
Troubleshooting
If you encounter a problem, it often will merely be something minor. Before you call customer service, consider the suggestions and instructions below:
WARNING
RISK OF ELECTRIC SHOCK Incorrect repairs are dangerous. Repairs must only be carried out by one of our trained customer service technicians.
Incorrect repairs to your appliance may present considerable risks for the user.
Fault Possible cause Notes/remedy
| The appliance does not work. Faulty fuse Look in the fuse box and check that the circuit breaker for the range is in working order. | ||
| Power failure Check whether the kitchen light works. | ||
| The oven cannot be switched off. | Electronics are faulty | Switch off the circuit breaker. Call customer service. |
| The clock display flashes. Power failure Reset the clock. | ||
| The oven does not heat. Faulty fuse Check the fuse and replace if necessary. | ||
| Function selector not set | Set the function selector. | |
| The door glass is broken. Switch off the appliance. Call customer service. | ||
| Fruit juice or albumen stains on enameled surfaces. | Moist cake or meat juices | Harmless change in the enamel, cannot be removed. |
| The oven stops operating in the middle of a program, and the cooling fan continues to run at high speed even when function selector is set to Off position. The buzzer sounds intermittently and the control lamp is flashing. | Problem with thermostat | 1. Set function selector to Off position. The cooling fan continues to run at high speed.2. Wait for 10 seconds.3. Set function selector to a new position.If the error occurs again when setting a new function: Disconnect the oven from power supply, then reconnect power supply.If the error occurs again after reconnecting power supply:Call customer service. |
Replacing the oven light bulb
If the oven light bulb fails, it must be replaced. Replacement heat-resistant bulbs can be obtained from customer service or from specialist retailers. Please supply your appliance's E number and FD number. Do not use any other type of bulb.
CAUTION
WHEN REPLACING AN OVEN LIGHT:
- Make sure the appliance and lights are cool and power to the appliance has been turned off before replacing the light bulb(s). Failure to do so could result in electrical shock or burns.
- The lenses must be in place when using the appliance.
- The lenses serve to protect the light bulb from breaking.
- The lenses are made of glass. Handle carefully to avoid breaking. Broken glass could cause an injury.
Light socket is live when door is open.
WARNING
Light socket is live when door is open if main power supply is not turned off.
- Unplug the appliance from the mains or switch off the circuit breaker in the fuse box.
- Allow the cooking compartment to cool down.
- Open the appliance door.
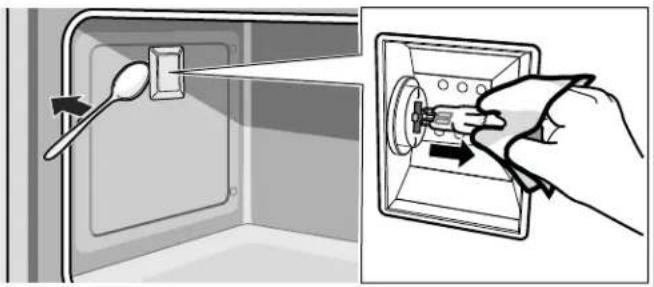
- Place a tea towel in the cooking compartment to prevent damage.
- Remove the hook-in racks.
- Remove the glass cover. To do this, open the glass cover at the front with your hand. Should you experience difficulties removing the glass cover, use a spoon to help.
- Remove the oven light bulb.
- Replace the oven light bulb with a bulb of the same type:
Voltage (V): 12 V;
Power: 20W;
Socket: G4
Temperature resistance: 570^ F (300^)
- Refit the glass cover for the oven light bulb.
- Refit the hook-in racks.
- Remove the tea towel.
- Switch the circuit breaker back on.
- Check that the oven lighting is working again.
Bosch® Support
Before Calling Service
See the Use and Care Manual for troubleshooting information. Refer to the "Statement of Limited Product Warranty" in the Use and Care Manual.
To reach a service representative, see the contact information at the front of the manual. Please be prepared with the information printed on your product data plate when calling.
Data Plate
The data plate shows the model and serial number. Refer to the data plate on the appliance when requesting service.
The data plate can be found at the right side of the appliance door.
To avoid having to search for each piece of information when calling, you can enter the four items needed in the spaces provided below.
Model No.
FD-No.
Date of Purchase
Customer Service
Keep your invoice or escrow papers for warranty validation if service is needed.
Service
We realize that you have made a considerable investment in your kitchen. We are dedicated to supporting you and your appliance so that you have many years of creative cooking.
Please don't hesitate to contact our Customer Support Department if you have any questions or in the unlikely event that your Bosch® appliance needs service. Our service team is ready to assist you.
USA
800-944-2904
www.bosch-home.com/us/support
Canada
800-944-2904
www.bosch-home.ca/en/support
Parts and Accessories
Parts, filters, descalers, stainless steel cleaners and more can be purchased in the Bosch® eShop or by phone.
USA
www.bosch-home.com/us/store
Canada
Marcone 800-482-6022
or
Reliable Parts 800-941-9217
Tips for using your appliance
Here you will find a selection of tips about cookware and preparation methods.
Notes
- Use the accessories provided. Additional accessories may be obtained as optional accessories from specialist retailers or from customer service. Before using the oven, remove any unnecessary accessories and cookware from the cooking compartment.
Always use oven gloves when taking hot accessories or cookware out of the cooking compartment.
Baking
Baking tins
- Use light-colored baking tins and trays wherever possible.
Always place the baking tins on the middle of the baking and roasting wire rack.
Baking tips
| How to tell whether sponge cake is baked through. | Approx. 10 minutes before the end of the baking time stated in the recipe, insert a toothpick into the cake at its deepest point. If the toothpick comes out clean, the cake is ready. |
| The cake collapses. Use less fluid next time or set the oven temperature 50°F (10°C) lower. Observe the specified mixing times in the recipe. | |
| The cake has risen in the middle but is lower around the edge. | Do not grease the sides of the springform cake tin. After baking, loosen the cake carefully with a knife. |
| The cake browns too much on top. Place it lower in the oven, select a lower temperature and bake the cake for a little longer. | |
| The cake is too dry. When it is done, make small holes in the cake using a toothpick. Then drizzle fruit juice or an alcoholic beverage over it. Next time, set the temperature 50°F (10°C) higher and reduce the baking time. | |
| The bread or cake (e.g. cheese-cake) looks good but is sticky on the inside (soggy with wet streaks). | Use slightly less fluid next time and bake for slightly longer at a lower tempera-ture. For cakes with a moist topping, bake the base first. Sprinkle it with almonds or bread crumbs and then place the topping on top. Please follow the recipe and baking times. |
| The cake is unevenly browned. Select a slightly lower temperature to ensure that the cake is baked more evenly. Excess greaseproof paper can affect the air circulation. For this reason, always trim greaseproof paper to fit the baking tray. | |
| The bottom of a cake topped with fruit is too light. | Place the cake one level lower the next time. |
| The fruit juice overflows. Next time, use the deeper universal pan, if you have one. | |
| Small baked items made out of yeast dough stick to one another during baking. | There should be a gap of approx. 2 cm around each item. This gives enough space for the baked items to expand and turn brown on all sides. |
| Condensation forms when you bake moist cakes. | Baking may create water vapor, which escapes above the door. The steam may settle and form water droplets on the control panel or on the fronts of adjacent units. This is a natural process. |
Roasting and broiling
Cookware
You may use any heat-resistant cookware. Always place the cookware in the center of the wire rack. The enameled baking tray is also suitable for large roasts.
Roasting tips
- A lower temperature results in more even browning.
Depending on the size of the meat, add 2 or 3 tablespoons of liquid to lean meat and 8 to 10 tablespoons of liquid to pot roasts. - When cooking duck or goose, pierce the skin on the underside of the wings to allow the fat to run out.
- Poultry will turn out particularly crispy and brown if you baste it towards the end of the roasting time with butter, salted water or orange juice.
- Turn pieces of meat halfway through the cooking time.
- When the roast is ready, turn off the oven and allow it to rest for an additional 10 minutes. This will allow the meat juices to distribute themselves better inside the roast.
- When roasting large pieces of meat, you may find that the amount of steam and condensation on the oven door is more than usual. This is a normal occurrence that has no effect on the oven's performance. Once roasting is complete, dry the oven door and window with a cloth.
- If you are roasting on the wire rack, insert the enameled baking tray into shelf position 1 to collect the drips of fat.
Broiling tips
- As far as possible, the pieces of food you are broiling should be of equal thickness. They should be at least 1 inch thick. This will allow them to brown evenly and remain succulent and juicy.
- Place the food to be broiled in the center of the wire rack. Pour a little water into the enameled baking tray and insert this into the shelf position underneath the broil element to collect the drips of fat. Never place it on the cooking compartment floor.
- Drizzle some oil over the food to be broiled before you place it on the wire rack under the broil element.
- If the food to be broiled is thin, turn it over halfway through broiling; if it is thick, turn it over several times during broiling. Use tongs when turning the food to avoid piercing it and, in the case of meat, to keep the meat juices inside the meat.
- Dark meats such as lamb and beef brown better and more quickly than light meats such as pork and veal.
Roasting tips
| How can you tell when the roast is ready? | Use a meat thermometer (available from specialist shops) or carry out a “spoon test.” Press down on the roast with a spoon. If it feels firm, it is ready.If the spoon can be pressed in, it needs to be cooked for a little longer. |
| The roast is too dark and the crack-ling is partly burnt. | Check the shelf position and temperature. |
| The roast looks good but the juices are burnt. | Next time, use a smaller roasting dish and add more liquid. |
| The roast looks good but the juices are too clear and watery. | Next time, use a larger roasting dish and use less liquid. |
Tested for you in our cooking studio
Here, you can find a selection of dishes and the ideal settings for them. We will show you which type of heating, temperature and shelf position are best suited for your dish.
Notes
- The times specified in the tables are only guidelines. They will depend on the quality and composition of the food.
- Use the accessories provided. Additional accessories may be obtained as optional accessories from specialist retailers or from customer service. Before using the oven, remove any unnecessary accessories and ovenware from the cooking compartment.
Always use oven gloves when taking hot accessories or cookware out of the cooking compartment.
| Food Weight | Ibs (kg) | Function Runner position from the bottom | Temperatur in °F (°C) | Time (minutes) |
| Lasagne 6 3/4 - 8 | (3 - 4) | Bake 1 400 - 450 | (205 - 230) | 45 - 50 |
| Pasta bake 6 3/4 - 8 | (3 - 4) | Bake 1 400 - 450 | (205 - 230) | 45 - 50 |
Pork 412 (2) Conv Bake 2350(175)70-80
| Sausages 31/ | 3 (1.5) Conv Broil Plus | 4 500 (260) 15 | |||
| Roast beef | 21/4 (1) Conv Bake 2 500 (260) 40 - 45 | ||||
| Turkey breast | 63/4 (3) Conv Bake 2 350 (175) 110 - 120 | ||||
| Roast chicken | 22/3 (1.2) Conv Bake 2 350 (175) 65 - 70 | ||||
| 1stsurface | 2ndsurface | ||||
| Pork chops | 31/3 (1.5) ConvBroil Plus | 4 500 (260) 15 | 5 | ||
| Spare ribs | 31/3 (1.5) ConvBroil Plus | 4 500 (260) 10 | 10 | ||
| Bacon | 13/4 (0.7) | 5 | 500 (260) | 7 | 8 |
| Pork fillet 31/ | 3 (1.5) ConvBroil Plus | 4 500 (260) 10 | 5 | ||
| Beef fillet 21/4 (1) Broil Plus | 5 500 (260) 10 | 7 | |||
| Salmon | 1 1/3 (0.6) | Conv Bake | 2 300 (150) | 25 - 30 | ||
| Pizza | 2 1/4 (1) Frozen Food | 2 500 (260) | 8 - 9 | |||
| Bread | 2 1/4 (1) Frozen Food | 2 350 - 400 | 25 - 30 | |||
| (175 - 205) | ||||||
| Focaccia | 2 1/4 (1) Frozen Food | 2 350 (175) | 20 - 25 | |||
| Sponge cake | 2 1/4 (1) Pie | 2 300 (150) | 55 - 60 | |||
| Cheesecake | 2 1/4 (1) Pie | 2 | 300 - 350 | 55 - 60 | ||
| Cream puffs | 2 2/3 (1.2) Pie | 2 350 (175) | 80 - 90 | |||
| Light sponge cake | 2 1/4 (1) Pie | 2 300 - 350 | 55 - 60 | |||
| (150 - 175) | ||||||
| Biscuits | 2 1/4 (1) | Conv Multi-Rack | 2 - 4 | 300 (150) | 20 - 25 | |
| The times indicated in the table do not include preheating times and are provided as a guide only. | ||||||
STATEMENT OF LIMITED PRODUCT WARRANTY
What this Warranty Covers & Who it Applies to
The limited warranty provided by BSH Home Appliances Corporations ("BSH") in this Statement of Limited Product Warranty applies only to the Bosch appliance ("Product") sold to you, the first using purchaser, provided that the Product was purchased:
- For your normal, household (non-commercial) use, and has in fact at all times only been used for normal household purposes.
- New at retail (not a display, "as is", or previously returned model), and not for resale, or commercial use.
- Within the United States or Canada, and has at all times remained within the country of original purchase.
The warranties stated herein apply only to the first purchaser of the Product and are not transferable. BSH reserves the right to request proof of purchase at the time any warranty claim is submitted to confirm that the Product falls within the scope of this limited product warranty.
Please make sure to return your registration card; while not necessary to effectuate warranty coverage, it is the best way for BSH to notify you in the unlikely event of a safety notice or product recall.
How Long the Warranty Lasts
BSH warrants that the Product is free from defects in materials and workmanship for a period of three hundred sixty-five (365) days from the date of purchase. The foregoing timeline begins to run upon the date of purchase, and shall not be stalled, tolled, extended, or suspended, for any reason whatsoever.
This Product is also warranted to be free from cosmetic defects in material and workmanship (such as scratches of stainless steel, paint/porcelain blemishes, chip, dents, or other damage to the finish of the Product), for a period of thirty (30) days from the date of purchase or closing date for new construction. This cosmetic warranty excludes slight color variations due to inherent differences in painted and porcelain parts, as well as differences caused by kitchen lighting, product location, or other similar factors. This cosmetic warranty specifically excludes any display, floor, "As Is", or "B" stock appliances.
Repair/Replace as Your Exclusive Remedy
During this warranty period, BSH or one of its authorized service providers will repair your Product without charge to you (subject to certain limitations stated herein) if your Product proves to have been manufactured with a defect in materials or workmanship. If reasonable attempts to repair the Product have been made without success, then BSH will replace your Product (upgraded models may be available to you, in BSH's sole discretion, for an additional charge). All removed parts and components shall become the property of BSH at its sole option. All replaced and/or repaired parts shall assume the identity
of the original part for purposes of this warranty and this warranty shall not be extended with respect to such parts. BSH's sole liability and responsibility hereunder is to repair manufacturer-defective Product only, using a BSH-authorized service provider during normal business hours. For safety and property damage concerns, BSH highly recommends that you do not attempt to repair the Product yourself, or use an un-authorized servicer; BSH will have no responsibility or liability for repairs or work performed by a non-authorized servicer. If you choose to have someone other than an authorized service provider work on your Product, THIS WARRANTY WILL AUTOMATICALLY BECOME NULL AND Void. Authorized service providers are those persons or companies that have been specially trained on BSH products, and who possess, in BSH's opinion, a superior reputation for customer service and technical ability (note that they are independent entities and are not agents, partners, affiliates or representatives of BSH). Notwithstanding the foregoing, BSH will not incur any liability, or have responsibility, for the Product if it is located in a remote area (more than 100 miles from an authorized service provider) or is reasonably inaccessible, hazardous, threatening, or treacherous locale, surroundings, or environment; in any such event, if you request, BSH would still pay for labor and parts and ship the parts to the nearest authorized service provider, but you would still be fully liable and responsible for any travel time or other special charges by the service company, assuming they agree to make the service call.
Out of Warranty Product
BSH is under no obligation, at law or otherwise, to provide you with any concessions, including repairs, pro-rates, or Product replacement, once this warranty has expired.
Warranty Exclusions
The warranty coverage described herein excludes all defects or damage that are not the direct fault of BSH, including without limitation, one or more of the following:
- Use of the Product in anything other than its normal, customary and intended manner (including without limitation, any form of commercial use, use or storage of an indoor product outdoors, use of the Product in conjunction with air or water-going vessels).
- Any party's willful misconduct, negligence, misuse, abuse, accidents, neglect, improper operation, failure to maintain, improper or negligent installation, tampering, failure to follow operating instructions, mishandling, unauthorized service (including self-performed "fixing" or exploration of the appliance's internal workings).
- Adjustment, alteration or modification of any kind.
-
A failure to comply with any applicable state, local, city, or county electrical, plumbing and/or building codes, regulations, or laws, including failure to install the product in strict conformity with local fire and building codes and regulations.
-
Ordinary wear and tear, spills of food, liquid, grease accumulations, or other substances that accumulate on, in, or around the Product.
-
Any external, elemental and/or environmental forces and factors, including without limitation, rain, wind, sand, floods, fires, mud slides, freezing temperatures, excessive moisture or extended exposure to humidity, lightning, power surges, structural failures surrounding the appliance, and acts of God.
In no event shall BSH have any liability or responsibility whatsoever for damage to surrounding property, including cabinetry, floors, ceilings, and other structures or objects around the Product. Also excluded from this warranty are Products on which the serial numbers have been altered, defaced, or removed; service visits to teach you how to use the Product, or visits where there is nothing wrong with the Product; correction of installation problems (you are solely responsible for any structure and setting for the Product, including all electrical, plumbing or other connecting facilities, for proper foundation/flooding, and for any alterations including without limitation cabinetry, walls, floors, shelving, etc.); and resetting of breakers or fuses.
TO THE EXTENT ALLOWED BY LAW, THIS WARRANTY SETS OUT YOUR EXCLUSIVE REMEDIES WITH RESPECT TO PRODUCT, WHETHER THE CLAIM ARISES IN CONTRACT OR TORT (INCLUDING STRICT LIABILITY, OR NEGLIGENCE) OR OTHERWISE. THIS WARRANTY IS IN LIEU OF ALL OTHER WARRANTYES, WHETHER EXPRESS OR IMPLIED. ANY WARRANTY IMPLIED BY LAW, WHETHER FOR MERCHANTABILITY OR FITNESS FOR A PARTICULAR PURPOSE, OR OTHERWISE, SHALL BE EFFECTIVE ONLY FOR THE PERIOD THAT THIS EXPRESS LIMITED WARRANTY IS EFFECTIVE. IN NO EVENT WILL THE MANUFACTURER BE LIABLE FOR CONSEQUENTIAL, SPECIAL, INCIDENTAL, INDIRECT, "BUSINESS LOSS", AND/OR PUNITIVE DAMAGES, LOSSES, OR EXPENSES, INCLUDING WITHOUT LIMITATION TIME AWAY FROM WORK, HOTELS AND/OR RESTAURANT MEALS, REMODELLING EXPENSES IN EXCESS OF DIRECT DAMAGES WHICH ARE DEFINITIVELY CAUSED EXCLUSIVELY BY BSH, OR OTHERWISE. SOME STATES DO NOT ALLOW THE EXCLUSION OR LIMITATION OF INCIDENTAL OR CONSEQUENTIAL DAMAGES, AND SOME STATES DO NOT ALLOW LIMITATIONS ON HOW LONG AN IMPLIED WARRANTY LASTS, SO THE ABOVE LIMITATIONS MAY NOT APPLY TO YOU. THIS WARRANTY GIVES YOU SPECIFIC LEGAL RIGHTS, AND YOU MAY ALSO HAVE OTHER RIGHTS WHICH VARY FROM STATE TO STATE. No attempt to alter, modify or amend this warranty shall be effective unless authorized in writing by an officer of BSH.
Table des Matieres
1901 Main Street, Suite 600
Irvine, CA 92614
Questions?
1-800-944-2904
www.bosch-home.com
Position Signification
www.bosch-home.com/us/support
Canada
800-944-2904
www.bosch-home.ca/en/support
www.bosch-home.com/us/store
Canada
Marcone 800-482-6022
ou
Reliable Parts 800-941-9217
www.bosch-home.com/us/support
Canadá
800-944-2904
www.bosch-home.ca/en/support
Piezas y accesorios
www.bosch-home.com/us/store
Canadá
Marcone 800-482-6022
0
Reliable Parts 800-941-9217