ReefTourer SP121QB - Diving mask Tusa - Free user manual and instructions
Find the device manual for free ReefTourer SP121QB Tusa in PDF.


User questions about ReefTourer SP121QB Tusa
0 question about this device. Answer the ones you know or ask your own.
Ask a new question about this device
Download the instructions for your Diving mask in PDF format for free! Find your manual ReefTourer SP121QB - Tusa and take your electronic device back in hand. On this page are published all the documents necessary for the use of your device. ReefTourer SP121QB by Tusa.
USER MANUAL ReefTourer SP121QB Tusa
T.E.C. [TABATA EUROPE CORPORATION] B.V.
2380 Mira Mar Ave., Long Beach, CA 90815, U.S.A.
TEL 562-498-3708/FAX 562-498-1390 (Country Code=1)
TABATA AUSTRALIA PTY. LTD
Unit 11, 86 Falconer Street, West Ryde, N.S.W. 2114, Australia
TEL 02-9807-4177/FAX 02-9808-1638 (Country Code=61)
©Copyright TABATA CO., LTD
Printed in Taiwan
TUSA
TUSA DIVING MASK, SNORKEL
TUSA TAUCHMASKE SCHNORCHEL
MASQUE DE PLONGÉE,TUBA TUSA
TUSA DUIKMASKER SNORKEL
MANUAL DE INSTRUÇÕES
Do not use this product before reading this manual. It is important to fully understand
its proper handling for safe usage.
5th.


EN1972
FOREWORD SAFETY WARNINGS
Thank you for purchasing this TUSA Diving Mask and Snorkel and/or we wish you many enjoyable future diving experiences.
To help ensure your future diving safety, do not use this product before reading this manual. It is important to fully understand its proper handling for safe usage.
TYPE OF SNORKEL
| TYPE | TOTAL INNER VOLUME cm3 max. |
| 1Persons with height ≤ 150cm | 150 |
| 2Persons with height > 150cm | 230 |
※The total inner volume representing the dead space of the snorkel for respiratory exchange.
WARNING: Type 2 snorkels are not to be used by persons ≤ 150cm. (EN1972)
●Type 2 snorkels must not to be used by persons who is under 150cm in height. (EN1972)
●Always check every part of the product before use. If you suspect any defect or irregularities, do not use the product. Take it to an authorized TUSA dealer to have it checked.
●This product is to be used exclusively for scuba diving and snorkeling. Do not use this product for any other purpose.
- When replacing the mask lens with a corrective lens (i.e., a lens for myopia), be sure to have an authorized TUSA dealer perform the replacement. Replacement by an unauthorized person could cause the mask to leak due to improper lens fitting.
●The mask lens has an enhanced safety feature with its reinforced (tempered) glass. However, it will shatter with the strong impact. Reckless diving, such as diving over your head or risking a collision with hard objects can result in damaging the product and serious physical injury.
- Do not disassemble the product, attach parts or accessories that are not included in the specifications and do not modify the product (e.g. extending its length.) on your own. Such alterations could lead to serious accidents and will void any warranty.
HOW TO ATTACH THE SNORKEL
The snorkel is generally attached to the left side of the mask when used in scuba diving so that the snorkel will not interfere with the regulator's air hose.
GB
TUSA
Attaching the Snorkel to the Mask
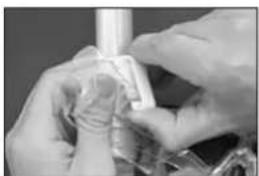
Insert the mask strap while pushing the bottom of the snorkel adapter upward from the inside. Make sure that the strap is not twisted.
To remove the snorkel from the mask, follow the steps in reverse order.(Photograph 1)
natural_image
Close-up of hands holding a small object with a string, possibly a tool or device (no visible text or symbols)(Photograph 1)
WEARING THE MASK
When putting on the mask, brush away silicone skirt and face. Hair trapped under the skirt is the most frequent cause of water leakage.
hair caught between the
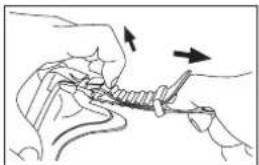
Adjusting the Strap Length
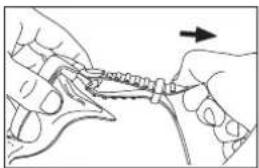
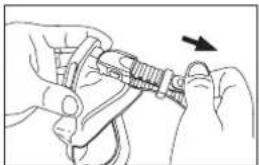
- To tighten the Strap
As shown in illustration 1, pull the strap toward the outside in the direction shown by the arrow.
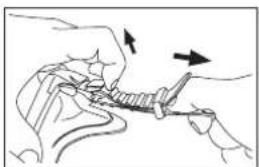
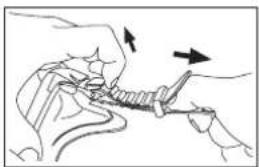
- To loosen the Strap
As shown in illustration 2, pull the strap on the inside in the direction shown by the arrow while pulling the buckle lever with your fingertip.
natural_image
Illustration of hands holding a tool with an arrow indicating direction (no text or symbols)( Illustration 1 )
natural_image
Illustration of hands using a tool to interact with a mechanical component (no text or symbols visible)( Illustration 2 )
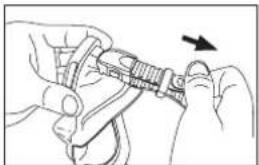
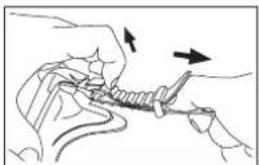
Adjusting the Strap Length (M-17, M-28)
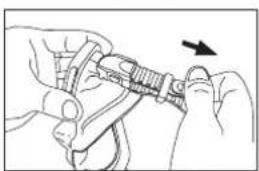
- To tighten the strap
As shown in illustration 3, pull the strap toward the outside in the direction shown by the arrow.
natural_image
Illustration of hands using a mechanical clamp or spring to adjust a cable (no text or symbols present)( Illustration 3 )
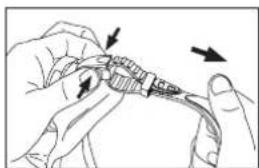
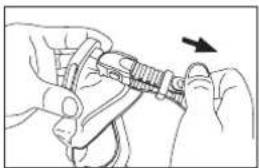
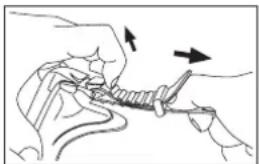
- To loosen the strap
As shown in illustratoin 4, pull the strap on the inside in the direction shown by the arrow while pinching buckle buttons.
natural_image
Illustration of hands holding a tool with arrows indicating movement (no text or symbols)( Illustration 4 )
MASK CLEARING
When water enters the mask while swimming on the surface, water can be easily drained by simply lifting the mask from the face. However, when swimming under water, it is necessary to perform the "mask clearing" by sending air into the mask through the nose.
Clearing an Ordinary Mask
For ordinary masks, tilt your head back and slightly lift only the bottom of the mask while exhaling air into the mask through the nose in order to purge water.
Water will not drain properly if air is blown into the mask with excessive force. Take care to send air into the mask slowly at a measured pace.
Clearing a Mask with Purge Valve
Since the purge valve is located at the lowest point of the frame, tilt the head slightly to the front or left (M-21) to collect water around the purge valve, and send a stream of slow and steady air through the nose. It is not necessary to lift the mask while purging with this procedure, however slightly pressing the mask against the face while blowing will assist the purge process.
SNORKELING
A snorkel is used when swimming on the water's surface while looking beneath the water. It is not used underwater in a submerged position. For obvious reasons, one cannot breathe through a snorkel when it is completely submerged underwater.
The tip of the snorkel tube must always be above water surface when in use.
You will not able to breathe if the tip of the tube is underwater.
To prevent swallowing water, always inhale slowly and exhale forcefully when breathing during snorkeling.
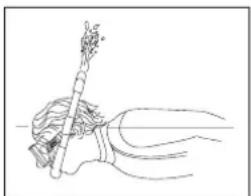
Clearing the snorkel
When you dive underwater during skin diving with a snorkel in your mouth, or when you are washed by a wave during surface, or when the tip of snorkel sinks below the water's surface, you will have to clear the water from the snorkel tube.
The most common method is to blow the water remaining in the snorkel by blowing through the snorkel in short, strong blasts when you are above the water surface or when you have just surfaced from below.
natural_image
Line drawing of a human head with a stick inserted, showing anatomical structure without any text or symbolsEven when the snorkel has been cleared, there is a possibility that some water remains in the snorkel. Therefore, breathe slowly and carefully. When water still remains in the snorkel, try blasting the water out again.
MAINTENANCE AND STORAGE
●To maintain the equipment in optimum condition and enjoy safe and pleasant diving in the future, be sure to wash the mask in fresh water as soon as possible after diving.
After washing the mask in fresh water, use a dry cloth to remove all moisture and store the mask in a well-ventilated area out of direct sunlight.
- Do not place the mask in extremely hot locations such as in direct sunlight or in cars or trunks directly exposed to the sun. The heat and ultraviolet rays could cause damage and shorten the life of the equipment.
- When storing with other colored items (wet suits, rubber fins, swimwear) the colors could transfer to the silicone section of the mask. When storing or transporting the mask and snorkel, insert them in a case to separate them from colored items.
●In case of soiling of the mask and snorkel, wash with a neutral cleaning agent diluted with water to the percentage indicated by the manufacturer (instructions on container). Then completely remove any residual cleaning agent with running water. If strong cleaning agents are used or the equipment is inserted directly in cleaning agent so that some of the agent remains on the mask, the cleaning agent could enter the plastic materials, causing cracks and similar damage.
Replacement of the safety color marking (For European market only)
When you need to replace the safety color marking of your snorkel, be sure to have an authorized TUSA dealer perform the replacement.
D
TUSA
VORWORT
natural_image
Close-up of hands holding a small object with a transparent tube, no visible text or symbols(Foto 1)
ANLEGEN DER MASKE
natural_image
Illustration of two hands tying a rope knot with an arrow indicating direction (no text or symbols)(Foto 1)
natural_image
Illustration of hands performing a manual task with tools and arrows indicating motion (no text or symbols)(Foto 2)
natural_image
Illustration of hands holding a mechanical component with an arrow indicating direction (no text or symbols)(Foto 3)
2. Lösen des Bandes
natural_image
Illustration of hands holding a tool with arrows indicating movement or force (no text or symbols)(Foto 4)
AUSBLASEN DER MASKE
natural_image
Line drawing of a human head with a stick inserted, showing anatomical structure without any text or symbolsnatural_image
Close-up of hands holding a small object with a white strip, possibly a tool or device (no visible text or symbols)(Photographie 1)
PORT DU MASQUE
natural_image
Illustration of hands holding a tool with an arrow indicating direction (no text or symbols)( l'illustration 1 )
natural_image
Illustration of hands using a tool to adjust or install a mechanical component (no text or symbols visible)( l'illustration 2 )
natural_image
Illustration of hands adjusting a mechanical component with an arrow indicating direction (no text or symbols present)( l'illustration 3 )
- Détendre la sangle
natural_image
Illustration of hands holding a tool with arrows indicating movement (no text or symbols)( l'illustration 4 )
PURGE DU MASQUE
natural_image
Line drawing of a human head with a stick inserted, showing anatomical positioning (no text or labels)natural_image
Close-up of hands assembling or adjusting a small component (no visible text or symbols)(zie foto 1 )
HET MASKER OPZETTEN
natural_image
Illustration of two hands holding a tool with an arrow indicating direction (no text or symbols)( illustratie 1 )
natural_image
Illustration of two hands performing a manual tool manipulation (no text or symbols visible)( illustratie 2 )
natural_image
Illustration of hands using a mechanical clamp or spring to adjust a component (no text or symbols visible)( illustratie 3 )
2. De band losser maken
natural_image
Illustration of hands holding a tool with arrows indicating movement (no text or symbols)( illustratie 4 )
WATER UIT HET MASKER KLAREN
natural_image
Line drawing of a human hand holding a tool, possibly a medical or laboratory instrument (no text or symbols present)natural_image
Close-up of hands assembling a small electronic component (no visible text or symbols)( Fotografía 1 )
natural_image
Illustration of hands tying a knot around a rope, with an arrow indicating direction (no text or symbols)( Dibujo 1 )
natural_image
Illustration of hands using a tool to interact with a mechanical component (no text or symbols visible)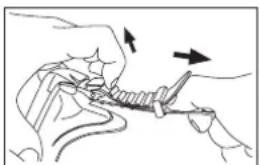
natural_image
Illustration of hands using a tool to interact with a mechanical component (no text or symbols visible)( Dibujo 2 )
natural_image
Illustration of hands adjusting a mechanical component with an arrow indicating direction (no text or symbols present)( Dibujo 3 )
2. Aflojar la correa
natural_image
Illustration of hands holding a tool with arrows indicating movement (no text or symbols)( Dibujo 4 )
natural_image
Anatomical line drawing of a human hand holding a needle inserted into the jaw (no text or labels)natural_image
Close-up of hands assembling a small electronic component (no visible text or symbols)( Figura 1 )
COME INDOSSARE LA MASCHERA
natural_image
Illustration of hands holding a tool with an arrow indicating direction (no text or symbols)(Figura 1)
natural_image
Illustration of hands using a tool to interact with a mechanical component (no text or symbols visible)(Figura 2)
natural_image
Illustration of hands using a tool to adjust or install a mechanical component (no text or symbols visible)(Figura 3)
2. Allentare la cinghia
natural_image
Illustration of hands tying a knot with arrows indicating rope movement (no text or symbols)( Figura 4 )
natural_image
Anatomical line drawing of a human head and neck with a needle inserted, showing internal structures without any text or labels.natural_image
Close-up of hands assembling a small electronic component (no visible text or symbols)( Fotografia 1 )
natural_image
Illustration of two hands tying a knot around a string (no text or symbols)( Ilustração 1 )
natural_image
Illustration of hands using a tool to interact with a mechanical component (no text or symbols visible)( Ilustração 2 )
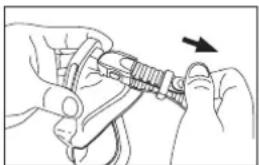
natural_image
Illustration of hands using a tool to adjust or install a mechanical component (no text or symbols visible)( Ilustração 3 )
2. Para alargar a precinta:
natural_image
Illustration of hands holding a tool with arrows indicating movement or force (no text or symbols)( Ilustração 4 )