WBDR1400A38BNB - Tumble drier Wisberg - Free user manual and instructions
Find the device manual for free WBDR1400A38BNB Wisberg in PDF.
User questions about WBDR1400A38BNB Wisberg
0 question about this device. Answer the ones you know or ask your own.
Ask a new question about this device
Download the instructions for your Tumble drier in PDF format for free! Find your manual WBDR1400A38BNB - Wisberg and take your electronic device back in hand. On this page are published all the documents necessary for the use of your device. WBDR1400A38BNB by Wisberg.
USER MANUAL WBDR1400A38BNB Wisberg
Quantity of refrigerant
130
Grade of waterproof
IPX4
Tonne(s) of CO2 equivale
Or
GWP valg
3
Contains fluorinated greenhouse gases
covered by the Kyoto Protocol
Hermetically sealed.
Wisepick Productions B.V.
Wesng 664
3012CN.Rotterdam
The Netherlands
www.wisberghome.com
klantenservice@wisberghome.nl
Made in China
Serial Number:
Botchcode:


WBDR1400A38BNB

WISBERG
HEAT PUMP DRYER
MODEL:WBDR1400A3BBNB
Product ID:
955012
Rated capacity:
8.0kg
Power supply:
220-240V~50Hz
Rated power:
750W
Refrigerant:
P290
Quantity of refrigerant:
130g
Grade of water
PX4
Tennels of CO2 equivalent: O
GWP value:
3
Contains fluorinated greenhouse gases
covered by the Kyoto Protocol.
Hermetically sealed.
Wisepick Productions B.V.
Weeng 664
3012CN.RotterdAm
The Netherlands
www.wisberghome.com
klontensevice@wisberghome.nl
Made in Ching
Serial Number
Batchcode


INHOUDSOPGAVE
Voorwoord
5
1. Veiligheid 7
Wisepick Productions B.V.
Weena 664
3012 CN Rotterdam
Nederland
Made in China
1. VEILIGHEID

WAARSCHUWING!
1.2 VEILIGHEIDSWAARSCHUWINGEN EN -VOORSCHRIFTEN

WAARSCHUWING!
PROBLEM OORZAAK OPLOSSING
FOUTCODE BESCHRIJVING OPLOSSING
Wisepick Productions B.V.
Weena 664
3012 CN Rotterdam
Nederland
Made in China
USER MANUAL
HEAT PUMP DRYER
WBDR1400A38WNB
WBDR1400A38BNB

WISBERG
TABLE OF CONTENTS
Foreword
47
1. Safety 49
1.1 Intended use and anticipated unintended use 49
1.2 Safety warnings and instructions 49
1.3 Safety instructions: installation 50
1.4 Safety instructions: use 51
1.4.1 Safety of persons 51
1.4.2 Safety in use 51
1.5 Safety instructions: electrical safety 53
1.6 Safety instructions: repairs 54
1.7 Explanation of graphic symbols on the product and packaging 55
2. Product features 56
2.1 System overview 56
2.2 Guarantee 56
2.3 Spare parts 56
2.4 Technical specifications 56
3. Installation 58
3.1 Important information 58
3.2 Unpacking the appliance 58
3.3 Key components 58
3.3.1 Heat Pump Dryer 58
3.3.2 Optional Accessories 59
3.4 Installation of the appliance 59
4.Use 64
4.1 Important information 64
4.2 To effectively use the appliance 64
4.3 The control panel 65
4.3.1 Control panel to select the program 65
4.3.2 Function button screen 66
4.4Turning the appliance on and off 67
4.5 Cleaning before first use 67
4.6 Overview of the programs 67
4.6.1 Drying programs and energy consumption 68
4.7 Drying of clothing and textiles 70
4.8 Use of the additional functions 70
4.8.1 Using the time function 70
4.8.2 Using the wrinkle prevent function 71
4.8.3 Using the dryness level function 71
4.8.4 Using the Start-Delay function 72
4.8.5 Disable the UV function 72
4.8.6 Turning the light in the tumble dryer on and off 73
4.8.7 Setting the Audible Signal 73
4.9 Saving and using the preferred program 73
4.10 Using the child safety lock 73

5. Maintenance and cleaning 74
5.1 Important information 74
5.2 Emptying the water tank 74
5.3 Cleaning the door filter 75
5.4 Cleaning the appliance after each use 76
5.5 Removal of foreign objects 77
5.6 Cleaning the heat exchanger 78
5.7 General cleaning of the appliance 80
6. Faults and solutions 81
6.1 Errorcodes 82
7. Taking out of service 83
8. Safe disposal 83
8.1 Safe removal of the appliance 83
8.2 Dispos of the appliance as waste 84
8.3 Disposethepackaging materialaswaste 84
FOREWORD
About this document
- This manual contains all information for the correct, efficient and safe use of the appliance.
- This manual is intended for the end user and/or buyer of this appliance.
- Installation of the appliance, use and all cleaning and maintenance activities as described in the instructions may be carried out by the end user, unless clearly indicated to the contrary.
- Make sure you have fully read and understood the instructions in this manual before installing or using the appliance. This prevents fire, explosions, electric shocks and/or other hazards that may result in physical injury and/or material damage.
- Please retain this document for future use as long as you use and/or own the appliance and pass it on to subsequent users of the appliance.
- Wisepick Productions B.V. cannot in any way be held liable for material or immaterial damage to you or to others, the appliance, your other belongings or belongings of others caused by not following the instructions in this manual.
The warnings and safety instructions in this manual do not cover all possible circumstances and situations. - The heat pump dryer is also called appliance in this manual.
- If you contact our customer service, make sure you have the model number at hand. The information can be found on the type plate or on the front of this manual.
Original instructions
This manual was originally written in Dutch. All other languages are translated documents. In the case of translation errors, the Dutch version takes precedence.
Symbols used
| SYMBOL DESCRIPTION | |
| DANGER! | Indicates a fire hazard and/or flammable materials. |
| WARNING! | Indicates a dangerous situation which, if not avoided, may result in serious immaterial damage to you or others. |
| CAUTION! | Indicates a dangerous situation which, if not avoided, can result in slight immaterial damage to you or others. |
| ATTENTION! | Indicates a situation related to material damage. |
| NOTE | Indicates useful additional information. |

NOTE
You can also find the latest version of this manual online, atwisberghome.com if you search for the article number.
Copyright
The data depicted in this manual, including texts, photographs, graphic drawings, trademarks, (trade) names and logos, are the property of Wisepick Productions B.V. and are protected by copyright, trademark law and/or any other intellectual property right, unless these data belong to a third party. You are never allowed to reproduce, transfer, distribute, store or make the contents of the manual available to third parties, in whole or in part, without the prior written consent of Wisepick Productions B.V. and/or the third party to whom the data belong.

Compliance
WBDR1400A38WNB
Wisepick Productions B.V. hereby declares that the device conforms to Regulation (EU) 2019/2017. The full text of the EU declaration of conformity can be consulted at:wisberghome.com (search by product number).
WBDR1400A38BNB
Wisepick Productions B.V. hereby declares that the device conforms to Regulation (EU) 2019/2017. The full text of the EU declaration of conformity can be consulted at:wisberghome.com (search by product number).
Wisberg contact details
Customer service can be reached at:wisberghome.com
Wisepick Productions B.V.
Weena 664
3012 CN Rotterdam
The Netherlands
Made in China
1. SAFETY

WARNING!
Read this manual and safety instructions carefully and make sure you understand the contents before using the appliance with the appropriate parts. Failure to comply with all instructions can cause material damage and/or serious injury.
1.1 INTENDED USE AND ANTICIPATED UNINTENDED USE
- This appliance is only intended for use indoors.
- This appliance is intended to dry laundry that has been washed and centrifuged in a washing machine and no longer contains contaminants or detergents.
- This appliance is only intended for domestic use and drying typical amounts of laundry from a typical household.
- This appliance is not intended for use as a built-in appliance.
- This appliance is not intended for commercial use or shared use (for example, use by different families in an apartment building).
- Any use of the appliance other than as described in this manual is considered to be unintended use and can result in property and immaterial damage to you or to others, the appliance, your property or other people's property and the expiry of the warranty.
1.2 SAFETY WARNINGS AND INSTRUCTIONS

WARNING!
- This appliance may be used by children from eight years of age and above and by persons with reduced physical, sensory or mental capabilities or lack of experience and knowledge, provided that they are under supervision or have been trained in the safe use of the appliance and that they understand the associated dangers.
- This appliance must not be used by children under eight years of age.
- This appliance and its associated components are not toys, so children should not play with the appliance or its components.
- Children, legally incompetent persons and domestic animals must be supervised while using the appliance. The appliance contains small parts. Children should be supervised to ensure that they do not play with or climb into the appliance.
Children under three years of age should not come near the appliance unless they are under continuous supervision. - Cleaning and user maintenance must not be carried out by children without supervision.
- RISK OF SUFFOCATION! Keep packaging away from children.
- This appliance is only suitable for domestic use or similar environments.
- This appliance is for indoor use only. This appliance should not be used outdoors.
- The appliance must be stored in a room that is free of naked flames, gas-powered appliances or electric heaters.
-
The appliance must be stored in such a way so as to prevent mechanical failure.
-
Store the appliance out of reach of unauthorised persons and do not allow anyone unfamiliar with the appliance and these instructions to use it.
- The maximum permitted load that may be carried by one person is 25kg . Therefore, always lift the appliance with two people.
1.3 SAFETY INSTRUCTIONS: INSTALLATION

DANGER! Risk of fire / flammable materials.
- Do not use the open door as a handle when lifting or moving the appliance.
- Install the appliance in accordance with the installation instructions. Incorrect installation can cause water leakage, electric shocks, fire and/or property damage.
- Use only the accessories provided for the installation.
- Only use the new hoses supplied with the appliance. Do not use old hoses.
- Do not extend the drain hoses or use your own hose. Drain hose lengths are specially adapted to the technique of this appliance. Adjustment of the drain hoses may adversely affect the functioning of the appliance.
- Ensure that the plug and earthed socket are clearly visible and accessible at all times.
- This appliance must not be connected to an external switching appliance, such as a timer, or be connected to a circuit that is regularly switched on and off by the energy supplier. This is because of the air temperature in the tumble dryer during drying of more than 55^ ( 55^ to 60^ ).
- Ensure that the appliance is upright at all times, including during transport. If the appliance is still (partly) horizontal or tilted more than 30^ , wait two hours before using the appliance. The compressor needs that time to be able to operate properly.
- Before installing the appliance, remove all obstacles on the route and at the installation site.
- Do not install the appliance in areas where there is a risk of frost. At temperatures around or below freezing, the appliance may work less well. Freezing of condensation water in the pump and hoses may result in irreparable damage to the appliance.
- RISK OF FIRE! Do not block the air vents at the bottom of the appliance. Do not install the appliance on (deep pile) carpet, elevations, etc., which reduce the ground clearance causing heat generation.
- WARNING! Ensure that the ventilation openings in the appliance housing or in the built-in structure are free of blockages.
- Never remove the feet from the appliance.
- The appliance must not be installed behind a lockable door, a sliding door or a door with the hinge on the other side of the door of the appliance, in such a way that the door of the appliance cannot be fully opened.
- This appliance is not suitable for built-in installation and may only be installed as a stand-alone appliance or with a stacking kit on a washing machine.
- RISK OF SERIOUS INJURY! Not using a stacking kit can lead to dangerous situations because vibrations of the washing machine or the heat pump dryer can cause the heat pump dryer to slide and possibly fall.
-
Installation of the appliance with a stacking kit may only be carried out by the manufacturer, an authorised service agent or equivalent qualified persons.
-
Avoid kinks or sharp turns in the drain hoses. This causes condensation to build up and may lead to leakage, overheating or appliance shutdown.
- The maximum permitted load that may be carried by one person is 25kg . Therefore, always lift the appliance with at least two people.
- Use both hands when moving, lifting or turning the appliance.
1.4 SAFETY INSTRUCTIONS: USE

WARNING!
1.4.1 Safety of persons
- Always be alert and act with caution. Do not use electrical appliances if you suffer from impaired concentration or lack of awareness, or if you are under the influence of drugs, alcohol or medication. Even the slightest distraction can lead to serious accidents and injuries when using electrical appliances.
- Always operate and use the appliance as described in these instructions for use. Assume that anything not specified in the instructions for use is also not possible.
- The closed cooling system of this appliance contains a quantity of the R290 refrigerant (either 120 or 130g , depending on the type of appliance, see 'Technical data'). R290 is a refrigerant that complies with European environmental regulations. Do not use any other refrigerants.
- Ensure sufficient ventilation in the room where the appliance is installed and never block the vents.
- Do not damage the refrigerant circuit.
- When the appliance is installed, used or stored in a non-ventilated room, the room must be designed in such a way as to prevent the accumulation of leaked refrigerant. This can lead to a risk of fire or an explosion due to the ignition of the refrigerant, caused by electric heaters, furnaces or other sources of ignition. Please note that refrigerant can be odourless.
1.4.2 Safety in use
- Follow the cleaning and maintenance instructions in this manual for trouble-free use and long service life.
- RISK OF FIRE OR EXPLOSIONS! Do not place any highly flammable or explosive substances or fuels in or near the appliance.
- Never expose the appliance to a naked flame.
- Do not expose the appliance to direct sunlight to avoid discolouration of the housing.
- Do not use paint, cleaning spray, anti-insect spray, etc. on or near the appliance. This may cause deformation of the housing or electrical damage.
- Do not use in damp or wet environments, such as the bathroom and laundry area, or near a bath, shower or pool.
- Do not use the appliance close to a fire source, close to splashing oil, direct sunlight or splashing water.
- Do not spill water, oil or any liquid on or in the appliance.
-
Do not pour water or other liquids over the appliance.
-
Never lean or stand on the open door of the appliance.
- RISK OF INJURY OR BURNS! Only open the appliance door when the program is finished. The appliance may be hot and hot steam may escape if the door is opened before the program is finished.
- RISK OF INJURY! Do not touch the door window or the inside of the tumble dryer during or immediately after the appliance is finished with a program. The door and tumble dryer may be hot and may cause burns. Also, do not allow children to play around the dryer or touch the door window.
- RISK OF INJURY OR BURNS! Do not touch the back of the appliance during or immediately after drying. This surface can be hot and cause burns.
- WARNING! RISK OF FIRE! Never turn off the appliance before the program is finished, unless the tumble dryer is emptied immediately and the laundry is spread to cool down.
- RISK OF INJURY! The condensation water is not drinkable and can result in damage to health if ingested by humans or animals. The condensation water can contain chemicals and other contaminants.
- Never use the appliance without a door filter.
- Always spin the laundry in the washing machine before placing it in the tumble dryer.
- Do not load more weight into the tumble dryer than the maximum capacity of the appliance (see 'Technical data').
- RISK OF FIRE OR EXPLOSION! Do not use the appliance to dry clothing or textiles that have been cleaned with industrial chemicals.
- RISK OF FIRE OR EXPLOSION! Do not use the appliance to dry clothing or textiles contaminated with substances such as vegetable oil, cooking oil, acetone, alcohol, petrol, kerosene, stain remover, turpentine, wax and washing remover, or a hair care product. In these cases, the clothes or textiles should first be washed in hot water with an additional amount of detergent before the clothes or textiles are dried in the appliance.
-
RISK OF FIRE! Do not use the appliance to dry materials that:
-
are made of foam (latex foam) or contain foam as a filling (such as cushions or clothes with filling);
include a liner or back of rubber; -
are waterproof (such as shower caps or waterproof jackets).
-
RISK OF FIRE! Do not store oil-contaminated laundry and do not stack it on top of each other or on other laundry or materials. Materials contaminated with oil may spontaneously ignite, especially when exposed to heat sources such as in a dryer. There may be an oxidation reaction that creates heat. If this heat cannot escape, materials can become hot enough to catch fire.
-
Do not use the appliance to dry laundry that:
-
is not washed;
-
has not been centrifuged: wet and water-leaking laundry can cause damage to the appliance.
-
Do not dry materials with heavy metal objects in them.
-
To prevent damage to the appliance or laundry:
-
Remove all items from pockets and storage compartments, such as lighters, matches, coins, safety pins, nails, glass, shells, screws or stones before placing the garments in the tumble dryer.
-
Closes zips, buttons and straps.
- Tie laces or other long pieces of textile.
- Do not dry any laundry with rubber parts or similar elastic material.
- Turn printed and black clothing inside out.
-
If necessary, use a laundry net for small and light laundry, such as fabric belts, cords of an apron and bras that may fall apart or break during a program.
-
Use fabric softeners and similar products in accordance with the manufacturer's instructions.
- Keep the area around the appliance clean and do not allow any lint or dust to accumulate around the appliance.
- Do not use the appliance near dangerous powders, such as coal powder, wheat flour, etc. At certain concentrations of dust in the air, this can lead to electric shocks, fire or an explosion.
-
Always close the appliance door after use. This helps prevent:
-
children from climbing into the appliance or hiding something in the appliance;
-
pets and other (small) animals from climbing into the appliance.
-
Do not operate the appliance if you notice damage to the appliance, the power cable or the plug, or if does not work properly, has fallen or otherwise malfunctions. Contact customer service for further information (See 'Foreword' for contact details).
- Unplug the appliance from the earthed socket if you hear strange noises, smell an odour or see smoke.
- Empty the water tank before moving or using the appliance to prevent leaks.
- Do not insert fingers or objects such as pens through the grilles in the appliance and especially warn children of these dangers.
- RISK OF FIRE! Do not place objects on the appliance and never cover the appliance. Never block the grilles for incoming and outgoing air, not even partially. This can cause fire!
- Do not climb, sit or stand on the appliance.
- If the appliance is not in use, or when cleaning it, carrying out maintenance or moving it, first switch it off and then remove the plug from the earthed socket.
1.5 SAFETY INSTRUCTIONS: ELECTRICAL SAFETY

DANGER! Risk of fire / flammable materials.
If there are any questions regarding the instructions for electrical safety, contact a qualified electrician.
- RISK OF FIRE! The appliance has thermal protection to prevent fire. To prevent accidental resetting of this thermal protection, this appliance must not be connected to an external switching appliance, such as a timer, or be connected to a circuit that is regularly switched on and off by the energy supplier.
-
RISK OF FIRE! Before use, check that the earthed socket you want to use has no defects, that it has earthing and an earth leakage circuit breaker connected in accordance with the legal regulations. If this is not clear, contact a qualified electrician.
-
Before use, check that the voltage on the socket you want to use matches that on the type plate of the appliance (AC 220-240V ~ 50 Hz). Damage caused by faulty voltage is not covered by the guarantee.
- RISK OF ELECTRIC SHOCK! Only use the appliance's factory-fitted plug and never change it. The plug must match the type of earthed socket used to reduce the risk of electric shocks.
- RISK OF ELECTRIC SHOCK! The connector has an earth connection. Do not remove the earth contacts from the plug. Improper use of the earthing can result in an electric shock.
- RISK OF FIRE! Only connect the appliance to a fixed, earthed socket. Do not use an extension cable, plug adapter, junction box or table socket etc.
- RISK OF ELECTRIC SHOCK! Never pull the power cable to carry or move the appliance or to disconnect the plug from the earthed socket. Keep the power cable away from heat, oil, sharp edges and moving parts. Do not make any changes to the power cable or submerge it in water or other liquids. Do not twist or kink the power cable. Do not roll up the power cable too tightly after use and do not wind it up around the unit; this can damage the insulation layer! Damaged or tangled power cables increase the risk of electric shocks.
- RISK OF ELECTRIC SHOCK! Do not touch the appliance, plug or mains cable with wet or damp hands. Only use the appliance with clean, dry hands.
- RISK OF ELECTRIC SHOCK! Do not use the appliance barefoot.
- Fully unroll the appliance's power cable before plugging it into the earthed socket. This is to prevent heat generation in the cable.
- Do not pass the power cable under a carpet or cover it with mats, runners and the like. This can lead to unforeseen heat generation.
- Regularly check the appliance for damage to the power cable and plug. If there is visible damage, a strong smell, or parts become excessively hot, stop using it immediately and remove the plug from the earthed socket.
- The appliance, plug and/or cable must be repaired and/or replaced by an electrician or an equivalent qualified person. Repairs by amateurs invalidate the guarantee and can cause dangerous situations!
1.6 SAFETY INSTRUCTIONS: REPAIRS
- It is not permitted to open, change or repair the appliance yourself. Do not drill holes into the appliance anywhere to avoid dangerous situations. The appliance, plug and/or cable must be repaired and/or replaced by an electrician or an equivalent qualified person. Repairs by amateurs invalidate the guarantee and can cause dangerous situations!
- Ensure that the appliance is upright at all times, including during transport. If the appliance is still (partly) horizontal or tilted more than 30^ , wait two hours before using the appliance. The compressor needs that time to be able to operate properly.
- RISK OF FIRE / FLAMMABLE MATERIALS! The appliance contains flammable gas (R290).
- Do not damage the refrigerant circuit.
- Repairs and maintenance to the closed cooling system and all other possible work on the appliance not described in this manual may not be carried out by the end user. Contact customer service for more information. See 'Foreword' for the contact details.
1.7 EXPLANATION OF GRAPHIC SYMBOLS ON THE PRODUCT AND PACKAGING
| SYMBOL MEANING | |
| CE | The CE marking on this appliance indicates that Wisberg declares that this appliance meets the requirements of the relevant European legislation relating to health, safety and environmental protection.The declaration of conformity is available upon request from Wisberg. See 'Foreword' for the contact details. |
| Indicates that the instructions for use must be read carefully before continuing to use the appliance. | |
| The accessible surfaces can be hot during or after use. | |
| This is a class I appliance. The metal parts of the appliance are connected to a protective earthing conductor, the so-called earth. | |
| ~ | This symbol indicates alternating current. |
| = | This symbol indicates direct current. |
| Warnings of fire hazard due to flammable material.This appliance contains a flammable refrigerant. If the refrigerant leaks and is exposed to an external source of ignition, there is a risk of fire. | |
| This symbol indicates that the appliance must not be lifted by one person alone. | |
| This symbol on the appliance, accessories or packaging indicates that this appliance must not be disposed of with ordinary household waste, but must be returned to a collection point. | |
2.PRODUCT FEATURES
2.1 SYSTEM OVERVIEW
A heat pump dryer is a type of dryer that uses a heat pump to efficiently and effectively remove moisture from clothing. Unlike traditional ventilated dryers that expel hot air and moisture to the outside air, heat pump dryers recycle the hot air, making them more energy efficient.

The heat pump dryer draws in ambient air and heats it via the heat exchanger. The heated air is directed to the drum and takes moisture from the clothing. The warm, humid air is passed through a condenser and comes into contact with a cold surface, causing the moisture to condense into water.
The condensed water is collected in the water tank (which must be emptied manually) or it can be pumped directly to a drain via the optional drain hose.
Via the control panel, 14 different programs can be selected based on the type of laundry.
2.2 GUARANTEE
This appliance comes with a warranty period of three years after purchase. For more information on guarantee conditions, please visitwisberghome.com. In any case, you must have the purchase order with purchase and/or delivery date in order to be able to claim the guarantee.
2.3 SPARE PARTS
Spare parts are available on the consumer market for up to 10 years after the introduction of the appliance: Please note that some spare parts are only available to professional repairers.
To order spare parts or for more information, please visit: wisberghome.com.
2.4 TECHNICAL SPECIFICATIONS
The main data of the appliance can also be found on the type plate (also printed on page 2).
| PARAMETER UNIT | ||
| Product name Heat Pump Dryer | ||
| Model / Type WBDR1400A38WN B | WBDR1400A38BNB | |
| Maximum load capacity 8kg 8kg | ||
| Size (H × W × D) 84.5 × 59.5 × 60 | .0cm 84.5 × 59.5 × 60.0cm | |
| Weight 45kg 45kg | ||
| Energy efficiency class | A +++ | A +++ |
| Nominal voltage and frequency | AC 220-240V ~ 50Hz | AC 220-240V ~ 50Hz |
| Input power | 750W | 750W |
| Energy consumption in the OFF mode | 0.5W | 0.5W |
| Energy consumption in the ON position | 0.8W | 0.8W |
| Weighted Annual Energy Consumption (AEc) * | 175.4 kWh/year 175.4 kWh/year | |
| Energy consumption of the standard ECO-program | Partial loading: 0.81 kWh Partial load | ding: 0.81 kWh |
| Full load: 1.42 kWh Full load: 1.42 | kWh | |
| Weighted energy consumption of the standard ECO- program for partial and full loading | 1.07 kWh 1.07 kWh | |
| Duration of the standard ECO-program | Half load: 120 min Half load: 120 min | |
| Full load: 180 min Full load: 180 min | ||
| Weighted average duration of the standard ECO-program for partial and full loading | 146 min 146 min | |
| Condensation efficiency class A (most effective) to G (least effective) | B | B |
| Average condensation efficiency of the standard ECO-program | Half load: 81% Half load: 81% | |
| Full load: 81% Full load: 81% | ||
| Weighted condensation efficiency of the standard ECO-program at partial and full loading | 81% 81% | |
| Sound power for the standard ECO-program with full load | 65dB 65dB | |
| Refrigerant | ||
| Model R290 R290 | ||
| Weight 130 g 130 g | ||
| GWP 3 | 3 | |
| CO2 equivalent 0.00 t | 0.00 t | |
| Temperature range during use | +2°C ~ +35°C | |
| IP value | IPX4 | |
- The weighted annual energy consumption is based on 160 drying cycles with the ECO programme at full and partial loading and the use of power-saving modes.
Actual energy consumption per cycle depends on how the appliance is used. The ECO programme at full and partial load is the standard programme to which the information on the label and the card relates. This programme is suitable for drying normal, wet cotton laundry and is the most energy efficient programme for cotton.
3. INSTALLATION
3.1 IMPORTANT INFORMATION
Read and follow all instructions in the 'Safety Instructions' section (chapter 1).

CAUTION!
Ensure that the appliance is upright at all times, including during transport. If it is not possible to move the appliance in an upright position, the appliance may be tilted to the right by no more than 30^ .
If the appliance is still (partly) horizontal or tilted more than 30^ , wait two hours before using the appliance. The compressor needs that time to be able to operate properly.
3.2 UNPACKING THE APPLIANCE

WARNING!
Keep packaging materials out of reach of children. Packaging materials are not toys.
To unpack the appliance:
- Remove all packaging material and any transport attachments present (e.g. tape that holds parts in place during transport).
- Remove any protective films on the outside of the housing.
- Check that all accessories are present and that the appliance and accessories do not present any damage. See 'Key components' for more information.
3.3 KEY COMPONENTS
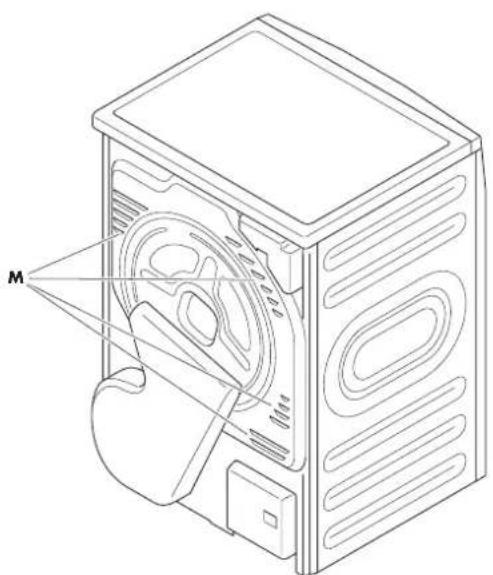
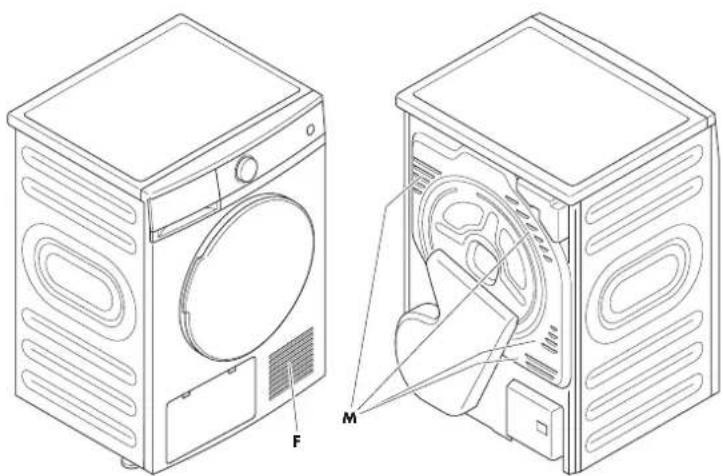
3.3.1 Heat Pump Dryer
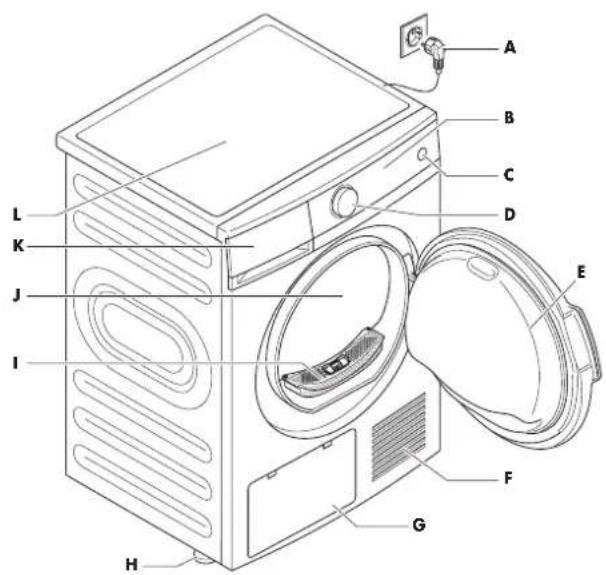
| ID NAME ID NAME | |||
| A Power supply cable H Adjusting | feet | ||
| B Control panel I Door filter | |||
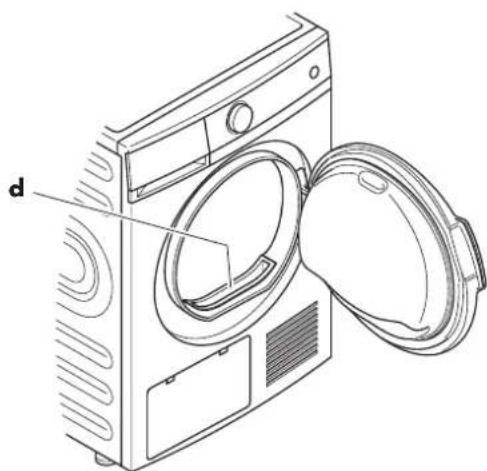
| C Standby button J Tumble dryer | |||
| D Program button K Water tank for condensate water | |||
| E Door L Top Cover | |||
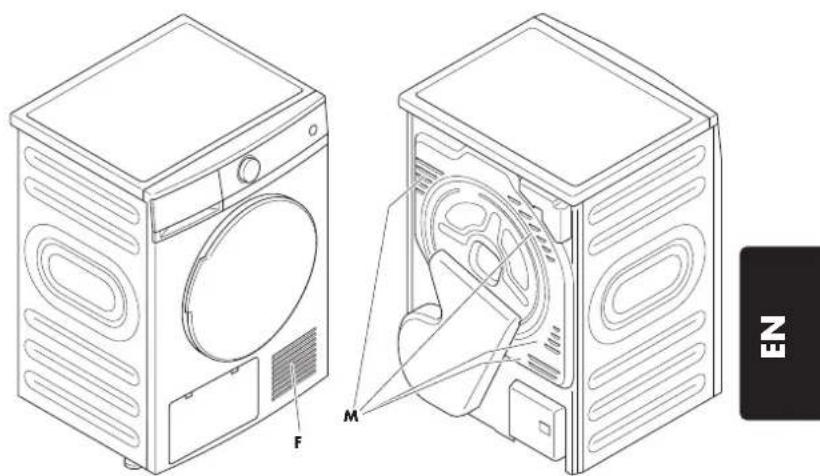
| F Air inlet M Air outlets | |||
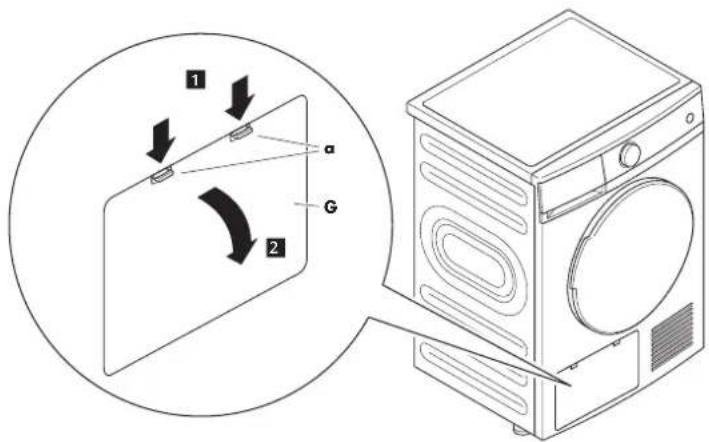
| G Maintenance hatch | |||

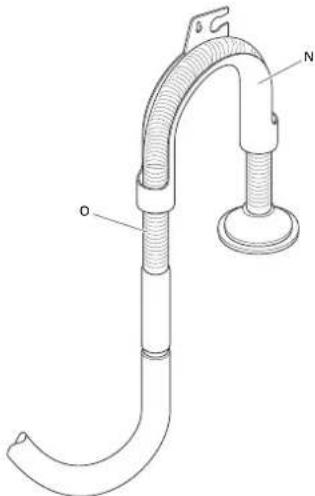
3.3.2 Optional Accessories

NOTE!
Optional accessories are not included as standard with every model.
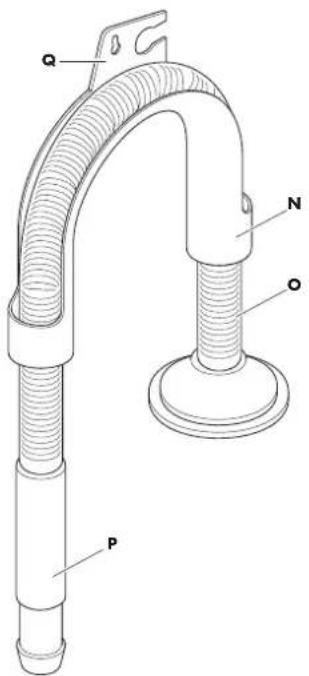
| ID NAME | |
| N | Holder |
| O | Condensate water drain hose |
| P | Connector |
| Q | Attachment point |
3.4 INSTALLATION OF THE APPLIANCE

WARNING!
RISK OF SERIOUS INJURY! Not using a stacking kit can lead to dangerous situations because vibrations of the washing machine or the heat pump dryer can cause the heat pump dryer to slide and possibly fall.
- Installation of the appliance with a stacking kit may only be carried out by the manufacturer, an authorised service agent or equivalent qualified persons.
- Avoid kinks or sharp turns in the drain hoses. This causes condensation to build up and may lead to leakage, overheating or appliance shutdown.
The appliance can be installed free-standing or on the washing machine. In this case, use one of the following stacking kits:
- Article 935259 / BBSK001W BlueBuilt Universal Intermediate Piece for Washing Machine and Dryer
- Article 868158 / 698.044.06CB Premium BlueBuilt Universal Intermediate Piece for Washing Machine and Dryer.

NOTE!
A stacking kit is not included. This is available through customer service (see 'Foreword' for contact details).
Condensation water is collected in the water tank, but can also be drained directly via the drain hose supplied as an option.
Tools required:
- Spanner, size 17 mm
To install the appliance:
-
Select a suitable place for use that satisfies the following points:
-
A firm, flat, dry and horizontal surface to prevent abnormal vibrations, noise and problems with the appliance.
- For convenience, near the washing machine or on the washing machine.
- In the vicinity of an earthed power socket that supplies the voltage stated on the type plate of the appliance (AC 220-240V ~ 50Hz).
- Where no other equipment is connected to the same earthed socket.
- Where dust and other dirt cannot accumulate. Air must be able to circulate freely around the appliance.
- Where the air inlet and air outlets are not blocked by a protective mesh or other obstacle.
- Away from a heat source and not in direct sunlight.
- Where there is no risk of frost. At temperatures around or below freezing, the appliance may work less well. Freezing of condensation water in the pump and hoses may result in irreparable damage to the appliance.
- Where the full opening of the appliance door is not blocked. Pay attention to this when installing behind a lockable door, a sliding door or a door with the hinge on the other side than the hinge of the door of the appliance.
- Where the ground clearance is not reduced or blocked by deep pile carpet, elevations, etc. Reducing ground clearance can cause heat generation and adversely affect the functioning of the appliance.
- When the optional drain hose is used, close to a drain in the floor or a sink. Pay attention to the maximum height of the sink and the length of the drain hose.
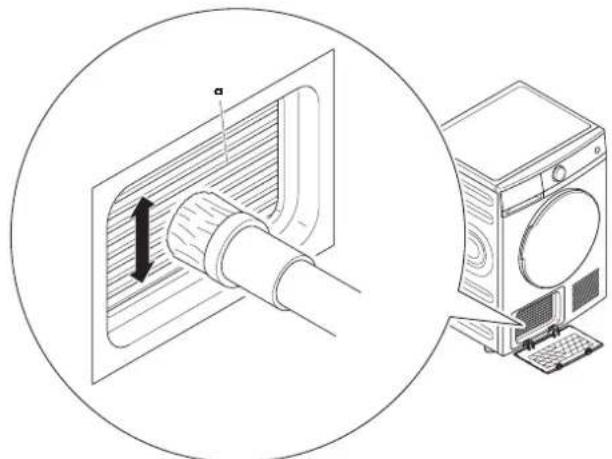
-
When the water tank (K) is used to collect the condensation water, proceed with step 4.
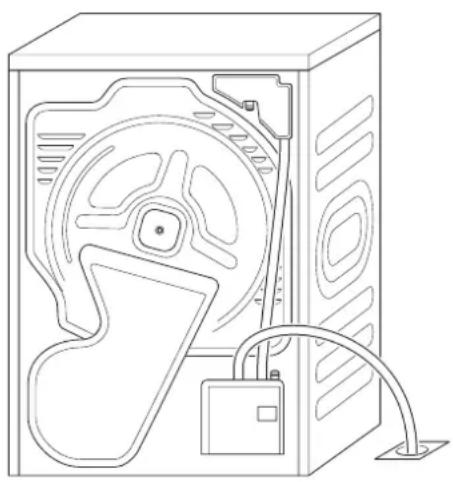
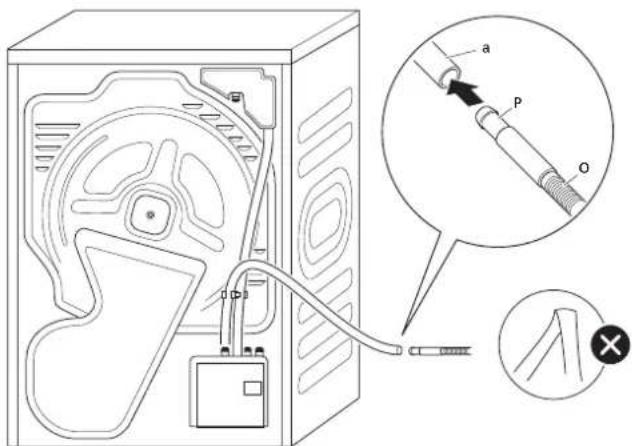
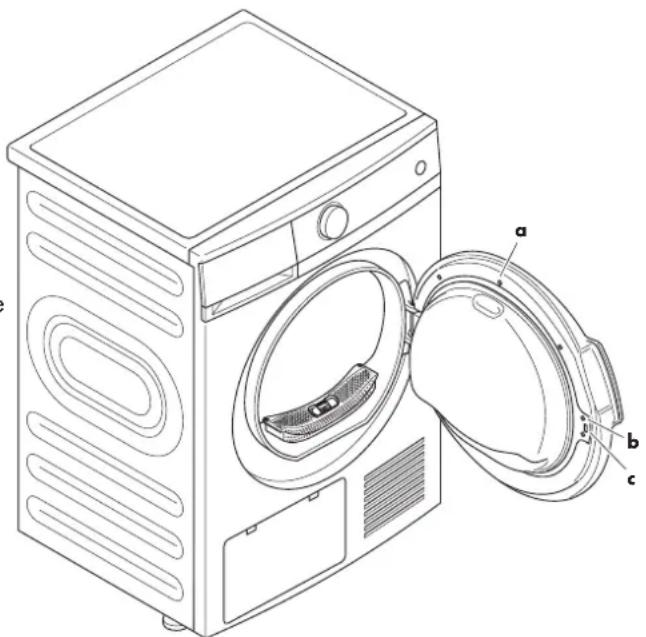
-
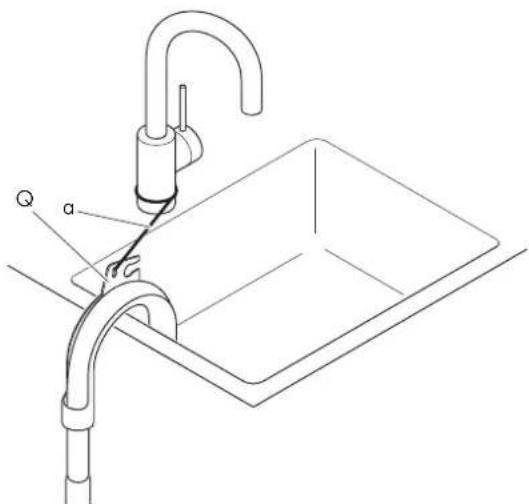
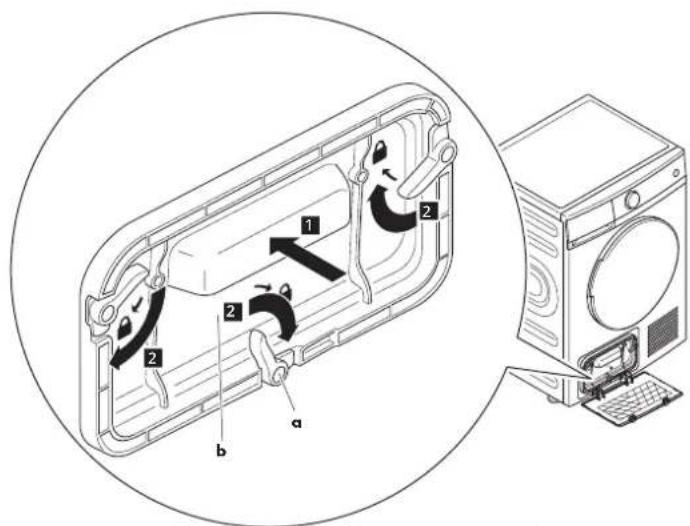
When the optional drain hose (O) is used to drain the condensation water directly: a. Disconnect the drain hose (a) and take the drain hose out of the upper cable clamp (b). b. Connect the optional drain hose (O) to the drain hose (a).
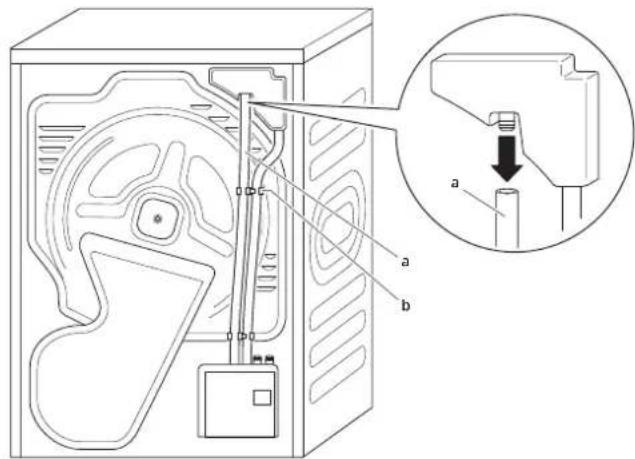

ATTENTION!
Make sure that the connector () is fully installed in the drain hose (a) to prevent leaks.
-
When the appliance is placed on a washing machine:
-
Use a stacking kit and follow the stacking kit instructions for correct installation.
- The following washing machines are suitable for installing a dryer on top:
- For the Wisberg heat pump dryer WBDR8A2WNB, the Wisberg washing machine WBWM1400A8WNB is suitable,
For the Wisberg heat pump dryer WBDR9A3WNB, the Wisberg washing machine WBWM1400A9WNB is suitable, - Important that the same filling capacities are put on top of each other.
-
Or similar washing machines, provided the width and depth match the dryer.
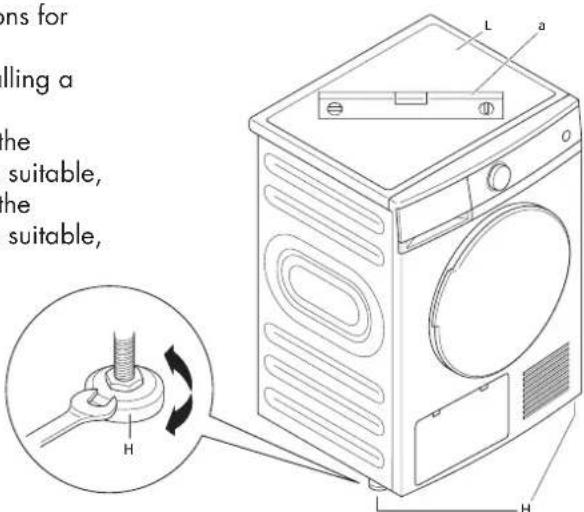
-
Place a spirit level (a) on the top cover (L).
-
Use a spanner to set the two adjusting feet (H) so that the appliance is completely level.
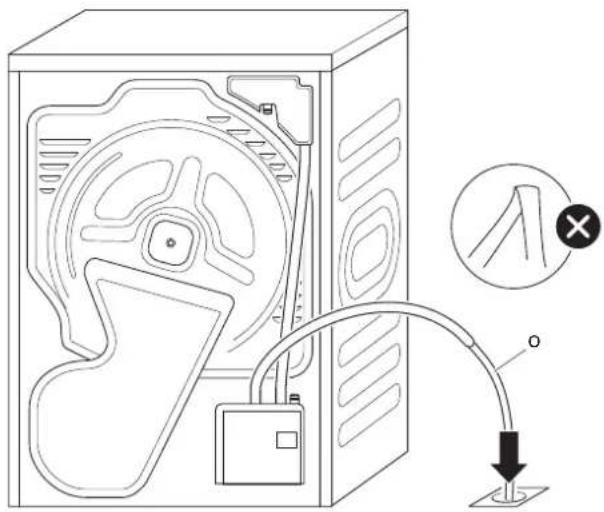
- When the optional drain hose (O) is installed:
a. To drain the condensation water via a drain in the floor:
- Place the end of the optional drain hose (O) sufficiently deep in the drain.

ATTENTION!
Make sure there are no kinks in the drain hose.
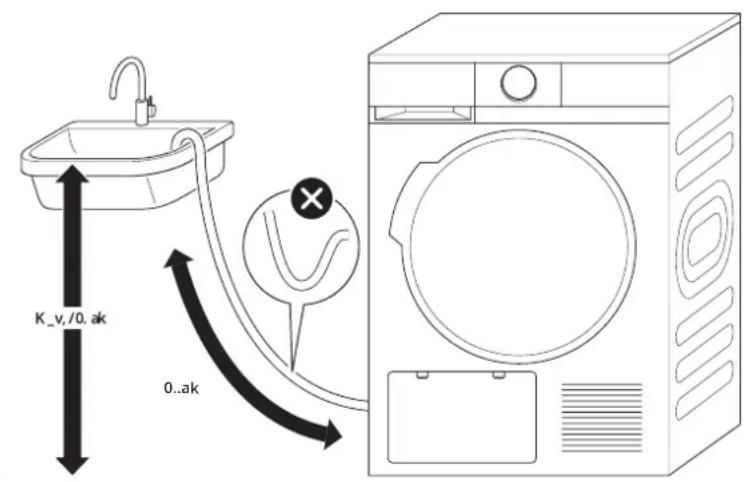
b. To drain the condensation water via a sink:
I. Place the optional drain hose (O) in the holder (N).
II. Place the holder (N) over the edge of the sink so that the end of the hose hangs in the sink.

ATTENTION!
Make sure that the drain hose does not sag to prevent condensation water from being drained.
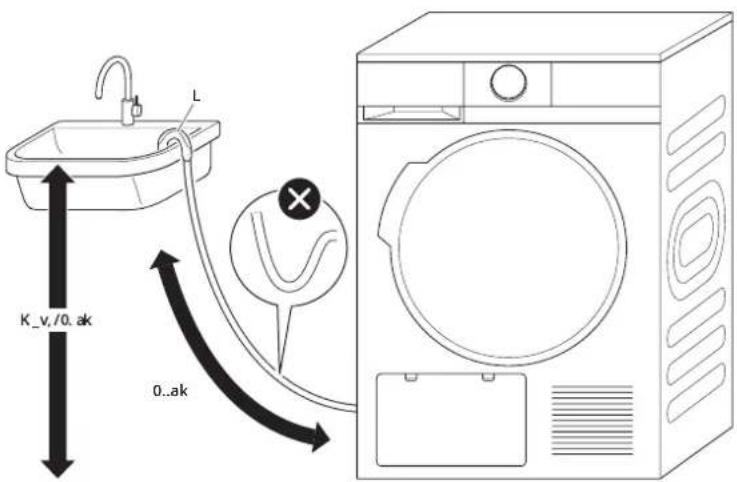
III. Attach the holder (N) with, for example, a piece of string or chain to the tap or the sink in such a way that the drain hose cannot fall out of the sink. Use the attachment point (Q) for this.
- Fully roll off the power cable of the appliance and lay the power cable so that it cannot touch hot parts of the appliance. Insert the plug (A) into the earthed socket.

ATTENTION!
Wait two hours before putting the appliance into service. The compressor needs that time to be able to operate properly.

WARNING!
RISK OF TRIPPING! Lay the power cable outside the walking route. Make sure that the power cable cannot be stepped on and that no furniture or other items are placed on it.
4. USE
4.1 IMPORTANT INFORMATION
Read and follow all instructions in the 'Safety Instructions' section (chapter 1).
- Do not use the appliance until installed as instructed!
- During use, the compressor and condensation water make a noise. This is not a defect and is normal for this type of appliance.
RISK OF INJURY OR BURNS! Only open the appliance door when the program is finished. The appliance may be hot and hot steam may escape if the door is opened before the program is finished.
RISK OF FIRE! Never turn off the appliance before the program is finished, unless the tumble dryer is emptied immediately and the laundry is spread to cool down. - After each program, clean the door filter and empty the water tank to reduce drying time and keep energy consumption as low as possible.
- Dry with the appliance only clothing and textiles suitable for tumble dryers. Clothing dries faster due to heat, but can also shrink as a result. Please note the information on the clothing and textile label:
| ICON MEANING | |
| Indicates that the garment: • is safe to put in the tumble dryer. • can generally be set to any heat setting. | |
| Indicates that the garment: • is safe to put in the tumble dryer. • may only be dried at a low heat setting. Higher heat settings can damage or shrink garments with this symbol. | |
| Indicates that the garment: • is safe to put in the tumble dryer. • may only be dried on a low or medium heat setting. Higher heat settings can damage or shrink garments with this symbol. | |
| Indicates that the garment should not be dried with a tumble dryer. | |
4.2 TO EFFECTIVELY USE THE APPLIANCE
The energy consumption per cycle depends, among other things, on the program selected, the amount of laundry and the maintenance of the appliance.
The ECO-program at full and partial load is the standard program on which the information on energy consumption is based. This program is suitable for drying normal, wet cotton laundry and is the most energy efficient program for cotton.
Factors that cause the appliance to heat less well include, for example:
- laundry that is still very wet when it enters the appliance;
choosing the wrong program;
too much laundry in the tumble dryer; - irregular maintenance:
presence of a lot of lint in the door filter;
presence of dust on the heat exchanger;
- low ambient temperature.
To use the appliance as effectively as possible:
After each program, clean the door filter (see 'Cleaning the door filter').
- Clean the heat exchanger (see 'Cleaning the heat exchanger').
- Ensure that the laundry is thoroughly centrifuged in the washing machine so that it contains as little water as possible. This reduces drying time and saves energy.
- Sort the laundry according to the material and select the appropriate program to dry.
- Leave coats and the long zip of coats open so that the material dries evenly.
- Avoid over-drying the laundry as this can lead to the formation of wrinkles.
- Close bedding and pillow covers to prevent smaller items of laundry from being rolled in during drying.
- Choose the 'Drying Time' program for thick or multilayer materials that are more difficult to dry (for example for coats).
- If after drying uneven, thick or multilayer materials some parts are not yet dry, use the 'Drying Time' program to dry them further.
- Do not place more than the recommended amount of laundry in the tumble dryer and pay attention to the maximum load capacity of the appliance. As a reference for the weight of individual pieces of laundry, the following table can be used (weights are guidelines and actual weights may differ):
| TYPE OF CLOTHING REFERENCE WEIGHT TYPE OF CLOTHING REFERENCE WEIGHT | |||
| Sweater (various materials) 800 g Pyjamas 200 g | |||
| Jacket (cotton) 800 g Shirt (cotton) 300 g | |||
| Jeans 800 g T-shirt (cotton) 180 g | |||
| Bath towel (cotton) 900 g Underwear (cotton) 70 g | |||
| Single bed sheet 600 g Socks | (various materials) 50 g | ||
| Work clothing 1120 g | |||
4.3 THE CONTROL PANEL
4.3.1 Control panel to select the program

| ID NAME | ID | NAME | |
| 1 | Programs | D | Program-button |
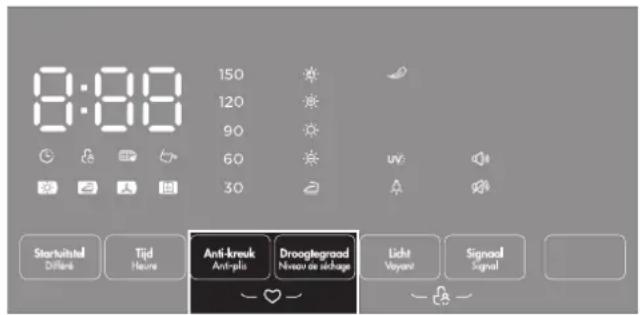
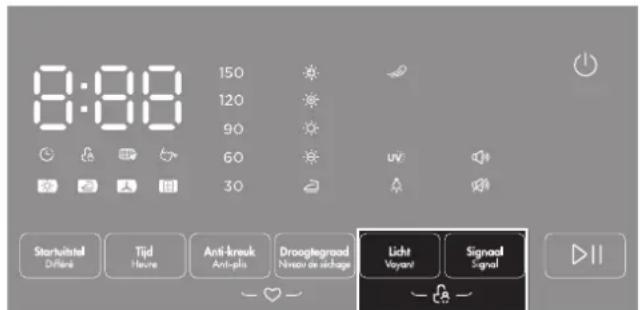
4.3.2 Function button screen
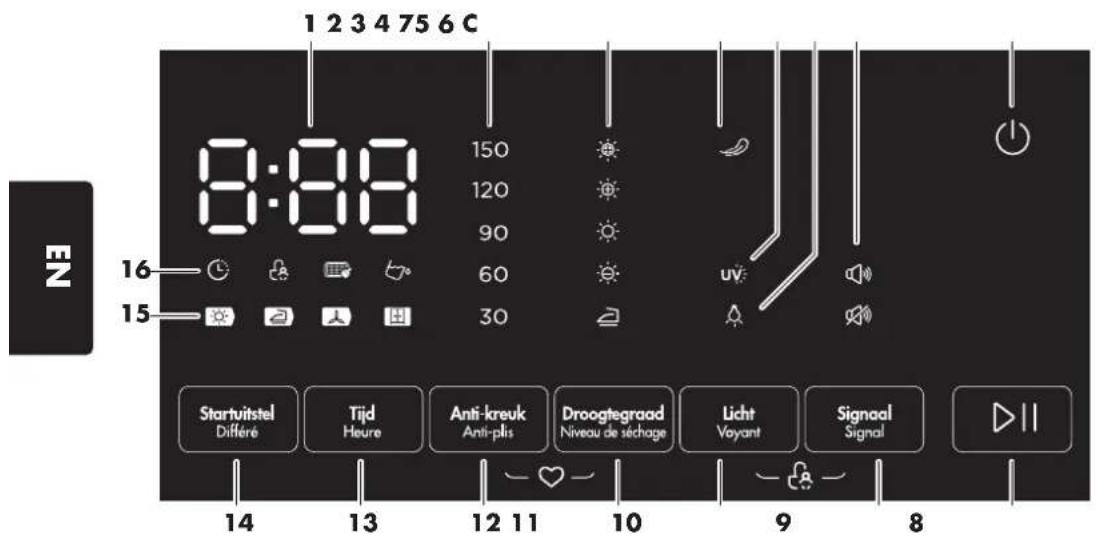
| ID NAME | |||
| 1 Time indication (estimated remaining program time) | |||
| 2 Wrinkle prevent time indicators | |||
| 3 Dryness level indicators (from iron dry to very dry) | |||
| 4 Wrinkle prevent indicator | |||
| 5 Hygiene indicator | |||
| 6 Light indicator | |||
| C Standby button | |||
| 7 Signal indicators | |||
| 8 Start/Pause button | |||
| 9 Signal button | |||
| 10 Light button | |||
| 11 Dryness level button | |||
| 12 Wrinkle prevent button | |||
| 13 Time button | |||
| 14 Start-delay button | |||
| 15 Program progress indicators | |||
| Drying Cooling down | |||
| The laundry is iron dry | The laundry is cupboard dry | ||
| 16 Function and warning indicators | |||
| Start-delay indicator Clear fill | er indicator | ||
| Child lock indicator Empty water tank indicator | |||
4.4 TURNING THE APPLIANCE ON AND OFF

WARNING!
RISK OF FIRE! Never turn off the appliance before the program is finished, unless the tumble dryer is emptied immediately and the laundry is spread to cool down.
To turn the appliance on:
- Insert the plug (A) of the appliance into the earthed socket.
- Press the Standby button (C).
The appliance is on and the screen lights up.

NOTE!
The appliance automatically switches off after 10 minutes when no program is started and no more settings are made. The appliance uses a minimum amount of current (0.5 W).
To turn the appliance off:
- Press the Standby button (C).
The screen is off and the appliance is off.

NOTE!
The set program and any set additional functions will be deleted when the appliance is switched off and on.
- Remove the plug (A) of the appliance from the earthed socket.
4.5 CLEANING BEFORE FIRST USE

WARNING!
Never use aggressive or abrasive cleaners, gasoline, detergents, chemically impregnated wipes or other cleaning solutions. These can damage the housing and appliance. Never spray the appliance and make sure no water gets into it.
To clean the appliance before first use:
- Open the door (E) of the appliance and put a number of dry cloths in the tumble dryer (J).
- Insert the plug (A) into the earthed socket.
- Turn the appliance on with the Standby button (C).
- Select the Refresh program using the program button (D).
- Press the start/pause button.
The program starts and the screen shows the remaining program time.
- Wait until the program is finished and the End screen is displayed.
- Clean the door filter (I) according to the instructions in 'Cleaning the door filter'.
4.6 OVERVIEW OF THE PROGRAMS

NOTE!
Actual energy consumption per cycle depends on how the appliance is used. The Cotton program at full and partial load is the standard program. This program is suitable for drying normal, wet cotton laundry and is the most energy efficient program for cotton.
4.6.1 Drying programs and energy consumption
Program Table

| PROGRAM | MAX. LOAD | APPLICATION/FEATURES TIME DELAY TIME DRYING | ||
| My Program 8.0 kg | To save a favo | uite program | (see 'Saving and using the favourite program') | Yes No |
| ECO Standard* 8.0 | kg To fully dry | single or multi | multi-layer cotton laundry for immediate wearing. | Yes No |
| Cotton 8.0 kg To full | ly dry single or | multi-layer | cotton laundry for immediate storage. | Yes No |
| Jeans 4.0 kg To dry | jeans or casual | clothing | that is centrifuged at high speed in the washing machine. | Yes No |
| Synthetic Standard | 3.5 kg To dry thin, synthetic | tin, synthetic | textiles that will not be ironed such as Easy care shirts, baby clothes and socks. | Yes No |
| Mix 3.5 kg To dry a | mix of synthetic and | cotton textiles. | Yes No | |
| Baby care | 1.0 kg To d | y a small amount of baby clothes. | Yes No | |
| Sport | 3.0 kg To d | y sportswear and thin textiles made of polyester, which are not ironed. | Yes No | |
| Shirts 1.0 kg To dry | small amounts of thin | synthetic clothing with wrinkle prevent functionality (Easy care). Place this 'Easy care' clothing loosely in the tumble dryer and remove from the tumble dryer immediately after drying and hang on a clothes hanger. | Yes No | |
| Wool 1.0 kg To give | machine-washhable | woollen clothing an extra drying. | Yes No | |
| Bed linen | 4.0 kg To d | dry bed sheets, duvet covers and other large items. | Yes No | |
| Refresh | 1.0 kg To refresh clothing that has been in a closed space for a long time or to remove odours. | Yes Yes | ||
| Drying time 3.0kg To | to dry individual | pieces or to | continue to dry pieces that are not completely dry (such as multi-layered clothing, coats, cushions or voluminous pieces) | Yes Yes | |
| Hygiene 4.0 kg To | sterilise clothing | and textiles | that are heat-resistant for long periods of timeATTENTION! This program is not suitable for lightweight and fine clothing. | Yes No |
- Test programme according to delegated regulations 2533/2023 and 2543/2023 for eco design and energy labels, measured according to EN 61121. The ECO programme is suitable for drying normal wet cotton and is the most energy-efficient programme for cotton with the maximum load.
Energy consumption table
| PROGRAM LOAD | CENTRIFuge SPEED / RESIDUAL MOISTURE | DRYING TIME | ENERGY CONSUMPTION | |
| ECO * 8.0 kg 1000 rpm / 0% | 180 min 1.42 | kWh | ||
| 4.0 kg 1000 | rpm / 0% 120 min 1.81 kWh | |||
| Cotton Extra 8.0 kg 1000 rpm | -3% 230 min | 1.80 kWh | ||
| 4.0 kg 1000 | pm / -3% 140 min 1.10 kWh | |||
| Cotton Iron dry | 8.0 kg 1000 | rpm / 12% | 170 m | in 1.40 kWh |
| 4.0 kg 1000 | pm / 12% | 100 min | 0.80 kWh | |
| Synthetic Extra | 3.5 kg 800 rpm | pm / 0% | 100 m | in 0.80 kWh |
| Synthetic Cupboard dry | 3.5 kg | 800 rpm / 2% | 90 min | |
| Synthetic Iron dry | xxxx | xxxx | xxxx | |
| Wool | 1.0 kg - / 6% | 180 min | in 1.70 kWh | |
- Test programme according to delegated regulations 2533/2023 and 2543/2023 for eco design and energy labels, measured according to EN 61121. The ECO programme is suitable for drying normal wet cotton and is the most energy-efficient programme for cotton with the maximum load. Energy consumption for programmes other than ECO is only an indication.

NOTE!
Energy label information can be looked up in the European Commission's EPREL database:
- Go to the home page of the EPREL database at https://eprel.ec.europa.eu/screen/product/tumbledriers
- Search for the type: WBDR1400A38WNB or WBDR1400A38BNB.
4.7 DRYING OF CLOTHING AND TEXTILES
- Insert the plug (A) of the appliance into the earthed socket.
- Load the laundry in the tumble dryer.
- Close the door (E).
- Turn the appliance on using the Standby button (C).
- Select the desired program using the program button.
- Optionally set additional functions (Start-delay, Wrinkle prevent or Dryness level). See 'Use of the additional functions'.
- Press the start/pause button to start the program.
The program starts and the screen shows the remaining program time.
- To pause the program, press the start/pause button.

WAARSCHUWING!
RISK OF FIRE! Never turn off the appliance before the program is finished, unless the tumble dryer is emptied immediately and the laundry is spread to cool down.

NOTE!
When 'Start Delay' is set, the Start-delay indicator flashes and the screen shows the remaining time until the program starts.
When the wrinkle prevent function is set, the tumble dryer will rotate regularly to prevent wrinkle formation.
-
When the tumble dryer (J) has completely stopped turning, open the door (E) and take the laundry out of the tumble dryer.
-
Empty the water tank (K)(see 'Emptying the water tank').
- Clean the door filter (I) (see 'Cleaning the door filter').
- Turn off the appliance with the Standby button (C) and remove the plug (A) from the earthed socket.
4.8 USE OF THE ADDITIONAL FUNCTIONS

NOTE!
When describing the following functions, it is assumed that the laundry is loaded into the tumble dryer, the door is closed and the appliance is turned on with the Standby button.
4.8.1 Using the time function
The time function is intended to set the duration of the 'Dry Time' and 'Refresher' programs in 10-minute increments.
| PROGRAM MINIMUM TIME SETTING MAXIMUM TIME SETTING | ||
| Refresher 20 min 180 min | ||
| Drying time 10 min 150 min | ||
To set the duration of the Drying Time and Refresher programmes:
- Select the 'Drying Time' or 'Refresher' program using the program button (D).
- Press the 'Time' button several times to set the duration of the program.
- Press the 'Start/Pause' button to start the program. The program starts and the screen shows the remaining program time.
- Follow steps 9 to 13 in 'Drying clothing and textiles'.
4.8.2 Using the wrinkle prevent function
The wrinkle prevent function is intended to allow the tumble dryer to rotate for a certain time after drying to prevent wrinkle formation. The time can be set in 30-minute steps.

NOTE!
This function is not available with the 'Drying Time', 'Wool' and 'Refresher' programs.
| APPLIANCE TYPE MINIMUM TIME SETTING MAXIMUM TIME SETTING | ||
| WBDR1400A38WNB 30 min 150 | min | |
| WBDR1400A38BNB 30 min 150 | min | |
To set the wrinkle prevent function:
- Select a desired program using the program button (D).
- Press the 'Wrinkle prevent' button several times to set the desired time. The wrinkle prevent indicator lights up and the wrinkle prevent time indicators indicate the set time.
- Press the 'Start/Pause' button to start the program.
The program starts and the screen shows the remaining program time.
- Follow steps 8 to 12 in 'Drying clothing and textiles'.
To remove the laundry from the tumble dryer when the wrinkle prevent function is active:
- Turn the appliance off with the 'Standby' button (C).
- Wait until the tumble dryer (J) has completely stopped rotating.
- Open the door (E) and remove the laundry.
- Follow steps 11 to 13 in 'Drying clothing and textiles'.
4.8.3 Using the dryness level function
The dryness level function is intended to set the dryness level for the laundry. This enables the appliance to dry the laundry to varying degrees.

NOTE!
This function is not available with the 'Drying Time', 'Hygiene', 'Wool', 'Refresher', 'ECO' and 'My Program' programs.
To set the dryness level for the laundry:
- Select a desired program using the program button (D).
- Press the 'Dryness level' button several times to set the desired dryness:
| ICON MEANING | |
| - | Ultra-dry (highest dryness level) |
| - | Extremely dry |
| - | Standard dry (cupboard dry) |
| - | Somewhat dry |
| - | Iron dry (the lowest dryness level) |

- Press the 'Start/Pause' button to start the program.
- The program starts and the screen shows the remaining program time.
Follow steps 9 to 13 in 'Drying clothing and textiles'.
4.8.4 Using the Start-Delay function
The start-delay function is intended to postpone the start of the set program for a certain amount of time. The maximum time that can be set is 24 hours, in one hour increments. After the set time has elapsed, the set program will start automatically.
To postpone the start of the set program:
- Select a desired program using the 'Program' button (D).
- Optionally set the wrinkle prevent and/or dryness level function. (see 'Using the wrinkle prevent function / Using the dryness level function').
- Press the 'Start-Delay' button several times to set the delay time.
- Press the 'Start/Pause' button. The start-delay indicator will flash and the screen will show the time until the start of the program. The set program will start automatically when the time has elapsed.
- Follow steps 9 to 13 in 'Drying clothing and textiles'.
To pause/continue the start-delay:
- Press the 'Start/Pause' button. The countdown to the start of the program stops.
- Press the 'Start/Pause' button again. The countdown to the start of the program continues.
To delete the start delay:
Turn the appliance off and on with the 'Standby' button (C).

NOTE!
The set program and any additional functions set are erased when the appliance is turned off and on.
4.8.5 Disable the UV function
The programs 'Bedding', 'Sports', 'Baby care', 'Mix', 'Synthetic', 'Cotton' and 'Hygiene' have an automatic UV function during the program. The UV function can be disabled.

NOTE!
The UV function cannot be disabled in the 'Hygiene' program.
To turn off the UV function:
- Select a program with an automatic UV function ('Bedding', 'Sports', 'Baby care', 'Mix', 'Synthetic' or 'Cotton').
- Press the 'Light' button for three seconds to turn off the UV function.
- Press the 'Start/Pause' button to start the program.

NOTE!
When the UV function is cancelled, it is not automatically activated when selecting a program with UV function.
To enable the UV function:
- Select a program with an automatic UV function ('Bedding', 'Sports', 'Baby care', 'Mix', 'Synthetic' or 'Cotton').
- Press the 'Light' button for three seconds to activate the UV function.
- Press the 'Start/Pause' button to start the program.
4.8.6 Turning the light in the tumble dryer on and off
The light in the tumble dryer will turn on automatically when the door is opened or when the 'Light' button is used. After one minute, the lamp turns off automatically.
To turn the lamp in the tumble dryer on and off:
- Press the 'Light' button once to turn on the lamp in the tumble dryer (J).
The light indicator lights up. - Wait a minute or press the 'Light' button to turn the lamp off.
The light indicator is off.
4.8.7 Setting the Audible Signal
The audible signal function is intended to provide a confirmation signal when the buttons are used and when the program is finished. The audible signal is on by default.
To turn the audible signal on or off:
- To turn on the audible signal, press the 'Signal' button one or more times until the signal on indicator lights up.
- To turn off the audible signal, press the 'Signal' button one or more times until the signal off indicator lights up.
4.9 SAVING AND USING THE PREFERRED PROGRAM
One program can be saved together with the setting of additional functions as 'My program'.
To save a program as My Program:
- Select the desired program using the 'Program' button (D).
- Set the desired additional functions (see 'Use of the additional functions').
- At the same time, press the 'Wrinkle' prevent button and the Dryness level' button and hold for three seconds until you hear a beep.
The selected program and the additional functions set have been saved.
To use My program:
- Select 'My program' using the program button (D). The appliance is set to the stored program and additional functions.
4.10 USING THE CHILD SAFETY LOCK
This appliance is equipped with a child safety lock to prevent accidental buttons from being pressed.
To activate the child safety lock:
- When a program is busy, simultaneously press the 'Light' button and the 'Signal' button and hold for three seconds until you hear a beep. The child safety lock indicator lights up.
To turn off the child safety lock:
- Simultaneously press the 'Light' button and the 'Signal' button and hold for three seconds until you hear a beep. The child safety lock indicator is off.
5. MAINTENANCE AND CLEANING
5.1 IMPORTANT INFORMATION
Read and follow all instructions in the 'Safety Instructions' section (chapter 1).
- Carry out cleaning and maintenance as indicated. This extends the life of the appliance and will keep it working properly.
RISK OF ELECTRIC SHOCK! Before cleaning and maintenance, turn off the appliance with the 'ON/OFF' button and remove the plug from the earthed socket.
RISK OF BURNS! Wait until all hot parts of the appliance have cooled down before starting cleaning and maintenance. - Cleaning and user maintenance must not be carried out by children without supervision.
- Never use aggressive or abrasive cleaners, petrol, petroleum ether, detergents, thinner, alcohol, glass cleaners, chemically impregnated wipes or other cleaning solutions. These can damage the housing and appliance.
- Never spray the appliance and make sure no water gets into it.
5.2 EMPTYING THE WATER TANK

WARNING!
- The condensation water is not drinkable and can result in damage to health if ingested by humans or animals. The condensation water can contain chemicals and other contaminants.
- Never use the appliance without the water tank. This also applies when the optional drain hose is connected.
The water tank must be emptied after each drying cycle. When the water tank is full during a program and needs to be emptied, the program pauses and the 'Empty water tank' indicator turns on.
To empty the water tank:
- Pull the water tank (K) out of the appliance and hold it with two hands.
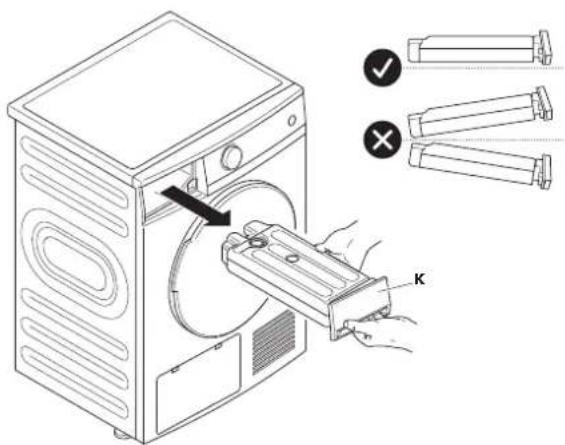
-
Tilt the water tank (K) above the sink to empty it.
-
Dry the water tank (K) on the outside.
- Place the water tank (K) in the appliance.
- When the program is paused, press the 'Start/Pause' button to continue the program.

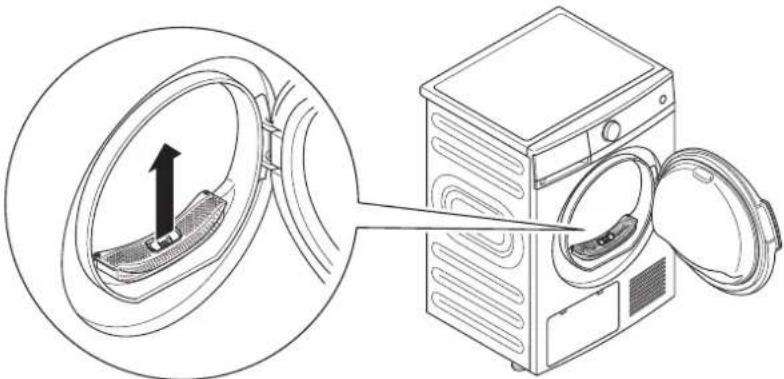
5.3 CLEANING THE DOOR FILTER

NOTE!
Do not flush the lint down the drain. Prevent the spread of microplastics in the wastewater system and dispose of the lint via household waste.
The door filter must be cleaned after each drying cycle. This prevents higher energy consumption and longer drying times.
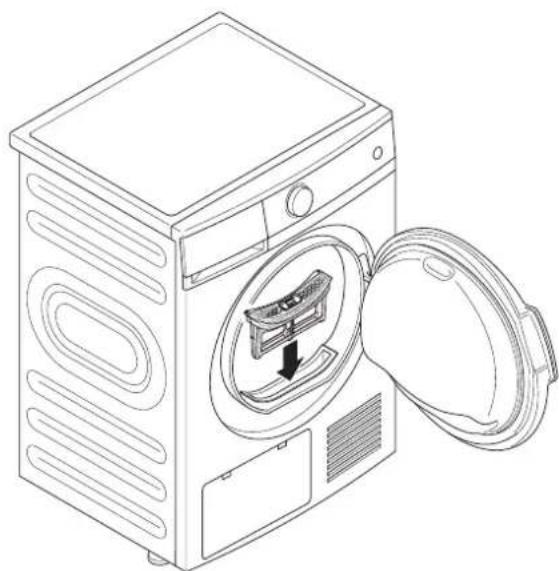
To clean the door filter:
- Open the door (E).
- Pull the door filter up (I) to remove it.
- Press the lip (a) of the lock slightly down and open the door filter (I).
- Remove all lint from the door filter (I) and lint screen.
ATTENTION! Do not push the lint screen of the door filter to prevent damaging the lint screen.
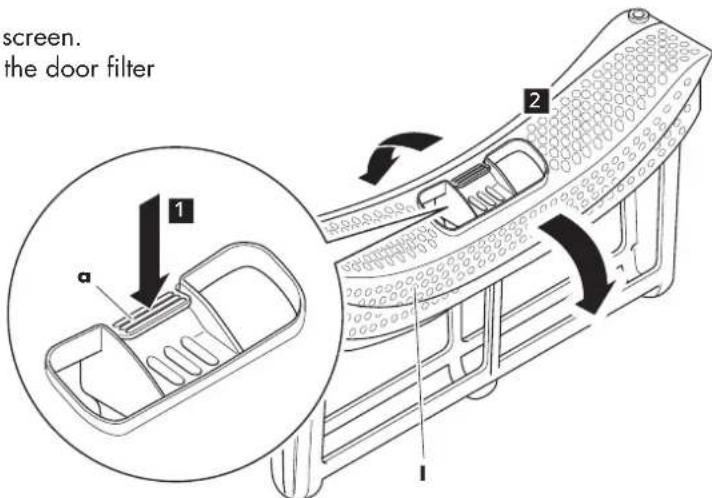
- If necessary, clean the door filter (I) with cold running water from the tap and completely dry the door filter.
- Close the door filter (I). Make sure that the arrows on both parts and the locking mechanism in the middle are properly aligned.
- Remove dust and lint from the seal (a).

- Insert the door filter (I) into the appliance. ATTENTION! Do not force the installation of the door filter; it only fits one way.
- Close the door (E).
5.4 CLEANING THE APPLIANCE AFTER EACH USE

WARNING!
Never use aggressive or abrasive cleaners, petrol, detergents, glass cleaners, chemically impregnated wipes or other cleaning solutions. These can damage the housing and appliance. Never spray the appliance and make sure no water gets into it. Do not use a steam cleaner to clean the appliance. Wear gloves when cleaning the appliance.
To clean the appliance after use:
- Turn off the appliance using the Standby button (C) and remove the plug (A) from the earthed socket.
- Take a clean cloth and moisten it with water.
ATTENTION! Do not use cleaning agents!
- Clean the appliance with the damp clean cloth:
a. Clean the door (E) and the inside (c) of the door.
b. Clean the seal (b) around the door opening.
c. Clean the humidity sensor (a).
d. Remove the door filter (I) and clean it (see Cleaning the door filter).
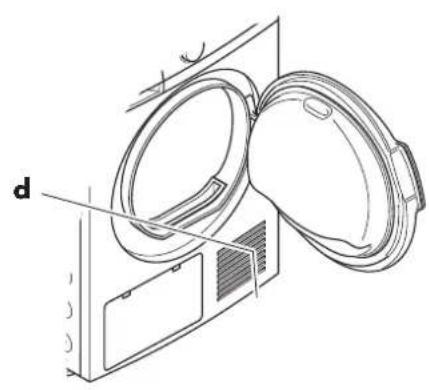
e. Clean the seal (d) in the appliance.
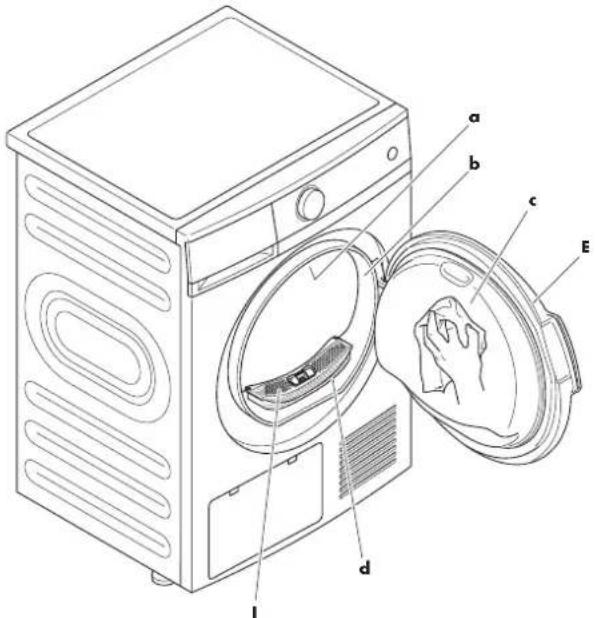
f. Clean the air inlet (F) and air outlets (M).
- Dry all parts with a soft, clean and dry cloth.
- Place the door filter (I).
- Close the door (E).
5.5 REMOVAL OF FOREIGN OBJECTS
If objects get under the door filter, remove them from the machine immediately.
To remove foreign objects:
- Turn the appliance off using the Standby button (C).
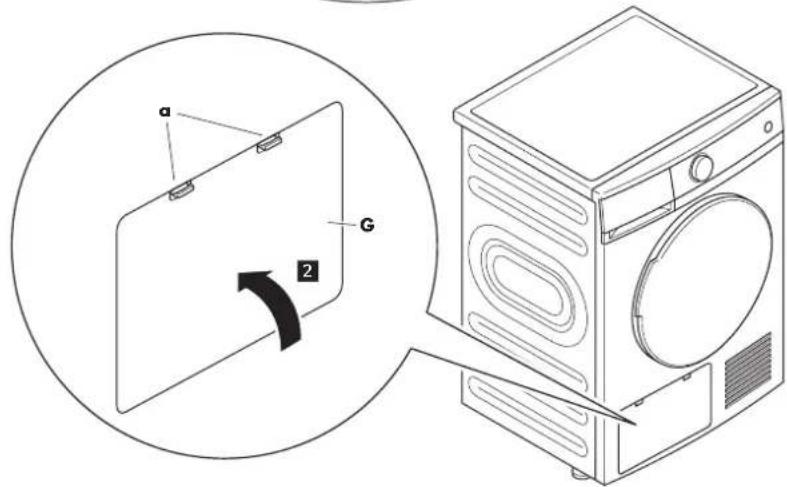
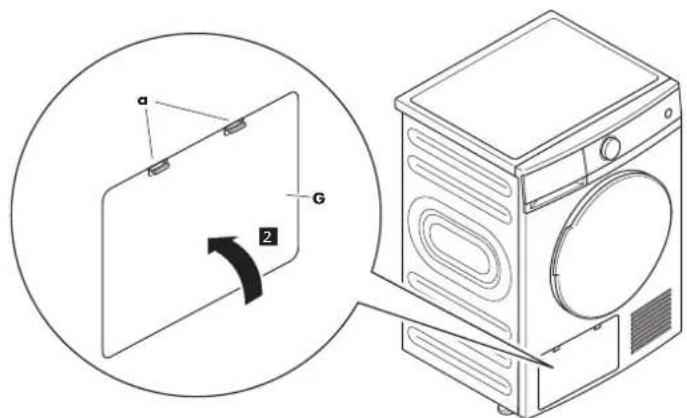
- Open the maintenance hatch (G):
a. Carefully push down the two tabs (a).
b. Tilt the maintenance section (G) forwards to open it.
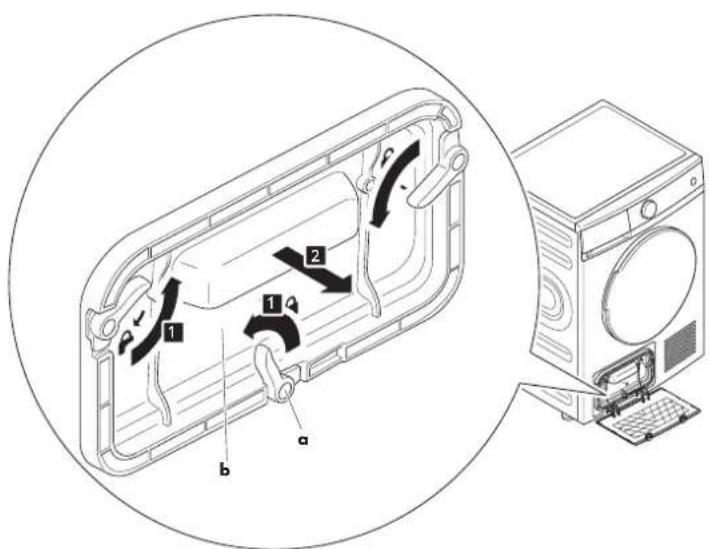
- Remove the cover (b):
a. Turn the three locks (a) anticlockwise to the open position.
b. Remove the cover (b).
- Remove the foreign objects.
ATTENTION! Do not touch the heat exchanger, use force or exert pressure on the heat exchanger.
- Install the cover (a):
a. Place the cover (b).
b. Turn the locks (a) clockwise to secure the cover (b).
- Close the maintenance hatch (G) and make sure that the two tabs (a) click into place.
5.6 CLEANING THE HEAT EXCHANGER

WARNING!
RISK OF INJURY. Do not touch the heat exchanger. It may contain sharp parts and be hot.
RISK OF DAMAGE Do not apply force or press the heat exchanger during cleaning. The appliance does not function or does not function properly when the blades of the heat exchanger are bent or damaged.
The heat exchanger is an important part of a heat pump dryer for energy-efficient drying. The heat exchanger should be cleaned at least every three months during normal use. Check and clean the heat exchanger more frequently during intensive use.
To clean the heat exchanger:
- Turn the appliance off using the 'Standby' button (C).
- Open the maintenance hatch (G): a. Carefully push down the two tabs (a). b. Tilt the maintenance section (G) forwards to open it.

- Remove the cover (b):
a. Turn the three locks (a) anticlockwise to the open position.
b. Remove the cover (b).
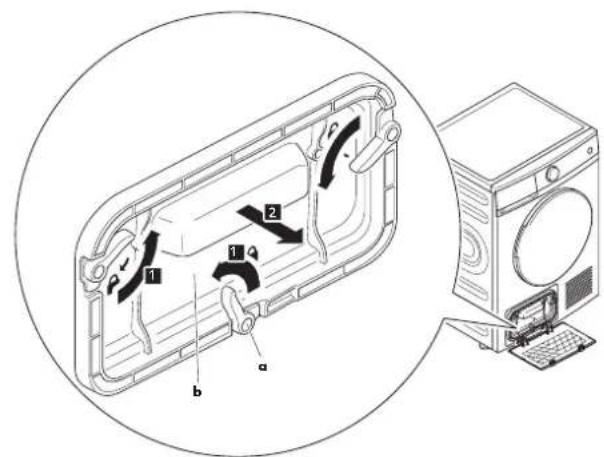
- Use a vacuum cleaner with brush accessory and remove dust and lint from the heat exchanger (a).
ATTENTION! Do not apply force and do not press the heat exchanger.
- Install the cover (a):
Place the cover (b).
Turn the locks (a) clockwise to secure the cover (b).

- Close the maintenance hatch (G) and make sure that the two tabs (a) click into place.
5.7 GENERAL CLEANING OF THE APPLIANCE

WARNING!
Never use aggressive or abrasive cleaners, petrol, detergents, glass cleaners, chemically impregnated wipes or other cleaning solutions. These can damage the housing and appliance. Never spray the appliance and make sure no water gets into it. Do not use steam cleaner to clean the appliance. Wear gloves for cleaning the appliance.
To clean the appliance in general:
- Turn off the appliance using the 'Standby' button (C) and remove the plug (A) from the earthed socket.
- Take a clean cloth and moisten it with water.
ATTENTION! Do not use cleaning agents!
- Clean the appliance with the damp clean cloth:
a. Clean the door (E) and the inside (c) of the door.
b. Clean the seal (b) around the door opening.
c. Clean the humidity sensor (a).
d. Remove the door filter (I) and clean the seal (d) in the appliance.

e. Clean the air inlet (F) and air outlets (M).
- Dry all parts with a soft, clean and dry cloth.
- Place the door filter (I).
- Close the door (E).
6. FAULTS AND SOLUTIONS
The following cases are not always a fault. See the possible solutions before asking for service.
| PROBLEM CAUSE SOLUTION | ||
| The screen is not on. | - Appliance is off. - The plug of the appliance is not in the earthed socket. - There is no voltage on the earthed socket. | - Check that the appliance is on. If not, turn the appliance on using the 'Standby' button. - Plug the appliance into the earthed socket and turn the appliance on using the 'Stand-by' button. - Check that there is power on the earthed socket and check the fuses in the meter cabinet. |
| It is not possible to choose a program. | - The screen or appliance is not on | - Turn the appliance on with the 'Standby' button. |
| The Empty water tank indicator is on. | - The water tank is full. - Empty the water tank | {see ' Emptying the water tank}. |
| - The water tank is not full. Possible problem with the water pump or the water level sensor. | - Turn the appliance off and on with the Standby button. | |
| Please contact Customer Service if the above steps do not resolve the issue. See 'Foreword' for the contact details. | ||
| The Clean door filter indicator is on. | - The door filter must be cleaned. - Clean the door filter (see 'Cleaning the door filter'). | |
| The appliance will not start. | - The plug is not in the earthed socket. - The appliance is not on. - The door is not closed. - No program has been set. - The appliance is on pause. | - Plug into earthed socket and turn the appliance on using the 'Standby' button. - Turn the appliance on with the 'Standby' button. - Close the door and press the 'Start/Pause' button. - Choose a program with the 'Program' button. - Press 'Start/Pause' button. |
| The appliance makes a buzzing or humming sound. | - ATTENTION! This is normal and not a fault or defect. The compressor is in operation. These sounds are normal and do not indicate a defect. | |
| The appliance goes off at the end of the program. | - ATTENTION! This is normal and not a fault or defect. The appliance is automatically turned off at the end of the program to save energy. | |
| The laundry is not as dry as set or the drying time is too long. | - The door filter is full of lint. | - Clean the door filter (see 'Cleaning the door filter'). |
| - The water tank is full. | - Empty the water tank (see 'Emptying the water tank'). | |
| - The optional drain hose does not drain properly. | - Check that the optional drain hose is installed correctly. | |
| - The location of the appliance does not meet the requirements. | - Check that the location of the appliance meets the requirements (see 'Installing the appliance'). | |
| - The air inlet is not free. | - Check that the air inlet is not blocked and is clean. If necessary, clean the air inlet (see 'General cleaning of the appliance'). | |
| - The program used is incorrect or the selected dryness level is too low. | - Choose the correct program for the type of laundry or increase the dryness level. Pay attention to the instructions on the labels of the clothing. | |
6.1 ERRORCODES
Below is an explanation of error codes that can appear on the display. These error codes can only be solved by qualified personnel. Please contact customer service to have the problem fixed.
| ERRORCODE MEANING SOLUTION | ||
| E33 | - Temperature sensor fault | - Please contact customer service. See ‘Foreword’ for the contact details. |
| E64 - BLDC motor commu nication error | ||
| E82 - Communication error of the circuit board | ||
| The screen displays a message other than E32, E33 or E82. | ||
7. TAKING OUT OF SERVICE
If the appliance is stored for a longer period, the following measures must be taken:
- Press the 'Standby' button (C) to turn off the appliance.
- Remove the plug (A) from the earthed socket.
- Empty the water tank (K) (see ' Emptying the water tank').
- If the appliance is used with the optional drain hose (O), make sure that all water is removed from the drain hose.
- Clean the door filter (I) (see 'Cleaning the door filter').
- Clean the heat exchanger (see 'Cleaning the heat exchanger').
- Clean the appliance (see 'General cleaning of the appliance').
- If possible, pack the appliance in its original packaging or in a plastic bag and put it in a dry place.

WARNING!
RISK OF SUFFOCATION! Make sure children are not able to play with the appliance and cannot climb into the appliance.
ATTENTION! Do not place heavy objects on the appliance. This can cause deformations and damage to the appliance. Store the appliance out of reach of unauthorized persons and do not allow anyone unfamiliar with the appliance and these instructions to use it.
8. SAFE DISPOSAL

DANGER!
RISK OF FIRE / FLammable MATERIALS! The appliance contains flammable gas (R290). Please contact your local authority for information on the correct waste processing of the appliance.
8.1 SAFE REMOVAL OF THE APPLIANCE
When the appliance is no longer in use and is discarded:
- Remove the plug (A) from the earthed socket.
- Empty the water tank (K) (see 'Emptying the water tank').
- If the optional drain hose () has been used, make sure that all water has been removed from the drain hose.
- Cut off the power cable as close to the appliance housing as possible.
- Dismantle the door lock (E). This prevents children or animals from getting stuck in the appliance:
a. Remove the screws (a) and remove the inner edge of the door (E).
b. Remove the screws (b) and the lock (c).
8.2 DISPOSE OF THE APPLIANCE AS WASTE

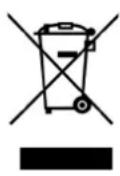
The materials used in this appliance marked with this symbol are recyclable. This marking indicates that this product should not be disposed of via household waste throughout the EU. In order to prevent damage to the environment or human health as a result of uncontrolled waste, it must be processed responsibly so that raw materials can be reused sustainably. Use the existing collection systems or contact the shop where you purchased the product if you want to dispose of the used product. There, the product is recycled in an environmentally friendly way.
8.3 DISPOSE OF THE PACKAGING MATERIAL AS WASTE
Dispos of the packaging material through your local recycling facility. By properly dising of packaging material and packaging waste, you help prevent potential risks to the environment and public health. The symbols on the packaging indicate that the packaging is made of cardboard, polyethylene (PE), polystyrene (EPS) and possibly rubber.
Wisberg contact details
Customer service can be reached at:wisberghome.com.
Wisepick Productions B.V.
Weena 664
3012 CN Rotterdam
The Netherlands
Made in China
NOTICE D'UTILISATION
SECHE-LINGE POMPE A CHALEUR
WBDR1400A38WNB
WBDR1400A38BNB

WISBERG
TABLE DES MATIÈRES
Avant-propos
88
1. Sécurité 90
Wisepick Productions B.V.
Weena 664
3012 CN Rotterdam
Les Pays-Bas
Made in China
1. SÉCURITÉ

AVERTISSEMENT!
2. PROPRIÉTÉS DU PRODUIT
2.1 APERCU DU SYSTÉME
6. DYSFUNCTIONNEMENTS ET SOLUTIONS
Wisepick Productions B.V.
Weena 664
3012 CN Rotterdam
Les Pays-Bas
Made in China
Wisberg contact details
Customer service can be reached at:wisberghome.com
Wisepick Productions B.V.
Weena 664
3012 CN Rotterdam
The Netherlands
Made in China