USER MANUAL KLV-17HR2 SONY
Operating Instructions
GB

Before operating the TV, please read the "Safety Information" section of this manual. Retain this manual for future reference.
Quick Start Guide Operating Instructions
NOTICE FOR CUSTOMERS IN THE UNITED KINGDOM
A moulded plug complying with BS1363 is fitted to this equipment for your safety and convenience. Should the fuse in the plug supplied need to be replaced, a 5 AMP fuse approved by ASTA or BSI to BS 1362 (i.e. marked with or 空 ) must be used.
When an alternative type of plug is used it should be fitted with a 5 AMP FUSE, otherwise the circuit should be protected by a 5 AMP FUSE at the distribution board.
If the plug supplied with this equipment has a detachable fuse cover, be sure to attach the fuse cover after you change the fuse. Never use the plug without the fuse cover. If you should lose the fuse cover, please contact your nearest Sony service station.
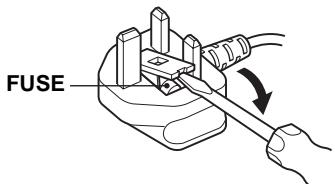
How to replace the fuse
Open the fuse compartment with a blade screwdriver, and replace the fuse.
IMPORTANT
If the plug supplied is not suitable for the socket outlets in your home, it should be cut off and an appropriate plug fitted in accordance with the following instructions:
The wires in this mains lead are coloured in accordance with the following code:
Blue Neutral
Brown Live
As the colours of the wires in the mains lead of this apparatus may not correspond with the coloured markings identifying the terminals in your plug, proceed as follows:
The wire which is coloured blue must be connected to the terminal which is marked with the letter N or coloured black. The wire which is coloured brown must be connected to the terminal which is marked with the letter L or coloured red. Do not connect either wire to the earth terminal in the plug which is marked by the letter E or by the safety earth symbol 12 or coloured green or green and yellow.
WARNING
- To prevent the risk of electric shock, do not insert the plug cut off from the mains lead into a socket outlet. This plug cannot be used and should be destroyed.
- To prevent the risk of fire or electric shock, do not expose the unit to rain or moisture.
- Dangerously high voltages are present inside the unit. Do not open the cabinet. Refer servicing to qualified personnel only.
Introduction
Thank you for choosing this Sony LCD Colour Television.
Before operating the TV, please read this manual thoroughly and retain it for future reference.
Symbols used in the manual
A .......Important information. 1 .......Information on a feature.
1, 2.... Sequence of instructions.
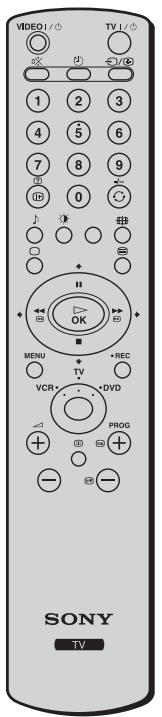
......Shaded buttons on the remote control show you the buttons you have to press to follow the sequence of instructions.
Informs you of the result of instructions followed.
- The illustrations used in this manual are of the KLV-17HR2 unless otherwise stated.
Table of Contents
Quick Start Guide
4
Operating Instructions 12
Safety Information 12
Precautions 18
Overview
Checking the Accessories Supplied 20
Overview of the TV Buttons and Indicators .... 21
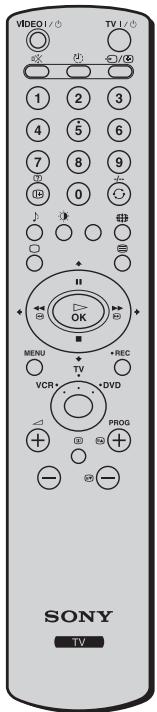
Overview of the Remote Control Buttons 22
Installation
Inserting Batteries into the Remote Control .... 24
Removing the Rear Cover 25
Connecting an Aerial and a VCR 26
First Time Operation
Switching On the TV and Tuning the TV
Automatically 29
Introducing and Using the Menu System 31
Picture Adjustment 32
Sound Adjustment 34
Screen Control 36
Features 39
Set Up 40
Other Functions
Sleep Timer Function 44
Teletext 45
NexTView 46
Connecting Optional Equipment 49
Using Optional Equipment 52
Remote Control Configuration for VCR/DVD 53
Specifications 55
Troubleshooting 57
Television Channel Number Guide for the United
Kingdom 60
Quick Start Guide
Thank you for purchasing this Sony product.
After following this step by step guide you will be able to:
- Insert batteries into the remote control.
- Remove the rear cover.
- Connect an aerial, VCR, and mains lead to your TV.
- Select the language of the menu screens.
- Select the country/region in which you want to operate your TV.
-Tune your TV.
- Change the broadcast channels into a different order.
1
Checking the Accessories Supplied
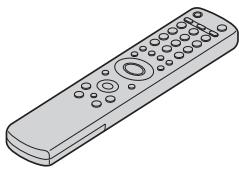
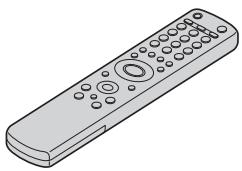
Remote Control
(RM-Y1101) (1):
Size AA Batteries
(R6 Type) (2):

Coaxial Cable (1):
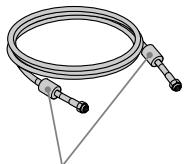
Do not remove ferrite cores.
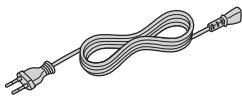
Mains Lead
(Type C-6) (1):
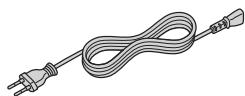

Use this mains lead if you use the unit outside the United Kingdom.
Mains Lead
(Type BF) (1):
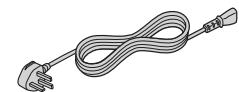
A Use this mains lead if you use the unit in the United Kingdom.
Refer to "NOTICE FOR CUSTOMERS IN THE UNITED KINGDOM" on page 2 when using this mains lead.
- This mains lead may not be supplied depending on the country/region.
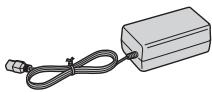
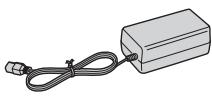
AC Power Adaptor
(AC-FD004E) (1):
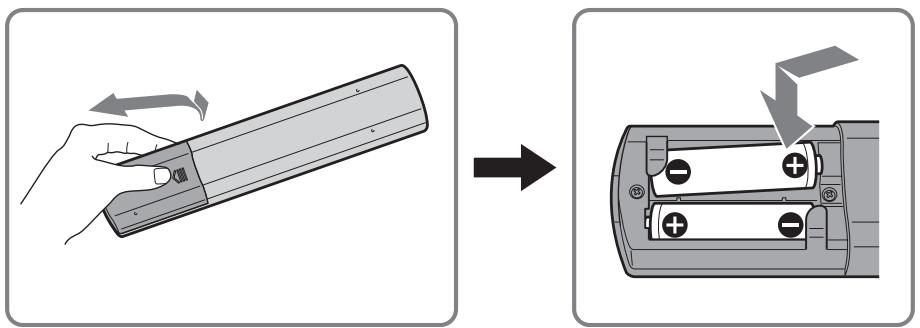
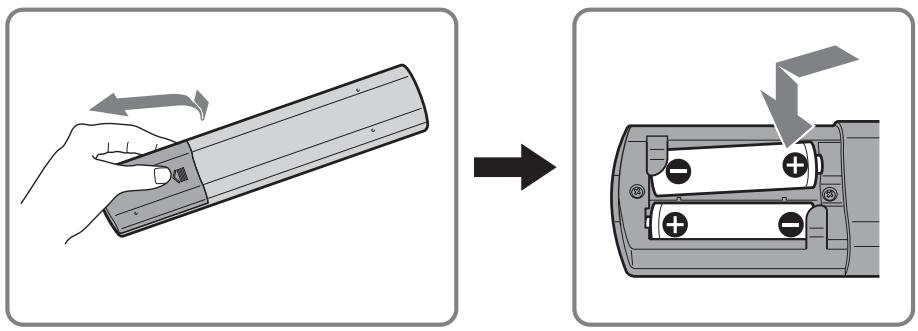
2 Inserting Batteries into the Remote Control

- Make sure you insert the supplied batteries observing the correct polarity.
- Always remember to dispose of used batteries in an environmentally friendly way.
- Do not use different types of batteries together or mix old and new batteries.
3
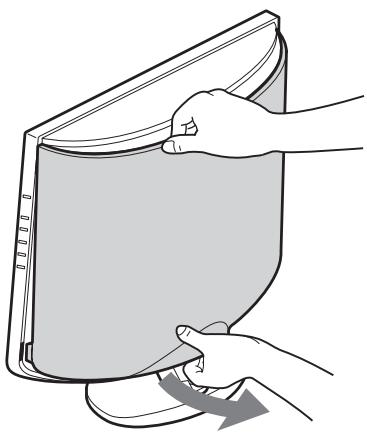
Removing the Rear Cover

When you connect the cables, remove the rear cover of the TV. Be sure to attach the rear cover back on the TV after you finish connecting the cables.
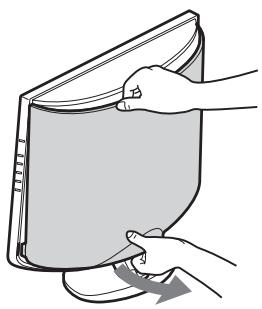
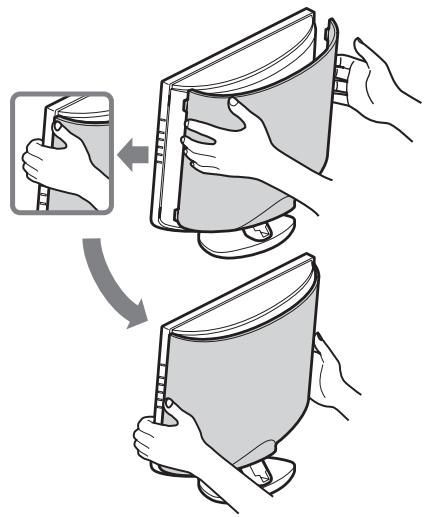
Removing the rear cover
Hold the rear cover as illustrated below and pull the lower part of the cover towards you first. Then, detach the upper part of the cover from the TV.
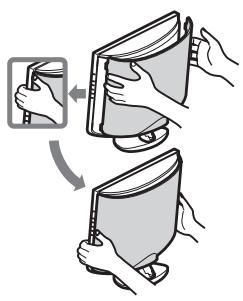
Attaching the rear cover
Hold the rear cover as illustrated below, fitting the four detents on the rear cover into the corresponding holes on the TV, then push the rear cover back onto the TV.
(continued)
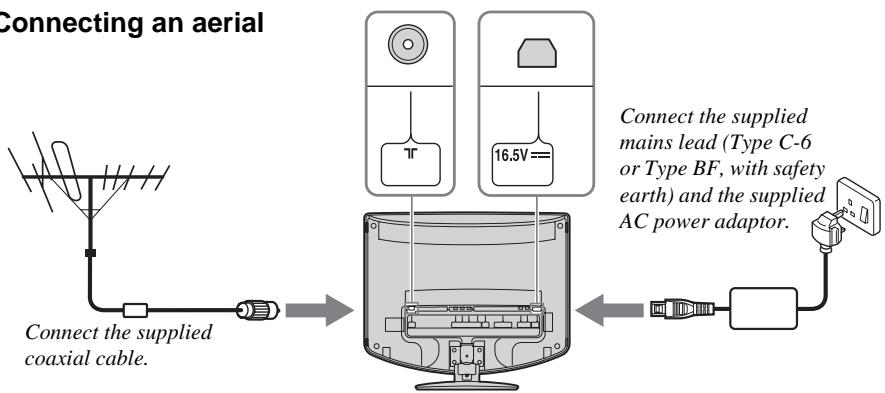
4 Connecting an Aerial, VCR, and Mains Lead to the TV

- Use the supplied mains lead (Type C-6 or Type BF, see page 4).
- Use the supplied coaxial cable for aerial connection.

Do not connect to the mains before all connections are complete.
Connecting a VCR with an aerial
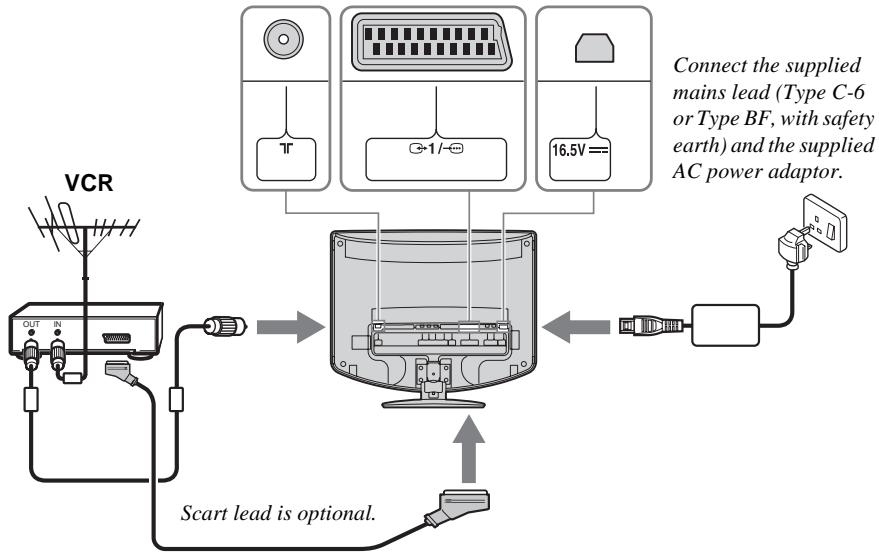

- For more details regarding VCR connection, refer to "Connecting Optional Equipment" on page 49.
Note that some Scart leads may not fit into the connector on the TV.
5
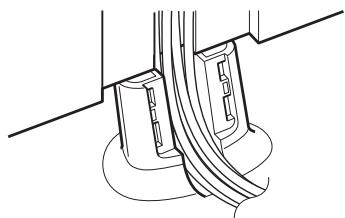
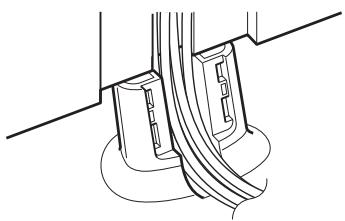
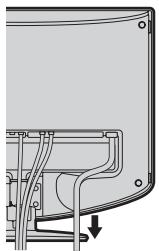
Bundling the Cables

You can store the cables in the back of the TV.
1 Bundle the cables and pass the cables through the centre hole.
2 Put the cable cover on the stand by fitting the claws of the cover with the corresponding holes on the stand. Then, push the cover to secure it.

To remove the cable cover, pull the convex part of the cover towards you.
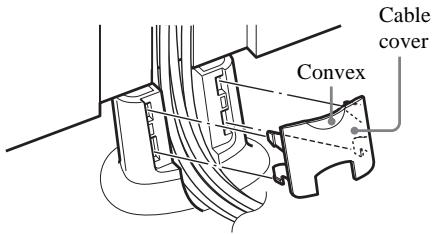

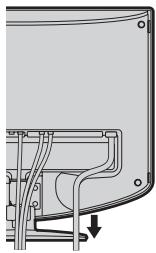
- It may not be possible to fasten cables that are too thick with the cable cover.
- If all the cables cannot be stored inside, leave some of them hanging down on both sides of the TV.
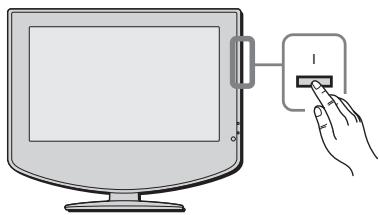
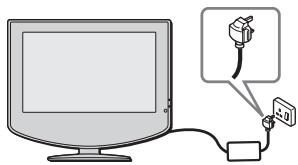
1 Connect the TV to the mains (100-240 V AC, 50/60 Hz).
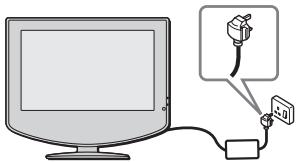
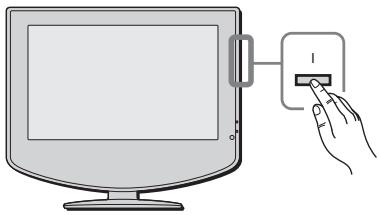
2 Press the I (Power) switch on the TV to switch it on.
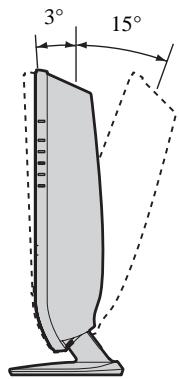
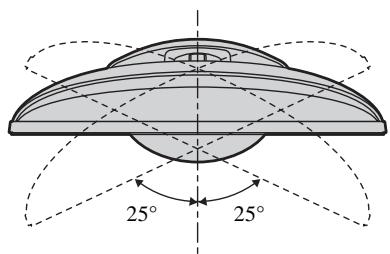
Adjusting the viewing angle of the TV
You can adjust the angle to avoid the reflection of light and get a better view of the TV.

When adjusting the angle, hold the stand with your hand so that it does not come loose or fall off. Be careful not to catch your fingers between the TV and the stand.
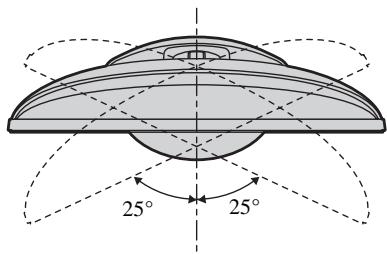
Horizontal direction
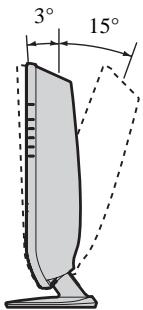
Backward direction
7
Selecting the Language of the Menu Screens and the Country/Region
This TV works with menu screens. By following the instructions below, you can select the desired language of the menu screens, and the country/region in which you want to operate the TV.
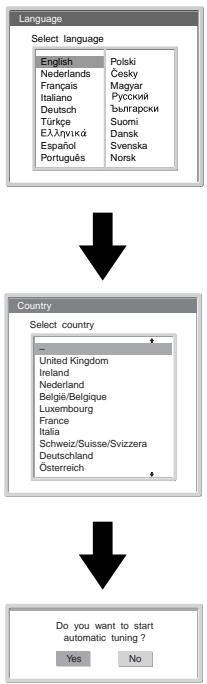
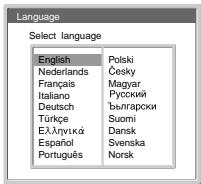
The first time you switch on the TV, the Language menu appears automatically on the screen (Auto Startup).
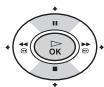
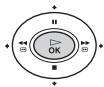
1 Press / / or on the remote control to select the language, then press OK to confirm your selection.
From now on, all the menus will appear in the selected language.
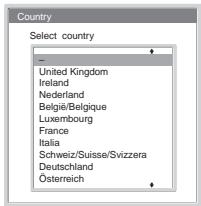
2 The Country menu appears automatically on the screen.
Press or to select the country/region in which you will operate the TV, then press OK to confirm your selection.
If the country/region in which you want to use the TV does not appear in the list, select “-” instead of a country/region.
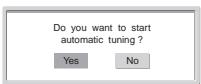
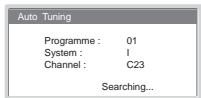
The Auto Tuning menu appears automatically on the screen.

To perform Auto Startup later, press + on the rear panel of the TV.
You must tune the TV to receive channels (TV Broadcast). If you follow the instructions below, the TV automatically searches and stores all available broadcast channels.
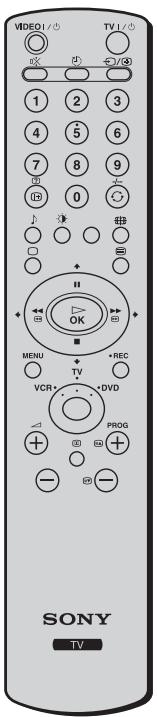
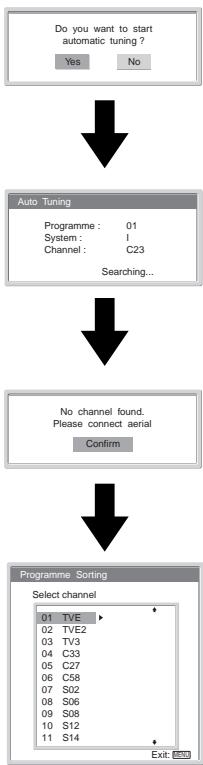
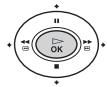
1 Press OK to select Yes.
2 The TV starts searching and storing all available broadcast channels.

-
This procedure could take some minutes. Please be patient and do not press any buttons, otherwise the auto tuning will not be completed properly.
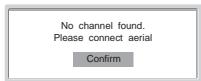
-
If no channels are found during the auto tuning process, a new menu appears automatically on the screen asking you to connect the aerial. Please connect the aerial (see page 6) and press OK. The auto tuning process will start again.
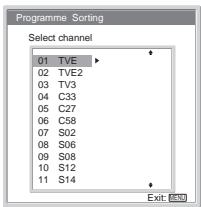
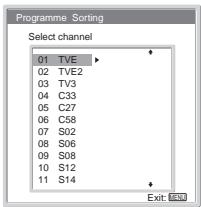
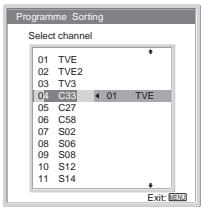
When the auto tuning is finished, the Programme Sorting menu appears automatically on the screen.

Changing the Programme Order of the Broadcast Channels
By following the instructions below, you can rearrange the order in which the broadcast channels appear on the screen.
A) If you want to keep the broadcast channels in the tuned order
Press MENU to exit and return to the normal TV screen.
B) If you want to store the broadcast channels in a different order

1 Press or to select the programme number with the channel you want to rearrange, then press .
2 Press or to select the new programme number position for your selected channel, then press .

The selected channel now moves to its new programme position and the other channels move accordingly.
3 Repeat steps 1 and 2 if you want to change the order of the other channels.
4 Press MENU to exit and return to the normal TV screen.

Your TV is now ready for use.
Operating Instructions
For Safety
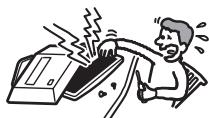
Mains lead
Unplug the mains lead when moving the unit. Do not move the unit with the mains lead plugged in. It may damage the mains lead and result in fire or electric shock. If the unit has been dropped or damaged, have it checked immediately by qua
Medical institutions
Do not place this unit in a place where medical equipment is in use. It may cause malfunction of medical instruments.
Installation
Installation of the unit on the wall should be carried out by qualified servicemen. Improper installation may render the unit unsafe in the event of an earthquake, etc.
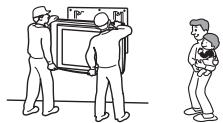
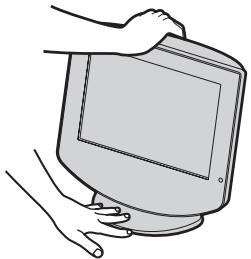
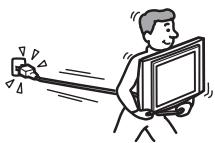
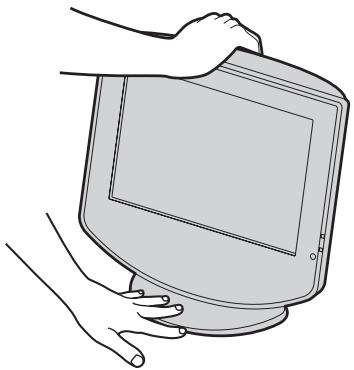
Carrying
Before carrying the unit, disconnect all the cables from the unit.
- When you carry the unit by hand, hold the unit as illustrated on the right. Do not hold the rear cover only. As the rear cover comes off easily, the unit may fall and be damaged or cause serious
- When transporting it, do not subject the unit to shocks or excessive vibration. The unit may fall and be damaged or cause serious injury.
- When you carry the unit in for repair or when you move it, pack it using the original carton and packing material.
Installation and Moving
Ventilation
Never cover the ventilation holes in the cabinet. It may cause overheating and result in fire. Unless

proper ventilation is provided, the unit may gather dust and get dirty. For proper ventilation, observe the following:
- Do not install the unit turned backwards or sideways.
- Do not install the unit turned over or upside down.
- Do not install the unit on a shelf or in a closet.
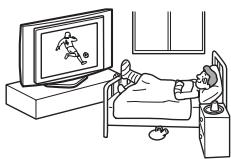
- Do not place the unit on a rug or bed.
- Do not cover the unit with cloth, such as curtains, or items such as newspapers, etc.
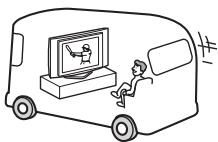
Vehicle or ceiling
Do not install this unit in a vehicle. The motion of the vehicle may cause the unit to fall down and cause injury. Do not hang this unit from the ceiling.
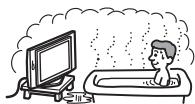
Water and moisture
Do not use this unit near water - for example, near a bathtub or shower room.
Also do not expose to rain, moisture or smoke. This may
result in fire or electric shock. Do not use this unit where insects may enter.
Optional accessories
Observe the following when installing the unit using a stand or wall-mount bracket. If you do not do so, the unit may fall and cause serious injury.
- Be sure to follow the instructions supplied with your stand or wall-mount bracket when installing the unit.
- Be sure to attach the brackets supplied with your stand.
Outdoor use
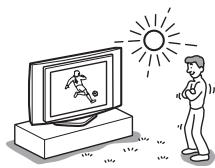
Do not install this unit outdoors. If the unit is exposed to rain, it may result in fire or electric shock. If the unit is exposed to direct sunlight, the unit may
heat up and this may result in damage to the unit.
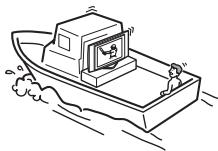
Ships and other vessels
Do not install this unit on a ship or other vessel. If the unit is exposed to seawater, it may cause fire or damage the unit.
To prevent the unit from falling
Place the unit on a secure, stable stand. Do not hang anything on the unit. If you do so, the unit may fall from the stand or wallmount bracket, causing damage
Do not allow children to climb on the unit.

Power Sources
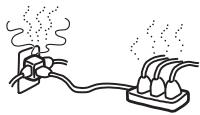
Overloading
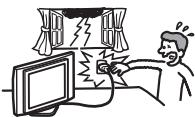
This unit is designed to operate on a 100-240 V AC supply only. Take care not to connect too many appliances to the same mains socket as this could result in fire or electric shock.
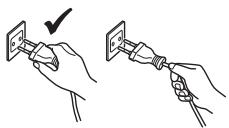
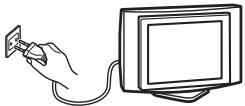
Mains lead protection
Pull out the mains lead by the plug. Do not pull on the mains lead itself.
Mains
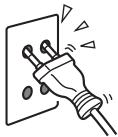
Do not use a poor fitting mains socket. Insert the plug fully into the mains. If it is loose, it may cause arcing and result in fire. Contact your electrician to have the mains socket changed.
Wiring
Unplug the mains lead when wiring cables. Be sure to unplug the mains lead for your safety, when hooking up.
Moisture
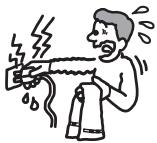
Do not touch the mains lead with a wet hand. If you plug/unplug the mains lead with a wet hand, it may cause electric shock.
Cleaning
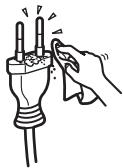
Clean the mains plug regularly. If the plug is covered with dust and it picks up moisture, its insulation may deteriorate and result in fire. Unplug the mains plug and clean it regularly.
Lightning storms
For your own safety, do not touch any part of the unit, mains lead, or aerial lead during lightning storms.
Use
Damage requiring service
If the surface of the unit cracks, do not touch it until you have unplugged the mains lead. Otherwise electric shock may result.
Ventilation holes
Do not insert anything in the ventilation holes. If metal or something flammable is inserted in these holes, it may result in fire or electric shock.
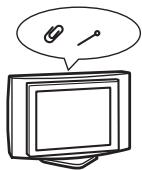
Servicing
Do not open the cabinet.
Entrust the unit to qualified service personnel only.
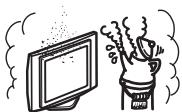
Moisture and
flammable objects
- Do not let this unit get wet.
Never spill liquid
of any kind on
the unit. If any liquid or solid object does fall through openings in the cabinet, do not operate the unit. It may result in electric shock or damage to the unit.
Have it checked immediately by qualified
service personnel.
- To prevent fire, keep flammable objects or naked lights (e.g. candles) away from the unit.

Electric shock
Do not touch the unit with wet hands. Doing so may cause electric shock or damage the unit.
Protruding location
Do not install the unit in locations where it may protrude. If you install the unit in the following locations, it may result in injury.
- Do not install the unit in a location where the unit protrudes, such as on or behind a pillar.
- Do not install the unit in a location where you might bump your head on it.
Placement
Never place the unit in hot, humid or excessively dusty places. Do not install the unit where insects may enter. Do not install the unit where it may be exposed to mechanical vibration.
Accessories
Secure the unit properly.
If the unit is not secured properly, it may fall and cause injury. Take measures to prevent this by using a stand or other apparatus on the floor or wall in the specified manner, referring to the operating instructions supplied with your stand.
Disposal of the unit
- Do not dispose of the unit with general household waste.
- The LCD contains a small amount of liquid crystal and mercury. The fluorescent tube used in this unit also contains mercury. Follow your local ordinances and regulations for disposal.
Oils
Do not install this unit in restaurants that use oil. Dust absorbing oil may enter the unit and damage the unit.
Corrosion
If you use this unit near the seashore, salt may corrode metal parts of the unit and cause internal damage or fire. It may also shorten the life of the unit. Steps should be taken to reduce the humidity and temperature of the area where the unit is located.
Cleaning
Unplug the mains lead when cleaning this unit. If you do not do so, it may result in electric shock.
Recommended place for the unit
Place the unit on a stable, level surface. Otherwise, the unit may fall and cause injury.

LCD Screen
- Although the LCD screen is made with high-precision technology and 99.99% or more of the pixels are effective, black dots may appear or bright points of light (red, blue, or green) may appear constantly on the LCD screen. This is a structural property of the LCD panel and is not a malfunction.
- Do not expose the LCD screen surface to the sun. Doing so may damage the screen surface.
- Do not push or scratch the front filter, or place objects on top of this unit. The image may be uneven or the LCD panel may be damaged.
- If this unit is used in a cold place, a smear may occur in the picture or the picture may become dark. This does not indicate a failure. These phenomena disappear as the temperature rises.
- Ghosting may occur when still pictures are displayed continuously. It may disappear after a few moments.
- The screen and cabinet get warm when this unit is in use. This is not a malfunction.
Fluorescent lamp
This unit uses a special fluorescent lamp as its light source. If the screen image becomes dark, flickers, or does not appear, the fluorescent lamp has run down and should be replaced. For replacement, consult qualified service personnel.
Heat
Do not touch the surface of the unit. It remains hot, even after the unit has been turned off for some time.
Cleaning the screen surface
The screen surface is finished with a special coating to prevent strong light reflections. Be sure to observe the following precautions to avoid damaging the finish.
- To remove dust from the screen surface, wipe gently with a soft cloth. If dust is persistent, wipe with a soft cloth slightly moistened with a diluted mild detergent solution. You can wash and repeatedly use the soft cloth.
- Never use any type of abrasive pad, alkaline/acid cleaner, scouring powder, or strong solvent such as alcohol, benzine or thinner.
Adjusting the viewing angle of the TV
When adjusting the angle, hold the stand with your hand so that it does not come loose or fall off.
Be careful not to catch your fingers between the TV and the stand.
Mains lead
If you damage the mains lead, it may result in fire or electric shock.
- Do not pinch, bend, or twist the mains lead excessively. The core lines may be exposed or cut, causing a short-circuit which may induce fire or electric shock.
- Do not convert or damage the mains lead.
- Do not put anything heavy on the mains lead. Do not pull the mains lead.
- Keep the mains lead away from heat sources.
- Be sure to grasp the plug when disconnecting the mains lead.
If the mains lead is damaged, stop using it and ask your dealer or Sony service centre to exchange it.
When not in use
For environmental and safety reasons, it is recommended that the unit be switched off when not in use - not left in standby mode. D
Cable wiring
Take care not to catch your feet on the cables. It may damage the unit.
Installation
Do not install optional components too close to the unit. Keep optional components at least 30cm away from the unit. If a VCR is installed in front of the unit or beside the unit, the picture may become distorted.
Precautions
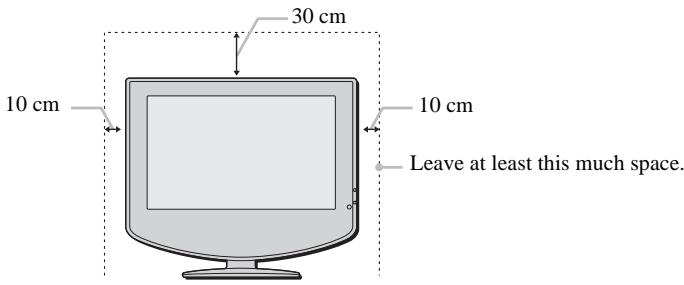
Precautions concerning ventilation
Leave space around the unit. Otherwise, adequate air-circulation may be blocked causing overheating, which may cause fire or damage to the unit.
When installing the unit on the wall
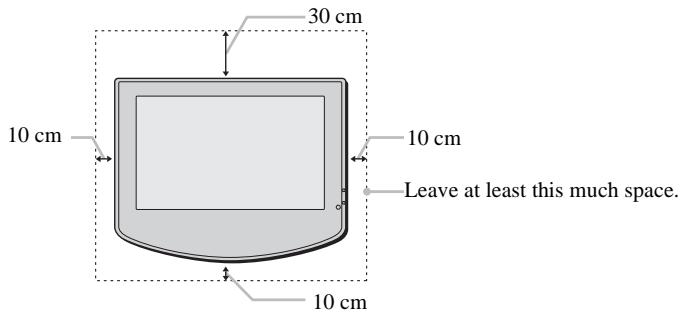
When installing the unit using a stand
Never install the unit as follows:
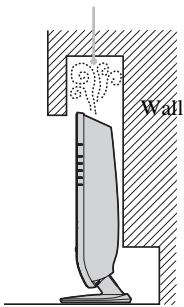
Air circulation is blocked.
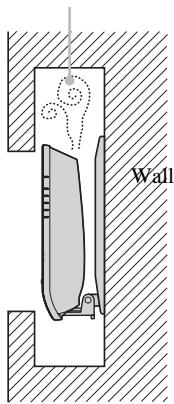
Air circulation is blocked.
Viewing the TV comfortably
- To view the TV comfortably, the recommended viewing position is from four to seven times the screen's vertical length away from the TV.
- View the TV in moderate light, as viewing the TV in poor light taxes your eyes. Watching the screen continuously for long periods of time can also tax your eyes.
Installing the unit
Use the specified wall-mount bracket or stand.
- Do not install the unit in places subject to extreme temperature, for example in direct sunlight, or near a radiator, or heating vent. If the unit is exposed to extreme temperature, the unit may heat up and this may cause deformation of the casing or cause the unit to malfunction.
- To obtain a clear picture, do not expose the screen to direct illumination or direct sunlight. If possible, use spot lighting directed down from the ceiling.
- The unit is not disconnected from the mains when the unit is switched off. To disconnect the unit completely, pull the plug from the mains.
Volume adjustment
- Adjust the volume so as not to trouble your neighbours. Sound carries very easily at night time. Therefore, closing the windows or using headphones is suggested.
- When using headphones, adjust the volume so as to avoid excessive levels, as hearing damage may result.
Handling the remote control
- Handle the remote control with care. Do not drop or step on it, or spill liquid of any kind onto it.
- Do not place the remote control in a location near a heat source, or in a place subject to direct sunlight, or in a damp room.
Handling and cleaning the screen surface of the unit
To avoid screen degradation, follow the advice given below. Do not push on the screen or scratch it with hard objects, or throw anything at it. The screen may be damaged.
- Be sure to unplug the mains lead before cleaning the unit.
- Do not touch the display panel after operating the unit continuously for a long period as the display panel becomes hot.
- We recommend that the screen surface be touched as little as possible.
- Clean the screen with a soft cloth.
- Never use any type of abrasive pad, scouring powder, or solvent, such as alcohol or benzine. Using such materials may result in damage to the screen surface.
Cleaning the cabinet
- Be sure to unplug the mains lead before cleaning the cabinet.
- Clean the cabinet with a soft cloth.
- Note that material deterioration or screen coating degradation may occur if the unit is exposed to a volatile solvent, such as alcohol, thinner, benzine or insecticide, or if prolonged contact is maintained with rubber or vinyl materials.
- The ventilation holes can accumulate dust over a period of time. To ensure proper ventilation, we recommend removing the dust periodically (once a month) using a vacuum cleaner.
Checking the Accessories Supplied
Remote Control
(RM-Y1101) (1):
Size AA Batteries
(R6 Type) (2):

Coaxial Cable (1):

Do not remove ferrite cores.
Mains Lead
(Type C-6) (1):
Mains Lead
(Type BF) (1):

AC Power Adaptor (AC-FD004E) (1):

Use this mains lead if you
use the unit outside the
United Kingdom.

- Use this mains lead if you use the unit in the United Kingdom.
Refer to "NOTICE FOR CUSTOMERS IN THE UNITED KINGDOM" on page 2 when using this mains lead.
- This mains lead may not be supplied depending on the country/region.
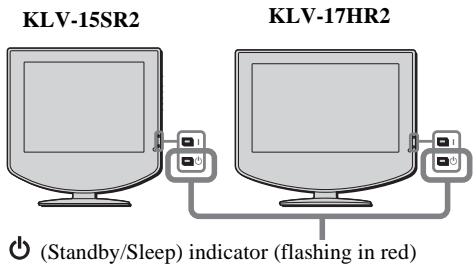
KLV-17HR2/15SR2
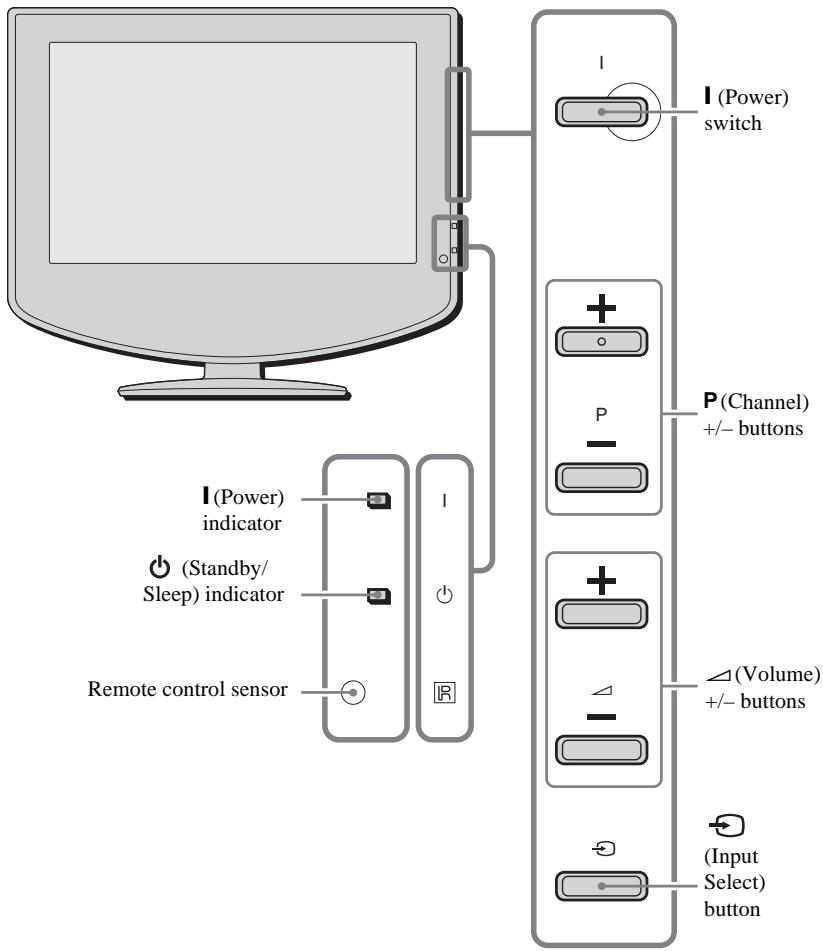
Status of the indicators
I (Power) indicator lights up in green
The power of the TV is on.
(Standby/Sleep) indicator lights up in red
The TV is in the standby mode.
The Sleep Timer function is on when the TV is turned on.
(Standby/Sleep) indicator flashes in red
The TV is receiving remote control signals.
(Standby/Sleep) indicator flashes in red repeatedly and the I (Power) indicator is off
There is a problem with the TV. For more details, refer to "Self-diagnosis function" on page 57.

For the connectors on the rear panel of the TV, refer to "Connecting Optional Equipment" on page 49.
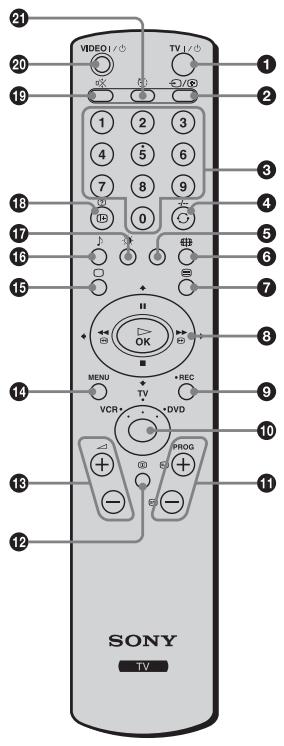
Switching the TV to the standby mode:
Press this button to temporarily turn off the TV and switch it to the standby mode (the
(Standby/Sleep) indicator on the TV lights up in red). Press it again to switch on the TV from the standby mode.
To save energy, we recommend switching the TV off completely when the TV is not in use.

If no signal is received or no operation is performed in the TV mode for 10 minutes, the TV automatically switches to the standby mode.
Press this button repeatedly until the input symbol of the desired source appears on the screen.
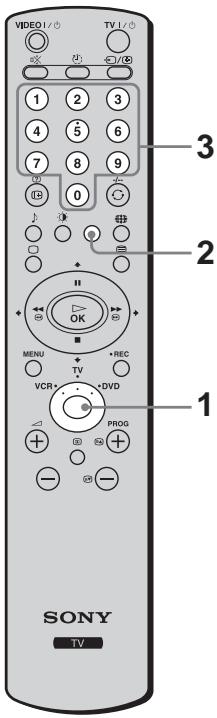
3 Selecting channels:
Press this button to select channels.
For double-digit programme numbers, enter the second digit within 2.5 seconds.
a) If the TV is selected:
Press this button to watch the last channel selected (the last channel watched for at least five seconds).
b) If the VCR is selected:
For Sony's VCR double-digit programme numbers, e.g. 23, press this button first then press the 2 and 3 buttons.
5 Programming the remote control:
Use this button to programme the remote control to operate your VCR or DVD. For more details, refer to "Remote Control Configuration for VCR/DVD" on page 53.
Press this button repeatedly to change the screen format. For more details, refer to "Screen Control" on page 36.
7 Selecting Teletext:
Press this button to switch on Teletext. For more details, refer to "Teletext" on page 45.
a) If the TV is selected:
- When the menu is displayed, use these buttons to operate the menu system. For more details, refer to "Introducing and Using the Menu System" on page 31.
- When the menu is turned off, press OK to show an overview of all TV channels. Then press or to select the channel and press OK to watch the selected channel.
b) If the VCR or DVD is selected:
Use these buttons to control the main functions of your VCR or DVD.
Recording programmes on your VCR:
If the VCR is selected, press this button to record programmes.
Selecting the VCR, TV or DVD (Media Selector):
With this remote control you can operate not only this TV but also the main functions of your VCR or DVD.
Switch on the equipment you want to operate and press this button repeatedly to select VCR, TV, or DVD. The green light just above the selected equipment lights up momentarily.

An initial setup is required to synchronise this remote control to your VCR or DVD. This setup depends on the manufacturer. For more details, refer to "Remote Control Configuration for VCR/DVD" on page 53.
1 Selecting channels:
Press these buttons to select the next or previous channel.
Displaying NexTView:
For more details, refer to "NexTView" on page 46.
Adjusting the TV volume:
Press these buttons to adjust the volume of the TV.
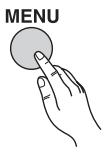
Displaying the menu system:
Press this button to display the menu on the screen. Press it again to remove the menu display from the screen.
15 Selecting the TV mode:
Press this button to switch off Teletext or video input.
Selecting a sound effect:
Press this button repeatedly to change the style of sound used by your TV. For more details on the styles available, refer to "Sound Adjustment" on page 34.
Selecting a picture mode:
Press this button repeatedly to change the picture mode. For more details, refer to "Picture Adjustment" on page 32.
18 Displaying on-screen information:
Press this button to display all on-screen indicators. Press it again to cancel.
Muting the sound:
Press this button to mute the sound from the TV. Press it again to restore the sound.
20 Switching the VCR or DVD on/off:
Press this button to switch your VCR or DVD on or off.
3 Turning on the Sleep Timer function:
Press this button to set the TV to automatically switch to the standby mode after a specified time period. For more details, refer to "Sleep Timer Function" on page 44.

In addition to the TV functions, all coloured buttons are also used for Teletext operations. The buttons with green symbols (except for (NexTView) and 1 / 0 (Power/Standby)) are also used. For more details, refer to "Teletext" on page 45.
Inserting Batteries into the Remote Control

- Make sure you insert the supplied batteries observing the correct polarity.
- Always remember to dispose of used batteries in an environmentally friendly way.
- Do not use different types of batteries together or mix old and new batteries.
Removing the Rear Cover

When you connect the cables, remove the rear cover of the TV. Be sure to attach the rear cover back on the TV after you finish connecting the cables.
Removing the rear cover
Hold the rear cover as illustrated below and pull the lower part of the cover towards you first. Then, detach the upper part of the cover from the TV.
GB
Attaching the rear cover
Hold the rear cover as illustrated below, fitting the four detents on the rear cover into the corresponding holes on the TV, then push the rear cover back onto the TV.
Connecting an Aerial and a VCR

- Use the supplied mains lead (Type C-6 or Type BF, see page 20).
- Use the supplied coaxial cable for aerial connection.

Do not connect to the mains before all connections are complete.
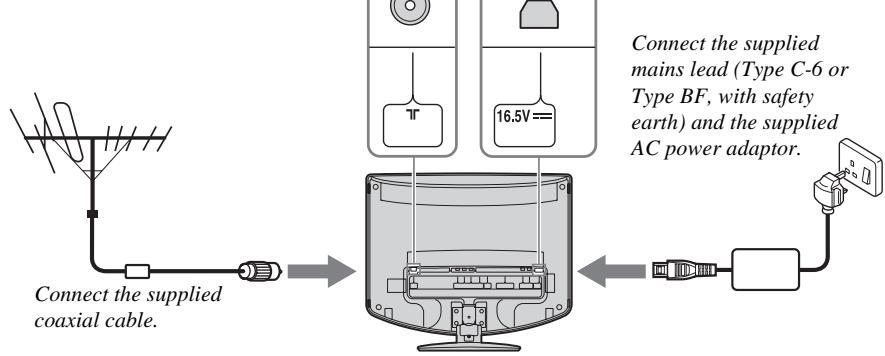
Connecting an aerial
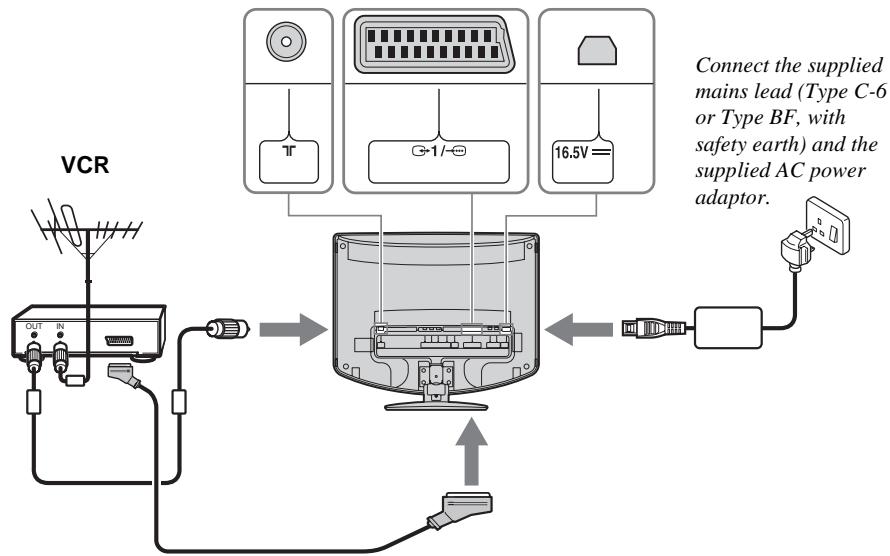
Connecting a VCR with an aerial
Scart lead is optional.

- For more details regarding VCR connection, refer to "Connecting Optional Equipment" on page 49.
- Note that some Scart leads may not fit into the connector on the TV.
Bundling the cables
You can store the cables in the back of the TV.
1 Bundle the cables and pass the cables through the centre hole.
2 Put the cable cover on the stand by fitting the claws of the cover with the corresponding holes on the stand. Then, push the cover to secure it.

To remove the cable cover, pull the convex part of the cover towards you.
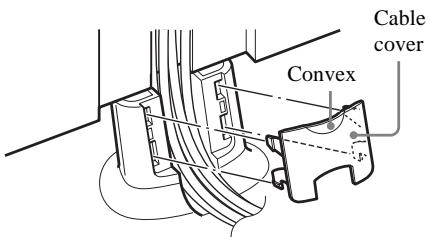

- It may not be possible to fasten cables that are too thick with the cable cover.
- If all the cables cannot be stored inside, leave some of them hanging down on both sides of the TV.
Adjusting the viewing angle of the TV
You can adjust the angle to avoid the reflection of light and get a better view of the TV.

When adjusting the angle, hold the stand with your hand so that it does not come loose or fall off. Be careful not to catch your fingers between the TV and the stand.
Backward direction
Horizontal direction
Switching On the TV and Tuning the TV Automatically

The first time you switch on your TV, a sequence of menu screens appear on the TV enabling you to: 1) choose the language of the menu screen, 2) choose the country/region in which you want to operate the TV, 3) search and store all available channels (TV Broadcast), and 4) change the order in which the channels (TV Broadcast) appear on the screen.
However, if you need to change any of these settings at a later date, you can do so by selecting the appropriate option in the "Set Up" menu (see page 40).
1 Connect the TV to the mains (100-240 V AC, 50/60 Hz).
2 Press the (Power) switch on the TV to switch it on. The first time you switch on the TV, the Language menu appears automatically on the screen (Auto Startup).

To perform Auto Startup later, press on the rear panel of the TV.
3 Press / / or on the remote control to select the language, then press OK to confirm your selection. From now on, all the menus will appear in the selected language.
4 The Country menu appears automatically on the screen. Press or to select the country/region in which you will operate the TV, then press OK to confirm your selection.

If the country/region in which you want to use the TV does not appear in the list, select " - " instead of a country/region.
5 The Auto Tuning menu appears automatically on the screen.
Press OK to select Yes.
6 The TV starts searching and storing all available broadcast channels.

- This procedure could take some minutes. Please be patient and do not press any buttons, otherwise the auto tuning will not be completed properly.
- If no channels are found during the auto tuning process, a new menu appears automatically on the screen asking you to connect the aerial. Please connect the aerial (see page 26) and press OK. The auto tuning process will start again.
7 When the auto turning is finished, the Programme Sorting menu appears automatically on the screen.
A) If you want to keep the broadcast channels in the tuned order, go to step 8.
B) If you want to store the broadcast channels in a different order:
1 Press or to select the programme number with the channel you want to rearrange, then press .
2 Press or to select the new programme number position for your selected channel, then press .

The selected channel now moves to its new programme position and the other channels move accordingly.
3 Repeat steps 1 and 2 if you want to change the order of the other channels.
8 Press MENU to turn off the menu.
MENU

Your TV is now ready for use.
Introducing and Using the Menu System

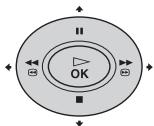
Your TV uses an on-screen menu system to guide you through the operations. Use the following buttons on the remote control to operate the menu system.
1 Press MENU to switch the first level menu on.
2 Do the following to operate the menu.
- To highlight the desired menu or option, press or .
- To enter the selected menu or option, press
- To return to the last menu or option, press .
- To alter the settings of your selected option, press
To confirm your selection, press OK.
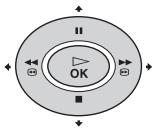
3 Press MENU to turn off the menu.
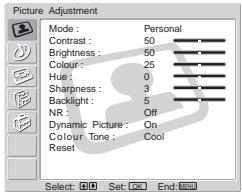
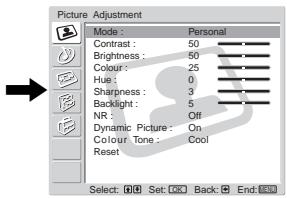
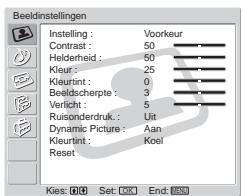
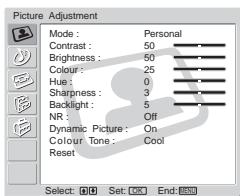
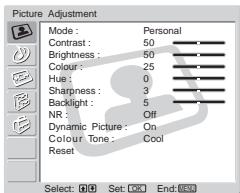
The "Picture Adjustment" menu allows you to alter the picture adjustments.
To do this:
After selecting the item you want to alter, press , then press / / or repeatedly to adjust it.
This menu also allows you to customise the picture quality for the "Personal" mode based on the programme you are watching.
| Mode | Live
For enhanced picture contrast and sharpness.
Movie
For a finely detailed picture.
Personal
For your own custom settings. |
| Contrast | Press ↓ or ← to reduce picture contrast.
Press ↑ or ↓ to enhance picture contrast. |
| Brightness | Press ↓ or ← to darken the picture.
Press ↑ or ↓ to brighten the picture. |
| Colour | Press ↓ or ← to decrease colour intensity.
Press ↑ or ↓ to increase colour intensity. |
| Hue | Press ↓ or ← to decrease the green tones.
Press ↑ or ↓ to increase the green tones. |
| Hue can only be adjusted for an NTSC colour signal (e.g. U.S.A. video tapes). |
| Sharpness | Press ↓ or ← to soften the picture.
Press ↑ or ↓ to sharpen the picture. |
| Backlight | Press ↓ or ← to darken the backlight.
Press ↑ or ↓ to brighten the backlight. |
| NR (Noise Reduction) Auto/Off
Select to reduce the noise level. |
| Dynamic Picture | On/Off
Select to enhance the picture contrast. |
| Colour Tone | Cool/Normal/Warm
Select to give bright colours a red tint (setting is variable from Cool to Warm). |
| Reset | Cancel/OK
Select OK to reset the picture to the factory preset levels. |

Only "Mode," "Contrast," and "Reset" can be adjusted when "Mode" is set to "Live" or "Movie."
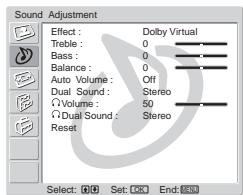
The "Sound Adjustment" menu allows you to alter the sound adjustments.
To do this:
After selecting the item you want to alter, press , then press / / or repeatedly to adjust it.
Effect
Off
No effect.
Natural
Enhances clarity, detail and presence of sound by using the "BBE High Definition Sound system."
Dynamic
Intensifies clarity and presence of sound for better intelligibility and musical realism by using the "BBE High Definition Sound system."
*Dolby Virtual
Uses the TV speakers to simulate the surround effect produced by a multi channel system.

If you set "Auto Volume" to "On" when Dolby Virtual is selected, the Effect option automatically changes to Natural.
The "BBE High Definition Sound system" is manufactured by Sony Corporation under licence from BBE Sound, Inc. It is covered by U.S. Patent No. 4,638,258 and No. 4,482,866. The word "BBE" and BBE Symbol are trademarks of BBE sound.
- Manufactured under license from Dolby Laboratories. "Dolby," "Pro Logic," and the double-D symbol are trademarks of Dolby Laboratories.
| Treble | Press ↓ or ↓ to decrease higher-frequency sounds.
Press ↑ or ↑ to increase higher-frequency sounds. |
| Bass | Press ↓ or ↓ to decrease lower-frequency sounds.
Press ↑ or ↑ to increase lower-frequency sounds. |
Balance
Press or to emphasise the left speaker.
Press or to emphasise the right speaker.
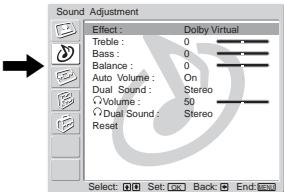
Auto Volume
On/Off
Volume level of the channels will stay the same, independent of the broadcast signal (e.g. in the case of advertisements).

If you set "Effect" to "Dolby Virtual," Off is selected automatically.
Dual Sound
Mono/Stereo
For a stereo broadcast, select Stereo or Mono.
Mono/A/B
For a bilingual broadcast, select A for sound channel 1, B for sound channel 2, or Mono for a mono channel, if available.

If you select other equipment connected to the TV, set the Dual Sound option to Stereo, A, or B.
Volume
Press or to turn the volume of the headphones down.
Press or to turn the volume of the headphones up.

Even if headphones are connected to the TV, you can hear the sound from the TV speakers.
Dual Sound
Select the "Dual Sound" option of the headphones.
Mono/Stereo
For a stereo broadcast, select Stereo or Mono.
Mono/A/B
For a bilingual broadcast, select A for sound channel 1, B for sound channel 2, or Mono for a mono channel, if available.

If you select other equipment connected to the TV, set the Dual Sound option to Stereo, A, or B.
Reset
Cancel/OK
Select OK to reset the sound to the factory preset.
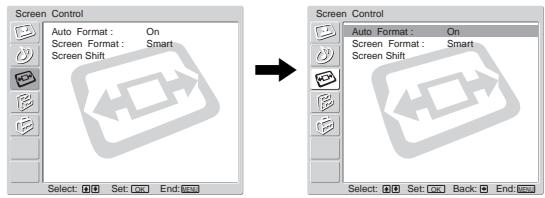
The "Screen Control" menu allows you to alter the screen adjustments.
(KLV-17HR2)
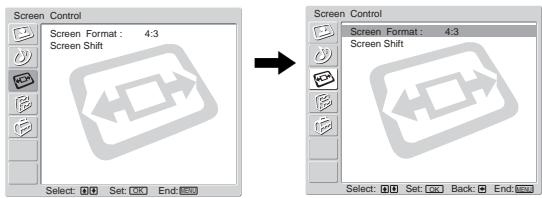
(KLV-15SR2)
The "Auto Format" option allows you to automatically change the aspect ratio of the screen.
To do this:
1 After selecting this option, press
2 Press or to select On (if you want the TV to automatically switch the screen format according to the video input signal) or Off (if you want to keep your preference).

Even if you have selected On or Off in the Auto Format option, you can always modify the format of the screen by pressing repeatedly on the remote control.
The "Screen Format" option allows you to modify the format of the screen.
To do this (KLV-17HR2):
1 After selecting this option, press
2 Press or to select the desired screen format and press OK.
| Smart
Imitation of the wide screen effect for a 4:3 broadcast. | →
Smart |
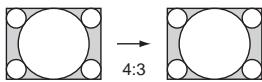
| 4:3
Conventional 4:3 picture size, full picture information. | →
4:3 |
| 14:9
Compromise between 4:3 and 16:9 picture size. | →
14:9 |
| Zoom
Wide screen format for letterbox movies. | →
Zoom |
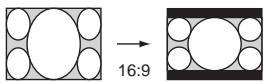
| Wide
For a 16:9 broadcast. | →
Wide |
To do this (KLV-15SR2):
1 After selecting this option, press
2 Press or to select the desired screen format and press OK.
4:3
Conventional 4:3 picture size.
16:9
For a 16:9 broadcast.

You can adjust the position of the image when Smart, 14:9, or Zoom is selected. If parts of the top and bottom of the screen are cut off, press or to move the image up or down (e.g. to read subtitles).
Screen Shift
The "Screen Shift" option allows you to adjust the position of the picture for each screen format.
To do this:
1 After selecting this option, press
2 Press or to select the desired option and press . Then Press / / or to adjust the position of the picture.
V Shift (Vertical Shift) (KLV-17HR2 only)
Press to move the screen up.
Press to move the screen down.
H Shift (Horizontal Shift)
Press to move the screen to the left.
Press to move the screen to the right.
Reset
Select OK to reset to the factory settings.

- H Shift (Horizontal Shift) can only be adjusted for an RGB input signal from the Scart connector 1 /
- When "Screen Format" is set to "4:3" or "Wide," V Shift (Vertical Shift) cannot be adjusted.

The "Features" menu allows you to alter various adjustments of the TV.
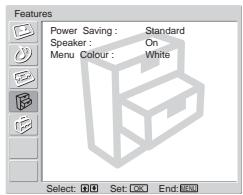
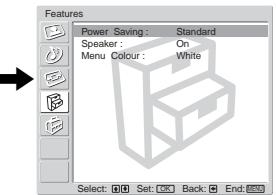
Power Saving
The "Power Saving" option allows you to reduce the power consumption of the TV.
To do this:
1 After selecting this option, press
2 Press or to select Reduce.

If you switch the TV off then on again when the Power Saving option is set to Reduce, the setting remains unchanged.
Speaker
The "Speaker" option allows you to control the sound of the TV speakers when external audio equipment is connected.
To do this:
1 After selecting this option, press
2 Press or to select the desired output.
On
The sound of the TV is output through the TV speakers.
Off
The sound of the TV is not output through the TV speakers.
The "Menu Colour" option allows you to alter the background colour of the menus.
To do this:
1 After selecting this option, press
2 Press or to select White or Black.
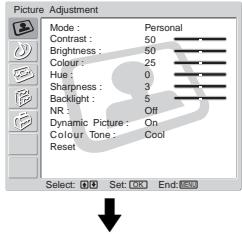
| Picture Adjustment
Mode: Personal
Contrast: 50
Brightness: 80
Colour: 25
Hue: 0
Sharpness: 3
Backlight: 5
NR: Off
Dynamic Picture: On
Colour Tone: Cool
Reset: End |
| Language:
Language: English
Country:
Auto Tuning
Programme Sorting
Programme Labels
AV Preset
Manual Programme Preset
Select: Set: End |
| Language:
Language: English
Country:
Auto Tuning
Programme Sorting
Programme Labels
AV Preset
Manual Programme Preset
Select: Set: End |
| Language:
Language: English
Country:
Auto Tuning
Programme Sorting
Programme Labels
AV Preset
Manual Programme Preset
Select: Set: End |
| Language:
Language: English
Country:
Auto Tuning
Programme Sorting
Programme Labels
A/P Preset
Manual Programme Preset
Select: Set: End |
| Language:
Language: English
Country:
Auto Tuning
Programme Sorting
Programme Labels
A/P Preset
Manual Programme Preset
Select: Set: End |
| Language:
Language: English
Country:
Auto Tuning
Programme Sorting
Programme Labels
A/P Preset
Manual Programme Preset
Select: Set: End |
| Language:
Language: English
Country: 1
Follow step 3 of “Switching On the TV and Tuning the TV Automatically” on page 29. |
| Country
The “Country” option allows you to select the country/region in which you want to operate the TV.
To do this:
1 After selecting this option, press ↓.
2 Follow step 4 of “Switching On the TV and Tuning the TV Automatically” on page 29. |
| Auto Tuning
The “Auto Tuning” option allows you to automatically search and store all available channels (TV Broadcast).
To do this:
1 After selecting this option, press ↓.
2 Follow steps 5 and 6 of “Switching On the TV and Tuning the TV Automatically” on page 29. |
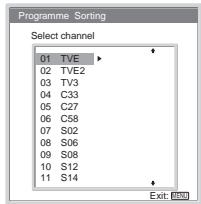
| Programme Sorting
The “Programme Sorting” option allows you to change the order in which the channels (TV Broadcast) appear on the screen.
To do this:
1 After selecting this option, press ↓.
2 Follow step 7 B) of “Switching On the TV and Tuning the TV Automatically” on page 29. |
Programme Labels
The "Programme Labels" option allows you to name a channel using up to five characters (letters or numbers).
To do this:
1 After selecting this option, press
2 Press or to select the programme number with the channel you want to name, then press OK.
3 Press / / or to select the character, then press OK.
4 When you have finished, press / / or to select the word "End" on the screen and press OK to exit the character input screen.
- If you input a wrong character, select the character using + or + on the screen. Then press +/+ or + to select the correct character and press OK.
- For a blank, select on the screen and press OK.
AV Preset
The "AV Preset" option allows you to designate a name for any external equipment you have connected to the TV.
To do this:
1 After selecting this option, press
2 Press or to select the input source you want to name, then press .
3 A label automatically appears in the label column.
a) If you want to use one of the predefined labels, press or to select the desired label: AV1/AV2,VIDEO,DVD,CABLE,GAME,CAM or SAT.
b) If you want to set a different label, select Edit and press OK. Then with the first element highlighted, press / / or to select the character, then press OK.
When you have finished, press / / or to select the word "End" on the screen and press OK to exit the character input screen.
- If you input a wrong character, select the character using + or + on the screen. Then press + / + / + or + to select the correct character and press OK.
- For a blank, select on the screen and press OK.
Manual
Programme Preset
The "Manual Programme Preset" option (A-E) allows you to:
A) Preset channels, one by one, in the programme order of your choice.
To do this:
1 After selecting this option, press
2 Highlight the Programme option and press
3 Press or to select a programme number for which you want to preset the channel, then press . If you do not want to preset other options for the channel, press OK instead of and go to step 8.
4 After selecting the System option, press . Depending on the country/region you have selected in the "Country" option, this option may not be available (see page 40).
5 Press or to select the TV Broadcast system (B/G for western European countries/regions, D/K for eastern European countries/ regions, I for the United Kingdom, or L for France), then press . If you do not want to preset other options for the channel, press OK instead of and go to step 8.
6 After selecting the Channel option, press
7 Press or to select the type of channel to be tuned (S for cable channels or C for terrestrial channels), then press .
After that, press the number buttons to enter the channel number of the TV Broadcast directly. If you do not know the channel number, press or to search for it.
When you have tuned the desired channel, press OK.
8 Highlight the Confirm option and press OK. Then press to select OK and finally press OK to store your channel selection.
Repeat all the above steps to tune and store other channels.
B) Label a channel using up to five characters (letters or numbers).
To do this:
1 Press PROG + / - to select the programme number with the channel you want to name.

You cannot select the programme number set to skip in the "Skip" option (see step D on page 43).
2 When the programme you want to name appears on the screen, select the Label option and press
3 Press / / or to select the first character, then press OK.
4 When you have finished, press / / or to select the word "End" on the screen and press OK to exit the character input screen.
-
If you input a wrong character, select the character using + or + on the screen. Then press +/+/+ or + to select the correct character and press OK.
-
For a blank, select on the screen and press OK.
C) Normally the automatic fine tuning (AFT) option will give the best possible picture, however you can manually fine-tune the TV to obtain a better picture if the picture is distorted.
To do this:
1 Press PROG + / - to select the programme number with the channel you want to fine-tune manually.

You cannot select the programme number set to skip in the "Skip" option (see step D on page 43).
2 When the programme you want to fine-tune appears on the screen, select the AFT option and press .
3 Press or to adjust the fine tuning between -15 and +15 and press OK.
4 Highlight the Confirm option and press OK. Then press to select OK and finally press OK to store your choice.
To restore automatic fine tuning, select On in step 3 above.
D) Skip any unwanted programme numbers when they are selected with the PROG + / - buttons.
To do this:
1 Highlight the Programme option and press . Then press or to select the programme number you want to skip.
2 When the programme you want to skip appears on the screen, select the Skip option and press .
3 Press or to select Yes and press OK.
4 Highlight the Confirm option and press OK. Then press to select OK and finally press OK to store your choice.
To cancel this function afterwards, select No instead of Yes in step 3 above.
E) View and record scrambled channels when using a decoder connected to the Scart connector 1 / either directly or via a VCR.

Depending on the country/region you have selected in the "Country" option, this option may not be available (see page 40).
To do this:
1 Press PROG + / - to select the programme number with the scrambled channel you want to view.

You cannot select the programme number set to skip in the "Skip" option (see step D on page 43).
2 When the programme you want to view appears on the screen, select the Decoder option and press .
3 Press or to select On and press OK.
4 Highlight the Confirm option and press OK. Then press to select OK and finally press OK to store your choice.
To cancel this function afterwards, select Off instead of On in step 3 above.
Sleep Timer Function

The Sleep Timer function allows you to set the TV to switch itself automatically to the standby mode after a specified time period. You can select the time period from among 30 minutes, 60 minutes, 90 minutes, and 120 minutes.
To set the Sleep Timer function
Press on the remote control repeatedly until the desired time period ("30min," "60min," "90min," or "120min") appears on the screen.
When the Sleep Timer function is on, the (Standby/Sleep) indicator on the TV lights up in red.
To cancel the Sleep Timer function
Press repeatedly until "Off" appears on the screen.

- If you switch off the TV and switch it on again, the Sleep Timer function is reset to "Off."
- The message "Sleep timer will end soon. Power will be turned off." appears on the screen one minute before the TV switches to the standby mode.
- If you press + / 2 on the remote control, the remaining time in minutes before the TV switches to the standby mode is displayed on the screen.
Teletext

Teletext is an information service transmitted by most TV stations. The index page of the Teletext service (usually page 100) gives you information on how to use the service. To operate Teletext, use the remote control buttons as indicated below.

Make sure you use a channel (TV Broadcast) with a strong signal, otherwise Teletext errors may occur.
To switch on Teletext
After selecting the TV channel which carries the Teletext service you want to view, press l

Each time you press 且 , the screen changes cyclically as follows: Teletext mode Teletext Superimpose mode TV mode Teletext mode (repeat).
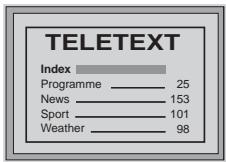
To select a Teletext page
Input three digits for the page number, using the number buttons.
- If you make a mistake, retype the correct page number.
- If the counter on the screen continues searching, it is because this page is not available. In this case, input another page number.
To access the next or preceding page
Press PROG + (E) or PROG - (E).
To superimpose Teletext on to the TV
Whilst you are viewing Teletext, press 3 . Press it again to cancel the Teletext mode.
To freeze a Teletext page
Some Teletext pages have sub-pages which follow on automatically. To stop them, press / . Press it again to cancel the freeze.
Press + /? . Press it again to conceal the information.
To select a sub page
A Teletext page may consist of several sub pages. In this case, the page number that appears on the upper left corner will change from white to green and one or more arrows will appear next to the page number.
Repeatedly press or on the remote control to watch the desired page.
To switch off Teletext
Press
Fastext

The Fastext service lets you access pages with one push of a button.
Whilst you are in the Teletext mode and Fastext is broadcast, a colour coded menu appears at the bottom of the Teletext page. Press the colour button (red, green, yellow or blue) to access the corresponding page.
NextView*
- Depending on availability of service.

NexTView is an on-screen electronic programme guide, providing you with programme information for different broadcasters.
When looking for information, you can search by theme (sports, art, etc.) or date.

When you are viewing the NexTV view service, wrong characters appear on the screen if the language used in the NexTV service does not match the language set on your TV. To resolve this problem, select the "Language" option in the "Set Up" menu and set the same language as that used in the NexTV service. Also select the "Country" option in the "Set Up" menu and set the country/region in which the NexTV view service is provided (see page 40).
Displaying NexView
1 Select a broadcast channel providing the NexTV view service. In this case, the indication "NexTV" is displayed as soon as data is available.
2 To see the NexTView service, you have two different NexTView interface types, depending on the percentage of available data.
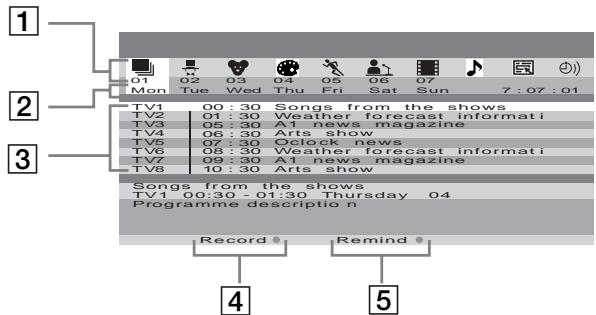
a) "Programme List" interface
Whilst you are watching TV, and after the indication "NexTView" in orange is displayed on the screen, press on the remote control to see the "Programme List" interface (see fig. 1 on page 47).
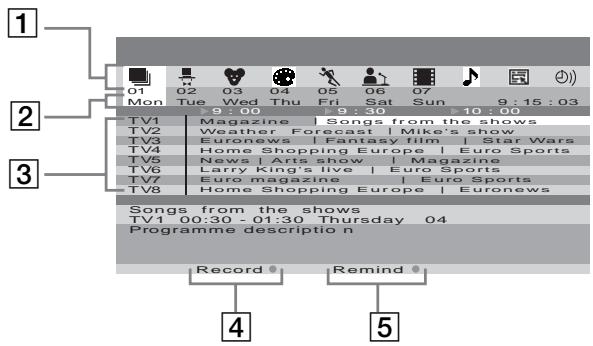
b) "Overview" interface
Whilst you are watching TV, and after more than 50% of NexTView data is available (100% data may not be available depending on your area), the indication "NexTView" in black or white is displayed on the screen. (The colour of the indication "NexTView" may vary depending on the Menu Colour option. See page 39.) Then press l on the remote control to see the "Overview" interface (see fig. 2 on page 47).

As soon as you enter the NexTView service, the lower left corner of the screen will show the percentage of NexTView data available. Once you have entered this service, the percentage of data available will not increase.
3 To navigate through NexTView:
- Moving right or left, press or .
- Moving up or down, press or .
- Confirming a selection, press OK.
4 To switch off NexTView, press on the remote control.
"Programme List" interface (fig. 1)
GB
"Overview" interface (fig. 2)
1 Icons for different themes Refer to "Icon key" on page 48.
Date
3 Programme list
4 Record

This function only works if you have connected a VCR which supports SmartLink and Timer Programming features.
If you want to record the selected programme, press the red button on the remote control.
5 Remind
If you want to be reminded when the selected programme is broadcast, press the green button on the remote control. At the time that programme should be broadcast a reminder message is displayed on the TV.

- The "Record" and "Remind" options will be shown on the screen as soon as a programme has been selected, but they will not be shown if you are watching the NexTV view service on a TV channel which is not a NexTV view provider.
- The "Record" and "Remind" options will not be available if the programme that you have selected has already started.
Icon key

Full selection list
All the programme information is listed by time and broadcast channels order.

Channel selection
If the NexTView provider sends information on more than eight broadcast channels, you can select eight of them to create a personal list.
After you have created your personal list, the default list can be restored. To restore it, select "Auto" by pressing on the remote control.

Entertainment

Children

Remind list
Shows you a list with all the programmes (maximum of five programmes) that you have selected to be reminded about.

Arts

Sports

News

Movies

Music
Connecting Optional Equipment

Using the following instructions, you can connect a wide range of optional equipment to your TV. (Connecting cables are not supplied.)
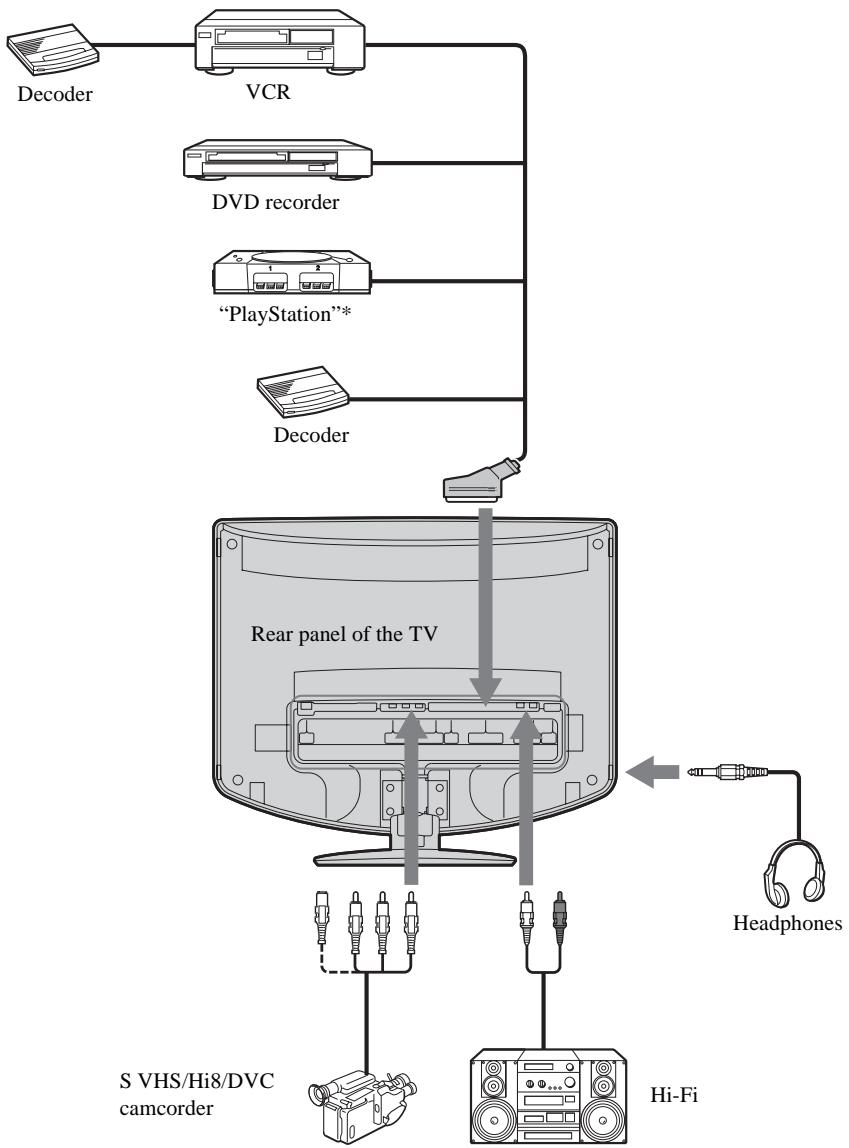
“PlayStation” is a product of Sony Computer Entertainment, Inc.
"PlayStation" is a trademark of Sony Computer Entertainment, Inc.
(continued)
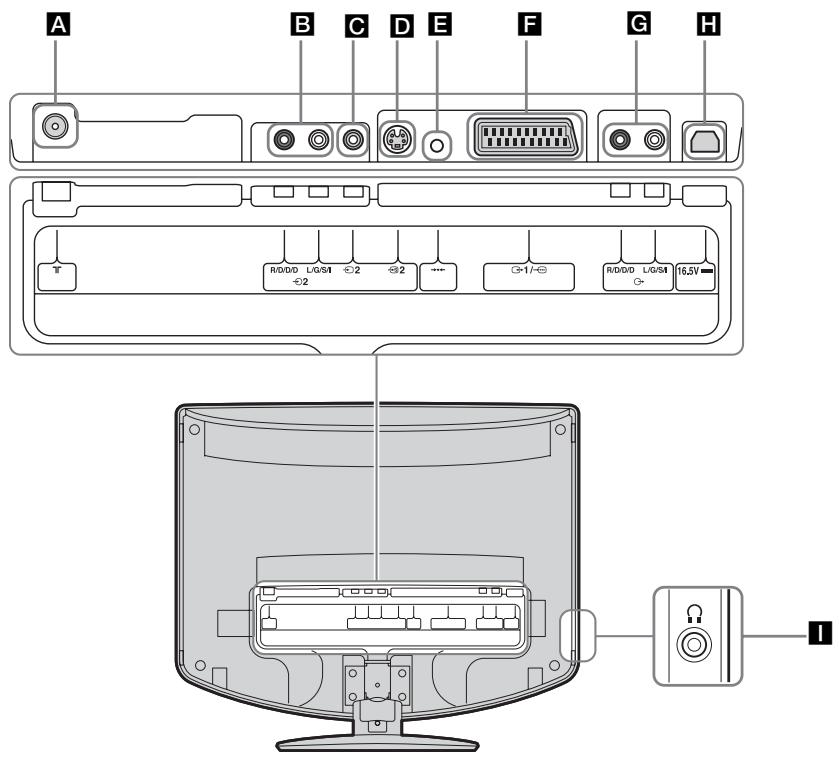
A Connect the supplied coaxial cable.
2 : AV2 Audio input jacks
2:AV2 Video input jack
2:AV2S video input jack
: Auto startup button
F 1/AV1Scart connector
(SmartLink)
G : Audio output jacks
Connect the supplied mains lead.
1:Headphones jack

- To avoid a noisy picture, do not connect external equipment to connectors C and D at the same time.
- Even if headphones are connected to the TV, you can hear the sound from the TV speakers.
Note that some Scart leads may not fit into the connector on the TV.
Connecting a VCR
To connect a VCR, refer to "Connecting an Aerial and a VCR" on page 26. We recommend you connect your VCR using a Scart lead. If you do not have a Scart lead, tune in the VCR test signal to the TV programme number "0" by using the "Manual Programme Preset" option. For details on how to manually programme these presets, see page 42, step A.
Refer to the instruction manual of your VCR to find out how to find the output channel of your VCR.
Connecting a VCR or a DVD recorder that supports SmartLink

SmartLink is a direct link between the TV and a VCR or a DVD recorder. For more information on SmartLink, refer to the instruction manual of your VCR or DVD recorder.
If you use a VCR or a DVD recorder that supports SmartLink, please connect the VCR or the DVD recorder using a Scart lead to the Scart connector 1 / (F).
Connecting a decoder
If you have connected a decoder to the Scart connector 1 / - (F), or through a VCR connected to this Scart
Select the "Manual Programme Preset" option in the "Set Up" menu and, after entering the "Decoder"* option, select "On" (using or ). Repeat this option for each scrambled signal.

Depending on the country/region you have selected in the "Country" option, this option may not be available (see page 40).
Connecting external audio equipment
To listen to the sound from the TV on Hi-Fi equipment
Connect your Hi-Fi equipment to the audio output jacks (G) if you want to amplify the audio output from the TV. Next, using the menu system, select the "Features" menu and set "Speaker" to "Off" (see page 39).
Using Optional Equipment
1 Connect your equipment to the designated TV socket, as indicated on pages 49 to 51.
2 Switch on the connected equipment.
3 To watch the picture of the connected equipment, press the 12 button on the remote control repeatedly until the correct input symbol appears on the screen.
| Symbol | Input Signals |
| 1 | • Audio/video input signal through the Scart connector F. |
| 1 | • RGB input signal through the Scart connector F. This symbol appears only if an RGB source has been connected. |
| 2 | • Video input signal through the phono jack C and audio input signal through B. |
| 2 | • S video input signal through the S video input jack D and audio input signal through B. |
4 Press the button on the remote control to return to the normal TV picture.
For mono equipment
Connect the phono plug to the L/G/S/I jack and press / repeatedly until the input symbol 2 or 2 appears on the screen.
Select the "Sound Adjustment" menu and set "Dual Sound" to "A" (see page 35).
Remote Control Configuration for VCR/DVD
This remote control is set by default to operate the basic functions of this Sony TV, most Sony DVDs and Sony VCRs when batteries are initially installed. To control VCRs and DVDs of other major brands, and certain Sony VCR models, please complete the following steps:

Before you start, look up the three digit code for your brand of DVD or VCR from the list on page 54. For those brands that have more than one code, enter the first code number.
1 Press the Media Selector button on the remote control repeatedly until the required VCR or DVD green light lights up.

If the Media Selector is in the TV position, code numbers will not be stored.
2 Before the green light goes out, press and hold the yellow button for approximately six seconds until the green light starts flashing.
3 Whilst the green light is flashing, enter all three digits of the code for your brand (see page 54) using the number buttons on the remote control.

If your selected code is entered correctly, all three green lights will be lit momentarily.
4 Turn on your VCR or DVD and check that the main functions work.

- If your equipment is not working or some of the functions do not work, please check to be sure you entered the correct code set or try the next code listed against the brand (see page 54).
- Your brand codes may be lost if weak batteries are not replaced within a few minutes. To reset your DVD or VCR code number, please repeat the above steps. A small label is attached inside the battery cover to allow you to record your brand codes.
- Not all brands are covered and not all models of every brand are covered.
| VCR Brand List | DVD Brand List |
| Brand | Code | Brand | Code |
| SONY (VHS) | 301, 302, 303, 308, 309 | SONY | 001 |
| SONY (BETA) | 303, 307, 310 | AIWA* | 021 |
| SONY (DV) | 304, 305, 306 | DENON | 018, 027, 020, 002 |
| AIWA* | 325, 331, 351 | GRUNDIG | 009, 028, 023, 024, 016, 003 |
| AKAI | 326, 329, 330 | HITACHI | 025, 026, 015, 004 |
| DAEWOO | 342, 343 | JVC | 006, 017 |
| GRUNDIG | 358, 355, 360, 361, 320, 351 | KENWOOD | 008 |
| HITACHI | 327, 333, 334 | LG | 015, 014 |
| JVC | 314, 315, 322, 344, 352, 353, 354, 348, 349 | LOEWE | 009, 028, 023, 024, 016, 003 |
| MATSUI | 013, 016 |
| LG | 332, 338 | ONKYO | 022 |
| LOEWE | 358, 355, 360, 361, 320, 351 | PANASONIC | 018, 027, 020, 002 |
| MATSUI | 356, 357 | PHILIPS | 009, 028, 023, 024, 016, 003, 362 |
| ORION | 328 |
| PANASONIC | 321, 323 | PIONEER | 004 |
| PHILIPS | 311, 312, 313, 316, 317, 318, 358, 359 | SAMSUNG | 011, 014 |
| SANYO | 007 |
| SAMSUNG | 339, 340, 341, 345 | SHARP | 019, 027 |
| SANYO | 335, 336 | THOMSON | 012 |
| SHARP | 324 | TOSHIBA | 003 |
| THOMSON | 319, 350 | YAMAHA | 018, 027, 020, 002 |
| TOSHIBA | 337 | | |
- If an AIWA VCR or DVD does not work even though you enter the code for AIWA, enter the code for SONY instead.
Specifications
Display Unit:
(KLV-17HR2)
Power Requirement: 100-240 V AC; 50/60 Hz
Screen Size: 17 inches Approx. 43.4cm measured diagonally
Display Resolution: 1,280 dots (horizontal) × 768 lines (vertical)
Power Consumption: 55 W
Standby Power Consumption: 1 W
Dimensions (w× h× d) Approx. 46.0× 39.7× 14.9cm (with stand) Approx. 46.0× 36.3× 8.9cm (without stand)
Weight: Approx. 5.7kg (with stand) Approx. 5.1kg (without stand)
(KLV-15SR2)
Power Requirement: 100-240 V AC; 50/60 Hz
Screen Size: 15 inches
Approx. 38.0cm measured diagonally
Display Resolution: 1,024 dots (horizontal) × 768 lines (vertical)
Power Consumption: 50 W
Standby Power Consumption: 1 W
Dimensions (w× h× d) Approx. 39.1× 40.2× 14.9cm (with stand) Approx. 39.1× 37.0× 8.9cm (without stand)
Weight: Approx. 5.0kg (with stand) Approx. 4.4kg (without stand)
Panel System:
LCD (Liquid Crystal Display) Panel
TV System:
Depending on your country/region selection: B/G/H, D/K, L, I
Colour System:
PAL, SECAM NTSC 3.58, 4.43 (only Video In)
Aerial:
75 ohm external terminal for VHF/UHF
Channel Coverage:
VHF: E2-E12
UHF: E21-E69
CATV: S1-S20
HYPER: S21-S41
D/K: R1-R12, R21-R69
SMARTLINK) 21-pin Scart connector (CENELEC standard) including audio/video input, RGB input, TV output, and SmartLink interface.

Audio output (Left/Right) (phono jacks)

Headphones jack
Sound Output:
Full range speaker: 3W× 2
Accessories Supplied:
- Remote control (RM-Y1101) (1)
Size AA batteries (R6 type) (2)
Coaxial cable (1)
- Mains lead (Type C-6) (1)
- Mains lead (Type BF) (1)
- AC adaptor (AC-FD004E) (1)
The mains lead Type BF may not be supplied depending on the country/region.
Optional Accessory:
Wall-Mount Bracket SU-W100
Other Features:
- Teletext, Fastext, TOPtext
- Sleep Timer
- SmartLink (Direct link between your TV and a compatible VCR or DVD recorder. For more information on SmartLink, please refer to the instruction manual of your VCR or DVD recorder.)
TV system autodetection
- Auto Format (KLV-17HR2 only)
- NexView (depending on availability of service)
Troubleshooting
Self-diagnosis function
This TV is equipped with a self-diagnosis function. If there is a problem with your TV, the (Standby/ Sleep) indicator will flash in red repeatedly. Writing down the duration of flashes and interval between flashes helps you inform your dealer or Sony service centre of the TV's condition.
1 Measure how long the (Standby/Sleep) indicator flashes and stops flashing.
For example, the indicator flashes for two seconds, stops flashing for one second, and flashes for two seconds.
2 Press the (Power) switch on the TV to switch it off, disconnect the mains lead, and inform your dealer or Sony service centre of how the indicator flashes (duration and interval).
Trouble symptoms and remedies

- Here are some simple solutions to problems which may affect the picture and sound.
- If you continue to experience problems, have your TV serviced by qualified service personnel. Never open the casing yourself.
| Problem | Possible remedies |
| No picture | |
| No picture (screen is dark) and no sound | ·Check the aerial connection.
·Connect the TV to the mains, and press the | (Power) switch on the TV.
·If the Ⓞ (Standby/Sleep) indicator lights up in red, press TV |/ Ⓞ on the remote control. |
| The TV turns off automatically (the TV enters the standby mode). | ·Check if the Sleep Timer function is activated (page 44).
·If no signal is received or no operation is performed in the TV mode for 10 minutes, the TV automatically switches to the standby mode. |
| No picture or no menu information from equipment connected to the Scart connector | ·Check that the optional equipment is on and press → / Ⓞ on the remote control repeatedly until the correct input symbol is displayed on the screen.
·Check the connection between the optional equipment and the TV. |
| Poor picture/Unstable picture | |
| Double images or ghosting | ·Check aerial/cable connections.
·Check the aerial location and direction. |
| Only snow and noise appear on the screen. | ·Check if the aerial is broken or bent.
·Check if the aerial has reached the end of its serviceable life (three to five years in normal use, one to two years at the seaside). |
| Dotted lines or stripes | ·Keep the TV away from electrical noise sources such as cars, motorcycles, or hair-dryers. |
| No colour on colour programmes | ·Using the menu system, select the “Picture Adjustment” menu and select “Reset” to return to the factory settings (page 33).
·If you set the “Power Saving” option to “Reduce,” picture colours may become dimmer (page 39). |
| Some tiny black points and/or bright points on the screen | ·The picture of a display unit is composed of pixels. Tiny black points and/or bright points (pixels) on the screen do not indicate a malfunction. |
| The picture is too bright. | ·Using the menu system, select the “Picture Adjustment” menu and select “Mode.” Then select the desired picture mode (page 32). |
| Picture (stripe) noise | ·Make sure that the aerial is connected using the supplied coaxial cable.
·Keep the aerial cable away from other connecting cables.
·Do not use 300-ohm twin lead cables as interference may occur. |
| Distorted picture and noisy sound | ·Check if any connected optional equipment is installed in front of the TV or beside the TV. When installing optional equipment, leave some space between the optional equipment and the TV. |
| Stripe noise during playback/recording of a VCR | ·Video head interference. Keep your VCR away from the TV.
·Leave a space of 30 cm between your VCR and the TV to avoid noise.
·Avoid installing your VCR in front of the TV or beside the TV. |
| Poor or no picture (screen is dark), but good sound | ·Using the menu system, select the “Picture Adjustment” menu and select “Reset” to return to the factory settings (page 33). |
| Noisy picture when viewing a TV channel | ·Using the menu system, select the “Manual Programme Preset” option in the “Set Up” menu and adjust “AFT” (Automatic Fine Tuning) to obtain better picture reception (page 43).
·Using the menu system, set the “NR” (Noise Reduction) option in the “Picture Adjustment” menu to reduce the noise in the picture (page 33). |
| Distorted picture when changing programmes or selecting Teletext | Turn off any equipment connected to the Scart connector on the rear of the TV. |
| Wrong characters appear when viewing Teletext. | Using the menu system, select the “Language” and “Country” options in the “Set Up” menu and set the language and country/region in which you view Teletext (page 40). For Cyrillic languages, we recommend that you select Russia in case your own country/region does not appear in the list. |
| Wrong characters appear when viewing NexTView. | Using the menu system, select the “Language” and “Country” options in the “Set Up” menu and set the language and country/region in which NexTView is provided (page 40). |
| No sound/Noisy sound | |
| Good picture, no sound | Press +/- or (Mute) on the remote control. Check that the “Speaker” option is set to “On” in the “Features” menu (page 39). |
| Audio noise | Make sure that the aerial is connected using the supplied coaxial cable. Keep the aerial cable away from other connecting cables. Do not use 300-ohm twin lead cables as interference may occur. |
| Menu item is not displayed. | Some items cannot be selected depending on the signal or other settings. Refer to the instructions on each menu item. |
| Strange sound | |
| The TV cabinet creaks. | Changes in room temperature sometimes cause the TV cabinet to expand or contract, which can make slight noises. This does not indicate a malfunction. |
| The TV ticks. | An electrical circuit inside the TV is activated when the TV is turned on. This does not indicate a malfunction. |
| The TV buzzes. | There might be a surge sound when turning on the TV. This does not indicate a malfunction. |
| Remote control does not function. | Check that the remote control is set correctly for the device you are using (VCR, TV, or DVD). If the remote control does not operate the VCR or DVD even when the remote control has been set correctly to VCR or DVD, enter the necessary code set as explained in “Remote Control Configuration for VCR/DVD” (page 53). Replace the batteries. |
| The (Standby/Sleep) indicator on the TV flashes. | Refer to “Self-diagnosis function” (page 57) and contact your nearest Sony service centre. |
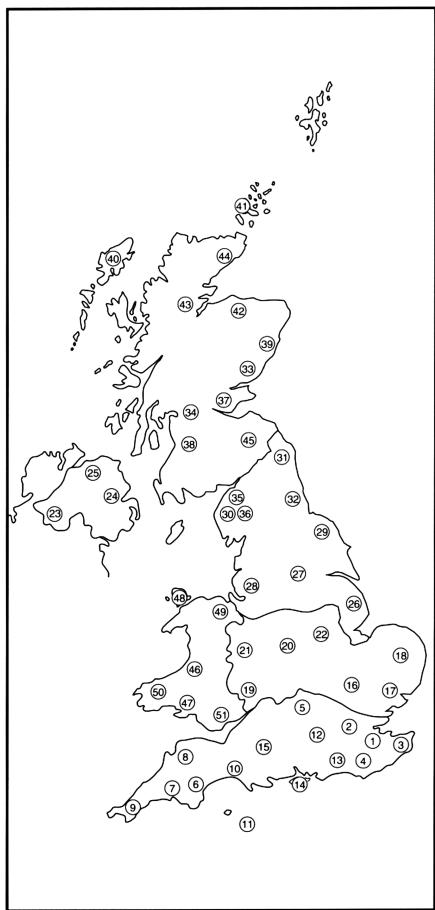
Television Channel Number Guide for the United Kingdom
Only the main transmitters are listed. Information regarding the regional sub-relay channel numbers can be obtained by contacting the BBC Engineering Information Dept., Telephone Number 020 7852 5040.
| MAIN TRANSMITTERS | BBC1 | BBC2 | ITV | CH4 | CH5 |
| London & South East | | | | | |
| ①Bluebell Hill | 40 | 46 | 43 | 65 | - |
| ②Crystal Palace | 26 | 33 | 23 | 30 | - |
| ③Dover | 50 | 56 | 66 | 53 | - |
| ④Heathfield | 49 | 52 | 64 | 67 | - |
| ⑤Oxford | 57 | 63 | 60 | 53 | 49 |
| South-West | | | | | |
| ⑥Beacon Hill | 57 | 63 | 60 | 53 | - |
| ⑦Carodon Hill | 22 | 28 | 25 | 32 | - |
| ⑧Hunshaw Cross | 55 | 62 | 59 | 65 | 67 |
| ⑨Redruth | 51 | 44 | 41 | 47 | 37 |
| ⑩Stockland Hill | 33 | 26 | 23 | 29 | - |
| Channel Islands | | | | | |
| ⑪Fremont Point | 51 | 44 | 41 | 47 | - |
| South | | | | | |
| ⑫Hannington | 39 | 45 | 42 | 66 | - |
| ⑬Midhurst | 61 | 55 | 58 | 68 | - |
| ⑭Rowridge | 31 | 24 | 27 | 21 | - |
| West | | | | | |
| ⑮Mendip | 58 | 64 | 61 | 54 | 37 |
| East | | | | | |
| ⑯Sandy Heath | 31 | 27 | 24 | 21 | 39 |
| ⑰Sudbury | 51 | 44 | 41 | 47 | - |
| ⑱Tacolneston | 62 | 55 | 59 | 65 | 52 |
| Midlands (West) | | | | | |
| ⑲Ridge Hill | 22 | 28 | 25 | 32 | - |
| ⑳Sutton Coldfield | 46 | 40 | 43 | 50 | - |
| ㉑The Wrekin | 26 | 33 | 23 | 29 | - |
| Midlands (East) | | | | | |
| ㉒Waltham | 58 | 64 | 61 | 54 | - |
| Northern Ireland | | | | | |
| ㉓Broughter Mountain | 22 | 28 | 25 | 32 | - |
| ㉔Divis | 31 | 27 | 24 | 21 | - |
| ㉕Limavady | 55 | 62 | 59 | 65 | - |
| North | | | | | |
| ㉖Belmont | 22 | 28 | 25 | 32 | 56 |
| ㉗Emley Moor | 44 | 51 | 47 | 41 | 37 |
| North-West | | | | | |
| ㉘Winter Hill | 55 | 62 | 59 | 65 | 48 |
| North-East | | | | | |
| ㉙Bilsdale West Moor | 33 | 26 | 29 | 23 | - |
| ㉚Caldebeck | 30 | 34 | 28 | 32 | 56 |
| ㉛Chatton | 39 | 45 | 49 | 42 | - |
| ㉜Pontop Pike | 58 | 64 | 61 | 54 | - |
| Scotland | | | | | |
| ㉝Angus | 57 | 63 | 60 | 53 | - |
| ㉞Black Hill | 40 | 46 | 43 | 50 | 37 |
| ㉟Sandale | 22 | 67 | - | - | - |
| ㊱Caldebeck | - | - | 28 | 32 | 56 |
| ㊲Craigkelly | 31 | 27 | 24 | 21 | 48 |
| ㊳Darvel | 33 | 26 | 23 | 29 | - |
| ㊴Durris | 22 | 28 | 25 | 32 | 67 |
| ㊵Etishal (Levis) | 33 | 26 | 23 | 29 | - |
| ㊷Keelylang Hill | 40 | 46 | 43 | 50 | - |
| ㊸Knock More | 33 | 26 | 23 | 29 | - |
| ㊹Rosemarkie | 39 | 45 | 49 | 42 | - |
| ㊺Rumster Forest | 31 | 27 | 24 | 21 | - |
| ㊻Selkirk | 55 | 62 | 59 | 65 | 52 |
| Wales | | | | | |
| ㊼Blaenplwyf | 31 | 27 | 24 | 21 | 56 |
| ㊽Carmel | 57 | 63 | 60 | 53 | - |
| ㊾Llandona | 57 | 63 | 60 | 53 | - |
| ㊿Moel-y-Parc | 52 | 45 | 49 | 42 | - |
| ㊿Presely | 46 | 40 | 43 | 50 | 37 |
| ㊿Wenvoe | 44 | 51 | 41 | 47 | - |

Piles AA (Type R6) (2):
Support mural SU-W100
Alleen "Instelling," "Contrast," en "Reset" können worden geregeld wanner "Instelling" is ingesteld op "Live" of "Film."
NL