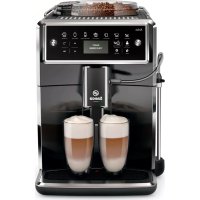
Barista Brew PSA3218 - Coffee machine PHILIPS - Free user manual and instructions
Find the device manual for free Barista Brew PSA3218 PHILIPS in PDF.
Download the instructions for your Coffee machine in PDF format for free! Find your manual Barista Brew PSA3218 - PHILIPS and take your electronic device back in hand. On this page are published all the documents necessary for the use of your device. Barista Brew PSA3218 by PHILIPS.
USER MANUAL Barista Brew PSA3218 PHILIPS
English Contents Machine overview (Fig. A) _________________________________________________________ 5 Control panel (Fig. B)______________________________________________________________ 5 Introduction _____________________________________________________________________ 6 Before first use ___________________________________________________________________ 6 Making coffee ____________________________________________________________________ 7 Making milk froth ________________________________________________________________ 13 Making hot water ________________________________________________________________ 13 Descaling ________________________________________________________________________ 14 Automatic sleep mode ____________________________________________________________ 14 Cleaning and maintenance ________________________________________________________ 14 Warning icons ____________________________________________________________________ 17 Troubleshooting__________________________________________________________________ 17 Technical specifications ___________________________________________________________ 20 Machine overview (Fig. A) A1 Bean hopper A9 Tamper slot A2 Double bean hopper A10 Ground receiving bracket (grind position) A3 Control panel A11 Brewing head A4 Powder ring A12 Steam wand A5 Portafilter A13 Steam/Hot water knob A6 Grind powder separator A14 Water tank A7 Drip tray A15 Water tank lid A8 Drip tray grid A16 Hot water spout Accessories A17 Basket single/double cup dual walls A22 Cleaning brush A18 Basket single/double cup single walls A23 Grinder cleaning brush A19 Espresso stand A24 Milk jug with temperature strip A20 Calibrated tamper A25 Milk jug A21 Cleaning pin Control panel (Fig. B) Refer to figure B for an overview of all buttons and icons. Below you find the description.6 English Some of the buttons/icons are for specific types only. B1 On/Off B6 Pressure gauge B2 Descale light B7 Espresso B3 Grinder B8 Double Espresso B4 Single/Double dose lights B9 Americano B5 Grind amount knob B10 Hot water/Steam light Introduction Congratulations on your purchase of a Philips Barista Brew Espresso machine! To fully benefit from the support that we offer, please register your product at www.philips.com/welcome. Read the separate safety booklet carefully before you use the machine for the first time and save it for future reference. To help you get started and to get the best out of your machine, we offer online support at www.philips.com/coffee-care. There are multiple versions of this semi-automatic espresso machine, which all have different features. Each version has its own type number. You can find the type number on the data label located on the bottom of the machine. This machine has been tested with coffee. Although it has been carefully cleaned, there may be some coffee residues left. We guarantee, however, that the machine is absolutely new. Before first use
1. Installing the bean hopper and filling the water tank
1 Check and ensure that the two arrows on the grinder align with each other (Fig. 1). 2 Check and ensure that the two "I" marks on the bean hopper base align with each other (Fig. 2). 3 Press downward the bean hopper, ensure that the lock symbol on the bean hopper aligns with the triangle symbol on the machine top (Fig. 3), and rotate the bean hopper clockwise (Fig. 4). 4 Rotate the bean hopper to select your desired coarseness (Fig. 5). The grinder and bean hopper are precision components, so avoid frequently removing them after installation. 5 Open the water tank lid, grip the top handle of the water tank, and lift it vertically to remove it (Fig. 6). 6 Remove the yellow sealing strip from the bottom of the water tank (Fig. 7). 7 Fill the water tank with room-temperature filtered water. The water level should be controlled below the "Max" mark on the water tank (Fig. 8). 8 Grip the top handle and place the water tank back onto the machine vertically. Close the water tank lid (Fig. 9).7 English The removed yellow sealing strip does not need to be reinstalled; you may discard it. For best coffee quality, we suggest to frequently change water in the water tank.
2. Switching on the machine for the first time
1 Put the plug in an earthed wall socket. 2 Make sure the hot water/steam knob is in the off position (Fig. 10). 3 Press the On/Off button (Fig. 11) to switch on the machine.
On/Off and Espresso buttons will light up. 4 Ensure that the steam wand is aligned with the hole of the drip tray (Fig. 12). 5 Press the Espresso button (Fig. 13) to flush.
Hot water will begin to flow out of the brewing head and the steam wand. 6 After the water stops dispensing, the On/Off button starts blinking and the machine will heat up. During the flushing the hot water/steam wand, portafilter may become hot. To avoid the risk of burns, let them cool down first. Making coffee Setting the grinder The coarseness of ground coffee significantly influences brewing dynamics, like the pressure and flow rate, and ultimately, the flavor of espresso. This machine offers 15 coarseness levels (1-15). The lower the grind setting, the finer the coffee beans are ground and the stronger the coffee. Adjustments may be needed for different beans with varying roast degrees, impacting the amount of ground coffee produced. For Espresso/Americano grinder levels 1-4 are recommended. For longer coffee recipes (e.g. Lungo) levels 5-10 are best (Fig. 5). Choosing the filter basket
Basket single/double cup dual wall: The supplied basket single/double cup dual walls (Fig. 14) allow you to brew an espresso with crema even when using the machine for the first time, and facilitate achieving the optimal pressure range.
Basket single/double cup single wall: The supplied basket single/double cup single walls (Fig. 15) are like those used in professional bar machines and require manual skills and experience. Allow for greater customization of your coffee, resulting in improved extraction, taste and consistency once you find the right setup. Grinding beans 1 Select a single or dual wall filter and install it into the portafilter.8 English
When changing the filter, you can easily pry off the installed filter with the edge of the other filter (Fig. 16). 2 Attach the powder ring onto the portafilter (Fig. 17). 3 Align the portafilter with the grinder bracket and push it horizontally (Fig. 18).
Use the Grind Amount knob to grind more or less beans 4 For automatic grinding, long press the Grinder button for three seconds to select 1x or 2x dose. Then press the Grinder button once again to start grinding. To stop the grinding process midway, simply press the Grinder button again. 5 For manual grinding, hold the portafilter with one hand and press and hold the portafilter into the bracket until the required amount of coffee is ground. It is recommended to use 12-14 grams of beans for a single cup, and 18-20 grams for double cups. You may use an electronic scale for precise control of the coffee amount. You can use the "Max" indication on the filter basket as a rough measure. Make sure the bean hopper is properly installed and locked before adding coffee beans and using the machine. Only roasted coffee beans are allowed in the bean hopper. Do not put raw coffee beans, coffee powder, instant coffee or other materials in the bean hopper, as it may damage the coffee machine. Pay attention to the maximum level of ground coffee during grinding and avoid clogging the ground coffee outlet (Fig. 19). Different beans may yield slightly different amounts of ground coffee in automatic grinding. You may need to adjust the grinding settings based on the actual brewing pressure for each type of bean (see 'Optimized brew'). When splattering of ground coffee visibly worsens, clean the grinding chute (see 'Cleaning the grinder and ground coffee outlet'). Tamping 1 Remove the portafilter from the grinder bracket. 2 Remove the powder ring from the portafilter (Fig. 20). 3 Position the portafilter on a countertop with its padded bottom to facilitate effortless tamping (Fig. 21). 4 Gently tap the portafilter several times to make the ground coffee distribute evenly in the filter basket (Fig. 22). 5 Use the calibrated tamper to tamp the ground coffee. Brewing Espresso 1 Insert the portafilter into the brewing head.
Align the portafilter with the "triangle" mark on the brewing head and place it upward inside the brewing head (Fig. 23). Then, rotate the portafilter counterclockwise to the center to lock it (Fig. 24).9 English 2 Press the Espresso or Double Espresso button to start brewing (Fig. 25). To stop dispensing before the machine is finished, press the button again. When the On/Off button indicator flashes, the machine is in the preheating mode and brewing cannot be started. When all button indicators are solid on, brewing can be started. After brewing is completed, there may be steam and pump noise above the drip tray. This is normal and indicates that the machine is depressurizing. When the brewing pressure is too high, the machine will stop dispensing coffee to maintain the desired coffee taste. At this time, the indicator keeps flashing. In such cases, brew coffee again. The Espresso volume is about 40 ml and Double Espresso volume about 80 ml by default. Brewing Americano An Americano is made by pouring hot water from the water spout over a shot of espresso. 1 Switch on the machine and wait until it is ready for use. 2 Place the preferred filter basket into the portafilter. 3 Grind coffee beans with the machine. 4 Use the calibrated tamper to tamp the ground coffee. 5 Put the portafilter into the brewing head and align the portafilter with the "triangle" mark and place it upward inside the brewing head (Fig. 23). Then, rotate the portafilter counterclockwise to the center to lock it (Fig. 24). 6 Place a large cup under the spout openings of the portafilter and the hot water spout (Fig. 26). 7 Press the Americano button to start brewing. 8 After the Espresso shot has finished brewing, hot water will be poured on top from the water spout to finish the americano. The hot water spout may become hot. To avoid the risk of burns, let it cool down first. Optimized brew Pressure is an important factor for brewing espresso. The pressure gauge indicates the pressure and helps to monitor the optimal extraction of your espresso shots.
The optimal range marked by the solid white line represents the best pressures for extraction.
The range marked by the dotted line on the left represents under-extraction.
The range marked by the dotted line on the right represents over-extraction.10 English The pressure is affected by different bean brands, degrees of roast and freshness of coffee beans, so you may need to test different coarseness levels, amounts of ground coffee and tamping pressure to achieve the optimal pressure range. It is recommended to re-adjust the grind parameters based on the pressure gauge status each time you use different type of coffee beans.11 English Optimal extraction Under-extraction Over-extraction - Steady flow - Rich and velvety crema - Balanced flavor - 20-30 seconds of brewing time - Fast flow - Thin and pale crema - Sour and weak flavor - Less than 20 seconds of brewing time
- Dripping or no flow - Dark and uneven crema - Bitter or burnt taste - More than 40 seconds of brewing time After extraction Solution Solution - To remove used grinds, used grinds will form a coffee 'puck'. If the puck is wet, refer to the 'Under-extraction' section. - To clean the brewing head, press the Espresso button to release hot water to thoroughly clean the brewing head, portafilter and filter basket (see 'Cleaning the portafilter, filter basket and brewing head'). - First, adjust the coarseness level (to a smaller number). - Then, increase the amount of ground coffee using the Grind amount knob. - First, adjust the coarseness level (to a higher number) - Then, reduce the amount of ground coffee using the Grind Amount knob.12 English Customizing default volumes 1 Install the portafilter with tamped ground coffee inside the brewing head. 2 Press and hold the button of the drink you want to customize. After three seconds, the machine enters the customization mode and emits a beep. 3 Stop holding the buttons when the cup contains the desired volume. The setting is complete when you hear one beep from the machine. 4 After you have programmed the volume for a drink, the machine will dispense this new volume each time you select the drink again. Press and hold the Americano button to extract the desired coffee volume. Release to set the new coffee volume. Repeat for water volume adjustment. The minimum Espresso and Double Espresso volumes are 20 ml and 40 ml, respectively. The maximum Espresso and Double Espresso volumes are 70 ml and 120 ml, respectively. For Americano, the minimum and maximum volume of coffee is 20 ml and 70 ml respectively. The minimum and maximum volume of hot water is 50 ml and 200 ml respectively. Customizing coffee temperature It is possible to adjust the coffee extraction temperature. You can choose from three settings: warm coffee, medium hot coffee, hot coffee. At a higher coffee extraction temperature, the bitterness of the coffee will increase and the acidity will decrease. At a lower coffee extraction temperature, the bitterness of the coffee will decrease and the acidity will increase. 1 Turn off the the machine. 2 Press and hold the On/Off button and the Espresso button for three seconds. The machine will emit a beep sound. 3 Press one of the buttons below to adjust the coffee extracting temperature setting to your preferred level.
To adjust the setting to warm coffee, press the Espresso button
To adjust the setting to hot coffee, press the Americano button. Once the right temperature of coffee is selected, press the On/Off button to confirm. If you do not switch off the machine yourself, it will switch off automatically after 30 minutes. Setting water hardness 1 Turn off the machine. 2 Press the On/Off button and the Americano button at the same time for three seconds. The Descale and the On/Off button light will blink. The default is hard water, so the Americano button light will be on.
To adjust the setting to medium water quality, press the Double Espresso button.
To adjust the setting to soft water quality, press the Espresso button. Once the right hardness of the water is selected, press the On/Off button to confirm.13 English To assess the water hardness supplied by your local water service, you can obtain the Philips Water Hardness Testing Kit from a nearby supplier or online through the Philips website. Resetting volumes to factory defaults
Reset Espresso: Turn on the machine, press and hold the On/Off and the Espresso buttons simultaneously for three seconds. After this time, you will hear three 'beeps,' and the On/Off and the Espresso buttons will flash three times.
Reset Double Espresso: Turn on the machine, press and hold the On/Off and the Double Espresso buttons simultaneously for three seconds. After this time, you will hear three 'beeps,' and the On/Off and the Double Espresso buttons will flash three times.
Reset Americano: Turn on the machine, press and hold the On/Off and the Americano buttons simultaneously for three seconds. After this time, you will hear three 'beeps,' and the On/Off and the Americano buttons will flash three times. After each of these three resets, the machine will go to standby-ready mode. Making milk froth Always use milk coming directly from the fridge for the best foam quality. 1 Fill a milk jug with about a quarter of milk (100 ml) for cappuccino and to about a third (150 ml) of milk for latte macchiato (Fig. 27). 2 Make sure that the end of the steam wand is 3 cm below the milk surface and that the milk jug is tilted (Fig. 28). 3 Turn the hot water/steam knob to the steam icon (Fig. 29).
Steam will begin to flow out of the steam wand. For an optimal frothing result, do not shake the milk jug and do not hold the milk jug upright (Fig. 30). 4 When the milk foam in the milk jug has reached the required volume and temperature, turn the hot water/steam knob to the off position to stop frothing milk (Fig. 10). The steam wand becomes very hot during working. Allow it to cool down before touching it. Clean the steam wand each time you use it with a damp cloth, for hygiene reasons and to avoid the build-up of milk residues. Making hot water 1 Place a cup under the steam wand. 2 Rotate the knob to the hot water position to turn on hot water. At this time, the steam/hot water light is on. 3 To stop the hot water flow, rotate the steam/hot water knob to the off position. The steam wand becomes very hot during working. Allow it to cool down before touching it.14 English Descaling When the descale light is on, it is time to descale your coffee machine. Under no circumstances should sulfuric, hydrochloric, aminosulfonic or acetic acid (vinegar) based descaler be used, as this may damage the water circuit in the coffee machine and may not completely remove limescale. Failure to use Philips descaler will void the warranty. Failure to descale the machine will also void the warranty. The descaler is not supplied with the machine. You can purchase Philips descaler from a local supplier or online store (www.philips.com/coffee-care). The descaling procedure includes one descaling cycle (≈ 4 minutes) and one rinsing cycle (≈ 3 minutes). Descaling procedure 1 Turn on the coffee machine. 2 Remove the drip tray, empty water in it and put it back. 3 Remove the water tank and empty water in it. 4 Pour the Philips descaler (CA6700) into the water tank, and fill it to the descale level (descale icon printed on the water tank). 5 Reinsert the water tank, and position a large bowl (≥1.2 L) under the brewing head and steam wand for liquid collection (Fig. 31). 6 Initiate descaling by simultaneously pressing the Espresso and Double Espresso buttons for three seconds, acknowledging the beep. 7 Let the machine dispense descaler. Once finished, the machine will power off automatically. 8 Remove the water tank and clean any remaining descaler solution by rinsing it with fresh water. 9 Refill the water tank to the max level indicated on it with fresh water. 10Reposition the large bowl under the brewing head and steam wand for water collection. 11Press the On/Off button. The Espresso button light turns on. 12Press the Espresso button and let the machine dispense water. 13Once the machine has finished, the descaling procedure is complete, and the machine will automatically be ready to brew. Automatic sleep mode If the machine is not operated for 30 minutes, it will enter the sleep mode automatically, with all the indicators turned off. To use the machine again, press the On/Off button to restart it. You can also turn off the machine by pressing the On/Off button while it's powered-on. Cleaning and maintenance Regular cleaning and maintenance will keep your coffee machine in optimal condition and serve tasty coffee for a long time.15 English See the table below for details about when and how to clean all the removable parts of the coffee machine. Part When to clean How to clean Portafilter, filter basket and brewing head After each use. Thoroughly rinse the inside and outside of the portafilter and filter basket (see 'Cleaning the portafilter, filter basket and brewing head'). Filter basket When the holes in the filter basket are clogged. Use the thin end of the cleaning pin to clear residue from the holes (see 'Cleaning the portafilter or filter basket when clogged'). Steam wand After each use. Wipe the steam wand with a damp cloth and purge (see 'Cleaning the steam wand after each use'). Steam wand When clogged. Use the thick end of the cleaning pin to clear residue from the holes on the end of the hot water/steam wand (see 'Cleaning the steam wand when clogged'). Coffee machine surface Every week. Clean the coffee stains and coffee residue on the front of the coffee machine every week with a damp cloth. Do not use abrasive materials like steel wool or scouring pads, as this may result in peeling of paint. Grinder and ground coffee outlet Every two weeks. Use the cleaning brush to clean the grinder and ground coffee outlet (see 'Cleaning the grinder and ground coffee outlet'). Drip tray Empty the drip tray every day or when the red "drip tray full" indicator pops up.Clean the drip tray every week. Remove the drip tray, add a small amount of detergent, and rinse it under the tap.You can also clean it in a dishwasher. Water tank Every week. Rinse the water tank under tap every week. Cleaning the portafilter, filter basket and brewing head Cleaning the portafilter and filter basket after each use
Press the Espresso button to thoroughly rinse the inside and outside of the brewing head, portafilter and filter basket with hot water. This will remove all the residue and coffee grease.
You can rinse the portafilter and filter basket under tap to thoroughly clean their insides and outsides.
Dry the filter baskets and the portafilter before placing them back.16 English Do not wash the portafilter in a dishwasher, as it may damage the portafilter. Cleaning the portafilter or filter basket when clogged 1 When the filter basket is clogged, use the thin end of the cleaning pin (Fig. 32) to clear residue from the holes (Fig. 33). 2 You can also use the cleaning pin to clear residue from the coffee outlet and holes of the portafilter. Cleaning the steam wand Cleaning the steam wand after each use Clean the steam wand after each use to keep it clean and prevent milk residue buildup. 1 Wipe the steam wand with a damp cloth immediately after each use. 2 Run the steam function for 5-10 seconds to expel milk residue.
Failure to clean the steam wand may affect the taste of milk. Cleaning the steam wand when clogged When any hole at the end of the steam wand is clogged, follow the steps below to unclog it. 1 Turn off the coffee machine. 2 Use the thick end of the cleaning pin to clear residue from the hole on the end of the steam wand (Fig. 34). Cleaning the grinder and ground coffee outlet Clean the grinder and ground coffee outlet every two weeks to prevent ground coffee from clogging the outlet or affecting grinding. Ensure the bean hopper is empty before starting cleaning. Ensure that the grinder can rotate normally and no ground coffee comes out of the ground coffee outlet when the grinding function is activated. 1 Check and ensure that the bean hopper is empty. 2 Rotate the bean hopper counterclockwise to remove it from the coffee machine (Fig. 35). 3 Remove the top grinding wheel (Fig. 36) and clean the built-in grinding wheel with the cleaning brush (Fig. 37). Clean the grinding chamber and ground coffee chute with the grinder cleaning brush (Fig. 38). 4 Place back the internal grinding wheel (Fig. 39) and bean hopper (Fig. 4). 5 Start the grinding function with the inserted portafilter. Allowing the machine to run without coffee beans to clear any remaining powder residue from the grinding chamber. Cleaning is complete. Do not rinse the built-in grinder with water. If there is still powder residue, repeat step 5. Before starting cleaning, ensure that the bean hopper is empty, as coffee beans can damage the internal structure of the bean hopper when you remove it.17 English Warning icons Warning icon Solution The descaling/cleaning indicator is on: Descale the coffee machine (see 'Descaling'). The On/Off button indicator flashes: The coffee machine is heating up. The steam/hot water indicator flashes white: The coffee machine is heating up to use the hot water/steam function. The steam/hot water indicator flashes red: The coffee machine is indicating a lack of water. The cause may be 1. lack of water in the water tank; or 2. excessive brewing pressure. Troubleshooting This chapter summarizes the most common problems you could encounter with the coffee machine. For any problem that cannot be solved, please contact your local customer service center. The contact information is provided on the warranty card. Problem Cause Solution The coffee machine does not start. The coffee machine is not connected to a power outlet. Plug in the coffee machine The coffee machine appears to be leaking. The drip tray is overflowing, which appears to be a leak. Empty the drip tray. The water tank is not in the correct position. Re-insert the water tank and push it down into the coffee machine (see '1. Installing the bean hopper and filling the water tank'). The water tank is not fully inserted, allowing air to be drawn into the coffee machine. Ensure the water tank is in the correct position by removing it, re-inserting it and pushing it down firmly (see '1. Installing the bean hopper and filling the water tank').18 English Problem Cause Solution The coffee machine is not placed on a level surface. Place the coffee machine on a level surface to prevent liquid in the drip tray from overflowing. There is steam coming out or a hissing or rattling sound after the coffee machine is started or during brewing. This is normal. The pressure relief value procedures such a sound during its normal working. The coffee machine makes a lot of noise and cannot brew coffee. There is no water in the water tank. Fill the water tank with water. The water tank is not fully inserted, allowing air to be drawn into the coffee machine. The sealing ring at the bottom of the water tank is not removed. Ensure the water tank is in the correct position by removing it, re-inserting it and pushing it down firmly (see '1. Installing the bean hopper and filling the water tank'). The coffee machine is provided with a sealing ring to protect the water loop. Remove the sealing ring before first use. The coffee is too cold. A cold cup will lower the temperature of your drink. Preheat the cup by rinsing it with hot water. Adding milk will lower the temperature of your drink. Whether you add hot or cold milk, it will lower the temperature of your coffee. Preheat the cup by rinsing it with hot water. The temperature of the machine is not set properly. Check the temperature setting of the machine and set it to the highest level (see 'Customizing coffee temperature'). The coffee is too weak. The grinder is set to high coarseness. Set the coarseness level to a smaller number (see 'Setting the grinder'). You have to brew 1 to 2 cups before achieving a different taste. The ground coffee is not enough. Increase the quantity by using the Grind Amount knob. The milk does not froth. The type of milk used is not suitable. The quantity and quality of froth varies depending on the type of milk. For good frothing, use semi-skimmed milk, whole milk or lactose-free milk. The steam wand is clogged. Clean the steam wand (see 'Cleaning the steam wand when clogged').19 English Problem Cause Solution The steam wand is dipped too deep in the milk carafe. Adjust the depth the steam wand is dipped in the milk (see 'Making milk froth'). The coffee is not flowing out or the flow is slow. The grinder is set to low coarseness. See the coarseness level to a larger number (see 'Setting the grinder'). Please be noted that this may affect the taste of your coffee. There is too much ground coffee in the filter basket. Reduce the ground coffee in the filter basket by using the Grind amount knob. The filter basket used is not suitable. Use a filter basket suitable for this coffee machine. The filter basket in the portafilter is clogged. Use a different filter basket for testing. If the filter basket works normally, it indicates that the original filter basket is clogged and should be cleaned (see 'Cleaning the portafilter, filter basket and brewing head'). The coffee spout of the portafilter is clogged. You can also use the thin end of the cleaning pin to clear residue from the coffee outlet and holes of the portafilter (see 'Brewing Espresso'). Coffee flows along the edge of the portafilter. The portafilter is not properly secured on the brewing head. Secure the portafilter properly on the brewing head. The upper edge of the portafilter is dirty. After grinding, remove any coffee residues from the edge of the portafilter. The filter basket is not inserted properly. Insert the filter basket properly. Ensure that its edge does not protrude beyond the brew handle's edge. There is coffee residue on the portafilter bracket of the brewing head. Clean the ground portafilter bracket with the cleaning brush. There is too much ground coffee in the filter basket. Reduce the amount of the ground coffee in the filter basket using the Grind amount knob. Less and less ground coffee comes out of the output during grinding. The ground coffee outlet is clogged. Clean the grinder and ground coffee outlet (see 'Cleaning the grinder and ground coffee outlet'). Ground coffee splatters during grinding. The powder ring is not used. Install the powder ring before grinding.20 English Problem Cause Solution There is too much grinding. Before the grinding ends automatically, press and release the Grinder button to end it to reduce the amount of ground coffee. The portafilter cannot be installed normally. The portafilter is not properly snapped into the brewing head. Install the portafilter (see 'Brewing Espresso'). The portafilter is not tightened by rotating from the leftmost insertion position. Install the portafilter (see 'Brewing Espresso'). The amount of ground coffee changes. A different coarseness level is used. This is normal. Different coarseness levels may result in different amounts of ground coffee. A different type of beans is used. This is normal. Beans of different roast degrees or brands yield different amounts of ground coffee even at the same coarseness level. Beans of a different freshness are used. This is normal. Beans stored for different time yield different amounts of ground coffee even at the same coarseness level. Technical specifications The manufacturer reserves the right to improve the technical specifications of the product. All the preset quantities are approximate. Description Value Size (h x w x d) 410 x 320 x 335 mm Weight without packaging 8.0 kg Weight with packaging 13.5 kg Power cord length 1 m Power plug type Type B Power rating 120 V, 60 Hz, 1350 W Standby power < 0.5 wEspañol (México)
39Page appears only if there are more than 24 figureswww.philips.com/coee-care >75% recycled paper 2024 © Versuni Holding B.V. PHILIPS and the Philips Shield Emblem are registered trademarks of Koninklijke Philips N.V. and are used under license. This product has been manufactured by and is sold under the responsibility of Versuni Holding B.V., and Versuni Holding B.V. is the warrantor in relation to this product. 642001008190_MONTECARLO BACKCOVER A5 BW_MANUAL NAM MCR.indd 1642001008190_MONTECARLO BACKCOVER A5 BW_MANUAL NAM MCR.indd 1 03-01-2024 15:1703-01-2024 15:17 642001008190 ( 3/2024) rev.01