USER MANUAL RO6 H5TB3YTX ROSIERES
Thank you for choosing our product. To ensure your safety and get the best results, please read this manual carefully, including the safety instructions, and keep it for future reference.
Before installing the oven note the serial number, which you might need for repairs. Check for any damage during transportation and consult a technician if you're unsure before using it. Keep packaging materials away from children.
NOTE: Please note that the oven's features and accessories may vary depending on the model you purchased.
SUMMARY
2.PRODUCT INTRODUCTION
2.1. Overview of the product
2.2. Accessories
2.3. Control panel
2.4. Connectivity
3. BEFORE STARTING
3.1. Information to start
3.2. First usage
3.3. Preliminary cleaning
4. OPERATION OF PRODUCT
4.1. How the product works
4.2. Cooking functions
4.2.1. Standard functions
4.2.2. Special functions
5. COOKING GUIDELINES
5.1. General Cooking tables
5.2. Everyday Cooking tables
6. CARE & CLEANING
6.1. General recommendations
6.2. Cleaning the oven
6.2.1. Inside the oven: cleaning functions
6.2.2. Outside the oven: removal and cleaning the glass door
6.3. Cleaning of accessories
6.4. Maintenance
7. TROUBLESHOOTING
8. ENVIRONMENTAL PROTECTION & DISPOSAL
8.1. Appliance disposal
8.2. Saving and respecting the environment
9. INSTALLATION
GENERALWARNINGS
- Do not use a steam cleaner for cleaning operations.
- CAUTION: in order to avoid a hazard due to inadvertent resetting of the thermal cut-out, this appliance must not be supplied through an external switching device, such as a timer, or connected to a circuit that is regularly switched on and off by the utility
- During use the appliance become hot. Care should be taken to avoid touching heating elements inside the oven.
Use in accordance with attendend use
- Only use the oven for its intended purpose, that is only for the cooking of foods: any other use, for example as a heat source, is considered improper and therefore dangerous. The manufacturer cannot be held responsible for any damage resulting from improper, incorrect or unreasonable usage.
Use limitations
- The appliance can be used by children aged from 8 years and above and persons with reduced physical, sensory or mental capabilities or lack of experience and knowledge if they have been given supervision or instruction concerning use of the appliance in a safe way and understand the hazards involved. Children shall not play with the appliance. Cleaning and maintenance shall not be made by children without supervision.
- This appliance is not intended to be used by persons (including children) with reduced physical, sensory or mental capabilities, or lack of experience and knowledge, unless they have been given supervision or instruction concerning use of the appliance by a person responsible for their safety.
- Children should be supervised to ensure that they do not play with the appliance.
WARNING: the appliance and its accessible parts become hot during use. Care should be taken to avoid touching heating elements Children less than 8 years of age shall be kept at away unless continuously super
vised.
WARNING: Accessible parts may become hot during use. Young children should be kept away.
INSTALLATIONWARNINGS
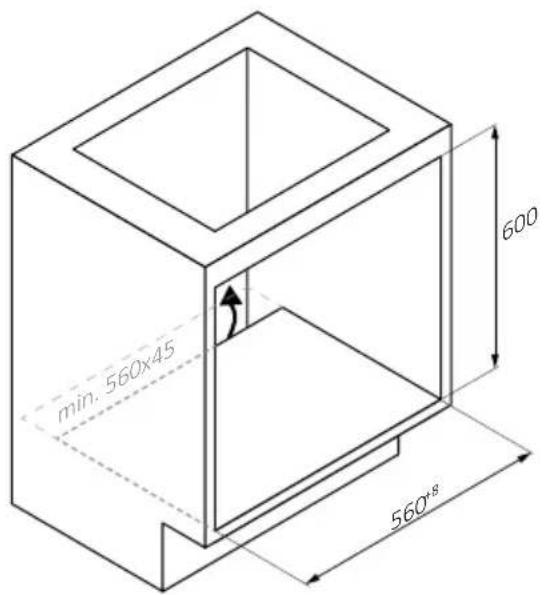
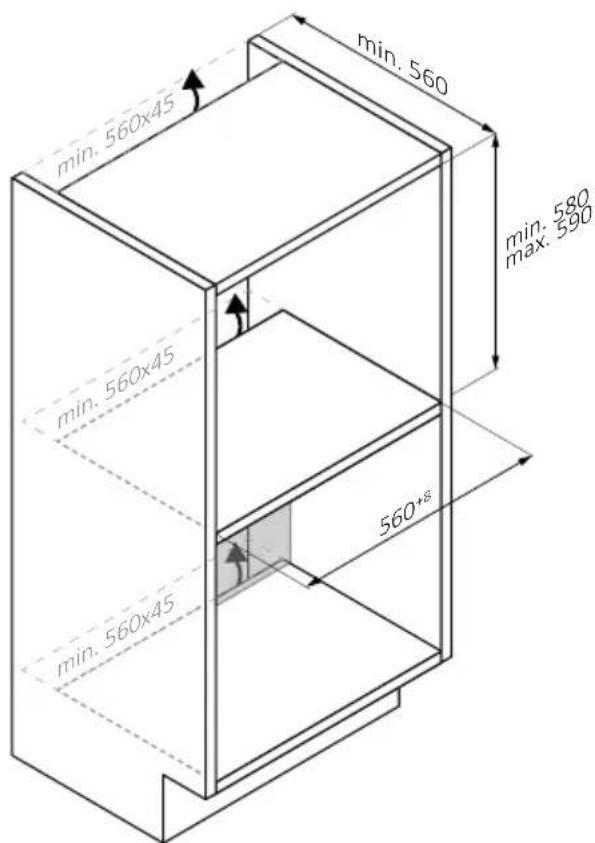
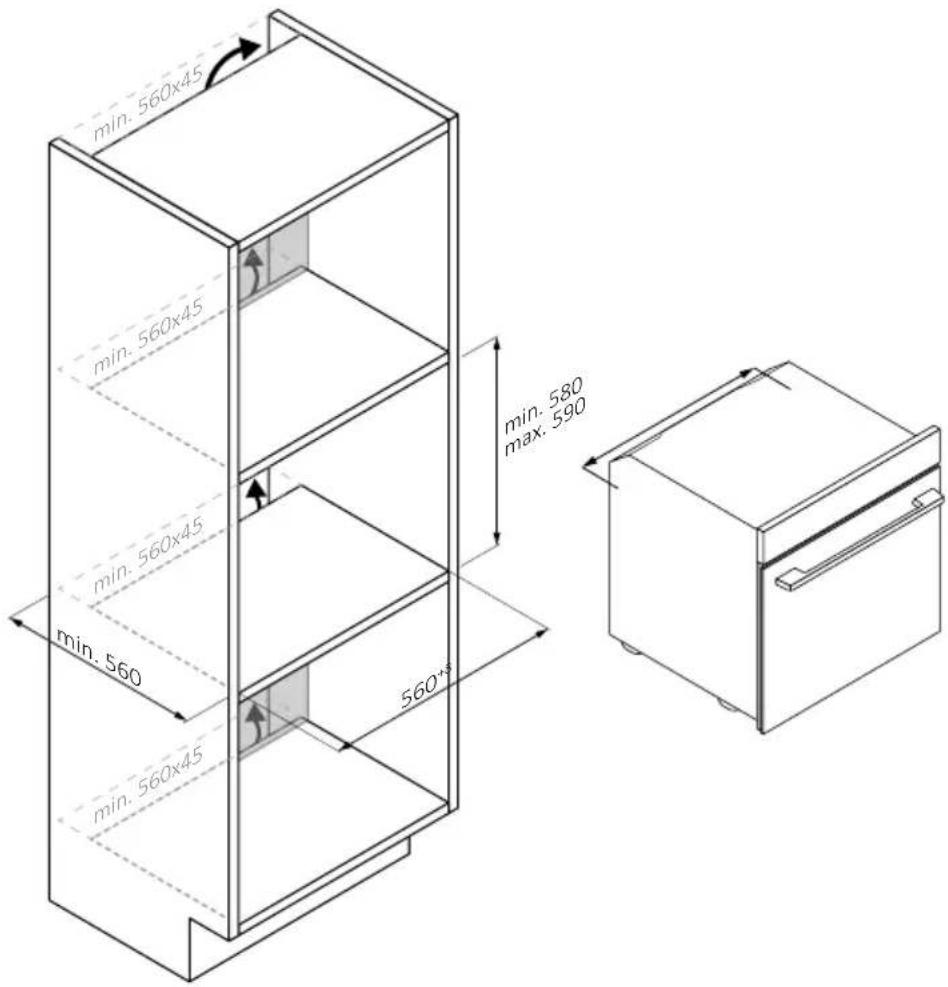
The oven can be located high in a column or under a worktop.
- Before fixing, you must ensure good ventilation in the oven space to allow proper circulation of the fresh air required for cooling and protecting the internal parts. Make the openings specified on the illustrations according to the type of fitting. Always fix the oven to the furniture with screws provided with the appliance.
- No additional operation/setting is required in order to operate the appliance at the rated frequencies.
- The appliance must not be installed behind a decorative door in order to avoid overheating.
- During installation the oven should be disconnected from the mains to avoid overheating.
- If the assistance of the manufacturer is required to rectify faults arising from incorrect installation, this assistance is not covered by the guarantee. The installation instructions for professionally qualified personnel must be followed.
- Incorrect installation may cause harm or injury to people, animals or belongings. The manufacturer cannot be held responsible for such harm or injury.
- Installation must be carried on by a qualified technician who must know and respect the laws in force in the country of installation and the manufacturer's instruction.
- After unboxing the appliance, always check it is not damaged, in case of issue contact the customer service before installing and do not connect to the power supply.
- Remove the packaging material before operating the appliance.
- During installation do not use the oven door's handle to lift and move the oven.
- The installation furniture and the adjacent ones must with stand temperatures of 95^ .
- It is recommended to wear protective gloves during installation to avoid cut injuries.
- Do not install the product in open environments exposed to atmospheric agents.
- This appliance is designed to be used at altitude lower than 2000m .
ELECTRICALWARNINGS
cables is not recommended;
- in case of malfunction and/or poor operation, switch off the appliance and do not tamper with it.
NOTE: as the oven could require maintenance work, it is advisable to keep another wall socket available so that the oven can be connected to this if it is removed from the space in which it is installed.
- Any repair, installation and maintenance not carried out correctly can seriously endanger the user.
- The manufacturing company hereby states that it does not assume any responsibility for direct or indirect damages caused by incorrect installation, maintenance, or repair work. Furthermore, it is not liable for damages caused by the absence or interruption of the grounding system (e.g., electric shock).
- CAUTION: in order to avoid a hazard due to inadvertent resetting of the thermal cut-out, this appliance must not be supplier through an external switching device, such as a timer, or connected to a circuit that is regularly switched on and off by the utility.
- The appliance is not designed to be activated by an external timer or separate remote control system.
USE & MANTEINANCE
- The dripping pan collects the residues that drip during cooking.
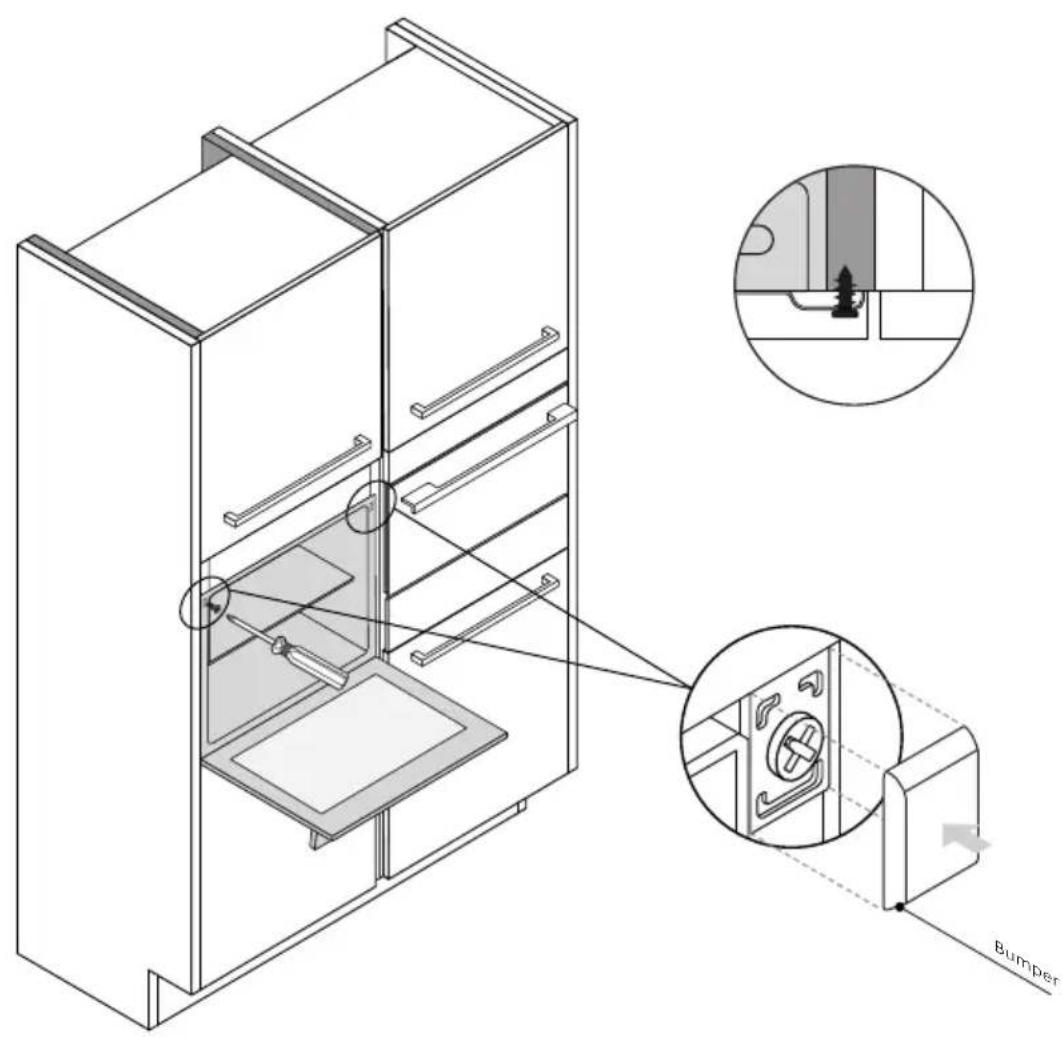
- When you place the grid on the side racks, make sure that the shorter section of the side (between the stop and the extremity) is directed towards the interior of the oven. If the grid has a decorative metal bar, pay attention to position it on the exterior of the oven so that the brand logo can be visible and readable. For the correct positioning refer also to the image in the Accessories section of this user manual.
- Do not use harsh abrasive cleaners or sharp metal scrapers to clean the oven door glasses, since they can scratch the surface, which may result in shattering of the glass.
- Only use the temperature probe recommended for this oven.
-
During cooking, moisture may condense inside the oven cavity or on the glass of the door. This is a normal condition. To reduce this effect, wait 10-15 minutes after turning on the power before putting food inside the oven. In any case, the condensation disappears when the oven reaches the cooking temperature.
-
Cook the vegetables in a container with a lid instead of an open tray.
- Avoid leaving food inside the oven after cooking for more than 15/20 minutes.
- A long power supply failure during an occurring cooking phase may cause a malfunction of the monitor. In this case contact customer service.
WARNING: Do not line the oven walls with aluminium foil or single-use protection available from stores. Aluminium foil or any other protection, in direct contact with the hot enamel, risk melting and deteriorating the enamel of the insides.
WARNING: Never remove the oven door seal.
- CAUTION: Do not refill the cavity bottom with water during cooking or when the oven is hot.
- For a correct use of the oven it is advisable not to put the food in direct contact with the racks and trays, but to use oven papers and/or special containers.
WARNING (*FOR PYRO OVENS)
- Excess spillage must be removed before cleaning.
WARNING: before initiating the automatic cleaning cycle:
- In ovens with Heat Feel Sensor it is necessary, before making the cleaning cycle, close the hole with the nut provided. Always close the hole with the nut when the Heat Feel Sensor is not used.
- During the pyrolytic cleaning process (if available), the surfaces may get hotter than usual and children should be kept away.
- If a hob has been fitted above the oven, never use the hob while the Pyrolizer is working, this will prevent the hob from overheating.
- as soon as possible, wearing gloves, to avoid damage to the probe.
2.PRODUCT INTRODUCTION
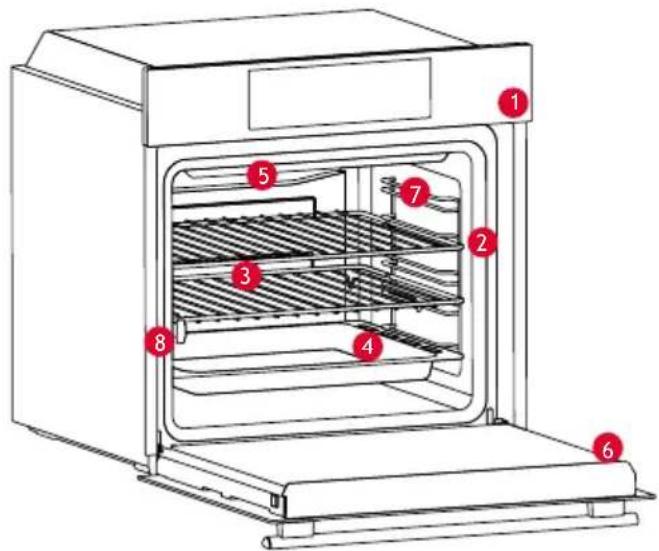
2.1. OVERVIEW OF THE PRODUCT
2.2 ACCESSORIES
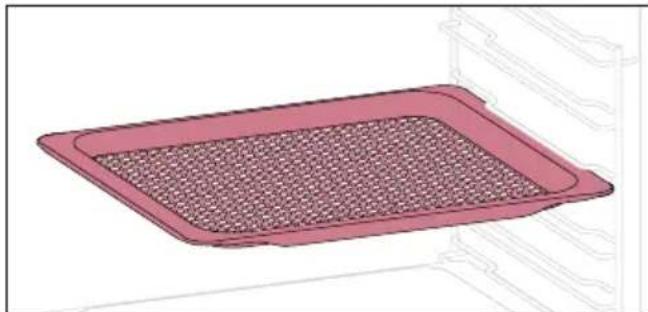
Lateral wire grids (only if present*)
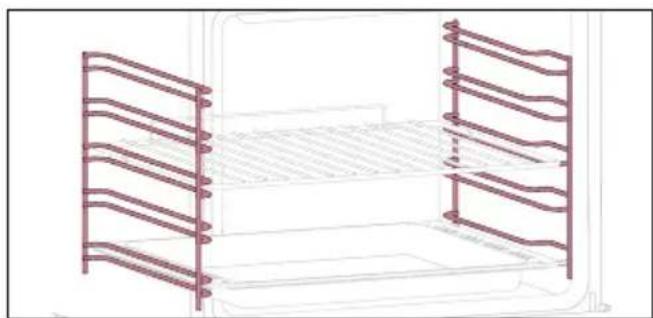
Located on both sides of the oven cavity, the side racks are designed for placing baking tray and grids during the cooking.
NOTE: 6 or 7 levels depending on the model.
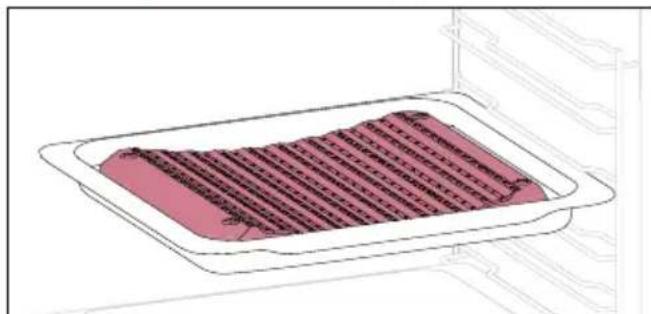
Baking tray (only if present*)
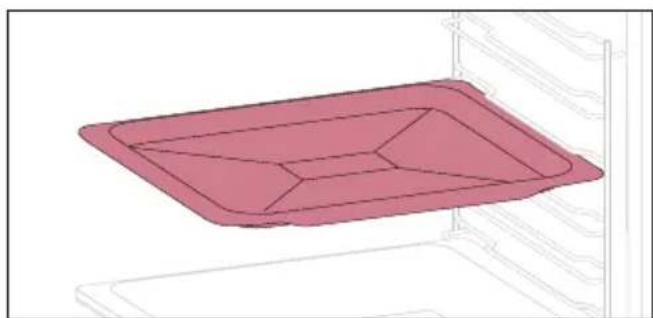
A baking tray is ideal for achieving even bottom browning, making it perfect for cookies and pastries due to its shallow, flat design. Additionally, placing it under a cooking grid can help collect drips and prevent messes in the oven.
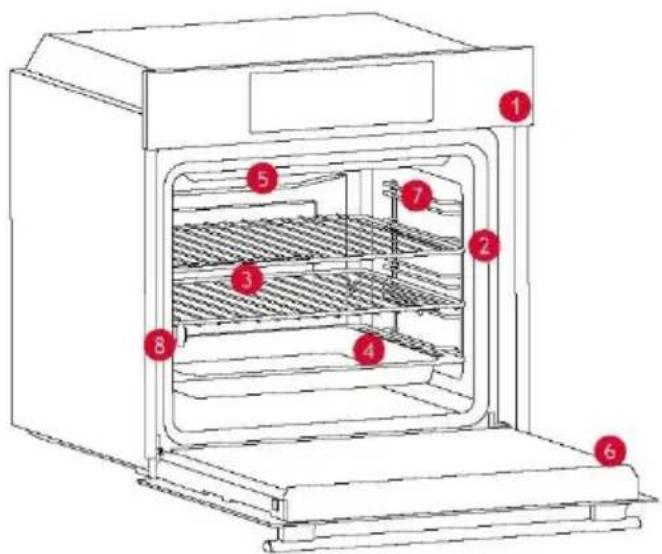
- Control panel
- Shelf positions numbers
- Grids
- Trays
- Fan cover
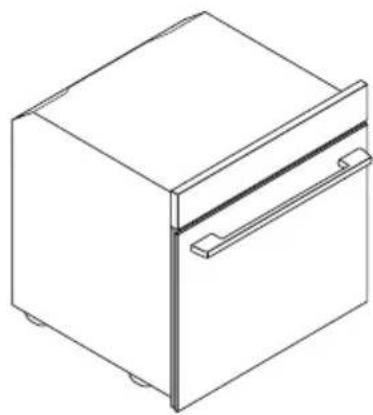
- Oven door
- Lateral wire grids (if present: only for flat cavity)
- Serial number & QRcode
Write here your serial number for future reference.
A metal grid in an oven is a removable, adjustable shelf that supports cookware, ensuring even cooking, and makes cleaning easy. It can be used to hold plates and pans at different heights for various cooking needs.
Deeper Tray
The deeper tray is ideal for recipes with added liquids or layers, such as casseroles or roasts. Its depth is specifically designed to ensure the desired consistency of the food prepared in it.
Telescopic Guides (only if present*)
Telescopic oven rails are shelves that can be extended, making it easier to place or remove items, without the need to reach deep inside a hot oven. They improve safety, stability, and can be adjusted at different level positions.
H-Lab Tray - STEAM mode (only if present*)
The concave shape allows a correct circulation of humidity generated in cooking, keeping the food humidity rate high. According to the quantity of water inserted in the tray, a drier or more "wet" cooking will be obtained.
Turnspit (only if present*)
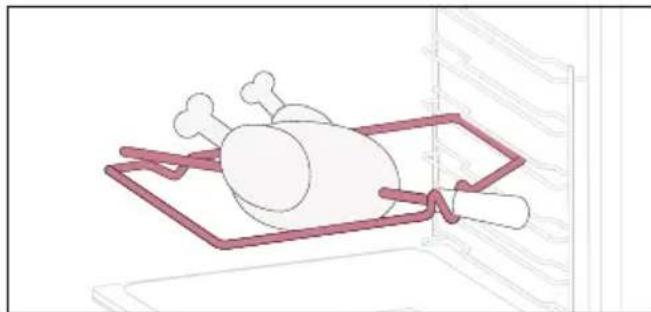
The turnspit works together with the top heating element, by rotating the food can be cooked. omogeniusly. It is best used for medium-sized food. Ideal for rediscovering the taste of traditional roast.
Softclose/Soft open hinges (only if present*)

Soft close and open hinges control the door's motion, ensuring smooth movement and preventing slamming.
H-Lab Tray - BBQ mode (only if present*)

The convex shape is suitable for grilling in the oven at high temperature (220^) allowing a BBQ result even at home with little smoke thanks to the drainage action of the fats on the bottom of the tray.
Heat Feel Sensor (only if present*)
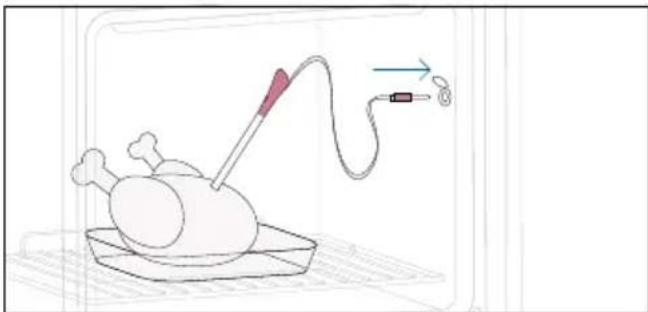
This Meatprobe is a temperature sensor that, inserted into the food and connected to the oven via cable, allows to control the inner temperature of the food during cooking. It is mainly used for fish and meat.
Airfry tray (only if present*)
The air fry tray ensures that hot air reaches the food evenly and tridimensionally, resulting in a crispier exterior while maintaining tenderness inside. To collect juices and breading, place it on top of the baking tray.
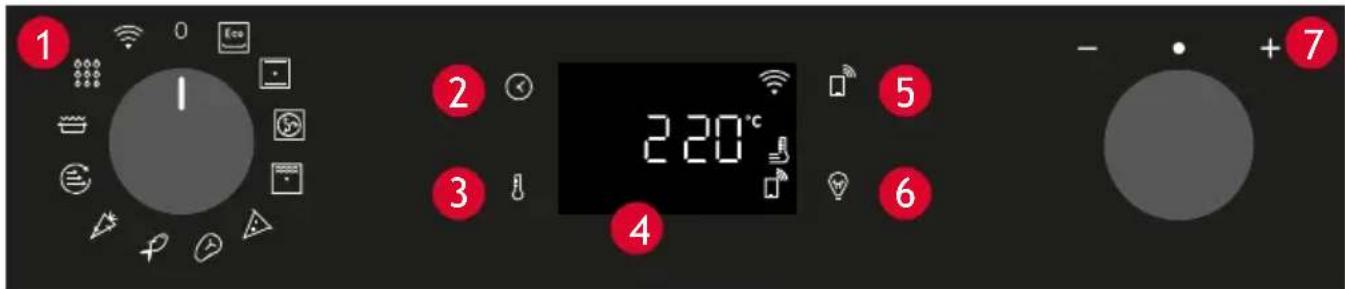
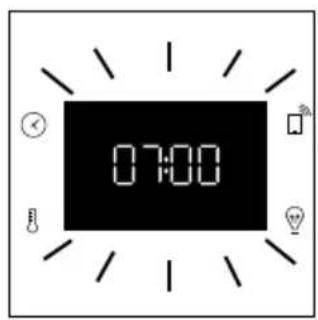
2.3 CONTROL PANEL
Functions and function ranking can be changed depending on the model.
- Function selector knob
- Time
- Temperature
- LED display 7
- Remote control
- Lamp
- Dial control
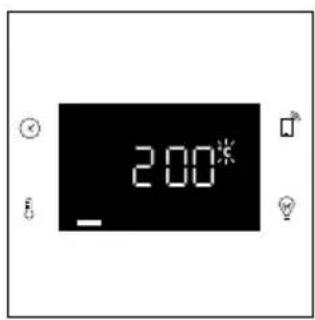
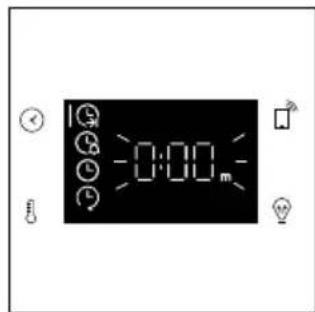
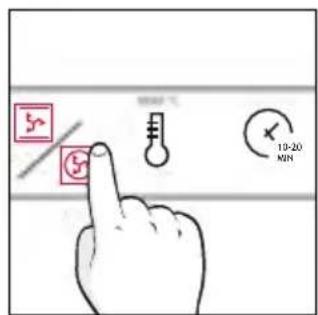
MAIN FUNCTIONS
The display has 4 main functions:
| Symbol Function Description | |
| × | Time | Press once for cooking duration, twice for the minute minder (available in standby mode), three times for the time of day, and four times for delay start. In standby mode, only the kitchen timer is accessible. |
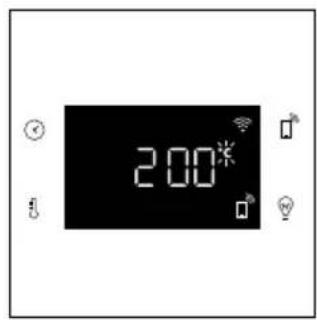
| Temperature | Press once to check the cavity temperature, press and hold for 3 seconds to activate the fast-heating option (only available during the oven's preheat phase). When the preheat is active, the released icon will be shown on the display. |
| Remote Control on/off | Press the button to activate remote control, after pairing the oven with the hOn app (through the application). |
| Light Press to turn on/off the oven cavity light. |
2.4 CONNECTIVITY
Wireless parameters
| Technology Wi-Fi Bluetooth | |
| Standard IEEE 802.11 | b/g/n Bluetooth v4.2, BR/EDR, BLE | |
| Frequency Band(s) [MHz] | 2401 ÷2483 2402÷2480 | |
| Maximum Power [mW] | 100 10 | |
Power consumption of the product in networked standby if all wired network ports are connected and all wireless network ports are activated: 2,0 W.
How to activate wireless network port:
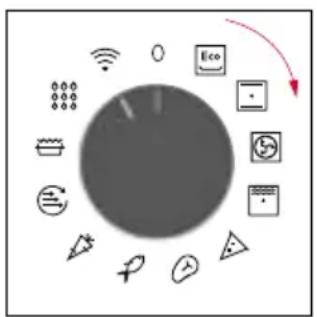
WIFI module switches on as soon as the function knob is set to a position different to zero.
How to deactivate wireless network port:
WIFI module is always off when the function knob is set to zero position. If the knob is set to different position, go to WIFI menu and select off to deactivate the WIFI.
Hereby, Candy Hoover Group Srl declares that the radio equipment is in compliance with Directive 2014/53/EU and with the relevant statutory requirements for the UK market. The full text of the declaration of conformity is available at the following internet address: www.candy-group.com
HOW TO INTERACT WITH THE APP
Your appliance may be connected to your home wireless network and operated remotely using the app. Connect your appliance to ensure it stays up to date with the latest software and features.

NOTE
- Once the oven is turned on, the WIFI icons blinks for 30 minutes. During this period it's possible to enroll the product.
- Ensure your home Wi-Fi network is turned on.
- You will be given step by step guidance on both your appliance and mobile device.
It may take up to 10 minutes to connect your oven.
- For further guidance and troubleshooting, please refer to the app.
Download on your smartphone.


NEW USER REGISTRATION
- Click on "Register"
- You can register through social accounts or sign up with your personal email


QUICK PAIR ENROLLMENT
Step 1

Step 2
- Allow your location permission.

Step 3
- Select oven from the appliance category.

Step 4
- Turn on your appliance; if it is already on, turn it off and on again.

Step 5
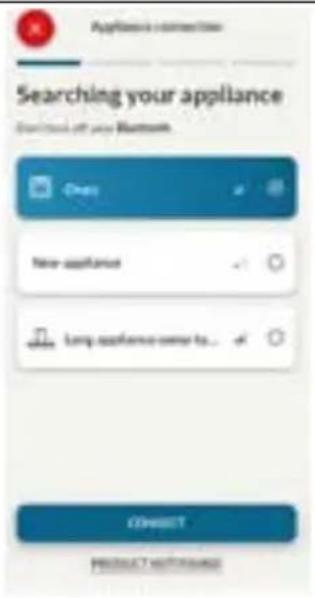
- After turning on, the hOn app will start searching for your home appliance.

Step 6.1-6.2
- Select your home appliance, tap on "connect" and wait a few seconds.

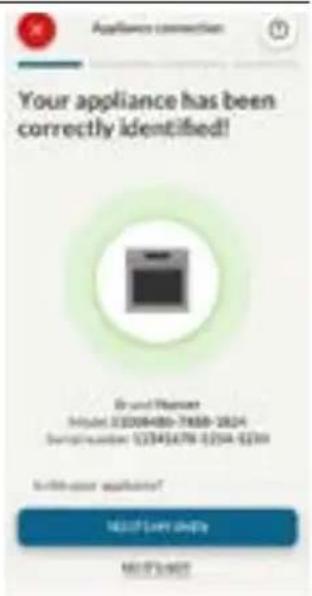
Step 7
- Your Oven will be found and you can control it through hOn.
Once the appliance is enrolled, the user can change the WIFI settings between:


REMOTE CONTROL
The Remote Control offers numerous advantages for users, enhancing convenience, efficiency, and the overall cooking experience, by giving the capability to control the product directly from both the appliance and hOn App
This function allows, through your device, to enjoy various features, such as: instant or scheduled start of recipes or cooking programs already available in the app; real-time monitoring of the progress of your recipes; adjustment of the cooking parameters in use; monitoring of the cooking process using the probe.
Furthermore, it is possible to receive notifications once programs or recipes are completed. The Remote Control can be activated exclusively when the product is enrolled.
NOTE: It is available for all cooking functions on the product, except for Gratin and Supergrill programs.
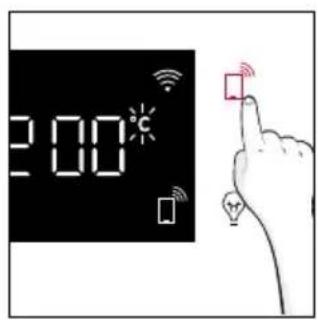
How to activate Remote Control:
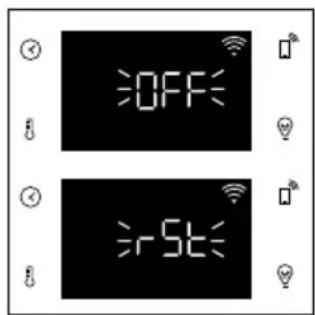
- Turn the function knob on WIFI menu.
- Press
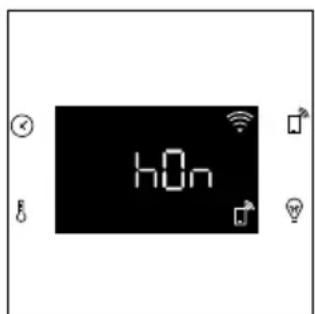
- On display appears "hOn". Both WIFI and Remote Control icons will be shown.
- Access to the App, select a program and let the cooking starts. During the process is possible to control and change the program parameters from both product and App.

It's also possible to activate Remote Control during cooking process by pressing related button


How to stop Remote Control:
While the cooking program is in progress, it can be stopped directly from the product itself by rotating the function knob to a different position. These actions interrupt the cooking process. Another way is by pressing the corresponding button of Remote Control that came with your appliance. These actions interrupt the cooking process.

You can also stop the cooking program remotely using the app by clicking the 'STOP' Button on display device. The oven will automatically stop the cooking.
NOTE: If the user stops the cooking in progress from the oven, simultaneously the stopped cooking will be seen in the App.

3. BEFORE STARTING
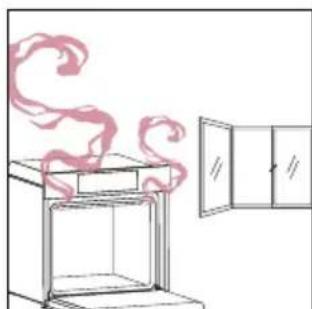
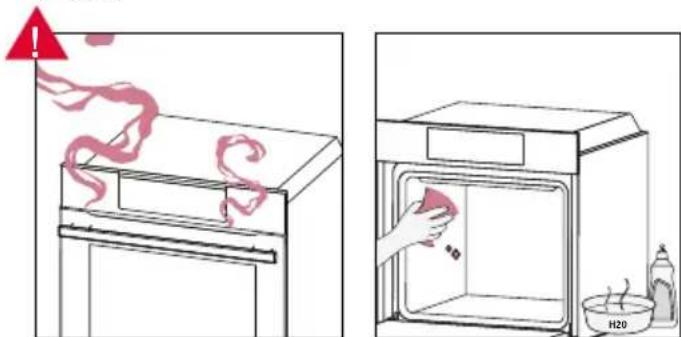
When you first turn on the oven, you might notice some smoke. Don't worry, just wait for the smoke to clear before using the oven.
How door works
For functions that use the grill, thanks to the door switch technology the oven will automatically pause the heating elements when you open the door and continue cooking once you close it.
This feature is available only on specific oven configurations. All the pyro models have it.
During the pyrolytic cleaning process, the oven door remains locked at all times. If it's not locked, the oven will display error code 24 and pause the cleaning function.
How illumination works
The oven cavity is illuminated by one or more light bulbs, typically activated each time a cooking function begins.
For ovens equipped with a door switch (see below), the light automatically turns on when the door is opened.
For ovens equipped with lamp button, it can also be used to activate the lighting.
If the oven door remains open for more than 10 minutes, the lights will automatically turn off.
During pyrolytic cleaning process light remains off. *
How cooling fan works
The cooling fan is responsible for dissipating the heat, keeping the oven and its surroundings from getting too hot, as well as protecting kitchen appliances from the effects of high temperatures. For this reason, the cooling fan remains audible for a period of time even after the oven is turned off.
It operates during and after cooking cycle in relation to the internal temperature of the oven.
When the cooling fan is operational, it usually generates a gentle humming or whirring noise. You may also notice a warm airflow emanating from the gap between the oven door and the control panel.
During pyrolytic cleaning and when door is locked, cooling fan is switched on. *
During ECO function the light will remain off.
^(*) only for pyro ovens
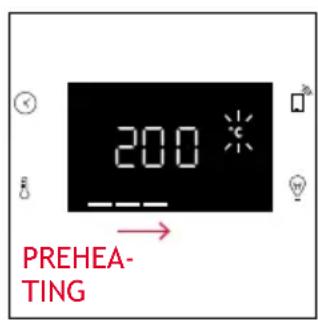
How status bar works
The status bar, based on the set programs, simplifies monitoring of temperature and time. Specifically, for functions involving preheating, it displays the temperature increase during this phase. In cooking programs and the pyrolytic cleaning function, it shows the countdown of cooking time and the cleaning cycle, respectively.
3.2. FIRST USAGE
When the appliance is switched On for the first time, the initial step is to set time of day, choose between 13 ampere or 16 ampere, select brightness and sound level.
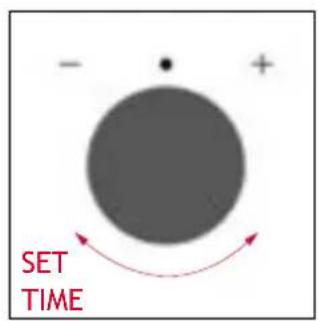
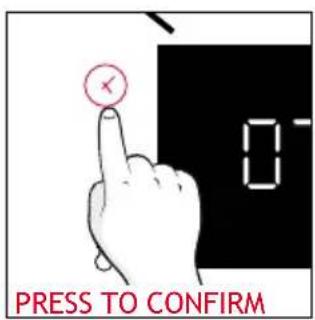
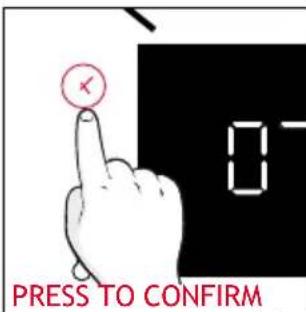
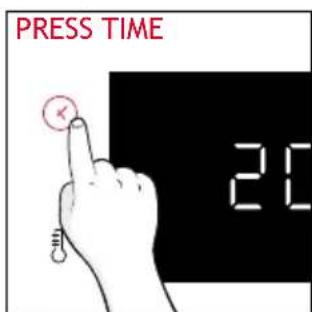
- SET THE TIME: The display will show the blinking preset time '12:00'. To modify it, press and use the right knob to adjust the current hour. Press again and follow the same procedure to set the minutes. To confirm, press once more.


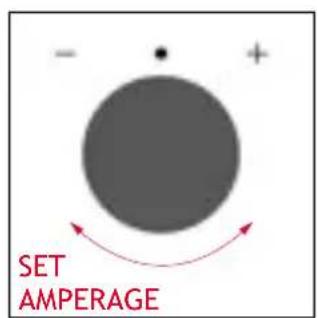
- AMPERAGE: By default, the oven is set to work with higher power suitable for households with more than 3kW (16 A). If your home has lower power, you can change this setting to 13 A. This setting affects how quickly the oven heats up. Choosing the higher option (16A) means it heats up faster (because the power absorption is increased). On the display, you'll see two choices: 13A and 16A. Just turn the right knob to pick the one you want, then press to confirm.
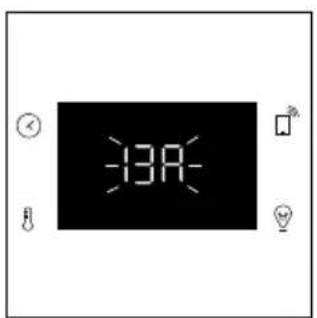
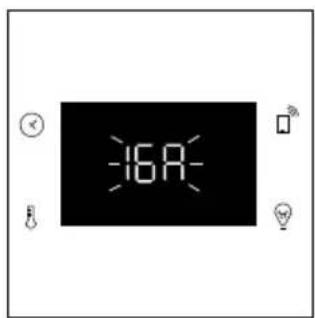
NOTE: The option to set the amperage is only available during the initial installation. To modify the set amperage, please refer to the post-installation instructions.
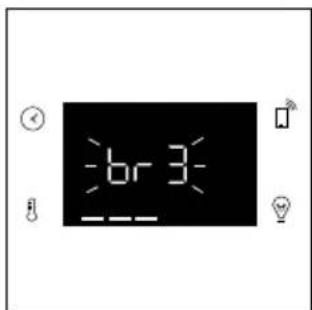
- BRIGHTNESS: The display shows the symbol "br". The numbers represent the level of brightness intensity, editable turning the right knob. To confirm press

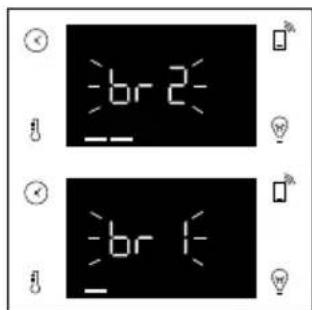
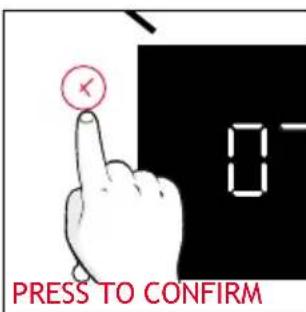
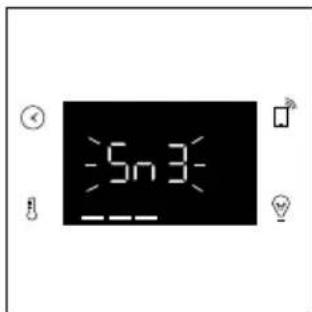
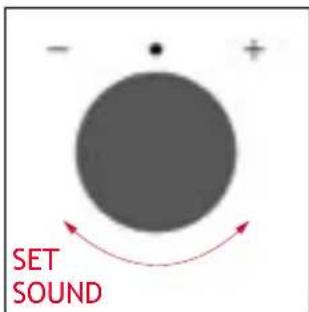
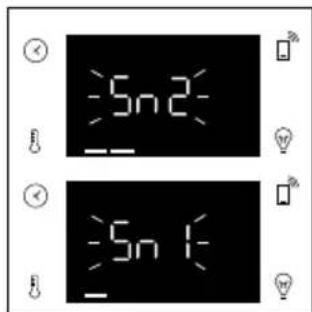
- SOUND: The display shows the symbol "Sn". The numbers represent the level of sound intensity, editable turning the right knob. To confirm press
When oven is in stand-by mode, it is possible to go back to initial settings by pressing simultaneously Temperature and Lamp buttons for 5 sec.

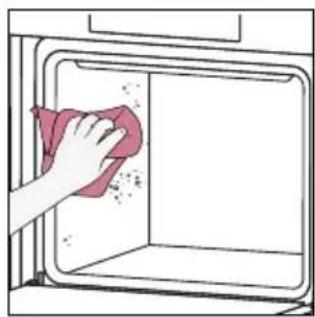
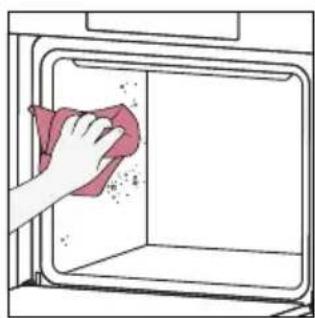
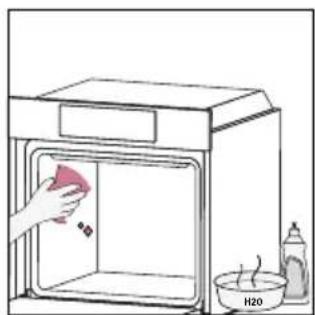
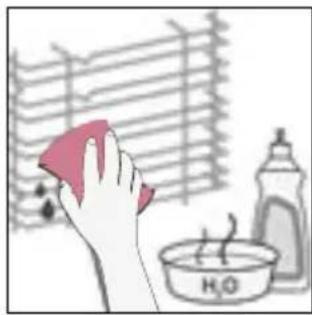
3.2. PRELIMINARY CLEANING
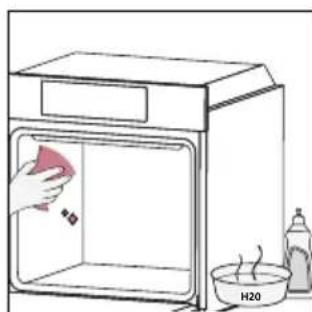
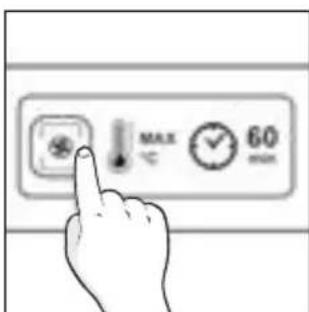
Clean the oven before using for the first time. Wipe over external surfaces with a damp soft cloth. Wash all accessories and wipe inside the oven with a solution of hot water and washing up liquid. Set the empty oven to the maximum temperature and leave on for about 1 hour, this will remove any lingering smells of newness.
4. OPERATION OF PRODUCT
4.1. HOW THE PRODUCT WORKS
SWITCHING ON/OFF THE OVEN
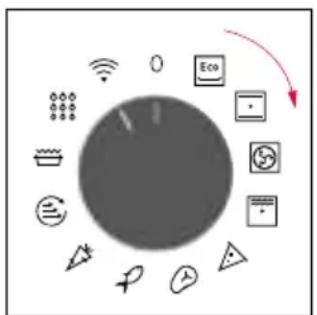
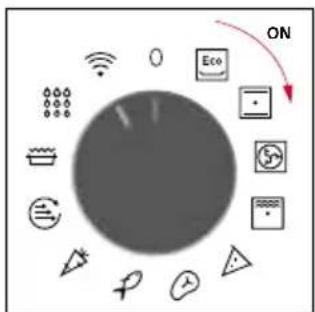
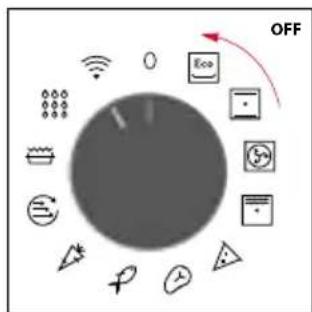
To turn ON the oven rotate the function knob (clockwise/counterclockwise) and select a cooking program. To turn it OFF, set the function knob to the '0' position.
SET COOKING PROGRAM
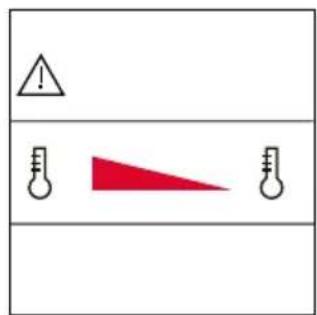
Turn the function knob and select the desired program. On display will appear a default temperature that can be edit in every moment turning the right knob (clockwise to increase and counterclockwise to decrease the temperature).
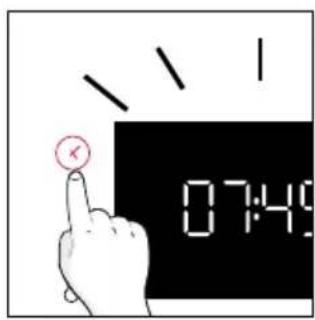
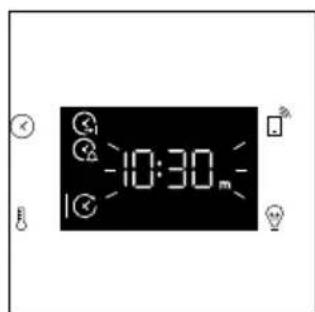
Access the Time menu by pressing ⑥ . To navigate into tap as many times as is needed to enter in the following settings:


NOTE: several parameters cannot be set at the same time, therefore only the last set remains in the memory while the previous one is deleted.
COOKING DURATION
Allows to preset the cooking time required for the recipe chosen.
ACTIVATION: press ⑤ to enter in the Time menu. Tap ⑥ as many times as you need to select "Cooking duration" function. Then use the dial control to regulate the value.

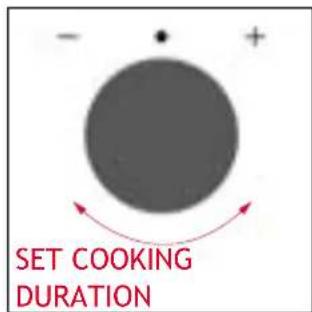
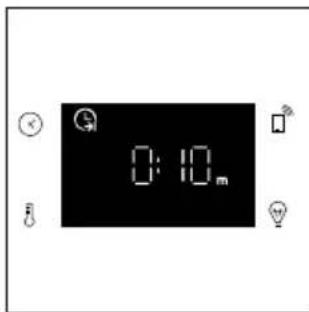
The countdown starts at the end of preheating (if present). During cooking phase is possible to change the duration value by turning the right knob. When duration is elapsed the cooking stops.
MINUTE MINDER
Allows to use the oven as alarm clock.
ACTIVATION: press to enter in the Time menu. Tap as many times as you need to select "Minute minder" function. Then use the dial control to regulate the value.

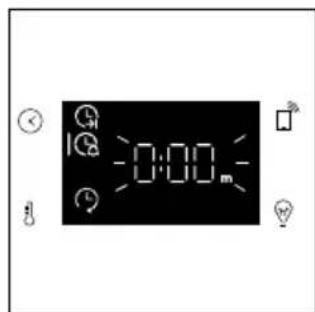
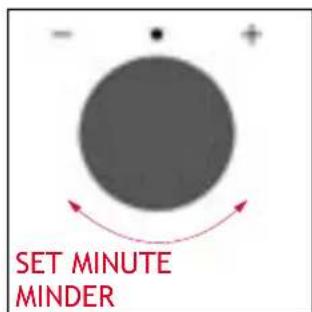
When the function is set, the primary information showed on display is always the time. To edit the temperature, press to enter dedicated edit mode. When duration is elapsed, the cooking continues until the left knob is turned in 0 position.
This function can be set also when the oven is in stand by mode by pressing . When activated, the minute minder operates independently of the oven's cooking functions.
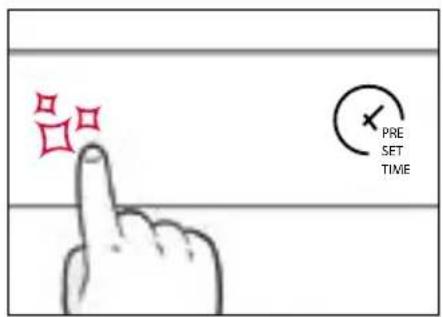
③ DELAY START
Allows to choose the cooking start time.
ACTIVATION: press to enter in the Time menu. Tap as many times as you need to select "Delay start" function. Then use the dial control to set the start time of cooking.

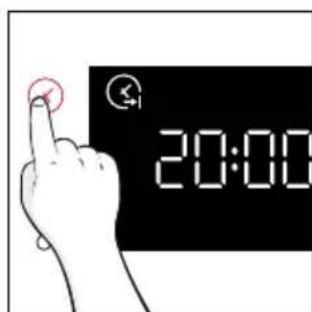
NOTE: Delay start is activable only after setting Cooking Duration and it is not available with grill's functions.
ADDITIONAL FUNCTIONS
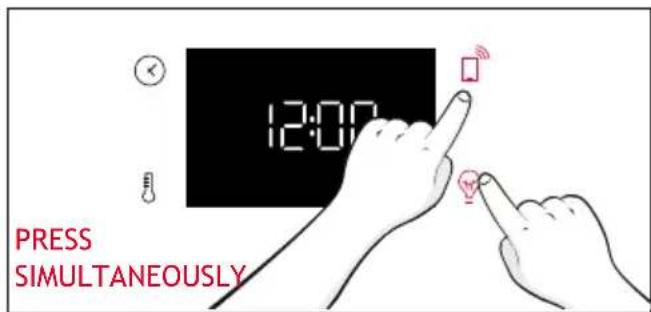
CHILD LOCK
This function allows you to lock the screen to prevent any unwanted use by minors. To activate the screen lock, press and hold down the Remote Control and Lamp buttons simultaneously.
Repeat the same action to deactivate the lock.
4.2. COOKING FUNCTIONS
FAST PREHEATING OPTION
In order to accelerate preheating phase, the fast-preheating option can be selected by pressing the temperature icon for 3s after having selected cooking program and temperature. This option will activate a combination of fan and heating elements regardless of the chosen cooking function.
To save energy, when fast preheating is activated the cavity fan will be turned OFF until the oven reaches the desired temperature.
4.2.1. STANDARD FUNCTIONS
NOTE: for functions that require preheating, ensure all accessories are removed during this phase.
| Symbol Function | T°C default T°C range | Suggested shelf position | Preheat Suggestions |
| Eco | *ECO | 190 °C 150-220 °C | L3/L4 NO | |
| IDEAL FOR: cooking meat, fish or vegetablesThis function allows to save energy during cooking keeping the food moist and tender.Cavity lamp is switched off |
| *Conventional 30-250°C L2/L3 | | Yes/Fast preheat |
| IDEAL FOR: cakes, breads, biscuits, quiches on one level using both upper and lower heating.Can be used with Heat Feel Sensor. |
| Multi-Level | 160°C 50-250°C | L4 (one tray) L2+L5 (two trays) L2+L4+L6 (three trays) | Yes/Fast preheat |
| IDEAL FOR: cakes, biscuits and pizzas on one or more levels.ideal to cook different foods.Can be used with Heat Feel Sensor. |
| **Supergrill | 05 01-05 | L6 NO | |
| IDEAL FOR: big quantities of sausages, steaks and toast bread.The entire area below the grill element becomes hot.Use with the door closed.Turn food two thirds of the way through cooking (If necessary). |
| **Gratin(***) | 200°C
150-250°C | L4/L5 | Yes/Fast preheat | IDEAL FOR: whole pieces of meat (roasts) or gratinated foods. Use with the door closed. Slide the drip tray under the shelf to collect juices. Turn food over halfway through cooking if needed. |
| Air fry(***) | 200°C
150-250°C | L3/L4 NO | | IDEAL FOR: preparing frozen foods or breaded par-cooked foods which are usually fried.
Thanks to the dedicated tray, the hot air can flow evenly over the foods. |
| Gentle cooking | 70°C
50-90°C | 3rd level NO | | DEAL FOR: slow cooking with sous-vide like result.
Use it for meat, fish and vegetables
Can be used with Preci Probe. |
- Tested in accordance with the EN 60350-1 for the purpose of energy consumption declaration and energy class.
Use with the door closed.
* Depending on the oven model.
4.2.2. SPECIAL FUNCTIONS
| Symbol | Function | T°C default T°C range | Suggested shelf position | Preheat | Suggestions |
| Pizza | 300°C
200-300°C | 2/3 NO | | IDEAL FOR: all kind of pizzas without preheating the oven. Use lower temperatures for frozen items and 300°C for home-made recipes |
How to use the probe:
- Plug the Probe into designed port on the oven and insert the accessory in the food.
- On display appears the Probe icon. Only dedicated functions or cooking programs are available. From this moment, the displayed temperature will be that of the probe
- Choose the cooking function and set the Probe target temperature to begin. The oven will then use the Probe data to monitor your food's internal temperature and stop cooking once the desired temperature is reached.
i NOTE: When using the probe, there's no need to set a cooking timer; it will automatically stop once the desired temperature is reached.
- Once the desired internal temperature is reached, the alarm sounds and the oven turns off. Before taking the food out of the oven, be sure to remove the Probe from the food carefully.
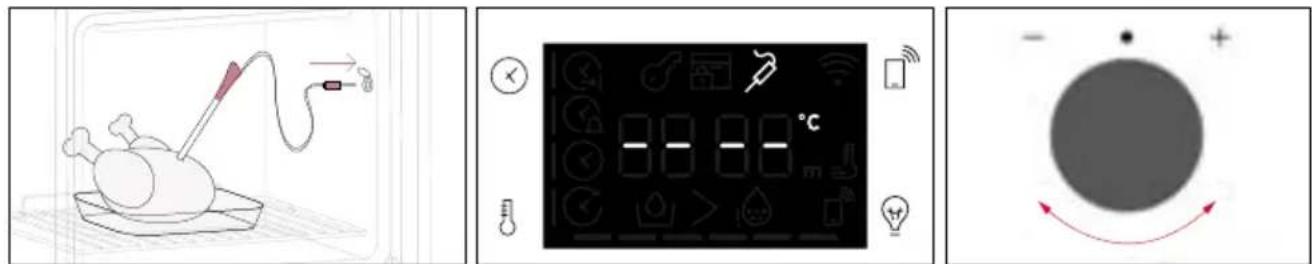
The Probe icon will be displayed on the screen. Only specific functions or cooking programs are accessible when this icon is active. If you attempt to use other functions, the oven will display a message saying "can't use probe."

Cooking tips
The Probe is equipped with a single measuring point. Insert it entirely into the food with the metal tip positioned at the centre of the food. Place this point as close as possible to the thickest (coldest) part of the food to accurately monitor the cooking process.

The Probe can be used with manual functions (Static, Static + Fan, Grill, Super grill, Gratin, and Multilevel), with FOOD COOKING CATEGORIES (Meat, Fish and Vegetables) and Gentle cooking.
| Food category Suggested | core T°C Suggested positioning | |
| Roast beef 45°C | | Diagonally in the thickest part. For cylindrical shape foods (i.e. beef roasts) place the tip as close as possible to the geometric center |
| Roasted meats 55 °C / 60 °C / 65 °C |
| Poultry 83-85°C | | Into the thickest part of the breast |
| Fish (whole/steaks) 65°C Diagonally in the thickest part | | |
| Bread/casseroles 90°C | | Close to the geometric center of the food |
5. COOKING GUIDELINES
5.1. GENERAL COOKING TABLE
| Category Recipe | N° of levels | Cooking program | T°C Preheat | Cooking accessory | Shelf position | Cooking time after preheating* (min) |
| Sweet bakery | Small cakes /Muffins | 1 | Static Multilevel | 175°C 160°C | | Baking tray Baking tray | L3 L4 | 20-30 30-40 |
| 2 | Multilevel | 150°C | Y | Baking + Deeper trays | L2+L5 | 30-40 |
| 3 | Multilevel | 140°C | | Baking trays | L2+L4+L6 | 40-50 |
| Sponge cakes (26 cm Ø) | 1 | Static | 170°C | | Metal grid + Cake tin | L2 | 30-40 |
| Multilevel | 150°C | y | Metal grid + Cake tin | L4 | 40-50 |
| 2 | Multilevel | 150°C | | Metal grids + Cake tin | L1+L4 | 50-60 |
| Biscuits/Shortbreads | 1 | Static Multilevel | 150°C 150°C | | Baking tray Baking tray | L3 L4 | 25-30 30-40 |
| 2 | Multilevel | 140°C | Y | Baking + Deeper trays | L2+L5 | 30-40 |
| 3 | Multilevel | 140°C | | Baking trays | L2+L4+L6 | 35-40 |
| Choquettes | 1 | Static | 190°C | | Baking tray | L4 | 25-35 |
| 2 | Multilevel | 170°C | | Baking tray | L3 | 25-35 |
| Yorkshire pudding | 1 | Static | 200°C | Y | Baking tray | L3 | 20-30 |
| Meringues | 1 | Multilevel | 90°C | Y | Baking tray | | 90-160 |
| Macaron | 1 | Static | 150°C | Y | Baking tray | L3 | 15-20 |
| Apple pie | 1 | Static | 185°C | Y | Metal grid + Cake tin | L2 | 60-70 |
| 1 | Multilevel | 170°C | Y | Metal grid + Cake tin | L4 | 65-75 |
| Tarte tatin | 1 | Static | 170°C | Y | Metal grid + Cake tin | L2 | 40-60 |
| Chocolate souffle | 1 | Static | 200°C | Y | Baking tray + molds | L3 | 10-15 |
| Cheesecake 1 | | Static 150°C Y | | | Metal grid + Cake tin | L2 | 50-65 |
| Frozen crois-sants | 1 | Static | 180°C | Y | Baking tray | L3 | 20-25 |
| 2 | Static | 180°C | | Baking trays | L2+L5 | 25-35 |
| 3 | Multilevel | 160°C | | Baking trays | L2+L4+L6 | 30-40 |
| Strudel, frozen | 1 | Static | 210°C | Y | Baking tray | L3 | 30-45 |
| Breads and Flatbread | Toast bread | 1 | Supergrill | 5 | N | Metal grid | L6 | 4-6 |
| Focaccia | 1 | Static | 200°C | Y | Baking tray | L2 or L3 | 25-35 |
| Bread, whole | 1 | Static | 200°C | Y | Baking tray | L3 | 35-50 |
| Category | Recipe | N° of levels | Cooking program | TC Preheat | Cooking
accessory | Shelf
position | time after
preheating* (min) | |
| Salty cakes / Quiches | 1 Static 200°C Y | | | + Quiche tin | L1 or L2 30-50 | | |
| Cheese souffle / Static 200°C Y | | | | | | | |
| Savory pies and casseroles | | | | | | | |
| Lasagna, fresh / Static 200°C Y | | | | Baking tray + molds | L3 20-35 | | |
| Laagna, fresh / Static 200°C Y | | | | Metal grid + ovenproof | L3 40-60 | | |
| frozen | 1 Static 180°C Y | | | | dish | L3 45-55 | | |
| Cannelloni, frozen | 1 Static 180°C Y | | | | ovenproof | L4 20-30 | | |
| Pizza, fresh (TRAY) | 1 Static 250°C Baking tray | L2 or L3 | 1 | 250°C | N | Baking tray | 12 or L3 | |
| 2 Multilevel 180°C Y | | | | Deeper trays | L2+L5 25-35 | | |
| Pizza, fresh (Round) | 1 Static 250°C Baking tray | L2 or L3 | 8-10 | | | | | |
| 2 Multilevel 180°C Y | | | | | | | |
| Pizza, frozen (thin crust) | 1 Static 220°C | | | | | | | |
| 2 Multilevel 200°C | | | | | | | |
| Meat & poultry | Pizza, frozen | 1 Pizza 200°C N | Metal grid | L2+L5 15-25 | | | | |
| Pizza, frozen | 1 Pizza 200°C N | Metal grid | L2+L4+L6 | | | | |
| Chicken things | 1 Gratin 220°C Y | 1 Gratin 220°C Y | Metal grid | L2+L4+L6 | | | | |
| Roasted whole chicken | 1 Gratin 220°C Y | 1 Gratin 220°C Y | Metal grid | L2+L4+L6 | | | | |
| Chicken things | 1 Gratin 220°C Y | 1 Gratin 220°C Y | Metal grid | L2+L4+L6 | | | | |
| Chicken things | 1 Gratin 220°C Y | 1 Gratin 220°C Y | Metal grid | L2+L4+L6 | | | | |
| Chicken things | 1 Gratin 220°C Y | 1 Gratin 221°C Y | Metal grid | L2+L4+L6 | | | | |
| Chicken things | 1 Gratin 220°C Y | 1 Gratin 221°C Y | Metal grid | L2+L4+L6 | | | | |
| Chicken things | 1 Gratin 220°C Y | 1 Gratin 221°C Y | Metal grid | L2+L4+L6 | | | | |
| Chicken things | 1 Gratin 220°C Y | 1 Gratin 221°C Y | Metal grid | L2+L4+L6 | | | | |
| Chicken things | 1 Gratin 220°C Y | 1 Gratin 221°C Y | Metal grid | L2+L4+L6 | | | | |
| Chicken things | 1 Gratin 270°C Y | 1 Gratin 270°C Y | Metal grid | L2+L4+L6 | | | | |
| Chicken things | 1 Gratin 270°C Y | 1 Gratin 270°C Y | Metal grid | L2+L4+L6 | | | | |
| Chicken things | 1 Gratin 270°C Y | 1 Gratin 270°C Y | Metal grid | L2+L4+L6 | | 1 | 30-50 | |
| Chicken things | 1 Gratin 270°C Y | 1 Gratin 270°C Y | Metal grid | L2+L4+L6 | | 1 | 30-50 | |
| Category | Recipe | N° of levels | Cooking program | T°C | Preheat | Cooking accessory | Shelf position | Cooking time after preheating* (min) |
| Meat & Poultry | Rooster 1 Gratin 220°C | Y | | | | Metal grid Place baking tray at L1 | L4 | 20-40 |
| Roasted Turkey | 1 | Gratin 200°C | Y | | Metal grid + Ovenproof dish | L3 | 50-60 |
| Pork ribs (1000-1200g) | 1 | Static 200°C | Y | | Metal grid + Ovenproof dish | L3 | 80-100 |
| Sausages | 1 | Supergrill | 4 | Y | Metal grid | L5 | 40-50 |
| Beef fillet (1000-1500g) | 1 | Gentle cooking** | 60°C | N | Metal grid + Ovenproof dish | L3 | 60-80 |
| Roast beef (500g) | 1 | Gratin | 220°C | Y | Baking tray | L3 | 20-40 |
| Meatloaf (1000-1500g) | 1 | Static | 180°C | Y | Baking tray | L3 | 40-50 |
| Roasted chicken with potatoes | 1 | Gratin | 200°C | Y | Deeper tray | L4 | 45-60 |
| Fish and Seafood | Grilled seafood | 1 | Supergrill | 4 | N | Metal grid | L5 | 15-30 |
| Frozen fish sticks | 1 | AirFry** | 200°C | N | Air fry tray** | L4 | 20-25 |
| Baked fish | 1 | ECO | 200°C | N | Metal grid Place baking tray at L1 | L3 | 40-60 |
| Vegetables | Vegetable gratin | 1 | ECO | 200°C | N | Metal grid + Ovenproof dish | L3 | 80-90 |
| Frozen french fries (300-500g) | 1 | AirFry** | 220°C | N | Air fry tray** | L4 | 18-25 |
| Potato gratin | 1 | Gratin 200°C | Y | | Metal grid + Ovenproof dish | L4 | 15-25 |
| Roasted potatoes | 1 | Static | 200°C | Y | Baking tray | L4 | 30-50 |
Cooking times may vary according to consumer's recipe and ingredients.
*if preheating required
** Depending on the oven model.
NOTE: For cooking cakes, quiches and other recipes that require a mold or a container on 2 levels, place the staggered: the upper tray on the left side and the lower tray on the right side.
5.2.EVERYDAY COOKING TABLE
Food category menu allows to cook a variety of recipes without preheating the oven, thanks to dedicated cooking programs tailored to each category needs.
After selecting the cooking program, the default time will be shown and can be edited by turning the right knob; cooking temperature can be changed by pressing the dedicated icon. Both parameters can be set within a limited range as shown in the table below.
| Sym-bol | Description | Pre-heat | Shelf position | Tempera-ture range (℃) | Time Range (min) | Heat Feel Sensor tem-perature (if available) | Description |
| Meat | NO | 2-3-4 | 180-200 | 20-80 | 55-85°C | For beef, veal and pork roasts, poultry and cuts of meat. |
| Fish | NO | 3-4 | 160-180 | 15-45 | 55-65°C | For whole fish and fillets. |
| Vegetables | NO | 3-4 | 180-200 | 30-80 | 70-90°C | For roasted vegetables and potatoes |
NOTE: if, after turning off the oven, there is a need to continue cooking, it's recommended avoiding th use of everyday cooking programs and instead opting for standard functions.
| Recipe Serving size | Cooking program | T°C | Cooking accessory | Shelf position | Cooking time (min) | |
| Beef roast | 500-800g | Meat | 190°C | L3 | 30-40 | |
| Beef fillet | 200g | Meat | | L3 | | |
| Meatloaf | 1000-1500g | Meat | 180°C | L3 | 40-50 | |
| Beef wellington | 500g | Meat | 200°C | L3 | 50-80 | |
| Port roast | 800-1000g | Meat | 200°C | L3 | 40-70 | |
| Pork ribs | 1000-1200g | Meat | 200°C | L3 | 80-100 | |
| Lamb rack | 800-1000g | Meat | 200°C | L3 | 60-80 | |
| Lamb leg | 1500-2000g | Meat | 190°C | L3 | 80-100 | |
| Salmon fillets | 200-600g | Fish | 170°C | L3 | 20-35 | |
| Tuna steaks | 600g (app. 4 pcs) | Fish | 180°C Metal grid | L3 | 10-20 | |
| Swordfish steaks | 700g (app. 4 pcs) | Fish | 200°C Baking tray | L3 | 15-20 | |
| Cod fillet | 600g (app. 4 pcs) | Fish | 150°C Baking tray | L3 | 10-20 | |
| Seabream, whole | 1 | Fish | 170°C | Baking tray | L3 | 35-45 |
| Seabream, fillet | 600g (app. 4 pcs) | Fish | 150°C Baking tray | L3 | 10-20 | |
| Seabass fillet | 600g (app. 4 pcs) | Fish | 150°C Baking tray | L3 | 10-20 | |
| Salt baked fish | 1 | Fish | 220°C | Baking tray | L3 | 30-40 |
| Fish skewers | 8 pieces | Fish | 150°C | Metal grid | L3 | 20-30 |
| Stuffed squid | 4 pieces | Fish | 180°C | Baking tray | L3 | 25-40 |
| Whole bread | 1 | Bakery | 200°C | Metal grid | L3 | 35-50 |
| Rye bread | 1 | Bakery | 190°C | Metal grid | L3 | 35-50 |
| Sandwich loaf | 1 | Bakery | 200°C | Metal grid | L3 | 35-50 |
| Frozen baguettes | 1 | Bakery | 200°C | Metal grid | L3 | 15-25 |
| Frozen puff pastry snacks | 1 | Bakery | 190°C | Metal grid | L3 | 20-30 |
| Fennels | 1 tray | Vegetables | 200°C | Metal grid | L3 | 30-40 |
| Recipe Serving size | Cooking program | T°C | Cooking accessory | Shelf position | Cooking time (min) |
| Mixed vegetables | 1 tray Vegetables 190°C Metal grid L3 40-45 | | | | |
| Cauliflower | 1 tray Vegetables 190°C Metal grid L3 40-50 | | | | |
| Pumpkins, cubed | 1 tray Vegetables 200°C Metal grid L3 30-40 | | | | |
| Stuffed peppers | 1 tray Vegetables 180°C Metal grid L3 70-80 | | | | |
| Stuffed zucchini | 1 tray Vegetables 190°C Metal grid L3 35-45 | | | | |
| Carrot sticks | 1 tray Vegetables 180°C Baking tray L3 35-40 | | | | |
| Broccoli 1 tray Vegetables 190°C Baking tray L3 30-40 | | | | | |
| Ratatouille 1 tray Vegetables 190°C Metal grid L3 40-45 | | | | | |
| Vegetable flan | 6 ramekins Vegetables 180°C | | Baking tray + molds | L3 25-35 | |
6. CARE & CLEANING
6.1. GENERAL RECOMMENDATIONS
Regular cleaning can extend the lifecycle of your appliance. Wait for the oven to cool before carrying out manual cleaning.
- After each use of the oven, a minimum of cleaning will help keep the oven perfectly clean.
- Do not line the oven walls with aluminum foil or single-use protection available from stores.
Aluminum foil or any other protection, in direct contact with the hot enamel, risks melting and deteriorating the enamel of the insides.
- In order to prevent excessive dirt of your oven and the resulting strong smokey smells, we recommend not using the oven at very high temperature. It is better to extend the cooking time and lower the temperature a little.
- In addition to the accessories supplied with the oven, we advise you only use dishes and baking molds resistant to very high temperatures.
6.2.CLEANING THE OVEN
6.2.1. INSIDE THE OVEN: cleaning functions
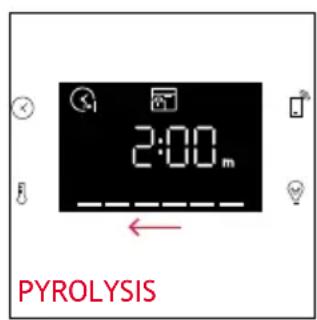
Pyrolytic cleaning (*depending on the oven model)
This process relies on the chemical process bearing the same name, which involves the decomposition of complex substances through the application of heat treatment.
Once initiated, it automatically locks the oven door and swiftly elevates the temperature to a searing 410^ .
At the end of the cleaning cycle, all that remains within the cavity is a minimal deposit of dust, easily wiped away with a damp cloth.
How does it work:
- Remove any accessories from the oven, such as grids, side racks and side racks screw (^*)
- Turn function knob on 1 . Turn the dial control to set the Pyrolytic program;
Allow the function to operate for the preset time. During this process and the following cooling phase, the oven door will remain locked.
- When the appliance is cool, clean the inner surfaces of the oven with a cloth.
WARNING: Make sure that the appliance is cool before you touch it. Care must be taken with all hot surfaces as there is a risk of burns. Use distilled or drinkable water.
(^*) only for models with 7 levels.
Hydroeasy
The Hydroeasy function is designed to effortlessly tackle light dirt and provide a quick and eco-friendly solution for cleaning your oven cavity using the power of steam.
How does it work:
- Pour 100ml of water into the bottom embossment of the oven.
- Turn the knob on . If necessary, turn the dial control to set the Hydro clean program. Allow the function to operate for the preset time.
- At the end of the cleaning process, allow the oven to cool down.
- When the appliance is cool, clean the inner surfaces of the oven with a cloth.
- A WARNING: Make sure that the appliance is cool before you touch it. Care must be taken with all hot surfaces as there is a risk of burns. Use distilled or drinkable water.

Catalytic cleaning
The Catalytic panels line the oven cavity and grant you the luxury of never having to contend with a dirty oven.
The panels are coated with a specialized enamel that boasts a microporous structure, adept at absorbing absorbs grease from splashes.
Through a catalytic chemical reaction, they efficiently convert the absorbed grease into gaseous elements when exposed to high temperatures.
Recommendation: Consider replacing the catalytic panels after approximately three years of use, especially if you use your oven for two to three cooking cycles per week. This ensures optimal performance and cleanliness.
6.2.2. OUTSIDE THE OVEN: removal and cleaning the glass door
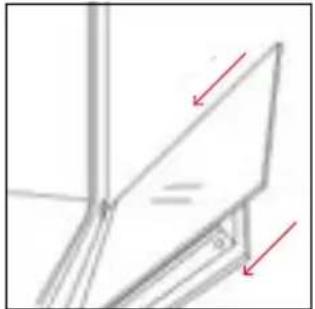
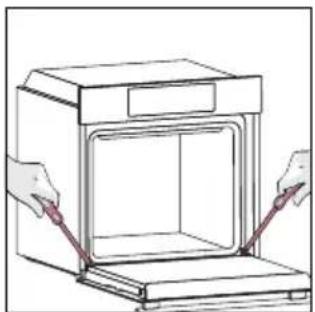
- Position the door at 90^ . Rotate the hinge locking tabs outward from the oven.
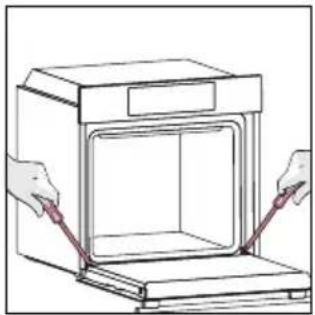
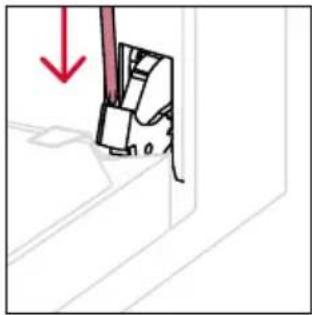
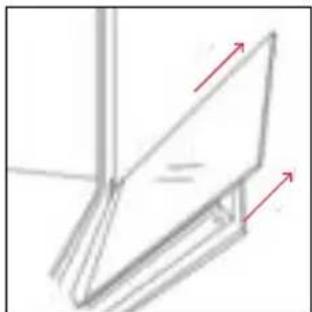
- Position the door at 45^ . Simultaneously press the two buttons on both the sides of the door's lateral shoulders and pull towards yourself to remove the upper glasses' door cover.

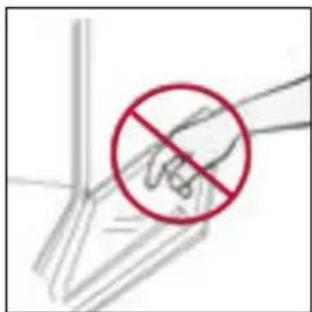
- Very carefully remove the oven glass, starting with the inner one. During the procedure, rrmly hold the glass with both hands and place them on a cushioned at surface (e.g., on a fabric).
- AWARNING: The outer glass is not removable.
- Clean the glass using a soft cloth and suitable cleaning products.

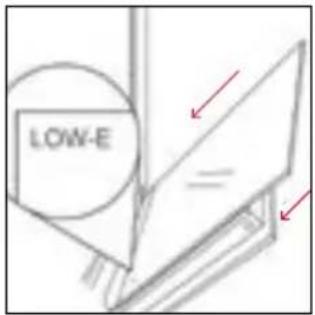
- Insert the glass panels, making sure that the "Low-E" label is correctly readable and positioned on the lower left side of the door, near the left-side hinge. This way, the printed label on the first glass will remain on the inside of the door.
- Reattach the upper glasses' door cover by pushing it inwards until you hear a click from the two side buttons.
- Then, bring the door back to 90^ and rotate the hinge locking tabs inward towards the inside of the oven.
6.3 CLEANING OF ACCESSORIES
Ensure that you clean the accessories thoroughly after every use and dry them using a towel. For persistent residues, consider soaking the accessories in a mixture of water and soap for approximately 30 minutes before giving them a second wash.
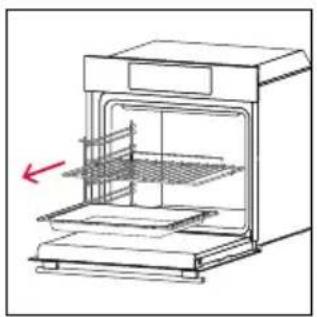
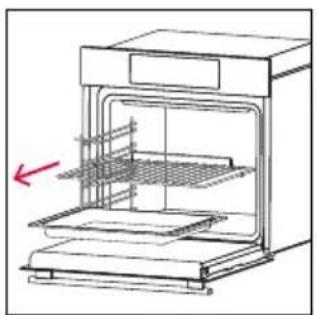
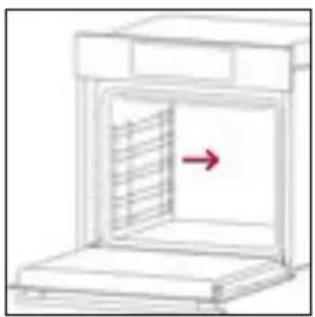
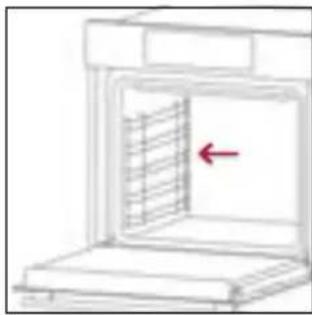
CLEANING OF SIDE RACKS:
-6 levels model
- Remove the side racks by pulling them in the direction of the arrows.
- To clean the side racks either put them in the dishwasher or use a wet sponge, ensuring that they are dried afterwards.
- After the cleaning process install the side racks in reverse order.
6.4 MAINTENANCE
COMPONENTS REPLACEMENT
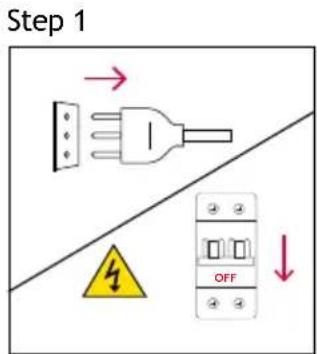
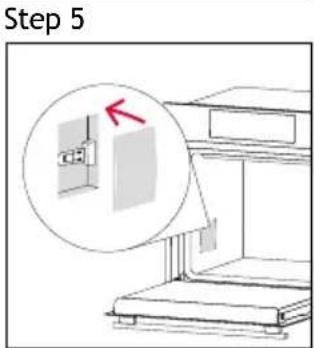
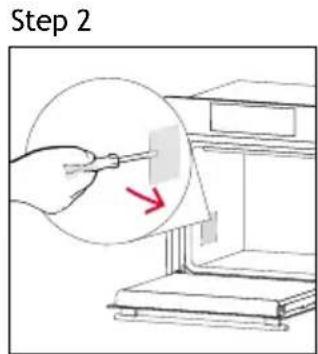
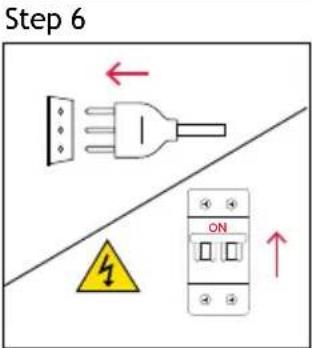
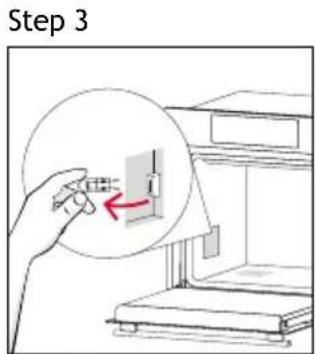
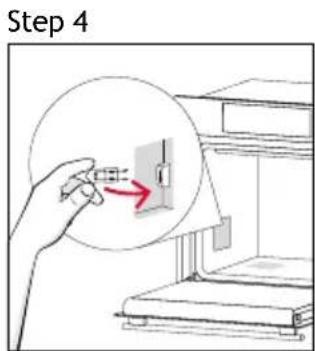
Changing the bulb on top:
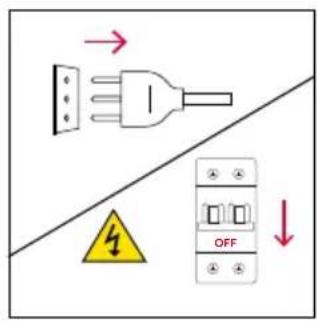
- Disconnect the oven from mains supply.
- Remove the lamp's glass cover.
- Disassemble the bulb.
- Replace the bulb with a new one of the same type.
- Relocate the lamp's glass cover.
- Reconnect the oven from mains supply.
Step 1
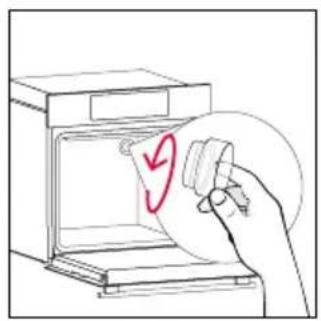
Step 2
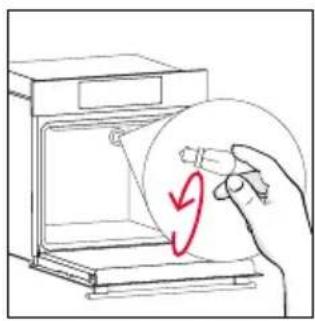
Step 3
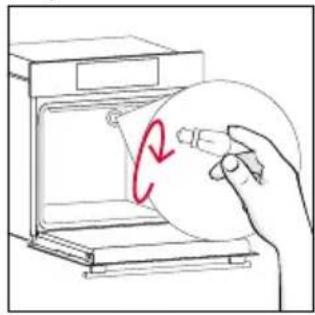
Step 4
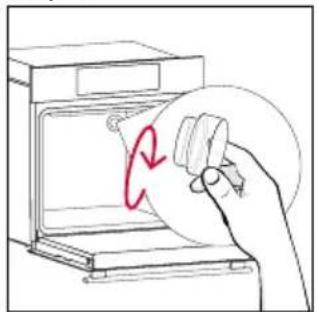
Step 5
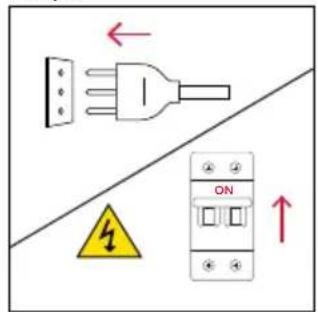
Step 6
This product contains one or more light sources of energy efficiency class G (Lamp)
Changing the lateral bulb:
- Disconnect the oven from mains supply.
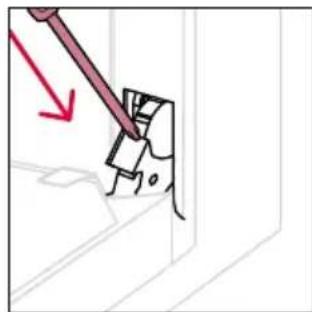
- Use a flat-head screwdriver by positioning it to the side of the protective glass and gently apply pressure to remove it.
- Carefully grasp the bulb from its base.
- Insert the new one.
- Reinstall the protective glass by pressing it gently until it's locked into position.
- Reconnect the oven from mains supply.
This product contains one or more light sources of energy efficiency class G (Lamp)
7. TROUBLE SHOOTING
If, during oven use, an error occurs, the display will show the code "ER" followed by two digits, which will identify the error.
Proceed by turn off the oven and un-plug it, wait for a few minutes, and then reconnect it.
If the error disappears, you can resume using the oven. If it doesn't, call customer service and communicate the code (ERXX) you see on the display.
Error

Smoke
8.1.APPLIANCE DISPOSAL

This appliance is labelled in accordance with European Directive 2012/19/EU regarding electric and electronic appliances (WEEE). The WEEE contain both polluting substances (that can have a negative effect on the environment) and base elements (that can be reused). It is important that the WEEE undergo specific treatments to correctly remove and dispose of the pollutants and recover all the materials.
Individuals can play an important role in ensuring that the WEEE do not become an envi
ronmental problem; it is essential to follow a few basic rules:
In many countries, domestic collections may be available for large WEEEs. When you buy a new appliance, the old one can be returned to the vendor who must accept it free of charge as a one-off, as long as the appliance is of an equivalent type and has the same functions as the purchased appliance.
8.2. SAVING AND RESPECTING THE ENVIRONMENT
Where possible, avoid pre-heating the oven and always try to fill it.
Open the oven door as infrequently as possible, because heat from the cavity disperses every time it is opened. For a significant energy saving, switch off the oven between 5 and 10 minutes before the planned end of the cooking time, and use the residual heat that the oven continues to generate.
Keep the seals clean and in order, to avoid any heat dispersal outside of the cavity. If you have an electric contract with an hourly tariff, the "delayed cooking" programme makes energy saving simpler, moving the cooking process to start at the reduced tariff time slot.
mm
Vista posteriore Vista laterale
mm

BIENVENUE
2.1.VUE D'ENSEMBLE DU PRODUIT
(EN) Thanks to the "Over The Air" technology, you can effortlessly keep your oven up-to-date with the latest features.
If available, once the oven is connected, when the knob is turned on "Wi-Fi" or a cooking program has just ended, the update will automatically initiate. "OtA" will appear on the display, the Wi-Fi icon will blink, and all product commands will be temporarily unavailable. This process may take a few minutes, so please do not disconnect or unplug the oven during this time. Once the update is complete, "12:00" will blink on the display. Simply reset the time and start cooking!