FED 7253 IN - Oven ROSIERES - Free user manual and instructions
Find the device manual for free FED 7253 IN ROSIERES in PDF.

User questions about FED 7253 IN ROSIERES
0 question about this device. Answer the ones you know or ask your own.
Ask a new question about this device
Download the instructions for your Oven in PDF format for free! Find your manual FED 7253 IN - ROSIERES and take your electronic device back in hand. On this page are published all the documents necessary for the use of your device. FED 7253 IN by ROSIERES.
USER MANUAL FED 7253 IN ROSIERES
Instructions and installation book for built-under double ovens
FED7253IN
Contents
General information 1-3
Warning instructions 4
Installation instructions 5-9
Timer instructions 9-11
Before the first use 12
Operating instructions 12-14
Cooking guide 15-16
Cleaning and maintenance 17-18
Fault finding 19
Technical data 20-22
Dear Customer
We thank you for having chosen our product. We are certain that it will satisfy your needs giving you optimum results.
Kindly read carefully the instruction manual which will allow you to use the equipment correctly. Please keep for future reference.
The producer reserves the right to make any necessary or important modifications with no obligation of prior warning to the client.
GENERAL INFORMATION
ENVIROMENT PROTECTION
Packing disposal

Sort packing into different materials (cardboard, polystyrene etc.) and dispose of them in accordance with local waste disposal laws.
Declaration of conformity. The parts of this appliance designed to come into contact with foodstuffs comply with the prescriptions of EEC directive 89109, assimilated by Legislative Decree n° 108 of 25/01/92

Appliance compliant with European Directives 89/336/EEC, 73/23/EEC and subsequent modifications.
Please refer to the rating label for any technical data necessary for the installation of this product. The label, as pictured below, which is found when opening the door on the front edge of the oven cavity.
| ROSIERES | NUM | MOD | VOLT | HZ | WATT | CE |
| MADE IN ITALY | 00001 | 230~ | 50 |
IMPORTANT
This appliance may only be used to cook foodstuffs.
Any other use (heating rooms, for example) is considered as improper and therefore dangerous.
The maker declines all responsibility for damage caused by improper, incorrect or unreasonable use.
The following fundamental rules must be observed when using an electrical appliance:
- do not remove the plug from its socket by pulling the power cable
- do not touch the appliance with wet or damp feet
- do not use the appliance barefooted
- children or incapable people may only use the appliance under supervision
- adapters, multiple sockets and extension cables should not be used.
- in case of faults and/or malfunctions, switch off the appliance; do not attempt to repair it yourself.
If the cable is damaged, replace it immediately as follows:
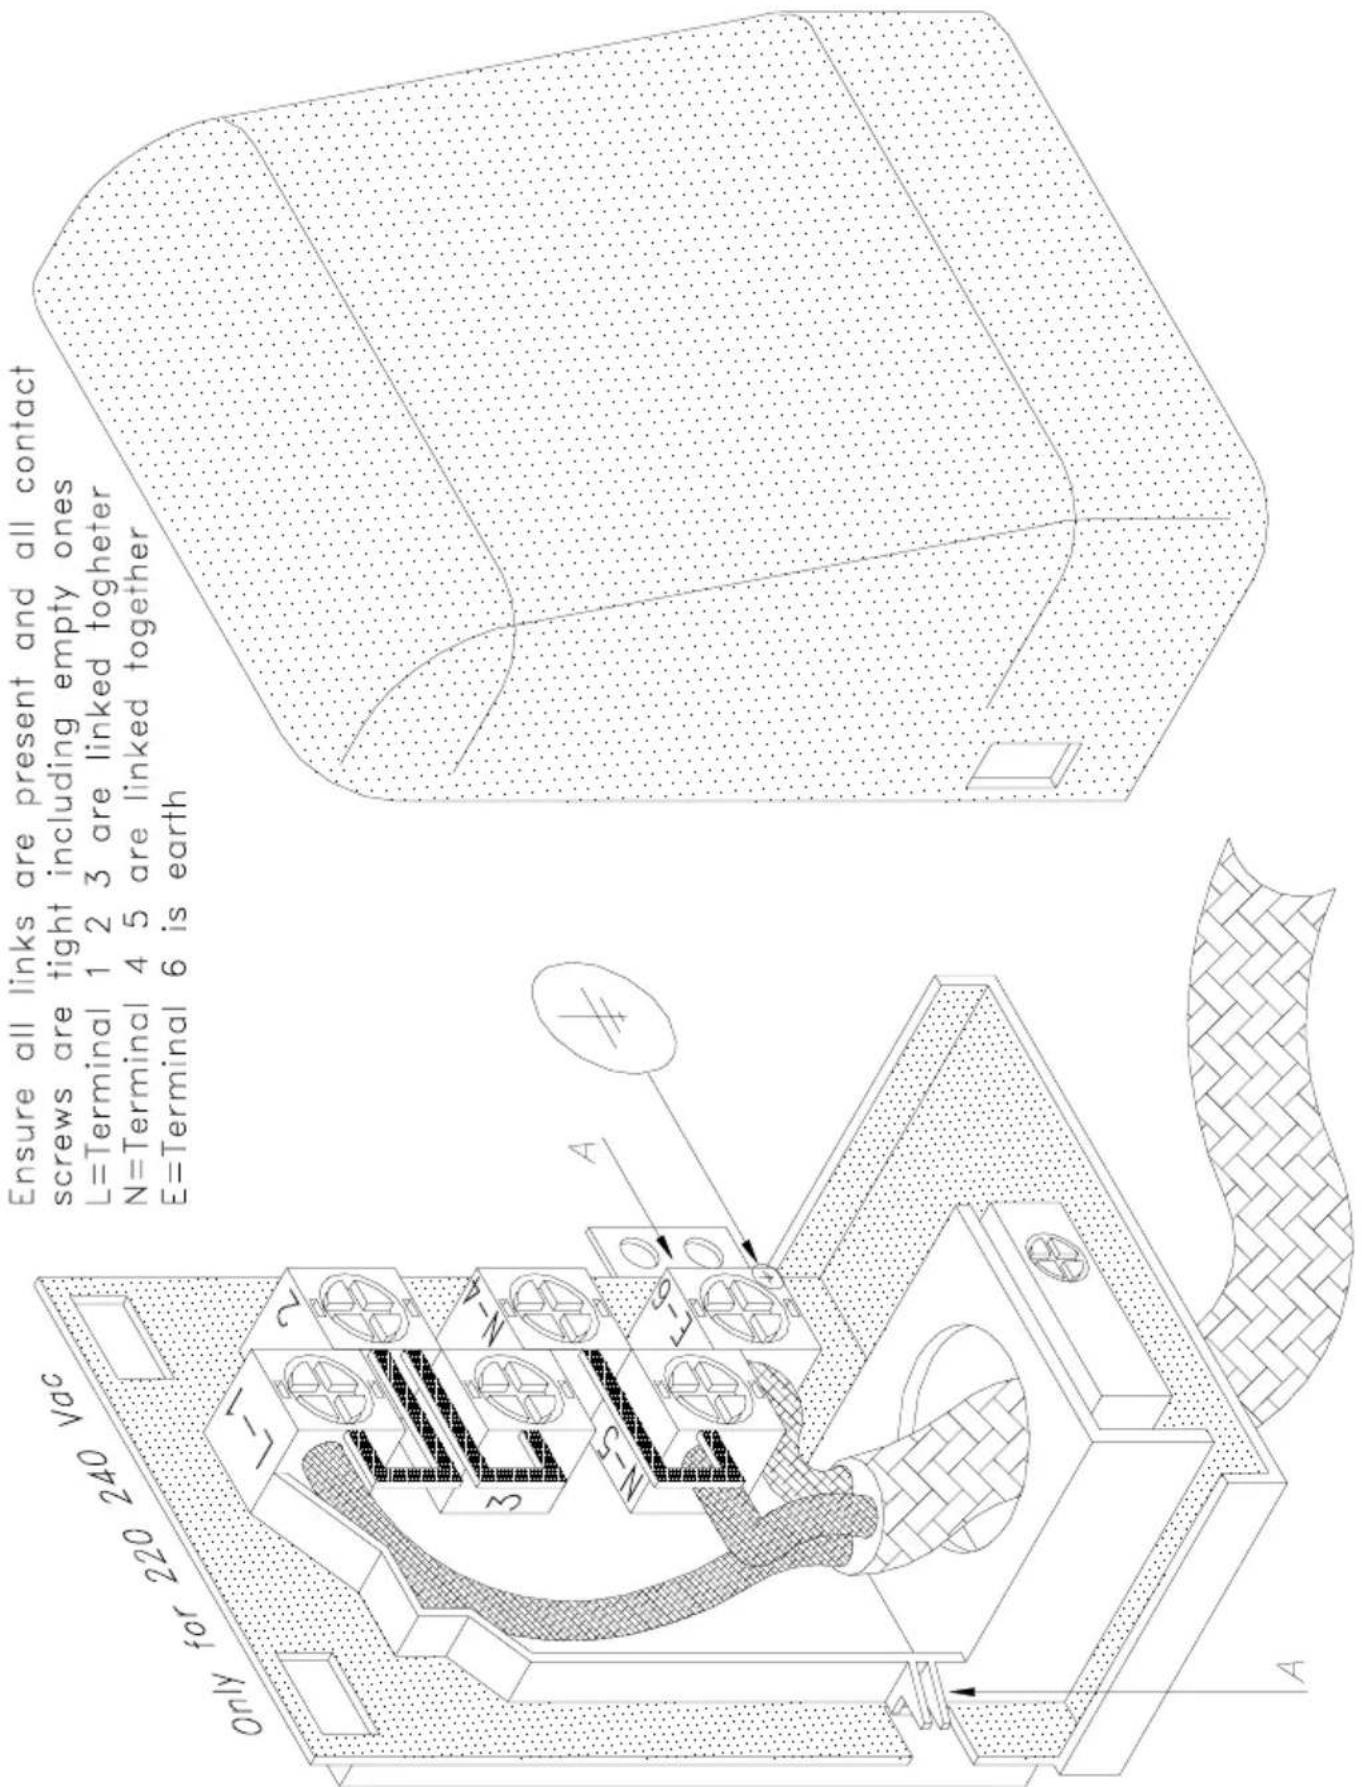
-open the terminal board cover, remove the power cable and replace it with one of a relative length with rubber insulation (H05RRF) and sufficiently large for the rated power of the appliance.
This operation must be carried out by a qualified technician.
The earth wire (yellow-green) must be about 10 mm longer than the line wires.
In case the appliance needs repairing, contact an authorised technical service centre and make sure original spare parts are used.
Non-compliance wit the above points may jeopardize the safety of the appliance.
WARRANTY
Your new appliance is covered by warranty.
You should fill in the Guarantee Registration Form enclosed and send it by post. Please retain the main part and make a note of all relevant details such as date and place of purchase, model number, serial number etc.
Please also retain your invoice/proof of purchase. This documentation will have to be produced to the engineer in case the After Sales Service should be needed. Failure to provide proof of purchase will force the engineer to charge for the call.
Please also note that this appliance is for domestic use only. Commercial use will invalidate the warranty.
The use of service engineers not authorised will invalidate the warranty. The above conditions do not affect your statutory rights.
AFTER SALES SERVICE
The excellent quality and advanced technology of our appliances guarantee their perfect operation.
If, however, a fault occurs, try and remedy it by checking if you have correctly followed all of the guidelines in the instruction booklet.
If, after consulting the instruction book and checking the gas and electrical connections, the fault persists, please contact GIAS UK on Tel: 08705 - 400600 for manufacturers service.
Please have the following information available when calling for assistance:
- Model number
- Serial number
- Date of purchase
The use of other unauthorised services will invalidate your warranty.
WARNING AND SAFETY INSTRUCTIONS
- This appliance must only be used for the purpose of domestic cooking.
- Before the first use of the appliance do not forget to remove all of the plastic films protecting the oven.
- DO NOT LET CHILDREN NEAR THE OVEN DURING USE AS EXTERNAL SURFACES INCLUDING GLASS WILL BECOME HOT. SUPERVISE THE USE OF THE OVEN WHEN USED BY THE ELDERLY OR INFIRM.
- Where an oven is built-under with a drawer beneath, this must be made to be non-functional (not to be used for any kind of storage) with a “dummy” front.
- Do not place heavy objects on the open door or sit on it as this can damage the hinging.
- When cooling with oil or fat, do not leave the appliance unattended as there is a risk of fire.
- To avoid damage to the interior enamel, do not place the oven pan or baking trays on the bottom of the oven. DO NOT LINE THE BOTTOM OF THE OVEN WITH ANY TYPE OF ALUMINIUM FOIL.
- During cooking, food naturally produces steam which is vented away to prevent an excessive build up within the oven.
- As steam can condense to water droplets on the cool outer trim of the oven, it may be necessary during cooking to wipe away moisture with a soft cloth. This will also help prevent discolouration of the oven exterior by cooking vapours.
- Do not use the oven as a room heater.
•Take care when connecting other electrical fittings or appliances near the oven and ensure cables are routed away from the hot areas of the oven.
- Do not dry any item on the oven door.
- Do not operate the grill with the door closed (top oven only) as this will cause overheating of the appliance.
- Do not install the appliance next to curtains or soft furnishings.
INSTALLATION INSTRUCTIONS
This appliance must be correctly installed by a suitable qualified person strictly in accordance with the manufacturer's instructions.
The manufacturer declines any responsibility for injury or damage to persons or property as a result of improper installation of this appliance.
The housing, adjacent furniture and all materials used in installation must be able to withstand a minimum temperature of 85^ C plus ambient during periods of operation. In addition, adjacent furniture cabinet doors must be at least 3mm from the appliance at all points. Certain types of vinyl or laminate kitchen furniture are particularly prone to heat damage discolouration of materials which occurs below 85^ C plus ambient or where materials are less than 3mm from the appliance will be the liability of the owner.
This range of ovens has been designed to be located under a worktop surface.
Two systems can be used to fit your appliance to a chosen furniture layout:
A) Between two side panels of two distinct cabinet units without the aid of a support shelf, by fitting four support steel brackets provided with the product. (See Sys A, fig. 1, page 5).
B) Between two side panels each fixed to the side of a cabinet unit without the aid of a support shelf. In this case only the two lower support brackets will be necessary. (See Sys B, fig. 2, page 6).
Note: In both the above cases you must measure 717mm from the underside of the work-top and mark the correct position of the lower support brackets before fixing them to the sides. With reference to (Sys A, fig. 1) ensure side support brackets are positioned 40mm from the front of the cabinet door exterior surface, as illustrated, before securing them to the cabinet sides.
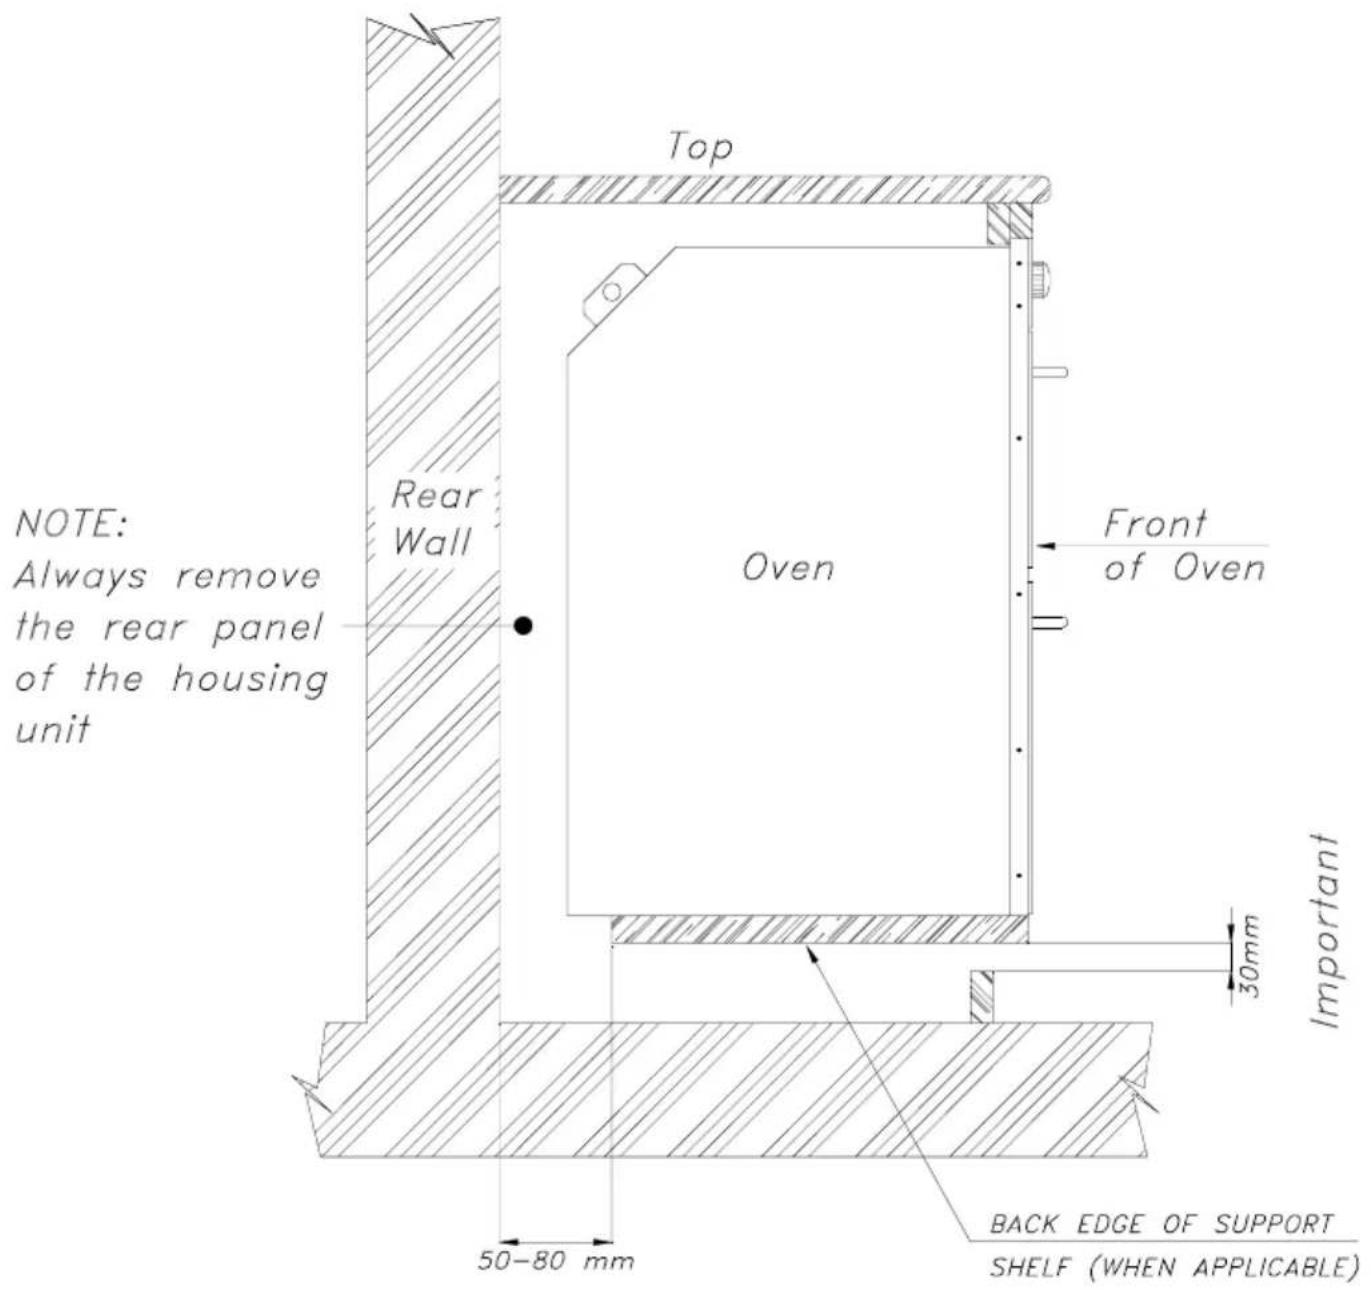
If necessary, this product can be installed in a housing unit. The housing unit will not be a standard one but will have to be of a size to accept the full height of the oven - minimum height 717mm.
This housing unit will need to fulfil the ventilation requirements (see page 7).
IMPORTANT
Ventilation requirements
Ventilation forms a very important part of the installation of this appliance.
The ventilation requirements are shown on page 7 of this booklet and must be adhered to.
Failure to do this may adversely effect the operation of the appliance.
System A Fig. 1
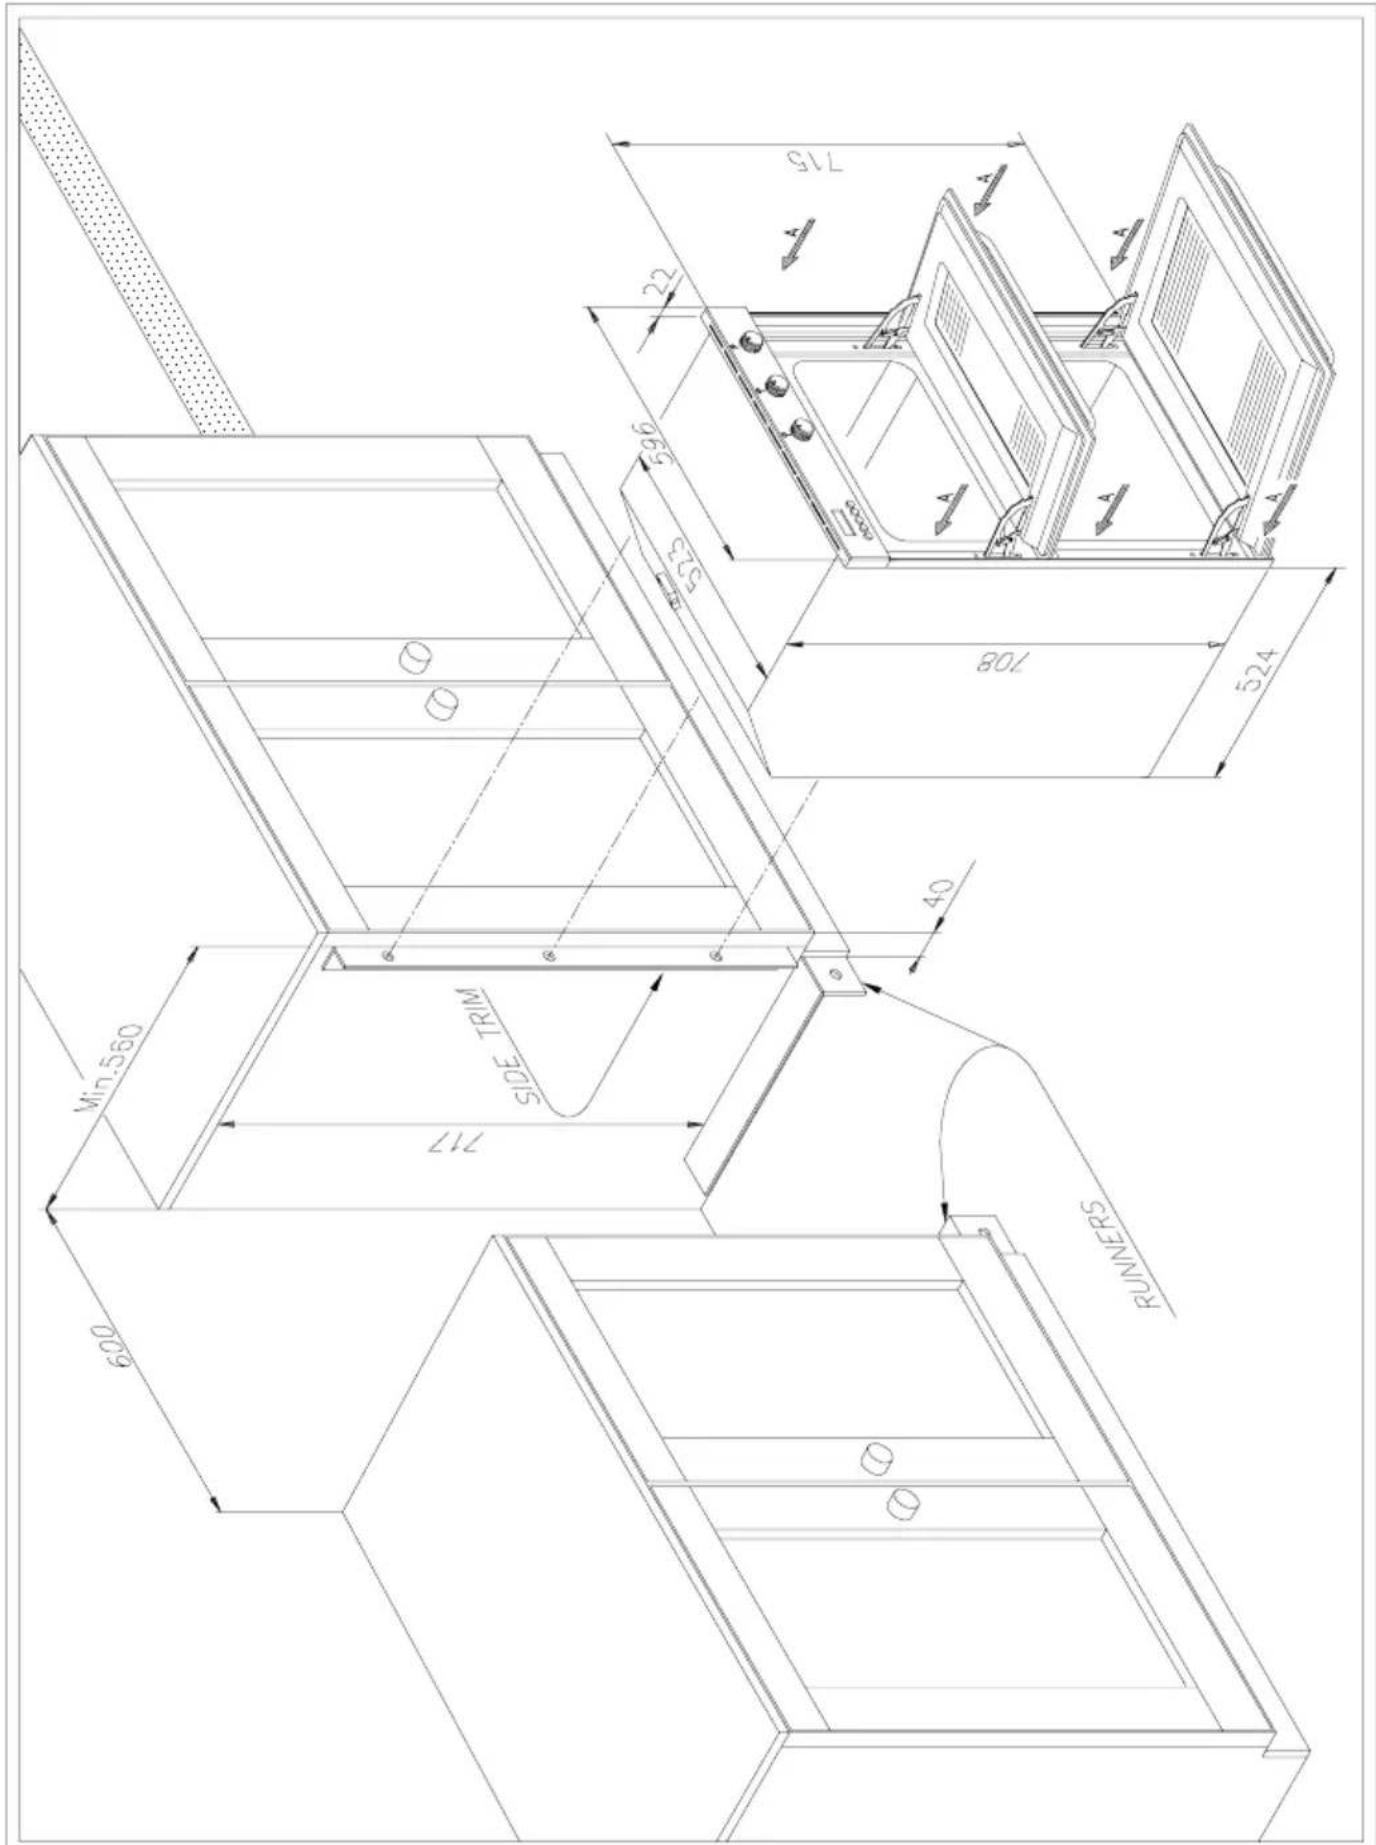
System B Fig. 2
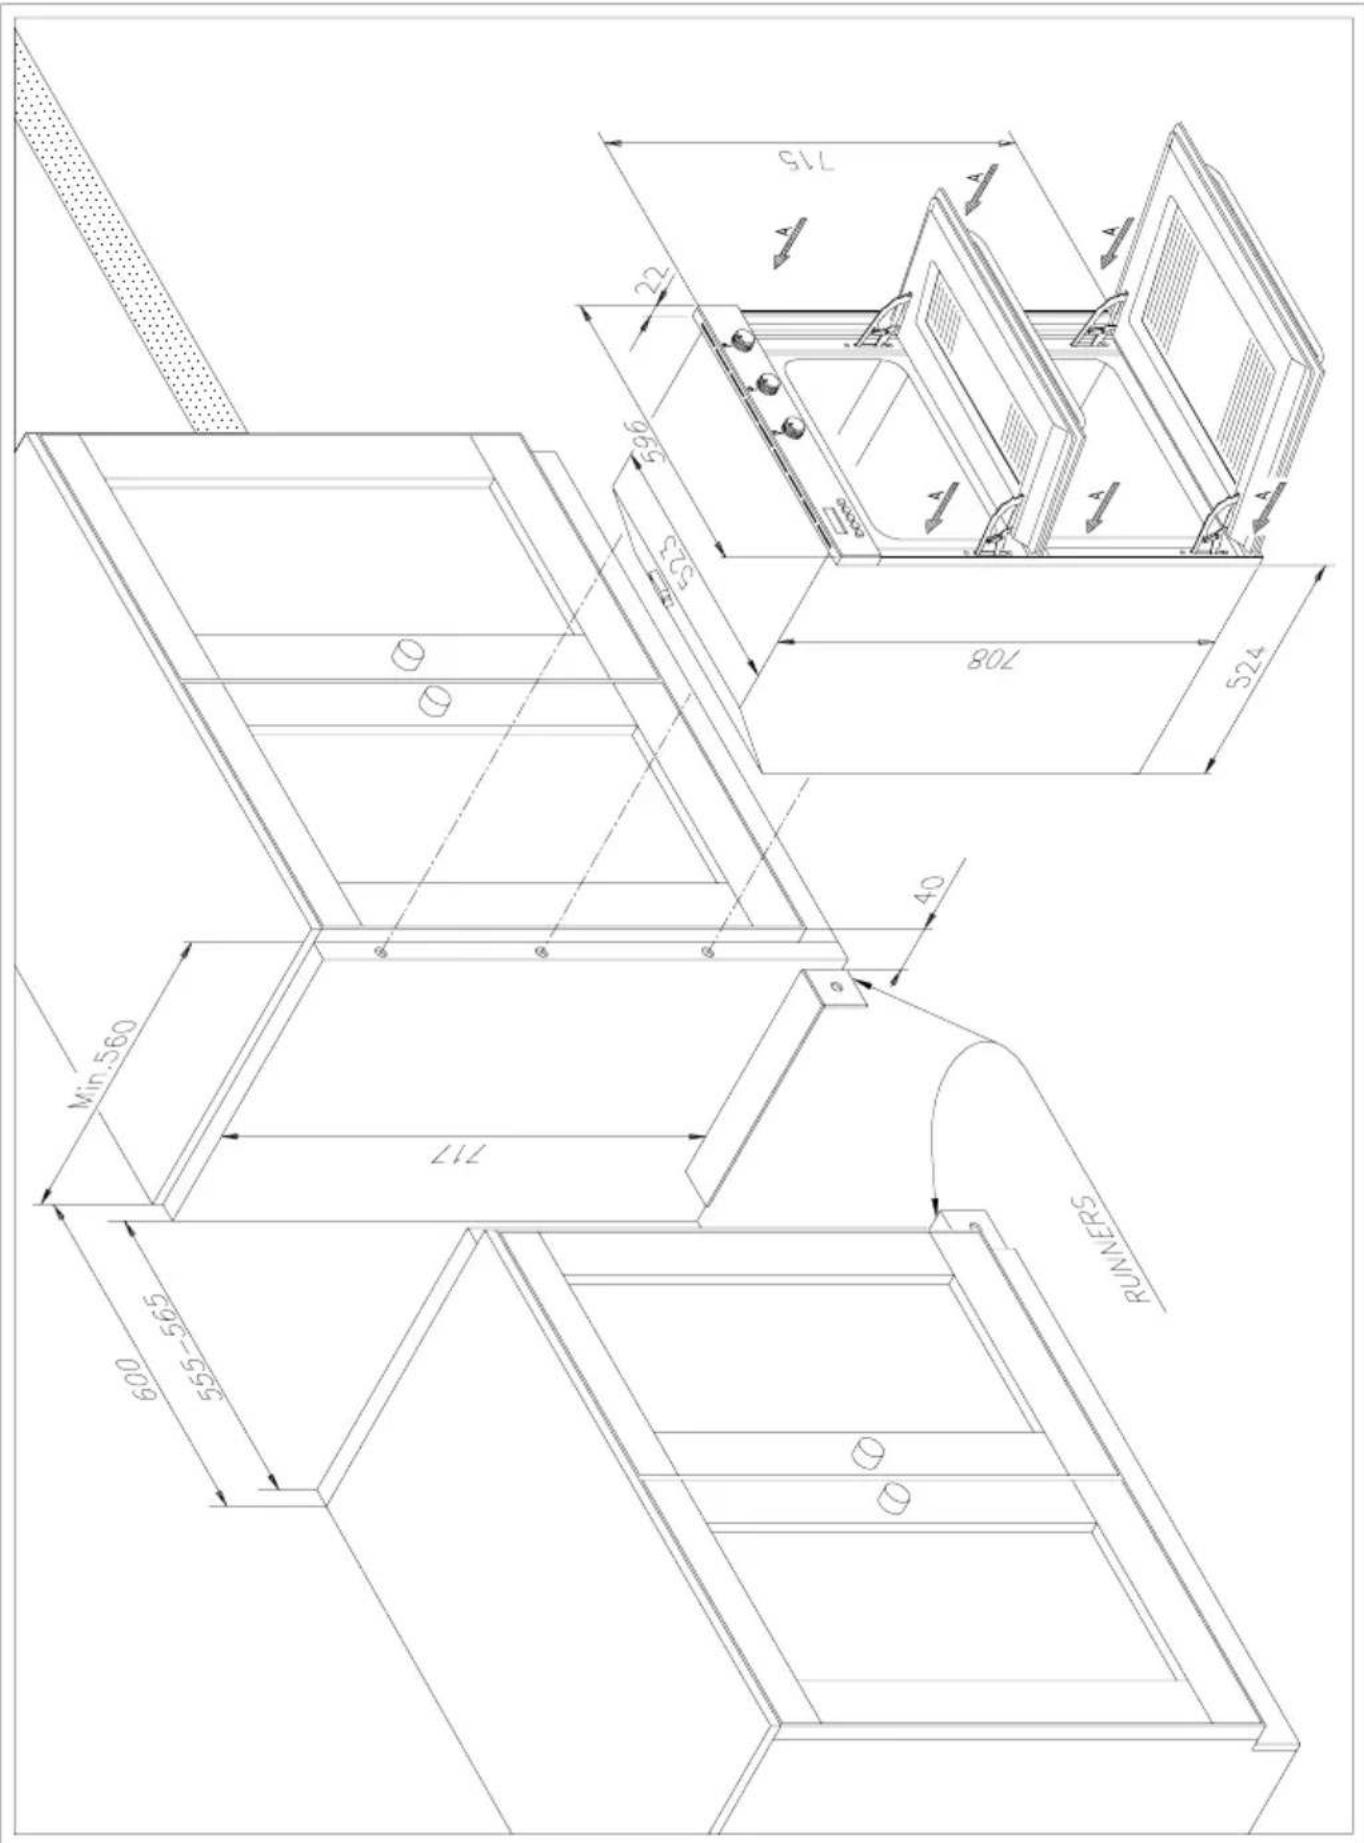
Ventilation requirements must be as specified by the drawing below.
ELECTRICAL REQUIREMENTS
WARNING: THIS APPLIANCE MUST BE EARTHED.
Electrical installation must comply with all relevant local and national regulations. Make sure that the voltage supply is the same as the ratings given on the data plate positioned on the lower part of the front of the oven.
This appliance must be connected to a single phase 230V\~, 50Hz electricity supply. The total rated load is 3.1 kW.
The oven must be connected to a 30 amp power supply via a double pale isolating switch with a minimum opening between the contacts of 3mm. The switch must be of easy access once the appliance is in place far maintenance and service purposes.
This appliance is supplied without a connection cable. A suitable cable which complies with all local and national regulations must be used, and to be in accordance with the details shown in the "Technical Data" table.
The connection clamp far the cable is at the rear of the appliance. Unscrew and remove the cover, then insert the cable by way of the cable clip and connect according to the drawing on page 20. The earth wire of the power supply cable must be longer than the positive and negative conductors. Tighten the cable clip screws and close the cover. Maintenance and servicing work must only be carried out after the power supply has been disconnected, either by switching off at the wall socket or disconnecting at the main fuse box.
ELECTRONIC TIMER

Timer
Cooking time with automatic function
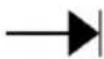
End of cooking time

Move back numbers in all programs

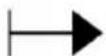
Move ahead numbers in all programs

Automatic program

Duration and manual mode

Minute control
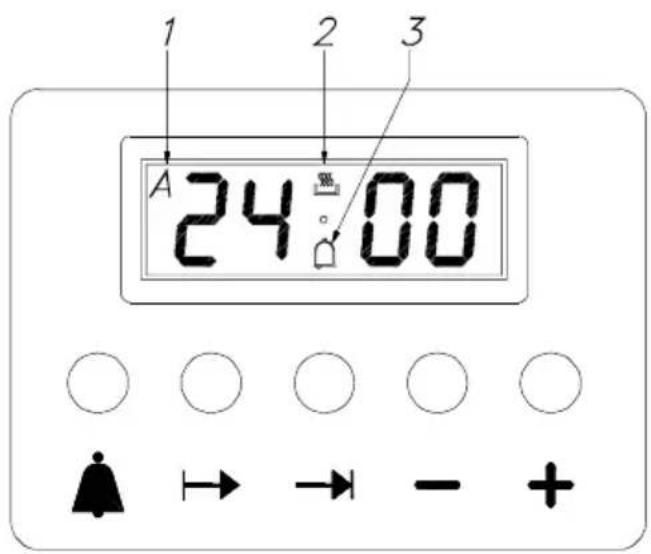
Settings
After pressing a function button, the required time can be set via the +/- keys. For quicker regulation, keep the required key pressed. By pressing the function key and then releasing it, the pre-selected function appears on the display and remains for 5 seconds: during this time the setting can be performed (with one hand). Five seconds after releasing the function key or finishing the setting, the display returns to the clock. Any program set will start immediately. Program selection is accompanied by the sounding of a buzzer.
Setting the time (clock)
Select the clock function by simultaneously pressing the Duration and End of cooking time keys and adjust the clock by means of the +/- keys. All the programs set will be cancelled and the relay will switch off.
Manual operation
Simultaneously press the and (the auto symbol will be cancelled): the saucepan symbol will light up.
Any program set will be cancelled.
Semi-automatic operation and cooking duration
Press the Cooking duration key and set the duration by means of the +/- keys.
The saucepan symbol will appear.
The relay output will be activated.
If clock = end of cooking time, the relay and saucepan symbol will be off.
The buzzer will sound and symbol A will blink.
Semi-automatic operation and end of cooking time
Press the end of cooking time key and set the required time by means of the +/- keys.
The symbol A and the symbol of the saucepan will light up.
The relay output will be activated.
If clock = end of cooking time, the relay and saucepan symbol will switch off.
The buzzer will sound and the symbol A will blink.
Completely automatic operation
Press the duration key and set the required time by means of the +/- keys. The symbol A will appear.
The relay will come on and the saucepan symbol will appear.
Select the End of cooking time function - the minimum setting time will appear. Set the required time by means of the +/- keys.
The relay and the saucepan symbol will switch off.
The saucepan symbol will re-appear when the clock time = the calculated switch-on time.
After setting the automatic program the symbol A will blink. The buzzer will sound and the saucepan symbol and relay will switch off.
Minute control
Press the Minute control key and set the required time by means of the +/- keys.
While the set time runs, the bell symbol will appear.
When the set time elapses, the buzzer will sound.
Buzzer
The buzzer remains active for 7 minutes after the minute control cycle or the cooking program have finished.
Press any function key to stop the buzzer.
Program start-up and check
A set program is run when the required time has also been set. The remaining timers can be checked at any time by selecting the relevant function.
Setting error
The setting is not correct if the clock time is between the beginning of cooking time and the end of cooking time.
The error is indicated via sounding of a buzzer and blinking of the Auto symbol. An incorrect setting can be corrected by re-setting either the beginning or end of cooking time.
Cancelling a program
A program can be cancelled by selecting the manual function.
A set program is automatically cancelled when it reaches the end of its cycle.
BEFORE THE FIRST USE
- Remove any packaging and accessories from the oven.
- Wipe the oven interior using hot water and a mild detergent. Rinse carefully using damp cloth. Wash the oven shelves and accessories in a dishwasher or using hot water with a mild detergent, and dry thoroughly.
- Slide the oven shelves and the oven pan onto the runners, close the door and heat the oven to maximum temperature far 30 minutes to eliminate any residues from the manufacturing process.
Note: An odour and some smoke may be emitted during this process. It is quite normal.
Before switching the oven on, check that there are no unprotected live parts accessible to touch.
IMPORTANT NOTICE
Switch off oven at the wall socket or disconnect at the main fuse box before cleaning.
OPERATING INSTRUCTIONS
Conventional oven (Top oven)
Main Functions
Conventional cooking
Variable control grilling
Position 1: Interior courtesy light

Position 2: Conventional mode (Zone 2)

(outer section only on top element).
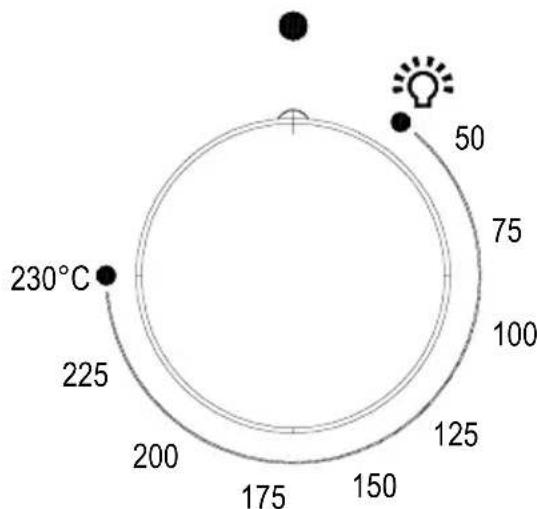
This traditional cooking mode is achieved by selecting the desired cooking temperature within the given 50^ C to 230^ C.
The amber light will automatically switch off once the desired temperature is achieved. It is advisable to preheat the oven for a few minutes before use.

Position 3: Top heating element only

(outer section only).
This cooking mode is particularly suited for delicate food, for browning and keeping dishes warm AFTER cooking time.
Position 4: Lower heating element

This particular function is ideal for warming meals or for slow cooking.
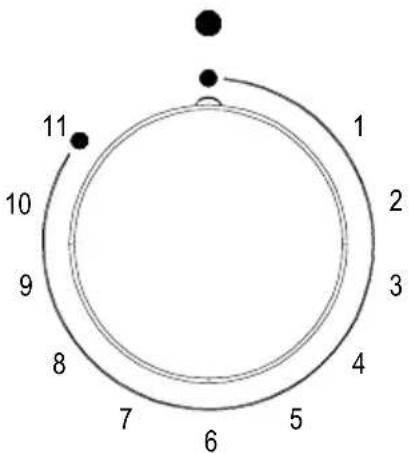
Position 5: Variable grill

(inner section of top element only).
Select the grilling function and set the required power by turning the regulator dial between the position from 1 to 11.
The amber light will switch off once the correct setting has been achieved.
WARNING
- Grilling must take place with the door open (top oven only).
- Using aluminium foil to cover the grill pan, or putting items wrapped in foil under the grill creates a FIRE HAZARD, and the high reflectivity can damage the frill element.
- CAUTION: ACCESSIBLE PARTS MAY BE HOT WHEN GRILL IS USED. YOUNG CHILDREN SHOULD BE KEPT AWAY.
Main fan oven (Lower cavity)
Main Function
Position 1: Interior courtesy light

COOKING GUIDE
The cooking times given below are only approximate, as both the size and type of dish and personal preferences will influence cooking time.
| Item | Temperature at °C | Approximate cooking time |
| Small cakes 170-180 20-25 mins. | ||
| Whisked Sponge 170 15-20 mins. | ||
| Swis s Roll 190 8-12 mins. | ||
| Victoria Sandwich 170 25-35 mins. | ||
| (2 x 205mm./8in. s hallow tins) | ||
| Semi rich fruit cake | 140 | 212-312 hours |
| (230mm./9in.deep tin) | ||
| Scones | 210-220 10-15 mins. | |
| Meringues | 110 2-3 hours | |
| Cooking times for pastry dishes depend on the size and type of cooking dish and also the filling. | ||
| Shortcrusty Pastry | 200 | |
| Puff/Flake Pastry | 210 | |
| Choux Pastry | 200 | |
| Biscuits | 160-200 10-20 mins. | |
| Bread 500g. (1lb) loaf | 210 20-30 mins. | |
| Sponge Pudding | 150 | 45 mins.-1 hour |
| Milk Pudding | 150 | 112-134 hours |
Slow cooking
Make sure that frozen foods are thoroughly THAWED before cooking.
DO NOT slow cook joints of meat or poultry weighing more than 2 ^1/4 Kg (4 ^1/2 lb).
For roasting joints of meat or poultry and for pot roast preheat the oven to 190^ C- 200^ C and cook for 30 minutes, the adjust the oven control to 110^ C- 120^ C for the remainder of the cooking time.
Slow cooking times will be about three times as long as conventional cooking.
Roasting guide
Frozen meat should be thoroughly thawed before cooking. For large joints it is advisable to thaw overnight.
Frozen poultry should be thoroughly thawed before cooking, the time required depends on the size of the bird, e.g. a large turkey may take up to 48 hours to thaw.
Adjust the shelf position so the meat or the poultry will be in the centre of the oven.
The time given in the roasting guide are only approximate as the size, age of the bird, the shape of joint and proportion of bone will influence cooking times.
| Cook in oven180°C (fan oven)200°C (Conventional oven) | Approximate cooking time | |
| BEEF | Rare | 20 minutes per 450g.(1 lb) plus 20 minutes |
| Medium | 25 minutes per 450g.(1 lb) plus 25 minutes | |
| Well | 30 minutes per 450g.(1 lb) plus 30 minutes | |
| Done | ||
| LAMB | Medium | 25 minutes per 450g.(1 lb) plus 25 minutes |
| Well | 30 minutes per 450g.(1 lb) plus 30 minutes | |
| Done | ||
| PORK | 35 minutes per 450g.(1 lb) plus 35 minutes | |
| POULTRY | 20 minutes per 450g.(1 lb) plus 20 minutes |
Notes:
When you are cooking a very large turkey eg. over 14lb., we recommend that it is turned round halfway through cooking, so that both legs will be cooked evenly.
Remove any excess fat from the tin before turning, to prevent any fat splashing. When cooking stuffed meat or poultry calculate the cooking time from the total weight of the meat plus the stuffing.
For joints cooked in foil or covered roasters, and for lidded casseroles, add 5 minutes per 450g. (1lb.) to the calculated cooking time.
Smaller joints weighing less than 1.25 k.g. (2½lb.) may require 5 minutes per 450g. (1lb) extra cooking time.
CLEANING AND MAINTENANCE
IMPORTANT : Before undertaking any maintenance, disconnect the oven from the mains electricity supply.
OVEN CLEANING
The oven is coated with a very special type of enamel. Its very low porosity makes it easy to clean. The oven should be cleaned after each use. It should be done when still slightly warm which makes it easier to clean the grease that may be deposited during cooking. (The oven cavity should not be hot to touch so as to avoid risk of burns). Remove the guides, and wash under running water with some detergent. (Abrasive materials should not be used).
The oven doors can be removed to make the cleaning easier (see section for door removal page 17).
Do not immerse the doors in water.
Clean the enamelled interior surface and the glass using a damp cloth and proprietary mild cream cleaner, rinse, then dry carefully using a soft cloth. If necessary the inner door glass can be removed by unscrewing the two lateral fixing screws (see fig. 6). Make sure that the glass is dried thoroughly before re-fitting. Do not over tighten screws.
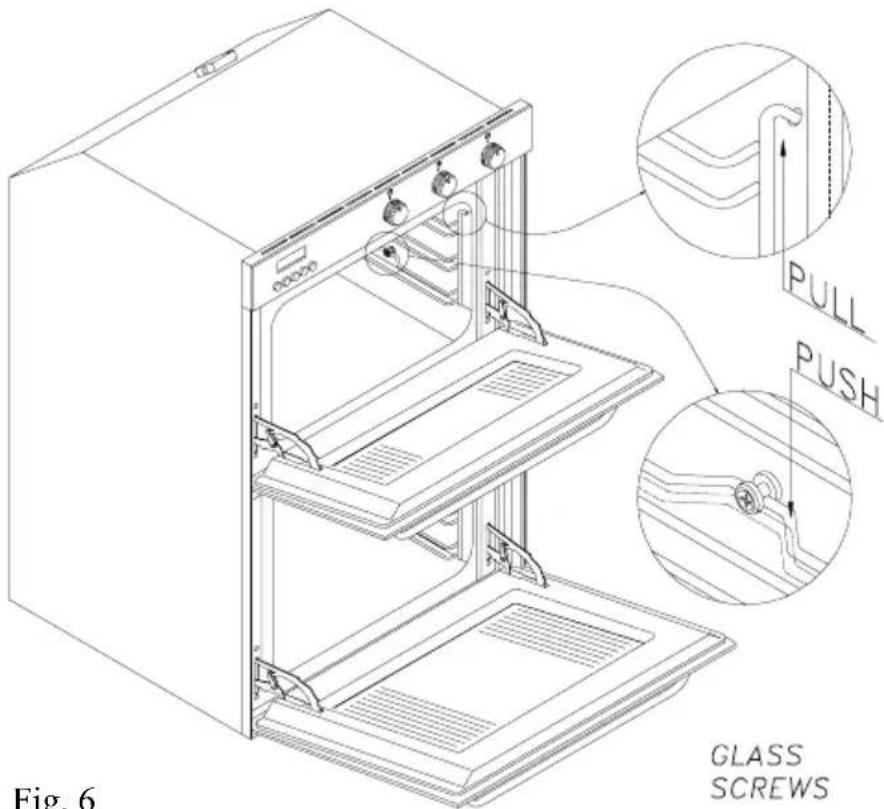
Fig. 6
REMOVING THE SHELF SUPPORTS
The shelf supports can be removed from the oven, either clean by hand or in a dishwasher.
REPLACING THE OVEN LIGHT
Warning: Disconnect the appliance from the power supply. If the oven light “B” needs to be replaced, the protective cover “A” must be removed by turning anticlockwise. After the light has been replaced, refit the protective cover “A”. (Fig. 7).
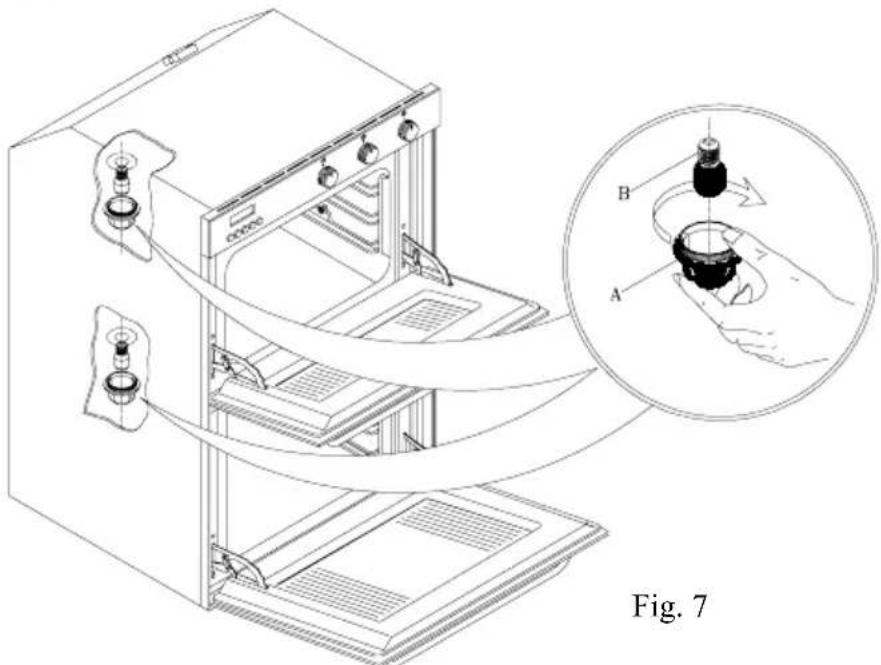
natural_image
Technical line drawing of a laboratory apparatus with an inset showing a hand holding a device (no text or symbols present)REMOVING THE OVEN DOOR
To aid cleaning and make access to the oven interior easier, the oven door can be simply removed.
To facilitate cleaning of the oven, the door can be removed via the hinges as follows:
- Hinge with mobile U-bolts (fig. 8).
The hinges “A” are fitted with two mobile U-bolts “B” which block the door when it is completely open if they are hooked onto sections “C” of the hinges. After this has been done, the door must be lifted up and taken out. When carrying out this operation, hold the sides of the oven door beside the hinges. To refit door first slide the hinges into the grooves. Lastly before closing the door do not forget to detach the two mobile U-bolts “B” which were used to hook the two hinges.
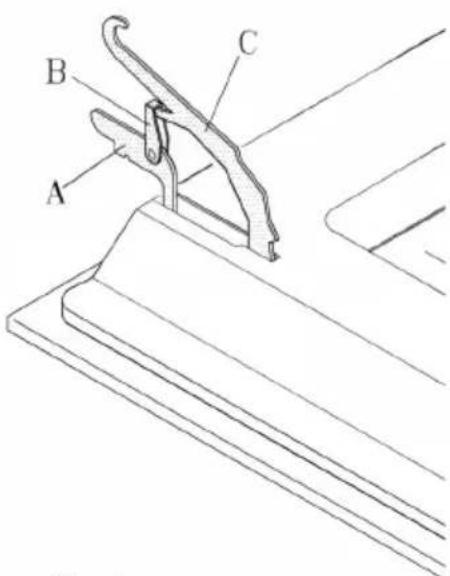
Fig. 8
WHAT TO DO IN THE EVENT OF A FAULT
This appliance must only be repaired by a qualified technician appointed by the manufacturer. Unauthorised repairs could be dangerous and would invalidate any warranty.
The oven does not work at all
Check that the electricity supply is connected and switched on. Has the fuse blown? If so, replace with correct type. Is the timer set on automatic operation? (see pages 8,9,10)
The oven does not heat up
Has a temperature been set using the temperature selector knob? (see page 11) Is the timer set on automatic operation? (see pages 8,9,10)
The oven heats up but the light bulb does not come on
The light bulb is faulty and needs replacing (see page 17).
NOTE: THE LIGHT BULB IS NOT COVERED BY THE MANUFACTURER'S WARRANTY.
TECHNICAL DATA
This fitting conforms with laws regarding radio interference.
| ELECTRICAL SUPPLY: 230V - 50 Hz | ||
| ELEMENT RATINGS: 2 OVEN LIGHTS 0.015 kW each | ||
| 2 COOLING MOTOR 0.025 kW each | ||
| LOWER OVEN: FAN MOTOR | 0.025 kW | |
| CIRCULAR HEATING 1.5 kW | ||
| UPPER OVEN: LOWER HEATING 0.9 kW | ||
| UPPER HEATING 0.6 kW | ||
| GRILL HEATING | 1.4 kW | |
| MAXIMUM LOAD: STATIC + FAN 3.105 Kw | ||
| CABLE CROSS SECTION: | 3x1.5 mm2 minimum, H05 RNF, H05 RRF insulated twin and earth cable. Where a hob is fitted above the cooker, the connecting cable must be 85°C heat resistant. | |
| OVERALL DIMENSIONS: | HEIGHT | 715 mm |
| WIDTH | 596 mm | |
| DEPTH | 605 mm | |