
Labs CM800 - Microscope CELESTRON - Free user manual and instructions
Find the device manual for free Labs CM800 CELESTRON in PDF.
| Product type | Optical microscope |
| Brand | Celestron |
| Model | Labs CM800 |
| Magnification range | 40x to 800x |
| Eyepieces | WF 10x and WF 20x (wide angle) |
| Objectives | 4x, 10x, 40x |
| Turret | Triple with click stop |
| Head | Monocular 45° inclined |
| Stage | 88 mm x 88 mm, with clips |
| Illuminator | Adjustable LED (3 positions) |
| Condenser | N.A. 0.65 |
| Diaphragm | Disc with 6 aperture diameters |
| Power supply | AC adapter (included) or 3 AA batteries (included) |
| Dimensions (L x W x H) | 127 mm x 152 mm x 279 mm |
| Box contents | Microscope, 2 eyepieces, AC adapter, 10 prepared slides, 3 AA batteries |
| Optics maintenance | Air blower or camel hair brush; for fingerprints, use a cleaning agent and optical cloth |
| Handling precautions | Hold by arm and base; do not touch objectives during focusing |
| Warranty | Limited 2-year |
| Recommended age | 14 years and up |
Frequently Asked Questions - Labs CM800 CELESTRON
User questions about Labs CM800 CELESTRON
0 question about this device. Answer the ones you know or ask your own.
Ask a new question about this device
Download the instructions for your Microscope in PDF format for free! Find your manual Labs CM800 - CELESTRON and take your electronic device back in hand. On this page are published all the documents necessary for the use of your device. Labs CM800 by CELESTRON.
USER MANUAL Labs CM800 CELESTRON
Congratulations on your Celestron Labs microscope purchase. Your new Celestron Labs microscope is a precision optical instrument, made of the highest quality materials to ensure durability and long life. It is designed to give you a lifetime of enjoyment with minimal maintenance. This CL-CM800 microscope provides powers from 40x up to 800x. It is ideally suited for examining specimen slides of yeasts and molds, cultures, plant and animal parts, fibers, bacteria, and more.
Before attempting to use your Celestron Labs microscope, please read these instructions to familiarize yourself with the parts and functions of the microscope. Refer to the microscope diagrams to locate the parts discussed in the manual. The final section of the manual provides simple care and maintenance tips.
IN THE BOX
- Microscope CL-CM800
- 2 wide field eyepieces: 10x, 20x
- AC adapter
- 10 prepared slides
-3 AA batteries
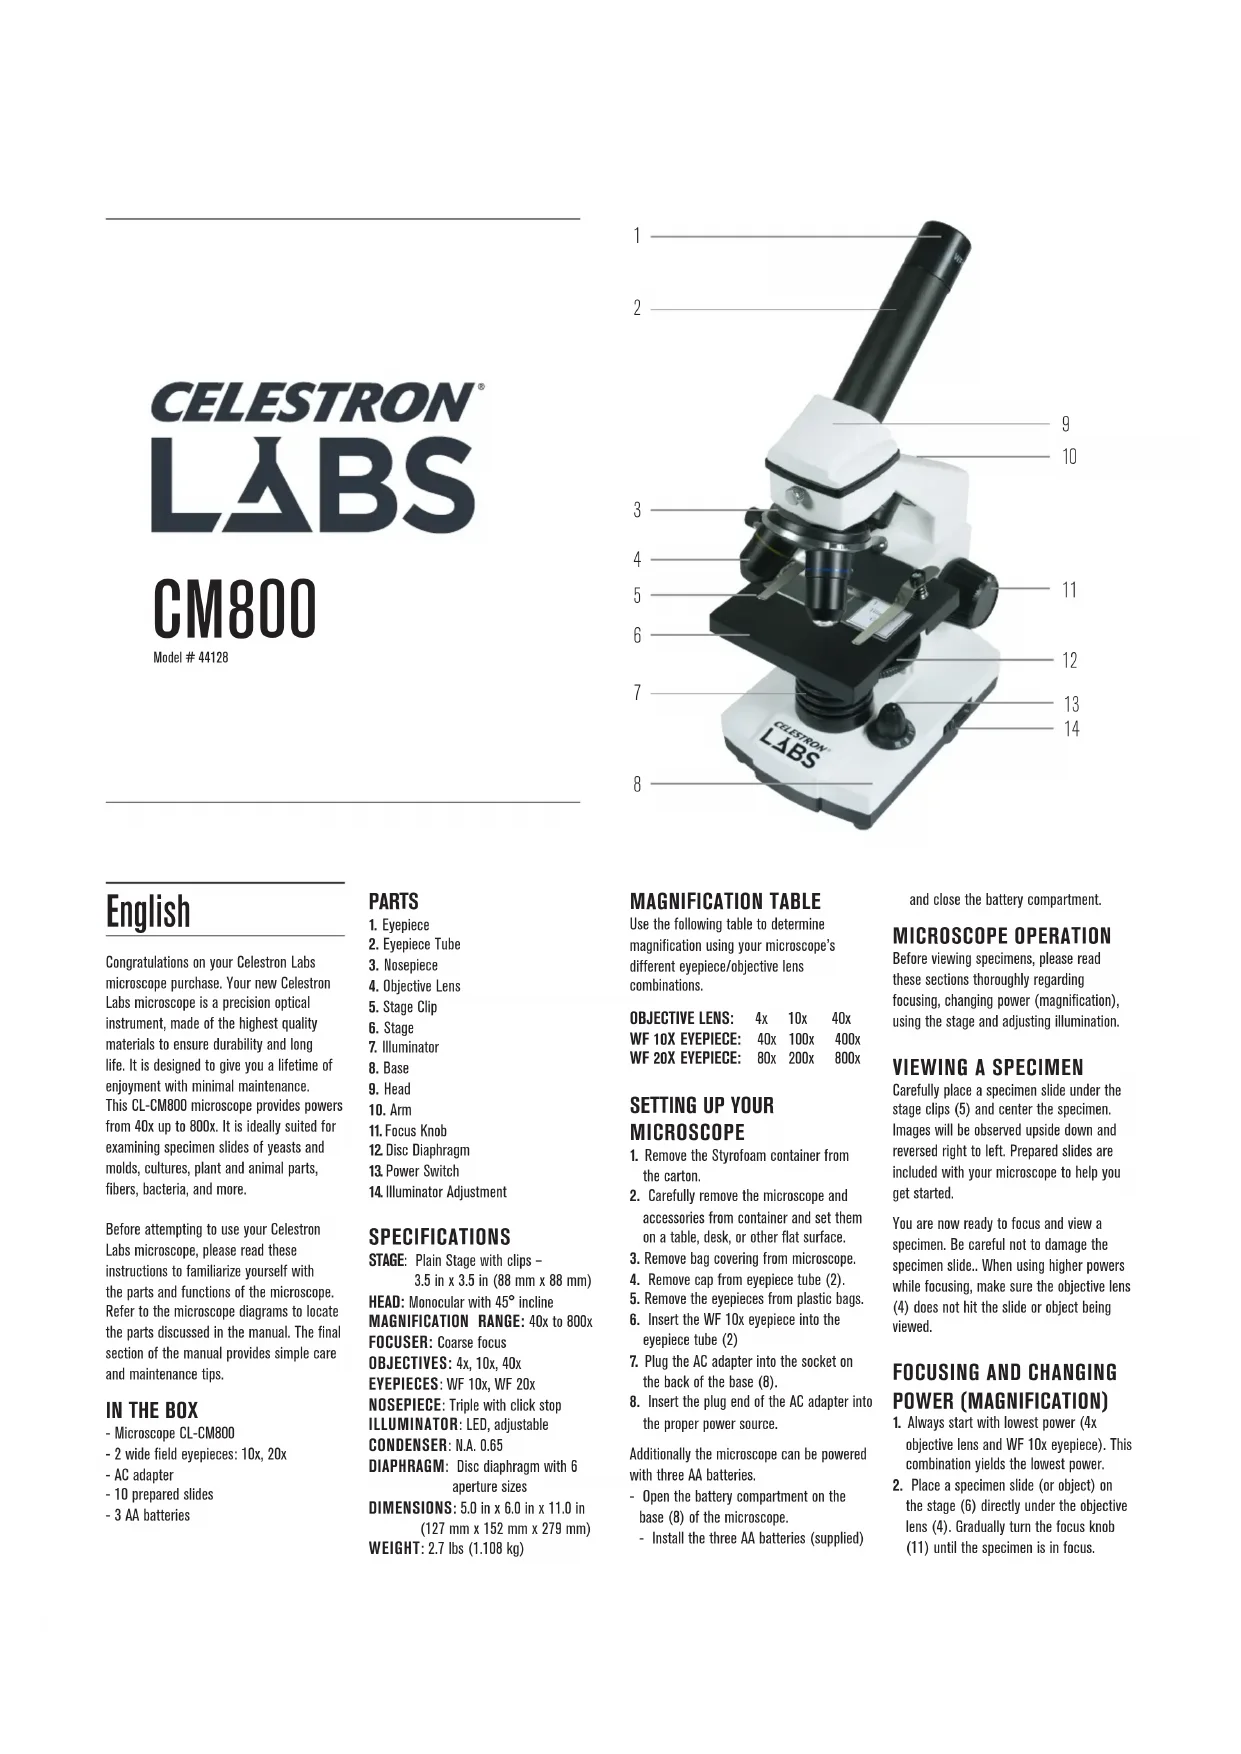
PARTS
- Eyepiece
- Eyepiece Tube
- Nosepiece
- Objective Lens
- Stage Clip
- Stage
- Illuminator
- Base
- Head
- Arm
- Focus Knob
12 Disc Diaphragm - Power Switch
- Illuminator Adjustment
SPECIFICATIONS
STAGE: Plain Stage with clips - 3.5 in x 3.5 in (88 mm x 88 mm)
HEAD: Monocular with 45^ incline
MAGNIFICATION RANGE: 40x to 800x
FOCUSER: Coarse focus
OBJECTIVES: 4x, 10x, 40x
EYEPIECES: WF 10x, WF 20x
NOSEPIECE: Triple with click stop
ILLUMINATOR:LED,adjustable
CONDenser: N.A. 0.65
DIAPHRAGM: Disc diaphragm with 6 aperture sizes
DIMENSIONS: 5.0 in x 6.0 in x 11.0 in (127 mm x 152 mm x 279 mm)
WEIGHT: 2.7 lbs (1.108 kg)
MAGNIFICATION TABLE
Use the following table to determine magnification using your microscope's different eyepiece/objective lens combinations.
OBJECTIVE LENS: 4x 10x 40x
WF 10X EYEPiece: 40x 100x 400x
WF 20X EYEPIECE: 80x 200x 800x
SETTING UP YOUR
MICROSCOPE
- Remove the Styrofoam container from the carton.
- Carefully remove the microscope and accessories from container and set them on a table, desk, or other flat surface.
- Remove bag covering from microscope.
- Remove cap from eyepiece tube (2).
- Remove the eyepieces from plastic bags.
- Insert the WF 10x eyepiece into the eyepiece tube (2)
- Plug the AC adapter into the socket on the back of the base (8).
- Insert the plug end of the AC adapter into the proper power source.
Additionally the microscope can be powered with three AA batteries.
- Open the battery compartment on the base (8) of the microscope.
Install the three AA batteries (supplied)
and close the battery compartment.
MICROSCOPE OPERATION
Before viewing specimens, please read these sections thoroughly regarding focusing, changing power (magnification), using the stage and adjusting illumination.
VIEWING A SPECIMEN
Carefully place a specimen slide under the stage clips (5) and center the specimen. Images will be observed upside down and reversed right to left. Prepared slides are included with your microscope to help you get started.
You are now ready to focus and view a specimen. Be careful not to damage the specimen slide.. When using higher powers while focusing, make sure the objective lens (4) does not hit the slide or object being viewed.
FOCUSING AND CHANGING POWER (MAGNIFICATION)
- Always start with lowest power (4x objective lens and WF 10x eyepiece). This combination yields the lowest power.
-
Place a specimen slide (or object) on the stage (6) directly under the objective lens (4). Gradually turn the focus knob (11) until the specimen is in focus.
-
For higher powers, rotate the nosepiece (3) to change the objective lens (4) to 10x or 40x. This will yield a greater magnification. Gradually turn the focus knob (11) to refocus on the specimen.
NOTE: You should first turn the focus knob to lower the stage, before turning the objective carriage. - You can replace the WF 10x eyepiece with the WF 20x eyepiece to obtain three additional high power magnifications, including (800x) the highest power possible.
ADJUSTING THE
ILLUMINATION
Specimens of different sizes, thickness and color variations will require different levels of illumination. In order to adjust illumination, turn the illuminator adjustment wheel (14) to either increase or decrease the illumination. The illuminator adjustment wheel (14) has three illumination settings (I being the lowest and III the highest). Optimal lighting is found by making adjustments and experimenting.
DIAPHRAGM
The disc diaphragm (12) has six diameter openings. These openings allow you to adjust the amount of light passing through the specimen. Adjusting the light can help you maximize brightness, contrast, etc.
CARE, MAINTENANCE AND WARRANTY
Your Celestron Labs microscope is a precision optical instrument and should be treated with care at all times. Follow these care and maintenance suggestions and your microscope will need very little maintenance throughout its lifetime.
- When you are done using your microscope, remove any specimens left on the stage.
- Turn off the power and unplug the power cord (if applicable).
Always place the plastic bag or dust cover over the microscope when not in use to help keep it clean. - Store the microscope in a dry, clean place.
- Be very careful if using your microscope in direct sunlight to prevent damage to the microscope or your eyes.
- To carry your microscope, place one hand on the "arm" of the microscope and the other hand under the base for support. Do not grasp your microscope by the focuser knob or head.
-
Clean the outside surfaces (metal and plastic) with a moist cloth.
Always unplug any cords before cleaning. -
Never clean optical surfaces with cloth or paper towels as they can scratch optical surfaces easily. Instead, use an air blower or camel hair brush.
To clean fingerprints off of optical surfaces, use a lens cleaning agent and lens tissue available at most photo supply stores. When cleaning, do not rub in circles as this may cause streaks or scratches. - Never disassemble your microscope or clean internal optical surfaces. Only qualified technicians at the factory or an authorized repair facility should attempt these repairs.
- When handling glass specimen slides, use care, as the edges can be sharp.
YOUR MICROSCOPE HAS A TWO YEAR LIMITED WARRANTY. FORMORE DETAILED INFORMATION, PLEASE VISIT
www.CelestronLabs.com
CC F

Torrance, CA 90503
TEL (800) 421-9649
www.CelestronLabs.com
Copyright 2014 Celestron
All rights reserved.
(Products or instructions may change without notice or obligation. Designed and intended for those 14 years of age and older.
Français
TUBE DE MISE AU POINT:
mise au point grossiere
POIDS:1,108 kg (2,7 lbs)
TABLEAU DE
GROSSISSEMENT
m = 311
Torrance, CA 90503
TEL (800) 421-9649
www.CelestronLabs.com
ILUMINADOR:LED,ajustable
CONDENSADOR: N.A. 0,65
DIMENSIONES: 5,0 in x 6,0 in x 11,0 in (127 mm x 152 mm x 279 mm)
PESO:2,7 lbs (1,108kg)
TABLA DE AUMENTO
OCULAR WF 10X: 40x 100x
OCULAR WF 20X: 80x 200x
PREPARACION DEL MICROSCOPIO
MESSAGE A FUOCO: Macrometrical
OBIETTI:4x,10x,40x
OCULARI: WF 10x, WF 20x
PORTAOBIETTIVI: Triplo con arresto a clic
DIMENSIONI: 5,0^ 6,0^ 11,0^ (127 mm x 152 mm x 279 mm)
PESO:2,7 lb (1,108 kg)
