
3EBC983ER - Cooker BALAY - Free user manual and instructions
Find the device manual for free 3EBC983ER BALAY in PDF.
| Product type | Cooker with integrated hood (hob with integrated extraction) |
| Brand | Balay |
| Model | 3EBC983ER |
| Appliance dimensions (W x D x H) | See diagram Fig. 3 (approx. 90 x 50 x 20 cm) |
| Net weight | Maximum 25 kg |
| Electrical supply | 230 V / 400 V, 50 Hz, according to diagram (1N, 2N, 3N, 2L/2N) |
| Total power | See rating plate |
| Protection class | Class 1 (with protective conductor) |
| Connection types | 1N, 2N, 3N, 2L/2N |
| Extraction modes | External extraction / Air recirculation |
| Extraction duct diameter | 150 mm (round) or flat equivalent (177 cm²) |
| Supplied filters | Grease filters (metal), anti-odor filters, acoustic filters |
| Safety devices | Permanent magnets (10 cm distance for implants), mandatory safety switch |
| Worktop load capacity | Minimum 60 kg |
| Maximum furniture temperature | 90 °C |
| Filter maintenance | Grease filters dishwasher-safe |
| Repairability | Spare parts available from Balay after-sales service |
| Warranty | Manufacturer's warranty (see conditions) |
Frequently Asked Questions - 3EBC983ER BALAY
User questions about 3EBC983ER BALAY
0 question about this device. Answer the ones you know or ask your own.
Ask a new question about this device
Download the instructions for your Cooker in PDF format for free! Find your manual 3EBC983ER - BALAY and take your electronic device back in hand. On this page are published all the documents necessary for the use of your device. 3EBC983ER by BALAY.
USER MANUAL 3EBC983ER BALAY
m = 311
18
m = 311

20
22
24
m = 311
25
26

28

30
m = 311
32
34
35
37
36
39

41
44
46
42
43

m = 311
48
50
51
52
es
After unpacking all parts, check for any damage in transit and completeness of the delivery.
Fig. 1
QR code for the installation video
This is were you will find the QR code for the installation video.
Fig. 2
Appliance dimensions
You will find the dimensions of the appliance here Fig. 8
Installation dimensions for flat duct bends
This is where you can find an overview of the installation dimensions for the flat duct bends.
Side view:
Fig. 4, Fig. 5, Fig. 6
Front view:
Fig. 7
Installation variants
This is where you can find an overview of the different installation variants.
Odour filter and adapter for circulating-air mode:
Fig. 8
Odour filter, diffuser and seal for circulating-air mode: Fig. 9
Acoustics filter and seal for air extraction mode: Fig. 10
Note: Channels suitable for installation can be obtained from customer service, our website or from specialist retailers.
Safety clearances
Comply with the safety clearances for the appliance. Clearances to the overflow container:
Fig. 11
Position of the overflow container: Fig. 12
The performance is optimal at a clearance of 50~mm between the unit back panel and the wall. The performance is reduced at a smaller clearance.
→Fig.13
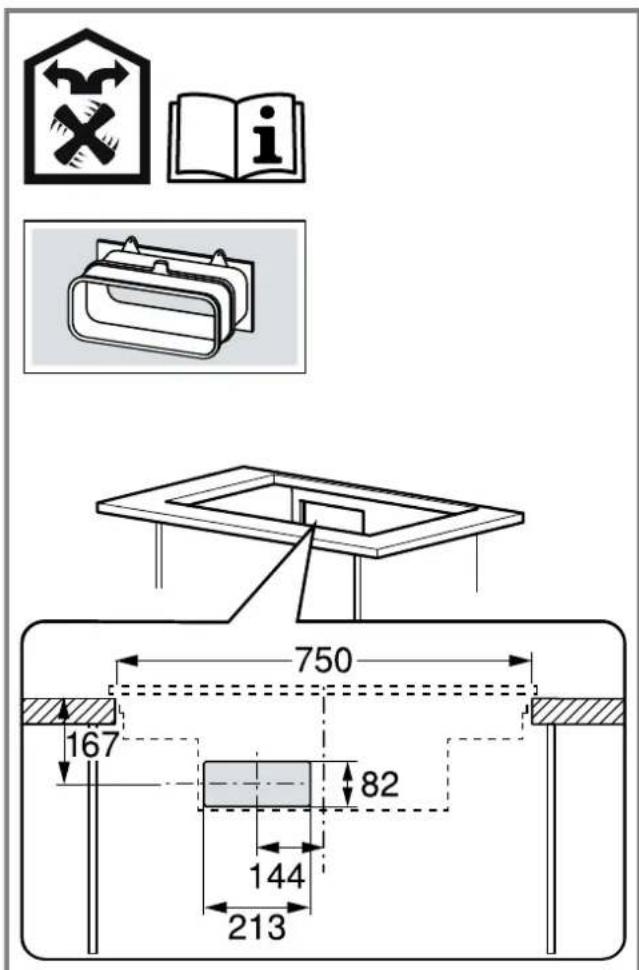
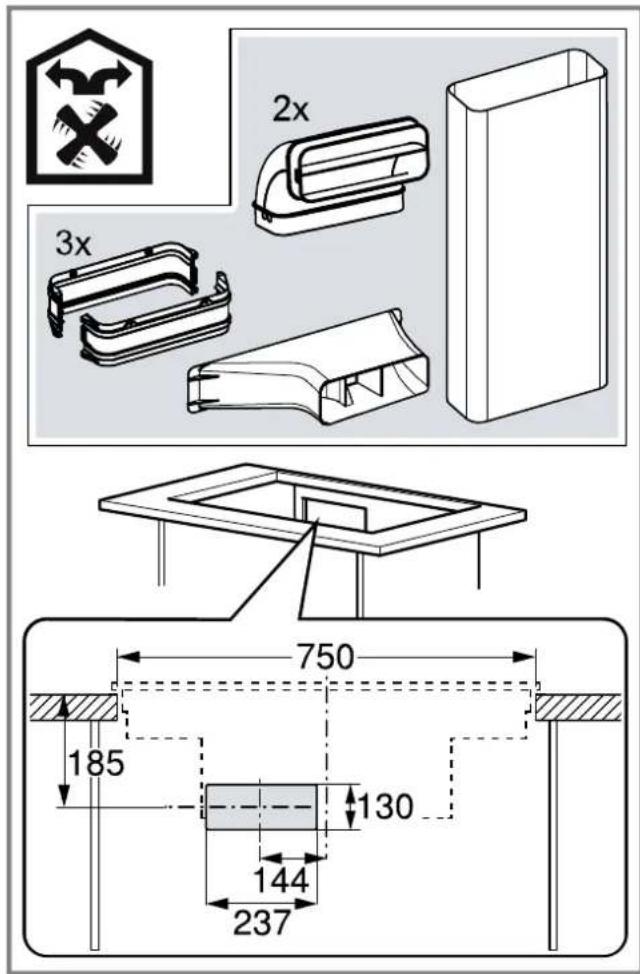
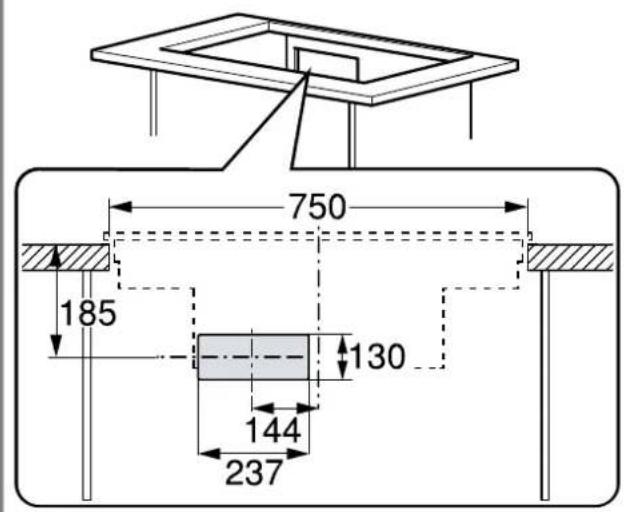
Observe the safety clearances for the worktop cutout.
Do not place any objects in the drawer which exceed the maximum height of the drawer. The objects may come into contact with the base of the appliance and thus disrupt the functions.
Fig. 14

General information
- Read this instruction manual carefully.
Only a licensed expert may connect the appliance. - Switch off the power supply before carrying out any work.
- Never use this appliance in boats or in vehicles.
- Follow the worktop manufacturer's recommendations.
Safe installation
Follow these safety instructions when installing the appliance.
The appliance can only be used safely if it is correctly installed according to the safety instructions. The installer is responsible for ensuring that the appliance works perfectly at its installation location.
WARNING - Danger: Magnetism!
The appliance contains permanent magnets. They may affect electronic implants, e.g. pacemakers or insulin pumps.
Persons with electronic implants must stand at least 10cm away from the appliance.
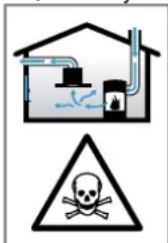
WARNING - Risk of poisoning!
Risk of poisoning from flue gases being drawn back in. Room-air-dependent heat-producing appliances (e.g. gas, oil, wood or coal-operated heaters, continuous flow heaters or water heaters) obtain combustion air from the room in which they are installed and discharge the exhaust gases into the open through an exhaust gas system (e.g. a chimney).
With the extractor hood switched on, air is extracted from the kitchen and the adjacent rooms. Without an adequate supply of air, the air pressure falls below atmospheric pressure. Toxic gases from the chimney
or the extraction shaft are sucked back into the living space.
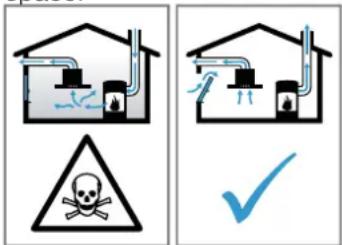
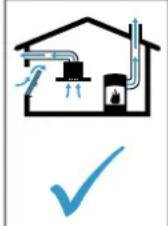
Always ensure adequate fresh air in the room if the appliance is being operated in exhaust air mode at the same time as a room-air-dependent heat-producing appliance is being operated.
It is only possible to safely operate the appliance if the pressure in the room in which the heating appliance is installed does not fall below 4 Pa (0.04 mbar). This can be achieved whenever the air needed for combustion is able to enter through openings that cannot be sealed, for example in doors, windows, incoming/exhaust air wall boxes or by other technical means. An incoming/exhaust air wall box alone is not sufficient to ensure compliance with the limit.
In any case, consult your responsible chimney sweep. They are able to assess the house's entire ventilation setup and will suggest the suitable ventilation measures to you.
Unrestricted operation is possible if the appliance is operated exclusively in circulating-air mode.
WARNING - Risk of fire!
The grease deposits in the grease filter may catch fire.
- Never work with naked flames close to the appliance (e.g. flambéing).
- Do not install the appliance near a heat-producing appliance for solid fuel (e.g. wood or coal) unless a closed, non-removable cover is present. There must be no flying sparks.
WARNING - Risk of injury!
Changes to the electrical or mechanical assembly are dangerous and may lead to malfunctions.
- Do not make any changes to the electrical or mechanical assembly.
Parts that are accessible during installation may have sharp edges and may lead to cutting injuries.
Wear protective gloves.
The appliance is heavy.
To move the appliance, two people are required.
- Use only suitable tools and equipment.
WARNING - Risk of suffocation!
Children may put packaging material over their heads or wrap themselves up in it and suffocate.
- Keep packaging material away from children.
- Do not let children play with packaging material.
WARNING - Risk of poisoning!
Risk of poisoning from flue gases being drawn back in.
- Do not emit the exhaust air into a smoke or exhaust gas flue that is in operation.
- Do not emit the exhaust air into a shaft that is used to ventilate installation rooms for heat-producing appliances.
If the exhaust air is to be conveyed into a smoke or exhaust gas flue, you must obtain the consent of the heating engineer responsible.
Risk of poisoning from flue gases being drawn back in.
If an extractor hood with an open-flued heat production source is installed, the power supply for the extractor hood must be provided with a suitable safety switch.
Information about the electrical connection
In order to safely connect the appliance to the electrical system, follow these instructions.
WARNING - Risk of electric shock!
It must always be possible to disconnect the appliance from the electricity supply. The appliance must only be connected to a mains socket that has been installed correctly.
An all-pole isolating switch must be integrated into the permanent electrical installation in accordance with the conditions of overvoltage category III and in accordance with the installation regulations.
The permanent electrical installation must only be wired by a professional electrician. We recommend installing a residual-current circuit breaker (RCCB) in the appliance's power supply circuit.
- Do not kink or trap the connection cable, and keep it away from sharp edges.
- Route the connection cable in such a way that it does not touch the hot casing.
- Use only the connection cable that is supplied with the appliance or is provided by technical after-sales service.
This appliance complies with the EC interference suppression regulations.
- The appliance corresponds to protection class 1. You should therefore only use the appliance with a protective earth connection.
The manufacturer shall assume no liability for malfunctions or damage resulting from incorrect electrical wiring.
Preparing the electrical connection
Requirement: Only after-sales service staff who have been trained accordingly may carry out work on the inside of the appliance or replace the power cord.
- Observe the information about the electrical connection.
An incorrect installation, an improper installation or connection invalidates the warranty. - If a longer mains power cable is required, contact the after-sales service. Connecting cables up to 2.20m are available.
- On appliances without a preinstalled cable, insert the power cable into the mains socket.
Opening the mains socket
- Use a screwdriver to lift the cover of the mains outlet.
$$ \rightarrow \text {F i g .} $$
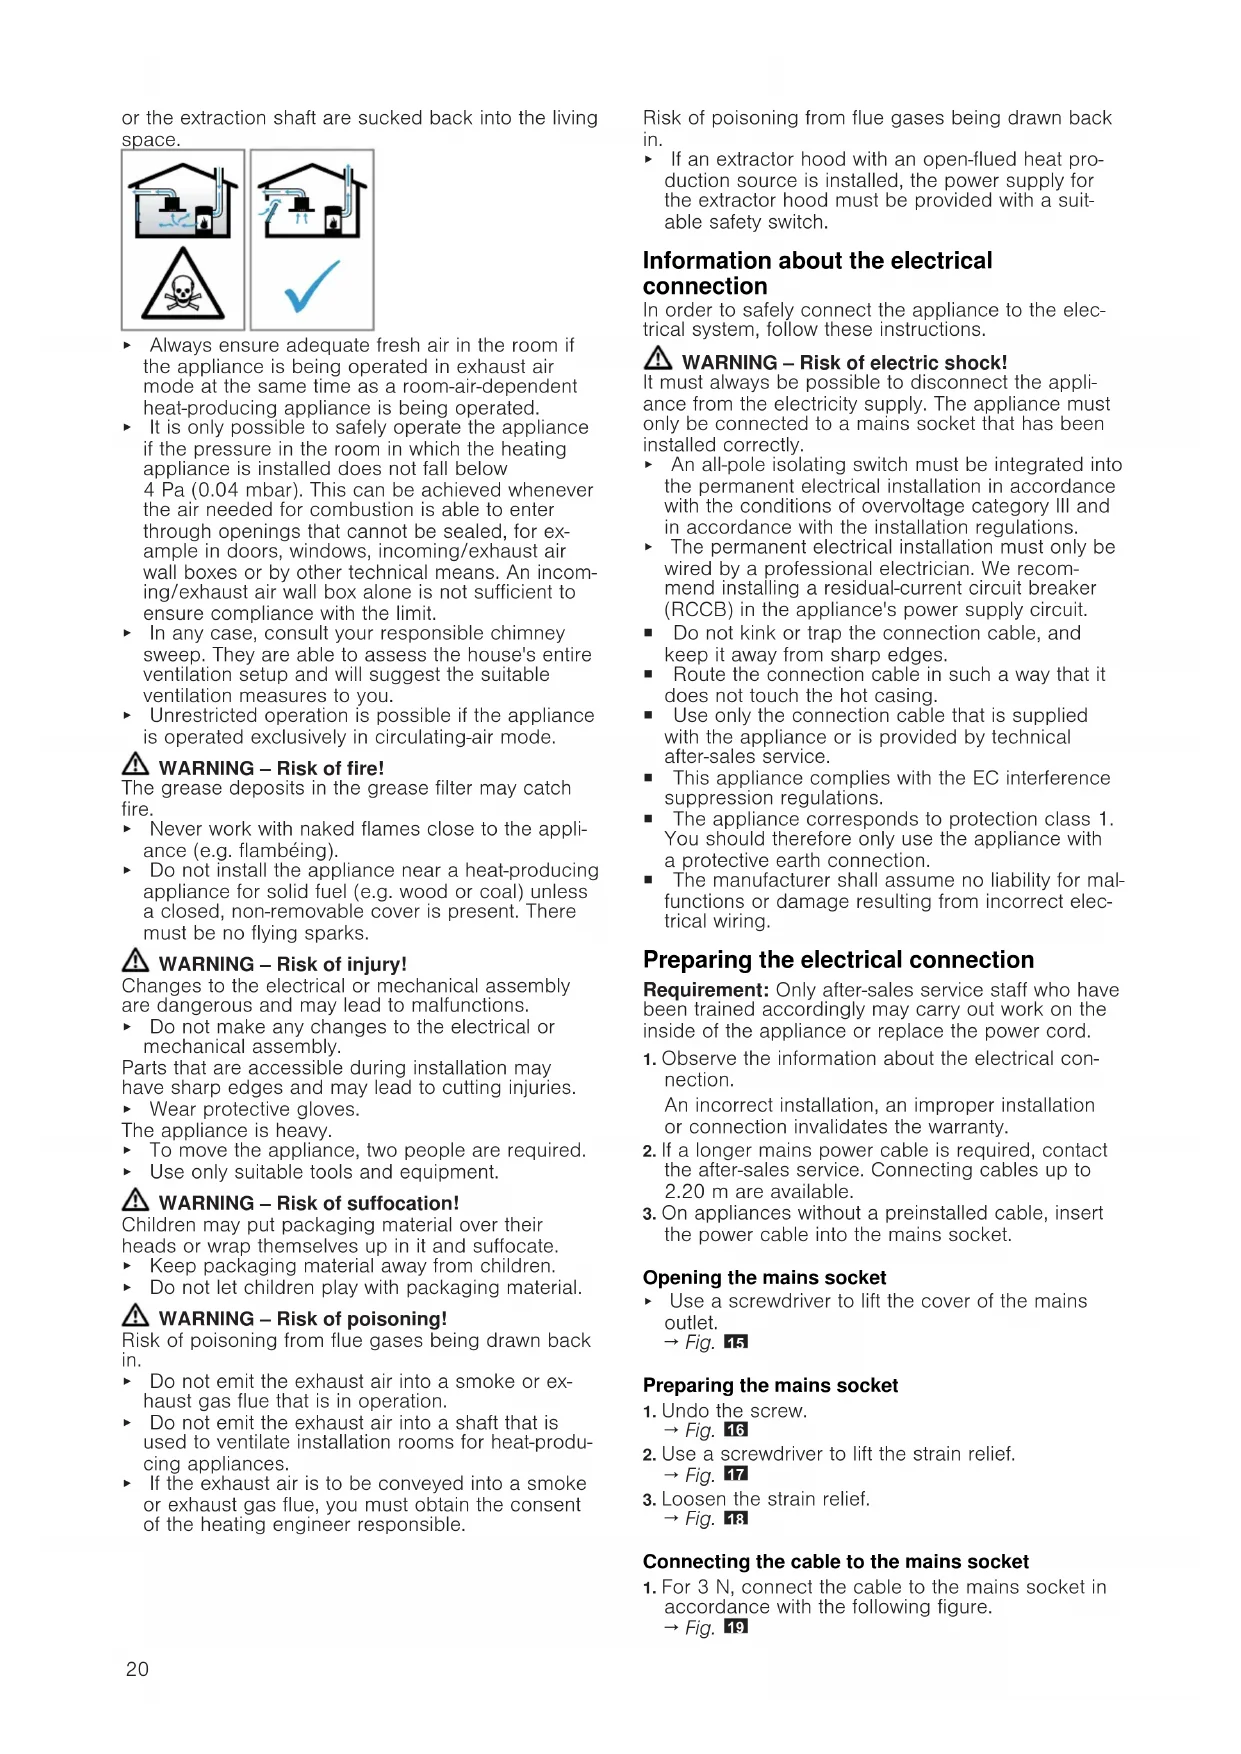
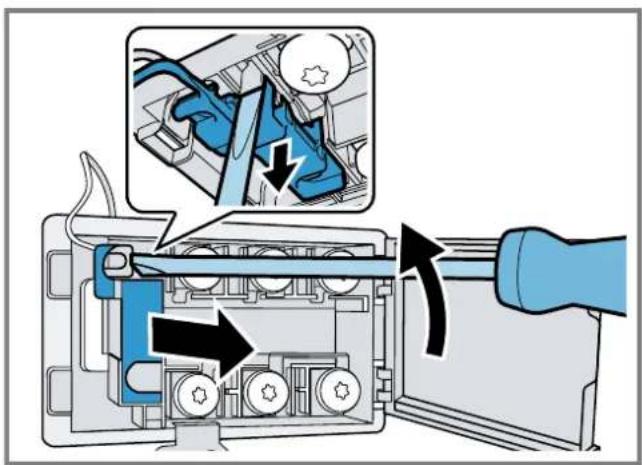
Preparing the mains socket
-
Undo the screw.
-
Use a screwdriver to lift the strain relief.
-
Loosen the strain relief.
$$ \begin{array}{l} \rightarrow \text {F i g .} 1 6 \ \rightarrow \text {F i g .} \ \rightarrow \text {F i g .} \ \end{array} $$
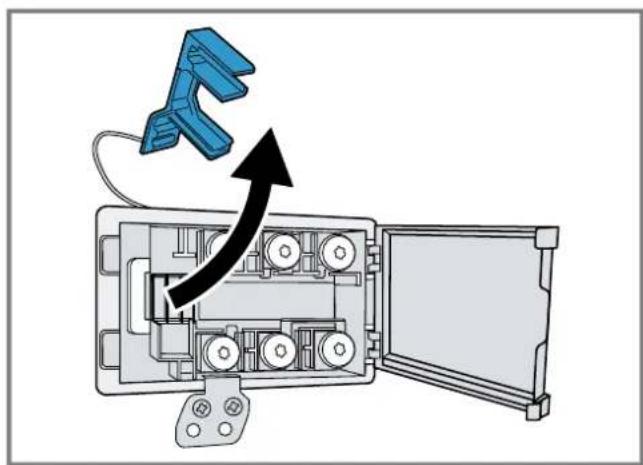
Connecting the cable to the mains socket
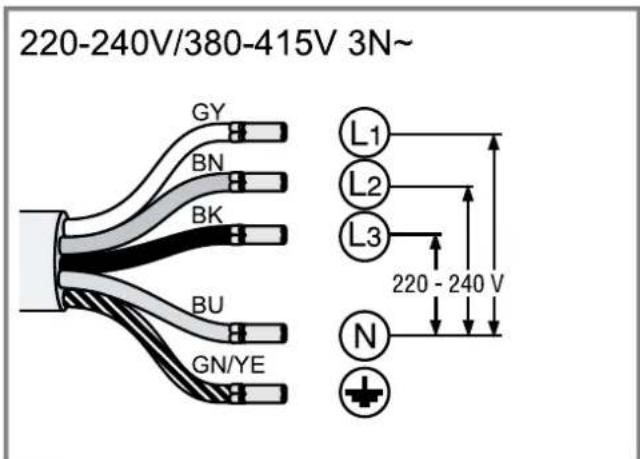
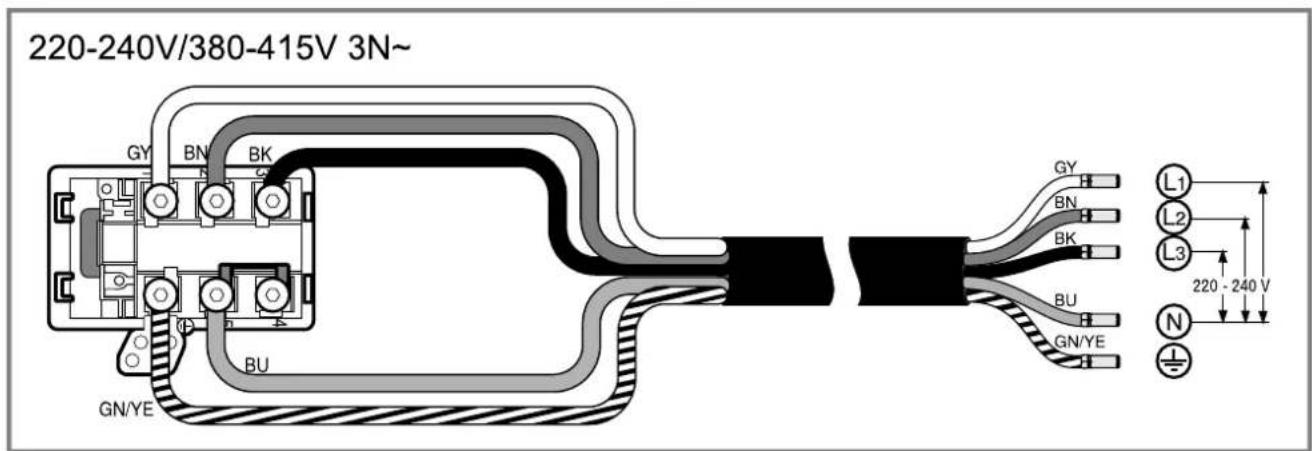
- For 3N connect the cable to the mains socket in accordance with the following figure.
$$ \rightarrow \text {F i g .} 1 9 $$
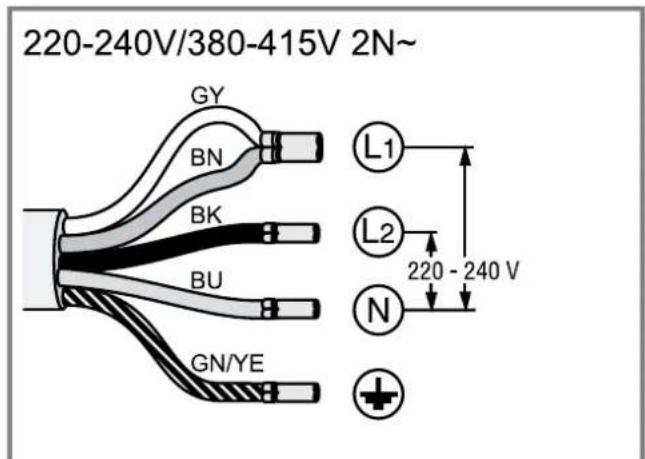
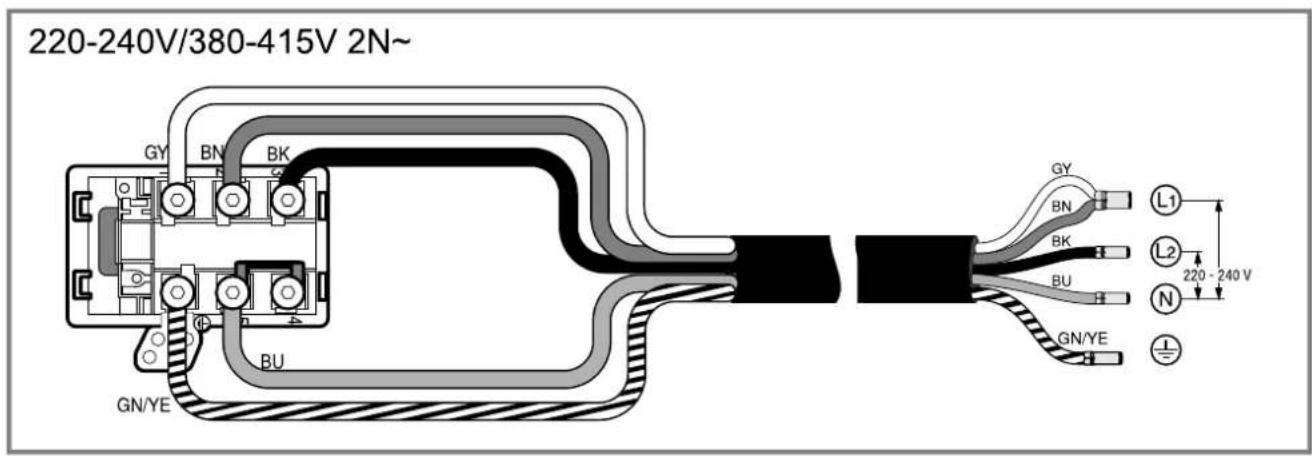
- For 2N connect the cable to the mains socket in accordance with the following figure. Fig. 20
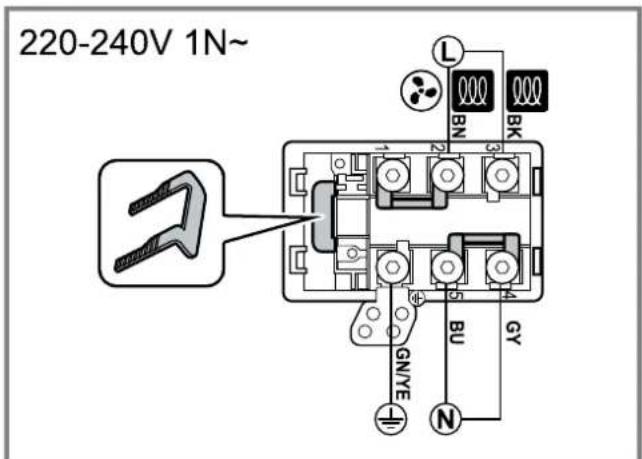
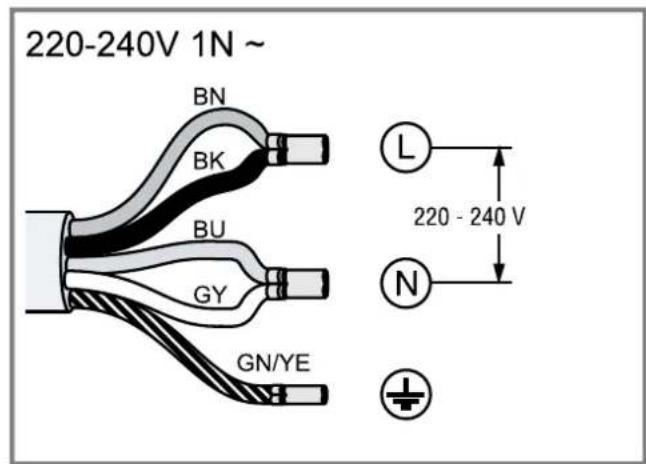
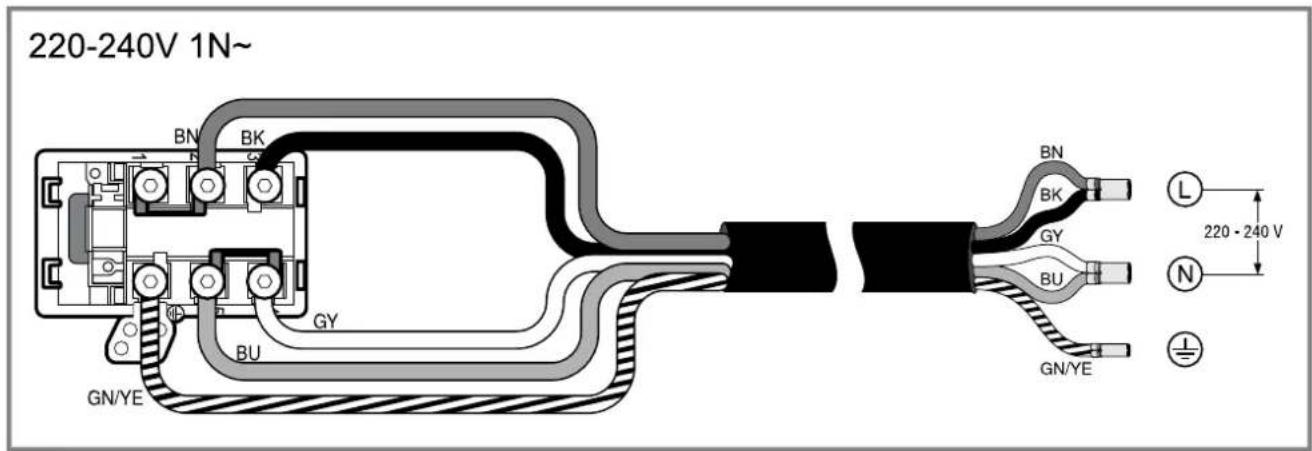
- For 1 N, connect the cable to the mains socket in accordance with the following figure. Fig.21
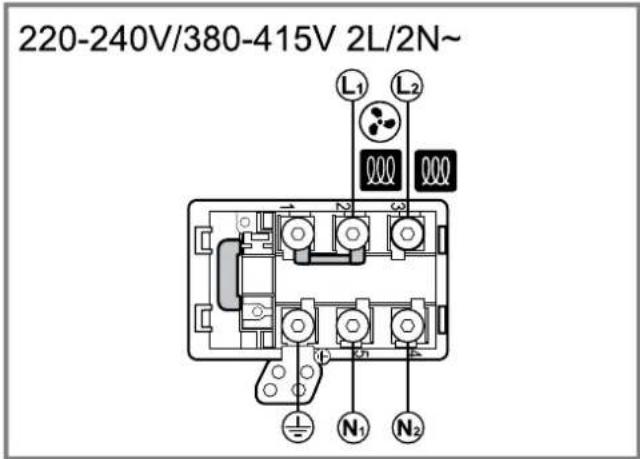
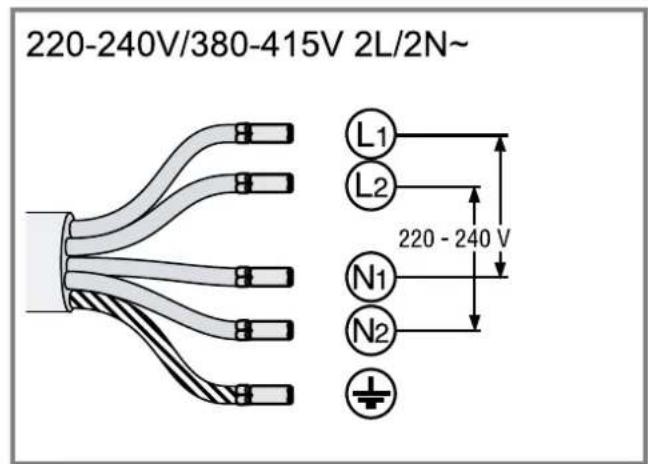
- For 2L / 2N connect the cable to the mains socket in accordance with the following figure. Fig.
-
Note the colours of the cables.
-
BN: Brown
- BU: Blue
- GN/YE: Yellow and green
- BK: Black
-
GY: Grey
-
If required, install the enclosed copper bridges in accordance with the connection diagram.
- Connect the cables and then tighten the screws of the mains socket.
- For a 1N^ or 2L/2N connection in accordance with the connection diagram, 1 corresponds to the fan motor.
- For a 2N^ / 3N^ connection, phase L1 (grey) corresponds to the fan motor.
Secure the cable in the mains socket
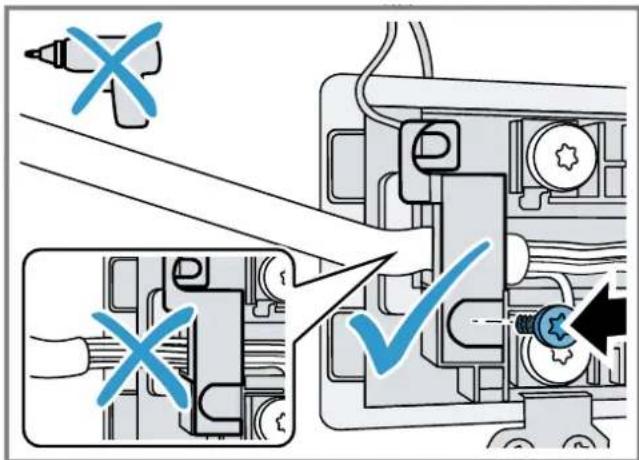
- Use the strain relief to secure the power cable in place.
-
Tighten the screw at the correct position.
-
Do not use a cordless screwdriver.
$$ \rightarrow \text {F i g .} 2 3 $$
- To facilitate closing the mains socket, arrange the cables in the central area of the mains socket.
- Close the cover on the mains socket.
Instructions for the exhaust air pipe
The appliance manufacturer does not provide any warranty for faults attributable to the pipeline.
Use a short, straight exhaust air pipe with as large a pipe diameter as possible.
- Long, rough exhaust air pipes, many pipe bends or small pipe diameters reduce the suction power and increase the fan noise.
Use an exhaust air pipe that is made of non-combustible material.
- To prevent condensate from returning, fit the exhaust pipe with a 1^ gradient from the appliance.
Flat ducts
Use flat ducts with an inner cross-section that corresponds to the diameter of the round pipes:
Diameter of 150mm corresponds to approx. 177~cm^2
Use sealing strips for different pipe diameters.
- Do not use any flat ducts with sharp bends.
Round pipes
Round pipes with an inner diameter of 150~mm
Instructions for the air extraction mode
For air extraction mode, a one-way flap should be installed.
Notes
If a one-way flap is not included with the appliance, one can be ordered from a specialist retailer.
If the exhaust air is conveyed through the external wall, a telescopic duct should be used.
Checking the units
- Check whether the fitted unit is level and has sufficient load-bearing capacity.
The maximum weight of the appliance is approx. 25kg
The worktop into which you are fitting the appliance must be able to withstand loads of approx. 60kg
- Ensure that the stability of the fitted unit is also guaranteed following cut-out work.
-
Use suitable substructures to ensure the load-bearing capacity and stability, particularly in the case of thin worktops.
-
Take the appliance weight, including additional load, into consideration.
-
Use heat-resistant and moisture-resistant reinforcement material.
-
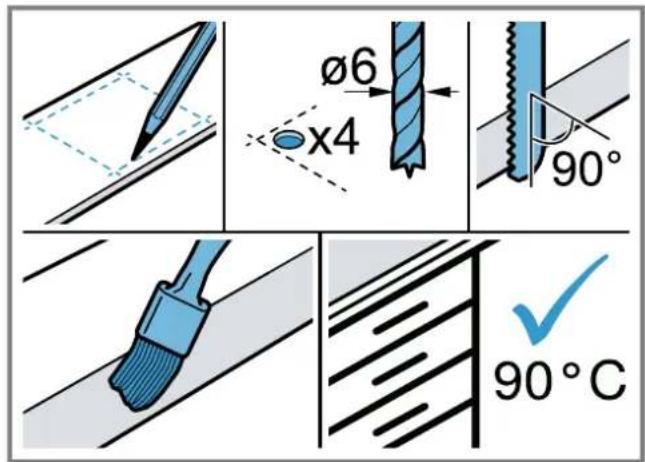
Ensure that the fitted unit is heat-resistant up to 90^ .
- Do not support any other appliances, e.g. ovens, refrigerators, dishwashers or washing machines.
- Only check that the appliance is level once it has been installed in the installation opening.
- You can freely select the clearance to a top cabinet. In doing so, take into consideration the ease of use and ergonomics when using the plate.
Preparing the units
Requirement: The fitted units are heat-resistant up to 90^
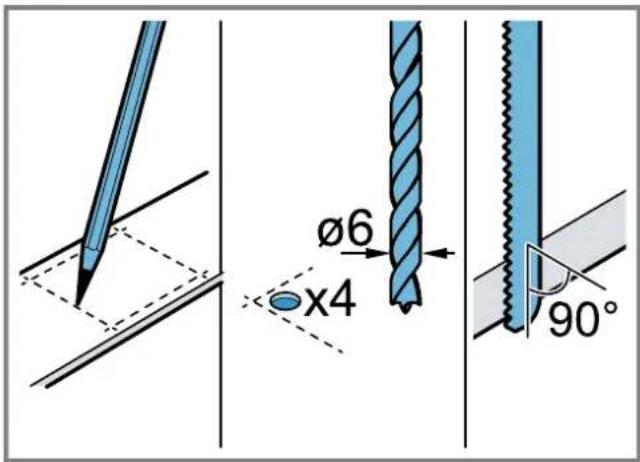
- Mark the unit cut-out in accordance with the installation diagram.
$$ \rightarrow \text {F i g .} 1 4 $$
- Drill four holes with a diameter of 6mm
$$ \rightarrow \text {F i g .} 2 4 $$
- Ensure that the angle of the cut surface to the worktop is 90^ .
$$ \rightarrow \text {F i g .} \boxed {2 4} $$
Observing the minimum clearances when installing above a drawer
- When removing the overflow container on integrated appliances, take the minimum clearances into consideration. Fig. 11
- Observe the position of the overflow container. Fig. 12
Preparing the unit for circulating-air mode with the adapter
Notes
We do not recommend to install on a nonthermally insulated outer wall or above a cold floor ( ≥ 0.5W / m^2 C).
Air outlets must not be directed at other appliances, they should be parted by a separation panel. If you cannot install any separation panels, refer to other installation types..
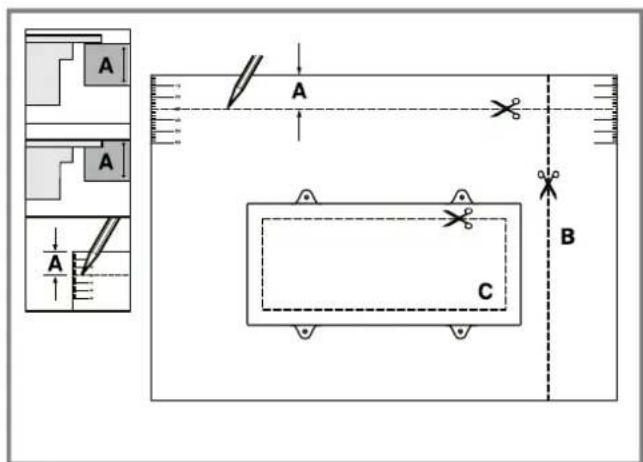
- Observe the relevant dimensions when combining with the adapter for the cut-out in the back wall. Fig. 25
- Measure the thickness of the worktop. Transfer the measurement to the template and draw a line that corresponds to it. Fig. 26
- Cut the template along the marked line for worktop thickness A, the cut centre line B and the reference line to the inner air outlet C.
- Mark the centre of the cut-out in the worktop as the centre line on the back panel of the unit. Fig. 27
-
Align the template to the centre line of the back panel of the unit and to the lower edge of the work surface.
-
Use the template to make the cut-out in the back panel.
- After making the cut-outs, remove any shavings.
- Seal the cut surfaces so that they are heat-resistant and waterproof.
$$ \rightarrow \text {F i g .} 2 4 $$
Ventilation
-
In circulating-air mode, establish an air outlet in the unit's plinth.
-
Provide a minimum air outlet cross-section of approx. 400~cm^2
- Make the outlet opening in the base panel as large as possible in order to keep draughts and noise to a minimum.
-
Make the outlet opening by shortening the plinth or by using suitable ventilation grilles or a lamellar plinth.
-
To guarantee that the appliance works correctly, ventilate the hob appropriately via an air outlet with a minimum cross-section of 200~cm^2 in the base unit.
Installing an appliance featuring circulating-air mode with adapter
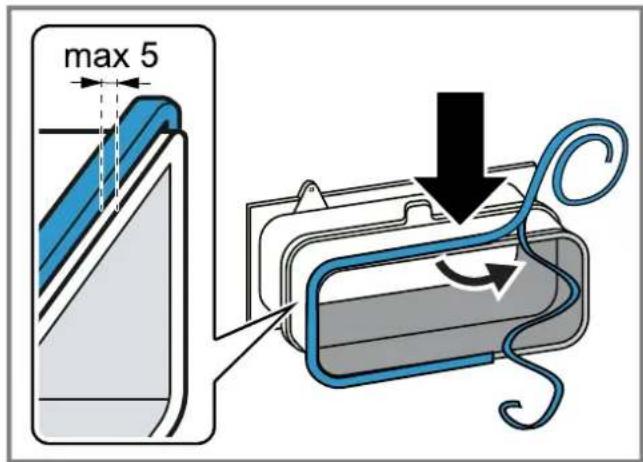
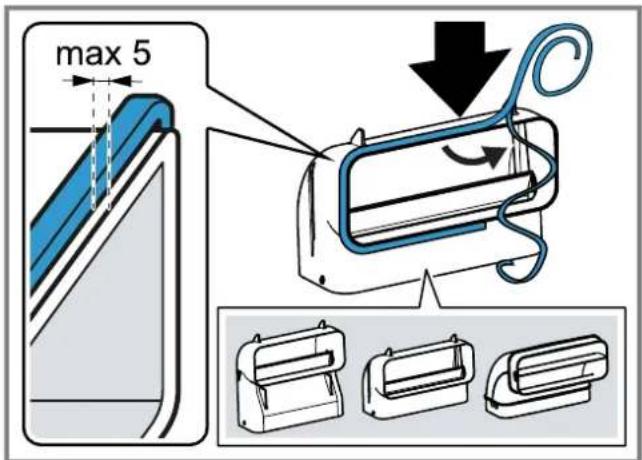
Attaching the seal to the adapter
- Attach the seal to the adapter with max. 5 mm to the edge.
Fig. 28
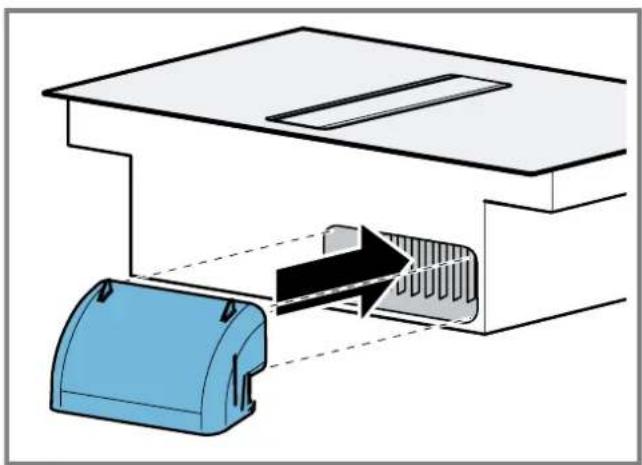
Attaching the adapter
- Clean and degrease the adhesive surface around the cut-out in the unit's back panel.
-
Insert the adapter into the outlet opening on the rear of the hob. Fig. 29
-
Remove the adhesive tape's protective film from the adapter.
$$ \rightarrow F i g. \boxed {3 0} $$
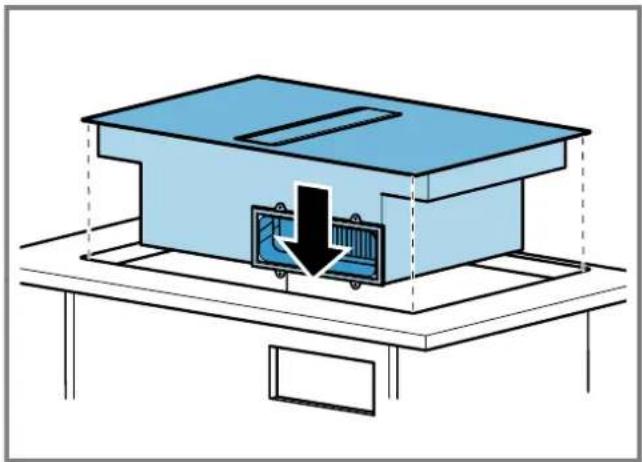
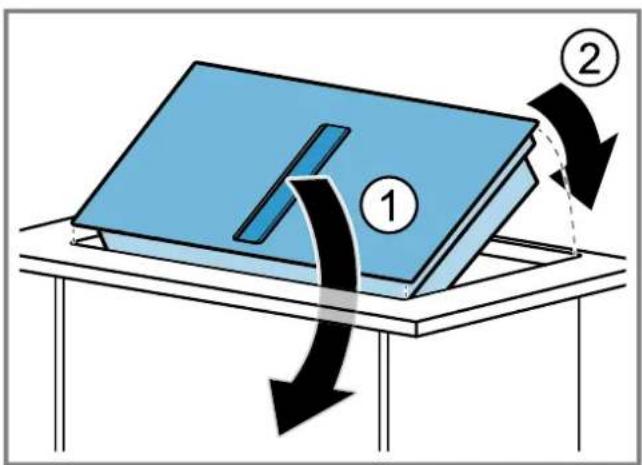
Inserting the appliance into the worktop cut-out
- Ensure that the connection cable is connected to the appliance.
- Carefully insert the appliance into the worktop cutout.
$$ \rightarrow \text {F i g .} \quad 3 1 $$
Securing the adapter
$$ \rightarrow \text {F i g .} 3 2 $$
$$ \rightarrow \text {F i g .} \quad 3 3 $$
- Hold the adapter at the central holder and use the side holders to slide it towards the unit's back panel in the base unit, then affix it.
- If required, also use screws to secure it.
Preparing the unit for circulating-air mode with a circulating-air duct
- If required, remove the unit's back wall.
- Observe the relevant dimensions when combining with the flat duct elbow for the cut-out in the back wall.
$$ \rightarrow F i g. \quad 3 4 $$
-
In circulating-air mode, establish an air outlet in the unit's plinth.
-
Provide a minimum air outlet cross-section of approx. 400~cm^2
- Make the outlet opening in the base panel as large as possible in order to keep draughts and noise to a minimum.
-
Make the outlet opening by shortening the plinth or by using suitable ventilation grilles or a lamellar plinth.
-
To guarantee that the appliance works correctly, ventilate the hob appropriately via an air outlet with a minimum cross-section of 200~cm^2 in the base unit.
- After making the cut-outs, remove any shavings.
- Seal the cut surfaces so that they are heat-resistant and waterproof.
$$ \rightarrow \text {F i g .} 2 4 $$
Installing the appliance for air recirculation mode with circulating-air duct
- For circulating-air mode, use the seal, the circulating-air duct, the diffuser and the odour filter.
- Observe the dimensions for the different flat duct bends. Page 19
Securing the seal
- Secure the enclosed seal on the flat duct elbow at a maximum of 5mm from the edge.
$$ \rightarrow \text {F i g .} \quad 3 5 $$
Inserting the flat duct elbow
- Insert the flat duct elbow into the outlet opening on the rear of the appliance.
$$ \rightarrow \text {F i g .} \quad 3 6 $$
Inserting the appliance into the worktop cut-out
- Ensure that the connection cable is connected to the appliance.
- Carefully insert the appliance into the worktop cutout.
$$ \rightarrow \text {F i g .} \quad 3 7 $$
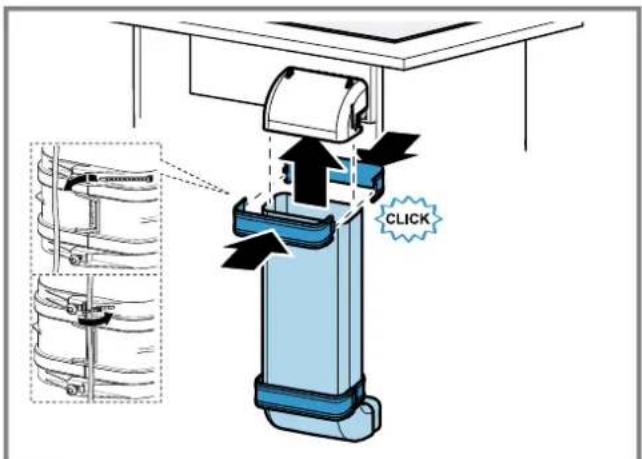
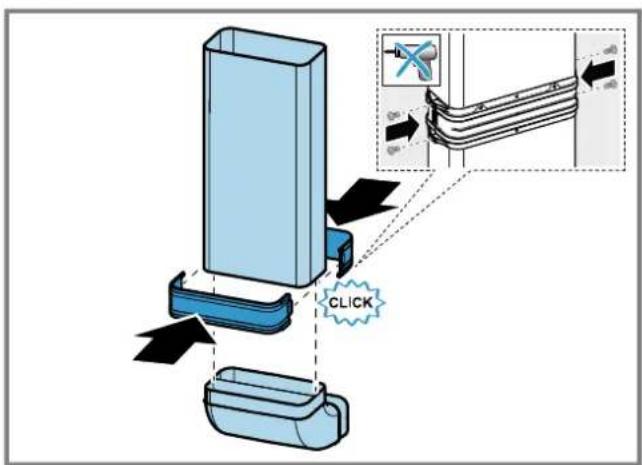
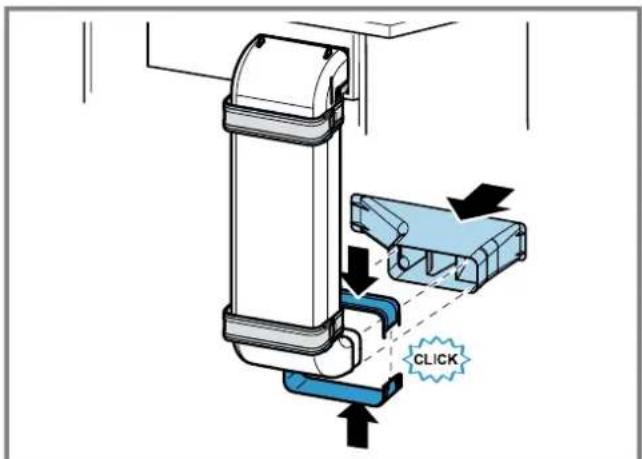
Establishing the pipework between the appliance and the diffuser
-
Connect the components of the circulating-air duct to each other.
-
Secure the flat duct pipe connector by engaging it in place.
- For an additional fixing, screw the flat duct pipe connector together using 4 × PT 4 × 8 ~mm screws for plastic.
$$ \rightarrow \text {F i g .} \quad 3 8 $$
$$ \rightarrow \text {F i g .} \quad 3 9 $$
$$ \rightarrow F i g. \quad 2 0 $$
- Connect the circulating-air duct to the flat duct elbow on the rear of the hob.
- Connect the diffuser to the circulating-air duct.
Preparing the unit for air extraction mode
- If required, remove the unit's back wall.
- Observe the relevant dimensions when combining with a flat duct elbow for the cut-out in the back wall.
$$ \rightarrow \text {F i g .} \quad 4 1 $$
- After making the cut-outs, remove any shavings.
- Seal the cut surfaces so that they are heat-resistant and waterproof.
$$ \rightarrow \text {F i g .} $$
Install the appliance for air extraction mode
- For air extraction mode, use the seal and the acoustics filters.
- Observe the instructions for the exhaust air pipe. Page 21
Securing the seal
- Secure the enclosed seal on the flat duct elbow at a maximum of 5mm from the edge.
$$ \rightarrow \text {F i g .} $$
Establishing the piping
- Insert the flat duct elbow into the outlet opening on the rear of the appliance.
$$ \rightarrow \text {F i g .} $$
- If required, install additional piping elements.
Inserting the appliance into the worktop cut-out
$$ \rightarrow \text {F i g .} 3 7 $$
- Ensure that the connection cable is connected to the appliance.
- Carefully insert the appliance into the worktop cutout.
Connecting the exhaust air pipe
- Secure the exhaust air pipe to the flat duct bend.
- Establish the connection to the exhaust air opening.
- Seal the joints appropriately.
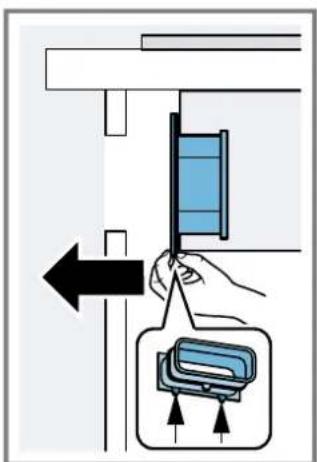
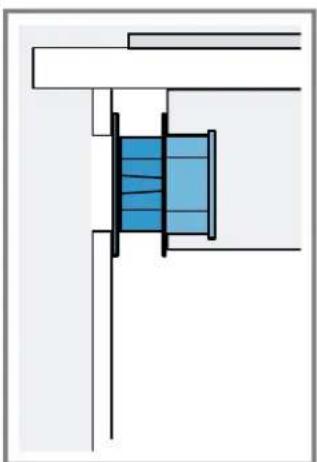
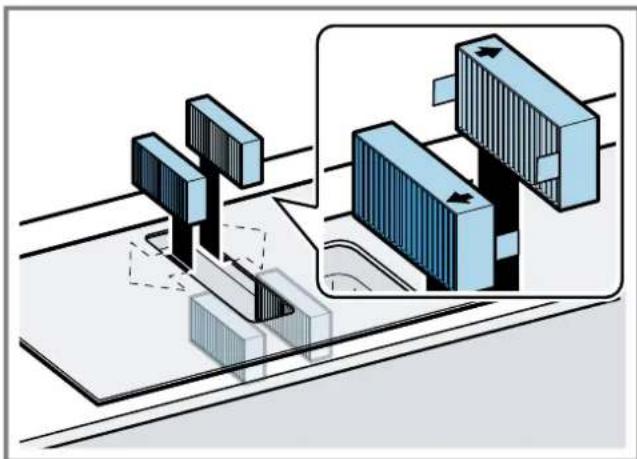
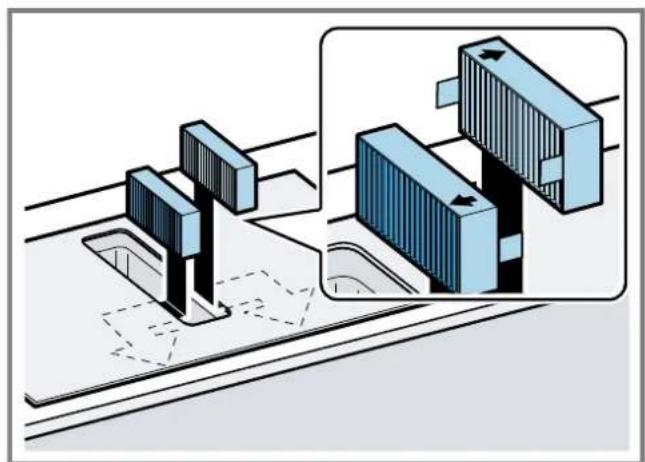
Inserting filters
Note: For circulating-air mode, insert the odour filters.
For air extraction mode, insert the acoustics filters.
- Observe the filters' air flow direction.
- Insert two of the filters into the left and right of the appliance, and slide them forwards.
$$ \rightarrow F i g. \quad 4 3 $$
$$ \rightarrow \text {F i g .} \quad 4 4 $$
- Insert the other filters into the left and right of the appliance.
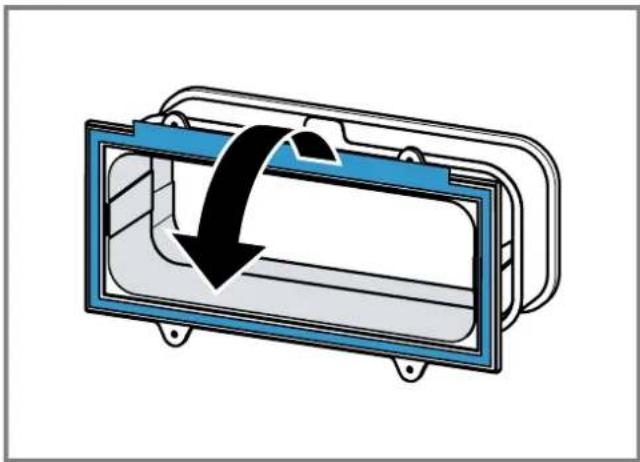
Inserting grease filters
- Insert the grease filter.
$$ \rightarrow \text {F i g .} 4 5 $$
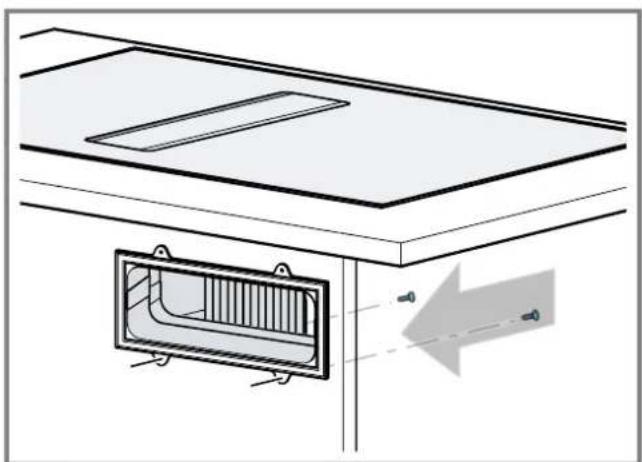
Establishing the connection to the power supply
- Observe the connection data on the rating plate.
- For 3N connect the cable to the mains socket in accordance with the figure.
$$ \rightarrow \text {F i g .} 4 6 $$
- For 2N connect the cable to the mains socket in accordance with the figure.
$$ \rightarrow F i g. \tag {17} $$
- For 1 N, connect the cable to the mains socket in accordance with the figure.
$$ \rightarrow \text {F i g .} 4 8 $$
- For 2L / 2N connect the cable to the mains socket in accordance with the figure.
$$ \rightarrow \text {F i g .} 4 9 $$
-
Note the colours of the cables.
-
GN/YE: Yellow and green
$$ \begin{array}{l} - B N: B r o u n \ - \mathrm {B U}: \text {B l u e} \ - \text {B K}: \text {B l a c k} \ - G Y: \text {G r e y} \ \end{array} $$
- If required, arrange the supplied wire end ferrules differently depending on the type of connection.
- To connect two cables, if required, use a wire end ferrule.
Shorten the wires.
- Remove the insulation.
Checking the function
- Switch on the appliance.
- If the appliance is not connected correctly. "Checking and correcting the electrical connection", Page 23
- If no faults appear in the appliance's display, use the operating instructions to check that the ventilation is working.
Checking and correcting the electrical connection
-
Disconnect the appliance from the power supply.
-
Check whether the connection to the appliance and the building-side connection correspond to the connection diagram in these installation instructions. "Preparing the electrical connection", Page 20 "Establishing the connection to the power supply", Page 23
3.For 3N observe the following figure. Fig.50
4.For 2 N, observe the following figure. Fig.51
5.For 1 N, observe the following figure. Fig.52
Switching the display for air extraction mode
- If required for the air extraction mode and the air recirculation mode, change the display of the electronic control in the basic settings.
- Observe the basic settings section in the instruction manual.
Removing the appliance
ATTENTION!
Tools may damage the appliance frame.
Do not prise out the appliance from above.
1. Disconnect the appliance from the power supply.
2. Remove the exhaust air duct or undo the circulating-air connections.
3. Push out the appliance from below.
fr
Positie van overlooppreservoir:
Fig. 12
ADVARSEL-Fare for forgiving!
ADVARSEL - Brandfare!
Fedtaflejringer i fedtfiltret kan blive antaendt.
ADVARSEL-Fare for forgiving!
Fastgoring at taeling
$$ \rightarrow \text {F i g .} 3 5 $$
- Fastgor den medfolgende taeling pa fladkanalbogen maks. 5 mm fra kanten.
Fastgoring at taeling
Monteringsmal for flat rorbend
Her finner du en oversikt over monteringsmalene for flate rorbend.
Sett fra sider:
Fig. 4, Fig. 5, Fig. 6
Sett fortra:
Fig. 7
ADVARSEL-Fare for forgiving!
ADVARSEL-Fare for forgiving!
PpOeToiuaia TnC nEaKtpiKnC ouvBc
PounoEon: Movo n EkTiaIDeUeVn yia auto unnpoeia Eunnpentnon nIeAATWv EITIPETAI VA EKTEAEOI epaaic oTO eawTePiKO TnC OuKEuNC n va aVTiKAATAOTnoTo KAwio Tou dIKTuou.
KaTaakEun TnOuvdeanεEaepiou
MOHTaHHbI pa3Mepbl IJIy IIOcKOro BO3dUxOBoDa
3Decb npBBeDen 063Op MOHTaHHbIX pa3MepOB dIy NIOCKoTo BO3DyXOBOda.
BnDc6oky:
$$ \rightarrow P _ {N C}. \mathbf {4}, \rightarrow P _ {N C}. \mathbf {5}, \rightarrow P _ {N C}. \mathbf {6} $$
Bud cpeepn:
→PcC.7
BaphaHTbI yCTaHOBKn
3decb npBBeDeH 063Op BnIOB pa3NHybIX BapnaHTOB yCTaHOBKN.
Фиьтду ydaileHn 3anXOB n aanTep dnypeKHa mUHKyIaun BO3dyxa:
→PNC. 3
HnIbTp dna ydaene H3anaxOB, nHΦy3Op nynlOHTHeB dna peKHaMa uNpKpyAaBn BO3dyxa:
→Pnc.9
UlymonornotteNb yNnOHTeNb dIpeKHa oTBoDa BO3dyxa:
→PUC.10
3aMeTHa: IIOxOJIuIe BO3DyXoBOJb IINy yCTaHOBKn BmOKeTe npno6peCTn B cepBncHoi CnyKbe, Ha Hauem Be6caTte NnB CneunnHPOBaHHbIX MaRa3NHax.
Be3onachbIe pacCToHHN
Co6JIIOaIe 6e3OaIacHbIe pacCToRHHaIIBaUero np6o- pa.
PacctoHHe Do EMKoCTn Ia nBa IuIHe JxNkoCTn:
→PNC.11
PacnonoJKeHne EMKocTN nIa cNbA IINuHei XnKocTn: →Pnc.
OnTImaJIbHaM MoUHOCb DOCTnRAeTCa, ecIn paCCTOHNHe MeKdY 3aHHei CTeHKoM MeBEn H CTeHOI COCTaBnAeT 50 MM. Pn HeOcTaTOHOM paCCTOHN MOpHOCb CHNKAeTcA.
→PUC.18
BbIepKbBaTe 6e3oNaChbIe paCtOHaHn npN BbINOJIHeHH N Bblpe3a B CToJIeUHnIe.
He knaIne B bIDBnKHO nIK npEdMeTb, Bbcota KOTOpbIX pEBblAeT MaKcImaJIbHyO BbcOTy nUka. TaKe npeDMeTb MOrY yNpaTbcB OChOBaHne npnbopa, TEm caMbIM MeWAr ero pa6ote.
→PUC.14

06uhe yka3aHnra
BHHMaTeIbHo npOHTaIte daHHe pyKOBOdCTBO.
ToIbKO KBaIIHΦIuPObaHHbI CneuaJIInCT MoKET BbIIOJNHITb NOdKJIIOUeHHe npIbOpa.
Ipeed npoBeHnem IIO6bix pa6OT OTKJIHOuHTe noauy 3JKeKtpO3Heprn.
3anpeaaetca nCnoB3ObaTb npn6op Ha noKax HnB aBTOMo6nax.
Co6HnOaIte peKOMeHdaaun npOn3BOaNTeJI CToJeuHnUbl.
Be30nachoctb npn MOHTaKe
Pny yctaHOBKe np60pa co6nOdaTe daHHbIe yka3aHnA NO texHnke 6e3oNaCHOCTN.
БezonaHocTh ekCnnyatau np rapaTnpyETcToIbKo np KBaIINΦNUPOBAHHO yCTaHOBKe C co6NIOHeHem INHCTpyKU N IO MOHTaKy. 3a npabINbHOCTb yCTaHOBKN OTBeTCTBeHNOCt b HecET YCTaHOBUNK.
NPEyPExKDEHNE -OnachOcTB:MarHeTH3M!
Pn6bOp cOepKHT nocToHHbIe MaHHTbl. OHN MoYr Bo3-DeiCTBOBaTb Ha BxHbJIeHHbIe 3JeKtpOHHbIe np6Opbl, HApHmEp, Ha KapDIOcTHMylrTOpbI INHcYlnHOBbIe NOMbl.
JinuamC3JIeKTKPOHHbIMNIMnIaHTaTaMn 3anpeuaeTc np6nkaTbcra K np6bopy 6nke, yem Ha 10 cm.
NPEyPEXKDEHNE -Onachocb OTPabJeHHa
Bthytbie o6paTHo oTpa60TaBwne ra3bMoYr cTaTB npuHnO oTpaBHeHH. NcToCHNK nIaMeHN C NOBODOM Bo3dyXa H3 NOMeHn (HaNPmep, pa60TaIOUne Ha r3e, JHKOM TOnJIbe, ApOBax IIN yrIe HaReBaTeHN, IpOTouHbE BoOHaRpeBaTeHN, 6oIIePbI) NOLyauOT Bo3dyx dNcCKHARn HONJIBa H3 NOMeHn, rDe OHN yCTaHOBHeHb, a OTPa6oTabWe Ra3bI OTXoJr Tyepe BbITKHyTO CnCTEmy (HaNPmep, BbITAKHyTO Tpy6y) H3 NOMeHn Ha yLIuCy. Bo Bpemra Pa60TbI BbITAKKn H3 KXYHn I pacNoLaIaOUInxC PdOM NOMeHn ydaJIeTcBA 03dyx. Be3 DoCTaTOHOro npTOKa ATMocFepHoro BO3dyxA B NOMeHne DaBLeHne MoKet YMeHbWHTbcN, IN TOKChNbIe Ra3b I3 DblMOxOJa IIN BEHTInAaHcyHT BCaCbIbATbcr O6paTHo B XkInOE NOMeHne.
Bcerda obecneuBaIte npitOK doCTaTOHOro KOJIueCTBa BO3dyxa, ecIn npinbOp nNcToUHnK PnAmEH C NOBODOM BO3dyxa n3 NOMEeHHra pa6OtaHOT ONDHOpeMeHHo B peJxme OTBOJa BO3dyxa.
Be3onacbIM dIg 3KcNpyataun np60pa cOTkpbItbIM nIamaHem RABTcra NOnHKeHne daBHeHn He 6Oonee Hm Ha 4 Pa (0.04 M6ap). 3To MoKeT 6bIb DoCTnHyTO, ecn Tpe6yEmblr CxHraHn BO3dyx 6yDet NoCTynaTb Chepe3 He3aKpbIbAemble OTBepCTn, HanpImep, B DBePax, OKHax, c NOMObUcTeHHORo Kopo6a cnCTeMbl npTOka/OTBOda BO3dyxa IIN INbIX TexHnuecknx MEP. Bcero Odnn npTOuHO-BbITAAKHO KnAnaH He ObecneHT rapaHTIO CO6KnODeHn PpeDJIbHOrO 3HaueHn.
B JIObOcNtyaunOnbpaaunTeScb 3a CoBeTOM K KompeTeHTHOMy Nnuy,OTBeTCTBeHHOMy 3a 3KcPiyaTaunIO OounCTKy Tpy6,CnocOBHomy OueHHTb BeHTNIJIauHOHHUo CnCTeMy Bcero DomaI n PpeJIOXHTb Bam peJeHne IOnPnHrTHIO COOTBeTCTByUOxMep.
Ecni npnbop pa6oTaET NCKIIOHTeBHO B peKIme LInpkyJIaun BO3dyxa,TO 3KcIIpyataaIGNBa 03MOXHa 6e3 OrpaHn-ueHn.
NPEyPExKDEHNE -OnachocbBo3ropaHa!
OTIOXKeHnJ XnpaB XnpooynaBnBaIOUeM FnIbTpE MOryT BCnblxHyTb.
HnKorDa He pa6oTaIe C oTkpbITbIM nJaMeHem pAOM c np6opom (HaPmep, fAm6HpObaHne).
Pn6op MoKHO yCTaHaBnBaTb B6H3N nCTOHNKa dIe CxHraHNA TBepDOro TOnnBa (HAnpIMep, DPOBa HINyrol), ecIn npEduCMTopeHa uehHa HecbEmHa 3a- uHTHa naHeB. He donKHO 6bItb pa3netaOuNXcNcKp.
I PNEUYPENKDEHNE -OnacHocTb TpaBMnpoBaHHa!
H3MeHeHne MexaHueeCKo Hn 3NeKtpueecko KOHCTpyKcun MoKeT CTaTb HCTOuHNKOM ONaCHOCTN IN PpNBecTN K BblXOy pnp6opa n3 cTpor.
H3MeHeHne MExaHnueckoN HIn 3JeKtpnueckoN KOHCTpyKcnn 3aIpeUeHo.
Ieta,OTKpbItbIe npu MoHTaKe,MOyT 6bITb OCTpbIMn npNBecTu K Nope3aM.
HcnoJb3yIte 3aunTHbIe nepuATKn.
Pn6op TaKJIbI.
Ie erno nepemeeHn noTpebHOTc2 yeLoBeKa.
NcnoIb3yIe TOnIbKO NIOxOJaUHe BCNOMOraTeJIbHbIe cpeIcTBA.
I NPEyIpeJxDEHNE -Onacnoctb ydysb!
TeMOry3aBepHyTbCBy yNaKOBOUHbMy MaTePnAn HnHa-DeTb erO ce6e Ha roNoBy n 3aDOxHyTbCra.
He noDnyckaIte TeTeK yNaKOBOHOMy MaTePnaIy.
He no3BOJIaTe DeTm HrpaTb C yNaKOBOuHbM MaTePnA- JOM.
NPEyPExKDEHNE -OnachocTb OTPaBJeHnA!
Brahytble o6paTHOBnmeHne Otpa6oTaBunne ra3bl MoryT CTaTB npuHNO OtpaBHeHH.
BbTJHKHO B03dyH He DOnJIKeH BbIXOHTb Yepe3 DbIMOBYIO Tpy6y HnN BO3dyXOBoD npn Hx 3KcPnyataun.
IgOrtBODa BbITXHORO BO3DyHa He CneDyET HcNOb3oBaTb BEHTKaHaJI, CnyKaUIN DnI BeHTNlaUIN NOMEueHN,B KOTOpBX YCTaHOBHeHb ICTOuHNKPiMaMeHN.
Pn NODKJIIOUeHNBbITAKKKN K HEnCNoJIb3yeMOMy DbIMOxOy, Heo6XoJIMo NOLyuHTb pa3peJHHe B CneuaJIbHOI INCTaHcN, OTBeauOSei 3a 3KcNlyaTaunIO uNCTky Tpy6.
Brahytbe 6paTHOBnmeHne Otpa6oTabuHne ra3bMoryT CTaTB npuHNO OtpaBHeHH.
Pn yctaHOBKe BbTTKNN B NOMeHnHX, rne npcyTCTByET NCTOCHNKN PIIaMeHN C NOBDOOM BO3dyXa N3 NOMeHnHA, CNCTema NODaUNIITAHN BbTTKNN DOJXHa 6bItbOBOpyIDoBaHa FyHKnue aBapHnHOrO OKJIIOUeHn.
Yka3aHnno NO noKIOUOeHHo K 3JIeKTpocetN
Дябзогио ркупгьнлрбopaКэнкtpocetncoblaaTe daHbIe HcTpyKun.
I PEPdUYPEXKDEHNE -OnacHocTb npaHexn 3JIeKTPnueckm TOKOM!
CneIyET o6ecneuTb BO3MOXHOCtB OTKHIOueHn npnbopaOT 3JIeKTPoCeTn B IHObO MoMeHT. 3TO Tnp6Op MOxHO nO4 KIIHOaTb K cTeN TObKO uepe3 npaBnBHO yCTaHOBNeHHyO paCnpedeNTeBHyO Kopo6Ky.
B ctauohapno 3neKtppOboDke Heo6xOIMo npedyCMOTpeb CneuaJIbHbI BbIKIOUaTeIb IIN pa3MbkaHNBCex NOIIOOB corlaCHO ycIOBNM KaterOpn NepeHaipJKeHn III n corlaCHO ycIOBNM MOHTaKa.
IopKnHoueHne cTaunHOapHoro 3NeKtpoo6OpyObaHHn DOJHKHO pOn3BOIDHTCBaTbKO KBaINHpOpaBBHbIM 3NeKtpnKOM.Mbl peKomeHdyem yCTaHOBHT bYcTpOcTB0 3aunTHoro OTKnHoueHHN (Y3O) B 3NeKtpnuecko ceNN cHa6KeHHn npu6OpOB.
I PocneIeIte, YTo6bI ceTeBoi Ka6eB He 6bl 3aKaT, He nepern6anr HaxoDnCBAaIN OT ocTpBX KpOMK.
iPpoknlaBbAte CeTeBOKa6eIb TaK,HTo6bl OH He Ka- canHaRpeTOrO Kopnyca np6opa.
IcnoJb3yIte TOnbKO CeTeBOI Ka6eJIb, BXOJaIINB KOMnIeKTI NOCTaBKN PnIObOPa IIN NocTAbIReMbI CepBNCHOH cIyK6oI.
1 ΘOT npnbop cooTBeCTbBye Tpe6oBaHnM npaBn EC no NOaBneHnO paHnonomEx.
I Pn6bop COOTBETCTByeT KAnccy 3aunHb1, NoTOMy OH DoJIKeH 3KcIIlyaTHPOBaTbC ToIbKO C 3a3eMJIIOUIM npoBODOM.
I PON3BODInTeJIb He HecET OTBETCTBeHHOCTN 3a HeHcnpaBHOCTN IIN BO3MOXHbIE NOBpeKJDeHnA, KOTOpbIe MOyT6bITb C8R3aHbI C HECOOTBETCTBYUcIM 3JIeKTPnueckmMOHTaXOM.
IoproTOBka K 3JeKTPponoKnIOHueHHIO
Tpe6oBaHne:Pa6oTaB C BHTpeHHmH uactaMn np6oopa HIN pOn3BODHT 3aMeHy cTeBOrO Ka6eJr MOyr TOnbKO npoeJeune ObyeHne CneuaNCTb CepBnCHOH cnjxKbl.
- Co6nIaIte yka3aHnno NO nOdkNIOUeHNIO K 3neKTPocetn. B cnYae HeKOppeKTHoN c6OpKn, HecooTBeTCTByHOuei yctahOBKn IIN NoDKNIOUeHN rapaHTnHa np6op nepe-CTaET DeNcTBoBATb.
- EcHn Bam Tpe6yETc8 60one nnHHbI ceTeBOI Ka6eJIb, 6paTntecb B cepBnchHyIO cnYK6y. B HAnuHmEIoTc Ka6eII nnHOI Do 2,20 M.
3.Пиусановприборов6e3прдварпьнсmoHTHpoBaHHoro Ka6eЯ HeOxOДМо пobecTu CTeBOI Ka-6eBJ KpacnpedentelbHoi Kopo6ke.
OTKpbBaHne pacnpeDenIteNbHO Kopo6Kn
PpHnOaHmHMe KpbIuKy paCnppeJeNTbHOJ Kopo6Kn c NOMoUbO OTBepTK.
$$ \rightarrow P u c. \quad 1 5 $$
PnoIroTOBka pacnpeJeHnteJbHoN Kopo6Kn
- Ocna6bTe BnHT.
2.ПиноДиMuTe Ka6eIbHbI amOpTH3aTop OTBepTKoI.
- Ocna6bTe ΦKKcauHIO Ka6eIbHOro aMOPTu3aTopa.
$$ \begin{array}{l} \rightarrow P _ {H C}. \quad 1 6 \ \rightarrow P u c. 1 7 \ \rightarrow P u c. \quad 1 8 \ \end{array} $$
PoiKJIIOUeHHe Ka6eIa PaCppeIeHTeIb-HoI Kopo6Ke
1.ПодклioчiteКлемmy3Nka6eЯKpacpeiTeIbHOB Kopo6ke,KaK poka3aHoHa cneyHOeM pncyHKe.
$$ \rightarrow P u c. 1 9 $$
2.ПодключiteКлемmy 2Nka6якpacnpedentelьног Коробke,кakпokа3aHoHa cneушem pncyHke.
$$ \rightarrow P u c. \boxed {2 0} $$
3.ПоdkлioчiteКлемmy1NKa6eIЯKpacpeJeHnteHbHoi Kopo6Ke,KaK pOKa3aHoHa cNeyHOeM pncyHke.
$$ \rightarrow P _ {H C}. \quad 2 1 $$
4.ПОДКЛIOUHTe KIeMMy 2 L/2 N Ka6eR KpacpepeHINTeB-HOHOPO6Ke, KaK nOKa3aHO Ha cJeDyUoUeM pncyHke.
$$ \rightarrow P _ {H C}. \quad 2 2 $$
5.YuHTbIbAaTe UBeT Ka6eNei.
- BN: KOpnHeBbI
- BU: cHnH
-
GN/YE: Jéltbɪn 3eJIeHbɪ
-BK:YeHbI
-GY:cepbii -
Пи HeoXoHMoCTN yCTaHOBHTe NoCTaBnREMbIe B KOMJIeKTe MeHbIe NepEmbUKN CoTnAChO CXeMe NOJ-KJIIOUHeHr.
7.ПОДКЛIOUHTe Ka6eIa, a 3aTeM 3aTAHNTe BnHTbHa paCnppeJInTeBHOH Kopo6ke. - Cornacno cxeme nodklqueyn nookklueyen1 N\~nn2 L/2N cooTBeTcByet pa3a 1 3neKtpoBnraTeIeBentn IyTopa.
9.ПОДКИLOЧЕНIO 2N\~/3N\~ COOTBETCTByeT Φa3a L1 (cepbI) 3JIeKTKPODIBRAteTEnBEHTINrTopa.
Фнкcaия ka6eЯВpacnpedeJIHTeJbHoi Kopo6ke
- 3aФИКСИРУTe ceTeBOI KaБeJIb KaБeJIbHbIM aMOpTn3aTOpOM.
2.3aTAHHTe BINTB nPaBnIbHOM NIOJXKeHN.
He nCnoJb3yIte aKKMyJITOpHbI raKOBepT.
→PNC.23
- YTo6bI yInpOCTnTb 3aKpbIBaHHe pacnPpeDenIteNbHO KoP06Kn, pacNoIOJKeTe Ka6eINB CpeDneY cactN Kopo6Kn.
- 3aKpOHTe KpbIShKy po3ETKn.
Yka3aHnnoOTbOyBO3dyXa
PpOINBODInTeIb npIObopa He daet rapaHTnB Cnyae peKnaMaun, KacaHOuNXcYyactKOB Tpy6oNPOBoDa dIra OTBODa BO3dyxa.
IcnoB3yTe KopoTkyIO npAmyIO BbITAAKHyIO Tpy6y, HMeIOUIO NO BO3MOXHOCTN 60JIbWoIN DnAmETp.
ДиHHbIe WepoxOBaTbe BbITaKHbIe TpybI, BoNbUoe KOJIuYeCTBO KOneH HnTpybMaIOrO DnAmEtpa yMeHbTaKOT MoUHOCTb BbITaKKn YBeJIuNBAkOT Wym OT paBToBtBeHTnIATopa.
NcnoB3yTe BbITAAHbIe Tpy6bI N3 HeBOcPnAmEHHOuX-Ca MaTePnaIOB.
TTo6bl npEoTOBpaHTb BO3BpaT KOHeHcata, yCTaHOBnTe BbITJHKHyIO Tpy6y noI yrnom 1° K npN60py.
ПлOCKи KaHaJIbI
HcnoIb3yIte PnOckne KaHaJIbI, BHyTppeHHee CeeyHee KOTopbIX COOTBeCTByET DnaMaETpy KpyIbIX Tpy6:
DnaMeTp 150 MM COOTBeTCTByET npM. 177 cm².
Ipn HecooBtCTBn DnaMeTPOB Tpy6 nCnoJb3yIte repMeTN3HpyOuOyIo HENTy.
He nCnoNb3yIte nnOckne KaHaJIb C pe3KIMn H3rNo6aMn.
KpyrIbIe Tpy6bl
PekomeHdyembI BHyTppeHHn DnaMeTp Kpyrblx Tpy6- 150 MM.
yKa3aHnIepeKnMaOTbOdaBO3dyXa
BpeKIMeOTBOda BO3dyxa DOJIKA H6bITb yCTaHOBJIeHa 3acNoHka 6paTHoI Tn.
PpIMeuaHn
Ecn 3acnoHa o6paTHoT Tn He BXOHT B KOMnneKT noCTaBKn np6opa, eMozHo npno6pctu B cneuaJIn3npoBaHHOM MaarHHe.
Ecnn BbTTKHOB03dyx OTBDHTCnHpe3 HApyXHyO CTeHy, cIeNyET NcIOJIb3OBaTb TeneCKONUeCKN BeHTINRAuOHHHk KaHaJ, npoxOJaun B CteHe.
PpOBePKa Me6eJIH
- Y6eIITecb, yTO Me6eJIb IINB RACTpaNBAHnY cTaHOBNeHa poBHO nCnoc6Ha BbIDepKaTb HArpy3Ky.
MaKcMaJIbHbI Bec np6opa coCTaBnEe npM.25Kr. CToJeuHnua, B KOTOpYIO BCTpaNBAeTc np6Op, DOnKHb BbIDepXnBaTb Harpy3Ky npM.60Kr.
2.ПослЕВынOLненЯВыpeз nanopоверпуycToиBOCTb Me6eINДЛВСТРANBAHЯ.
3. CneJyET oBecneuTb HecCyUyO cnOCo6HocTb uYCTOnuBOCTb c NOMOsbIO NOxOaIux ONOpHBIX KOHcTPyKcN,OCo6eHHo y TOHKX CToneuHnU.
- YUHTbIaBaiTe Bec npHbopa, BKJIouaJ DoONIHITeIbHyIO HArpy3ky.
-
IcnoIb3yIte JkaopnpOHyBn IN BlaarocToKn MaTePnAn.
-
Y6eHITecb, yTO Me6eB nIa BcTpaHbHa cNoco6Ha Bbl-epKnBaTb Tempepatyp do 90^
5.He BCTpaHbAte DyXOBble WkaΦbl, XOJIOINbHNKn, NocyDOMOeHbIe MaUNHbI, CTnpaJIbHbIe MaUNHbI n dpyryoTexHNky NOI np6opom.
6. Tocnoctb pacnoJoxhen npboa B rupn3oHTanbHOI NIOCKOCTn CneNyet npOBepNTb nocne erO yCTaHOBKn B MOHTaKbHn pOeM.
7. PacToaHHe Do HaBeCHoro ⅢKaΦa MoXHo BbIbpaTb NcBOeMy yCMOTpeHHo. Pn HcNoJIb3OBaHHn NaHeJN yuHTbBaIte yDIO6CTBO n 3pRoHOmHKy.
PoiroTOBka Me6eJH
Tpe6oBaHHe:Me6eIbIaBcTpAunBaHHaBbIepeKHNBaETemnepatypydo 90^
- Pa3MeTbTe MeCTO BbIpe3a B Me6eINB COOTBeTCTBnC CXEMoYcTaHOBKn.
→PNC.4
2ПрсьерпгечыpeOTВерстнДиametpOM6MM.
→PNC.24 - Y6eHITecb, yTO yrO1 cpe3a oTHOCHTebHO NOBepxHOCTOneUHHu coCTaBnAET 90^
→PUC.24
Pn yCTaHOBKe HaI BblBHHbIM AUNKOM BblepKNBaIe MHHMaJIbHbIe OTCTynbl.
- Пи сгтпс EMKOCTN ДЯ снва Лшн HeждКOCTN Ha yctaHOBHeHOM np6ope co6IIOaTe MHHMaJIbHbIe OTCTybl.
→PUC.11
2.YuHTbBaTe paCnoJoxKeHHe EMKoCTn DnR CnBa JnUHeN KNDKoCTn.
→PUC. 12
IoproToBHa Me6eH N ycTaHOBKe npH6opa dIaIrpKuJyauN B03duYa c aIaNTePOM
PpmeaHn
YcTaHOBka Ha BHeUHcTeHe 6e3 TeIIOH3OJIaUNn HnHaI HeOTaIIINBaEMbIM NOnOM He peKOMeHdyETCA ( ≥ 0,5BT / M^2 C)
He nodknquaHTe ctopoHy Ha BbIyB HAnpMyIO Kdpyrnn npnbopam 6e3 neperopdoK. EcnH Heo3MoJHO yCTaHO-BNTb neperopodKn CM. "pyrHne cnocobbl yctaHOBNK".
- Пи КOMбИнрОВаHи c aДaNTePOM yuHTbIbAite COOTBeTCTBHe pa3МePoB Bblpe3a B 3aДHei CTeHKe. → PnC.25
2.ИЗМерьТЕTOЛПУНHYCTОЛЕшИЦБI.NepeHecHTe3aMepHa Ⅲa6NoHипpoВeДNTe COOTBeTCTBByUOуJINHHIO. →PnC.23 - BbipeKbte 7a6IOH no pa3MeueHHo IINn IIN TOnIINbI CToneuHnUcI A, CEHTpaIbHOI INnBbpe3a B n KOHTpOJIbHOI INn IIN DnBHyTpEHHero BblNyCKHOrO OTBepCTnC.
- OtmTe Te CEHTBbipe3a B CToneUHnue CEHTpaJIbHOJ HnEHa 3aHei CTeHKe Me6eHN. Pnc.27
- BbipOBHnTe WApBnO No cHTpaBHOIINHHHa 3aHHe CTeHKe Me6eNn I NO HxKHeMy KpaIO CToneuHnUbl.
- CdelaIaIe BbIpe3 B 3aIHei CTeHKe B COOTBeTCTBnC Ila- 6IOHOm.
- Nocle BbInonHeHHBbIpe3a ydaJIte OnIIKn.
- 3aRepeMeTn3npyIe CTbIKN TepMOCTOINKIM N BOHOHePNOHuaeMbIM TepMeTNIKOM. Puc.24
BeHTnlaIaIa
1.YcTaHOBnTe BO3DyHbI KlaHaH B 0KoNe IJIpeKHMa CnpKyJrCIN BO3DyXa.
MHHMaJIbHoe NOppeuHoe CeueHne BO3dUwHoro KnaHaDoJHKHO6bITb npm.400 cm².
BbIyckHoe OTBepCTne B OkoJe DOnJXHO 6bITb DOCTaTOUHO 6OJIbJIMM, YTO6bI CHN3NTb MOUHOCTb TARIN OBeCneuHTb Hn3Km yPOBEHb WyMa.
CdenaIe BbIXoHoe OTBepCTne, yKOpOTNB 0OKoNbHbIe peiKn, IIO6 IOcNOb3yIe COOTBeTCTBYIOUHe BeHTnIAuONHHbIe peWetKN NIN PInNTyCa.
- TTo6bI npH6Op FyHKUHOHPOBaI npaBnIbHo, o6ecneYbTe npTOK Bo3dyxa K BapOuHoi NaHei Ype3 OTBepCTne DnB BixOda Bo3dyxa C MInHMaJIbHbIM NOnepeHbIM ce-ueHHem 200cM² B HnKHeM uKaФy.
YcTaHOBka np6opa c peKHMOM UnpKyIaun Bo3dyxa C aadantepom Kpenenne yNIOHTHnTeHa aadantpe
3aKpeNTE yIIOTHnTeJIb Ha aIaIantepe Ha paCCToHm He 60Jee 5 MM OT Kpa.
→PNC.28
YcTaHOBKa aDanTepa
- OuHCTHe N o6e3KnPbTe NOBepxHocTb PnPKJEnBaHN BOKpyr Bbipe3a B 3aDHei CTehKe Me6eNl.
2.YctaHOBtTe aAnTep B BbInyCKHoe OTBepCTHe B 3aDHeu Yactn BapOHyI NaHEnI.
→PUC.29
- CHIMITE 3aUHTyIO nIeHky caanTepa. →PcC.80
YctahOBka np6opa B Bbipe3 B CToJeHHne
- Y6eDntecb, yTo CeTeBOI Ka6eBn PoKKnIOUeyH K npN60py.
2.AKKypaTHO yCTAHOBNTe npH6Op B BBipe3 CToneHHNbI. P_NC 31
Фнкациаадпета
- YdepknBaCpeHnI depKaTeB aAnTepa, CdBnHbTe ero 60KOBbIMN depKaTeJMaM N 3aDHe cTeHKe B HxHHeM ShkaFy n npKneTe.
→PNC.32
2.Пи Heo6xOAnMoCTn DoOnJHInTeNbHO 3aФИKcHpyTe aanTep BHTAMN.
→PUC.
IodrotOBKa Me6eHN K yctaHOBKe np6opa IJRA CHPKylAunn BO3DyXa C HpKylAunOH HbIM KaHaJOM
1.ПиНeoБхODIMOCTHCHIMITE3aHIOCTeHKyMe6eHn.
2.ПиКOM6HINPOBaHnC nIOCKHM KaHaIOM yHTbIaIe COOTBETCTBnE pa3MepOB BbIpe3a B 3aIHeN CTeHKe. P_NC 34
3.YCTaHOBnTe BO3DyHbI KJIaHaN B LOKONE nIpeKIMa CHPKUYLNU BO3DyXa.
-
MHHMaJIbHoe nonpeuHoe ceeHne BO3dUHOrO KlaNaHa DOJHKHO 6bTb npM.400 cm².
BbIyckHoe OTBepCTne B zuKoJe DOnJxHO 6bITb DOCTaTOUHO 60JIbUIM, YTO6bI CHN3NTb MOUHOCTb TARn I ObecneuTb HN3KN yPOBeHb WyMa.
CdeNaTe BbIXoHoe OTBepCTne, yKopoTnB 0OKoNbHbIe peiKn, nio hOJIb3yTe COOTBeTCTBYIOUne BeHTnIAuONHbIe peWetkn nn nnNTyca. -
TTo6b npIn60fYHKUHOHPOBAn ppaBnIbHo, o6ecneyTe npTOK Bo3dyxa K BapOHH NaHeN Yepe3 OTBepCTne DnBbIXoDa Bo3dyxa C MInHMaJIbHbIM NOpEpeHbIM ce-ueHem 200cM² B HnKHeM uKaФy.
- NocJe BbInonHeHH BBype3a ydaJIte OINIKN.
- 3aRepeMeTHN3HpyIe CTbIKN TepMOCTOKNM IN BOHOHePNOHNuCaEMbIM TepMeTNIKOM.
→PUC.24
YcTaHOBbKa npnbopa IJIpa6OtIbpeJHMe UnpKyJIaCIN BO3dUxCa C npKpyJIaCIOHHbIM KaHaJIOM
- HcnoIb3yIte yNIOTHIeIb, cIpyKJIaUNOHHbI KaHaI, dIΦ-Фy3Op IΦnIbTp dIyIaIeHnI 3anaxOB BpeKImpe- CInpKyJauIN BO3dyxa.
2 YuHTbIBaIte pa3MepeIpa3NHyBIX NIOCKNX BO3dyXOBO- IOB. CtpaHua 73
ФнкациулnotHTteЯ
3aKpeNTe BXOJUINB KOMNJIeKT NOCTaBN yNIOHTeNB Ha NIOCKOM KAHane He daJIbIe 5 MM OT KpaI. Pnc.35
YctaHOBKa IIOCKORO KaHaJa
YcTaHOBnTe PIOCKn KaHaN B BBInyCKHoe OTBepCTne Ha 3aJHei CTeHKe npNo6opa. Puc.36
YctaHOBka np6opa B Bbipe3 B cToJeHHne
- 6eIntecb, yTO cTeBoi KaebIb NpIKnIOUeH K npBOpy.
2.AKKypaTHO yCTAHOBNTe np6Op B Bblpe3 CToneuHnUbl. P_NC 37
YcTaHOBbKa CnCTeMbI Tpy6 MeHdy npH6Opom HnΦΦy3OpOM
-
CoeINHnTe KOMnHOENTbI UINPKyIaIOHOHorO KaHaJa MeKdy co6oJ.
-
3aKpeHnTe CoeINHnTeI INIOCKnx BO3dYxOBOOB, 3a-ΦHKcHPOBaB INx CO ΚeNkOM.
Длгболге haedжног Фиксuaи npikpytnte coeHINTeIb nIOCKORO BO3dYxOBOda 4 BnHTaMn Длг пlaCTNkA PT 4 x 8 MM.
→Pnc.38
2.ПодсоeДиHHTe UINPKyIaIauHOHHbI KaHaI C pIoCKM Bo3- dYxOBOdOM K 3aJdHe YacTn BapOuHoN NaHeII. →Pc.39
3.ПОДСоЕДИНITEДИФФуЗОРКцИРКУЛЯЦИОHOMYKAHAny. →PnC.40
IOnrToBkMa Me6eHn IJIy yCTaHOBKn peKHa Ma OTbOda BO3dYxa
1.Пи Heo6xOdHmOcTH CHIMITE 3aHIOU CTeHKy Me6eHN.
2.ПиКOM6HINHPOBAHN CПLOCKIM KaHaIOM yuHTbIaTe COOTBETCTBNE pa3MepOB Bblpe3a B 3aJHeI CTeHKe.
→PUC.41
3.ПослЕ ВынOLнEHиВ Bipe3a yДалЛteОпИКИ.
4. 3aRepeMeTHN3HpyIe CTbIKN TePMoCTOKNIM N BODoHeNPoHNzAeMbIM RepeMeTNIKOM.
→PUC.
YcTaHOBka npH6opa IJIpa6OtBI B peKHMe OTBOJa BO3Iyxa
- B pexnme oTbOa Bo3dyxa nCNoIb3yIe yNIOTHInTeIb IyMOnOrIooiaOUIne fNJIbTpbl.
2 Co6IIOJaTe yka3aHnNo paBoTe B peKIme OTbOda BO3dyxa. CtpaHnua 75
ФнкациулnotHTeJIa
3aKpeINTE BxOJaIuN B KOMnJIeKT NocTaBKn yNIOHTeJIb Ha IIOCKOM KaHane He daJbWe 5 MM OT KpaR. Pnc.35
YctaHOBKa CnCTembl Tpy6
- YctaHOBtTe NIOCKn KaHaN B BbInyCKHoe OTBepCTne Ha 3aDHeN CTeHKe npNo6opa.
→PUC.36
2.Пи Heo6xOaHmocTH MoHTnpyTe DoNoJIHnTeIbHbIe 3ne-MeHTbI CnCTeMbI Tpy6.
YctaHOBka npbOpa B Bbipe3 B CToJeHHne
- Y6eIntecb, yTO cTeBoi Ka6eBIO IOKIIIOUeH K npIbOpy.
2.AKKypaTHO yCTaHOBNTe np6Op B BBipe3 cToJeHHuBl. P_NC 37
NoCoeHHeHne BbITaHHoTpy6bl
- 3aKpeIe TBy BITAAHHyTOpy6y Ha KJIeHe IIOCKoR OBO3dyXOBOda.
- BbIOnHInTe CoeINHeHne C BbITaXHbIM OTBepCTnEM.
- 3a repmetn3npyte Mecta coeHHeHH COOTBeTCTByHtIIM o6pa3OM.
YcTaHOBkaΦHbTpOB
3aMeTHa:BpeKIMe CnpKyIaIyCtAHOBnTeΦnIbTpbl, nOIIouaIOUne 3aIax.
BpeKHMoe OTbOa BO3dyxa ycTaHOBnTe WymONOrNoaIOU 1Ie FJIbTpbl.
- 06paTHe BnMaHHe Ha HAnpaBHeHne Bo3DyUHoro nToKa ΦNtPoB.
2.BctaBbTe B npH6Op Dba FnIbTpca CneBa N cnpaba N CdBnHbTe IN Bnepe.
→Puc.43
- BcTaBbTe B npH6Op dpyrHe DBa FnIbTpbl CneBa H cnpaBA.
→PUC.44
YctaHObKa HnpoylaBnBaIOeO hJIbTpA
YcTaHOBnTe KInpoynabNBAOuIeHΦnIbTp.
→PUC.45
3NeKtpnuecKoe noDKJIIOUeHne
- YuHTbBaIe npaMeTpbl NOdkJIIOUeHnHa TINOBO Ta-6JNHyKe.
2.ПоДКЛЮЧИТЕКЛEMМУ3NKa6EJIKNpacpeJENTIELHOBI Kopo6Ke,KaK NOKa3aHOHa pncyHke.
→PUC.46
3.ПоДКЛЮЧИТЕКЛемму2NkaбелЯкpacnpedeNTelbHOKopo6ke,KaKпOKa3aHoHa pncyHke.
→PNC.47
4.ПоДКЛЮЧИТЕКЛEMМу1NkaБЯнKpacpeДeNTIELHOBKOPO6Ke,ΚΑΚΝΟΚA3aHOHa pιсунke.
→PUC.48
5. NookHIOHTe KIeMMy 2 L/2 N Ka6eN K pacnpedentelbHOH KOPO6Ke, KaK nokaHa Ho pncyhke.
→Pnc.49
6. YUHTbIbAitte UBeT KaBenei.
- BN: KoprHHeBbI
BU: CnHn
GN/YE:KjENTbHn3eHbH -
BK:чернь
-GY:cepbl -
B 3aBnHmocTH OT Tnna NODKlHoueHn, npH Heo6xOIMOCTH paCnNoJXHTe Ka6eNbHbIe 3aXHMbl, NOCTaBnREMbIe B KOMnJIeKeTe, no-pa3HOMy.
8.Пи Heo6xOdHmocTH nCnONb3yIte Ka6eIbHbIe 3aXHMbl dIra CoeDInHeHH aByx Ka6eIeN. -
YKOPOTHTe KINbI Ka6enei.
- YdaHnTe H3OJIaHIO.
PpOBepka pa6oTbI
- BkHouHTe npH6op.
- EcIn 3aropaeTc8 E0B E0bop nKIO-ueH HeKOppeKTHo. "PpOBepKa n OTnAka NOkNIOueHH K 3neKtpocTeH", CtpaHnua 77
- EcIn Ha DnCnnee npnbopa He noBnHeTcHnDnKaun OwN6ok, npOBepbTe paOToY BeHTnJIaun, cNeDyR pyKOBOCTBy NO 3KcNpyaTuIN.
PpOBepKa n OTlaJaKa POnKJIHOueHnK 3JneKtpocetN
- OToeHNHnTe npHbOp OT cETN.
- Y6eIntecb, yTO NOkHIOueHHe Ha npBope n NOkHIOueHHe Ha CTeHe COOTBeTCTBYOT CXEMe NOkHIOueHn B HNCTpyKunn IO MOHTaKy. "NoIroTOBka K 3NeKtpoNOJ KIOUeHnO", CtpaHnua 74 "3NeKtpuYeecKoe NOkHIOueHne", CtpaHnua 77
3.ДЯ3NOBpaTHTeBHIMaHHeHaCneIyUOuINpucyHOK. →PcC.50
4.ДЯ2NobpaTneBHIMaHHeHaCneIyOuynpncyHOK. →Pc.51
5.ДЯ1NObpaTteBHMaHHeHaCneIyUoHnI pncyHOK.
→PnC.52
IpepeHaCTpOJa HnHnKaaun Ha peKHM OTBOda BO3dyxa
- Пи Heo6xOIMOCtI nepeHAcTpoTe COOTBETCTBYIOUIM O6pa3OM 3JIeKToPHHOe ynpaBHeHne B 6a3OBbIX yCTaHOB-KaxДЯ peKIMa OTBOda BO3dYxa.
- CM. rnaBy «Ba3oBbIe yCTaHOBKN» B pyKOBoIDCTBe no 3Kc- nlyatauN.
Демонтах пибopa
BHIMAHNE!
PnHcNoJIb3OBAHm HcTpymeHTOB MoKHO IOBpeIb paMy np6opa.
He n3BnkeKaIte np6op cBepxu.
1. OToeDHHTe npH6Op oT 3NeKTPocetH.
2. CHIMITE BbITXHON KaHAN INN OcIa6Be CoeINHeHne DnR CUPKyIaUNB03Dyxa.
3. N3BLeKeKHe npH6Op, BbIToJIKNHyB eO CHN3y.
- es
- QR code for the installation video
- Appliance dimensions
- Installation dimensions for flat duct bends
- Installation variants
- Odour filter and adapter for circulating-air mode:
- Acoustics filter and seal for air extraction mode: → Fig. 10
- Safety clearances
- General information
- Safe installation
- WARNING - Danger: Magnetism!
- WARNING - Risk of poisoning!
- WARNING - Risk of fire!
- WARNING - Risk of injury!
- WARNING - Risk of suffocation!
- Information about the electrical connection
- WARNING - Risk of electric shock!
- Preparing the electrical connection
- Opening the mains socket
- Preparing the mains socket
- Connecting the cable to the mains socket
- Secure the cable in the mains socket
- Instructions for the exhaust air pipe
- Flat ducts
- Round pipes
- Instructions for the air extraction mode
- Notes
- Checking the units
- Preparing the units
- Observing the minimum clearances when installing above a drawer
- Preparing the unit for circulating-air mode with the adapter
- Ventilation
- Installing an appliance featuring circulating-air mode with adapter
- Attaching the seal to the adapter
- Attaching the adapter
- Inserting the appliance into the worktop cut-out
- Securing the adapter
- Preparing the unit for circulating-air mode with a circulating-air duct
- Installing the appliance for air recirculation mode with circulating-air duct
- Securing the seal
- Inserting the flat duct elbow
- Establishing the pipework between the appliance and the diffuser
- Preparing the unit for air extraction mode
- Install the appliance for air extraction mode
- Establishing the piping
- Connecting the exhaust air pipe
- Inserting filters
- Inserting grease filters
- Establishing the connection to the power supply
- Checking the function
- Checking and correcting the electrical connection
- Switching the display for air extraction mode
- Removing the appliance
- ATTENTION!
- fr
- ADVARSEL-Fare for forgiving!
- ADVARSEL - Brandfare!
- Fastgoring at taeling
- Monteringsmal for flat rorbend
- PpOeToiuaia TnC nEaKtpiKnC ouvBc
- KaTaakEun TnOuvdeanεEaepiou
- MOHTaHHbI pa3Mepbl IJIy IIOcKOro BO3dUxOBoDa
- BaphaHTbI yCTaHOBKn
- Be3onachbIe pacCToHHN
- 06uhe yka3aHnra
- Be30nachoctb npn MOHTaKe
- NPEyPExKDEHNE -OnachOcTB:MarHeTH3M!
- NPEyPEXKDEHNE -Onachocb OTPabJeHHa
- NPEyPExKDEHNE -OnachocbBo3ropaHa!
- I PNEUYPENKDEHNE -OnacHocTb TpaBMnpoBaHHa!
- I NPEyIpeJxDEHNE -Onacnoctb ydysb!
- NPEyPExKDEHNE -OnachocTb OTPaBJeHnA!
- Yka3aHnno NO noKIOUOeHHo K 3JIeKTpocetN
- I PEPdUYPEXKDEHNE -OnacHocTb npaHexn 3JIeKTPnueckm TOKOM!
- IoproTOBka K 3JeKTPponoKnIOHueHHIO
- OTKpbBaHne pacnpeDenIteNbHO Kopo6Kn
- PnoIroTOBka pacnpeJeHnteJbHoN Kopo6Kn
- PoiKJIIOUeHHe Ka6eIa PaCppeIeHTeIb-HoI Kopo6Ke
- Фнкcaия ka6eЯВpacnpedeJIHTeJbHoi Kopo6ke
- Yka3aHnnoOTbOyBO3dyXa
- ПлOCKи KaHaJIbI
- KpyrIbIe Tpy6bl
- yKa3aHnIepeKnMaOTbOdaBO3dyXa
- PpIMeuaHn
- PpOBePKa Me6eJIH
- PoiroTOBka Me6eJH
- Pn yCTaHOBKe HaI BblBHHbIM AUNKOM BblepKNBaIe MHHMaJIbHbIe OTCTynbl.
- IoproToBHa Me6eH N ycTaHOBKe npH6opa dIaIrpKuJyauN B03duYa c aIaNTePOM
- PpmeaHn
- BeHTnlaIaIa
- YcTaHOBka np6opa c peKHMOM UnpKyIaun Bo3dyxa C aadantepom Kpenenne yNIOHTHnTeHa aadantpe
- YcTaHOBKa aDanTepa
- YctahOBka np6opa B Bbipe3 B CToJeHHne
- Фнкациаадпета
- IodrotOBKa Me6eHN K yctaHOBKe np6opa IJRA CHPKylAunn BO3DyXa C HpKylAunOH HbIM KaHaJOM
- YcTaHOBbKa npnbopa IJIpa6OtIbpeJHMe UnpKyJIaCIN BO3dUxCa C npKpyJIaCIOHHbIM KaHaJIOM
- ФнкациулnotHTteЯ
- YctaHOBKa IIOCKORO KaHaJa
- YcTaHOBbKa CnCTeMbI Tpy6 MeHdy npH6Opom HnΦΦy3OpOM
- IOnrToBkMa Me6eHn IJIy yCTaHOBKn peKHa Ma OTbOda BO3dYxa
- YcTaHOBka npH6opa IJIpa6OtBI B peKHMe OTBOJa BO3Iyxa
- ФнкациулnotHTeJIa
- YctaHOBKa CnCTembl Tpy6
- YctaHOBka npbOpa B Bbipe3 B CToJeHHne
- NoCoeHHeHne BbITaHHoTpy6bl
- YcTaHOBkaΦHbTpOB
- YctaHObKa HnpoylaBnBaIOeO hJIbTpA
- 3NeKtpnuecKoe noDKJIIOUeHne
- PpOBepka pa6oTbI
- PpOBepKa n OTlaJaKa POnKJIHOueHnK 3JneKtpocetN
- IpepeHaCTpOJa HnHnKaaun Ha peKHM OTBOda BO3dyxa
- Демонтах пибopa
- BHIMAHNE!
Brand : BALAY
Model : 3EBC983ER
Category : Cooker