
FFPD5380 - Faucet FRANKE - Free user manual and instructions
Find the device manual for free FFPD5380 FRANKE in PDF.
| Product Type | Double-spout kitchen faucet with sprayer |
| Brand | Franke |
| Model | FFPD5380 |
| Series | FFPD5300 |
| Ideal working pressure | 60 PSI (4.1 bar / 410 kPa) |
| Maximum working pressure | 125 PSI (8.6 bar / 860 kPa) |
| Minimum working pressure | 20 PSI (1.4 bar / 140 kPa) |
| Ideal water temperature | 60 °C (140 °F) |
| Maximum water temperature | 70 °C (158 °F) |
| Mounting hole diameter | 35 mm (1 3/8 in) |
| Material | Chrome-plated brass |
| Certifications | ASME A112.18.1 / CSA B125.1, NSF 61, NSF 372, AB1953 |
| Package contents | Faucet assembly, aerator tool, plastic mounting ring, rubber washer, mounting plate, lock nut, supply hoses, bypass valve, spout set screw, Allen key |
| Features | Swivel double spout, retractable sprayer, bypass valve for water filter |
| Maintenance | Clean with soft sponge and soapy water; avoid harsh detergents |
| Cartridge replacement | Ceramic cartridge ref. F5319 |
| Warranty | Limited lifetime warranty on mechanical parts and chrome finish; 5 years other finishes |
| Repairability | Replacement parts available (see spare parts list) |
Frequently Asked Questions - FFPD5380 FRANKE
User questions about FFPD5380 FRANKE
0 question about this device. Answer the ones you know or ask your own.
Ask a new question about this device
Download the instructions for your Faucet in PDF format for free! Find your manual FFPD5380 - FRANKE and take your electronic device back in hand. On this page are published all the documents necessary for the use of your device. FFPD5380 by FRANKE.
USER MANUAL FFPD5380 FRANKE
Installation instructions 6
Cleaning and maintenance 10
Replacing the cartridge 10
General maintenance 10
Spare/replacement list 11
FF5300 Series 11
Spare/replacement list 12
FFPD5300 Series 12
Spare/replacement list 13
FFPD5400 Series 13
Limited lifetime warranty 14
Contents in box
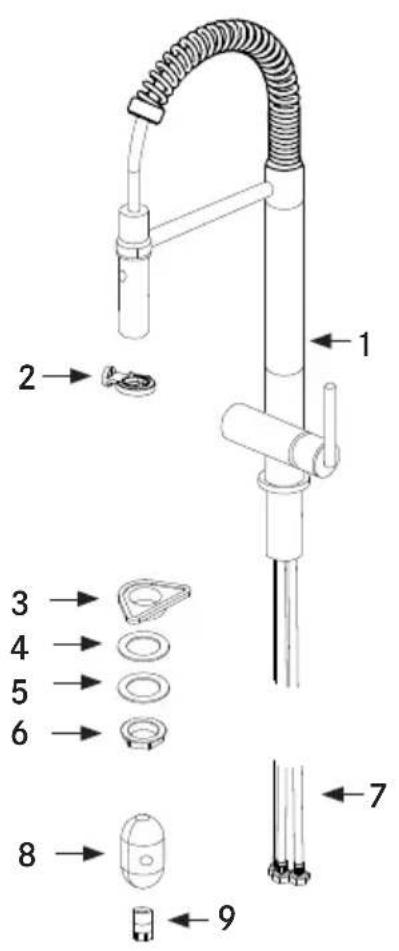
FF5300 Series
1 -Faucet Assembly
2-Aerator Key
3-Plastic Flange
4-Rubber Washer
5-Fixing Plate
6-Fixing Nut
7 - Supply Hoses
8 - Weight
9 - Check Valve Holder
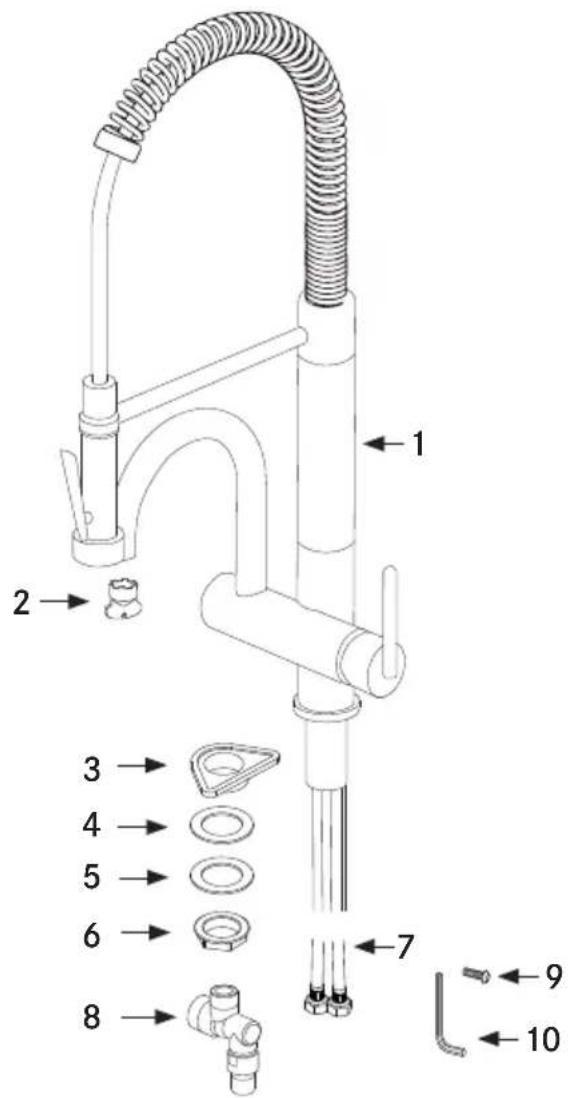
FFPD5300 Series
1 -Faucet Assembly
2-Aerator Key
3 - Plastic Flange
4-Rubber Washer
5-Fixing Plate
6-Fixing Nut
7 - Supply Hoses
8-Diverter
9 - Spout Set Screw
10-Hex Key
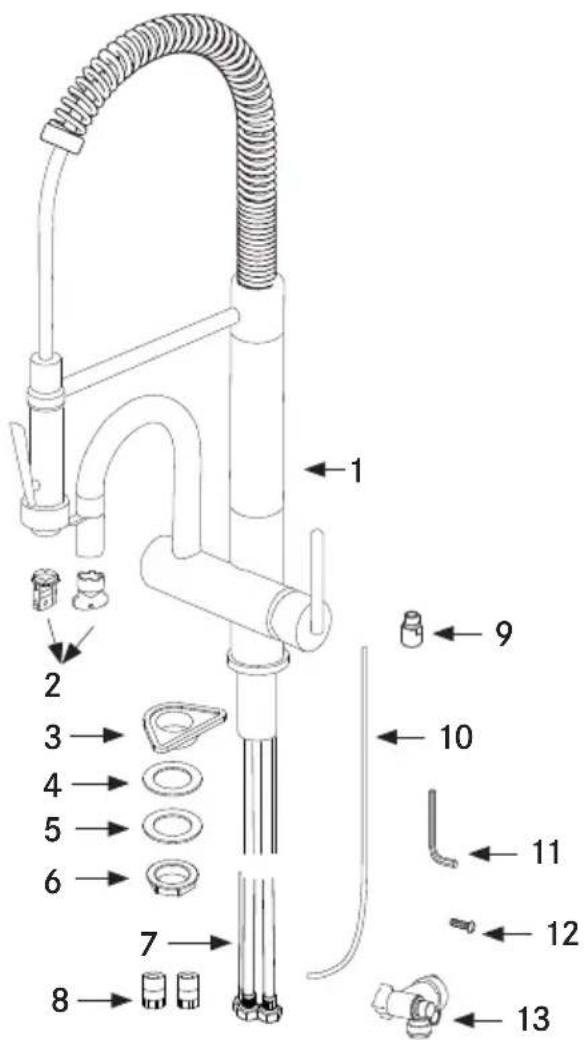
FFPD5400 Series
1 -Faucet Assembly
2-Aerator Keys
3-Plastic Flange
4-Rubber Washer
5-Fixing Plate
6-Fixing Nut
7 - Supply hoses
8 - Check Valve Holders
9 - Filtered water supply fitting
10-3/8" poly tubing
11-Hex Key
12 - Spout Set Screw
13-Shut off valve
NOTE: Contact us immediately if you see inconsistencies.
phone: (1-800-626-5771)
website: www.franke.us/ks
email: ks-customerservice.us@franke.com
Technical data
| Operating data Value | |||
| Operating pressure (ideal) | 60 PSI | 4.1 bar | 410 kPa |
| Operating pressure (max.)* | 125 PSI | 8.6 bar | 860 kPa |
| Operating pressure (min.)* | 20 PSI | 1.4 bar | 140 kPa |
| Water temperature (ideal) 140°F 60°C | |||
| Water temperature (max.) 158°F 70°C | |||
| Hole Size For Faucet 1 3/8" | 35mm | ||

Certifies this faucet complies with ASME A112.18.1 / CSA B125.1 & NSF 61, NSF 372 and AB1953. The faucet also complies with water usage requirements of the California Energy Comission and the US Department of Energy.
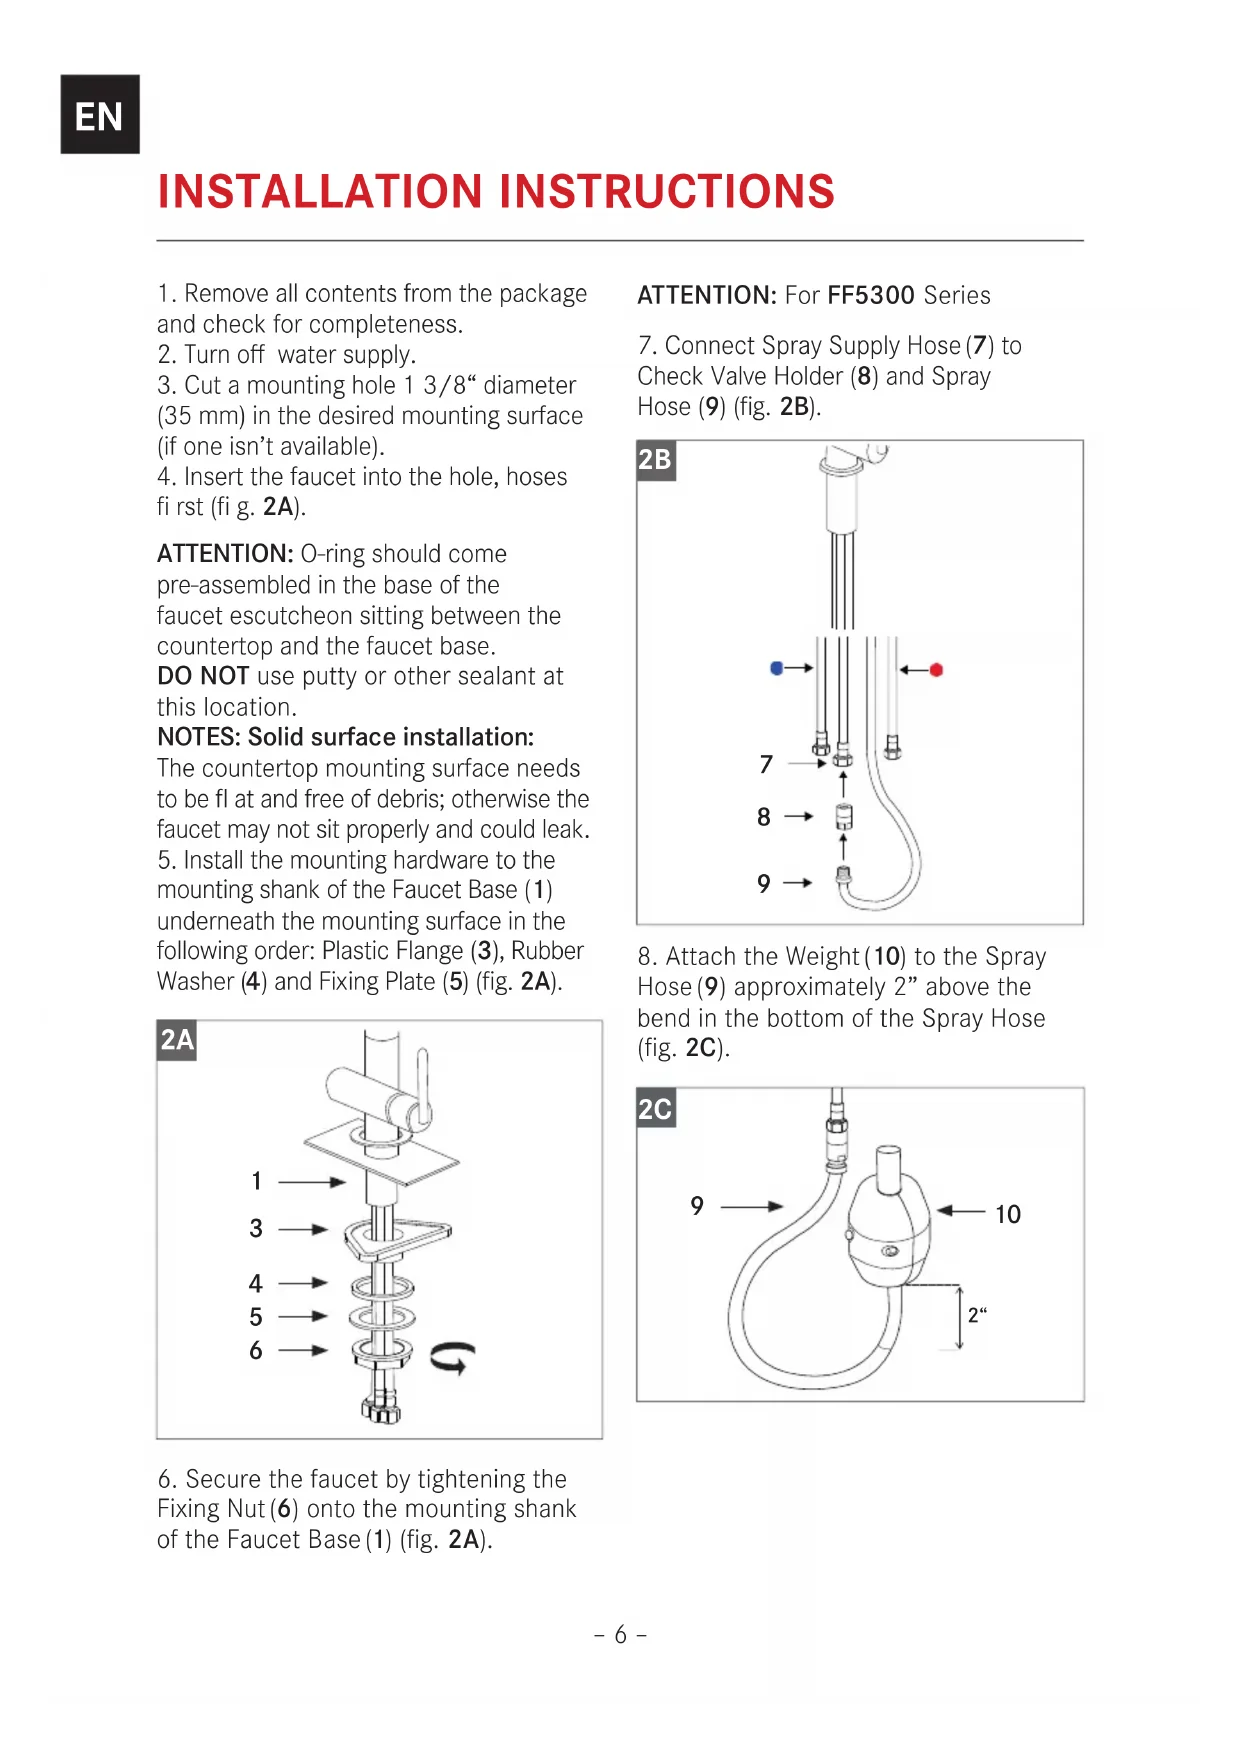
INSTALLATION INSTRUCTIONS
- Remove all contents from the package and check for completeness.
- Turn off water supply.
- Cut a mounting hole 1 3/8 diameter (35mm) in the desired mounting surface (if one isn't available).
- Insert the faucet into the hole, hoses first (fi g. 2A).
ATTENTION: O-ring should come pre-assembled in the base of the faucet escutcheon sitting between the countertop and the faucet base.
DO NOT use putty or other sealant at this location.
NOTES: Solid surface installation:
The countertop mounting surface needs to be fl at and free of debris; otherwise the faucet may not sit properly and could leak.
5. Install the mounting hardware to the mounting shank of the Faucet Base (1) underneath the mounting surface in the following order: Plastic Flange (3), Rubber Washer (4) and Fixing Plate (5) (fig. 2A).
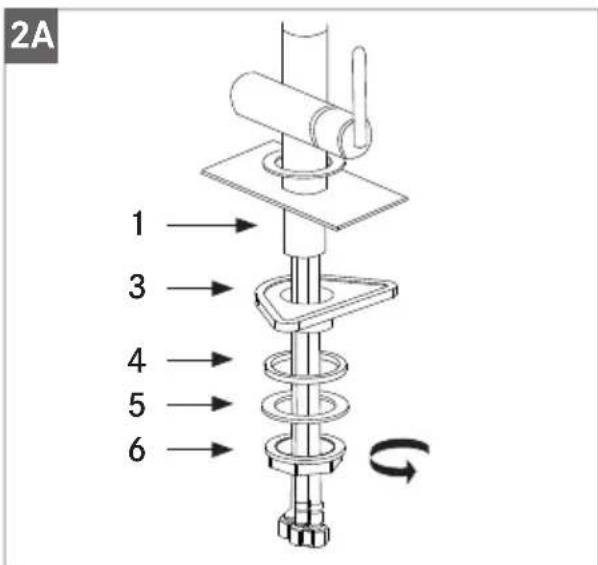
- Secure the faucet by tightening the Fixing Nut (6) onto the mounting shank of the Faucet Base (1) (fig. 2A).
ATTENTION: For FF5300 Series
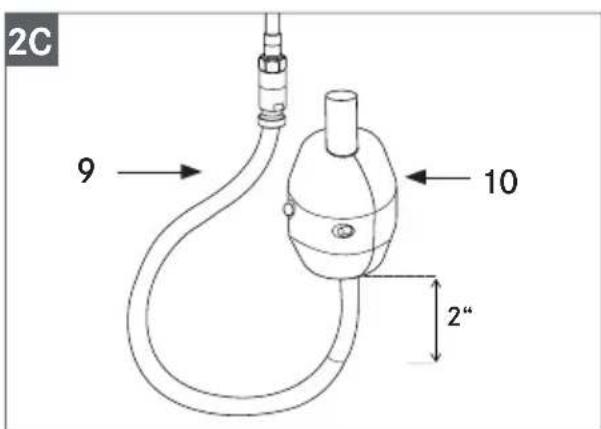
- Connect Spray Supply Hose (7) to Check Valve Holder (8) and Spray Hose (9) (fig. 2B).

- Attach the Weight (10) to the Spray Hose (9) approximately 2" above the bend in the bottom of the Spray Hose (fig. 2C).
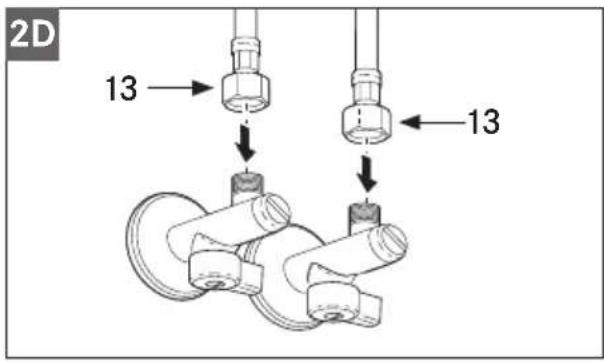
- Connect the Flexible Supply Hoses (13) to the water supply in the home (fig. 2D).
- Remove Aerator (14) using the Aerator Key (15) (fig. 2E).
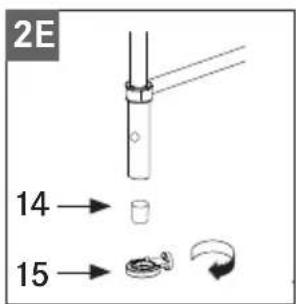
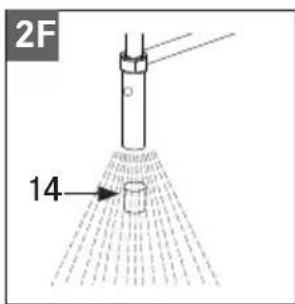
- Turn on water, flush the faucet and Aerator (14) to remove any debris and check for leaks (fig. 2F).
- Reinstall the Aerator (14) and ensure everything is functioning properly.
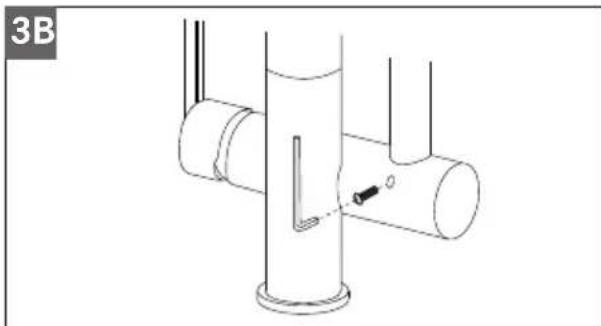
ATTENTION: For FFPD5300 Series 8. NOTE: Secondary spout is NOT secured to allow for better transportation. Align the secondary spout parallel to the main spout as shown in image 3A.

Take the set screw attached to the warning card and insert it into the back of the body under the spout, and tighten it with the hex key also attached to the warning card (fig. 3B).
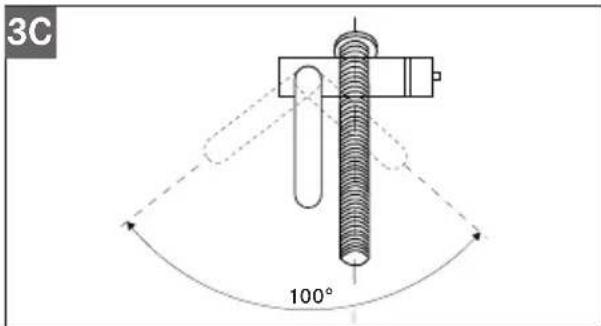
The secondary spout rotation is approximately 100 degrees to prevent it from hitting the main spout (fig. 3C).
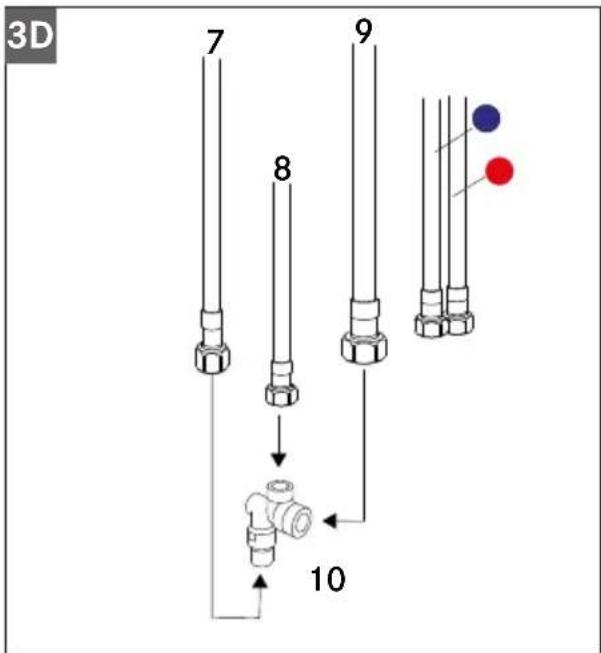
- Connect Stainless Steel Mixed Water Supply Hose (8) to the top of the Diverter (10) (fig. 3D).
EN
- Connect the Stainless Steel Faucet Supply Hose (9) to the largest fitting on the Diverter (10) (fig. 3D).
- Connect the Gray Nylon Spray Supply Hose (7) to the smallest fitting on the Diverter (10) (fig. 3D).
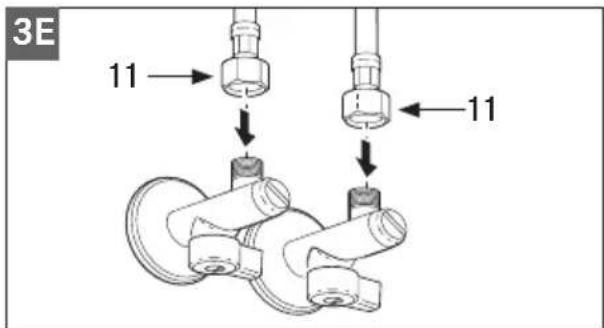
- Connect the Flexible Supply Hoses (11) to the water supply in the home (fig. 3E).
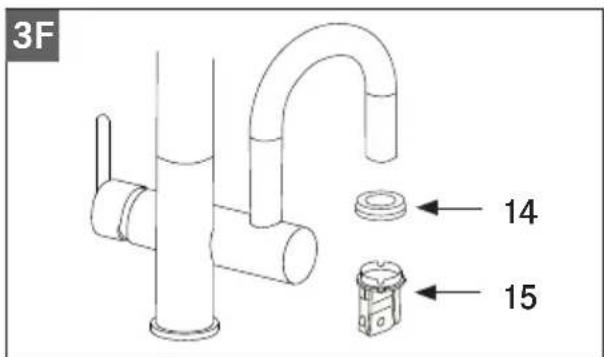
- Remove Spout Aerator (14) using the Spout Aerator Key (15) (fig. 3F).
- Turn on water, flush the faucet and Aerator (14) to remove any debris and check for leaks (fig. 3G).
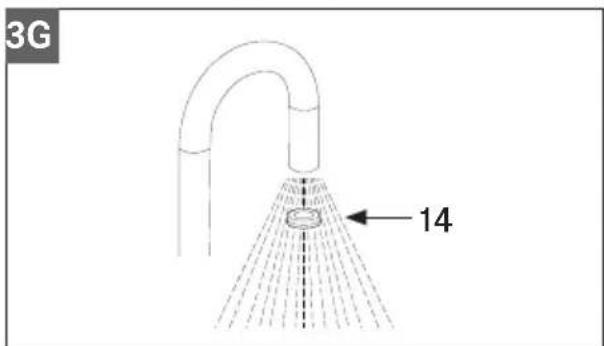
- Reinstall the Aerator (14) and ensure everything is functioning properly.
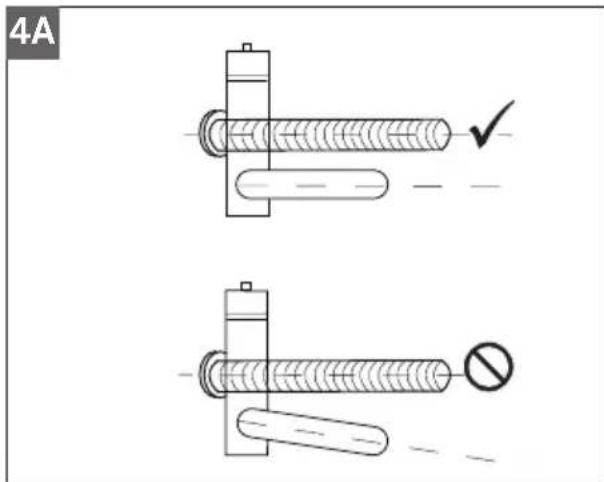
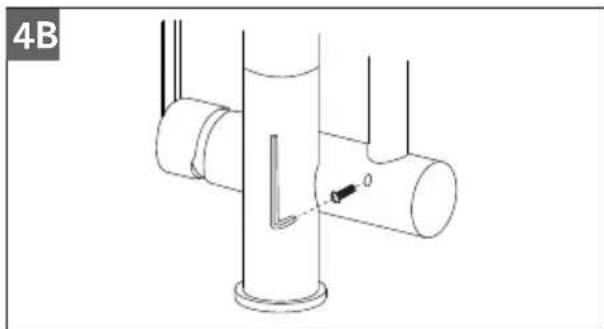
ATTENTION: For FFPD5400 Series 8. NOTE: Secondary spout is NOT secured to allow for better transportation. Align the secondary spout parallel to the main spout as shown in image 4A.
Take the set screw attached to the warning card and insert it into the back of the body under the spout, and tighten it with the hex key also attached to the warning card (fig. 4B).
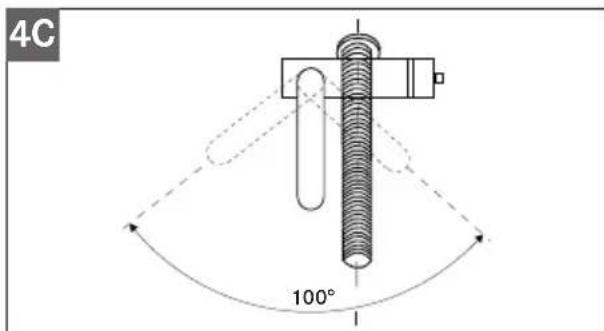
The secondary spout rotation is approximately 100 degrees to prevent it from hitting the main spout (fig. 4C).
-
Connect the Drinking Water Fitting (10) to the Drinking Water Supply Hose (11) with a 17mm wrench.
-
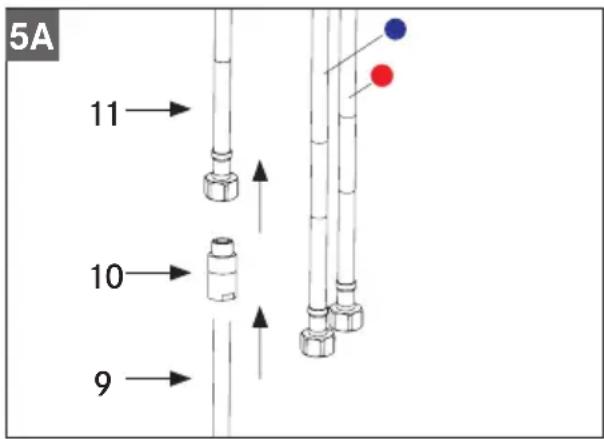
Connect the 3/8 ” Poly Tubing (9) to the Drinking Water Fitting (10) and cut the Poly Tubing (9) to proper length to remove any unnecessary loops or low spots as shown in figure 5A. Save excess Poly Tubing (9) for water filtration connection. IMPORTANT: When using push fittings, ensure the ends of the tubing are cut square and free of burrs or damage within 1” of the end of the tube. DO NOT use any forms of sealing compounds or tools to remove the tubing or modify the fitting in any way, as this can damage the fitting and result in leaks. Proper installation and removal of tubing with push fittings is outlined in figure 5B. Damage in this area can cause leaks.
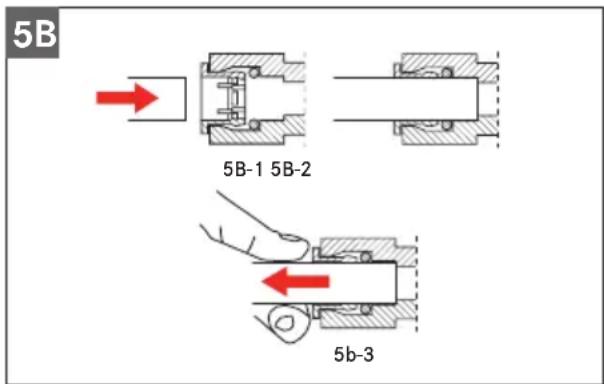
How to insert / Remove Tubing In Push Fit Connections
- Insert the tubing squarely. See fig. 5B-1.
- Make sure to insert tubing completely. See fig. 5B-2.
- To remove, push in collet and pull out tubing. See fig. 5B-3.
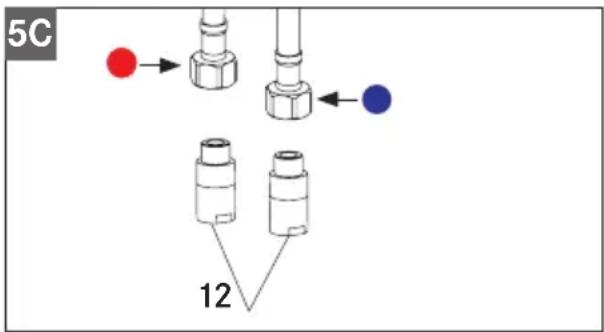
- Connect the Check Valve Holders (12) to the Hot and Cold Supply Hoses (red/blue) from the faucet as illustrated in figure 5C.
- Connect the 3/8 Poly Tubing (9) to the exit of the Water Filter (15), which is NOT included with the faucet, as illustrated in figure 5D.
IMPORTANT: Franke strongly recommends using only genuine Franke water filtration products with this faucet. The installation or function of the faucet can't be guaranteed if using other filtration products.
13. Connect the Shut-off Valve (13) to the Cold Water Supply in the home (blue) and connect the other side to the Cold Water Supply Hose (blue) from the faucet as illustrated in figure 5D.
IMPORTANT: DO NOT over-tighten threaded connections for the shut-off valve (13).DO NOT exceed 25 In-lbs of torque.
- Take excess 3/8 ” Poly Tubing (14) from Step 10 and connect one end to the push fitting connection of the Shut-off Valve (13). Take the other end and connect it to the inlet of the Water Filter (15). See figure 5D for overview.
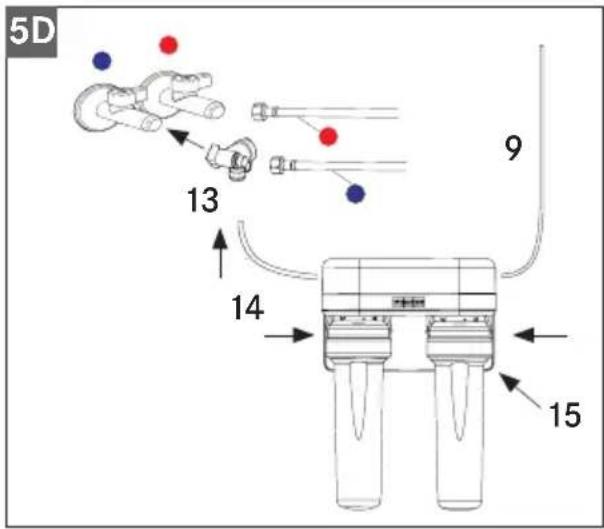
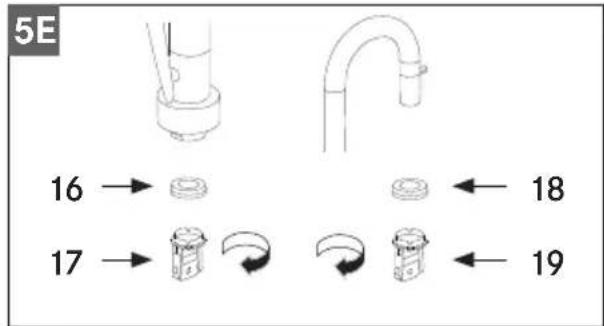
- Connect the Hot Water Supply Hose (red) to the Hot water supply in the home (red) as indicated in figure 5D. 16. Remove Spray Aerator (16) using the Spray Aerator Key (17) and remove Spout Aerator (18) using the Spout Aerator Key (19) (fig. 5E).
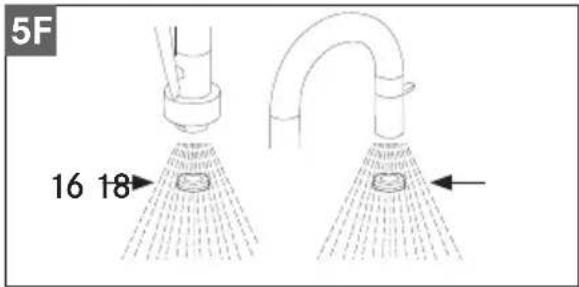
- Turn on water, flush the faucet and both Aerators (16 and 18) to remove any debris and check for leaks (fig. 5F). 18. Reinstall the Aerators (16 and 18) in reverse and ensure everything is functioning properly.
CLEANING AND MAINTENANCE
Replacing the cartridge
- Shut off the water supply to the faucet.
- Turn on the faucet briefly to relieve any pressure inside the faucet.
- Move the faucet handle to the "OFF" position.
- Remove the set screw from the handle assembly (A) using a 2.5mm hex key.
- Pull handle assembly (A) from faucet body.
- Unscrew the cartridge cap (B) from faucet body.
- Unscrew the cartridge lock nut (C).
- Lift ceramic disc cartridge (D) from the body and replace it with a new one. Ensure the two lugs on bottom of the cartridge sit properly in the allocated holes at the base of the body.
- Re-assemble faucet in reverse order.
- Test for leakage.
General maintenance
Clean aerator periodically for any buildup. Do not use harsh detergents, solvents, chemical agents or metallic sponges as these can damage the surface finish. Clean only with a soft sponge and soapy water.
Do not store chemicals or cleaning agents in the immediate vicinity of the faucet and connection hoses. Chemical vapors could cause damage.
Spare/replacement list FF5300 Series
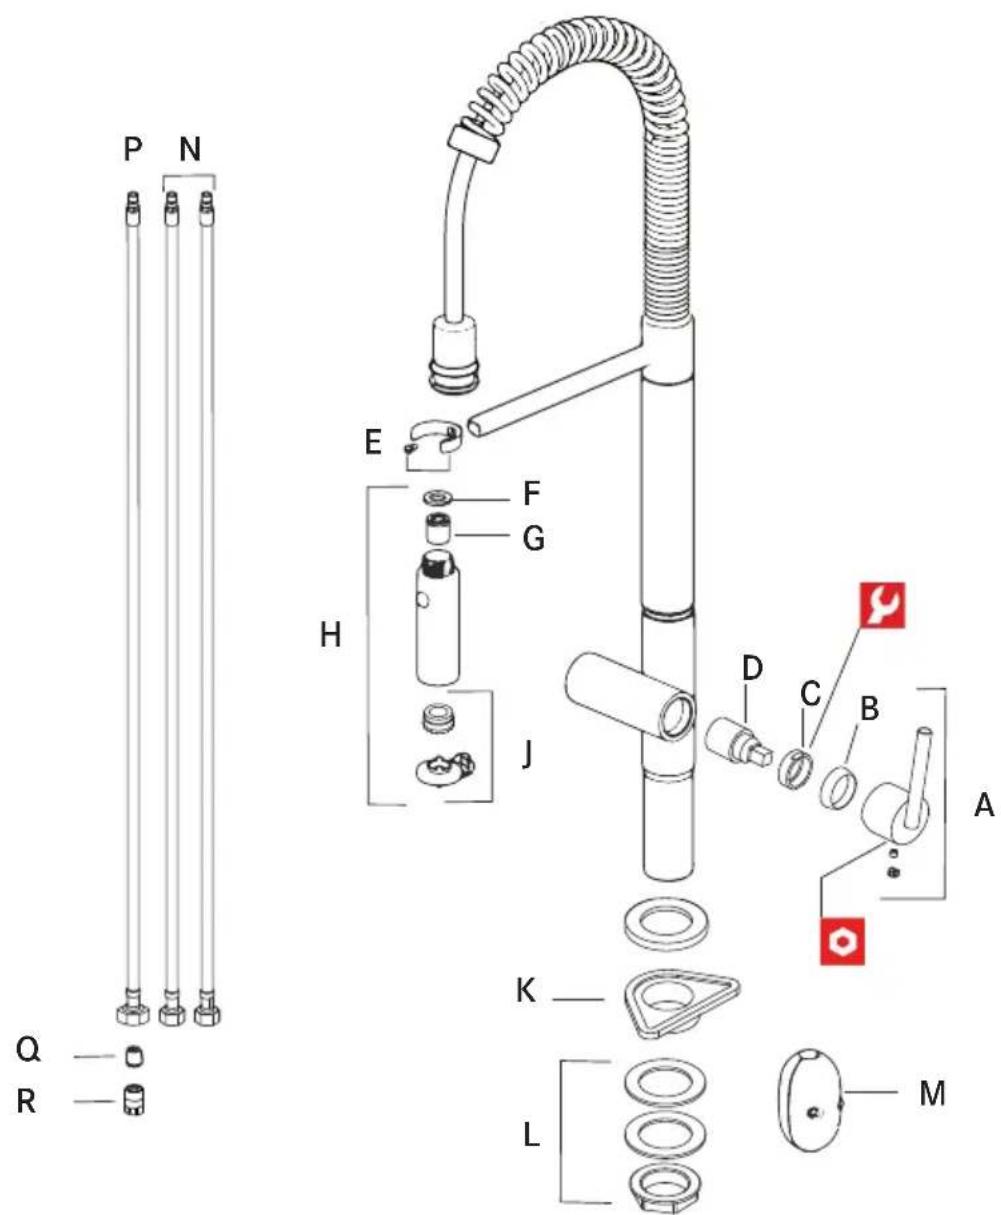
A F5301 Handle Assy
B F5302 Cartridge Cap
C F5303 Cartridge Lock Nut
D F5304 Cartridge
E F5305 Spray Holder
F F5306 Spray O-Ring
G F5307 Spray Check Valve
H F5308* Spray Head Assy
F5309 Spray Aerator and Key
K F5310 Plastic Flange
L F5311 Fixing Kit
M F5312 Weight
N F5313 Supply Hoses
P F5314 Spray Supply Hose
Q F5315 Check Valve
R F5316 Check Valve Holder
*Must Specify Finish
Spare/replacement list FFPD5300 Series
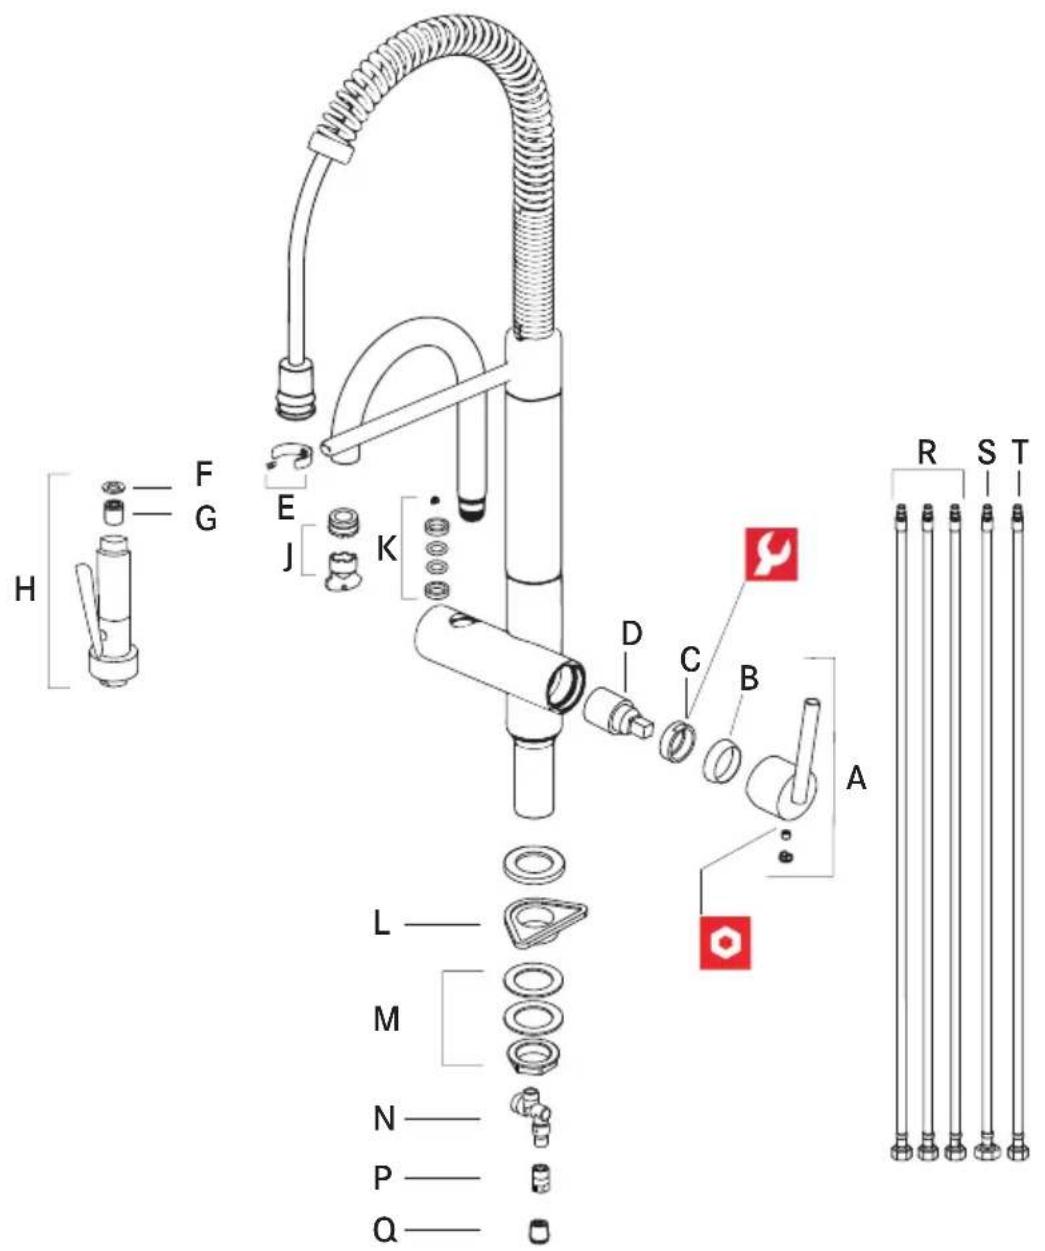
A F5301* Handle Assy
B F5317 Cartridge Cap
C F5318* Cartridge Lock Nut
D F5319 Cartridge
E F5305 Spray Holder
F F5306 Spray O-Ring
G F5307 Spray Check Valve
H F5332 Hand Spray Assy
J F5320 Aerator and Key
K F5321 Spout Bushing Kit
L F5310 Plastic Flange
M F5311 Fixing Kit
N F3112 Diverter Valve
P F5322 Check Valve Holder
Q F5315 Check Valve
R F5313 Supply Hose
S F5323Faucet Supply Hose
T F5314 Spray Supply Hose
*Must Specify Finish
Spare/replacement list FFPD5400 Series
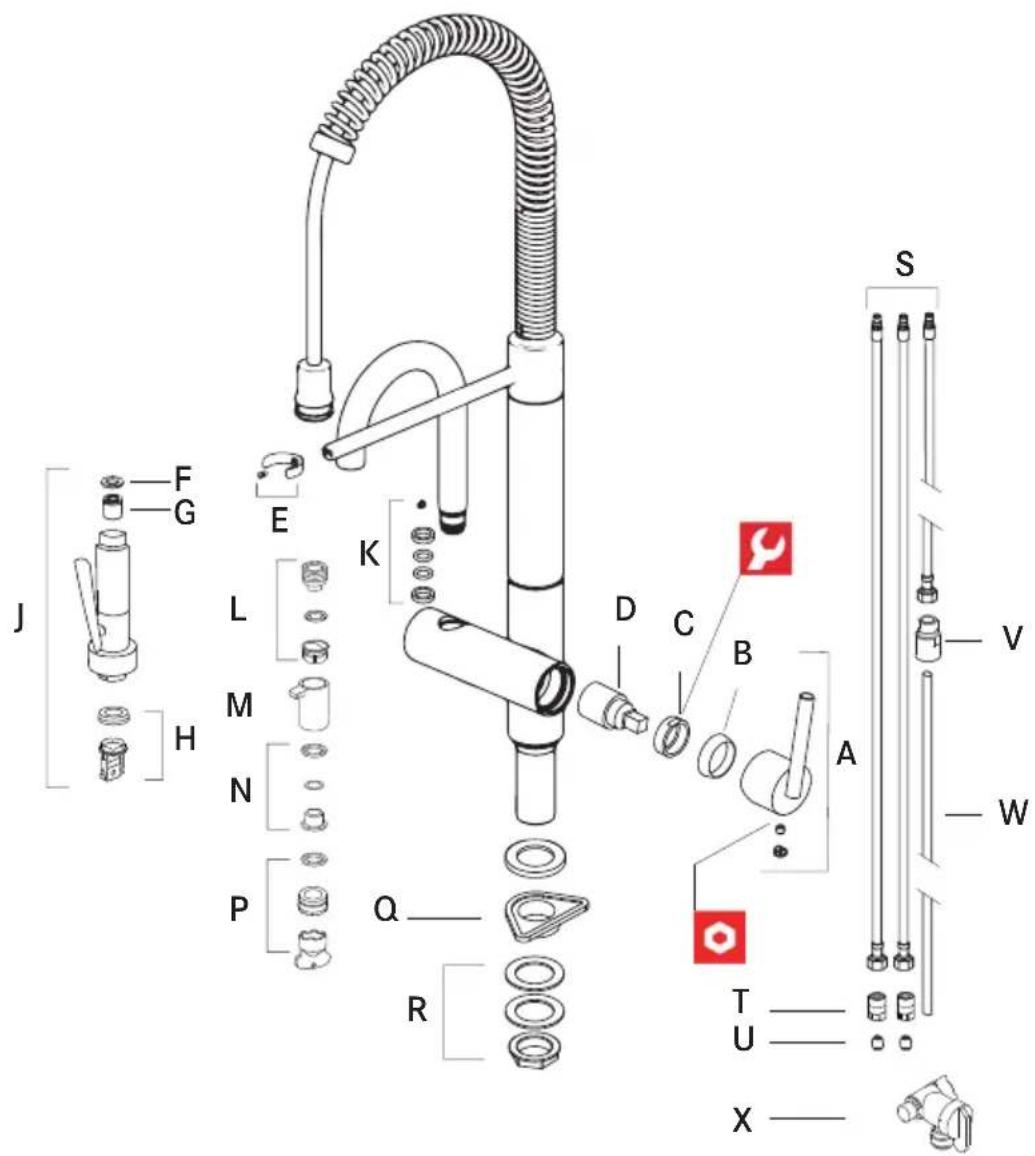
| A | F5301* Handle Assy | M | F5328* Drinking Water Handle Assy |
| B | F5317* Cartridge Cap | N | F5329 Drinking Water Handle Bushing Kit |
| C | F5318 Cartridge Lock Nut | P | F5330 Drinking Water Aerator and Key |
| D | F5319 Cartridge | Q | F5310 Plastic Flange |
| E | F5305 Spray Holder | R | F5311 Fixing Kit |
| F | F5306 Spray O-Ring | S | F5313 Supply Hose |
| G | F5324 Hand Spray Check Valve | T | F5322 Check Valve Holder (1 pc) |
| H | F5325 Hand Spray Aerator and Key | U | F5315 Check Valve |
| J | F5326* Hand Spray Assy (dual function) | V | F5331 Drinking Water Fitting |
| K | F5321 Spout Bushing Kit | W | 10305 3/8" Poly Tubing |
| L | F5327 Drinking Water Cartridge Kit | X | 10306 Stop Valve |
*Must Specify Finish
Franke Kitchen Systems LLC extends the following warranty to the original purchaser of its faucets effective January 1, 2003.
All faucets installed in a private residence will carry a limited lifetime warranty on all mechanical parts to be free of manufacturing defects in material and workmanship under normal usage. All chrome finishes carry a limited lifetime warranty; all other finishes are warranted for five (5) years from the original date of purchase.
Marine and Outdoor Installation: Franke faucets are NOT warranted for Marine and Outdoor installations.
This warranty applies only to the original owner, providing the product has been installed in accordance with our installation instructions, used as recommended and in a normal residential application. In the event of a warranty claim, the owner will be required to provide proof of purchase - save sales receipt. This warranty covers all components which make the product operational. Franke, at its option, may repair or replace the product or components necessary to restore the product to good working condition. Franke reserves the right to inspect the installation prior to the actual replacement of the product or component part. This warranty does not cover misuse or abuse, accidental damages, scuffs or scratches, improper installation, abnormal usage, negligence
or damage caused by improper maintenance or cleaning. Normal wear of parts is excluded from the warranty. Damage caused by impurities or acts beyond our control are not covered. Any product or part which has been repaired or altered in any manner outside of Franke's factory, unless previously authorized in writing by Franke, will void warranty.
Any replacement excludes transportation and any labor re-installation costs. This warranty does not allow recovery of incidental or consequential damages such as loss of use, delay, property damage or other consequential damage, and Franke accepts no liability for such damages.
The Franke warranty is limited to the above conditions and to the warranty period specified herein and is exclusive. Franke DISCLAIMS all other warranties, expressed or implied, including IMPLIED WARRANTY OF MERCHANTABILITY AND/OR FITNESS FOR A PARTICULAR PURPOSE. This warranty gives you specific legal rights that may vary from state to state.
Further information
For any further information about our products, about the installation of them or about the guarantee, please contact our customer service department:
Franke Kitchen Systems
800 Aviation Parkway
Smyrna, TN 37167, USA
Phone: 800-626-5771
Email: ks-customerservice.us@franke.com
800 Aviation Parkway
800 Aviation Parkway
Franke Kitchen Systems
Egypt S.A.E.
6th of October City
Hotline 16828
Finland
Franke Finland Oy
76850 Naarajärvi
Phone +358 15 341 11
France
Franke France S.A.S.
60230 Chambly
Phone +33 130 289 400
Germany
Franke GmbH
79713 Bad Säckingen
Phone +49 7761 52 0
Greece
Franke Hellas S.A.
19003 Markopoulos Attikis
(Athens)
Phone +30 22991 500 00
Hong Kong SAR
Franke Asia Hong Kong
Causeway Bay
Phone +852 3184 1900
India
Franke Faber India Pvt Ltd.
Aurangabad - 431 136
Phone 1800 209 3484
Italy
Franke S.p.A.
37019 Peschiera del Garda
Numero Verde 800 359 359
Kazakhstan
Franke Kazakhstan Ltd.
040918 Almaty City
Phone +7 727 297 3812
Morocco
Franke Kitchen System SARL
21 000 Casablanca
Phone +212 522 674 200
Norway
Franke KS Norway 8520 Lystrup, Denmark Phone +47 35 566 450
Poland
Franke Polska Sp. z o.o.
05-090 Raszyn
Phone +48 22 711 6700
Portugal
Franke Portugal S.A.
2735-531 Cacém
Phone +351 21 426 9670
Romania
Franke Romania SRL
Pantelimon 077145
Phone +40 21 350 1550
Russia
Franke Russia GmbH
199106 St. Petersburg
Phone +7 812 703 1540
Slovak Republic
Franke Slovakia s.r.o.
010 01 Žilina
Phone +421 41 733 6200
South Africa
Franke South Africa
Durban 4052
Phone +27 31 450 6300
Spain
Franke Espana S.A.U.
08174 Sant Cugat del Valles
Phone +34 93 565 3535
Sweden
Franke Futurum AB
930 47 Byske
Phone +46 912 405 00
Switzerland
Franke Kuchentechnik AG
4663 Aarburg
Phone +41 800 583 243
Thailand
Franke (Thailand) Co., Ltd.
Bangkok 10110
Phone +66 2 013 7900
The Netherlands
Franke Nederland B.V. 5700 AD Helmond Phone +31 492 585 111
Turkey
Franke Mufak ve Banyo
Sistemleri Sanayi ve
Ticaret A.S.
41400 Gebze Kocaeli
Phone +90 262 644 6595
Ukraine
Franke Ukraine LLC
02081 Kyiv
Phone +38 044 492 0015
United Arab Emirates
Franke LLC
Ras Al Khaimah
Phone +971 7 203 4700
United Kingdom
Franke UK Ltd.
Manchester M22 5WB
Phone +44 161 436 6280
USA
Franke Kitchen Systems LLC
Smyrna, TN 37167
Phone 800 626 5771
- Installation instructions 6
- Cleaning and maintenance 10
- Limited lifetime warranty 14
- Contents in box
- FF5300 Series
- FFPD5300 Series
- FFPD5400 Series
- INSTALLATION INSTRUCTIONS
- NOTES: Solid surface installation:
- ATTENTION: For FF5300 Series
- EN
- How to insert / Remove Tubing In Push Fit Connections
- CLEANING AND MAINTENANCE
- Replacing the cartridge
- General maintenance
- Spare/replacement list FF5300 Series
- Spare/replacement list FFPD5300 Series
- Spare/replacement list FFPD5400 Series
- Further information
- Finland
- France
- Germany
- Greece
- Hong Kong SAR
- India
- Italy
- Kazakhstan
- Morocco
- Norway
- Poland
- Portugal
- Romania
- Russia
- Slovak Republic
- South Africa
- Spain
- Sweden
- Switzerland
- Thailand
- The Netherlands
- Turkey
- Ukraine
- United Arab Emirates
- United Kingdom
- USA
Brand : FRANKE
Model : FFPD5380
Category : Faucet