WXST400P - Microphone PANASONIC - Free user manual and instructions
Find the device manual for free WXST400P PANASONIC in PDF.
| Product Type | Wireless clip-on lavalier microphone |
| Brand | Panasonic |
| Model | WX-ST400P |
| Dimensions (transmitter) | 60 mm (L) x 97 mm (H) x 20 mm (D) |
| Weight (transmitter with alkaline battery) | Approx. 95 g |
| Weight (microphone unit) | Approx. 20 g |
| Power supply | 1 rechargeable Ni-MH battery or 1 AA alkaline battery |
| Battery life (Ni-MH) | Approx. 8 hours (with Panasonic BK-3MCCA battery) |
| Battery life (alkaline) | Approx. 6 hours (with Panasonic LR6PA battery) |
| Radio frequencies | 1921.536 MHz to 1928.448 MHz (DECT 1.9 GHz band) |
| Dimensions (microphone unit) | Max. diameter 13 mm, length 22 mm, cable 1 m |
| Connectors | External audio input (3.5 mm stereo mini-jack), micro USB type B port |
| Microphone type | Unidirectional electret condenser |
| Frequency response | 100 Hz to 15 kHz |
| Operating temperature range | 5 °C to 35 °C |
| Operating humidity | 10% to 90% (without condensation) |
| Included accessories | Microphone clip, microphone holder, windscreen, identification sticker |
| Maintenance | Clean with a dry cloth; do not use solvents; periodically clean contacts with ethyl alcohol |
| Safety | Do not expose to rain or moisture; do not use near water; avoid heat sources; do not disassemble; use only the original charger |
| Repairability | Have any repairs performed by a qualified technician |
| Warranty | Warranty card included (keep it) |
Frequently Asked Questions - WXST400P PANASONIC
User questions about WXST400P PANASONIC
0 question about this device. Answer the ones you know or ask your own.
Ask a new question about this device
Download the instructions for your Microphone in PDF format for free! Find your manual WXST400P - PANASONIC and take your electronic device back in hand. On this page are published all the documents necessary for the use of your device. WXST400P by PANASONIC.
USER MANUAL WXST400P PANASONIC
Operating Instructions
Wireless Microphone
Model No. WX-ST400P
Before attempting to connect or operate this product, please read these instructions carefully and save this manual for future use.
The model number is abbreviated in some descriptions in this manual.
WARNING:
- To prevent fire or electric shock hazard, do not expose this apparatus to rain or moisture.
- The apparatus should not be exposed to dripping or splashing and no objects filled with liquids, such as vases, should be placed on the apparatus.
- Batteries (battery pack or batteries installed) shall not be exposed to excessive heat such as sunshine, fire or the like.
- Operating near 1.9 GHz electrical appliances may cause interference. Move away from the electrical appliances.
- This device complies with Part 15 of the FCC Rules and Innovation, Science and Economic Development Canada's licence-exempt RSS(s). Operation is subject to the following two conditions: (1) This device may not cause harmful interference, and (2) this device must accept any interference received, including interference that may cause undesired operation.
- This transmitter must not be co-located or operated in conjunction with any other antenna or transmitter.
- MEDICAL: Consult the manufacturer of any personal medical devices, such as pacemakers, to determine if they are adequately shielded from external RF (radio frequency) energy. (The unit operates in the frequency range of 1.92 GHz to 1.93 GHz, and the power output level is 115mW (max.)
Supplier's Declaration of conformity
Trade Name: Panasonic Model No.: WX-ST400P
Responsible Party:
Panasonic Corporation of North America
Two Riverfront Plaza, Newark, NJ
07102-5490
Support Contact: 1-800-491-9986
wirelessmicsupport@us.panasonic.com
For U.S.A.

For U.S.A.
FCC Caution:
Changes or modifications not expressly approved by the party responsible for compliance could void the user's authority to operate the equipment.
A nickel metal hydride battery that is recyclable powers the product you have purchased. Please call 1-800-8-BATTERY for information on how to recycle this battery.

For U.S.A.
NOTE: This equipment has been tested and found to comply with the limits for a Class A digital device, pursuant to part 15 of the FCC Rules. These limits are designed to provide reasonable protection against harmful interference when the equipment is operated in a commercial environment. This equipment generates, uses, and can radiate radio frequency energy and, if not installed and used in accordance with the instruction manual, may cause harmful interference to radio communications. Operation of this equipment in a residential area is likely to cause harmful interference in which case the user will be required to correct the interference at his own expense.
For U.S.A.
The model number and serial number of this product may be found on the surface of the unit.
You should note the model number and serial number of this unit in the space provided and retain this book as a permanent record of your purchase to aid identification in the event of theft.
Model No.
Serial No.
For U.S.A.
CAUTION:
The FCC ID number for this radio equipment is listed below.
FCC ID: ACJ9TAWX-ST400P
For Canada
CANICES-3(A)/NMB-3(A)
For Canada.
RSS-Gen
- Under Industry Canada regulations, this radio transmitter may only operate using an antenna of a type and maximum (or lesser) gain approved for the transmitter by Industry Canada. To reduce potential radio interference to other users, the antenna type and its gain should be so chosen that the equivalent isotropically radiated power (e.i.r.p.) is not more than that necessary for successful communication.
-
This device contains licence-exempt transmitter(s)/receiver(s) that comply with Innovation, Science and Economic Development Canada's licence-exempt RSS(s). Operation is subject to the following two conditions:
-
This device may not cause interference.
- This device must accept any interference, including interference that may cause undesired operation of the device.
IMPORTANT SAFETY INSTRUCTIONS
1) Read these instructions.
2) Keep these instructions.
3) Heed all warnings.
4) Follow all instructions.
5) Do not use this apparatus near water.
6) Clean only with dry cloth.
7) Do not install near any heat sources such as radiators, heat registers, stoves, or other apparatus (including amplifiers) that produce heat.
8) Only use attachments/accessories specified by the manufacturer.
9) Use only with the cart, stand, tripod, bracket, or table specified by the manufacturer, or sold with the apparatus. When a cart is used, use caution when moving the cart/apparatus combination to avoid injury from tip-over.
10) Refer all servicing to qualified service personnel. Servicing is required when the apparatus has been damaged in any way, such as power-supply cord or plug is damaged, liquid has been spilled or objects have fallen into the apparatus, the apparatus has been exposed to rain or moisture, does not operate normally, or has been dropped.

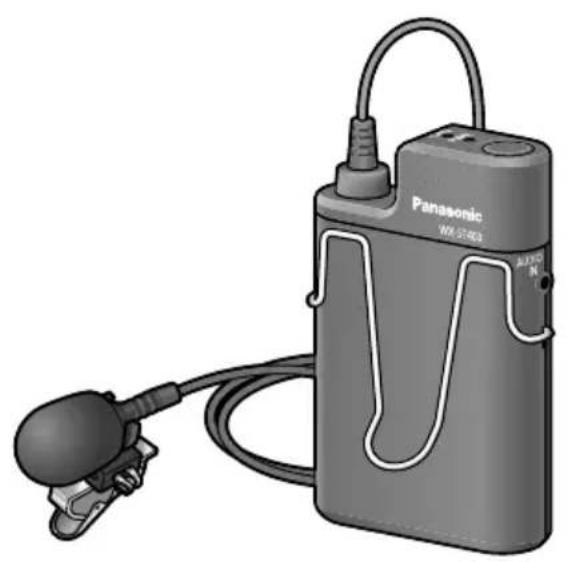
Product overview
This product is a tie pin wireless microphone.
-
It uses a system based on the 1.9 GHz DECT* standard to achieve a stable connection over a wide area which makes for a clear audio with little interference.
-
DECT (Digital Enhanced Cordless Telecommunications) is a digital cordless communication standard.
-
It is powered with either one AA-size dry-cell battery (locally procured) or one AA-size rechargeable Ni-MH battery (locally procured).
- The compatible charger (WX-SZ200P: sold separately) allows for AA-size rechargeable Ni-MH batteries to be recharged while inside the microphone.
Limitation of liability
THIS PUBLICATION IS PROVIDED "AS IS" WITHOUT WARRANTY OF ANY KIND, EITHER EXPRESS OR IMPLIED, INCLUDING BUT NOT LIMITED TO, THE IMPLIED WARRANTY OF MERCHANTABILITY, FITNESS FOR ANY PARTICULAR PURPOSE, OR NON-INFRINGEMENT OF THE THIRD PARTY'S RIGHT. THIS PUBLICATION COULD INCLUDE TECHNICAL INACCURACIES OR TYPographical ERRORS. CHANGES ARE ADDED TO THE INFORMATION HEREIN, AT ANY TIME, FOR THE IMPROVEMENTS OF THIS PUBLICATION AND/OR THE CORRESPONDING PRODUCT(S).
Disclaimer of Warranty
IN NO EVENT SHALL Panasonic Corporation BE LIABLE TO ANY PARTY OR ANY PERSON, EXCEPT FOR REPLACEMENT OR REASONABLE MAINTENANCE OF THE PRODUCT, FOR THE CASES, INCLUDING BUT NOT LIMITED TO BELOW:
① ANY LOSS OR DAMAGE, INCLUDING WITHOUT LIMITATION, DIRECT OR INDIRECT, SPECIAL, CONSEQUENTIAL OR EXEMPLARY, ARISING OUT OF OR RELATING TO THE PRODUCT;
② ANY INCONVENIENCE, LOSS, OR DAMAGE CAUSED BY INAPPROPRIATE USE OR NEGLIGENT OPERATION OF THE USER;
③ ALL MALFUNCTIONS OR TROUBLES FROM UNAUTHORIZED DISASSEMBLY, REPAIR OR MODIFICATION OF THE PRODUCT BY THE USER, REGARDLESS OF THE CAUSE OF THE MALFUNCTION OR TROUBLE;
④ ANY PROBLEM CAUSING FAILED SIGNAL TRANSMISSION RESULTING IN CONSEQUENTIAL INCONVENIENCE, LOSS OR DAMAGE, ARISING OUT OF CAUSES SUCH AS SYSTEM MALFUNCTION, FAULT, SET UP OR INSTALLATION.
⑤ ANY PROBLEM, CONSEQUENTIAL INCONVENIENCE, OR LOSS OR DAMAGE, ARISING OUT OF THE SYSTEM COMBINED BY THE DEVICES OF THIRD PARTY.
⑥ IMPOSSIBILITY TO USE THE PRODUCT OR ANY INCONVENIENCE, LOSS, OR DAMAGE ARISING OUT OF THE IMPOSSIBILITY TO USE THE PRODUCT BECAUSE OF RADIO WAVES BROADCAST BY THIRD PARTIES.
Copyright
Distributing, copying, disassembling, reverse compiling and reverse engineering of the software provided with this product are all expressly prohibited. In addition, exporting any software provided with this product violating export laws is prohibited.
Abbreviations
This manual uses the following abbreviations.
- "Wireless Microphone (WX-ST400P)" is referred to as "this product", "the product" or "microphone".
- "Charger (WX-SZ200P: sold separately)" is referred to as "charger".
- "Wireless Antenna (WX-SA250P: sold separately)" is referred to as "wireless antenna" or "antenna".
- "Wireless Receiver (WX-SR202P: sold separately)" is referred to as "wireless receiver" or "receiver".
All information on separately-sold products contained in this manual is up-to-date as of June 2019. Refer to a retailer for the latest information.
Safety precautions 2
Product overview 5
Limitation of liability 5
Disclaimer of Warranty 5
Copyright 6
Abbreviations 6
Precautions 8
Usage precautions 10
Parts and their names 12
Inserting the battery 16
Microphone clip installation 18
Setting the microphone sensitivity ... 19
Pairing 20
Pairing with the WX-SR202P
(wireless connection) 20
Pairing with the WX-SR202P
(wired connection) 22
Confirming pairing 25
Attaching the microphone 27
Using the microphone 28
Connecting an external device 29
Replacing the battery 30
Recharging the battery 32
Troubleshooting 35
Specifications 38
Standard accessories 39
Only use the original charger
Failing to do so may lead to leaks, overheating, and bursts.
Only recharge rechargeable Ni-MH batteries
Failing to do so may lead to leaks, overheating, and bursts in the batteries.
Turn the power OFF when boarding airplanes
Failing to do so may lead to safety concerns for the aircraft.
If the product shows any abnormality, immediately stop using it
If the product shows abnormalities such as smoke or an unusual smell coming out of the product, or damage to its outer shell, continuing to use it may pose hazards such as the product catching on fire or falling, leading to injuries to the users or to further damage to the product itself.
- Immediately remove the batteries and contact the retailer.
Do not bring the product near medical equipment (do not bring it into operation rooms, ICUs, CCUs, etc.)
The radio waves emitted from the product may interfere with the medical equipment causing it to malfunction and lead to accidents.
Do not use near automatic doors, fire alarms, and other automatic controllers
The radio waves emitted from the product may interfere with the automatic controllers causing them to malfunction and lead to accidents.
Do not place on unstable surfaces
The product may fall leading to accidents or injuries.
Do not charge, open, or short-out dry-cell batteries
Failing to do so may cause the batteries to leak or burst, leading to fires, injuries, and burns.
Do not open or short-out rechargeable batteries
Failing to do so may cause the batteries to leak or burst, leading to fires, injuries, and burns.
Do not attempt to disassemble or remodel the product
It may lead to fire or electric shock.
Do not spill any liquid
It may lead to fire or electric shock.
- Immediately turn the product OFF and contact the retailer.
Do not perform maintenance while the product is powered ON
It may lead to injury.
Refer to a professional for disposal
Burning the product may lead to harmful chemicals causing damage to the eyes, and it could pose a fire hazard or burn risk.
Insert the batteries according to the correct polarity (positive + / negative -)
Failing to do so may cause the batteries to leak or burst, leading to fires, injuries, and damage to the surroundings.
Do not install at places exposed to large amount of humidity and/or dust
It may lead to injury.
Do not install the product where children may reach it
It may lead to injury.
Do not use Ni-Cd batteries
Internal damage may lead to fires.
Other than the aforementioned "Precautions", make sure to follow the points below.
This product is intended for indoor use only
- It cannot be used outdoors.
Avoid exposing the product to direct sunlight for extended periods of time, and do not install it near air conditioners or heaters. Failing to do so may lead to damage to the shape and color of the product, and may cause it to malfunction. Also avoid exposure to water droplets and bubbles.
Use this product with care
- This product contains delicate components which may be damaged by improper use or storage.
Repair or replace any damaged components. - Subjecting the product to strong impacts, drops, etc. may alter its fine-tuning and change its characteristics. Please use it with care. Avoid impacting the product, as this will result in a strong impact sound noise.
- Do not disassemble the product or touch its inner components.
The operating temperature range is
- Between 5^ ( 41^ ) and 35^ ( 95^ ). Using the product outside of this range may cause it to malfunction or to be damaged.
When calculating the usage time, consider that the batteries will last less than usual below 10^ (50°F).
Storage and usage locations
- Avoid using the product where it could be affected by motors, transformers, or the ignition noise of cars.
- Be especially careful when using the product in a high place. It may fall leading to malfunctions and injuries.
- Do not use the product where there is a risk of damage from seawater or corrosive gases.
- Do not use the product near TVs, radios, computers, and other office automation appliances. Failing to do so may cause the product to pick up noise.
- Do not use the product near CS digital broadcasting receivers (tuners, digital TV sets with internal tuners, recorders, etc.). Failing to do so may cause the CS digital broadcast image to deteriorate.
- Do not leave the product in hot places such as near heat-diffusing appliances (power amplifiers, video monitors, measuring instruments, etc.) or closed-off cars in the summer. When storing the product, keep it away from moisture as much as possible.
Batteries
- Even when the power is turned OFF, batteries left inside the product will slowly be drained. Remove the batteries when you are not using the product, as failing to do so may cause battery leaks.
- Do not use or store batteries in hot places, such as under direct sunlight, inside closed-off cars during the summer, near open fires, stoves, etc.
- Do not touch the battery poles or the components behind the battery cover with dirty hands. Doing so may cause connection problems or noise.
- Do not use batteries which are deteriorated or which have suffered internal short-circuits. Failing to do so may lead to leaks, overheating, and bursts in the batteries.
Interception
- This product uses a difficult to intercept digital signal, but, as it uses radio waves, it might be possible for a third party to willfully intercept the transmission of the product.
Maintenance
- Turn OFF the power and clean the product with a dry cloth.
- Do not use volatile chemicals such as benzene or paint thinner.
- When using chemically treated cloths, carefully read the included instructions.
- If the battery poles or the components behind the battery cover are dirty, clean them thoroughly with a dry, soft cloth. The components behind the battery cover get dirty very easily. Clean them periodically (around once per month) with ethyl alcohol. Do not use solvents such as benzene or paint thinner, or abrasive metal polishes, as they will damage the shape and color of the product and cause its coating to peel.
- If the surface of the product is particularly dirty, dilute mild detergent with water, then soak a soft cloth with it. Squeeze the cloth to remove excess moisture and use it to clean the product. After having cleaned the product, use a soft dry cloth to remove any residues of the detergent.
Proper use
Preventing noise
When inserting, removing, or replacing batteries, very loud noise may occur. To avoid this, only insert, remove, or replace the batteries after having turned the product OFF and having lowered the volume in the power amplifier, mixer, etc.
- Preventing popping noise
Use the included windscreen (already attached to the microphone unit) to alleviate popping noises (the noise of air hitting the microphone) during speech.
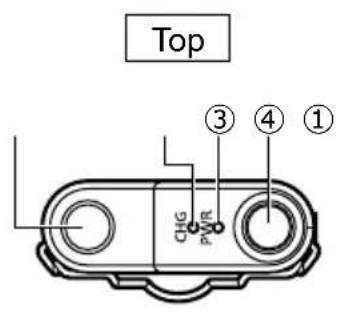

① Microphone connector
The connector into which the microphone is plugged.
② Charge indicator [CHG] (red)
Shows the charge status.
On: Charging
Off: Charging complete or the microphone is not set correctly on the charger.

- If the charger cannot directly contact the microphone because of an obstruction, the [CHG] indicator will remain off and the [ERROR] indicator on the charger will either light up or blink. In that case, remove any foreign matter that is obstructing the connection and re-insert the microphone into the charger.
Blinking: Charging error
- The microphone may contain a dry-cell or deteriorated rechargeable battery, or the battery may be absent. Make sure that the proper type of battery is inserted.
- The battery may be outside of the operating temperature range. Make sure that the battery is within the operating temperature range.
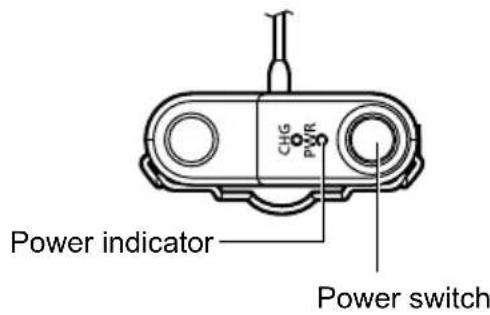
③ Power indicator [PWR]
Shows the battery status.
On (green): Power ON
On (orange): Power ON (less than one hour of battery runtime remaining)
On (red): Battery almost depleted (recharge or exchange the battery)
Off: Power OFF
Blinking (green): There is either another microphone turned ON and registered on the same channel, or the connection is otherwise close to being lost.
Blinking (orange): No signal (outside of the connection area between microphone and antenna)
Pairing mode
Blinking (red): Microphone unpaired or failed to pair with a receiver
See "Pairing" (page 20).
Alternately blinking (orange/green):
Confirming pairing

- The indication of the remaining battery level will change according to the battery type (either alkaline dry-cell or Ni-MH) selected through the microphone battery setting switch on the wireless receiver.
- Setting the battery type switch to the wrong position will not interfere with the operation of the microphone, but it may result in the orange and red indicators lighting up for too long or too short, displaying an incorrect reading of the remaining battery level.
- The microphone battery type setting on the wireless receiver applies to all microphones paired with it, and cannot be changed individually. Refer to the wireless receiver manual for further details.
④ Power switch
Turns the microphone ON/OFF.
Pressing the power switch will turn the microphone ON, and audio from the microphone unit will be transmitted.
Pressing the power switch again while the microphone is ON will turn the microphone OFF.
⑤ Microphone unit
Collects audio.
A windscreen is attached to the microphone unit.
- The windscreen is an expendable component which deteriorates with use. Refer to a retailer for replacement.
⑥ External input connector [AUDIO IN]
Transmits the audio from the external device to the receiver (page 29).
When an external device is connected to this connector, audio from the microphone unit will not be transmitted to the receiver.
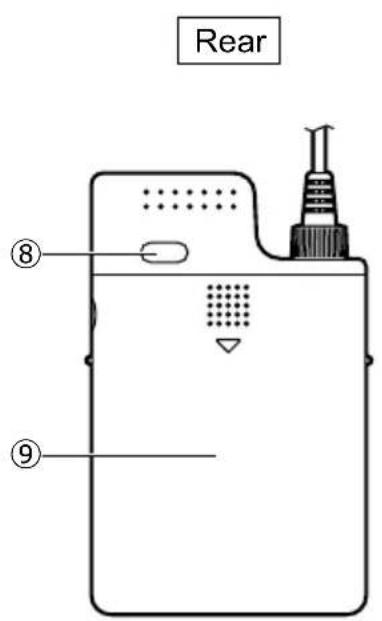
⑦ Hook
The attachment hook for the microphone. Used to attach the microphone to a belt or breast pocket.
⑧ Space to place stickers for microphone identification
Place the included microphone identification stickers here. Using the stickers makes it easier to identify microphones.
⑨ Battery cover
Slide the battery cover downwards while pressing on it to remove it.
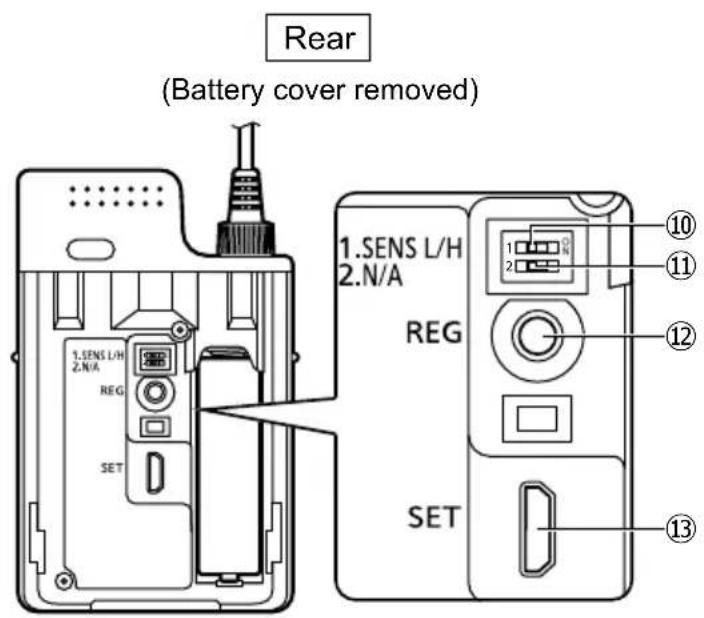
Sensitivity setting switch [SENS L/H] (inside the battery cover)
Sets the sensitivity to audio from for the microphone unit (page 19).
[SENS L]: Low sensitivity (factory default)
[SENS H]: High sensitivity
Unused
Pairing button [REG] (inside the battery cover)
This button controls the pairing between the microphone and the receiver.
- Pairing: While the power switch is set to ON, keep the [REG] button pressed for more than two seconds to enter pairing mode (page 20).
- Pairing confirmation : Press the [REG] button once while the power switch is set to ON to enter pairing confirmation mode (page 25). The pairing confirmation mode lasts for five seconds on both the microphone and the receiver, after which both will go back to their normal operation mode.
⑬ Connector for configuration and maintenance [SET] (inside the battery cover)
Micro USB 2.0 type B connector to connect the product to the wireless receiver. Connects through a USB 2.0 cable (micro type B male to type A male; locally procured) and a conversion cable (type A female to micro type B male; locally procured).
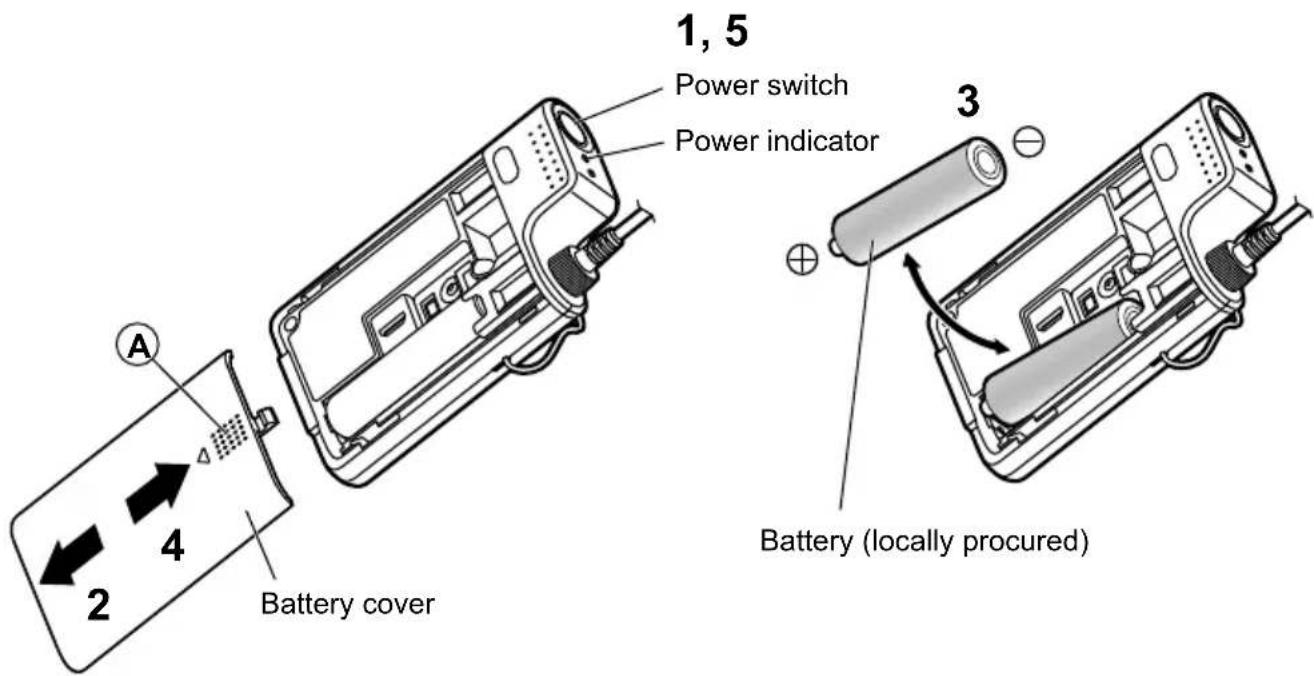
Inserting the battery
Carefully read the "Precautions" section and follow all of its instructions.
Switch the power to OFF before inserting the battery.
See "Replacing the battery" (page 30) for instructions on changing the battery.

- Do not touch the battery poles with your hands. Doing so may cause connection problems and noise. If the battery poles become dirty, clean them with a dry, soft cloth.
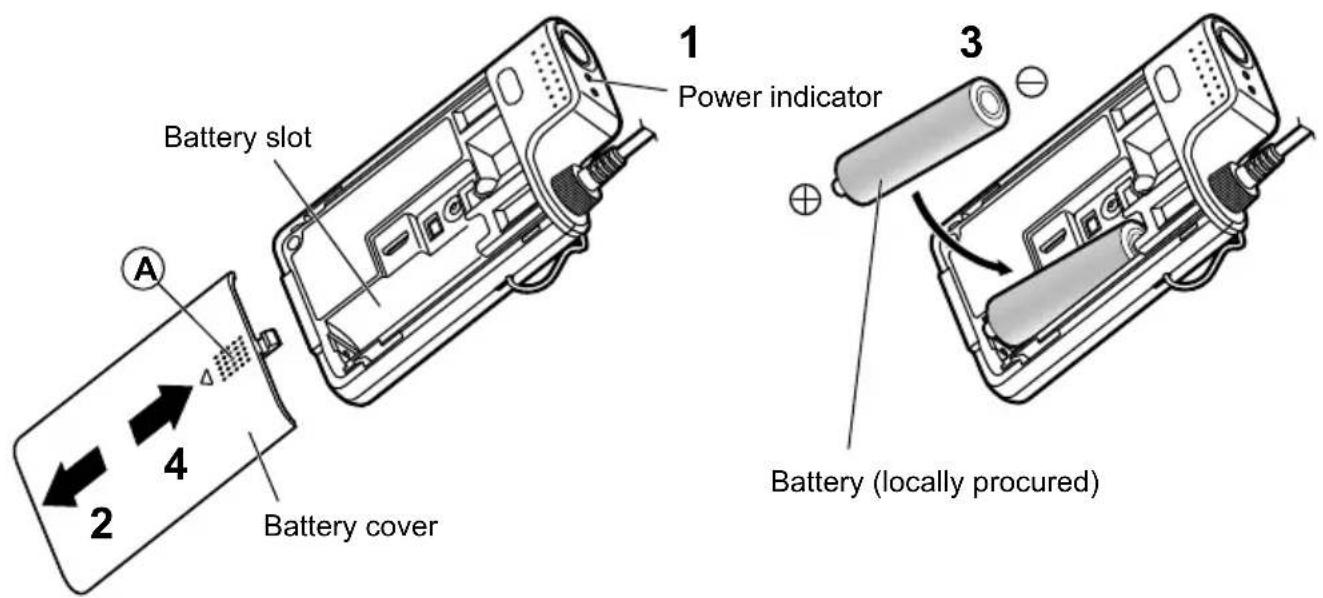
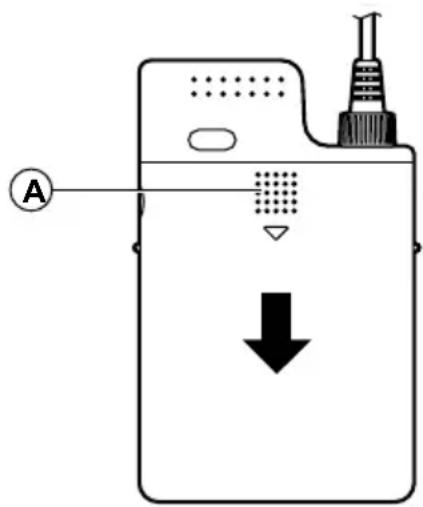
1 Make sure that the [PWR] indicator is off
2 Remove the battery cover
Press on the portion labeled as on the back of the battery cover and slide the cover downwards to remove it.
3 Insert the battery
Check the polarity of the battery (positive and negative and insert either one rechargeable Ni-MH AA-type battery or one AA-type alkaline dry-cell battery in the battery slot according to the polarity indication ( ,)
4 Place the battery cover back on
Slide the battery cover upwards to place it back on.

- When recharging Ni-MH batteries, only use the original charger (WX-SZ200P). The charging time depends on the battery type and the specific use situation, but at longest it will be around eight hours.
- Some batteries may not perform well with this product. If possible, use one of the recommended batteries. The recommended batteries are as follows. Rechargeable battery: BK-3MCCA Panasonic Ni-MH AA-size battery Dry-cell batteries: LR6PA Panasonic alkaline AA-size battery LR6XE Panasonic alkaline AA-size battery
Microphone clip installation
1 Attach the microphone clip
Attach the included microphone clip to the already attached microphone holder.
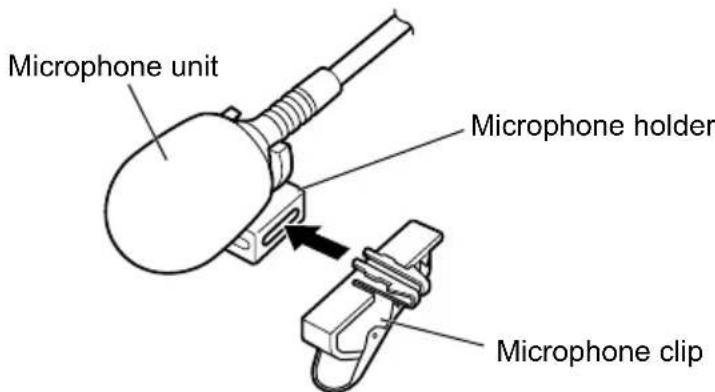
- The microphone holder can be attached such as to fit different types of clothing.
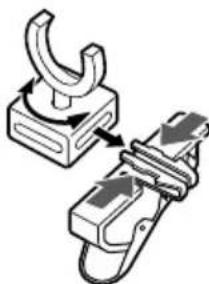
Pinch the microphone clip from both sides as shown in the illustration below to remove it from the microphone holder. Rotate the microphone holder as necessary and re-attach it to the microphone clip.
Setting the microphone sensitivity
Sets the sensitivity to audio collected by the microphone unit.
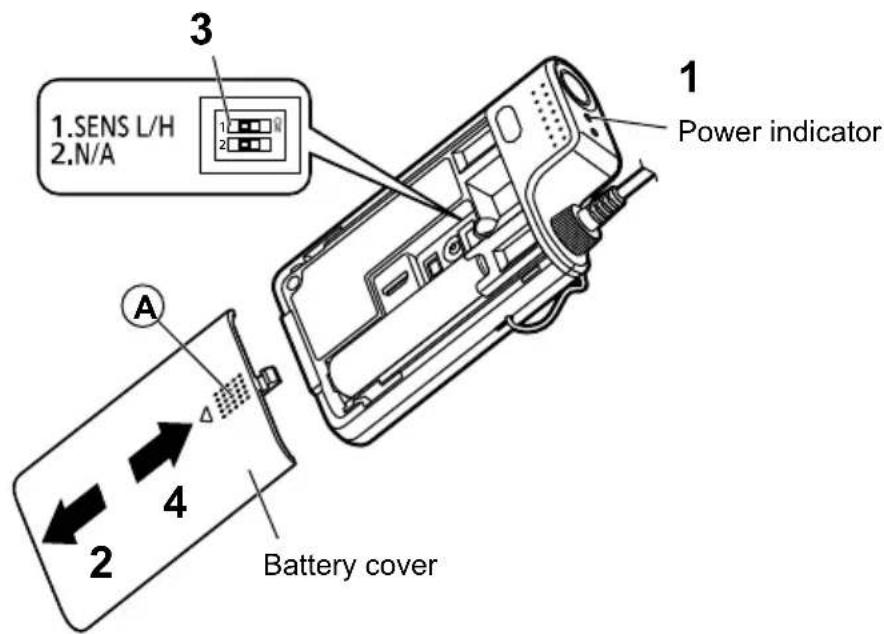
1 Make sure that the [PWR] indicator is off
2 Remove the battery cover
Press on the portion labeled as on the back of the battery cover and slide the cover downwards to remove it.
3 Set the microphone sensitivity
Set the sensitivity setting switch. Use the tip of a pen, screwdriver, or other narrow pointed object to control the switch. The settings for the switch are as follows.
[SENS L]: Low sensitivity (factory default) 1
[SENS H]: High sensitivity1
4 Place the battery cover back on
Slide the battery cover upwards to place it back on.

- Changing this setting while the microphone is turned ON could lead to noise. Turn down the volume on the power amplifier or mixer before changing this setting.

- Set the sensitivity to "Low" when the microphone unit is close to the mouth.
- Set the sensitivity to "High" when the microphone unit is far from the mouth or when the volume of voice is low.
The microphone and the receiver must be paired to each other in order to establish a connection.
Perform pairing when using a microphone which has not yet been paired to the receiver on when a registration error occurs.
The maximum number of microphones which can be paired to a receiver and the maximum number of microphones which can be used simultaneously is as follows. When the maximum number of pairable microphones is exceeded, the newest microphone will overwrite the oldest one.
| Receiver | Maximum number of pairable microphones | Maximum number of simultaneously usable microphones |
| WX-SR202P 6 per | channel 2 (1 per channel) |
Also refer to the wireless receiver manual.
Pairing with the WX-SR202P (wireless connection)
Pair the microphone to a wireless antenna via a wireless connection. Perform the pairing within the connection range of the wireless antenna connected to the wireless receiver to which you want to pair the microphone.
1 Remove the battery cover
Press on the portion labeled as on the back of the battery cover and slide the cover downwards to remove it.
2 Set the wireless receiver to pairing mode
Make sure that the [POWER] indicator on the wireless receiver lights green, then press for at least two seconds the [REG] button of the channel to which you want to pair a microphone.
When the wireless receiver is in pairing mode, the [REG] indicator of the channel whose [REG] button has been pressed will blink orange. Pairing mode lasts for 30 seconds, so pair the microphone within this time.
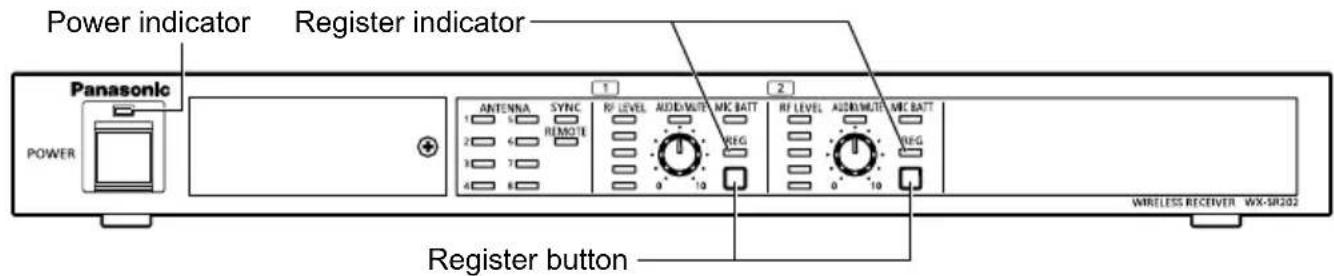
3 Pair the microphone
With the microphone powered on, keep the [REG] button pressed for at least two seconds to start pairing. (the [PWR] indicator will blink orange).
If pairing is completed successfully, the [PWR] indicator on the microphone will switch to the normal status according to the remaining battery level (green, orange, or red), and the [REG] indicator on the paired channel on the wireless receiver lights green for one second and then goes off.
- If pairing could not be completed successfully, the [PWR] indicator on the microphone will blink red. In that event, place the microphone as close as possible to the antenna and try pairing it again. (Pairing may fail if the microphone is too far away from the antenna or under bad connection conditions.)

4 Place the battery cover back on
Place the battery cover back onto the product.

- The [REG] button is invalid if the channel to which microphone is paired and if that microphone is in use. Turn the currently paired microphone power OFF, then you can pair a different microphone to the channel that is already in use.
- The wireless receiver cannot enter pairing mode on multiple channels simultaneously.
- When a channel on the wireless receiver is in pairing mode, all other channels can still be used as normal.
Pairing with the WX-SR202P (wired connection)
Pair the microphone to a wireless receiver via a wired connection. The wired connection uses a USB 2.0 cable (micro type B male to type A male; locally procured) and a conversion cable (type A female to micro type B male; locally procured).
1 Remove the battery cover
Press on the portion labeled as on the back of the battery cover and slide the cover downwards to remove it.
2 Connect the microphone to the wireless receiver
Connect the [SET] connector of the microphone to the [SET] connector of the wireless receiver via a USB 2.0 cable (micro type B male to type A male; locally procured) and a conversion cable (type A female to Micro type B male; locally procured).
When connecting the cables, make sure that the conversion cable is attached to the wireless receiver. If you connect the cables otherwise, you will not be able to pair the microphone.
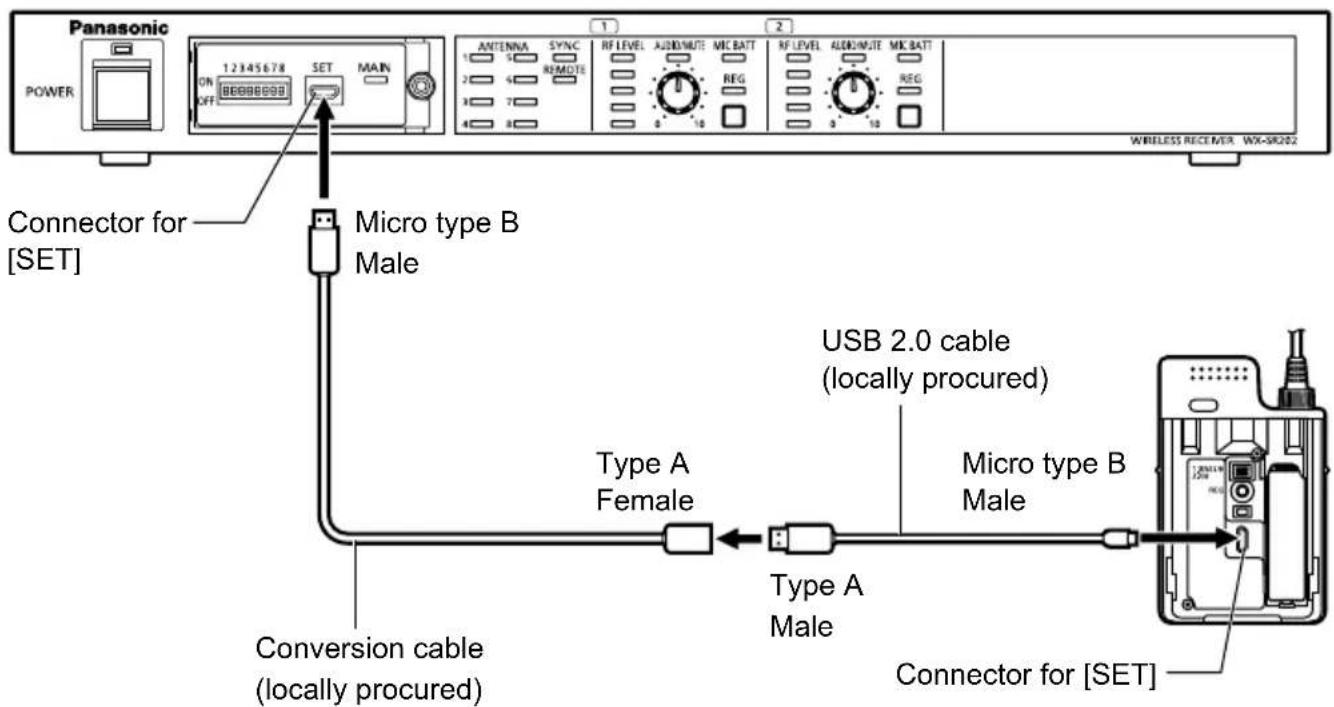
3 Turn the microphone ON
If the microphone is currently OFF, turn the power switch to ON. When the microphone and the wireless receiver are connected via a cable, the audio from the microphone will not be transmitted.
4 Pair the microphone to the wireless receiver
Make sure that the [POWER] indicator on the wireless receiver lights green, then press for at least two seconds the [REG] button of the channel to which you want to pair a microphone. Both the microphone and the wireless receiver will enter pairing mode and pairing will start.
During pairing mode, the [PWR] indicator on the microphone and the [REG] indicator of the channel whose [REG] button has been pressed on the wireless receiver will blink orange.
If pairing is completed successfully, the [PWR] indicator on the microphone will switch to the normal status according to the remaining battery level (green, orange, or red), and the [REG] indicator on the paired channel on the wireless receiver lights green for one second and goes off.
- If pairing could not be completed successfully, the [PWR] indicator on the microphone will blink red.
5 Unplug the microphone from the wireless receiver
Unplug the cables connecting the microphone to the wireless receiver. If pairing has been completed successfully, the audio from the microphone is transmitted.
6 Place the battery cover back on
Place the battery cover back onto the product.

- The [REG] button is invalid if the channel to which microphone is paired and if that microphone is in use. Turn the currently paired microphone power OFF, then you can pair a different microphone to the channel that is already in use.
- When a channel on the wireless receiver is in pairing mode, all other channels can still be used as normal.
- Setting the microphone selection switch is optional.
Confirming pairing
1 Remove the battery cover
Press on the portion labeled as on the back of the battery cover and slide the cover downwards to remove it.
2 Make sure the wireless receiver is turned ON
Make sure that the [POWER] indicator on the wireless receiver lights green.

3 Set the microphone to pairing confirmation mode
With the microphone powered on, press the [REG] button once to enter pairing confirmation mode (the [PWR] indicator will turn green and orange alternately for five seconds).
4 Check the [REG] indicator on the receiver
While the microphone is in pairing confirmation mode, the [REG] indicator of the paired channel on the wireless receiver will turn green and orange alternately. This allows to confirm the pairing. The pairing confirmation mode lasts for five seconds, after which the devices will go back to their normal operation mode. Press the [REG] button once during pairing confirmation mode to go back to the normal operation mode.
![PANASONIC WXST400P - Check the [REG] indicator on the receiver - 1](/content/2026/03/492674/images/4028f2a7fded9175b450c6759297a91f5e52d0f4bf2d5804ef7deac1c825715a.jpg)
![PANASONIC WXST400P - Check the [REG] indicator on the receiver - 2](/content/2026/03/492674/images/5aa4908b4487ccd0774905fb779309486070e8584877892f37df965995e6d5fe.jpg)
- If the [PWR] indicator on the microphone blinks red, the microphone is not paired to a wireless receiver. Perform the steps described in "Pairing" (page 20).
The pairing confirmation can also be performed from the wireless receiver. - The microphone audio will be kept on transmitting during pairing confirmation.
- Also refer to the wireless receiver manual.
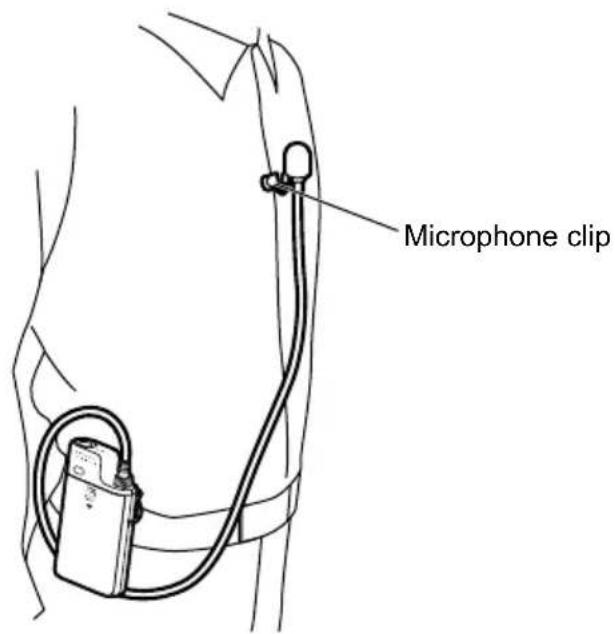
Attaching the microphone
Turn the microphone OFF before attaching it or adjusting its position.
1 Attach to the belt
Attach the hook on the front of the microphone to the belt.
2 Attach the microphone with the microphone clip
Use the included microphone clip to attach the microphone unit to a necktie or collar. Attach it as close as possible to the mouth to ensure the best audio clarity.
1 Make sure that the receiver is turned ON
Make sure that the [POWER] indicator on the wireless receiver lights green.
Power indicator

2 Press the power switch on the microphone to turn it ON.
The [PWR] indicator on the microphone lights up. When the microphone is turned ON, the audio collected by the microphone unit is transmitted.
Power switch

- If the [PWR] indicator on the microphone blinks red, the microphone is not paired to a wireless receiver. Perform the steps described in "Pairing" (page 20).
After use, return the power switch on the microphone to the OFF position.
Press the power switch once more to turn the microphone OFF. The [PWR] indicator goes off.

Important
- Do not place the microphone near the speakers. Doing so may cause howling and other loud noises which may cause injuries to the ears.

-
If the microphone moves out of the antenna range, the [PWR] indicator blinks orange and the microphone stops audio transmission. Move the microphone back into the antenna range to resume transmission. Refer to the wireless receiver manual for specifics on the wireless transmission range.
-
Keep a distance of at least 50 cm (19-5/8 inch) between this microphone and other wireless microphones. Placing multiple microphones within 50 cm (19-5/8 inch) of each other may cause transmission lag, audio dropouts, and noise.
Connecting an external device
Connect an external device (eg: portable CD player) to the [AUDIO IN] connector of the microphone to input the audio output from the device to the receiver.
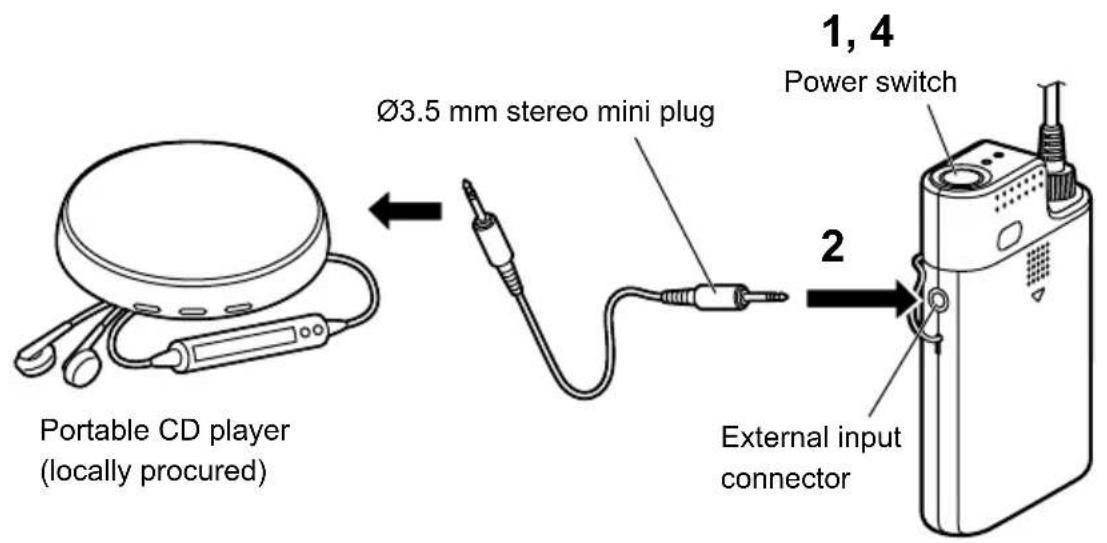
1 Turn OFF the microphone and the external device
2 Connect the external device
Use a 03.5 mm stereo mini plug to connect the audio output from the external device (eg: portable CD player) to the [AUDIO IN] connector.
3 Turn ON the external device (eg: portable CD player)
4 Turn ON the microphone

- When a 03.5mm stereo mini plug is connected to the [AUDIO IN] connector, this audio source is given priority and the audio from the microphone unit stops transmission.
- If the external device outputs stereo audio, the L/R channels will be mixed.
- Also refer to the manual of the external device you are connecting to the microphone.
Replacing the battery
Carefully read the "Precautions" section and follow all of its instructions.
Turn the microphone OFF before replacing the battery.
In the following cases, the dry-cell battery is depleted or remaining capacity of the rechargeable battery is insufficient. Replace the dry-cell battery with new one or recharge the rechargeable battery.
The [PWR] indicator lights red
The [PWR] indicator does not light up

- Do not touch the battery poles with your hands. Doing so may cause connection problems or noise. If the battery poles become dirty, clean them with a dry, soft cloth.
- Even when the power is turned OFF, battery left inside the product will slowly be drained. Remove the battery when you are not using the microphone for an extended period of time, as failing to do so may cause battery leaks.
1 Make sure that the [PWR] indicator is off
2 Remove the battery cover
Press on the portion labeled as on the back of the battery cover and slide the cover downwards to remove it.
3 Replace the battery
When removing battery, take them out from the positive pole.
Check the polarity of the battery (positive and negative , and insert either one rechargeable Ni-MH AA-type battery or one AA-type alkaline dry-cell battery in the battery slot according to the polarity indication (, )
4 Place the battery cover back on
Slide the battery cover upwards to place it back on.
5 Check the power indicator
Press the power switch to turn the microphone ON and check that the [PWR] indicator lights either green or orange.

- When recharging Ni-MH batteries, only use the original charger (WX-SZ200P). The charging time depends on the battery type and the specific use situation, but at longest it will be around eight hours.
- Some batteries may not perform well with this product. If possible, use one of the recommended batteries. The recommended batteries are as follows. Rechargeable battery: BK-3MCCA Panasonic Ni-MH AA-size battery Dry-cell batteries: LR6PA Panasonic alkaline AA-size battery LR6XE Panasonic alkaline AA-size battery
1 Turn OFF the microphone
Check that the [PWR] indicator is off.
Power indicator
2 Insert the microphone into the charger (WX-SZ200P)
Check that the [POWER] indicator in the charger lights up, and place the microphone inside the charger.
When the microphone is inserted into the charger, the [CHG] indicator (red) of the microphone will show the charging status as follows:
On: Charging
Off: Charging complete or the microphone is not set correctly on the charger.
Blinking: Usually caused by one of the following.
-
The microphone may contain a dry-cell or deteriorated rechargeable battery, or the battery may be absent. Make sure that the proper type of battery is inserted.
-
The rechargeable battery may be outside of its operating temperature range. Make sure that the battery is within its operating temperature range.
Charge error indicator

- Only use the original (WX-SZ200P) charger. Also refer to the charger manual.
The microphone cannot be used while in charging. - The microphone will not be charged if it is not properly inserted into the charger.
- If the charger cannot directly contact the microphone because of an obstruction, the [CHG] indicator will remain off and the [ERROR] indicator on the charger will either light up or blink. Failing to remove the obstruction may cause overheating. Remove any foreign matter which may be causing the obstruction.
- Set the power switch on the microphone to OFF while charging. Even when you insert the microphone into the charger with the power switch in ON position, the microphone is automatically turned OFF and the battery will be charged. However, in such event, you still need to move the power switch to the OFF position. (This is because the battery power will be slightly consumed after charging when the switch is in ON position.)
- Hold the charger with your hand when removing a microphone from it.

- If, once charging is complete, the battery in the microphone spontaneously drains, charging will not start again even if the microphone is still inserted into the charger.
- If the [CHG] indicator does not light up despite the microphone being inserted into the charger, confirm that all the links between charger, AC adapter, power cable, and electric plug are securely connected.
- The charging time depends on the battery type and the specific use situation, but at longest it will be around eight hours.
- Charging the batteries outside of their operating temperature range may substantially increase the amount of time required for charging. Even if the batteries are within their operating temperature range, charging while the microphone is very hot or cold may increase the amount of time required for charging.
- Both the microphone and the charger normally become hot during charging. This is not due to a malfunction.
- Do not try to charge already full batteries. Doing so will reduce the lifespan of the batteries.

- Some kinds of batteries may not be fully recharged in just one cycle and the runtime becomes small. This happens to the batteries which are being used for the first time, batteries which have not been used for a long (more than three months) time, and batteries which have been recharged and depleted numerous times. This phenomenon is characteristic of the rechargeable batteries. The battery runtime may be recovered to the normal level by completely charging and then depleting (by using the microphone) the batteries two or three times.
- The charger automatically recognizes the dry-cell battery inside the microphone to cancel charges, and then the [CHG] indicator will blink. However, depending on the type of dry-cell battery, this automatic recognition may take some time and the [CHG] indicator stay lit until the recognition completes.
- Sometimes, when trying to recharge almost-full batteries at very low temperatures, these may be mistakenly recognized as dry-cell batteries, and the [CHG] indicator may start blinking.
- The microphone is charged through inductive charging. Because of inductive charging regulations, the [PWR] indicator on the microphone may go off multiple times just before charging is completed, but this does not indicate a malfunction.
- Sometimes, when trying to charge almost-empty batteries, these may be mistakenly recognized as dry-cell batteries, stopping the charging and making the [CHG] indicator start blinking. If this happens, remove the microphone from the charger and re-insert it multiple times until the batteries are properly recognized. If the batteries cannot be recharged despite multiple attempts, it means that they are completely exhausted and need to be replaced.
Please check the common problems listed in this table before seeking professional help.
If none of the tips provided here help, if you are dealing with a problem not listed here, or if you are otherwise uncertain, contact your retailer for more information.
| Phenomenon Cause/measure | Reference page |
| The product does not turn ON | ● Have you inserted the dry-cell battery or the rechargeable battery? → Make sure that the battery is inserted. |
| ● Is the microphone currently inserted into the charger? → Even if the [CHG] indicator does not light up, the microphone cannot be turned ON as long as it is inserted into the charger. Take the microphone out of the charger and then turn it ON. | |
| ● Is the battery depleted? → If it is, replace it (if it is the dry-cell battery) or charge it (if it is the rechargeable battery). | |
| ● Is the battery inserted according to the correct polarities? (Positive ⊕, negative ⊙ → Make sure that the battery is inserted correctly. | |
| The [PWR] indicator blinks red and I cannot use the microphone | ● The microphone is not paired. Alternatively, there could have been an error during the pairing process due to a bad connection. → Place the microphone as close as possible to the antenna and try pairing it again. |
| The [PWR] indicator blinks orange and I cannot use the microphone | ● The microphone may be outside of the antenna range, and it cannot establish a connection. → Move the microphone inside the antenna range. |
| ● Is the receiver turned ON? → Make sure that the receiver is powered. |
| Phenomenon Cause/measure | Reference page | |
| The [PWR] indicator blinks green and I cannot use the microphone | ●You cannot use the microphone because there is another active microphone paired to the same channel. →Stop using the other microphone paired to the same channel. | 13 |
| ●The microphone may be almost outside of the antenna range. →Move the microphone inside the antenna range. | 13 | |
| Audio from the microphone unit is not transmitted | ●Is an external device connected to the [AUDIO IN] connector? →When an external device is connected, even if it is turned OFF, it will take precedence over the microphone unit, which will stop audio transmission from the microphone unit. Disconnect the plug from the [AUDIO IN] connector. | 29 |
| ●Is the volume on the receiver, connected amplifier, etc. high enough? →Adjust the volume with the volume adjustment knob. | — | |
| I cannot charge the microphone (The [CHG] indicator stays off) | ●Is the microphone properly inserted into the charger? →Make sure that the microphone is properly inserted into the charger. | 32 |
| I cannot charge the microphone (The [CHG] indicator only stays on for a few minutes) | ●Is the battery already charged? →The battery may already be fully charged. Take the microphone out of the charger and use it as normal. | 32 |
| I cannot charge the microphone (The [CHG] indicator blinks) | ● The battery inside the microphone may be dry-cell battery or deteriorated rechargeable battery. → Make sure that the proper type of battery is inserted. | 32 |
| ● Almost empty rechargeable battery may be incorrectly detected as dry-cell battery. → Remove the microphone from the charger and insert it back in multiple times until the battery is properly recognized. | 34 | |
| ● Is the battery extremely hot? → Check the battery temperature. | 32 | |
| ● Have you inserted the rechargeable battery? → Make sure that you have inserted the rechargeable battery. | 16 | |
| ● Is the battery inserted according to the correct polarities? (Positive ⊕, negative ⊙ → Make sure that the battery is inserted correctly. | 16, 30 | |
| The battery runtime is short despite being fully charged | ● Is the battery you are using deteriorated, for example because of extensive use? → Deteriorated battery may hold less charge, may be unable to power ON the microphone, and cause other problems. Replace them with new rechargeable battery. | 30 |
| Wireless Used frequencies 1921.536 MHz to 1928.448 MHz | |
| Antenna Internal antenna | |
| Microphone type Tie pin Unidirectional electret condenser microphone | |
| Frequency response 100 Hz to 15 kHz | |
| External input connector -14 dBV line-in Ø3.5 mm stereo mini jack(Monaural mix) | |
| Connector for [SET] USB micro type B | |
| Battery type Rechargeable battery: Ni-MH AA-size battery × 1Dry-cell battery: alkaline AA-size battery × 1 | |
| Battery runtime\(\begin{array}{c}\text{Assuming continuous use at}\\ \text{a 25 °C (77 °F) temperature}\\ \text{with Panasonic batteries}\end{array}\) | Approx. 8 hours (Ni-MH AA-size battery BK-3MCCA)\(\begin{array}{c}\text{Approx. 6 hours (Alkaline AA-size battery LR6PA)}\\ \text{Approx. 8 hours (Alkaline AA-size battery LR6XE)}\end{array}\) |
| Display (indicators) Power, Charge | |
| Operating temperature range 5 °C to 35 °C (41 °F to 95 °F) | |
| Operating humidity range | 10 % to 90 % (no condensation) |
| Dimensions | Transmitter:\(60~mm (W) x 97~mm (H) x 20~mm (D)\)(2-3/8 inches x 3-13/16 inches x 13/16 inches)Microphone unit:\(\text{Maximum diameter: 13 mm (1/2 inches),}\)Length: 22 mm (7/8 inches),Length of the transmitter-microphone unit cable:1000 mm (39-3/8 inches) |
| Mass | Transmitter: Approx. 95 g (0.2 lb)(including LR6PA alkaline battery)Microphone unit: Approx. 20 g (0.04 lb) |
| Finish | Black finish |
Standard accessories
Operating Instructions (this booklet) 1
Warranty Card 1
Microphone clip 1
Microphone holder (pre-attached) 1
Windscreen (pre-attached) 1
Microphone identification sticker 1
AVERTISSEMENT :
Partie responsible :
Panasonic Corporation of North America
Two Riverfront Plaza, Newark, NJ 07102-5490
Pile rechargeable : Pile Ni-MH type AA Panasonic BK-3MCCA
Piles sèches : Pile alcaline type AA Panasonic LR6PA
Pile alkaline type AA Panasonic LR6XE
Pile rechargeable : Pile Ni-MH type AA Panasonic BK-3MCCA
Piles sèches : Pile alcaline type AA Panasonic LR6PA
Pile alkaline type AA Panasonic LR6XE
Panasonic Corporation of North America
Two Riverfront Plaza, Newark, NJ 07102-5490
http://business.panasonic.com/
Panasonic Canada Inc.
5770 Ambler Drive, Mississauga, Ontario, L4W 2T3 Canada
1-877-495-0580
https://www.panasonic.com/ca/
© Panasonic Corporation 2019