
MVHP8200BT - DVD player PIONEER - Free user manual and instructions
Find the device manual for free MVHP8200BT PIONEER in PDF.
| Product type | Multimedia car radio with DVD player |
| Brand | Pioneer |
| Model | MVH-P8200BT (with Bluetooth) / MVH-P8200 (without Bluetooth) |
| Dimensions (W × H × D) | Approx. 178 × 50 × 165 mm (standard DIN) |
| Weight | 1.5 kg (estimated) |
| Power supply | 14.4 V DC (10.8 V to 15.1 V acceptable), negative ground |
| Maximum current consumption | 10.0 A |
| Display | Active matrix TFT screen, NTSC compatible |
| Supported audio formats (USB/SD) | MP3, WMA, AAC (iTunes), LPCM (not supported for DivX) |
| Supported video formats (USB/SD) | DivX (Home Theater 3,4,5,2,6), .srt subtitles |
| Supported image formats | JPEG (baseline, EXIF 2.1 up to 8192×7680) |
| Playback sources | DVD, CD, USB, SD card, iPod/iPhone, AUX (3.5 mm jack) |
| Wireless connectivity (BT model) | Bluetooth 2.0, class 2, max range 10 m |
| Radio tuner | FM (87.9-107.9 MHz), AM (530-1710 kHz), RDS |
| Audio output power | 50 W × 4 max, 22 W × 4 RMS (4 Ω, 1% THD) |
| Equalizer | 8-band graphic equalizer (40 Hz to 10 kHz), ±12 dB |
| High-pass filter (HPF) | 50/63/80/100/125 Hz, slope -12 dB/octave |
| Subwoofer output | Mono, adjustable frequency (50-125 Hz) and gain (+6 to -24 dB) |
| Safety | Parking brake lock, front panel disconnection warning |
| Maintenance | Clean with a soft dry cloth, avoid liquids and direct sunlight |
| Included accessories | Remote control (CR2025 battery included), detachable face, USB cable |
Frequently Asked Questions - MVHP8200BT PIONEER
User questions about MVHP8200BT PIONEER
0 question about this device. Answer the ones you know or ask your own.
Ask a new question about this device
Download the instructions for your DVD player in PDF format for free! Find your manual MVHP8200BT - PIONEER and take your electronic device back in hand. On this page are published all the documents necessary for the use of your device. MVHP8200BT by PIONEER.
USER MANUAL MVHP8200BT PIONEER
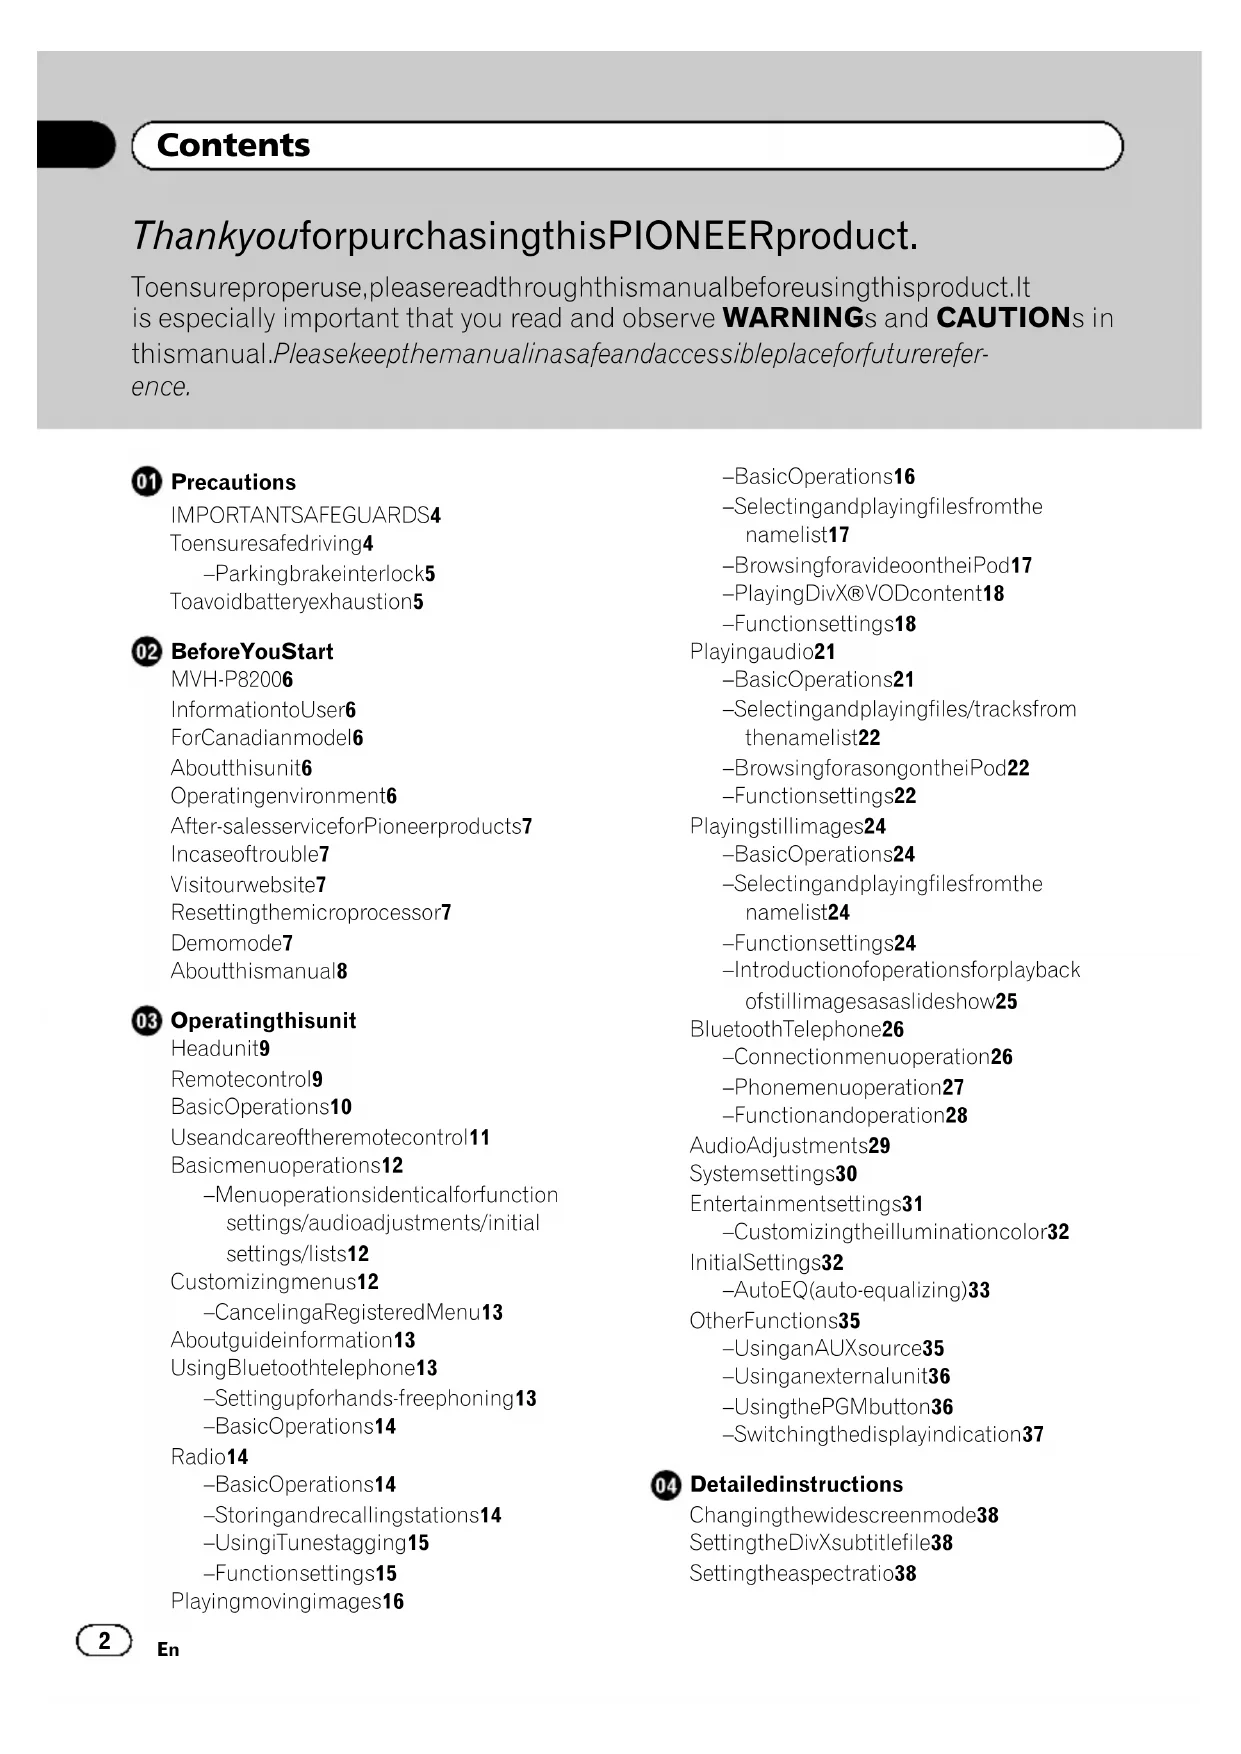
ThankyouforpurchasingthisPIONEERproduct.
Toensureproperuse,pleasereadthroughthismanualbeforeusingthisproduct.It is especially important that you read and observe WARNINGs and CAUTIONs in this manual.Pleasekeepthemanualinasafeandaccessibleplaceforfuturereference.

Precautions
IMPORTANTSAFEGUARDS4
Toensuresafedriving4
-Parkingbrakeinterlock5
Toavoidbatteryexhaustion5

BeforeYouStart
MVH-P82006
InformationtoUser6
ForCanadianmodel6
Aboutthisunit6
Operatingenvironment6
After-saleserviceforPioneerproducts7
Incaseoftrouble7
Visitourwebsite7
Resettingthemicroprocessor7
Demomode7
Aboutthismanual8

Operatingthisunit
Headunit9
Remotecontrol9
BasicOperations10
Useandcareoftheremotecontrol11
Basicmenuoperations12
-Menuoperationsidenticalforfunction settings/audioadjustments/initial settings/lists12
Customizingmenus12
-CancelingaRegisteredMenu13
Aboutguideinformation13
UsingBluetoothtelephone13
-Settingupforhands-freephoning13
-BasicOperations14
Radio14
-BasicOperations14
-Storingandrecallingstations14
-UsingiTunestagging15
-Functionsettings15
Playingmovingimages16
-BasicOperations16
-Selectingandplayingfilesfromthenamelist17
-BrowsingforavideoontheiPod17
-PlayingDivX®VODcontent18
-Functionsettings18
Playingaudio21
-BasicOperations21
-Selectingandplayingfiles/tracksfrom thenamelist22
-BrowsingforasongontheiPod22
-Functionsettings22
Playingstillimages24
-BasicOperations24
-Selectingandplayingfilesfromthenamelist24
-Functionsettings24
-Introductionofoperationsforplayback ofstillimagesasasideshowhow25
BluetoothTelephone26
-Connectionmenuoperation26
-Phonenuoperation27
-Functionandoperation28
AudioAdjustments29
Systemsettings30
Entertainmentsettings31
-Customizingtheilluminationcolor32
InitialSettings32
-UsingthePGMbutton36
Switchingthedisplayindication37

Detailedinstructions
Changingthewidescreenmode38
SettingtheDivXsubtitlefile38
Settingtheaspectratio38
DisplayingtheDivX®VODregistration code39
Displayingthedeactivationcode39
Changingthepictureadjustment39
05 Availableaccessories
HDRadio™tuner40
-BasicOperations40
-Storingandrecallingstations40
-UsingiTunestagging40
-Functionsettings40
XMTuner40
-BasicOperations41
-Storingandrecallingstations41
-SelectinganXMchanneldirectly41
-Functionsettings41
-Selectingachannelfromachannel category42
-DisplayingtheRadioID42
SIRIUSSatelliteRadiotuner42
-BasicOperations42
-Storingandrecallingstations43
-SelectingaSIRIUSchannel directly43
-Functionsettings43
-Selectingachannelfromachannel category44
-UsingtheInstantReplayfunction44
AdditionalInformation
Troubleshooting45
Errormasses45
UnderstandingautoEQerrormessage48
Indicatorlist48
Handlingguideline49
Compressed audio/videoocompatibility(USB, SD)51
iPodcompatibility52
Sequenceofaudiofiles52
Usingthedisplaycorrectly53
-Handlingthedisplay53
Liquidcrystaldisplay(LCD)screen53
-LED(light-emittingdiode) backlight53
-Fluorescenttube53
Copyrightandtrademark54
Specifications56
IMPORTANTSAFEGUARDS
Please read all of these instructions regarding your display and retain them for further reference.
1 Readthismanuallyandcarefullybeforeoperatingyourdisplay.
2Keepthismanualhandyasareference for operating proceduresandsafetyinformation.
3Paycloseattentionontoall warningsinthis manualandfollowtheinstructionscarefully.
4 Donotallowotherpersonstousethissystemuntiltheyhavereadandunderstood theoperatinginstructions.
5 Donotinstallthedisplaywhereitmay(i) obstructthedriver'svision,(ii)impairthe performanceofanyofthevehicle'soperatingsystemssafetyfeatures,includingairbags,hazardlampbuttonstoriii) impairthedriver'sabilitytosafelyoperatethevehicle.
6 Donotoperatethisdisplayifdoingsoin anywaywilldivertyourattentionfrom theseafeoperationofyourvehicle. Always observesafedrivingrulesandfollowall existingtrafficregulations.Ifyouexperienceddifficultyinoperatingthesystemor readingthedisplay,parkourvehicleina safelocationandmakenecessaryadjustments.
7 Pleaseremembertowearyourseatbeltat alltimeswhileoperatingyourvehicle.If youareeverinanaccident,yourinjuries canbeconsiderablymoreseverifyour seatbeltisnotproperlybuckled.
8Neveruseheadphoneswhiledriving.
9Topromotesafety,certainfunctionsare disabledunlesstheparkingbrakeison, andthevehicleisnotinmotion.
10Neversetthevolumeofyourdisplayso highthatyoucannothearoutsidetraffic andemergencyvehicles.
WARNING
- Donattempttoinstallorserviceyour displaybyyourself.Installationorservic ingofthedisplaybypersonswithout trainingandexperienceinelectronic equipmentandautomotiveaccessories maybedangerousandcouldexposeyou totheriskoflectricshockorother hazards.
Toensuresafedriving
WARNING
LIGHTGREENLEADATPOWERCON-NECTORISDESIGNEDTODETECT PARKEDSTATUSANDMUSTBECN-NECTEDTOTHEPOWERSUPPLYSIDE OFTHEPARKINGBRAKESWITCH.IMPROPERCONNECTIONORUSEOF THISLEADMAYVIOLATEAPPLICABLE LAWANDMAYRESULTINSERIOUSINJURYORDAMAGE.
- Toavoidtheriskofdamageandjuryandthe potentialviolationofapplicablelaws,thisunit isnotforusewithvideothatisvisibletothe driver.
- Toavoidtheriskofaccidentandthepotential violationofapplicablelaws,noviewingof frontseatvideoshouldeveroccurwhethe vehicleisbeingdriven.
- Insomecountriesorstatesstheviewing of imagesonadisplayinsidevehicleevenby personsotherthanthedrivermaybeillegal. Wheresuchregulationsapply,theymustbe obeyed.
Whenyouattempttowatchvideoimage whiledriving,thewarningViewingofffront seatvideosourcewhiledrivingisstrictly prohibited.willappearonthefrontdisplay. Towatchvideoimageonthefrontdisplay, parkyourvehicleinasafeplaceandapplythe parkingbrake.
Precautions
Certain functions(微观行为)offered by this unit could be dangerous and/or unlawful if used whileparking brake. If you attempt to use the vehicle's brakes, they will become disabled until you stop the vehicle's safe place, and (1) apply the parking brake, (2) release the parking brake, and then (3) apply the parking brake again. Please keep the brakepedal pushed down before releasing the parking brake.
Operation
1PressM.C.todisplaythenextpage.
2PressM.C.toselectOK.

Toavoidbatteryexhaustion
Keepthevehicleengineerunningwhenusing thisunittoavoiddrainingthebatterypower.
- Whennopowerissuppliedtothisunit, suchaswhenthevehiclebatteryisbeing replaced,themicrocomputerofthisunitreturnstoitsinitialcondition.Werecommendthatyoutranscribetheaudo adjustmentdata.

WARNING
Donotusewithvehiclesthatdonotfeaturean ACCposition.
FCCID:AJDK029
MODELNO.:MVH-P8200BT
IC:775E-K029
ThisequipmentcomplieswithFCC/ICradiation exposurelimitset forthforuncontrolled equipmentandmeetstheFCC/ICradiofrequency(RF)ExposureGuidelinesinSupplementCtoOET65.Thisequipmenthasverylow levelsofRFenergythatitdeemedtocomply withoutmaximumpermissiveexposureevaluation (MPE).Butitisdesirablethatitshouldbe installedandoperatedwithatleast20cmand morebetweentheradiatorandperson'sbody (excludingextremities:hands,wrists,feet and ankles).
This transmitter must not be located or operated in conjunction with any other antenna or transmitter.
MVH-P8200
Thisdevicecomplieswithpart15oftheFCC Rules. Operationissubjecttothefollowing twoconditions:
(1)Thisdevicemaynotcauseharmfulinterference,and(2)thisdevicemustacceptanyinterferencereceived,includinginterferencethat maycauseundesiredoperation.

InformationtoUser
Alterationormodificationscarriedoutwithout appropriateauthorizationmayinvalidatethe user'srighttooperatethequipment.

ForCanadianmodel
ThisClassBdigitalapparatuscomplieswith CanadianICES-003.

Aboutthisunit
ThetunerfrequenciesonthisunitareallocatedforuseinNorthAmerica.Useinotherareasmayresultinpoorreception.

WARNING
Handlingthecordonthisproductorcordsassociatedwithaccessoriesoldwiththeproductmayexposeyoutochemicalslistedonproposition65knowntotheStateofCaliforniaandothergovernmententitiestocausecancerandbirthdefectorotherreproductiveharm.Washhandsafterhandling..

CAUTION
- Donotallowthisunittocomeintocontact withliquids. Electricalshockcouldresult. Also,damagetothisunit,smoke,andoverheatingcouldresultfromcontactwithliquids.
- Keepthismanualhandyforfuturereference.
- Alwayskeep the volume lowened to hear outside sounds.
- Avoidexposureto moisture.
- If the battery is disconnected or discharged, any preset memory will be erased.

Important(Serialnumber)
Theserialnumberislocatedonthebottomof thisunit.Foryourownsecurityandconvenience, besuretorecordthisnumberontheenclosed warrantycard.
Operatingenvironment
Thisunitshouldbeusedwithinthetemperaturerangesshownbelow.
Operatingtemperaturerange: -10^ + 60^ (14°Fto140°F)
EN300328ETCtesttemperature: -20^ cand
+55°C(-4°Fand131°F)
BeforeYouStart
After-saleservicefor Pioneerproducts
Pleasecontactthedealerordistributorfrom whereyoupurchasedthisunitforafter-sales service(includingwarrantyconditions)orany otherinformation.Incasethenecessaryinformationisnotavailable,pleasecontactthe companieslistedbelow: Pleasedonotshipourunittothecompanies attheaddresseslistedbelowforrepairwithout advancecontact.
U.S.A.
PioneerElectronics(USA)Inc.
CUSTOMERSUPPORTDIVISION
P.O.Box1760
LongBeach,CA90801-1760
800-421-1404
CANADA
PioneerElectronicsofCanada,Inc.
CUSTOMERSATISFACTIONDEPARTMENT
300AllstateParkway
Markham, Ontario L3R0P2
1-877-283-5901
905-479-4411
ForwarrantyinformationpleaseseetheLimitedWarrantysheetincludedwiththisunit.

Incaseoftrouble
Shouldthisproductfailtooperateproperly, pleasecontactyourdealerornearestauthorizedPioneerServiceStation.
Visitourwebsite
Visitusatthefollowingsite:
http://www.pioneerelectronics.com
1 Registry your product. Wewill keep the details of your purchase on file to help you refer to this information in the event of an insurance claims such as lossortheft.
2Receiveupdatesonthelatestproductsand technologies.
3Downloadowner'smanuals,orderproduct catalogues,researchnewproducts,and muchmore.
4Yourfeedbackisimportantinourcontinuelforttodesignandbuildthemostadvanced,consumer-focusedproductintheindustry.
Serialnumber
Resettingthemicroprocessor
Themicroprocessormustberesetinthefollowingsituations:
- Beforeusingthisunitforthefirsttimeafter installation
-Iftheunitfailstooperateproperly - Whenstrangeorincorrectmessagesappearonthedisplay
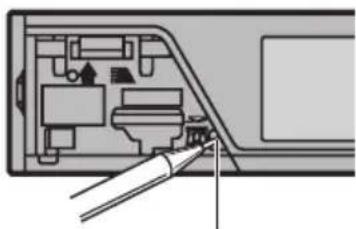
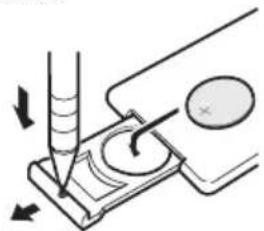
RESETbutton
1Removethefrontpanel.
2PressRESETwithapentiporother pointedinstrument.
Demomode

Important
Failuretoconnecttheredlead(ACC)ofthisunit toterminalcoupledwithignitionswitchon/off operationsmayleadbatterydrain.
ThedemoautomaticallystartswhentheignitionswitchissettoACCorONwhiletheunitisturnedoff.Turningofftheunitdoesnotcanceldemomode.Tocancelthedemomode,operatethefunctionintheinitialsettingmenu.Operatingthedemowhilethegignitionswitch issettoACCmaydrainbatterypower. RefertoDemonstration(demodisplaysetting)onpage32.
Aboutthismanual
This manual describes operations of both MVH-P8200BT and MVH-P8200. Only MVH-P8200BT features Bluetooth functions, so the explanationsforthosefunctionsdonotapply to MVH-P8200.
Inthe following instructions, USBmemories, USBportableaudiolayers, and SDmemory cardsarecollectivelyreferredtoas"external storagedevices(USB,SD). "IfonlyUSBmemoriesandUSBportableaudiolayersareindicated, theyarecollectivelyreferredtoas"USB storagedevices."
Inthismanual,iPodandiPhonewillbereferredtoas"iPod".
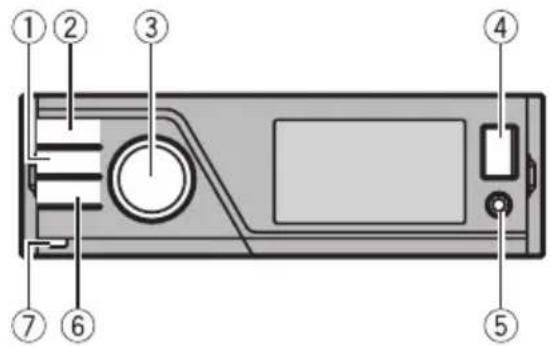
Headunit
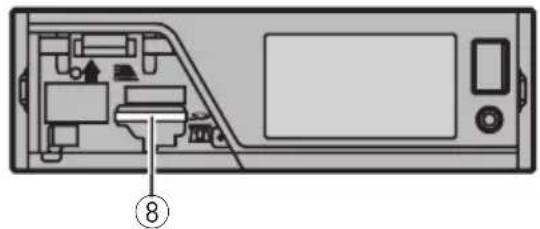
| PartPart | |
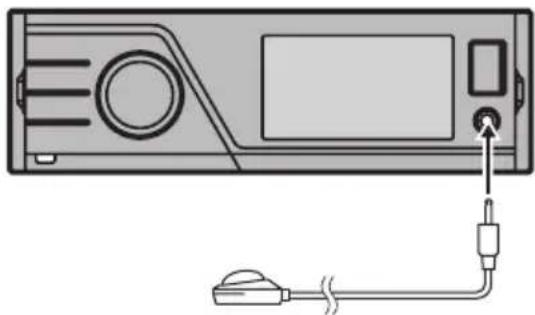
| ①HOME⑤ | AUXinputjack(3.5 mmstereo/video jack) Microphoneinput jackforautoEQ measurement |
| ②SRC/OFF⑥ | back/display off) |
| ③ MULTI-CONTROL (M.C.) | ⑦Detachbutton |
| ④USBport⑧ | SDmemorycard slot Removethefront paneltoaccessthe SDmemorycard slot. |

CAUTION
UseanoptialPioneerUSBcable(CD-U50E)to connecttheUSBaudiolayer/USBmemoryas anydeviceconnecteddirectlytotheunitwill protrudeoutfromtheunitandmaybedangerous. Donotuseunauthorizedproducts.
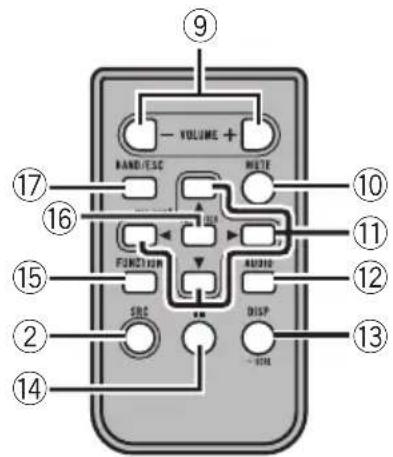
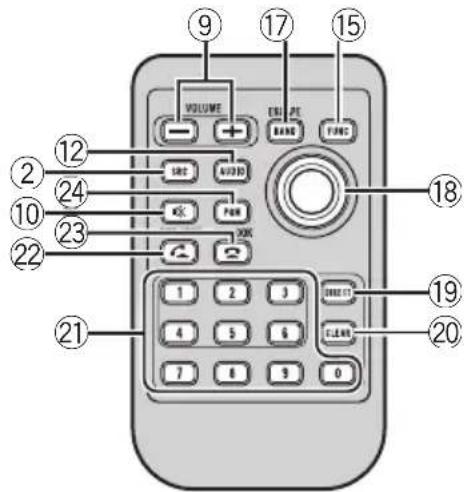
Remotecontrol
OnlyforMVH-P8200.
OnlyforMVH-P8200BT.
| PartOperation | |
| 9 | +/-(VO-LUME) Presstoincreaseordecreasevo-lume. |
| 10MUTE | Presstomute.Pressagaintoun- mute. |
| 11▲/▼/▲ | Presstoperformmanualseek tuning,fastforward,reverseand tracksearchcontrols Alsused forcontrollingfunctions. |
| 12 AUDIO | Press to select an audio function. |
Operatingthisunit
| PartOperation | |
| 13DISP/SCRL | Presstoselectdifferentdisplays fortheaudiosource.Presstoselectthebasicscreenshot imagescreenforthevideo source.Ifthebackgroundsettingon theentertainmentmenuis turnedoff,youcanswitchbe-tweenthebasicsscreenand imagescreen. |
| 14II | Presstopauseorresumeplay-back. |
| 15FUNCTIONPresstoselectfunctions. | |
| 16LIST/ENTER | Presstodisplaythelistdepending onthesource.Whileintheoperatingsnuc,presstocontrolfunctions. |
| 17BAND/ES-CAPE | PresstoselectamongthreeFM bandsandoneAMband.Whenplayingexternalstoragede-vicescontainingamixtureofvariousmediafiletypes,presstoswitchbetweenmediafiletypes toplay.Music(compressedaudio)-Video(DivXvideofiles)-Photo(JPEGpicturefiles)Presstoturrentotheordinarydis-playfromthelist/functionmenu.Presstocanceltheinitialsetting menu. |
| 18Thumbpad | Movetoperformmanualseek tuning,fastforward,reverseand tracksearchcontrols Alsused forcontrollingfunctions.FunctionsarethesameasM.C.exceptforvolumecontrol.Presstodisplaythefolderlist,file listorpresetchannellistdepend-ingonthesource. |
| 19DIRECT | Presstodirectlyselectthedesired channelforXM/SIRIUStuner. |
| 20Clear | Presstocanceltheinputnumber when0to9areused. |
| PartOperation | ||
| 21 | 0to9but-tons | Presstodirectlyselectthedesired channelorpresettuning Buttons 1to6canoperatorethepresettun- ing. Pressandholdoneofthebuttons 1to6topresetthedesiredsta- tion. |
| 22 | OFF HOOK | Presstostarttalkingonthe phonewhileoperatingaphone. |
| 23 | ONHOOK | Whileoperatingthephone source,presstoendacallorre- jectanincomngcall. |
| 24 | PGM | Presstoooperatetheprepro- grammedfunctionsforeach source.(RefertoUsingthePGM buttononpage36.) |

BasicOperations

Important
- Handlegentlywhenremovingorattaching thefrontpanel.
- Avoid subjecting the front panel to excessive shock.
- Keep the front panel out of direct sunlight and hightemperatures.
- Toavoid damagetohedevicerevehicleinterior,removeancablesanddevicesattached tothefrontpanelbeforedetachingit.
Operatingthisunit
| Removingthefrontpaneltoprotectyourunitfrom theft 1|Pressthedetachbuttontoreleasethefront panel. 2|Grabthefrontpanelandremove. 3|Alwayskepthedetachedfrontpanelinaprotectiondevicessuchasaprotectioncase. |
| Re-attachingthefrontpanel 1|Slidethefrontpanelupuntilitclicks. Thefrontpanelandtheheadunitareconnected ontheupperside.Makesurethatthefrontpanel hasbeenproperlyconnectedtotheheadunit. 2|Pressthelowersideofthefrontpaneluntilitis firmlyseated. Ifyoucan'tattachthefrontpaneltotheheadunit successfully,tryagain.However,forcingthefront panelintoplacemayresultindamage. |
| Turningtheuniton 1|Press SRC/OFF to turn the unit on. |
| Turningtheunitoff 1|Press SRC/OFF and hold until the unit turns off. |
| Selectingasource 1|Press SRC/OFF to cycle between: XM (XM tuner)—SIRIUS (SIRIUS tuner)—Digital Radio(HDRadiotuner)/Radio(tuner)—USB (USBstoragedevice)/iPod(iPodconnectedusing USB input)—SD (SD memory card)—EXT1 (external unit 1)—EXT2 (external unit 2)—AUX (AUX) |
| Adjustingthevolume 1|TurnM.C.toadjustvolume. |

Note
Whenthisunit'sblue/whiteleadisconnectedto thevehicle'sauto-antennarelaycontrolterminal, thevehicle'santennaextendswhenthisunit's sourceisturnedon.Toretracttheantenna,turn thesourceoff.
Useandcareoftheremote control
Usingtheremotecontrol
1 Pointtheremotecontrolinthedirectionofthe frontpaneltooperate. Whenthusingforthefirsttime,pulloutthefilm protrudingfromthetray.
Replacingthebattery
1Slidethetrayoutonthebackoftheremotecontrol.
2Insertthebatterywiththeplus (+) andminus(-)
polesalignedproperly.
OnlyforMVH-P8200.
OnlyforMVH-P8200BT.


WARNING
- Keep the battery out of thereach of children. Should the battery beswallowed, consult a doctor immediately.
- Batteries(batterypackorbatteriesinstalled) mustnotbeexposedtoexcessiveheatsuch assunshine,fireorthelike.

CAUTION
- UseoneCR2025(3V) lithiumbattery.
- Removethebatteryiftheremotecontrolisnot usedforamonthorlonger.
- Thereisadangerofexplosionifthebatteryis incorrectlyreplaced.Replacesonlywiththe sameorequivalenttype.
- Donothandlethebatterywithmetallictools.
- Donotstorethebatterywithmetallicobjects.
- If the battery leaks, wipe heremotecontrol completely clean and install new battery.
Operatingthisunit
- Whendisposingofusedbatteries,comply withgovernmentalregulationsorenvironmentalpublicinstitutions'rulesthatapplyinyour country/area.
- "Perchlorate Material - special handling may apply.
See www.dtsc.ca.gov/hazardouswaste/ perchlorate.(ApplicabletoCalifornia,U.S.A.)

Important
- Donotstoretheremotecontrolinhightemperaturessordirectsunlight.
- Theremotecontrolmaynotfunctionproperly indirectsunlight.
- Donotlettheremotecontrolfallontothefloor,whereitmaybecomejammedunderthebrakeoracceleratorpedal.
Basicmenuoperations
You can operates source selection, list function, audio adjustment, etc., using HOME.
1PressHOME.
2PushM.C.upordowntochangethe menuoption.
Home(homemenu)—Custom(custom menu)—Phone(phonenum)
ThephonemenuisavailableonlyforMVHP8200BT.
3TurnM.C.toselectthemenuoption.
Afterselecting,performthefollowingprocedures.
Home(homemenu)
Source(selectingasource)
1|PressM.C.todisplaythesettingmode.
2 Use M.C. to select the desired source name. Turntochangethesource.Presstoselect. Forthesourcesyoucanchoose,refertoSelecting asourceonthepreviouspage.
List(operatingsalistmenu)
1 PressM.C.todisplaythelist. Presstodisplaythefolderlist,filelistorpreset channellistdependingonthesource.
Audio(settinganaudiomenu)
1PressM.C.todisplaytheaudiomenu. RefertoAudioAdjustmentssonpage29.
System(settingasystemmenu)
1PressM.C.todisplaythesystemmenu. RefertoSystemsettingsonpage30.
Entertainment(settinganentertainmentmenu)
Press M.C. to display the entertainment menu. RefertoEntertainmentsettingssonpage31.
Custom(custommenu)
You can choose menus with each menu (Audio function menu, etc.) and register them to this custom menu.
RefertoCustomizingmenuonthispage.
Thecustommenuisdisplayed.
1PressM.C.todisplaythesettingmode.
Phone(phonemenu)
Thephonenuisdisplayed.
RefertoPhonenuoperationonpage27.
Menuoperationsidenticalfor functionsettings/audo adjustments/initialsettings/lists
Returningtothepreviousdisplay
Returningtothepreviouslist/category(thefolder/ categoryonelevelhigher)
1Press

Customizingmenus
You can register frequently used menu items to custom menu.
- Themenucolumnsyoucanregisterare displayedincircularindicators.
Operatingthisunit
1Displaymenucolumnstoregister.
2PushandholdM.C.righttoregisterthemenucolumn.
Themenucolumnsyouhavenegisteredare displayedinlarge,circularindicators.
3Displaythecustommenuandchoosea registeredmenu.
ReferoBasicmenuoperationsonthepreviouspage.

Note
Youcanregisterupto12columns.
CancelingaRegisteredMenu
1Displaythecustommenuandchoosea registeredmenu.
ReferoBasicmenuoperationsonthepreviouspage.
2PushandholdM.C.righttocancelthe registeredmenu.
Aboutguideinformation
Thisunitdisplaysguideinformationonhowto useM.C.foreachfunction.
1Displaythesystemmenu.
ReferoBasicmenuoperationsonthepreviouspage.
2UseM.C.toselecttheGuidInfo.
Turntochangethemenuoption.Presstoselect.
Guideinformationisdisplayed.
| Operation | |
| TurnM.C. | |
| PushM.C.upordown. | |
| Operation | |
| PushM.C.leftorright. | |
| PressM.C. | |
| PressandholdM.C. | |
| PushM.C.up. | |
| PushM.C.down. | |
| PushandholdM.C.up. |
PressM.C.todisplaythenextpage.

UsingBluetoothtelephone
ThisfunctionisavailableonlyforMVH-P8200BT.

Important
- Sincethisunitisonstandbytoconnectwith yourcellularphoneviaBluetoothwireless technology,usingitwithouttheengineerunningcandrainthebatterypower.
- Operationsmayvarydependingonthekindof cellularphone.
- Advancedoperationsthatrequireattention suchasdialingnumbersonthemonitor, usingthephonebook,etc.,areprohibited whiledriving.Parkyourvehicleinasafeplace whenusingtheseadvancedoperations.
Settingupforhands-freephoning
Beforeyoucanusethehands-freephoning functionyoumustsetuptheunitforusewith yourcellularphone.
[1]Connection
OperatetheBluetoothtelephoneconnection menu.RefertoConnectionmenuoperationon page26.
2Functionsettings
OperatetheBluetoothtelephonefunctionmenu.
RefertoPhonenuoperationonpage27.
BasicOperations
Makingaphonecall
[1]RefertoPhonenumberoperationonpage27.
Answeringanincom ingcall
1Whenacallisreceived,pressM.C.
-Youcanalsoperforthisoperationbypush
ingM.C.up.
Endingacall
[1]PressM.C.
Rejectinganincomngcall
1Whenacallisreceived,pushM.C.down.
Answeringacallwaiting
Whenacalli received, pressM.C.
-You canalsoperformthisoperationbypush
ingM.C.up.
Switchingbetweencallersonhold
PushM.C.up.
Cancelingcallwaiting
1PushM.C.down.
Adjustingtheotherparty'slisteningvolume
Push M.C. left or right while talking on the phone.
Turningprivatemodeonoroff
Push and hold M.C. up while talking on the phone.

Notes
- Ifprivatemodeisselectedonthecellular phone, hands-freephoningmaynotbeavailable.
- Theestimatedcalltimeappearsinthedisplay (thismaydifferslightlyfromtheactualcall time).
Radio
BasicOperations
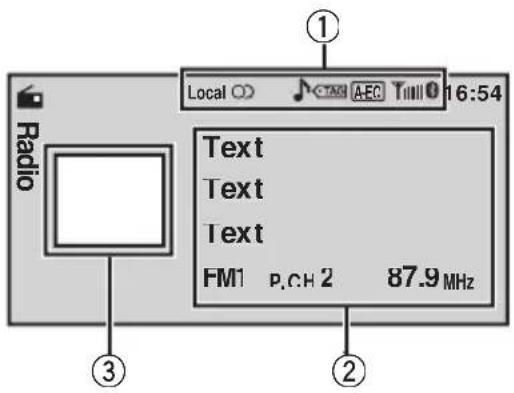
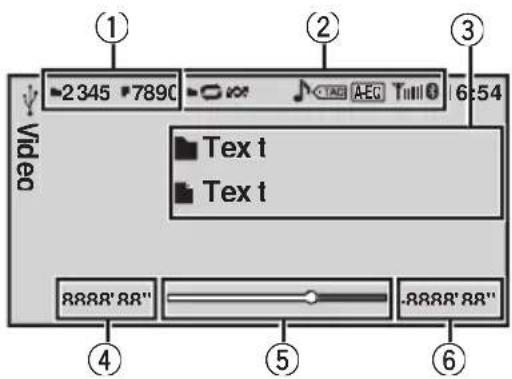
①Indicatorisplayarea RefertoIndicatoristonpage48.
②Textinformationarea
Songtitle
-Artistname
-Programservicename
- Band/Presetnumber/Frequencyindicator
③Sourceimagedisplay
Manualtuning(stepbystep)
PushM.C.leftorright.
Seeking
1PushandholdM.C.leftorright,andthen release.
YouancancelseektuningbypushingM.C.left orright.
WhilepushingandholdingM.C.leftorright,you canskipstations.Seektuningstartsassoonas you'releaseM.C.
Storingandrecallingstations
Youcaneasilystoreuptosixstationsforeach bandaspresets.
Operatingthisunit
Using the presetscreen
Push M.C. up or down to display the preset screen.
Push M.C.up or down until the desired band (FM1, FM2, FM3 for FM or AM) is displayed.
3 Use M.C. to store the selected frequency in the memory. Turntochangethepresetnumber.Pressand holdtostore.
4UseM.C.toselectthedesiredstation. Turntochangethestation.Presstoselect. Youcanalsodisplaythepresetscreenbypressing HOME.Refer to Basic menu operations on page 12.
UsingiTunestagging
Thisfunctioncanbeoperatedwiththefollowing iPodmodels.
—iPod5thgeneration
—iPodnano3rdgeneration
—iPodnano4thgeneration
—iPodnano5thgeneration
—iPodclassic
—iPodclassic120GB
—iPodtouch
—iPodtouch2ndgeneration
iPhone
iPhone3G
However, taginformation can bestored in this uniteven while otheri Podmodels are used.
Thesonginformation tag)canbesavedfrom thebroadcastingstation toyouriPod.The songswillshowupinaplaylistcalled"Tagged playlist"iniTunesthenexttimeyousyncyour iPod.Thenyoucandirectlybuythesongsyou wantfromtheiTunesStore.
Storingthetaginformationtothisunit
Tuneintothebroadcaststation.
2PressandholdM.C.if TAG appearsinthedisplay whilethedesiredsongisbroadcasting.
StoringthetaggedinformationtoyouriPod
[1]ConnecttheiPodtothisunitandtransferthis unit'staginformationtotheiPod.
- Thetaggedsongsandthesongthatyoucan buyfromtheiTunesStoremaybedifferent.
Makesuretoconfirmthesongbeforeyou makethepurchase.
- If you cannot use this function normally, update your Podfirmware.
- Thetaginformationforupto50songscanbestoredonthisunit. Dependingonthetimingofwhenthetaginformationiststored,thetaginformationforthesongplayedbeforeafterthecurrenllyplayingsongmayalsobestored.
- IfanSDdisselectedasthesourcewhiletaginformationisbeingstoredtothisunit,thetaginformationwillnotbetransferredtotheiPod.
- Taginformationcannotbetransferredtothe iPodwhenafelineanSDdeviceisbeing viewedasasideshowhow.
- Whiletransferringthetag,youcannotselect theSDsource.
Functionsettings
1PressM.C.todisplaythefunction menu.
2TurnM.C.toselectthefunction.
Afterselecting,performthefollowing proceduresostosetthefunction.
BSM(beststationsmemory)
BSM(beststationsmemory)automaticallystoresthe sixstrongestationsintheorderoftheirsignal strength.
1PressM.C.toturnBSMon. Tocancel,pressM.C.again.
Local(localseektuning)
Localseektuningletsyoutuneintoonlythoseradio stationswithsufficientlystrongsignsforgoodreception.
PressM.C.todisplaythesettingmode.
Turn M.C. to select the desired setting. FM: Off—Level1—Level2—Level3—Level4
AM: Off—Level1—Level2
Thelargerthesettingnumber, thehigherthesignallevel. The highest level settingallowsreceptionofonlythestrongeststations; while lower settingsletyoureceiveprogressivelyweakerstations.
ressM.C.toconfirmtheselection.
Operatingthisunit

Note
Operationiscompletteevenifthemenuiscan
celledbeforebeingconfirmed.
Playingmovingimages BasicOperations
IfaniPodwithvideocapabilitiesisconnected tothisunitusinganinterfacecablessuchas theCD-IU50V(soldseparately),youcanenjoy thevideocontentsoftheiPodasaniPod source.YouneednotchangetheAUXsetting.
Youcanswitchtothebasicscreenorthe imagescreen.
RefertoDisplay(displaysetting)onpage19.
①Fileinformationareaforthecurrenllyplaying file
Externalstoragedevic USB,SD)
- Folder/filenumberindicator iPod
- Songnumberindicator
②Indicatorisplayarea
- USBstoragedevicethatcanbechargedvia USBwillberechargedwhenpluggedinand theignitionswitchissettoACCorON.
- DisconnectUSBstoragedevicesfromtheunit whennotinuse.
- Incompatible text stored with the video image file may not be displayed or may be displayed incorrectly.
- IncompatibletextsAVEDontheiPodwillnot bedisplayedbytheunit.
- IftheignitionswitchissettoACCorON, the iPodbatterywillbechargedwhileconnected.
-
DisconnectheadphonesfromtheiPodbefore connectingtothisunit.
-
While the Pod disconnected to this unit, the Pod cannot be turned on or off unless the control mode is set to iPod.
- TheiPodwillturnoffabouttwominutesafter theignitionswitchissettoOFF.
- Whenplayingexternalstoragedevicesthat containamixtureofvariousmediafiletypes, switchbetweenmediafiletypeswhenplaying differentfiles.
ReferoA/VFormat(switchingmediafile types)onpage19.
Selectingandplayingfiles fromthenamelist
1Displayingthelistmenu.
RefertoBasicmenuoperationsonpage12.
2UseM.C.toselectthedesiredfilename (orfoldername).
| Changingthefileorfoldername 1TumM.C. |
| Playing 1Whenafileisselected,pressM.C. |
| Viewingalistofthefiles(or folders)intheselected folder 1Whenafolderisselected,pressM.C. |
| Changingthefileorfoldername skip100itemsat once) 1PushM.C.upordown. |
| Changingthefileorfoldername (automaticallyskip 100itemseachtime) 1PushandholdM.C.upordown. |
BrowsingforavideontheiPod
1Displayingthelistmenu.
RefertoBasicmenuoperationsonpage12.
2UseM.C.toselectacategory/video.
| Changingthenameofthevideoorcategory [T]umM.C. |
| Playing [T]henavideoisselected,pressM.C. |
Operatingthisunit
| Viewingalistofthefiles(or folders)intheselected folder 1)Whenacategoryisselected,pressM.C. |
| Searchingthelistbyalphabet 1)Whenalistfortheselectedcategoryisdisplayed, pushandholdM.C.leftorrighttoswitchtoal- phabetsearchmode. 2)TurnM.C.toselectaletter. 3)PressM.C.todisplaythealphabeticallist. Ifalphabetsearchisaborted,NotFoundisdis- played. |
| Changingthenameofthevideo skip100itemsat once) 1)PushM.C.upordown. |
| Changingthenameofthevideo(automaticallyskip 100itemseachtime) 1)PushandholdM.C.upordown. |

Note
DependingonthenumberoffilesintheiPod, theremaybeadelaywhendisplayingalist.
PlayingDivX® VODcontent
SomeDivXVOD(videoon-demand)content mayonlybeplayableafixednumberoftimes. Whenyouattempttoplaybackthistypeof contentsavedonanexternalstoredagedevice, theremainingnumberoftimesitcanbe playedisshownon-screen.Youcanthendecidewhetherornottplaybackthecontents oftheexternalstoredagedevice.
- Ifthereisnolimittothenumberoftimes theDivXVODcontentcanviewed, then youmayinserttheexternalstoragedevice intoyourplayerandplaythecontentas oftenasyoulike,andnomessagewillbe displayed.
- You can confirm thenumberoftimesthat the content can be played by checking the number displayed after RemainingViews:

Important
- InordertoplayDivXVODcontentonthisunit, youfirstneedtoregistertheunitwithyour DivXVODcontentprovider.Fordetailsonyour
registrationcode,refertoDisplayingtheDivX VODregistrationcodeonpage39.
DivXVODcontentisprotectedbyaDRM(DigitalRightsManagement)system.Thisrestrictsplaybackofcontenttospecific,registereddevices.
- Ifmessageisdisplayedafterinserting theexternalstoragedevicecontaining DivXVODcontent,useM.C.toselectadesiredmode.
Turntochangethemode.Presstoselect.
- Play-PlaybackoftheDivXVODcontent
- NextPlay-Skipttothenextfile
- Stop-IfyoudonotwanttoplaytheDivX VODcontent
Functionsettings
1PressM.C.todisplaythefunction menu.
2TurnM.C.toselectthefunction.
Afterselecting,performthefollowingprocedurestosetthefunction.
Externalstoragedevice(USB,SD)
Play/Pause play/pause)
1PressM.C.todisplaythesettingmode.
2 Turn M.C. to select the desired setting. Play—Pause
3PressM.C.toconfirmtheselection.
PlayMode(repeatplay)
1PressM.C.todisplaythesettingmode.
2 Turn M.C. to select a repeat play range.
-All-RepeataIfiles
- File-Repeatthecurrentrfile
- Folder-Repeatthecurrentfolder
3PressM.C.toconfirmtheselection.
Stop(stoppingplayback)
1PressM.C.tostopplayback.
TimeSearch(timesearch)
1PressM.C.todisplaythesettingmode.
2 Turn M.C. to find the part you want to play.
3 PressM.C.toconfirmtheselection.
Operatingthisunit
WideMode(switchingthewidemode)
1PressM.C.todisplaythesettingmode.
2 Turn M.C. to select the desired setting. Full (full) Just (just) Cinema (cinema) Zoom (zoom) Normal (normal) Fordetailsaboutthesettings.refertoChanging thewidescreenmodeonpage38.
3PressM.C.toconfirmtheselection.
Display(displaysetting)
Youcanswitchtothebasicscreenorthemagescreen.
1PressM.C.todisplaythesettingmode.
PressM.C.toselectthedesiredsetting.
A/VFormat(switchingmediafiletypes)
PressM.C.todisplaythesettingmode.
2 Turn M.C. to select the desired setting. Music (compressed audio)—Video (DivX video files)—Photo(JPEGpicturefiles)
3PressM.C.toconfirmtheselection.
DivX®Subtitle(DivXsubtitlefilesettings)
PressM.C.todisplaythesettingmode.
2 Turn M.C. to select the desired setting. Original (DivX subtitles) - Custom (DivX external subtitles) Fordetailsaboutthesettings,refertoSettingthe DivXsubtitlefileonpage38.
3PressM.C.toconfirmtheselection.
TVAspect(aspectratiosettings)
PressM.C.todisplaythesettingmode.
Turn M.C. to select the desired setting. 16:9-LetterBox-PanScan Fordetailsaboutthesettings,refertoSetti aspectratoonpage38.
3PressM.C.toconfirmtheselection.
DivX®VOD(DivX®VODregistrationcode)
1PressM.C.todisplaythesettingmode.
2UseM.C.todisplaythedesiredcode. Turntochangethemenuoption.Presstoselect. RegistrationCode-ReferToDisplayingtheDivX VODregistrationcodeonpage39. Deactivation Code - Refer to Displaying the deactivationcodeonpage39.
AudioLang.(audiolanguagesettings)
Youcanswitchthearaudiolanguageduringplayback whenplayingafilerecordedwithdialogintwoormorelanguages.
1)PressM.C.todisplaythesettingmode.
Turn M.C. to select the desired setting.
3PressM.C.toconfirmtheselection.
SubtitleLang.(subtitlelanguagesettings)
Youcanswitchsubtitlelanguageageduringplayback whenplayingfilerecordedwithsubtitlesinoneormorelanguages.
[1]PressM.C.todisplaythesettingmode.
[2] Turn M.C. to select the desired setting.
[3]PressM.C.toconfirmtheselection.
iPod
Pause(pause)
[1]PressM.C.topauseorresume.
ShuffleMode(shuffle)
PressM.C.todisplaythesettingmode.
[2] Turn M.C. to select your favorite setting.
Songs - Play back songs in the selected list in randomorder.
- Albums - Play back songs from a randomly selected albuminorder.
-Off-Cancelrandomplay.
[3]PressM.C.toconfirmtheselection.
PlayMode(repeatplay)
Refer to Play Mode (repeat play) on the previous page.
However,therepeatrangeisdifferentfromthatof externalstoragedevices.
One-Repeatthecurrentsong
All-Repeat all songs in the selected list
ControlMode(controlmode)
Thisfunctionisnotcompatiblewiththefollowing iPodmodels.
- iPodnano1stgeneration
- iPod5thgeneration
Thisunit'siPodfunctionallowsyoutoconductoperationsfromyouriPodandlistentoitusingyourcar's speakers.
1)PressM.C.toselectyourfavoritesetting.
- iPod - This unit's iPod function can be operated from the connected iPod.
Audio - This unit's iPod function can be operated from this unit.
Operatingthisunit
TimeSearch(timesearch)
Refer to Time Search (time search) on page 18.
WideMode(switchingthewidemode)
Refer to Wide Mode (switching the wide mode) onthepreviouspage.
Display(displaysetting)
Refer to Display (display setting) on the previous page.
ABCSearch(alphabetsearchmodesetting)
Whenthissettingison,youcanswitchtoalphabet searchmodebyturningM.C.twicewhileusingthe browsefunctionoftheiPod.RefertoSearchingthe listbyalphabetonpage18.
[1] Press M.C. to turn the setting for when M.C. is turned twiceonoroff.
—SubtitleLang.(subtitlelanguage settings)

Notes
Operationiscompleteevenifthemenuiscancelledbeforebeingconfirmed.
- SwitchingthecontrolmodetoiPodpauses songplayback.OperatetheiPodtoresume playback.
The following functionsarestillaccessible fromtheunitevenifthecontrolmodeissetto iPod.
Volume
Fastforward/reverse
—Trackup/down
—Pausing
- WhenthecontrolmodeissettoiPod,operationsarelimitedasfollows:
-OnlyControlMode(controlmode)and Pause(pause)functionsareavailable.
Thebrowsefunctioncannotbeoperated fromthisunit.
- You can select the following functions if the background setting on the entertainment menu is off.
—WideMode(switchingthewidemode)
—Display(displaysetting)
DivX®Subtitle(DivXsubtitlefilesettings)
—TVAspect(aspectratiosettings)
Playingaudio BasicOperations
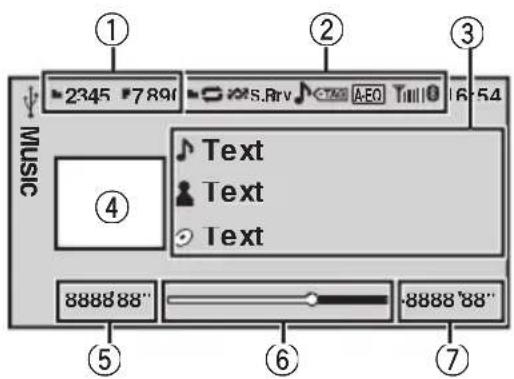
①Fileinformationareaforthecurrenllyplaying file
Externalstoragedevic USB,SD)
- Folder/filenumberindicator iPod
- Songnumberindicator
②Indicatordisplayarea
④Artwork/Sourceimagedesplayarea
iPod
- ArtworkdisplayorSourceimagedisplay
Externalstoragedevic USB,SD)
- Sourceimagedisplay
⑤Playtimeindicator
⑥ Scrubberbar
⑦Remainingtimeindicator
PlayingsongsonaUSBstoragedevic
1)OpentheUSBconnectorcover.
[2]PlugintheUSBstoragedeviceusingaUSB cable.
StoppingplaybackofsongsonaUSBstoragedevic
1|YoumaydisconnecttheUSBstoragedevicat anytime.
PlayingsongsonanSDmemorycard
TRemovethefrontpanel.
2InsertanSDmemorycardintotheSDcardslot. Insertitwiththecontactsurfacefacingdownand pressthecarduntilitclicksandcompletelylocks.
3Re-attachthefrontpanel.
StoppingplaybackofsongsonanSDmemorycard
1Removethefrontpanel.
PresstheSDmemorycarduntilitclicks. TheSDmemorycardisejected.
[3]PullouttheSDmemorycard.
4Re-attachthefrontpanel.
PlayingsongsonaniPod
1OpentheUSBconnectorcover.
2ConnectaniPodtotheUSB cable usinganiPod DockConnector.
Selectingafolder
[1]PushM.C.upordown.
Selectingatrack(chapter)
1|PushM.C.leftorright.
Fastforwardingorreversing
1PushandholdM.C.leftorright.

Notes
- USBstoragedevicethatcanbechargedvia USBwillberechargedwhenpluggedinand theignitionswitchissettoACCorON.
- DisconnectUSBstoragedevicesfromtheunit whennotinuse.
- Incompatible text stored with the audio file may not be displayed or may be displayed incorrectly.
- IncompatibletextsAVEDontheiPodwillnot bedisplayedbytheunit.
- If theignitionswitchisottoACCorON, the Podbatterywill becharged while connected.
- DisconnectheadphonesfromtheiPodbefore connectingtothisunit.
- While the Pod is connected to this unit, the Pod cannot be turned on or off unless the control mode is set to iPod.
- TheiPodwillturnoffabouttwominutesafter theignitionswitchissettoOFF.
Operatingthisunit
Selectingandplayingfiles/ tracksfromthenamelist
Operationsarethesameasthoseformoving images.(RefertoSelectingandplayingfiles fromthenamelistonpage17.) Thefollowing operationisavailable.
Playingasongintheselectedfolder 1Whenafolderisselected,pressandholdM.C.
BrowsingforasongontheiPod
Operationsarethesameasthoseformoving images.(RefertoBrowsingforvideoonthe iPodonpage17.) Thefollowingoperationisavailable.
Playingasongintheselectedcategory 1Whenacategoryisselected,pressandholdM.C.
However, the categories in the topier are different from those form moving images.
- Video(video)
- Playlists(playlists)
- Artists(artists)
-Albums(albums)
Songs(songs) - Podcasts(podcasts)
- Genres(genres)
- Composers(composers)
Audiobooks(audiobooks)
Functionsettings
1PressM.C.todisplaythefunction menu.
2TurnM.C.toselectthefunction.
Afterselecting,performthefollowingprocedurestosetthefunction.
Externalstoragedevice(USB,SD)
Pause(pause)
- PressM.C. topauseorresume.
Random(randomplay)
1PressM.C.toturnrandomplayonoroff.
PlayMode(repeatplay)
Refer to Play Mode (repeat play) on page 18.
SoundRetriever(soundretriever)
Automatically enhances compressed audio and restores-rich sound.
1PressM.C.todisplaythesettingmode.
2 Turn M.C. to select the desired setting. Off (off)1-2 1iseffectiveforlowcompressionrates.and2 is effectiveforhighcompressionrates.
3PressM.C.toconfirmtheselection.
TimeSearch(timesearch)
Refer to Time Search (time search) on page 18.
Display(displaysetting)
Youcanswitchtothedesiredtextinformation.
Refer to Display (display setting) on page 19.
A/VFormat(switchingmediafiletypes)
Refer to A/V Format (switching media file types) onpage19.
iPod
Pause(pause)
Refer to Pause (pause) on page 19.
ShuffleAll(shuffleall)
1PressM.C.toturnshuffleallon. Toturnoff,setShuffleModeintheFunction menuutoff.
ShuffleMode(shuffle)
Refer to Shuffle Mode (shuffle) on page 19.
PlayMode(repeatplay)
Refer to Play Mode (repeat play) on page 18. However, therepeatrangeisdifferentfromthatof externalstoragedevices.
One-Repeatthecurrentsong
All-Repeat all songs in the selected list
LinkSearch(linksearch)
Operatingthisunit
You can playsongsfromthefollowinglists.
-Albumistofthecurrenlyplayingartist
Songlistofthecurrenlyplayingalbum
- Albumlistofthecurrenlyplayinggenre
|1|PressM.C.todisplaythesettingmode.
2 Turn M.C. to change the mode; press to select.
- Artists - Displays the album list of currently playingartist.
- Albums - Displays a song list from the album currently being played.
Genres - Displays an album list from the genrecurrentlybeingplayed.
3UseM.C.toselectanalbumorsongfromthelist. Formoredetailsabouttheselectionoperation, refertoBrowsingforavideoontheiPodonpage 17.
- Ifnorelatedalbums/songsarefound,NotFound isdisplayed.
ControlMode(controlmode)
Refer to Control Mode (control mode) on page 19.
Audiobooks(audiobookspeed)
Theplaybackspeedofaudiobookcanbechanged.
PressM.C.todisplaythesettingmode.
2 Turn M.C. to select your favorite setting.
- Faster - Playback at a speed faster than normal
- Normal-Playbackatnormalspeed
- Slower - Playback at a speed slower than normal
3PressM.C.toconfirmtheselection.
SoundRetriever(soundretriever)
Refer to Sound Retriever (sound retriever) on the previouspage.
TimeSearch(timesearch)
Refer to Time Search (time search) on page 18.
ABCSearch(alphabetsearchmodesetting)
Refer to ABC Search (alphabet search mode setting) onpage20.

Notes
Operationiscompleteevenifthemenuiscancelledbeforebeingconfirmed.
- SwitchingthecontrolmodetoiPodpauses songplayback.OperatetheiPodtoresume playback.
The following functions are still accessible from the unitevenifthecontrolmodeissetto iPod.
Volume
Fastforward/reverse
—Trackup/down
—Pausing
- WhenthecontrolmodeissettoiPod, operationsarelimitedasfollows:
-OnlyControlMode(controlmode)and Pause(pause)functionsareavailable.
Thebrowsefunctioncannotbeoperated fromthisunit.
Operatingthisunit
Playingstillimages
WhenaUSB/SDdevicethatcontainsJPEG picturefilesisconnected, thisunitstartsasli-deshowfromthefirstfolder/pictureonthedevice.Theplayerdisplaysthepicturesineach folderinalphabeticalorder.
BasicOperations
Youcanswitchtothebasicscreenorthe imagescreen.
ReferToDisplay(displaysetting)onthenext page.
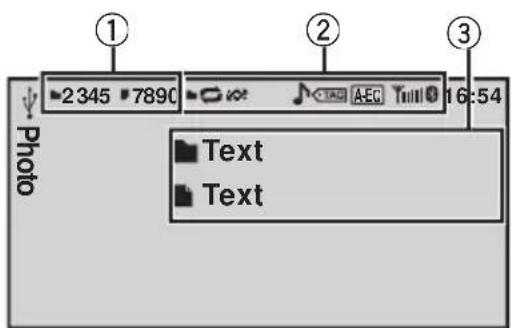
①Folder/filenumberindicator
②Indicatordisplayarea
Refertolndicatorlstonpage48.
③Textinformationarea
- Foldername
- Filename
PlayingfilesonaUSBstoragedevic
TOpentheUSBconnectorcover.
[2]PlugintheUSBstoragedevicusingaUSB cable.
StoppingplaybackofflesonaUSBstoragedevic
1YoumaydisconnecttheUSBstoragedevicat anytime.
PlayingfilesonanSDmemorycard
1Removethefrontpanel.
2InsertanSDmemorycardintotheSDcardslot. Insertitwiththecontactsurfacefacingdownand pressthecarduntilclicksandcompletelylocks.
[3]Re-attachthefrontpanel.
| StoppingplaybackofflesonanSDmemorycard 1Removethefrontpanel. 2PresstheSDmemorycarduntilitclicks. TheSDmemorycardsejected. 3PullouttheSDmemorycard. 4Re-attachthefrontpanel. |
| Selectingafolder 1PushM.C.upordown. |
| Selectingafile 1PushM.C.leftorright. |
| Searchingevery10files 1PushandholdM.C.leftorright. |

Notes
- USBstoragedevicethatcanbechargedvia USBwillberechargedwhenpluggedinand theignitionswitchissettoACCorON.
- DisconnectUSBstoragedevicesfromtheunit whennotinuse.
- Incompatible text stored with the video image file may not be displayed or may be displayed incorrectly.
- Whenplayingexternalstoragedevices that containamixtureofvariousmediafiletypes, switchbetweenmediafiletypeswhenplaying differentfiles.
ReferoA/VFormat(switchingmediafile types) onthenextpage.
Selectingandplayingfiles fromthenamelist
Operationsarethesameasthoseformoving images.(RefertoSelectingandplayingfiles fromthenamelistonpage17.)
Functionsettings
1PressM.C.todisplaythefunction menu.
2TurnM.C.toselectthefunction.
Afterselecting,performthefollowingprocedurestosetthefunction.
Operatingthisunit
Pause(pause)
1PressM.C.topauseorresume.
Random(randomplay)
Refer to Random (random play) on page 22.
PlayMode(repeatplay)
Refer to Play Mode (repeat play) on page 18. However, therepeatrangeisdifferentfromthatof movingimages.
All-Repeatallfiles
- Folder-Repeatthecurrentrfolder
Capture(capturinganimageeinJPEGfiles)
You can capture imagedata and use it as wall paper. Imagescan restored and recalled easily in this unit.
-Onlyoneimagecanbestoredonthisunit.Old imagesareoverwrittenwiththenewones.
PressM.C.todisplaythesettingmode.
2 Turn M.C. to select the desired setting.
3PressM.C.toconfirmtheselection.
Rotate(picturerotation)
[1]PressM.C.todisplaythesettingmode.
2PressM.C.torotatethdisplayedpicture90° clockwise.
WideMode(switchingthewidemode)
Refer to Wide Mode (switching the wide mode) onpage19.
TimePerSlide(slideshowhowintervaltimesetting)
JPEGfilescanreviewedasasideshowhowonthisunit. Inthissetting, the intervalbetweeneachimagecan beset.
[1]PressM.C.todisplaythesettingmode.
2 Turn M.C. to select the desired setting.
- 5sec - JPEG images switch at intervals of 5 seconds
10sec-JPEG images switch at intervals of 10 seconds
15sec-JPEG images switch at intervals of 15 seconds - Manual - JPEG images can be switched manually
3PressM.C.toconfirmtheselection.
Display(displaysetting)
Refer to Display (display setting) on page 19.
A/VFormat(switchingmediafiletypes)
Refer to A/V Format (switching media file types) onpage19.

Notes
Operationiscompleteevenifthemenuiscancelledbeforebeingconfirmed.
- You can select the following functions if the background setting on the entertainment menu is off.
—Capture(capturinganimageinJPEG files)
-Rotate(picturerotation)
—WideMode(switchingthewidemode)
—Display(displaysetting)
Introductionofoperationsfor playbackofstillimagesasa slideshow
You can view stillimagessavedtoaUSB/SD asasideshowhowwhilelisteningtoaudiofrom another source.
Fordetailsaboutthesettings,referto
SlideShow(slideshowviewing)onpage31.
Functionsettings
1PressM.C.todisplaythefunction menu.
2TurnM.C.toselectthefunction.
Afterselecting,performthefollowing proceduresostetthefunction.
Return(endingslideshow)
Endingtheslideshow.
1PressM.C.toendtheslideshowhow.
PhotoSelection(selectingphotos)
Operatingthisunit
[1]PressM.C.todisplaythesettingmode.
2 Selectafile. Thefollowingoperationsareavailable.Theoperat ingmethodisthesameasthatforthebasicop erations.RefertoBasicOperationsonpage24.
- Selectingfolder
- Selectingafile
- Searchingevery10files
Pause(pause)
Refer to Pause (pause) on page 19.
Random(randomplay)
Refer to Random (random play) on page 22.
PlayMode(repeatplay)
Refer to Play Mode (repeat play) on the previous page.
Capture(capturinganimageeinJPEGfiles)
Refer to Capture (capturing an image in JPEG files) on the previous page.
Rotate(picturerotation)
Refer to Rotate (picture rotation) on the previous page.
WideMode(switchingthewidemode)
Refer to Wide Mode (switching the wide mode) onthepreviouspage.
TimePerSlide(slideshowhowintervaltimessetting)
Refer to Time Per Slide (slideshowhow interval time setting) on the previous page.

Note
WhentheUSBorSDsourceisselected,thisunit cannotviewstillimagesonUSB/SDasa slideshow.
BluetoothTelephone
ThisfunctionisavailableonlyforMVHP8200BT.
Fordetailsonbasicoperationsafterconnectingtoacellulararphone,refertoUsingBluetoothtelephonehoneonpage13.
PINcodeissetto0000asthedefault.You canchangethiscode.RefertoPINCode (PINcodeinput)onthenextpage.
Connectionmenuoperation

Important
Besuretoparkyourvehicleinasafeplaceand applytheparkingbrakewhenperformingthisoperation.
1Displaythephonemenu.
RefertoBasicmenuoperationsonpage12.
2UseM.C.toselectConnection.
Turntochangethemenuoption.Presstoselect.
3TurnM.C.toselectthefunction.
Afterselecting,performthefollowingprocedurestosetthefunction.
DeviceList connectingcordconnectingcellular phonefromthedevicelist)
PressM.C.todisplaythesettingmode.
2 Turn M.C. to select the name of a device you want to connect.
3 Press and hold M.C. to switch the BD address anddeviceiname.
4 PressM.C.toconnecttheselectedcellular phone. Whileconnecting, the circular indicator flashes. Tcompleteteconnection.checkthedevicename(MVH-P8200BT)andenterthelinkcodeon yourcellularphone.lftheconnectionisestablished.acircularindicatorappearsnexttothede-vicename.
DeleteDevice(deletingacellulararphonefromthede- vicelist)
Operatingthisunit
|1|PressM.C.todisplaythesettingmode.
[2] Turn M.C. to select the name of a device you want to delete.
[3]PressM.C.toselectthedeviceyouwanttodelete. PressandholdM.C.toswitchtheBDaddress anddeviceiname.
4 Use M.C. to select Yes.
Turntochangethemenuoption.Presstoselect.
Tocancel,selectNo.
- Whilethisfunctionisinuse,donotturnoffthe engine.
AddDevice connectinganewcellularphone)
1PressM.C.tostartsearching.
Tocancel,pressM.C.whilesearching.
2 Turn M.C. to select a device from the device list.
- Ifthedesireddeviceisnotdisplayed,select SearchAgain.
- Iffivedevicesarealreadypaired,Memory Fullisdisplayedanditisnotpossibletoper-formthisoperation.Inthiscase,deletea paireddevicefirst.
3PressandholdM.C.toswitchtheBDaddress anddeviceiname.
4PressM.C.toconnecttheselectedcellular phone. Whileconnecting, the circularindicatorflashes. Tcompletetheconnection.checkthedevicename(MVH-P8200BT)andenterthelinkcodeon yourcellularphone.lftheconnectionisestablished.acircularindicatorappearsnexttothedevicename.
SpecialDevice(settingaspecialdevice)
Bluetoothdevicessthatareddifficulttoestablishhaconnectionwitharecalledspecialdevices.IfyourBluetoothdeviceislisteddasaspecialdevice,selecttheappropriateone.
PressM.C.todisplaythesettingmode.
UseM.C.toselectaspecialdevice. Turntochangethemenuoption.Pressselect.
3|Useacellulararphonoconnecttothisunit. Whileconnecting, the circular indicator flashes. Tcompletetheconnection.checkthedevicename(MVH-P8200BT)andenterthelinkcodeon yourcellularphone.lftheconnectionisestablished.acircularindicatorappearsnexttothedevicename.
- Iffivedevicesarealreadypaired,Memory Fullisdisplayedanditisnotpossibletoper-formthisoperation.Inthiscase,deletea paireddevicefirst.
AutoConnect connectingtoaBluetoothdevice automatically)
[1] Press M.C. to turn automatic connection on or off.
Visibility(settingthevisibilityofthisunit)
Tochecktheavailabilityofthisunitfromotherdevices,Bluetoothvisibilityofthisunitcanreturned on.
[1]PressM.C.toturnthevisibilityofthisunitonor off.
- WhilesettingSpecialDevice,Bluetoothvisibilityofthisunitisturnedontemporarily.
DevicelInformation(BD(Bluetoothdevice)address display)
[1]PressM.C.todisplaytheBDaddressanddevice name.
PINCode(PINcodeinput)
ToconnectyourcellularphonetothisisunitviaBluetoothwirelessstechnology,youneedtoenteraPIN codeonyourphonetoverifytheconnection.Thedefaultcodeis0000,butyoucanchangeitwiththis function.
PressM.C.todisplaythesettingmode.
2TumM.C.toselectanumber.
3PressM.C.tomovethecursortothernextposition.
AfterinputtingthePINcode(upto8digits),press M.C.
ThePINcodecanbestoredinthememory.
- When you press and hold M.C. in the same display, the PINcodeyouentereddisstored in thisunit.
- PressingM.C. in the confirmation display returnsyouthePINcodeinputdisplay, and you can change the PIN code.
Phonenuoperation

Important
Besuretoparkyourvehicleinasafeplaceand applytheparkingbrakewhenperformingthisoperation.
1Displaythephonemenu.
RefertoBasicmenuoperationsonpage12.
Operatingthisunit
2TurnM.C.toselecttthefunction.
Afterselecting,performthefollowingprocedurestosetthefunction.
Recent(recentcallhistory)
Youcanmakeaphonecallbyselectingfromdialed calls,receivedcalls,andmissedcallsinthismenu.
Press M.C. to display Missed Calls (missed call history).DialledCalls(dialedcallhistory)orReceivedCalls(receivedcallhistory).
2UseM.C.toselectthedesiredlist. Turntochangethemenuoption.Presstoselect. Toreturtothepreviousdisplay,pushM.C.down.
3PressM.C.tomakeacall.
4)Whenyoufindaphonenumberthatyouwantto storeinthememory,pressandholdM.C.right.
PhoneBook(Phonebook)
Thephonebookinyourcellularphonenumberwill be transferredautomaticallywhenthephoneisconnectedtothisunit.
- Dependingonthecellarphone,thephonebook maynotbetransferredautomatically.Inthiscase, operateyourcellarphonetotransferthephone book.Thevisibilityofthisunitshouldbeon.Refer toVisibility(settingthevisibilityofthisunit)on thepreviouspage.
1PressM.C.todisplaythealthabeticallist.
2 Turn M.C. to select the first letter of the name you are looking for.
- Press and hold M.C. to select the desired character type.
- alphabet-cyrillicalphabet
3PressM.C.todisplayareregisterednamelist.
4 Turn M.C. to select the name you are looking for.
Press M.C. to display the phone number list.
6 UseM.C.toselectthephonenumberyouwantto call. Turntochangethephonenum.Presstoselect. Toreturntothepreviousdisplay,pushM.C.down.
[7]PressM.C.tomakeacall.
8Whenyoufindaphonenumberthatyouwantto storeinthememory.pressandholdM.C.right.
PresetDial(presetphonenumbers)
PressM.C.todisplaythesettingmode.
[2] Use M.C. to select the desired preset number. Turntochangethemenuoption.Presstoselect. Toreturntothepreviousdisplay,pushM.C.down.
3)PressM.C.tomakeacall.
PhoneFunction(Phonefunction)
You can set Auto Answer and Ring Tone from this menu.Fordetails.refertoFunctionandoperationon thispage.
Connection(Phoneconnection)
OperatetheBluetoothtelephoneconnectionmenu. RefertoConnectionmenuoperationonpage26.
Functionandoperation
1DisplayPhoneFunction.
RefertoPhoneFunction(Phonefunction)on thispage.
2PressM.C.todisplaythefunction menu.
3TurnM.C.toselectthefunction.
Afterselecting,performthefollowingprocedurestosetthefunction.
AutoAnswer(automaticanswering)
1PressM.C.toturnautomaticansweringonoroff.
RingTone(ringtoneselect)
1 Press M.C. to turn the ring tone on or off.

Operatingthisunit
AudioAdjustments
1Displaytheaudiomenu.
RefertoBasicmenuoperationsonpage12.
2TurnM.C.toselecttheaudiofunction.
Afterselecting,performthefollowingprocedurestosettheaudiofunction.
Fader/Balance(fader/balanceadjustment)
PressM.C.todisplaythesettingmode.
Push M.C.up or down to adjust the front/rear speakerbalance. Adjustment range (front/rear):Front 15 to Rear 15
Push M.C. left or right to adjust the left/right speakerbalance. Adjustmentrange(left/right):Left15toRight15
- Select F/R 0 when only using two speakers.
- Whenthearoutputsettingandpreoutsetting areSubwoofer,youcannotadjustfront/rear speakerbalance.
SonicCenterControl(soniccentercontrol)
Soundthatissuitedforthelisteningpositioncaneasilybecreatedwiththisfunction.
[1]PressM.C.todisplaythesettingmode.
[2] Push M.C. left or right to select a listening position. Adjustmentrange:Left:7toRight:7
AutoEQauto-equalizeron/off)
Theauto-equalizerisanequalizercurvecreatedby autoEQ(refertoAutoEQ( auto-equalizing)onpage 33). Youcanturntheauto-equalizeronoroff.
[1]PressM.C.toturntheauto-equalizeronoroff. YoucannotthisfunctionifautoEQhasnotbeen carriedout.
GraphicEQ(equalizeradjustment)
You can adjust the currently selected equalizer curves settings as desired. Adjusted equalizer curves settings are stored in Custom1 or Custom2.
- A separate Custom1 curve can be created for eachsource.Ifyoumakeadjustmentswhena curveotherthanCustom2isselected,theequalizercurvesettingswillbestoredinCustom1.
- A Custom2 curve that is common for all sources can be created. If you make adjustments when the Custom2curveisselected, the Custom2 curve will be updated.
[1]PressM.C.todisplaythesettingmode.
[2] Turn M.C. to select an equalizer curve.
Powerful—Natural—Vocal—Custom1—Custom2—Flat—SuperBass
- When Flat is selected no adjustments are madetothesound.
3 Push M.C. left or right to select the equalizer bandtoadjust. 40Hz-80Hz-200Hz-400Hz-1kHz-2.5kHz -8kHz-10kHz
Push M.C.up or down to adjust the level of the equalizerband. Adjustmentrange:+12dBto-12dB
Loudness(loudness)
Loudnesscompensatesfordeficienciesinthelowandhigh-frequencyrangesatlowvolume.
PressM.C.todisplaythesettingmode.
Turn M.C. to select the desired setting. Off (off)—Low (low)—Mid (mid)—High (high)
3PressM.C.toconfirmtheselection.
Subwoofer1(subwooferon/offsetting)
This unitisequippedwithasubwooferoutputwhich can be returnedonoroff.
Press M.C. to turn subwoofer output on or off.
Subwoofer2(subwooferadjustment)
Thecut-offfrequencyandoutputlevelcanbeadjustedwhenthesubwooferoutpution.Onlyfrequencieslowerthanthoseintheselectedrangeareoutputtedfromthesubwoofer.
PressM.C.todisplaythesettingmode.
2 Turn M.C. to select the phase of subwoofer output. Normal (normal phase)—Reverse (reverse phase)
3 Push M.C.up or down to adjust the output level ofthesubwoofer. Adjustmentrange:+6to-24
4 Push M.C. left or right to select the cut-off frequency. 50Hz-63Hz-80Hz-100Hz-125Hz
Operatingthisunit
BassBooster(bassboost)
PressM.C.todisplaythesettingmode.
[2]TumM.C.toadjustthelevel. Adjustmentrange:0to+6
3)PressM.C.toconfirmtheselection.
HighPassFilter(highpassfilteradjustment)
Whenyoudonotwantlowsoundsfromthesubwooferoutputfrequencyrangetoplayfromthefrontorrearspeakers,turnontheHPF(highpassfilter).Onlyfrequencieshigherthanthoseintheselectedrangeareoutputfromthefrontorrearspeakers.
PressM.C.todisplaythesettingmode.
[2] Turn M.C. to select the cut-off frequency. Off (off)50Hz-63Hz80Hz100Hz125Hz
3PressM.C.toconfirmtheselection.
SLAsourceleveladjustment)
SLA(SourceLevelAdjustment)letsyouadjustthevolumelevelofeachsourcetopreventradicalchangesinvolumewhenswitchingbetweensources.
-WhenselectingFMasthesource,youcannot switchtoSLA.
- SettingsarebasedontheFMvolumelevel,which remainsunchanged. Beforeadjustingsourcelevels,comparetheFM volumelevelwiththelevelofthesourceyouwish toadjust.
The AM volume level canalsobeadjusted with this function.
1PressM.C.todisplaythesettingmode.
Push M.C.up or down to adjust the source volume. Adjustment range: +4 to -4

Notes
- YoucannotselectCustom1andCustom2 whenusingtheauto-equalizer.
- Operationiscompleteevenifthemenuiscancelledbeforebeingconfirmed.
Systemsettings
1Displaythesystemmenu.
RefertoBasicmenuoperationsonpage12.
2TurnM.C.toselectthesystemfunction.
Afterselecting,performthefollowingprocedurestosetthesystemfunction.
Guidelinfo(guideinformation)
Press M.C. to display the guide information. RefertoAboutguideinformationonpage13.
ClockADJ(dateandclock)
1PressM.C.todisplaythesettingmode.
2PressM.C.toselectthesegmentoftheclockdisplayyouwishtoset. Day—Month—Year—Hour—Minute—AM/PM
3TumM.C.tosetthedateandtime.
PictureADj(picturedjustment)
1PressM.C.todisplaythesettingmode.
2 Turn M.C. to select the function to be adjusted. Presstoselect. Brightness-Contrast-Color-Hue-Dimmer Temperature-BlackLevel
Fordetailsaboutthesettings,refertoChanging thepictureadjustmentonpage39.
When you select Black Level, press M.C. to turn the settingonoroff.
3 Turn M.C. to increase or decrease the level of the selected item.
Adjustmentrange:+24to-24
- Dimmer can be adjusted from +48 to +1.
- Temperature can be adjusted from +3 to -3.
CautionLang.(cautionlanguagesettings)
Youcanswitchthedisplaylanguageeforthewarning messageoftheparkingbrakeinterlock.
1PressM.C.todisplaythesettingmode.
2 Turn M.C. to select the desired setting. English—Français—Espanol
3PressM.C.toconfirmtheselection.
SystemLang.(menulanguagesettings)
Operatingthisunit
-
Thelanguagecanbechangedforthefollowing:
-
Function menus
- Systemmenu
-Initialmenu -
On-screendisplay
MultilanguagesettingforDivX -
If the embedded language and these selected languages setting are not the same, text information may not be displayed properly.
- Somecharactersmaynotbedisplayedproperly.
- Tcompletethisoperation.switchtheignitionkey offandonafteryousetthissetting.
[1]PressM.C.todisplaythesettingmode.
2 Turn M.C. to select the desired language. English (English)—Espanol (Spanish)—Portugues (Portuguese)—PyCCKN (Russian)
3PressM.C.toconfirmtheselection.
DetachWarning(warningtonesetting)
lfthefrontpanelisnotdetachedfromtheheadunit withininfoursecondsoftturningofftheignition,awamingtonesounds.Youcanturnoffthewarningtone.
Press M.C. to turn warning tone on or off.
AUXInput(auxiliaryinput)
Activatethissettingwhenusinganauxiliarydevice connectedtothisunit.
Press M.C. to turn AUX Input on or off.

Entertainmentsettings
1Displaytheentertainmentmenu.
RefertoBasicmenuoperationsonpage12.
2TurnM.C.toselecttheentertainment function.
Afterselecting,performthefollowing proceduresetosetheentertainmentfunction.
Background(backgrounddisplaysetting)
|1|PressM.C.todisplaythesettingmode.
[2] Turn M.C. to select the desired setting. BGP1(backgroundpicture1)—BGP2(backgroundpicture2)—BGP3(backgroundpicture3)—BGV (background visual)—Photo (photo)—SPEANA (spectrum analyzer)—Off (display off)
[3]PressM.C.toconfirmtheselection.
Clock(entertainmentclock)
[1]PressM.C.totumentertainmentclockdisplayon oroff. Ifthesettingison,itisautomaticallyswitchedto entertainmentclockdisplay.
SlideShow(slideshowviewing)
PressM.C.todisplaythesettingmode.
Turn M.C. to select the external storage device. USB (USB storage device)-SD (SD memory card) Slideshowwillstart.
Appearance(screen/illuminationcolor)
PressM.C.todisplaythesettingmode.
Turn M.C. to change the desired screen/illuminationcolor.Presstoselect. Screen (screen color)Illumi (Illumination color) ColorSetting(customizingcolor) FordetailsonColorSetting(customizingcolor), refertoCustomizingtheilluminationcoloronth nextpage.
3 Turn M.C. to change the desired illumination color.Presstoselect.

Theilluminationcolorchangesateregularinterval.

Thecustomizedorcolorissetastheilluminationcolor.
Operatingthisunit

Notes
- IfSPEANA(spectrumanalyzer)isselected, the spectrumanalyzerwillbedisplayedinsteadofSourceimagedisplayerArtworkdisplay.
- If you select USB, SD as the source, you cannotselectSlideShow.
Customizingtheilluminationcolor
1UseM.C.toselectColorSettinginthe Appearance(Illuminationcolor).
RefertoAppearance(screen/illumination color) on the previous page.
2UseM.C.tocustomizethecolor.
Turnforfinetuning.Pushleftorrighttoadjust thenextcolor.
3PressM.C.tostorethecustomizedcolor inthememory.
Theilluminationcolorwillbeswitchedtothecustomizedcolor.
InitialSettings
1PressSRC/OFFandholduntiltheunit turnoff.
2PressM.C.todisplaytheinitialsetting menu.
3TurnM.C.toselecttheinitialsetting.
Afterselecting,performthefollowingprocedurestosettheinitialsetting.
A-EQMeasurement auto-equalizing)
Theauto-equalizerisanequalizercurvecreatedby autoEQ(refertoAutoEQauto-equalizing)onthenext page).
Youcanturntheauto-equalizeronoroff.
RearSpeaker(rearoutputandsubwoofersetting)
Thisunit'searoutput(rearspeakerleadsoutputand RCAreaoutput)canbeusedforfull-rangespeaker (Full) or subwoofer (Subwoofer) connection. If you switchtherearoutputsettingtoSubwoofer,you can connectaresspeakerleaddirectlytoasubwoofer withoutusinganauxiliaryamp. Initially, the unitissetforrearfull-rangespeakerconnection(Full).
1PressM.C.todisplaythesettingmode.
2TumM.C.tochangethesetting. Subwoofer (subwoofer)—Full (full-range speakeer)
Evenifyouchangethissetting,thereisno outputunlessyouturnthesubwooferoutput on(refertoSubwoofer1(subwooferon/off setting)onpage29).
- If you change this setting, subwoofer output in the audiomenu will return to the factory settings.
3PressM.C.toconfirmtheselection.
Demonstration(demodisplaysetting)
1 PressM.C.toturnthedemodisplayonoroff.
BTMemoryClear(resettingtheBluetoothwireless technologymodule)
Operatingthisunit
- phonebookentriesontheBluetoothtelephone
-presetnumbersontheBluetoothtelephone - registrationassignmentoftheBluetoothtelephone
-callhistoryoftheBluetoothtelephone - informationoftheconnectedBluetoothtelephone
-PINcode
[1]PressM.C.todisplaythesettingmode.
[2] Use M.C. to select Yes.
ThisfunctionisavailableonlyforMVH-P8200BT.
Bluetoothtelephonedatacanbedeleted.Toprotect personalinformation,werecommenddeletingthis databeforetransferringtheunittootherpersons.The followingsettingswillbedeleted.
Turntochangethemode.Presstoselect.
Cleared is displayed and the settings are deleted.
Tocancel,selectNo.
- Whilethisfunctionisinuse, donotturnoff theengine.
BTVer.Info.(Bluetoothversiondisplay)
ThisfunctionisavailableonlyforMVH-P8200BT.
Press M.C. to display the Bluetooth (microprocessor) version of this unit.
SoftwareUpdate(updatingthesoftware)
ThisfunctionisavailableonlyforMVH-P8200BT.
Thisfunctionisusedtoupdatethisunitwiththelatestsoftware.Forinformationonthesoftwareandupdating,refertoourwebsite.
PressM.C.todisplaythesettingmode.
Use M.C. to select Yes to show a confirmation display.
Turntochangethemode.Pressstoselect.
Tocancel,selectNo.
Followtheon-screeninstructionstofinishupdat ingthesoftware.
Theauto-equalizerautomaticallymeasures thecar'sinterioracousticcharacteristics,and thencreatesanauto-equalizercurvebased on thatinformation.
- Toperformthisfunction, dedicated microphone(e.g. CD-MC20) is required.

WARNING
Asaloudtone(noise)maybeemittedfromthe speakerswhenmeasuringthecar'sinterior
acousticcharacteristics,neverperformautoEQ whiledriving.

CAUTION
- Thoroughly check the conditions before performing autoEQasthespeakers maybedamagedif these functions are performed when:
—Thespeakersareincorrectlyconnected. (Foreample,whenarearspeakerisconnectedasasubwooferoutput.)
—Aspeakerisconnectedtoapowerampdelerivingoutputhigherthanthespeaker's maximuminputpowercapability.
- Ifthemicrophoneisplacedinanunsuitable positionthemeasurementtonemaybecome loudandmeasurementmaytakealongtime, resultinginbatterydrainage.Besuretoplace themicrophoneinthespecifiedlocation.
BeforeoperatingtheautoEQfunction
- CarryoutautoEQinasquietaplaceas possible,withthecarengineandairconditioningswitchedoff. Alsocutpowertocar phonesorportabletelephonesinthecar,or removethemfromthecarbeforecarrying outautoEQ.Soundsotherthanthemasurementtone(surroundingsounds, enginesound,telephonesringingetc.)may preventcorrectmeasurementofthecarinterioracousticcharacteristics.
- BesuretocarryoutautoEQusingtheop-tionalmicrophone.Usinganothermicrophonemaypreventmeasurement,orresult inincorrectmeasurementofthecarinterioracousticcharacteristics.
- InordertoperformulaEQ, the front speaker must be connected.
- Whenthisunitisconnectedtoapower ampwithininputlevelcontrol,autoEQmay notbepossibleifthepoweramp'sinput levelissetbelowthestandardlevel.
- Whenthisunitisconnectedtoapower ampwithanLPF,turnthisLPFoffbefore performingautoEQ.Alosetthecut-offfrequencyforthebuilt-inLPFofanactivesubwoofertothehighestfrequency.
Operatingthisunit
- Thedistancehasbeencalculatedbycomputertobetheoptimumdelaytogiveaccu-rateresultsforthecircumstances,so pleasecontinuetousethisvalue.
—Thereflectedsoundwithinthecaris stronganddelaysoccur.
—TheLPFonactivesubwoofoersorexternalampsdelaythelowersounds.
- AutoEQchangestheaudiosettingsasfollows:
—Thefader/balancesettingsreturntothe centerposition.(Refertopage29.)
TheequalizercurveswitchestoFlat. (Refertopage29.)
Thefront,centerandrearspeakerswill automaticallybeadjustedtoahigh passfiltersetting.
- Previoussettings for autoEQwillbeoverwritten.
PerformingautoEQ
1Stopthecarinaplacethatisquiet, closealtheddoors, windowsandsunroof, andthenturntheengineoff.
Iftheengineisleftrunning,enginenoisemay preventcorrectautoEQ.
2Fixtheopticalmicrophoneinthetercenteroftheheadrestofthedriver'sseat,face.
TheautoEQmaydifferdependingonwhere youplacethemicrophone.Ifdesired,place themicrophoneonthefrontpassengerseatto carryoutautoEQ.
3TurntheignitionswitchtoONorACC.
Ifthecar'sairconditionerorheateristurned on,turnitoff.Noisefromthefanintheair conditionerorheatermaypreventcorrectauto EQ.
- Ifthisunitisturnedoff,pressSRCoturnthe sourceon.
4Displaytheinitialsettingmenu.
Referto/initial/Settingssonpage32.
5UseM.C.toentertheautoEQmeasure-mode.
Turntochangethemenuoption.Presstoselect.
6Plugthemicrophoneintothemicrophoneinputjackonthisunit.
7PressM.C.tostartautoEQ.
8Whenthe10-secondcountdownstarts, getoutofthecarandclosethedoorwithin 10seconds.
Ameasurementtone(noise)isemitted from thespeakers,andautoEQmeasurementbegins.
- IttakesaboutnineminutesforautoEQmeasurementtobecompletedwhenallthespeakers areconnected.
TostopautoEQ,pressM.C.
9WhenautoEQiscompleted, Complete isdisplayed.
Whenthecar'sinterioracousticcharacteristicscannotbemeasuredcorrectly,anerrormessagewillbedisplayed.(RefertoUnder-standingautoEQerrormessagesonpage48.)
Operatingthisunit
10Storethemicrophonecarefullyinthe glovecompartmentoranothersafeplace.
Ifthemicrophoneissubjecteddodirectsunlightforanextendedperiod,hightemperaturesmaycauseddistortion,colorchangeormalfunction.
OtherFunctions
UsinganAUXsource
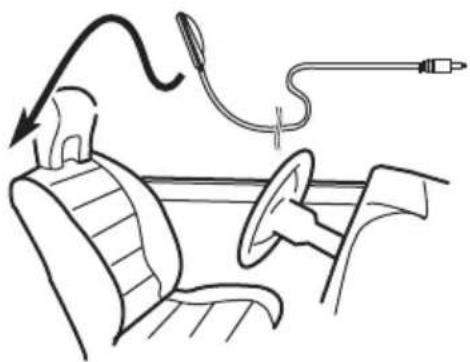
Whenconnectingauxiliarydeviceusingthe frontAUXinput
- YouneedtoactivatetheAUXsettinginthe initialsettingmenu.RefertoAUXInput (auxiliaryinput)onpage31.
- IfaniPodwithvideocapabilitiesisconnectedtothisunitvia3.5mmplug(4pole) cable(suchastheCD-V150M),you can enjoy the video contentsoftheconnected iPod.
- Aportableaudio/videoplayercanbeconnectedbyusinga3.5mmplug(4pole)with anRCAcable(soldseparately).However, dependingonthecable,areverseconnectionbetweenered(rightsideaudio) cableandyellow(video)cablemayberequiredinorderforthesoundandvideo imagetobereproducedcorrectly.
- InserttheminiplugintotheAUXinput jackonthisunit.
Formoredetails,refertoHeadunitonpage9. Thisauxiliarydeviceisautomaticallysetto AUX.
Functionsettings
1PressM.C.todisplaythefunction menu.
2TurnM.C.toselectthefunction.
Afterselecting,performthefollowing proceduresostosethefunction.
A/VChange(auxiliarydeviceisignalsetting)
1PressM.C.todisplaythesettingmode.
Turn M.C. to select the desired setting.
Audio - auxiliary device connected with a stereominiplugcable
Video - auxiliary video device connected with 4-poleminiplugsable(e.g.,CD-V150M)
3PressM.C.toconfirmtheselection.
Display(displaysetting)
Refer to Display (display setting) on page 19.
Operatingthisunit
WideMode(switchingthewidemode)
Refer to Wide Mode (switching the wide mode) onpage19.

Notes
Operationiscompleteevenifthemenuiscancelledbeforebeingconfirmed.
- YoucanselectDisplayandWideMode, whenVideohasbeenselected.
- You can select the following functions if the background setting on the entertainment menu is off.
—WideMode(switchingthewidemode)
—Display(displaysetting)
Usinganexternalunit
AnexternalunitreferstoaPioneerproduct, suchasthosewhichwillbeavailableinthefuture.Althoughincompatibleasasource,the basicfunctionsofuptotwoexternalunitscan becontrolledwiththisunit.Whentwoexternal unitsareconnected,theexternalunitsare automaticallyallocatedtoexternalunit1orexternalunit2.
Thebasicoperationsoftheexternalunitare explainedbelow.Theallocatedfunctionswill differdependingontheconnectedexternal unit.Fordetailsconcerningthesefunctions, refertotheowner'smanualfortheexternal unit.
Selectingtheexternalunitasthesource
- PressSRC/OFFtoselectExternalasthe source.
Basicoperations
Thefunctionsallocatedtothefollowingoperationswilldifferdependingontheconnectedexternalunit.Fordetailsconcerningthesefunctions,refertotheowner'smanualfortheconnectedexternalunit.
PressBANDontheremotecontrol.
-PressandholdBANDontheremote control.
- PushM.C.leftorright.
- PushandholdM.C.leftorright.
- PushM.C.upordown.
-Pressanynumberkeyfrom1to6on theremotecontrol(MVH-P8200BTonly).
Usingthefunctionsallocatedto1to 6keys
1Displayingthelistmenu.
RefertoBasicmenuoperationsonpage12.
2UseM.C.toselect1KEYto6KEY.
Turntochange1KEYto6KEYandpress.
Functionsettings
1PressM.C.todisplaythefunction menu.
2TurnM.C.toselectthefunction.
Turntochangethemenuoption.Presstoselect.
Function1(function1)—Function2(function
2)-Function 3 (function 3)-Function 4
(function4)—Auto/Manual( auto/manual)
UsingthePGMbutton
ThisfunctionisavailableonlyforMVH-P8200BT. Youcanoperatethepreprogrammedfunctions foreachsourcebyusingPGMmontheremote control.
- PressPGMtoturnpauseonwhenselectingthefollowingources:
USB/iPod-USB/iPod
-SD-SDmemorycard
- Toturnpauseoff,pressPGMagain.
Operatingthisunit
- PressPGMandholdtoturnBSMon whenselectingtunerorHDRadioasthe source.
PressPGMmandholduntiltheBSMturnson.
-
Tocancelthestorageprocess,pressPGM again.
-
PressPGMtoselectthedesiredchannel selectsettingwhenselectingXMorSIRIUS asthesource.
PressPGMrepeatedlytoswitchbetweenthe followingchannelselectsettings:
AIICHCHANNELumberselectsetting)Category channelcategoryselectsetting)
- PressPGMtoturnfunction1onwhen selectingEXT1(externalunit1/external unit2)asthesource.
Switchingthedisplayindication
Displayindicationcanbeswitchedonoroff.
-
Pressandhold
-
Pressingoneofthebuttonswillturnondisplayindication.
Changingthewidescreen mode
You can select adesiredmodeforenlarginga 4:3 picturetoa16:9 picture.
- Displaythescreenmode.
ReferoWideMode(switchingthewide mode)onpage19.
Full(fullscreen)
The4:3pictureisenlargedinthehorizontaldirectiononly,givingyoua4:3TVpicture(normalpicture)withoutanyomissions.
Just(just)
Thepictureisenlargedslightlyatthecenterand theamountofenlargementincreaseshorizontally towardtheedgesoftheshcreen,enablingyouto enjoya4:3picturewithoutsensinganydisparity evenwhenviewingonawidescreen.
Cinema(cinema)
Thepictureisenlargedbythesameproportionas FullorZoominthehorizontaldirectionandby anintermediateproportionbetweenFulland Zoomintheverticaldirection;idealforacinemasizedpicture(widescreenpicture)wherecaptionslieoutsidethepicture.
Zoom(zoom)
The4:3pictureisenlargedinthesameproportion bothverticallyandhorizontally;idealforacinema sizedpicture(widescreenpicture).
Normal(normal)
The4:3picture is displayed as itis, giving you no sense of disparity since its proportions are the same as that of thenormal picture.

Notes
- Differentsettingscanbestoredforeachvideo source.
-
Whenavideoisviewedinawidescreenmode thatdoesnnotmatchitsoriginalaspectratio,it mayappeardifferent.
-
Rememberthatusingthewidemodefeature ofthisystemforcommercialpublicviewingpurposesmayconstituteaninfringement ontheauthor'srightsprotectedbytheCopyrightLaw.
Thevideoimagewillappearcoarserwhen viewedinCinemaorZoommode.
SettingtheDivXsubtitlefile
You can select whetherornottodisplayDivX externalsubtitles.
TheDivXsubtitleswillbedisplayedeven whenCustomisselectedifnODivXexternalsubtitlefileexist.
- You can select the following functions if the background setting on the entertainment menu is off.
- DisplaytheDivXsubtitlefilesetting mode.
ReferoDivX®Subtitle(DivXsubtitlefilesettings) onpage19.
- Original-DisplaytheDivXsubtotals
- Custom-DisplaytheDivXexternalsubti-ties

Notes
- Upto42characterscanbedisplayedonone line. Ifmorethan42charactersareset, the linebreaksandsthecharactersaredisplayed onthenextline.
- Upto126characterscanbedisplayedone screen.Ifmorethan126charactersareset, theexcesscharacterswillnotbedisplayed.

Settingtheaspectratio
- Displaytheaspectratosettingmode.
Refer to TVApect (aspectratiosettings) on page 19.
- 16:9-Widescreenpicture(16:9)isdisplaysedasis(initialsetting)
Detailedinstructions
- LetterBox-Thepictureistheshapeofa letterboxwithblackbandsonthetopand bottomofthescreen
- PanScan-Thepictureiscutshortontherightandleftsidesofthescreen
DisplayingtheDivX VOD registrationcode
InordertoplayDivXVOD(videoon demand) contentonthisunit, theunitmustfirstbere-gisteredwithaDivXVODcontentprovider.For registration, generateaDivXVODregistration codeandsubmitittoyourprovider.
- Keeparecordofthecodeasyouwillneed itwhenyouregistryourunittotheDivX VODprovider.
- SelectRegistrationCode.
RefertoDivX®VOD(DivX® VODregistration code)onpage19. Yourregistrationcodeisdisplayed.
Displayingthedeactivation code
If your device is already activated, deactivate it by entering the deactivation code.
1SelectDeactivationCode.
RefertoDivX®VOD(DivX® VODregistration code)onpage19.
2UseM.C.toselectYes.
Turntochangethemenuoption.Presstoselect.
Thedeactivationcompleted.
Tocanceldeactivation,selectNo.

Changingthepicture adjustment
You can adjust the Brightness (brightness), Contrast (contrast), Color (color), Hue (hue),
Dimmer(dimmer),Temperature(temperature)andBlackLevel(blacklevel)foreach source.
- YoucannotadjustColor,Hue and BlackLevelfortheaudiosource.
- Displaythepictureadjustmentmode.
ReferoPictureADJ(pictureadjustment)on page30.
- Brightness-Adjuststheblackintensity
- Contrast-Adjuststhecontrast
Color-Adjuststhecolorsaturation
Hue-Adjuststhetoneofcolor(redor greenisemphasized) - Dimmer-Adjuststhebrightnesssoftdisplay
- Temperature-Adjuststhecolortemperature,resultinginabetterwhitebalance
- BlackLevel—Emphasizesthedarkportions ofimagesmakinthedifferencebetween brightanddarkmoredistinct
HDRadio™tuner
You can use this unit to control an HDR radio tune (e.g. GEX-P20HD), which issold separately.
Fordetailsconcerningoperation,refertotheHD Radiotuner'soperationmanual.
BasicOperations
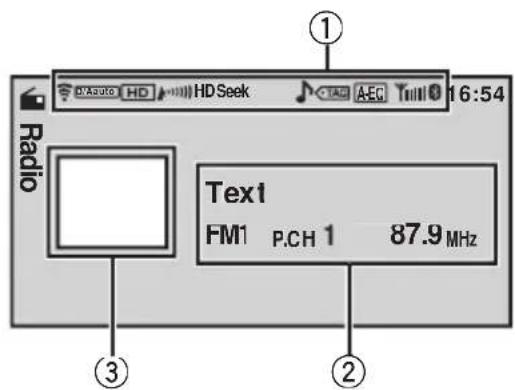
①Indicatordisplayarea
Refertolndicatorlstonpage48.
②Textinformationarea
- Call sign—artist name—song title—programtype
- Band/Presetnumber/Frequencyindicator
③Sourceimagedisplay
Operationsarethesameasthoseofthetuner. (RefertoBasicOperationsonpage14.)
Storingandrecallingstations
Operationsarebasicallythesameasthoseof thetuner.(RefertoStoringandrecallingstationsonpage14.)
However, the bandselection method is different from that of the tetuner.
- Push M.C. down.
UsingiTunestagging
Theoperationisthesameasthatofthetuner. (RefertoUsingiTunestaggergingonpage15.)
Functionsettings
1PressM.C.todisplaythefunction menu.
2TurnM.C.toselectthefunction.
Afterselecting,performthefollowingprocedurestosetthefunction.
BSM (best stations memory)
Refer to BSM (best stations memory) on page 15.
Local (local seek tuning)
Refer to Local (local seek tuning) on page 15.
Seek Mode (seek mode)
Seek tuning setting can be changed between digital station seek (Seek HD) and analog station seek (Seek All) depending on the reception status.
Press M.C. to select your favorite setting.
Seek All—Seek HD
Blending (reception mode)
If the reception for a digital broadcast becomes poor, this unit automatically switches to the analog broadcast of the same frequency. If this function is set to D/A Auto, the tuner switches between digital broadcast and analog broadcast automatically. If this function is set to Analog, the tuner will only receive analog broadcasts.
Press M.C. to display the setting mode.
2 Turn M.C. to select a desired mode.
D/A Auto—Analog
3 Press M.C. to confirm the selection.
Display (display setting)
You can switch to the desired text information.
Refer to Display (display setting) on page 19.

Note
Operationiscompleteevenifthemenuiscancelledbeforebeingconfirmed.
XMtuner
You can use this unit to control an XM satellite digital tune (GEX-P920XM), which issold separately.
Available accessories
Fordetailsconcerningoperation,refertothe XMturer'soperationmanuals.Thissection providesinformationonXMoperationswith thisunitwhichdiffersfromthatdescribed in theXMturer'soperationmanual.
- Withthisunit,youcanoperatetwoadditionalfunctions:XMchanneldirectselectionandpresetchannellist.
BasicOperations
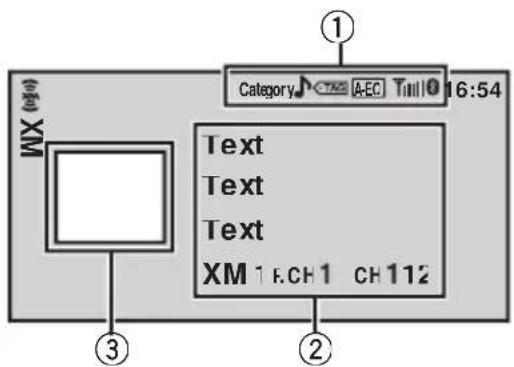
①Indicatordisplayarea
Referto/Indicatoristonpage48.
②Textinformationarea
- Channelname
- Artistname
Songtitle
- Band/Presetnumber/Frequencyindicator
③Sourceimagedisplay
Selectingachannel(stepbystep)
PushM.C.leftright.
If you push and hold M.C. left or right, you can increase order decrease the channel number continuously.
- Youcanalsoperfortuningfromadesired channelcategory.(RefertoSelectingachannelfromachannelcategoryonthenthetae.)
Switchingthedisplayoff
|1|Pressandhold
Storingandrecallingstations
Operationsarebasicallythesameasthoseof thetuner.(RefertoStoringandrecallingstationsonpage14.)
However, the bandselection method is different from that of the tetuner.
- PushM.C.down.
Band can be selected from XM1, XM2 or XM3.
SelectinganXMchanneldirectly
ThisfunctionisavailableonlyforMVH-P8200BT. Whenusingtheremotecontrol,youcanselect thechanneldirectlybyenteringthedesired channelnumber.
[1]PressDIRECT.
The channel number input display appears.
[2] Press 0 to 9 to enter the desired channel number.
- Youancanceltheinputnumberbypressing Clear.
3PressDIRECT.
Thechanneloftheenterednumberisselected.
Afterenteringthenumberinputmode,ifyou donotperformmanoperationwithinabout eightseconds,themodeisautomaticallycanceled.
Functionsettings
1PressM.C.todisplaythefunction menu.
2TurnM.C.toselectthefunction.
Afterselecting,performthefollowing proceduresostetthefunction.
ChannelMode channelselectmodesetting)
You havetwomethodsforselectingachannel:by numberandbycategory.Whenselectingbynumber, channelsinanycategorycanbeselected.Selectby categorytonarrowyoursearchdowntoonlychannelsinaparticularcategory.
|1|PressM.C.todisplaythesettingmode.
2|Turn M.C.to select the desired setting. AllCH channelnumberselectsetting)Categorychannelcategoryselectsetting
3|PressM.C.toconfirmtheselection.

Note
Operationiscompleteevenifthemenuiscancelledbeforebeingconfirmed.
Selectingachannelfromachannelcategory
1Switchthechannelselectsettingsto Category.
RefertoChannelMode(channelselectmode setting) on the previous page.
2PushM.C.upordowntoselectthedesiredchannelcategory.
3PushM.C.leftorrighttoselectthedesiredchannelintheselectedchannelcategory.
DisplayingtheRadioID
1Selectthechannelselectsettingsto AIICH.
ReferoChannelMode(channelselectmode setting)onthepreviouspage.
2PushM.C.leftorrighttoselect RADIOID.
Ifyouselectanotherchannel,displayofthelD codeiscanceled.
- RADIOIDandthelDcodesarepeatedlydisplayedoneaftertheother.
SIRIUSSatelliteRadiotuner
You can use this unit to control SIRIUSSatellite Radiotuner, which issold separately. Whenthe SIRIUStuneris used together with this unit, some operations differ slightly from those described in the SIRIUSoperationmanual. This manual provides information on these points. For all other information on using the SIRIUStuner, please refer to the SIRIUSoperationmanual.
BasicOperations
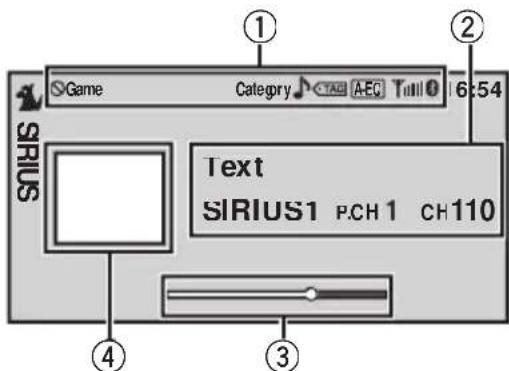
①Indicatorisplayarea
Push M.C. left or right.
IfyoupushandholdM.C.leftorright,you canincreaseoredecreasethechannelnumber continuously.
- Youcanalsoperformtuningfromadesired channelcategory.(RefertoSelectingachannelfromachannelcategoryonpage44.)
DisplayingtheRadioID
Push M.C. left or right to select CH 000.
- ToselectCH000,setthechannelselectsettingto AllICH.Aboutthechannelselectsetting,referto ChannelMode channelselectmodesetting)on thenextpage.

Notes
- PlaytimeandscrubberbararedisplayedduringtheInstantReplaymode.RefertoUsing theInstantReplayfunctiononpage44.
- Playtimedisplayindicateshestimeinverted fromthelivebroadcast.Theplaytimeisdisplayedasanegativenumber.
Availableaccessories
- It may take a few seconds before you can hear anything while this unit acquires and processes esthesatellites signal when you change the source to a SIRIUS Tunerorsect channel.
Storingandrecallingstations
Operationsarebasicallythesameasthoseof thetuner.(RefertoStoringandrecallingstationsonpage14.)
However, the bandselection method is different from that of the tetuner.
- PushM.C.down.
Band can be selected from SIRIUS1, SIRIUS2 or SIRIUS3.
SelectingaSIRIUSchanneldirectly
OperationsarethesameasthoseoftheXM tuner.(RefertoSelectinganXMchanneldirectly onpage41.)
Functionsettings
1PressM.C.todisplaythemainmenu.
2TurnM.C.tochangethemenuoption andpresstoselectFunction.
3TurnM.C.toselectthefunction.
Afterselecting,performthefollowingprocedurestosetthefunction.
ChannelMode channelselectmodesetting)
Youhavenwormethodsforselectingachannel:by numberandbycategory.Whenselectingbynumber, channelsinanycategorycanbesected.Selectby categorytonarrowyoursearchdowntoonlychannelsinaparticularcategory. RefertoChannelMode channelselectmodesetting) onpage41.
GameAlert(gamealertsetting)
Thissystemcanalertyouwhengamesinvolvingyour favoriteteamsareabouttostart.Tousethisfunction youneedtosetupagamealertfortheteamsinadvance.
Tousethisfunction,aPioneerSIRIUSbusinterface(e.g.CD-SB10)isrequired.
- Tousethisfunction, aSIRIUSplug-and-playunit withaGameAlertFunctionisrequired.
- Fordetails,refertotheSIRIUSplug-and-play unit'smanuals.
- You can also operate this function when a SIR-PNR2 is connected to this unit.
TheGameAlertfunctionisonafterdefaultsetting.
-Onceyouselecttheteams,youneedtoturnthe GameAlertfunctionon.
[1]PressM.C.toturntheGameAlertonoroff.
- Whenagameoftheselectedteamisabouttostart(oriscurrentlyplaying)onadifferentstation,agamealertisdisplayed.UseM.C.to selectJumpand switchto the otherstationolistentothegame.Turntochangethemenuoption.Presstoselect.IfyouselectStay,thestationwillnotbeswitched.
TeamSetting(teamsetting)
PressM.C.todisplaythesettingmode.
PressM.C.toselectadesiredleague.
3TumM.C.toselectadesiredteam.
4PressandholdM.C.tostoretheselectedteam thememory. Thegamealertfunctionisactivatedforthatteam.
[5]Repeatthesestepstoselectotherteams. Upto12teamscanbeselected.
- When you have already selected 12 teams, FULL is displayed and additional teamscannotbeselected. Inthis case, first delete selectedteamandthentryagain.
LiveGamelinfo(gameinformation)
Availableaccessories
Manygamesoftheselectedteamsarecurrentlyplaying,youcandisplayinformationonthegamesandtuneintothebroadcastchannel.Youcandisplayinformationonthegameswhileenjoyingthesoundfromthestationyouarecurrentlytunedinto.Youcanalsotuneintothebroadcastchannelwhenyouwishto.
[1]PressM.C.todisplaythesettingmode.
[2]TumM.C.toselectagame.
Thegamescorewillbeupdatedautomatically.
3PressM.C.toswitchtotheotherstationandlistentothegame.
- If you haven't selected any teams, NOT SET is displayed.
- Whengamesinvolvingyourfavoriteteamsarenot currentlyplaying.NOGAMEisdisplayed.
Display(displaysetting)
Youcanswitchtothedesiredtextinformation.
Refer to Display (display setting) on page 19.
InstantReplay(InstantReplaymodesetting)
Press M.C. to turn Instant Replay mode on or off.
Pause(pause)
Refer to Pause (pause) on page 19.
Selectingachannelfromachannelcategory
OperationsarethesameasthoseoftheXM tuner.(RefertoSelectingachannelfromachannelcategoryonpage42.)
UsingtheInstantReplay function
ThefollowingfunctionscanbeoperatedinInstantReplaymode.
- Tousethisfunction,aPioneerSIRIUSbus interface(e.g.CD-SB10)isrequired.
- Tousethisfunction,aSIRIUSplug-and-playunitwithanInstantReplayFunctionis required.
- Fordetails,refertotheSIRIUSplug-and-playunit'smanuals.
UsingInstantReplaymode
Refer to Instant Replay (Instant Replay mode setting) onthispage.
- Whenanothersourceisselected, instantreplaymodeiscanceled.
Selectatrack
PushM.C.leftorright.
Fastforwardorreverse
1PushandholdM.C.leftorright,andthen release.

Troubleshooting
Common
| SymptomCauseAction(Refer-encepage) | ||
| Thepowerwill notturnon. Theunitwill notoperate. | Leadsandcon-nectorsareincor-rectlyconnected. | Confirmoncemore thatalconnec-tionsarecorrect. |
| Thefuseis blown. | Rectifythecause andthenreplace thefuse.Besureto installafusewith thesamerating. | |
| Noiseand/or otherfactorsare causingthebuilt-inmicroproces-sortooperatine-correctly. | PressRESET. (Page 7) | |
| Operationwith theremote controlisnot possible. Theunitdoes not operate correctlyeven whenthep-propriaterete-motecontrol buttonsare pressed. | Batterypoweris low. | Loadanewbattery. |
| Thereisnosound. Thevolume levelwillnot rise. | Cablesarenot connectedcor-rectly. | Connectthecables correctly. |
| Theaspect ratioisincor-rectandthe imageis stretched. | Theaspectratiosettingisincor-rectforthedis-play. | Selecttheappro-priatesettingfor yourdisplay.(Page 38) |
| Thereisno imagedis-played. | Theparking brakeablesis notconnected. | Connecttbepark-ingbrakecable, andapplythepark-ingbrake. |
| Theparking brakeisnotap-plied. | Connecttbepark-ingbrakecable, andapplythepark-ingbrake. | |
SymptomCauseAction(Refer
encepage)
| Theimagedisplayedstops(pauses)andtheunitcannotbeoperated. | Thedatacouldnolongerbereadduringplayback. | Stopplaybackonce, and startplaybackagain. |
| Thereisnosound.Thevolumelevelislow. | Thevolumelevelislow. | Adjustthevolumelevel. |
| Theattenuatorison. | Turntheattenuaoff. | |
| Thesoundandvideoskip. | Theunitisnotfirmlysecured. | Firmlysecuretheunit. |
| NOXXXappearswhenadisplayischan-ged(NOTITLE,forexample). | Thereisnottextinformationem-bedded. | Switchthedisplaorplayanothertrack/file. |
| Sub-folderscannotbeplayedback. | Foldererepeatplayhasbeense-lected. | Selecttherepeatrangeagain. |
| Therepeatrangechangesautomatically. | Anotherfolderwasseledduringrepeatplay. | Selecttherepeatrangeagain. |
| Tracksearchorfastforward/re-versewasperformeddurdinfilerepeatplay. | Selecttherepeatrangeagain. |
ProblemsduringiPodplayback
SymptomCauseAction
| TheiPoddoes not operate correctly. | Thecablesarein-correctlycon-nected. | Disconnectthe cablefromthe iPod.Oncethe iPod'smainmenu isdisplayed,reconnecttheiPodand resetit. |
| TheiPodversion isold. | UpdatetheiPod version. |

Errormessages
Whenyoucontactyourdealeroryournearest PioneerServiceCenter,besuretonotethe errormessage.
AdditionalInformation
Externalstoragedevic USB,SD)
| MessageCauseAction | ||
| NoDeviceTheUSBstorage deviceisnotconnected. | Connectaccompany USBstorage device. | |
| Unplayable File | Thistypeoffile cannotbeplayed onthisunit. | Selectafelthat canbeplayed. |
| Thereareonsongs. | Transfertheaudio filestothexternal storagedeviceneand connect. | |
| Theconnected USBstoragede-vicehassecurity enabled | FollowtheUSB memoryinstruc-tionstodisablenes-curity. | |
| FormatReadSometimeshere isadelaybeteenthestartof playback and whenyoustartto hearanysound. | Waituntilthemes-sagedisappears andyouhear sound. | |
| SkippedTheexternalsto-ragedevicenein usecontains WMAfilesem-beddedwith WindowsMedi-ia™DRM9/10 | Playanaudiofile notembeddewith WindowsMedia DRM9/10. | |
| ProtectAllthefilesinthe externalstorage deviceareem-beddedwith WindowsMedia DRM9/10 | Transferaudiofiles notembeddwith WindowsMedia DRM9/10tothe externalstorage deviceandcon-nect. | |
| Incompatible USB | Theconnected USBstoragede-viceisnotsup-portedbythis unit. | ConnectaUSB MassStorage Classcompliant device. |
| TheUSBdevice isnotformatted with FAT16or FAT32. | Theconnected USBdeviceshould beformatted with FAT16orFAT32. | |
| Incompatible SD | Notcompatible SDstoragede-vice | Removeyourdevice andreplaceit withacompatible SDstoragedevicere. |
| MessageCauseAction | ||
| CheckUSBTheUSBconnec-tororUSBcablehasshort-circuited. | CheckthattheUSBconnectororUSBcableisnotcaughtinsome-thingordamaged. | |
| TheconnectedUSBportableaudiplayer/USBmemoryconsumesmorethanmaximumallowablecurrent. | DisconnecttheUSBstoragede-viceanddonotuseit.TurntheignitionswitchtoOFF,thentoACCorONandthenconnectonlycom-pliantUSBstoragedevices. | |
| Error-02-9X/-DX | Communicationfailed. | Performoneofthefollowingoperations.-TurntheignitionswitchOFFandbackON.-Disconnector ejecttheexternalstargedevic.-Changetoadif-ferentsource.Then,returntotheUSBorSDsource. |
| Rentalex-pired. | TheconnectedexternalstoragedevicecontainsexpiredDivXVODcontent. | •Replacetheexternalstargagede-vice.•Selectafelthatcanbeplayed. |
| FileNotPlay-able-HighDe-finition | TheconnectedexternalstoragedevicecontainsahighdefinitionDivXfile. | •ThisunitcannotplayDivXHDfiles.Replacesexternalstoragedevicewithonethisunitcanplay.•Selectafelthatcanbeplayed. |
| Itisnotpossi-bletowritein theflash. | Thisunit'sflashmemoryusedastherem temporarystorageareaisfull. | Selectafelthatcanbeplayed. |
| AuthorizationError | Thisunit'sDivXregistrationcodehasnotbeenauthorizedbytheDivXVODcon-temsprovider. | RegisterthisunittotheDivXVODcontentsprovider.(Page18) |
AdditionalInformation
MessageCauseAction
| Videoframe ratenotsup- ported | Theexternalsto- ragedevice's framerateis morethan30fps. | Replacetheexterna- nalstoragedevice. |
| AudioFormat notsupported | Thisypeoffileis notsupportedon thisunit. | Selectafilethat canbeplayed. |
| Unplayable File | Thisypeoffile cannotbeplayed onthisunit. | Selectafilethat canbeplayed. |
iPod
| MessageCauseAction | ||
| NoDeviceUSBstoragedevicereiPodisnotconnected. | ConnectaccompanyiPod. | |
| IncompatibleUSB | Non-compatibleiPod | Disconnectyour deviceandreplaceitwithacompanyiPod. |
| CheckUSBTheiPodoper-atescorrectlybutdoesnnotcharge | Makesurethecon-rectioncablefortheiPodhasnotshortedout(e.g.,notcaughtinmetalobjects).Afterchecking,turntheignitionswitchOFFandbackONordiscon-necttheiPodandreconnect. | |
| FormatRead/Ready | Sometimeshereisadelaybetweenthestartofplaybackandwhenyoustarttohearanysound. | Waituntilthemes-saged disappearsandyouhear sound. |
MessageCauseAction
| Error-02-6X/-9X/-DX | Communication failed. | Disconnectthe cablefromthe iPod.Oncethe iPod'smainmenu isdisplayed,reconnecttheiPodand resetit. |
| iPodfailureDisconnectthe cablefromthe iPod.Oncethe iPod'smainmenu isdisplayed,reconnecttheiPodand resetit. | ||
| Error-02-67TheiPodfirmwareversionsare old. | UpdatetheiPod version. | |
| StopThereareno songs. | Transfersongsto theiPod. | |
| Selectalistthat containsongs. | ||
| NoxxxxThereisnoinfor-mation. | Recordinformation ontheiPod. | |
iTunestaggering
MessageCauseAction
| iPodfullTAGsnottransferred. | MemoryusedfortaginformationontheiPodisfull. | SyncthiePodwithiTunesandcleanupthetaggedplay-list. |
| MemoryfullTAGsnotstored. | Thisunit'sflesh memoryusedastemporary storageareaisfull. | ConnecttheiPodtothisunitandtransferthisunit'staginformationtotheiPod. |
| Tagtransferfailed.ReconnectyouriPod. | Thisunit'staginformationcannot transfertotheiPod. | ChecktheiPodandtryagain. |
| Tagstorefailed. | Taginformationcannotbestoredinthisunit. | Tryagain. |
| SDsourcecan-notbeselectedduringtagtransfer. | Taginformationisbeingtrans-ferredtotheiPod. | Waituntiltagtransferiscom-plete. |
AdditionalInformation
BluetoothTelephone
MessageCauseAction
Error-10Thepowerfailed
fortheBluetooth moduleofthis
unit.
Turntheignition switchOFFand thentoACCorON. Iftheerrormessageisstilldisplayedafter performing the aboveaction, pleasecontact yourdealeroran authorizedPioneer ServiceStation.

UnderstandingautoEQ errormessages
Whencorrectmeasurementofthecar'sinteracousticcharacteristicsisnotpossible usingautoEQ,anerrormessagemayappear onthedisplay.Insuchcases,refertothetable belowtoseewhattheproblemisandhowit maybecorrected. Afterchecking,tryagain.
MessageCauseAction
| Error.Please checkMIC. | Themicophone isnotconnected. | Plugtheoptional microphonese-curelyintothe jack. |
| Error.Please checkxxxx speaker. | Themicophone cannotpickup themeasuring toneofaspeaker. | ·Confirmthatthe speakersarecon- nectedcorrectly. ·Correcttheinput levelsettingofthe powerampcon- nectedtothe speakers. ·Setthemicro- phonecorrectly. |
| Error.Please checknoise. | Thesurrounding noiselevelistoo high. | ·Stopyourcarin aplacethatis quiet, and switch offtheengine,air conditionerand heater. ·Setthemicro- phonecorrectly. |
MessageCauseAction
Error.Please checkbattery.
Powerisnot beingsupplied fromthebattery tothisunit.
- Stopyourcarin
aplacethatis quiet, and switch offtheengine, air conditioner and heater. - Connect thebat
terecorrectly.

Indicatorlist
Common

(MVH-P8200BTonly)
IndicateshataBluetoothtelephoneisconnected.

(MVH-P8200BTonly)
Indicateshesignalstrengthofthecellularphone.

Showswhentaginformationist storedinthisunit.

Flasheswhenthetagisbeing transferredtoaniPod.

Indicates that AutoEQison.
iPod

Showswhenrepeatplayissetto OneorAll.

Showswhenshufflefunctionison.

Showswhenthesoundretriever functionison.
AdditionalInformation
Externalstoragedevic USB,SD


Showswhentherepeatrangeis selectedforthecurrenftfile.


Showswhentherepeatrangeis selectedforthecurrentfolder.


Showswhenrandomplayison.
Showswhenthesoundretriever functionison.
Tuner

Showswhenlocalseektuningis on.

Indicates that the selected frequency is being broadcast in stereo.

Showswhensonginformation (tag)fromaradiostationisreceived.
HDRadio™Technology
All Seek
HD Seek
Showsthesearkmodestatus.
D/Aauto
Analog
Showsthesetupvalueofreception mode.

ShowswhendigitalaudioofHD Radiosignalisreceived.

ShowswhenanalogaudioHD Radiosignalisreceived.

Showstheradiofieldstrength.

Showswhenthetuneristunedto HDRadiostation.

Showswhensonginformation (tag)fromaradiostationisreceived.
XM/SIRIUStuner

Showswhenautomaticallyswitch ingtothegamealertfunctionis notpossible.

Showswhenthechannelnumber selectsettingisselected.

Showswhenthechannelcategory selectsettingisselected.

Handlingguideline
Externalstoragedevice(USB,SD)
Addressanyquestionsyouhaveaboutyourexternal storagedevic(USB,SD)tothemanufacurerofthe device.
Donotleavetheexternalstoragedevic(e(USB,SD)in placeswithhightemperatures.
Dependingontheexternalstoragedevice(USB,SD), thefollowingproblemsmayoccur.
- Operationsmayvary.
- Thestoragedevicemaynotberecognized.
- Filesmaynotbeplayedbackproperly.
USBstoragedevic
ConnectionsviaUSBhubarenotsupported.
DonotconnectanythingotherthanaUSBstorage device.
FirmlysecuretheUSBstoragedevicewhendriving. DonotlettheUSBstoragedevicefallontothefloor, whereitmaybecomejammedunderthebrakeoracceleratorpedal.
AdditionalInformation
DependingontheUSBstoragedevicethedevicemaycausenoisetooccurthoneradio.
Thedevicemaygeneratenoiseintheradio.
ThisunitcanplaybackfilesintheUSBportable audioplayer/USBmemorythatisUSBMassStorage Class.However,copyrightprotectedfilesthatare storedintheUSBdevicescannotbeplayedback.
YoucannotconnectaUSBportableaudiolayer/USB memorytothisunitviaUSBhub.
PartitionedUSBmemoryisnotcompatiblewiththis unit.
DependingonthekindofUSBportableaudiolayer/ USBmemoryyouuse,thedevicemaynotberecognizedoraudiofilesmaynotbeplayedbackproperly.
DonotleavetheUSBportableaudiplayer/USB memoryindirectsunlightforextendedamountsoft time.Doingsomaycausethedevicetomalfunction fromtheextremeintemperature.
SDmemorycard
ThisunitssupportsonlythefollowingtypesofSD memorycards.
SD
KeeptheSDmemorycardoutofthereachofchildren.ShouldtheSDmemorycardbeswallowed,consultadoctorimmediately.
Don't touch the connector for the SD memory card directly with your fingers or with any metal device.
DonotinsertanythingotherthananSDmemorycard intotheSDcardslot.Ifametalobject(suchasa coin)isinsertedintotheslot,theinternalcircuitsmay breakandcausemalfunctions.
DonotinsertadamagedSDmemorycard(e.g. warped, label peeledoff) as it may not beejected fromtheslot.
DonottrytoforceanSDmemorycardintotheSD cardslotasthecardthisunitmaybedamaged.
WhenejectinganSDmemorycard,pressitandhold ituntilitclicks.Itisdangeroustoreleaseyourfinger immediatelyafterpressingthecardasitmayshoot outoftheslotandhityouintheface,etc.Ifthecard shootsoutoftheslot,itmaybelost.
iPod
DonotleavetheiPodindirectsunlightforextended amountsofttime.DoingsomaycausetheiPodto malfunctionfromtheextremeiseintemperature.
DonotleavetheiPodinplaceswithhightemperatures.
Toensureproperoperation,connectthedockconnectorcablefromtheiPoddirectlytothisunit.
FirmlysecuretheiPodwhendriving.Donotletthe iPodfallontothefloor,whereitmaybecomejammed underthebrakeoracceleratorpedal.
Fordetails,refertothemanualsfortheiPod.
AboutiPodsettings
- WhenaniPodisconnected, this unit changes the EQ(equalizer)setting of the Podtooffinorderto optimize the acoustics. When you discover the iPod, the EQreturnstotheoriginal setting.
- YoucannotsetRepeattooffonteiPodwhen usingthisunit.Repeatisautomaticallychanged toAllwhentheiPoddisconnectedtothisunit.
JPEGpicturefiles
JPEGisshortforJointPhotographicExpertsGroup andreferstoastillimagecompressiontechnology standard.
FilesarecompatiblewithBaselineJPEGandEXIF2.1 stillimagesuptoaresolutionof8192×7680.(EXIF formatisusedmostcommonlywithdigitalstillcameras.)
PlaybackofEXIFformatfilesthatwereprocessedby a personalcomputermaynotbepossible.
ThereisnoprogressiveJPEGcompatibility.
DivXvideofiles
Dependingon the composition of the file information, suchasthenumberofaudiosreamsorfilesize, theremaybeaslightdelayinplaybackifdatais beingplayedbackfromanexternalstoragedevice.
Somespecialoperationsmaybeprohibiteddueto thecompositionoftheDivXfiles.
OnlyDivXfilesdownloadedfromaDivXpartnersite areguaranteeforproperoperation.Unauthorized DivXfilesmaynotoperateproperly.
DRMrentalfilescannotbeoperateduntilplaybackistarted.
AdditionalInformation
RecommendedFILESize:2Mbpsorlesswithatransmissionrateof2GBorless.
ThelIDcodeofthisunitmustberegisteredtoaDivX VODproviderinordertoplaybackDivXVODfiles.For informationonIDcodes,refertoDisplayingtheDivX VODregistrationcodeonpage39.
FormoredetailsaboutDivX,visitthefollowingsite: http://www.divx.com/

Important
- WhennamingaJPEGimagefile,addthecorrespondingfilenameextension(.jpg,.jpeg,.jpeor.jfif).
- Thisunitplaysbackfileswiththesefilename extensions(.jpg,.jpeg,.jpeor.jfif)asaJPEG imagefile.Toppreventmalfunctions,donot usetheseextensionsforfilesotherthanJPEG imagefiles.
Compressedaudio/video compatibility(USB,SD)
WMA
| Fileextension:.wma |
| Bitrate:5kbpsto320kbps(CBR),VBR |
| Samplingfrequency:8kHzto48kHz |
| WindowsMediaAudioProfessional,Lossless,Voice/DRMStream/Streamwithvideo:No |
MP3
| Fileextension:.mp3 |
| Bitrate:8kbpsto320kbps(CBR),VBR |
| Samplingfrequency:8kHzto48kHz(32kHz,44.1 kHz,48kHzforemphasis) |
| CompatibleID3tagversion:1.0,1.1,2.2,2.3(ID3tag Version2.xisgivenprioritythanVersion1.x.) |
| M3uplaylist:No |
| MP3i(MP3interactive),mp3PRO:No |
AAC
| Compatibleformat:AAEncodedbyiTunes |
| Fileextension:.m4a |
| Bitrate:8kbpsto320kbps |
| Samplingfrequency:8kHzto44.1kHz |
| AppleLossless:No |
| AACfileboughtontheiTunesStore(.m4pfilextension):No |
DivXcompatibility
| Compatibleformat:DivXvideoformatimplementedin relationtoDivXstandards |
| Fileextensions:.avior.divx |
| DivXUltraformat:No |
| DivXHDformat:No |
| DivXfileswithoutvideodata:No |
| Compatibleaudiocodec:MP2,MP3,DolbyDigital |
| LPCM:No |
| Bitrate:8kbpsto320kbps(CBR),VBR |
| Samplingfrequency:32kHz,44.1kHz,48kHz |
| Compatibleexternalsubtitlefileextension:.srt |
Supplementalinformation
| Onlythefirst32characterscanbedisplayadasafelname(includingthefileextension)orafoldername. |
| ThisunitmaynotoperatecorrectlydependingontheapplicationusedtoencodeWMAfiles. |
| Theremaybeaslightdelaywhenstartingplaybackofaudiofilesembeddedwithimagedata. |
| Externalstoragedevicest(USB,SD) |
| Playablefolderhierarchy:uptoeighttiers(Apracticalhierarchyislessthantwotiers.) |
| Playable folders:upto6000 |
| Playablefiles:upto65535 |
| Playbackofcopyrightprotectedfiles:No |
AdditionalInformation
Partitionedexternalstoragedevice(USB,SD):Only thefirstplayablepartitioncanbeplayed.
Theremaybeaslightdelaywhenstartingplaybackof audiofilesonanexternalstoragedevice(USB,SD) withnumerousfolderhierarchies.
SDmemorycard
ThereisnocompatibilityforMultiMediaCards (MMC).
CompatibilitywithallsDmemorycardsisnotguaranteed.
ThisunitisnotcompatiblewithSD-Audio/SD-Video.

CAUTION
Pioneeracceptsnoresponsibilityfordatalost on theUSBmemory/USBportableaudioplayer/SD memorycardevenifthatdataislostwhileusing thisunit.
iPodcompatibility
ThisunitssupportsonlythefollowingiPodmodels. SupportediPodsoftwareversionsareshownbelow. Olderversionsmaynotbesupported.
-iPodnano5thgeneration(softwareversion1.0.2)
-iPodnano4thgeneration(softwareversion1.0.3)
-iPodnano3rdgeneration(softwareversion1.1.3)
-iPodnano2ndgeneration(softwareversion1.1.3)
-iPodnano1stgeneration(softwareversion1.3.1)
-iPodtouch2ndgeneration(softwareversion3.0)
- iPodtouch1stgeneration(softwareversion3.0)
- iPodclassic120GB(softwareversion2.0.1)
-iPodclassic(softwareversion1.1.2)
-iPod5thgeneration(softwareversion1.3.0)
iPhone3GS(swtwareversion3.0)
iPhone3G(sffwareversion3.0)
- iPhone(softwareversion3.0)
DependingonthegenerationorversionoftheiPod, somefunctionscannotbeoperated.
OperationsmayvarydependingonthesoftwareversionofiPod.
When usinganiPod,iPodDockConnectortoUSB Cableisrequired.
PioneerCD-IU50interfacecableisalsoavailable.For details,consultyourdealer.
Aboutthefile/formatcompatibility,refertoiPodmanuals.
AudioBook,Podcast:Yes

CAUTION
Pioneeracceptsnoresponsibilityfordatalost theiPodevenifthatatdataislostwhileusingthis unit.
Sequenceofaudiofiles
Theusercannotassignfoldernumbersand specifyplaybacksequenceswiththisunit.
Exampleofahierarchy
Level 1 Level 2 Level 3 Level 4
Folder
Compressed
audiofile
01to05:Folder
number
①to⑥:Playback
sequence
Externalstoragedevic USB,SD)
Playbacksequenceisthesamesrecorded sequenceintheexternalstoragedevice(USB, SD).
Tospecifytheplaybacksequence,thefollowingmethodisrecommended.
1Create the filename including numbersthat specify the playback sequence (e.g., 01xxx.mp3 and 099yyy.mp3).
2Putthosefilesintoafolder.
3 Savethefoldercontainingfilesontheexternal storagedevic USB,SD).
However,dependingonthesystemenvironment,youmaynotbeabletospecifytheplaybacksequence.
ForUSBportableaudiolayers,thesequenceisdifferentanddependsontheplayer.
Usingthedisplaycorrectly

CAUTION
- If liquidorforeignmattersshouldgetinside thisunit,turnoffthepowerimmediatelyand consultyourdealerorthenearestauthorized PIONEERServiceStation.Donotusetheunit inthisconditionbecausedoingsomayresult infire,electricshock,ortherfailure.
- If you notice smoke, astrangenoiseorsmell, or any other abnormal signs from the display, turn off the power immediately and consult your dealer or the nearest authority. PIONEERServiceStation.Using this unit in this condition may result in permanent damagetohesystem.
- Donotdisassembleormodifythisunit,as therearehigh-voltagecomponentsinsidewhichmaycauseelectricshock.Besureto consultyourdealerorthenearestauthorizedPIONEERServiceStationforinternalinspec-tion,adjustments,orrepairs.
Handlingthedisplay
- Whenthedisplayissubjecttedtodirectsunlightforalongperiodoftime,itwillbecomeveryhotresultinginpossible damagetothelCDscreen.Youshouldavoidexposingthedisplayunittodirect sunlightasmuchaspossible.
- Thedisplayshouldbeusedwithinthe temperaturerangeof-10°Cto+60°C(14°F to 140°F).
Attemperatureshigherorlowerthanthis operating temperaturerange, the display maynotoperatenormally.
Liquidcrystalldisplay(LCD)screen
- HeatfromtheheatermaydamagetheLCD screen, and coolairfrom the coolermay causemoisturetoforminsidethisplay resulting in possibly damaged. Also, if the display is cooled down by the cooler, the screen may become dark, or the lifespan
ofthesmallfluorescenttubeusedinsidethedisplaymaybeshortened.
- Smallblackdotsorwhitedots(brightdots) mayappearonthelLCDscreen.Theseare duetothecharacteristicsofthelCD screenanddonotindicateamalfunction.
- When using acellular phone, keep the antenna away from the displaytopreventdisruption of the videoimage by the appearance of spots, colored stripes, etc.
LED(light-emittingdiode) backlight
- Atlowtemperatures, using the LED backlightmayincreaseimagelaganddegrade the imagequalityduetothecharacteristics of the LCDscreen.Imagequalitywillimprovewithanincreaseintemperature.
-ToprotecttheLEDbacklight,thedisplay willdarkeninthefollowingenvironments: -Inthedirectsunlight -Neartheheatervent
The product lifetime of the LED backlight is more than 10000 hours. However, it may decrease if used in high temperatures. - IftheLEDbacklightreachestheendofits productlifetime, thescreenwill become darkandtheimagewillnolongerbeprojected. Insuchcases, please consult your dealerorthenearestauthorizedPIONEER ServiceStation.
Fluorescenttube
- Asmallfluorescenttubeisusedinsidethe displaytoilluminatetheLCDscreen.
—Thefluorescenttubeshouldlastforapproximately10000hours,depending on operatingconditions.(Usingthedisplays atlowtemperaturesreduceshesteservice lifeofthefluorescenttube.)
AdditionalInformation
—Whenthefluorescenttubereaches the endofitsusefullife,thescreenwill bedarkandtheimagewillnolongerb projected.lfthishappens,consultyour dealerorthenearestauthorized PIONEERServiceStation.
Copyrightandtrademark
Thisproductincorporatescopyright protection technologythatisprotectedbymethodclaims ofcertainU.S.patentsandotherintellectual propertyrightsownedbyMacrovision Corporationandotherrightssowners.Useof thiscopyright protectiontechnologymustbe authorizedbyMacrovisionCorporation,andis intendedforhomeandotherlimitedviewing usesonlyunlessotherwiseauthorizedby MacrovisionCorporation.Reverseengineering ordisassemblyisprohibited.
Bluetooth

TheBluetooth® wordmarkandlogosareregisteredtrademarksownedbyBluetoothSIG,Inc. andanyuseofsuchmarksbyPioneer Corporationisunderlicense.Othertrademarksandtradenamesarethoseoftheirrespectiveowners.
iTunes
AppleandiTunesaretrademarksofApple Inc.,registeredintheU.S.andother countries.
MP3
Supply of this product only conveys salicense for private, non-commercial use and does not convey alicensenor imply any righttouse this product inany commercial (i.e. revenue-generating) realtime broadcasting (terrestrial,
satellite,cableand/oranyothermedia),broadcasting/Streamingviainternet,intranetsand/orthernetworksorinotherelectroniccontentdistributionssystems,suchaspay-audior audio-on-demandapplications.Anindependentlicenseforsuchuseisrequired.Fordetails,pleasevisit http://www.mp3licensing.com.
WMA

WindowsMediaandtheWindowslogoaretrademarksorregisteredtrademarksofMicrosoft CorporationintheUnitedStatesand/orther countries.
Thisproductincludestechnologyownedby MicrosoftCorporationandcannotbeusedordistributedwithoutalicensefromMicrosoft Licensing,Inc.
SDmemorycard

SDLogoisattrademark.
iPod

iPodisattrademarkofAppleInc.,registered in theU.S.andothercountries.
AdditionalInformation
"MadeforiPod" meansthatanelectronicaccessoryhasbeendesigntoconnectspecifi-callytoiPodandhasbeencertifiedbythe developopertomeetAppleperformancestandards.
Appleisnotresponsiblefortheoperationof thisdeviceoritscompliancewithsafetyand regulatorystandards.
iPhone

iPhoneisattrademarkofAppleInc.
"WorkswithiPhone"meansthatanelectronic accessoryhasbeendesigntoconnectspecificallytoiPhoneandhasbeencertifiedby thedeveloportomeetAppleperformance standards.
Appleisnotresponsiblefortheoperationof thisdeviceoritscompliancewithsafetyand regulatorystandards.
DivX

DivX® isregisteredtrademarkofDivX,Inc., andisusedunderlicense.
ABOUTDIVXVIDEO:DivX isadigital videoformatcreatedbyDivX,Inc.ThisisanofficialDivXCertifieddevicethatplaysDivX video.Visitwww.divx.comformoreinformationandsoftwaretoolstoconvertyourfiles intoDivXvideo.
ABOUTDIVXVIDEO-ON-DEMAND:This
DivXCertified device must be registered in orderto play DivXVideo-on-Demand(VOD)
content.Togeneratetheregistrationcode,locatetheDivXVODsectioninPlayingmovingimages.Gotovod.divx.comwiththiscodeto completetheregistrationprocessandlearnmoreaboutDivXVOD.
SATRadio

TheSATRADIOREADYmarkindicates that theSatelliteRadioTunerforPioneer(i.e.,XM tunesandSiriussatellitetunerwhicharesold separately)canbecontrolledbythisunit. Pleaseinquiretoyourdealerornearest authorizedPioneerserviceationregarding thesatelliteradiotunerthatcanbeconnected tothisunit.Forsatelliteradiotuneroperation, pleaserefertothesatelliteradiotunerowner's manual.
- Thesystemwillusedirectsatellite-to-receiverbroadcastingtechnologyprovides listenersintheircarsandathomewith crystal-clearsoundseamlesslyfromcoast tocoast.Satelliteradiowillcreateand packageover100channelsofdigital-quality music,news,sports,talkandchildren's programming.
"SATRadio",theSATRadiologoandallrelatedmarksaretrademarksofSiriusSatelliteRadiolInc.,andXMSatelliteRadiolnc.
HDRadio™ Technology
- HDRadio™ and the HDRadio Readylogo are proprietaryly trademarksofi BiquityDigitalCorporation.
AdditionalInformation
Specifications
General
Power source 14.4 V DC (10.8 V to 15.1 V allowable)
Groundingsystem.......Negativetype
Maximumcurrentconsumption 10.0A
Dimensions(W×H×D): D
Weight 1.01 kg (2.2 lbs)
(MVH-P8200BT)
Weight 0.99 kg (2.2 lbs)
(MVH-P8200)
Display
Screensize/aspectratio.....3.0inchwide/16:9
(effectivedisplayarea:66.8
× 36.7 mm )
Pixels. 345600(1440x240)
Displaymethod.TFTactivematrix
Colorsystem..NTSCcompatible
Durabletemperaturerange(poweroff) 4^ + 176^
Audio
Maximumpoweroutput.....50Wx4
70W× 1 / 2 (forsubwoofer)
Continuouspoweroutput..22W×4(1kHz,5%THD,4
Ωload,bothchannelsdriven)
Load impedance 4Ω (4Ω to 8Ω (2Ω for 1 ch)allowable)
Preoutmaximumoutputlevel
Equalizer(8-BandGraphicEqualizer):
Frequency. 40/80/200/400/1k/2.5k/8k/ 10kHz
Gain. 12dB
HPF: Frequency 50/63/80/100/125 Hz Slope. -12dB/oct
Subwoofer(mono): Frequency 50/63/80/100/125 Hz
Slope. 18dB/0ct
Gain..+6dBto-24dB
Phase............Normal/Reverse
Bassboost: Gain+12dBto0dB
USB
USBstandardspecification USB1.1,USB2.0fullspeed
Maximumcurrentsupply...500mA
USB Class .MSC (Mass Storage Class)
Filesystem.FAT16,FAT32
MP3decodingformat......MPEG-1&2AudioLayer3
WMAdecodingformat.......Ver.7,7.1,8,9,10,11(2ch audio) (WindowsMediaPla
AACdecodingformat.......MPEG-4AACiTunesencodedonly) (Ver.8.2andearlier)
DivXdecodingformat.......HomeTheaterVer.3,4,5.2, 6(.avi.,divx)
SD
Compatiblephysicalformat Version1.10
Maximummemorycapacity 2GB
Filesystem.FAT12,FAT16,FAT32
MP3decodingformat......MPEG-1&2AudioLayer3
WMAdecodingformat.......Ver.7,7,1,8,9,10,11(2ch audio) (WindowsMediaPla
AACdecodingformat.......MPEG-4AAC(iTunesencodedonly) (Ver.8.2andearlier)
DivXdecodingformat......HomeTheaterVer.3,4,5.2 6(.avi.,divx)
FMtuner
Frequencyrange.87.9MHzto107.9MHz
Usable sensitivity 9 dBf (0.8 V/75 Ω, mono. S/N:30dB)
Signal-to-noiseratio.72dB(IHF-Anetwork)
AMtuner
Frequencyrange.530kHzto1710kHz(10 kHz)
Usablesensitivity. 25uV(S/N:20dB)
Signal-to-noiseratio.62dB(analogbroadcasting) (IHF-Anetwork)
Bluetooth
(MVH-P8200BT) Version.............Bluetooth2.0certified
Outputpower. +4dBmMax (Powerclass2)
AdditionalInformation
CEA2006Specifications

Poweroutput.14WRMSx4Channels(4
Ωand≤1%THD+N)
S/Nratio. 91dBA(reference:1Winto
4Ω)

Note
Specificationsandthedesignaresubjecttomodificationswithoutnotice.
Tabledesmatieres
—Selectiondirected'uncanalXM100
Markham, Ontario L3R0P2
1-877-283-5901
905-479-4411
Pourconnaitrelesconditionsdegarantie,reportez-vousaudocumentGarantielimiteequi accompaniescetappareil.
Encasd'anomalie
Encasd'anomalie,consultezledistributeur ouleserviced'entretienagreeparPioneerle plusproche.
VisiteznotresiteWeb
1Retirezlafaceavant.
2AppuyezsurRESETTaveclapointed'un styloouunautreinstrumentpointu.
Modededemonstration

Important
PhotoSelection(selectiondephotos)
1AffichezPhoneFunction.
BassBooster(accentuationdesgraves)
MP3i(MP3interactif),mp3PRO:Non
AAC
Formatcompatible:AAEncodépariTunes
Phase.. Normale/Inverse
Accentuationdesgraves: Gain. +12dB a0dB
USB
SpécificationstandardUSB USB1.1,USB2.0pleinevi-tesse
Alimentationmaximale.....500mA
ClasseUSB..MSC(MassStorageClass)
Systemedefichiers.FAT16,FAT32
FormatdedecodageMP3...MPEG-1&2CoucheAudio 3
FormatdedecodageWMA Ver.7,7.1,8,9,10,11(2ca nauxaudio) (WindowsMediaPlayer)
AM: Off—Level1—Level2
Cuantomayorseaelnumberodelajuste,mayorseraelniveldelesenal.Elajustedenivelsupersorlosopermiterecibirlasemisorsaclonssenaasmasintensas,miantrasquelosajustesmasbajospermitenrecibirdemaneraprogrisivalasemisorasconlassenaalesmasdebiles.
3PulseM.C.paraconfirmarlaseleccion.

Nota
Brightness—Contrast—Color—Hue—Dimmer—Temperature—BlackLevel
Paraobtenerdetallessobrelosajustes,consulte Cambiodelajustedelaimagenenlapagina159.
Cuando selezione Black Level, pulse M.C. para activarodesactivarelajuste.
TeamSetting(ajustedequipment)
Register your product at
http://www.pioneerelectronics.com
See "Visit our website" page.
4-1,MEGURO1-CHOME,MEGURO-KU
TOKYO153-8654,JAPAN
PIONEERELECTRONICS(USA)INC.
P.O.Box1540,LongBeach,California90801-1540,U.S.A.
TEL:(800)421-1404
PIONEEREUROPENV
Haven1087,Keetberglaan1,B-9120Melsele,Belgium/Belgique
TEL:(0)3/570.05.11
PIONEERELECTRONICSASIACENTREPRELTD.
253AlexandraRoad,#04-01,Singapore159936
TEL:65-6472-7555
PIONEERELECTRONICSAUSTRALIAPTY.LTD.
178-184BoundaryRoad,Braeside,Victoria3195,Australia
TEL:(03)9586-6300
PIONEERELECTRONICSOCANADA,INC.
300AllstateParkway,Markham,OntarioL3R0P2,Canada
TEL:1-877-283-5901
TEL:905-479-4411
PIONEERELECTRONICSDEMEXICO,S.A.deC.V.
Blvd.ManuelAvilaCamacho13810piso
Col.LomasdeChapultepec, Mexico, D.F. 11000
TEL:55-9178-4270
先锋股份有限公司
總公司:台北市中山北路二段44號13樓
電話:(02)2521-3588
先鋒電子(香港)有限公司
香港九龍尖沙嘴海港域世界商業中心
9楼901-6室
電話:(0852)2848-6488
PublishedbyPioneerCorporation.
Copyright©2009byPioneerCorporation.
Allrightsreserved.
PubliéparPioneerCorporation.Copyright
©2009parPioneerCorporation.Tous
droitsréserves.
PrintedinThailand
ImpriméenThaïlande

- ThankyouforpurchasingthisPIONEERproduct.
- Precautions
- BeforeYouStart
- Operatingthisunit
- Detailedinstructions
- Availableaccessories
- AdditionalInformation
- IMPORTANTSAFEGUARDS
- WARNING
- Toensuresafedriving
- Operation
- Toavoidbatteryexhaustion
- MVH-P8200
- InformationtoUser
- ForCanadianmodel
- Aboutthisunit
- CAUTION
- Important(Serialnumber)
- Operatingenvironment
- After-saleservicefor Pioneerproducts
- U.S.A.
- CANADA
- Incaseoftrouble
- Visitourwebsite
- http://www.pioneerelectronics.com
- Serialnumber
- Resettingthemicroprocessor
- Demomode
- Important
- Aboutthismanual
- Remotecontrol
- BasicOperations
- Note
- Useandcareoftheremote control
- Basicmenuoperations
- 1PressHOME.
- 2PushM.C.upordowntochangethe menuoption.
- 3TurnM.C.toselectthemenuoption.
- Home(homemenu)
- Source(selectingasource)
- List(operatingsalistmenu)
- Audio(settinganaudiomenu)
- System(settingasystemmenu)
- Entertainment(settinganentertainmentmenu)
- Custom(custommenu)
- Phone(phonemenu)
- Menuoperationsidenticalfor functionsettings/audo adjustments/initialsettings/lists
- Customizingmenus
- CancelingaRegisteredMenu
- Aboutguideinformation
- UsingBluetoothtelephone
- Settingupforhands-freephoning
- Notes
- Radio
- Storingandrecallingstations
- UsingiTunestagging
- Functionsettings
- 2TurnM.C.toselectthefunction.
- BSM(beststationsmemory)
- Local(localseektuning)
- Playingmovingimages BasicOperations
- Externalstoragedevic USB,SD)
- Selectingandplayingfiles fromthenamelist
- 1Displayingthelistmenu.
- 2UseM.C.toselectthedesiredfilename (orfoldername).
- BrowsingforavideontheiPod
- 2UseM.C.toselectacategory/video.
- PlayingDivX® VODcontent
- - Ifmessageisdisplayedafterinserting theexternalstoragedevicecontaining DivXVODcontent,useM.C.toselectadesiredmode.
- Externalstoragedevice(USB,SD)
- Play/Pause play/pause)
- PlayMode(repeatplay)
- Stop(stoppingplayback)
- TimeSearch(timesearch)
- WideMode(switchingthewidemode)
- Display(displaysetting)
- A/VFormat(switchingmediafiletypes)
- DivX®Subtitle(DivXsubtitlefilesettings)
- TVAspect(aspectratiosettings)
- DivX®VOD(DivX®VODregistrationcode)
- AudioLang.(audiolanguagesettings)
- SubtitleLang.(subtitlelanguagesettings)
- iPod
- Pause(pause)
- ShuffleMode(shuffle)
- ControlMode(controlmode)
- ABCSearch(alphabetsearchmodesetting)
- Playingaudio BasicOperations
- Selectingandplayingfiles/ tracksfromthenamelist
- BrowsingforasongontheiPod
- Audiobooks(audiobookspeed)
- SoundRetriever(soundretriever)
- Playingstillimages
- Random(randomplay)
- Capture(capturinganimageeinJPEGfiles)
- Rotate(picturerotation)
- TimePerSlide(slideshowhowintervaltimesetting)
- Introductionofoperationsfor playbackofstillimagesasa slideshow
- Return(endingslideshow)
- TimePerSlide(slideshowhowintervaltimessetting)
- BluetoothTelephone
- Connectionmenuoperation
- 1Displaythephonemenu.
- 2UseM.C.toselectConnection.
- 3TurnM.C.toselectthefunction.
- DeviceList connectingcordconnectingcellular phonefromthedevicelist)
- DeleteDevice(deletingacellulararphonefromthede- vicelist)
- AddDevice connectinganewcellularphone)
- SpecialDevice(settingaspecialdevice)
- AutoConnect connectingtoaBluetoothdevice automatically)
- Visibility(settingthevisibilityofthisunit)
- DevicelInformation(BD(Bluetoothdevice)address display)
- PINCode(PINcodeinput)
- Phonenuoperation
- 2TurnM.C.toselecttthefunction.
- Recent(recentcallhistory)
- PhoneBook(Phonebook)
- PresetDial(presetphonenumbers)
- PhoneFunction(Phonefunction)
- Connection(Phoneconnection)
- Functionandoperation
- 1DisplayPhoneFunction.
- 2PressM.C.todisplaythefunction menu.
- AutoAnswer(automaticanswering)
- RingTone(ringtoneselect)
- AudioAdjustments
- 1Displaytheaudiomenu.
- 2TurnM.C.toselecttheaudiofunction.
- Fader/Balance(fader/balanceadjustment)
- SonicCenterControl(soniccentercontrol)
- AutoEQauto-equalizeron/off)
- GraphicEQ(equalizeradjustment)
- Loudness(loudness)
- Subwoofer1(subwooferon/offsetting)
- Subwoofer2(subwooferadjustment)
- BassBooster(bassboost)
- HighPassFilter(highpassfilteradjustment)
- SLAsourceleveladjustment)
- Systemsettings
- 1Displaythesystemmenu.
- 2TurnM.C.toselectthesystemfunction.
- Guidelinfo(guideinformation)
- ClockADJ(dateandclock)
- PictureADj(picturedjustment)
- CautionLang.(cautionlanguagesettings)
- SystemLang.(menulanguagesettings)
- DetachWarning(warningtonesetting)
- AUXInput(auxiliaryinput)
- Entertainmentsettings
- 1Displaytheentertainmentmenu.
- 2TurnM.C.toselecttheentertainment function.
- Background(backgrounddisplaysetting)
- Clock(entertainmentclock)
- SlideShow(slideshowviewing)
- Appearance(screen/illuminationcolor)
- Customizingtheilluminationcolor
- 1UseM.C.toselectColorSettinginthe Appearance(Illuminationcolor).
- 2UseM.C.tocustomizethecolor.
- 3PressM.C.tostorethecustomizedcolor inthememory.
- InitialSettings
- 3TurnM.C.toselecttheinitialsetting.
- A-EQMeasurement auto-equalizing)
- RearSpeaker(rearoutputandsubwoofersetting)
- Demonstration(demodisplaysetting)
- BTVer.Info.(Bluetoothversiondisplay)
- SoftwareUpdate(updatingthesoftware)
- BeforeoperatingtheautoEQfunction
- PerformingautoEQ
- 3TurntheignitionswitchtoONorACC.
- 4Displaytheinitialsettingmenu.
- 5UseM.C.toentertheautoEQmeasure-mode.
- 6Plugthemicrophoneintothemicrophoneinputjackonthisunit.
- 7PressM.C.tostartautoEQ.
- 8Whenthe10-secondcountdownstarts, getoutofthecarandclosethedoorwithin 10seconds.
- 9WhenautoEQiscompleted, Complete isdisplayed.
- 10Storethemicrophonecarefullyinthe glovecompartmentoranothersafeplace.
- OtherFunctions
- UsinganAUXsource
- - InserttheminiplugintotheAUXinput jackonthisunit.
- A/VChange(auxiliarydeviceisignalsetting)
- Usinganexternalunit
- Selectingtheexternalunitasthesource
- Usingthefunctionsallocatedto1to 6keys
- UsingthePGMbutton
- - PressPGMtoturnpauseonwhenselectingthefollowingources:
- Switchingthedisplayindication
- Changingthewidescreen mode
- - Displaythescreenmode.
- Full(fullscreen)
- Just(just)
- Cinema(cinema)
- Zoom(zoom)
- Normal(normal)
- SettingtheDivXsubtitlefile
- - DisplaytheDivXsubtitlefilesetting mode.
- Settingtheaspectratio
- - Displaytheaspectratosettingmode.
- DisplayingtheDivX VOD registrationcode
- - SelectRegistrationCode.
- Displayingthedeactivation code
- 1SelectDeactivationCode.
- 2UseM.C.toselectYes.
- Changingthepicture adjustment
- - Displaythepictureadjustmentmode.
- HDRadio™tuner
- XMtuner
- Available accessories
- SelectinganXMchanneldirectly
- 1PressM.C.todisplaythefunction menu.
- ChannelMode channelselectmodesetting)
- Selectingachannelfromachannelcategory
- DisplayingtheRadioID
- 2PushM.C.leftorrighttoselect RADIOID.
- SIRIUSSatelliteRadiotuner
- Availableaccessories
- SelectingaSIRIUSchanneldirectly
- 2TurnM.C.tochangethemenuoption andpresstoselectFunction.
- TeamSetting(teamsetting)
- LiveGamelinfo(gameinformation)
- InstantReplay(InstantReplaymodesetting)
- UsingtheInstantReplay function
- Troubleshooting
- Common
- SymptomCauseAction(Refer
- encepage)
- ProblemsduringiPodplayback
- SymptomCauseAction
- Errormessages
- iTunestaggering
- MessageCauseAction
- UnderstandingautoEQ errormessages
- Indicatorlist
- Externalstoragedevic USB,SD
- Tuner
- HDRadio™Technology
- XM/SIRIUStuner
- Handlingguideline
- USBstoragedevic
- SDmemorycard
- JPEGpicturefiles
- DivXvideofiles
- Compressedaudio/video compatibility(USB,SD)
- WMA
- MP3
- AAC
- DivXcompatibility
- Supplementalinformation
- iPodcompatibility
- Sequenceofaudiofiles
- Usingthedisplaycorrectly
- Handlingthedisplay
- Liquidcrystalldisplay(LCD)screen
- LED(light-emittingdiode) backlight
- Fluorescenttube
- Copyrightandtrademark
- Bluetooth
- iTunes
- iPhone
- DivX
- SATRadio
- HDRadio™ Technology
- Specifications
- General
- Display
- Audio
- USB
- SD
- FMtuner
- AMtuner
- CEA2006Specifications
- Tabledesmatieres
- Encasd'anomalie
- VisiteznotresiteWeb
- 1Retirezlafaceavant.
- Modededemonstration
- 1AffichezPhoneFunction.
- BassBooster(accentuationdesgraves)
- Nota
- Brightness—Contrast—Color—Hue—Dimmer—Temperature—BlackLevel
- TeamSetting(ajustedequipment)
Brand : PIONEER
Model : MVHP8200BT
Category : DVD player