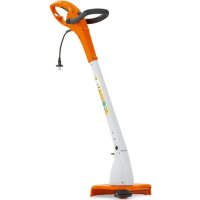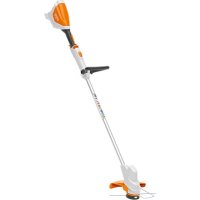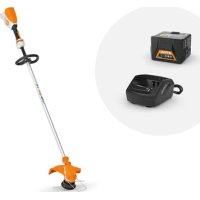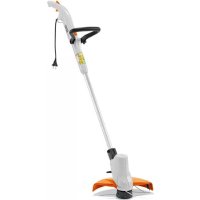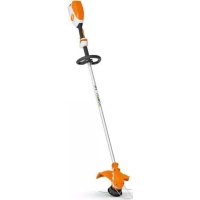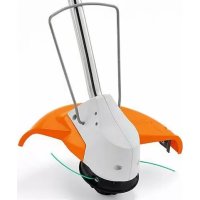
FSA 85 - Grass trimmer STIHL - Free user manual and instructions
Find the device manual for free FSA 85 STIHL in PDF.


User questions about FSA 85 STIHL
0 question about this device. Answer the ones you know or ask your own.
Ask a new question about this device
Download the instructions for your Grass trimmer in PDF format for free! Find your manual FSA 85 - STIHL and take your electronic device back in hand. On this page are published all the documents necessary for the use of your device. FSA 85 by STIHL.
USER MANUAL FSA 85 STIHL
natural_image
Two identical robotic levers with black handles and metallic blades, shown against a white background (no text or symbols visible)

Guide to Using this Manual 2
Safety Precautions and Working Techniques 2
Description of Operation 7
Using the Unit 8
Approved Combinations of Cutting
Attachment and Deflector 8
Adjusting the Loop Handle 9
Mounting the Deflector 9
Adjusting Nylon Line 10
Connecting Charger to Power
Supply 10
Charging the Battery 10
Light Emitting Diodes (LED) on
Battery 11
Light Emitting Diodes (LED) on
Charger 13
Switching On 14
Switching Off 15
Storing the Machine 15
Replacing Nylon Line 16
Maintenance and Care 19
Main Parts 20
Specifications 21
Special Accessories 22
Troubleshooting 23
Maintenance and Repairs 25
Battery Recycling 25
Disposal 25
STIHL®
FSA 65, FSA 85
Dear Customer,
Thank you for choosing a quality engineered STIHL product.
This machine has been built using modern production techniques and comprehensive quality assurance. Every effort has been made to ensure your satisfaction and troublefree use of the machine.
Please contact your dealer or our sales company if you have any queries concerning your machine.
Your
Ham Pete Hong
Hans Peter Stihl
English
Guide to Using this Manual
Pictograms
All the pictograms attached to the machine are shown and explained in this manual.
Symbols in text

Warning where there is a risk of an accident or personal injury or serious damage to property.

Caution where there is a risk of damaging the machine or its individual components.
Engineering improvements
STIHL's philosophy is to continually improve all of its products. For this reason we may modify the design, engineering and appearance of our products periodically.
Therefore, some changes, modifications and improvements may not be covered in this manual.
Safety Precautions and Working Techniques

Some special safety precautions have to be observed when working with this power tool because of the very high speed of the cutting attachment.

It is important you read and understand the instruction manual before using your unit for the first time and keep the manual in a safe place for future reference. Non-observance of the safety precautions may result in serious or even fatal injury.
Observe all applicable local safety regulations, standards and ordinances.
If you have not used this power tool model before: Have your dealer or other experienced user show you how to operate your power tool or attend a special course in its operation.
Minors should never be allowed to use the power tool.
Keep bystanders, especially children, and animals away from the work area.
When the power tool is not in use, shut it off so that it does not endanger others. Secure it against unauthorized use.
The user is responsible for avoiding injury to third parties or damage to their property.
Do not lend or rent your power tool without the instruction manual. Be sure that anyone using it understands the information contained in this manual.
The use of noise emitting power tools may be restricted to certain times by national or local regulations.
To operate the power tool you must be rested, in good physical condition and mental health.
If you have any condition that might be aggravated by strenuous work, check with your doctor before operating a power tool.
Do not operate the power tool if you are under the influence of any substance (drugs, alcohol) which might impair vision, dexterity or judgment.
Use your power tool only for cutting grass, wild growth and similar materials.
Do not use your power tool for any other purpose since it may result in accidents.

Remove the battery from the power tool before:
– carrying out tests and adjustments or cleaning work
– working on the cutting attachment
– leaving the machine unattended
- transporting the machine
- storing the machine
- performing repairs and maintenance work
– in the event of danger or in an emergency
This avoids the risk of the motor starting unintentionally.
Only use cutting attachments and accessories that are explicitly approved for this power tool by STIHL or are technically identical. If you have any questions in this respect, consult a servicing dealer. Use only high quality parts and accessories in order to avoid the risk of accidents and damage to the unit.
STIHL recommends the use of original STIHL replacement parts. They are specifically designed to match your model and meet your performance requirements.
Never attempt to modify your unit in any way since this may increase the risk of personal injury. STIHL excludes all liability for personal injury and damage to property caused while using unauthorized attachments.
The deflector on this power tool cannot protect the operator from all objects thrown by the cutting attachment (stones, glass, wire, etc.). Such objects may ricochet and then hit the operator.
Do not use a pressure washer to clean the unit. The solid jet of water may damage parts of the unit.
Do not spray the machine with water.
Battery
- Use only original STIHL rechargeable batteries.
- Use STIHL batteries only with STIHL power tools and recharge them only with STIHL chargers.
- Charge the battery before using it.
- Do not charge or use a defective, damaged or deformed battery. Do not open, damage or drop the battery.
- Store the battery out of the reach of children.

Protect from rain – do not immerse in fluids.

Protect from direct sunlight, heat and fire – never throw into a fire – risk of explosion.
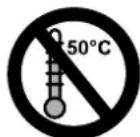
Operate and store the battery only in a temperature range from - 10°C to max. + 50°C.
- Never expose the battery to microwaves or high pressures.
- Never insert objects in the battery's cooling slots.
- Never bridge the battery terminals with metallic objects (short circuit). The battery may be damaged by a short circuit. Keep a battery that is not in use away from metal objects (e.g. nails, coins, jewelry). Do not use metallic transport boxes.
- Fluid may leak from the battery if it is not used properly – avoid contact with the skin! Leaking battery fluid can cause skin irritation and chemical burns. In case of accidental contact, wash affected areas of skin with plenty of water and soap. If fluid gets in the eyes, do not rub – rinse the eyes with plenty of water for at least 15 minutes. Also seek medical assistance.
Charger
- Use only original STIHL chargers.
- Only use for charging matching STIHL batteries of type AP with a maximum capacity of 10 Ah and a maximum voltage of 42 V.
- Never charge defective, damaged or deformed batteries.
English
- Connect the charger only to an easily accessible wall outlet with the voltage and frequency specified on the rating plate.
- Do not use a defective or damaged charger.
- Do not open the charger.
- Store the charger out of the reach of children.

Protect from rain and dampness.

Use and store only
indoors in dry rooms.
- Operate the charger at ambient temperatures between + 5°C and + 40°C.
- Allow the charger to cool down normally - do not cover it.
- Never bridge (short circuit) the contacts of the charger with metallic objects (e.g. nails, coins, jewelry). The charger may be damaged by a short circuit.
- In the event of smoke or fire in the charger, disconnect it from the wall outlet immediately.
-
To reduce the risk of electric shock or short circuit, do not insert any objects in the charger's cooling slots.
-
Do not operate on an easily combustible surface (e.g. paper, textiles) or in an easily combustible environment – risk of fire.
- Do not operate in a hazardous location, i.e. in a location where there are combustible liquids (fumes), vapors or dusts. Chargers can produce sparks, which may ignite the dust or vapors – risk of explosion.
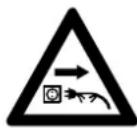
Check the charger's connecting cord regularly for damage. If the connecting cord is damaged, immediately disconnect the plug from the wall outlet to avoid the risk of electric shock.
- Never jerk the connecting cord to disconnect it from the wall outlet. To unplug, grasp the plug, not the cord. Have a damaged connecting cord repaired by an experienced electrician.
- Do not use the connecting cord for any other purpose, e.g. for carrying or hanging up the charger.
- Never use connecting cords that do not comply with regulations.
- To reduce the risk of stumbling, position and mark the connecting cord so that it cannot be damaged or endanger others.
To reduce the risk of electric shock: - Always connect the unit to a properly installed wall outlet.
- Make sure the insulation of the connecting cord and plug is in good condition.
After using the charger, unplug it from the wall socket.
Clothing and Equipment
Wear proper protective clothing and equipment.

Clothing must be sturdy but allow complete freedom of movement. Wear snug-fitting clothing, an overall and jacket combination, do not wear a work coat.
Avoid clothing that could get caught on branches or brush or moving parts of the machine. Do not wear a scarf, necktie or jewelry. Tie up and confine long hair (e.g. with a hair net, cap, hard hat, etc.).

Wear sturdy shoes with non-slip soles.

To reduce the risk of injury from thrown objects, always wear a face shield and safety glasses.
A face shield alone does not provide adequate eye protection.

Wear heavy-duty gloves.
STIHL offers a comprehensive range of personal protective clothing and equipment.
Transporting the Unit
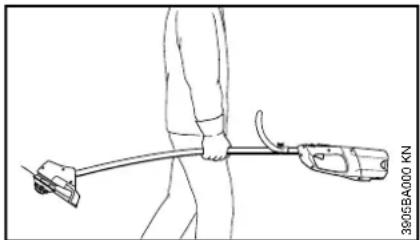
Always switch off the power tool, move the retaining latch to 📋 and remove the battery – even when you carry the machine for short distances. This avoids the risk of the motor starting unintentionally.
natural_image
Line drawing of a person using a handheld device with a cable, no text or symbols presentCarry the power tool properly balanced by the shaft.
Transporting in a vehicle: Properly secure the power tool to prevent turnover and damage.
Before Starting Work
Check that your power tool is properly assembled and in good condition – refer to appropriate chapters in the instruction manual.
- The trigger switch and trigger lockout must move freely (retaining latch to ☐) – switches must return to the idle position when they are released.
-
Use only an approved combination of cutting attachment, deflector and handle. All parts must be assembled properly and securely. To reduce the risk of injury, never use metal cutting attachments.
-
Check that the cutting attachment is properly and securely mounted and in good condition.
- Check protective devices (e.g. deflector for cutting attachment) for damage or wear. Always replace damaged parts. Never operate the unit with a damaged deflector.
- Never attempt to modify the controls or the safety devices in any way.
- Keep the handles dry and clean – free from oil and dirt – for safe control of the power tool.
- Check contacts in battery compartment for foreign matter.
- Fit the battery correctly – it must engage audibly.
- Never use defective or deformed batteries.
To reduce the risk of accidents and personal injury, do not operate your power tool if it is not properly assembled and in good condition.
Before switching on the power tool, make sure the cutting attachment is not touching the ground or any other object.
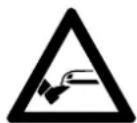
To reduce the risk of injury, avoid contact with the cutting attachment.
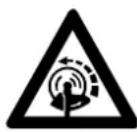
Note that the cutting attachment continues to run for a short period after the power tool is switched off – flywheel effect.
Holding and Controlling the Unit
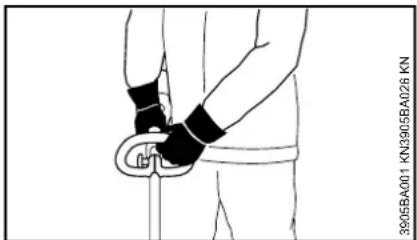
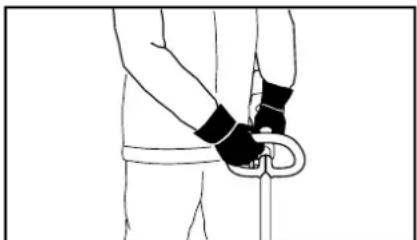
Always hold the unit firmly with both hands on the handles. Make sure you always have good balance and secure footing.
Right-handers
natural_image
Line drawing of a person wearing a belt and wristband, holding a circular object (no text or symbols)Left hand on the loop handle and right hand on the control handle.
Left-handers
natural_image
Line drawing of a person wearing a belt and wristband, holding a circular object (no text or symbols)Right hand on the loop handle and left hand on the control handle.
During Operation
In case of imminent danger or in an emergency, switch off the motor immediately, move retaining latch to ☐ and remove the battery.
text_image
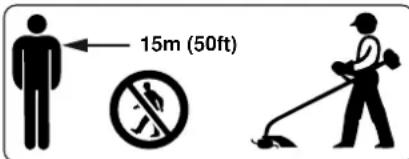
15m (50ft)To reduce the risk of personal injury, do not allow any other persons within a radius of 15 meters of your own position. To reduce the risk of damage to property, also maintain this distance from other objects (vehicles, windows).

The drive motor is not waterproof. Never work with the power tool in the rain or in wet or very damp locations.
Do not leave the machine outdoors in the rain.
Do not cut wet grass.
Take special care in slippery conditions – damp, snow, ice, on slopes or uneven ground.
Watch out for obstacles: Roots, tree stumps or holes which could cause you to trip or stumble.
To reduce the risk of accidents, take a break in good time to avoid tiredness or exhaustion.
Work calmly and carefully – in daylight conditions and only when visibility is good. Stay alert so as not to endanger others.
If your power tool is subjected to unusually high loads for which it was not designed (e.g. heavy impact or a fall), always check that it is in good condition
before continuing work – see also "Before Starting Work". Make sure the safety devices are working properly. Do not continue operating your power tool if it is damaged. In case of doubt, have the machine checked by your servicing dealer.

To reduce the risk of injury from thrown objects, never operate the unit without the proper deflector for the type of cutting attachment being used.
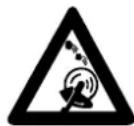
Inspect the work area: Stones, pieces of metal or other solid objects can be thrown and cause personal injury or damage the cutting attachment and property (e.g. parked vehicles, windows).
Special care must be taken when working in difficult, over-grown terrain.
The dust that occurs during operation may be harmful to health. If dust levels are very high, wear a suitable respirator.
Before leaving the power tool unattended: Switch off the power tool, move the retaining latch to ⏻ and remove the battery.
Check the cutting attachment at regular short intervals during operation or immediately if there is a noticeable change in cutting behavior:
- Switch off the motor, move the retaining latch to 📋 and wait for the cutting attachment to come to a standstill, remove the battery.
- Check condition and tightness, look for cracks.
Clean grass and plant residue off the cutting attachment mounting at regular intervals – remove any build up of material from the cutting attachment and deflector.
To replace the cutting attachment, switch off the power tool, move the retaining latch to ⏻ and remove the battery. This avoids the risk of injury from the motor starting unintentionally.
Never continue using or attempt to repair damaged or cracked cutting attachments.
This may cause parts of the cutting attachment to come off and hit the operator or bystanders at high speed and result in serious or fatal injuries.
Use only the deflector with properly mounted line limiting blade to ensure the mowing lines are automatically trimmed to the approved length.
After Finishing Work
Always clean dust and dirt off the power tool – do not use any grease solvents for this purpose.
Vibrations
This power tool is minimizes the vibrations transmitted to the operator's hands.
However, the operator should seek medical advice in the event of suspected circulatory problems in the hands (e.g. tingling sensation in the fingers).
Maintenance and Repairs
Always move the retaining latch to 📁 and remove the battery before carrying out any repairs or maintenance work on the power tool. This avoids the risk of the motor starting unintentionally.
Service the machine regularly. Do not attempt any maintenance or repair work not described in the instruction manual. Have all other work performed by a servicing dealer.
STIHL recommends that you have servicing and repair work carried out exclusively by an authorized STIHL servicing dealer. STIHL dealers are regularly given the opportunity to attend training courses and are supplied with the necessary technical information.
Only use high-quality replacement parts in order to avoid the risk of accidents and damage to the unit. If you have any questions in this respect, consult a servicing dealer.
STIHL recommends the use of genuine STIHL replacement parts. They are specifically designed to match your model and meet your performance requirements.
Never attempt to modify your power tool in any way since this will increase the risk of personal injury.
Regularly check the electrical contacts and ensure that the insulation of the connecting cord and plug of the charger is in good condition and shows no sign of ageing (brittleness).
Electrical components, e.g. connecting cord of charger, may only be repaired or replaced by a qualified electrician.
Clean plastic components with a cloth. Do not use aggressive detergents. They may damage the plastic.
Check tightness of mounting screws on safety devices and the cutting attachment and retighten if necessary.
Clean cooling air inlets in motor housing as necessary.
Keep the battery guides free from foreign matter – clean as necessary.
Store the power tool in a dry, locked location with the retaining latch on 🔒 and the battery removed.
Description of Operation
The power tool is operated with a rechargeable battery. Use only STIHL chargers to recharge the battery.
Data exchange
The power tool, battery and charger communicate with each other. The charger charges the battery and the battery supplies the necessary power only if data exchange functions properly. For this reason you should operate your power tool only with the approved STIHL batteries and STIHL chargers.
English
Using the Unit
Mowing
natural_image
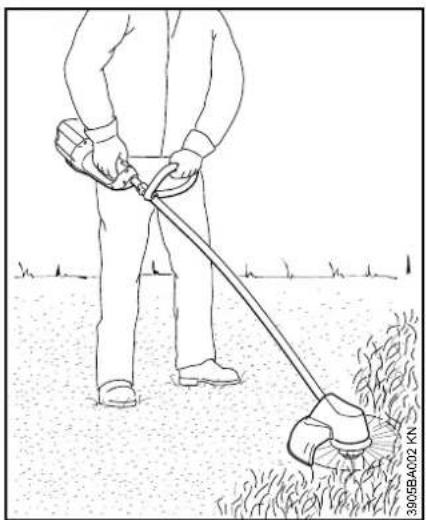
Line drawing of a person using a long-handled tool to clean grass, no text or symbols present●Hold the unit with both hands – one hand on the control handle – one hand on the loop handle.
●Stand upright – hold the power tool in a relaxed position.
●Make sure the cutting attachment is not touching the ground or any other objects.
●Swing the trimmer back and forth in an arc.
●The cutting height is determined by the distance of the mowing line from the lawn surface.
●Avoid contact with fences, walls, rocks, etc. since it will result in a higher rate of wear.
Working with bump guard
The bump guard comes standard with the FSA 85. It is available as a special accessory for the FSA 65.
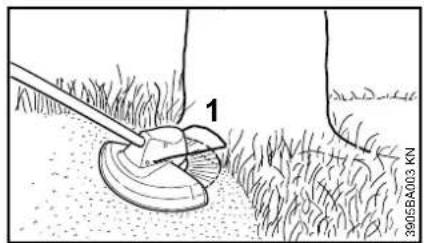
text_image
1 3905BA003 KNThe bump guard (1)
- Limits the cutting range of the mowing line
– reduces the risk of the rotating mowing line causing damage (e.g. tree bark)
The mowing head may continue to rotate briefly after you switch off your power tool – wait for the mowing head to come to a standstill before adjusting the bump guard – do not adjust it with your foot.
Disposal
- Do not throw cuttings into the garbage can – they can be composted.
Approved Combinations of Cutting Attachment and Deflector
Cutting attachment
natural_image
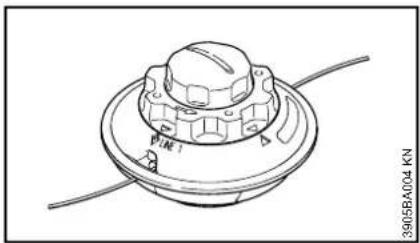
Technical line drawing of a mechanical component with no visible text or symbolsThe trimmer comes from the factory with the AutoCut C 4-2 mowing head already fitted. For safety reasons no other cutting attachments may be mounted to the trimmer.
Deflector
The trimmer is supplied with a deflector. Only this deflector may be mounted to the trimmer – no other deflectors are permitted. For further information see "Mounting the Deflector".
Adjusting the Loop Handle
Your new power tool comes with the loop handle mounted on the drive tube, but it must be turned and lined up to suit your requirements.
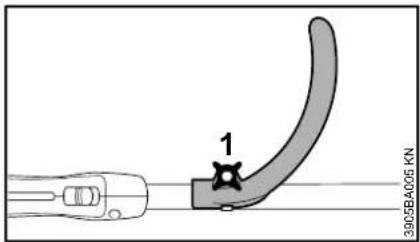
text_image
1 3905BA005 KN●Loosen the star knob (1) on the handle.
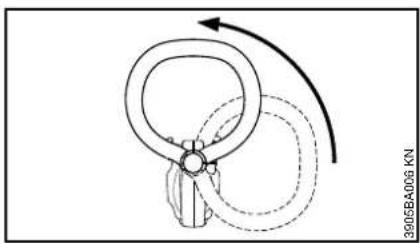
natural_image
Diagram of a mechanical linkage or clamping device with motion arrows, no text or symbols present●Turn the handle to the vertical position.
text_image
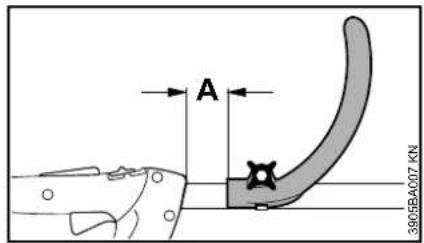
A 3905BA017 KNThe loop handle can be adjusted to suit the height and reach of the operator and the application by changing distance (A).
Recommendation: distance (A): about 10 cm
- Slide the handle to the required position.
●Tighten down the star knob so that the handle cannot be rotated on the shaft.
Mounting the Deflector
text_image
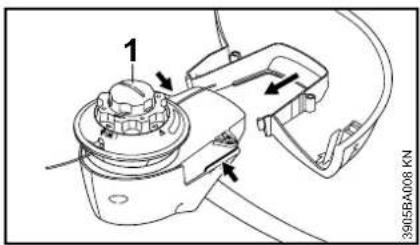
1 3905RA008 KN- Position your trimmer so that the mowing head (1) faces up.
The motor housing has guide slots (arrows) to correctly locate the deflector.
text_image
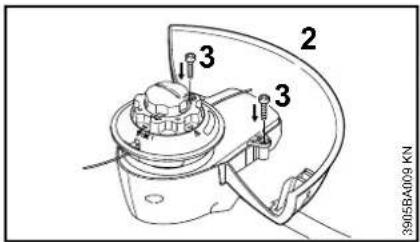
3 2 3 3905BA009 KN●Push the deflector (2) into the guide slots as far as stop.
- Insert the screws (3) and tighten them down firmly.
English
Adjusting Nylon Line
Adjusting Nylon Line
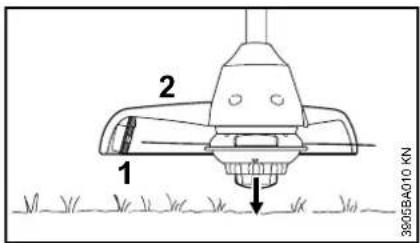
●Hold the rotating mowing head above the ground – tap it on the ground once – about 3 cm fresh line is advanced.
text_image
2 1 390/58A010 KNThe blade (1) on the deflector (2) trims surplus line to the correct length – avoid tapping the mowing head more than once at a time.
Line feed operates only if both lines still have a minimum length of 2.5 cm.
If the line is shorter than 2.5 cm:
●Switch off the trimmer.
- Move the retaining latch to 📋 and remove the battery.
●Turn the trimmer on its back.
●Press down the cap on the spool as far as stop.
●Pull the ends of the lines out of the spool.
If the spool is empty, see "Replacing Nylon Line".
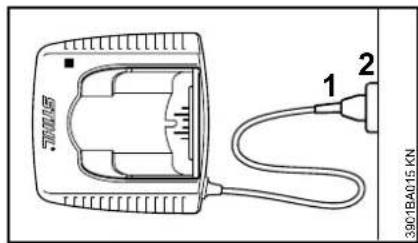
Connecting Charger to Power Supply
Mains voltage and operating voltage must be the same.
text_image
700105 1 2 39018A015 KN- Insert the mains plug (1) in the wall outlet (2).
text_image
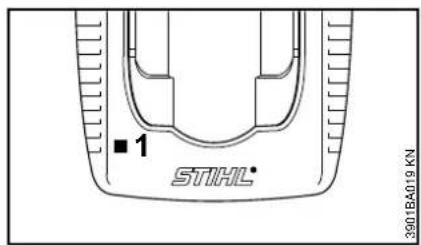
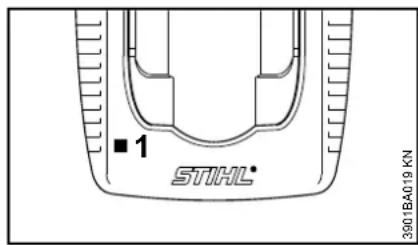
■1 STIHL® 3901BA019 KNA self test is performed after the charger is connected to the power supply. During this process the light emitting diode (1) on the charger lights up green for about 1 second, then red and goes off again.
Charging the Battery
The battery is given a charge of about 30% before leaving the factory.
Recommendation: Fully charge the battery before using your power tool for the first time.
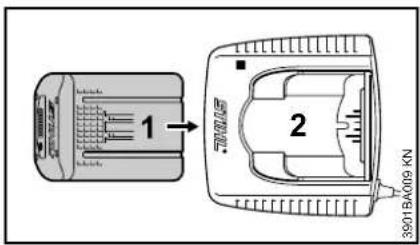
- Connect the charger to the power supply – mains voltage and operating voltage of the charger must be the same – see "Connecting Charger to Power Supply".
Operate the charger indoors only in dry locations at an ambient temperature between +5°C and +40°C.
text_image
1 2 3901BA009 KN●Push the battery (1) into the charger (2) until you feel noticeable resistance – then push it as far as stop.
text_image
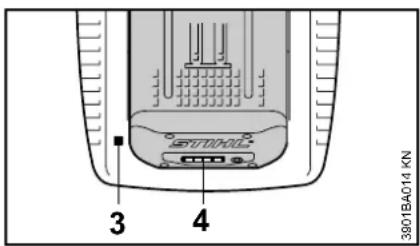
3 4 3001BA014 KNThe light emitting diode (3) on the charger comes on when the battery is inserted – see "Light Emitting Diodes (LED) on Charger"
Charging begins as soon as the light emitting diodes (4) on the battery light up green – see "Light Emitting Diodes (LED) on Battery".
The charge time is dependent on a number of factors, including battery condition, ambient temperature, etc., and may therefore vary from the charge time in the "Specifications".
The battery becomes hot during operation. If a hot battery is inserted in the charger, it may be necessary to cool it down before charging. The charging process begins only after the battery has cooled down. The time required for cooling may prolong the charge time.
The battery and charger become warm during the charging process.
AL 300 charger
This charger is equipped with a battery cooling fan which is audible when it is running.
AL 100 charger
This charger waits for the battery to cool down before starting the charging process. The battery is cooled normally by heat transfer to the ambient air.
End of charge
The charger switches itself off automatically when the battery is fully charged:
– Light emitting diodes on the battery go off
- The light emitting diode on the charger goes off
- The charger's fan is switched off (if charger is so equipped)
Remove the charged battery from the charger.
Light Emitting Diodes (LED) on Battery
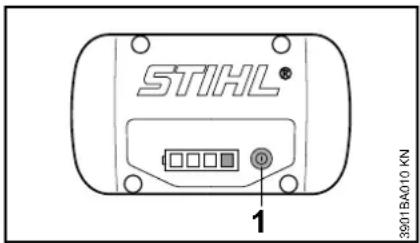
Four LEDs indicate the charge state of the battery as well as any problems that occur with the battery or the machine.
text_image
STIHL® 1 3901BA010 KN- Press button (1) to activate the display – display switches off automatically after 5 seconds
The LEDs can be green, red or flashing.

LED is continuously green.

LED flashes green.

LED is continuously red.

LED flashes red.
English
During charging
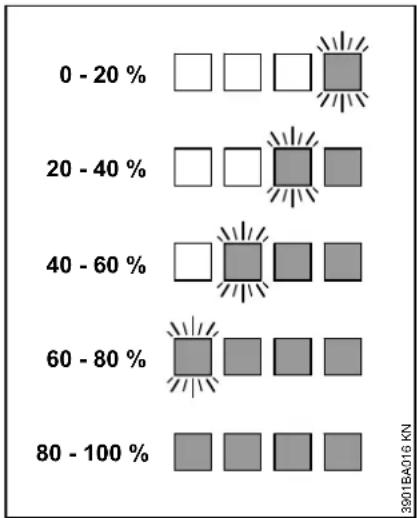
The LEDs indicate the progress of charging by lighting up continuously or flashing.
During charging, the current charging capacity is indicated by a flashing green LED.
text_image
0 - 20 % 20 - 40 % 40 - 60 % 60 - 80 % 80 - 100 %When the charging process is completed, the LEDs on the battery switch off automatically.
If the LEDs on the battery are continuously red or flash red – see "If the red LEDs are continuously red / flash".
During work
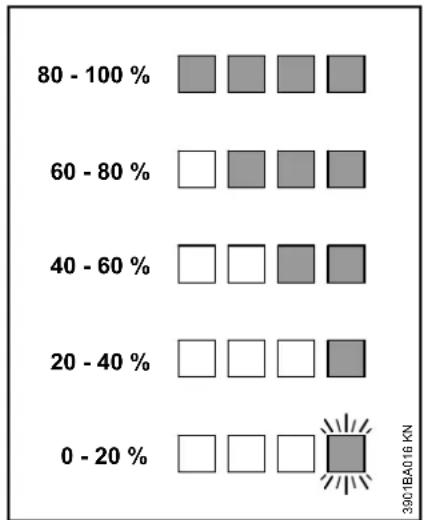
The green LEDs indicate the charge state by lighting up continuously or flashing.
heatmap
| Range (%) | White Square | Dark Gray Square | |---|---|---| | 80 - 100 % | □ | □ | | 60 - 80 % | □ | □ | | 40 - 60 % | □ | □ | | 20 - 40 % | □ | □ | | 0 - 20 % | □ | □ |If the LEDs on the battery are continuously red or flash red – see "If the red LEDs are continuously red / flash".
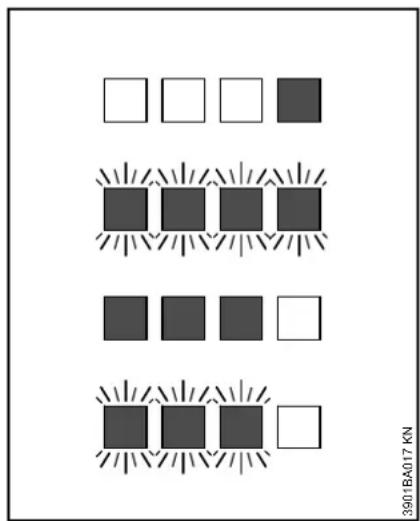
If the red LEDs are continuously red / flash
text_image
3901BA017 KN| 1 LED is contously red: | Battery is too hot ^1) ^2) /cold ^1) |
| 4 LEDs flash red: | Fault in battery ^3) |
| 3 LEDs are continuously red: | Machine is too hot– allow it to cool off |
| 3 LEDs flash red: | Fault in ^4) |
1) During charging: The charging process starts automatically after the battery has cooled down / warmed up.
2) During work: Machine switches off automatically – let the battery cool off for a while, it may help to remove the battery from the machine for this.
3) Remove battery from the machine and reinsert it. Turn on the machine – if the LEDs still flash, the battery is faulty and must be replaced.
4) Remove battery from the machine and reinsert it. Turn on the machine – if the LEDs still flash, the machine is faulty and must be checked by a servicing dealer – STIHL recommends STIHL servicing dealers.
Light Emitting Diodes (LED) on Charger
text_image
■1 STIHL® 3901BA019 KNThe light emitting diode lights up green or flashes red.
Green continuous light ...
... means the following:
The battery
- is being charged
- is too hot and must cool down before it is charged
See also "Light Emitting Diodes (LED) on Battery".
The green light emitting diode on the charger goes off as soon as the battery is fully charged.
Red flashing light ...
... means the following:
- No electrical contact between battery and charger – remove and refit the battery
- Faulty battery – see also "Light Emitting Diodes (LED) on Battery".
- Charger faulty – have checked by a servicing dealer. STIHL recommends a STIHL servicing dealer.
English
Switching On
The battery is given a charge of about 30% before leaving the factory.
Recommendation: Fully charge the battery before using your power tool for the first time.
- If necessary, remove the cover from the battery compartment before fitting the battery, i.e. depress both locking tabs to unlock and remove the cover.
Fitting the battery
text_image
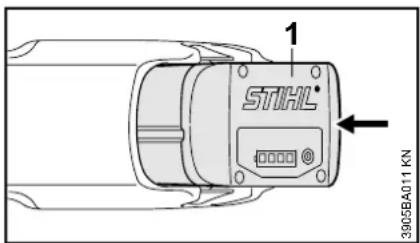
STIHL 1 3905BA011 KN- Insert the battery (1) in the power tool – the battery slides into the compartment – press it down carefully until it snaps into position – the battery must be flush with the top of the housing.
Switching On
●Make sure you have a secure and balanced footing.
- Stand upright – hold the power tool in a relaxed position.
●Make sure the cutting attachment is not touching the ground or any other objects.
- Hold the unit with both hands – one hand on the control handle – one hand on the loop handle.
text_image
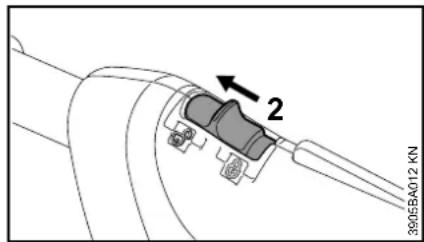
2 3905BA012 KN- Unlock the power tool by moving the retaining latch (2) to 📋.
text_image
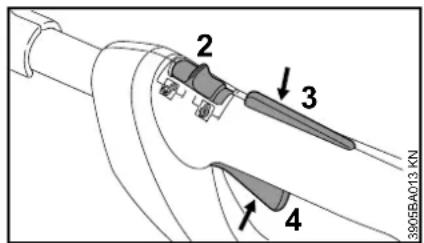
2 3 4 3905BA013 KN●Push down the trigger switch lockout (3) and depress the trigger switch (4) and hold them in that position.
The motor runs only if the retaining latch (2) is on ☐ and the trigger switch lockout (3) and trigger switch (4) are operated simultaneously.
Trigger Switch
Motor speed can be controlled with the trigger switch. Motor speed is increased progressively by squeezing the trigger switch (FSA 85 only).
Switching Off
text_image
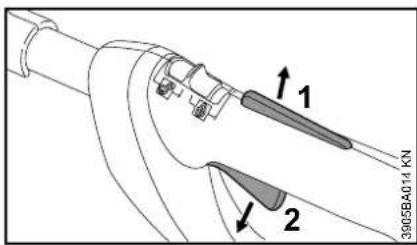
3905BA014 KN 1 2●Release the trigger switch lockout (1) and the trigger switch (2).
Removing the battery
text_image
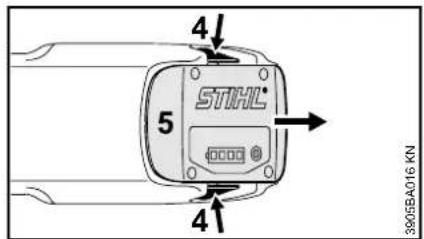
4 STIHL* 5 4 3905BA016 KN●Press in both locking tabs (4) at the same time to unlock the battery (5).
●Take the battery (5) out of the housing.
When the power tool is not in use, shut it off so that it does not endanger others.
Secure it against unauthorized use.
text_image
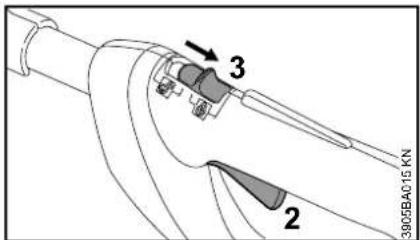
3 2 390GBA015 KN- Move the retaining latch (3) to ☐ – the trigger switch (2) cannot be operated – the power tool is locked to prevent start-up.
Always remove the battery from the power tool during work breaks and after finishing work.
Storing the Machine
- Move the retaining latch to 🔒.
- Remove the battery.
●Thoroughly clean the machine. - Store the machine in a dry, high or locked location – out of the reach of children and other unauthorized persons.
Cover for battery compartment
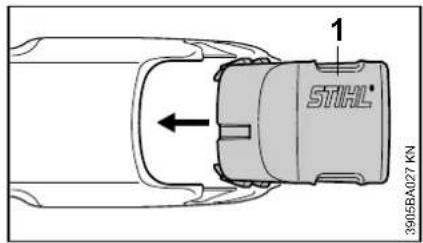
In some markets the machine comes with a cover for the battery compartment. It protects the battery compartment from contamination.
text_image
1 STIHL 3905BA027 KN●After finishing work, slide the cover (1) home until it engages audibly in position.
English
Storing the battery
●Take the battery out of the power tool or the charger.
●Store in a dry, locked location. Keep it out of the reach of children and other unauthorized persons and protected from contamination.
- Do not store spare batteries unused – use in rotation.
To ensure maximum battery life:
- Store at a temperature between + 10°C and + 20°C.
●Store with a charge of about 30%.
Storing the charger
- Remove the battery.
●Disconnect the plug from the wall outlet.
●Store the charger in a dry, locked location. Keep it out of the reach of children and other unauthorized persons and protected from contamination.
Replacing Nylon Line
STIHL AutoCut C 4-2
Always check the mowing head for signs of wear before replacing the nylon line.
⚠️ If there are signs of serious wear, replace the complete mowing head.
Preparations
●Switch off the trimmer.
- Move the retaining latch to 🔒.
- Remove the battery
●Put the power tool on the ground with the mowing head facing up.
Removing the mowing head and remaining nylon line
In normal operation, the supply of nylon line in the head is used up almost completely.
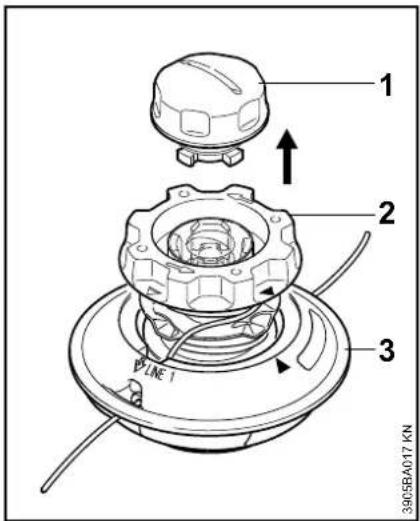
text_image
1 2 3 LINE 1 3905BA017 KN●Hold the mowing head steady and rotate the cap (1) counterclockwise until it can be removed.
- Remove the mowing head.
●Pull the spool (2) out of the mowing head (3) and remove the remaining line.
Assembling the mowing head
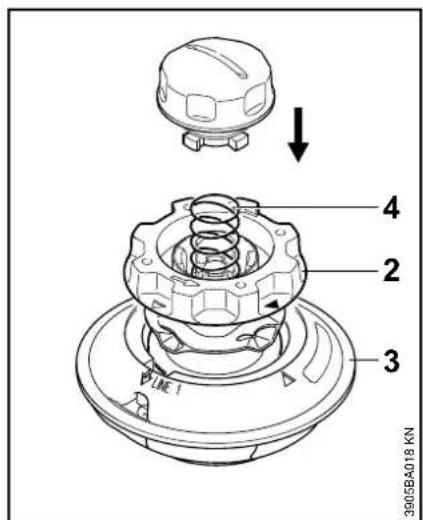
text_image
3905BA018 KN 4 2 3 TIME!● Fit the empty spool in the mowing head (3).
If the spring (4) has popped out:
●Push the spring into the spool (2) as far as stop.
Winding line onto spool
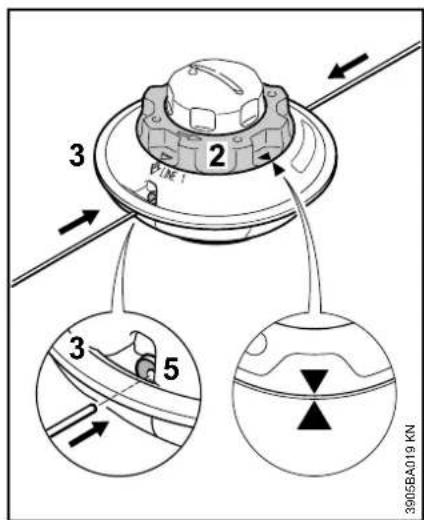
text_image
3 2 PLINE 1 3 5 3905BA019 KN●Use green-coded nylon line with a diameter of 2.0 mm.
●Cut two 2.5 m lengths of line from the replacement reel (special accessory).
- Rotate the spool (2) counterclockwise until the two arrow points are in alignment.
- Push the straight end of each line through one sleeve (5) in the mowing head (3) until you feel a noticeable resistance – and then continue pushing as far as stop.
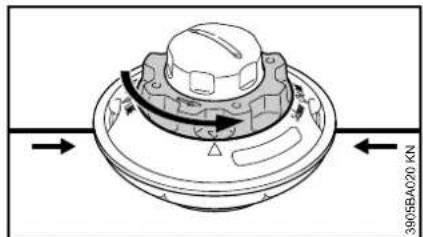
text_image
3805BA020 KN●Hold the mowing head steady.
- Rotate the spool counterclockwise until the shortest line is about 10 cm.
- If necessary, cut the longer line to a length of about 10 cm.
The mowing head is now full.
Mounting the Mowing Head
text_image
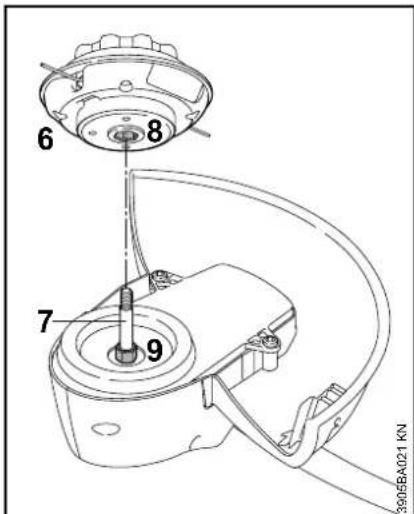
6 8 7 9 3905BA021 KN●Slip the mowing head (6) over the shaft (7) and engage hex recess (8) on the external hexagon (9).
English
text_image
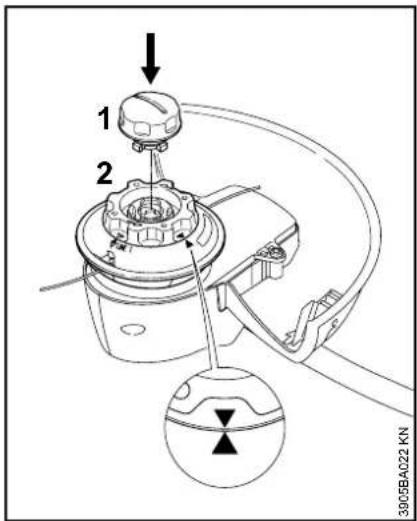
1 2 3005BA022 KN●Turn the spool (2) clockwise until the two arrow heads line up – secure the spool in this position.
- Insert the cap (1) in the spool (2), press it down as far as stop and turn it clockwise at the same time.
●Turn the cap (1) as far as stop and tighten it down by hand.
Maintenance and Care
| The following intervals apply to normal operating conditions only. If your daily working time is longer or operating conditions are difficult (very dusty work area, etc.), shorten the specified intervals accordingly.Move the retaining latch to ☐ before performing any work on the power tool. | before starting work | after finishing work or daily | weekly | monthly | every 12 months | if problem | if damaged | if required | |
| Complete machine | Visual inspection (condition) X | ||||||||
| Clean X | |||||||||
| Controls (retaining latch, trigger switch lockout, trigger switch) | Check operation X | ||||||||
| Clean X | X | ||||||||
| All accessible screws and nuts Retighten X | |||||||||
| Battery Visual inspection X | X | X | |||||||
| Battery compartment | Clean X X | ||||||||
| Check operation (eject battery) X | |||||||||
| Cutting attachment (mowing head) | Visual inspection X | ||||||||
| Replace X | |||||||||
| Check tightness X | |||||||||
| Safety labels Replace X | |||||||||
Main Parts
text_image
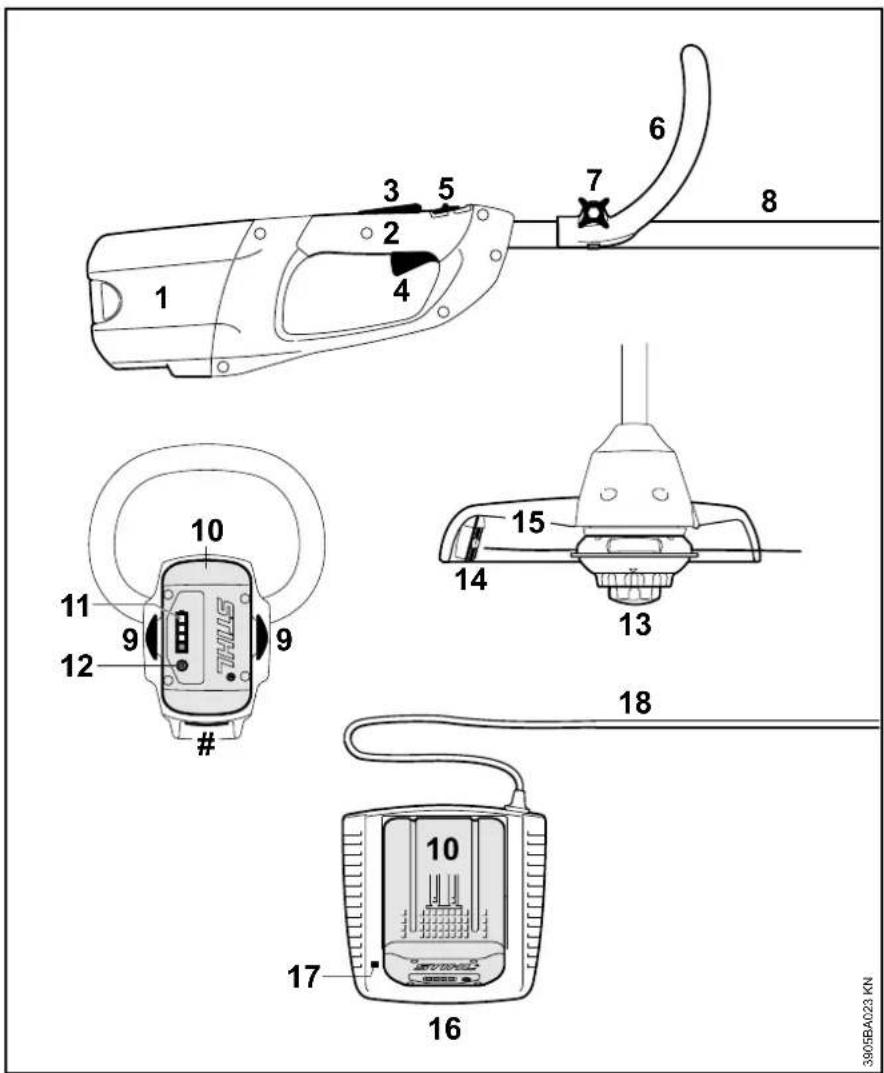
1 2 3 4 5 6 7 8 10 11 12 9 12# 13 14 15 16 17 18 3905BA023 KN1 Battery Compartment
2 Control Handle
3 Trigger Switch Lockout
4 Trigger Switch
5 Retaining Latch
6 Loop Handle
7 Wing Screw
8 Drive Tube
9 Battery Locking Tabs
10 Battery
11 Light Emitting Diodes (LED) on Battery
12 Push Button
13 Mowing Head
14 Line Limiting Blade
15 Deflector
16 Charger
17 Light Emitting Diode (LED) on Charger
18 Power Supply Cord
# Serial Number
Definitions
1. Battery Compartment
Accommodates the battery in the unit.
2. Control Handle
The handle of the trimmer held by the rear hand.
3. Trigger Switch Lockout
Must be depressed before the trigger switch can be activated.
4. Trigger Switch
Switches the motor on and off and controls the speed of the motor.
5. Retaining Latch
Locks or unlocks the trigger switch.
6. Loop Handle
For easy control of machine during cutting work.
7. Wing Screw
Locks loop handle in selected position.
8. Drive Tube
Encloses and protects the cables between the motor and control handle.
9. Battery Locking Tabs
Secure the battery in the unit.
10. Battery
Supplies the motor with electrical power.
11. Light Emitting Diodes (LED) on Battery
Indicate the state of charge and operating condition of the battery.
12. Push Button
For activating light emitting diodes (LED) on battery.
13. Mowing Head
The cutting attachment for cutting grass and similar material.
14. Line Limiting Blade
Metal blade on the deflector which keeps the line of the mowing head at the proper length.
15. Deflector
Designed to reduce the risk of injury from foreign objects flung backwards toward the operator by the cutting attachment and from contact with the cutting attachment.
16. Charger
Charges the battery.
17. Light Emitting Diode (LED) on Charger
Indicates charger operating mode and certain problems.
18. Power Supply Cord
Supplies electric current to charger.
Specifications
Battery
Type: Lithium-Ion
The power tool can be operated with STIHL type AP batteries.
Power tool running time depends on the stored energy of the battery (e.g. 80 Wh with AP 80 or 160 Wh with AP 160).
Charger
AL 100
Mains voltage: 120 V
Rated current: 1.3 A
Frequency: 60 Hz
Power consumption: 75 W
Charging current: 1.6 A
Insulation: II, ☐ (double insulated)
AL 300
Mains voltage: 120 V
Rated current: 4.7 A
Frequency: 60 Hz
Power consumption: 330 W
Charging current: 6.5 A
Insulation: II, □ (double insulated)
English
Charging Times
AL 100
with AP 80:
– up to 80% capacity: 70 min
– up to 100% capacity: 100 min
with AP 160:
- up to 80% capacity: 150 min
– up to 100% capacity: 165 min
AL 300
with AP 80:
– up to 80% capacity: 25 min
– up to 100% capacity: 50 min
with AP 160:
– up to 80% capacity: 35 min
- up to 100% capacity: 60 min
Cutting Attachment
Cutting swath:
- FSA 65: 300 mm
- FSA 85: 350 mm
Length
FSA 65: 1530 mm
FSA 85: 1650 mm
Weight
without battery, with cutting attachment and deflector
FSA 65: 2.7 kg
FSA 85: 2.8 kg
Transport
STIHL batteries fulfill the requirements stated in UN-Manual ST/SG/AC.10/11/Rev.5 Part III, Subsection 38.3.
The user can transport STIHL batteries by road transport to the place where the machine is to be used without additional requirements.
Observe national regulations for air or sea transport.
Special Accessories
Cutting Attachments
Mowing heads
1 STIHL AutoCut C 4-2
Special accessories for cutting attachments
– Nylon line for mowing heads, for 1
Other special accessories
- Safety glasses
- STIHL battery
- STIHL charger
- STIHL battery belt
- Bump guard
– Cover for battery compartment
Contact your STIHL dealer for more information on these and other special accessories.
Troubleshooting
Always remove the battery before carrying out any work on the power tool.
| Condition Cause Remedy | ||
| Machine does not run when switched on | No electrical contact between power tool and battery | Remove battery, check contacts and refit battery |
| Battery discharged(1 light emitting diode on battery flashes green) | Charge the battery | |
| Battery too hot / too cold(1 light emitting diode on battery glows red) | Allow the battery to cool down / warm up the battery slowly at a temperature between 15°C and 20°C. | |
| Fault in battery(4 light emitting diodes on battery flash red) | Take the battery out of the power tool and refit it. Switch on the power tool – if the light emitting diodes still flash, the battery is faulty and must be replaced. | |
| Power tool too hot(3 light emitting diodes on battery glow red) | Allow power tool to cool down | |
| Fault in power tool(3 light emitting diodes on battery flash red) | Take the battery out of the power tool and refit it. Switch on the power tool – if the light emitting diodes still flash, the power tool is faulty and must be checked by a servicing dealer1). | |
| Moisture in power tool and/or battery Allow power tool/battery to dry | ||
| Power tool cuts out during operation | Battery or power tool circuitry too hot Take the battery out of the power tool; allow the battery and power tool to cool down | |
| Electrical malfunction Remove the battery and refit it again | ||
Always remove the battery before carrying out any work on the power tool.
| Condition Cause Remedy | ||
| Running time is too short | Battery is not fully charged Charge the battery | |
| Using unsuitable nylon line Replace nylon line | ||
| Life of battery has been reached or exceeded | Check battery^1) and replace | |
| Battery jams when being inserted in power tool / charger | Guides / contacts dirty Carefully clean the guides / contacts | |
| Battery is not being charged even though the light emitting diode on the charger glows green | Battery too hot / too cold(1 light emitting diode on battery glows red) | Allow the battery to cool down / warm up the battery slowly at a temperature between 15°C and 20°C.Operate the charger indoors only in dry locations at an ambient temperature between +5°C and +40°C. |
| Light emitting diode on charger flashes red | No electrical contact between charger and battery | Remove the battery and refit it again |
| Fault in battery(4 light emitting diodes on battery flash red for about 5 seconds) | Take the battery out of the power tool and refit it. Switch on the power tool – if the light emitting diodes still flash, the battery is faulty and must be replaced. | |
| Fault in charger Have charger checked by servicing dealer^1) | ||
1) STIHL recommends a STIHL servicing dealer.
Maintenance and Repairs Battery Recycling Disposal
Users of this machine may only carry out the maintenance and service work described in this user manual. All other repairs must be carried out by a servicing dealer.
STIHL recommends that you have servicing and repair work carried out exclusively by an authorized STIHL servicing dealer. STIHL dealers are regularly given the opportunity to attend training courses and are supplied with the necessary technical information.
When repairing the machine, only use replacement parts which have been approved by STIHL for this power tool or are technically identical. Only use high-quality replacement parts in order to avoid the risk of accidents and damage to the machine.
STIHL recommends the use of original STIHL replacement parts.
Original STIHL parts can be identified by the STIHL part number, the STIHL logo and the STIHL parts symbol G_6 (the symbol may appear alone on small parts).
Battery Recycling Information

text_image
RECYCLF RBRC TM Li-ion 1.800.822.8837STIHL is committed to the development of products that are environmentally responsible. This commitment does not stop when the product leaves the STIHL dealer. STIHL has partnered with the RBRC (Rechargeable Battery Recycling Corporation) to promote the collection and recycling of spent STIHL lithium ion batteries in the United States and Canada. The RBRC seal can be found on every STIHL rechargeable battery and indicates that STIHL has prepaid for recycling the battery. The seal has a toll free phone number (1-800-822-8837) that connects you to information on battery recycling locations and information on battery disposal bans or restrictions in your area. You can also return your spent battery to any STIHL authorized servicing dealer for recycling free of charge.
Observe all country-specific waste disposal rules and regulations.
text_image
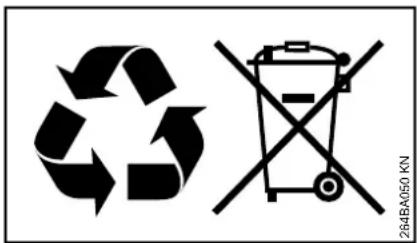
264BA050 KNElectrical appliances must not be thrown in the garbage can. Take the machine, accessories and packaging to an approved disposal site for environment-friendly recycling.
Contact your STIHL servicing dealer for the latest information on waste disposal.
English
Table des matières
natural_image
Line drawing of a person holding a long cable or tool, with no visible text or symbolsnatural_image
Line drawing of a person wearing a belt and wristband, holding a circular object (no text or symbols)natural_image
Line drawing of a person wearing a belt and wristband, holding a circular object (no text or symbols)text_image
15m (50ft)natural_image
Line drawing of a person using a tool to clean grass, no text or symbols presentnatural_image
Technical line drawing of a mechanical component with no visible text or symbolsnatural_image
Diagram of a mechanical linkage or clamping mechanism with motion arrows (no text or symbols)text_image
RECYCLF RBRC TM Li-ion 7.800.822.8837text_image
Black and white barcode image with vertical lines and a central 'R' mark0458-284-8221-A