RT18M6213SG - Freezer SAMSUNG - Free user manual and instructions
Find the device manual for free RT18M6213SG SAMSUNG in PDF.

User questions about RT18M6213SG SAMSUNG
0 question about this device. Answer the ones you know or ask your own.
Ask a new question about this device
Download the instructions for your Freezer in PDF format for free! Find your manual RT18M6213SG - SAMSUNG and take your electronic device back in hand. On this page are published all the documents necessary for the use of your device. RT18M6213SG by SAMSUNG.
USER MANUAL RT18M6213SG SAMSUNG
Free Standing Appliance
text_image
SAMSUNGSAMSUNG
Contents
Safety information 3
Important safety symbols and precautions: 4
State of California Proposition 65 Warning 4
Severe warning signs for transportation and site 4
Critical installation warnings 5
Installation cautions 7
Critical usage warnings 7
Usage cautions 10
Cleaning cautions 11
Critical disposal warnings 12
This appliance is intended to be used in household and similar applications such as 13
Additional tips for proper usage 13
Installation 14
Refrigerator at a glance 14 Step-by-step installation 15
Operations 29
Feature panel 29 Special features 34
Maintenance 36
Door reversal (applicable models only) 36
Handle and care 49
Cleaning 51
Replacement 51
Troubleshooting 52
General Do you hear abnormal sounds from the refrigerator? 52 55
LIMITED WARRANTY (U.S.A.) 57
SAMSUNG REFRIGERATOR 57
Warranty Information (CANADA) 60
If your refrigerator needs service 60 Limited Warranty for Original Purchaser 60 Obligation to the Original Owner 61 Exclusions of the Warranty 61
English2
Safety information
- Before using your new Samsung Refrigerator, please read this manual thoroughly to ensure that you know how to operate the features and functions that your new appliance offers safely and efficiently.
- This appliance is not intended for use by persons (including children) with reduced physical, sensory or mental capabilities, or lack of experience and knowledge, unless they have been given supervision or instruction concerning use of the appliance by a person responsible for their safety. Children should be supervised to ensure that they do not play with the appliance.
- This appliance can be used by children aged 8 years and above and persons with reduced physical, sensory or mental capabilities or lack of experience and knowledge if they have been given supervision or instruction concerning use of the appliance in a safe way and understand the hazards involved. Do not let children play with the refrigerator. Do not let children clean the refrigerator or perform user maintenance on the refrigerator without supervision.
- Warnings and Important Safety Instructions in this manual do not cover all possible conditions and situations that may occur. It is your responsibility to use common sense, caution, and care when installing, maintaining, and operating your appliance.
- Because the following operating instructions cover various models, the characteristics of your refrigerator may differ slightly from those described in this manual. Not all warning signs may be applicable. If you have any questions or concerns, contact your nearest Samsung service center or find help and information online at www.samsung.com.
- Refrigerant squirting out of the pipes could ignite or cause an eye injury. When refrigerant leaks from the pipe, avoid any naked flames and move anything flammable away from the product and ventilate the room immediately.
- Failing to do so may result in fire or explosion.
- It is hazardous for anyone other than an Authorised Service Person to service this appliance.

Warning; Risk of fire / flammable materials
Safety information
WARNING
- R-600a is used as a refrigerant. This product contains flammable gas (Refrigerant R-600a), contact your local authority in regard to safe disposal of this product.
- In order to avoid the creation of a flammable gas-air mixture if a leak in the refrigerating circuit occurs, the size of the room in which the appliance may be sited depends on the amount of refrigerant used. The room must be 35.3 ft ^3 in size for every 8 g of R-600a refrigerant inside the appliance.
- The installation location should not be exposed to direct sunlight and not placed near any electric appliance or heat source, e.g. stove, oven or hob, radiator, etc.
- If you use two products side by side, for safety reason, be sure to use certified products in explosive gas atmospheres.
- Never start up an appliance showing any signs of damage. If in doubt, consult your dealer.
Important safety symbols and precautions:
WARNING
Hazards or unsafe practices that may result in severe personal injury or death.
CAUTION
Hazards or unsafe practices that may result in minor personal injury or property damage.
These warning signs are here to prevent injury to you and others.
Please follow them carefully.
After reading this section, keep it in a safe place for future reference.
State of California Proposition 65 Warning
WARNING
Cancer and Reproductive Harm - www.P65Warnings.ca.gov.
Severe warning signs for transportation and site
WARNING
- When transporting and installing the appliance, care should be taken to ensure that no parts of the refrigerating circuit are damaged.
Refrigerant leaking from the pipe work could ignite or cause an eye injury. If a leak is detected, avoid any naked flames or potential sources of ignition and air the room in which the appliance is standing for several minutes.
English4
- This appliance contains a small amount of isobutane refrigerant (R-600a), a natural gas with high environmental compatibility that is, however, also flammable. When transporting and installing the appliance, care should be taken to ensure that no parts of the refrigerating circuit are damaged.
Critical installation warnings
WARNING
- Do not install the refrigerator in a damp location or place where it may come in contact with water.
Deteriorated insulation on electrical parts may cause an electric shock or fire.
- Do not place this refrigerator in direct sunlight or expose it to the heat from stoves, room heaters, or other appliances.
- Do not plug several appliances into the same multiple power strip. The refrigerator should always be plugged into its own individual electrical outlet which has a voltage rating that matches the voltage listed on the refrigerator's rating plate.
- This provides the best performance and also prevents overloading of house wiring circuits, which could cause a fire hazard from overheated wires.
- If the wall socket is loose, do not insert the power plug.
- There is a risk of electric shock of fire.
- Do not use a power cord that has cracks or abrasion damage along its length or at either end.
- Do not bend the power cord excessively or place heavy objects on it.
- Do not pull or excessively bend the power cord.
- Do not twist or tie the power cord.
- Do not hook the power cord over a metal object, place a heavy object on the power cord, insert the power cord between objects, or push the power cord into the space behind the appliance.
- When moving the refrigerator, be careful not to roll over or damage the power cord. - This may result in an electric shock or fire.
- Never unplug your refrigerator by pulling on the power cord. Always grip the plug firmly and pull straight out from the outlet.
- Damage to the cord may cause a short-circuit, fire, and/or electric shock.
- Do not store explosive substances such as aerosol cans with a flammable propellant in this appliance.
- Do not install this appliance near a heater or flammable material.
- Do not install this appliance in a location where gas may leak.
- This may result in an electric shock or fire.
- This refrigerator must be properly located and installed in accordance with the instructions in this manual before you use it.
- Connect the power plug in the proper position with the cord hanging down.
- If you connect the power plug upside down, the wire can get cut off and cause a fire or electric shock.
- Make sure that the power plug is not crushed or damaged by the back of the refrigerator.
Safety information
- Keep the packing materials out of reach of children.
- There is a risk of death from suffocation if a child puts the packing materials on his or her head.
- The appliance must be positioned so that the plug is accessible after installation.
Failing to do so may result in an electric shock or fire due to electric leakage.
- Do not install this appliance in a humid, oily or dusty location, in a location exposed to direct sunlight and water (rain drops).
Deteriorated insulation of electrical parts may cause an electric shock or fire.
- If any dust or water is in the refrigerator, pull out power plug and contact a Samsung Electronics service center.
- Otherwise there is a risk of fire.
- Do not stand on top of the appliance or place objects (such as laundry, lighted candles, lighted cigarettes, dishes, chemicals, metal objects, etc.) on the appliance.
- This may result in an electric shock, fire, problems with the product, or injury.
- You need to remove all the protective plastic film before you initially plug the product in.
- Children should be supervised to ensure that they do not play with the snap rings used for door adjustment or the water tube clips.
- There is risk of death by suffocation if a child swallows a snap ring or water tube clip. Keep the snap rings and water tube clips out of children's reach.
• The refrigerator must be safely grounded.
- Always make sure that you have grounded the refrigerator before attempting to investigate or repair any part of the appliance. Power leakages can cause severe electric shock.
- Never use gas pipes, telephone lines, or other potential lightning attractors as an electrical ground.
- You must ground the refrigerator to prevent any power leakages or electric shocks caused by current leakage from the refrigerator.
- Grounding the refrigerator improperly may result in an electric shock, fire, explosion, or problems with the product.
- Improper use of the grounding plug can result in a risk of electric shock. If it is necessary to use an extension cord, use only a 3-wire extension cord that has a 3-blade grounding plug and a 3-slot receptacle that will accept the plug on the appliance. The marked rating of the extension cord should be AC 115-120 V, 10 A, or more. If a grounding adapter is used, make sure the receptacle box is fully grounded.
- Plug the power plug into the wall socket firmly. Do not use a damaged power plug, damaged power cord, or loose wall socket.
- This may result in an electric shock or fire.
- If the power cord is damaged, have it replaced immediately by the manufacturer or one of its service agents.
- The fuse on the refrigerator must be changed by a qualified technician or service company.
Failing to do so may result in an electric shock or personal injury.
- The wall socket must be easily accessible so that the appliance can be quickly disconnected from the wall socket in an emergency.
- It must be outside the area of the rear of the appliance.
- When positioning the appliance, ensure the power cord is not trapped or damaged.
English6
- Do not locate multiple portable socket-outlets or portable power supplies at the rear of the appliance.
Installation cautions

CAUTION
- Allow sufficient space around the refrigerator and install it on a flat surface.
- Keep the ventilation space in the appliance enclosure or mounting structure clear of obstructions.
• After the refrigerator has been installed and turned on, let it stand for 2 hours before loading it with food.
- It is strongly recommended you have a qualified technician or service company install the refrigerator.
- Failing to do so may result in an electric shock, fire, explosion, problems with the product, or injury.
• Overloading the refrigerator door may cause the refrigerator to fall, causing physical injury.
Critical usage warnings

WARNING
- Do not insert the power plug into a wall socket with wet hands.
- This may result in an electric shock.
- Do not store articles on the top of the appliance.
- When you open or close the door, the articles may fall and cause personal injury and/or material damage.
- Do not insert hands, feet, or metal objects (such as chopsticks, etc.) into the bottom or into the back of the refrigerator.
- This may result in an electric shock or injury.
- Any sharp edges may cause a personal injury.
- Do not touch the inside walls of the freezer or products stored in the freezer with wet hands.
- This may cause frostbite.
- Do not put a container filled with water on the refrigerator.
- If spilled, there is a risk of fire or electric shock.
- Do not keep volatile or flammable objects or substances (benzene, thinner, propane gas, alcohol, ether, LP gas, and other such products) in the refrigerator.
- This refrigerator is for storing food only.
- This may result in fire or explosion.
• Children should be supervised to ensure that they do not play with the appliance.
- Keep fingers out of "pinch point" areas. Clearances between the doors and cabinet are necessarily small. Be careful when you open the doors if children are in the area.
- Do not let children hang on the door or door bins. A serious injury may occur.
- Do not let children go inside the refrigerator. They could become trapped.
Safety information
- Do not store pharmaceutical products, scientific materials, or temperature sensitive products in the refrigerator.
- Products that require strict temperature controls must not be stored in the refrigerator.
- Do not place or use electrical appliances inside the refrigerator/freezer, unless they are of a type recommended by the manufacturer.
- If you smell a burning smell or smoke, pull out power plug immediately and contact a Samsung Electronics service center.
- If any dust or water is in Refrigerator, pull out power plug and contact your nearest Samsung Electronics service center.
- Otherwise there is a risk of fire.
- Do not let children step on a drawer.
- The drawer may break and cause them to slip.
- Do not leave the doors of the refrigerator open while the refrigerator is unattended and do not let children enter inside the refrigerator.
- Do not allow babies or children go inside a drawer.
- It can cause death from suffocation by entrapment or personal injury.
- Do not overfill the refrigerator with food.
- When you open the door, an item may fall out and cause personal injury or material damage.
- Do not spray volatile material such as insecticide onto the surface of the appliance.
- As well as being harmful to humans, it may also result in an electric shock, fire, or problems with the product.
- Do not use or place any substances sensitive to temperature such as flammable sprays, flammable objects, dry ice, medicine, or chemicals near or inside of the refrigerator.
- Do not use a hair dryer to dry the inside of the refrigerator. Do not place a lighted candle in the refrigerator for removing bad odours.
- This may result in an electric shock or fire.
- Fill the water tank, ice tray and water cubes with potable water only (tap water, mineral water, or purified water).
- Do not fill the tank with tea, juice or sports drinks. This may damage the refrigerator.
- Do not stand on top of the appliance or place objects (such as laundry, lighted candles, lighted cigarettes, dishes, chemicals, metal objects, etc.) on the appliance. This may result in an electric shock, fire, problems with the product, or injury. Do not put a container filled with water on the appliance.
- If spilled, there is a risk of fire or electric shock.
- Never stare directly at the UV LED lamp for long periods of time.
- This may result in eye strain due to the ultraviolet rays.
- Do not put fridge shelves in upside down. The shelf stopper, which prevents the shelf from falling, will not work.
- The shelf could fall and cause a personal injury.
- Keep fingers out of "pinch point" areas. Clearances between the doors and cabinet are necessarily small. Be careful when you open the doors if children are in the area.
- If a gas leak is detected, avoid any naked flames or potential sources of ignition, and air the room in which the appliance is standing for several minutes.
- Do not touch the appliance or power cord.
- Do not use a ventilating fan.
- A spark may result in explosion or fire.
English8
- Use only the LED Lamps provided by the manufacturer or its service agents.
- Bottles should be stored tightly together so that they do not fall out.
- This product is intended only for the storage of food in a domestic environment.
- Do not attempt to repair, disassemble, or modify the refrigerator yourself.
- Unauthorized modifications can cause safety problems. To reverse an unauthorized modification, we will charge the full cost of parts and labor.
- Do not use any fuse (such as cooper, steel wire, etc.) other than a standard fuse.
- If your refrigerator needs to be repaired or reinstalled, contact your nearest Samsung service center.
- Failing to do so may result in an electric shock, fire, problems with the product, or injury.
- If the interior or exterior LED lamp has gone out, contact your nearest Samsung service center.
- If the refrigerator emits a burning smell or smoke, unplug the refrigerator immediately and contact your Samsung Electronics service center.
- Failing to do so may result in an electric or fire hazard.
- Pull the power plug out of the socket before changing the interior lamps of the refrigerator.
- Otherwise, there is a risk of electric shock.
- If you experience difficulty changing a non-LED light, contact a Samsung service center.
- If the product is equipped with LED lamps, do not disassemble the Lamp Covers and LED lamps yourself.
- Contact a Samsung service center.
- Plug the power plug into the wall socket firmly.
- Do not use a damaged power plug, damaged power cord or loose wall socket.
- This may result in an electric shock or fire.
Safety information
Usage cautions
CAUTION
- Do not re-freeze frozen foods that have thawed completely. Do not place carbonated or fizzy drinks in the freezer compartment. Do not put bottles or glass containers in the freezer.
- When the contents freeze, the glass may break and cause personal injury.
-
Use only the ice maker provided with the refrigerator.
• To get the best performance from the product: -
Do not place food too close to the vents at the rear of the refrigerator as this can obstruct free air circulation in the refrigerator compartment.
- Wrap food up properly or place it in airtight containers before putting it into the refrigerator.
- Do not place glass bottles or carbonated beverages into the freezer. They can freeze and break. Broken beverage containers can cause injury.
- Please observe maximum storage times and expiration dates of frozen goods.
- Do not place carbonated or fizzy drinks in the freezer compartment. Do not put bottles or glass containers in the freezer compartment.
- When the contents freeze, the glass may break and cause personal injury and property damage.
• Service Warranty and Modification.
- Any changes or modifications performed by a 3rd party on this finished appliance are not covered under Samsung warranty service, nor is Samsung responsible for safety issues that result from 3rd party modifications.
- Do not block the air vents inside the refrigerator.
- If the air vents are blocked, especially with a plastic bag, the refrigerator can be over cooled. If a cooling period lasts too long, the water filter may break and cause water leakage.
- Wipe excess moisture from the inside and leave the doors open.
- Otherwise, odor and mold may develop.
- If the refrigerator is disconnected from the power supply, you should wait for at least five minutes before plugging it back in.
- If the refrigerator is flooded by water, there is a risk of electric shock or fire. Pull out the power plug, and then contact a Samsung Electronics service center as soon as possible.
- Do not strike or apply excessive force to any glass surface.
- Broken glass may result in a personal injury and/or property damage.
- Fill the water tank and ice cube trays with potable water only (tap water, mineral water, or purified water).
- Do not fill the tank with tea or a sports drink. This may damage the refrigerator.
English10
natural_image
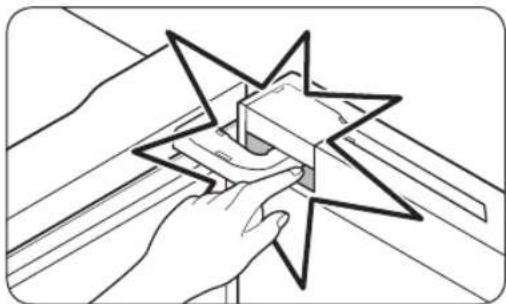
Line drawing of a hand holding a star-shaped object with a rectangular block, no text or symbols present- Be careful that your fingers do not get caught in the door or the space between the door and the door hinge.
- The lamps in the freezer and refrigerator may turn off if the doors of the freezer and refrigerator are left open for 2 seconds or longer.
- The lamps will turn back on when the doors are closed and opened again.
- Do not keep vegetable oil in your refrigerator's door bins. The oil can solidify, making it foul-tasting and difficult to use. In addition, the open container can leak and the leaked oil can cause the door bin to crack. After opening an oil container, it is best to keep the container in a cool and shaded place such as a cupboard or pantry.
- Examples of vegetable oil: olive oil, corn oil, grape-seed oil, etc.
Cleaning cautions

CAUTION
- Do not spray water directly on the inside or outside the refrigerator. - There is a risk of fire or electric shock.
- Do not use a hair dryer to dry the inside of the refrigerator.
- Do not place a lighted candle in the refrigerator to remove bad odors. - This may result in an electric shock or fire.
- Do not spray cleaning products directly on the display. - Printed letters on the display may come off.
- If any foreign substance such as water has entered the appliance, unplug the power plug and contact your nearest Samsung service center. - Failing to do so may result in an electric shock or fire.
- Use a clean, dry cloth to remove any foreign matter or dust from the power plug blades. Do not use a wet or damp cloth when cleaning the plug. - Otherwise, there is a risk of fire or electric shock.
- Do not clean the appliance by spraying water directly onto it.
- Do not use benzene, thinner, or Clorox, Chloride for cleaning. - They may damage the surface of the appliance and may cause a fire.
- Never put fingers or other objects into the dispenser hole. - It may cause a personal injury or material damage.
- Before cleaning or performing maintenance, unplug the appliance from the wall socket. - Failing to do so may result in an electric shock or fire.
- Use a clean sponge or soft cloth and a mild detergent in warm water to clean the refrigerator.
English 11
Safety information
- Do not use abrasive or harsh cleansers such as window sprays, scouring cleansers, flammable fluids, muriatic acid, cleaning waxes, concentrated detergents, bleaches, or cleansers containing petroleum products on exterior surfaces (doors and cabinet), plastic parts, door and interior liners, and gaskets.
These can scratch or damage the material. - Do not clean glass shelves or covers with warm water when they are cold. Glass shelves and covers may break if exposed to sudden temperature changes or impacts such as bumping or dropping.
Critical disposal warnings
WARNING
• Children trapped inside a refrigerator can hurt themselves or suffocate to death.
- Please dispose of the packaging material from this product in an environmentally friendly manner.
- Ensure that none of the pipes on the back of the refrigerator are damaged prior to disposal.
- R-600a is used as a refrigerant. This product contains flammable gas (Refrigerant R-600a), contact your local authority in regard to safe disposal of this product.
- When disposing of this refrigerator, remove the door/door seals and door latch so that small children or animals cannot become trapped inside. Children should be supervised to ensure that they do not play with the appliance. If trapped inside, a child may get hurt or suffocate to death.
- If trapped inside, the child may get hurt or suffocate to death.
- Cyclopentane is used in the insulation. The gases in the insulation material require a special disposal procedure. Please contact your local authorities in regard to the environmentally safe disposal of this product.
- Keep all packaging materials well out of the reach of children, as packaging materials can be dangerous to children.
- If a child places a bag over his or her head, the child could suffocate.
WARNING
- Fill with potable water only.
- Keep ventilation openings, in the appliance enclosure or in the built-in structure, clear of obstruction.
- Do not use mechanical devices or other means to accelerate the defrosting process, other than those recommended by the manufacturer.
- Do not damage the refrigerant circuit.
- Do not use electrical appliances inside the food storage compartments of The appliance, unless they are of the type recommended by the manufacturer.
- Connect to potable water supply only.
English12

WARNING
- Risk of child entrapment. Before you throw away your old refrigerator or freezer:
- Take off the doors.
- Leave the shelves in place so that children may not easily climb inside.
This appliance is intended to be used in household and similar applications such as
- staff kitchen areas in shops, offices and other working environments;
- farm houses and by clients in hotels, motels and other residential type environments;
• bed and breakfast type environments;
• catering and similar non-retail applications.
Additional tips for proper usage
- In the event of a power failure, call the local office of your electric company and ask how long the failure is going to last.
- Most power failures that are corrected in an hour or two will not affect your refrigerator temperatures. However, you should minimize the number of door openings while the power is off.
- Should the power failure last more than 24 hours, remove and discard all frozen food.
- The refrigerator might not operate consistently (frozen contents can thaw or temperatures can become too warm in the frozen food compartment) if sited for an extended period of time in a location where ambient air temperatures are constantly below the temperatures for which the appliance is designed.
- Some foods (bananas, etc.) should not be refrigerated. Refrigeration can cause these foods to deteriorate.
- Your appliance is frost free, which means there is no need to manually defrost your appliance. This will be carried out automatically.
- Temperature rise during defrosting complies with ISO requirements. If you want to prevent an undue rise in the temperature of frozen food while the appliance defrosts, wrap the frozen food in several layers of newspaper.
- Do not re-freeze frozen foods that have thawed completely.
Installation
Follow these instructions carefully to ensure the proper installation of this refrigerator and to prevent accidents before using it.
WARNING
- Use the refrigerator only for its intended purpose as described in this manual.
- Any servicing must be performed by a qualified technician.
- Dispose of the product packaging material in compliance with the local regulations.
Refrigerator at a glance
NOTE
The illustrations of the refrigerator and its component parts shown in this manual may differ from your actual refrigerator and its component parts, depending on the model and your country.
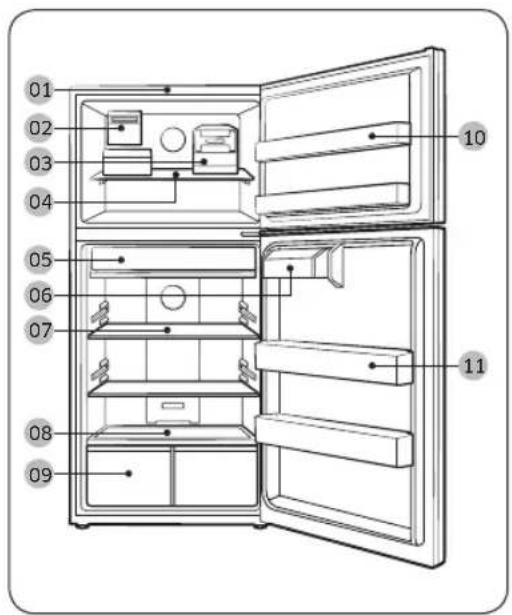
text_image
01 02 03 04 05 06 07 08 09 10 1101 Control Panel
02 Auto Ice Maker (Optional)
03 Twist Ice Maker (Type A) *
04 Freezer shelf
05 Slide & Reach Pantry *
06 Guard container
07 Refrigerator shelves
08 Vegetable shelf
09 Vegetable Drawer
10 Freezer Guard
11 Refrigerator guard
* applicable models only
English14
Step-by-step installation
STEP 1 Select a site
Select a site that:
- Has a solid, level surface without carpeting or flooring that may obstruct ventilation
• Is away from direct sunlight - Has adequate room for opening and closing the door
• Is away from any heat sources - Provides room for maintenance and servicing
- Has a temperature range between 50^ (10 °C) and 109^ (43 °C)
Installation
Clearance
See the pictures and table below for space requirements for installation.
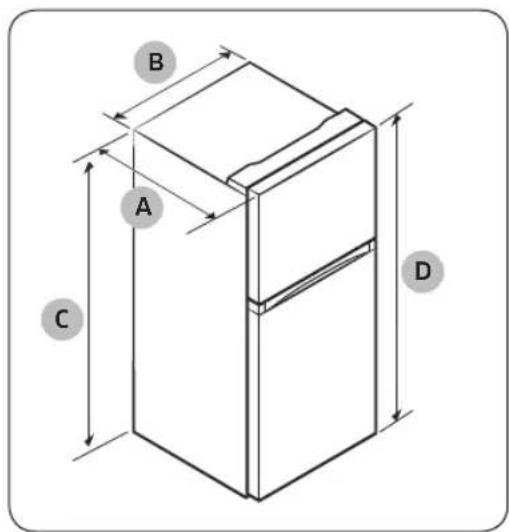
text_image
B A C D| Model RT18* | RT21* | |
| Depth "A" | 31 ^7/8 " (810 mm) | 31 ^7/8 " (810 mm) |
| Width "B" | 28 ^3/4 " (729 mm) | 32 ^7/8 " (836 mm) |
| Height "C" | 65 ^3/4 " (1669 mm) | 66 ^3/4 " (1694 mm) |
| Overall Height "D" | 66 ^3/4 " (1697 mm) | 67 ^3/4 " (1722 mm) |
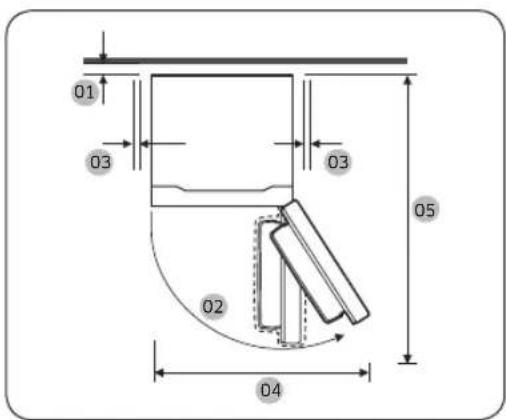
text_image
01 03 03 05 02 04| Model RT18* RT21* | ||
| 01 | more than 2" (50 mm) recommended | |
| 02 121° 121° | ||
| 03 | at least 2" (50 mm) | at least 2" (50 mm) |
| 04 | 44" (1117 mm) | 50 ^2/_5 " (1280 mm) |
| 05 | 57 ^7/_8 " (1470 mm) | 59 ^7/_8 " (1521 mm) |
English16-
STEP 2 Flooring
natural_image
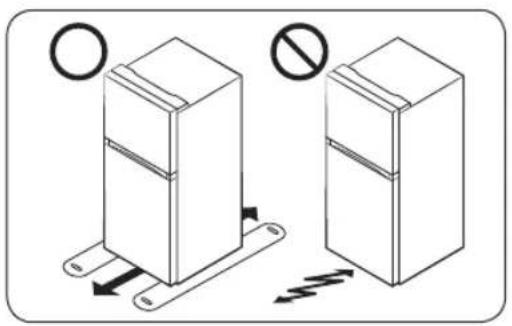
Diagram showing two refrigerators with directional arrows indicating movement, no text or symbols present- The surface you install the refrigerator on must support a fully loaded refrigerator. (Approximately 200 lb or 90 kg.)
• To protect the floor, put a large piece of cardboard along the path to the refrigerator's final installation location. - Once the refrigerator is in its final position, do not move it unless necessary to protect the floor. If you have to move the refrigerator, place thick paper or cloth such as old carpets along the path of movement.
Installation
STEP 3 Adjust the leveling legs
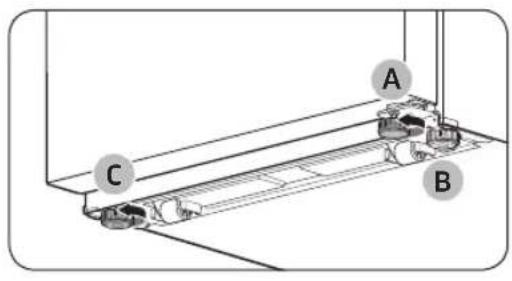
text_image
A B C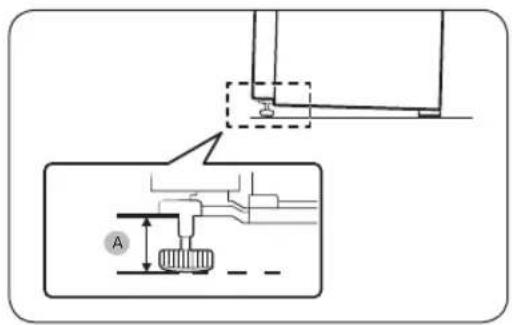
text_image
Technical diagram showing mechanical assembly with labeled component A and detail viewThe refrigerator comes with 3 leveling legs, 1 on the door and 2 on the unit. Level the refrigerator by manually adjusting the leveling leg (A) on the door and the leveling leg (C) on the opposite side of the unit. The other leveling leg (B) on the unit is for stability purposes.
Turn the leveling legs clockwise to lower the position, or turn counter clockwise to raise.
CAUTION
- In all cases including door reversal, to prevent the refrigerator from tipping, make sure the leveling leg (A) on the door is on the floor and fully supporting the weight of the door.
• Using only 2 legs on the unit can cause the refrigerator to tip over.
Leave the legs at least (A) mm from the floor as shown.
• (A) 39 mm for RT18*
• (A) 43 mm for RT21*
English18-
STEP 4 Connect the water line (optional)
Connect the water line to the ice maker. For the ice maker to operate properly, a water pressure of 20-125 psi (138-862 kPa) is required. After you have connected the water line, make sure the water storage tank inside the refrigerator is properly filled.

CAUTION
- Use the new hose-sets supplied with the appliance only. Do not re-use an old hose set.
- The water line installation is not covered by the Warranty of this product. Read carefully through these instructions to protect your property and prevent possible damage.
- Banging pipes (water banging in the pipes) can cause damage to the refrigerator, and lead to water leakage or flooding. If you encounter this problem, contact a plumber for professional assistance.
- To prevent burns and product damage, do not connect the water line to a hot water source.
- Do not install the water line in areas where temperatures fall below the freezing point.
- When using any electrical device (such as a motorized drill) during installation, be sure the device is insulated and properly grounded to prevent electric shock.
- All installations must be in accordance with local plumbing code requirements.
- The water filter must be replaced as instructed by the manufacturer or the retailer.
• To purchase additional water filters, contact the manufacturer or the retailer of the filter.

NOTE
- You can purchase the water line installation kit from your retailer. We recommend using a kit that contains copper tubing and a 6 mm (1/4") compression nut.
- In an area with low water pressure (below 20 psi (138 kPa)), you can install a booster pump to compensate for the low pressure.
Installation
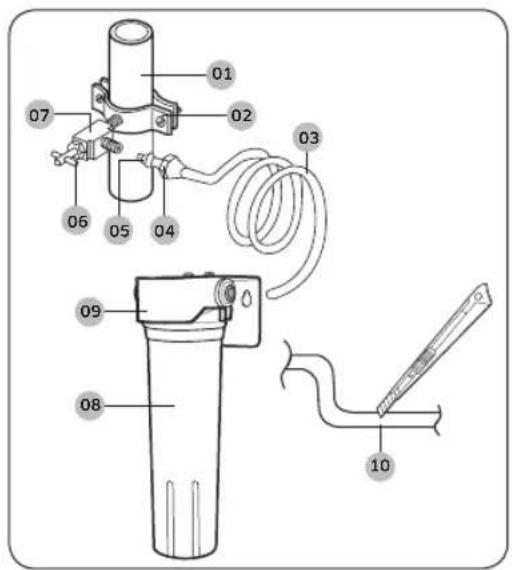
To assemble the water line installation kit
text_image
A B C-
Shut off the main water source.
-
Insert the pipe clamp (B) and the shut-off valve (C) into the cold water line (A).
-
Connect the water line installation kit (A) to the shut-off valve (B).
text_image
Diagram of a mechanical or electrical component with labeled parts A and B, showing directional movement indicated by arrows.To connect the water line to the refrigerator
WARNING
Make sure to connect the water line only to a potable water source.
There are several items you must purchase to complete this connection. You may find these items sold as a kit at your local hardware store.
| Copper Tubing | ^1/_4" copper tubing ^1/_4" compression nut (1 pc)Ferrule (2 pc) |
| Plastic Tubing • | ^1/_4" plastic tubing → Molded end (Bulb) |
English20
text_image
A 04 05 01 02 06 07 0308 BA. Refrigerator
B. Household water supply line
01 Compression nut (1/4")
02 Ferrule (Not supplied)
03 Copper tubing (Not supplied)
04 Plastic tubing (Assembled)
05 Compression fitting
06 Molded end (Bulb)
07 Compression nut (B) (1/4") (Not supplied)
08 Plastic tubing (A) (Not supplied)
NOTE
RT**M6215* models ship with parts 01 and
05 while RT**M6213* models are available with the optional Auto Ice Maker Kit.
-
Connect the household water line to the assembled compression fitting.
-
If you are using copper tubing, slip the compression nut (B) (not supplied) and ferrule (not supplied) on the copper tubing (not supplied) as shown.
- If you are using plastic tubing (A), insert the molded end (Bulb) of the plastic tubing (A) into the compression fitting.
CAUTION
If you use plastic tubing, (A) do not use it without the molded end (Bulb).
- Tighten the compression nut (B) onto the compression fitting. Do not over-tighten the compression nut (B).
- Turn the water on and check for any leakage. If you find water drops or leakage in the connection areas, turn off the main water supply. Check the connections and, if necessary, tighten.
- After you turn on the refrigerator, let the ice maker makes ice for 1 to 2 days. Over that period of time, throw out the first 1 or 2 buckets of ice the ice maker makes to ensure all impurities have been removed from the water line.
NOTE
- If you have to repair or disassemble the water line, cut off ^1/4 of the plastic tubing to make sure you get a snug, leak-free connection.
• Leaving the water line disconnected may cause the water valve to produce a buzzing sound over time. - If water is not supplied to the refrigerator, make sure to turn the ice maker off.
Installation
Installing a Water Filter (optional)
The water filter and the water filter installation kit containing necessary parts illustrated in this section are not provided. You must purchase the water filter and the water filter installation kit at a local hardware store.
To connect to the water supply line
text_image
Technical diagram of a mechanical device with numbered components and labeled parts01 Cold water line
02 Pipe clamp
03 Plastic line
04 Compression nut
05 Compression sleeve
06 Packing nut
07 Shut off valve
08 Filter cartridge
09 Cartridge holder
10 Cut vertically by 90 degrees
- Shut off the main water line and turn the ice maker off.
- Locate the nearest cold potable water line.
- Follow the instructions mentioned in the water filter installation kit.
- After connecting the water line to the inlet of the cartridge holder with the plastic line fully inserted, insert and tighten the filter cartridge.
- Turn on the water line and flush 11 liters of water (approximately 6 minutes) through the filter before use.

natural_image
Two cylindrical objects with circular holes and a prohibition symbol, no text or labels presentCAUTION
- The water line must be connected outside of the refrigerator.
- Do not use copper lines.
- If cutting the tubing for resizing, make sure the ends of the tubing are vertically clean cut.
English22-
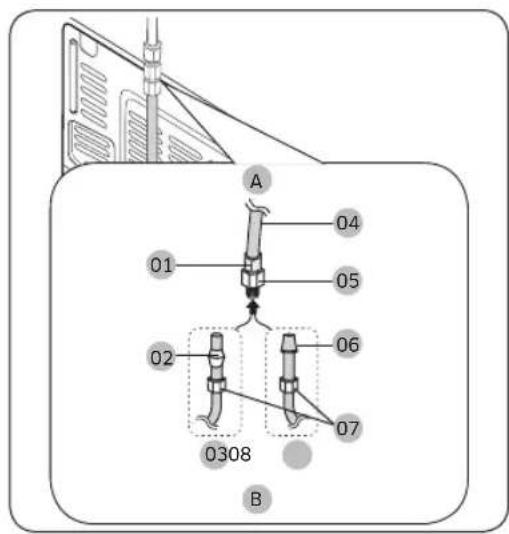
To connect the water line to the refrigerator
text_image
Technical diagram showing a device with labeled components and a magnified inset view of the component with numbered parts.01 Cartridge holder
02 Plastic clip
03 Plastic line
04 Filter cartridge
- Connect the plastic line from the rear of the refrigerator to the outlet of the cartridge holder until the plastic line is fully inserted.
- Clamp both ends of the cartridge holder using the plastic clips.
- Turn the water line on and check for leaks.
CAUTION
- Use only potable water.
- The filter cartridge is not provided. You must purchase it at a local hardware store.
- When moving the refrigerator for line connection, use caution so that you don't step on the power cord or water line (for the ice maker).
Installation
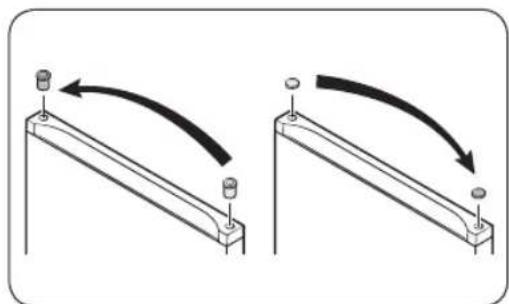
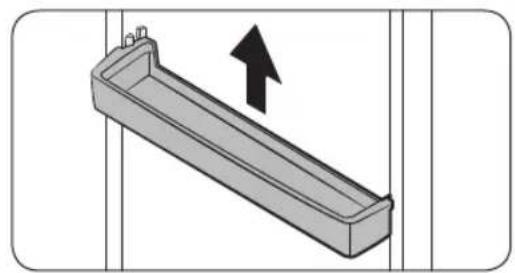
STEP 5 Unpack and put accessories in place
The accessories that ship with this refrigerator are properly packed for transportation and safety reasons. Unpack those accessories and put them in place.
Door guards
natural_image
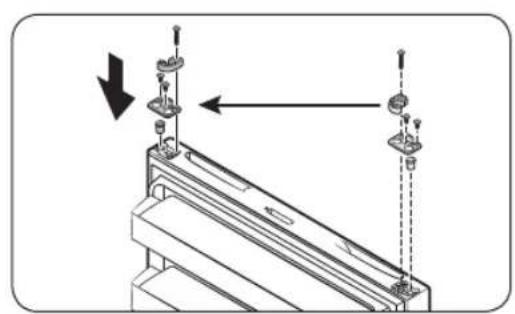
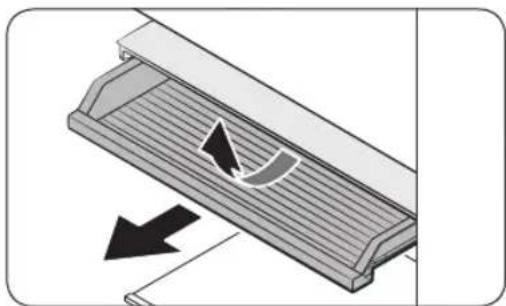
3D diagram of a rectangular mechanical part with an arrow indicating downward motion (no text or symbols)There are four door guards provided with the product. Insert two door guards each to the freezer and the fridge.
natural_image
Isometric line drawing of a multi-layered mechanical component (no text or symbols)Installation
English24
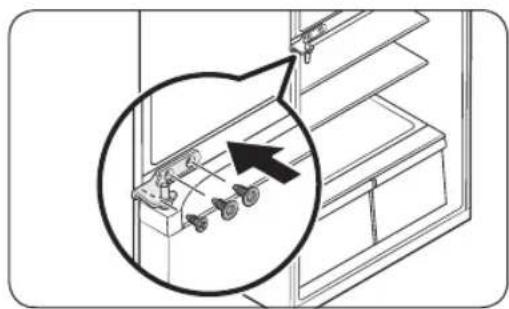
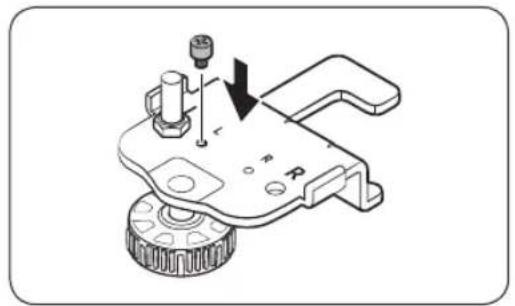
STEP 6 Install the Auto Ice Maker (optional)
To purchase a new auto ice maker (part type : RA-TIMO63PP/AA), visit the Samsung website (www.samsung.com) or contact your retailer.
Ice maker kit
natural_image
Isometric line drawing of a rectangular electronic component with internal compartments and ventilation grilles (no text or symbols)Ice maker Ice bucket
natural_image
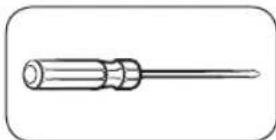
Line drawing of a rectangular plastic container with internal compartments (no text or symbols)Tools required (not provided)
natural_image
Simple line drawing of a screwdriver (no text or symbols)Phillips screwdriver
Installation
To install the ice maker kit

WARNING
To prevent electrical shock, make sure the refrigerator is turned off before installation.
natural_image
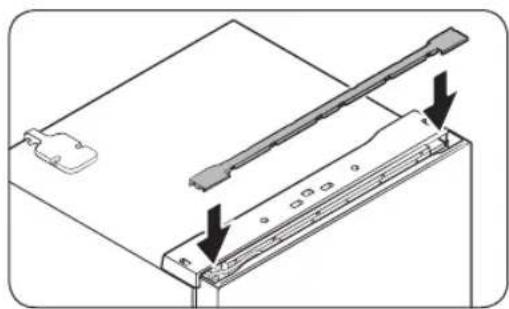
Diagram of ceiling-mounted fixtures with hanging lights and a downward arrow indicating a component (no text or symbols)- See the figure on the left, and then locate the cover on the inner upper corner of the main unit.
natural_image
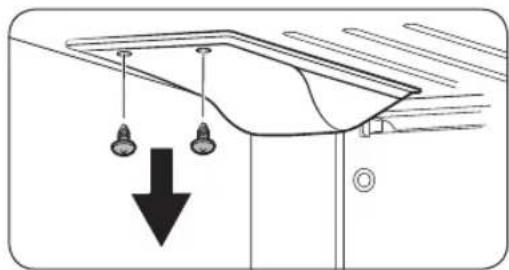
Diagram of a roof structure with an arrow indicating direction, no text or symbols present- Remove the screws (x2) from the cover, and then remove the cover by pulling it to the front.
natural_image
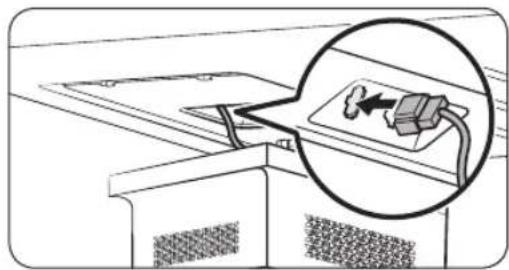
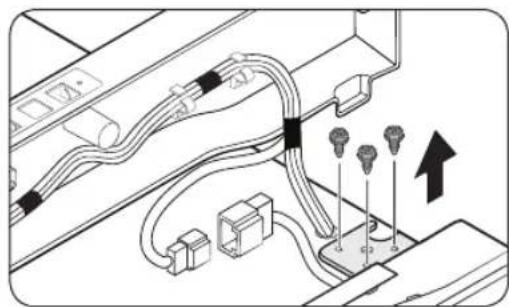
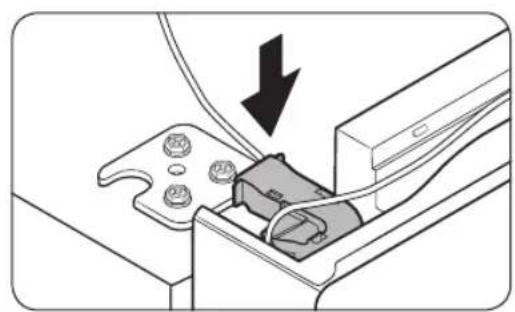
Diagram of a device with an arrow pointing to a component, shown through a magnified inset (no text or symbols present)- Connect the wire connector of the ice maker to the socket (marked in the figure) on the main unit. Make sure the connector is fully inserted to prevent system failure.
natural_image
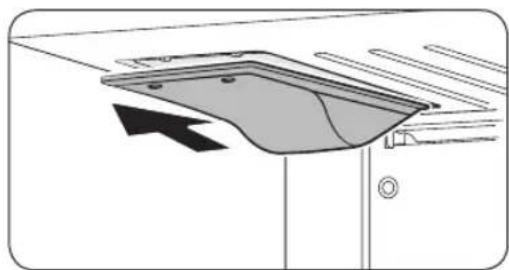
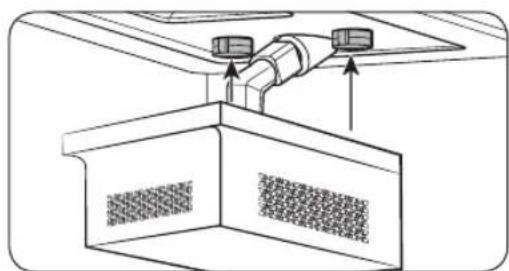
Technical line drawing of a mechanical assembly with pipes and mounting brackets (no text or symbols)- Insert the ice maker into the front side of the 2 grommets as shown. Then, push the ice maker inwards to the end. To prevent deviation of the ice maker, make sure the ice maker fits into position.
English26-
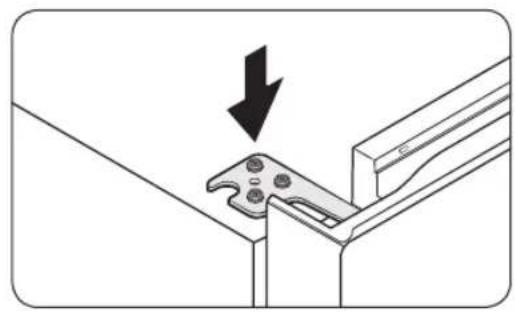
text_image
Installation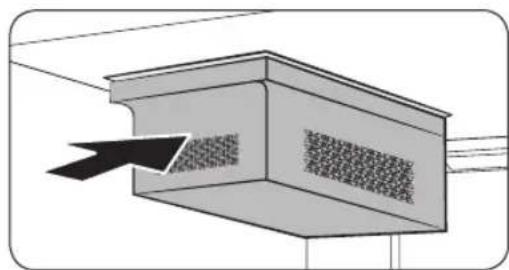
natural_image
Diagram of a building interior with ventilation ducts and airflow direction arrow (no text or symbols)
natural_image
Diagram showing a refrigerator with hanging lights and a close-up of the refrigerator's door (no text or symbols present)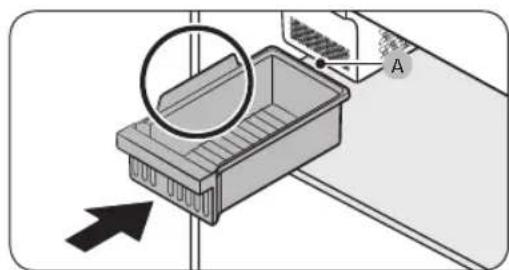
natural_image
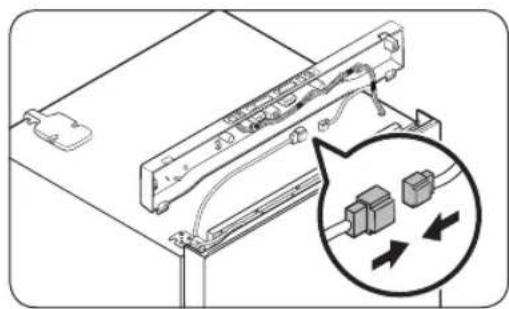
Diagram of a storage tray with an inset showing a magnified view of the tray (no text or symbols present)- Tighten the provided screws (x2) to attach the ice maker firmly to the refrigerator.
- Make sure the screw holes are aligned with each other before tightening the screws.
-
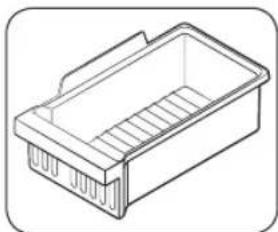
Put the ice bucket on the shelf as shown. By design, the ice bucket is supposed to sit behind the ice maker. Otherwise, the ice cubes from the ice maker will not collect in the bucket as intended.
-
When installation is complete, turn the refrigerator on, and then press Test Switch (A) on the ice maker to check if the ice maker operates and supplies water for the ice tray normally.
CAUTION
- If you don't intend to use the ice maker, or if you are going for a business trip or vacation, turn off the ice maker.
- Do not turn the ice maker on without the ice bucket in place. The ice cubes produced by the ice maker will drop into and scatter through out the freezer.
- Noises may occur when the ice maker is making ice or being supplied with water, or when ice cubes drop into the ice bucket. However, this is not a system failure. When the ice bucket is full, none of these noises will occur.
- The first time you use the ice maker, or after you have replaced the water filter, the ice made by the ice maker may have a carbon residue. If this happens, discard the first full load of ice. Note that the carbon residue is harmless to humans.
Installation
STEP 7 Initial settings
By completing the following steps, the refrigerator should be fully functioning.
- Plug the power cord into the wall socket to turn the refrigerator on.
- Open the door, and check if the interior light lights up.
- Set the temperature to the coldest setting, and wait for about an hour. Then, the freezer should be slightly chilled, and the motor should be running smoothly.
- Wait until the refrigerator reaches the set temperature. The refrigerator is now ready for use.
STEP 8 Final check
When installation is complete, confirm that:
- The refrigerator is plugged into an electrical outlet and grounded properly.
- The refrigerator is installed on a flat, level surface with a reasonable clearance from the wall or the cabinet.
- The refrigerator is level and is sitting firmly on the floor.
- The door opens and closes freely, and the interior light turns on automatically when you open the door.
English28
Operations
Feature panel
Type A
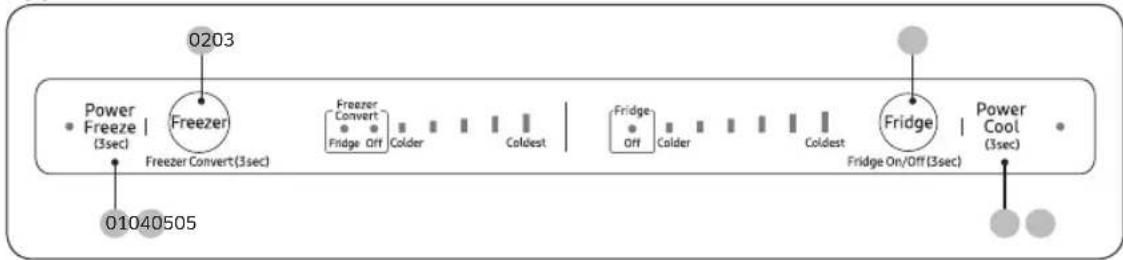
flowchart
graph LR
    A["0203"] --> B["Freezer"]
    B --> C["Freeze Convert(3sec)"]
    C --> D["01040505"]
    D --> E["Fridge On/Off (3sec)"]
    E --> F["Fridge"]
    F --> G["Power Cool (3sec)"]
    style A fill:#f9f,stroke:#333
    style G fill:#bbf,stroke:#333
Type B
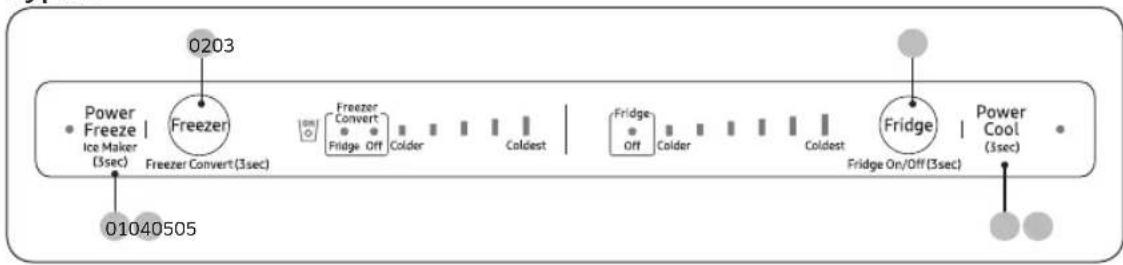
flowchart
graph LR
    A["Power Freeze | Ice Maker (3sec)"] --> B["0203"]
    B --> C["Freezer Convert (3sec)"]
    C --> D["Fridge Off"]
    D --> E["Colder"]
    E --> F["Coldest"]
    F --> G["Fridge Off"]
    G --> H["Colder"]
    H --> I["Coldest"]
    I --> J["Fridge On/Off (3sec)"]
    J --> K["Power Cool (3sec)"]
    L["01040505"] --> M["Freezer"]
01 Power Freeze / Ice Maker (applicable models only)
03 Fridge / Fridge On/Off 04 Power Cool
05 Sabbath mode
02 Freezer / Freezer Convert
Operations
01 Power Freeze / Ice Maker (applicable models only)
| Power Freeze | Power Freeze speeds up the freezing process at maximum fan speed. The freezer keeps running at full speed for several hours and then returns to the previous temperature.To activate Power Freeze, press and holdPower Freezefor 3 seconds (Type A), or press and releasePower Freezewithin 3 seconds (Type B). The corresponding indicator lights up, and the refrigerator will speed up the freezing process for you.For Type B, do not hold downPower Freezefor 3 seconds or more. This will activate the ice maker, not Power Freeze.To deactivate, press and holdPower Freezefor 3 seconds (Type A), or press and releasePower Freezewithin 3 seconds (Type B). The freezer returns to the previous temperature setting.To freeze large amounts of food, activate Power Freeze for at least 20 hours before putting food in the freezer.The freezer keeps running at full speed for 50 hours and then returns to the previous temperature.NOTEUsing Power Freeze increases power consumption. Make sure you turn it off and have the Freezer return to its previous temperature if you no longer need Power Freeze on. |
| Ice Maker(applicable models only) | By default, the refrigerator is set to make ice with the ice maker indicator on.To disable this function, press and holdIce Makerfor 3 seconds.We recommend disabling the function in the following cases:The ice bucket is already full of ice.You want to decrease power consumption.When removing the ice maker while it is operating, the ice maker automatically turns off, and the ice maker button (holding downPower Freeze) will be disabled.If reattaching the removed ice maker while the refrigerator is on, the ice maker automatically turns on. |
02 Freezer / Freezer Convert (3 sec)
| Freezer | The Freezer button can be used to set the freezer temperature.⚠️ CAUTIONTo prevent system failure or food spoiling, do not set the temperature to Colder in summer (when temperatures are above 95 °F (35 °C).Do not store glass bottles containing liquid in the freezer. Glass bottles will crack or break into pieces when the liquid freezes. |
English30-
| Freezer Convert | You can use the freezer as a freezer only, set the entire refrigerator including the freezer to Fridge mode, or turn off the freezer.To change the default freezer mode, press and hold Freezer Convert for 3 seconds to enter the selection mode. Then, press Freezer Convert to select a desired mode.The mode changes in this sequence: Fridge → Off → Freezer, then back to Fridge.If you select Fridge, the fridge indicator turns on. The freezer will operate in Fridge mode with refrigerator temperatures (above freezing). Power Freeze will be deactivated if active, and Ice On will turn off if enabled.If you select Off, the Off indicator turns on. The freezer will be turned off.If you switch to Fridge or Off mode, the ice maker automatically turns off after 15 seconds. Empty the ice bucket before you select these modes.If you select Freezer, the freezer temperature indicators turn on and the freezer will operate as a freezer (with temperatures below freezing).If you switch back to Freezer mode from Fridge or Off mode, the ice maker automatically turns on.Your changes will be set and activated after 10 seconds. To cancel or change the mode again, press and hold Freezer Convert again for 3 seconds. Then, follow the instructions above.NOTEIf you press and hold Freezer Convert for 3 seconds in other modes, the refrigerator switches to selection mode where you can press Freezer Convert to select a different mode.When the fridge or the freezer is set to Off mode, the temperature of the fridge or the freezer remains under 59 °F (15 °C) to prevent mold and odors. The refrigerator will use less electricity.The fridge and the freezer cannot be powered off independently.Do not store food or beverages in the refrigerator when the refrigeration or freezer functions are set to 'Off mode'. 59 °F (15 °C) is not cool enough to prevent spoilage. |

WARNING
- Do not put glass bottles containing liquid in the freezer. When you cancel Freezer Convert and the freezer returns to freezer mode, the liquid in the glass bottles will freeze which can cause the glass bottles to break or burst in the freezer.
- Make sure to remove frozen foods from the freezer before you use Freezer Convert to convert the freezer to Fridge mode. Frozen foods will melt and spoil as the temperature increases.
Operations
- Make sure to remove chilled foods from the freezer before using Freezer Convert to change the freezer to Freezer mode. Chilled foods may freeze as the temperature decreases.
NOTE
If you want to use Freezer Convert, we strongly recommend that you use plastic containers to store food, especially vegetables.
03 Fridge / Fridge On/Off (3 sec)
| Fridge | To adjust the fridge temperature, pressFridgeto select the corresponding temperature.⚠️CAUTIONIn winter, do not set the temperature control to Coldest. This may cause problems with the cooling performance.In summer, do not set the temperature control to Colder. This may also cause problems with the cooling performance. |
| Fridge On/Off | Press and holdFridgefor 3 seconds to select Fridge On/Off. The temperature indicator will turn off and the Fridge On/Off indicator will turn on.💡NOTEIn Fridge On/Off mode, the temperature of the fridge or freezer remains under 59 °F (15 °C) to prevent mold and odors. The refrigerator uses less electricity.Do not store food or beverages in the refrigerator when the refrigeration or freezer functions are set to 'Off mode'. 59 °F (15 °C) is not cool enough to prevent spoilage. |
04 Power Cool (3 sec)
| Power Cool | Power Cool speeds up the cooling process at maximum fan speed. The fridge keeps running at full speed for several hours and then returns to the previous temperature.To activate Power Cool, press and holdPower Coolfor 3 seconds.The corresponding indicator (lights up, and the refrigerator will speed up the cooling process for you.To deactivate Power Cool, press and holdPower Coolagain for 3 seconds. The fridge returns to the previous temperature setting.To cool large amounts of food completely, make sure you have activated Power Cool at least 24 hours in advance.NOTEUsing Power Cool increases power consumption. Make sure you turn it off and have the Fridge return to its previous temperature if you no longer need Power Cool on. |
English32-
| Cooling Off mode | North American (US, Canada) Models OnlyCooling Off mode (also called Shop mode), is designed for use by retailers when they are displaying refrigerators on the shop floor. In Cooling Off mode, the refrigerator's fan motor and lights work normally, but the compressors do not run, and the refrigerator and freezer do not get cold.To start Cooling Off mode, press and holdPower Freeze, Freezer andFridgesimultaneously for 5 seconds during normal operation. The refrigerator chime sounds and the temperature LEDs will light up sequentially from left LED to right LED.To cancel Cooling Off mode, press and holdPower Freeze, Freezer andFridgesimultaneously again for 5 seconds. |
05 Sabbath mode
The Sabbath mode stays active for 85 hours once it is activated. After that, it will be deactivated automatically.
- To activate, press and hold Power Freeze and Power Cool simultaneously for 5 seconds to enter Sabbath mode. The refrigerator will operate in Sabbath mode where the buttons, display, and the room lamps are controlled by Sabbath mode.
- To deactivate, press and hold the buttons again for 5 seconds to exit Sabbath mode.
NOTE
Even after the refrigerator powers off and restarts, the Sabbath mode remains active. To exit Sabbath mode, you must deactivate it.
Operations
Special features
Your refrigerator and its special functions may differ from the images and functions presented in this section depending on your model and country.
Ice making (applicable models only)
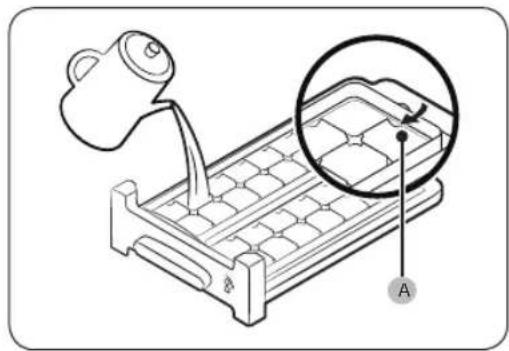
Twist ice maker
natural_image
Line drawing of a mechanical component with a cup pouring liquid into a grid-patterned plate, and an inset showing a magnified view of the component (no text or symbols)- Open the freezer door, and slide open the ice tray.
- Fill the tray with water up to the maximum level (A) marked on the inner rear of the tray.
- Slide the tray back into position.
NOTE
The ice making time depends on your temperature settings.
natural_image
Line drawing of a microwave oven with a handle and internal compartments (no text or symbols)NOTE
• Make sure the ice bucket is in place under the ice tray.
- To dispense the ice cubes, turn the handle of the bin to the right to empty half of the ice cubes into the bin. Then, turn it to the left to empty the other half.
• Take out the bin by slightly twisting and pulling to the front.
English34
Auto ice maker (applicable models only)
For first-time use
- Let the ice maker make ice for 1-2 days.
- Discard the first 1-2 buckets of ice to remove impurities in the water supply system.
- When the upper ice tray is full, use the lower ice tray.
text_image
Auto Ice Maker ↓ Text Switch AIf the auto ice maker does not make ice, remove the ice bucket and press Test Switch (A) to check if the auto ice maker operates properly.
Maintenance
Door reversal (applicable models only)
WARNING
- Tilting/laying the refrigerator requires minimum of 2 people.
- Disconnect power source and water line before reversing the doors.
- If the unit is allowed to lay on its back or side for more than an hour, let it stand for 15 minutes after it is returned to the upright position before plugging it in.
Tools required (not provided)
natural_image
Simple line drawing of a screwdriver inside a rounded rectangle (no text or symbols)Phillips screwdriver Flat-head screwdriver

natural_image
Line drawing of a screwdriver with a cylindrical head and threaded shaft (no text or symbols)
natural_image
Simple line drawing of a mechanical tool handle (no text or symbols)
natural_image
Line drawing of a mechanical tool with a handle and lever (no text or symbols)^5/16 " (8 mm) socket wrench (for bolts)
^3/8 " (10 mm) socket wrench (for bolts)
natural_image
Simple line drawing of a wrench (no text or symbols)^7/_16 " (11 mm) spanner (for hinge shaft)
natural_image
Simple L-shaped metal bracket diagram without any text or symbols^3/_16 " (5 mm) Allen wrench (for middle hinge)
Accessories (provided)
natural_image
Technical line drawing of a mechanical component (no text or symbols)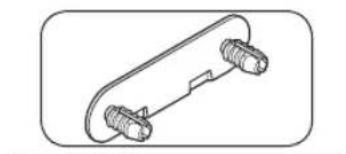
natural_image
Technical line drawing of a mechanical component with two threaded fasteners (no text or symbols)
text_image
LOWHinge Cover (L) Middle-Hinge Screw cap Bottom-Hinge Screw cap
CAUTION
Throughout the entire reversing procedure, keep all the small parts (screws, caps, etc.) of the refrigerator away from children or infants for safety reasons.
English36-
Step-by-step instructions
STEP 1 Remove the doors
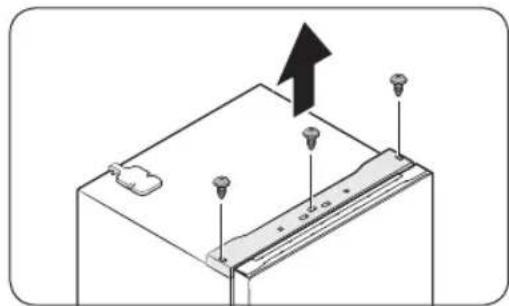
natural_image
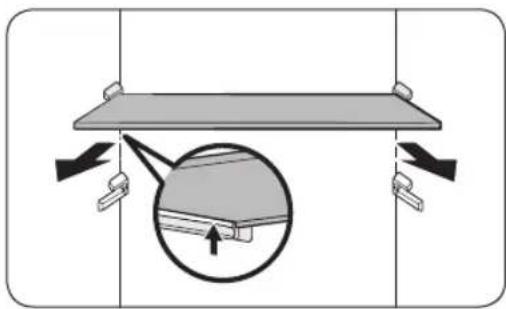
Diagram of a battery pack with three screw holes and an upward arrow indicating direction (no text or symbols)- Use a Phillips screwdriver to loosen the screws (x3) in three holes on the top table. Then, gently pull out the top table.
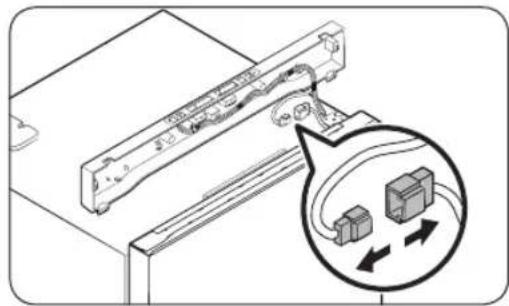
natural_image
Diagram of a device with cable routing and a magnified inset showing internal components (no text or symbols)- Decouple the wire connectors.
natural_image
Diagram of cable connections and connectors in a mechanical assembly (no text or symbols)- Loosen the bolts on the top hinge.
natural_image
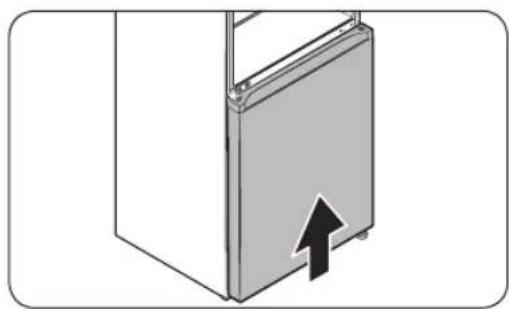
Diagram of a refrigerator with a door handle and a black arrow pointing to the lid (no text or symbols present)- Gently lift up the freezer door to remove it.
Maintenance
natural_image
Diagram showing a door panel with an arrow pointing to a mechanical component, and a magnified inset highlighting the component (no text or symbols present)- Use the screwdriver and the wrench to loosen the bolts and remove the middle hinge.

natural_image
Diagram of a door with an arrow pointing to the front panel (no text or symbols)- Gently slide the fridge door out of the hinge shaft, and then pull up to remove.
English38-
STEP 2 Remove the hinge and the door shaft
natural_image
Diagram showing a mechanical assembly with a magnified inset highlighting a component detail (no text or symbols present)- Use the screwdriver to remove the screw on the bottom hinge.
natural_image
Mechanical assembly diagram showing two views of a mechanical component with arrows indicating motion direction (no text or symbols)- Use the screwdriver to remove the hinge bolt. Then, use the wrench to remove the door shaft.
Maintenance
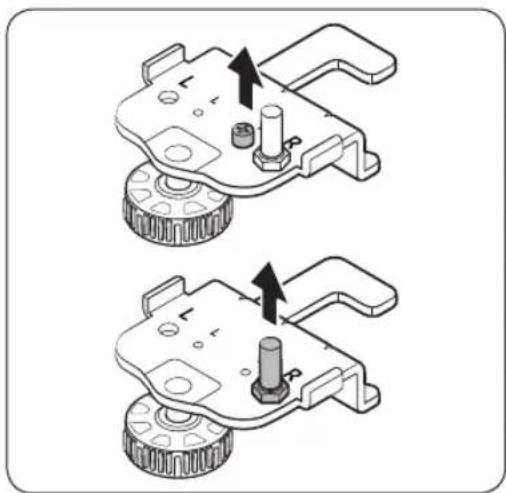
STEP 3 Reverse the auto closer (freezer door only)
Now stand the refrigerator back upright with care, and then do the following.
natural_image
Technical diagram showing mechanical assembly with two vertical supports and a downward arrow indicating motion (no text or symbols)- Remove the auto closer and the stopper from the bottom of the fridge door. Then, reinsert them on the opposite side of the fridge door as shown.
natural_image
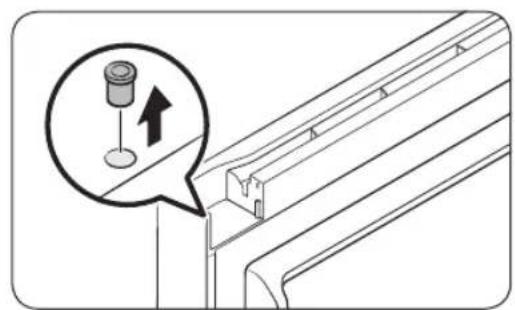
Technical diagram showing a mechanical component with an arrow pointing to a cylindrical component (no text or symbols present)- Use a flat-head screwdriver to remove the hinge grommet.
natural_image
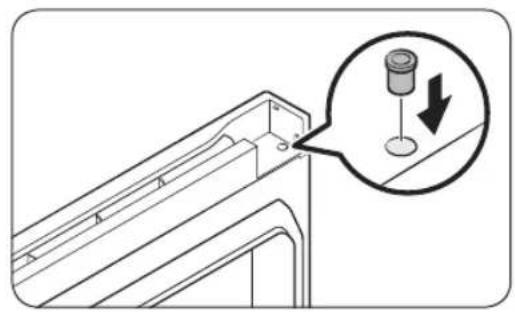
Technical diagram of a structural bracket with an inset showing a cylindrical component and a downward arrow (no text or symbols)- Reinsert the hinge grommet on the opposite side.
English40
STEP 4 Reverse the bar cover and the top hinge
natural_image
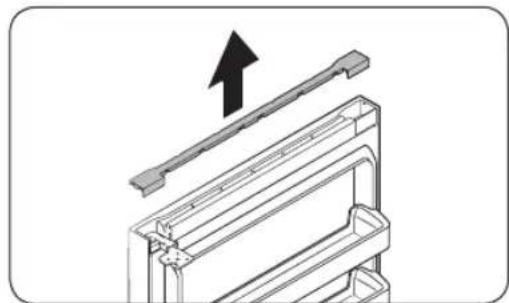
Technical diagram of a mechanical assembly with an upward arrow indicating motion (no text or symbols present)- Pull up to remove the bar cover on the top of the freezer door.
natural_image
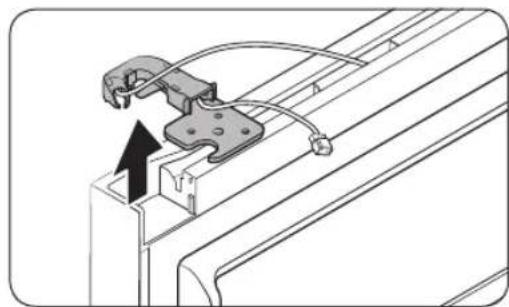
Technical line drawing of a mechanical bracket assembly with a clamping tool (no text or symbols)- Remove the top hinge with its cover.
natural_image
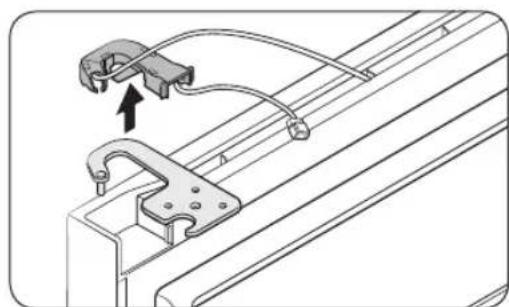
Technical line drawing of a mechanical clamp or bracket assembly with a hook and cable (no text or symbols)- Separate the top hinge from the hinge cover.
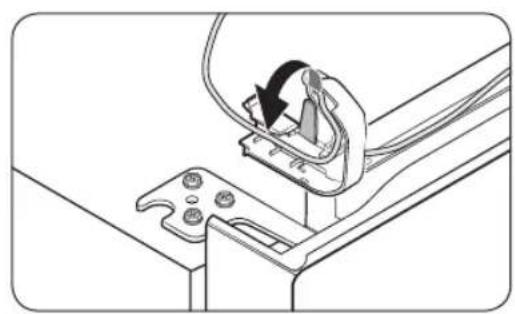
natural_image
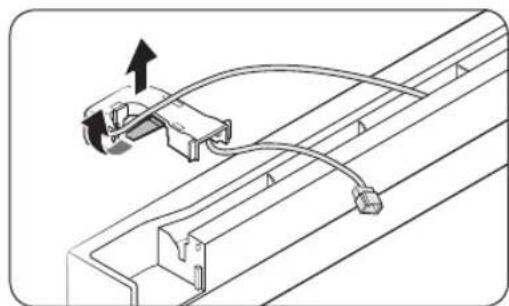
Technical line drawing of a mechanical assembly with a curved pipe and bracket (no text or symbols)- Arrange the door wire in the hinge cover.
Maintenance

natural_image
Technical line drawing of a mechanical component with directional arrows indicating movement or force (no text or symbols)- Remove the cap spacer, and then reinsert it on the opposite side.
natural_image
Three-step diagram showing a mechanical clamp mechanism with arrows indicating rotation and assembly (no text or symbols)- Remove the door shaft from the top hinge, flip it 180 degrees as shown, and then reinsert it.
English42-
STEP 5 Reattach the doors on the opposite side
natural_image
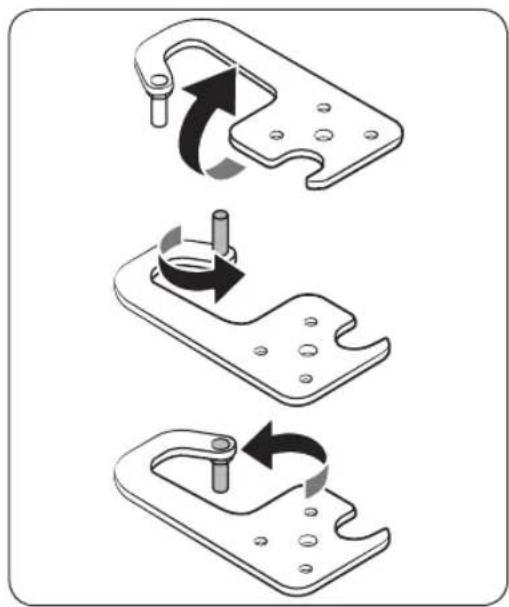
Diagram showing mechanical linkage with arrows indicating motion direction (no text or symbols)- Use a flat-heat screwdriver to remove the middle-hinge screw cap, and then reinsert it on the opposite side.
text_image
Diagram showing directional arrows and labeled points on a vertical structure, possibly illustrating a physics or engineering concept.- Use the flat-heat screwdriver to remove the flange-screw cap to reveal the flange screw. Use a Phillips screwdriver to remove the flange screw, and then tighten it on the opposite side. Finally, close the flange-screw cap on the opposite side.
natural_image
Three-step mechanical assembly diagram showing progressive assembly of a bracket with mounting holes (no text or symbols)- Remove the grommet ring from the middle-hinge shaft, and then reinsert the ring on the other side of the shaft. See the figure for visual reference.
Maintenance
natural_image
Diagram of a kitchen appliance with a magnified inset showing internal components (no text or symbols)- Reverse the middle hinge and insert it on the opposite side. Then, tighten the hinge with the screws.
natural_image
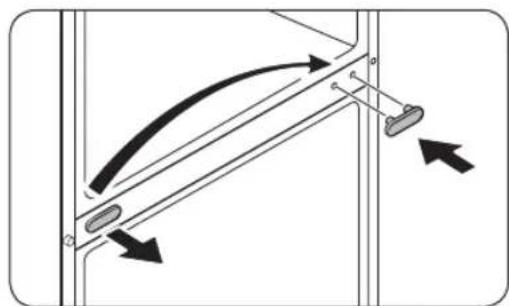
Two identical diagrams showing a mechanical or structural setup with arrows indicating direction of motion (no text or symbols present)- Use the flat-head screwdriver to remove both the hinge grommet on one side and the hinge-hole cap on the other side. Reinsert them on their respective opposite side.
natural_image
Diagram of a door panel with an arrow pointing to the front panel (no text or symbols present)- Gently slide the fridge door into the correction position so that it fits.
natural_image
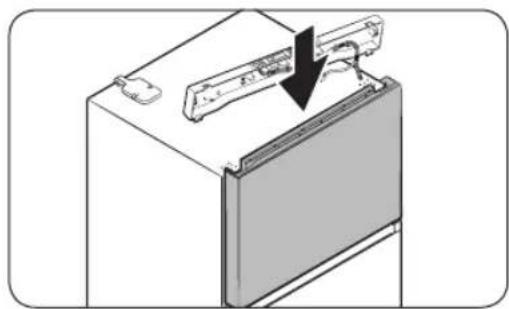
Diagram of a refrigerator with a door handle and a black arrow indicating a drop or change (no text or symbols present)- Gently slide the freezer door into the correction position so that it fits.
English44
Maintenance
STEP 6 Reverse the bottom hinge

natural_image
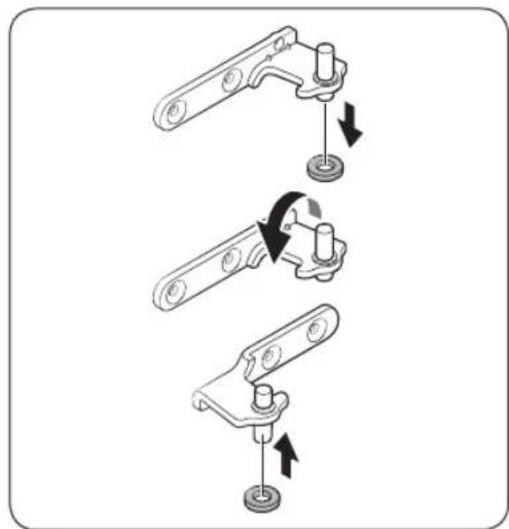
Mechanical assembly diagram showing a pin inserted into a gear with a screw, no text or symbols present- Insert the door shaft into the bottom hinge plate from the top as shown, and then tighten it until it is securely in place.
natural_image
Mechanical assembly diagram showing a gear and adjustment knob with no visible text or symbols- Insert the hinge bolt into the bottom hinge plate from the top as shown, and then tighten it until it is securely in place.

text_image
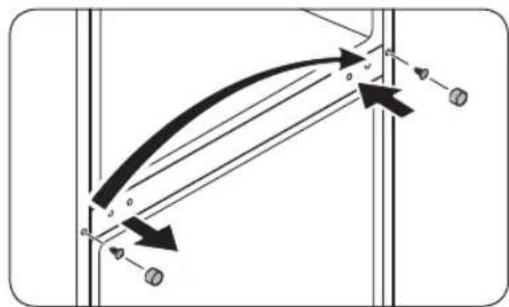
Diagram showing a device interacting with a wall-mounted device, with an inset magnified view highlighting the device's internal structure.- Position the bottom hinge plate on the opposite side, and then use two screws to secure and attach the hinge plate as shown.
Maintenance
STEP 7 Reattach the remaining parts
natural_image
Diagram showing a mechanical clamp or bracket with a downward arrow indicating force or direction (no text or symbols present)- Insert and tighten the top hinge on the opposite side.
natural_image
Technical line drawing of a mechanical component with no visible text or symbols- Detach the hinge cover manually from the top table.
natural_image
Technical line drawing of a mechanical assembly with a clamping tool inserted (no text or symbols)- Arrange the door wire in the hinge cover before placing the hinge cover onto the top hinge.
natural_image
Mechanical component diagram showing a clamping tool interacting with a bracket (no text or symbols visible)English46-
natural_image
Diagram of a mechanical device with a magnified inset showing internal components (no text or symbols)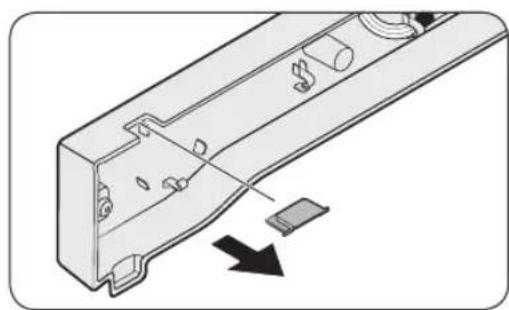
natural_image
Technical illustration of a mechanical component with an arrow indicating a disassembly or assembly (no text or symbols present)
natural_image
Diagram of a device rear panel with cable and connector, showing no text or symbols
natural_image
Diagram of a battery mounting structure with screw holes and a downward arrow indicating compression (no text or symbols)-
Connect the wire connectors.
-
Remove the hinge hole cap from the top table, and then reinsert it on the opposite side.
-
Insert the top table, and then fix it firmly to the refrigerator using the screws (x3).
Maintenance
natural_image
Technical diagram of a mechanical assembly with arrows indicating assembly steps (no text or symbols present)- Insert the bar cover.
natural_image
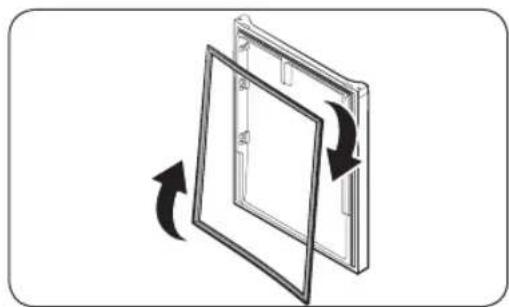
Diagram showing a door frame with arrows indicating rotation or movement (no text or symbols)- Remove the fridge door and freezer door gaskets. Turn them clockwise by 180 degrees, and then reattach them.
NOTE
In the future, you might want to return the doors to their initial position (before the doors were reversed). In that case, refer to the instructions on the previous pages, but switch the doors, hinges, and covers back to their initial positions.
English48-
Handle and care
Shelves (fridge/freezer)
text_image
Diagram illustrating a mechanical or electrical setup with labeled components and directional arrows, including a magnified inset showing a component being inserted.To remove the shelf, hold it with both hands and lift to release from the rear hooks. Then, pull it halfway to the front.
Fresh room
natural_image
Diagram of a mechanical component with directional arrows indicating motion or movement (no text or symbols)Slide out the sliding shelf of the Fresh room.
Vegetable drawers
natural_image
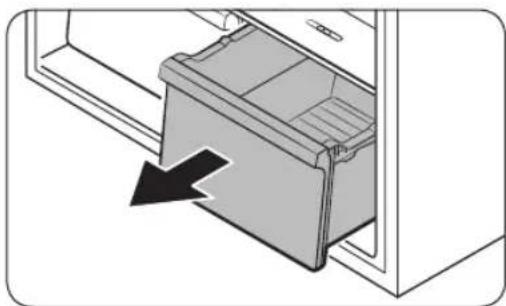
Diagram of a door opening with a black arrow indicating direction (no text or symbols present)Gently lift up the front of the drawer, and then slide it out.
Maintenance
Vegetable shelf

natural_image
Diagram of a refrigerator interior showing a door and drawer with an arrow indicating left-side motion (no text or symbols)- Gently lift up the front of the drawer, and then slide it out.

natural_image
Diagram showing a laptop with an open lid and a magnified inset highlighting the interior space (no text or symbols)- Hold the vegetable shelf with both hands, and then slide it out.
Door shelves
natural_image
3D diagram of a rectangular mechanical part with an upward arrow indicating direction (no text or symbols)Lift up the door shelf slightly, and then pull it out.
CAUTION
To prevent accidents, empty the door guards before removing.
English50-
Cleaning
Regularly use a dry cloth to remove all foreign substances such as dust or water from the power plug terminals and contact points.
- Unplug the power cord of the refrigerator.
- Use a moistened, soft, lint-free cloth or paper towel to clean the refrigerator's interior and exterior.
- When done, use a dry cloth or paper towel to dry the refrigerator well.
- Plug in the power cord of the refrigerator to turn the refrigerator on.
NOTE
If you have removed any removable parts such as shelves for cleaning, refer to the overall layout in the Refrigerator at a glance section to make sure you have re-inserted them correctly.
WARNING
- Do not use benzene, thinner, home/car detergent, or Clorox™ to clean your refrigerator. They may damage the surface of the refrigerator and cause a fire.
- Do not spray water onto the refrigerator. This may cause electric shock.
Replacement
Lamps
The lamps are not user-serviceable. To replace the lamps of the refrigerator, contact a local Samsung service center.
Troubleshooting
If you encounter a problem with the refrigerator, first check the tables starting below, and then try the suggested solutions. If none of the suggested solutions resolve your problem, please visit our website at www.samsung.com or call Samsung Customer Care at 1-800-SAMSUNG (726-7864).
General
Temperature
| Symptom Possible causes Solution | ||
| Fridge/freezer does not operate.Fridge/freezer temperature is warm. | Power cord is not plugged in properly. | Properly plug in the power cord. |
| Temperature control is not set correctly. | Set the temperature lower. | |
| Refrigerator is located near a heat source or in direct sunlight. | Keep the refrigerator away from direct sunlight or a heat source. | |
| Not enough clearance between refrigerator and sides/rear. | We recommend that the gap between the refrigerator and nearby walls (or cabinets) is more than 50 mm. | |
| The refrigerator is overloaded. Food is blocking the refrigerator vents. | Do not overload the refrigerator. Do not allow food to block ventilation. | |
| Fridge/freezer is over-cooling. | Temperature control is not set correctly. | Set the temperature higher. |
| Interior wall is hot. | Refrigerator has heat-proof piping in the interior wall. | To prevent condensation from forming, the refrigerator has heat-proof piping in the front corners. If the ambient temperature rises, this equipment may not work effectively. This is not a system failure.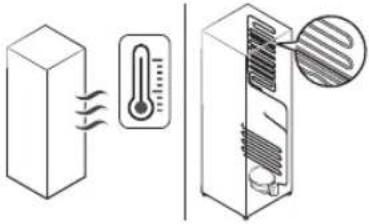 |
English52-
Odors
| Symptom Possible causes Solution | ||
| Refrigerator has odors. | • Spoiled food. | • Clean the refrigerator and remove any spoiled food. |
| • Food with strong odors. | • Make sure strong smelling food is wrapped airtight. | |
Frost
| Symptom Possible causes Solution | ||
| Frost around the vents. | Food is blocking the vents. | Make sure no food blocks the refrigerator vents. |
| Frost on interior walls. | Door is not closed properly. | Make sure food does not block the door. Clean the door gasket. |
| Fruits or vegetables are frozen. | Fruits or vegetables are stored in the Fresh/Chef Zone. | The Fresh/Chef Zone is only for meat/fish. |
Condensation
| Symptom Possible causes Solution | ||
| Condensation forms on the interior walls. | If door is left open, moisture enters the refrigerator. | Remove the moisture and do not leave the door open for extended periods of time or open the door frequently. |
| Food with high moisture content. | Make sure food is wrapped airtight. | |
Troubleshooting
Auto Ice Maker
| Symptom Possible causes Solution | ||
| The ice maker does not produce ice. | · The freezer room is not cold enough. | · Make sure the cold air outlet is not clogged. |
| · The ice maker is turned off. | · Make sure the ice maker is turned on. Press and hold Power Freeze for 3 seconds, and check if the corresponding indicator turns on. | |
| · The wire connector of the ice maker is not connected properly. | · Make sure the wire connector from the wire housing is connected properly. | |
| · The water line flowing to the ice maker is bent or kinked. | · Make sure the water line in the rear of the refrigerator is not bent or kinked. | |
English54
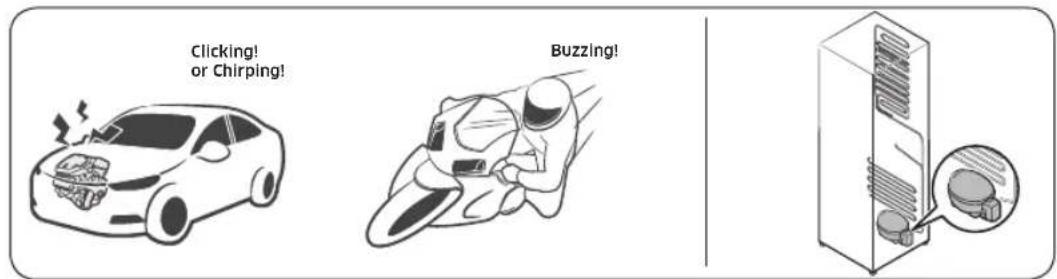
Do you hear abnormal sounds from the refrigerator?
Before calling for service, review the information below. Note that you will be charged for any service calls related to normal operating sounds in which no defects were found. If you have any questions about sounds your refrigerator is making, please call Samsung Customer Care at 1-800-SAMSUNG (726-7864).
These sounds are normal.
- When starting or ending an operation, the refrigerator may make sounds similar to a car engine ignition. As the operation stabilizes, the sounds will decrease.
text_image
Clicking! or Chirping! Buzzing!- While the fan is operating, these sounds may occur. When the refrigerator reaches the set temperature, no fan sound will occur.
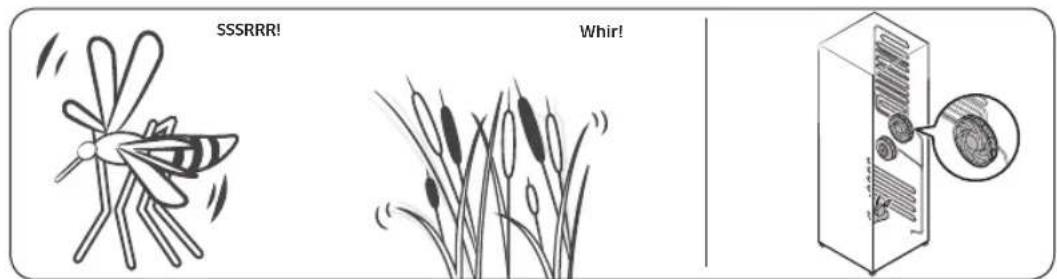
text_image
SSSRRR! Whir!Troubleshooting
- During a defrost cycle, water may drip on the defrost heater, causing sizzling sounds.
text_image
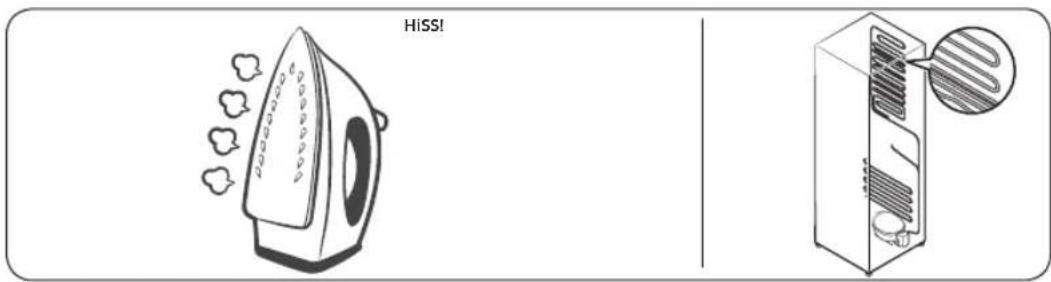
HiSS!- As the refrigerator cools or freezes, refrigerant gas moves through sealed pipes, causing bubbling sounds.
text_image
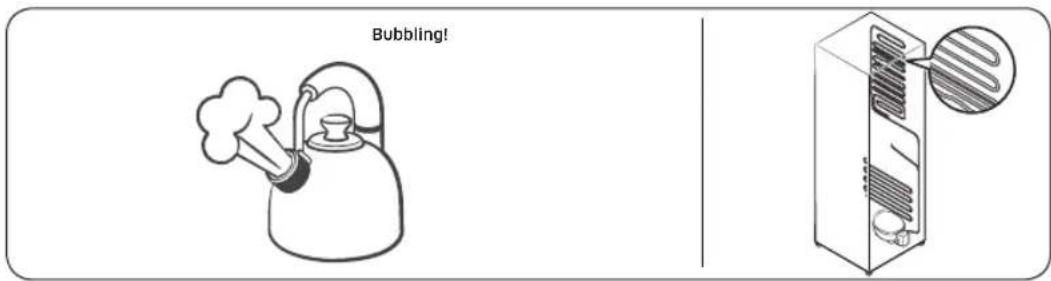
Bubbling!- As the refrigerator temperature increases or decreases, plastic parts contract and expand, creating knocking noises. These noises occur during the defrosting cycle or when electronic parts are working.
text_image
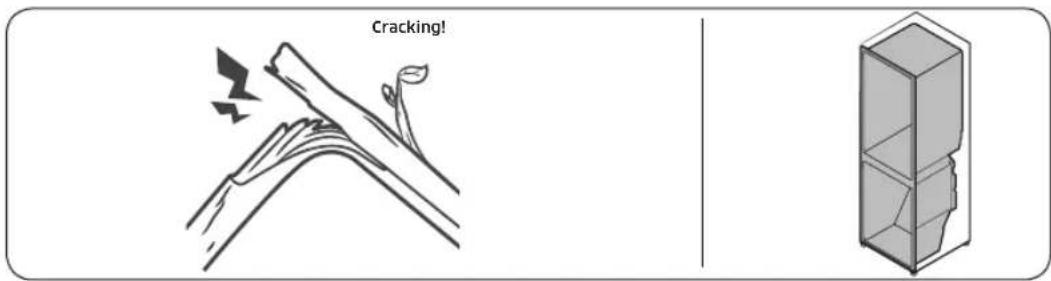
Cracking!- For ice maker models: When the water valve opens to fill the ice maker, buzzing sounds may occur.
- Due to pressure equalizing when you open and close the refrigerator door, whooshing sounds may occur.
English56-
LIMITED WARRANTY (U.S.A.)
SAMSUNG REFRIGERATOR
LIMITED WARRANTY TO ORIGINAL CONSUMER PURCHASER WITH PROOF OF PURCHASE
This SAMSUNG brand product, as supplied and distributed by Samsung Electronics America, Inc. (SAMSUNG) and delivered new, in the original carton to the original consumer purchaser, is warranted by SAMSUNG against manufacturing defects in materials or workmanship for the limited warranty period of:
One (1) year parts and labor
Five (5) years parts and labor on Sealed Refrigeration System Only (Compressor, Evaporator, Condenser, Drier, and Connecting Tubing)
Ten (10) years part and Five (5) years labor on Digital Inverter Compressor Only
This limited warranty is valid only on products purchased and used in the United States that have been installed, operated, and maintained according to the instructions attached to or furnished with the product. To receive warranty service, the purchaser must contact SAMSUNG at the address or phone number provided below for problem determination and service procedures. Warranty service can only be performed by a SAMSUNG authorized service center. The original dated bill of sale must be presented upon request as proof of purchase to SAMSUNG or SAMSUNG's authorized service center to receive warranty service.
SAMSUNG will provide in-home service within the contiguous United States during the warranty period at no charge, subject to availability of SAMSUNG authorized servicers within the customer's geographic area. If in-home service is not available, SAMSUNG may elect, at its option, to provide transportation of the product to and from an authorized service center. If the product is located in an area where service by a SAMSUNG authorized servicer is not available, you may be responsible for a trip charge or required to bring the product to a SAMSUNG authorized service center for service.
To receive in-home service, product must be unobstructed and accessible to the service agent.
During the applicable warranty period, a product will be repaired, replaced, or the purchase price refunded, at the sole option of SAMSUNG. SAMSUNG may use new or reconditioned parts in repairing a product, or replace the product with a new or reconditioned product. Replacement parts and products are warranted for the remaining portion of the original product's warranty or ninety (90) days, whichever is longer. All replaced parts and products are the property of SAMSUNG and you must return them to SAMSUNG.
LIMITED WARRANTY (U.S.A.)
This limited warranty covers manufacturing defects in materials or workmanship encountered in normal household, noncommercial use of this product and shall not cover the following: damage that occurs in shipment, delivery, installation, and uses for which this product was not intended; damage caused by unauthorized modification or alteration of the product; product where the original factory serial numbers have been removed, defaced, changed in any way, or cannot be readily determined; cosmetic damage including scratches, dents, chips, and other damage to the product's finishes; damage caused by abuse, misuse, pest infestations, accident, fire, floods, or other acts of nature or God; damage caused by use of equipment, utilities, services, parts, supplies, accessories, applications, installations, repairs, external wiring or connectors not supplied or authorized by SAMSUNG; damage caused by incorrect electrical line current, voltage, fluctuations and surges; damage caused by failure to operate and maintain the product according to instructions; in-home instruction on how to use your product; and service to correct installation not in accordance with electrical or plumbing codes or correction of household electrical or plumbing (i.e., house wiring, fuses, or water inlet hoses). The cost of repair or replacement under these excluded circumstances shall be the customer's responsibility.
Visits by an authorized servicer to explain product functions, maintenance or installation are not covered by this limited warranty. Please contact SAMSUNG at the number below for assistance with any of these issues.
EXCLUSION OF IMPLIED WARRANTIES
IMPLIED WARRANTIES, INCLUDING THE IMPLIED WARRANTIES OF MERCHANTABILITY OR FITNESS FOR A PARTICULAR PURPOSE, ARE LIMITED TO ONE YEAR OR THE SHORTEST PERIOD ALLOWED BY LAW. Some states do not allow limitations on how long an implied warranty lasts, so the above limitations or exclusions may not apply to you. This warranty gives you specific rights, and you may also have other rights, which vary from state to state.
English58-
LIMITATION OF REMEDIES
YOUR SOLE AND EXCLUSIVE REMEDY IS PRODUCT REPAIR, PRODUCT REPLACEMENT, OR REFUND OF THE PURCHASE PRICE AT SAMSUNG'S OPTION, AS PROVIDED IN THIS LIMITED WARRANTY. SAMSUNG SHALL NOT BE LIABLE FOR SPECIAL, INCIDENTAL OR CONSEQUENTIAL DAMAGES, INCLUDING BUT NOT LIMITED TO TIME AWAY FROM WORK, HOTELS AND/OR RESTAURANT MEALS, REMODELING EXPENSES, LOSS OF REVENUE OR PROFITS, FAILURE TO REALIZE SAVINGS OR OTHER BENEFITS REGARDLESS OF THE LEGAL THEORY ON WHICH THE CLAIM IS BASED, AND EVEN IF SAMSUNG HAS BEEN ADVISED OF THE POSSIBILITY OF SUCH DAMAGES. Some states do not allow exclusion or limitation of incidental or consequential damages, so the above limitations or exclusions may not apply to you. This warranty gives you specific rights, and you may also have other rights, which vary from state to state.
SAMSUNG does not warrant uninterrupted or error-free operation of the product. No warranty or guarantee given by any other person, firm, or corporation with respect to this product shall be binding on SAMSUNG.
To obtain warranty service, please contact SAMSUNG at:
Samsung Electronics America, Inc.
85 Challenger Road
Ridgefield Park, NJ 07660
If your refrigerator needs service
Do not hesitate to call any Samsung Authorized Service Center nearby giving them your name, address and telephone number if your product is not functioning properly.
Limited Warranty for Original Purchaser
This Samsung product is warranted by Samsung Electronics Canada Inc. (hereafter referred to as SECA) against manufacturing defects in material or workmanship for the following periods:
Labor : 1 year (in-home)
Parts : 1 year
Inverter Compressor : 10 years (Part only)
SECA further warrants that if this product fails to operate properly within the specified warranty period and the failure is due to improper workmanship or defective material, SECA will repair or replace the product at its option. In-home service is not available in all areas. Contact us to find out if in-home service is currently available in your area by using the contact information at the back of this warranty.
All warranty repairs or part replacements must be performed by a SECA Authorized Service Center. (To find the nearest SECA Service Center, call 1-800-SAMSUNG (7267864) or visit our web site at www.samsung.com/ca)
English60-
Obligation to the Original Owner
The original dated sales receipt must be retained by the customer and is the only acceptable proof of purchase. It must be presented to a SECA Authorized Service Center at the time service is requested before warranty services are rendered. On all carry-in models, transportation to and from the Authorized Service Center is the responsibility of the customer.
Exclusions of the Warranty
This warranty does not cover damage due to accident, fire, flood, and/or other Acts of God, misuse, incorrect line voltage, improper installation, improper or unauthorized repairs, commercial use, or damage that occurs during shipping. Customer adjustments which are explained in this owners manual are not covered under the terms of this warranty. This warranty will automatically be voided for any unit found with a missing or altered serial number. This warranty is valid only on products purchased and used in Canada.
SAMSUNG CUSTOMER CARE CENTER
Samsung Electronics Canada Inc.
2050 Derry Road West
Mississauga, Ontario L5N 0B9
Canada
www.samsung.com/ca/support (English)
www.samsung.com/ca_fr/support (French)
Memo
Memo
SAMSUNG

Scan this with your smartphone
Scan the QR code* or visit www.samsung.com/spsn to view our helpful How-to Videos and Live Shows
* Requires reader to be installed on your smartphone
Contact SAMSUNG WORLD WIDE
If you have any questions or comments relating to Samsung products, please contact the SAMSUNG Customer Care Center.
| Country Contact Center Web Site | ||
| U.S.A | 1-800-SAMSUNG (726-7864)1-844-SAM-PAYS (726-7297) | www.samsung.com/us/support |
| CANADA | 1-800-SAMSUNG(726-7864)1-844-SAM-PAYS (726-7297) | www.samsung.com/ca/support (English)www.samsung.com/ca_fr/support (French) |


DA68-03570A-14
Refrigerador
Manual del usuario
RT18M*****/RT21M*****
natural_image
Line drawing of a hand holding a star-shaped object with a rectangular block, no text or symbols presentnatural_image
Diagram showing two refrigerators with directional arrows indicating movement, no text or symbols presenttext_image
Technical diagram showing mechanical assembly with labeled component A and detail viewEspañol 18-
text_image
Diagram showing a mechanical or electrical component with labeled parts A and B, including a directional arrow indicating movement.text_image
Technical diagram of a mechanical device with numbered components and labeled partsnatural_image
Two cylindrical objects with circular holes and a prohibition symbol, no text or labels presentPRECAUCIÓN
text_image
Technical diagram showing mechanical assembly with labeled components and dashed circular annotationsnatural_image
3D diagram of a rectangular mechanical part with an arrow indicating downward motion (no text or symbols)natural_image
Technical line drawing of a multi-layered mechanical component (no text or symbols)Instalación
Español24
natural_image
Isometric line drawing of a rectangular electronic component with internal compartments and ventilation slots (no text or symbols)natural_image
Line drawing of a rectangular plastic tray with internal compartments (no text or symbols)natural_image
Simple line drawing of a screwdriver (no text or symbols)Destornillador Phillips
Instalación
natural_image
Diagram of a ceiling structure with hanging lights and a downward arrow indicating a component (no text or symbols)natural_image
Diagram of a roof structure with an arrow indicating direction, no text or symbols presentnatural_image
Diagram of a kitchen appliance with a magnified inset showing a component (no text or symbols present)natural_image
Technical diagram of a ceiling-mounted HVAC unit with mounting brackets and ventilation grilles (no text or labels)natural_image
Diagram of a ceiling-mounted structure with an arrow pointing to a textured panel (no text or symbols)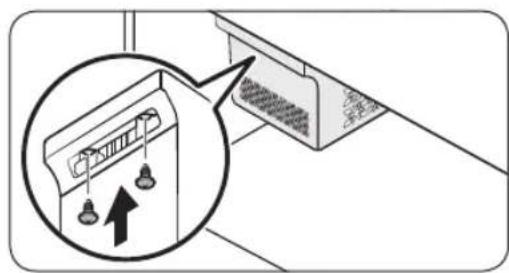
natural_image
Diagram showing a refrigerator with hanging lights and a close-up of the refrigerator's door (no text or symbols present)
natural_image
Diagram of a storage bin with an inset showing a magnified view of the tray (no text or symbols)natural_image
Line drawing of a mechanical component with a cup pouring liquid into a grid-patterned tray, and an inset showing a magnified view of the tray (no text or symbols)natural_image
Line drawing of a microwave oven with a handle and internal compartments (no text or symbols)NOTA
natural_image
Simple line drawing of a screwdriver (no text or symbols)natural_image
Line drawing of a screwdriver with a cylindrical head and shaft (no text or symbols)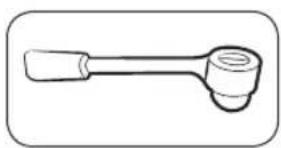
natural_image
Simple line drawing of a wrench tool (no text or symbols)natural_image
Line drawing of a wrench with a flared handle and pointed tip (no text or symbols)natural_image
Line drawing of a mechanical tool with a handle and central knob (no text or symbols)Llave de tubo de 516 " (8 mm) (para pernos)
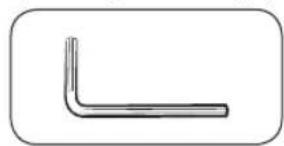
natural_image
Simple L-shaped metal bracket diagram without any text or symbolsLlave Allen de ^3/_16 " (5 mm) (para la bisagra del medio)
natural_image
Technical line drawing of a mechanical component (no text or symbols)natural_image
Technical line drawing of a mechanical component with two threaded fasteners (no text or symbols)del medio
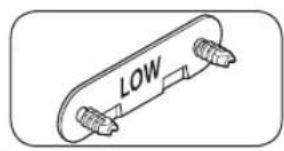
text_image
LOWTapa del tornillo de la bisagra inferior
PRECAUCIÓN
natural_image
Diagram of a battery pack with three screw holes and an upward arrow indicating direction (no text or symbols)natural_image
Diagram of a device with cable routing and a magnified inset showing internal components (no text or symbols)natural_image
Diagram of cable connections and connectors in a mechanical assembly (no text or symbols)natural_image
Diagram of a refrigerator with a door handle and a black arrow indicating a component (no text or symbols present)natural_image
Diagram showing a door with a close-up view of a mechanical component, no text or symbols presentnatural_image
Diagram of a door with an arrow indicating direction, no text or symbols presentnatural_image
Diagram showing a mechanical assembly with a magnified inset highlighting a component detail (no text or symbols present)natural_image
Mechanical assembly diagram showing two views of a mechanical component with arrows indicating motion direction (no text or symbols)natural_image
Technical diagram showing mechanical assembly with two vertical supports and a downward arrow indicating motion (no text or symbols)natural_image
Technical diagram showing a mechanical component with an arrow pointing to a cylindrical component (no text or symbols present)natural_image
Technical diagram of a structural bracket with an inset showing a cylindrical component and a downward arrow (no text or symbols)natural_image
Technical diagram of a mechanical assembly with an upward arrow indicating motion (no text or symbols present)natural_image
Technical line drawing of a mechanical bracket assembly with a clamp and mounting bracket (no text or symbols)natural_image
Technical line drawing of a mechanical clamp or bracket assembly (no text or symbols)natural_image
Technical line drawing of a mechanical assembly with a curved component and mounting bracket (no text or symbols)natural_image
Technical line drawing of a mechanical component with directional arrows indicating movement or force (no text or symbols)natural_image
Three-step diagram showing a mechanical assembly with arrows indicating rotation or movement (no text or symbols present)natural_image
Diagram of a mechanical linkage or lever system with directional arrows indicating motion (no text or symbols)text_image
Diagram showing directional arrows and labeled points on a vertical structure, possibly illustrating a physics or engineering concept.natural_image
Three-step mechanical assembly diagram showing a lever mechanism with arrows indicating motion (no text or symbols)natural_image
Diagram of a cabinet with hanging weights and an arrow pointing to a component (no text or symbols present)natural_image
Two identical diagrams showing a mechanical setup with arrows indicating direction of motion, no text or symbols present.natural_image
Diagram of a door frame with an arrow indicating upward motion (no text or symbols)natural_image
Diagram of a refrigerator with a door handle and a black arrow indicating the opening (no text or symbols present)natural_image
Mechanical assembly diagram showing a pin inserted into a gear with a screw, no text or symbols presentnatural_image
Mechanical assembly diagram showing a gear and adjustment knob with no visible text or symbolstext_image
Diagram illustrating a mechanical or electrical component with an inset magnified view showing internal components and directional arrows.natural_image
Technical diagram showing a mechanical clamp or bracket with a downward arrow indicating force or direction (no text or symbols present)natural_image
Technical line drawing of a mechanical component with no visible text or symbolsnatural_image
Technical line drawing of a mechanical assembly with a clamping tool inserted (no text or symbols)natural_image
Mechanical assembly diagram showing a clamping tool interacting with a bracket (no text or symbols visible)Español48-

natural_image
Diagram of a mechanical device with a magnified inset showing internal components (no text or symbols)
natural_image
Technical illustration of a mechanical component with an arrow indicating a disassembly or assembly (no text or symbols present)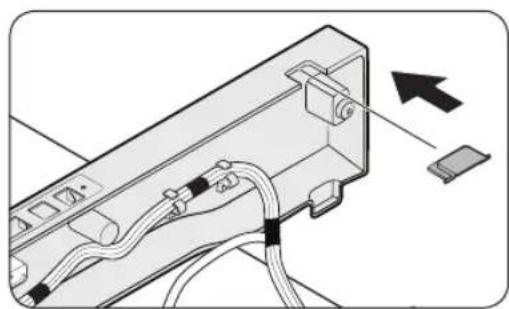
natural_image
Diagram of a device rear panel with cable and connector, showing no text or symbols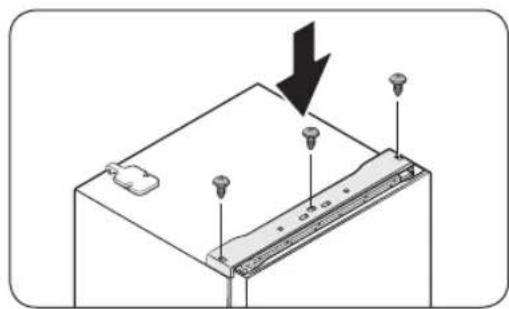
natural_image
Diagram of a battery pack with three screws and a downward arrow indicating compression (no text or symbols)natural_image
Diagram of a computer monitor with an attached cable and a separate panel, showing no text or symbols.natural_image
Diagram showing a door frame with arrows indicating rotation or movement (no text or symbols)text_image
Diagram illustrating a mechanical or electrical setup with labeled components and directional arrows, including a magnified inset showing a component being inserted.natural_image
Diagram of a mechanical component with directional arrows indicating motion or movement (no text or symbols)natural_image
Diagram of a door opening with a black arrow indicating direction (no text or symbols present)natural_image
Diagram of a refrigerator interior showing a door opening and a black arrow indicating the direction (no text or symbols present)natural_image
Diagram showing a laptop with an open lid and a magnified inset highlighting the interior space (no text or symbols)natural_image
3D diagram of a rectangular mechanical component with an upward arrow indicating direction (no text or symbols)text_image
Aleteo RunrúnRidgefield Park, NJ 07660
natural_image
Line drawing of a hand holding a star-shaped object with a rectangular block, no text or symbols presentnatural_image
Diagram showing two refrigerators with directional arrows indicating movement, no text or symbols presenttext_image
Technical diagram showing mechanical assembly with labeled component A and detail viewInstallation
text_image
Diagram showing a mechanical or electrical component with labeled parts A and B, including a directional arrow indicating movement.text_image
Technical diagram of a mechanical device with numbered components and labeled partsnatural_image
Two cylindrical objects with circular holes and a prohibition symbol, no text or labels presentATTENTION
text_image
Technical diagram showing a mechanical assembly with labeled components (01, 02, 03, 04) and a dashed circular annotation highlighting parts.text_image
InstallationInstallation
natural_image
Isometric line drawing of a rectangular electronic component with internal compartments and ventilation grilles (no text or symbols)natural_image
Isometric line drawing of a rectangular plastic container with internal fins (no text or symbols)Outils requis (non fournis)
natural_image
Simple line drawing of a screwdriver with no text or symbolsTournevis cruciforme
Français26
natural_image
Diagram of a ceiling structure with hanging lights and a downward arrow indicating a decrease (no text or symbols)natural_image
Diagram of a roof drainage system with a black arrow indicating direction (no text or symbols)natural_image
Diagram showing a device with an arrow pointing to a component, enclosed in a magnified inset (no text or symbols present)natural_image
Technical line drawing of a ceiling-mounted HVAC unit with ventilation grilles and piping (no text or symbols)natural_image
Diagram of a ceiling-mounted structure with an arrow pointing to a textured surface (no text or symbols)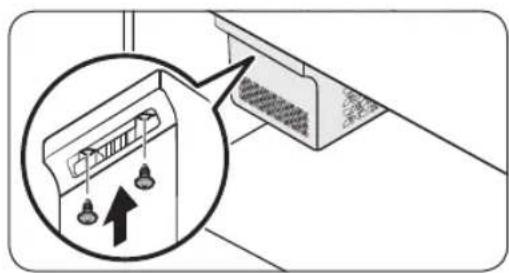
natural_image
Diagram showing a refrigerator with a close-up inset of its door and hanging lights (no text or symbols)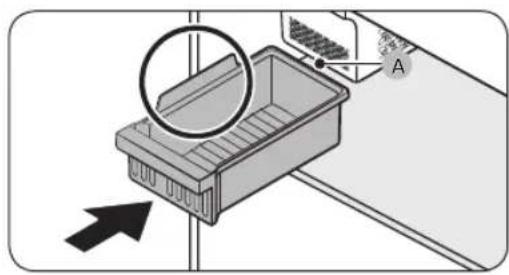
natural_image
Diagram of a storage tray with a magnified inset showing a lid and a labeled component (no text or symbols present)natural_image
Diagram of a container being poured into a rack with a magnified inset showing internal structure (no text or symbols)natural_image
Line drawing of a microwave oven with a scroll wheel and directional arrow indicating rotation (no text or symbols)REMARQUE
natural_image
Simple line drawing of a screwdriver (no text or symbols)natural_image
Line drawing of a screwdriver with a cylindrical head and shaft (no text or symbols)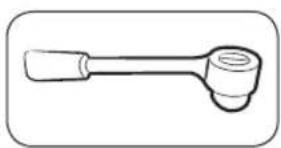
natural_image
Line drawing of a mechanical tool with a handle and lever (no text or symbols)natural_image
Simple line drawing of a mechanical tool or wrench (no text or symbols)natural_image
Line drawing of a mechanical wrench (no text or symbols)natural_image
Simple L-shaped metal bracket diagram without any text or symbolsAccessoires (fournis)
natural_image
Technical line drawing of a mechanical component (no text or symbols)natural_image
Pure technical line drawing of a mechanical component with two threaded fasteners and a central connector (no text or symbols)charnière centrale
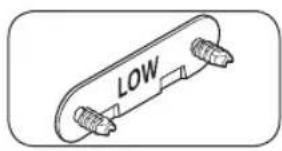
text_image
LOWnatural_image
Diagram of a battery mounting structure with three screws and an upward arrow indicating direction (no text or symbols)natural_image
Diagram of a computer monitor with cable routing and a magnified inset showing internal components (no text or symbols)natural_image
Diagram of cable connections and screw positioning on a device (no text or symbols)natural_image
Diagram of a refrigerator with an arrow indicating a component or operation, no text or symbols presentnatural_image
Diagram showing a door frame with an arrow pointing to a mechanical component, and a magnified inset highlighting the detail (no text or symbols present)natural_image
Diagram of a door with an arrow pointing to the side panel (no text or symbols present)natural_image
Diagram showing a mechanical assembly with a magnified inset highlighting a component detail (no text or symbols present)natural_image
Mechanical assembly diagram showing two steps of a mechanical component with arrows indicating motion direction (no text or symbols)natural_image
Technical diagram showing mechanical assembly with two vertical supports and a downward arrow indicating motion (no text or symbols)natural_image
Technical diagram showing a mechanical component with an inset magnified view of a cylindrical component (no text or symbols)natural_image
Technical diagram of a structural bracket with an inset showing a cylindrical component and a downward arrow (no text or symbols)natural_image
Technical diagram of a mechanical assembly with an upward arrow indicating motion (no text or symbols present)natural_image
Technical line drawing of a mechanical clamp or bracket assembly with an arrow indicating motion (no text or symbols present)natural_image
Technical line drawing of a mechanical clamp or bracket assembly (no text or symbols)natural_image
Technical line drawing of a mechanical assembly with wires and components (no text or symbols)text_image
MaintenanceFrançais44

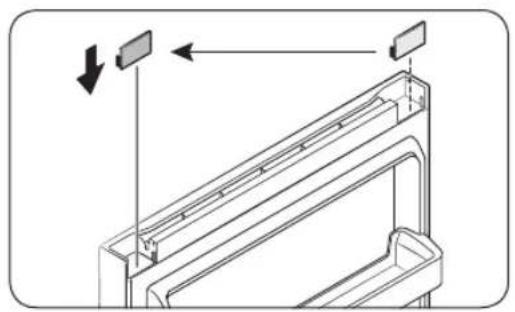
natural_image
Technical line drawing of a door frame with directional arrows indicating movement or assembly (no text or symbols)natural_image
Three-step diagram showing a mechanical clamp mechanism with rotation arrows (no text or symbols)natural_image
Diagram of a mechanical assembly with an arrow pointing to a component, no text or symbols presentnatural_image
Two identical diagrams showing a mechanical component with arrows indicating direction, no text or symbols present.natural_image
Diagram of a cabinet or storage unit with an arrow pointing to the front panel (no text or symbols present)natural_image
Diagram of a refrigerator with a door handle and a black arrow indicating a drop or change (no text or symbols present)natural_image
Mechanical assembly diagram showing a gear and shaft with a screwdriver inserted (no text or symbols)natural_image
Mechanical assembly diagram showing a gear and lever mechanism with no visible text or symbolstext_image
Diagram illustrating a mechanical or electrical setup with labeled components and an inset magnified view showing internal components.natural_image
Diagram showing a mechanical bracket with a downward arrow indicating force or direction (no text or symbols present)natural_image
Technical line drawing of a mechanical component with no visible text or symbolsnatural_image
Technical line drawing of a mechanical assembly with a clamping tool inserted (no text or symbols)natural_image
Diagram of a mechanical device with a black arrow pointing to a component, no text or symbols presentMaintenance
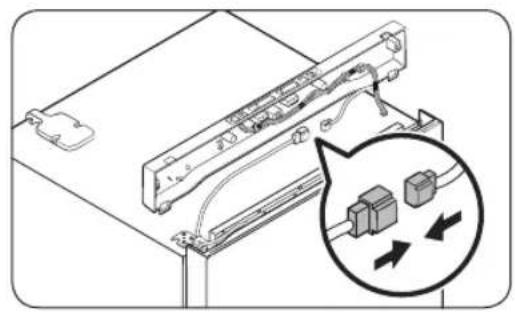
natural_image
Technical diagram of a mechanical assembly with a magnified inset showing internal components (no text or symbols)natural_image
Technical illustration of a mechanical component with an arrow indicating a disassembly or assembly (no text or symbols present)natural_image
Diagram of a device rear panel with cables and connectors, showing an arrow pointing to a component (no text or symbols present)natural_image
Diagram of a battery pack with three screws and a downward arrow indicating compression (no text or symbols)Maintenance
Français50-

natural_image
Diagram of a computer monitor with an attached cable and a scroll, showing no text or symbols.natural_image
Diagram showing a door frame with arrows indicating rotation or movement (no text or symbols)natural_image
Diagram showing a device with a screen and directional arrows, including a magnified inset of the screen area (no text or symbols)natural_image
Diagram of a mechanical component with directional arrows indicating motion or movement (no text or symbols)natural_image
Diagram of a refrigerator interior showing a door and drawer with an arrow indicating left-side motion (no text or symbols)natural_image
Diagram of a refrigerator interior showing a door opening and a black arrow indicating the direction (no text or symbols present)natural_image
Diagram showing a laptop with an open lid and a magnified inset highlighting the interior space (no text or symbols)natural_image
3D diagram of a rectangular plastic container with an arrow indicating upward motion (no text or symbols)natural_image
Illustration of a steam iron with steam bubbles (no text or symbols)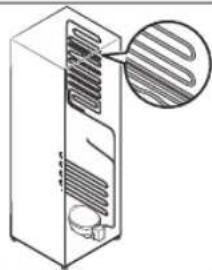
natural_image
Diagram of a refrigerator internal structure with ventilation slots and a magnified inset showing internal airflow (no text or symbols)natural_image
Simple line drawing of a kettle with steam rising (no text or symbols)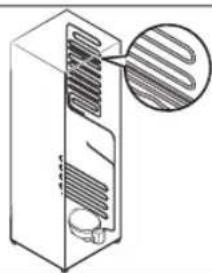
natural_image
Diagram of a refrigerant unit with internal cooling pipes and a magnified inset showing heat distribution (no text or labels)Samsung Electronics Canada Inc.
2050 Derry Road West,
Mississauga, Ontario L5N 0B9
Canada
www.samsung.com/ca/support (English)
www.samsung.com/ca_fr/support (French)
Mémo
Mémo