
MSACUSM1 - USB memory card reader SONY - Free user manual and instructions
Find the device manual for free MSACUSM1 SONY in PDF.

| Product Type | Multi-slot USB memory card reader |
| Brand | Sony |
| Model | MSACUSM1 |
| Dimensions (L x H x D) | 85 x 16 x 65 mm |
| Weight | Approx. 39 g (without stand) |
| Power Supply | 5 V DC via USB cable |
| Interface | USB 2.0 Hi-Speed (backward compatible with USB 1.1) |
| Max. Transfer Speed | 480 Mbps |
| Power Consumption | 500 mA (active), 0.5 mA (standby) |
| Supported Card Formats | Memory Stick (PRO, Duo, MagicGate), CompactFlash Type I/II, Microdrive |
| Compatible Operating Systems | Windows 98SE/Me/2000/XP, Mac OS 9.0-9.2.2 and OS X v10.1-10.3 |
| Supplied Software | USB driver, Memory Stick Formatter (Windows), user manual (PDF) |
| Included Accessories | Special USB cable 1 m, CD-ROM, printed manual |
| Operating Temperature | 0 °C to 40 °C |
| Operating Humidity | 20 % to 80 % (non-condensing) |
| Maintenance and Cleaning | Clean with a soft, dry cloth. Do not use solvents. |
| Safety Instructions | Do not remove the stand or disconnect the device during data access. Protect cards from shocks and moisture. |
| Spare Parts and Repairability | Contact an authorized Sony service center. Warranty is 1 year. |
| General Information | Complies with Canadian NMB-003 standard (class B). Trademarks: Sony, Memory Stick, CompactFlash, Microdrive, etc. |
Frequently Asked Questions - MSACUSM1 SONY
User questions about MSACUSM1 SONY
0 question about this device. Answer the ones you know or ask your own.
Ask a new question about this device
Download the instructions for your USB memory card reader in PDF format for free! Find your manual MSACUSM1 - SONY and take your electronic device back in hand. On this page are published all the documents necessary for the use of your device. MSACUSM1 by SONY.
USER MANUAL MSACUSM1 SONY
Multi Slot USB Reader/Writer
Operating Instructions
English
Before operating the unit, please read this instructions thoroughly, and retain it for future reference.
For the Customers in the U.S.A.
If you have any questions about this product, you may call:
Sony Customer Information Center 1-800-222-SONY(7669).
The number below is for the FCC related matters only.
Regulatory Information
Declaration of Conformity
Trade Name : SONY
Model:MSAC-UM1
Responsible Party : Sony Electronics Inc.
Address: 16450 W. Bernardo Dr, San Diego, CA
92127 U.S.A.
Telephone number: 858-942-2230
This device complies with Part 15 of the FCC Rules. Operation is subject to the following two conditions: (1) This device may not cause harmful interference, and (2) this device must accept any interference received, including interference that may cause undesired operation.
CAUTION
You are cautioned that any changes or modifications not expressly approved in this manual could void your authority to operate this equipment.
Note:
This equipment has been tested and found to comply with the limits for a Class B digital device, pursuant to Part 15 of the FCC Rules. These limits are designed to provide reasonable protection against harmful interference in a residential installation. This equipment generates, uses, and can radiate radio frequency energy and, if not installed and used in accordance with the instructions, may cause harmful interference to radio communications. However, there is no guarantee that interference will not occur in a particular installation. If this equipment does cause harmful interference to radio or television reception, which can be determined by turning the equipment off and on, the user is encouraged to try to correct the interference by one or more of the following measures:
- Reorient or relocate the receiving antenna.
- Increase the separation between the equipment and receiver.
- Connect the equipment into an outlet on a circuit different from that to which the receiver is connected.
- Consult the dealer or an experienced radio/TV technician for help.
The specified USB cable (supplied) must be used with the equipment in order to comply with the limits for a digital device pursuant to Subpart B of Part 15 of FCC Rules.
For the customers in Canada
This class B digital apparatus complies with Canadian ICES-003.
Notice
If static electricity or electromagnetism causes data transfer to discontinue midway (fail), restart the application or disconnect and connect the USB cable again.
Program©2000-2004 Sony Corporation
Documentation©2004 Sony Corporation
- "Memory Stick," "MagicGate Memory Stick," "Memory Stick PRO," "Memory Stick Duo," "MagicGate Memory Stick Duo," "Memory Stick PRO Duo" and are trademarks of Sony Corporation.
- Microsoft and Windows are trademarks or registered trademarks of Microsoft Corporation in the United States and/or other countries.
- MMX Pentium is registered trademark or trademark of Intel Corporation.
- Adobe, Acrobat, Acrobat Reader are registered trademarks or trademarks of Adobe Systems, Inc. in the United States and/or other countries.
- Macintosh and Mac OS are registered trademarks of Apple Computer, Inc. in the United States and/or other countries.
- CompactFlash and CF are trademarks of SanDisk.
- Microdrive is trademark or registered trademark of Hitachi Global Storage Technologies Netherlands B.V.
- All other trademarks and registered trademarks or trademarks of their respective holders.
Furthermore "TM" and ^ are not mentioned in each case in this manual.
Table of contents
On "Memory Stick" 6
System requirements 8
Checking the supplied accessories 9
Supplied applications 10
Using the Operating Instructions and help 11
Installing the software on your computer 13
Connecting this unit to your computer 15
Confirming that connections are completed 18
When the removable disk (Memory Stick icon) is not indicated (Except Windows XP) 19
Insert the recording media into the unit 22
Copying image data recorded on recording media to your computer .... 23
Disconnecting the unit from your computer 24
Formatting (initialization) of "Memory Stick" (For Windows only) 26
Precautions 28
Precautions for use of "Memory Stick" 29
Precautions for use of CF Memory Card (Microdrive) 31
Uninstalling (Deleting) the software 32
Troubleshooting 34
Specifications 35
LIMITED WARRANTY 36
On "Memory Stick"
What is "Memory Stick"?
"Memory Stick" is a new-generation IC storage media that is ultra-small and lightweight and has far greater storage capacity than floppy disks. The media can be used not only for transferring data between "Memory Stick" compatible products, but also as a removable, external storage media for storing data.
"Memory Stick" is available in standard size and a smaller size called "Memory Stick Duo." When "Memory Stick Duo" is inserted into a Memory Stick Duo Adaptor, the size becomes the same as the standardized "Memory Stick" to allow use with products that are compatible with the standard-sized "Memory Stick."
"Memory Stick" types that can be used with this unit
- Five types of "Memory Stick" are available to suit your needs.
"Memory Stick PRO"
This type of "Memory Stick" can only be used with products that are compatible with "Memory Stick PRO," and the media features built-in copyright-protection technology ("MagicGate"). (You need the application software programs compatible with copyright-protection technology to use copyright-protection technology of "Memory Stick PRO" with this unit.)
"Memory Stick"
A "Memory Stick" that allows recording of all kinds of data with the exception of data requiring copyright-protection technology ("MagicGate").
"Memory Stick Duo" (MagicGate/High-speed data Transfer compatible)
"Memory Stick Duo" is a "Memory Stick" with the "MagicGate" copyright protection technology, and supports high-speed data transfer. You can use this unit with "Memory Stick" compatible devices and "Memory Stick PRO" compatible devices. (The transfer speed varies depending on the "Memory Stick" compatible device used.)
"Memory Stick" (with Memory Select Function)
This is a "Memory Stick" containing more than one memory (128 MB). The memory select switch on the back of the "Memory Stick" enables you to select the memory most suitable for the intended use. You cannot use different memories at the same time or in succession.
"MagicGate Memory Stick"
This is a "Memory Stick" featuring built-in copyright protection technology ("MagicGate").
What is "MagicGate"?
"MagicGate" is a copyright protection technology that operates when it is provided in both the "Memory Stick" and the product in which the media is used. A "Do you comply with MagicGate?" authentication takes place between devices equipped with MagicGate (this unit, etc.) and the
"Memory Stick." Data encryption takes places after the authentication.
Copyright-protected data cannot be played back on devices other than those certified for this.
Music and other data that require copyright protection can be recorded and played back by using a combination of a MagicGate compatible "Memory Stick" and equipment compatible with "MagicGate," such as this unit.
Different types of data can be recorded on a single "Memory Stick."
For example, it is possible to record image data on the remaining empty section of a MagicGate compatible "Memory Stick" containing music data.
Using MagicGate compatible "Memory Stick"
Notes
- Formatting a MagicGate compatible "Memory Stick" containing data will delete all the data, including music data. Be careful not to delete important data accidentally. Sony can not be held responsible for the data lost through formatting.
- What you record are for personal enjoyment only. Copyright laws prohibit other forms of use without the permission of the copyright holder.
- In no event will Sony be liable for the data contents in case download of recorded material is impeded or music data is corrupted or deleted due to malfunctions of this unit or the "Memory Stick."
Note
This device is not equipped with MagicGate.
System requirements
Recommended Windows environment
- OS: Microsoft Windows 98 Second Edition (Windows 98SE)/Windows Millennium Edition (Windows Me)/Windows 2000 Professional (Windows 2000)/Windows XP Home Edition/XP Professional (Windows XP)
Not compatible with Microsoft Windows 98 Edition
- The operating systems mentioned above must be installed on the computer when shipped from the factory.
- Operation is not guaranteed for upgraded operating systems even if they are among those mentioned above.
- CPU: MMX Pentium II 400 MHz or faster processor (Pentium III 450 MHz or faster processor recommended)
RAM: 64 MB or more - Available hard disk space: 10 MB or more (More disk space may be required depending on the version of Windows you are using.)
- CD-ROM drive
- USB jack as standard equipment (This unit supports Hi-Speed USB (USB 2.0 based).)
- Display: High Color (16-bit) or higher, 800 × 480 pixels or more ( 800 × 600 pixels or more recommended.)
Recommended Macintosh environment
- OS: Mac OS 9.0~9.2.2/X (v10.1~10.3)
- The operating systems mentioned above must be installed on the computer when shipped from the factory.
- Operation is not guaranteed for upgraded operating systems even if they are among those mentioned above.
RAM: 64 MB or more - Hard disk: 10 MB or more available hard-disk space
- USB jack as standard equipment (This unit supports Hi-Speed USB (USB 2.0 based).)
Note
Operation is not guaranteed for all computers even if they comply with the recommended environments.
Checking the supplied accessories
Multi Slot USB Reader/Writer (1)
- Special USB cable 1.0 m (1)
-
CD-ROM (MSAC-USM1) (1)
-
The CD-ROM contains the following software programs.
Device Driver Software - Memory Stick Formatter Ver. 2.2 (For Windows only)
-Operating Instructions (PDF file)
The data of Operating Instructions for this unit (PDF file) is
MSAC-USM1Manual_ENG.pdf
- Operating Instructions for this unit (1)
Supplied applications
The supplied Windows CD-ROM contains the following software programs.
Device driver
For how to install the driver software, see page 13.
Memory Stick Formatter Ver. 2.2 (For Windows only)
This is a software program for formatting (initialization) of "Memory Stick." Formatting deletes all the data recorded on a "Memory Stick." In order to maintain the compatibility of a "Memory Stick" when using it with compatible products, always use this software when formatting "Memory Stick" on this unit.
Note
Formatting a "Memory Stick" to which data has already been written will delete the existing data. Be careful not to delete important data by mistake.
Using the Operating Instructions and help
Using the Operating Instructions on the CD-ROM
The supplied CD-ROM contains more detailed Operating Instructions (PDF file).
For details on how to use this unit, see these Operating Instructions.
Acrobat Reader from Adobe Systems Incorporated is required to view PDF files.
How to use Acrobat Reader is described in the following.
Screen view
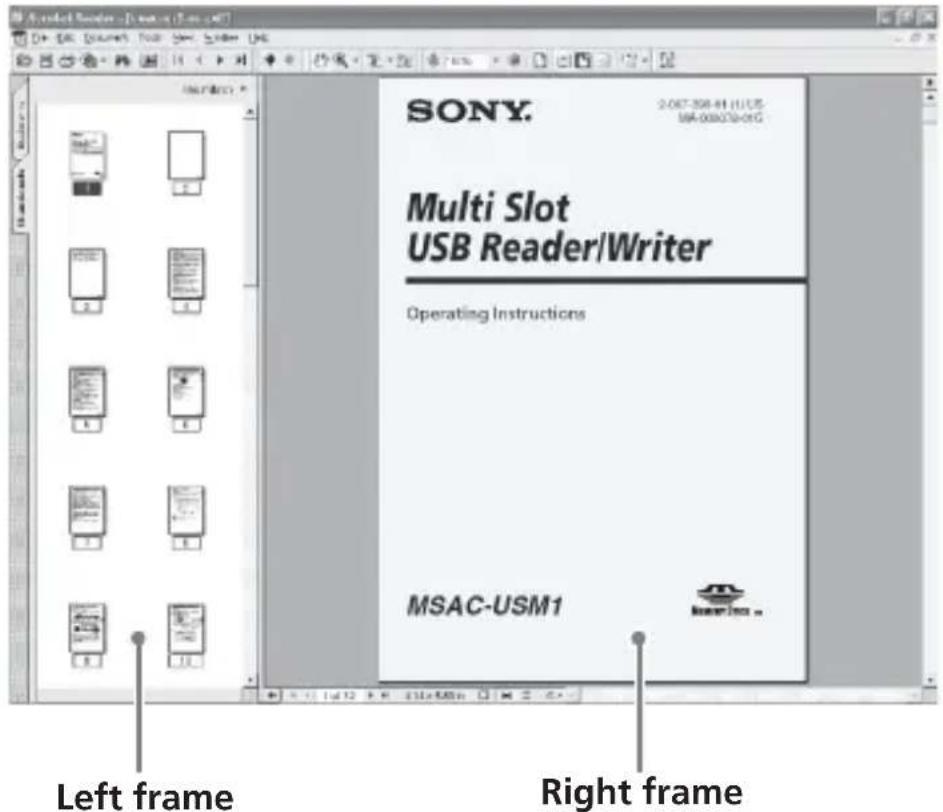
- Left frame
- Each page of the Operating Instructions appears as a thumbnail. When you click on the thumbnail corresponding to the page that you want to view, the page is shown in the "Right frame."
- Right frame
- Shows each page.
For details on how to use Acrobat Reader, see the online Help manual for Adobe Acrobat Reader.
How to use the Help (When Using Windows)
The following application features Help manual.
Memory Stick Formatter
For details on how to use the application software program, see the Help manual.
How to use the Help manual is described in the following.
Screen view
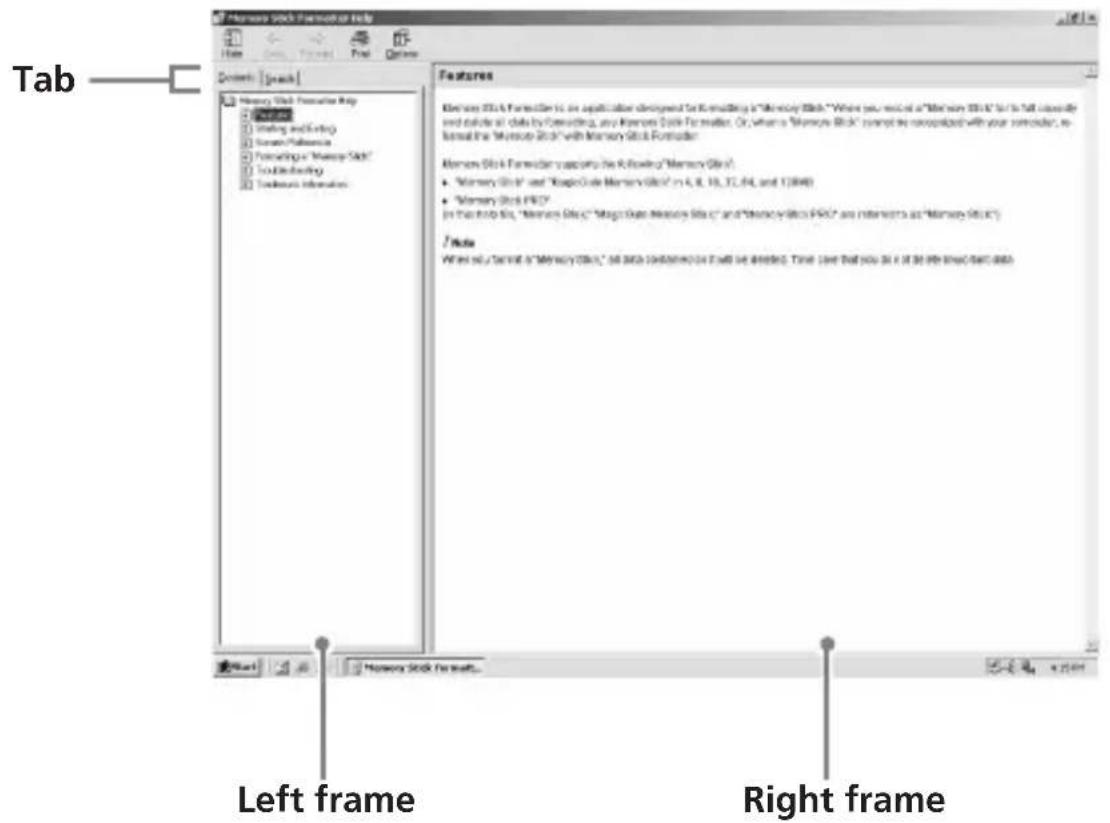
- Left frame
Contents or Keywords are displayed here.
- Right frame
Displays explanations. Clicking underlined parts in the text displays related explanations.
Installing the software on your computer
Use the following procedure to install the device driver. The CD-ROM contains the following software programs.
Device Driver Software
- Memory Stick Formatter Ver. 2.2 (For Windows only)
Note (For the first time)
When using Windows XP, perform installation after connecting this unit to your computer.
When using another OS, be sure to install the device driver before you connect this unit to your computer.
When using Mac OS 10.2.4 or higher, connect this unit to your computer without installing the device driver.
1 Turn on your computer.
Close all running applications.
To install the device driver when you are using Windows 2000 or
Windows XP, you must log on with Administrator rights.
2 Insert the supplied CD-ROM (MSAC-USM1) into the CD-ROM drive on your computer.
Click the device driver corresponding to the OS you are using.
3 Complete the installation according to the directions on the screen.
4 For Windows users, if you need Memory Stick Formatter, click the "Memory Stick Formatter" folder and then click the "Setup .EXE" icon to start installation.
- You cannot use "Memory Stick Formatter" on a Macintosh. Click the buttons according to the instructions on the screen.
5 Restart your computer.
Connecting this unit to your computer
Connect the USB jack on this unit to a USB jack on your computer using the special USB cable supplied.
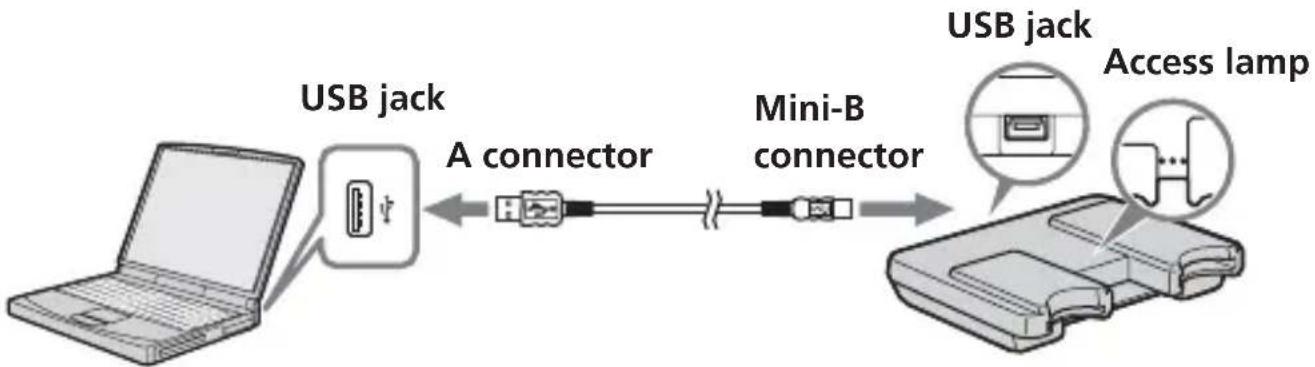
On the special USB cable
A connector: This is plugged into the USB jack on the computer. Any of the jacks can be used if the computer is provided with multiple USB jacks.
Mini-B connector: This is plugged into the USB jack on this unit.
1 Firmly insert the Mini-B connector of the USB cable into the USB jack on this unit as far as it will go.
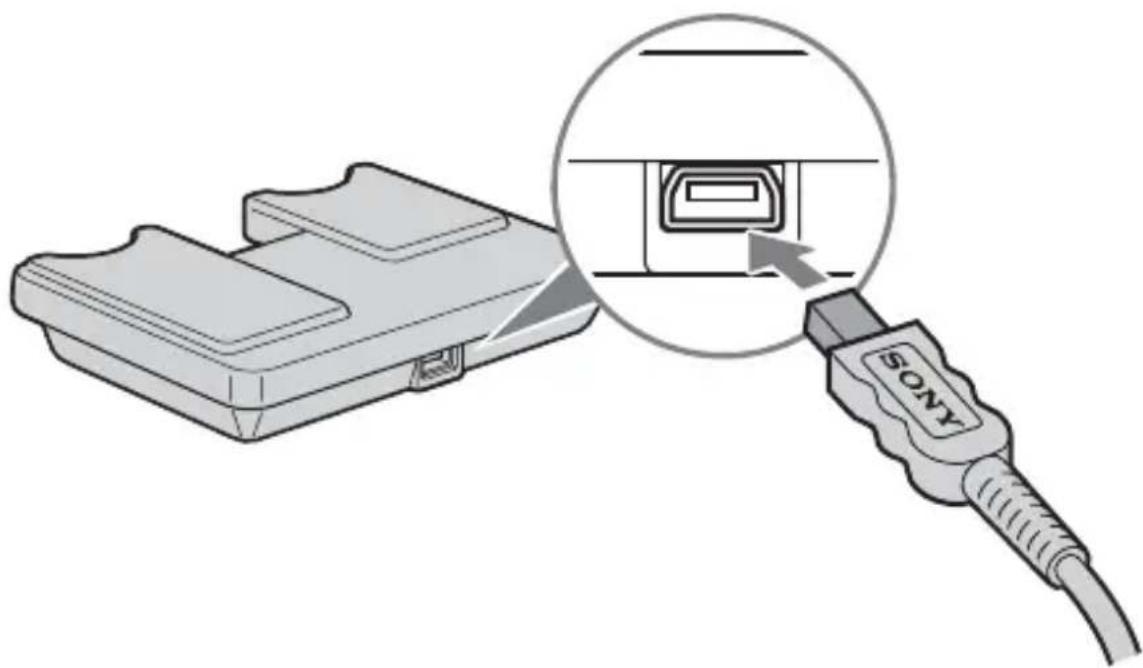
2 Plug the A connector of the USB cable into a USB jack on your computer.
-
The "Found New Hardware Wizard" starts up and installation of the driver begins. Depending on the OS, the driver installation may take place automatically.
-
The location of the USB jack on the computer differs with the computer used.
-
When using a computer with multiple USB jacks, do not connect other devices, with the exception of a standard mouse and keyboard, to USB jacks at the same time as this unit. When using a desktop computer, use a USB jack on the main unit of the computer. For details, see "Recommended ways for connecting this unit" on page 17.
Recommended ways for connecting this unit
The operation of this unit has been confirmed when connected to the computer in either of the following ways.
When this unit is connected to a USB jack on the computer main unit, and nothing is connected to other USB jacks on the computer main unit.

When, on a computer with a USB keyboard and mouse as standard equipment, the USB keyboard is connected to one of the USB jacks on the computer main unit, and this unit is connected to another USB jack on the computer main unit with the supplied USB cable.
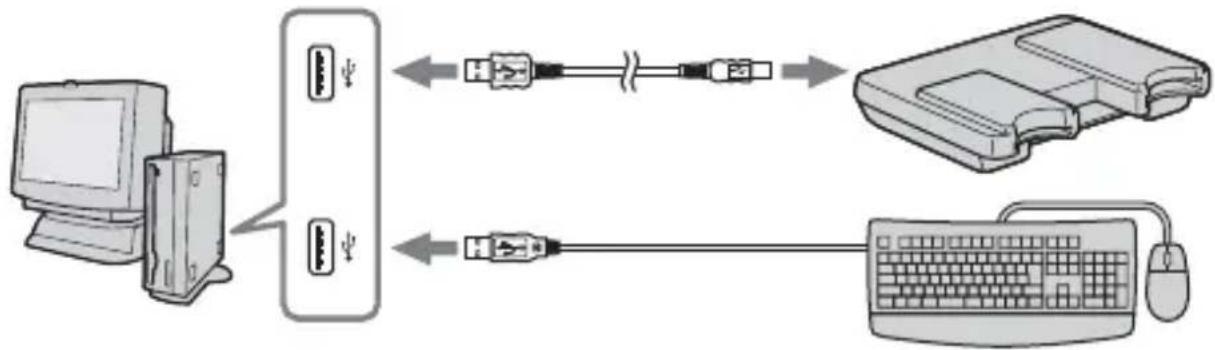
Notes
- When two or more USB devices except standard equipment are connected to one computer, and both are used simultaneously, operation is not guaranteed depending on the USB devices.
- Make sure to connect the supplied USB cable to a USB jack on the computer main unit. Operation is not guaranteed if the cable is connected via the keyboard or a USB hub, etc.
- Not all operations are guaranteed on all computers running under the recommended environment.
- Make sure to use the specified USB cable (supplied) to connect to your computer.
Confirming that connections are completed
Depending on the OS type and the settings, the screens may look different.
1 Open the "My Computer" folder.
2 Confirm that the newly recognized Memory Stick (F:), Memory Stick Duo (G:), and CF (H:) icons are shown.
Note
Depending on the computer used, the drive letter (F:) may differ.
Connection is complete when the Memory Stick (F:),Memory Stick Duo
(G:), and CF (H:) icons are shown.
It may take a little while before the Memory Stick (F:),Memory Stick Duo
(G:), and CF (H:) icons appear.
Notes
- When using Windows 98SE, drives for "Memory Stick (F:)" and "Memory Stick Duo (G:)" appear as the same icon. When using Macintosh, all icons appear as the same icon.
- If the Memory Stick icons are not shown, the device driver may not be installed correctly. Perform the procedures described in the following. When using another "Removable Disk," the "Removable Disk" icon also appears.
When the removable disk (Memory Stick icon) is not indicated (Except Windows XP)
A separate device driver may already have been installed. Connect this unit to your computer, and then perform the following procedure.
- When using Windows 2000 -
Log on as Administrator or using a user ID that has administrative privilege.
1 Double-click the "System" icon on the "Control Panel." The "System Properties" screen appears.
2 Check if the device driver has already been installed.
① Click the [Hardware] tab on the "System Properties" screen.
② Click [Device Manager]. The "Device Manager" screen appears.
③ Click [View].
④ Click [View devices by type].
Double-click [Universal Serial Bus Controller].
⑥ Check whether [? MSAC-USM1] preceded by the “?” symbol is shown.
3 Delete the driver if installed.
If you use the procedure described in Step 2 and confirm that [? MSAC-USM1] is shown under "Universal Serial Bus Controller" in the "View devices by type" display, a separate device driver has already been installed.
Use the following procedure to delete this driver.
Do not delete other devices than [? MSAC-USM1].
① Right-click on [? MSAC-USM1].
② Click on [Remove]. The "Confirm Device Removal" screen appears.
③ Click the [OK] button. The device is removed.
④ Restart your computer after disconnecting this unit from the computer.
Install the device driver again by performing the procedure from Step 1 described on page 13.
Note
If you delete other devices than [? MSAC-USM1], your computer may no longer operate normally.
- When using Windows 98SE/Windows Me -
1 Double-click the "System" icon on the "Control Panel."
The "System Properties" screen appears.
2 Check if the device driver has already been installed.
① Click the [Device Manager] tab on the "System Properties" screen.
Double-click [Universal Serial Bus Controller].
③ Check whether [? MSAC-USM1] preceded by the “?” symbol is shown.
3 Delete the driver if installed.
If you use the procedure described in Step 2 and find that [? MSAC-USM1] is shown under "Universal Serial Bus Controller," a separate device driver has already been installed.
Use the following procedure to delete this driver.
Do not delete other devices than [? MSAC-USM1].
① Click on [? MSAC-USM1].
② Click on [Remove]. The "Confirm Device Removal" screen appears.
③ Click the [OK] button. The device is removed.
④ Restart your computer after disconnecting this unit from the computer.
Install the device driver again by performing the procedure from Step 1 described on page 13.
Note
If you delete other devices than [? MSAC-USM1], your computer may no longer operate normally.
Insert the recording media into the unit
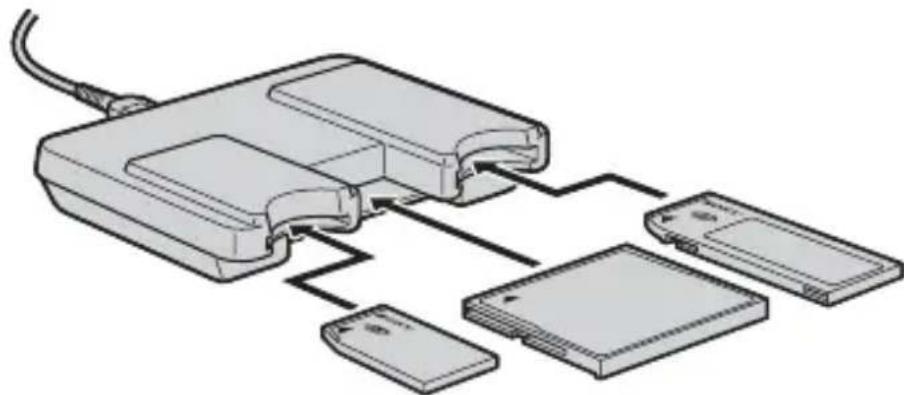
Note
Insert the recording media in the correct slot. Inserting it in the wrong slot may damage the unit.
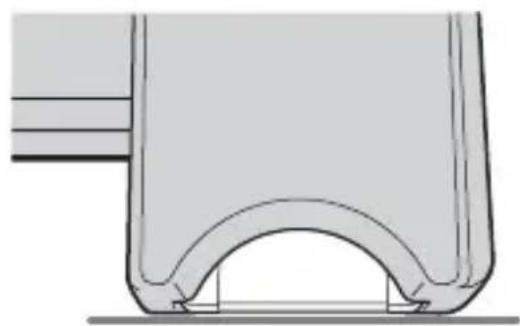
Insert the recording media so that its end is level with the unit.
Notes
-
The access lamp lights while the recording media is being accessed. Never remove the recording media, turn off the computer, or unplug the USB cable, etc., while the access lamp is on. The data on the recording media could be destroyed.
-
When disconnecting the USB cable, do not hold it by its cable; hold it by its connector.
Copying image data recorded on recording media to your computer
If the USB cable used to connect this unit and your computer is disconnected, the computer will no longer be able to recognize this unit and the image data stored on the "Removable Disk (recording media)" can no longer be viewed on the computer. If you copy the image data stored on the recording media to your computer, the image data can be displayed and processed on your computer even if this unit is not connected to your computer.
When the USB cable is disconnected, the Memory Stick (F:), Memory Stick Duo (G:), and CF (H:) icons disappear.
For how to copy image data to your computer, see the manual for your computer.
Disconnecting the unit from your computer
- For customers using Windows Me/Windows 2000/Windows XP -
Perform the procedure described below before disconnecting the USB cable from the computer.
- The screens may differ slightly with the type of OS used.
- Customers using Windows 98SE do not need to perform this procedure.
1 Click the "Unplug or Eject Hardware" icon in the task tray in the lower right corner of the screen.
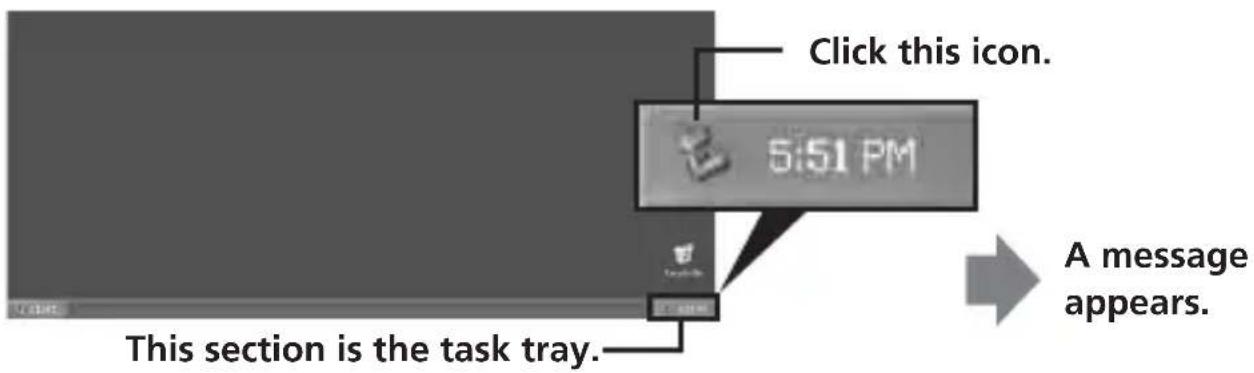
2 Click "Stop MSAC-USM1 - Drivers(F: , G: , H:)".
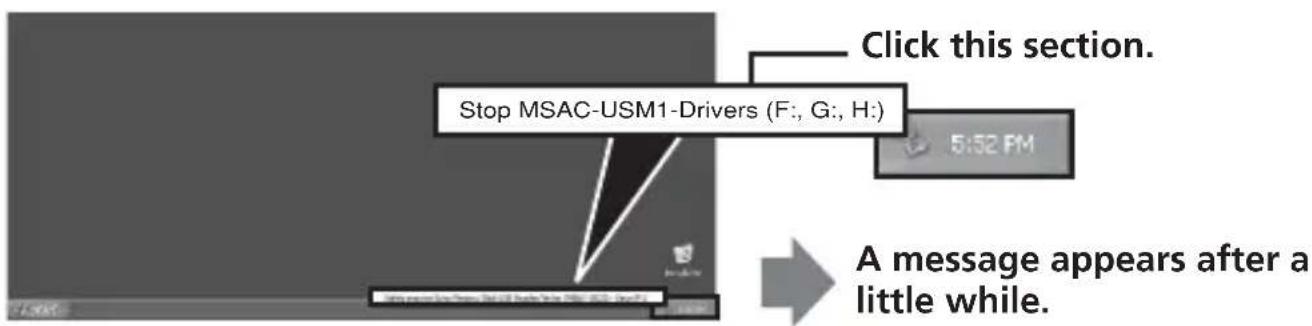
- The drive letter "(F:)," etc. differs with the computer used.
[The 'MSAC-USM1' device can now be safely removed from the system.] is displayed.
In this condition, you can safely remove this unit from your computer.
- The indications may be different depending on the OS that you are using.
Notes
- When you just want to remove the recording media from this unit, the procedure described above is not required.
- Do not remove the recording media from this unit while the access lamp is blinking. Data on the recording media could be corrupted.
- When you carry out this operation, this unit is not recognized by your computer. To make this unit recognize again, disconnect the USB cable from your computer and connect the USB cable to your computer again.
Formatting (initialization) of "Memory Stick" (For Windows only)
This deletes all the data recorded on a "Memory Stick." When formatting on this unit, be sure to use the supplied "Memory Stick Formatter" software program, following the procedures outlined below. Operation on a Handycam or other "Memory Stick" compatible products is not guaranteed for a "Memory Stick" formatted on a computer without the use of the "Memory Stick Formatter" software program.
For the details on how to use the "Memory Stick Formatter," refer to the manual supplied with the "Memory Stick Formatter." You can download the "Memory Stick Formatter" at the following Web Site.
http://www.sony.net/Products/mssupport/
Note
If you format a "Memory Stick" that contains recorded data, the already recorded data will be deleted. Be careful not to inadvertently delete important data.
1 Insert a "Memory Stick" into this unit.
2 Start "Memory Stick Formatter."
3 Click [Start formatting]. Formatting begins.
Note
Never remove this unit from the computer while formatting the "Memory Stick." The data on the "Memory Stick" may be damaged.
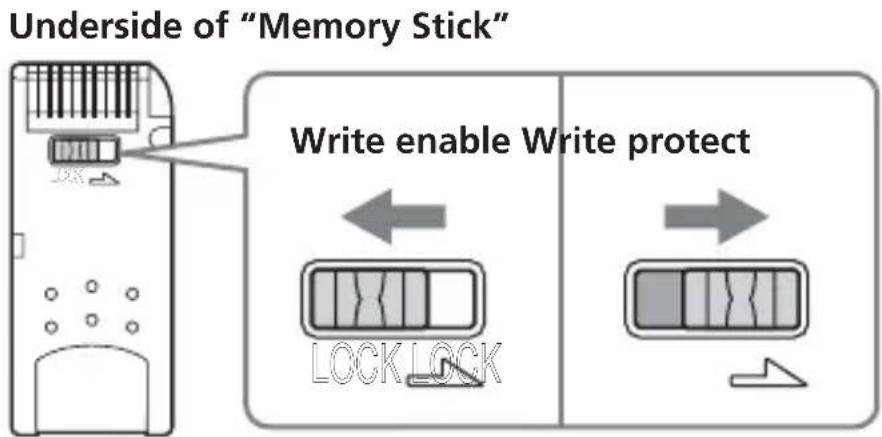
Write-protecting data
A "Memory Stick" is equipped with an erasure prevention switch to ensure that important data is not deleted by mistake. (Some of "Memory Stick" ("Memory Stick Duo") are not equipped with an erasure prevention switch. If you use a "Memory Stick" ("Memory Stick Duo") unequipped with the erasure prevention switch, be careful not to write data or delete data by mistake.) Sliding this switch to the left or right enables or prevents writing of data to the "Memory Stick."
Write enable
Data can be written.
Write protect
When the switch is moved to the right, the condition becomes the one in which data cannot be written to the "Memory Stick." Data can be read out but writing is prevented.
Data read/write speed
The data read/write speed differs with the "Memory Stick" and product combination that you are using.
Precautions
- This device is not equipped with MagicGate.
- You can use "Memory Stick," "Memory Stick Duo" or CF Memory Card (Microdrive) with this unit. In these Operating Instructions, "Memory Stick," "Memory Stick Duo" and CF Memory Card (Microdrive) are referred to as "recording media."
- If the body becomes dirty, wipe with a soft cloth. Never use benzine, alcohol, paint thinner or other solvents. This unit may deform or malfunction.
- Refer to the contents of the supplied CD-ROM for detailed Operating Instructions (PDF file).
Make sure to read it before using the unit. - The access lamp lights while the recording media is being accessed. Never remove the recording media, turn off the computer, or unplug the USB cable, etc., while the access lamp is on. The data on the recording media could be destroyed.
- When disconnecting the USB cable, do not hold it by its cable; hold it by its connector.
Precautions for use of "Memory Stick"
- Recording, editing and deletion are prevented when the erasure prevention switch is set to the "LOCK" position. B
-
Use a pointed object to move the erasure prevention switch on the "Memory Stick Duo." (Some of "Memory Stick" ("Memory Stick Duo") are not equipped with an erasure prevention switch.)
Data may be corrupted in the following cases. -
If the "Memory Stick" is removed or the power to this unit is turned off while the access lamp is on (while data is being read/written)
- When used in a location subject to static electricity or electrical noise
- Always backup important data. Sony does not accept liability for damage of the data.
We cannot accept responsibility in the event that data is lost or damaged and the unit is damaged, while using this unit. - Data copyright protected by "MagicGate" can only be used with a MagicGate compatible "Memory Stick."
- Do not affix any label other than those specially provided to the "Memory Stick." [C]
- When affixing labels, affix these at the designated positions. Labels should not protrude from the edges of the "Memory Stick."
- Do not apply excessive force when writing in the memo area of a "Memory Stick Duo."
- When transporting or storing a "Memory Stick," place it in the supplied storage case.
- Do not touch the connector section with fingers or metallic objects. A
- Do not bend, drop or subject the "Memory Stick" to strong impacts.
- Do not attempt to disassemble or modify the "Memory Stick."
- Do not wet with water.
- The contents of data cannot be compensated if recording or playing back is not made due to malfunctions such as "Memory Stick" error.
-
To prevent recording or deletion of data on "Memory Stick" set the "Memory Stick" write-protect switch to "LOCK."
-
Avoid use and storage in the following locations.
-
In a car where the temperature may become very high or in other hot locations
- Location subject to direct sunlight
- Location with humidity or where corrosive substance are present.
Precautions for use of CF Memory Card (Microdrive)
A Microdrive is a compact and lightweight hard disk drive that complies with Compact Flash TypeII.
Notes on use of the Microdrive
- Be sure to format the Microdrive using this camera when you use it for the first time.
- The Microdrive is a compact hard disk drive. Since the Microdrive is a rotating disk, the Microdrive is not strong enough to resist vibration and shock compared to a "Memory Stick," which uses flash memory.
Be sure not to transmit vibration or shock to the Microdrive during playback or shooting.
Data may be damaged in the following cases:
- Removing the Microdrive while reading or writing data.
- If you store the Microdrive near corrosive material.
- Note that the use of the Microdrive under 5^ ( 41^ ) may bring performance degradation. Operating temperature range when using the Microdrive: 5^ to 40^ ( 41^ to 104^ )
- Note that the camera cannot be used under low atmospheric pressure (above 3000 meters above sea-level).
- The Microdrive may be hot just after it has been used. Be careful when you handle it.
- Do not write on the label.
- Do not remove the label or attach a new label over the label.
- When you carry or store the Microdrive, put it in the case supplied with it.
- Do not expose the Microdrive to water.
- Do not press on the label strongly.
- Hold the sides of the Microdrive in your hand and do not squeeze the Microdrive.
Uninstalling (Deleting) the software
- In the case of Windows 98SE/ Windows Me -
1 Select [Settings] from the [Start] menu and then click [Control Panel].
The "Control Panel" screen appears.
2 Double-click the "Add/Remove Programs" icon.
The "Add/Remove Programs Properties" dialog box appears.
3 Select the software to be removed (Memory Stick Formatter) from the list of software programs that can be automatically removed, and then click [Add/Remove].
The selected software programs are uninstalled.
-In the case of Windows 2000/Windows XP -
After logging on as Administrator, perform the procedure described below. For how to log on as Administrator, see the manual for the computer that you are using.
Using Windows 2000: Select [Settings] from the [Start] menu and then click [Control Panel].
Using Windows XP: Click [Control Panel] from the [Start] menu.
The "Control Panel" screen appears.
2 Using Windows 2000: Double-click the "Add/Remove Programs" icon.
Using Windows XP: Double-click the "Add/Remove Programs" icon.
The "Add/Remove Programs" dialog box appears.
3 Click "Change/Remove."
4 Select the software to be removed (Memory Stick Formatter) from the list of "Currently installed programs," and then click [Change/Remove] ([Change and Remove] in the case of Windows XP).
The selected software programs are uninstalled.
Troubleshooting
| Symptom | Cause/Solution |
| The Memory Stick icon (Removable disk) is not displayed. | Not connected correctly. → Connect correctly. (Page 15) In addition to this unit, another device is connected to the USB jack on the computer. → Disconnect other USB devices than this unit. Also turn off the power and reboot. ·The driver is not installed. → Install the driver from the supplied CD-ROM. (Page 13) |
| The recording media cannot be accessed from Explorer or My Computer. | No recording media inserted. → Insert a recording media. |
| The access lamp blinks when a recording media is inserted. | Foreign matter adhering to the connector section of the recording media. → Check whether dust or dirt is adhering to the connector section of the recording media. Remove any foreign matter and insert the recording media again. |
Specifications
Multi Slot USB Reader/Writer
Interface: USB interface
Baud rate: Max. 480 Mbps
General
Operating voltage DC 5V (supplied via USB cable)
Power consumption Max. 500mA (during operation)
Max. 0.5mA (PC suspend time)
External dimensions Approx. 85mm× 16mm× 65mm
(33 / 8 × 21 / 32 × 25 / 8 in.)
Width × Height × Depth
Mass Approx. 39g (2 oz) (not including "Memory
Stick")
Operating conditions Temperature 0^ to 40^ (32 F to 104 F)
condensation not allowed)
Humidity 20% to 80%
condensation not allowed)
Design and specifications are subject to change without notice.
If you have any questions/comments related to this product, please visit our Customer Support website at
http://www.sony.net/Products/mssupport/
LIMITED WARRANTY
Sony Electronics Inc. (in the United States) and Sony of Canada Ltd (in Canada) ("SONY") warrants this Product from defects in material and workmanship for a period of one (1) year from date of original purchase. SONY will repair or replace the Product with new or refurbished product, at its option, at no charge during the one (1) year warranty period. For purposes of this Limited Warranty, "refurbished" means a product or part that has been returned to its original specifications. To obtain warranty service within the United States, you must take the Product, or deliver the Product freight prepaid, in either its original packaging or packaging affording an equal degree of protection, to any authorized SONY service facility. To obtain warranty service within Canada, you must take the Product to the authorized SONY dealer where you purchased the Product, or to a SONY service facility. Proof of purchase is required in the form of a dated bill of sale or receipt which evidences that the Product is within the limited warranty period.
BE SURE TO REMOVE ALL SOFTWARE, FILES, OR ANY OTHER DATA STORED ON YOUR MEDIA PRIOR TOSending THIS PRODUCT TO SONY.SONY IS NOT LIABLE FOR ANY LOSS,Damage OR CORRUPTION OF THESE ITEMS.
REPAIR OR REPLACEMENT AS PROVIDED UNDER THIS LIMITED WARRANTY IS THE EXCLUSIVE REMEDY OF THE CONSUMER. SONY SHALL NOT BE LIABLE FOR ANY INCIDENTAL, INDIRECT OR CONSEQUENTIAL DAMAGES OR OTHER DAMAGES INCLUDING BUT NOT LIMITED TO, LOSS OF PROFITS, LOSS OF REVENUE, LOSS OR CORRUPTION OF DATA, LOSS OF USE OF THE PRODUCT OR ANY ASSOCIATED EQUIPMENT, DOWNTIME AND USER'S TIME OR FOR BREACH OF ANY EXPRESS OR IMPLIED WARRANTY OR CONDITION, BREACH OF CONTRACT, NEGLIGENCE, STRICT LIABILITY OR ANY OTHER LEGAL THEORY RELATED TO THIS PRODUCT. EXCEPT TO THE EXTENT PROHIBITED BY APPLICABLE LAW, ANY IMPLIED WARRANTY/CONDITION OF MERCHANTABILITY OR FITNESS FOR A PARTICULAR PURPOSE ON THIS PRODUCT IS LIMITED IN DURATION TO THE DURATION OF THIS WARRANTY. ANY WARRANTY FOR INTELLECTUAL PROPERTY INFRINGEMENT IS HEREBY DISCLAIMED. Some states/jurisdictions do not allow the exclusion or limitation of incidental or consequential damages, or allow limitations on how long an implied warranty/condition lasts, so the above limitations or exclusions may not apply to you. This Limited Warranty gives you specific legal rights, and you may have other rights which vary from state to state, territory or province.
In the United States contact: Sony Direct Response Center, 12451 Gateway Blvd., Fort Myers, FL 33913; www.sony.com/service; or (800) 222-SONY. In Canada contact: Sony of Canada Ltd. 115 Gordon Baker Road, Toronto, Ontario M2H 3R6
Multi Slot USB Reader/Writer
Mode d'emploi
MSAC-USM1
MEMORYSTICKTM
Français
Applications fournies 9
Applications fournies
3 ["The 'MSAC-USM1' device can now be safely removed from the system."] est affché.
http://www.sony.net/Products/mssupport/
Remarque
http://www.sony.net/Products/mssupport/
GARANTIE RESTREINE
"MagicGate Memory Stick"
3 Se visualizará ["The 'MSAC-USM1' device can now be safely removed from the system."].
http://www.sony.net/Products/mssupport/
Nota
http://www.ony.net/Products/mssupport/
Multi Slot USB Reader/Writer
使用說明書
MSAC-USM1
中文
"MagicGate Memory Stick"
Professional (Windows 2000)/Windows XP Home Edition/XP
Professional (Windows XP)
3 顯示["The 'MSAC-USM1' device can now be safely removed from the system."]。
此時,可以安全地斷開電腦和本機的連接。
- 取決於使用的作業系統,顯示可能不同。
註
http://www.sony.net/Products/mssupport/
Multi Slot USB Reader/Writer
使用说明书
中文
"MagicGate Memory Stick"
3 显示["The 'MSAC-USM1' device can now be safely removed from the system."]。
http://www.sony.net/Products/mssupport/
- Multi Slot USB Reader/Writer
- English
- For the Customers in the U.S.A.
- Declaration of Conformity
- CAUTION
- Note:
- For the customers in Canada
- Notice
- Table of contents
- On "Memory Stick"
- What is "Memory Stick"?
- "Memory Stick" types that can be used with this unit
- "Memory Stick PRO"
- "Memory Stick"
- "Memory Stick Duo" (MagicGate/High-speed data Transfer compatible)
- "Memory Stick" (with Memory Select Function)
- "MagicGate Memory Stick"
- What is "MagicGate"?
- Using MagicGate compatible "Memory Stick"
- Notes
- Note
- System requirements
- Recommended Windows environment
- Not compatible with Microsoft Windows 98 Edition
- Recommended Macintosh environment
- Checking the supplied accessories
- Supplied applications
- Device driver
- Memory Stick Formatter Ver. 2.2 (For Windows only)
- Using the Operating Instructions and help
- Using the Operating Instructions on the CD-ROM
- Screen view
- How to use the Help (When Using Windows)
- Installing the software on your computer
- Note (For the first time)
- Turn on your computer.
- Connecting this unit to your computer
- On the special USB cable
- Firmly insert the Mini-B connector of the USB cable into the USB jack on this unit as far as it will go.
- Plug the A connector of the USB cable into a USB jack on your computer.
- Recommended ways for connecting this unit
- Confirming that connections are completed
- When the removable disk (Memory Stick icon) is not indicated (Except Windows XP)
- - When using Windows 2000 -
- Check if the device driver has already been installed.
- Delete the driver if installed.
- Double-click the "System" icon on the "Control Panel."
- Insert the recording media into the unit
- Copying image data recorded on recording media to your computer
- Disconnecting the unit from your computer
- [The 'MSAC-USM1' device can now be safely removed from the system.] is displayed.
- Formatting (initialization) of "Memory Stick" (For Windows only)
- Write-protecting data
- Data read/write speed
- Precautions
- Precautions for use of "Memory Stick"
- Precautions for use of CF Memory Card (Microdrive)
- Notes on use of the Microdrive
- Uninstalling (Deleting) the software
- Troubleshooting
- Specifications
- General
- LIMITED WARRANTY
- Français
- Applications fournies
- ["The 'MSAC-USM1' device can now be safely removed from the system."] est affché.
- Remarque
- GARANTIE RESTREINE
- Se visualizará ["The 'MSAC-USM1' device can now be safely removed from the system."].
- Nota
- 中文
- 顯示["The 'MSAC-USM1' device can now be safely removed from the system."]。
- 註
- 显示["The 'MSAC-USM1' device can now be safely removed from the system."]。
Brand : SONY
Model : MSACUSM1
Category : USB memory card reader